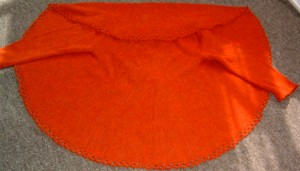
Vests and sweaters built on circular shapes offer some challenges. Shawls and shoulder wraps are much more forgiving, but garments, particularly if sleeves are added, can provide sizing and fitting challenges. Making a muslin in disposable knit yardage prior to the actual knitting allows for trial placement of armholes and testing of overall measurements prior to charting out garment and sleeve shaping. Slits for the armholes can easily be taped or stitched closed to suit, and in turn, trial cut in a different location. Trimming or adding borders to circumference allows for visualizing size grading. This process helps spare the knitter regrets upon completion of the piece.
Drawing large circles is easy and accurate with a “yardstick compass”. Trammel points are available online and at many woodworking supply stores, etc. They convert any standard size yardstick for drawing arcs and circles up to 72 inches dia. Use a longer stick the same width and thickness as a yardstick and draw circles as large as you like. They are usually made of aluminum except for the steel point, measure about 3-1/2 inches in length.
Some beginning guidelines for drafting:
1. Use your bust measurement as the circle’s diameter and draw the corresponding shape. Two or more strips of freezer paper may be used as the drawing surface, temporarily fused onto the knit yardage, becoming the paper “pattern” for the piece and stabilizing the knit for cutting.
2. Measure your back from arm to arm to determine how far apart to place armholes or obtain this measurement from any well-fitting favorite.
3. Measure armhole depth from the top of the shoulder to 2-3 inches below the armpit.
4. Draw lines for armholes and center horizontally within the body of the circle, shoulder measurement apart. Commercially written patterns are bountiful online and in magazines and tend to center the armholes vertically as well. I prefer them shifted up for a less bulky “collar”, and for placement of sleeves with raglan or traditional caps. Binding off a few stitches at the base and casting them on at the top of the slit create a slightly shaped for easing in the sleeve top.
5. Cut “armholes”, remove freezer paper if used, try on for fit, adjust as needed. 6. Back to more math!
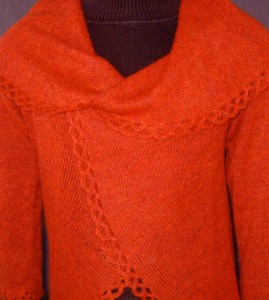
I made a series of long-sleeved circular sweaters for sale in 2008. Discovered problems with photos in my photo library (new computer). These are an attempt at “restored” shots of one of the first such sweaters. The yarn was fine Italian mohair.
close up

