Getting my thoughts together on this topic I searched for any of my previous posts that may be related, here is a list
2013/12/18/holding-stitches-short-rows/
2014/02/24/holdingshort-rows-hand-tech-to-chart-to-automating-with-slip-stitch-1/
2013/12/28/short-rows_-balls-tams-3d-rounds/
2013/01/21/automating-pleating/
Even in my earliest days as a hand knitter, I liked charting out my sweater shapes ie sleeves, necklines, etc on graph paper and tracking my place by marking the appropriate row or every other row on the charted image. Many of the formulas for charting math in garment shaping may be emulated by drawing a line on the chart where each square represents a stitch and a row, connecting points, and filling in squares. Averaging out grid shifts is also the guideline to increasing and decreasing for shaping on pixel charts. Though this may be a bit of egg before the chicken, I got sidetracked playing with software yet again.
GIMP
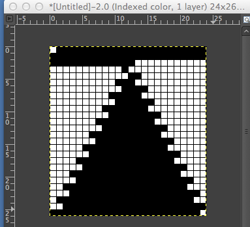
Working premise: using holding to shape a wedge over 36 rows. Stitch multiples are brought into hold opposite the carriage (floats will be created if they are brought into hold on the carriage side), in the instances below each graph row represents 2 rows knit, my fabric width at the start is 100 sts
Set image size _ pixels equal stitches and rows required

Magnify X 1000 (this is what I prefer for viewing and editing, less magnification may be used)
Activate 1 stitch grid/ show grid/ snap to grid
Make certain the whole image is within your window view
Using line shape: click on the upper left corner, press shift key_a drawing line will appear with a + symbol at its bottom right_click on the first square on the bottom right, a line will appear where black squares represent # of stitches to be held each row

bucket fill in the appropriate side of the wedge to represent knit stitches

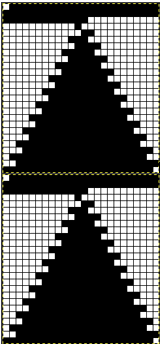
create a new, larger canvas that will accommodate desired multiple stacked repeats and possible knit rows in between shapes in a new window; copy image from the first window, paste into the new window, move it, and place in the desired location on your screen
return to the first window, flip the image vertically (image menu/ select transform and direction)

again copy, paste, move into the desired location, and insert knit or (patterned) rows (green) when and if desired. On electronic machines, the final image would have to be doubled in length, so those “knit row” pixels/squares would have to be adjusted accordingly to half the desired number

Row by row charting for double-height to represent each row of actual knitting: the process
starting with a repeat 6X6

convert image to bitmapped (repeat at upper right below is a different one, should match the one being resized)

scale image: click on the locked symbol/ chain link, in turn, to alter the aspect ratio, change both pertinent numbers

the repeat twice as long, 6 X 12

going 3D, possible spiral


eliminating squares
shifting things around in order to add “automatic wraps”, begin knit with COL

in further progress
stacked repeat
save in image in format for downloading to machines via cable and knitting using slip stitch setting, or export or screen grab for printing and knitting from chart visually as hand technique. If printing images colored cues may be added for carriage/lock setting or color changes, etc. The question: what about numbers and excel?
NUMBERS
Using the line tool (shapes) will get the line in place, shaping is “eyeballed”

knit squares are filled in

so you want to double the height only? Apple for some reason when they “upgraded” to the latest version of the program (3.2) has eliminated the split table feature, so the only way I can see is through using the table: add rows above or below in the chart, a new row will be a copy of the selected row

EXCEL
the insert row option will add rows only below selected ones, I have not found a tool equal to the line shape in Numbers