Working in Excel 2008 and Mac Numbers 3.2, edits added 2022, 2024
My blog is a living document. I tend to keep old posts as they were originally written, which can help reflect the evolution in the resources from those available at the time and my changing and at times growing skill in using them.
There have been many interim posts on using Numbers in knit design, whether as a stand-alone or in conjunction with other programs ie Gimp.
At times I revisit topics as separate posts, or I correct or expand the information in ones previously published, true here, at the bottom of the post.
2014
On a worksheet, columns are usually standardized to accommodate approximately 9 font characters. Width and height are measured in points and units such as inches or centimeters: 1 point equals approximately 1/72 inch or 0.035 cm. The default row height is app. 13 points. In developing knitting charts smaller units of measurement are preferred. Preferences (general) may be changed from the default (inches) to cm, or the smaller unit mm, and saving.
Online conversion between units of measurement and PostScript points may be calculated (if needed) using calculators ie.
http://www.unitconversion.org/unit_converter/typography.html default cell measurements in mm and points
  When opening an Excel document, to view only one page: on the bar at the top of your spreadsheet click the View menu and then in turn choose the Customize Toolbars and Menus. The window below will appear, click on the commands tab.
  Scroll down to “Zoom to One Page” on the list, “click and drag” it to your toolbar, releasing your mouse button to place it using the vertical line that appears as your guide to determine its placement.
the chart toolbar with the icon (to the right of the red line, click on the image for magnification)![]() on the standard toolbar
on the standard toolbar![]()
 If the chart toolbar is in use, left-click on the arrow at the right, where Customize toolbars and menu are the second option offered; a right-click will allow you to modify toolbars as a first choice and offer the commands as an option.
Clicking on the icon now in the toolbar will show one worksheet, and adjustments may be made as follows for producing your graph paper or knit chart, clicking again will show multiple sheets once more.
Click on the diamond upper left-hand corner to select the whole sheet, now that the whole sheet is selected apply your unit choice to the whole document: place your mouse on and hold it between the cells indicated by any 2 of the letters (separator will appear), drag the boundary on the right side to define the desired width, repeat the process between any 2 numbered rows to define the height.  The format menu may also be used; first, select the whole sheet, then on the home tab, click on format, and select format row height or format column width alternately to specify desired measurements The latter method may give better control over unit specs in some instances.
If the intent is to use the program as virtual graph paper on which to add color, symbols, etc one may continue editing, and working with borders and border drawing options line thickness most suitable for printing may be selected, along with types of lines and colors.  Common ratios for knitting are 4:5, and 2:3 (height to width) with stitches being usually wider than tall. Single-page workbooks to start your chart editing created in Excel to save for printing were deleted in 2024 because of failure to open in usable form in Windows 10 OS. A 2024 PDF for developing a punchcard repeat on a rectangular 4:5 grid punchcard red lines
Since this post was first written I have moved away from using Excel completely to working with Mac Numbers.
If the goal is to have graph paper that approximates stitch and row gauge, that is achievable by using Numbers with the rulers set to centimeters.
Selecting the initial document for printing by using the select all command in a variety of ways did not print the whole document for me or even recognize the content. Whether printing the whole document or part, the print area needs to be hand-selected. Click on the cell upper left where you want to begin, drag the mouse, and release on the last cell at the bottom right on which you wish to stop. The selected area will now appear colored blue and outlined by a broken line. In the file menu, choose the print area, and in turn to its right “select print area”. File print should in turn be operable now, along with a preview of the selected area to be printed.  If you wish to have the graph paper as a permanent file, proceed as above, but from your printer screen select PDF, then save as

 An online PDF generator for printing graph paper for knits (including shadow knitting) in 2 ratios and orientations may be found at
http://www.theknittingsite.com/knitting-graph-paper/
Previously posted links and more on using Excel for the virtual designing of knit charts and motifs
2013/10/29/charting-knits-in-excel/
Numbers 3.2.2, updated to version 12.2.1 in December 2022
I chose to change my preference for rulers to point units (options are for centimeter inches and points)

default cell size in cm and points

Click on the table at top of your document screen, to the right of the function icon; select the first choice on the left, the second row  a place to start
  Uncheck alternating rows on menus on the right, revise options
Click anywhere on the screen, and use the command all to select all table cells. Choose row and column size, type in your desired values, or using the arrows provided, hit return. Click anywhere on the sheet to get additional markings to appear again. With your mouse, grab and drag the _| symbol on the bottom right ![]() and you will also have the benefit of viewing the number of rows and columns in your document. Click on the circular target icon on the upper left, drag the _| symbol on the bottom right, and all units on the sheet will be resized to display measurements.
and you will also have the benefit of viewing the number of rows and columns in your document. Click on the circular target icon on the upper left, drag the _| symbol on the bottom right, and all units on the sheet will be resized to display measurements.  For thicker, darker, or even in different colors and types of lines changes are easily made when working with the borders menus.
  Clicking on any cell leaves only your graph; selecting print from your file menu prints exactly what appears as the sheet number chosen, and /or saved; additional adjustment options are offered on the right

Click on the white part of your sheet, only your chart will be viewable and ready for printing. If a PDF is desired, choose Export to -> PDF from the file menu.
PUNCHCARD TEMPLATES
I had a Ravelry request for a punchcard template. In a previous 2011/12/14/more-low-tech/, I shared a method that got me in the ballpark using a Word document, for having a printable, near-scale graph. Here is an editable Excel workbook resulting in as near as I could get to printing the punch card at scale; included are beginning added markings for Brother machines that could easily be altered to suit other makes; lines at the side can serve for comments or notes.
Going about printing differently: I captured an image from my Excel template  saved it, opened the image in Photoshop, adjusted the image size as below, and when printed the output was nearly dead-on in terms of size and would make tracing motifs from it onto a punchcard over a lightbox super easy
  Using Numbers the closest I could get to punchcard cell size at that point was using point values, 19 for rows, 18 for columns, and printing aspect ratio remained off.
December 2022
In the initial try, the repeat used is a part of an electronic one, adjusted to a random 24-stitch segment, and it is 30 rows in height.
It is placed over a hacked lightbox of sorts, with a Brother blank punchcard taped over it to hold it in place. As can be seen, marking the card in the location of future punched holes would be fairly easy. Longer repeats may require the card to be shifted up very slightly at some point, which may work well, and avoid adjusting the original file height dimensions by very small point values and printing again.
![]() I have created all my numbers tables for charts up to now using the ruler units set to points. Matching the results of those experiments to a printed template for marking the card in punched hole locations was slightly off and required a bit of shifting to the card during the process.
I have created all my numbers tables for charts up to now using the ruler units set to points. Matching the results of those experiments to a printed template for marking the card in punched hole locations was slightly off and required a bit of shifting to the card during the process.
Creating the spreadsheet using cm ruler units rather than points I came up with a template I am sharing, measuring 24 cells in width, and 60 rows in height as most standard factory-supplied blank cards.
The program will separate the design into more than one page if needed when File Print is chosen.
On the left, the 60-row table is divided into 2 sheets/pages.
The center shares the settings for the size of the table, the row and column size, and the print settings with Fit unchecked.
Punchcards design bodies are marked with a square grid. Using a ruler measuring in mm, they are fixed at 108 mm in width by 300 mm in height.
On the far right, a blank punch card is laid over the printout of page 1 of my document on an improvised lightbox, with what appeared to be accurate placement results: 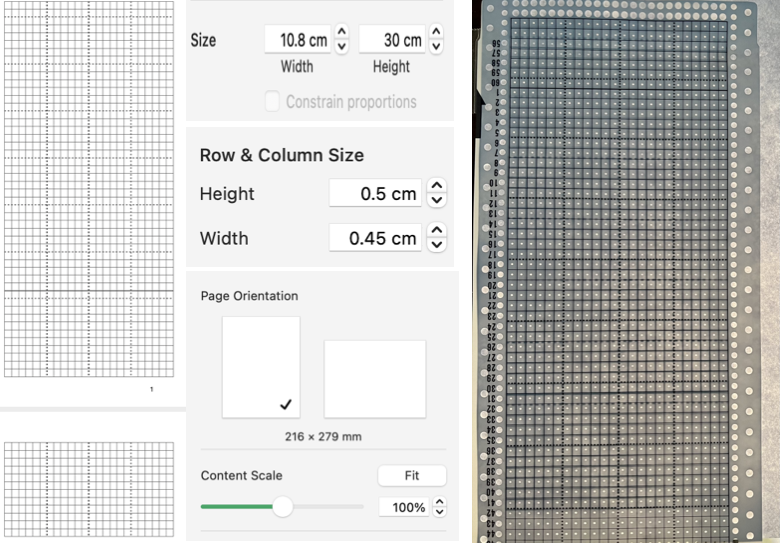 New downloadable documents should open with the corresponding points ruler setting unless you have already been using the program with the centimeter ruler setting. I cannot test the Exel documents.
For designing:
punchcard blank_excel
punchcard blank_numbers
I have had consistent success in maintaining the aspect ratio with ruler units set to centimeters, 2024, Numbers 13.2 :
punchcard-blank 35 09 meets the maximum content of 44 rows
print-card 60 rows will split the card into 2 default segments, the template is editable if operating in a later Mac OS, these options will be offered when the numbers spreadsheets are first opened 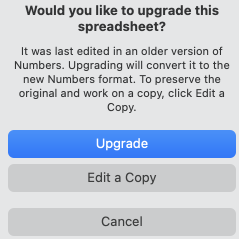 print card_Excel
A PDF: punchcard-blank 35. To print to scale using Acrobat Reader, select: ![]() Changing rulers in Numbers, from the program’s manual:
Changing rulers in Numbers, from the program’s manual: 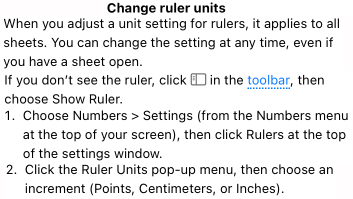 Added info and results in the post Numbers and GIMP: online punchcard patterns to electronics 2 7/21
 CUSTOM NEEDLE TAPES may be used as guides to track actions such as sequences in short rows or hooking up stitches (standard KM needles are 4.5mm apart). My color printer is defunct, so this is the grey version. Color coding or notes may be easily added to blocks for more complex fabric manipulations.
  A reference for some conversions of mm to points based on needle spacing, each 4.5 mm unit = 12.75 points, rulers may be set to centimeters, see the bottom of the post.
 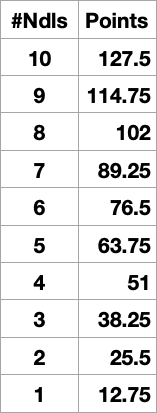 Print the results at 100% in landscape orientation with fit checked
 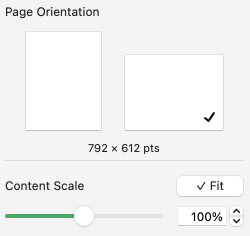 Some tables to test, editable to suit your needs. Keep in mind the size of the print area in the document is indicated immediately beneath the page orientation illustration, in points.
tapes_numbers
The last table in the document is designed for use on 35 stitches arranged in mixed-width segments. It has been printed and is shown here on the machine, placed under a random needle group, with corresponding needle selections in and out of work. 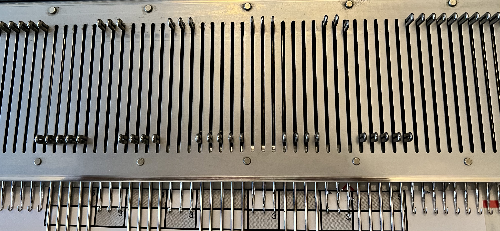 The topic was revisited here. A variety of printable tapes for multiple gauge knitting machines is offered by Claudia Scarpa in her blog post.
Working in cm, taking into account that needles are 4.5 mm, 0.45cm apart eliminated the conversion to points.
The program alters a couple of the values for the width of the table cells slightly, as seen here for 1-10 cm needle spacings 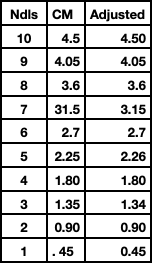 To maximize the available printing space, under print setup change all margin values from any preset default to 0.54
 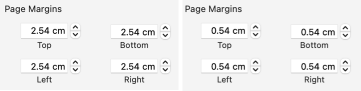 Although the print setup shows page numbers in cm, the page orientation measures are given in mm, the width in landscape orientation is 279mm=27.9cm, with 26.8mm available drawing space when page margins are set to 0.54
 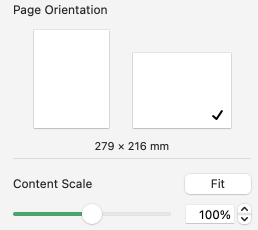 The 2.26 mm cell unit tape in place on the machine
 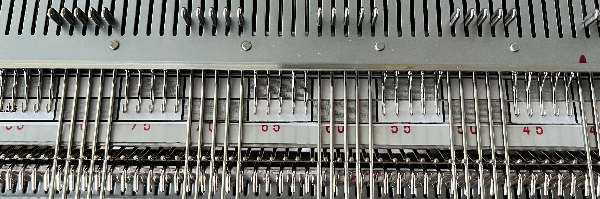 2024
2024
To change rulers in Numbers 13.2 to Centimeter setting, and avoid the need for any conversions to points from the Numbers Menu at the top of the screen Choose Numbers >Settings  then click rulers at the top of the settings window.
 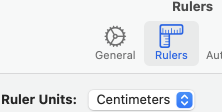 Click the Ruler Units from the pop-up menu, then choose an increment, in this case, centimeters. The math in calculating table cell size is simple. This export is a revised copy for use in Numbers 09 using cm rulers: needle-tapes-only.
The later versions appear to ask if you wish to upgrade the document.
The file created in version 13.2:
needle tapes only_numbers 2