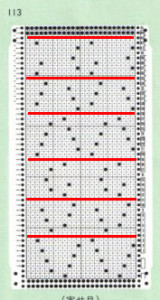
Some Studio punchcard patterns

Pattern 113 (bottom left) has a single blank row between groups of multiple transfers (indicated by punched holes). These correspond with single rows knit at the completion of each set of transfers. They are highlighted with red lines in the related punchcard image below.
Essentially the same repeat, found in a different publication source, was interpreted for use in the 910 electronic in my previous post, nearly a year ago. Pattern 112 (middle left on the first image) has some noticeable differences. To start with, at the end of each set of transfers, there are 2 blank rows (red), as opposed to one in #113, making it suitable for use on Brother KMs almost “as is”. Studio punchcards for this type of lace generally begin with 2 blank rows (blue highlight). Brother cards generally begin with the first row of punched holes for row 1 of the pattern. The Studio first 2 blank rows would normally be moved up to the top of the punchcard if punching your own, or simply if the card is pre-punched, a different row # selection may be chosen for the first selected row.
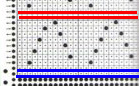
In the middle of the repeat, where the first set of transfers is completed, there are several (six) unpunched rows,
and at the punchcard top, there are 4 blank rows. These last rows, added to the first 2 rows (blue) will total another set of 6 unpunched rows at the top of the alternating pattern repeat. These multiple blank punchcard rows result in knit-only rows when using Studio KM. In Brother, the knit carriage does not advance the card unless cam buttons are in use ie for tuck or slip settings. Generally, if multiple plain rows are desired, this is indicated in Brother appropriate row markings on the card, and need to be tracked by the knitter.
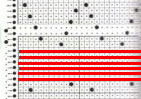
Lace cards generally require few punched holes but can be considerably longer. To insure 2 rows between each set of transfers I highlighted them on my card in light blue pencil, helping me place repeats properly. Following the highlighted markings above, the first 2 blank rows (blue) are dropped, a set of 6 is reduced to 2, and the top 4 (Brother lace usually ends with 2 blank rows) are reduced to 2 as well. My resulting punchcard is shown here in 2 segments that were to be joined with snaps for continuous use. I found in knitting the samples, that I was having a problem with the single row near the join being read correctly when using only snaps, the problem was solved when I taped the 2 cards together across their width. This particular punchcard roll was sold as for “Brother”, but markings are for Studio. Brother selection row 1 is marked on right. Thick pencil markings indicate the viewable point where rows are knit at the completion of each transfer sequence. These make it easier to know where to roll back the card to knit rows, as opposed to relying only on any of the row number markings. I prefer to unravel down to knit rows when correcting dropped stitches or other “mistakes”.
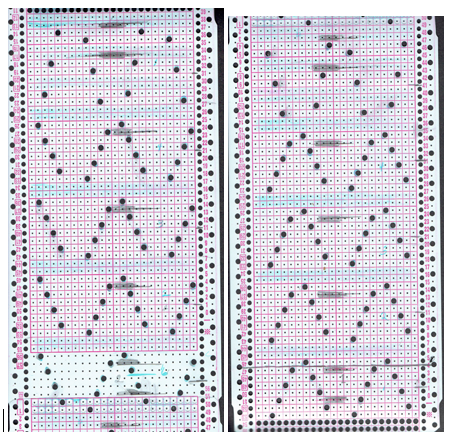
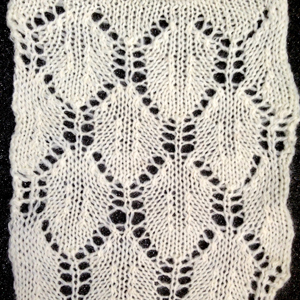
I omitted the extra knit rows (4 out of a series of 6) in my own sample (shown lightly pressed). This eliminates the visible break between eyelets in the knitting reference swatch jpg.
A WIP using the card showing the differences between “blocked” and not may be seen in the later post.