Pile, carpet, or loop stitch are terms used for a raised relief fabric made on KMs using both beds, with or without programmed patterning motifs on either bed. Two-color patterns are sometimes also called “punch pile”. Depending on the machine brand and on the thickness of the yarn, loops may be formed every row or every other, varying the pile density. Beds are always at half-pitch, the same setting used for every needle rib. The “needle rule” is disregarded. The first and the last needle are always on the non-patterning bed, to anchor down any loops close to the edge of the fabric. In machines with automatic end needle selection, the function is canceled. Some yarns and designs will even tolerate loops being dropped at the end of knitting. Sometimes dropping them every few rows will work. If any yarn splitting or fussy knitting off because of fiber content occurs, then dropping stitches may be needed after every row of loops formed. If using multiple colors of yarn on either of these 2 brands, having them equal gauge/weight is helpful.
The Passap knitting machines, as well as the Brother, did not have a built-in yarn feeder to facilitate knitting this fabric such as that possible in the Studio brand. Particularly with the advent of the E6000 Passap model, for a while, there was keen interest in how to produce similar fabrics. Susanna Lewis was among the first to describe knitting pile across multiple brands, whether punchcard models or, later, electronics.
The fabric loops are created with one pass of the carriage, the next row of knitting is intended to anchor down those loops, and with no needle or pusher selection, no stitches knit on the patterning bed. This fact gives one the opportunity to drop loops without disturbing pattern selection. Some of my drop stitch lace previous blog posts discuss designing such fabrics. Color separations are required. The E 6000 console performs many of these automatically, one simply has to plug in the appropriate “technique” number. The default DBJ separation made by the console in Brother electronics may not be used because blank rows for no needle selection need to be added in order to attempt the long loop or stitch fabrics. This, in turn, requires the knitter to do the work. Design rows are expanded
- Graph Motif Color
- Row 1 Row 1 Color 1
- Row 2 Row 1 Color 2
- a blank row is inserted on top of each of the separated rows, so for each 2 color design row, there will now be 4 charted rows
The E 6000 has some built-in technique choice options for knitting and automatically adding blank rows in charts where needed. This allows for the locks, empty of any yarn, to travel from and then back to the color changer achieving stitch dropping. My preference is to work with stitch dropping tools instead of the extra rows “knit” without yarn. Also, if the goal is to work between KM brands, keeping the separations more compact is practical, particularly if one plans to use the end chart with a punchcard or a mylar sheet for programming.
I had tried some pile fabrics on the E 6000 in the past, found the knitting too loose for my liking, but by light felting (wool yarn) result, I had a stable, attractive fabric that could easily be cut and sewn in combination with other knit companion DBJ fabrics. Another option in wearables to add stability may be an iron-on knit interfacing used on areas of pile knit. When I pushed the back bed tension as much as physically possible with the yarn used and was happier with the result. The only problem I encountered was in thinking I could knit a few extra rows on the back bed only before dropping the knit off the machine for inspection. The old adage still applies: if more than a row or 2 are to be knit across all stitches on any single machine bed, each yarn has an optimum tension required for stitches to form properly. Pushing limits will lead to problems. I had a lovely lock jam. For wide ribs, the same principle applies the more stitches on either bed, the closer tension on that bed to what number would apply to stocking stitch on that bed.
CARPET STITCH KNITTING ON PASSAP E-6000 with release stitch tool. Use any 2 color Fairisle pattern from the pattern book that accompanies the machine. Both Passap manuals are now available for free download online. I randomly chose # 1407 for my test.
Start with all stitches on the back bed. If the piece is started with ribbing, transfer all the front bed stitches to the back bed. For test swatches, if open stitches do not matter, it is possible to do a quick single bed cast on the Passap in a couple of ways, the “broken toe” cast on will work across brands. Have an extra needle and pusher on each side of the back bed when setting up work for patterning. Set the back bed tension as tight as possible, with the front bed 1 – 1.5 tension numbers looser than the back bed. As always test a small swatch before committing to a larger one.
Start with all stitches on the back bed, with an extra pusher on each side on the back bed when setting up for patterning
One-color carpet stitch in design: Technique 256, handle down, black strippers are recommended. I rarely if ever use black, go for orange first, sometimes combining with one blue or switching to 2 blues if the fabric calls for it. Ignore console instructions. The back bed is set to FX left arrow key <–, not BX as instructed. Do not use the AX setting by mistake. FX will tuck right to left, knit left to right (toward the color changer, which in Passap sits on the right side rather than on the left as in Brother machines). Knit rows help anchor loops. Back bed pushers are in 1 up, 1 down set up.
Using one arrow key means the same selection is repeated for 2 rows before the switch is made to the adjacent pusher and the corresponding needle. The front bed is set to LX (slip) throughout. The racking handle is down (setting for every needle rib). Two rows are knit, then the front bed stitches are dropped (Passap knitting beds are in reverse position to Japanese machines set up with their ribbers). If loops are long they may need to be pushed between the beds before knitting the next row. Passap machines have pushers for this purpose, in Brother rulers or any number of tools may be used for the same purpose.
Two-color carpet stitch: Technique 185, black (or other) strippers, 184 may also be used, its graphic gives the added reminder for 1X1 pusher set up on the back bed. The back bed tension setting is the same as for the one color pattern, the front bed knits in LX throughout. In theory, stitches may be dropped every 4 rows. Some yarns may split and catch the alternate color requiring dropping after each color is used, others will tolerate much less frequent dropping. It is all an experiment to start with.
Again: the back bed tension must be as tight as possible, the front bed at least 1.5 tension numbers higher until tests determine what is best for the yarn being used. Multiple strands of some thinner yarn may also be worth a shot. Weights are needed on the knitting, no matter what brand machine is in use.
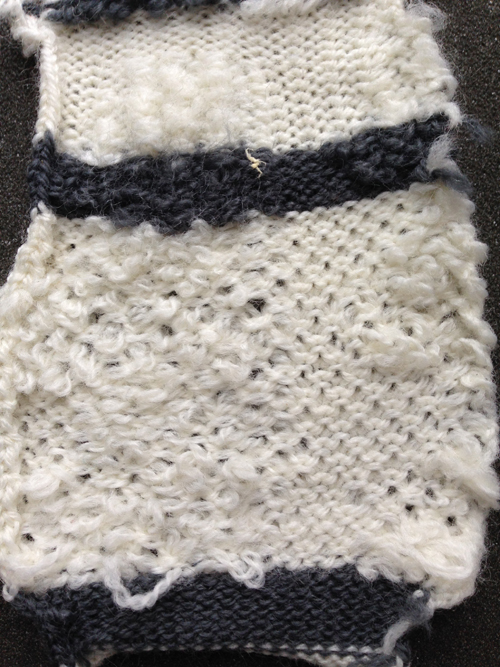
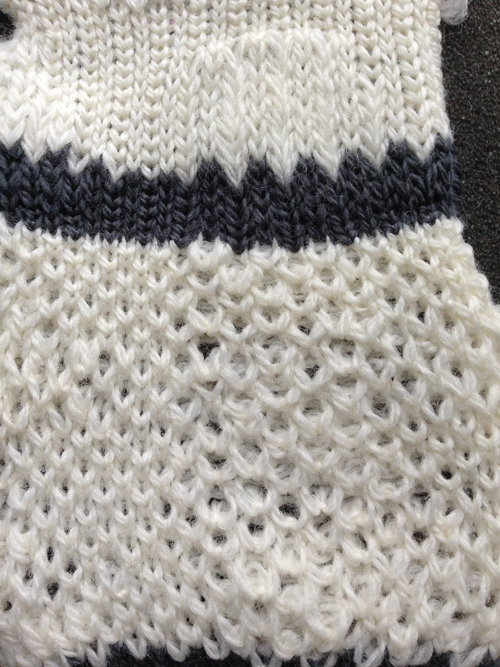
One-color trial: back tension too loose, note change in texture after tightening back lock tension; the loops are formed on the purl side
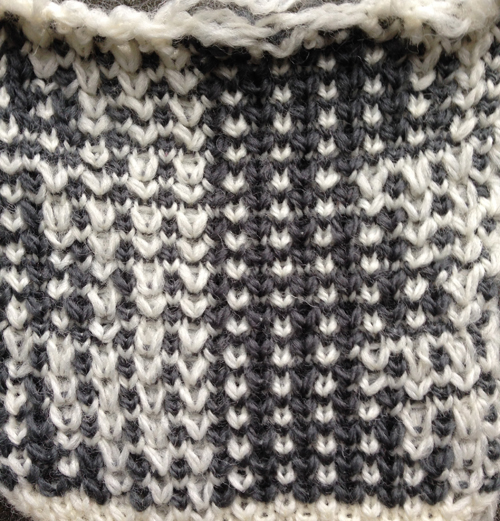
the 2 color version, with adjusted tension on the back bed
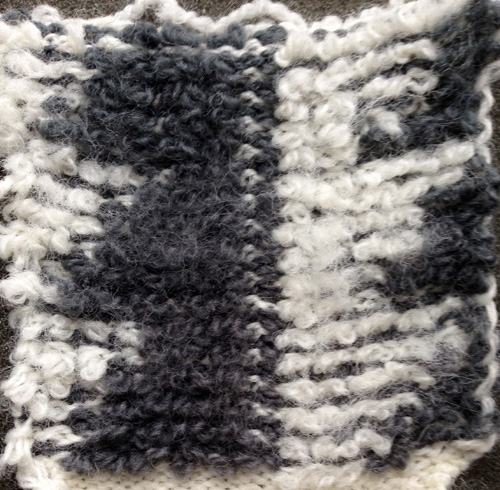
note vertical stripes in backing
At the end of knitting the pile, add anchoring rows of knitting on the back bed only (tension may need to be changed after a couple of rows), proceed as preferred.
embossed one color pile (black 2/8 wool)
One-color pile, striped background:
Technique 185, black strippers, handle down. Locks set as for above.
Knit two rows with the pile color
Set all front bed pushers down to rest position, change to the second color
Knit 2 rows, the back bed only will knit
Drop the front bed stitches, set all front bed pushers to work position-
Previous posts with info on accessories useful for dropping stitches and loops 1, 2, 3.
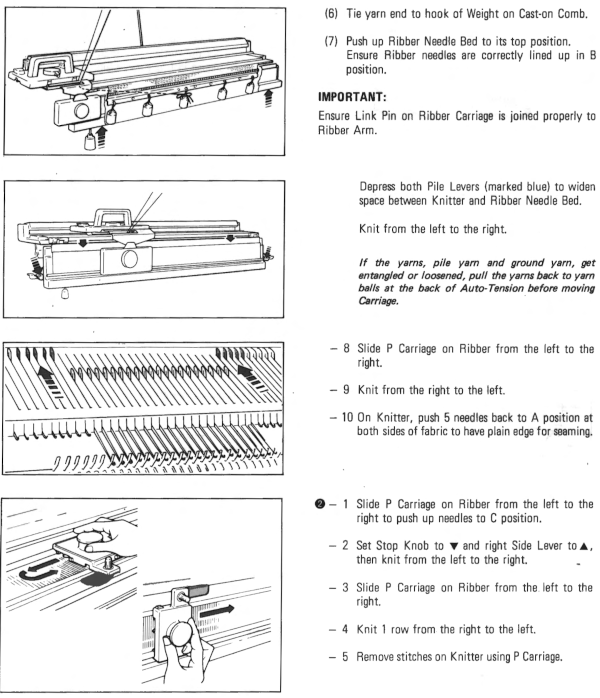
This method is a hack intended to emulate pile knitting created on the Studio machine. The ribber features had specific options for such fabrics. These pages are from the Singer SRP-50 ribber manual and one of their punchcard books and share some principles while illustrating setting and card design. Food for thought on any adaptation for use on other brands. Studio settings were reviewed in post-2015/02/20/pile-knitting/.
The comment on this post, clarified in an email, was actually in reference to knitting a solid single–color pile on the Passap. Tech 256 is intended to be used with a stitch pattern. This is a fabric that is slow to knit. My Passap had long been unused, and I had issues with yarn splitting and the yarn mast not maintaining even tension, which accounts for the occasionally pulled loops where they did not drop off properly, and the changes in some of the stitch sizes in a few rows on the reverse side. Looking at the Studio information again, I went back to the drawing board for a solution and a proof of concept swatch
1. cast on so that all stitches are on the back bed
2. knit a few rows in stocking stitch sorting the tightest tension at which your yarn will knit, also experiment with the front lock tension in order to produce as large a loop as possible that will also drop off properly, end to begin your test with locks on the right side:
3. bring back bed pushers to the up position, set the back lock to EX with the left arrow key. All needles will tuck moving to the left, and knit on their return to the right
3. the front lock is set to CX, it will knit on all needles to the left creating loops on the front bed, while the back lock does the same, slips all needles moving to the right.
When the locks reach the left side there will be loops on every needle on both beds. As they move from left to right, the needles on the back bed will knit, securing the loops there and anchoring the ones on the front bed while the front bed is slipped
4. with locks again on the right side, use stitch ditcher or another tool to drop off loops on the front bed, returning needles to proper work position, follow with a pass using a single eye tool to push loops between the beds, checking that none are left in the needle hooks
*make 2 more passes with locks from and returning to the right, drop off loops**, and continue from * to **
The difference in the size of the long stitches between loop rows in the photo was eliminated by tightening the tension on the back lock, it is evident that even are anchored even in those segments. As with any fabric, the larger the intended piece, the more likely some further adjustments may have to be made. 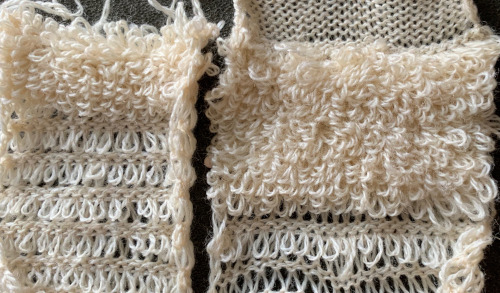