Just as other knitwear styles have varied in style, ease, and fit over the years, round yoke sweaters have also done so. Yokes can be wide or narrow, in patterned or textured stitches, and in varied proximity to the neckline. This is not generally a tailored style. Ease in knits can be calculated on the basis of fashion or personal preference. With some familiarity with slopers, measurements may, however, be adjusted in this style as in any other sweater. Neckline measurements do not reflect the measurements achieved after adding finishes i.e. turtle or round. Depending on the size of the yoke, shaping can begin at the armhole level bind off (seen in the early hand knitting directions in the 70s), while smaller yoke shaping can begin at whatever point is desired, extending to the neckline, or simply to create a design band. The shaping is created by decreases if the garment is knit from the bottom up, and with increases, if worked from the top down. In most styles, the same number of rows are worked from the armhole bind off or held section to where yoke sections meet. At that point, if hand knitting on circulars the 4 sections: i.e. left sleeve, front yoke, right sleeve, and back yoke may be picked up and joined for completing the yoke. My illustrations have been created using Mac’s Pages lines and shapes. They are not to scale.
Beginning to visualize the process: yokes are generally superimposed on raglan shaping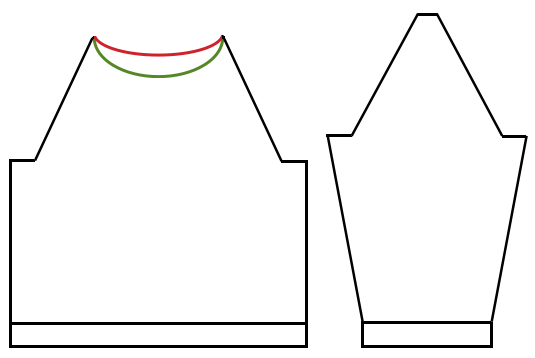
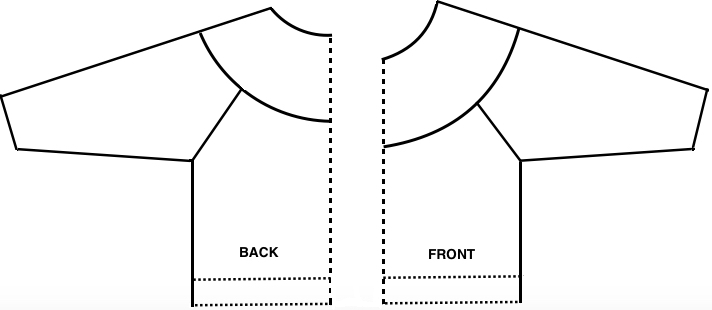
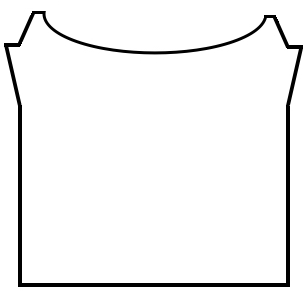
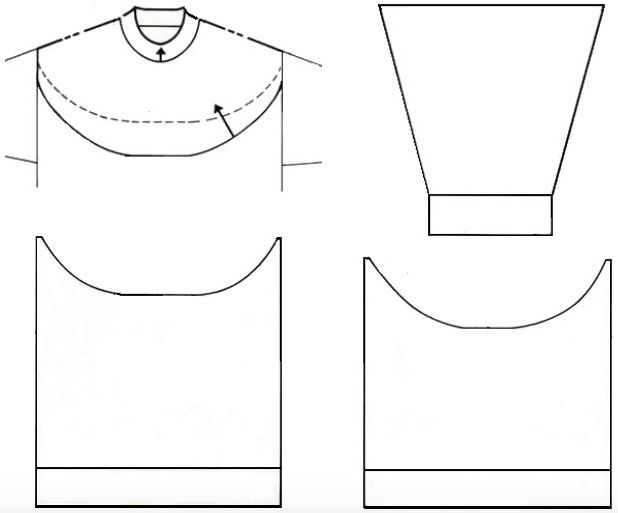
they form part of a flat circle; here is how they might appear in a partially seamed cardigan without front bands. They may be created in varying widths or patterns,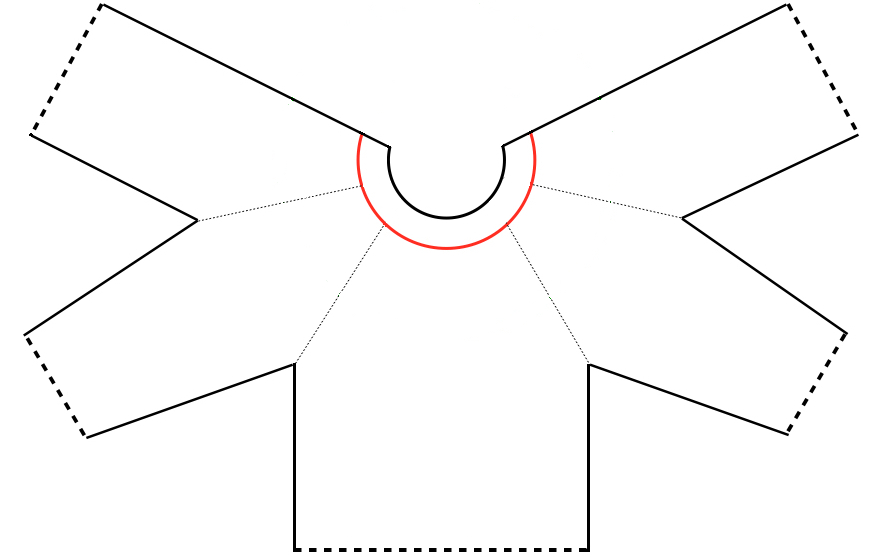
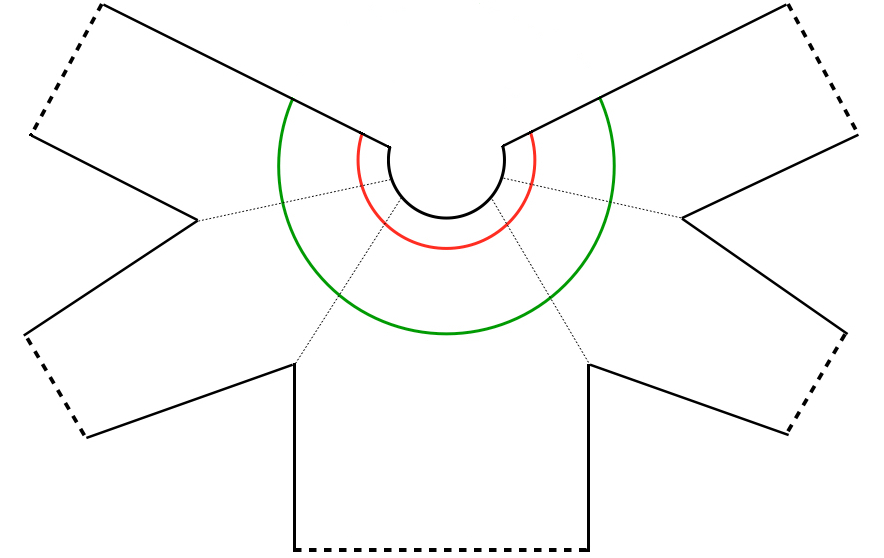
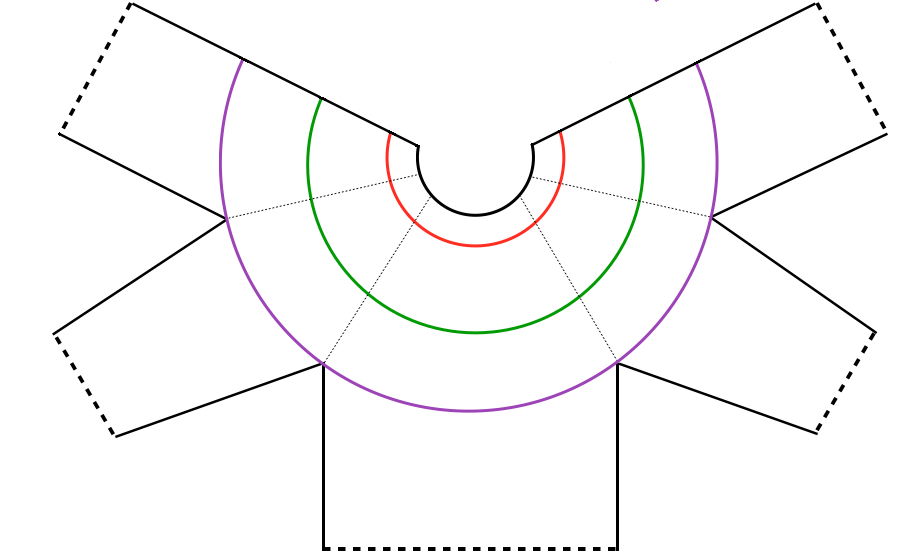
and in a pullover with shaping in the back that raises the rear neckline. Some of the early patterns were executed with front/ back and both sleeves sharing equal measurements and slopes
 separate the elements: the yoke
the front and back can begin to consider shaping at breasts, waist, and those wedges under where the yoke “circle” meets the sweater may be short rowed on each side with the intent of achieving a much better personal fit
sleeve 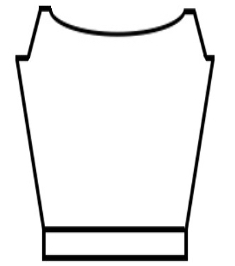
Hand knitters are probably familiar with Elizabeth Zimmermann and her daughter, Meg Swansen. Handknitting with Meg Swansen 1995, and Elizabeth Zimmermann’s Knitting workshop 1981, Knitting around 1989, Knitting without tears 1971 are classical references that include information on yoke creation, including these guidelines
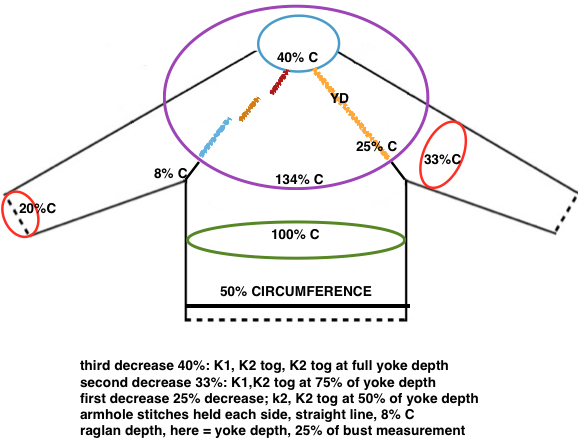
Other authors suggest 1/4 of total body and sleeve measurement in stitches (excluding armhole) for a tighter neckline (turtle neck), one third for a more open style (crewneck). Original circumference/ body measurement should include any ease. Though decreases for the yoke: first halfway up 25%(one out of every 4), second 3/4 of the way up 33% (one out of every 3), and last 1/2 inch before full depth is reached 40% (two out of every 5) are the most common, they can be placed and varied to suit your own design.
In drafting your own patterns and partnering with someone, a tape measure or string can be laid on the shoulder line, etc. for an idea as to preferred placement and measurement. Necklines finished by bound-off stitches whether machine or hand-knit, do not stretch, so measuring your head with something that does not as well gives you a guideline. Yokes end in open stitches, so the thing to consider there is what method is used to finish the neckline and its own stretch factor after bind off. Hand knitters have the added benefit of splitting the work onto 2 circulars and trying on the sweater or its pieces on while in progress to double check fit.
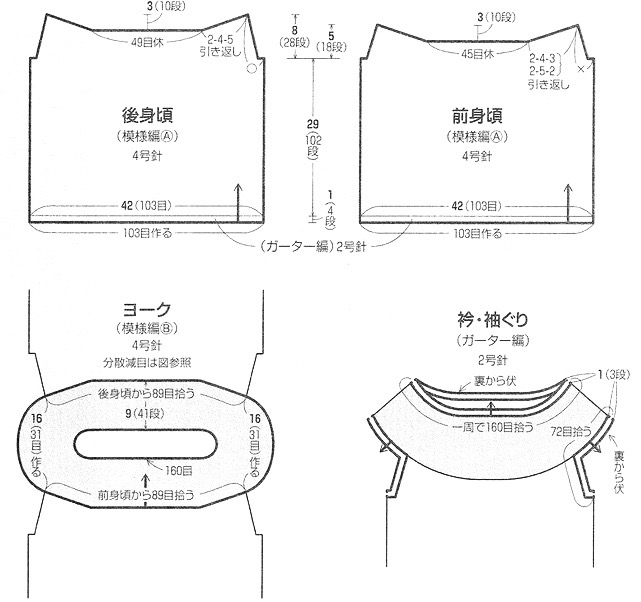
Japanese designers began to publish patterns that often included yokes that were constructed on the top of the drop shoulder line, with the back yoke placed higher than on the front. Such yokes also began to be represented in stepped figures showing decreases. In the round calculations are gauge based, not relying on the pi formula.
modified raglan for higher placement of yoke on the back of the body
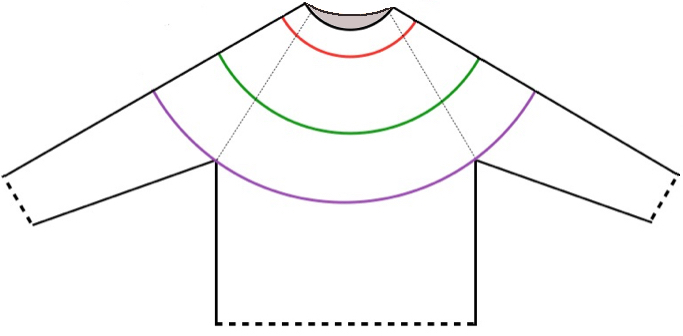
full pattern with traditional full cap sleeve
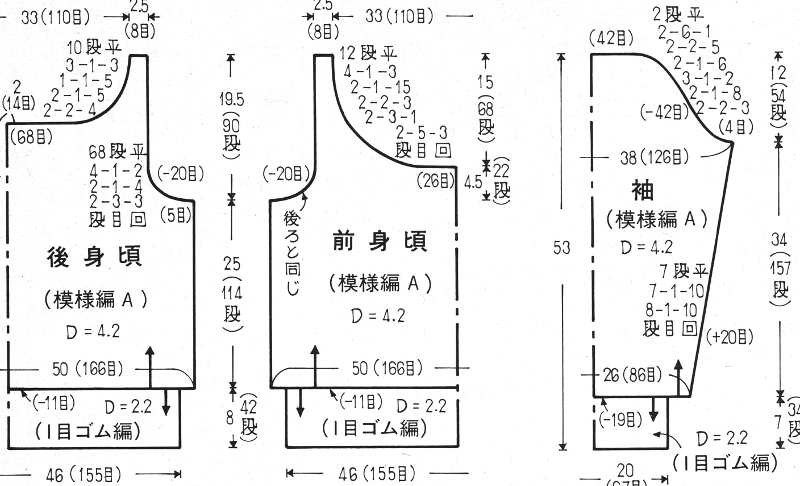
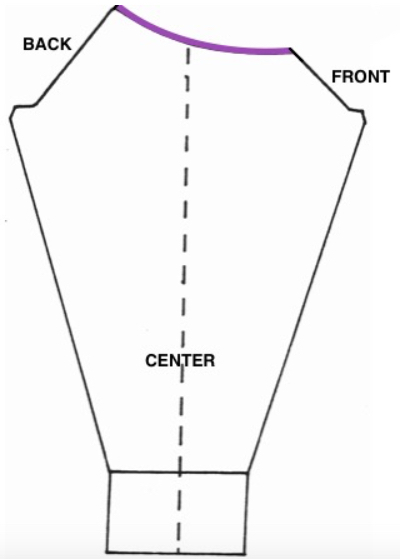
pieces meeting at dropped shoulder line: dotted line represents back collar placement, note difference in height between the back panel on the lower back, and front panel on lower right
 a sample diagram from a Japanese magazine
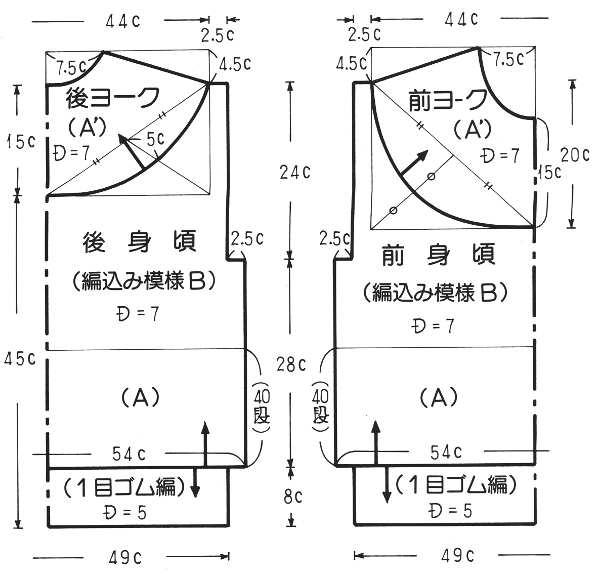
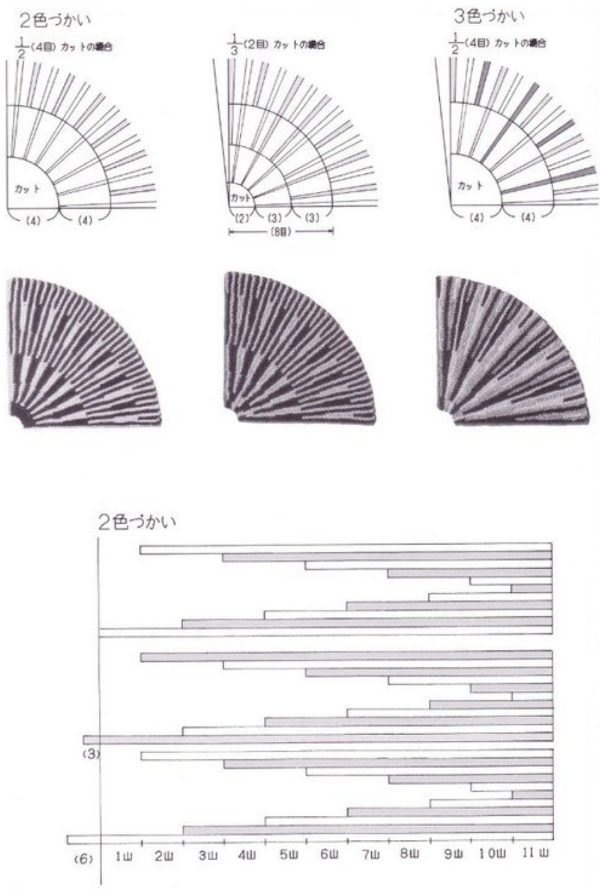
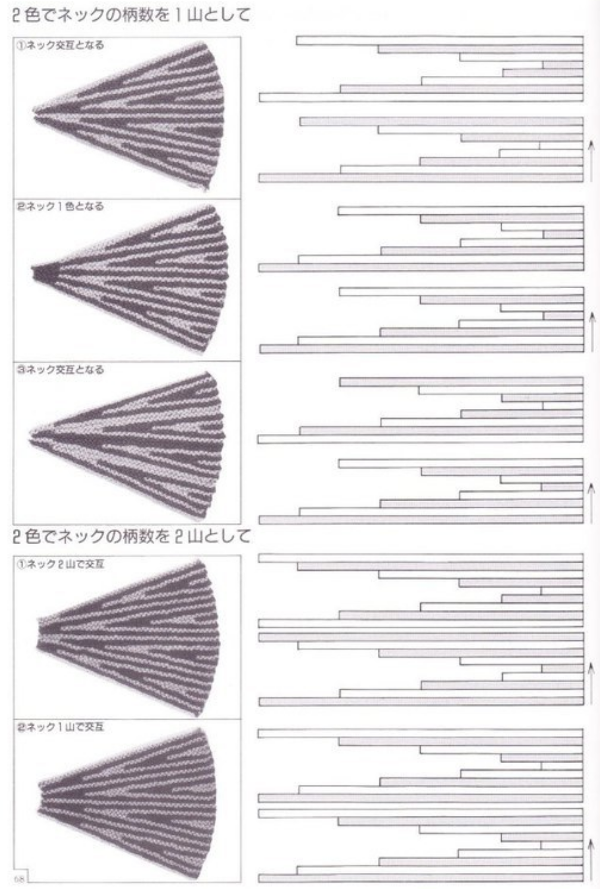
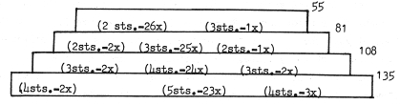
Yoke shaping may be indicated in a stacked format. The final count and frequency of decreases are shown, publishers may vary in language. On the first row here 4 sts – 2X means there is a group of 4 stitches followed by a decrease 2 times, then 5 stitches followed by a decrease 23 times, etc.
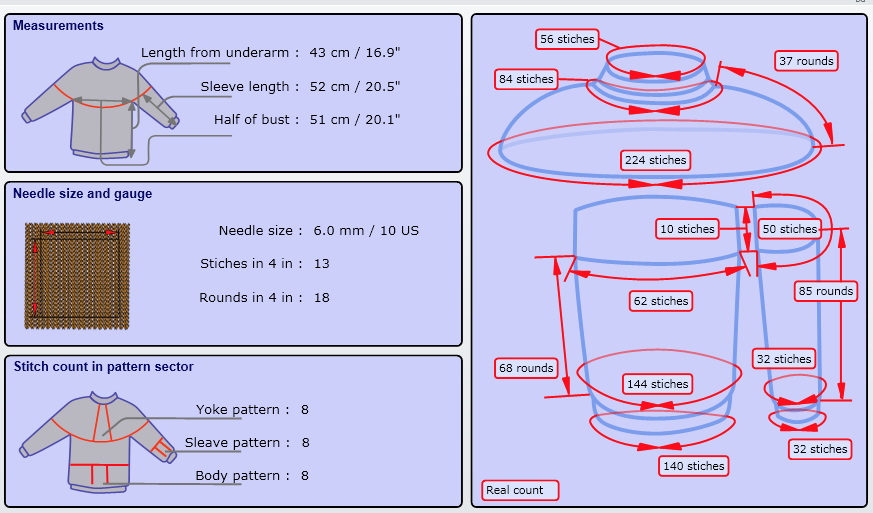
Two online calculators are available to help with DIY: 1. the Yoke-U-Lator no longer live, and 2. for Lopi, Icelandic styles. The image below is a screenshot from the latter website, indicating a sample possible result. There had been issues with Silverlight not working in some late OS updates, making the site unusable for many. On 3/12/18 after installing the latest update for the plugin from Microsoft, I was able to run it using both Safari and Firefox respectively.
Jessica Tromp offers free circular knitting patterns with a round yoke, dimensions in inches and ounces.
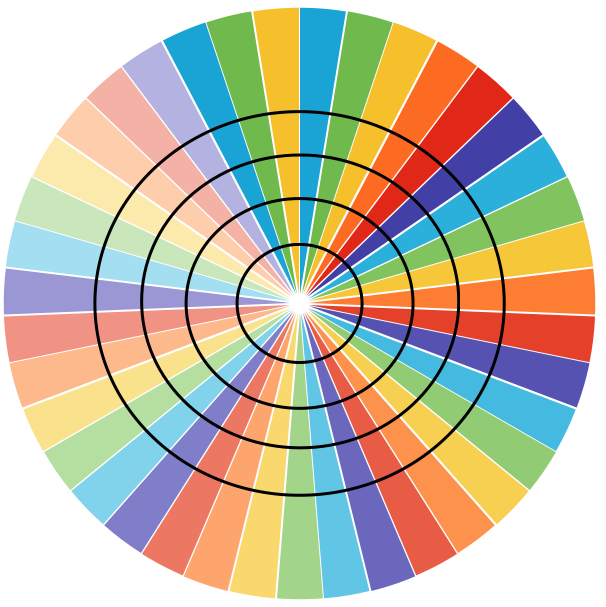
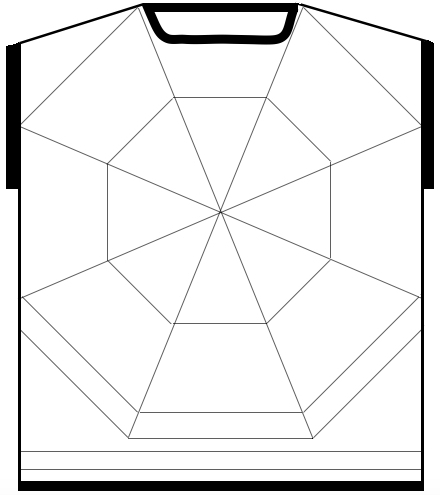
There are endless possibilities for combining math formulas, gauge, and pi. There are many ways to do decreases. With planning so that much more frequent intervals happen between decrease rounds, the decreases themselves can be fabricated to line up in line, and the resulting texture creates the interest in the sweater as opposed to any color patterning (i.e. along white lines)
“pie wedges” may be placed on neckline, yokes, sweater parts, various silhouettes and garment pieces, or full shapes (red dots outline possible dolman sleeve)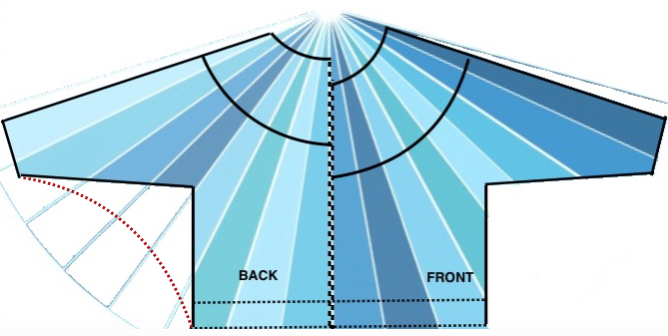 from a Japanese magazine a hint of detail that must be calculated
 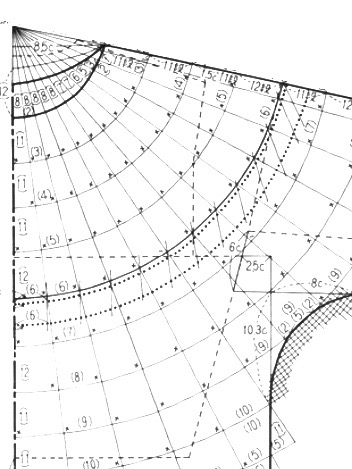 and the pie may be oriented in different locations on any one piece
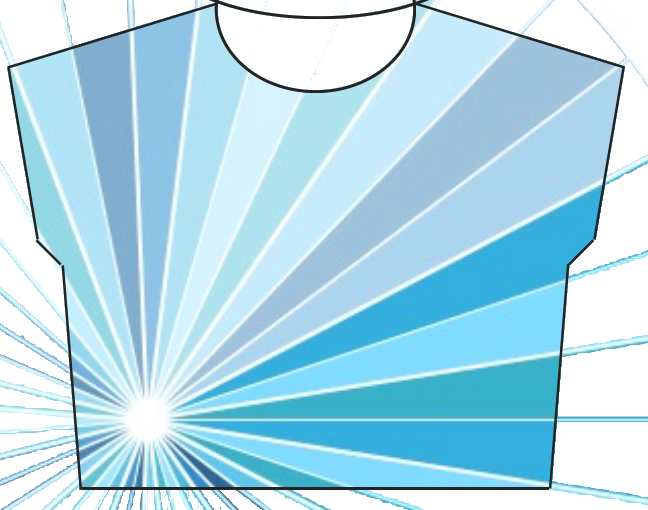
from a Japanese knitting magazine, an idea for long sleeve and side details merging with and becoming part of a circular yoke 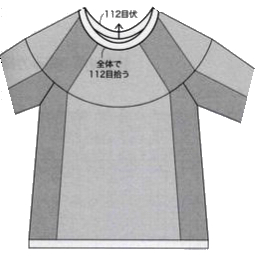 For some of the math calculations please see: https://alessandrina.com/2011/06/18/oh-the-math
“Decreases” in rib sometimes can be achieved through changes in needle size if hand knitting or tension changes on the machine. The yoke in machine knitting would need to be split into 2 parts or knit sideways. Plain colored rows between bands of FI may appear noticeably lighter in weight, so using a 1X1 one color FI pattern or double strand of one of the pattern colors may improve the look.
Before transferring stitches on the machine in the single color rows, make your transfers. The lace carriage may be used after selecting appropriate needles and putting them in position. Knit the following row before removing knitting on from the waste yarn or garter bar. If stitches are tight for garter bar use sometimes the row after transfers may be knit at a looser tension to facilitate the process, and the difference may not be noticeable when knitting at “normal tension” is resumed. The carriage should be set to plain knit for row prior to and after transfers. It may be easier to work toward the center from each side when returning stitches to the needle bed. In order to match the pattern at the shoulder seams or when motifs need to stack in position on separate bands, the stitches need to be rehung at specific positions on the needle bed that take into consideration the size of the repeat and its location within the stitch count. Also, take into account the seam allowance. One stitch extra on each of the meeting seam sides will allow the end needle selection stitch or an extra patterning needle to be hidden within a full stitch join. Working on machines that preselect needles or pushers makes tracking a bit easier. It is possible to combine knitting pieces in both directions. For example, knit yoke up toward neck, join shoulders and then pick up appropriate stitches to knit body and sleeves from the top down. Top-down makes any adjustments in length easier prior to finishing the sweater. Short rowing in garment segments underneath the yokes makes for a better fit at the bust line and upper back.
Calculators to help with all that math: online
http://www.thedietdiary.com/knittingfiend/tools/MagicFormulaSleeveTopDown.html
http://www.thedietdiary.com/knittingfiend/tools/MagicFormulaSleeve.html
http://www.thedietdiary.com/knittingfiend/tools/EvenlySpace.html
http://www.thedietdiary.com/knittingfiend/tools/IncreaseEvenlySpace.html
http://www.thedietdiary.com/knittingfiend/EZsweater/catalogSizeChart.html
http://www.thedietdiary.com/knittingfiend/tools/PieWedgeShawls.html
http://www.thedietdiary.com/knittingfiend/tools/PieWedgeShawls.html
http://www.eskimimimakes.com/knitulator-increase-decrease-knitting-calculator-eskimimi
for purchase:
https://itunes.apple.com/us/app/knitting-toolkit/id960312887?mt=8
https://itunes.apple.com/us/app/knit-evenly-calculator/id370449748?mt=8
Going low tech: if gauge works out to whole numbers, shapes can be plotted out on square grid graph paper (or grid created within the software to suit) where each square represents one stitch, one row. Draw connecting lines, follow the outline, filling in squares (or removing them) as the edge moves a whole unit (k2 tog). Here the goal is to go from 39 stitches to 5 over 60 rows. 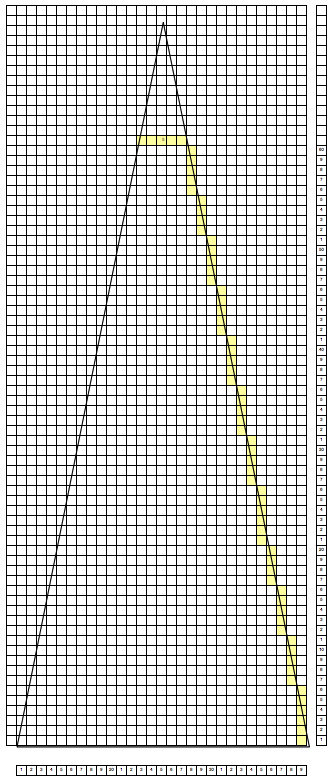 Color bands could be added and planned between decreases, which should occur on single color rows. Once a gauge is obtained, charting on graph paper or within programs can be boiled down to connecting dots and following outlines as above. Some simple breakdowns for outlines of garment pieces/ shapes
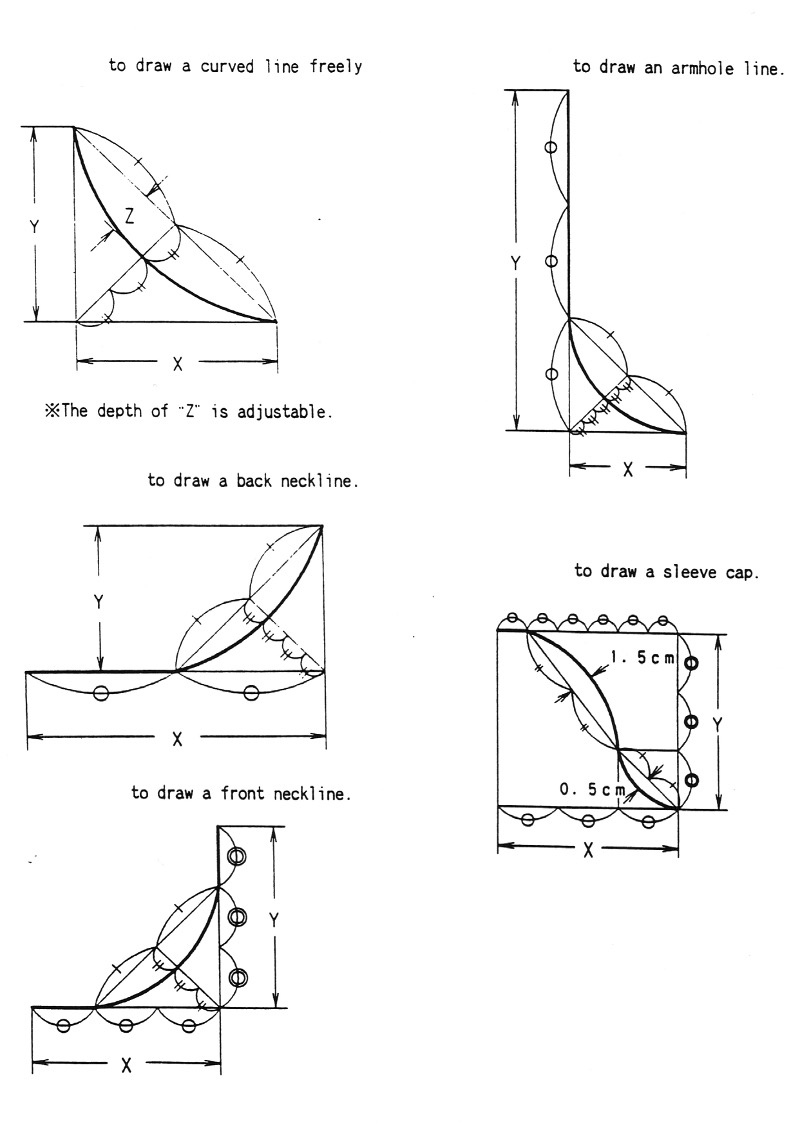
more inspiration from an old Japanese magazine
 visualizing a peplum
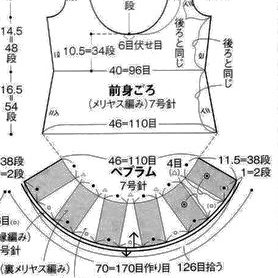
This was a share of mine on FB last March attempting to illustrate shaping by decreases across rows while maintaining the FI design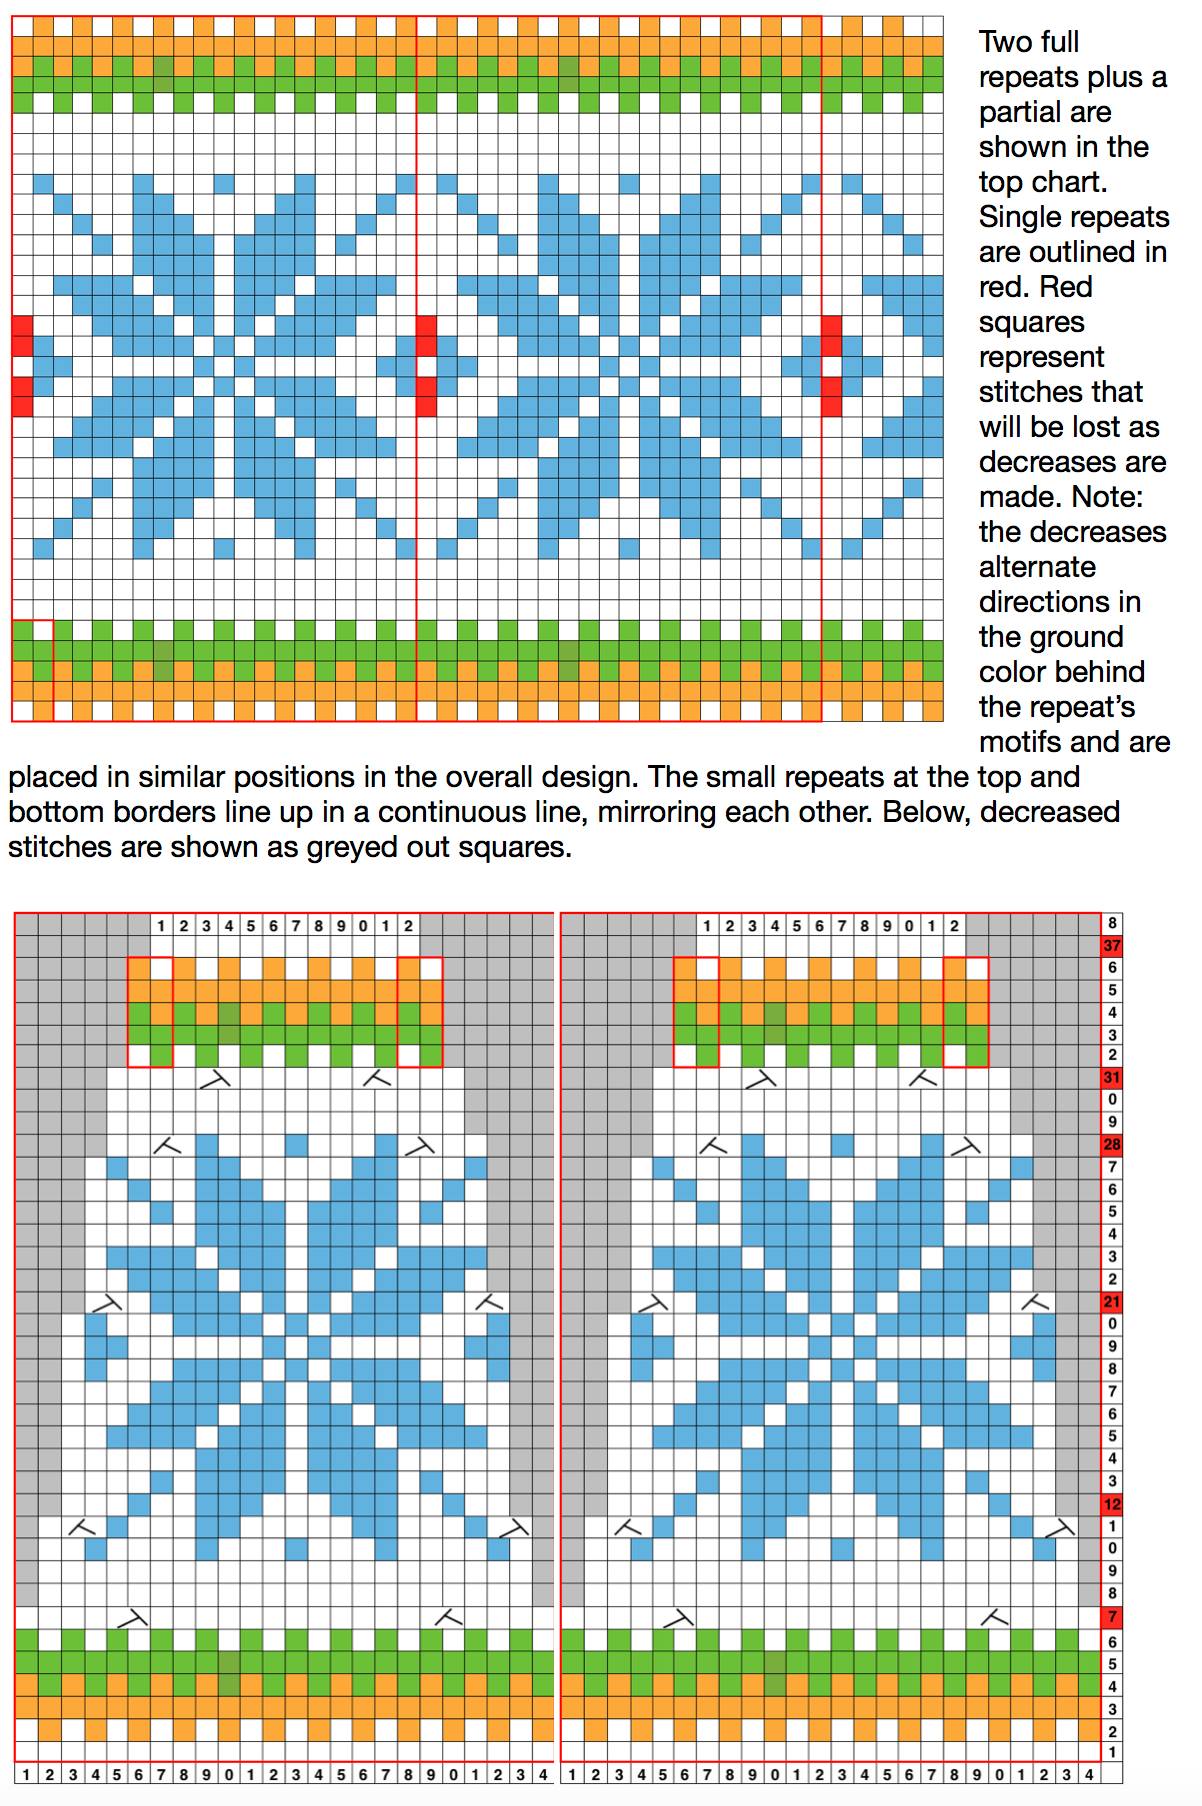 Starting with a square shape and going around.
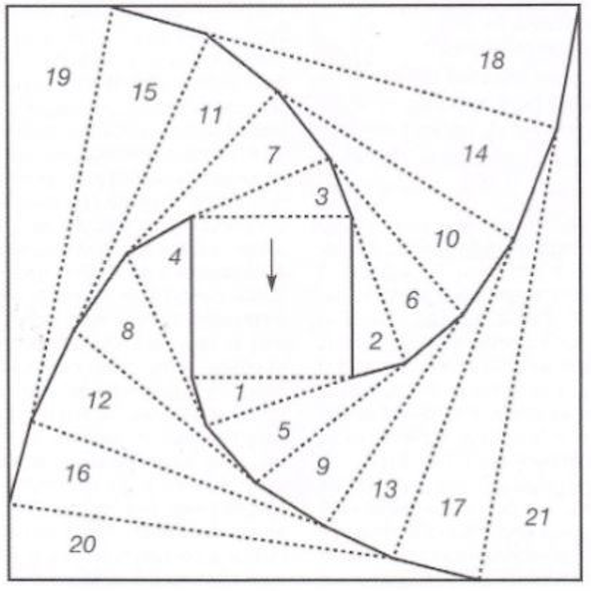 Garter stitch hand knit samples from a Japanese magazine, elongate X2 on the machine with selection toward the color changer for every 2 rows knit in each color to add striped patterning to modular wedges