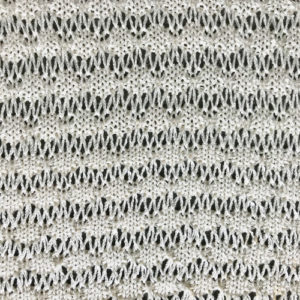
Hand knitters may be familiar with drop-stitch patterns where the yarn is wrapped multiple times around the knitting needle, followed by knit stitch(es). On the next row, when the wrap is reached, the extra wraps are dropped off the needle, and the remaining single loop is knit in a regular manner. On the knitting machine this technique is called drive and mesh lace, release stitch or summer fair isle by Passap, and drop stitch lace in some of the pattern books. Drive lace typically has lines of patterning where loops are formed between rows of all knit stitches. The main fabric, stockinette, is knitted and produced by either bed. Selected needles knit pattern stitches on the other bed for one or more rows, then are dropped from those needles, unraveling back to their starting point, creating the larger, open stitches. Sometimes a distinction is made between terms used, in drive lace the bulk of the punchcard is left blank, and there are far fewer marks than in drive lace. In mesh lace the balance of holes to punched or blank areas is 50/50 or more punched areas than blanks, often the “holes” or black squares are side-by-side.
Drive lace marks out the shape of the pattern, mesh forms the background. Blank rows across the width of the repeat allow the knitting of plain rows between dropped stitches including ones, separating the series of holes, or stabilizing the fabric.
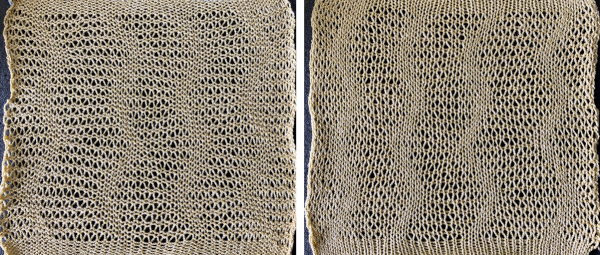
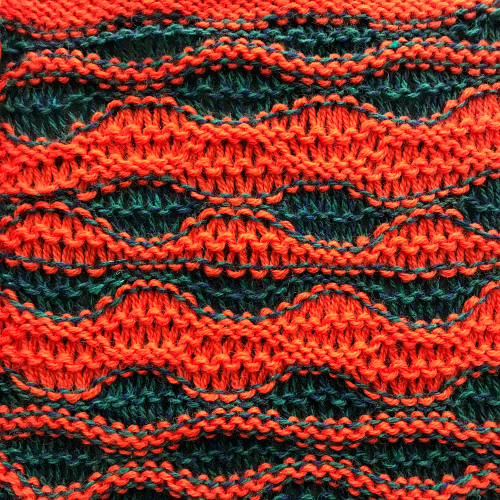
Both types of mesh may be combined in the same fabric, with dropping planned on the same rows. The diamond on the left represents drive lace, and the one on the right is a mesh version. On the right, solid “lines” echo the shape. Repeat is suitable for punch cards but may be altered to suit both cards and electronics. 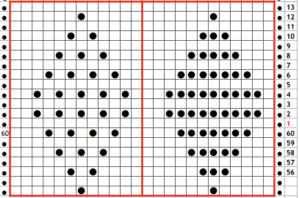 revised with fewer single dots, and solid lines in the ground
 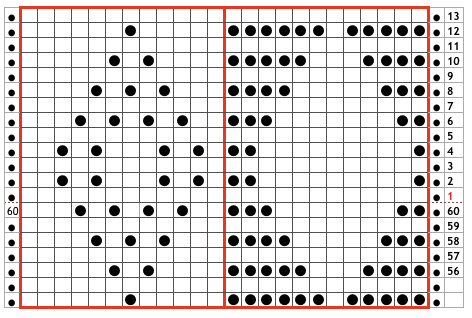 The fabric may be created both as a hand technique or using automated patterning. In sources that show loops being formed on the ribber, stitches are released by uncoupling the ribber carriage and moving it across the knitting and then back to its original spot, thus dropping the stitches. In Studio machines the P carriage may be used to drop stitches, see previous posts on modifying one for use on Brother KM.
The tension setting on the patterning bed affects the loop size and its tension is frequently one to three numbers looser than the all-knit bed tension. In Brother machines, the ribber knits at a tighter gauge than the main bed, so take that into consideration and adjust it when knitting all knit rows on every needle on the ribber, where the tension may need to be loosened one or more numbers than when knitting same yarn in stocking stitch on the main bed. Matching tension numbers on both beds may provide enough of a difference in stitch size for loop formation. The difference in gauge between the beds also merits calculating adjustments when knitting in circular or U format.
Releasing stitches may happen after every pattern row, after groups of pattern rows (such as bubbles or check patterns), or even at times when knitting is completed. With groups of pattern rows, I have had better results with more frequent stitch releases. Two types of mesh can be created. Stockinette mesh has an equal number of rows on both beds. The result is enlarged stocking stitches along with narrower, single-bed ones on any one row. Half Milano mesh has a horizontal ridge on the purl side with 2 rows knit on the all-knit fabric bed, to every one row on the patterning bed. One of the rows has the patterning bed slip every needle, with the ribber only knitting, the second row forms the combination size stitches as discussed previously. In patterning in Brother KMs, this would need to have such rows added to the programmed design. The fabric is a bit more “stable”. Passap offers multiple techniques for dropping stitches, often referred to as summer fair isle, and using 2 colors per row. Different looks are achieved by changing the built-in technique number, as well as when using a stitch ditcher on every row knit, as opposed to using empty passes of locks to drop the stitches.
Previous posts on the topic
2012/09/24/working-out-the-kinks-in-my-drop-stitch-lace-saga/
2013/10/19/drop-stitch-lace-2-colors-per-row-Japanese-machines
2013/10/16/drop-stitch-lace-2-colors-per-row-passap-km/
2013/10/19/drop-stitch-lace-2-colors-per-row-Japanese-machines/
2015/06/14/geometric-shapes-in-drop-stitch-lace-brother-km/
2015/06/16/geometric-shapes-in-drop-stitch-lace-2-brother-km/
2015/06/18/geometric-shapes-in-drop-stitch-lace-3-end-release/
2018/01/16/drop-stitch-lace-using-ayab-software
knitting patterns with no blank knit rows between loop formation 2015/06/16/geometric-shapes-in-drop-stitch-lace-2-brother-km/
2015/06/18/geometric-shapes-in-drop-stitch-lace-3-end-release/
stitch dropping tools
2012/09/21/knit-bubbles-and-stitch-ditchers-dumpers/
2015/06/10/brother-kms-pile-knitting-ribbed-stitch-dropping-tools/
from an old Studio KM Japanese publication, using their tool and what appears to be a lace repeat 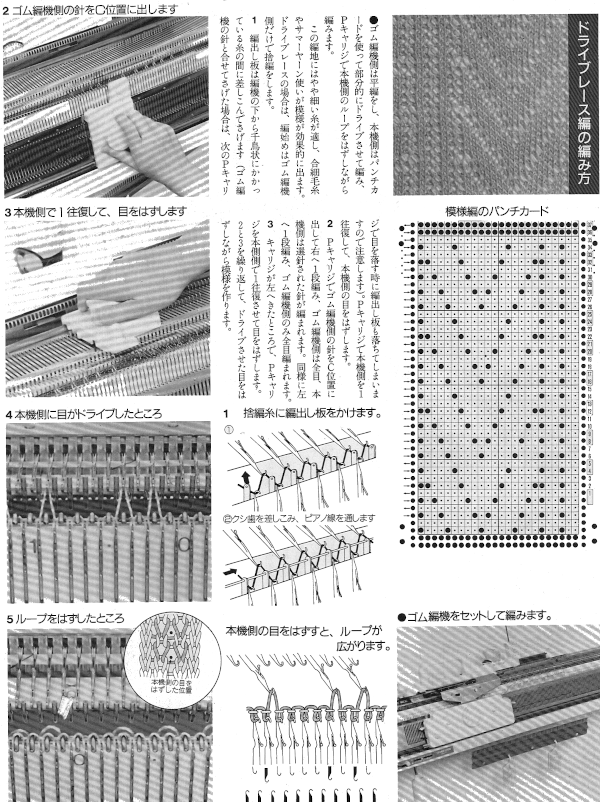
another related fabric: 2017/10/18/revisiting-knit-bubbles-brother-km/
using ribber cast on comb for an open cast on either bed
2017/02/14/ribber-cast-on-comb-open-stitch-single-bed-cast-on/
Working with positive and negative space variations: the repeat is suitable for any machine, my sample is executed on Brother KM. Since alternate, all blank rows have no needle selection, before knitting that row (ribber only will knit), dropping stitches knit on the main bed on the previous row will not alter the pattern 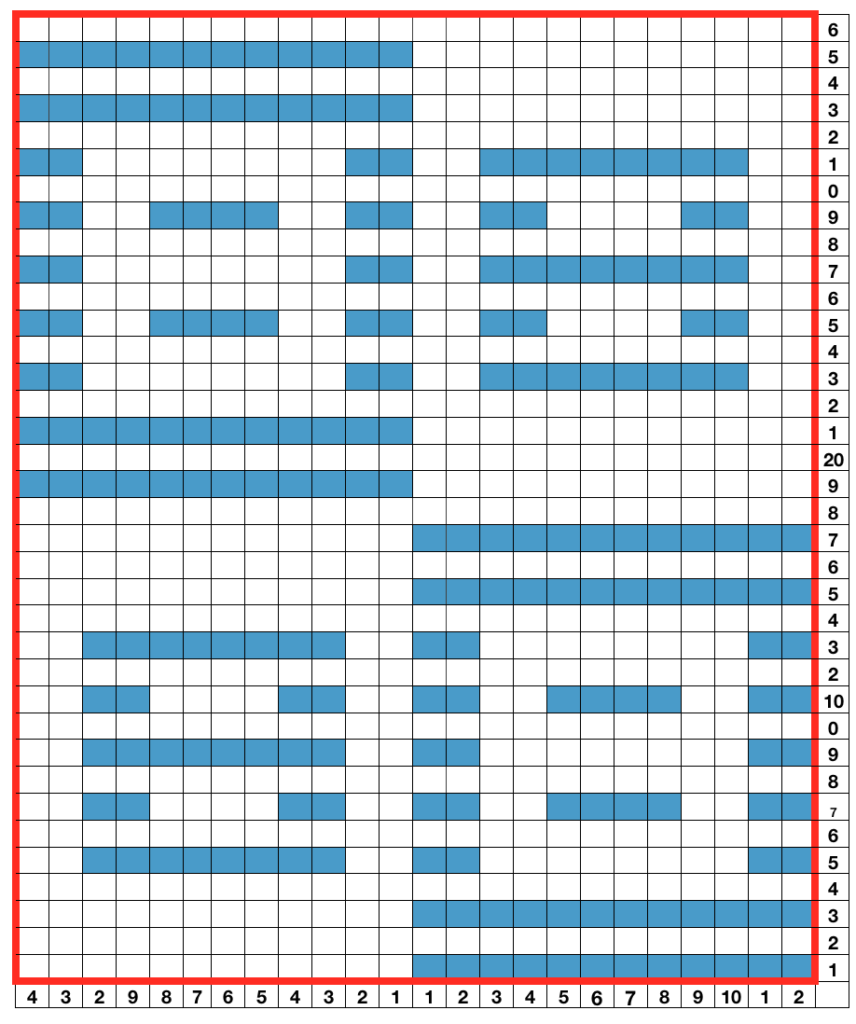 using any method you prefer, set up knitting so all stitches are on the ribber. If you prefer to set up complete repeats prior to watching, “air knitting” prior to ribber set up or using the position option on the main bed if that is available, will help achieve that
  set knit carriage to KC II (used when patterning does not occur on every needle across the needle bed), both part buttons pushed in for free pass to the opposite side of km, no knitting occurs but the first row of pattern knitting is selected. Ribber is set to N<–> throughout
 the carriages now move to the opposite side, selected needles on the main bed pick up loops, and nonselected needles stay empty. Ribber knits every stitch
 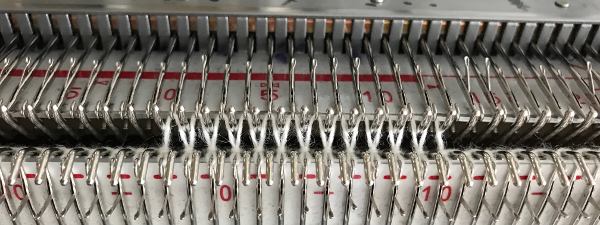 using a ribber cast on comb, stitch “dumper”, or another tool, move needles holding stitches forward to drop loops, and return empty needles to work position (B)
 as carriages move to the opposite side, needles are selected for next row of knit stitches to be knit on main bed
  carriages now move to the opposite side, loops are picked up on selected needles
  all needles are now not selected, above stitches/ loops are dropped, needles are returned to B position before the next carriages’ pass
  carriages move to the opposite side, selecting pattern needles
 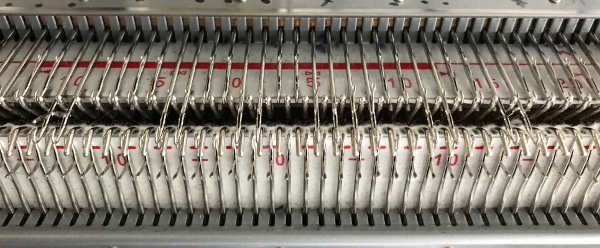 carriages move to the opposite side, picking up loops
 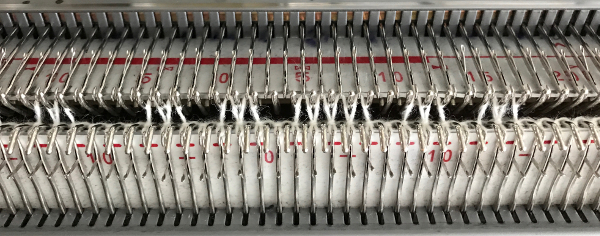 before carriages move again, drop stitches formed. Watch loops after they are dropped, if tugging knitting it is not enough to pull them out of the way of needles returning to patterning, take a tool, or something like a credit card. Slide it from one side to the other between the beds, thus keeping loops clear away from the main bed
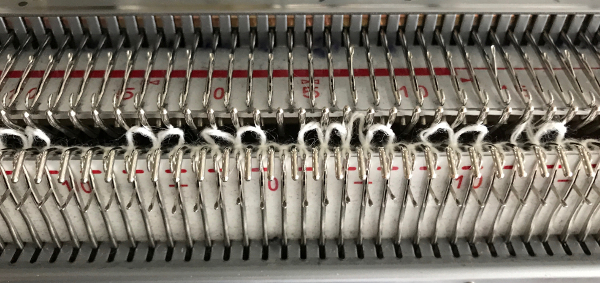
In summary; assuming one is starting on the right side of the machine COR
step 1. <- the carriages select needles that will form loops
step 2. -> the carriages knit, picking up loops
step 3. drop the loops just formed, returning all empty needles to the B position
step 4+ repeat 1-3 for the entire length of the piece
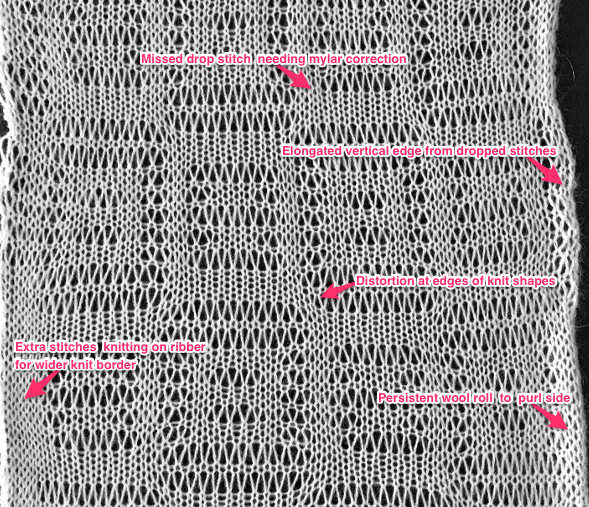
My sample was knit in slightly fuzzy wool. Smooth, thinner yarns result in longer stitches whose patterns get read more easily. Because wool has “memory” the vertical edges tend to roll to the purl side and return to rolling even after heavy pressing and steaming. There are a couple of spots where no long stitch was created due to markings on the mylar not being dark enough.
Other things to consider: this fabric widens when blocked, so cast on, bind off, and beginning and ending edges need to accommodate that. This particular design creates a fairly balanced fabric. In many drop-stitch fabrics, it is recommended that edges contain stitches dropped in the pattern in order to maintain vertical length at the edges. To achieve that, the first and last needles on both sides should be on the main bed. That said, having an all-knit border (stitches knitting only on ribber, no dropped stitches) may work well in your pattern, or pull edges in too tightly when compared to the all-over motif released repeats. Testing on your swatch can be achieved easily by simply taking some needles on the main bed out of work on one side, thus creating the “all-knit border”. The latter can happen by accident if not all needles are returned to the B position properly after dropping stitches.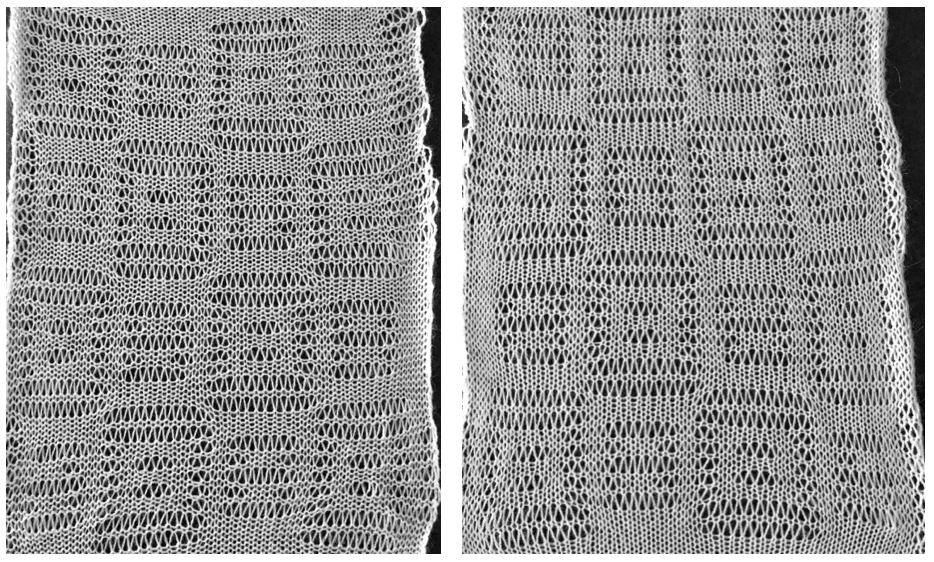
It is possible to produce a drop stitch pattern on the bulky machine or depending on the yarn, knit with heavier yarn on EON on the standard machine. The resulting “patterns” happen with varying the number of rows used to knit in each color, which has not been addressed in previous posts. I prefer to use patterning on the top bed to select needles, but this pattern may also be knit as a hand technique, using the ribber to produce the loops that will be dropped. This page from the ribber techniques book reviews the baseline process and settings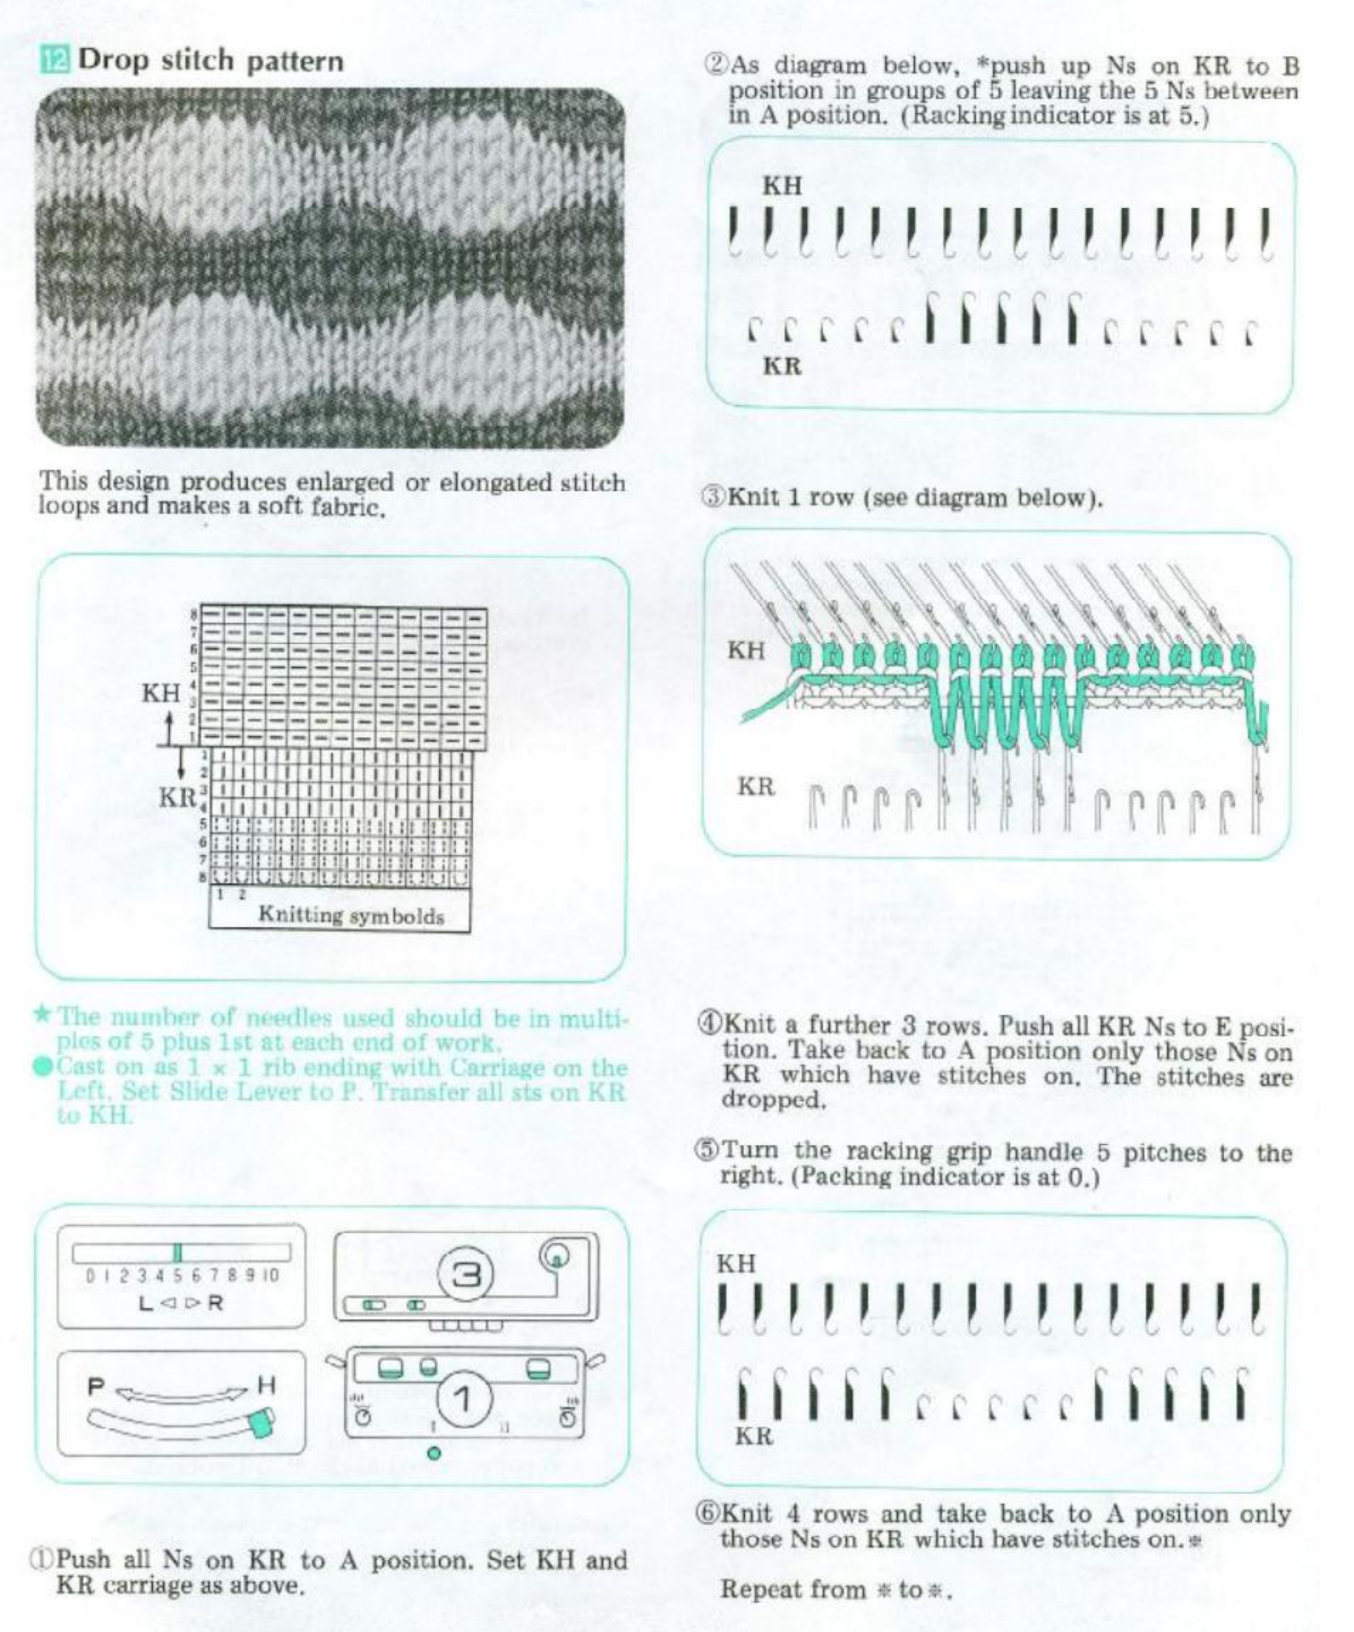
 purl side is shown first for each segment, followed by its knit
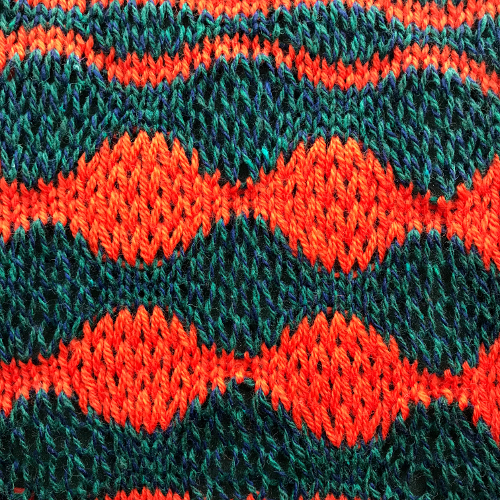
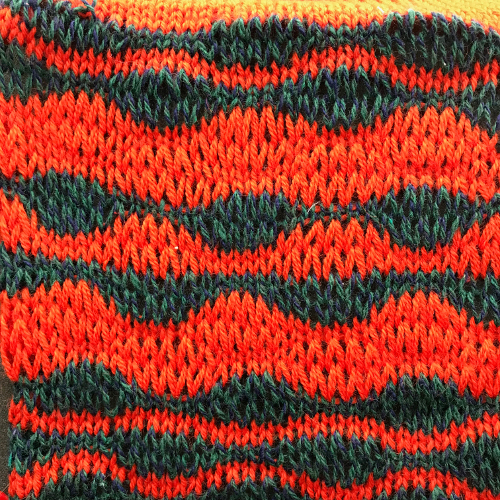

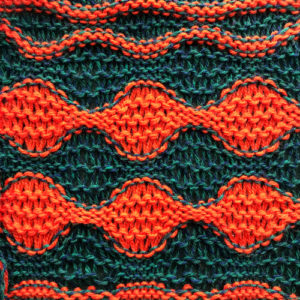
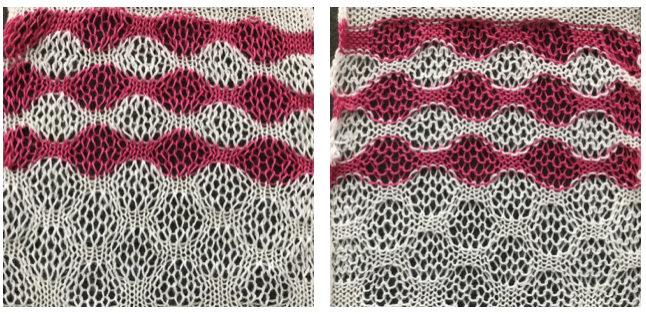
Punchcard knitters are not excluded from creating these fabrics. Some punchcard sets supplied with machine purchases were published for Silver Reed Machines, two such sets are available for download ie. Silver Reed-Singer R-2 Standard Punchcards For SR360 Ribber and the same in a 30 stitch version making them suitable Silver Reed-Singer FRP70 30 Stitch Ribber Punchcards. One such card  easily translates to one color drop stitch. Changing fiber content affects the scale of resulting patterns and the size of the dropped stitches, the yellow sample was knit using a wool rayon, and the purple cotton used the same tensions.
 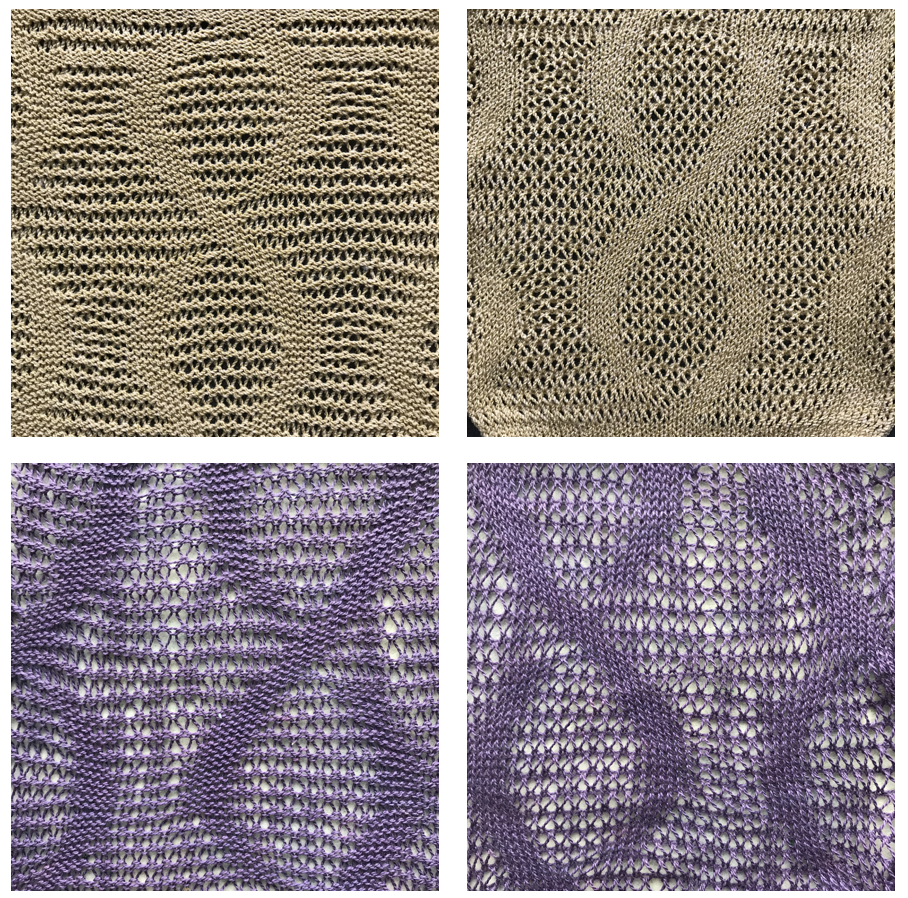 If using punchcard machines, factory issue punch cards provided with the KM may be used
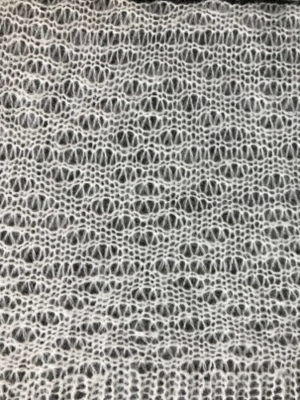 Plaiting is also possible, but depending on the color choice the pattern may become muddied
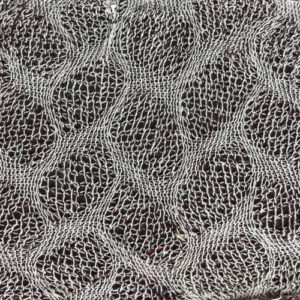
 A slip stitch edge may be planned to keep edges of items such as scarves from rolling
  consider top and bottom edgings that include the technique (illustrated in the previous post)
  Adding complexity: dropped stitches may be combined with other stitch types, shown here in combination with tuck stitch on the main bed, dropped loops created on the ribber. Stitches are transferred up to the top bed. The KC is set to tuck, the ribber episodically picks up loops across the whole row, and they are dropped on the following pass; it is then set to slip when the main bed is returned to tucking
 An alternative way to produce this fabric on Brother is to use the knit carriage with no yarn to do the “stitch ditching”. The basic design programmed into any brother machine, electronic or punchcard will need to be altered. The intended design in my sample is a 4 X 4 square, colors represent what would be punched holes, black squares, or pixels. Simple block patterns such as these may be released upon completion of each “square” series, in this case, after 4-row segments.
 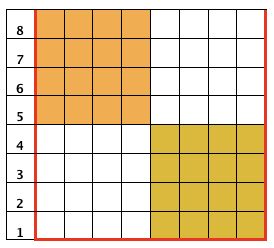 Two rows are added at the top of each “square”, one repeating the motif width, the next completely free of any markings
 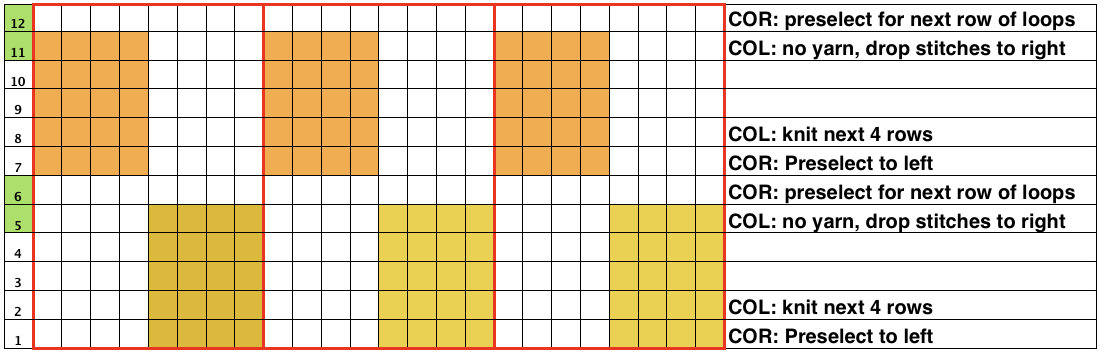 Rows 5 and 6, 11, and 12 are not part of the original repeat. The 5th design row provides needle selection, traveling from right to left. When the carriage passes in turn from left to right with no yarn, those preselected needles will drop while preselecting a blank design row (6) that allows the carriage to return to the left-hand side. As it moves back to the left, the carriage will preselect the first row of the design. With COL yarn is picked up in order to knit the next set of dropped stitches. A color change may be made while the carriage is on the left.
Begin with all stitches transferred and in the work position on the ribber only. Every needle will be in work on both beds for the remaining fabric. The ribber half-pitch lever is on H. With COR set the change knob to KC, preselecting from right to left for the first row to be knit after pushing both part buttons. This allows the KC to travel to the left without forming any loops or stitches, but the preselecting first row of the pattern. Change color if using more than one color, knit 4 rows. color 3 (or 2) can be an empty feeder. Change to color empty so yarn(s) in use are held until picked up again and there is no yarn in the ribbers sinker plate yarn feeder. There are 2 options for dropping stitches. One is to disengage the KC from the ribber, it will be picked up again as you move into the color changer to pick up the yarn once more. The other is to keep the carriages paired, set the ribber to slip for 2 rows, then back to knit as you return to the color changer, pick up the yarn again, and continue to knit. If row count is important ie in making a garment, the row counter gets turned off for the 2 rows when stitches are dropped, remember to turn it back on when knitting the next 4 pattern rows. I personally find this fussier and more error-prone than other methods I have described. My swatch is knit in acrylic thin yarns and lightly steamed, so bubbles have flattened out considerably. The fabric is related to that shown in the ribber techniques book, page 23, created by picking loops up from the ribber combined with racking.
This is my ayab repeat, this time executed by configuring the knitting to begin on the last pattern row 16 for that first preselection row from left to right instead of altering the repeat itself 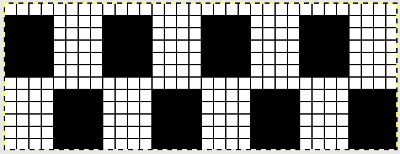
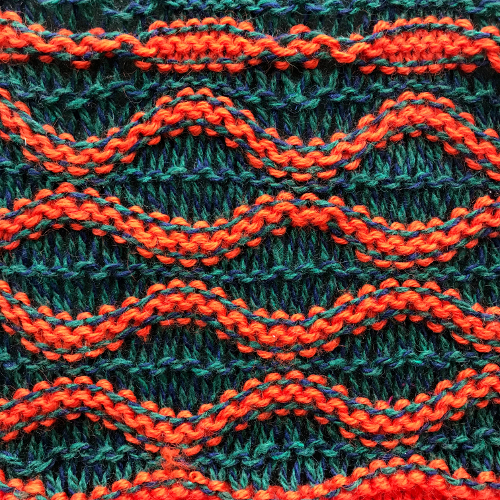
 More to try: the typical appearance to look for in the source inspiration is that of single-row horizontal geometric designs with all blank rows separating them from each other.
Studio pile knitting patterns such as those found in  may be used as published. It may be worth color inverting or spacing out the designs with many more white squares in between the motifs for more recognizable designs in the dropped stitch areas and for a more stable fabric in repeats such as these.
 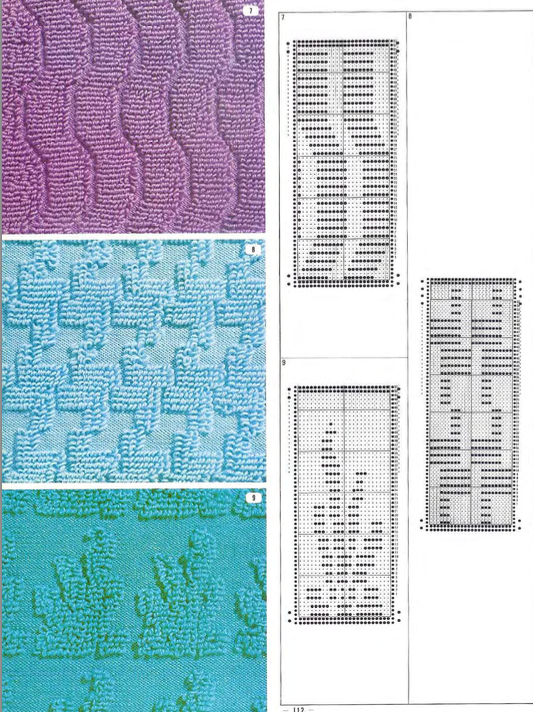 On rows where there are no punched holes, resulting in no preselection in Brother machines, stitches are dropped prior to moving the carriage for preselection of the next row of patterning. The results are easy to test and amend. One such pattern: the original repeat
  The yarn used here was a softly spun rayon that began eventually to split, and get partially caught up on gate pegs, leading to the ending of the swatch
 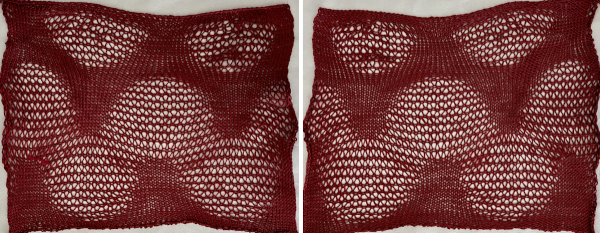 Switching yarns made knitting easier and quicker to produce, planning for a different sort of wave, an amended version of the original design was used
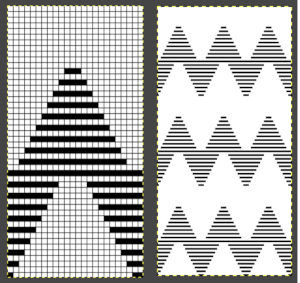
![]()
 Fair Isle
a 24X60 design repeat was randomly chosen and used double length ![]() The first pattern row will pick up loops on the top bed, using any tool, drop the loops and return empty needles to the B position.
The first pattern row will pick up loops on the top bed, using any tool, drop the loops and return empty needles to the B position.
The next pass will drop the stitches and preselect the next row of loops.
Knit to the opposite side again picking up loops, drop them, return needles to B, repeating the steps.
The knit grows in length very quickly, the side edges and cast-on and bind-off methods would need more careful planning in a final project. 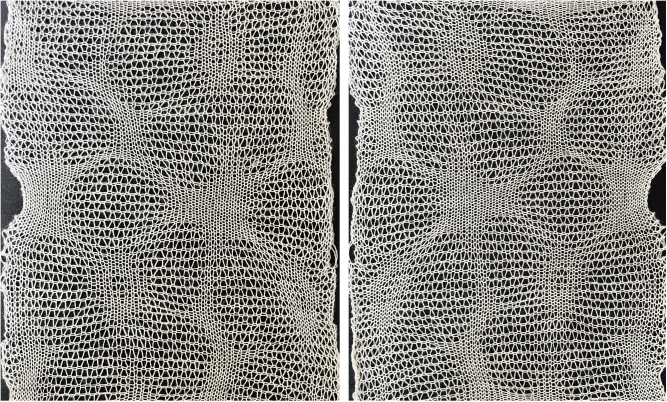 On electronic machines, the repeat can be adapted to yield more knit stitches between the flower forms
Beginning with a 23X31 isolated motif, ![]() the shape is expanded to 30X36,
the shape is expanded to 30X36, ![]() and two potential dispersals with the flower drawn in symmetric repeat in width and height X3
and two potential dispersals with the flower drawn in symmetric repeat in width and height X3 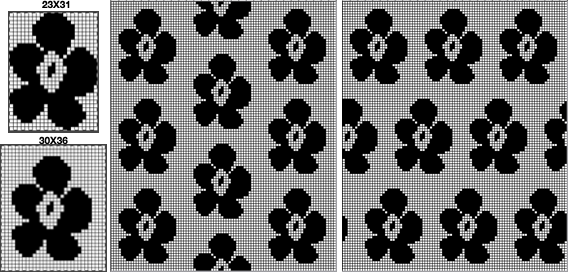 Transfer lace patterns: use patterns that have at least 2 rows knit between repeat segments. The results are likely to be subtle. On electronic machines: cast on as preferred, transfer MB stitches to ribber, where all stitches will be knit on every row. The main bed will be knitting the stitches that will be dropped, the lace carriage will not be used. As the carriage moves across the bed selected “lace” pattern needles will be knit, and the non-selected ones will be skipped. Program the pattern in the usual manner. Set the change knob to KC II to cancel end needle selection, the knit carriage to slip in both directions and continue knitting until all needles are in the B position. At that point disconnect the main bed and ribber carriages, unthread the yarn or have it held for you in the yarn changer. Set the main carriage to knit, move across needles in B, dropping them since no yarn is in use. Bring the disconnected carriage across the knitting again, reconnect to the ribber carriage, and rethread. Set KC to slip again, repeating the process. As an alternative for dropping stitches, leave KC set to slip, and push all needles out to hold. With no yarn in the feeder, any loops will be dropped. Make the 2 passes with KC only as described, reconnect carriages, rethread, and continue until no needles are selected again.
If on an electronic machine with 2 knit carriages available: the number of rows is usually an even number, so an additional knit carriage with no yarn could be positioned on the opposite side to the one selecting pattern, set to do plain knitting, holding no yarn, and it may be used to drop the stitches on “plain knit rows” on lace card without requiring the other additional steps and cam button changes.
Tuck and drop: use color reverse if appropriate (black squares for knit stitches, white for tuck) set up as for other drop stitch fabrics, choose patterns that are broken up by 2 rows of plain knitting between the tuck rows. KC II is used once again. Since in such cards, you one is working with punched holes or black squares, the empty knit carriage alone may be taken across with no yarn, dropping the complete, all knit rows. It is not necessary to change the knit carriage setting from tuck to knit to do so.
Tuck is an alternative option for a free pass as well, realizing that helps avoid errors in patterning by missing resetting the cam buttons between the two functions.
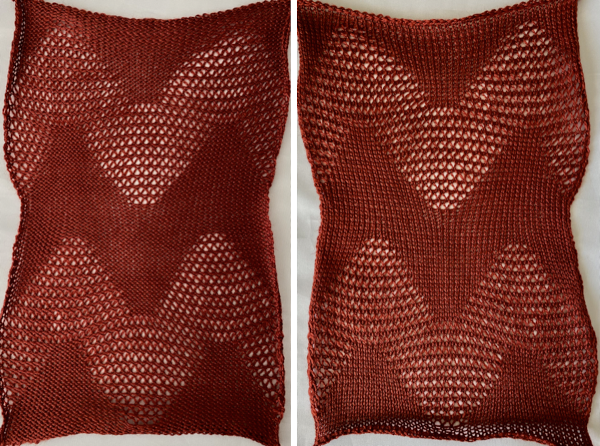
Racking patterns: a few variations are suggested in Brother punchcard volumes. Sometimes translations are what can be described as interesting. One such pattern 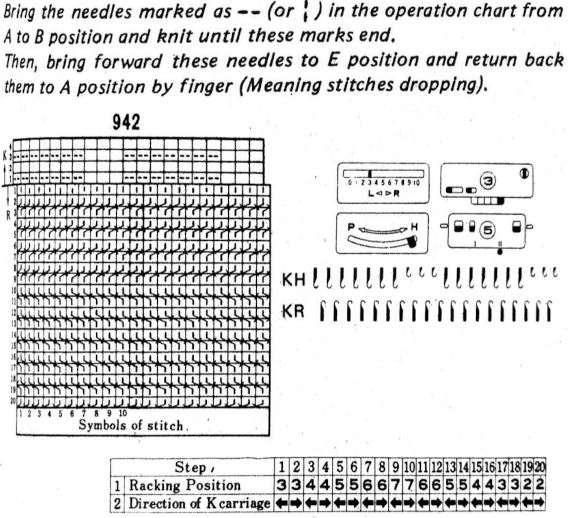 Yarn choice as always can make a good deal of difference, here a wool rayon was used. The zig-zags would be more visible if worked using a larger number of all-knit stitches