I have played with excel (and Numbers) before to create charts for various fabrics requiring color separations. My latest efforts relating to this knit group have gone in a different direction; I have also attempted to simplify the technique in terms of following the instructions for knitting them. This sample began with the use of Intwined to create the document and graphs. The first chart is set up with alternate row color striping, color 1=dark, color 2 = light. Blank-colored squares are used as knit symbols, and horizontal dash for the symbol for purl stitches. Beginning on light-colored, even-numbered rows, the design is marked in purl stitches.  On odd-numbered rows beginning with row 1, mark all empty squares in the even-numbered light-colored row immediately above it with purl symbols.
  All unmarked stitches throughout the design are knit, whether, on the “wrong/right” sides, all dashes are purled, patterning occurs on the second row of each color. To visualize the full pattern one may use the add row below feature to expand the graph (the chart below is missing the very first row).
  Now add the second row of each color and grounding stripe (s) at bottom of the repeat. Most patterns will start the illusion immediately after casting on with dark color, row 1 above. I was interested in my sample having a border of sorts on its top and bottom.
  The resulting knit swatch
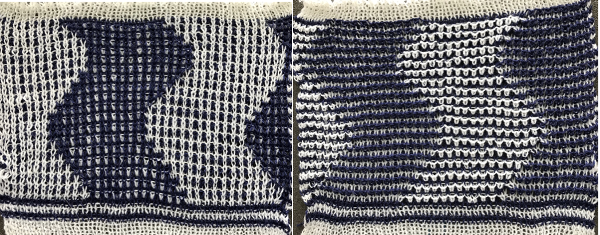
  shadow side
 Intwinded had the capacity for building row by row written instructions for patterns, but there were discrepancies on some rows for these charts, and I opted not to include them.
Note: the program quickly became buggy, unsupported, and unusable on the Mac during the remainder of 2013.
Another program I have just acquired and begun to use is GIMP; it is free, and now also available for use in Mac OS Mountain Lion. Both Gimp and Photoshop make it possible to design using single-pixel pencil and grids to build motifs from scratch as well as gridding of preexisting images. I have a different method for these fabrics using GIMP, which is easier for more complex, overall shapes. The same series of steps may be used for mosaic knitting (the color inversion sequence is different). Below are images generated for a different illusion pattern, I will share my “how-to” for designing the motifs later, referencing mosaics and mazes. To achieve such motifs one is drawing in magnification of multiple hundreds and more, there is no way to number within a one-pixel space, so these charts as generated are lacking numbers for stitches and rows, one drawback. Another is that this color inversion works only in black and white. One advantage: the proper repeat may be cropped and saved with the grid removed in various formats that may be used to import to various machine knitting download programs, and gridded may be used to establish punchcards or mylar repeats. Screengrabs of magnified charts were saved, and are shown below. Black squares represent purl stitches in the second row of each color. The first row of each color is always knit, not represented in these charts
The red squares are guidelines for no color inversion rows, the yellow ones isolate the repeat  the actual repeat
  color inversion begins on row 1 and follows every other row (if numbered these would be odd rows)
  testing the repeat through filter/ map/ tile
  a working chart that can be printed to suit with dark/light row markings and blank squares for tracking knitting rows in the execution of the pattern
  A larger version with stitch and row counts marked. The chart represents half the rows in the actual knit. The cast on row counts as knit row 1, color 1, and following the chart beginning with row 2 knit the black squares and purl the white squares. *Change color, knit one row (odd#), on the next row follow the chart, knitting the black squares and purling the white (even#).** Repeat from * to **.
 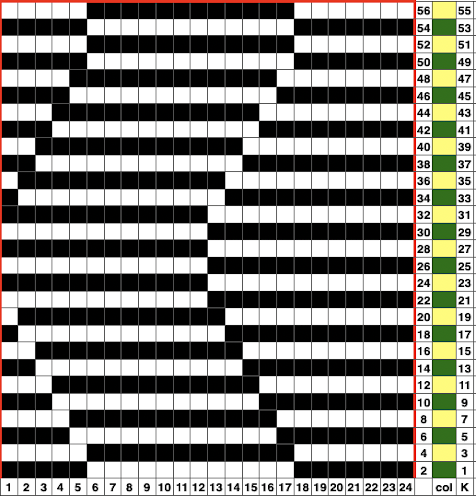 the knit swatch: “shadow side”
  its reverse side
  for online tutorials, patterns, and inspiration see Woolly Thoughts
Feb 18, 2017, I have recently become curious about creating illusions such as these in crochet, am developing ideas, and returned to this chart. The image below is intended to have symbols and notes superimposed on it. It shows the tiling in a different way, so I thought I would add it to this post as well. Repeats are highlighted with darker borders. The repeat on the right needs to be trimmed if the goal is to achieve matching edges. Row counts on the right would differ in knitting, the plan is to execute this pattern in Tunisian crochet, which handles rows in a very different manner than knitting or standard crochet. 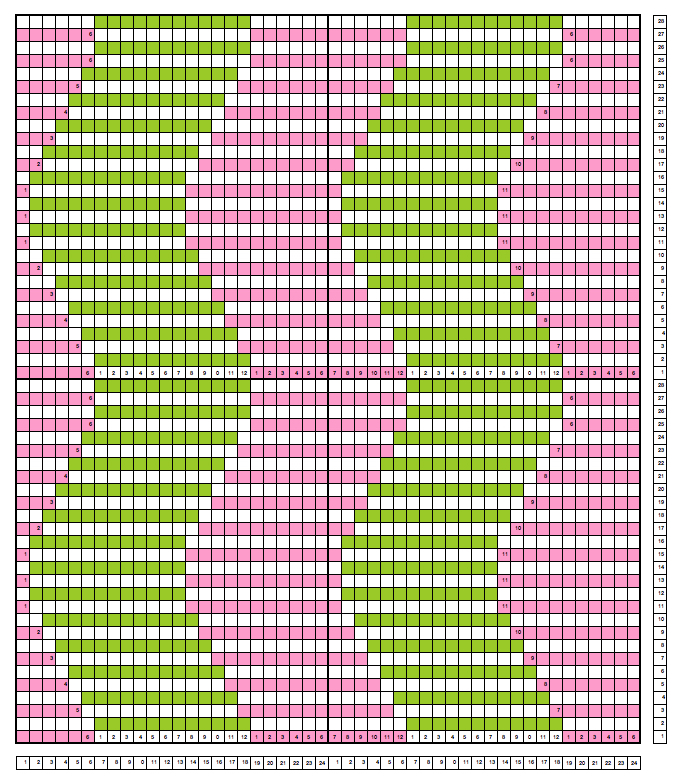 Follow up: 2017/03/06/illusion-DIY-patterns-in-crochet/
2/2019 from the first in a series of posts on geometric shapes on ribber fabrics using tuck settings, a mock variation with the ribber set for knitting in both directions throughout, and the main bed set to tuck in both directions: 
Multiple downloadable pngs for optical illusion designs may be found in the 2023 post on Developing tiled repeats suitable for multiple stitch types, including tuck
https://alessandrina.com/2017/03/06/illusion-diy-patterns-in-crochet/ may help you get started
I want to do this on tunisian crochet!