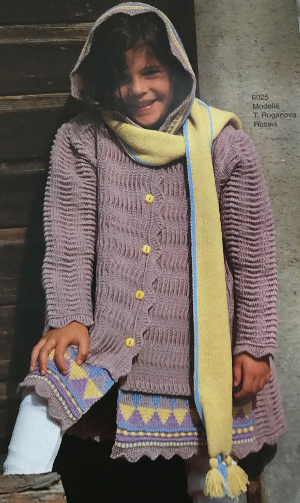
A Facebook member recently shared this photo, followed by a “wish I could make it” comment, it is from the Passap #60 pattern book. 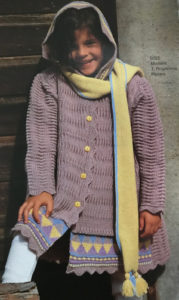 I began a spreadsheet on my blog intending to update it over time that may be useful when traveling between Brother and Passap
The style in the photo is that of a generously sized dropped shoulder sweater. I will not share pattern instructions but will try to interpret some of the possibilities for knitting it as written or for achieving similar textures on the Brother machines To start with, you will note the recommended test swatch size is 100 stitches by 100 rows. When gauge matters as in dbj or heavily textured knits, this is a necessity. In turn, math calculations also become easier in metric. If using the knitleader I have sometimes reduced the swatch size to 80 stitches by 80 rows. Even for scarves where calculations may matter less when transitioning from smaller gauge swatches to larger stitch counts there can be surprises. What knits on 60 stitches may refuse to do so on larger stitch counts, requiring tension and gauge adjustments. Although Passap promoted that it knits easily with no weights, I always cast on with ribber cast on comb, and then, if needed, the addition of weights may be easily made.
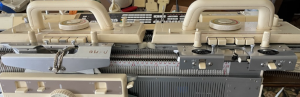
Strippers, which push down on the knit from the lock as it moves from side to side, have no equivalent in Brother, where weight is an absolute necessity when working ribbed fabrics. Stripper handles come in varied colors: orange is for double bed work, black is for single bed work, blue is for very heavy fabrics. A suggested rule of thumb is that if you are knitting on both back and front bed in a stitch pattern where several needles in work are opposite needles out of work use black strippers ( 3×3 rib or cables and Aran work would be examples). Sometimes spacing between the 2 beds will make black strippers harder to use, other times 2 different types may be used concurrently for best results.
As the size of the piece changes ie. in shaped sleeves, any weight must be adjusted proportionately to keep the gauge constant in order to avoid sizing surprises.
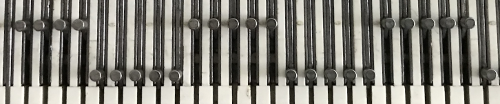
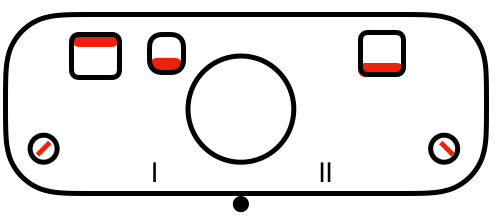
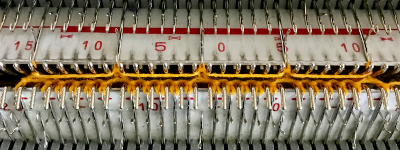
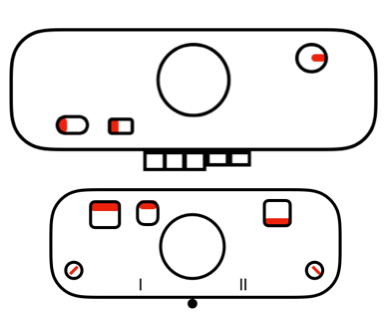
The Passap is a true double bed. The image on the left is of the Passap locks and on the right, of a stripper. The position of the beds is reversed to the Japanese, the knit bed is in front, the “ribber” in back. 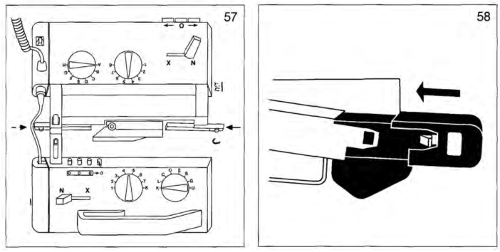 The locks (carriages) pr select pushers, they, in turn, select needles akin to Brother pre-selection. That is the reason why the Passap needle set up diagrams include more information bits than those for Japanese machines.
 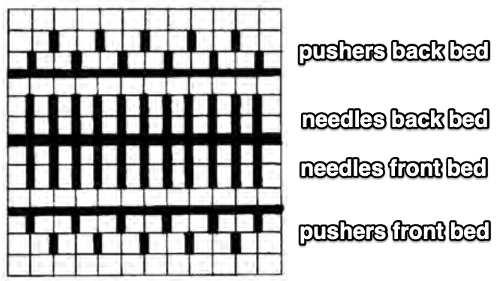 Additional details for any of the above are only provided in publications if they are necessary to create the particular stitch type. That said, one is free to add a knitting bed or alter lock settings simply based on the goal for the piece and an understanding of what black and white squares “do” in a pattern download. Looking at the Passap back lock, one can see the larger variety of the equivalent of cam button settings in Brother. The Passap buttons also referred to as arrow keys at its very rear make altering and automating patterns on the back bed easier and possible in a far wider assortment on any number of needles. The Brother lili setting, the equivalent of the #1 punchcard, must have an even number of needles in use on the ribber.
The arrow keys on the back lock reverse the Passap position of the pushers. Pushers that are down are brought up, pushers that are up are brought down. Arrows reverse when knitting in the direction of the arrow (think Brother preselection row), but cause needles to perform that function that same row. The O button releases any arrows, therefore pushers remain in the same position. N will knit disregarding arrow selection on the back bed. One arrow key reverses the pattern every 2 rows, 2 arrow keys do so every row.
Slip setting with pushers on Passap E6000 back lock is also BX, on the front lock it is LX. That differs from diagrams in the model and pattern books and magazines, which generally refer to Duomatic (Passap punchcard) settings. The assumption in the directions for the E6 is that the built-in techniques will provide you with LED prompts for any of the lock settings matching them to the right of schematics for the DUO, rather than that you would attempt to knit the pattern in some other way or on a different KM brand.
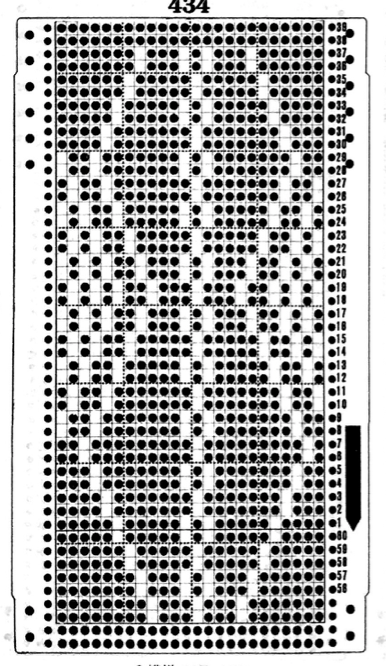
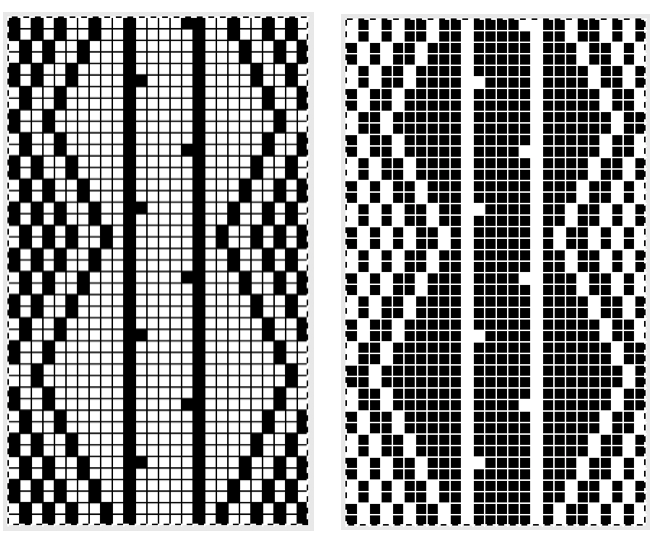
Scrolling down the pattern: Pintuck Pattern A: Deco card 77, E 6000 # 1130, technique 251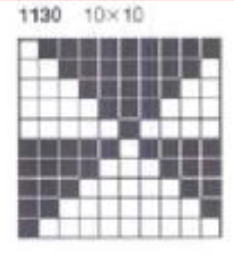
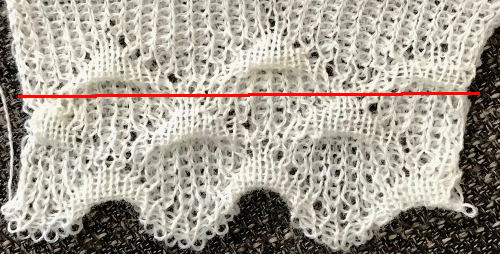
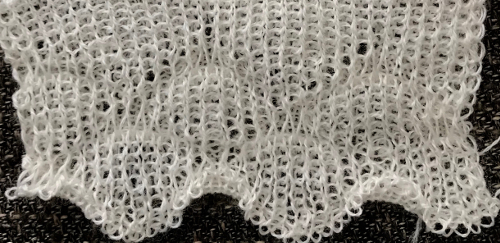
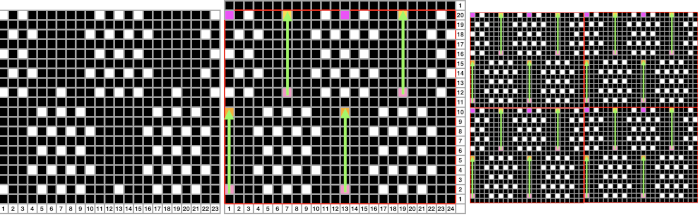
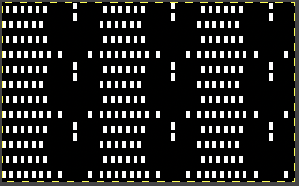
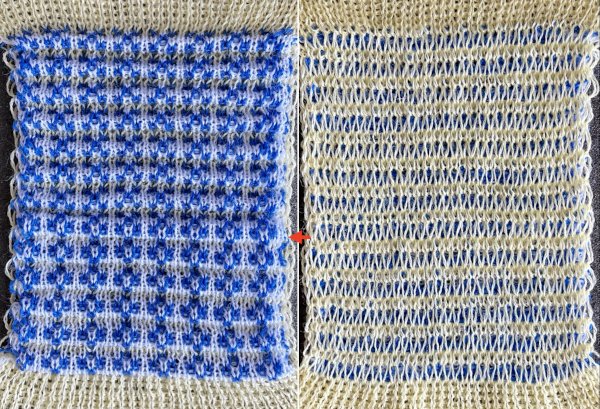
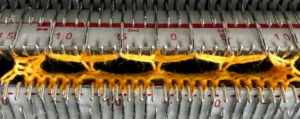
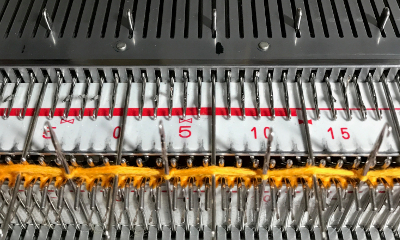
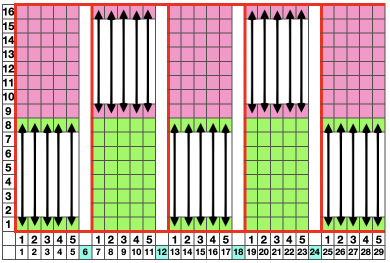
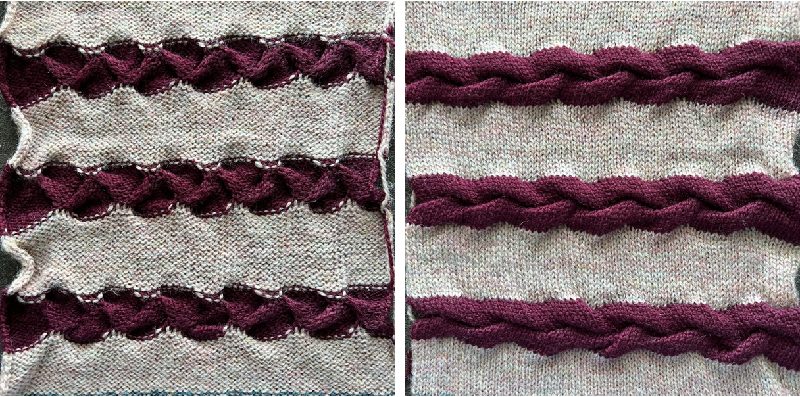
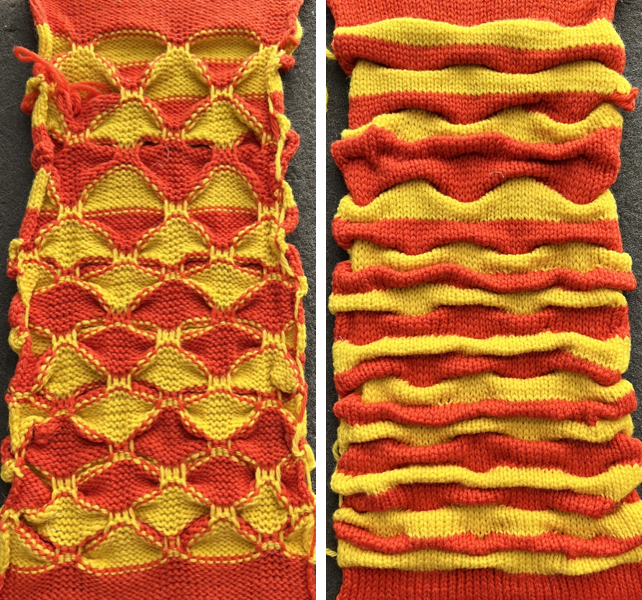
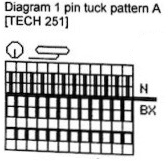 No pushers are illustrated. Back bed (N) knits every row. The front bed is set to slip in both directions (BX on Duo, LX on E6), pushers will be selected in the pattern by the console. When using Tech 251 two rows are knitting on the front bed forming pintucks where there are black squares in the stitch pattern. Brother probably would reach its limit with the original 1130, might be able to handle a thin yarn in a repeat slightly wider and taller. The Passap repeat becomes twice the length but is unaltered in its width. My swatch has an extra repeat before switching to normal knit, the red line highlights where the trim would have ended. The blistered pockets will appear as knit textured shapes on the purl side. The knit side will show a pattern of elongated stitches created when those needles are slipped. The red line in the photo shows the approximate ending for the repeat used in the trim in the magazine, I was on a roll and kept on knitting.
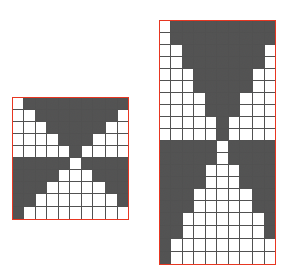
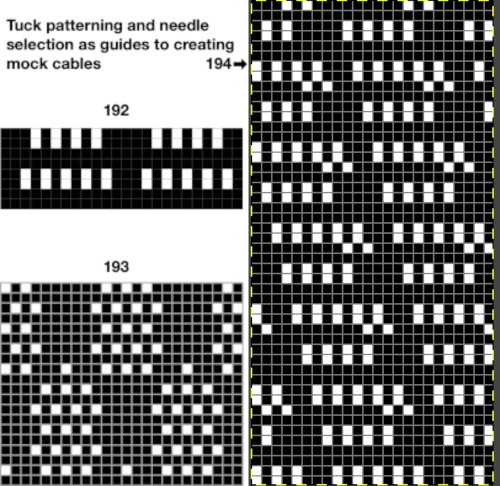
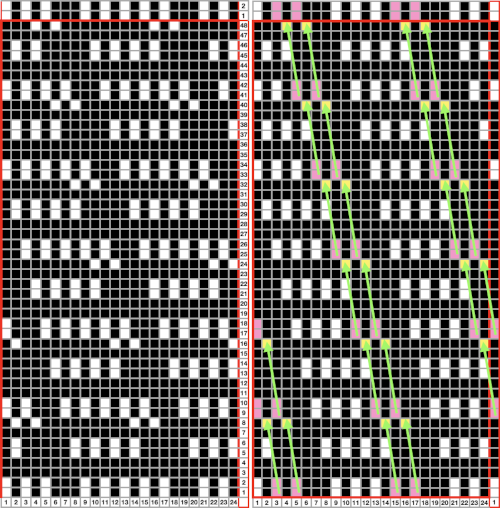
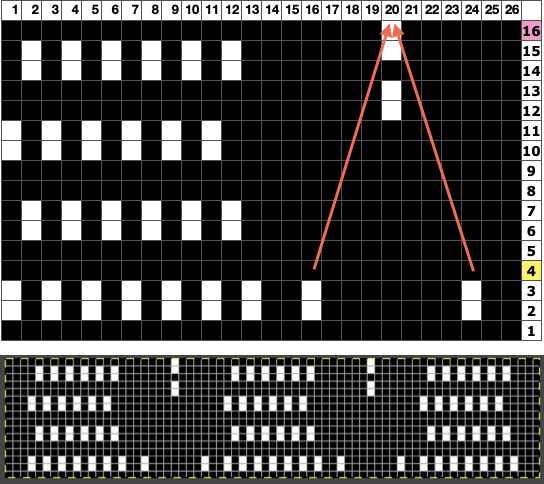
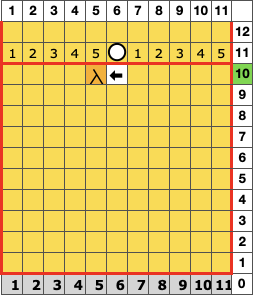
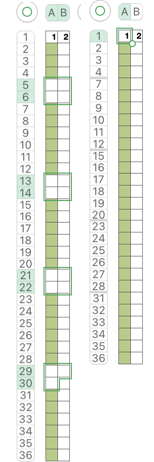
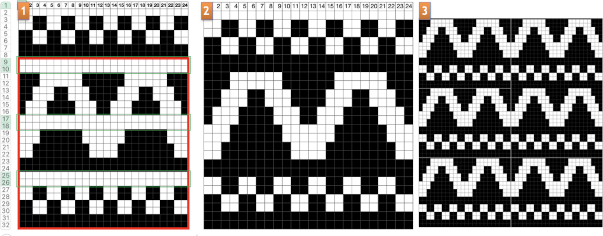
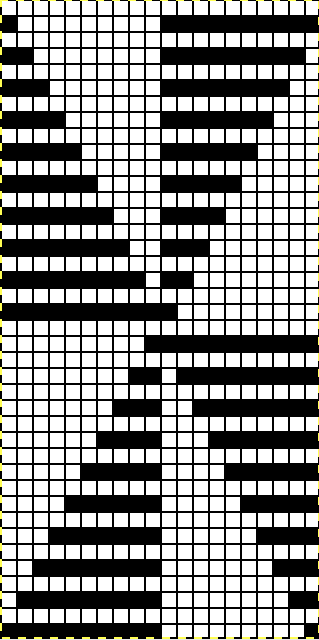
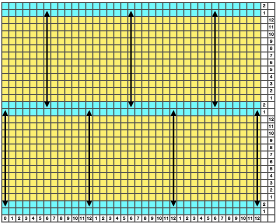
Pintuck pattern B: Deco repeat is 20 stitches wide (Duo cards are 40 stitches wide) The directions at the time the model books were written for knitting with the console were designed to have the knitter work with built-in patterns and then to use the alter possibilities to manipulate them to achieve the same result as the punched holes might in the final repeat in the Duo. The Passap console had a card reader that operated with sheets that were in turn inserted into a sleeve and were drawn on with “special” pens. C6, proprietary early software that operated with a dongle, came a bit later. There was a large factory built-in pattern library, and the manufacturer, Madag, supplied free files for the Duo pattern books in formats that could be used with the program for “easy” download. The 910 had variation buttons and instructions for combining multiple patterns using the factory-supplied mylar sheets. The intent was to allow the knitter to maximize the use of both. I honestly have avoided altering patterns that way intentionally most of my knitting career, finding I simply prefer programming black and white squares for the function intended, which for me is easier to visualize and reduces errors. The trend explains the E6000 instructions in the magazine, but in fact, the 20 stitch repeat as drawn can be downloaded and entered as-is, bypassing the alter loop manipulations. Technique 253: a pintuck is formed where there are white squares. For each row of squares, one row is knitted on the front bed. Pushers will knit for one row, rest for 1 row. 1124 is the console built-in pattern used in my test swatch and below it, its mirrored image
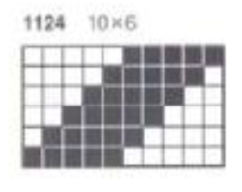
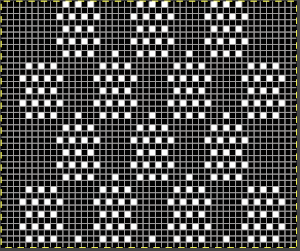
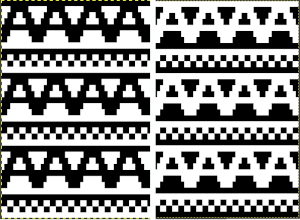
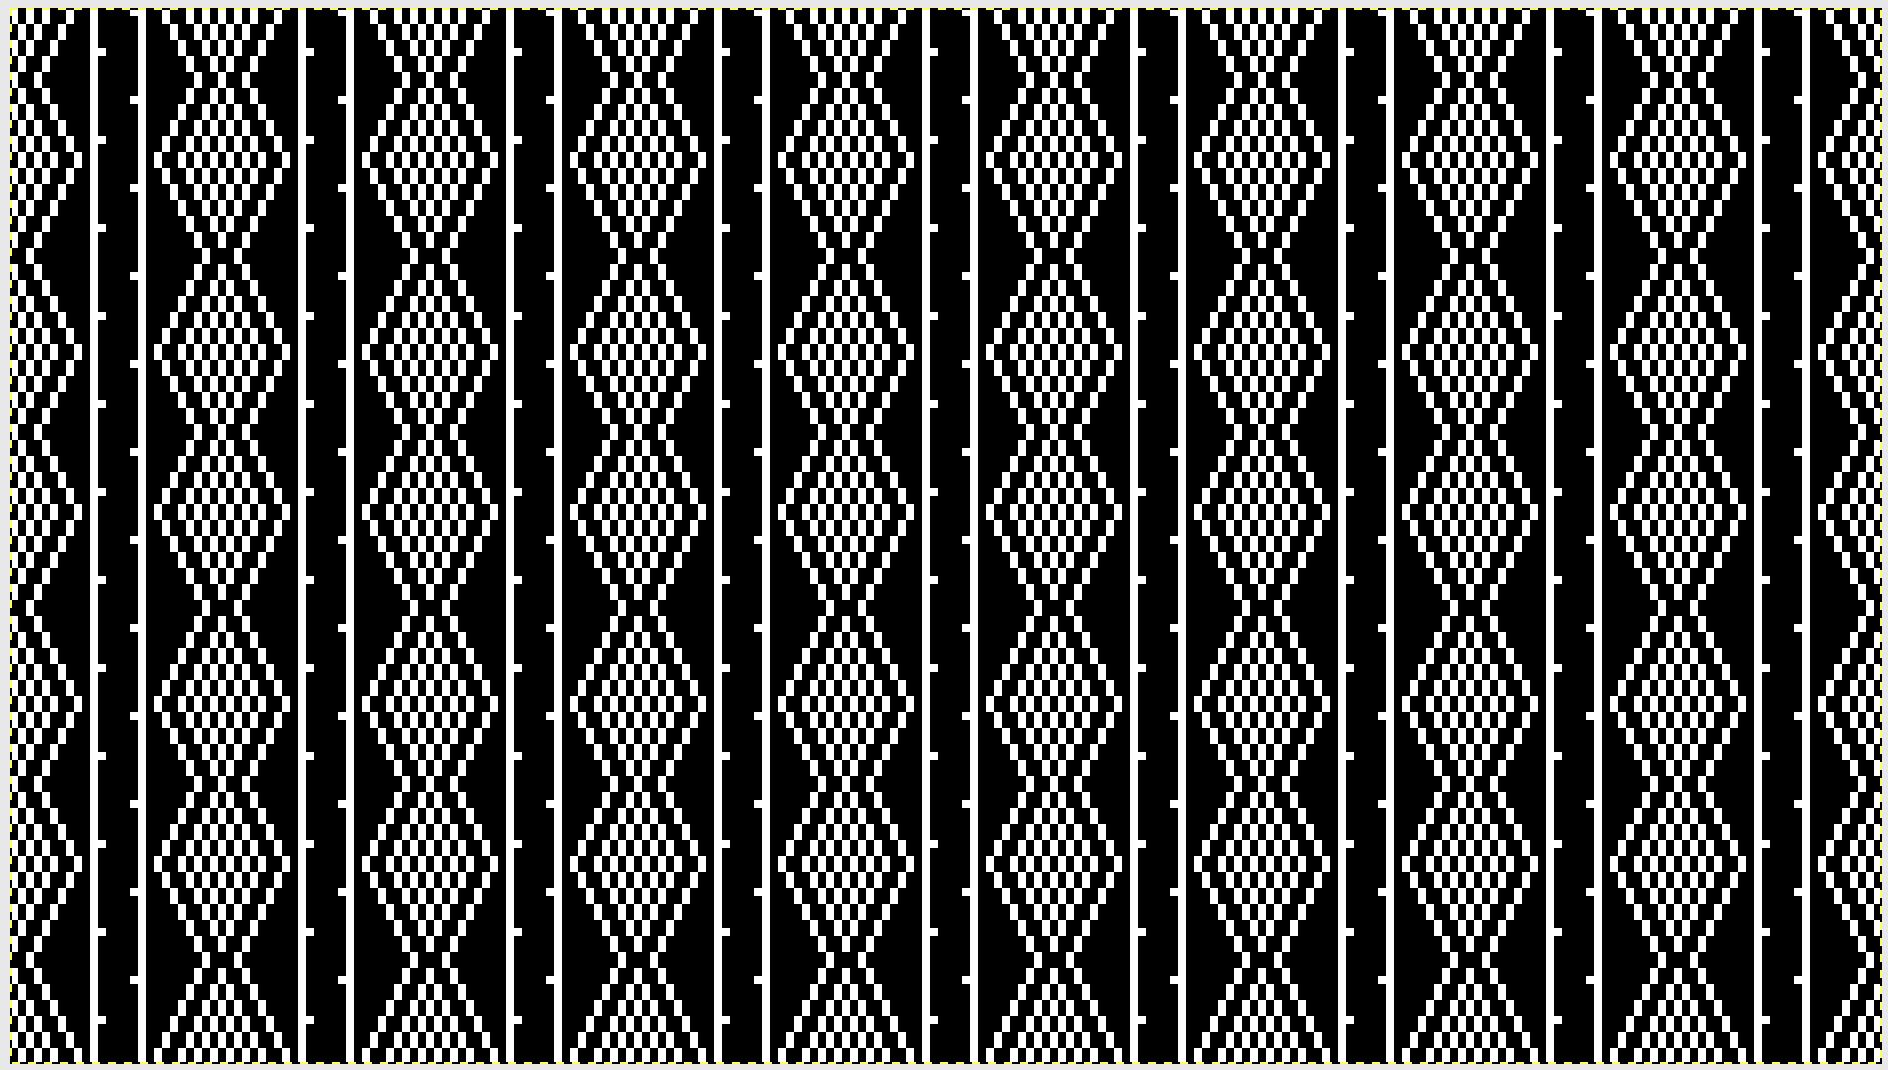
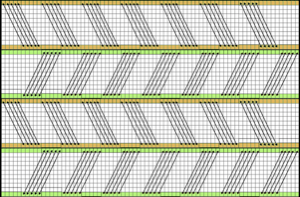
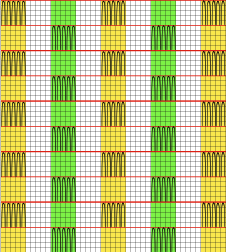
 tiled repeat to get a sense of the movement of the triangles:
 note: the direction of the chart pattern repeat for 1124 is reversed in the blisters. It appears as drawn on the knit side of the fabric, where stitches are slipped and elongated to create the pintuck texture on the purl side
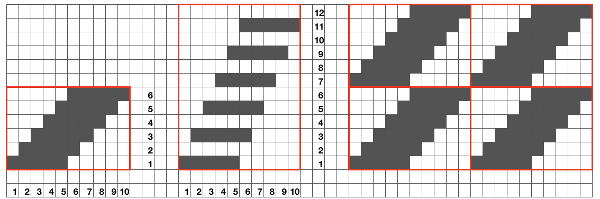

 In the Duo HX setting the front bed normally knits or slips according to the design for one row, and slips the next row. Again, the chart illustration is for the Duomatic and the lock there takes over the function performed automatically by the E6 technique. The back bed in this instance knits every row. In the E 6000 the front lock is set to LX (slip <– –>). The fabric created may be referred to as blister or pintuck (nothing to do with tuck stitch/brioche). The bubbly texture appears on the purl side. Stitches that slip on the bed with needle or pusher selection elongate, pulling extra rows together eventually, helping to form pockets that are sealed periodically by all knit rows. With pushers down, no needles selected the front (knit) bed skips/ slips associated needles. With the back bed (ribber) set to N, its stitches will knit every row.
Pusher selection is down when the front bed slips (akin to no needle preselection on Brother) This selection happens between each pattern row, as the design is advanced
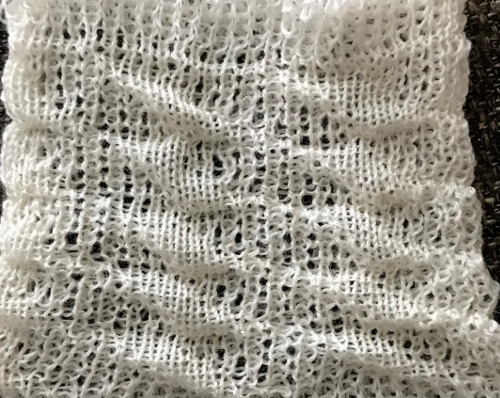
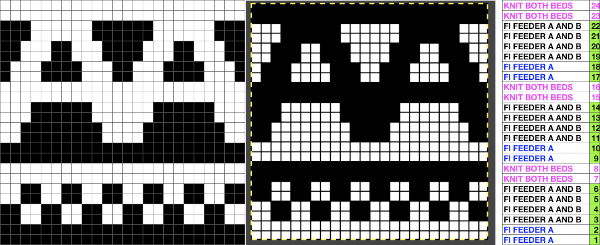
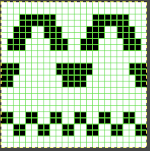
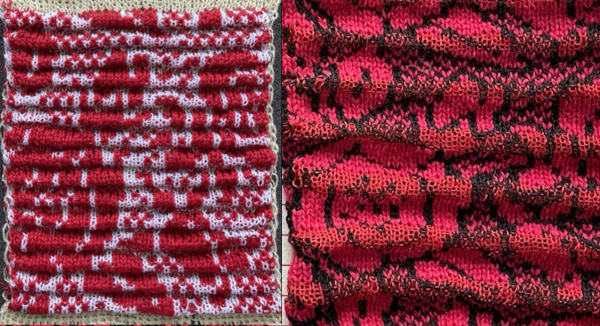
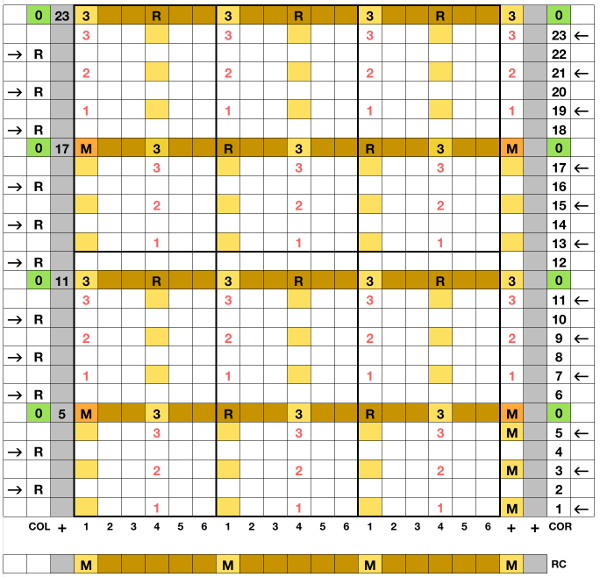
 This shows the pattern as knit on the Passap, reduced to black and white squares
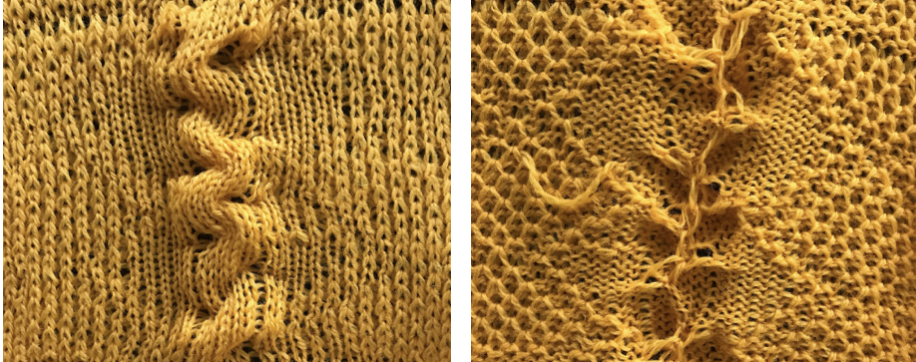
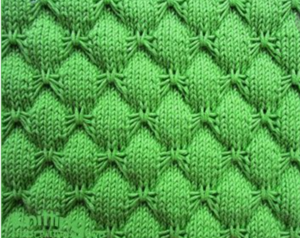
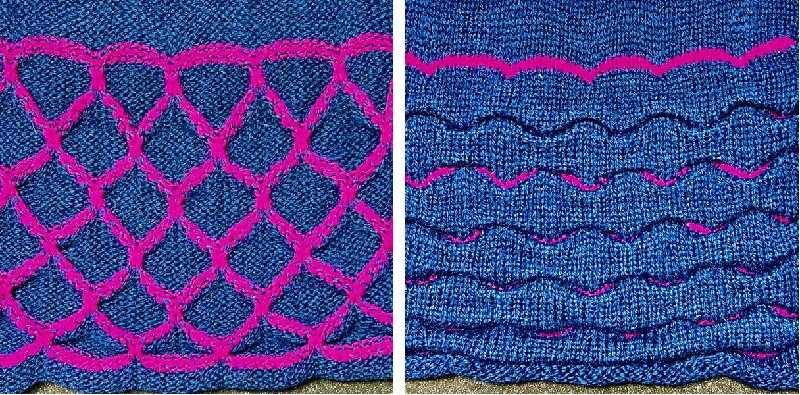
 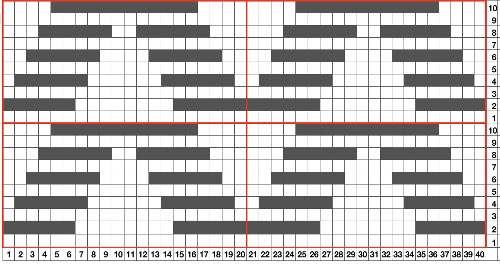 Taking a closer look at the pintucks on the sweater body
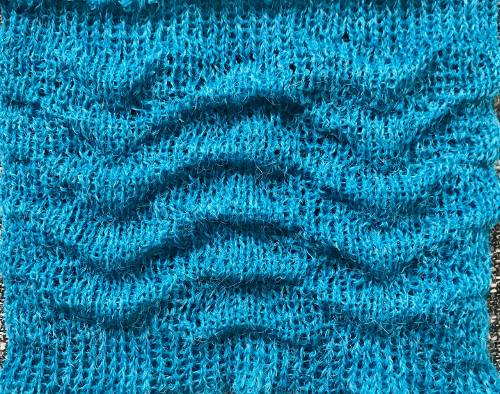
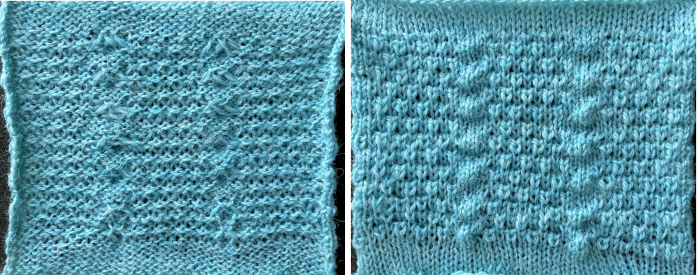
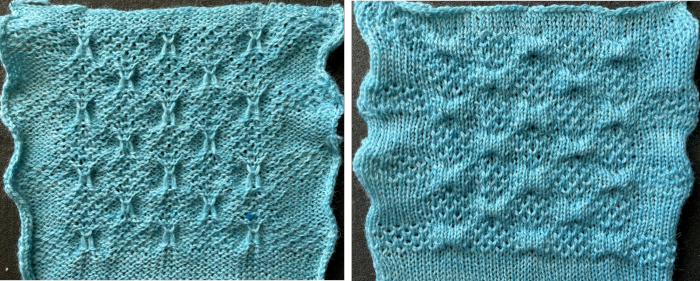
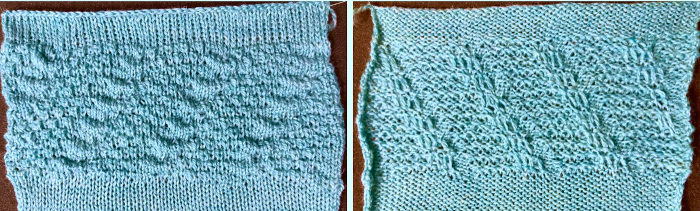
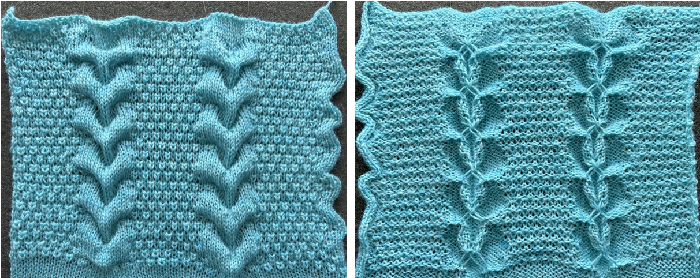
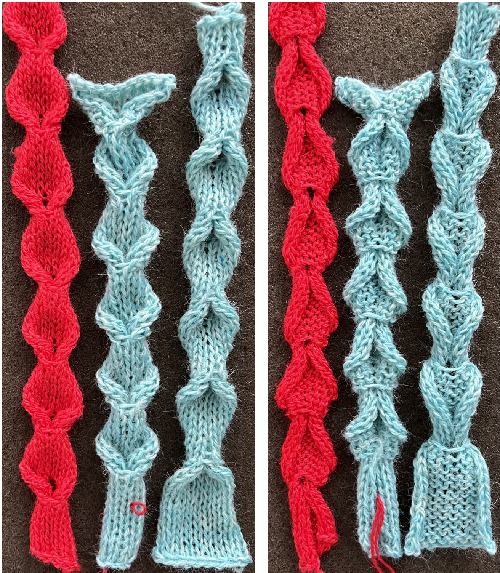
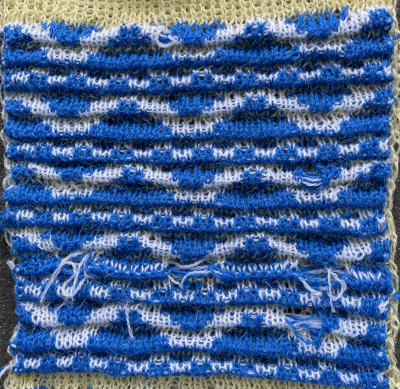
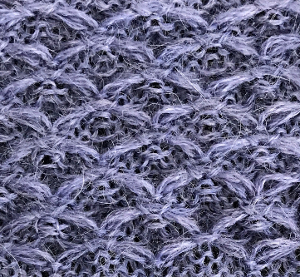
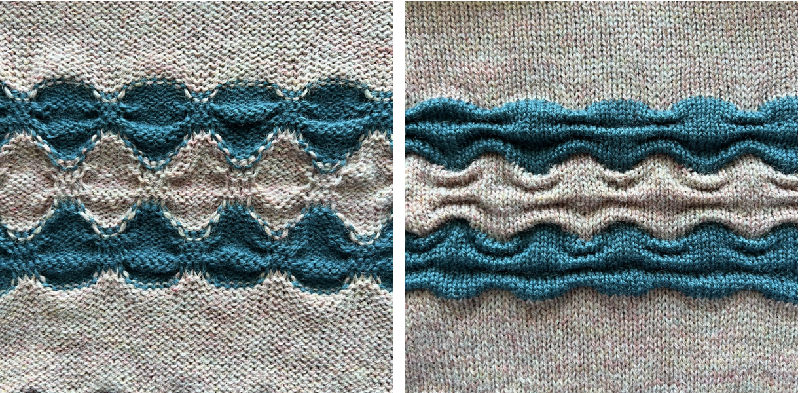
  Going for the safe repeat on Brother machine: color makes a significant difference in how visible the pattern will be. Both yarns are supposedly the same weight, the white was hard to knit, and there was a needle that dropped stitches regularly. The blue yarn knit with no problem
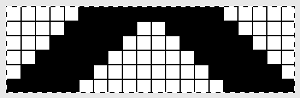
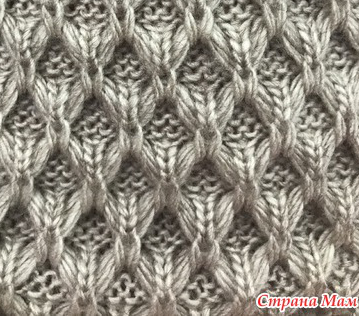
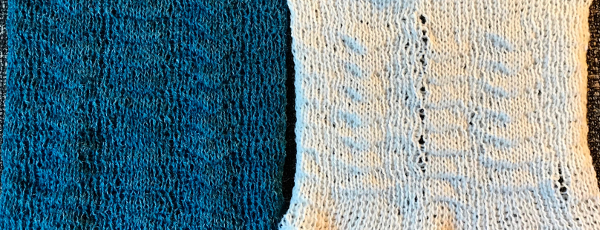 here the repeat is rendered twice as long, and the texture becomes more visible
  a sideways view:
 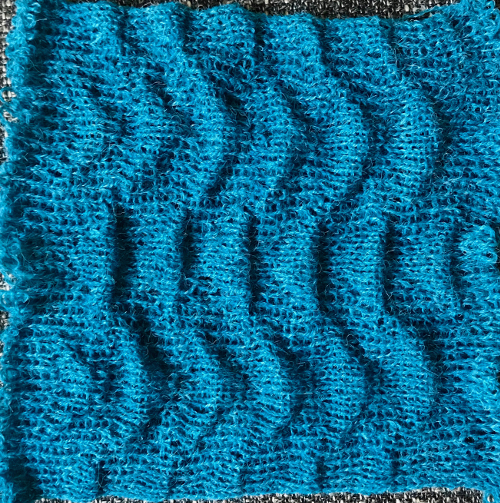 The last swatch in the series: I am now able to use Ayab once more, img2track is having issues for me with its use on the 930. My repeat, therefore, is planned for the maximum width I may wish to test knit on the 910 machines, emulating tech 253. Every other row there is no needle selection on the main bed except for the first and last needle if KCI is used. On those rows the ribber only knits, there are more rows in the blister “pockets”. I knit the sample quickly, not checking every row, and in this instance had two dropped stitches on the main bed and no breaks. Yarns with memory ie wool are the best for texture retention, acrylics such as my blue yarn would flatten permanently if pressed, resulting in a very different fabric. It takes experimentation to sort out whether the extra step is worth the effort or is problematic during lengthier knitting
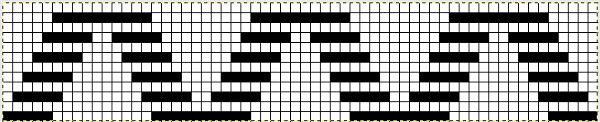
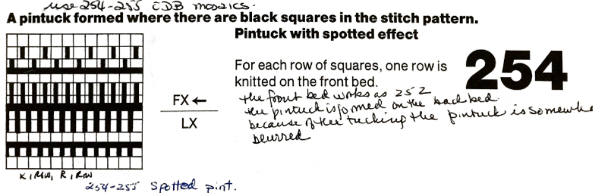
In summary: Passap E6000 knitting techniques 250-255 are used to produce pintucks. When using 250, 252, 254, the pintucks are formed on the back bed on the needles that are opposite those with the pushers selected down in accordance with programmed black squares. The corresponding odd numbers 251, 253, 255, select pushers down according to programmed white squares (253 in the manual should say white, not black squares). Since the pintuck is formed on the back bed, setting it on FX (Tuck) may also be used, the pintucks then become blurred, producing a fabric that is wider. The width of the resulting knit may be significant when producing garment panels. One option in cross-brand might be to use every other needle selection on ribber, with its carriage to tuck in one direction, knit in the other, resulting in a spotted pintuck. My Passap manual is filled with scribbles, often including notes on alternate fabrics produced with the same technique numbers.
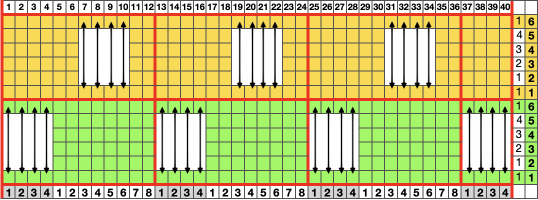
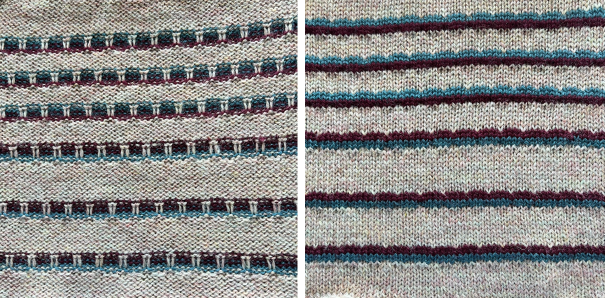
Returning to the specific sweater pattern: below the back bed is set to GX in the first 2 instances, which is akin to setting the Brother ribber to slip in both directions, no stitches are knit. There are no pushers or needles illustrated on the back bed, so the implication but not necessarily the fact is that these are single bed fabrics. How to transition between them and the double bed would need to be considered (see notes at end of the post). The pattern is an elongated one, using slip stitch and color changes every 2 rows, carrying one color at a time. Again, on the E6 front lock Duo BX is LX, the arrow key function on the front bed is replaced by the technique console instructions. The E6 front lock has no buttons or arrows.
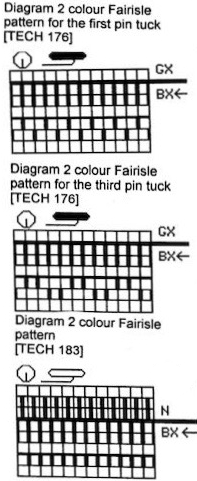 Tech 176: knits one color selection for 2 rows, then the alternate color selection for 2 rows; Pattern 1100,
  the Brother equivalent
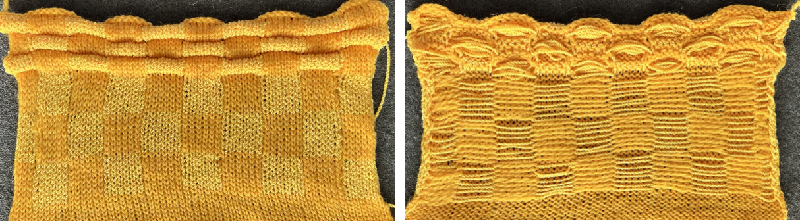
  in the next sample the same repeat 1100 is programmed via the console and enlarged <–> X2, which means in the number of stitches only
 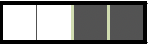 this is what will be knit, translatable to Brother, also with color change every 2 rows
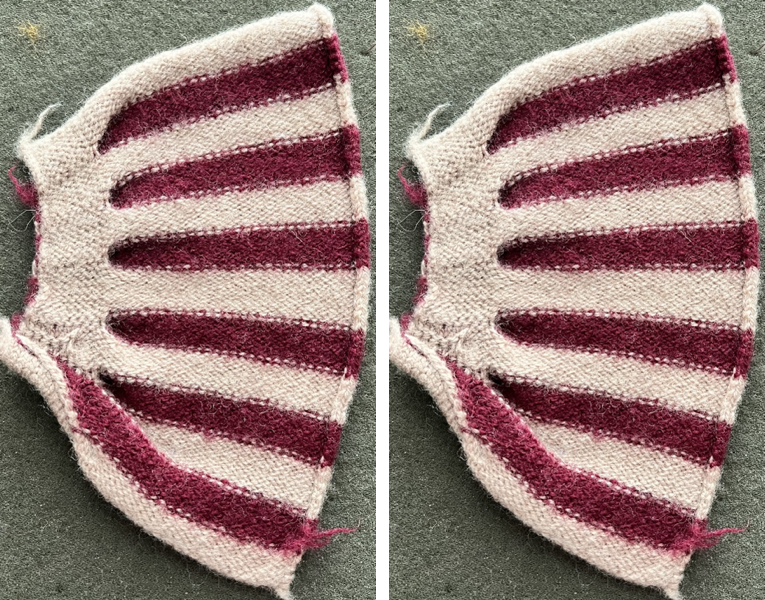
Tech 183: long stitch backing, back bed knits every stitch, every row. Brother would require the separation to be made for the elongated triangle to match the Passap knit where each design row color knits twice in succession. Ribber or back bed settings could be altered to suit if preferred.
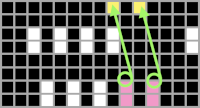
The shawl is what some may call a scarf  The above is the first illustration showing pushers on the back bed in alternate positions of rest (down) and work (up, toward the front of the machine) in groups. The pushers here at the end on either bed create the colored border on each side. The selection is opposite to the one on the end needles on the front bed. When the latter pushers are up, the back bed are down (slipping/not knitting), when they are down (not knitting the color in the yarn feeder), the back bed are up. This is an instance where to achieve the same, hand selection would need to happen on the Brother ribber on every row, or 2 sets of paired carriages, each carrying a color, could be used. Tech 181: is used for double bed fair isle with background color only on the backside. To seal the edges usually the first and last pusher on the back bed is brought into work, here 2 are used, creating a 2 stitch contrasting color border. Color is changed every 2 rows. To me this is an instance of because it is published, you may still not want to knit it. This is the first-row initial needle and pusher position on the front bed
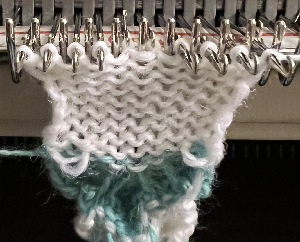
 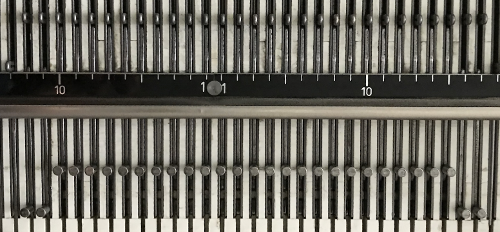 It is altered every other row (same is true on the back bed with the arrow key in use). My blue yarn is the body color, the white the border one. I only knit a very few rows, but that is enough to observe what is happening: the blue knits everywhere but on the stitches intended for the contrasting border
  when the border stitches knit only on each side, floats are formed the width of the needle bed between border stitches for two rows
 they are then enclosed by the next row of blue every needle riband there is considerable bleed-through of the white on both the knit and the purl side of the fabric

Tech 183: produces a double bed fair isle with striper backing. It essentially knits the elongated pattern 1130.
One then comes to actual knitting and putting the pieces together. Instructions are not always clear. There are several transitions in this piece. The trim at the bottom of the front, sleeves, and back is a double bed every needle rib that transitions easily from one textured pattern into the next. Its purl sides face the outside. The same is true for the back and sleeves, both are both knit from the trim on up. The front top portions are knit sideways as are the button bands, and they are in turn joined to the mixed stitch type “front border”. The “front border” is puzzling. Since the geometric pattern shows on the “knit” side, the trim by default then would have the slip stitch front bed pattern showing on the outside in order for it to transition directly to DBJ, not the pintuck. Looking closely at the photo there is a clue that that is indeed the plan in that the edge closest to the cast one has the triangles at the start facing in the opposite direction of that in the test swatch purl vs knit side.
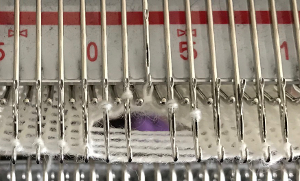
I also see extra colored hems in addition to patterned “FI” ones. The back bed can be set to slip (GX), the patterned section knit on the front bed, then the back bed returned to knit to seal the hem. This is not indicated in the schematics or the written directions. The same can be done with added solid color changes (purple and blue in the photo), knitting several rows on the front bed, then sealing it with a return to N on the back bed. That same row can also be planned as a selection row for DBJ. I am still knitting my swatches in 2/24 acrylic, which is also not always the best to use. If I were to knit the piece, the cast on would get some work on it, as well as the tension adjustments for each fabric segment.
Pattern 1130 is also used in the same issue # 60 in the body of a man’s sweater. In using Tech 250 pintucks are formed where there are black squares in the stitch pattern, for each row of squares 2 rows are knit on the front bed, elongating the pattern X 2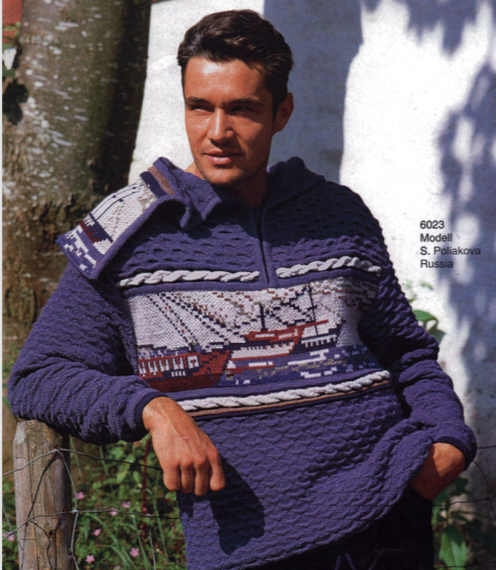
The Passap magazines generally also included a strip of heavier stock paper with samples of the yarn recommended for the particular pattern ie this one from another issue, which facilitated substitutions and provided a better sense of color than the garment photos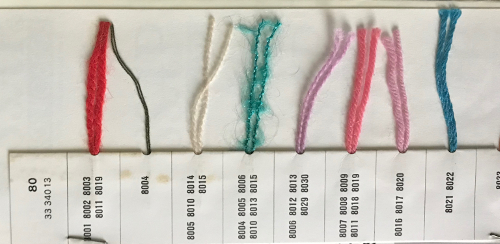 Brother ribber and DBJ settings reviewed including for solid color backing.
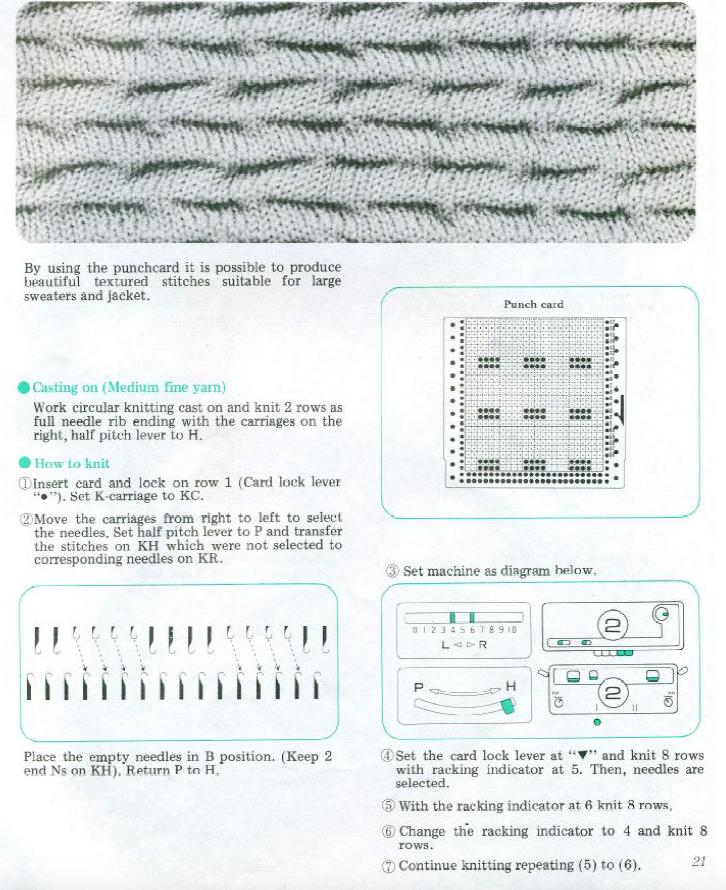
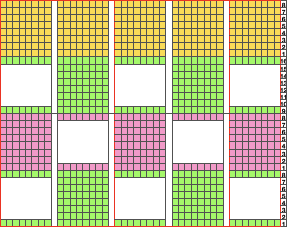
Because of the Passap capacity for heavily textured stitches, many of their early pubs included several patterns for use with tuck or slip stitch settings. This issue is dated 1990, may be found with accompanying pattern instructions in French online, 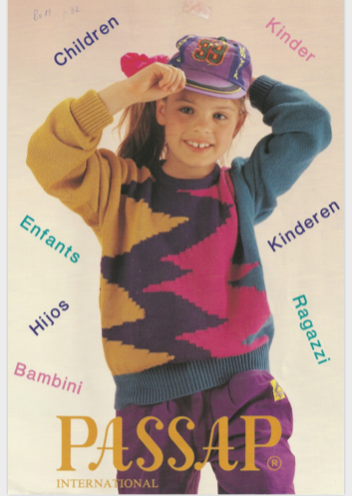 the sweater on the right uses a pintuck pattern with appliqued pockets in a different knit structure
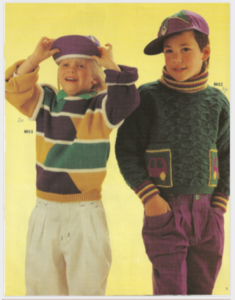
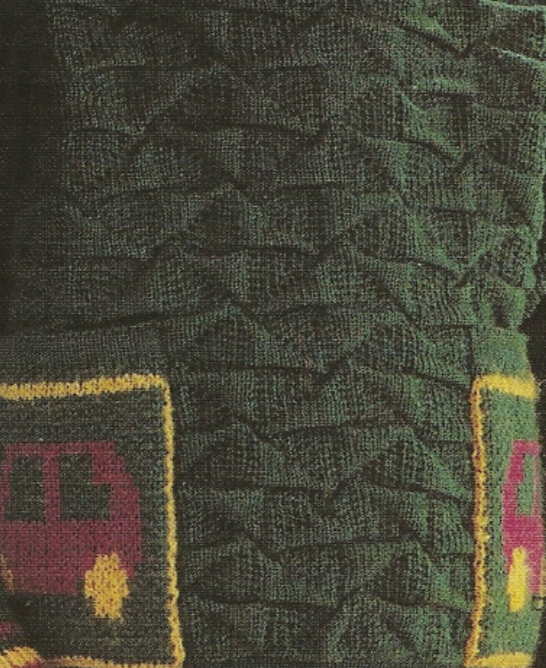 the repeat is 20 by 20 stitches wide, E6 Tech 253 is suggested, white squares form the pintucks, the same technique used in my sample knit using console design 1124
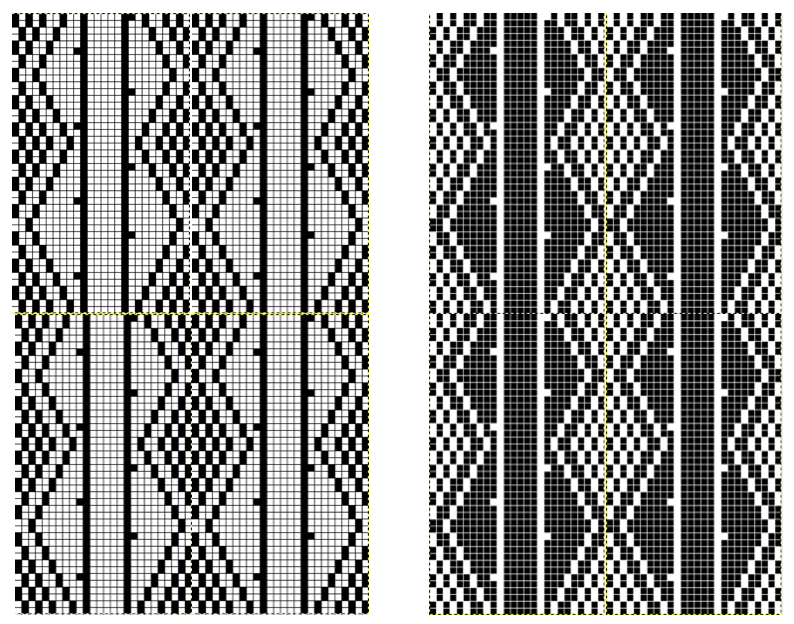
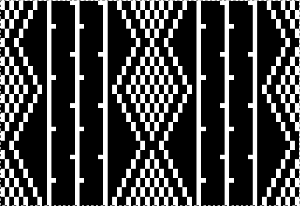
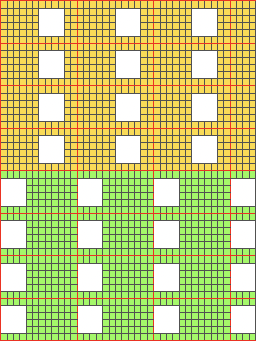
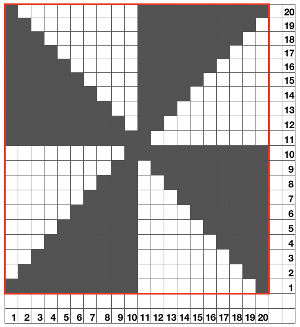 Working with simple shapes such as triangles can be an easy way to help one begin to understand how various techniques build up stitch or row counts, altering the original. Several of my DBJ posts are written using a cousin of pattern 1130 and include images of corresponding swatches executed on the Brother machine. In Brother, with rare exceptions (such as when needles are left out of work while in pattern) black squares (punched holes) knit, white squares (unpunched areas) slip. Slipped stitches are held until a black square or punched hole is reached, getting longer while the stitches on the opposite bed knit every stitch every row with that bed set to N/N. It is helpful to be using a yarn that does not break easily. Pockets are created of varying depths. As with any knitting, the color reverse option may produce an interesting variation or a “disaster” depending on the original motif. In the above chart, if knit as is, white squares would be slipped for 1-9 rows. Blisters of knit stitches will appear on the purl side. Tiling helps visualize the movement of the design in repeat.
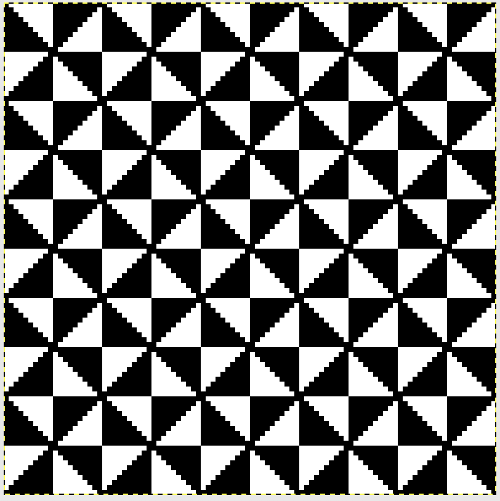
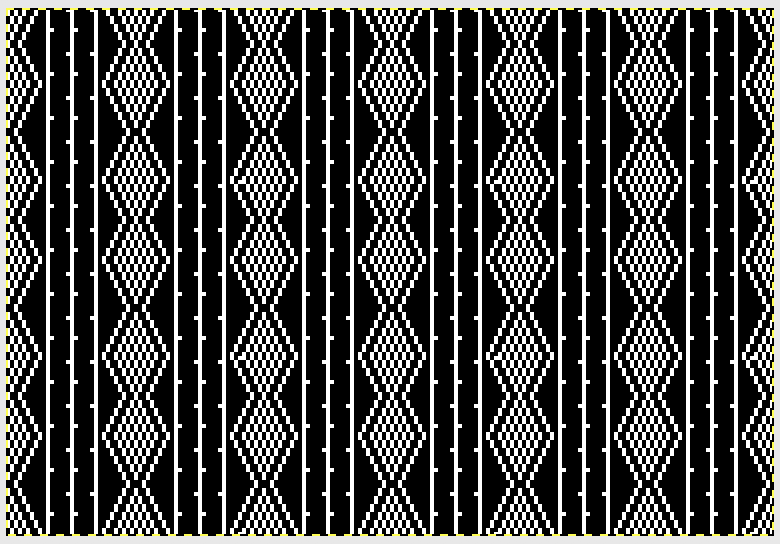
In the color reversed image the number of consecutive white squares is now increased along the center lines from 9 to 11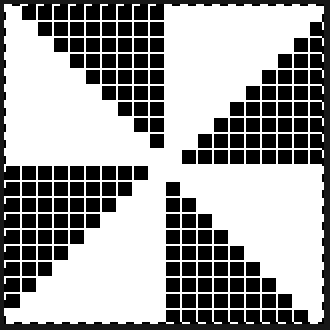 its tiled view
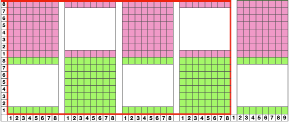
 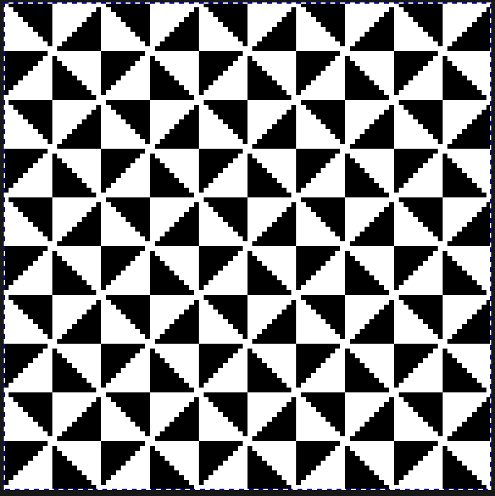 the expanded view of the original repeat emulating tech 253 now increases the height of the pattern to 40 rows from 20
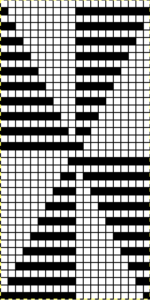 and its color reversed equivalent
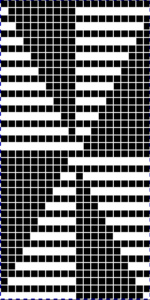
In both expanded repeat variations of the “pinwheel” black squares create knit stitches. In double bed knitting, this seals the layers created by each bed together. The original design would create large pockets/ blisters, while in its color reverse version white areas would slip for one row, keeping the pinwheel effect, but the fabric will be predominantly sealed together. Thin yarn use is best, I used a 2/13 wool.
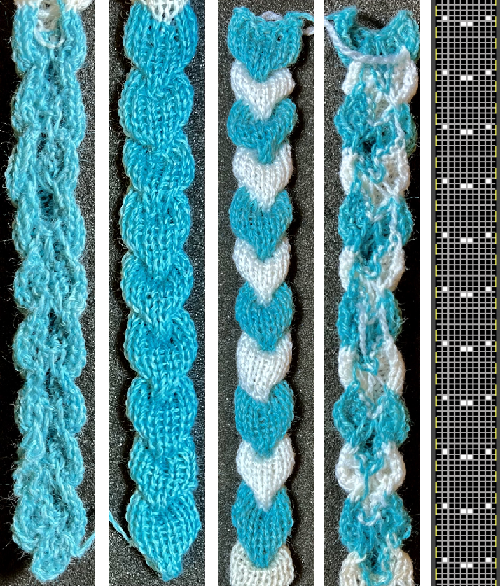
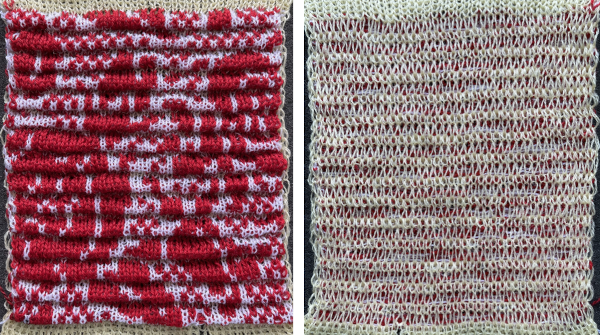
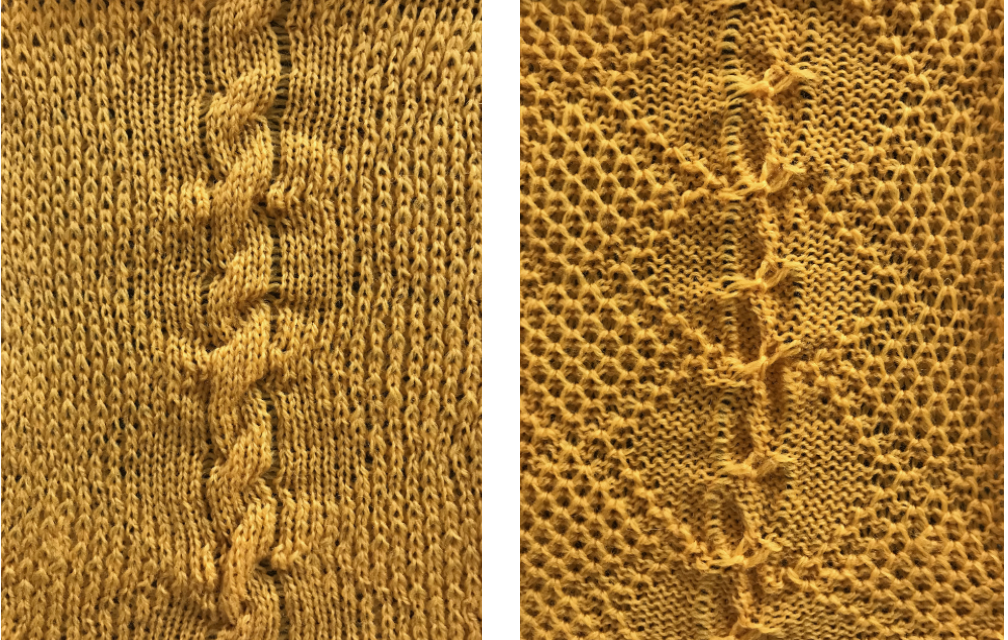
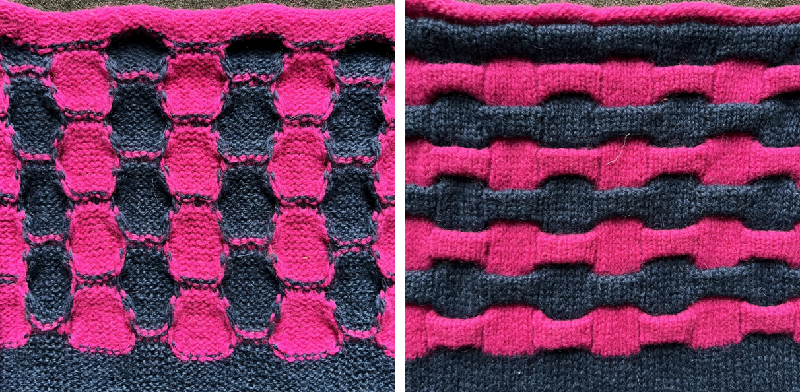
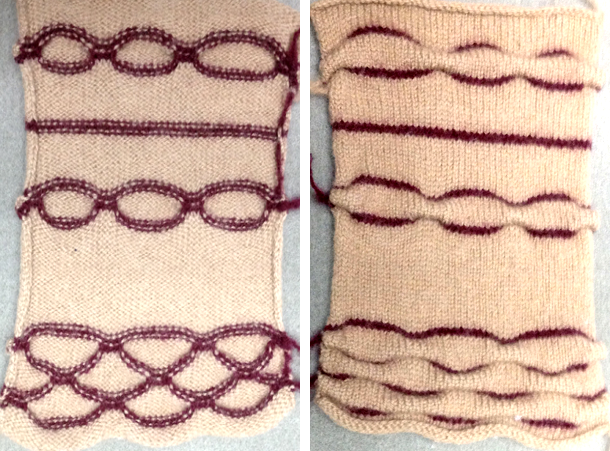
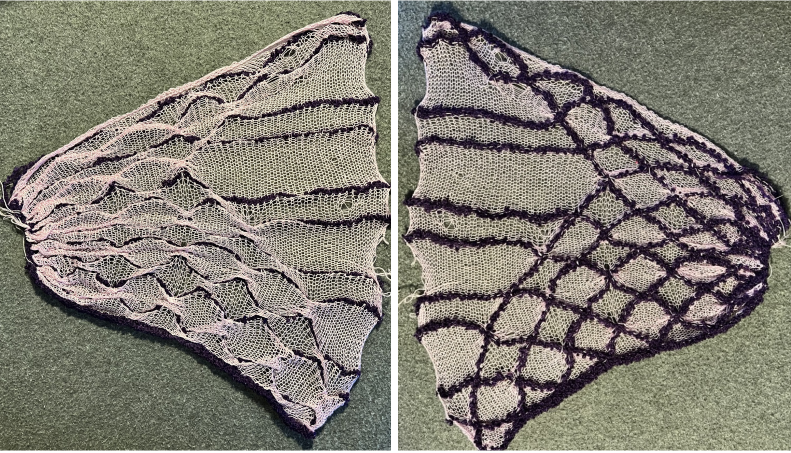
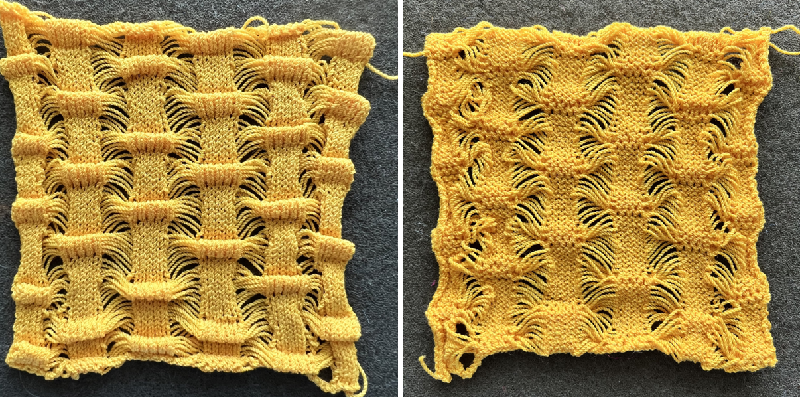
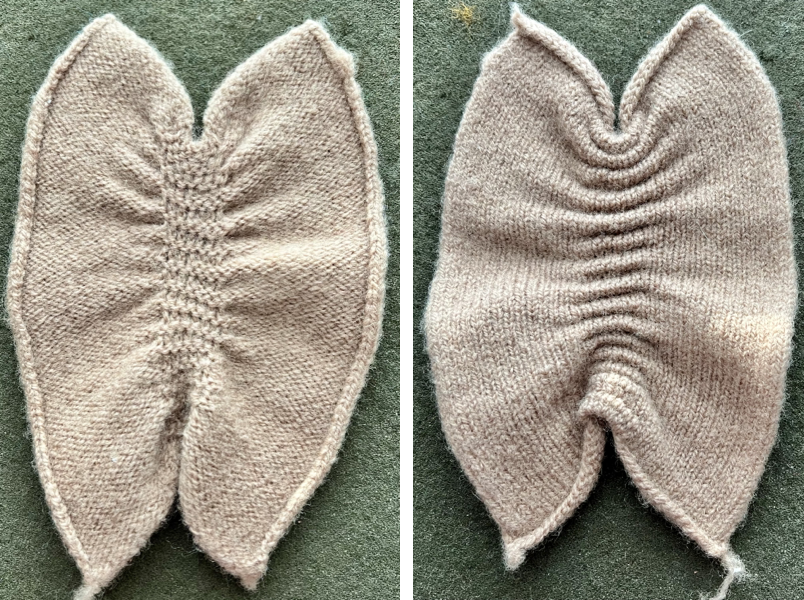
The original 20X20 design is shown on the knit side Left, its color reversed result on the knit side, Right. 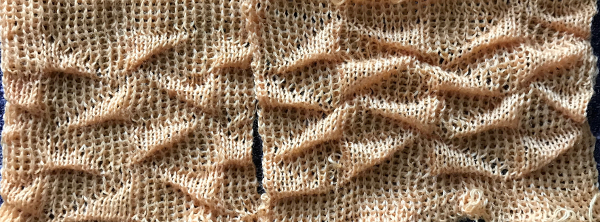 The elongated slipped stitches are noticeable on both purl sides
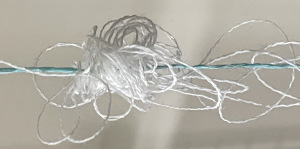
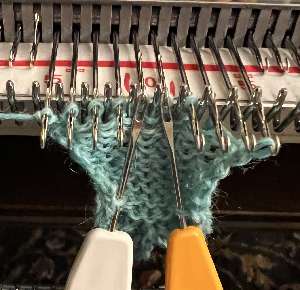
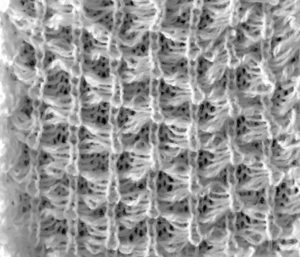
 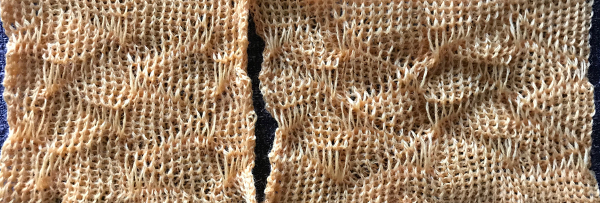 Using the expanded 20X40 repat I did not have a slipped stitch issue such as yarn breaking, but because the pockets were so deep and so many stitches on the ribber were knitting for so many consecutive rows, the ribber stitches began to refuse to stay on their bed. I got this far: a large knit area can be seen, as well as slip stitch loops
 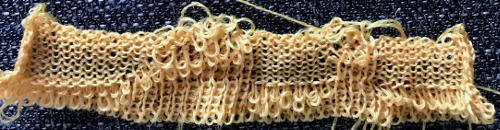 Can the same expanded repeat be used in another way? The color reversed version results in a subtle large scale pattern that might be quite interesting in a shiny rayon or other fiber
 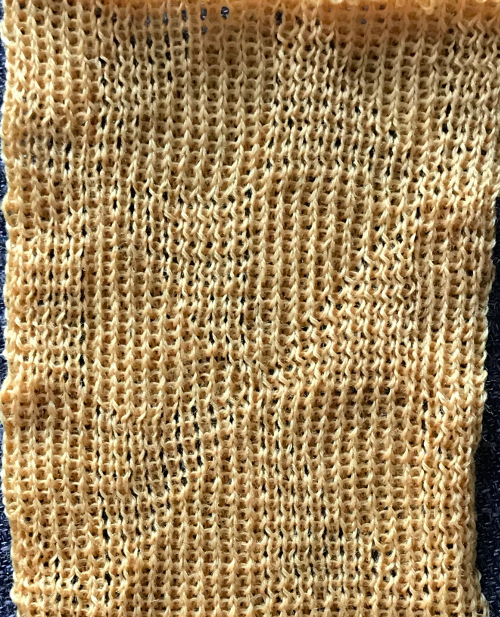 To review: Passap E6000 knitting techniques for pintucks are numbered 250-255. When using 250, 252, 254, the pint tucks are formed on the back bed on the needles that are opposite those with the pushers selected down in accordance with programmed black squares. The corresponding odd numbers 251, 253, 255, select pushers down according to programmed white squares (253 in the manual should say white, not black squares).
On any machine, the size of the pleat creating the ripple/ pintuck depends on the number of rows that can be knit on the all knit bed before the fabric begins to ride up and becomes difficult to retain on the needles in work. Tolerance depends on knitting machine brands as well as the type of yarn used. Bold patterns read better than smaller ones. Weights are usually helpful. The Brother Ribber techniques book (now available for free online) addresses the topic on pp. 20-22. 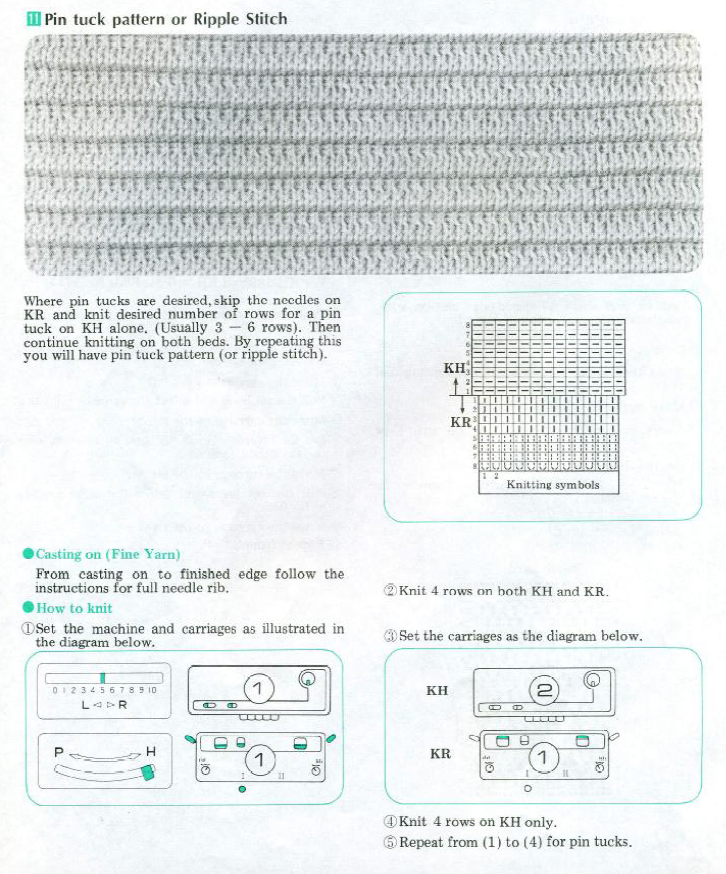
 I have added a few patterns from published sources in a flickr album , most take into account any single stitch not being slipped for more than 4 rows. Doubling the length if using electronics is not recommended. These fabrics may be created in combination with needles out of work.
 Brother introduced the idea in their Ribber Techniques Book:
 My experience in knitting these fabrics has been using Brother and Passap. In my blog posts, I discuss fabrics and settings I am able to test and reproduce, so specific ones for other machine brands are not usually included for specific techniques.
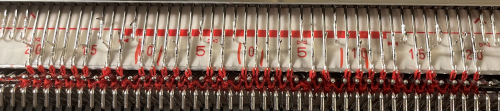 which will create ladders between knit spaces as would happen in any single-bed knitting.
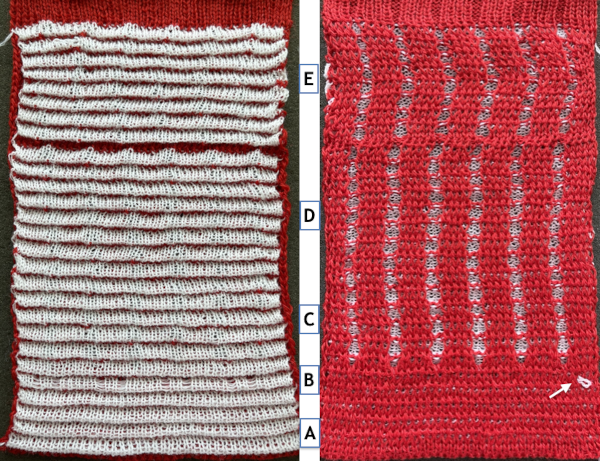 Additional swatch photos in each post
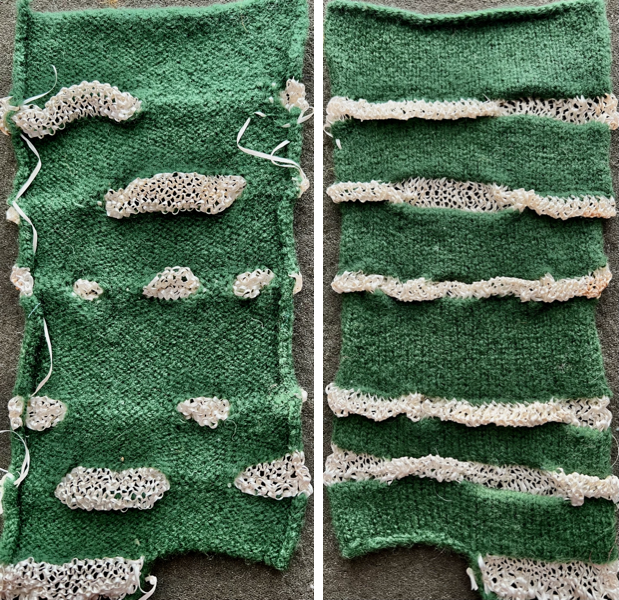
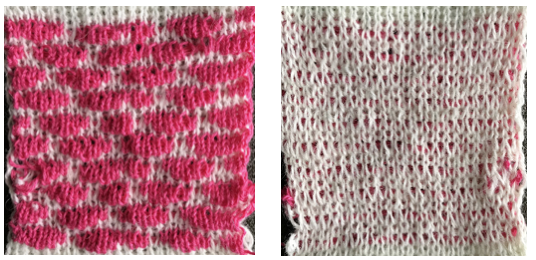 Adding lots of texture: Combining knit carriage needle selection with racking and needles out of work. The surface here is more dramatic, it is best to use yarns with memory such as wool, and to have a memo provided by the machine if possible or some other way to help track the racking sequence without errors in long projects.
 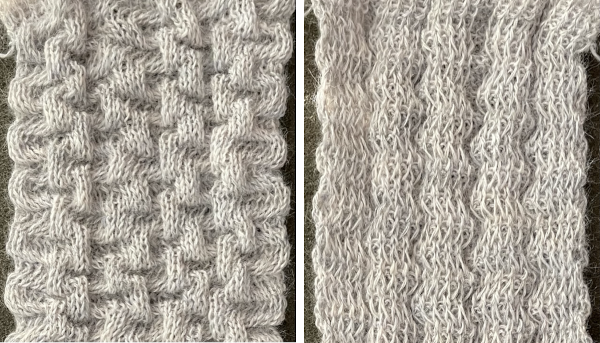 Racking by more positions as well as more knit rows on the top bed.
 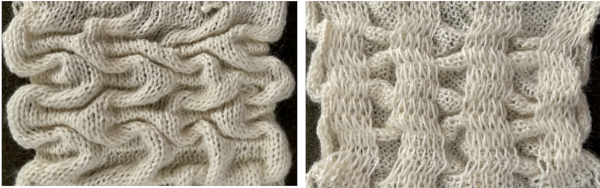 Racking: Passap/Brother 3 Combining knit carriage needle selection with racking
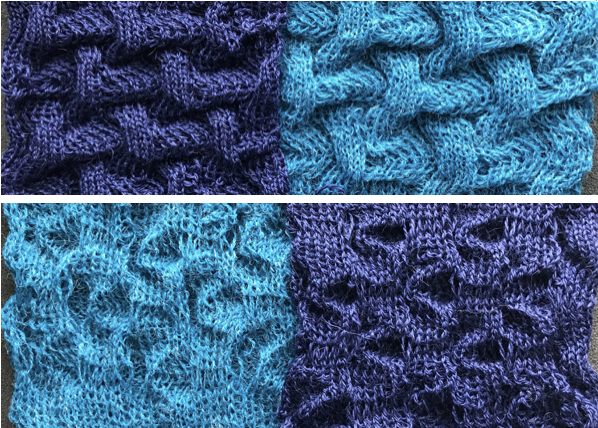 Adding complexity with transfers from one bed to the other to racking
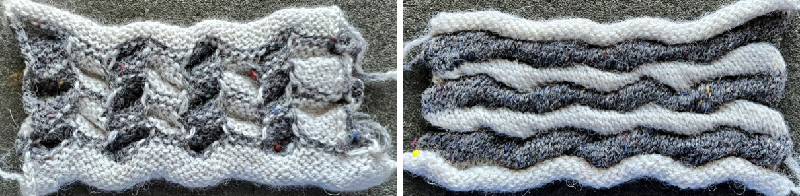
 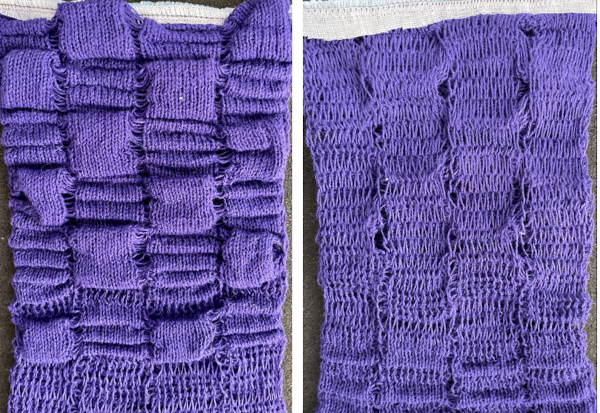 At the top of the swatch, to secure stitches, a strip of woven interfacing was ironed on, and a zig-zag stitch was added with a sewing machine before further trimming.
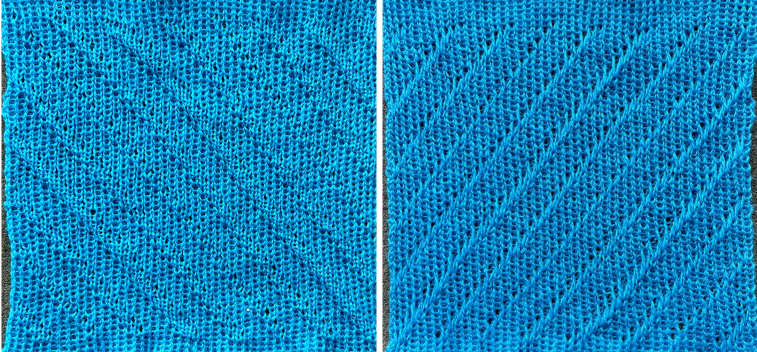 and one with evenly distributed, more pronounced folds
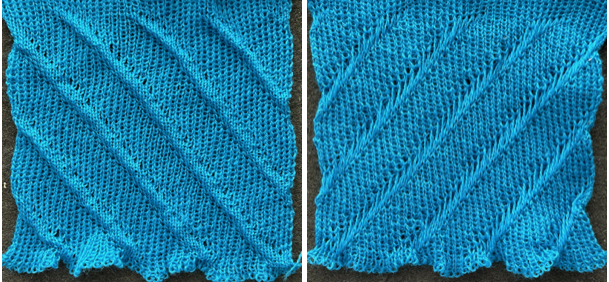

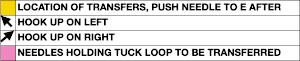
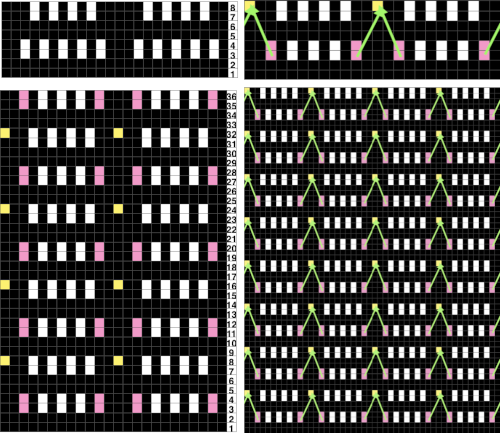

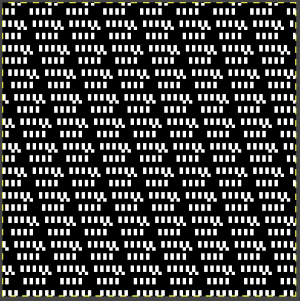


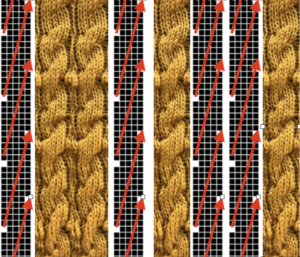
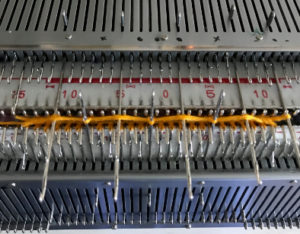
 The card is cropped to the 24 X 44 stitch in width and height for the repeat to be worked in electronics. The area colored blue on the far right indicates possible all knit rows for hooking up “cables” during knitting, mustard color indicates ladders created by an out of work needle on each side of the central, all knit column. The ladders make it easier to identify each all knit column. The tape over holes idea does not work for masking a punchcard since that blue area would need to be all punched holes. The tape over would result in “unpunched” ones.
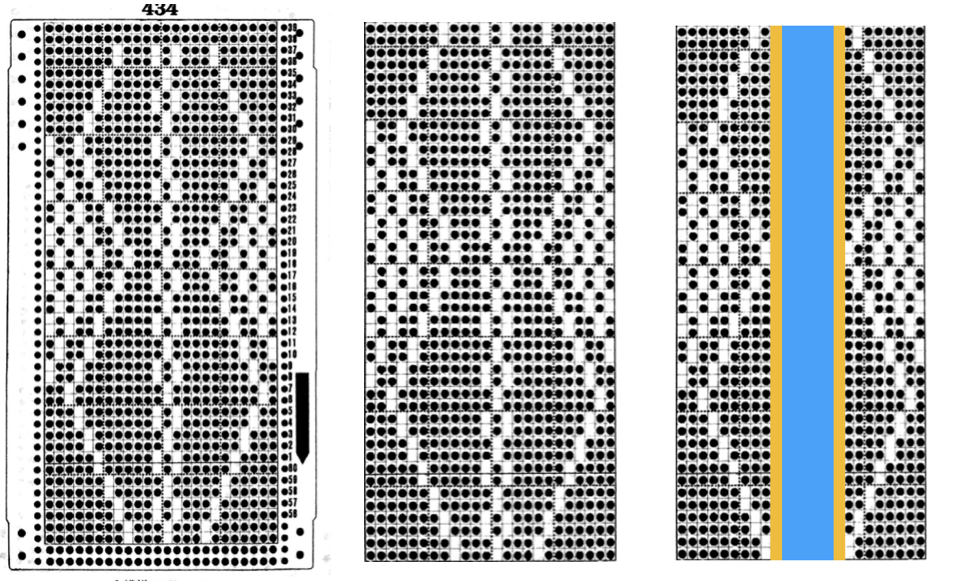 This takes the revised card single repeat and indicates some quick possibilities for altering it
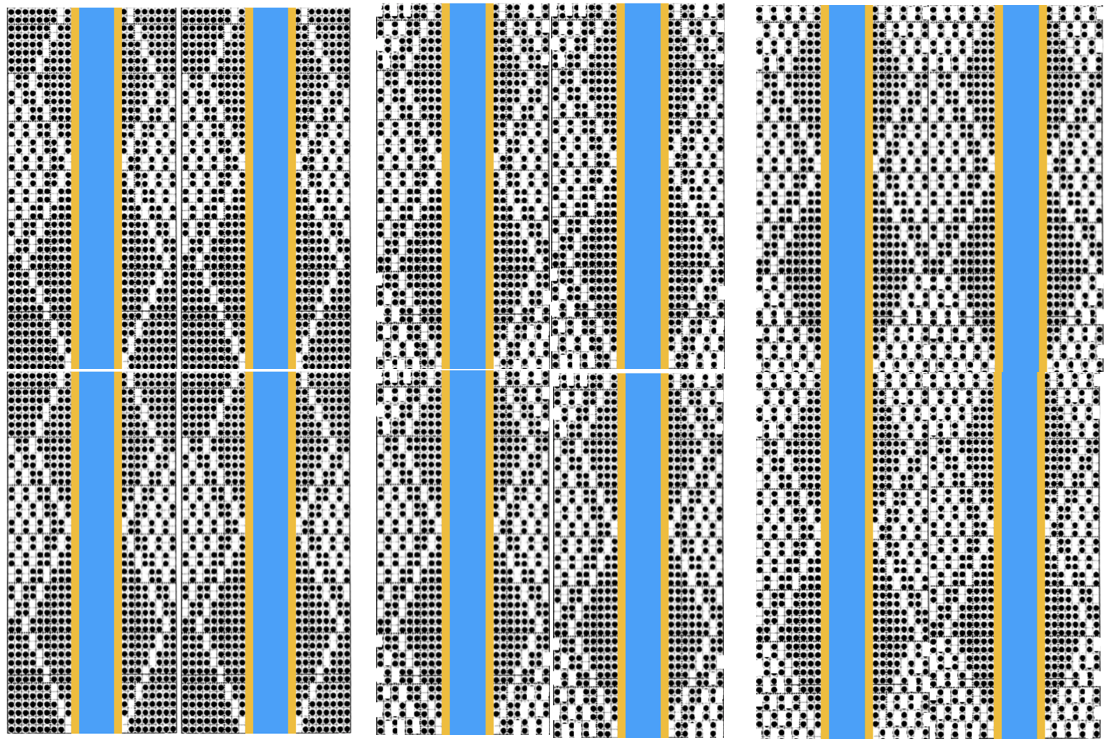


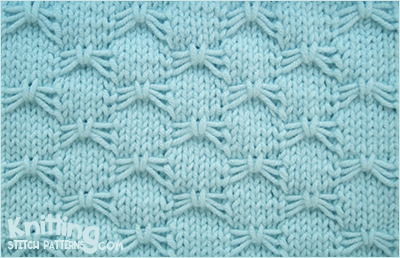
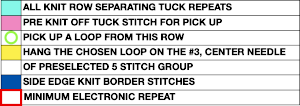
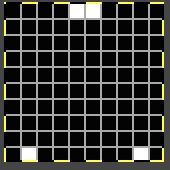
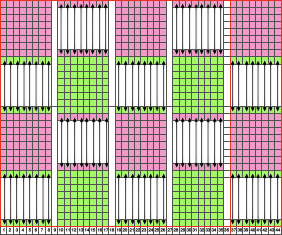
 This is my first experiment with gathered slip stitch floats on the purl side of the knit. To begin, this chart indicates one punchcard pattern’s full repeat in width. Four repeats in length would be required (the punchcard minimum repeat in length to achieve smooth continuous card feeding is 36 rows). Punch out blue squares, leaving white ones unpunched. A single repeat (outlined in black, 8 stitches by 12 rows) is for use in electronic patterning, where one may alternately draw or program white squares, then use color reverse. The red line represents 0 needle position in Brother KM
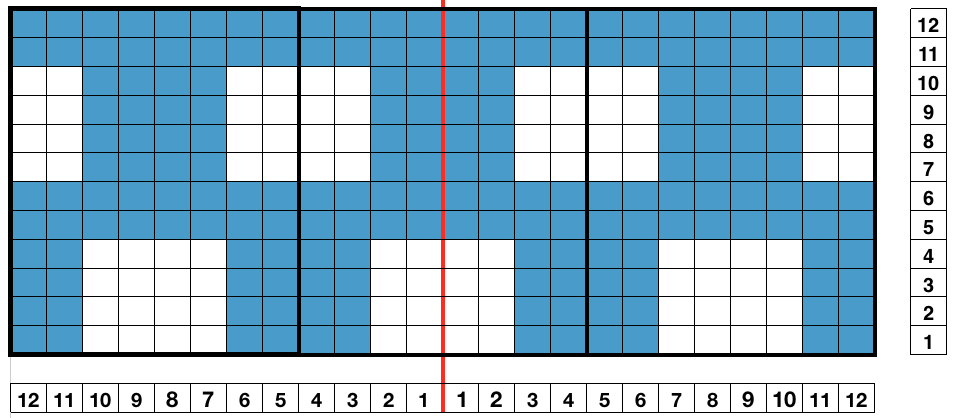

 result with color reverse
 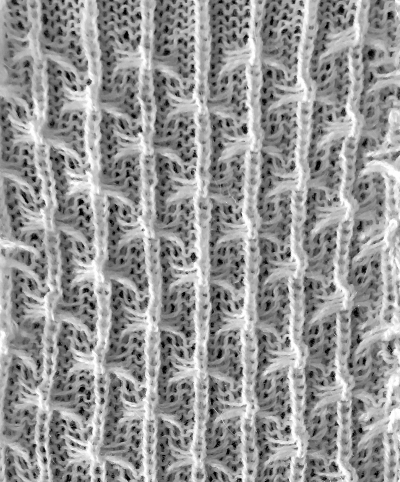 working out a mylar, electronic (unless DM 80 40 stitch width is in use) repeat for a variation of the fabric knit single bed. The stitch count is odd, allowing for a center stitch manipulation. KCI is used to make certain the first and last needles knit on each side. Floats created close to edges may be left without hooking them up. The fabric separates slightly along the “bowknot” edges
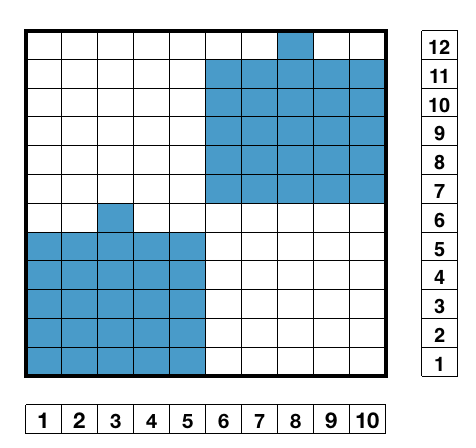
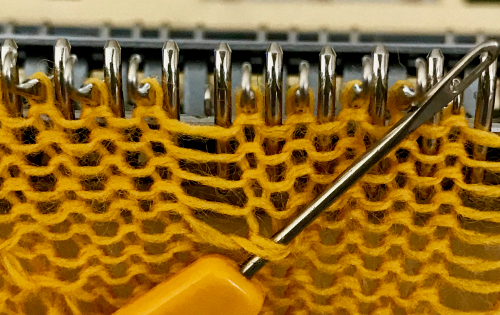
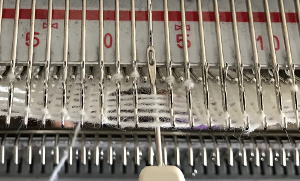 lift them up and onto that single non selected needle, push that needle out to hold
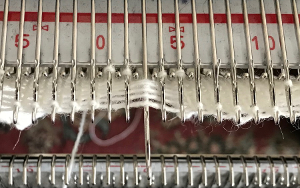 with the next pass the single needle and loops knit off together and become part of the alternating all knit block in the design
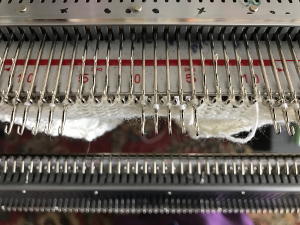 the swatches are knit in a 2/15 wool, the fabric might be better served using a thicker yarn. Here the “blocks” creating “floats” are side by side
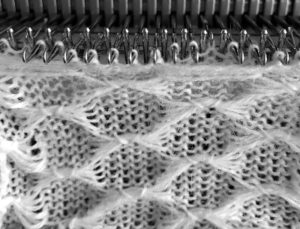
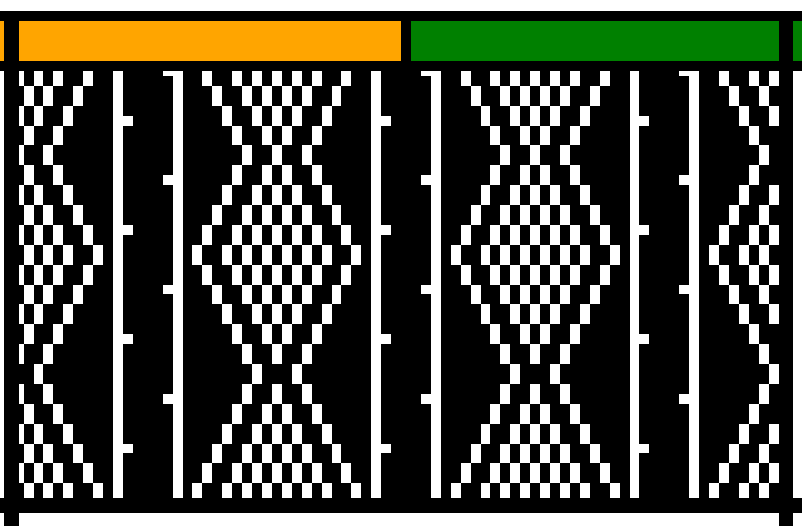
 adding border stitches, and more theory on the placement of stitch type
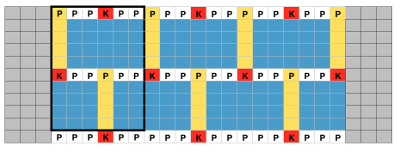 the result places “knit” stitches in the center of butterfly (magenta arrow), not at its sides, and I see and extra purl stitch (green arrow). Multiple stitch-wide borders create unwanted floats on one side
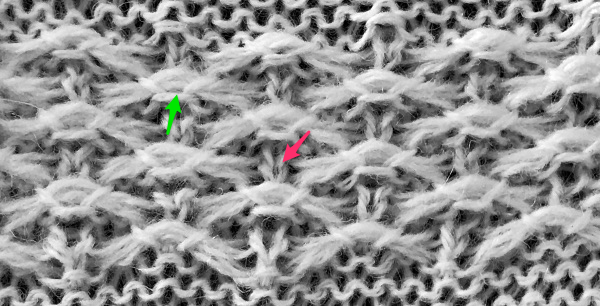 back to the drawing board and working things out first as a hand technique
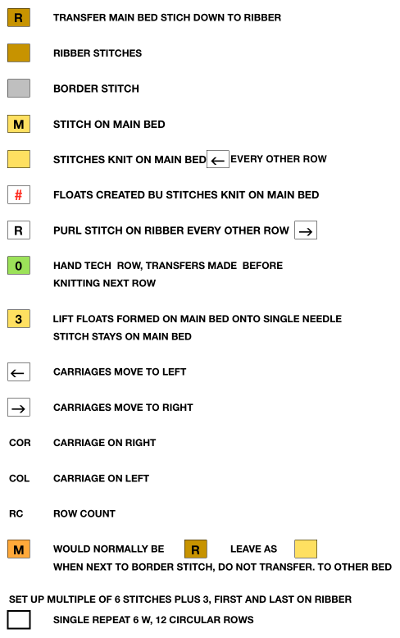
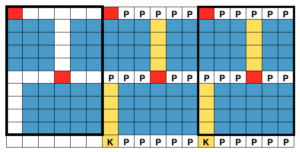
 I began with my carriage on the right (COR), after setting up the repeat on a multiple of 6 stitches +3 as indicated above. The last stitch on either side on both beds is never transferred, and the short loops of every other set (rows 5 and 17 in the chart) are not hooked up. This will produce a slightly rolled edge on each side. The larger number of border stitches becomes problematic. The photos were taken while knitting 2 different swatches, so needle tape markings are not the same in all photos. To produce the circular knit, opposite part buttons are pushed in so with carriage on the right (COR), the settings would be
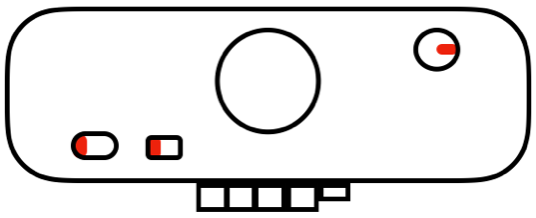

 after the three floats have been hooked up, with COL each time, the in-between main bed stitches are transferred back down to ribber
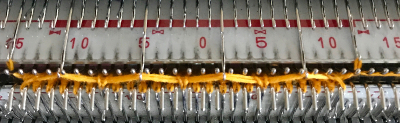

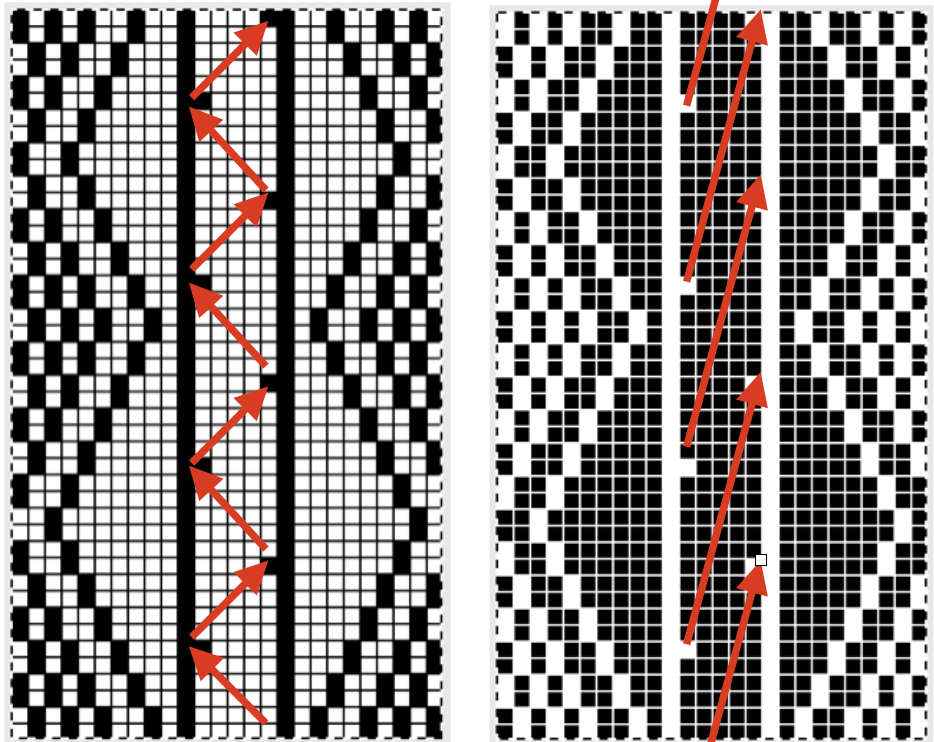
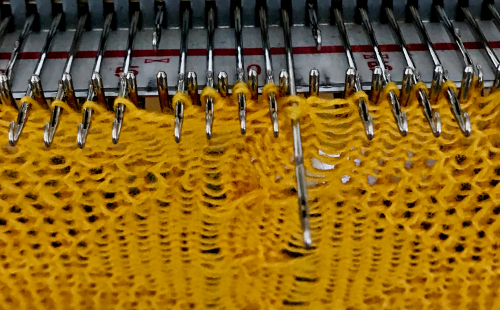
 reducing main bed count so only one needle is left on either side of a selected one
  that needle (green arrow, gets transferred down to ribber
  now the number of needles involved on both beds is evident on both beds
 While knitting in the pattern the ribber pitch is set on P (point to point) to keep stitches on opposing beds centered (P pitch also makes it easier to transfer directly from one bed to the other). If the cast-on is for every other needle rib with stitches then transferred between beds for pattern knitting set up, the cast-on and all rib rows need to be knit in H pitch, with a switch to P for transfers and knitting in pattern to be completed. With the first row set up on the selected segment of the needle bed, there are additional steps to take.
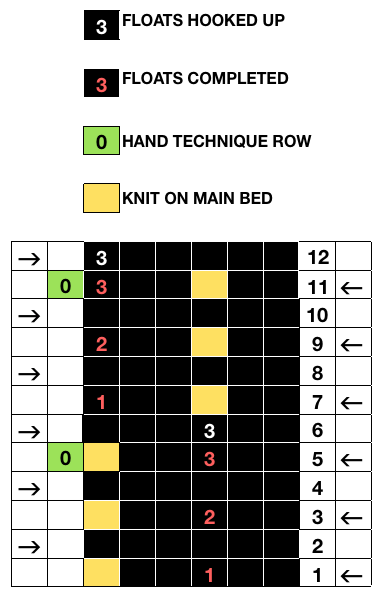
 Hand techniques will now also occur when carriages are on the left, on RC 5, 11, etc as described in the hand technique chart, on rows with no needle selection. As in hand tech, transfers and multiple loops containing needles are brought out to hold before moving the carriages from left to right and selecting the needles for the next set of floats with that same pass.
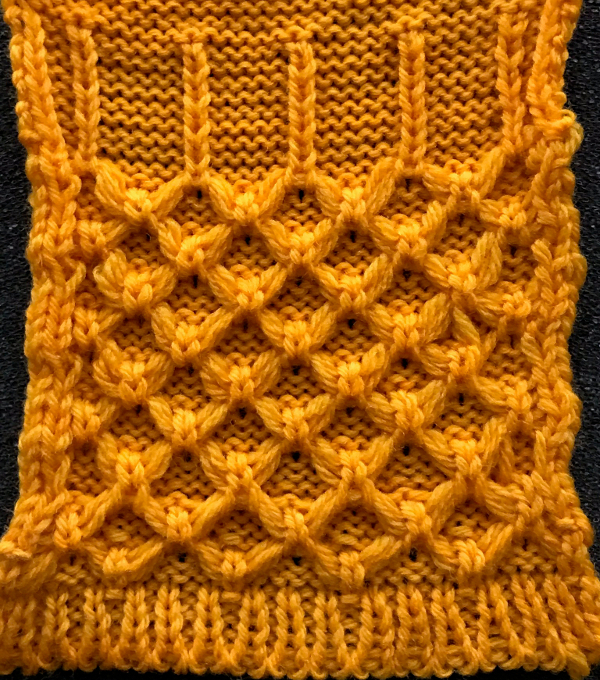

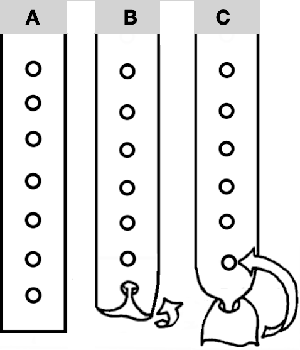
 Going straight up: in the 2014 chart color blocks illustrate needle groups that get picked up and transferred onto the same color row on the machine, with no specific references to needle tape or any other markings.
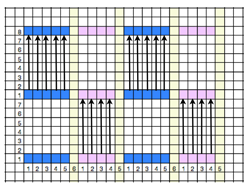


 now with some changes.
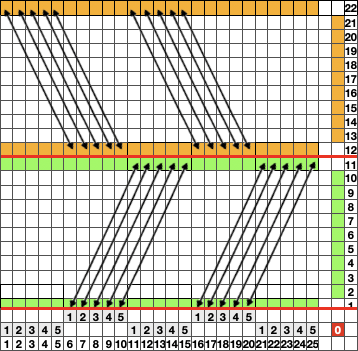


 In any fabrics requiring needles OOW, unless waste yarn and weights are a necessity, one may simply do a crochet cast-on across the required number of needles, then drop off cast-on stitches where NOOW are needed, pushing them back to A. In binding off using the latch tool bind off, treat empty needles as though they had stitches on them, and top and bottom edges will match in width.
 The same technique, used as a band rather than an all-over pattern
