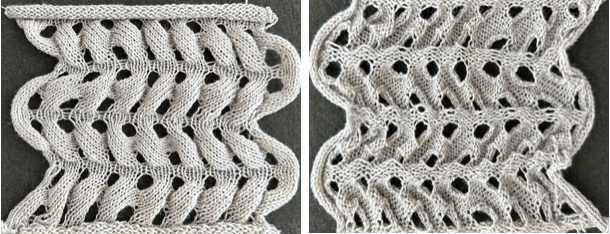
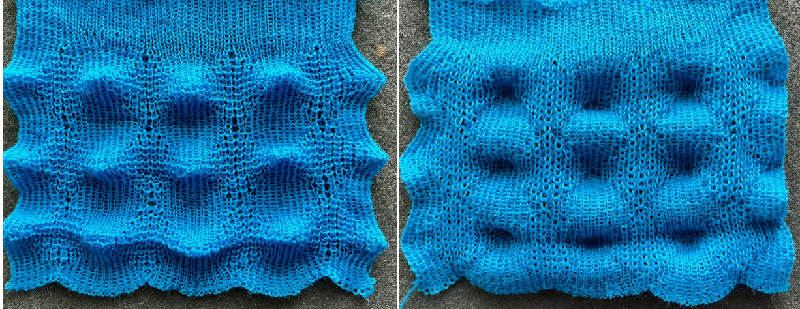
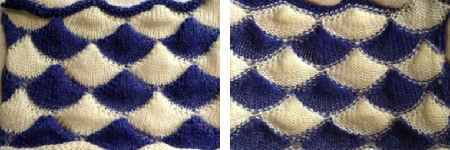
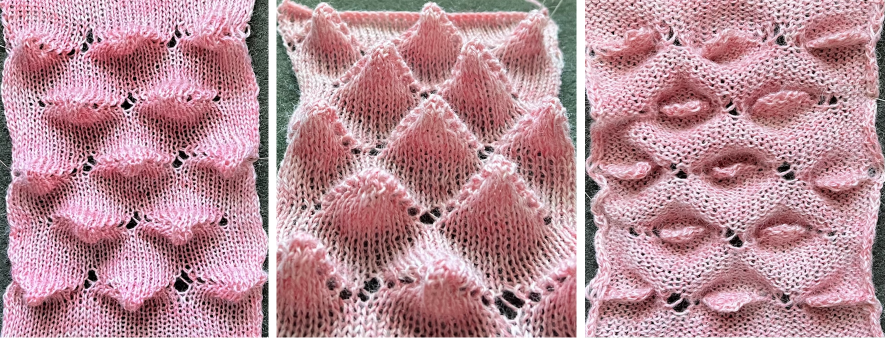
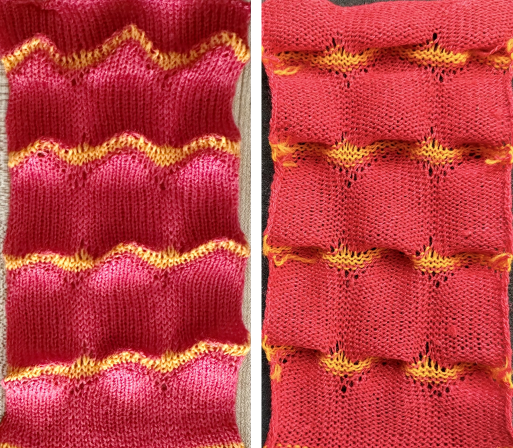
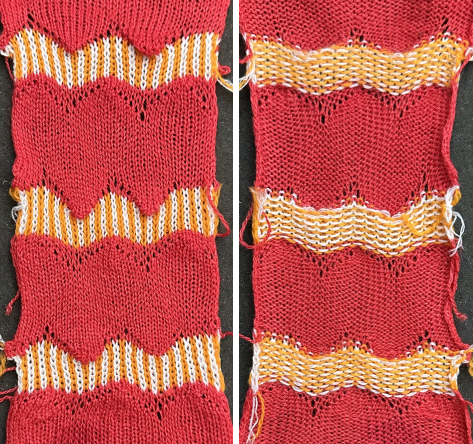
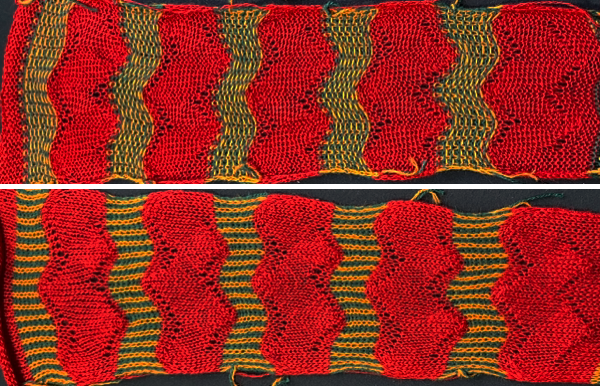
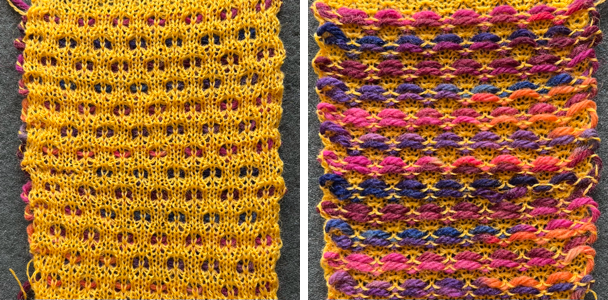
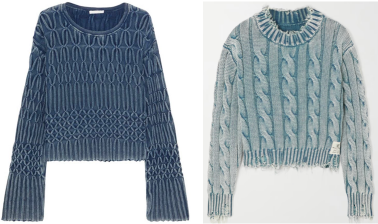
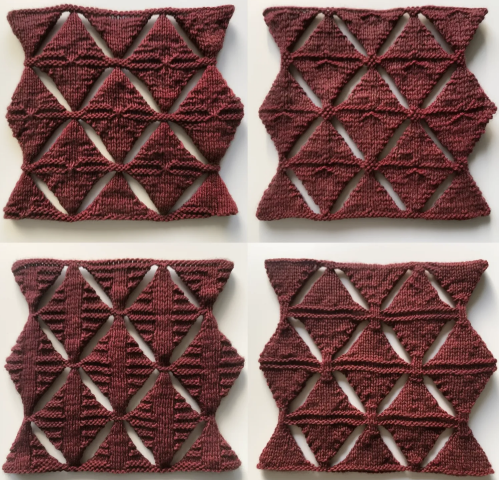
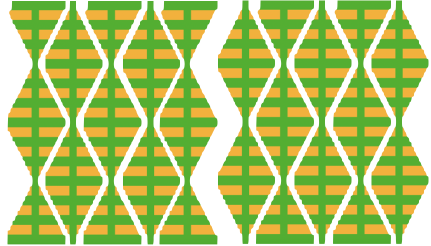
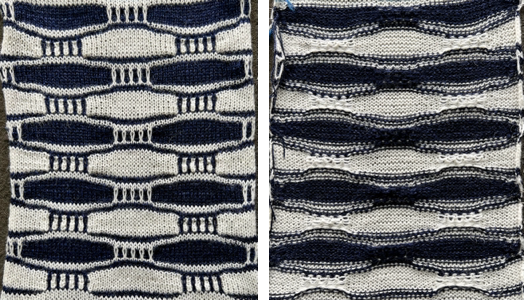
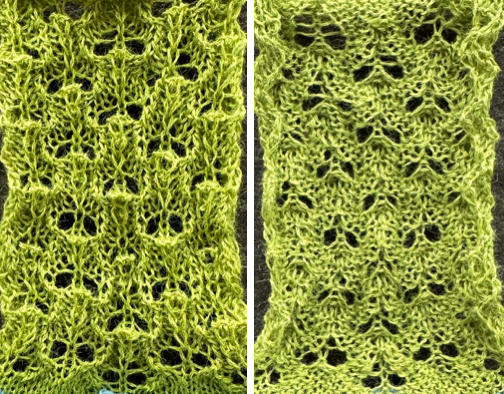
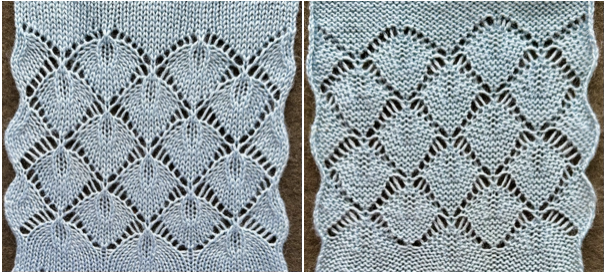
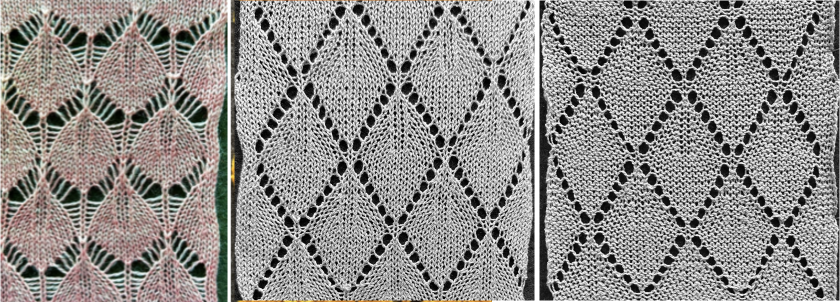
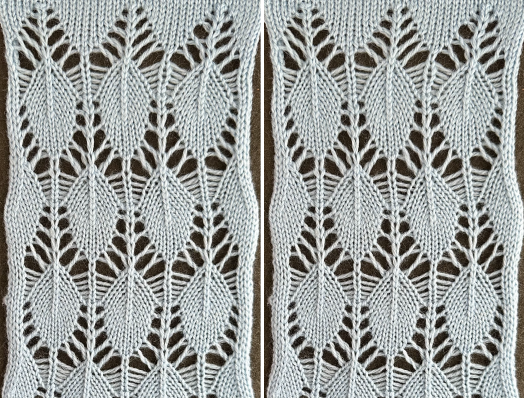
PRADA knitwear often becomes a source for inspiration and discussion both in hand and machine-knitting forums. A recent sample:  Developing proofs of concept can begin to be achieved by reducing repeats in size, making sampling quicker to achieve and evaluate.
Larger automated repeats by default require electronic machine programming.
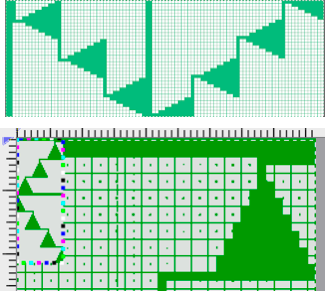
Spreadsheets offer an opportunity to plan color-changing sequences ahead of time and to check their horizontal and vertical alignments.
If a color changer is in use, in the Japanese machine models it sits on the left.
Color changes are made away from and back to the changer as frequently as every 2 rows, or as needed in the specific design.
Other brand machine models have color changers on each side, allowing for single rows knit in any one color and for dividing repeat segments differently.
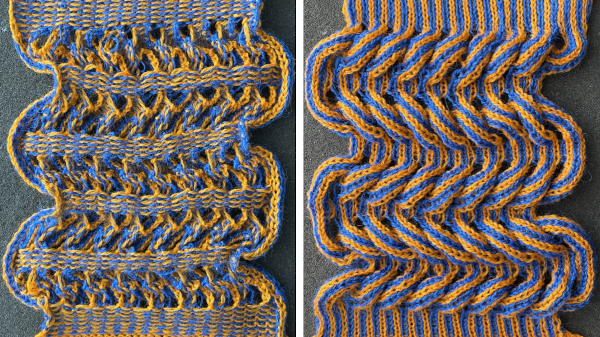
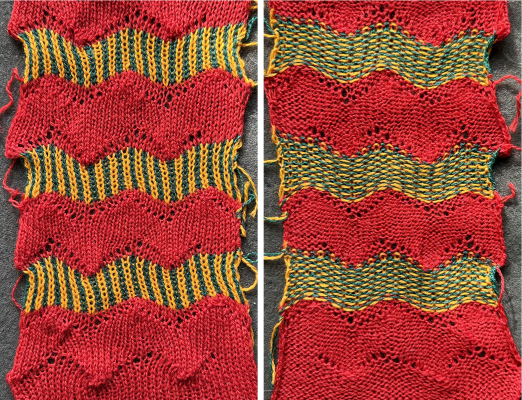
The assumption here, to begin with, is that each color is carried for an even number of rows.
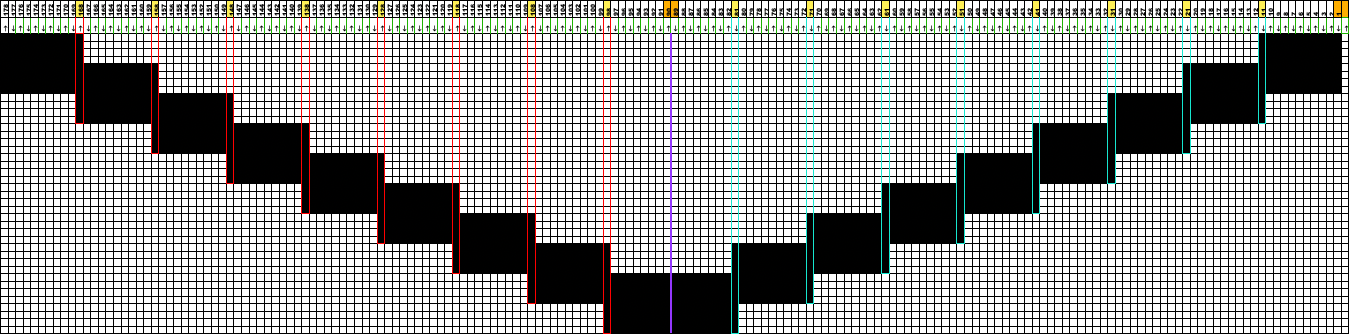
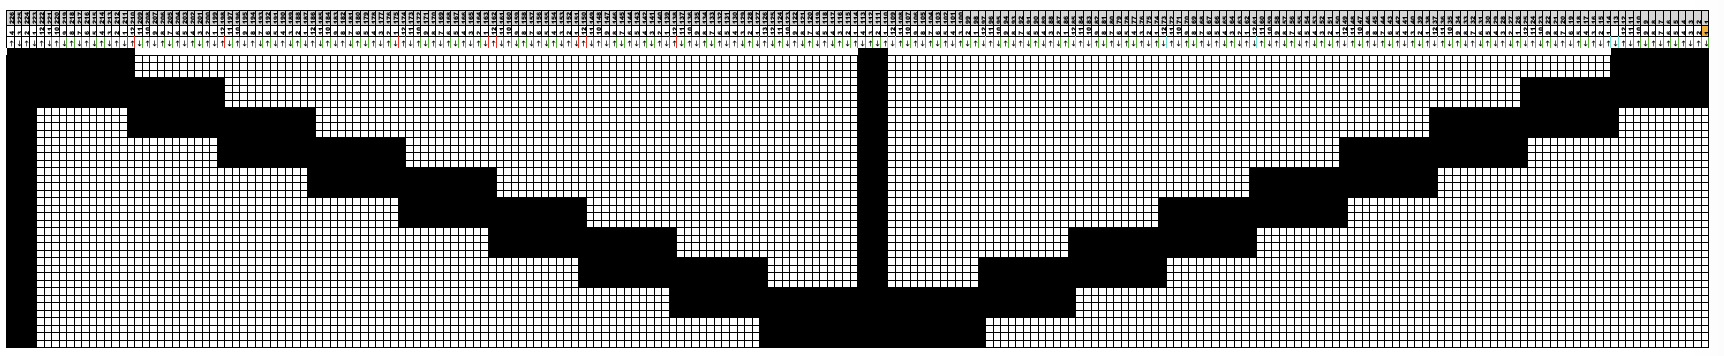
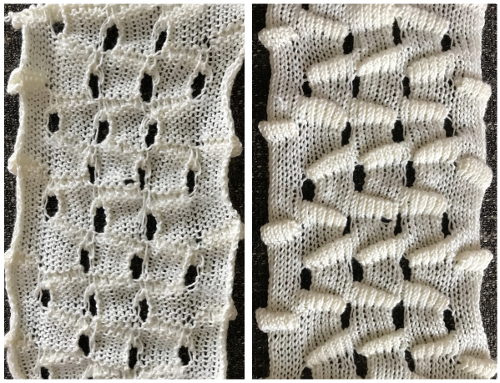
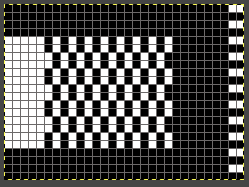
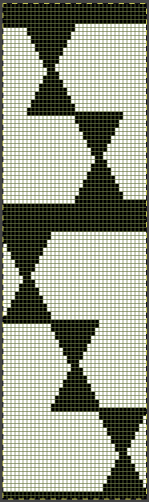
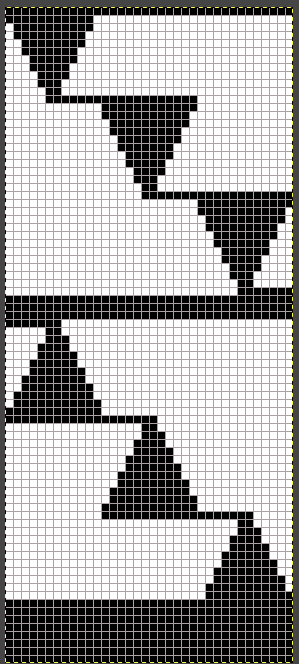
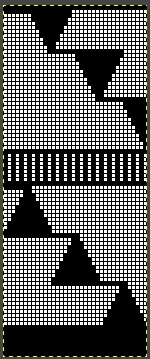
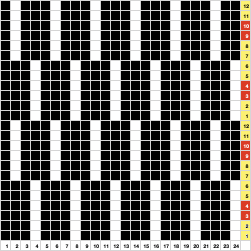
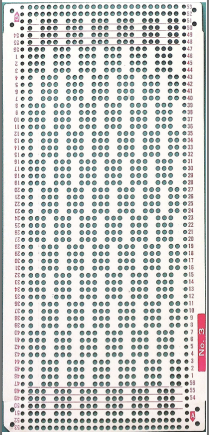
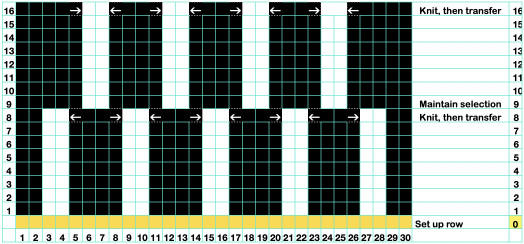
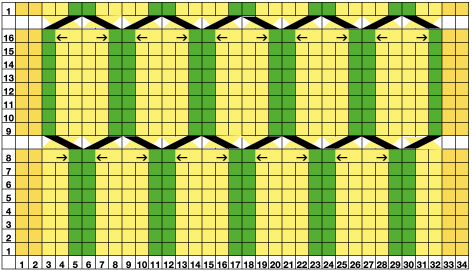
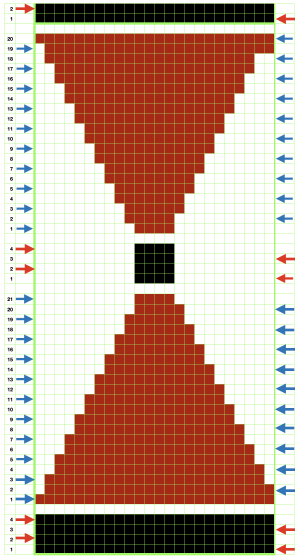
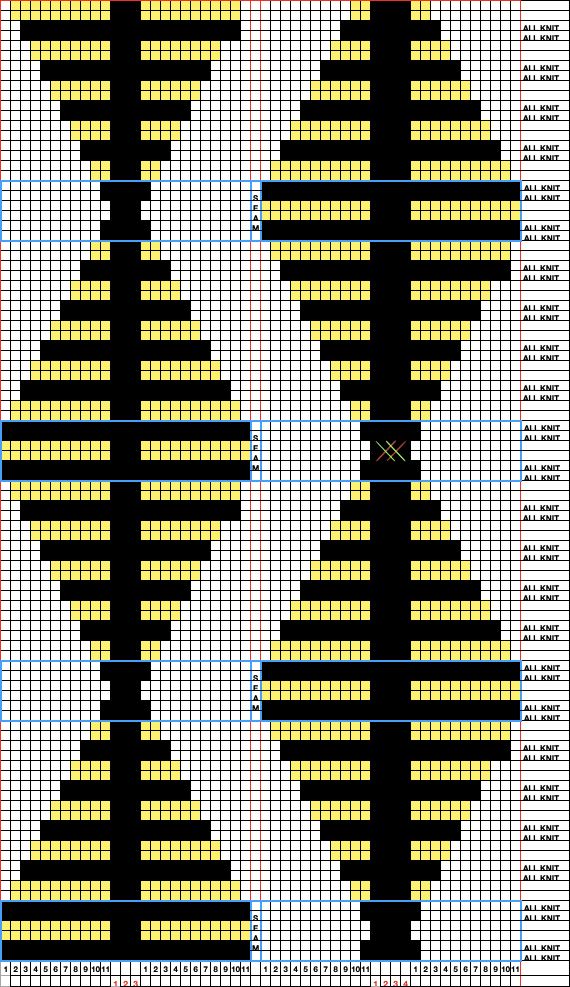
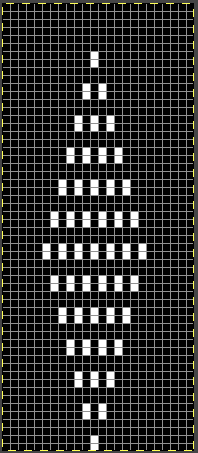
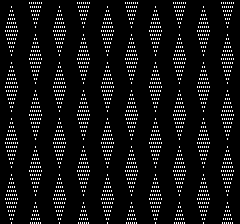
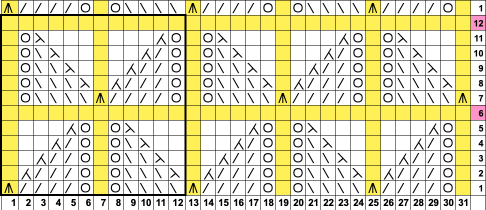
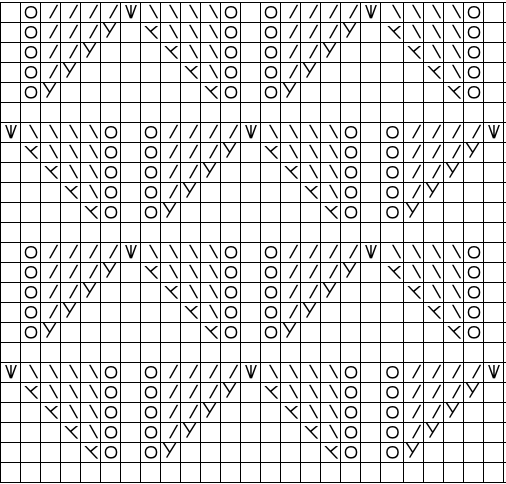
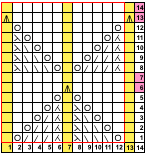
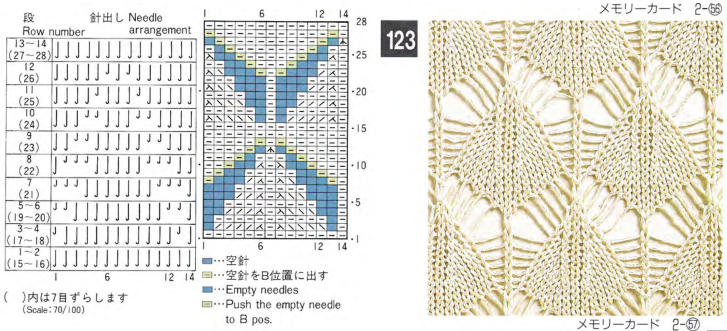
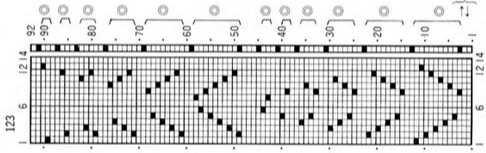
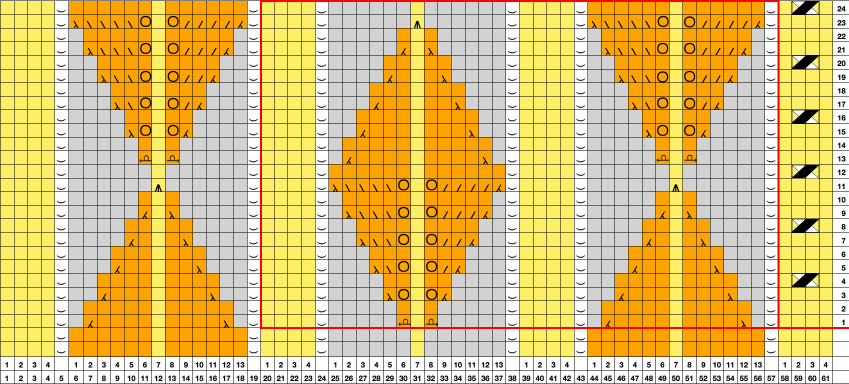
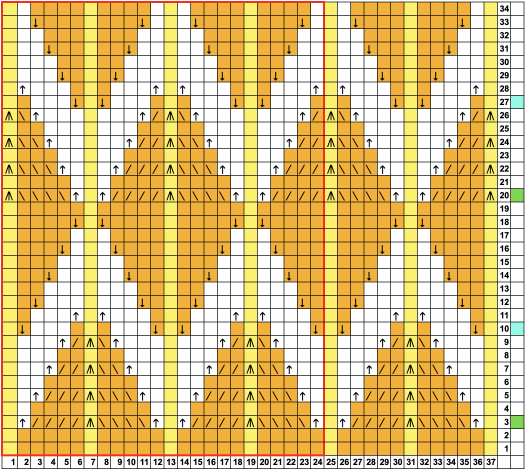
This chart was developed using Numbers for Mac. The repeat is 40 cells in width, and 52 cells in height, and is outlined with a red border. It is planned so as to return to the initial color selection when completed, maintaining a continuous design, 
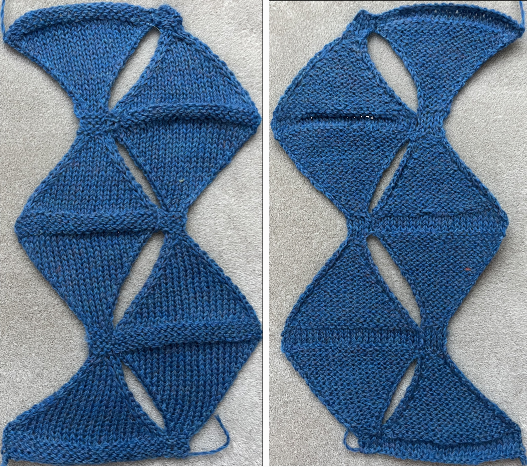
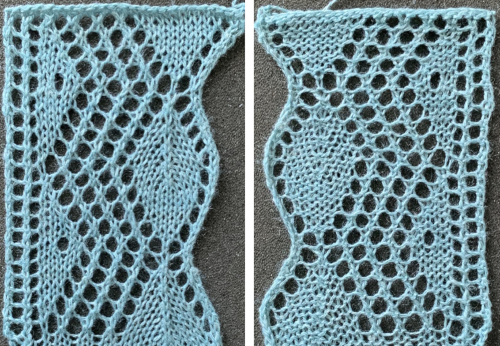
 tested on 80 stitches.
  Its alignment is not on a true diagonal, and shapes are offset
 To duplicate the swatch, cast on and knit for a preplanned number of rows with the dark color.
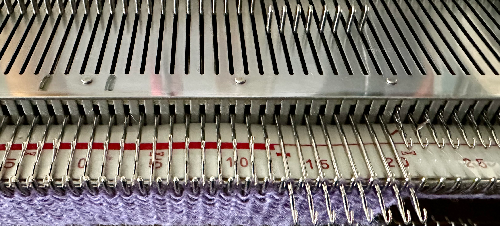
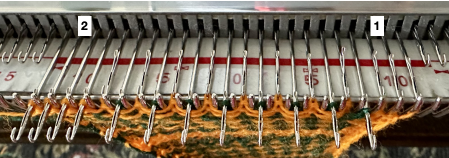
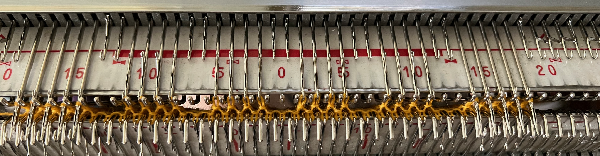
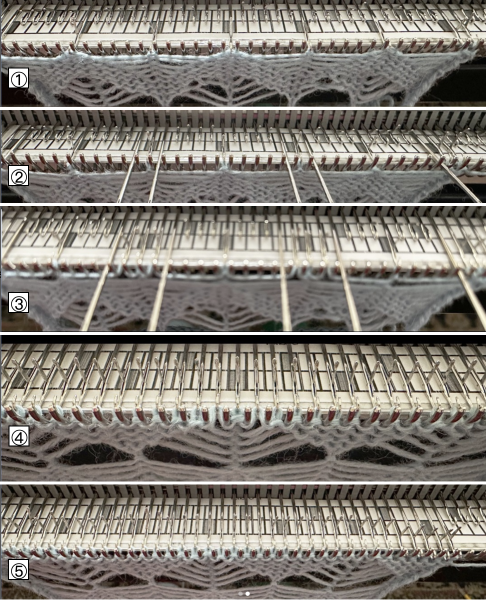
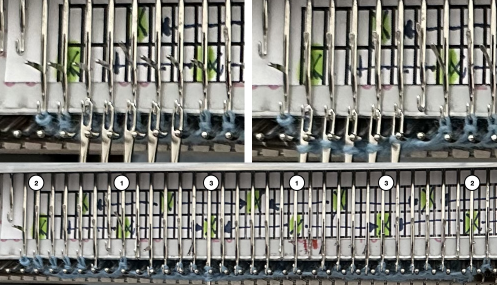
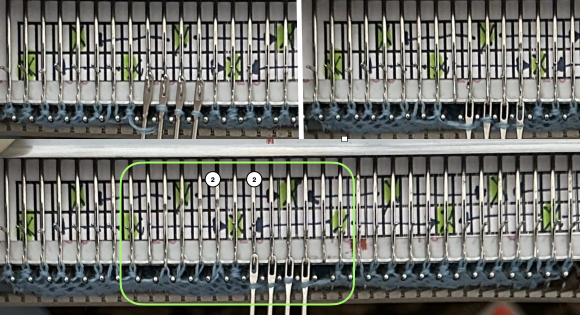
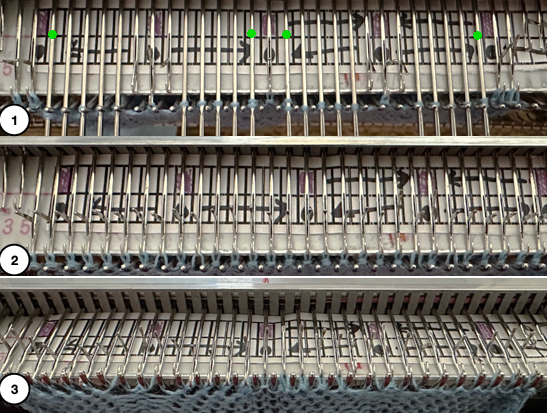
Needle selection serves as a visual guide to the need for color changing in addition to or instead of row counts.
End needle selection is in use, there are no empty needles in this design.
COR: make the first preselection row from right to left, toward the color changer.
COL: remember to set the knit carriage to slip in both directions, pick up the light color
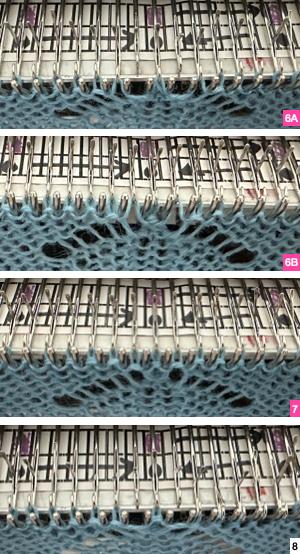
change color every 2 rows until every needle is preselected when moving from the right and back to the color changer (14 rows)
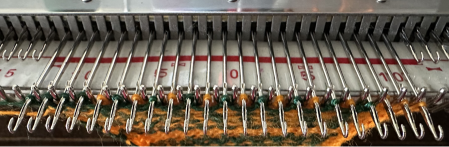
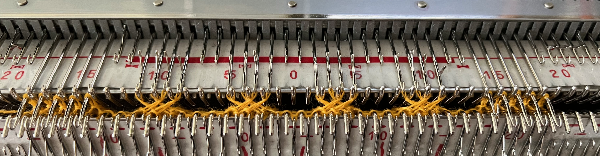
COL: every needle has been pre-selected. During every needle selection, only the dark color is used until preselection changes once more as the knit carriage returns to the left (12 rows)
COL: pick up the light color, resume with color changes every 2 rows (14 rows)
COL: a 12-row sequence with every needle preselection completes the 52-row design.
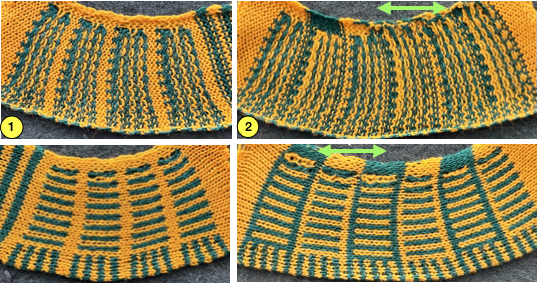
Repeat the process ending with a preplanned number of rows knit in the dark yarn, and bind off. 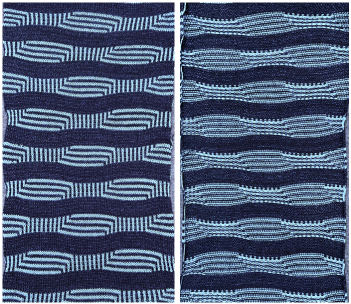 Expanding the design repeat would change the curvature in the solid color stripes.
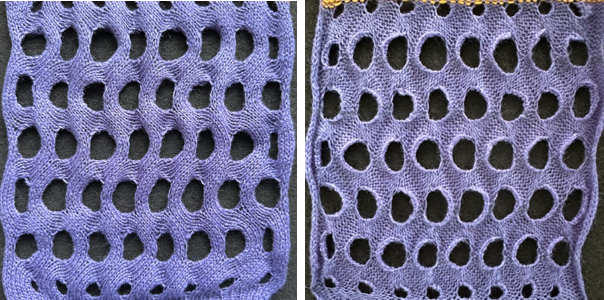
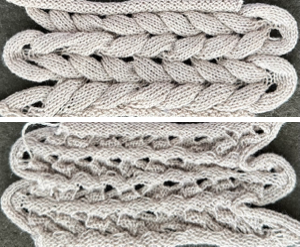
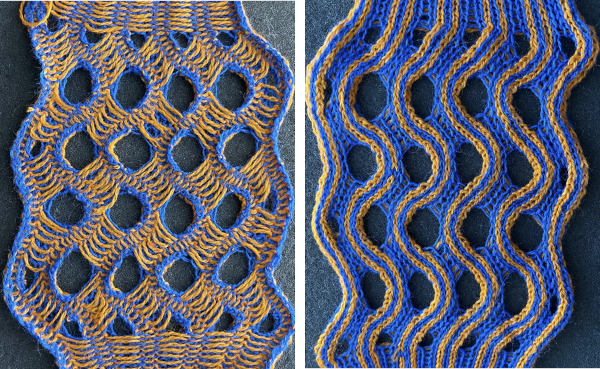
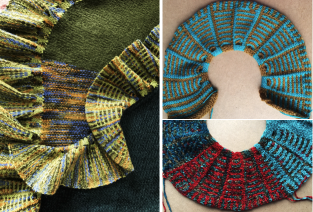
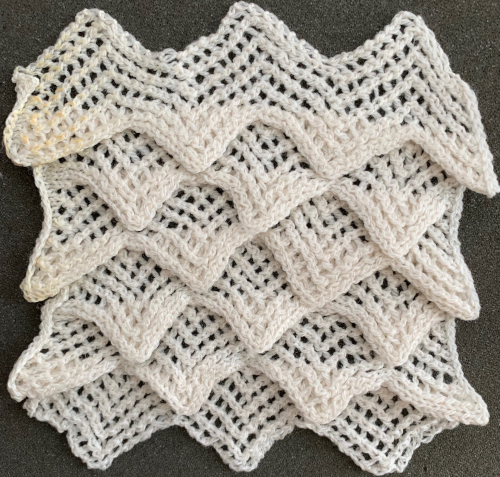
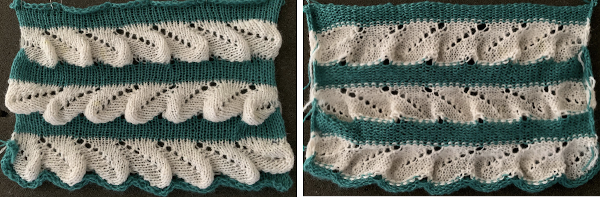
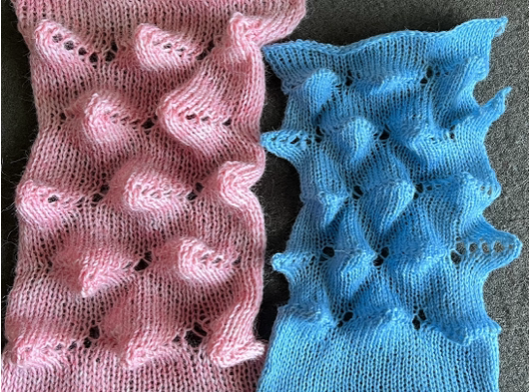
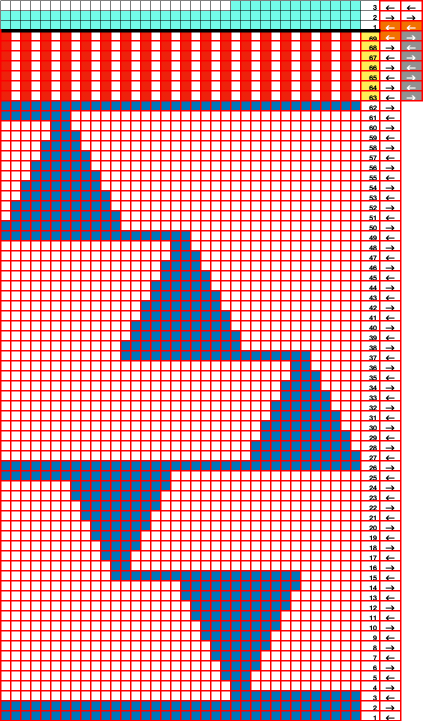
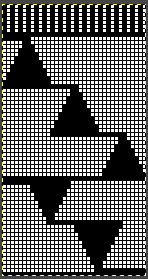
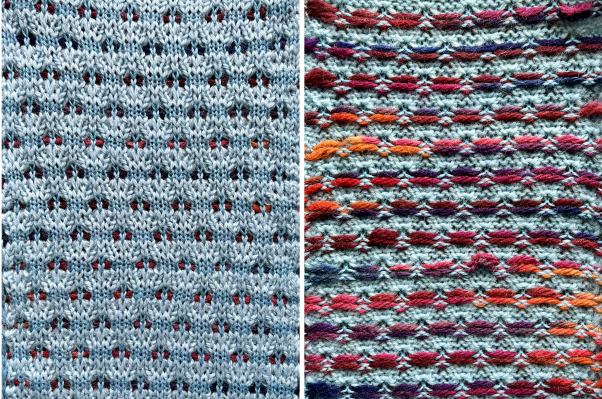
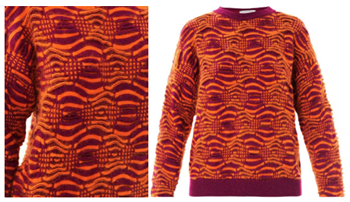
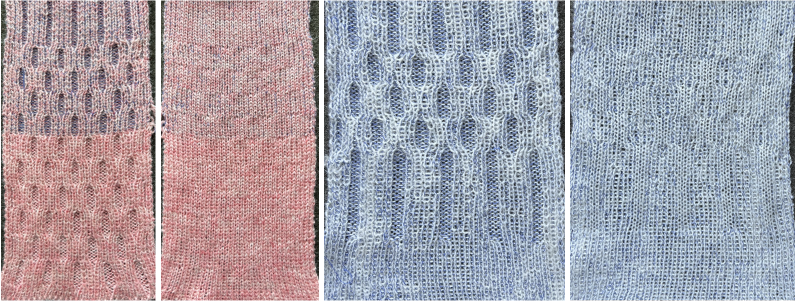
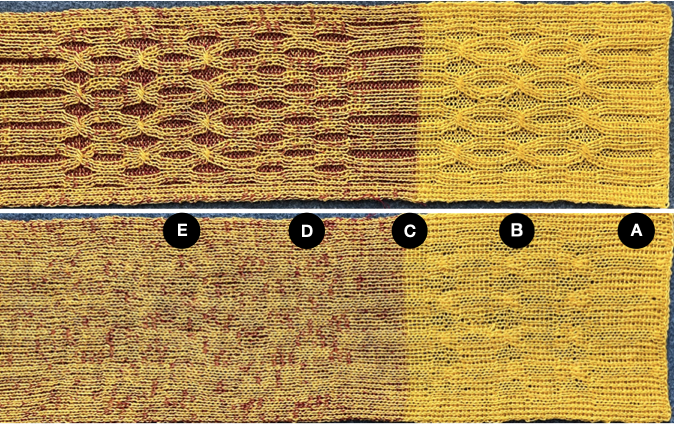
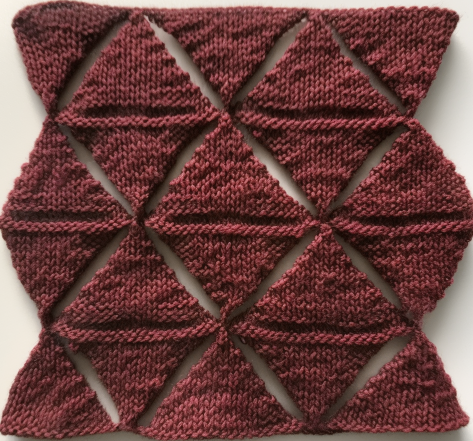
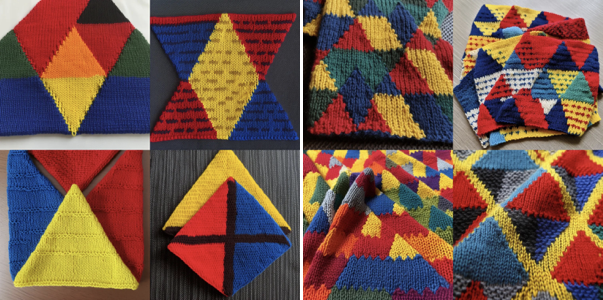
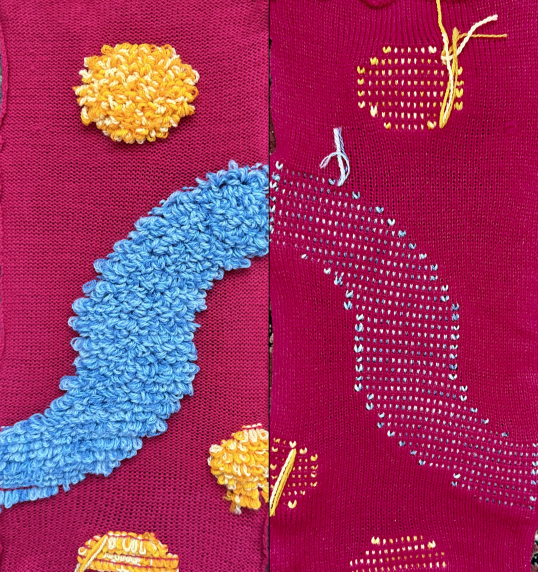
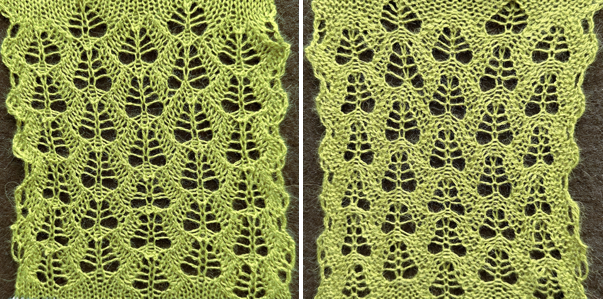
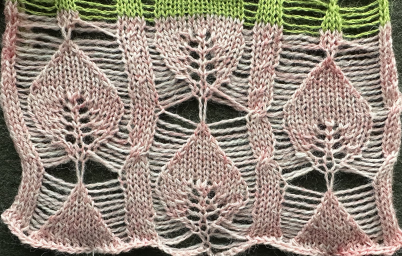
This knit is by LAFAYETTE 148, NY.  It is offered with coordinated pieces, which appear to use both a knit and a purl version as the exterior of the knit.
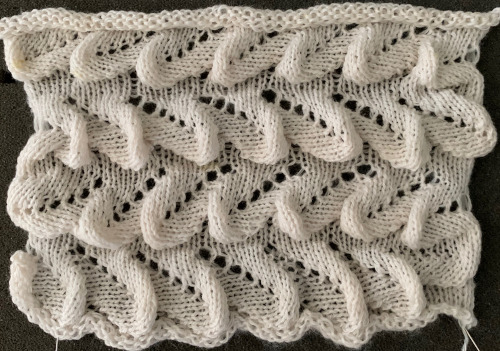
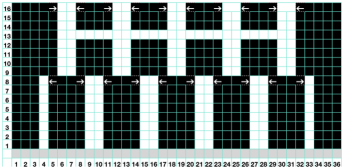
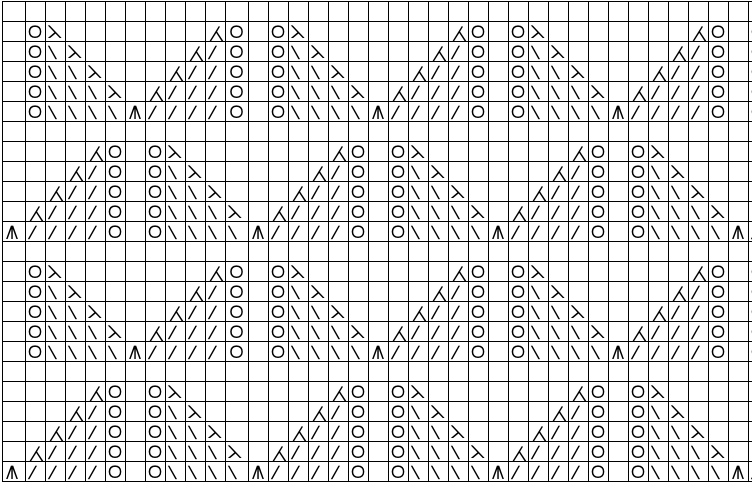
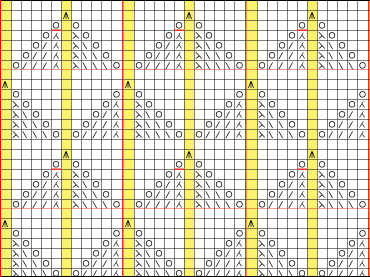
 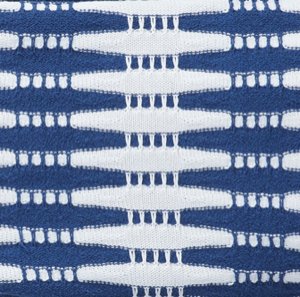 Beginning with an electronic slip stitch test emulating the larger shapes in alternating colors, adhering to the limitation of using an even number of rows in each color change, patterning shifts are explored in this 30X24 stitch repeat.
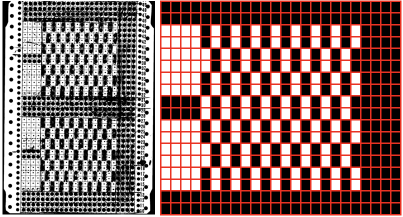
  A tiling test
 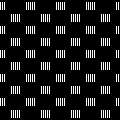 The extra horizontal lines formed in the swatch are because the goals are
1. to make larger shapes in alternating colors with long stitches in the contrasting color in front of them on the knit side,
2. automate the process,
3. and use the color changer.
In each case, the new color needs to be knit first to and from the color changer in order for its stitches to form those elongated stitches in it on the knit side, and knit again after the contrasting color rows to complete each segment of the full repeat.
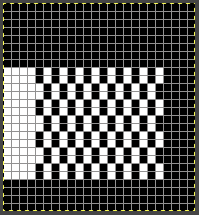
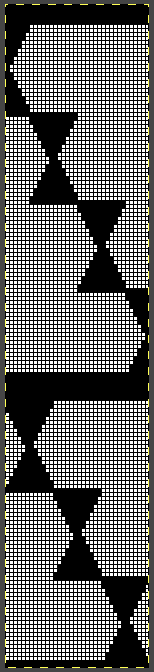
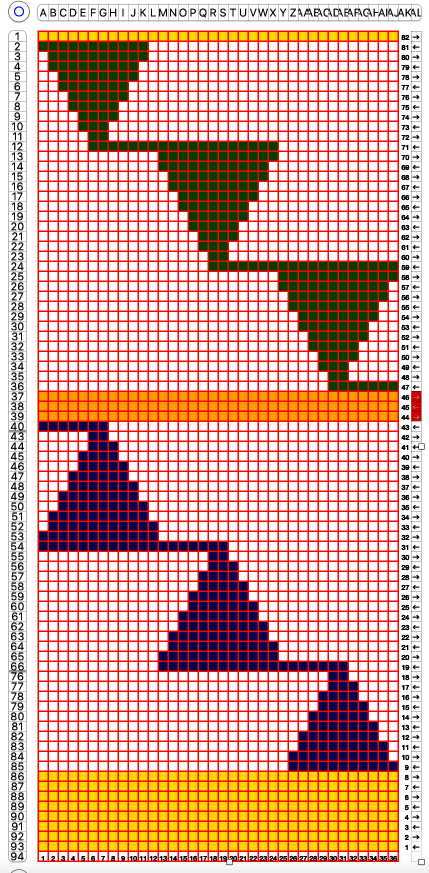
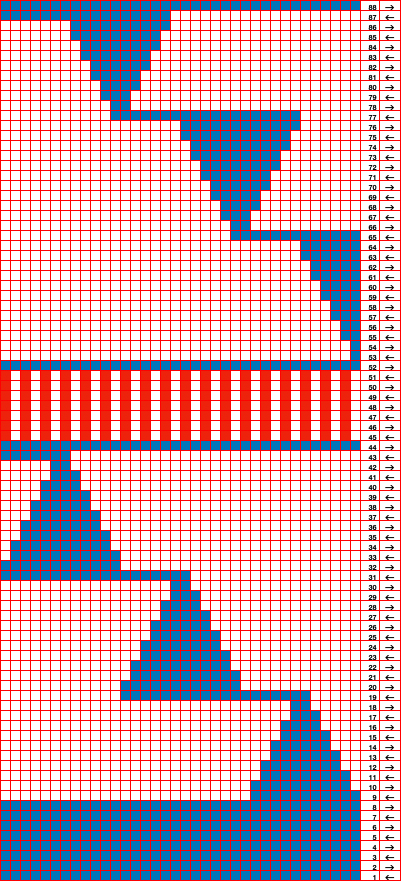
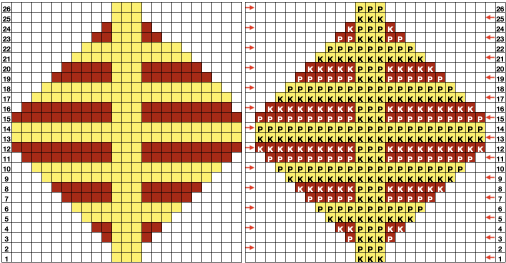
The visualization chart for the first experiment:
A 30X24 repeat: black cells form knit stitches including below and above white cells. White cells slip until a black cell occurs directly above them.
B a knit side visualization of color changes: the elongated stitches, marked by conical lines, are drawn where they would appear, with floats formed behind them by skipped stitches. 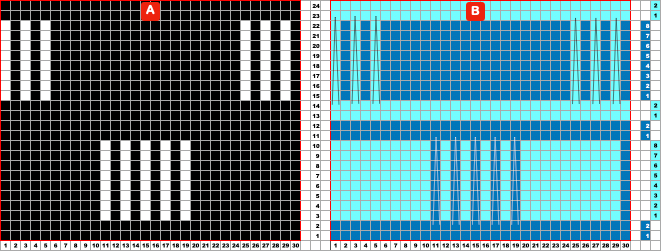
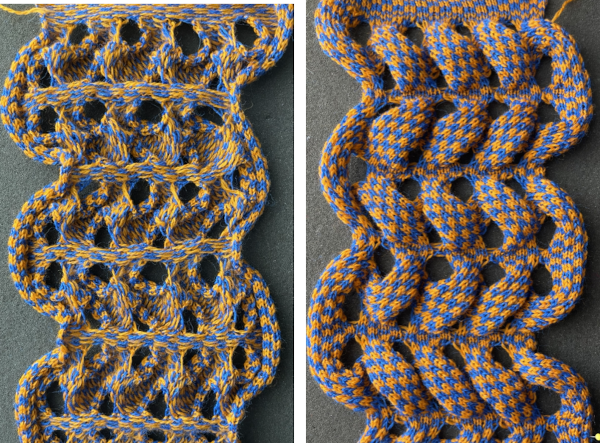
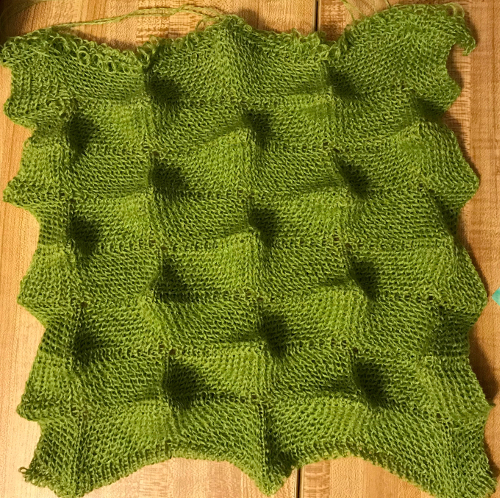
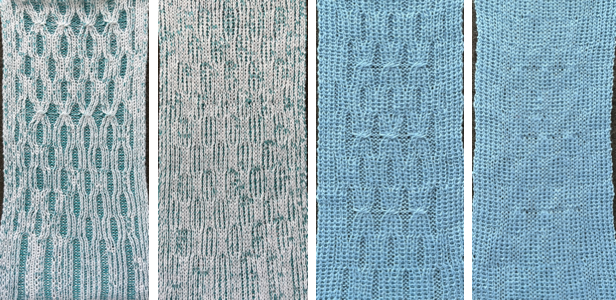
 Eliminating extra striping by bringing elongated stitches to the purl side may be achieved by transferring stitches between beds, and using programmed needle preselection to track when to do that.
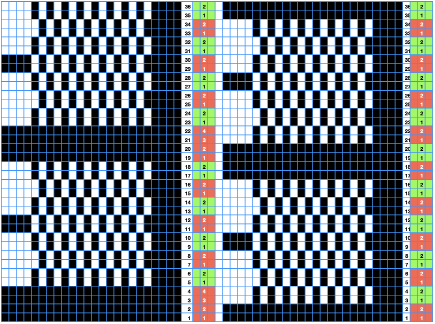
Taking the same repeat into consideration, the orange cells serve as markers for stitch transfers 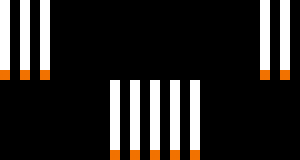 A programmable repeat:
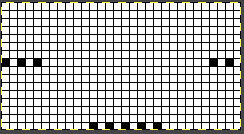
 Cast on for every other needle rib, then transfer all stitches to the top bed. This allows for even weight distribution on all stitches.
When a closed cast-on does not matter, the “broken toe” cast-on is an alternative to having all stitches on either bed  Using the ribber comb to cast on the single bed is documented in the post
  Both the knit and ribber carriages are in use.
  The knit carriage remains set to knit throughout, end needle selection is engaged.
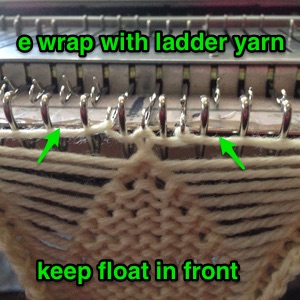
The ribber carriage is set to slip throughout, with needles point to point, its stitches are never knit, they are held until a transfer is made once again.
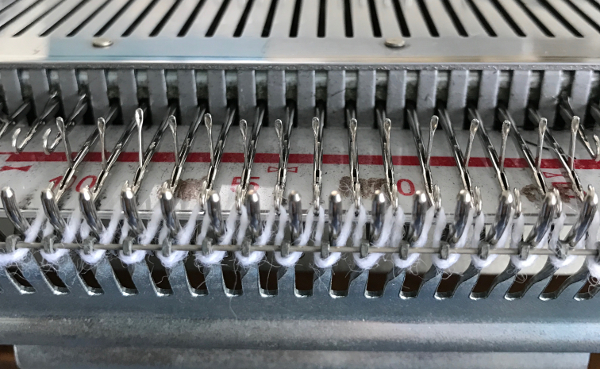
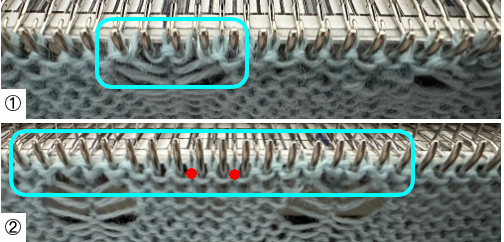
They stay in the B position after transfers so as not to be knit, are held, and will form the elongated stitches on the purl side, knitting off when the same color is returned to the opposite bed every 8 rows.
After transfers, empty needles are taken completely out of work.
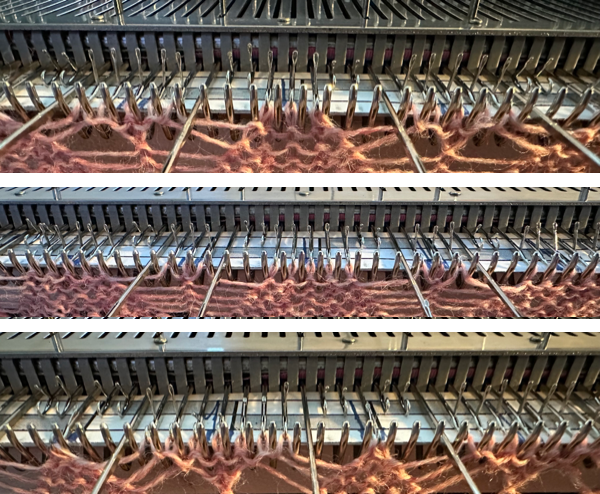
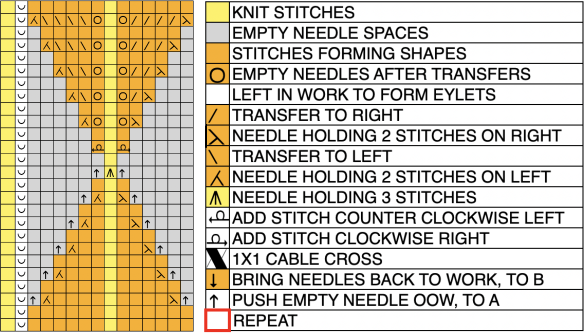
In this visualization, the conical shapes mark areas where the elongated stitches will form on the purl side, R marks stitches transferred down to the ribber, and M, the stitches transferred to the top bed: 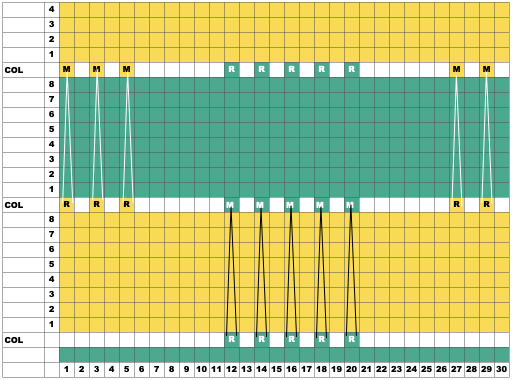 To duplicate my swatch, cast on and knit at least one base row with the dark color, ending COR
COR: program the first row, knit 1 row to the left
COL: transfer stitches on preselected needles down to the ribber, and push empty top bed needles out of work, OOW.
 Change to a light color. As the knit carriage moves to and from the color changer, floats will form in the location of the out-of-work needles on the top bed.
  COR: knit 8 rows, there will be a new preselection as the knit carriage moves to the left
  COL: transfer needles previously on the ribber onto the empty needles on the top bed, placing them in work position so they will knit on the next pass, and transfer new needle preselections down to the ribber.
  Knit 8 more rows, change to the dark color, repeat transfers of ribber stitches up, preselected stitches down, and continue knitting, following needle prompts.
 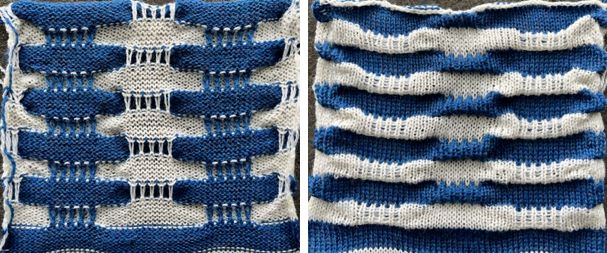 Printing custom needle tapes is an option that relies on printing the generated images to scale.
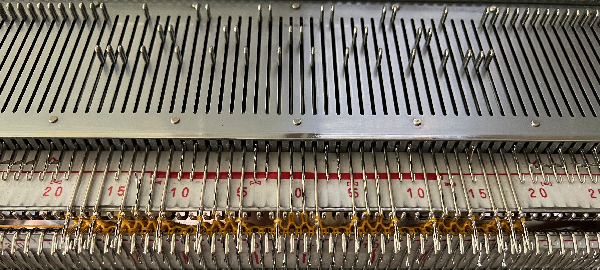
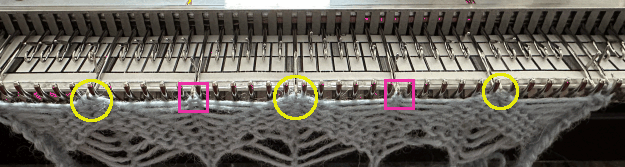
Marking the needle tape or metal bed with water-soluble pens or pencils is the old low-tech go-to.
However, custom markings can be made on strips of paper slipped under needles on either bed and marked for any chosen spacing as well as in multiple colors.
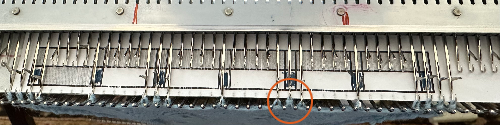
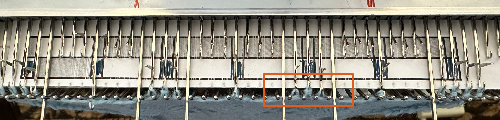
An illustration for a test on a repeat different from the programmed one began with marking a strip of paper on the top bed for alternating transfers to and from each bed using two colors:  The resulting tape may be used on either bed, seen here placed on the ribber. The markings on the metal bed are left over from a previous project.
  The reversed carriage settings
  The repeat is not programmed, setting the knit bed to slip allows the knit carriage to make free passes from one side to the other, and the stitches moved to it never knit.
All knitting happens on the ribber.
In Japanese machines, the ribber often produces tighter stitches. Since most needles will be knitting, the tension normally used for the chosen yarn on the top bed for stocking stitch may have to be loosened by one or two numbers for smooth knitting. In Brother machines, the higher the number, the looser the stitch.
The ribber needle presser bar for Brother machines is made of plastic alone and does not exert as much pressure on the needles as the ones used on the single bed, requiring care in watching for needles that slide into other than the proper position during knitting.
Emptied needles need to be placed completely out of work.
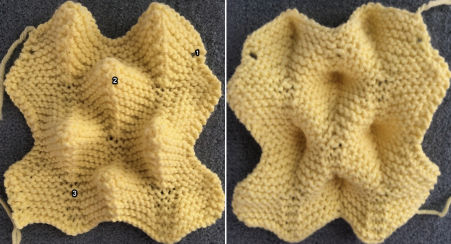
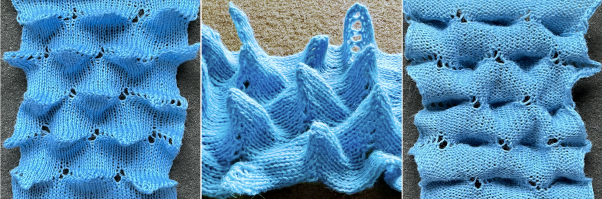
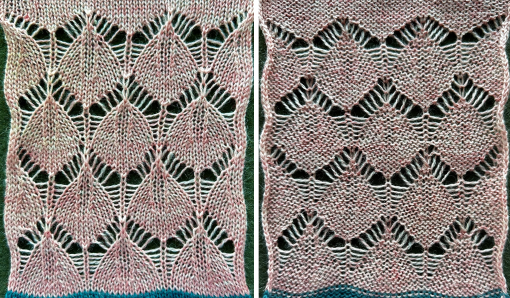
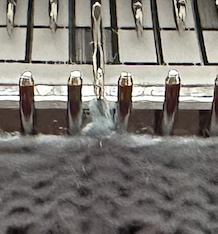
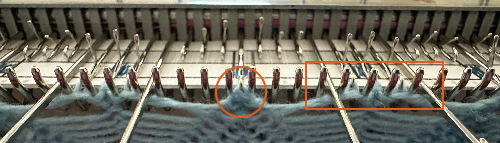
Floats will form on the ribber as the carriages move across the beds in the location of the empty needles, and the skipped stitches on the opposite bed will grow in length. 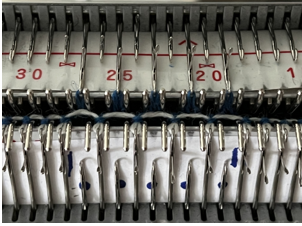 Though the knit side of the fabric is facing the knitter, the long loops appear behind it on the purl side, with the results in the same family as the automated single bed result but with more fiddly execution.
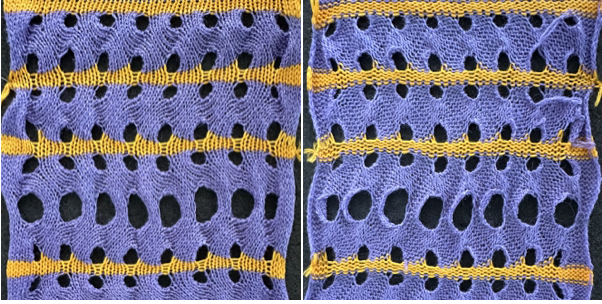
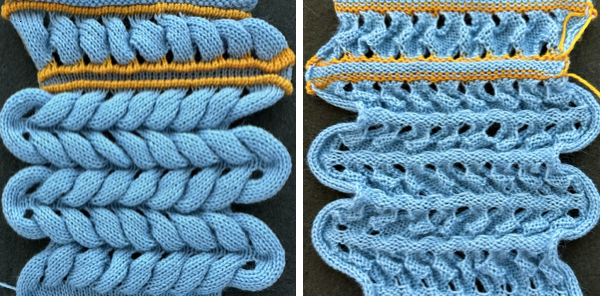
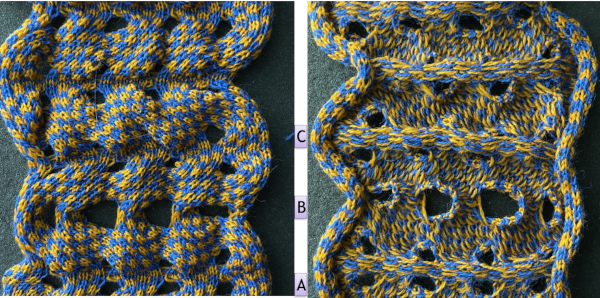
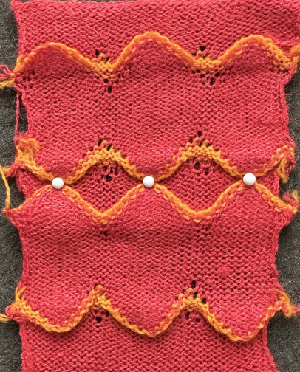
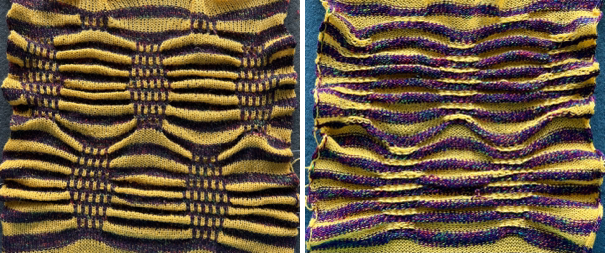
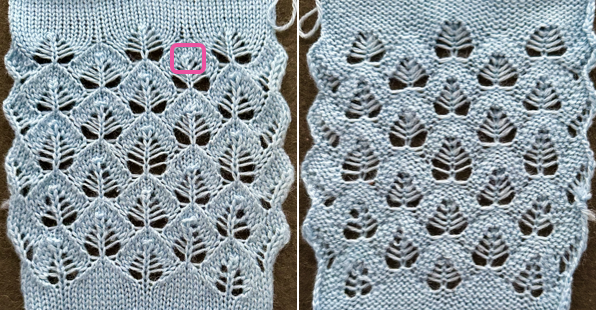
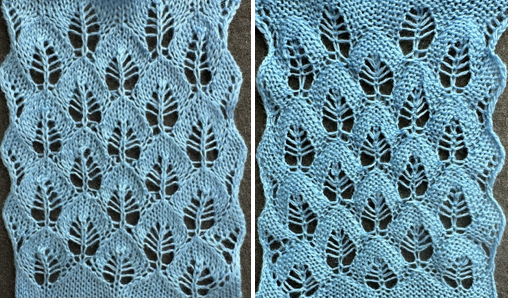
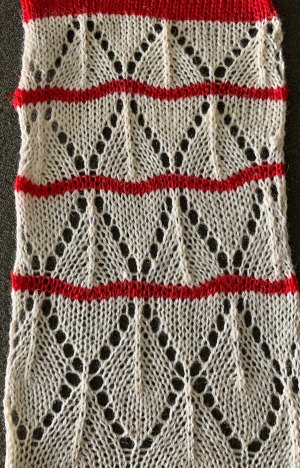
  Seeking a closer match for the inspiration companion pieces:
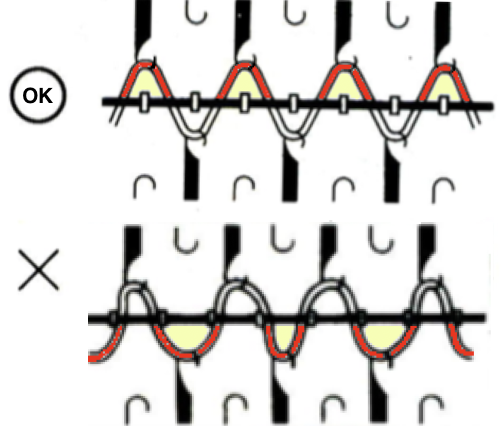
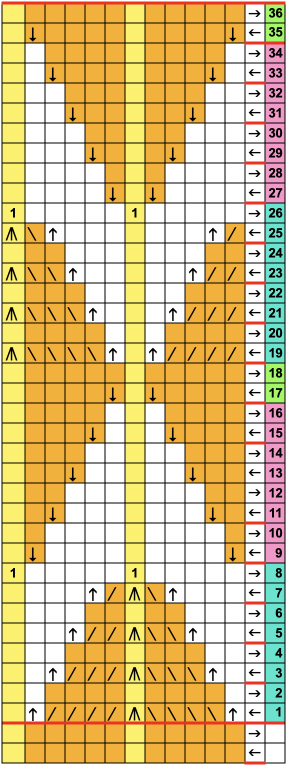
in multicolor slip-stitch patterning, the initial preselection row is generally made toward the color changer, with changes happening from the left and spaced at predetermined even numbers of rows.
Shifting that convention allows for elongated stitches on alternating color shapes without extra horizontal stripes in each color.
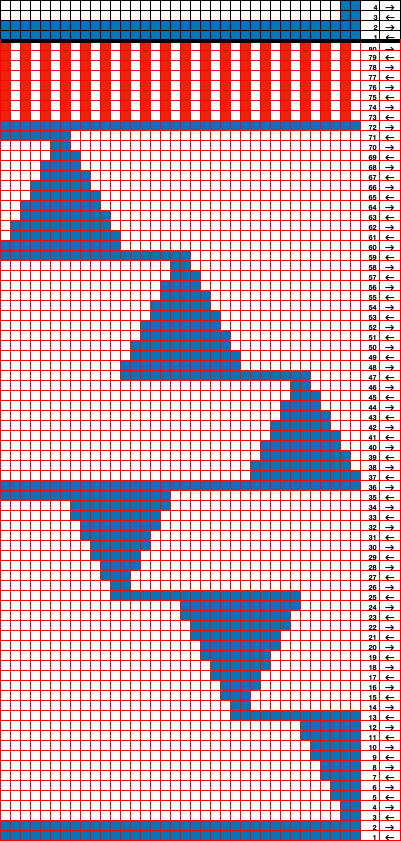
The repeat was first visualized and planned in a spreadsheet, repeated twice the necessary width, and outlined with a red border.
A few rows were added at the top of the table, checking for proper alignment of both the design and the color changes. 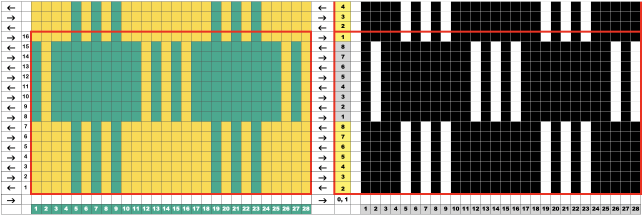 The single repeat measures 14 pixels in width by 16 in height
 and was tested on 44 stitches, with a planned knit stitch vertical border on each side.
  To duplicate the swatch, cast on using a dark color.
COL: the first design row in the adjusted repeat is programmed from left to right, away from the color changer with no yarn in the feeder. Setting the machine to slip in both directions allows the free pass when all needles are in the B position.
COR: thread the light color through the changer’s sinker plate, A position,  and knit to the left
COL: make certain the light color yarn is properly threaded in its place in the color changer.  Continue knitting until new needle preselections are made as the carriage returns to the left
COL: change to the dark color, subsequent color changes happen every 8 rows. 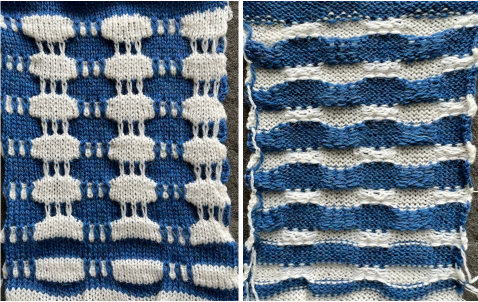
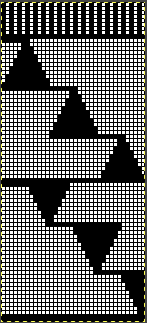
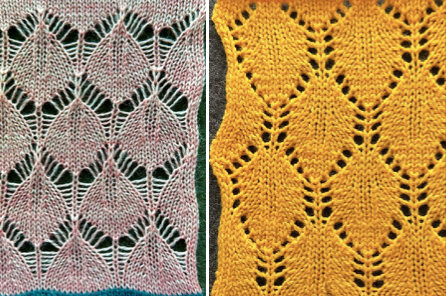
Reviewing a post from 2015 on a slip stitch experiment, the second source image now found attributed to Max Mara, inspired me to try a version using software presently available. 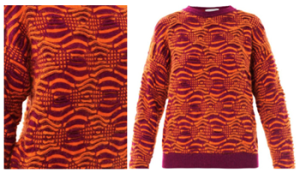 The speed in developing DIY designs and knitting them has grown exponentially with the use of new software and the capacity to move away from mylar sheets or punchcards.
The first 24X56 diamond shape
 rendered in half drop, to a 48X112 repeat, with a test in the alignment of multiples
 The proof of concept was knit at first with color changes every 2 rows, then converted to double length using the machine built-in function, followed by color changes every 4 rows.
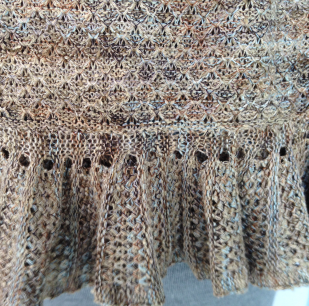
The light color yarn is a wool rayon, the dark is a shetland wool. 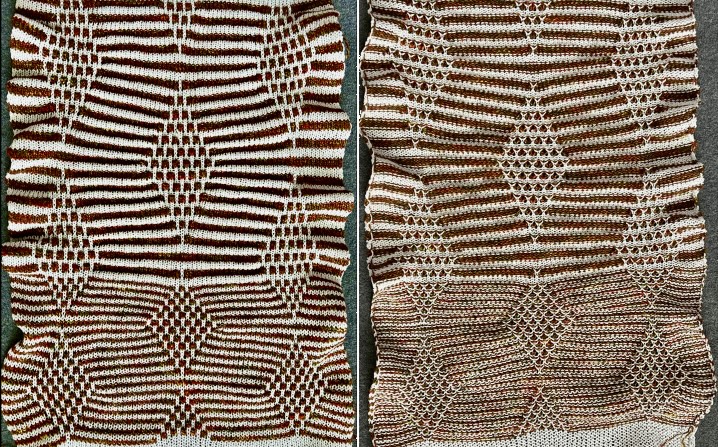 The all-knit rows on the side edges create ruffles.
An attempt to show the changes in texture on both surfaces: 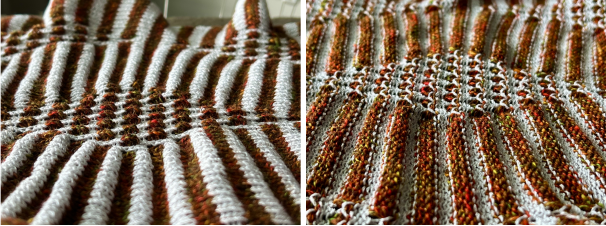 The limit on Japanese model machines for tuck stitch unless using very thin yarns is often 4 rows.
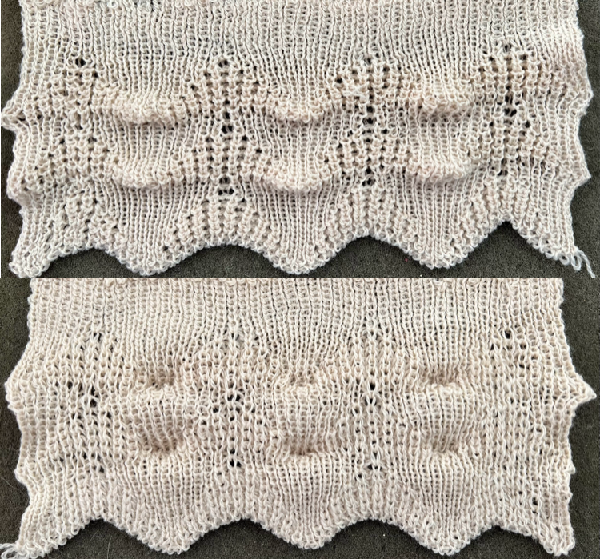
The inspiration image appears to have far taller color stripes, slip stitch is far more tolerant than tuck, what about trying color changes every 8 rows?
Keeping in mind that the light color consistently forms the elongated stitches on the purl side with no immediately visible long stitches on the dark color, the repeat first doubled to 48X224, if doubled in length again would require 448 rows of knitting!  A quick partial test revealed the diamond shape is far too elongated and that dark stripe needs to be gathered as well,
 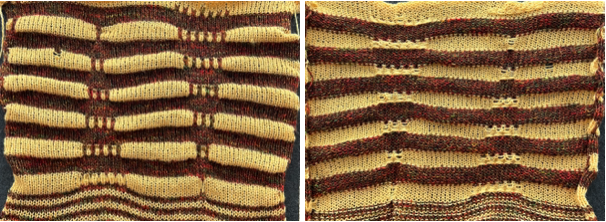 Back to the drawing board: after taking a break, the inspiration image is magnified and reexamined, revealing the fact that there are knit and purl stitch combinations across the same rows, not practical to execute on home knitting machines (excluding G carriages from the conversation).
  A compromise, still seeking to elongate only the stitches in the dark color on the knit side of a richly textured knit, planned for color changes every 6 rows,
 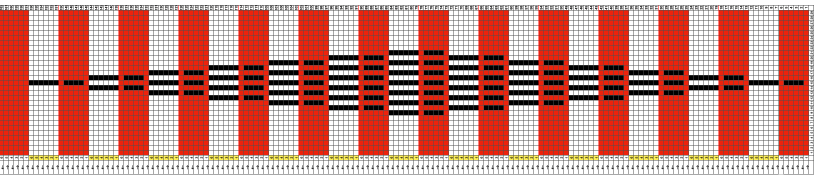 with color reversal necessary for slip stitch knitting, adjusted in width, the tested 40X162 repeat
  produces a gathered dark color as well. The knit stitches on either side of the shape form ruffles. There were tension adjustments at the bottom of the swatch, increasing the length of the held stitches, the shape is still too elongated for my eye
 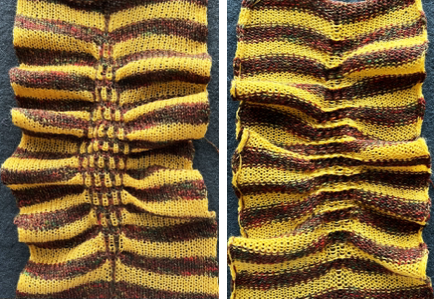 An adjusted repeat, the last in the series, 29X168
 tiled to check alignments
 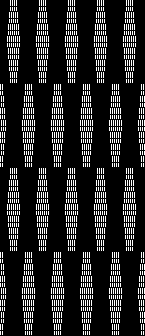 and knit on 80 sitch width using this 86 X168 programmed repeat
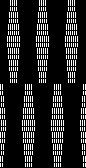
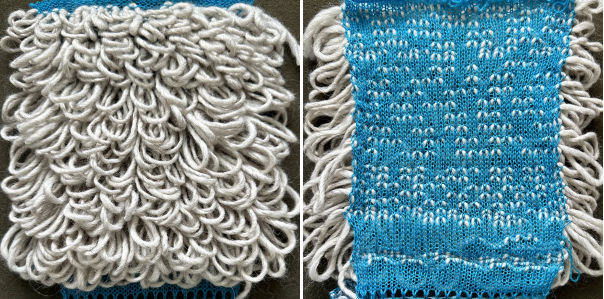
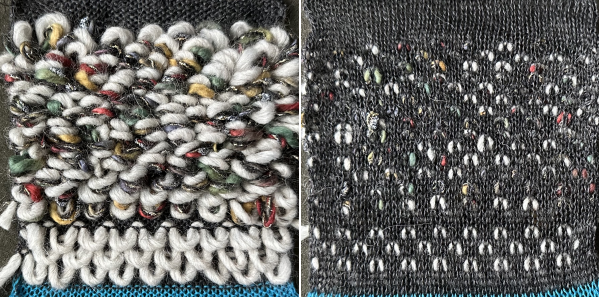
 offers punchcards for the double bed technique referred to as punch pile
 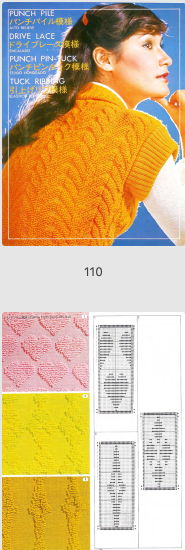 In analyzing the repeats, the black cell rows represent loops picked up on the main bed, the blank rows the carriage passes knitting every stitch on the ribber alone holding the loops down.
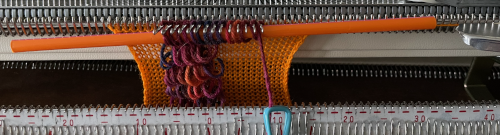 bulky loop yarn, the main bed programmed repeat:
 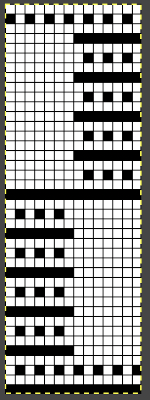 Long loops: a bit on method includes instructions on the use of single bed cast on comb, rulers, ribber gate pegs.
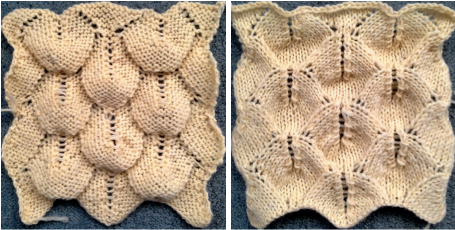
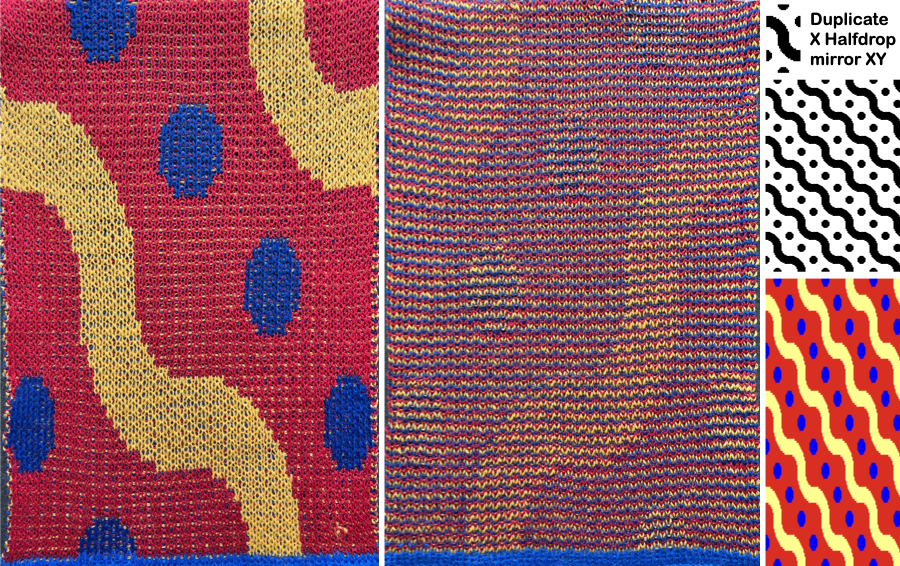 Aiming to form large loops and a larger scale motif with more than one knit row between rows of them, the original 24X48 repeat,
  The process used to attain it: the original repeat was scaled x3 in height, and then again in width X2 for visual balance
 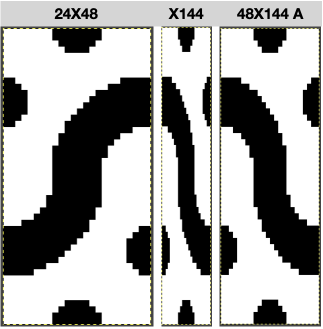 Working in RGB mode the 48X144 image was opened in Gimp, and a new image file in the same size was added with a white ground, and then a third 48X3 image with rows 2 and 3 colored in red.
 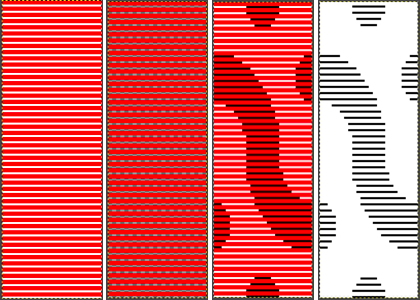 I grabbed yarns for color visibility and thickness, not fiber content, and in the resulting knit the loops flattened permanently in the red acrylic and the blue acrylic blend. The technique might be better served using a 3/8 wool for the loops.
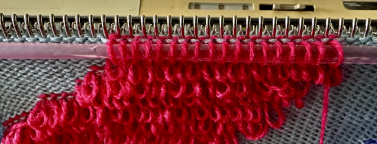 The full repeat in the final swatch measures 6X11.5 inches
 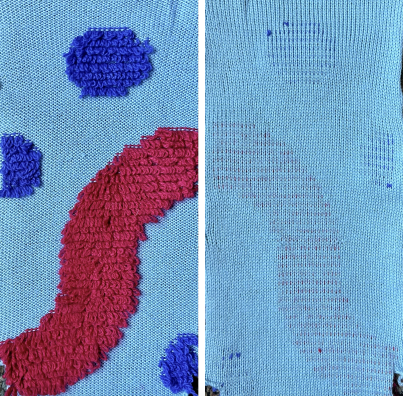 The same repeat was used again, and the red acrylic yarn was switched to the background for a result that would steam flatter permanently, while the loops were formed with triple yarn strands.
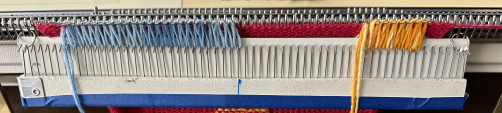
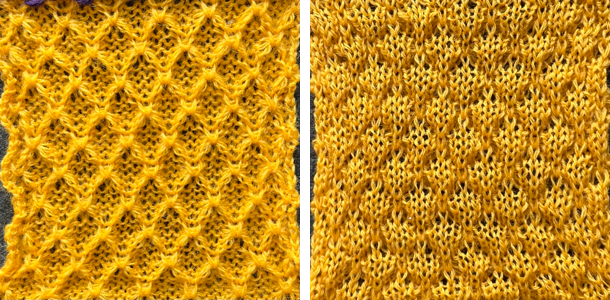
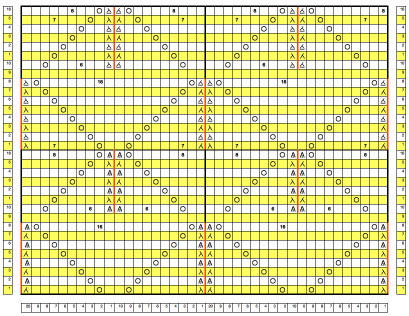
 When searching through published sources and adapting them, results can be random or outright failures. Pondering patterning on every other needle, with end needle selection off, this design from:
  for 12 stitch punchcard models came to mind, including this chunky machine design
 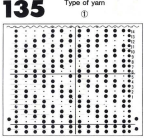 The what if repeat, expanding it to a 22 stitch version with every other column blank and checking for proper tiling
 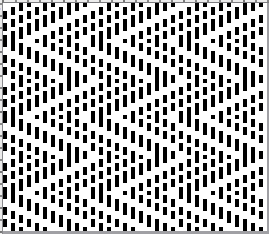 was not useful as a knit woven pattern, but when used to form loops on preselected needles and graduating the height of the loops the result proved interesting.
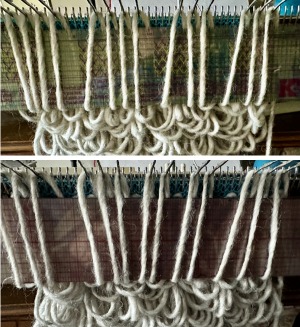
 Diagonal designs, in particular, can be hard to force into 12 or 24-stitch conventions. With further editing, the published repeat is adjusted to larger 23X18 pixel dimensions,
 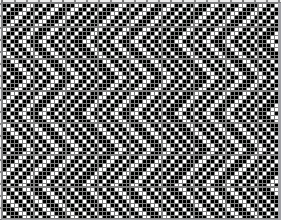 This test begins with caution, then produces a dense pile testing the limits on yarn thickness using the repeat:
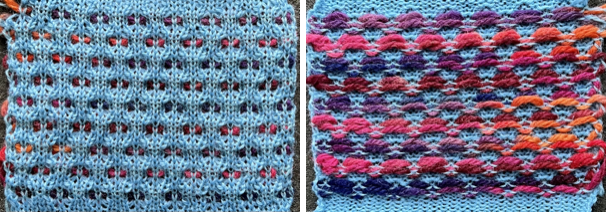
 Pony beads were threaded on a double strand of cotton from an unmarked cone, and loops were formed with beads advanced and placed between and below preselected needles.
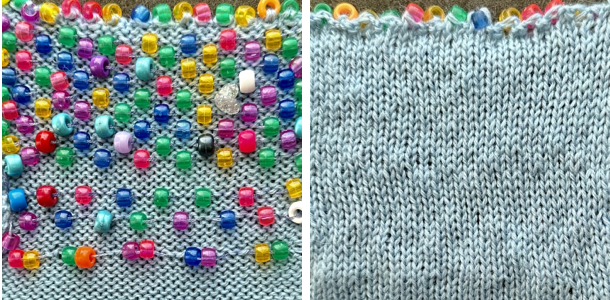

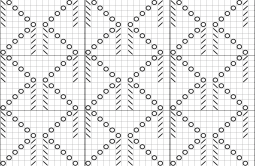


 and this, with both patterns shared in the same blog post