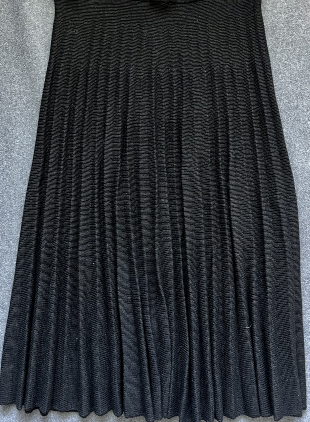
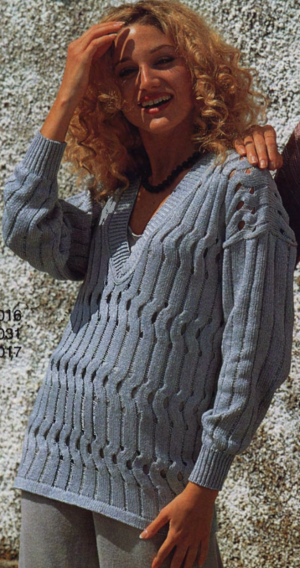
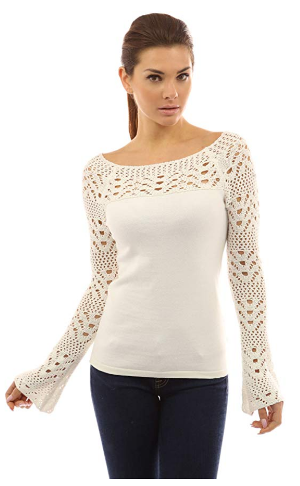
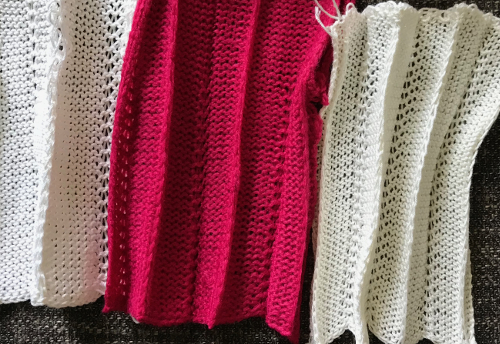
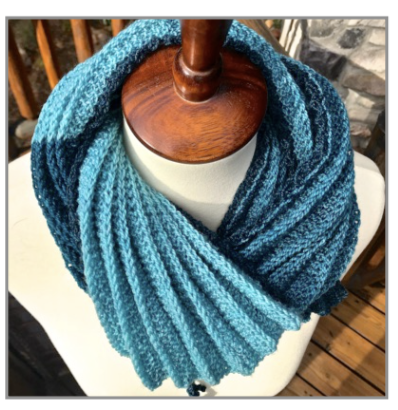
Knit skirts have been present in runway and online publications again. Another Mary Dowse pattern has stirred up interest in a design knit in fair isle shadow pleats.
Shadow pleats knitting began to present some of the techniques involved in creating this type of fabric fold.
The permanence of the folds relies on blocking from careful and almost aggressive to far more casual approaches depending on the fiber content and end-use for the knit.
As mentioned in the older post, for a while, skirts in shadow pleats were very popular. One of the tips for blocking them at the time when acrylics were also new and in trend, was to hang completed pieces with the bottom evenly weighted inside a large trash bag “sealed” as tightly as possible at the top, with steam entering from the bottom of the bag ie from a portable electric teapot. I always had a hard time imagining the specific activity, and the method may have been part of the reason as to why published patterns for such items quickly disappeared.
Simply using a yarn with memory in the rows composing the larger folds always seemed a more viable option to me.
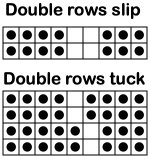
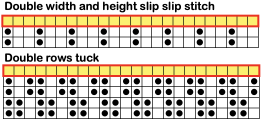
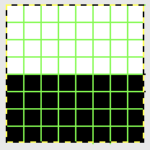
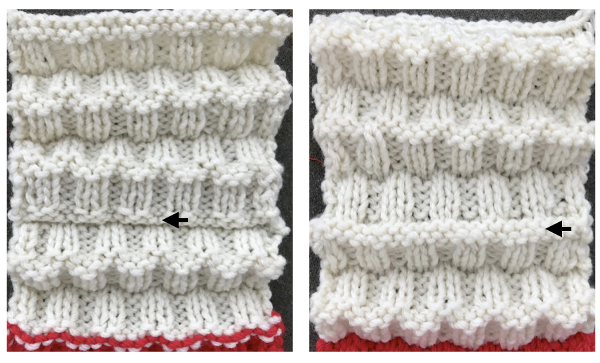
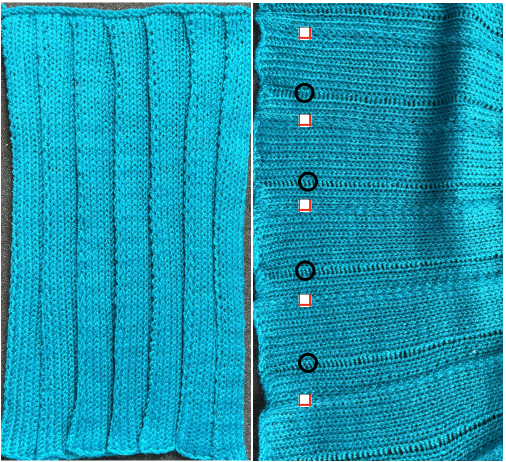
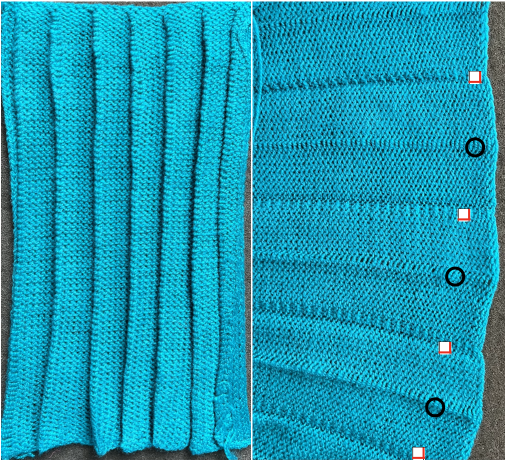
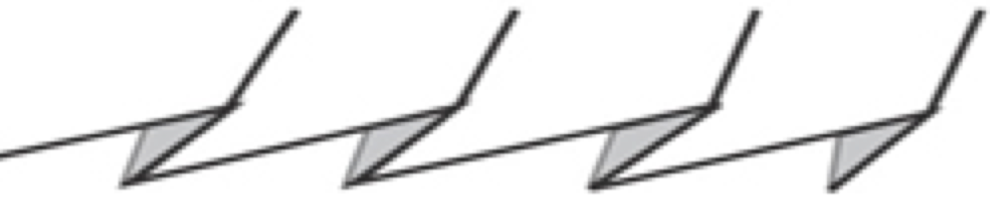
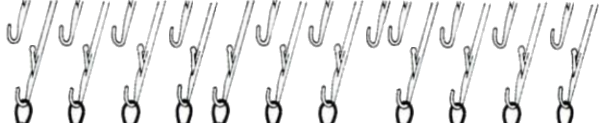
Ribber needle setups may be used to produce a rounded appearance in the resulting folds
rolled single pleats 
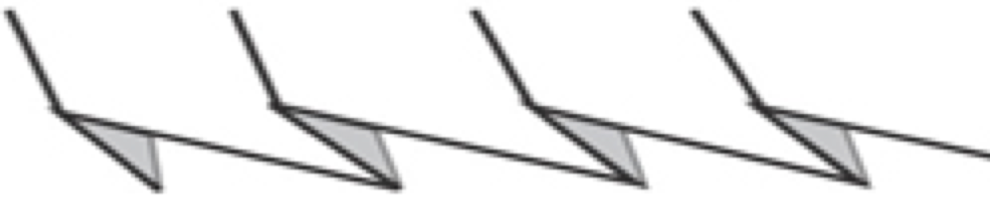
![]() double rolled pleats mirror needle groups
double rolled pleats mirror needle groups![]()
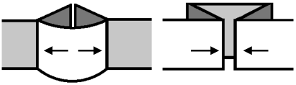
![]() accordion rolled OOW needles are spaced evenly on both beds
accordion rolled OOW needles are spaced evenly on both beds ![]()
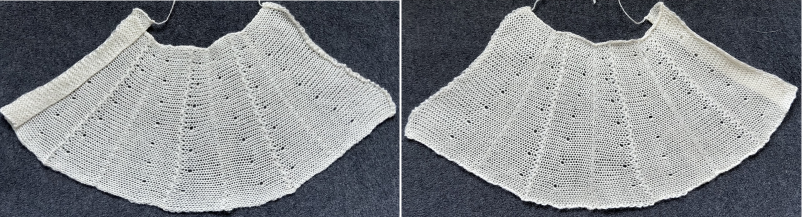
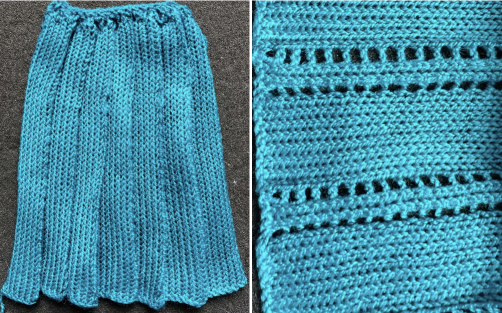
 A large variety of pleats may be knit on the single bed as well, one being shadow pleats. The resulting knits also need to be gathered on one of the 2 edges in items like skirts at waistlines, and the number of knit rows needed for the volume required can be daunting and a large commitment of time if not effort.
Very large swatches in colors that one guesses to be appealing guide decisions based on evidence and personal preference.
Old published patterns often called for specific brands of yarn which decades later are likely to no longer be available. In addition to searching for substitutes that will produce a similar gauge, the behavior of the newly found yarn may simply be different than expected and as described in the instructions.
Inspiration photos found online are often small and do not reveal clear details, so attempts to reproduce the pictured knitting techniques may yield unpredictable results.
Assuming traditional yarns are in use, the larger rolled shapes in the fabric formed by the higher number of rows knit in the thick yarn tend to roll toward the purl side, the familiar effect seen in any single bed stocking stitch.
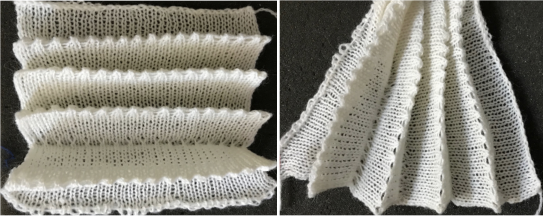
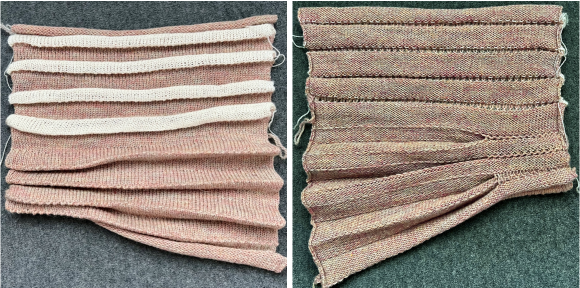
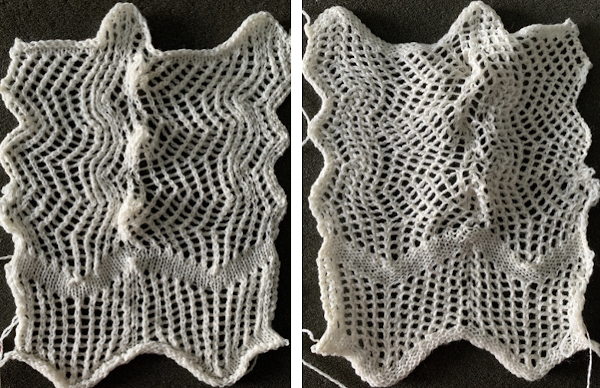
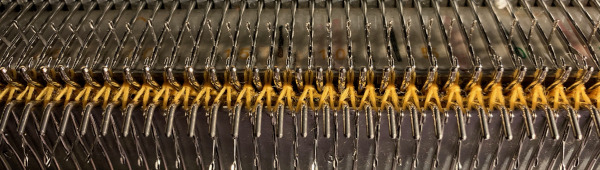
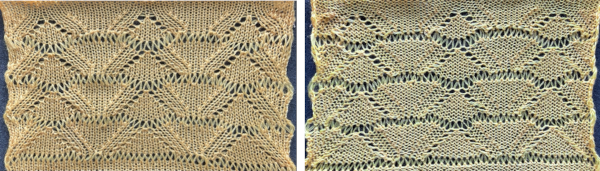
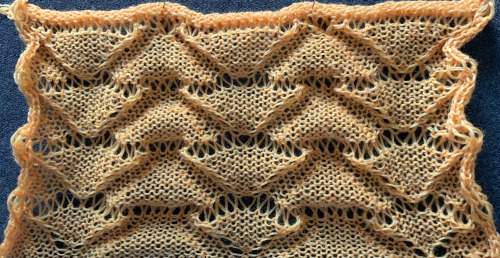
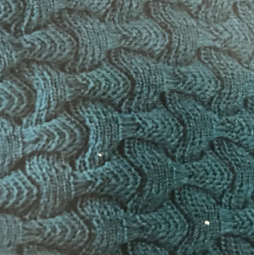
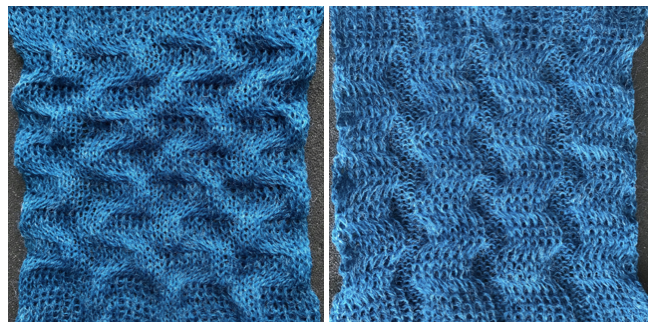
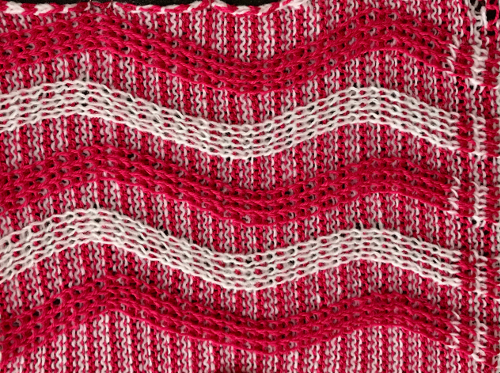
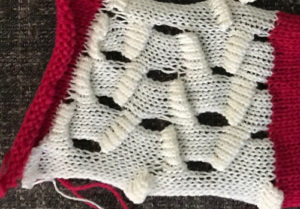
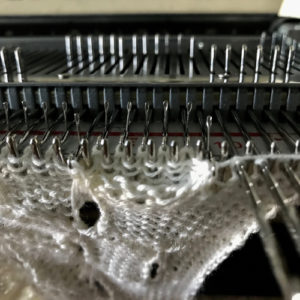
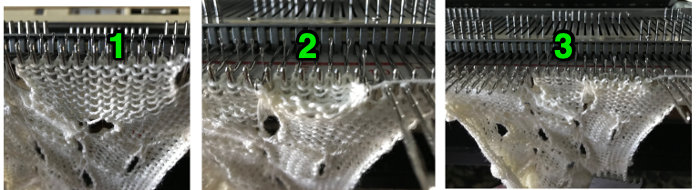
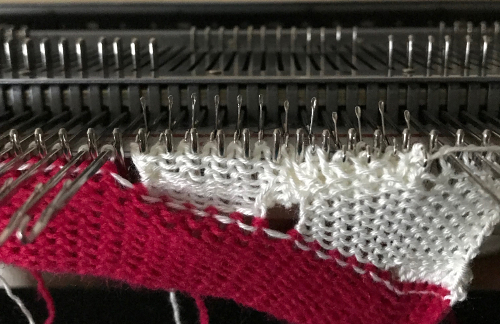
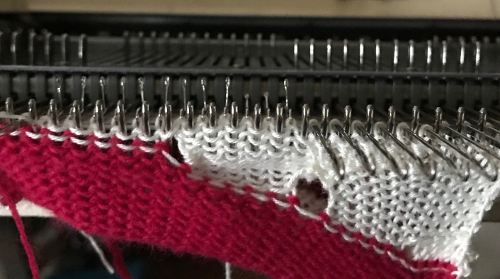
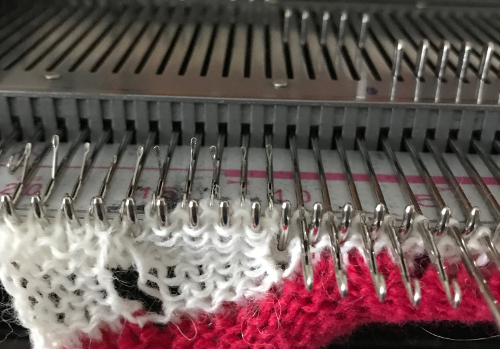
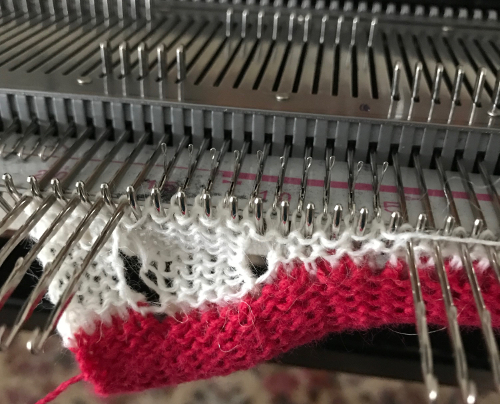
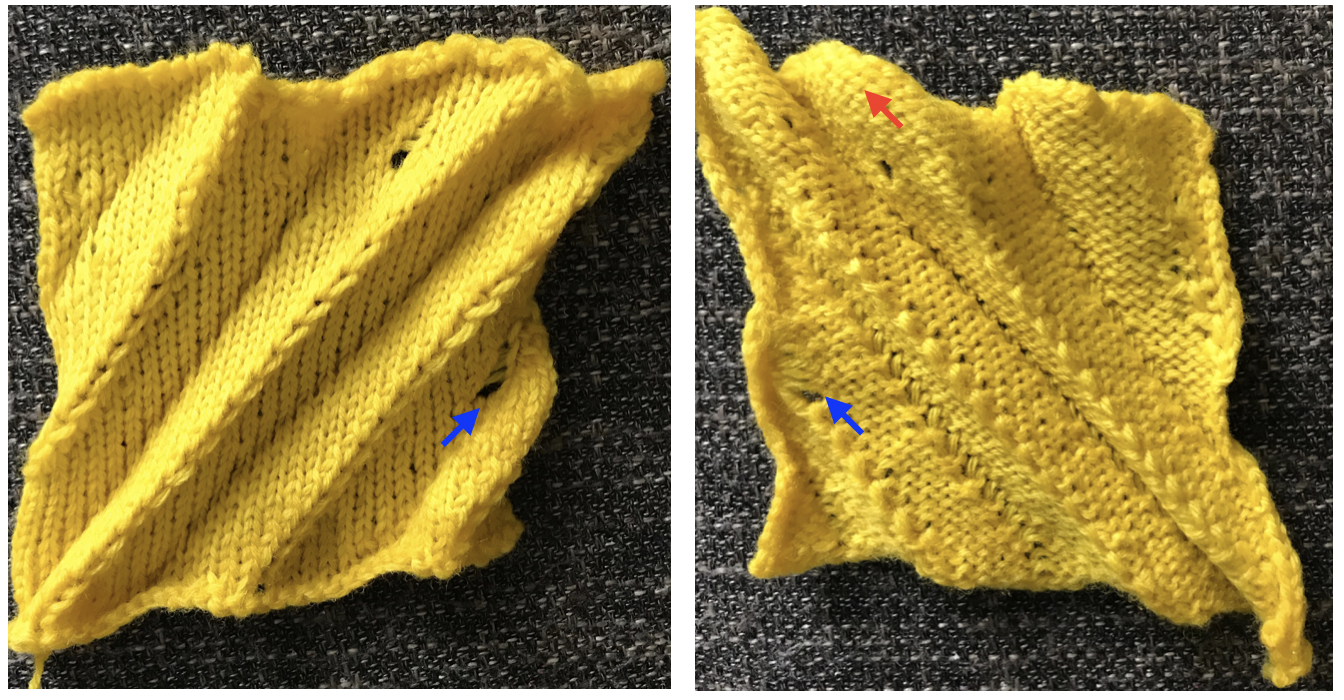
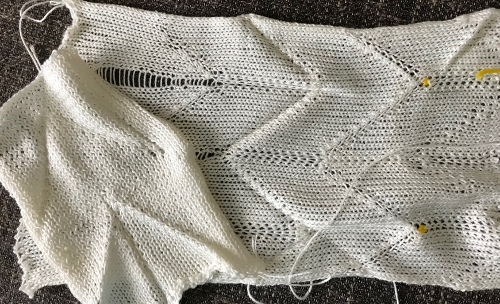
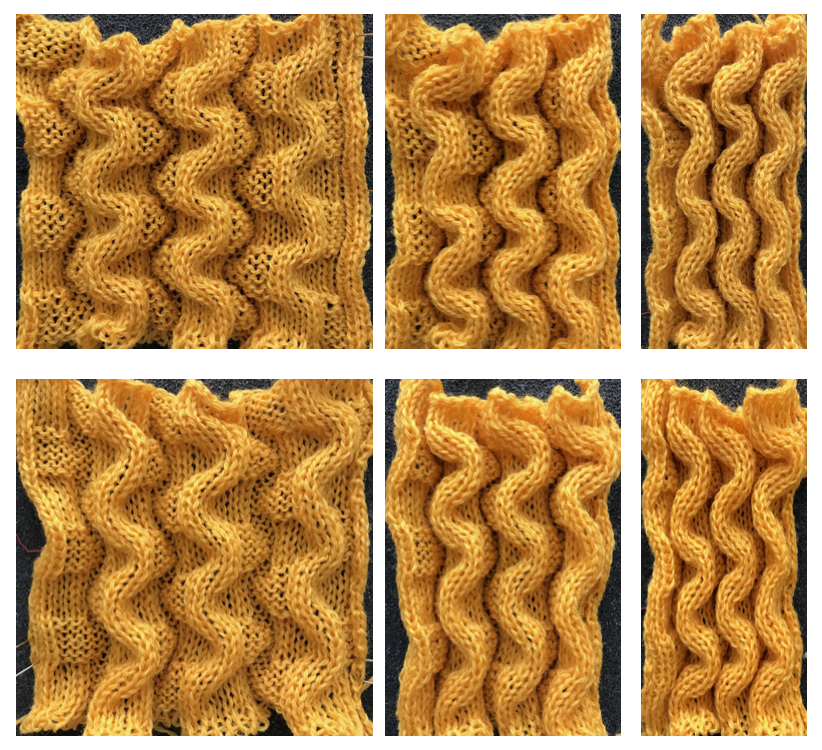
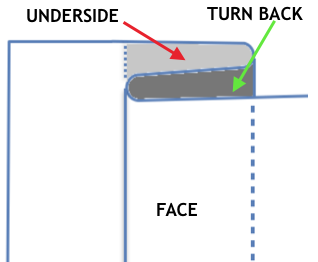
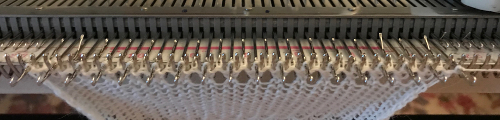
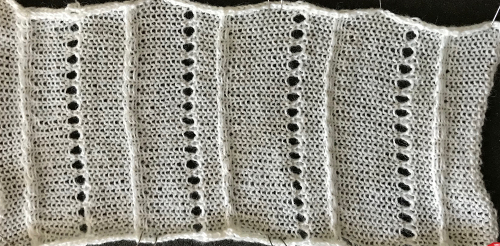
Part of the inspiration photo that began a renewed forum interest in the fabric 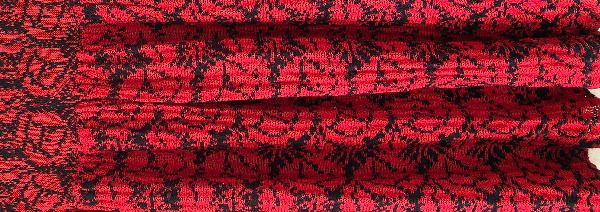 The appearance is of a fair isle pattern interrupted by the use of thinner yarn(s) in one or both feeders. Blocking long pieces can alter the aspect ratio of the original design, so in some cases, the width of the repeat or even the length would need to be doubled.
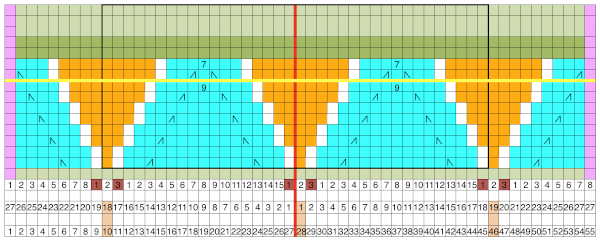
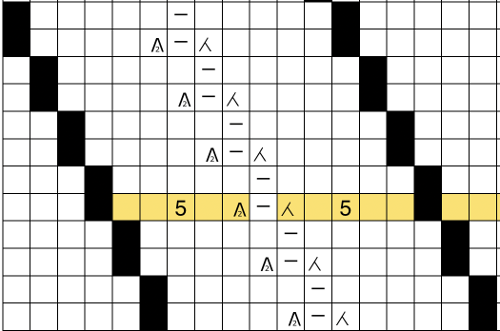
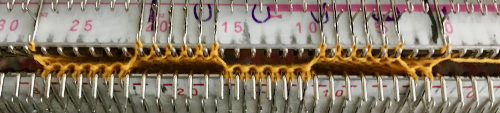
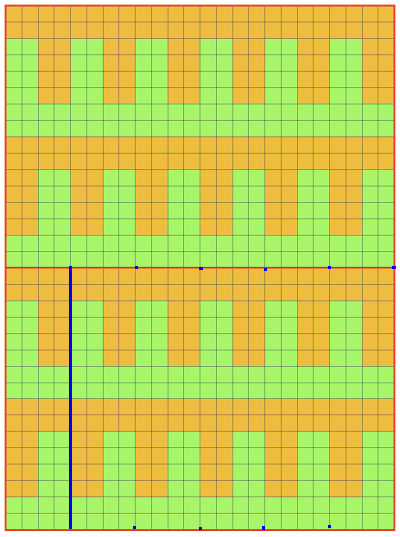
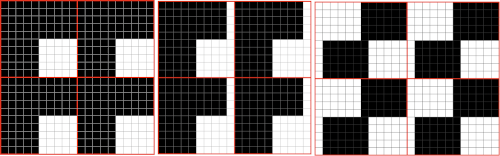
My initial repeat was 20X22 pixels: ![]() In this view, obvious places are highlighted for a possible switch to thinner yarns. If changing yarns manually, it is easier to change those in the sinker plate’s B position. If necessary, the planned motif may be color inverted to make those actions easier.
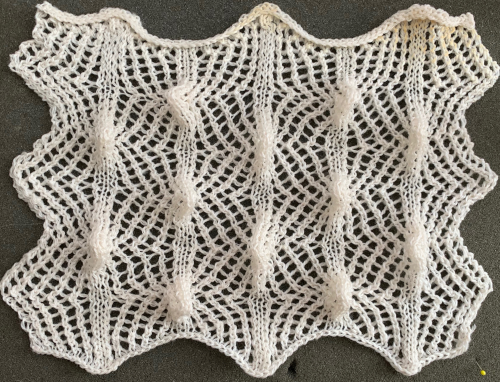
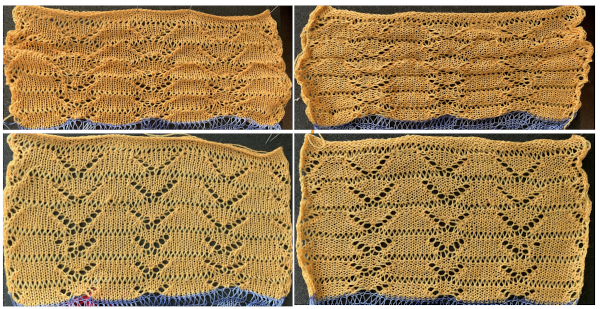
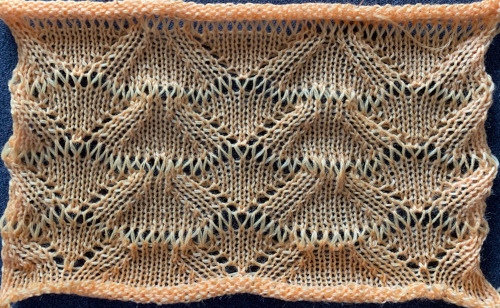
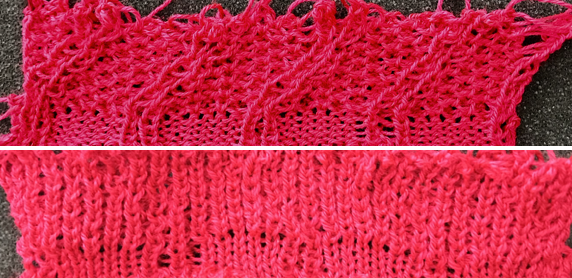
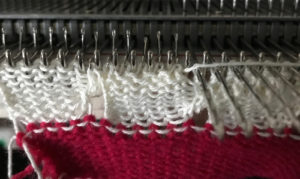
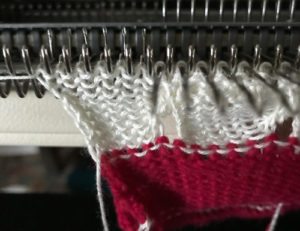
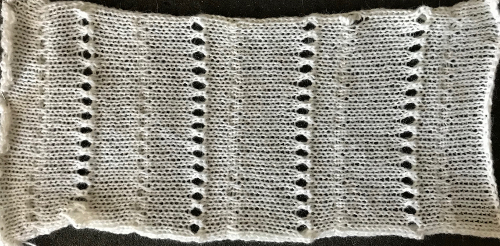
In this view, obvious places are highlighted for a possible switch to thinner yarns. If changing yarns manually, it is easier to change those in the sinker plate’s B position. If necessary, the planned motif may be color inverted to make those actions easier. 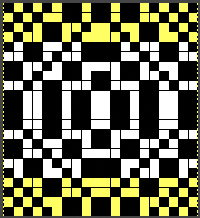 Both yarns used are wool, a yarn that has memory and spring-back. In the potential fold rows, the red color was replaced with a thin ply with the same fiber content. The first folds were knit in an *8 with thin, 14 with thick, 8 with thin** color sequence. Watching the knit as it progressed showed the thicker fair isle areas folding inward, with the thinner areas folding outward. The remainder of the swatch used a 4 thin, 8 thick sequence. The knit was steamed and pressed, the folds are soft but permanently present with the lower edge of the piece lying quite flat after a considerable amount of time.
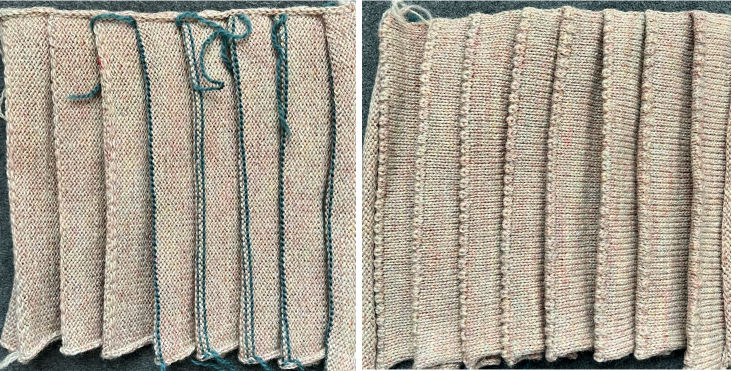
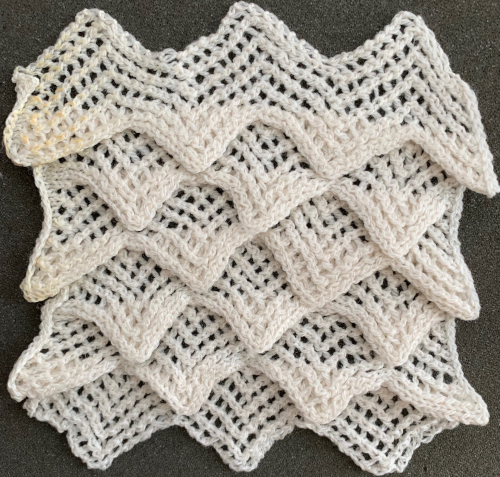
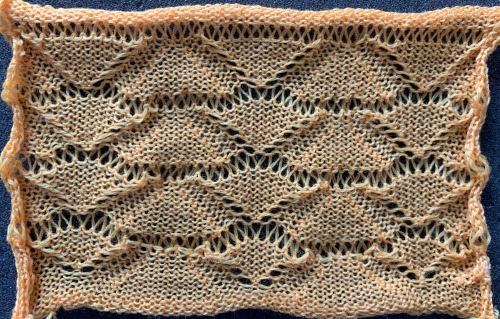
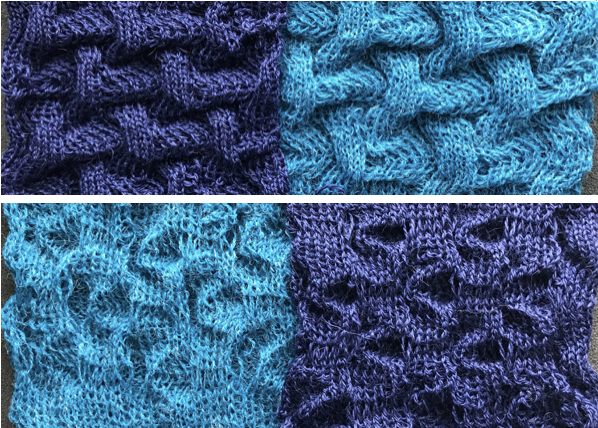
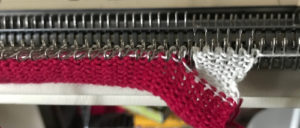
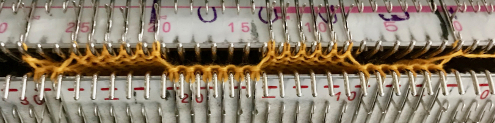
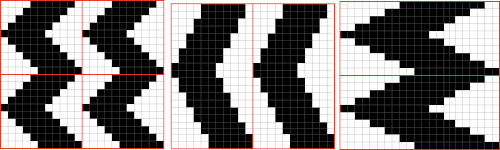
 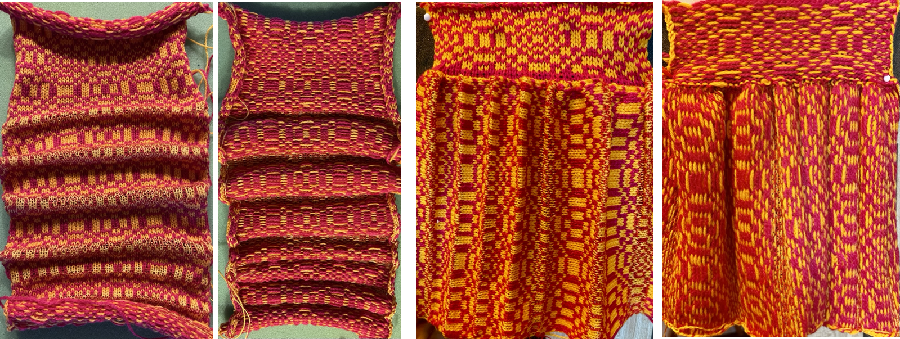 Here the red yarn used is acrylic, the black wool. An 8 thick 4 thin sequence was used, but in the thin areas, both colored yarns were replaced with single plies. The pattern is 48X54 pixels and from one of the Brother mylar sheets.
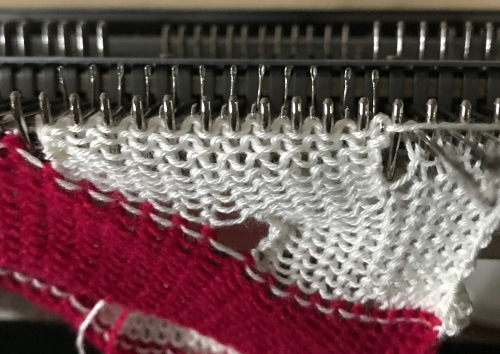
 ![]() The first swatch sports black flowers, the second, red ones. The knit sequences were the same, the change in texture in the areas may be seen here.
The first swatch sports black flowers, the second, red ones. The knit sequences were the same, the change in texture in the areas may be seen here. 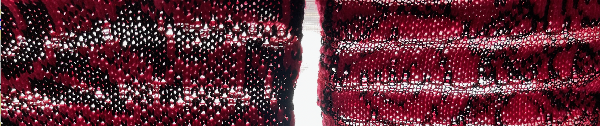 The black flowers swatch was ironed, becoming permanently flattened, aka “killed”. The hope is to manage the red flowers swatch in a better way. The thinner yarns are in slightly different shades of the base colors, so a subtle striping occurs in the areas where they are used. Both swatches were knit on the same number of needles and at the same tension.
 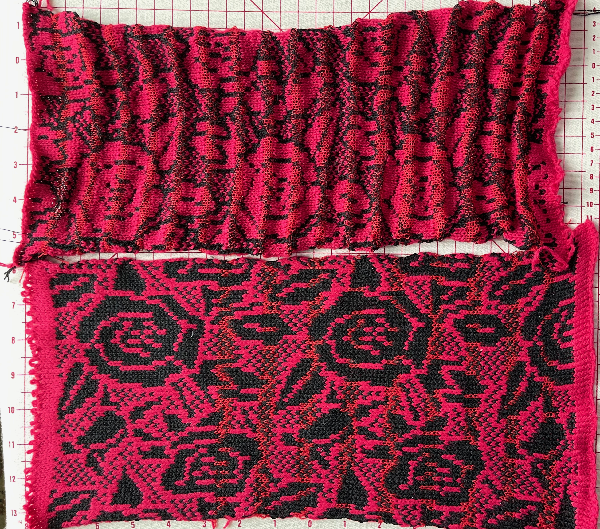 The blocking saga: I do own blocking pins but honestly have only used them in demos, and on rare occasions such as this, or to cut them down when I needed a fast replacement for a ribber cast on comb lost wire.
Whether extremely detailed blocking is ever needed can be a very emotionally charged topic for some, best saved for another day.
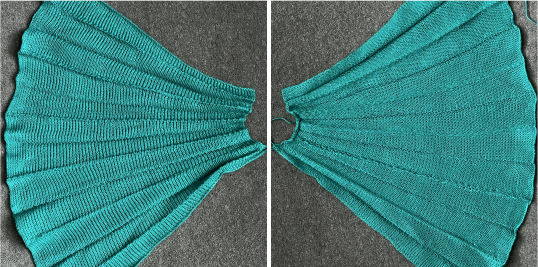
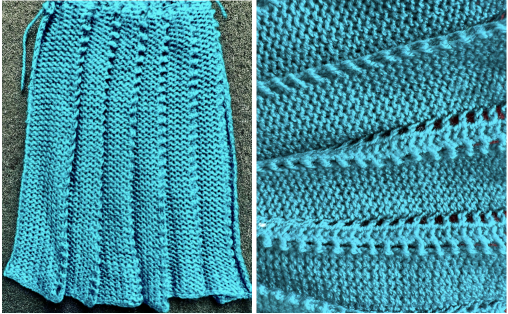
With an optimally gathered edge at the waistline secured, the wire is threaded very evenly through the bottom of the “skirt”, and evenly distributed weights are placed across it. The fabric is likely to grow considerably in length, another reason for knitting very large test/gauge swatches to calculate the width/length required.  I downsized a few years ago letting go of most of my professional equipment. My only iron at the moment when and if it generates steam, did not appreciate being held vertically, spitting hot water at my feet, so the amount of steam used to set the pleats was likely short of optimal. That said, with the wire and weights removed, that edge is staying flat, and the pleats appear to be permanent a month later.
 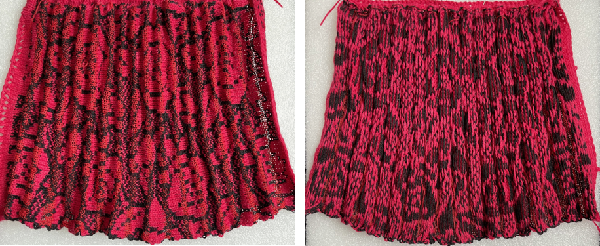 Knitweaving can be used to produce very interesting patterns, both all over or for edgings, and it may offer a viable alternative for patterning using multiple colors in the more prominent purl side rows of the knit. A 1x1selection is a good place to start.
 ![]() Returning to using wools, my efforts with the first yarns I grabbed failed with knit weaving, but since every other stitch every other row is selected, I was able to knit 8 rows in fair-isle with the thicker yarn in the B feeder, the thinner in A, followed by 4 rows of plain knit. The task is easier to accomplish with 2 knit carriages, one patterning, the other knitting stocking stitch.
Returning to using wools, my efforts with the first yarns I grabbed failed with knit weaving, but since every other stitch every other row is selected, I was able to knit 8 rows in fair-isle with the thicker yarn in the B feeder, the thinner in A, followed by 4 rows of plain knit. The task is easier to accomplish with 2 knit carriages, one patterning, the other knitting stocking stitch.
The colors were chosen for contrast making it easier to observe stitch formation.
The swatch, just off from the machine  after a manual tug
 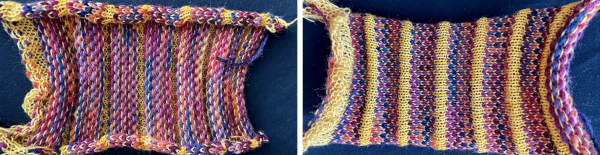 after steaming and pressing
 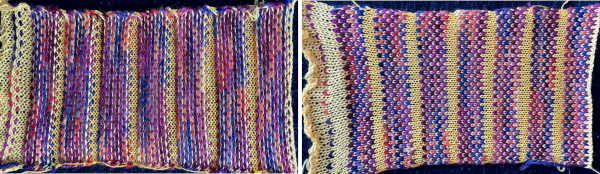 A bit more tugging and gathering on one edge, pleats are set.
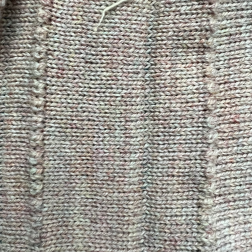
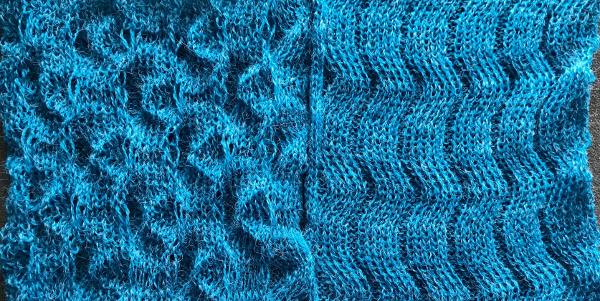
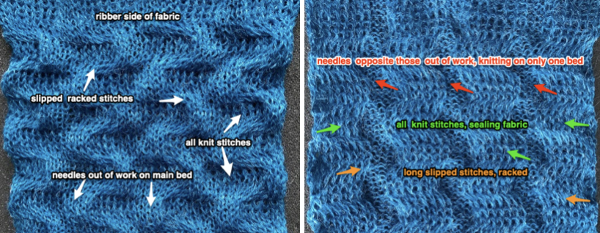
  The swatch view on the left illustrates well the pleating roll formed by the thin yarn to the knit side, the inward roll of the fair isle segment to the purl.
Floats formed by the yarns not used traveling up the sides of the knit should be considered the finishing of the final pieces.
Transitions could be made in any one piece between the ratio of the thick/thin number of rows, perhaps for sections ie yoke shaping, or varying the fold sequences from one texture to the other and back.
Most fabric is only limited by materials, tools, and the imagination of its creators.
Other ways to create permanent pleats
single bed
Origami folds inspired pleats 1 6/19
Revisiting pleats on the knitting machine: single bed 5/18
Pleats created with lace transfers 8/17
Pleats: automating “pleating”, single bed 1/1
double bed
Origami-inspired 2: more pleats and fold using ribber 3/21
Knit and purl blocks to create folding fabric_ “pleats”
Pleats: ribbed, folding fabrics 4/15
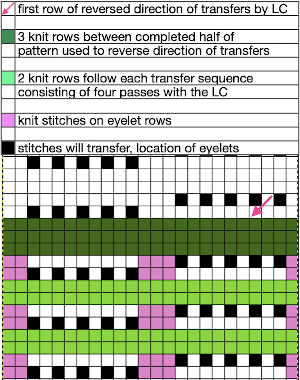
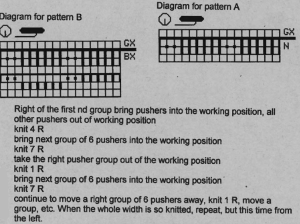
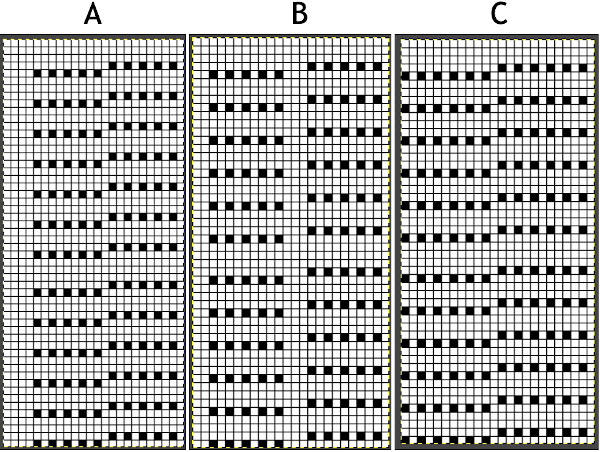 A variation of Card C, with 2 rows blank after each pair of transfers throughout was used in borders in some of my lace shawls including these, made in 2011.
  All 3 card designs share the fact that the lace carriage (LC) makes 4 passes followed by 2 rows using the knit carriage set for normal knit to complete the eyelets with exceptions. The exceptions are in areas where there are extra blank rows, where the lace carriage will make 6 passes in order to reverse the direction of transfers. Brother lace cards usually start with punched holes on the very first row, have 2 blank rows between LC passes that complete one sequence (here each sequence is 2 rows in height), and 2 blank rows at the top of the card. Lace markings are few and far between, errors are easy to make when punching long cards and working in designings with pixels in particular. In this case, I did not notice until I began composing the post, and after I had completed the first test swatches that the repeat on the left has an extra 4-row segment in the top half, making it 24 stitches X 54 rows as opposed to the other two at 24 X 50.
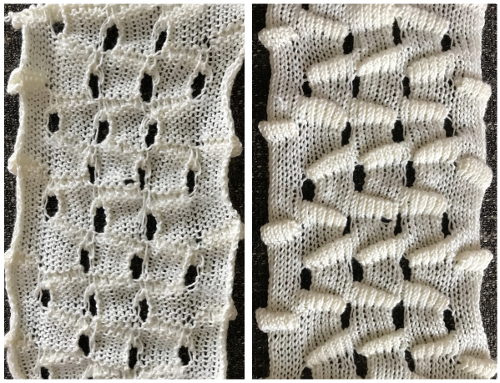
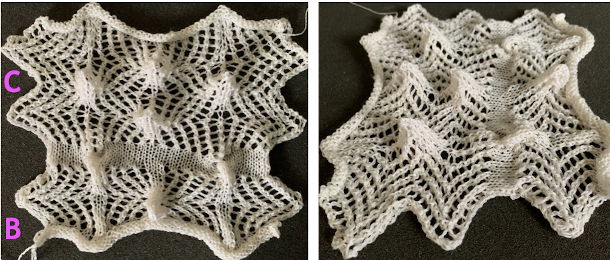 When using card A, the shapes alternate vertically between all mesh ones with all knit rows at the outer edge of the folds. Using Card B, all protrusions have a fixed number of knit stitch rows at the outer fold. Card C produces an all-mesh fabric that made me think of ocean waves somehow. Turned sideways, and pressed to set the folds, the resulting fabric could provide a springboard for a host of other, different ideas:
 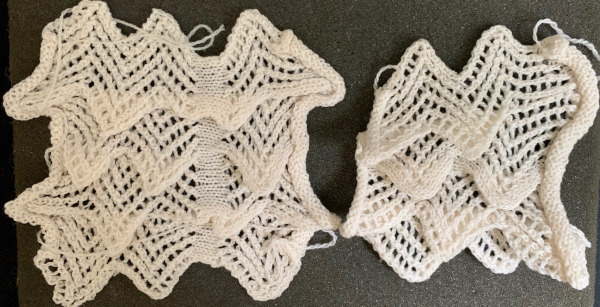 A larger swatch started on waste yarn, with 2 rows of knitting at the bottom and at the top before binding off. The design is card B, with 4 rows added to each half of the design. I am still working with the constraints of a punchcard machine, and for the moment, of retaining symmetry in the width of the “scales”. The working chart, turned counterclockwise to save space
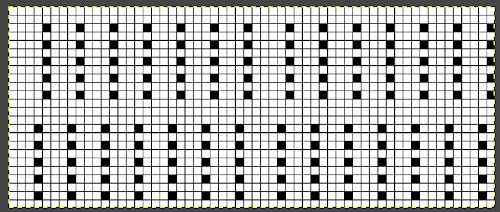
 the above arrangement will, in turn, need to be mirrored for the lace pattern. My sample was knit using 2/15 wool at tension 7, using needles 36 left to 35 right
 The knitting in progress
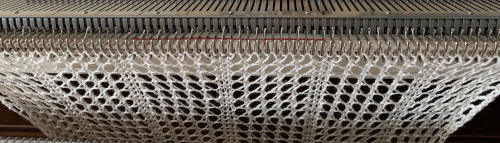

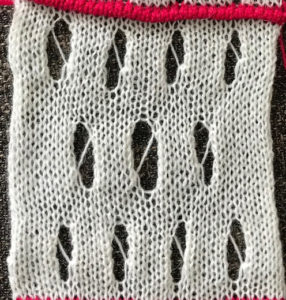
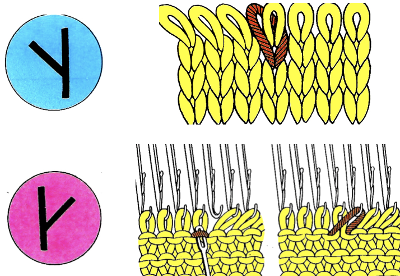
 Often the question of what fine lace is and how it is made comes up. Fine lace is a fabric against which I have a personal bias. It seems to involve a lot of work for the result unless one is using a light-colored yarn with a smooth surface to show the subtle and at times hard to observe surface changes. It fares better visually when mixed with eyelets. The yarn is shared between the needle that would normally be left empty and the one with the formed stitch already on it to its right or left depending on the direction of the transfer. If the shared yarn is dropped instead of staying in the hook of the transfer needle, as the next 2 rows are knit there will be eyelets on the ground lacking them anywhere else. Card C, knit using only the fine lace setting on the LC, looks very different from the previous fabrics, both knit and purl sides are shown, with a couple of spots where the yarn was not shared by 2 adjacent needles, forming eyelets
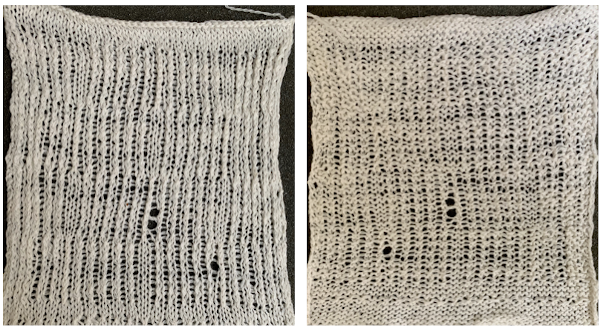 Now evaluating the possibility of mimicking my hand-knit version:
 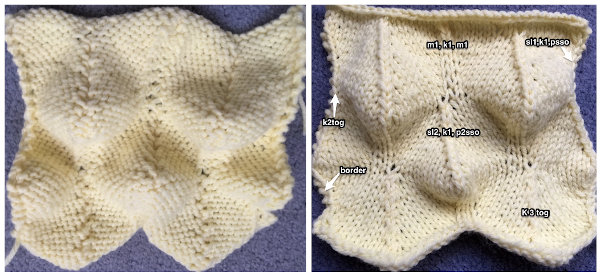 Planning out a repeat in chart form:

 The stitch structure so far appeared too loose to me, so I then switched to a 2/8 wool, at tension 7 with the intent to test knitting as tightly as possible while still facilitating the multiple moves of stitch groups on each row. The resulting fabric was stiff and wanted to curl strongly to the purl side, needed pins to help it lie flatter. The shapes refused to stay poked out to the knit side.
 On electronic machines, one does not have the same limitations in terms of the width of the repeat maxing out at 24. For example, the number of eyelets on either side of the block components of the repeats may differ, the greater the number of eyelets, the wider the spacing between the 3D shapes. Gradations may be planned in height and width of repeat blocks across the full needle bed, limited only by patience in designing, the capacity to download, and the tolerance for both the yarn and the operator to complete wide, long pieces using the technique.
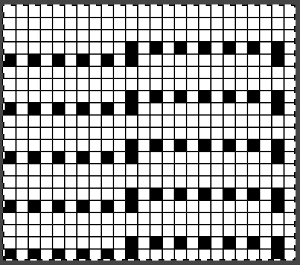 and in a staggered one, tested at the top of the swatch
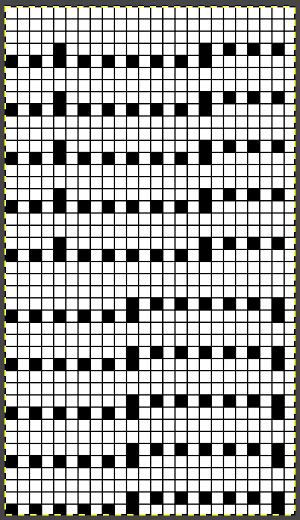
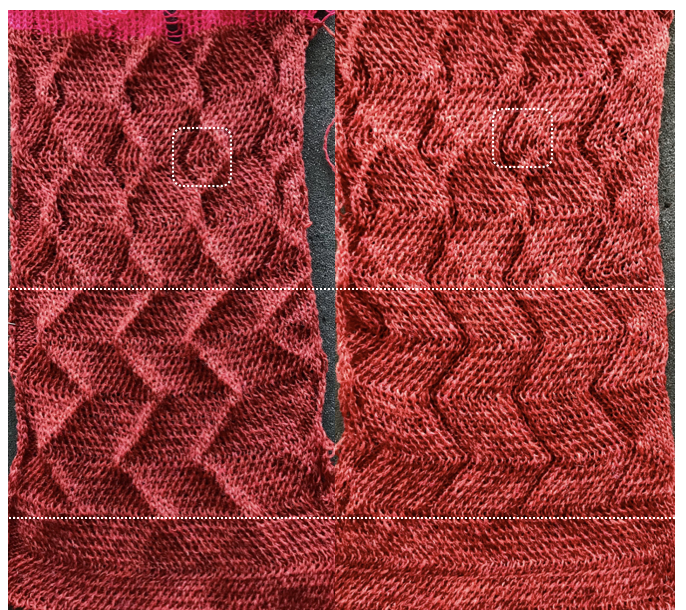
 The “scales” were more like twisty bumps, with subtle variations vertically in some of the stitch groups. That said the results were dramatically different when color changes were added to the pattern knitting in the shorter repeat. Blocking may make an even more marked difference depending on whether the mesh (lightly steamed) or the tighter knit (vertically pulled, should be washed) produces the preferred effect. The looser stitches at the top outside edge ie at the top left corner are the result of a stitch that got away from me. The cast on was a bit too loose, I knit 4 rows at the bottom after the cast on and 4 rows at the top of the repeat before binding off.
 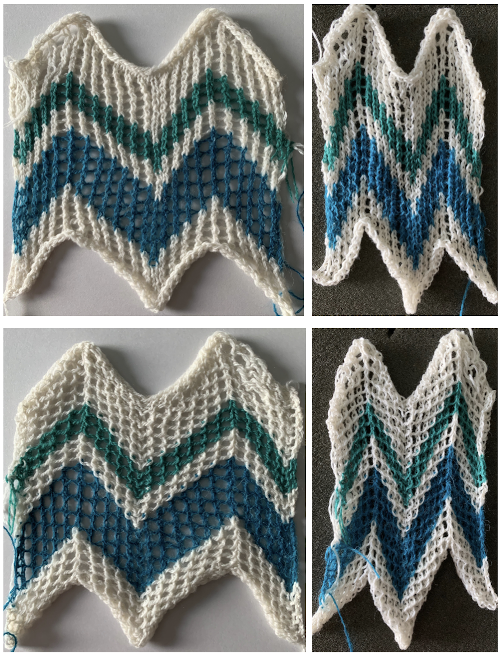 The differences in the width of the same fabric are dramatic. Any overall mesh/ lace fabric blocked for openness such as on the left will grow in length over time, is best stored flat, and will benefit from episodic pressing/ steaming to reset the width. Then I began counting eyelets, which were equal in number in the schematic for the repeat, but not equal in number on either side of the center pivot for the bend in the herringbone shape when the piece was finished. Any extra eyelet rows in the same direction will result in increased biasing in those sections. Time to test more mesh variations, a topic for another day.
 At about that time I came across this image on Pinterest.
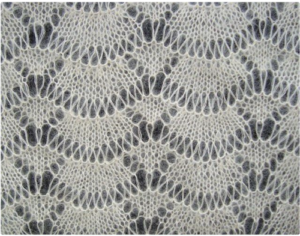 It combines transfer lace and long stitches, has characteristics that make some lace patterns unable to be reproduced on home knitting machines. Upon inspection, one will see that the number of stitches varies in different parts of the repeat. Aside from creating eyelets, the smaller triangular shapes increase in width, the fan shapes are decreased by half on their top row. Long stitches are created across all needles in work, then they are reconfigured so the center single stitch of the triangle and the center 2 stitches of the fan shape realign in the same position. The number of stitches at the start of the pattern and after the long stitches are created remains constant.
 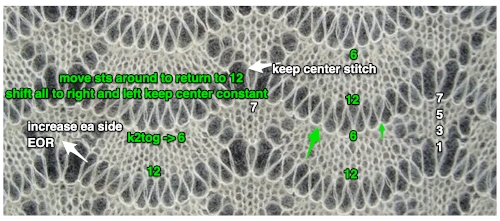 Trying variations on inspiration sources can lead to success, failure, somewhere in between, but also increase learning and skill that will carry over into other knitting techniques, even if the results are never used for a finished piece.
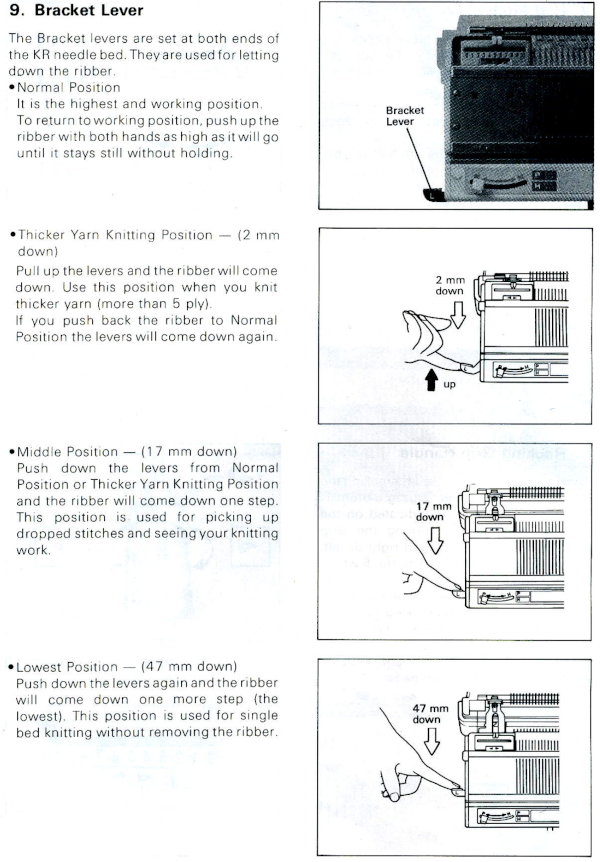

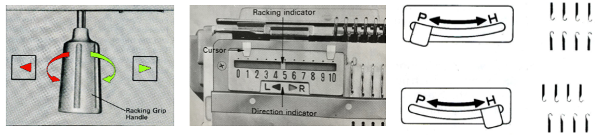
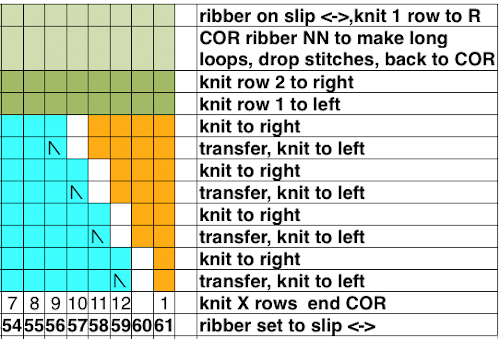 I found making the transfers easier an the process more visible if I dropped one side of the ribber to the second, 17 mm. position
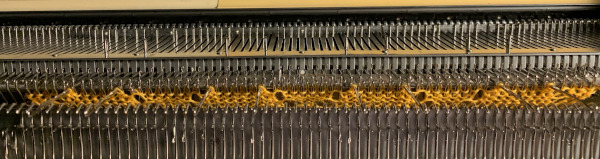
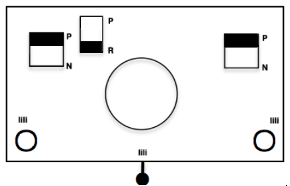 The ribber is set to N <– –> for three rows. On the first pass, all its needles will pick up the yarn, creating loops on every needle
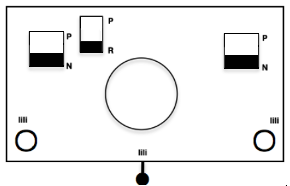
 With the ribber carriage alone, still set to N/N, free it, and make two passes to and from its starting side. The first pass releases the loops, the second returns it for coupling with the knit carriage. Below the long loops can be seen. My needle tape is “somewhere”, has not yet been returned to the ribber after my racking handle adventures were completed.
 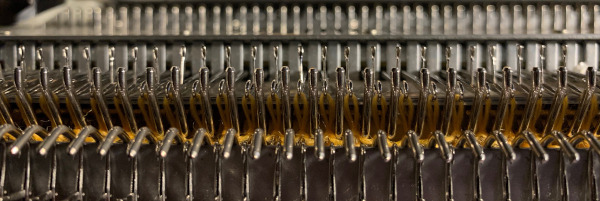 Return the ribber settings to slip in both directions, and repeat the process. Dropping the ribber to the lowest position at any point can verify goings-onHere one row has been knit on the main bed only, anchoring the loops, returning carriages to the opposite side prior to starting transfers once more
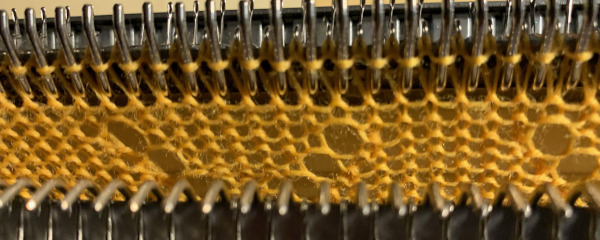 A word of caution: if loops are picked up on any single row that in theory was set to slip and was to be worked on only single bed, check to make certain the tuck lever has not been accidentally brought up to the tuck position. Although tuck <– –> can serve for a free pass on the main bed, having this setting on the ribber will create loops on all needles in work
 I cast on 55 stitches 27 left, 28 right. A ribber comb and weights are required.
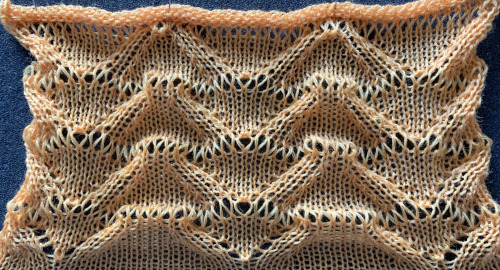
 shown below on the right
 Translating Duo directions to black and white squares in order to develop a repeat for use on Brother: N/N is easy. The Duo is using buttons on the front bed and selection in response to their arrow setting to alter and progress through the pattern. The setup is with 7 needles up, 7 down, creating a 14 stitch repeat. BX on Duo (LX with patterning on front bed E6) is the equivalent of slip setting on Brother. No arrow keys, Passap on N, everything knits. Brother equivalent is a row of black squares (or punched holes if applicable) for each row on the N/N knit setting. BX <– will reverse the needle selection from whatever it was immediately before the previous rows of N/N, and remain there for the full racking sequence. After the first 32-row repeat is completed, at the end of the 12 racked rows, there will then be 4 all knit rows between racking sequences, two knit rows at the top would match 2 rows knit at the start. Once again, the BX<-for one row sets up the alternate blocks of racking. I chose to start my repeat with the 930 with a cast on in racking position 10. The chart shows racking positions on each row, reversing direction after having reached #4. E6 knitters may use the same repeat, matching the Duo racking starting on 3 left to 3 right and back
 The repeat viewed tiled:
 After swapping out the needle retainer bar, knitting went smoothly. On the right in the photos below, the same racking sequences and needles out of work on the ribber are used, but the knit carriage was not set to slip, so essentially, every stitch on every row on the top bed was being knit. In addition to needle preselection, one should also check the type of stitches actually being formed. One of the disadvantages to knitting ribber fabrics is that several inches may be produced before one can actually evaluate the pattern being knit by peeking between the beds.
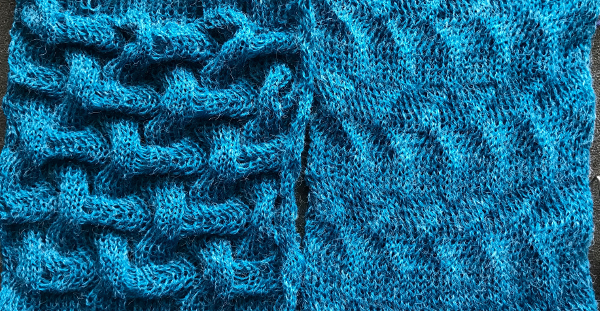
 I will have to revisit a
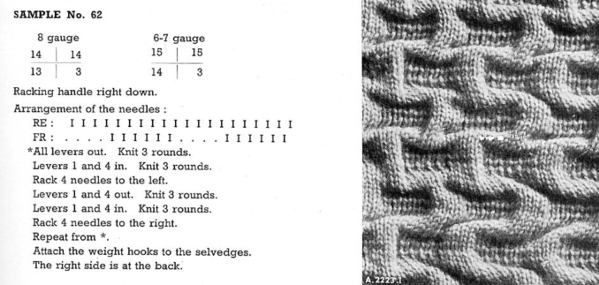


 All needles used in my swatch, I began the stitch transfers down onto the ribber needles on the far left, continuing across the knit bed.
 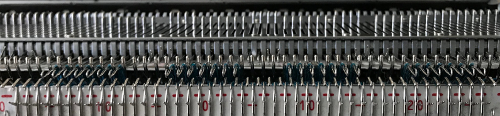 As end stitches knit on the ribber alone, a small edge weight may be required on that side. As stitches on the main bed are not worked in the slip stitch rows, they become elongated. Racking by 4 positions is not possible unless there is enough fabric so as not to pull so much that stitches will not knit off. If the yarn does not have some “give” that can make the changes in position harder, some yarns may break easily. The long stitches:
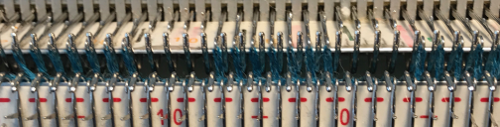

 This is the swatch knit changing ribber settings to and from slip <– –> to N/N on appropriate rows. I found the method above far simpler
 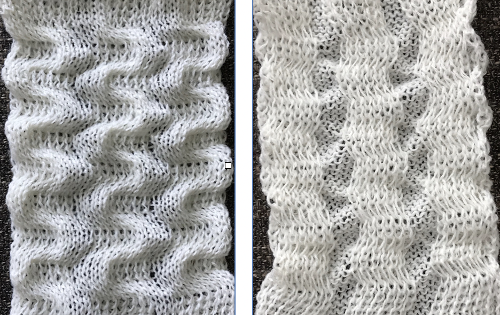 Coincidentally this morning a Duo pattern using a different setup was shown in Ravelry, and I was asked whether producing the same on Brother might have any advantages. The Duo results, shown on a
 Racking is from position 10 to 6 and back just as in the previous blue swatch, after the first preselection row at the start of the following repeat sequence. I began the stitch transfers down onto the ribber needles on the far left, continuing across the knit bed. The final look will vary with the choice of yarn and its color. Both swatch sides.
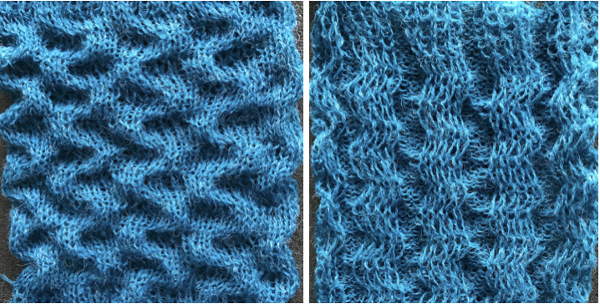 If for some reason horizontal direction matters simply cast on with racking position on 6, and continue to and from there to 10 and back. Below is a horizontal flip of the same swatch image, a way to quickly decide whether doing so might be preferred.
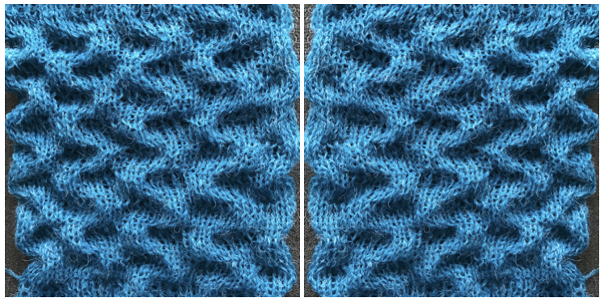
 The only way to find out is to try it. The lesson already learned: use a yarn that is crisp or capable of retaining memory for maximum effect. Here the swatch is knit in a 3/14 cotton. To start with, racking was from position 0 to 6 and back. Racking every 2 rows at the bottom of the sample, every row at its top
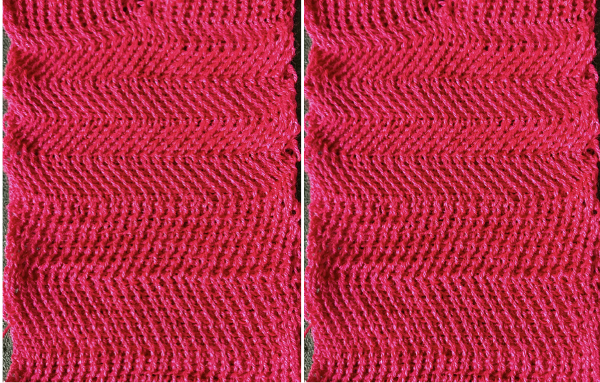 Now adding needles out of work with the expectation of folds at approximate center of each fold
 Racking started in center position 0, then swung to 3 left, to 3 right, ending on 0. I long ago got frustrated with the Passap numbering, marked the racking positions with a permanent marker from 0 on the right to 6 on the left. The knit result is definitely a rolling fabric, though a bit less so than the Brother sample which was able to move across more racking positions
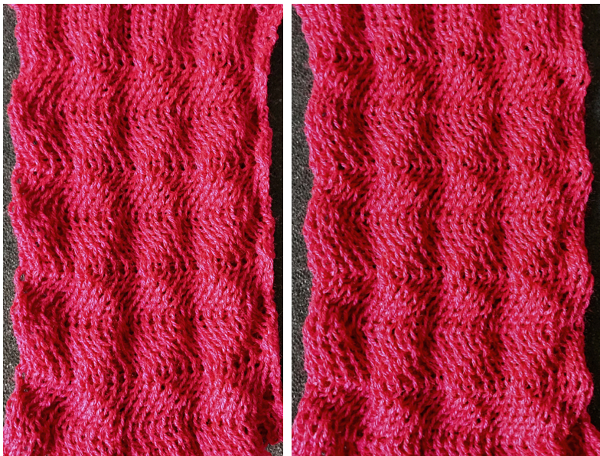
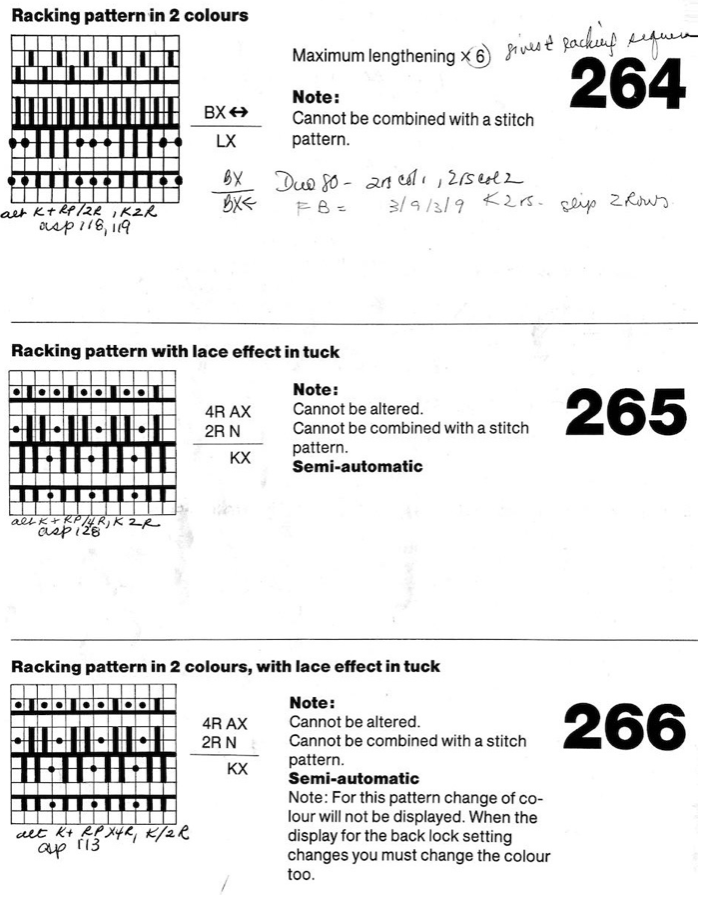
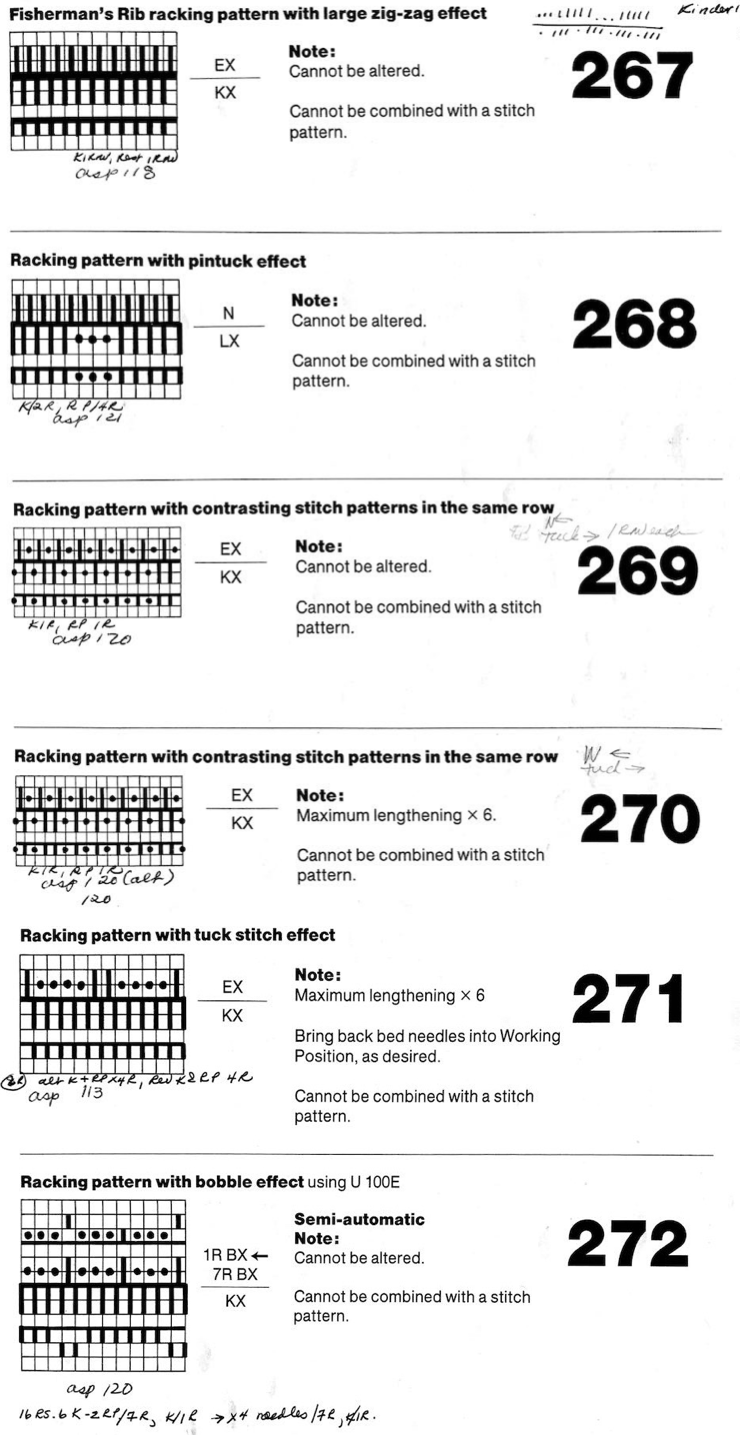
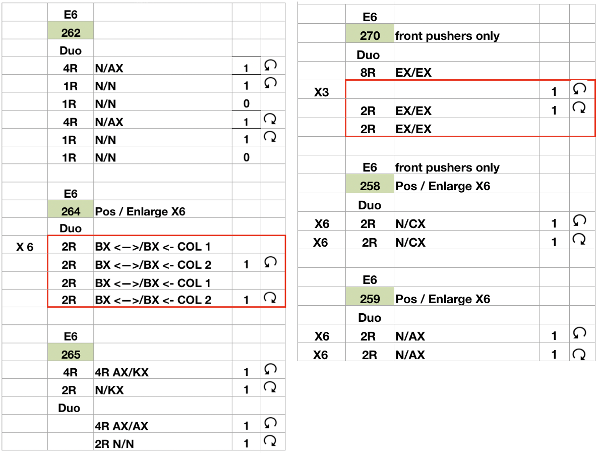
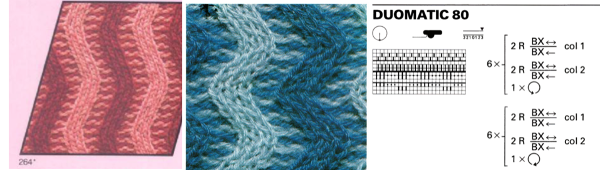
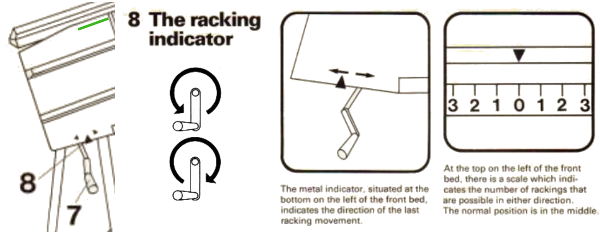 Passap E6 manual shows racking patterns possible with console built-in designs on pp. 118, 119, 120, 121, techniques used in racking patterns number 257-272. The console gives prompts for the direction in racking sequences. Self-programmed designs would need a separate knitting technique entered into the console as an additional “design”. This can be done with a card reader combined with a pattern download from a computer. Programs that automated the function to any degree are no longer on the market. Typically, in published patterns for either brand, if the starting point for the racking sequence is important, it will be given along with the frequency of movements such as in this design from the Duo 80 book
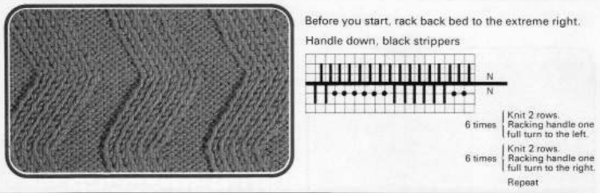
 Some Duo symbols and their meaning

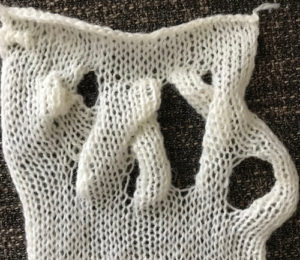
 My sample was knit in a tightly twisted cotton, and when off the machine had an interesting and unexpected fold 3Dquality
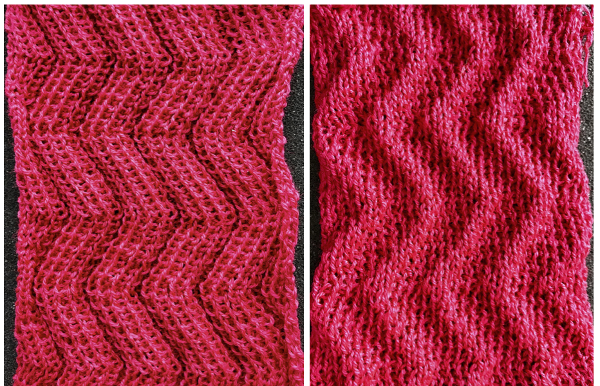

 The setup is essentially the same, with white squares representing needles and pushers that need to be out of work. Tech 258 uses LX (slip) on the front bed, back bed si set to N. The duomatic pattern has a different OOW needle arrangement, the front lock is also set to tuck = FX (E6=KX), adding another layer of texture and complexity. Needles are also out of work on the back bed.
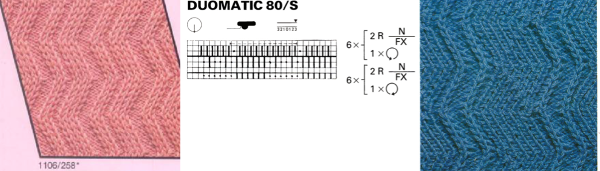
 What is knitting in terms of black and white squares if one continues:
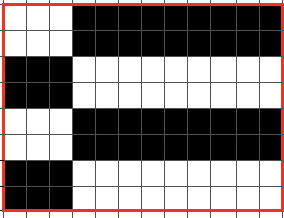
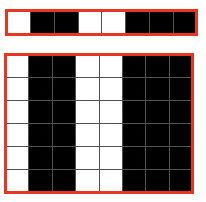
 this repeat is what is required to match the technique diagram

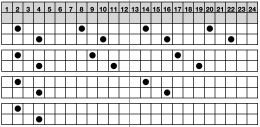
 Below the pattern alternates blocks of 5 black squares, 5 white, color changing every 2 rows and reversing racking direction after every 24 rows. The full repeat is 48 rows. If rows knit in the zig-zag are counted, they amount to 12 because each color slips it is not knitting for 2 rows. Note that to achieve the color reversal at the halfway point of the repeat the same color (2) knits for 4 rows, at the top of the repeat color 1 does the same.
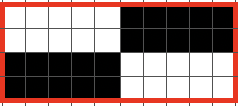
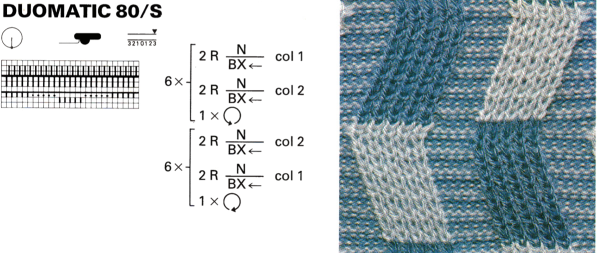

 Back to acrylic yarn, light color for more visibility creative yarn snag on the left midway, full swing movement is shown, each is 48 rows in height. As always it helps to check whether stitches are obliging by staying on the needle bed. The top half of the swatch is shown.
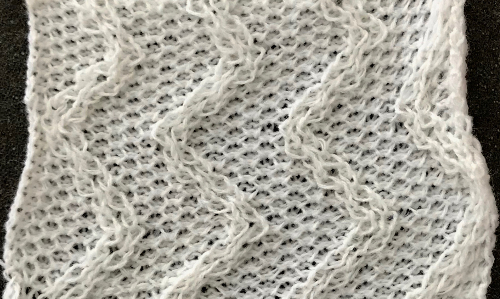 In turn, I programmed # 1000 X 6 in height but pusher selection was all up for one row, one down. I left it alone, and lastly, worked with pusher selection on the back bed, BX <–. Patterning advances a fixed repeat every row or every other, determined by original hand-selected up for selection and down above rail for out of selection. The front lock is left on N (disregard front for setting it to LX) there is a whole other world of possibilities, while the console racking sequences can be used from built-in techniques.
  Any ribber needle selection on Brother other than the use of lili buttons would have to be done manually.
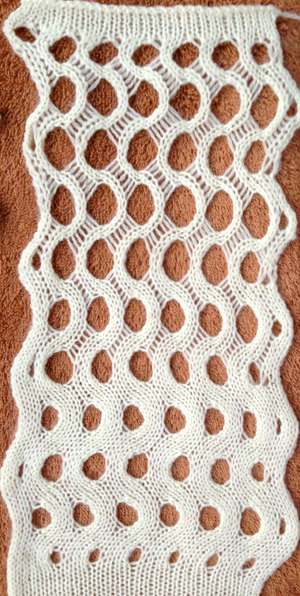
 The reverse side shows the same issue. Areas can be identified where the held stitches have been hung up to create hems. Note that as the knit grows in length, at the completion of each row of repeats there is one segment with no hem on alternating sides. A longer test swatch follows
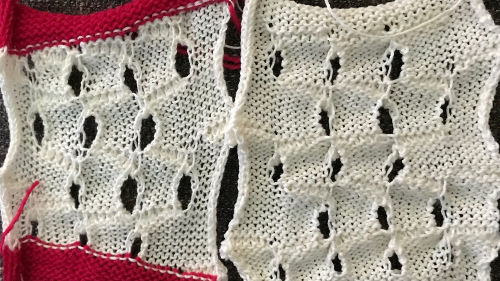
 I created my hems on the carriage side, immediately prior to bringing the following group of stitches into work opposite it, and knitting a single row across that new group of 3 segments. The highlighted area indicates the stitches to be hung to create the hem. The eyelet on the top, right, will be smaller than the one at the opposite side of the stitches to be hung up

 Reversing the direction of segments
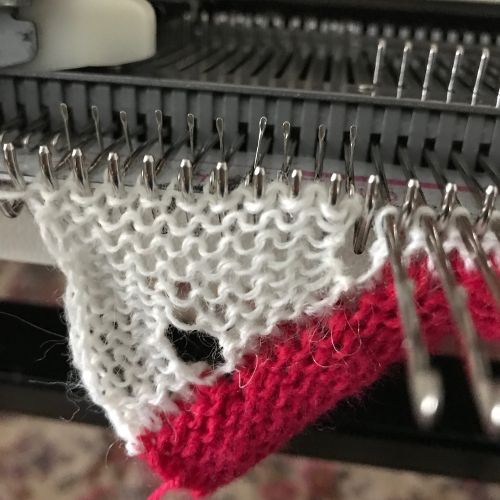


 This is one of my early graphics trying to imagine what is happening in chart form, which also references the repeat in the Passap garment, followed by plain knitting
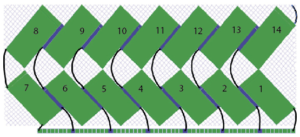
 This fabric is worked out differently, in groups of 2. After the first segment is completed, COR if the starting group 1 worked is on the right, bring group 2 into work, knit one row to left, immediately bring group one into hold, and continue across row. That “float” is created as the yarn traveling between the last stitch on the right now coming into hold and the first stitch to its left knits for many more rows gets pulled on as the piece grows.
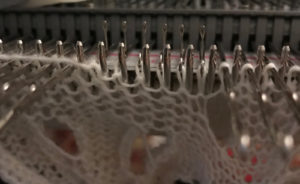


 Hems in knitting can be created on any number of stitches, anywhere on a garment, by definition join segments of the knit together permanently. Folds are freer. Here is an attempt at a different wisteria cousin with organized repeats. More on creating it will follow in a subsequent post now that holding techniques are back on my radar

 The fabric had an interesting twist and roll if tugged in opposite diagonal directions when first off the machine.
 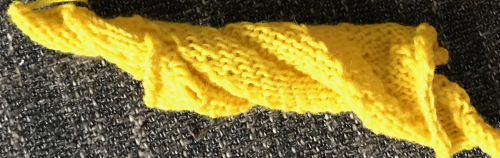 This is the working repeat, suitable for a punchcard machine. On the far left it is shown for use with electronics and color reverse, with the green grid highlighting black squares indicating holes that would need to be punched in a card, and lastly, as a tiled repeat looking for any errors in repeat sequences.
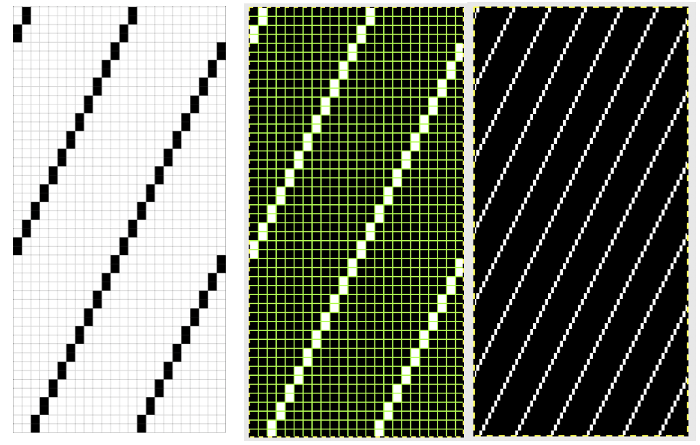
 This shows my swatch in progress. ? indicates operator error, in evidence if needle count on each side of the future tuck stitch or ladder space is checked
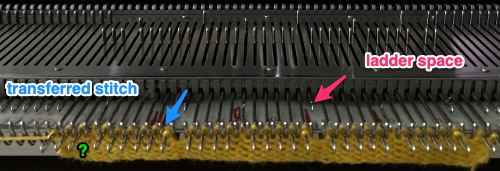 picking up loops from the row below to keep ladder width constant
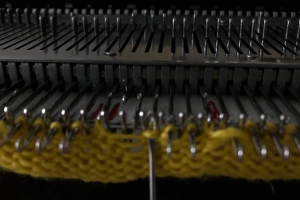
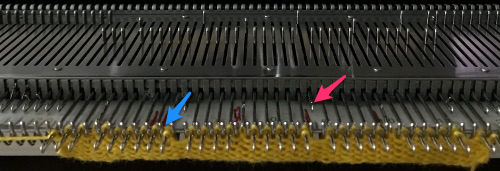 Check that stitches have knit off properly
 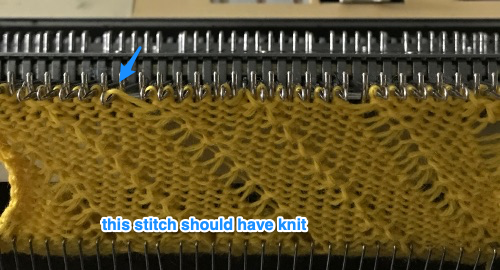 Needles with transfers or moved stitches may be brought out to hold position (E in Brother machines) for easier knitting. If this is done, be sure not to disturb needle selection or lack of it in location for next pair of tucked rows.
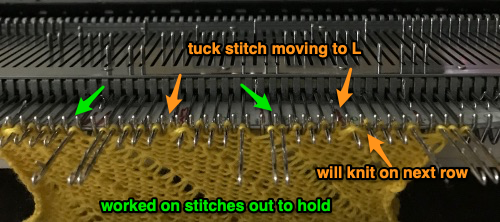
 Setting up a working repeat with blue representing tuck, purple slip (or vice versa). The distance between the vertical column, in this case, is fixed and seven stitches in width for a center folding repeat width of 16, color reverse is required
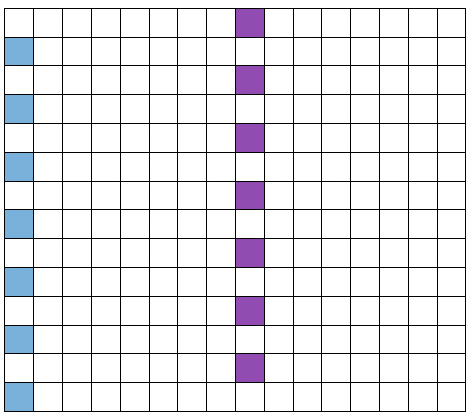

 Set up the cast-on as preferred. I used plain knitting, weighted it, and began my pattern work from the right-hand side of the machine. COL my preselection row was made from right to left. White squares in the chart with black ground and green grid become non selected needles on the main bed. Transfer nonselected stitches down to the ribber. Set the ribber to slip to the right, those stitches just transferred will slip moving to the right, knit on the return pass to the left. The knit carriage is set to knit until that first row is completed
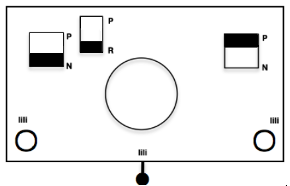 COR the ribber will knit on the next pass to the left. Set the knit carriage to tuck while the ribber is knitting
 Continue in pattern to the desired length. Fabric narrows considerably, so several panels may be required for items ie. skirts. The repeat on the knitting bed should also be adjusted to allow for as close to invisible seaming as possible. The stitches on either side of the single needle in work on the ribber may be inclined to drop off. I was unable to use tuck on those same needles for any significant length for that reason. It pays to visually check for stitches knitting off properly to avoid this
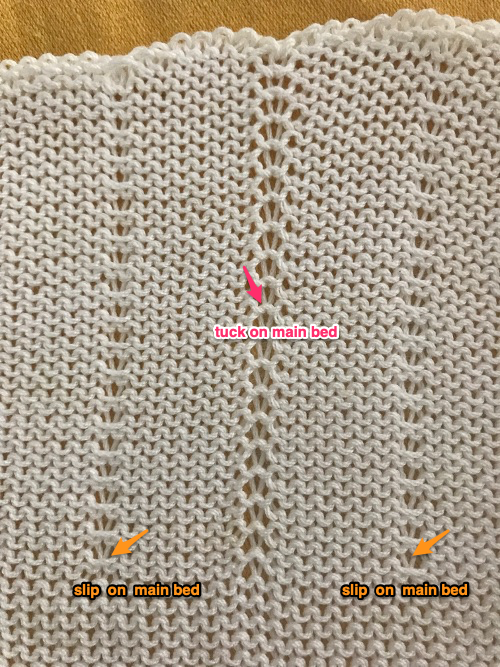
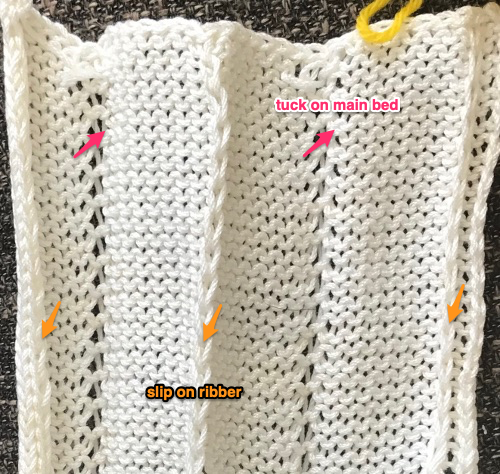
 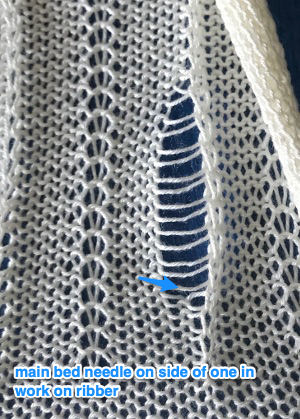 The start of vertical pleats, with the slip stitches folding to the purl side, the tucked stitches folding to the knit side on the machine, just after binding off.

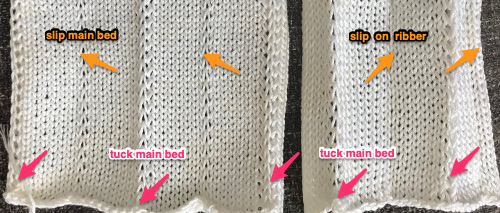 Different fibers can produce varying results in fold and drape. Setting either bed function for the wrong direction will produce an all-knit fabric (top of the red swatch).
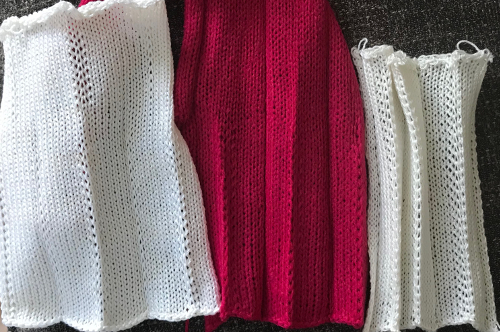
 This starts to address incorporating hand techniques and manual ones from the diagonal swatch and the one with vertical folds while also developing a design repeat to aid with planning or actions to be taken. It will be altered in future experiments
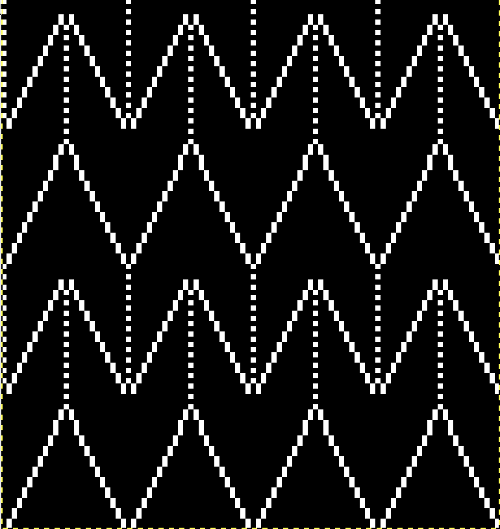
 This swatch is knit in wool, trying to sort out what does what and by how much. I am starting to get a bubble, but not a dramatic folding effect. The bottom folds more than the top. The filled eyelet technique has a hand-tooled tuck column on the reverse side. The top is automated using tuck stitch.
 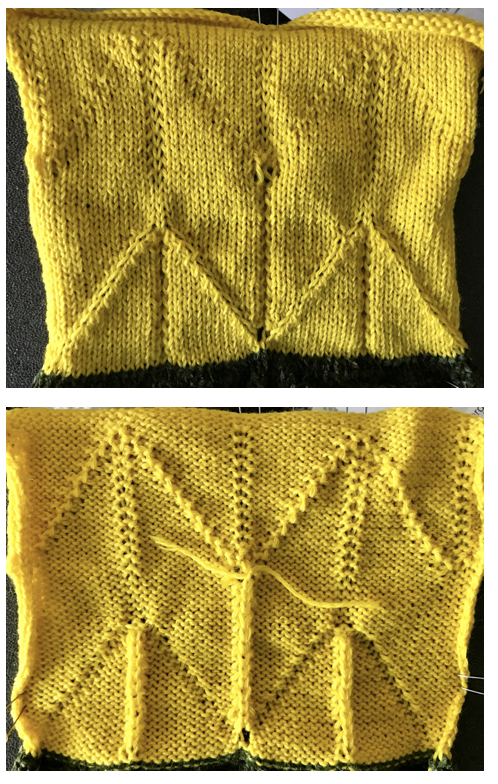 A different repeat: the bottom with carriage set to knit with needle selection as a cue to hand transfers, the top set to tuck automatically. Transition rows need to be considered further and altered where the twain meet.
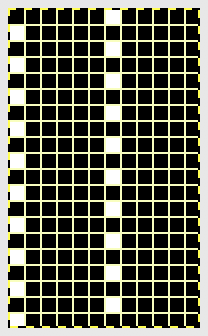
 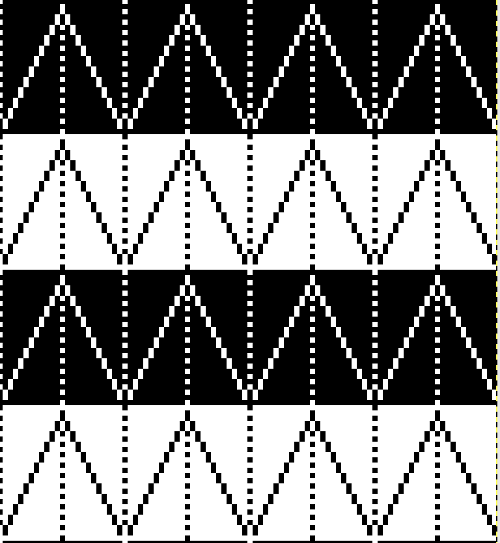 Returning to simpler creases and folds: a first experiment in racking double bed with NOOW. The setup and racking positions were not pre-planned. I knit 4 rows without racking at unplanned intervals as well; they produce a noticeable change in texture. The fabric is reversible, I actually rephotographed it adding a marker to make certain I had not shot the same side twice. The needle set up:
  the resulting swatch presented sideways for the sake of space:
 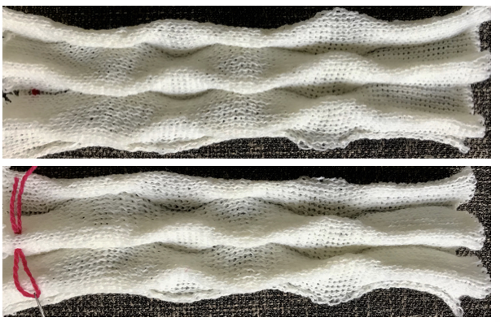 working with single needles out of work rather than two, with even spacing between them on each bed
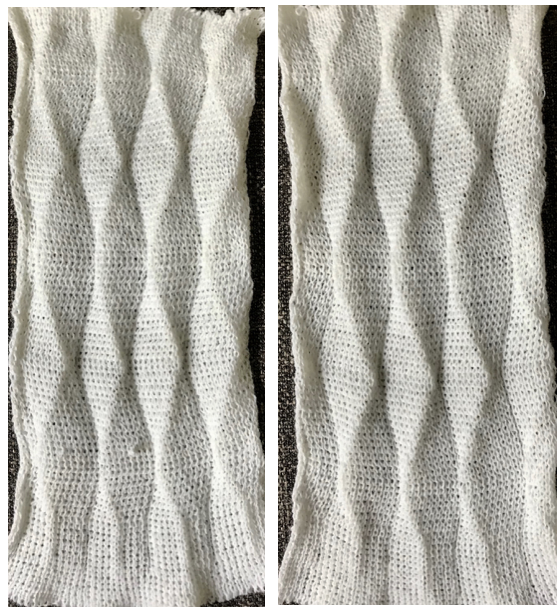 both swatches flattened to note differences between needle arrangement folds
 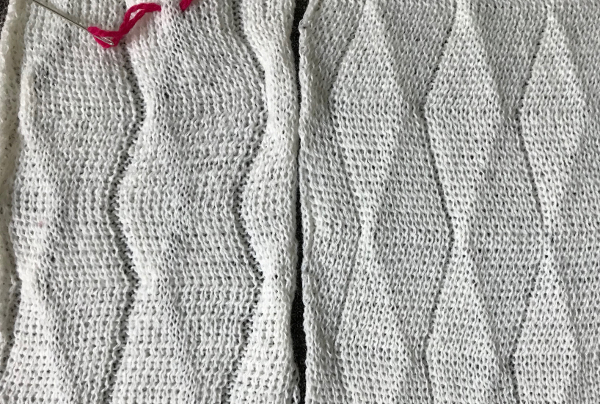 getting more organized, with a planned repeat: the needle set up
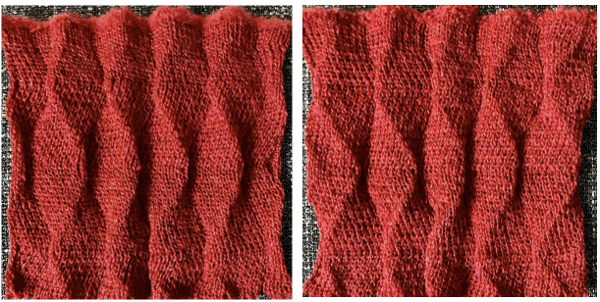 Here the arrangement here is with 2 needles out of work, racking every 2 rows in the same sequence. The resulting fabric has clear “spring” and foldsRR
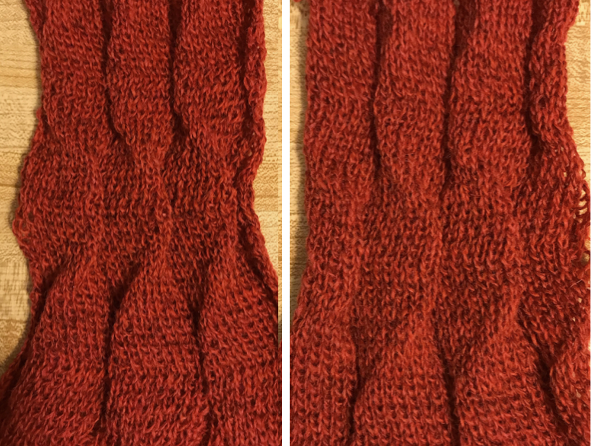 Returning to the previous needle set up, now racking every row from position 5 to 0, knit 1 more row with no racking; rack to position 10, knit one more row with no racking, reverse direction, end knitting on position # 5
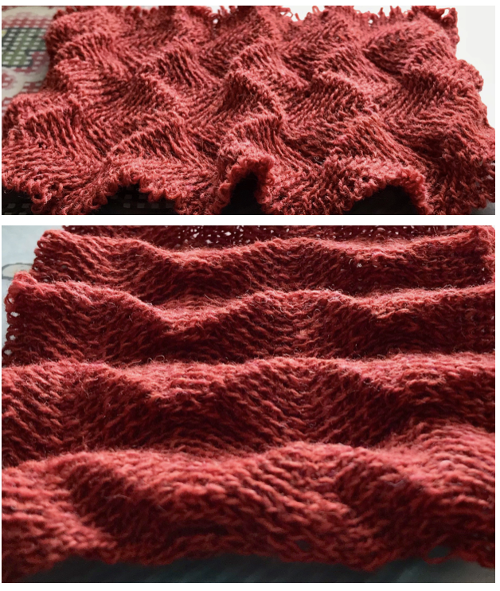 This last in the series is a personal favorite. I found racking from the center to 10, to 0, and back easy to track. One moves in the opposite direction when not allowed to go any further in the continuing direction by the machine. Single needles out of work appear to be enough to create the folds.
 Racking starting position on 7:
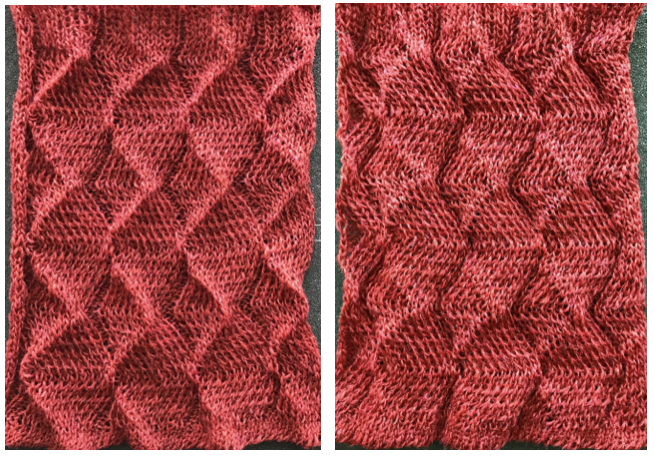 Consider playing with racking positions within the total number of needles in work on the main bed. For other possible needle arrangements and more on pleats created with needles in/out of work on both beds please see
 I would classify the results as ruching, a different knit category
 Some samples: fishing line and wire
  wool and cotton
 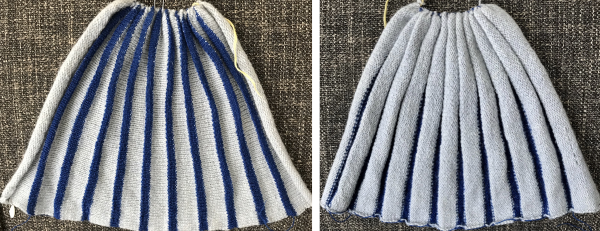 thin cotton and boucle
 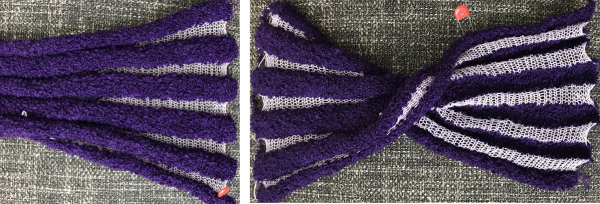 the same cotton and chenille
 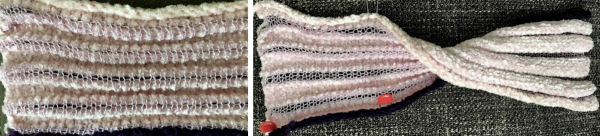 wool and raffia
 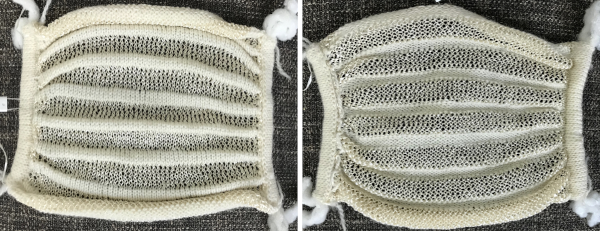 wire and vinyl
 combined with fair isle patterning
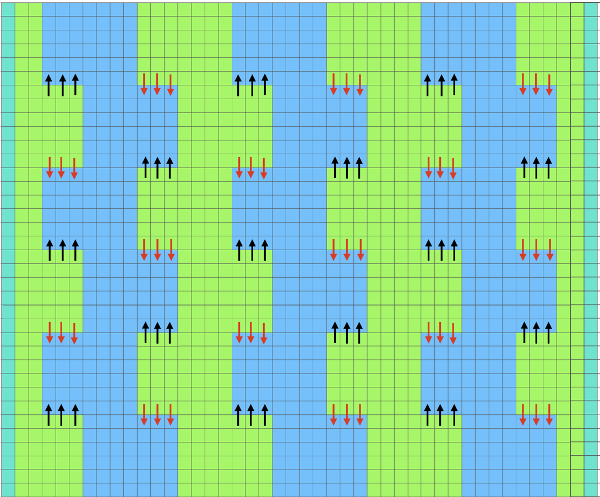


 and my small test swatch. The fold on each side and the swing in the pattern appear crisper and better defined to me
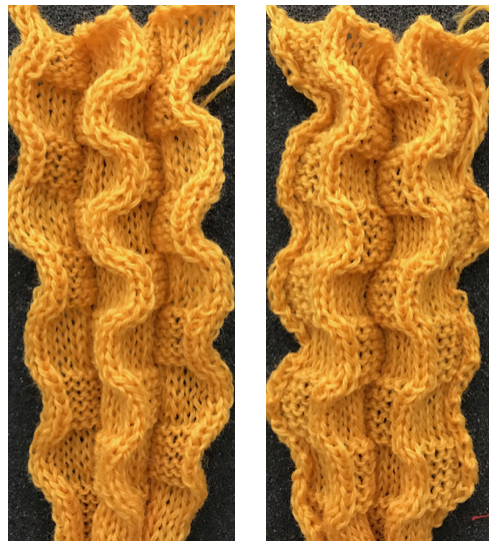

 an attempt at a side view
 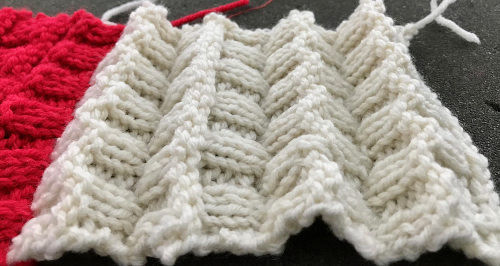 an earlier
  Another handknit swatch in worsted weight, perhaps suitable for G carriage
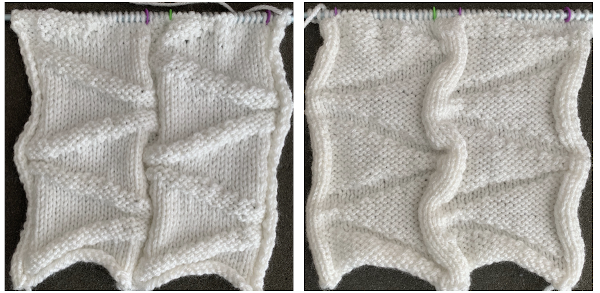


 The fabric narrows considerably as it is stretched lengthwise to set the stitches. Several panels would be required for a garment such as a skirt. Such an item would need to be pulled into shape, pinned, and hot pressed. Fiber content will determine the crispness of the pleats after blocking, and their retention after cleaning. The swatch below is turned sideways for the sake of space.
  More variations with folds can be made by varying the “rules” commonly recognized for creases. Working sideways once more: on a punchcard machine, using card # 1 locked, cast on making certain every other needle as well as the first and last are selected.
 Cancel the slip setting, complete the next knit section, and transfer every other needle to the adjacent one on either the right or left.
 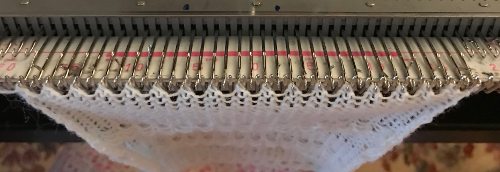 The needles holding 2 stitches may be brought out to the hold position as each transfer is made, or pushed out to hold after the fact to insure the stitches have been transferred and will knit off properly. The number of needles in work remains constant.
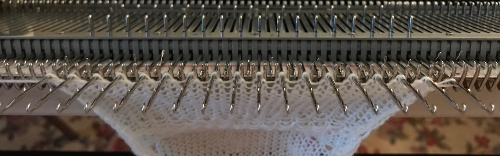
 The slipped stitches form the inside folds in the pressed swatch, while eyelets and tuck stitches fold a picot edge to the outside.