More GIMP charting 3

These are quick notes from some of my continuing experiments, not explicit how-tos or item patterns. Possible lengthening of designs dependent upon knitting technique is not considered; the “charts” were created keeping the aspect ratio of the original motif. The initial images are copyright free.

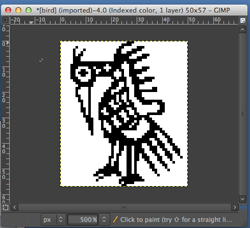
from scanned B/W source, 200 pixels X 227

open document

Image_Mode_B&W 1 bit indexed_ Convert

Image Scale 200 wide down to 50

areas were “cleaned up” using single-pixel pencil, when satisfactory capture window with grid enlarged for working graph,  or remove the grid, export in format for download

this is a partial repeat of a large black and white .png image

working with a smaller, random selection

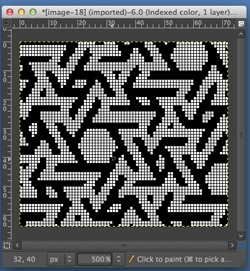
Open image

Image_Mode_B&W 1 bit indexed_ Convert

enlarge, show grid, decide on the accuracy of repeat,  when OK, graph or export and knit, no clean up required for this one

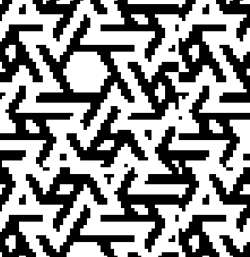
Filter_Map_Tile_magnifying result  will test the accuracy of the repeat

the motif was a random crop, with obvious issues, more work would need to be done with the original image to isolate the proper section for tiling accuracy to occur

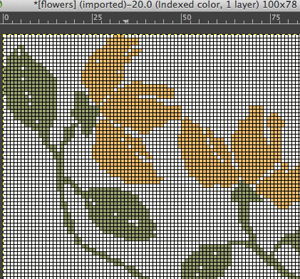
a multicolor image 143 pixels X 112

Image_Mode_Indexed _3 color (manual change from 4 to 3)

Image scale to 100 pixels wide

Enlarge for viewing grid and/or cleaning up; result yields 2 repeats that could be used 50 sts wide each, leaves could use a bit more detail

a partial image grab, pre any “corrections”

if color separations are needed for software that can superimpose colors and do the necessary color changer manipulations cues a link on color separations for screen printing provides some ideas. Another method

Tools_Selection Tools_By Color Select

Edit_Copy

Create new document the same dimensions

Edit_Paste

repeat for each color

the results: the flower is actually in the “wrong place” even with what appeared to be the same document settings

easier and “on the spot”:

Tools_Selection Tools_By Color Select

Click on color one (flower)

Edit_Cut

Fuzzy select, click on the screen outside of the image: the result

Re-open original image

Tools_Selection Tools_By Color Select

Click on color two (leaves)

Edit _ Cut

Fuzzy select, click on the screen outside of the image: the result


Illusion /shadow knitting DIY designs_HK

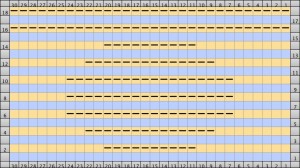
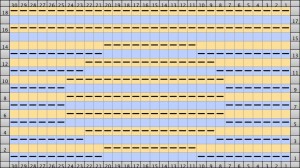
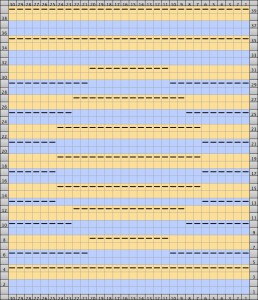
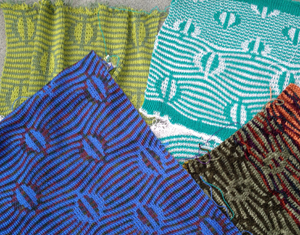
I have played with excel (and Numbers) before to create charts for various fabrics requiring color separations. My latest efforts relating to this knit group have gone in a different direction; I have also attempted to simplify the technique in terms of following the instructions for knitting them. This sample began with the use of Intwined to create the document and graphs. The first chart is set up with alternate row color striping, color 1=dark, color 2 = light. Blank-colored squares are used as knit symbols, and horizontal dash for the symbol for purl stitches. Beginning on light-colored, even-numbered rows, the design is marked in purl stitches. On odd-numbered rows beginning with row 1, mark all empty squares in the even-numbered light-colored row immediately above it with purl symbols. All unmarked stitches throughout the design are knit, whether, on the “wrong/right” sides, all dashes are purled, patterning occurs on the second row of each color. To visualize the full pattern one may use the add row below feature to expand the graph (the chart below is missing the very first row). Now add the second row of each color and grounding stripe (s) at bottom of the repeat. Most patterns will start the illusion immediately after casting on with dark color, row 1 above. I was interested in my sample having a border of sorts on its top and bottom. The resulting knit swatch shadow sideIntwinded had the capacity for building row by row written instructions for patterns, but there were discrepancies on some rows for these charts, and I opted not to include them.
Note: the program quickly became buggy, unsupported, and unusable on the Mac during the remainder of 2013.

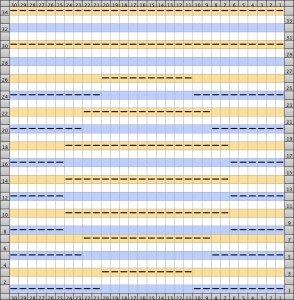
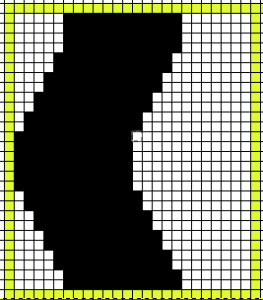
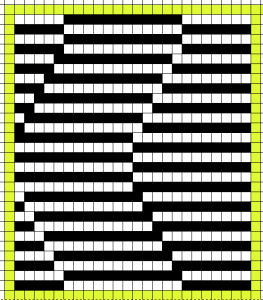
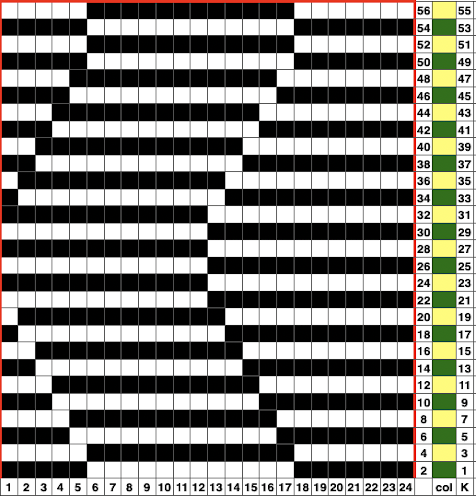
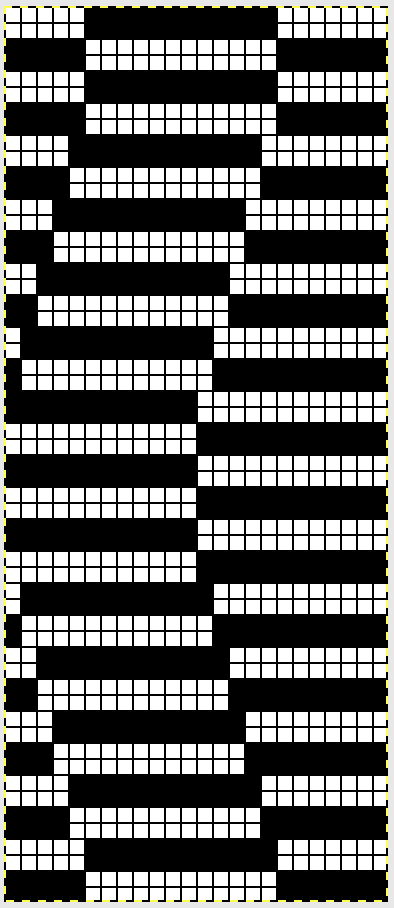
Another program I have just acquired and begun to use is GIMP; it is free, and now also available for use in Mac OS Mountain Lion. Both Gimp and Photoshop make it possible to design using single-pixel pencil and grids to build motifs from scratch as well as gridding of preexisting images. I have a different method for these fabrics using GIMP, which is easier for more complex, overall shapes. The same series of steps may be used for mosaic knitting (the color inversion sequence is different). Below are images generated for a different illusion pattern, I will share my “how-to” for designing the motifs later, referencing mosaics and mazes. To achieve such motifs one is drawing in magnification of multiple hundreds and more, there is no way to number within a one-pixel space, so these charts as generated are lacking numbers for stitches and rows, one drawback. Another is that this color inversion works only in black and white. One advantage: the proper repeat may be cropped and saved with the grid removed in various formats that may be used to import to various machine knitting download programs, and gridded may be used to establish punchcards or mylar repeats.  Screengrabs of magnified charts were saved, and are shown below. Black squares represent purl stitches in the second row of each color. The first row of each color is always knit, not represented in these charts
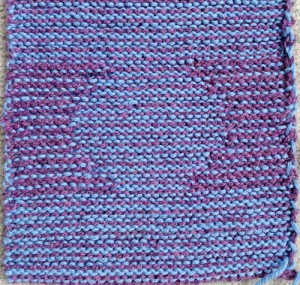
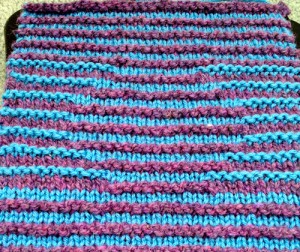
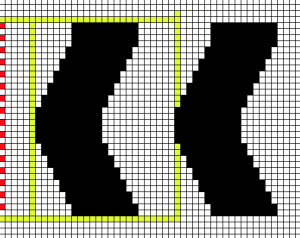
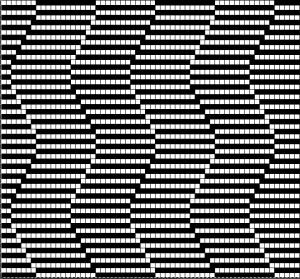
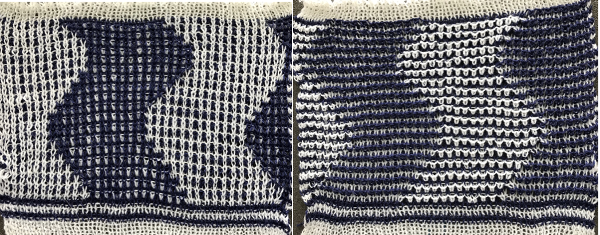
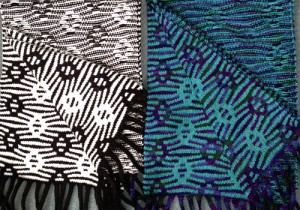
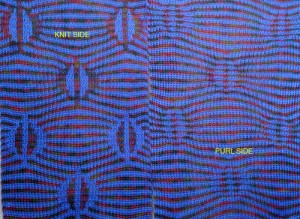
The red squares are guidelines for no color inversion rows, the yellow ones isolate the repeat the actual repeat color inversion begins on row 1 and follows every other row (if numbered these would be odd rows)  testing the repeat through filter/ map/ tile a working chart that can be printed to suit with dark/light row markings and blank squares for tracking knitting rows in the execution of the pattern A larger version with stitch and row counts marked. The chart represents half the rows in the actual knit. The cast on row counts as knit row 1, color 1, and following the chart beginning with row 2 knit the black squares and purl the white squares. *Change color, knit one row (odd#), on the next row follow the chart, knitting the black squares and purling the white (even#).** Repeat from * to **. the knit swatch: “shadow side” its reverse side for online tutorials, patterns, and inspiration see Woolly Thoughts

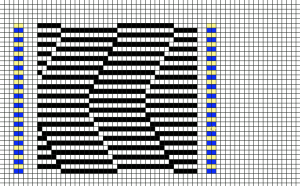
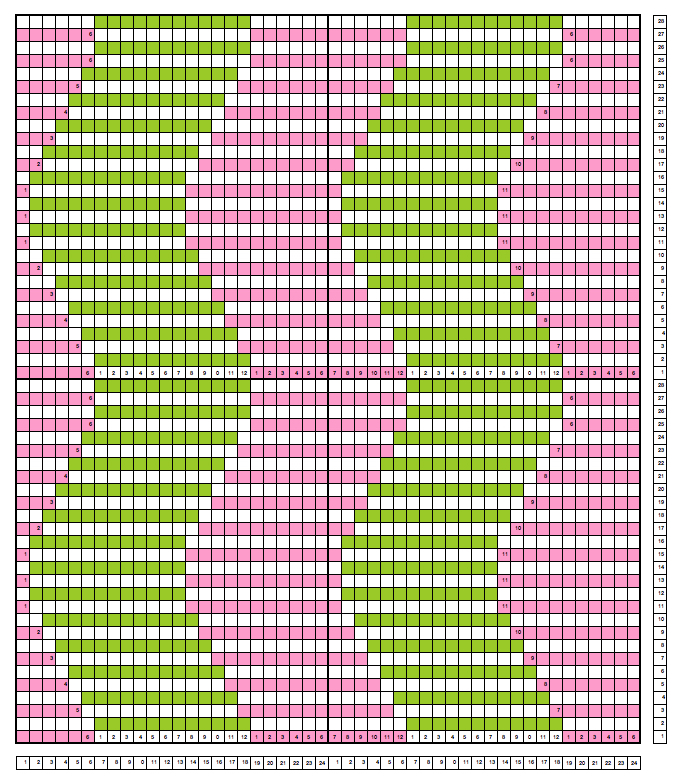
Feb 18, 2017, I have recently become curious about creating illusions such as these in crochet, am developing ideas, and returned to this chart. The image below is intended to have symbols and notes superimposed on it. It shows the tiling in a different way, so I thought I would add it to this post as well. Repeats are highlighted with darker borders. The repeat on the right needs to be trimmed if the goal is to achieve matching edges. Row counts on the right would differ in knitting, the plan is to execute this pattern in Tunisian crochet, which handles rows in a very different manner than knitting or standard crochet. Follow up: 2017/03/06/illusion-DIY-patterns-in-crochet/

2/2019 from the first in a series of posts on geometric shapes on ribber fabrics using tuck settings, a mock variation with the ribber set for knitting in both directions throughout, and the main bed set to tuck in both directions:

Multiple downloadable pngs for optical illusion designs may be found in the 2023 post on Developing tiled repeats suitable for multiple stitch types, including tuck

Not all parts are created equal: sinker plates

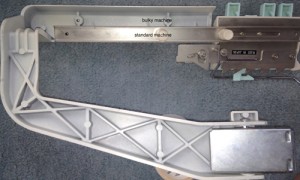
A recent forum discussion brought up the possibility of exchanging sinker plates between models. This is often possible, with some adjustments at times being required. The images below show the one sinker plate I know of with truly distinct parts, made for the 892E, 894, 4.5 mm Brother punchcard models that had a thread lace capability like that seen in the bulky 260 machines.

the illustrations on operation and parts from the manual

The bottom view in the first photo shows the distinct brushes and their white plastic “arms” (for lack of the technical name). The red line on the right shows the span and “nub” that may not align properly on the knit carriage if there is a huge disparity in model years. I knit using a lot of “fussy” yarns, substitute tuck wheels for the brushes usually on far right and left of image as viewed here to avoid problems sometimes caused by the bristles getting damaged and worn with use. Some people actually remove the same brushes altogether, but I have not had good results doing so. The three screws above the wheels on each side are used to adjust the space between the sinker plate and the gate pegs if needed. When the gap is too small yarn may get caught, when too great stitches may not knit off properly. Generally loosening the only the 2 side screws is enough to allow movement of the sinker plate in relationship to the gate pegs. It is helpful to have an old credit card or other “tool” to help hold the correct spacing while screws get tightened back up with carriage in its knitting position on the main bed.

This view shows the front of the sinker plate; the white plastic “arms” may be seen at the top of the image, 2 other distinct features on this model were the 2 metal pieces marked on the right

BTW: though some compatibility charts online list the 910 series as having thread lace capability, they indeed do not. I will try to find information on later models, and share here.

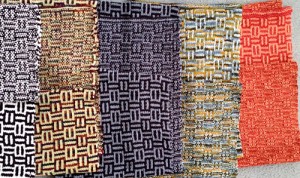
Knitting again, more block stitch, color changes

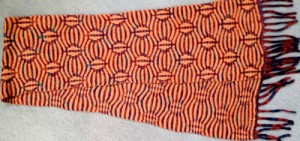
Two more of my scarves, rayon chenille, knit single bed

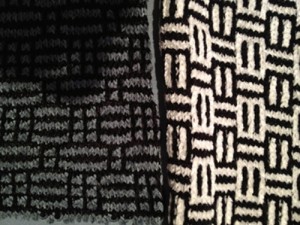
still working out the last repeat, now double bed

more studies

the final scarf detail for fabric on bottom left knit in tencel and Nomi Lee, 8″ X 63″, + 4 ” i-cord fringe; a detail shot

and yet another variant, knit in alpaca/silk blend and Tencel, 9″ X 58″ + 4 ” i-cord fringe

A recent Ravelry post brought up the use of the brother double bed color changer, which may actually be used on both bulky machines and on standard ones. The placement for the setting plate needs to be swapped when switching from one gauge to another

The knob on the left under my text is what screws into place to anchor the setting place in either spot. There is no single bed color changer for the bulky. This color changer may be used to knit single bed fabrics as long as they are weighted enough (ribber cast on comb through waste yarn single bed), since there are no wheels and brushes on the ribber sinker plate. There are limits to the amount of texture one may create, and having the ribber engaged reduces visibility, but the trade-off is speed. The 2 carriage trick on the 260 is a problem because the punchcard machines do not advance a row when the opposing carriage makes its first pass in the opposite direction of the last row knit.

Hand to machine, symbols 3

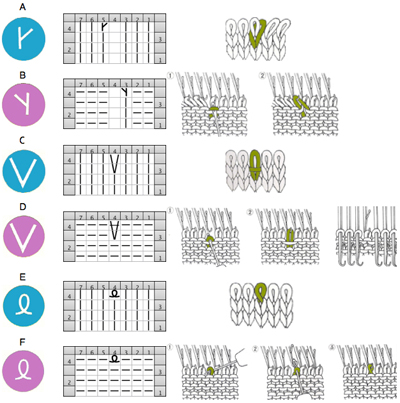
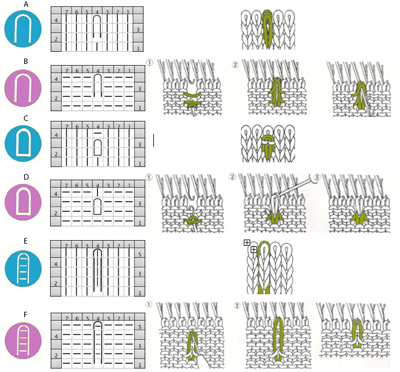
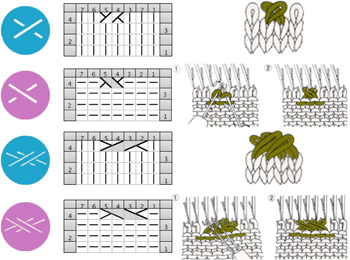
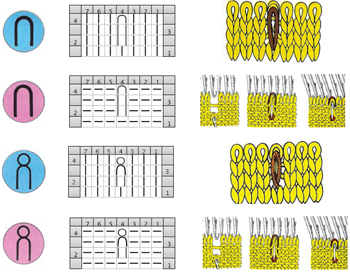
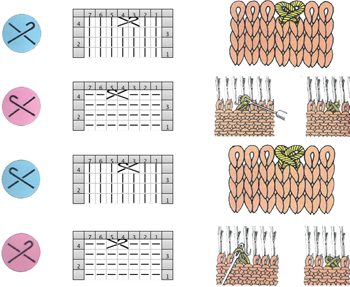
In the following series the blue dots and accompanying diagrams continue to represent the fabric as it would appear on the knit side if hand knit, or after the work is removed from the machine. The pink dots and accompanying graphics represent the matching stitch on the purl side and as it may be executed on the knitting machine to match the original fabric.

A/B revisit increases within the row. The same motion may be used on the KM to increase single stitches at the garment edge, allowing for increases on both sides at the same time (if they always occur mostly on the same side however, one side will have consistently tighter end stitches, and be shorter). C/D revisit slipped stitches. In D the image on the far right shows the position for the needle about to be skipped/slipped. If working slip stitch through hand selection, the needles that are out to 3rd position, or out to “holding” will knit. E/F revisit twisted stitches within any one row.


Revisiting tuck stitch, and ruching: in the tuck stitch formation in A/B, B has the added illustration showing bringing out to “holding”, (D, or E position depending on machine brand) any needle that has multiple loops on it prior to the next row of knitting all stitches. C/D are variants: in addition to combining loops, the top stitch is reformed to show as purl on the knit side, knit on the purl. E/F illustrate ruching where single or multiple stitches are pulled up to gather fabric and create texture, for any desired/varying number of rows

Below the first row illustrates ladders resulting from a few methods in hand-knitting to emptying needles and leaving them out of work (A position) on the KM. The second row represents a wrapped increase on the edge of the knit, on the KM this is known as e wrapping.

Cable crossings may be represented in a variety of ways, below are just a couple; the grayed-out areas after the first chart IMO help define forward-facing stitches on completion of the transfer for the cable, whether on front of the knit or on purl side facing the knitter on the machine.

Other fabrics such as ribs and more on lace will be explored at a later date.

Symbols to punchcard 1

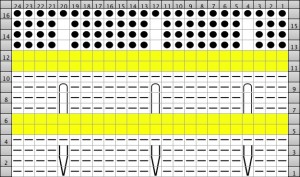
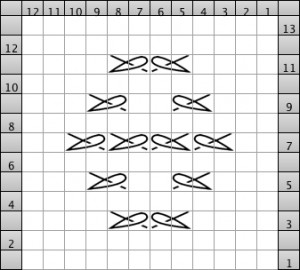
In the chart below pattern repeats take into account the punchcard limitation of 24 stitch maximum repeat. In the sections separated by the color stripe, the bottom shows a purl side symbol chart for slip stitch, the center the purl side symbol chart for brioche/ tuck stitch, the top the repeat punched out for use on the KM with black dots representing punched holes. Keeping in mind there is a 36 row minimum for the card to roll adequately through reader, this repeat would need to be punched 9 times. If one wants to use the color changes in other than totally random manner, then the pattern repeat must be an even number of rows in height. One option is to use double length, but unless the yarn used in the repeat below is very thin, for tuck stitch that may be beyond the limit of the KM. I also prefer when knitting lengths of fabric not to use elongation; for me that makes it easier to correct mistakes. A reminder: the punchcard selection mirrors the design horizontally (particularly noticeable in letters), so the hand knit repeat need not be reversed for a match.

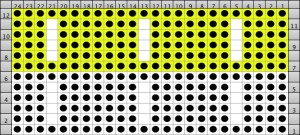
Below is a more manageable tuck repeat reconsidered for color changes (shown in change of ground behind punched holes). The first row selection needs to be from right to left toward the color changer in Japanese machines (Passap is on right, but console takes that into account). This is not the only color change sequence possible, only a place to start.

With very rare exceptions, tuck stitches generally must have a knit stitch/punched hole on either side of the unpunched square. This is because side by side loops jump off on the next pass, rather than knitting off in a group, making a long float in in some cases an interesting mess. Because slip stitch skips needles creating floats rather than depositing loops in needle hooks, the tolerance for side by side slipped stitches if far greater, and the number of rows that the individual stitches are not knit is limited by the strength of the yarn, and the tolerance in the machine. Both tuck and slip stitch fabrics benefit from being evenly weighted, with weights being moved up regularly during knitting. Canceling end needle selection and having the pattern repeats line up with tuck/slip on each edge may produce interesting side edges. If texture is the goal yarns that can be “killed” by pressing/steaming should be avoided.

Hand to machine, symbols 2

The symbol below usually represents a single increase. In hand knitting such increases may be achieved anywhere in any one row. In machine knitting however,  this may only be done with any ease at garment edges. Machine knitters may be familiar with calling what is depicted below a full fashioned increase. To achieve the latter,  a multiple prong tool is used to move the chosen stitches a number over to the right or to the left. On the machine, the resulting empty needle then needs to be “filled” unless lace holes created without doing so are part of the design; this may be done by picking up the purl bar from the row below. The blue dots represents the HK symbol, the pink the same symbol as it might be represented for MK to achieve the same result. The machine knit illustrations in this series do not factor in automatic patterning: rather,  they show how the stitches would be hand tooled on the machine to achieve similar fabrics.

single increase

brioche/tuck stitch: the first 2 image series show “normal” orientation, the  3rd and 4th series the twisted in front of knit version. In MK the elongated stitch is twisted and returned to its needle; similar fabric may be created  purely through hand technique by using holding on single needles in desired locations. Tucked rows in KM programming are unpunched squares in card, white “squares” in mylars or computer downloads. Using the repeat below, in electronics it is possible to “draw” only the 3 tucked squares, and use color reverse.

slip stitch: the first 2 image series show “normal” orientation. In machine knitting the slipped, elongated stitch is created on knit side, with the remaining “floats/bars” remaining on the purl. In the 3rd and 4th image series the elongated stitch moves to the back of the work, while the “floats/bars” move to knit side of the fabric and form a pattern on it. As with tuck stitches,  rows for slip in KM programming are unpunched squares in card, white “squares” in mylars or computer downloads. Using the repeat below, in electronics it is possible to “draw” only the 2 slipped squares, and use color reverse. Because in this fabric the needles are skipped, not filled with loops, multiple punched holes or white squares may occur side by side. If the goal is to achieve the skip stitch floats appearing on the knit side, retooling by hand is required on all skipped needles prior to the next all knit row.

stitches woven through stitches: because of the fixed width stitches must travel with any crossings on the machine there are limits as to how far they are able to move across the bed within any one row. Cables come to mind immediately in terms of stitches crossing; another type of cross weaves stitches through others singly or in sets, which may also be done within rows of long stitches. In the illustration below, one stitch crosses through the center of another. If one is trying to match the hand knit fabric version, then the direction of the “weaving” is reversed as it would be in the case of cabling. Light colors and thick yarn help make the results more visible. This is strictly a hand technique; however, for greater accuracy and speed one may program card or electronics to select either the needle that comes off first, or the pair of needles involved involved with the cross.

an alternative symbol sometimes seem for this stitch

a simply repeat illustrated for KM: since the whole ground is purl, symbols for purl need not be used

.

November 2015 PS: the charts such as the one immediately above were created using Intwined Pattern Studio and my own custom made stitch symbols. The program on Mac not long after became unusable due to the presence of custom made stitches in library, took multiple efforts to restore without their presence, and there have been no updates since then to address this, or any of the other issues. More information and reviews may be found on ravelry.

Knitting continues

I have been working on a series of tuck reversible chenille scarves. Color changing occurs every 2 rows. I do use 2 carriages. IMO the brother 2 color single bed changer was one of the worst designed accessories ever. The chenille is cranky, knitting is slow, and one is looking at the back of the knit so the pattern is not immediately obvious to the eye. These are a few colorways

thinking I had the knitting down, got to # 12 scarf, realized I needed to knit 10 more rows after canceling needle selection, “corrected” for row count, finished knitting the pattern, completed the edging, and realized the “corrected” rows were off and that this whole scarf has a mystery repeat. Here is an image of the front of the piece after unraveling edging and back to a row ready for rehanging next to a previously knit “how it should look”

it is an interesting variation of the pattern repeat, but without fiddling with starting rows, I have no clear idea how to duplicate it should I want to. Knitting rooms seem to have days when they are full of goblins.

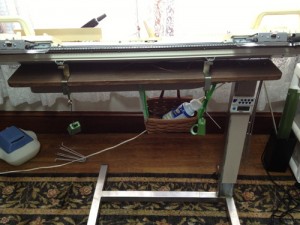
I have some issues with my back and right arm was looking for an easier way to manage the knitting of these things and the reach required to get the carriages off the beds while knitting with the opposing one and had forgotten about this particular “stand”. A few years ago I broke my right shoulder, and as I began to regain use of the arm I went looking for an adjustable height, stable KM “stand”. A friend found this for me. It is what I can only be described as an ancient, asylum quality hospital bedside stand. It is probably at least part iron since magnets stick to its metal parts, are very heavy, has a huge adjustable height range, and does not budge during knitting in spite of the fact it is on wheels, while it is easily moved when one wants to do so. It was “free” as well, an added bonus.

When knitting fabrics single bed I do not work with the ribber engaged, have no idea if the added weight would be an issue or if the clearance is adequate for attaching it to the “stand”, but using the ribber clamps with the main bed at an angle seems to make crankier fabrics easier to knit. The crank for raising/lowering the height easily stores lace extension rails.

A kitchen timer is handy to get an accurate gauge as to how long the items actually take to knit from beginning to completion in helping set retail prices for new items, and kitchen scales to weigh cones before and after (grams or ounces) aid not just to gauge the cost of materials, but also to be certain that yarn quantity is adequate to finish the piece.

In static season some of the problems with yarn management or electronic KM pattern shifts can be resolved by both having a grounding wire, and using a humidifier. One such model may be seen in the lower left of the photo, is very inexpensive, designed for use in nurseries, on the noisy side, but requires no special care other than occasionally cleaning out the water container, and uses tap water.

Canned air can help remove fiber dust during knitting so it does not become part of the finished piece when using a brush or small vacuum is impractical, it is best not to use it in places where the fuzz is likely to get blown into springs and electronic parts, however.

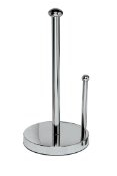
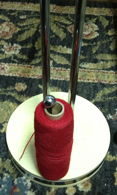
Paper towel holders can serve as yarn cone holders for ones that tip over easily, and the extra straight arm they sometimes have in models similar to the one below can help hold upright yarn wounds on tubes of various sizes, an alternative to the usual horizontal ways of managing such.

Craft ribbon holders can serve the same purpose if one wants to feed tubes horizontally in addition to the old super low tech tricks of HK needles poked through a variety of holders with caps to help secure them in place

.

Knit bubbles and “stitch ditchers/dumpers”

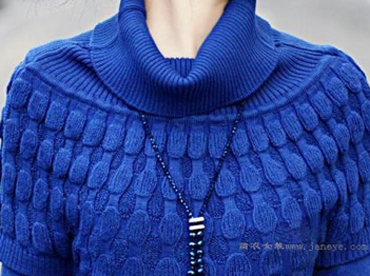
I encountered a photo of a commercial sweater not too long ago while knit surfing the web
and a bubble blanket available at Nordstrom’s during 2012
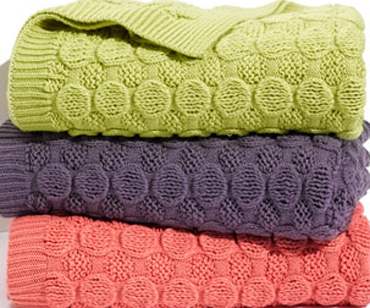
I had already been considering laces other than transfer ones for yarns that have been too crotchety to knit in that particular technique, and my Passap has been knitting idol for far too long.  The fabric above seems to alter between purl and knit sequences that would require transferring all stitches to the opposite bed for every other pattern sequence: out of my range of patience and time. The number of fabrics involving “lace” produced using the ribber involves a series of names with sometimes variations simply being specific to the technique performed on a particular brand, though possible on all. On the list: drive lace, pick rib, summer fair isle, drop stitch lace, etc. The above commercially produced knits seemed to be good candidates for drop stitch lace.

Since I recently posted on knitting long loops/stitches single bed, it seems natural to follow up that post as well with creating long stitches using the ribber and using automatic patterning as well. The following photo is familiar to most Brother users:
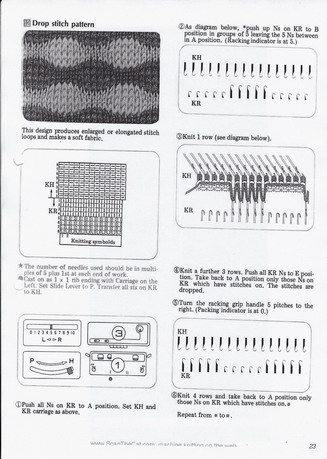
In this instance the fabric is produced as a hand technique, requiring racking and row counting. The process is easier if all stitches are transferred to ribber in Japanese KMs or back bed on Passap, and long stitches are then created by selected stitches knitting on the opposing bed, and in turn, being dropped. Punching a card, drawing on mylar, or downloading to machines makes it possible to do so in a pattern much more easily.

Punchcard books have several useable examples for such patterns. Two methods of release are used. One is end release, where the pattern is knit until the piece is completed, and stitches are dropped then. This works in friendly yarns and continuous repeats uninterrupted by rows of stocking stitch. If the design is interrupted, then the regular dropping of stitches whether at the end of the repeat or intermittently throughout is either required or preferable, depending on the design.

As for dropping those loops that will form the long stitches, one can do so “manually” with improvised tools. For more “automatic” dropping of stitches using knit carriage in Brother patterning, one may punch a card or draw a mylar with a method akin to the color separation that will allow for a pass of the KH carriage across the knit with no yarn in the feeder, “color 2” is actually “no yarn/empty” while establishing the proper needle selection on its return. Studio selects and knits in the same row, so needle selection disruption is not an issue, and in Passap techniques are built into the console that allows for “free/no yarn” passes. Both instances involve extra “knit” rows per item. Other alternative tools may be used that help the stitch ditching process. Studio brand had their P carriage and Brother their own “D slider” for the bulky KM.

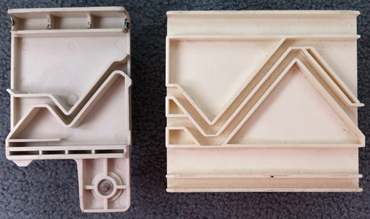
The Studio P carriage pulls needles on the main bed from B to C position going from right to left, then returning them back to B position going from left to right. On the ribber, it may be used to bring the needles up to C position for “safe knitting. (Studio needle positions are A, B, C, D, while Brother skipped the letter C, continuing with D and E). A video from Susan Guagliumi shows a later model than the one pictured below, used as well to bring needles out after hand techniques as opposed to pulling them out by hand or to insure thicker yarn knitting.

The Brother Bulky KR 260 D slider only moves in one direction, from left to right, completing the in and out needle position operation in one pass. End needle selection needs to be canceled. It is not usable on ribbers. After operating it from left to right, it is simply lifted off.  The knit carriage position while the transfers are occurring may vary depending on personal preference and whether the yarn changer is in use or not.

Studio 4.5 mm/ Bro 9 mm bulky viewed from the front
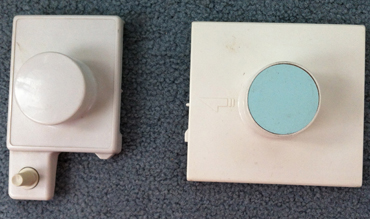
Studio 4.5mm/ Bro 9 mm bulky viewed from the back
Directions on altering the studio tool for use on Brother machines

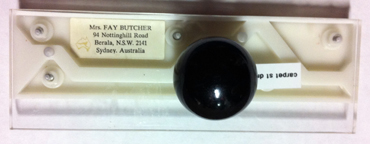
Passap’s need was answered by an Australian woman: Faye Butcher,  who developed the item shown below. Such tools were often discussed in seminars and publications of the time, in conjunction with pile or “carpet” knitting, so “P” for such knitting in Studio, and “carpet stitch tool” for Passap, seen below

front view

rear view
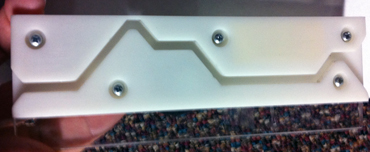
in use on the front rail
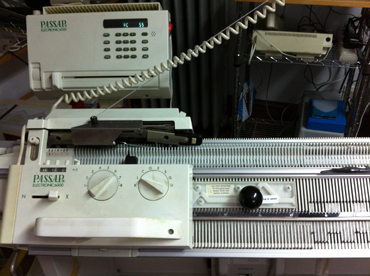
If patterning for long stitches occurs on the front bed, the Passap tool sits on the rail where you see it in the photo, it will release all stitches from needles in its path. Often directions for using it recommend its use for 2 passes with locks on right. Passap preselects pushers for the next row of knitting as Brother preselects needles, pushers are below the rail, so in theory, they should be unaffected bypasses of its travels. Once things are up, going, and “working” I have found it possible to align the tool as seen in the photo ahead of the next lock pass, so on the right of the lock from left to right, to its left from right to left, a bit of pressure will keep it in its place, and stitches are released each pass of the lock. This may result in having to operate the lock with one hand. There is also an optimum speed: if the movement is not smooth and regular and needles are jostled, pusher selection may be altered in response, thus resulting in a patterning “mistake” on the next row. Challenging yarns may make this method impossible.

Some samples follow: the yarn used was acrylic, I attempted to press it on swatch completion, and this flattened the fabric considerably. Of note: the disparity in width between the stockinette portions of the swatches, and the dropped stitch segments

too open
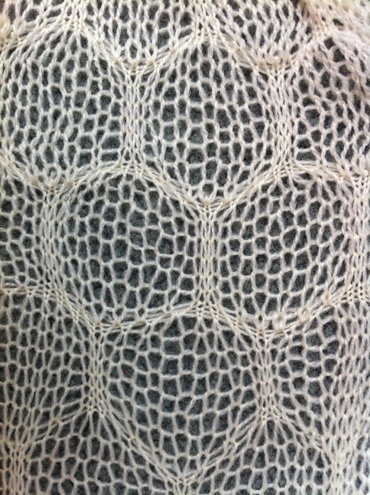
a bit closer, much more so before steaming
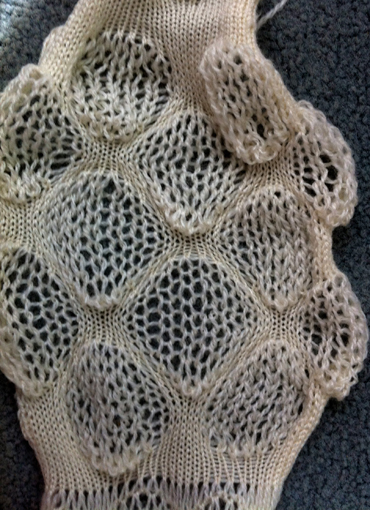
a “mistake” that may lead to a future accessory, with some revising and planning
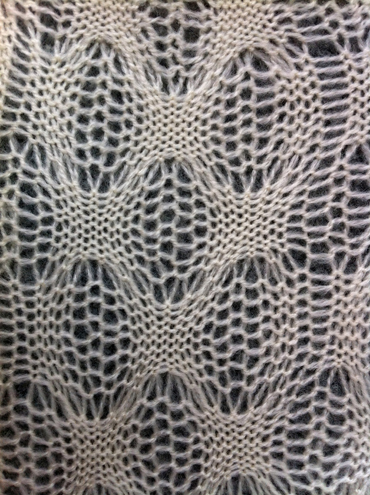
I am using Stitch Painter to plot out my repeats, exporting files as .cut files, using wincrea to import them, and downloading to the console with a cable purchased from England. I replaced an ill tower dell with a 64-bit dell laptop half its age, and am now running Windows XP instead of 98! My leaps into the present technologies/software are made using apple products. Technique 129 will work, color may need to be reversed using the alter loop, or within wincrea depending on how the pattern is drawn in the original graph, but that is a topic for another day (see April 2011 post: a bit on Passap for some information on Tech129). Back lock on N throughout, front lock on LX (slip/part on the main bed for Japanese KMs). Single bed slip and tuck stitches may also produce “bubbles” of a different quality.

Coincidentally the 10th-anniversary issue of Knitty has just been released, arriving in my virtual mailbox this AM. There are 2 patterns in the issue that may be of interest, one is tin roof, the other employs ribbed/bobble/bubble for hand knitters. Another hand knit version by Kieran Foley may be found here

Using Studio mylar sheets on brother KMs 1

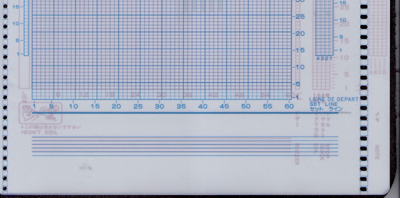
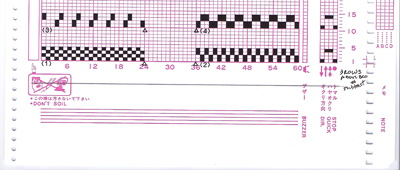
Factory “drawn” Studio mylar sheets ie for 560 model KMs will work on the Brother 910 with some adjustments. Just as when using punchcards, the card reader drum as well as the mylar scanner “see” a different row as row 1 than the alternate brand KM.
The image below is a quick scan of positions of black/white squares on Studio mylar with a superimposed, unmarked one for Brother. The holes for movement of the mylar occur in just about nearly the same location. The first issue at hand is to draw a set line in the proper position for Brother pattern reading (traces of pencil line on the red studio mylar may be seen underneath the blue brother markings). Some machines are fussier than others with the set position, and I found drawing the line by placing the denser studio card over the brother one on a light_box surface made that very easy.
The second issue is that as can be seen above, the first design row on Brother is actually 3 rows below that on Studio, so when programming the repeat 3 rows should be added to the first row of studio repeat, and 3 also added to its top. For example in the studio mylar #1 segment below#4 pattern in Studio programming would begin on row 11, ending on row 14, to program same in Brother beginning row is 14, ending row is 17; stitch locations remain unchanged, but a reminder: Brother sheet is marked in 5X5 blocks of squares, Studio in 6X5.
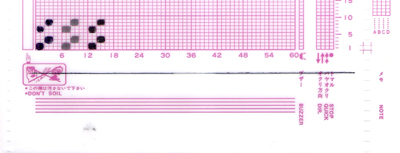
Hand drawn studio mylars when using the pencil appropriate for them will not read, so sheets need to be marked with any tools you have used for doing so in brother markings in the past. One oddity I encountered is that with the drawn repeat below I had no needle selection until I programmed rows beginning above row 5, using rows # 9-12 as top and bottom of the repeat, not an issue with the factory mylar. I used a sharpie to draw the first pair of squares (has never worked for me), number 2 pencil on the reverse of the sheet for the second (my preferred method), and template marking pencil on the mylar front for the third. Drawing with the latter over hand-drawn studio mylars enabled those markings, in turn, to be read by my 910. One problem with the template pencils is that small pieces of the coating they produce may shed with use. The issue with bottom rows not reading did not repeat when I used a different blank mylar sheet and drew the identical repeat, nor did it occur with factory drawn. Sometimes there are no explanations…