Reversible DBJ, Brother knitting machines

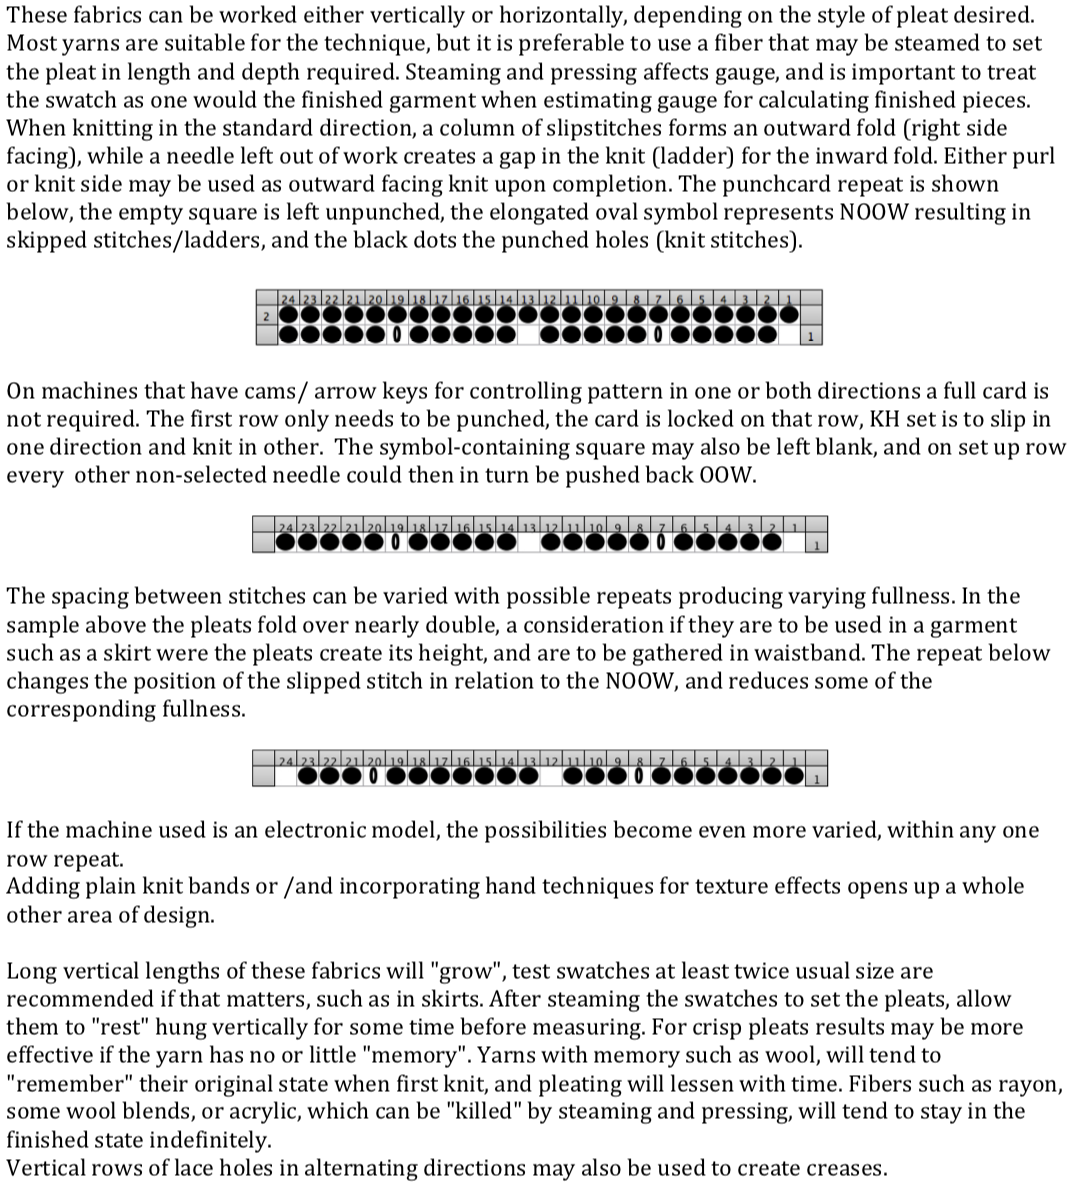
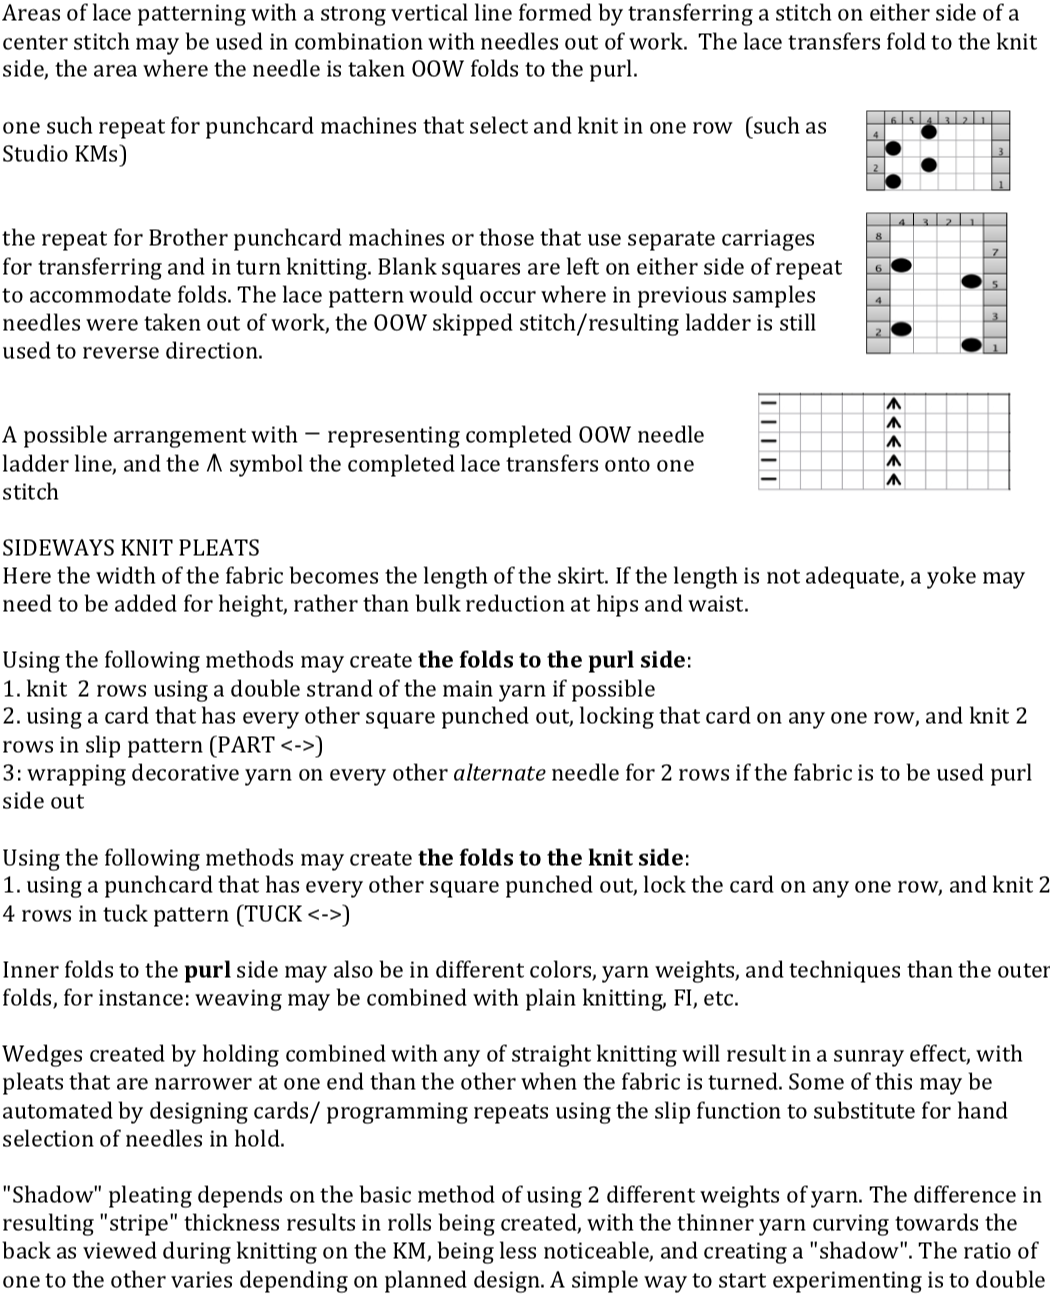
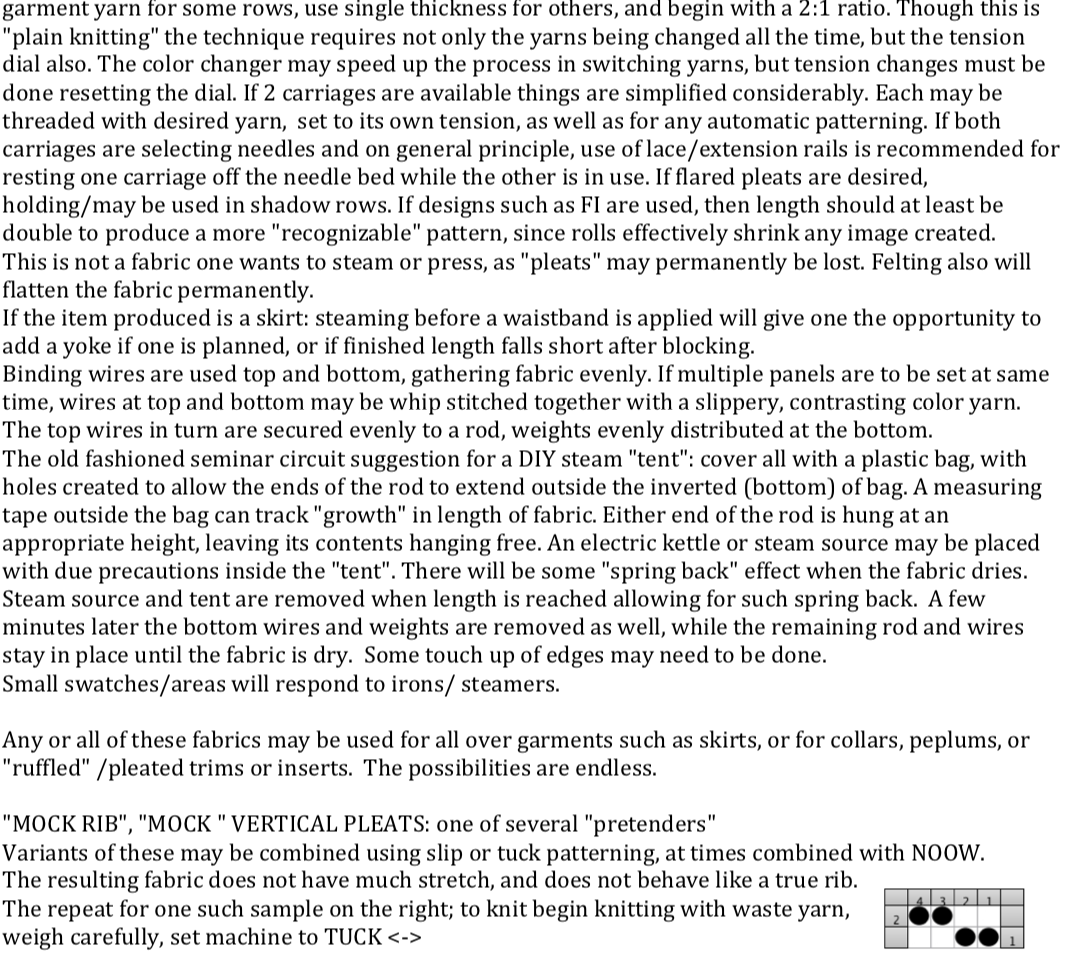
I am including notes on my working through the process and some of my stumbles at the start of this post. More specific how-tos are found toward the bottom of it.

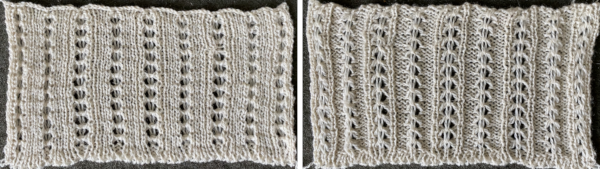
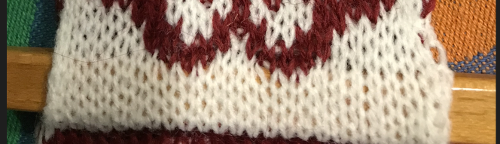
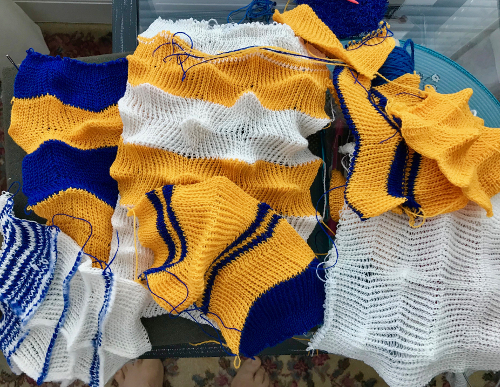
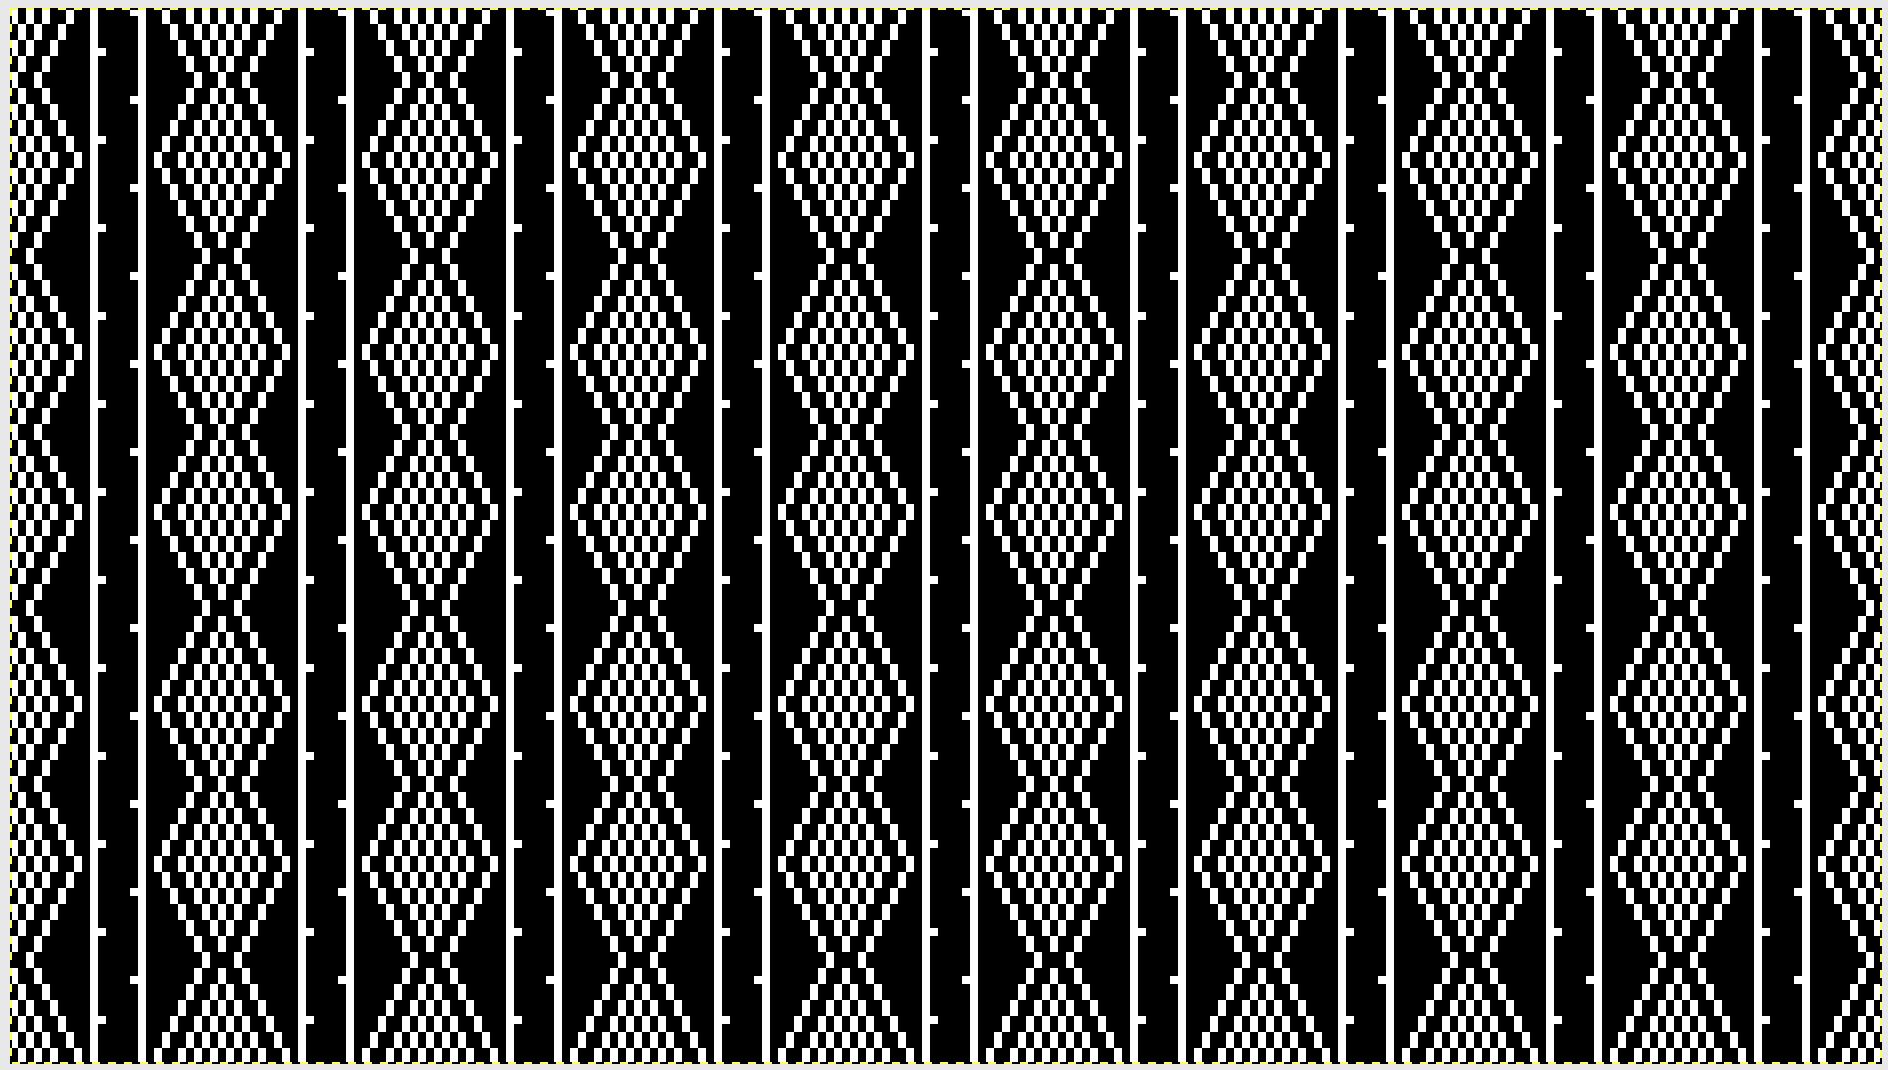
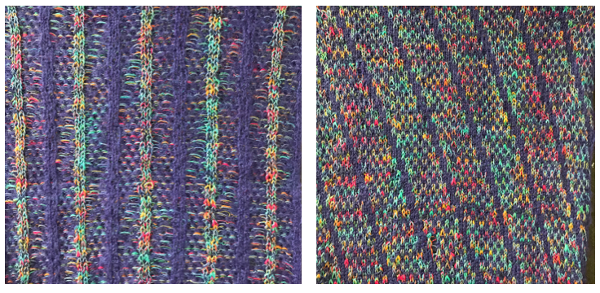
Such fabrics may be created with both the KRC built-in function or with the color separations that knit each color for each design row for 2 consecutive, identical rows. Punchcard knitters are not excluded. The starting side is on the left for the KRC setting (B in this illustration), on the right side for the alternate color separation (C, double length, or drawn with each row repeating X 2). 
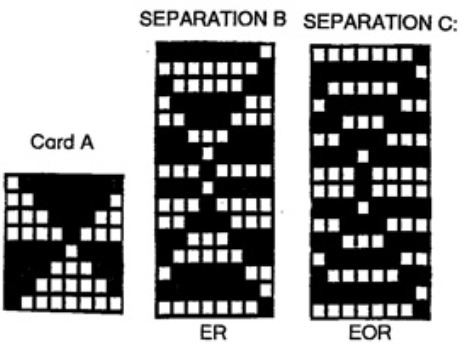
I am still testing my 930, for my samples I began by using the built-in pattern #16 in the Stitchworld Pattern Book I. 
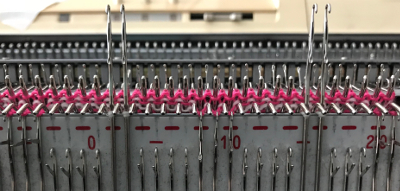
In the absence of a jac40, the fabrics are knit by manually selecting stitches to the upper working position (E on Brother) on the ribber bed every row. Preselection for the next row to be knit on the main bed makes the process far easier.

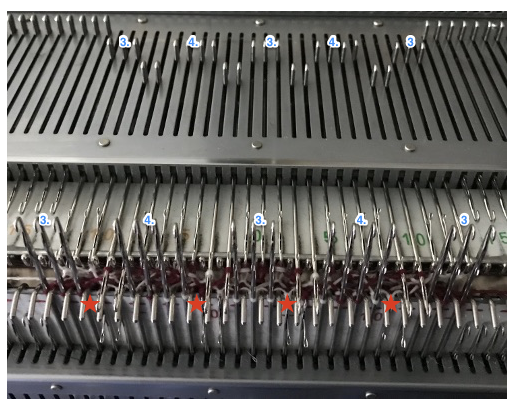
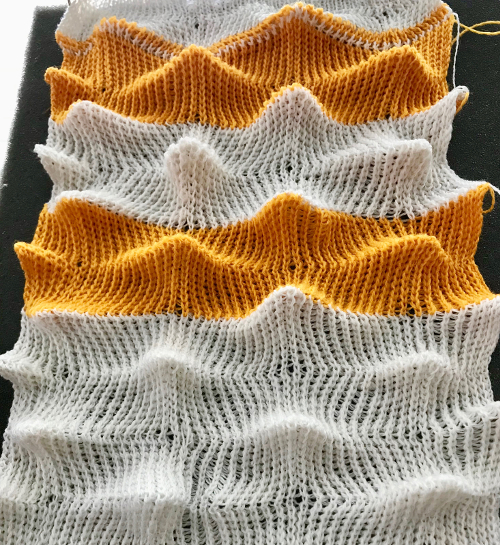
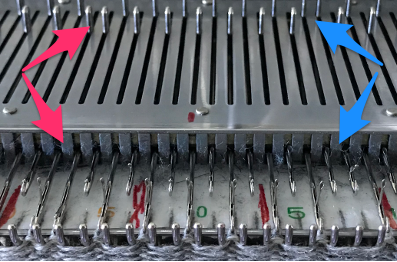
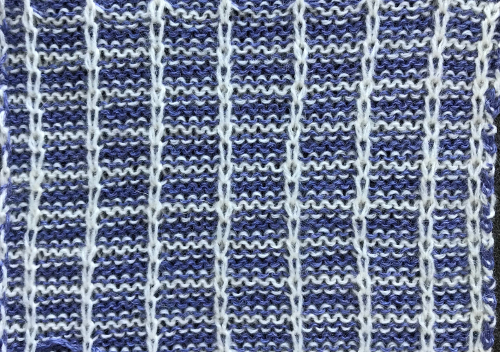
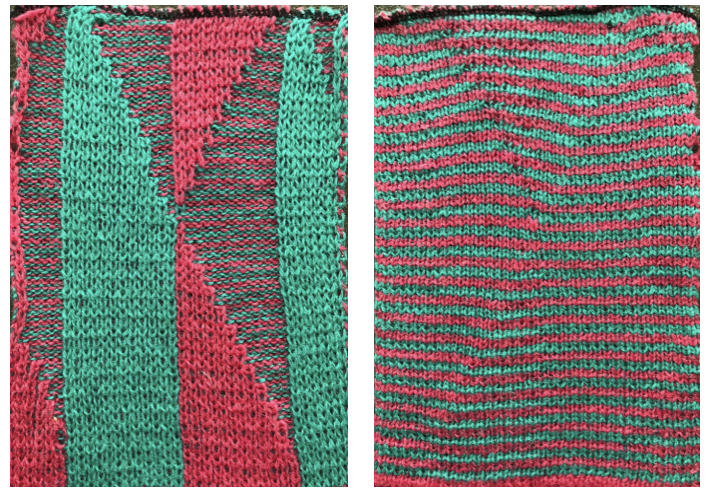
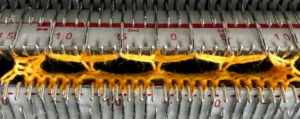
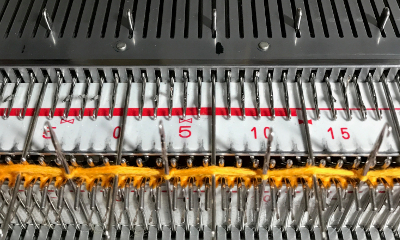
In my first sample, the colors are the same on each face. Since the same number of needles are selected for both design and ground, both sides of the fabric will be exactly alike. There will be floats, enclosed by knit stitches of the opposite color. Beds are set at half-pitch. Consistency makes any process easier and more predictable. My ribber set up was also with an extra needle on the ribber at either end of those in work on the main bed. I found I had less issue with the long floats in my design when I made certain the needle selection began with needles to the left of those in work on the opposite bed rather than to the right, allowing for the color in use to knit first on the ribber, then in turn on the main bed. It may not matter with patterns with shorter spans worked between the 2 colors. The dropped stitch issues below were resolved by using different yarns, no other changes. 
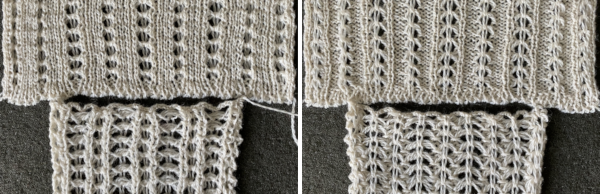
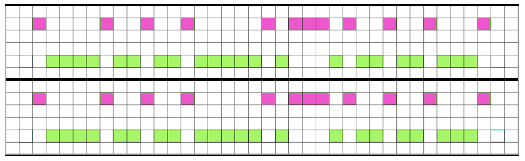
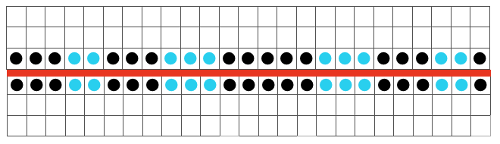
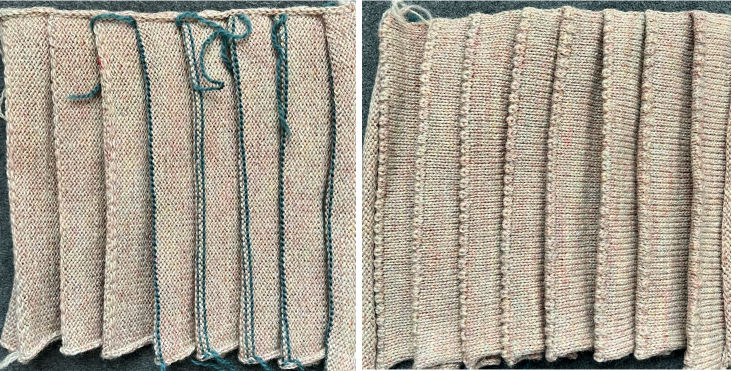
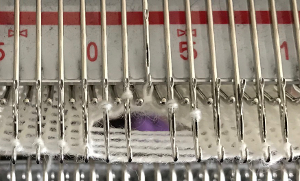
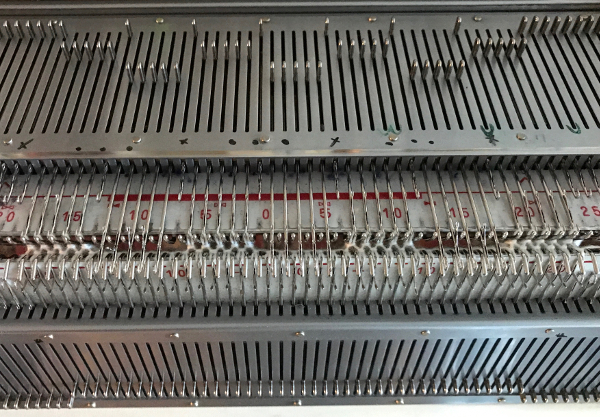
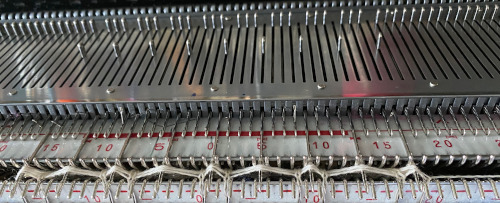
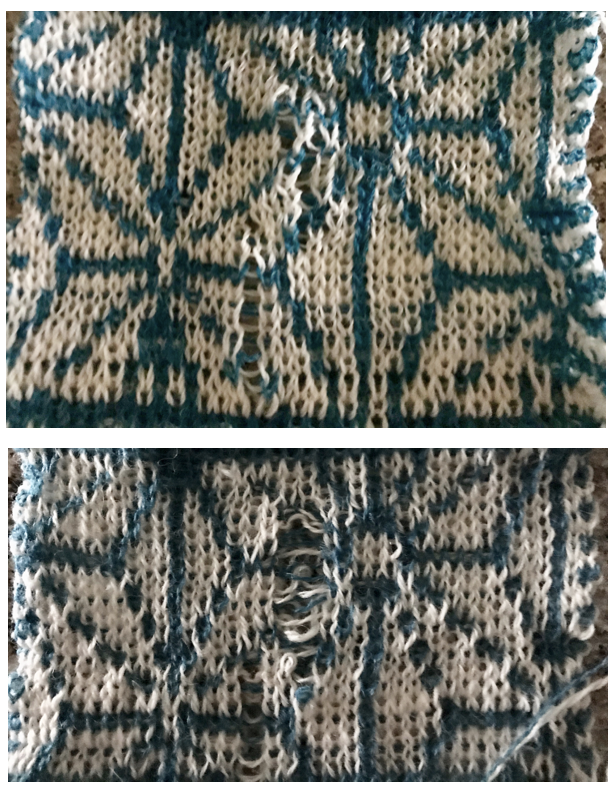
The needle set up in colored squares and on my needle beds showing matching selections on both beds (different design rows). Some of the floats may be seen created by the blue yarn in the bottom photo. If the first and last needle on each side were not selected on the main bed, the needles at each end on the ribber were added to hand selections for the next row (blue squares)


better results with the different yarn choice

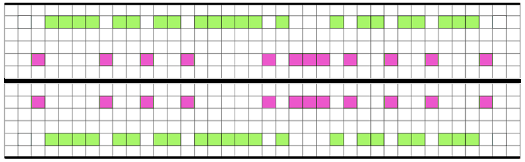
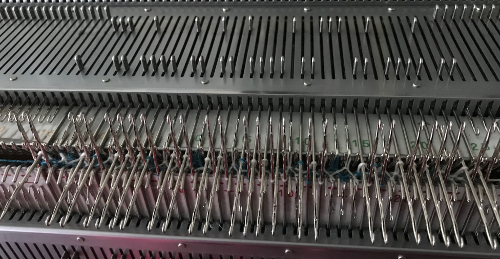
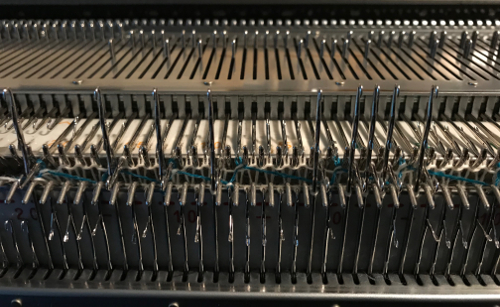
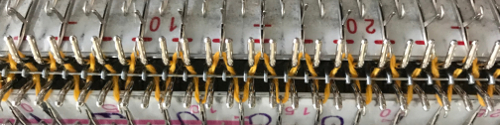
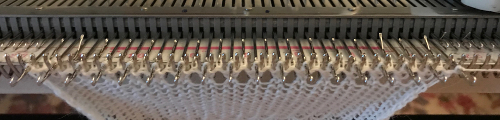
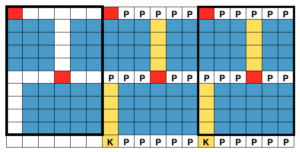
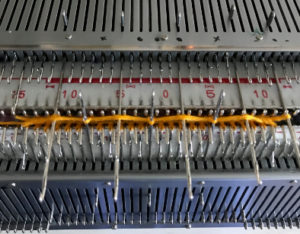
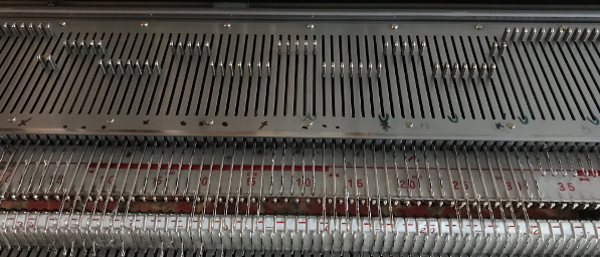
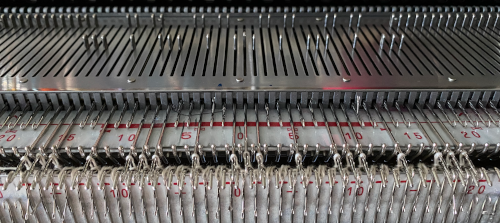
For DBJ that reverses ground and pattern colors, opposite needles are selected on each bed. Color 1 knits the design on one bed and the background on the other at the same time, while color 2 knits the reverse. There are no floats. I knit this fabric as well at half-pitch. The ground color created pockets (white squares), with the pattern color (black squares) locking the layers of fabric together. Here again, first and last needles on the ribber were worked on each row. I began pushing needles up on the ribber beginning to the right of each needle in work on the main bed. Needle selection on ribber matches unselected needles on the main bed (pink). All needle positions in each bed are mirrored.

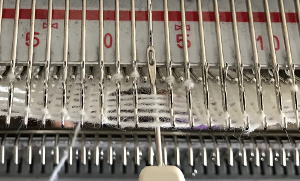
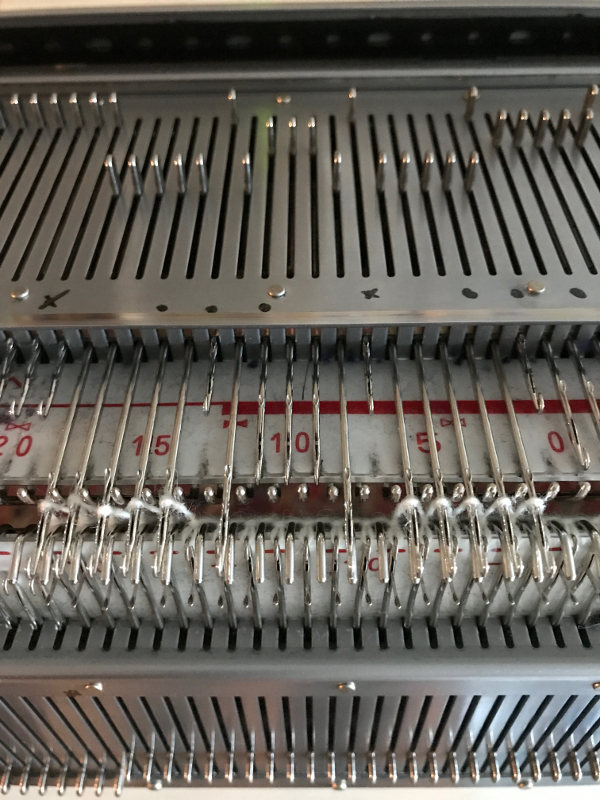
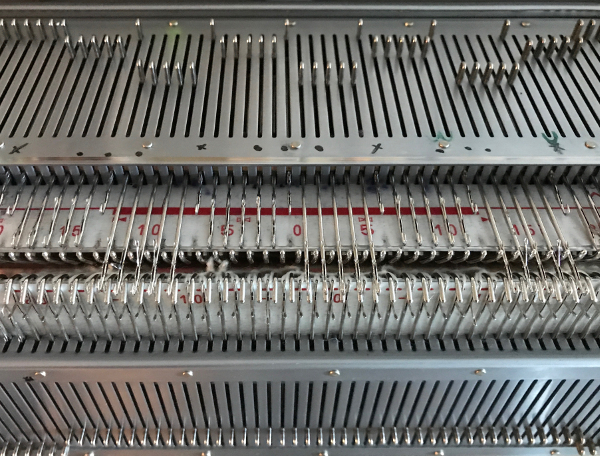
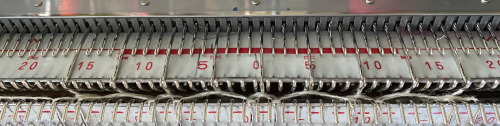
needles actually selected on both beds (pink), different design row
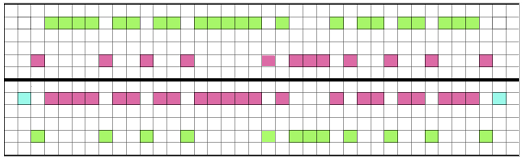
One design row, 2 different angles

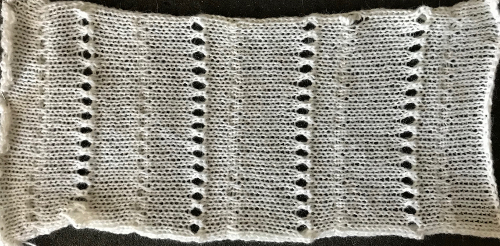
Since ribber fabrics are not visible for a large number of rows, I frequently scrap off after short distances to proof technique before committing to longer pieces as well as to assess whether the effort is worth it in order to produce the fabric in that particular technique or yarn.

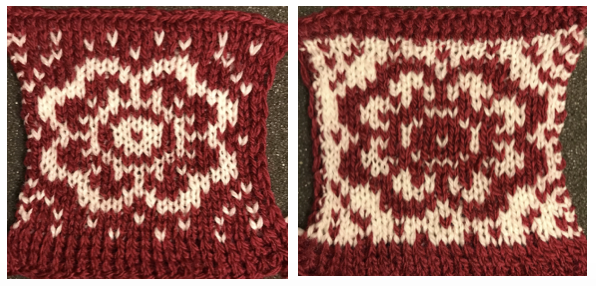
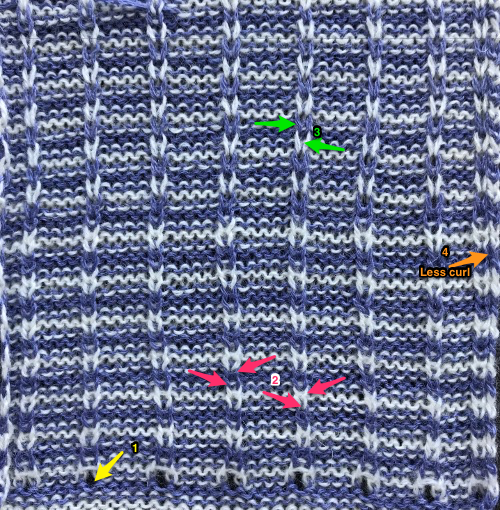
Moving on to a self-drawn pattern, the technique proved to be sound. On inspection, however, I saw I was actually missing a pixel in the .bmp I downloaded, and on the reverse, the green arrow is most likely operator error in needle selection. The orange dots highlight the missing pixel/contrast color stitch, and on the color changer side, I had a really sloppy edge that needs sorting out (red dots). A possible added factor: I knit the motif using KCI, and later recalled end needle selection does not always work with the carriage I am using. 
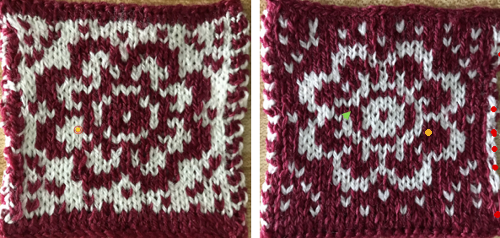
Here I filled in the missing pixel, and drew a single-pixel black line along each side, testing a “border”. The first and last needles on each side were now cast on and in work on the main bed.

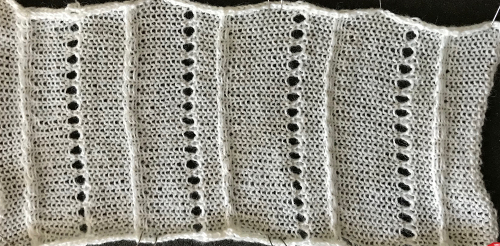
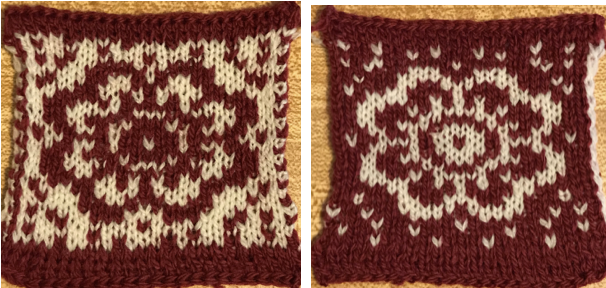
That single stitch solid color line does not add to the design in my opinion, so back to the drawing board: side “border” pixels are eliminated. The first and last stitch are now in work on the ribber. This fabric is the best by far, at the very start I forgot to cancel end needle selection (KCI), then switched to canceling it, KCII on electronic. 
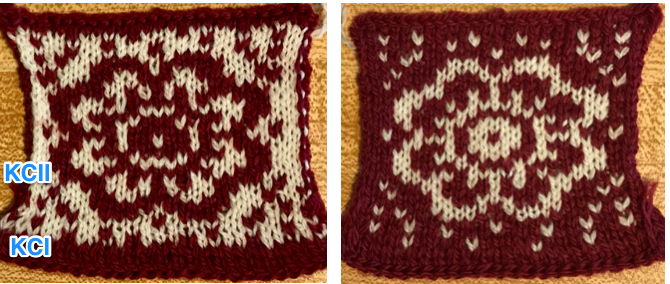
The how-to in summary: first and last needle are on the ribber. 
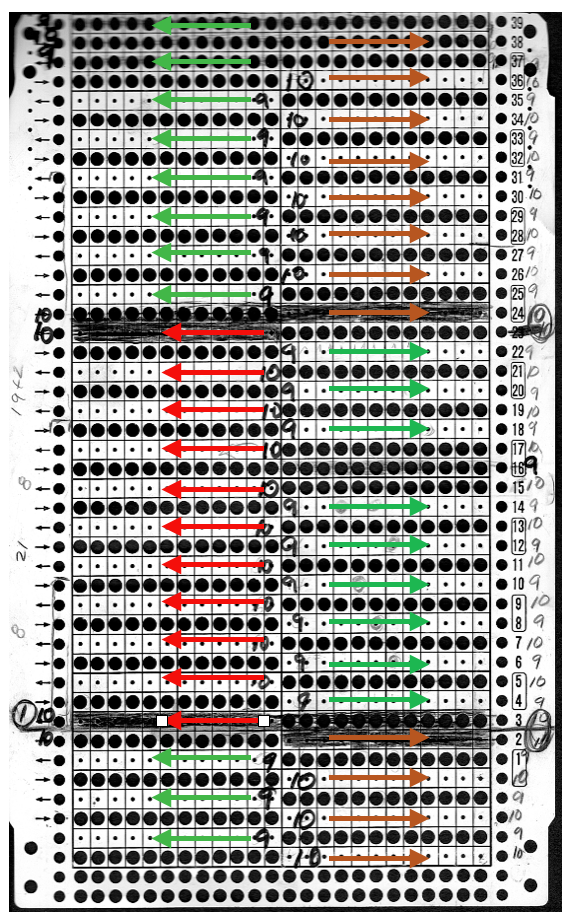
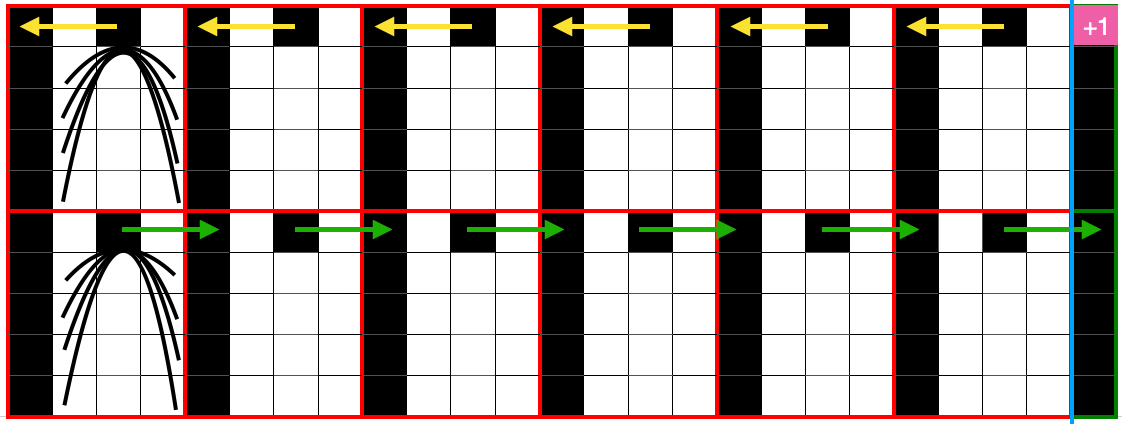
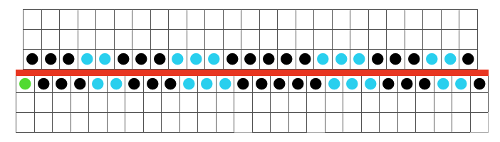
On the electronic choose KRC for the built-in color separation for the fabric to be worked in DBJ. KCII (no end needle selection). With a free pass to the right, both carriages set to slip <– –>, select for the first row of knitting to be worked in color represented by white squares in the design chart. Both carriages remain set to slip in both directions throughout. On the ribber bed, bring up to E/hold position first needle on the right of any needle selected on the top bed, then continue to push needles up into work to match the number of not selected needles on the knit bed. As needles are arranged, there will be a space between the last hand selected needle on the ribber, and the next needle in work on the main bed Now that there is that extra needle in work on the ribber on the color changer side, to match selection as seen above, needles are hand-selected to E beginning on the far left, still keeping that space just before the next needle selected by the pattern reader. Remaining selections began to right of needles on the main bed as described above.
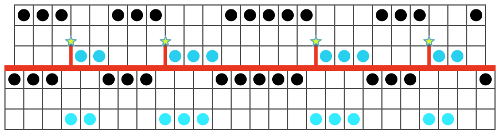
when selection begins on the main bed on the left Getting back to working the same pattern on both sides of the knit:  the first needle on the left is on the ribber, the one on the far right on the main bed. On the electronic select KRC for the fabric to be worked in DBJ. KCII. With a free pass to the right, both carriages set to slip <– –>, select for the first row of knitting to be worked in color represented by white squares in the design chart. Both carriages remain set to slip in both directions throughout. On the ribber bed, bring up to E/hold position first needle on the left of any needle selected on the top bed, then continue to push needles up into work to match the number of selected needles on the knit bed. 
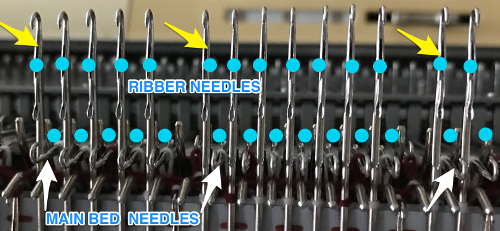
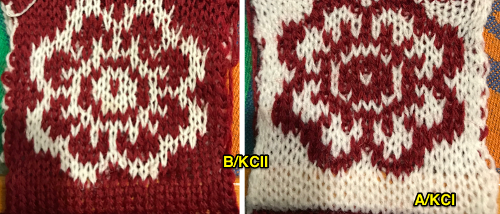
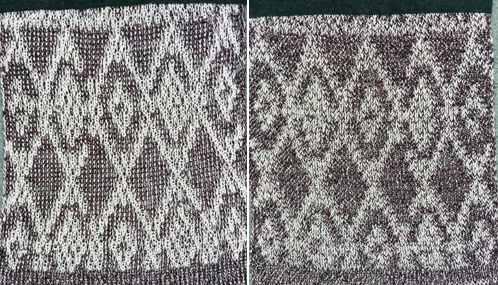
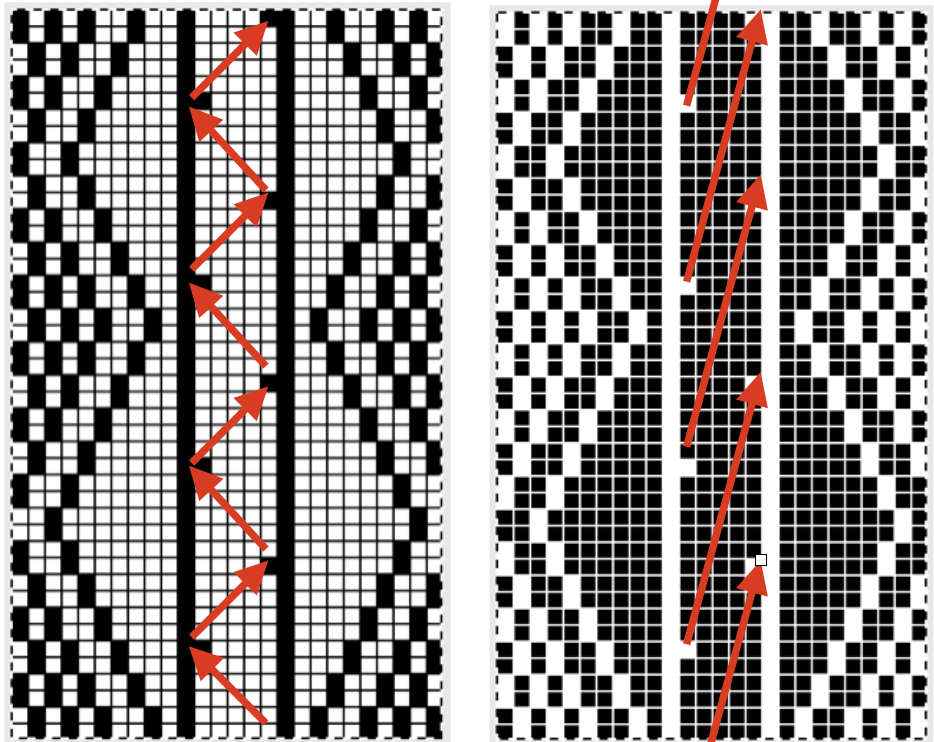
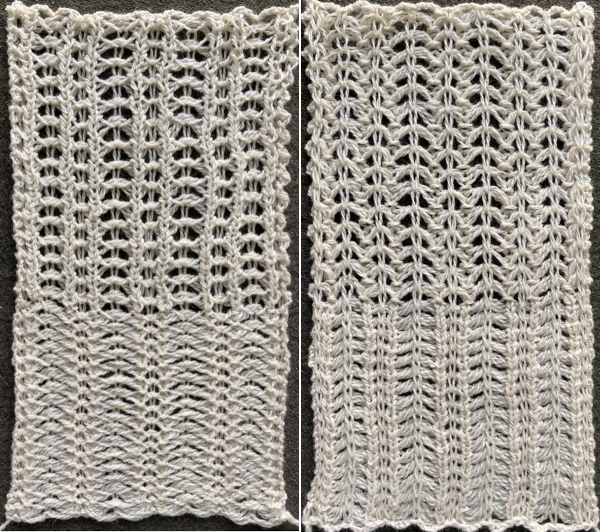
Small selection errors are seen on the left image, ie on the second row on its right, may be easily repaired by duplicate stitching. The stitching yarn may be fed easily through layers of double knit for short distances before and after the “mistake”. With all settings and yarn being equal, there is a difference in size between this fabric (larger of the 2) and the one with color reverse on its other side 

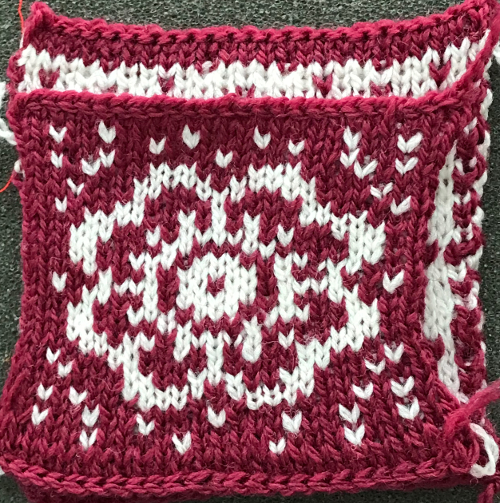
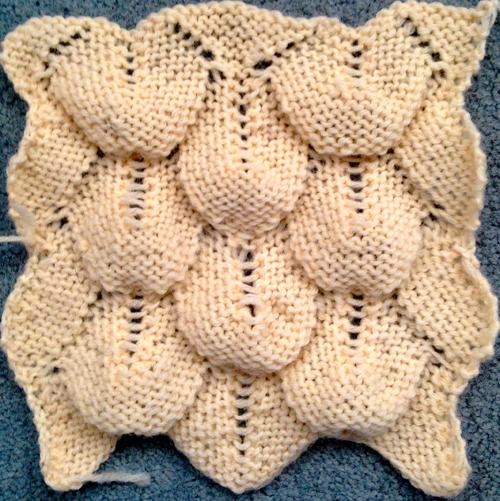
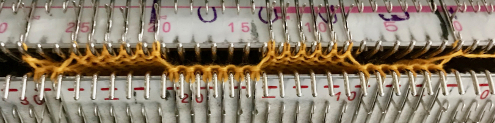
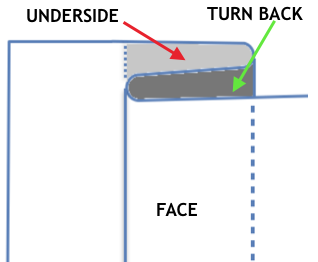
A similar setup, working in full pitch. Here needles line up directly below each other. If the wrong needle is selected it will be point to point with the needle immediately above it and is an added clue the wrong needle is being pushed up into hold/ E position. My first swatch had a distinctly different side / vertical edges. Cast on was for every needle, half-pitch (top image), the first needle on left on the main bed, last needle on right on the ribber. When completed, it was followed by a change to full-pitch prior to pattern knitting, lining up needles point to point, directly below each other (bottom image). 
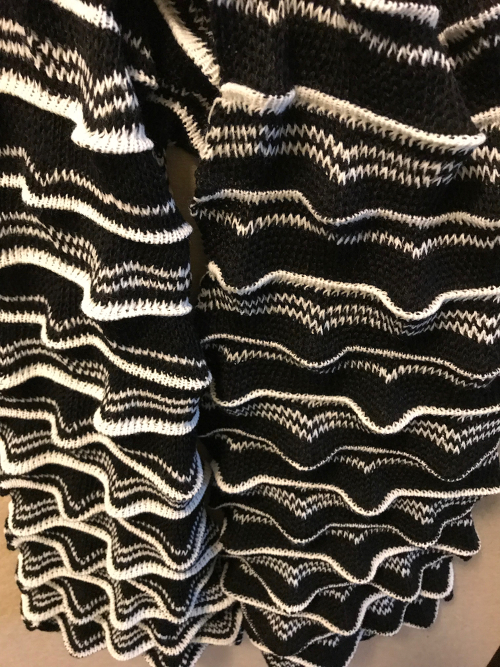
I prefer the edge obtained on the half-pitch throughout, seen in the previous  sample 

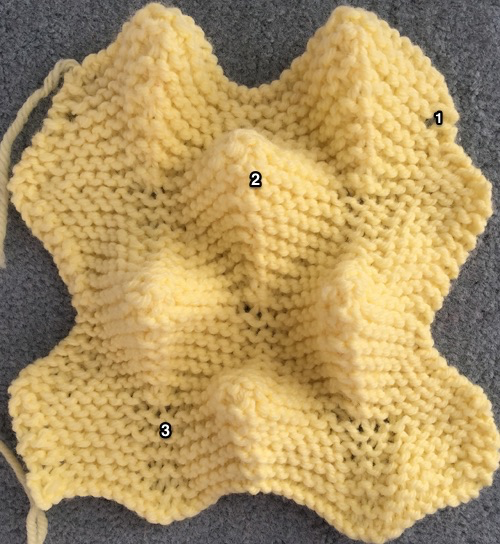
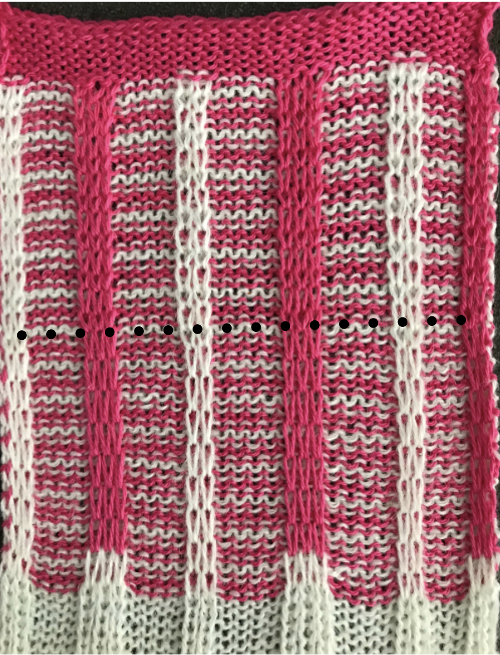
Still, pondering those edges, and what about repeats with large areas of a solid color? The image on the left is 25X26 rows in height, the one on the right adjusted for an even number of solid color rows, and a total row repeat divisible by 4, 25X28. The single black line at the top is a marker for returning the carriage to all knit when the top of the repeat is reached. When using full pitch, solid areas remained open at both edges with carriage set to KCII. A wooden tool handle is actually inserted through from one side to the other at the bottom of the swatch. Because the needles are point to point, no extra needles could be brought to work on both ends as a workaround. KCI will select end needles on the main bed. I tried that as the first workaround to seal the edges. I paid no attention to whether needles were selected at each end every row, and got another creative pair of edges.

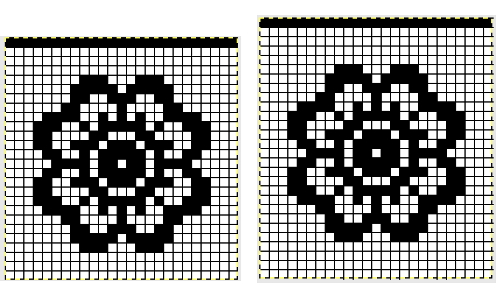
Returning to half-pitch I brought up to work the first needle on the left every row (too many rows at seen at R top edge compared to the other side) and pushed the last needle on right up to work if it was not part of the group to be brought up to E.
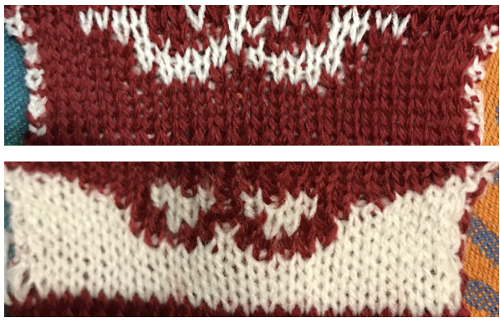
Analyzing the fabric structure in those areas of solid colors on alternating beds: at first full pitch makes sense if one has knit tubular stripes or solids which have closed edges, with the yarn making a single pass on each bed, traveling back to the color changer, with the option to stripe every X, even number of rows. Such stripes occur evenly spaced and identical on both fabric sides. Here the goal is to knit the fabric with large blocks of solid, alternate colors on each side. The main bed knits color 1 on selected needles on the top bed only, the alternate color is knit with the ribber needles being hand-selected up to E while the main bed is slipping, with none of its needles selected. Other than that first set up row with preselection from the left, 2 rows are knit in color A, followed by 2 rows in color B. There are no stitches traveling between the beds to seal the fabric together in those areas, creating open sides, so if the goal is to have the edges seal. other steps need to be taken. A single-pixel solid line along either edge of the repeat did not create a good edge. Full pitch is easier than half pitch to manage. One possible solution to both issues is to alter the side edges of the design repeat so there will be alternating needle selection along those side edges, thus sealing the fabric.

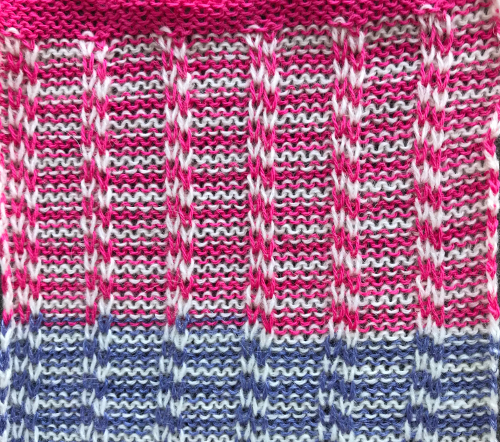
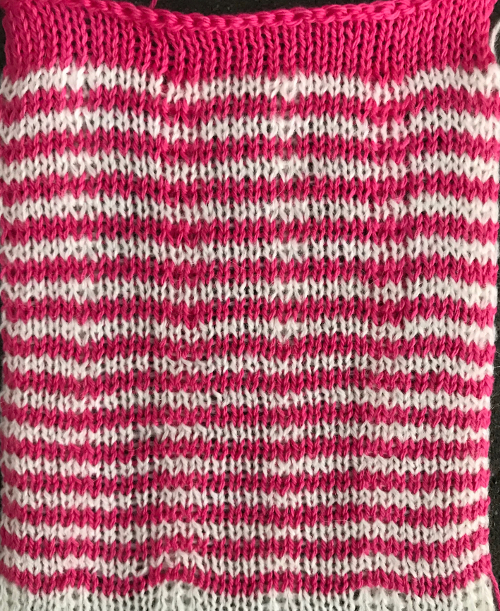
I decided to cast on with white and to continue with white as the first color used in the pattern (white squares in the chart). This swatch was knit in full pitch. Edges are sealed throughout. The only hitch was when the top was reached and that all black squares row was reached. I was on the right at that point, with my dark color in the feeder. The row toward the left would have knit in the dark color instead of the white on the top bed. I cut the dark yarn, made a free pass to the left, continued in plain knit in white to right, and then transferred stitches and bound off. Top and bottom edges /borders in terms of the number of rows, whether to add pattern there as well, are all subject to personal preferences and taste.

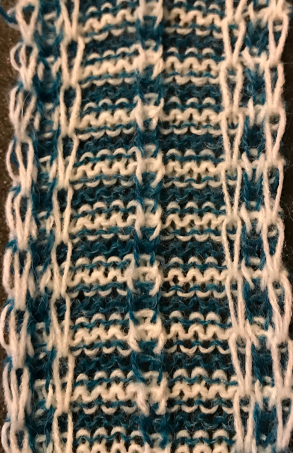
For an off-topic reversible double bed fabric using thread lace setting, see post

More dragon scales and chevrons in ribbed, racked (4) fabrics

Over the years a variety of fabrics have been named dragon scales or crocodile stitch. Here dragon scales have referred to shapes created using a lace technique and resulting in a pattern such as this

that was followed by hand knit samples and an investigation into possibly creating a ribber fabric with auto shaping resulting in similar protrusion

ribber-pitch-a-bit-on-racking-1-chevrons-horizontal-herringbone/

vertical chevrons/ herringbone which eventually led to this, where a reversal in racking periodically shifts the lean in opposite directionsautomating the pattern in half fisherman rib/ mylar repeat tracking shown. Any repeat in a factor of 24 may be used on punchcard machines as well. The start of a series in varied colors and fibers: sometimes I enjoy getting back to the simplicity and predictability of punchcard machines, though punching those cards can be slow and a bit tedious. I am presently curious about striping again, and creating a wider “scale”, with a crisper fold. The chart is for the working idea, the punchcard typical of what some of my cards begin to look like as my work evolves. When marking cards for any action, the fact that the eye is not on the same design row as the reader needs to be taken into consideration. Here racking numbers begin to get marked on what would normally be row one on a factory marked punchcard, 7 rows up for Brother KMs on any other brand punchcard, or card roll # position. Though the final repeat is an even number of rows in height (42) note that each half repeat is not (21). The color changer sits on the left, so the first preselection row is left to right, cam button on KCI to insure end stitches knit. Any color changes happen every even #X rows, so they will technically be in a slightly different spot on the alternate repeat. some of the trial and error, random yarns. The white is a 2/15 wool, the yellow a 2/12, the blue an unknown, also wool. The best of  the lot, but not “there ” yet, going back to one color knitting So then you go for a yummy alpaca and silk, make a racking error and manage to correct the pattern, and lo and behold the yarn breaks halfway across the row a repeat up from there! “They” do keep talking about how relaxing knitting is ;-). Yarn specsFiber Content: 80% Alpaca/20% Silk; Weight: Lace; Gauge: 8 sts = 1″, 1/2-lb cones/3472 YPP (1736 yards/cone)This yarn is an English import, 2675 yards per pound. It felts into a lovely fabric (not the goal here) and knit tolerably well. The fabric is quite stiff, however, and the surface change is minimal and nearly completely lost 2/18 Jaggerspun wool-silk: worth a shot at a scarf. Starting ribber cast on left, followed by 2 circular rows, one closing row right to left, and first KCI row from left to right will set up patterning in tuck so that the direction of the arrows on the left side of the card, lines up with the racking number appropriate for that row prior to knitting it. The fabrics below are as they came off the machine, not blocking of any sort

I have some lovely cash wool in 3 colors, 2/48 weight. Using 3 separate strands fed through the yarn feeder separately resulted in uneven feeding, loops, and too many problems. Using 2 strands “worked” easily, but the fabric was nearly flatCautiously winding 3 strands onto a cone prior to knitting gave far more predictable results, and there now is a scarf in progress. The difference in color is due to the lighting at the moment My best advice to anyone attempting this is to knit slowly. The most likely spot for errors in my experience is at the point where 1: no action is taken for a row (or more in later swatches), so racking position remains at 10 for 2 rows, and 2: for racking position 9 the knit carriage position is reversed in each half of the repeat. One can get also reach a left-right rhythm, and without realizing it, begin racking between positions 9 and 8 as opposed to 9 and 10, throwing the pattern off. Another look at racking positions: the numbers reflect racking position before the carriage moves to the opposite side, the arrows the direction in which the carriage will be moving. Once the knit carriage moves the card advances, so glancing at the card after that move will show the action for the next row at eye level, which can be confusing at times. A finished piece, 9.5″ X 64″, in the coned 3 strands of merino. Occasional single strand caught on ribber gate pegs, no yarn feeding issues as such. The fabric has not been blocked in any way, but allowed to “relax”. I like the larger scale of the “scales”, would still like to introduce striping in a way that pleases my eye. The knitting is slow thanks to all the racking but is probably faster than using single-bed holding for similar shapes, with a very different finished look. Future of the fabric TBD. 8/16: interestingly enough when the fabric relaxed, it became quite a bit less 3Dand back to introducing stripes in contrasting color An act of faith after lots of trial and errors and a punchcard redesign, that this may have been worth the effort when done. I am choosing to cut the yarn and weave in ends for longer solid areas, and am giving myself permission to only knit while I feel focused on manual changes in color and racking. It may take a very long time to get to “scarf length” and here is the fabric in a completed piece, about 54 inches in length when off the machine. The top right photo shows reverse side of the piece, the bottom right is how it might appear when worn  Next up was a test on how to use 2 carriages or changing settings, allowing for the turning stripes to help the scale shape bend more outward into a “point”. I found to get the width I needed, along with striping it was simpler to change ribber settings to slip <– –> for all knit rows and retain the use of the color changer on the left.

It is easy to share successes. There are also those days however when one should not be anywhere within range of a knitting machine and perseverance does not lead to anything positive. The above scarf was knit in charcoal, using 3 strands of cash wool. Two strands of the blue created a nearly flat fabric, 3 strands did the job. So I now turn to true black and white. Knitting 3 strands of the black was impossible at any tension for any length. Then I noticed the ribber on the right was lower than it should be. It turned out the bolt used to adjust the height of the ribber was loose, and the slightest turn of it loosened it completely. So then it took way too long to get it back in place. Got things back together and set up, and with each movement of the racking handle the ribber dropped on the right. After a lot more fiddling that got me nowhere, I decided to use the ribber for another Brother machine that had not been used for years. That was dry, the grease on it had turned black, and time flew cleaning and oiling and waiting. Back on the machine, the right ribber bracket of the alternate ribber will not allow it to drop on that side so it’s back to grease and patience and yes, I finally got up and running, only now the smell of the oil and lubricants makes me want to leave my apartment. Outdoors the temp is a dozen degrees warmer than inside it and grossly humid. I don’t want my knitting to smell like the solvents either, so the remainder of the day is called in as a period of rest and recreation mixed with a touch of, hopefully, amnesia.

Moving on to the next day: success in one color with no major problems or errors, have a black scarf, 64 inches long with lovely bumps, here as it appears immediately off the machine 8/16: 3D shapes held up very well So what would that true black in the thinner weight do with those stripes in a true white? I found myself forgetting completely to set the carriage to tuck for several tries, then messed up the color-changing sequence. Time for more R&R.

8/7 after several tests with minor variations in the pattern, sorting out yarn weights preferences, I decided to “go” for a version of the same stitch type as the charcoal and white in true black and white. Again, I am not able to use 3 strands of the black Got a third of the estimated desired length knit, and whoopee! about 10 stitches dropped off both beds on the color changer side. Oh, the joys of unraveling several rows of sewing thread weight black yarn, in racked tuck stitch, down to an all knit row in the white to make certain the proper number of stitches are in work on both beds. Got that far, and am ready for more R&R.

And 8/8 this is the last in the series, at least for a while in true B&W. The 3D pattern is reduced by the weight of the piece as it is worn Just a reminder: the service manual http://machineknittingetc.com/brother-kr120-kr710-kr830-kr850-kr230-kr260-service-manual.html provides information on ribber adjustments. The part in question I believe, is #24, the “slide plate guide stud”. In the image below b= the bolt that became completely loose. I discovered after getting things back together that a, which secures the ribber bracket, is actually directional with a barely perceptible difference in shape, and if accidentally rotated 180, it will keep the ribber bracket from changing height positions and working properly. Rotating it restored expected actions, so now I have 2 well-functioning ribbers to work with.  

Still at it, 8/16 I now have a lovely, equally bumpy fabric in all 3 colors using 2 strands each of the cash wool at the same tension. The single difference in my execution is that I am now using my alternate KR 850 ribber. The height and other adjustments appear identical to my eye. I am reminded of my teaching days in a Brother punchcard lab, where at times the same model machines might be side by side, and fabric would work perfectly on one machine while not on the other supposedly identical model. Students were not allowed to swap off machines, the one exception being if that was the only way to get the stitch types in their final projects completed after I attempted to work out other possible issues. “They” do keep talking about how relaxing knitting is, but with machine knitting, there are lots of opportunities to wonder about that suggested fact.8/17: complete a royal blue scarf in the smaller scale repeat, previously executed on my 910. The punchcard below it image may be used to achieve the same fabric. 8/18: trucking on, planning a couple of more pieces with the large-scale repeat. It seems I have been having more drat-it moments than one might ever want, resulting in having to discard hundreds of rows of knitting for any number of reasons including racking operator errors. I have also encountered another problem. In the past, I have used cello clear, or a variety of tapes to seal off holes accidentally punched in the wrong place. I very rarely produce multiples of any of my pieces, and my limited edition items were usually knit on an electronic due to its increased ease in adjusting the repeat width and height to suit. Transitioning from the solid repeat to the striped one, I decided to punch out holes on my original card to test my ideas, and when returning to the large scales I was too lazy to punch yet another card, and taped over sections I wanted to eliminate from the selection. Hundreds of rows into yet another piece I began to notice odd behavior in needle selection, which was fully remedied by investing time into punching a new card, and yes, starting over yet again. Note to self: do not do this sort of taping over in the future, no matter what the tape, and especially when knitting multiple pieces thousands of rows in length! 

8/21: I am working on a final series of large-scale, single-color scarves. As has often been my experience in knitting long pieces of ribbed fabrics (most of my scarves are 1200 rows or more in length), I have a talent for developing problems after the ¾ point. Two factors that can have an effect on stitches not knitting off properly “suddenly” can be the result of 1: the slide lever setting being changed accidentally when moving ribber sinker plate ie to correct patterning errors and bring it to the opposite side, and the ribber alignment for needle positions relative to each other on opposite beds changing slightly from all the side to side motion in racking nearly every single row.

The slide lever has 3 positions. I have out of habit gotten used to simply leaving it in its center setting (lili) for my knitting, and used to teach students to keep that constant if possible. Sometimes when knitting ribbed cuffs, bands, or collars, I have seen the differences in length and width of them changed for separate pieces and not noticed until one was ready to join pieces.  

adjusting needle bed positions (for more see https://alessandrina.com/2015/01/13/a-bit-on-ribbers-japanese-kms_-alignment-and-symbols-1/)

The last piece produced by me was in a charcoal color, using the same yarn brand and weight as the black. All things being equal, using the same tension (required to avoid knitting problems), the charcoal version stitches were considerably looser, and longer, also due to changes in gauge. I think the charcoal scarf will put this fabric to rest for me for a very long time. This was my final, pre-punched card, and its markings

Some Passap patterns 2016/01/13/racking-2-vertical-chevrons-herringbone/
and 2016/01/09/ribber-pitch-a-bit-on-racking-1-chevrons-horizontal-herringbone/

Knit and purl blocks to create folding fabric_ “pleats”

Knit and purl combinations may be executed in hand or machine knitting. Knit charts are generally planned and illustrated based on the fact that the same side of the fabric is always facing the knitter. Hand knitters have to accommodate for the fact that the work is turned over (unless knitting tubular) with every row worked, so plans would need to reverse knit for purl and vice versa if needed. For more ribbed, pleated/ folding fabrics please see Pleats: ribbed, folding fabrics , and Origami inspired 2: more pleats and fold using the ribber

The easiest way to produce this particular fabric on Brother machines would be to let your garter carriage do the walking and working. For those of us that do not have that option, there are transfer carriages, (I honestly have only used mine once, decades ago, will have to dig it out of mothballs) and transferring needles by hand. Pairs of identical stitch transfer tools may be used to move stitches from one bed to the other. If the goal is to produce a knit with tension as tight as possible, the latter can be problematic and result in dropped stitches, so testing the yarn and the mode of transfer should be part of swatch trials prior to committing to larger knit pieces.  I found moving stitches between beds one at a time for me was preferable and more reliable

The chart for the initial concept: The number of needles used for “pleats” is constant (7); 3 stitches move up (or down) in turn, indicated by arrows. After the first 3 are transferred, 3 more are now moved adjacent to the now remaining 4 stitches from the opposite bed in order to maintain a total of 7 on each bed, excluding any borders, in which stitch placement remains fixed.

cast on for every other needle rib after completing cast on rows, set up for pattern by transferring between beds*knit 6 rows, transfer between beds knit 6 rows, transfer again restoring original selections**repeat * to **; transfer to main bed, bind off. Swatch on KM prior to binding off If the goal is to retain the texture, it is best to knit using a yarn with “memory” such as wool, which may be steamed or blocked lightly while retaining the fabric’s quality. A rayon or cotton would flatten permanently if pressed. The photo shows both sides of my swatch, beginning on left with it slightly stretched with pins, relaxed in the center, and with a bit of vertical “tug” 
The fabric changes a bit when some stitches remain fixed on alternating beds, and the same sort of approach is used. My initial intent had been to transfer every 4 rows, but I actually did so after every 6 rows knit. Colors in the chart on right: Its numbers indicate the working needles on each of the 2 beds. The first 3 needles on either side are never transferred. Groups on either bed after transfers remain constant at 6 with the exception of the borders. The starting set up and the alternating one, repeated in turn throughout the knit. Note border stitch selection, constants in between still on the machine,  
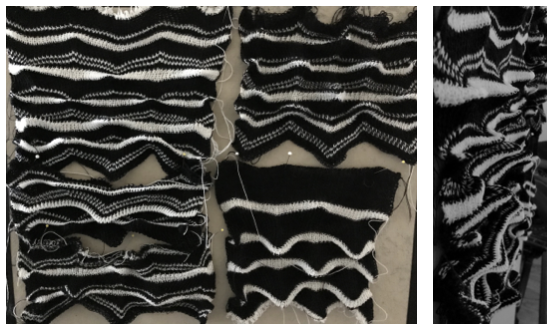
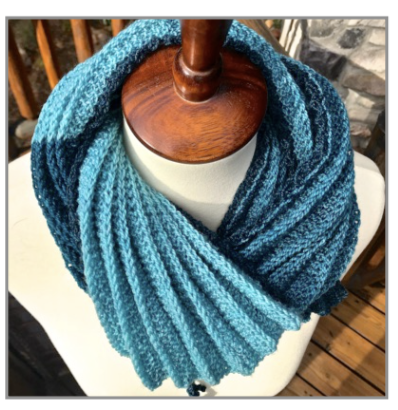
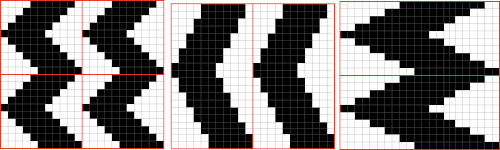
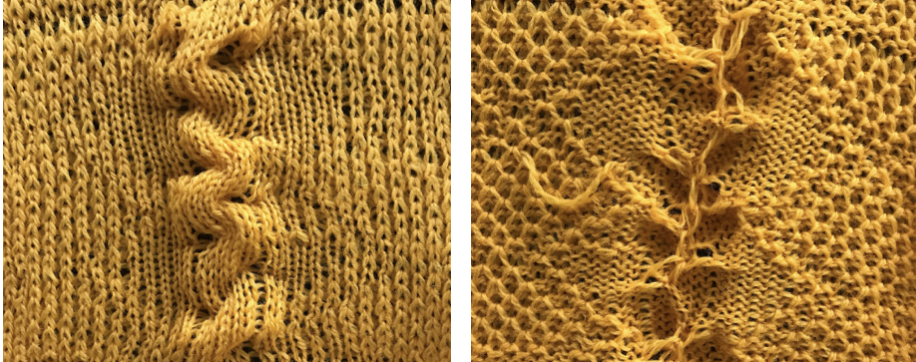
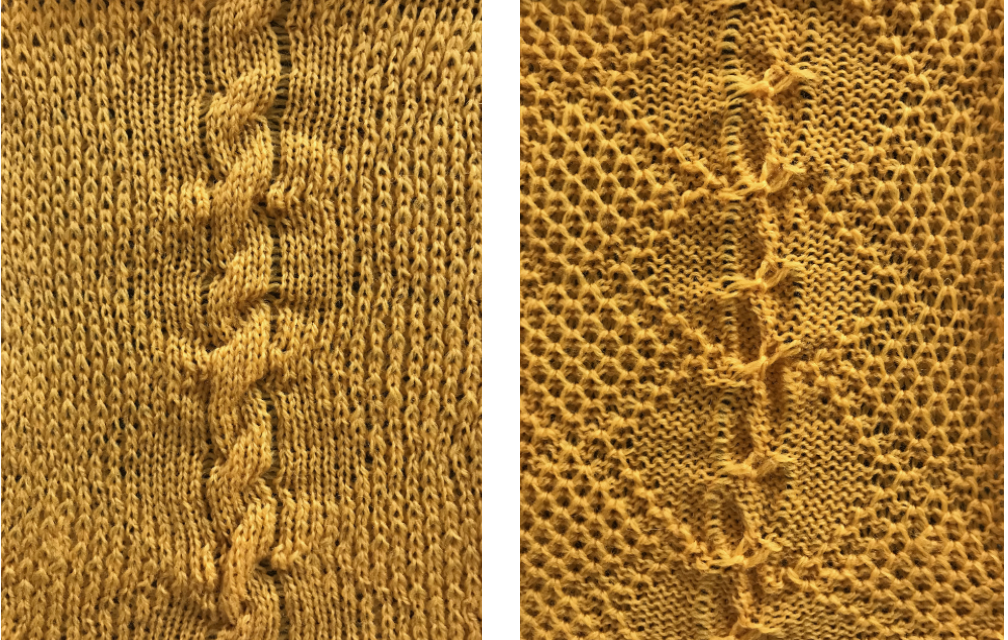
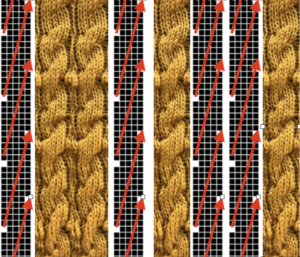
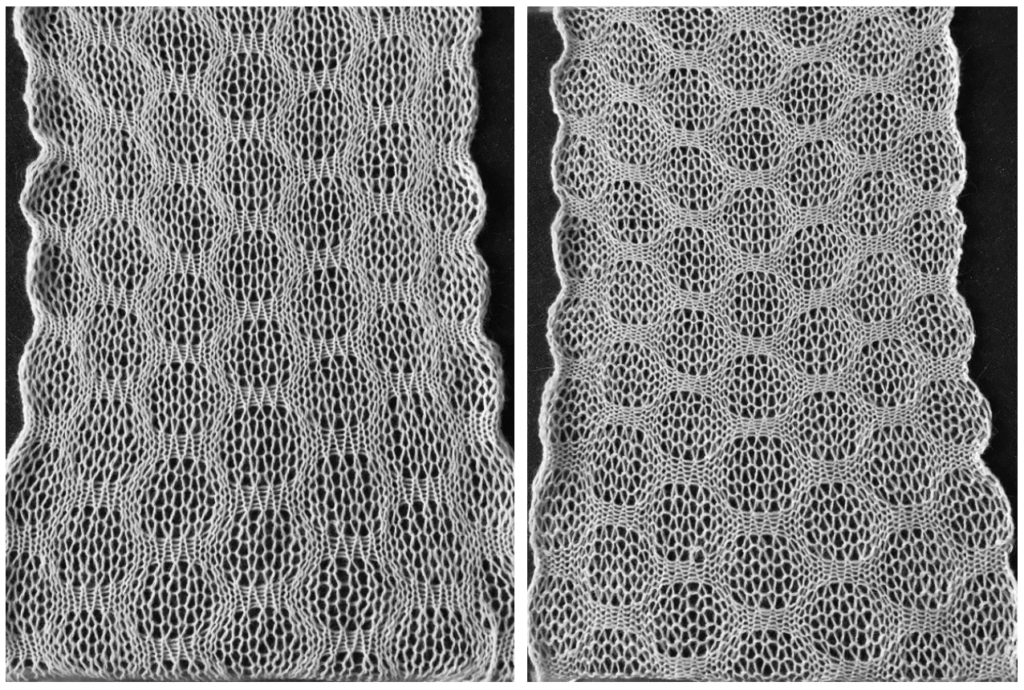
and my small test swatch. The fold on each side and the swing in the pattern appear crisper and better defined to me
What of horizontal folds? Transferring every stitch to and from the main bed manually is more than I am willing to deal with in addition to transfers for those blocks. I am also interested in the effect produced with the use of thicker yarn. This repeat is presently on my hand knitting needles, is suitable for electronics or punchcard machines. A single unit is 5 by 16 rows, the punchcard repeat is 24 X 16 X 3; 32 rows is a tad shy of enough rows for the punchcard to roll and advance properly, 36 rows in height is the recommended minimum. Knitting as tight as possible makes for a stiffer, crisper fabric. I decided there were things about this repeat I did not like, however, including the change in pattern at the folds 
The new repeat, with only 2 rows worked rather than 4 between block pattern reversal, the repeat is now 12 rows rather than 16 in height  The hand-knit swatch, using 4 ply yarn on #5 HK needles. The arrows mark the area where 4 rows were knit between knit and purl blocks rather than 2, creating an added ridge, and a straighter line than the row pairs 
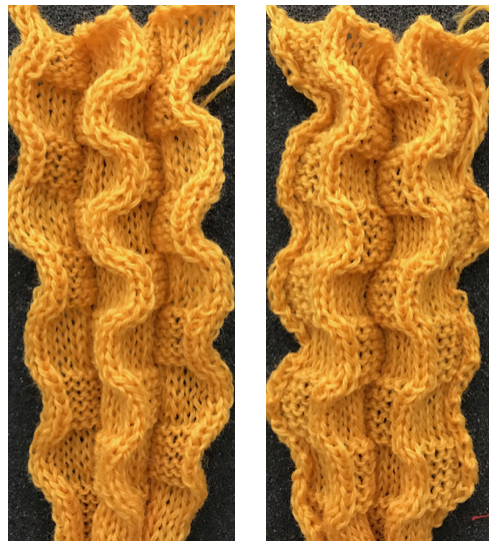
an attempt at a side view
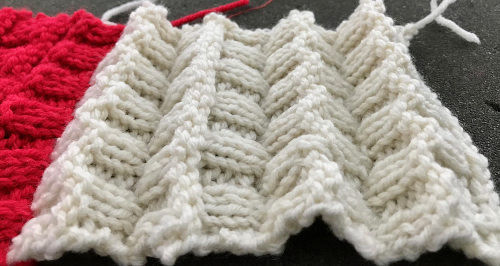
 an earlier hand knit project in the same stitch family 
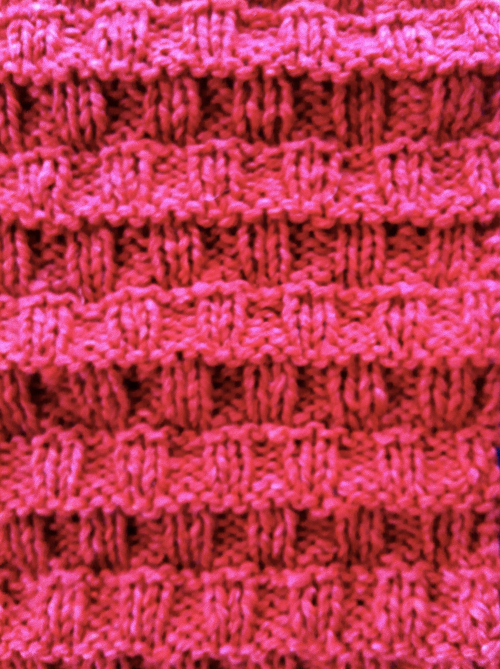
Another handknit swatch in worsted weight, perhaps suitable for G carriage Its repeat turned 90 degrees clockwise  Getting rid of those blocks altogether: a generously shared free pattern on Ravelry and a link to the author’s blog
More blocks to try
Zigzags in varied configurations

Pretend/ mock cables 3

A Facebook group query brought up the possibility of creating cables in an “easier, quicker” way than by crossing stitches by hand. Over the years different authors have suggested a “sewn” method for pulling stocking stitch columns together in order to achieve the cabled effect. The illustrations are usually of the work done on a ribbed fabric, but it also may be achieved in simple stocking stitch, with ladders marking the edges of the mock cable, and providing a visual line to follow and count spaces when smocking the fabric up. The width of each column, the yarn fiber content, and personal preferences will determine the success” of the results.

I was reminded of “magic cables”, a technique made popular years ago in a copyrighted pattern series by Ricky Mundstock, ie this one from 1969 (illustrated online). The concept originated in a Japanese publication years before, relies on hooking up tuck loops to create the cable-like effects. I tend not to knit from published patterns, set out to understand what makes the fabric work in theory, and then sort out whether I have other preferences of my own for creating it. I began to experiment with a totally random tuck card. Tuck is chosen for the background because it is short and fat, giving the taller all knit rows for the “cables” the possibility of an additional gather, adding to their depth. I chose a purely random repeat, which is a good way to start for DIY if hesitant about the process. White squares will not be selected, will tuck for 2 rows, have a knit stitch (black dot in card) on each side of them. Max on Brother, unless using very thing yarn would be white bars single square in width, 4 rows in height (yes, there can be exceptions on rare occasions)
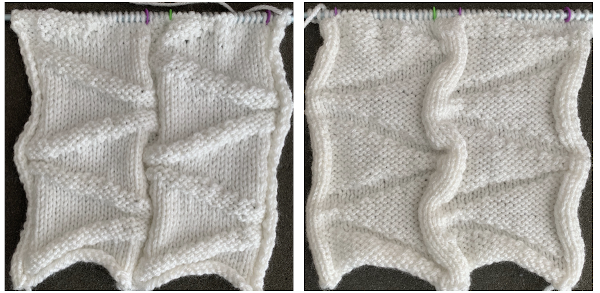
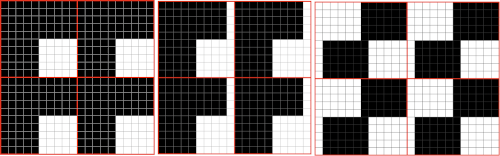
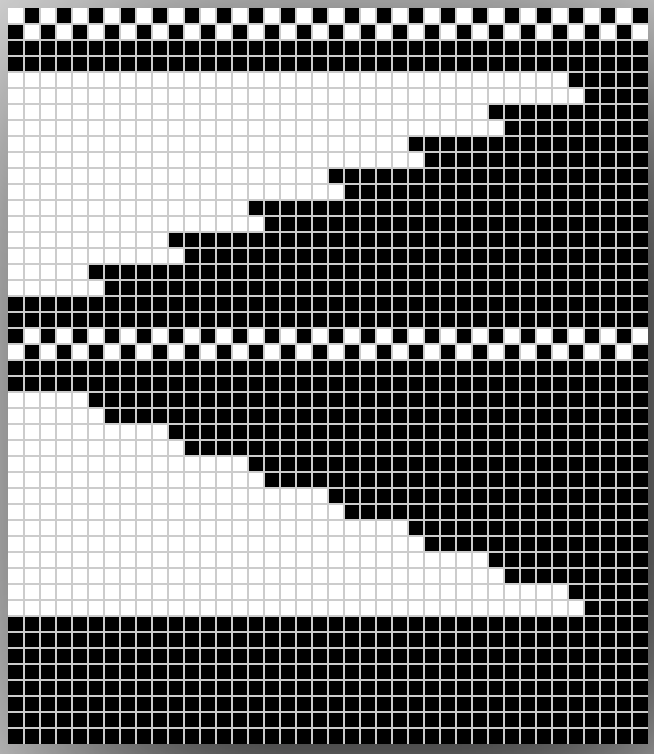
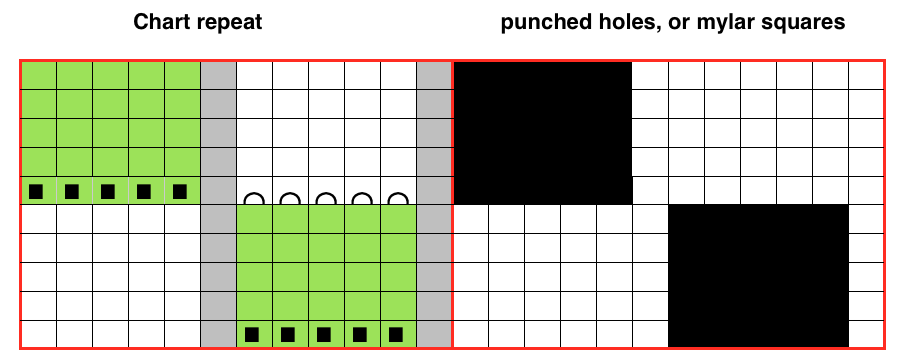
The card is cropped to the 24 X 44 stitch in width and height for the repeat to be worked in electronics. The area colored blue on the far right indicates possible all knit rows for hooking up “cables” during knitting, mustard color indicates ladders created by an out of work needle on each side of the central, all knit column. The ladders make it easier to identify each all knit column. The tape over holes idea does not work for masking a punchcard since that blue area would need to be all punched holes. The tape over would result in “unpunched” ones.

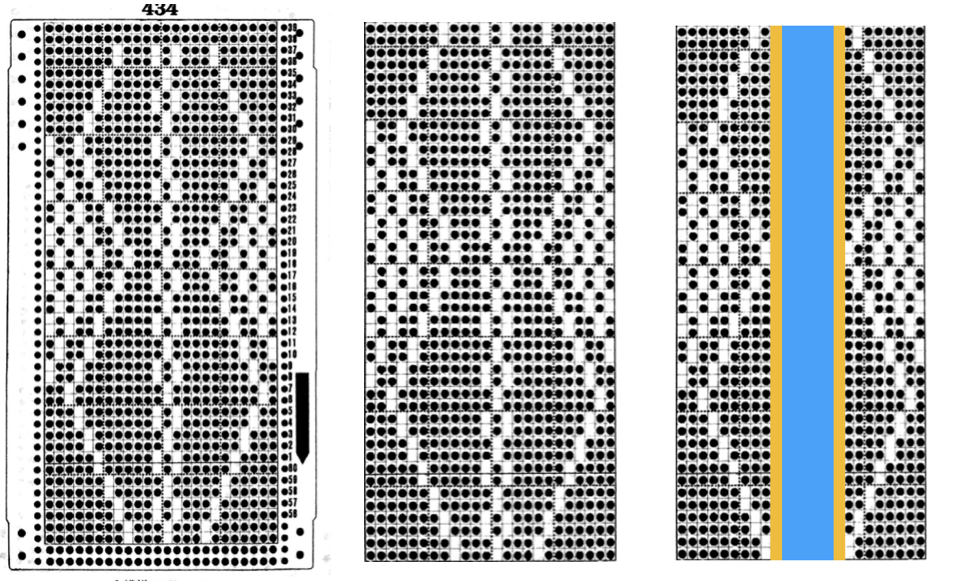
This takes the revised card single repeat and indicates some quick possibilities for altering it I added 2 more stitches to establish a slightly different pattern. The grab form my work in Numbers was then opened in gimp and scaled to 26X44 for the possible knitting pattern. If working with black and white squares, the image will need to be colored reverse for knitting. I abandoned this repeat for my final swatches in favor of keeping markers for hooking stitches up along the all knit column inside the ladders as opposed to the knit body of the remaining shapes. Here the non-selected needles are placed along the knit column itself, on alternating sides. The final repeat after correcting a pixel error I discovered while knitting: Ayab does not repeat across the horizontal row, each stitch in the width you are planning to knit needs to be programmed. For a test swatch, I decided to work with programmed 72 stitches (knit on fewer). This would be the downloadable file

magnified and gridded to visually check again prior to knitting it This is what is seen by the knitter when the image is loaded, but any image loaded is automatically flipped/ mirrored horizontally by the software. Direction may not matter in the overall pattern, but here we have needles out of work, which if selected on the basis of what is seen as opposed to what is knit, would be in the wrong location. The first preselection row is also only possible from left to right. The easiest way to empty the proper needles is to do transfers after that row, to either side, restoring needle selection prior to continuing to knit. Also, since there are needles out of work, end needle selection is canceled (KCII).

In my first swatch, I tried the idea of hooking up stitches in opposite directions, but was not pleased with the result, wanted to reduce the amount of hand manipulation involved. In the later swatch, I hooked up every other selection onto the same side. Arrows here indicate the direction, not the proper needle position.

Alternating side hooking up with some yarn and needle change issues. Hooking up to one side only was quicker to execute and appeared more pleasing to me. Both swatches had blips from an errant pixel. Steps in knitting the above fabric. The actual knitting will happen with what is shown as the repeat with white pixels on the dark ground, seen looking at the center vertical all knit column of the repeat when knitting the fabric. Allow the non-selected needle on the left side of the column to tuck, providing a marking row for picking up stitches, knit until the needle on the right side of the column is not selected. Prior to knitting across that row pick up the tucked loop and stitch on the left side
Lift both loops up onto the non selected needle on the right side of the column, bring that needle all the way out to hold (three yarn loops in the hook) 

Continue knitting until the next non-selected needle in the column appears once again on the right, pick up from below the left marking spot, and repeat. For DIY insert all knit columns on your chosen repeat and proceed as above.
Visualizing possibilities: chart for side by side columns actions on the purl side is shown. The black columns with arrows coupled with photos show the direction of the hook-ups in the back, purl side of the fabric, and potential “cables” as seen on the knit side using the column repeat illustrated above. This is a garter stitch version found on Pinterest

Revisiting pleats on the knitting machine: single bed

A cumulative collection of links to pleat-related blog posts
Single bed
Origami folds inspired pleats 1
Shadow pleats with added FI patterning
Shadow pleats knitting 
Revisiting pleats on the knitting machine: single bed 
Pleats created with lace transfers
Ruching 2: more working with stitch groups
Ruching 1: fern “pretender” and more 

Pleats: automating “pleating”, single bed
Double bed
Pintucks 2, ripples in knits using the ribber
Pintucks 1 vs shadow pleats, Fair Isle pintucks 
Origami-inspired 2: more pleats and fold using ribber
Slip stitch patterns with hand-transferred stitches, double bed

Knit and purl blocks to create folding fabric_ “pleats”  
Pleats: ribbed, folding fabrics
On two needles  hand-knit and purl folds
Some authors and publications include hems in the category of pleats as “horizontal”. To my mind, they merit their own category.
HEMS
Machine knit hems 2 

Machine knit hems 1
Ruching/hooked-up stitches 
Any techniques may also be used on only parts of finished projects.
Presently, in fashion and knitwear, skirts and clothing with ruffled or folded fabric variations abound.
In 2013 I shared a post on automating single bed pleats including downloadable files of one of my early handouts and working notes.
This post contains some of the same information, repeated for convenience, along with additional info and images added in 2023.

Addition: transfer lace punchcard repeats for Brother machines can vary, from 6 stitch patterns to 8, 12, and 24. Two blank rows (grey cells) would be added above the transfer marks (black dots) below to complete a single transfer repeat. The red line marks the centerline of the 24 stitches.  Proof of concept swatches:
a slip stitch design repeat, punchcard-suitable, is redrawn with black dots representing knit stitches, and blank cells representing slipped/skipped ones. Empty circles along with red numbers mark the locations where stitches are transferred to the right or left, and empty needles are pushed back to A position, out of work/OOW, resulting in ladders. The appearance of the knit side,  and the purl Vertical lace transfers: When working in a stocking stitch, if a soft-looking pleat is desired, the knitted fabric is simply folded to form the pleat and joined to keep the fold. Crisper folds require the added techniques described above. In hand-knitting fold lines are created by slipping stitches on the fold line on the “public side”. Assuming the latter is the knit side of the fabric, this is often indicated by “sl1 with yarn in the back” for the front fold line (and as another slip stitch option, with yarn in front for the back fold line). A purl stitch is more commonly worked on the same side of the knit for the opposing, inner fold. Both the slipped stitch and the purl one are purled on the return purl row pass. It is also possible to work the former purl stitch as a purl, resulting in a garter stitch inner fold.
To review, parts of pleats:

knife pleats may be put next to each other and pointing to the right (S) or the left (Z)

Box pleats are composed of alternating right and left knife pleats, pointing away from each other. Inverted box pleats are composed of one left and one right knife pleat, pointing toward each other.

Accordion pleas are a series of knife pleats in which the back of one pleat forms the face of the next 

It is possible to knit folding pleats in a knitted stocking stitch with the pleats formed vertically rather than sideways. The two needles (highlighted in red) close together form the top hard outer ridge, and the two empty spaces where needles are out of work (red dots) form the under-fold.  The remaining black dots represent out-of-work needles as well Normally, EON knitting is reserved for tuck lace or heavier yarns on standard machines.  For my test swatch, I used a coarse 2/8 wool on tension 4

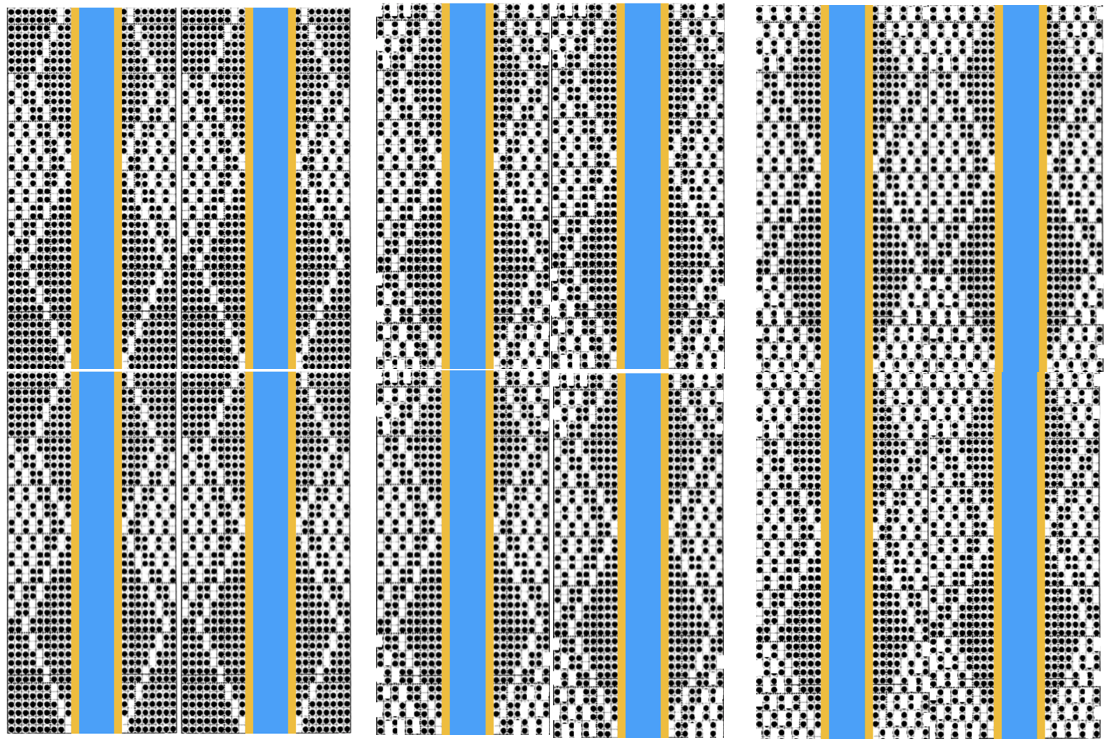
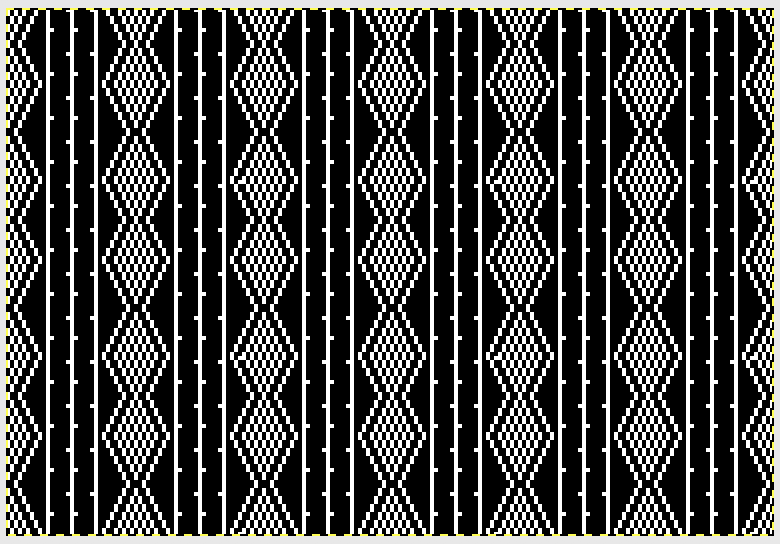
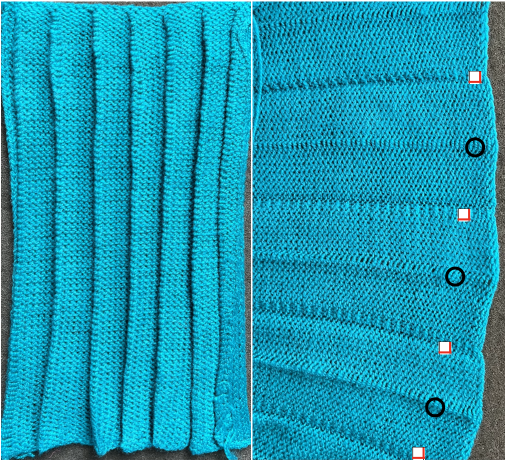
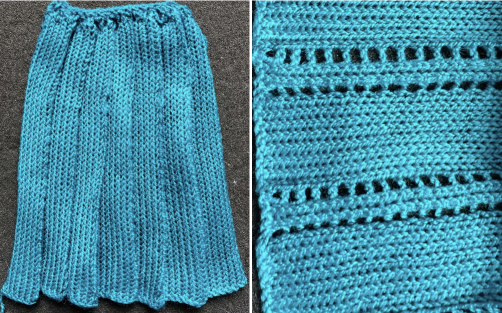
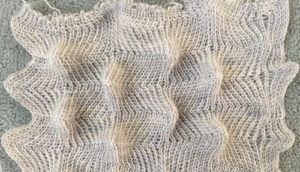
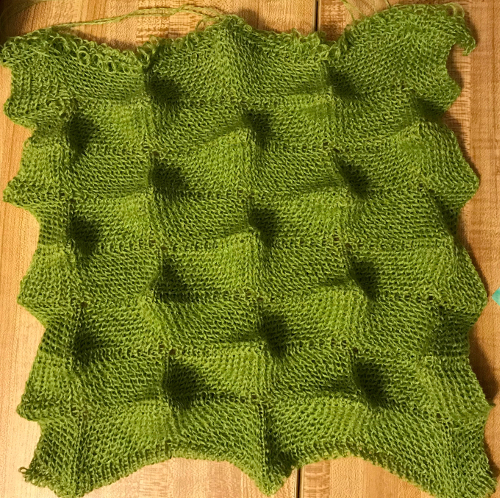
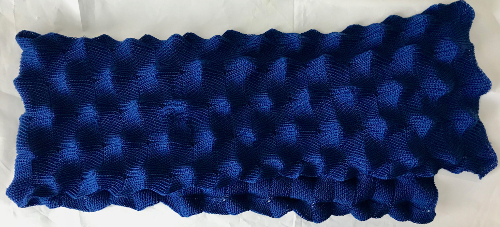
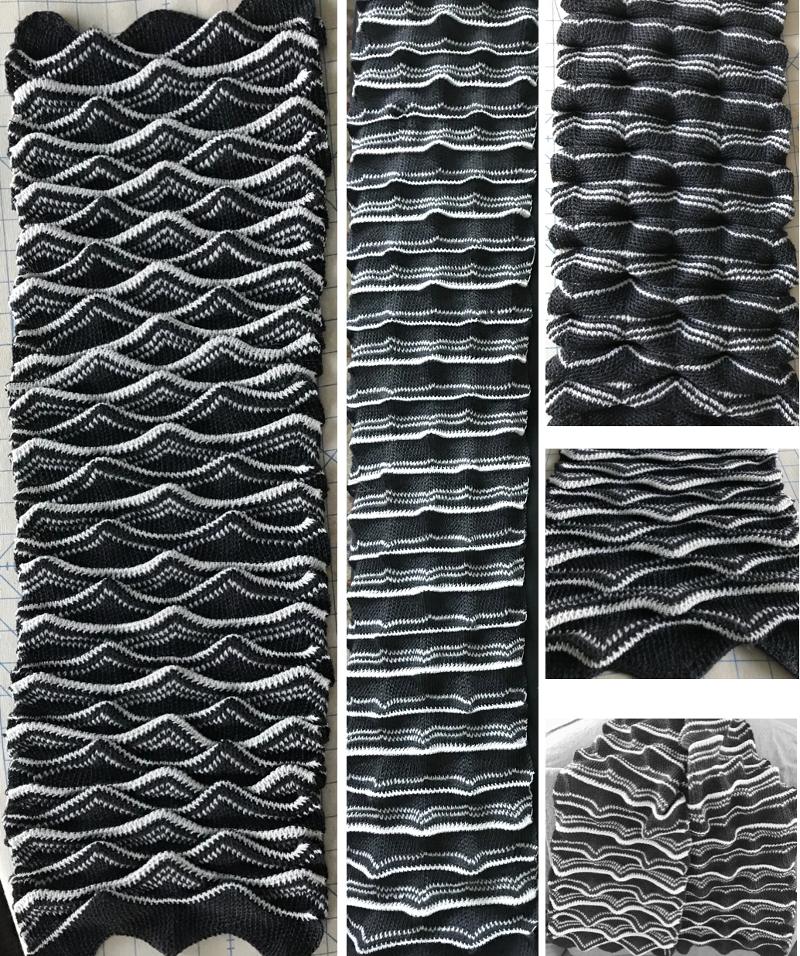
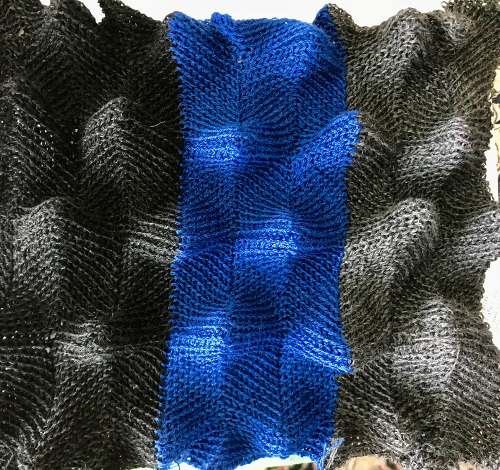
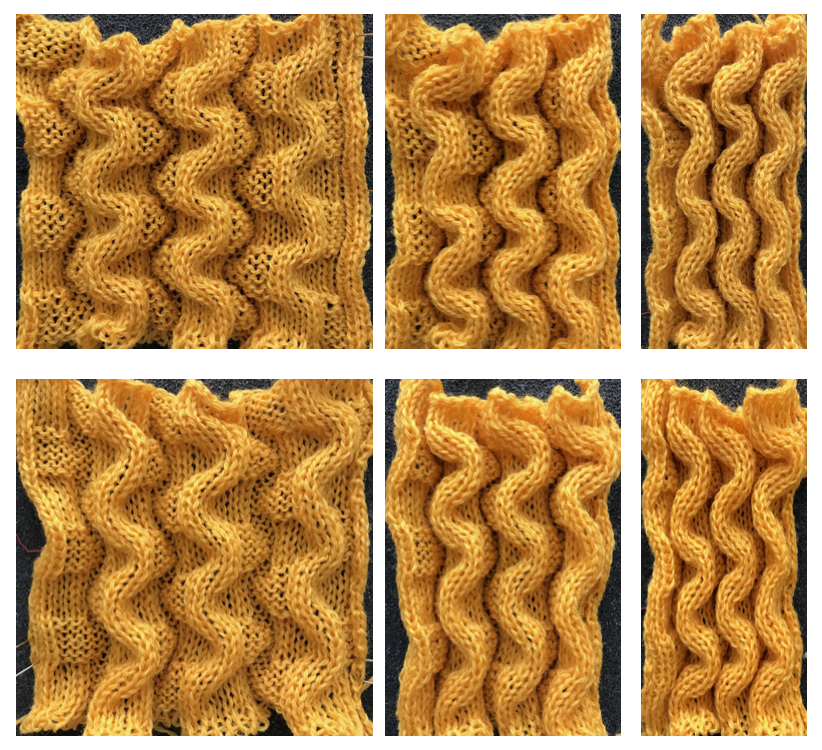
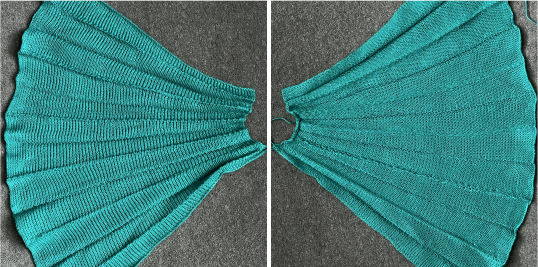
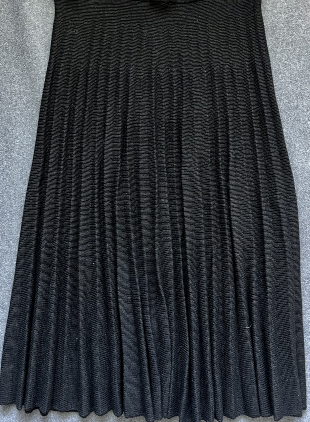
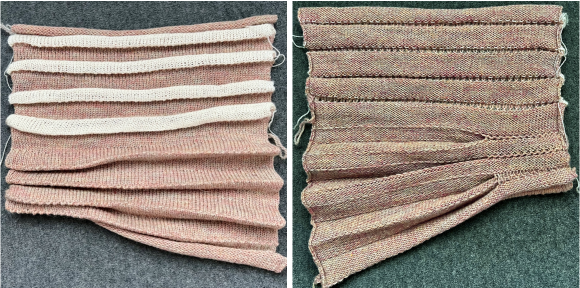
The fabric narrows considerably as it is stretched lengthwise to set the stitches. Several panels would be required for a garment such as a skirt. Such an item would need to be pulled into shape, pinned, and hot pressed. Fiber content will determine the crispness of the pleats after blocking, and their retention after cleaning. The swatch below is turned sideways for the sake of space. 
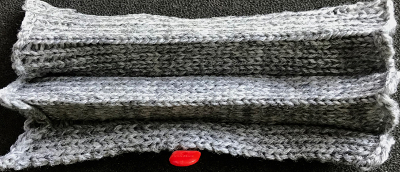
More variations with folds can be made by varying the “rules” commonly recognized for creases. Working sideways once more: on a punchcard machine, using card # 1 locked, cast on making certain every other needle as well as the first and last are selected.
In the swatch varies the number of all knit rows between creasing methods. Overlapping at fixed width at the top of the piece once the fabric is rotated lengthwise, creates a fair amount of bulk as pleats are fixed.
The all-knit sections could be combined with holding techniques to vary the width of pleats from one end to a different width than at the other.
The change knob remains set to KC throughout.
With no cam buttons selected, all stitches will knit.
After the desired number of rows, cam buttons are set to slip in both directions for at least 4 rows (commonly this is done for 2). 
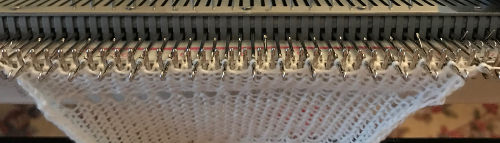
Cancel the slip setting, complete the next knit section, and transfer every other needle to the adjacent one on either the right or left. 
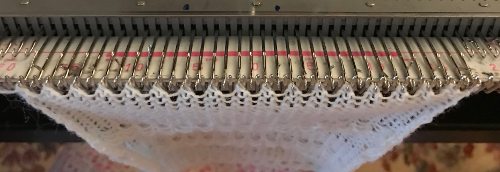
The needles holding 2 stitches may be brought out to the hold position as each transfer is made, or pushed out to hold after the fact to insure the stitches have been transferred and will knit off properly. The number of needles in work remains constant.  Change the cam buttons to tuck in both directions. On the first carriage pass, the empty needles will pick up a loop, on the second pass a second loop will be formed on those same needles.  Cancel the tuck setting, and leave the needle selection on to form knit stitches once again, continue with the determined number of rows.
Repeat the process beginning with the slip stitch setting once more.
The yarn used is a 2/24 acrylic, seen here stretched flat.  
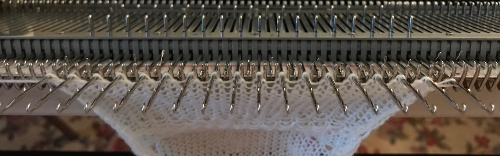
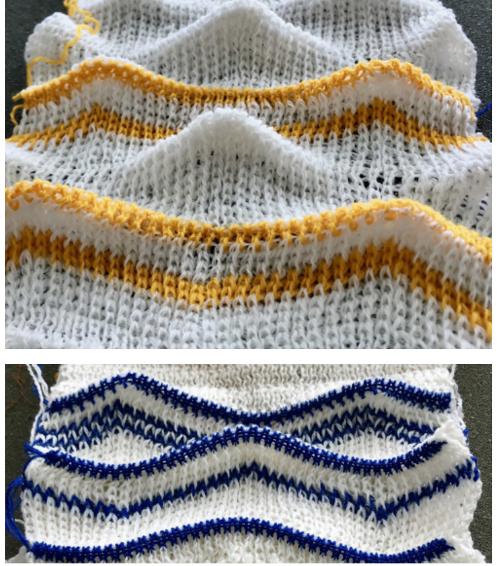
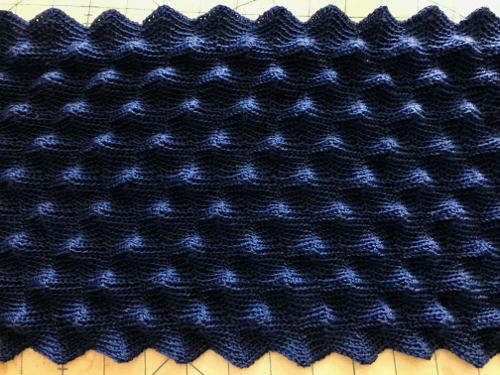
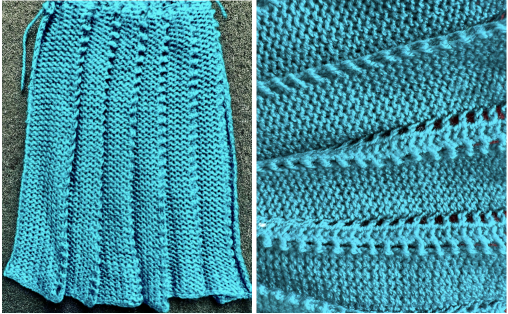
The slipped stitches form the inside folds in the pressed swatch, while eyelets and tuck stitches fold a picot edge to the outside.  The placement of the holding sequences may be varied, with the eyelets allowed to form and considered a potential design feature.  The number of slip floats or tucked stitches may also be altered by widening the slip repeat or lengthening it, and tucking on alternate pairs of stitches for usually no more than two rows.  Extending the repeat to a punch card with slipped or tucked stitches flanked by a single knit stitch on either side. The outlined blocks of colored cells represent subsequent knit rows.
The folds to the purl side may also be created by simply doubling up the yarn for a single row. Both yarns in this case are 2/8 wool. The second color is used for illustration purposes but might be a design feature in some pieces, and is not clearly visible on the knit side.   Hand selection aided by some of the standard multiple-selection tools is easy enough to use for tests on small swatches to determine resulting effects and preferences prior to any programming.
In this swatch, such increases are combined with holding techniques for what might become anything from an extended ruffle to a full skirt.
The issue with sideways knits is that the number of needles available and the knit gauge may limit the possible length of any garment produced in a single piece.  Single bed pintucks may be made by knitting any number of rows on the top bed, followed by the use of every other needle selection to create slip-stitch floats on the machine to serve as markers. The short floats are picked up and hooked onto the corresponding needles in work after more knit rows.
Short-row shaping may be automated to include needle wrapping to diminish the size of the resulting eyelets.  This photo is of a multiple-decades-old skirt that has been stored folded for years, as taken out of the storage box.  It measures 26 inches in length, with a 97.5-inch bottom circumference. Single tuck and slipped stitches were used along with short rows to create intentionally soft folds.

Useful math calculators for planning wedges
A look at miters, spirals, and angles to create shapes 
Some notes on circular shawls 
Round yokes and more
Hems created using this technique are faster than those where every needle is rehung and may be stuffed or threaded with other materials ie suitable size plastic tubing, or upholstery cords for sculptural effects.

Planning is required for the best method as to how to join panels in items such as skirts.
Markers at regular counts added while the work is on the machine in areas that are to be folded or gathered into a waistband, yoke, or to other shaped pieces are useful.

Ladder back double jacquard: backing variations

Periodically questions come up with regards to how to manage float control other than using familiar DBJ settings, or the best way to proceed to achieve it when one prefers to work in thicker yarns.  In this technique, all main bed needles are in use for patterning and in working position, the ribber needles can be arranged in nearly any configuration in groups with 1 needle in work, and one or more needles out of work. The main bed tension is close to what would normally be used for a single bed fair isle, while the ribber is set at least one or two whole tension numbers tighter, thus reducing bleed through or vertical separation lines on the “outside” of the knit. The fabric uses less yarn than every needle rib DBJ, is lighter in weight, has more stretch, but will not lie as flat. In Brother, if needles are arranged in groups of 2 (pairs of lines and spaces on the needle tape with even spacing between them (i.e. 2 X2, 4X4, 2X4, etc) then lili buttons can be used. The latter method has less chance of the backing showing as a vertical line/ separation on the pattern surface. Sometimes the ribber needle arrangement may result in a secondary, interesting pattern on the purl side. It is still a good idea to have floats that are limited in width, generally less than 5 stitches. For the purposes of illustration, I knit 2-row stripes on the main bed, while altering settings on the ribber.
This was my initial setup. The ribber needle tape is marked in what I think of as dashes and blanks, in continuous pairs. When using single ribber needles for the ladderback, the number of out of work needles may be even or odd between the ones in work

As each row is knit the ribber will pick up yarn, or not, depending on carriage settings, creating a knit stitch vertical chain on the purl side of the knit 
If empty needles are simply brought in to work above plain knit rows, eyelets will be created. One way to reduce their size would be to pick up loops between stitches on the main/ opposite bed and use them to œcast on your ribber needles. With ribber carriage set to knit in both directions, each color will knit with each pass of the carriages (2).
With it set to knit in one direction, slip in the other, each color will knit on the ribber for a single pass, slipped in the opposite direction, and the slipped stitch becomes elongated (3). Having a needle in work on the ribber close to the edge of the knit may help reduce the roll along that edge (4). A slight separation may appear on the knit side in the location of the vertical columns created by the ribber stitches, it is less apparent when ribber knits on every other row  It is possible to only have one of the 2 colors knitting on the purl side. In my case, it was white knits, blue slips. Here the ribber carriage settings need to be changed with each color change, so for white I used

for the blue

Setting up for using lili buttons: needles need to be in pairs, each with a matching “dash and a blank”, even number of out of work needles in between them. My previous set up required a bit of moving stitches around
 ribber is set to slip both ways, lili buttons engaged With the above settings, the needle on the right of each pair will catch the yarn on the pass to the right, the needle on the left of each pair will pick up the yarn on the way back to the color changer. Stitches are elongated because they are slipping alternately for one row, and are slightly offset from each other with a bit of a “jog”  because they are not knitting on the same pass. This is noticeable in lili backed full DBJ as well. The color change from blue to pink is simply because I ran out of blue yarn. My ribber stitches should have been tighter throughout, but even in this tension situation, the knit side has the least noticeable vertical separation along vertical column edges in the series of tests The technique may be used on any machine. This sample was knit on a Passap, using one of the patterns built into the console, pushers 2 up, 2 down for long stitch alternating color vertical lines, fixed distances between them, BX <–/LX, Tech 179.Similar backing may be produced on the Brother machine, but now a hand technique is involved. The ribber remains set to slip <– –> throughout, no lili buttons. The spacing may be chosen on the basis of the interaction with the main bed motif, or in a different configuration for each color, making the hand technique easier to track. Needles are brought to E position on the ribber for each row to be knit in that color. Here the different colors are easily identified

the ribber settings

There are 2 options: one is for bringing appropriate needles to the E position for each color only once. I chose to do so immediately after each color change, with carriages on the left (below dots). The other is to bring them to E for the second pass of the carriages on their way back to the color changer as well (above dots). There is elongation in stitches in both options, less so when each color knits on the ribber for 2 consecutive rows, where one short and one longer stitch for each color may be observed. The first option also caused a bit of puckering on the knit side, which disappeared with pressing.

the reverse side 

Similar ideas, playing with the configuration of color blocks on either or both beds, can result in applique, embossed jacquard including pleats, and a whole range of other double bed knit fabric variations. A quick sample with transfers between beds

Lastly, here is a tiny swatch in an arrangement beginning to explore the odd number of needles in work on the ribber in conjunction with the use of  lili buttons and adding needles to “fool the machine” as described in the post


“Crochet” meets machine knitting techniques: tuck lace trims or fabrics 2

There have been several previous posts on “crochet” like stitches and “tuck lace”, this is another variant. The needles need to be arranged as in the diagrams below. After the first preselection row, the carriage is set to tuck

the full punchcard T= areas where tuck loops will occur, K = knit columns, o = NOOW, the red line the 0 mark on the needle tape

Every 5 rows, after the tuck loops are knit together (illustrated in repeats on far left), the formed stitch (single black square) is transferred in turn to the right and then to left; this works out happily so that transfers may always be made toward the knit carriage.
The sole repeat (all that would be required on a mylar) is 4 stitches wide, 5 rows high. The number of needles used needs to be planned so that there is a knit stitch on either end of the piece. This is accomplished by using a repeated multiple of 4 + 1, so one side of the 0 mark has an even number of stitches, the other an odd (4+1=5). Ayab software requires that the repeat is programmed across the width of the fabric, so the final design would be a variant of this, my sample was worked on 20 left, 17 right. Non selected needles form tuck loops until they are knit together every 5th row

If you prefer to work with the top repeat programmed, then transfers will need to be made on each side of the non-selected needles to get the proper configuration. If programmed with the bottom repeat, then and every other needle cast on is fine. I generally stay away from combs and weights if I can, but this is a fabric that benefits by evenly distributed weight, a cast-on comb with weights added to it is a good idea. In the absence of any, start with waste yarn and ravel cord, thread a thin knitting needle or wire through the knit, and hang evenly spaced weights on that. Follow with your preferred cast on, and knitting in pattern. 

The swatch as it appears on the purl side (traditional “public side” for tuck stitch). The bottom 4 repeats show what the fabric looks like before one intervenes with the hand technique

its knit side and a bit closer a few more

in early publications combinations of lace and tuck, creating a large scale mesh were also referred to as mock crochet

Bowknot/ Butterfly stitch on the machine

A recent Pinterest post got me searching out some of the fabrics in this group. In hand knitting, floats creating the butterflies/ bowknots are usually apparent on the knit side. For two such patterns please see http://www.knittingstitchpatterns.com/2014/11/butterfly-bowknots.html

http://www.knittingstitchpatterns.com/2015/04/butterfly.html

https://handlife.ru/vazanie/obemnyy-uzor.html caught my attention. Here we have a combination of knit and purl stitches, with floats formed on the purl side, making the fabric or a “cousin” of it possible on the machine 
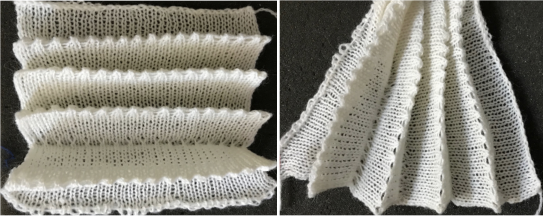
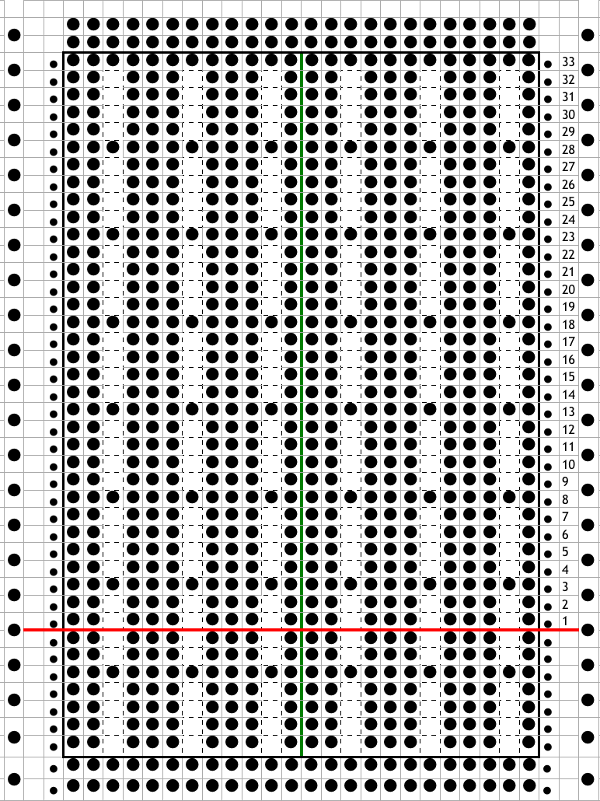
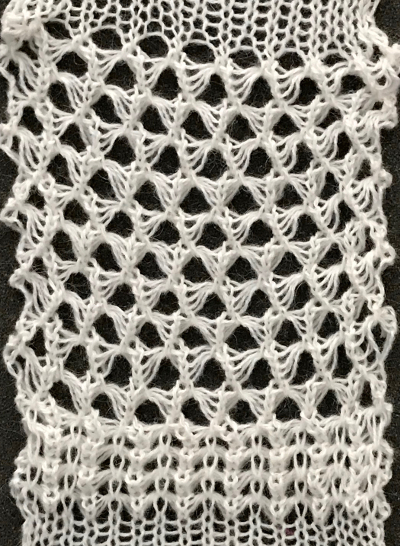
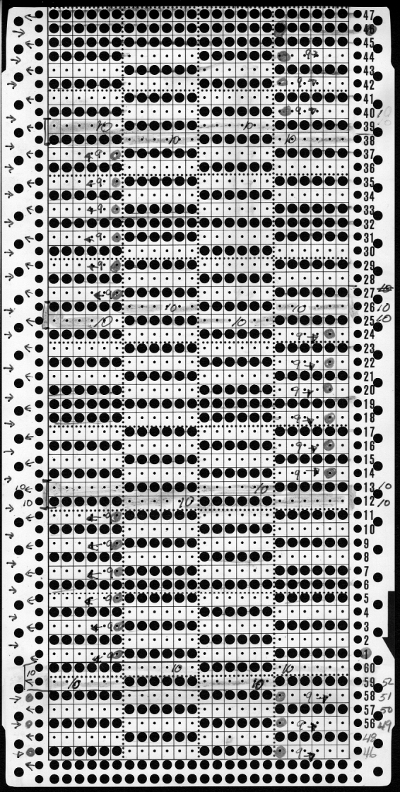
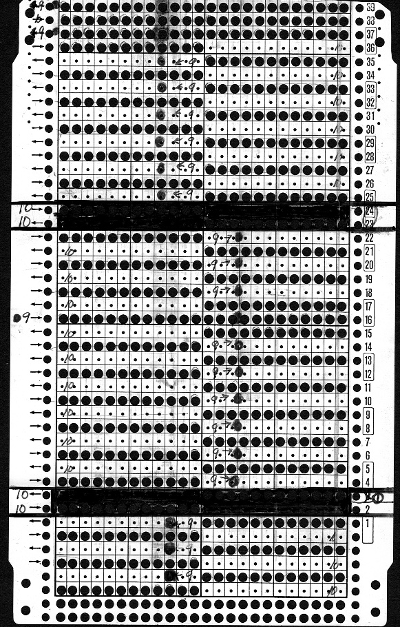
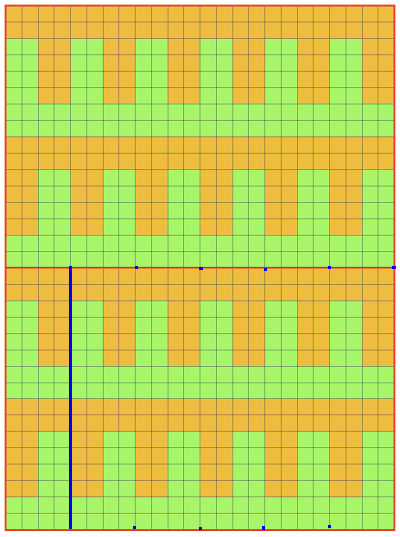
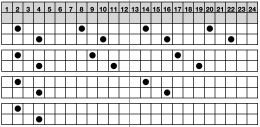
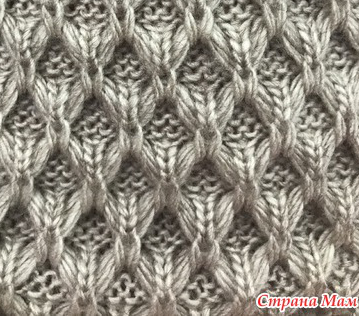
This is my first experiment with gathered slip stitch floats on the purl side of the knit. To begin, this chart indicates one punchcard pattern’s full repeat in width.  Four repeats in length would be required (the punchcard minimum repeat in length to achieve smooth continuous card feeding is 36 rows). Punch out blue squares, leaving white ones unpunched. A single repeat (outlined in black, 8 stitches by 12 rows) is for use in electronic patterning, where one may alternately draw or program white squares, then use color reverse.  The red line represents 0 needle position in Brother KM

Pitch on H5, ribber needles are centered between main bed ones, so the “knot” width, represented by white squares, can be even in number. Begin with the first needle left of 0 (red line) in the work position, continue across ribber bed with every 4th needle in work

The main bed knits in a slip stitch pattern for 4 rows, then knits 2 rows across all stitches. Floats are created every blank row throughout, composing the knots or butterflies. The ribber is set to knit (N,<–>N, will pick up stitches only on selected needles.
The fabric is a slip stitch one, so it will be short and narrow. That is something to be considered when planning cast on, bind off, and beginning and ending edges of the piece.
In Japanese machines, a ribber comb is recommended. If casting on the single bed, start with waste yarn, poke the comb through that, and proceed as you would for any other rib fabric.

My sample is knit on a 910, with white squares drawn. This is what happens when you forget to color reverse. The all-blue squares now became “white”, so those 2 rows were slipped, not knit, bringing float repeats closer together the 
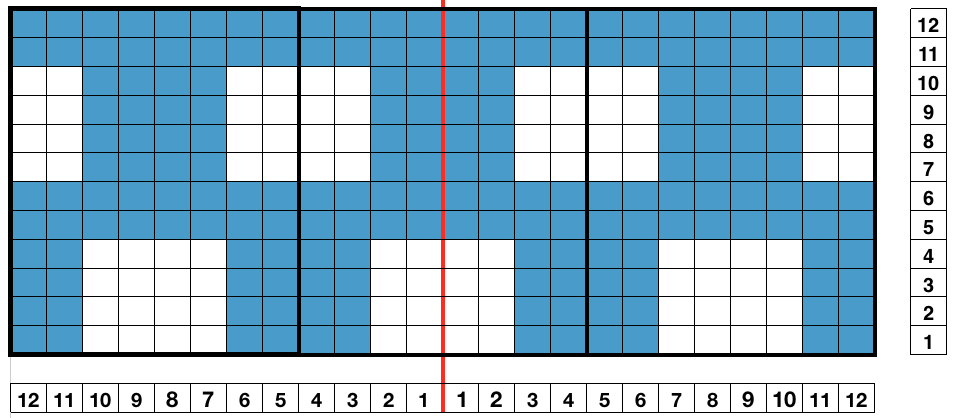
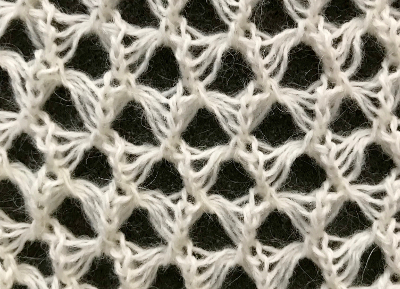
result with color reverse 
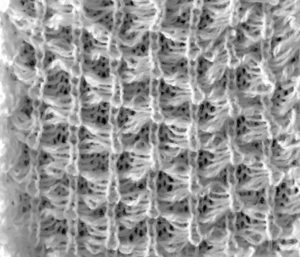
working out a mylar, electronic (unless DM 80 40 stitch width is in use) repeat for a variation of the fabric knit single bed. The stitch count is odd,  allowing for a center stitch manipulation. KCI is used to make certain the first and last needles knit on each side. Floats created close to edges may be left without hooking them up. The fabric separates slightly along the “bowknot”  edges because color-reverse is used, blue squares in chart slip, create floats when Rows 6 and 12 are reached respectively, that single square becomes a non- selected needle, and pick up those floats with any preferred tool 
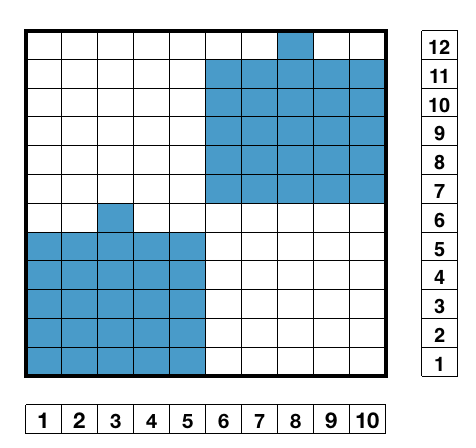
lift them up and onto that single non selected needle, push that needle out to hold
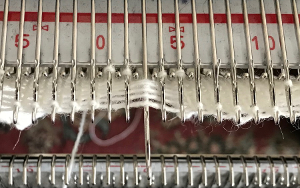
with the next pass the single needle and loops knit off together and become part of the alternating all knit block in the design
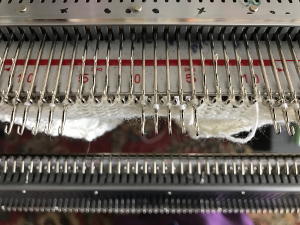
the swatches are knit in a 2/15 wool, the fabric might be better served using a thicker yarn. Here the “blocks” creating  “floats” are side by side

For another single bed cousin in different weight yarn, please see the previous post 

Fabrics worked on the single bed with groups of pulled-up stitches on the purl side will have some distortion of the stocking stitch side depending on the weight of yarn used, the number of rows hooked up, and stitch type. Working on the opposite bed to create the floats produces a more balanced fabric.

My charts often evolve. This may be done on graph paper if there is no access to the software. I began adding a space between each block, thinking about those knit stitches I wanted to create on the purl ground, hooking stitches up on red squares 
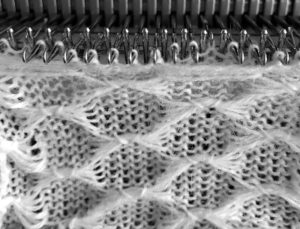
adding border stitches, and more theory on the placement of stitch type
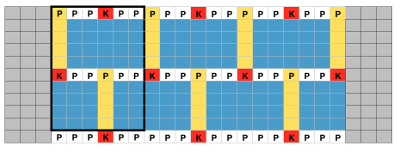
the result places “knit” stitches in the center of butterfly (magenta arrow), not at its sides, and I see and extra purl stitch (green arrow). Multiple stitch-wide borders create unwanted floats on one side
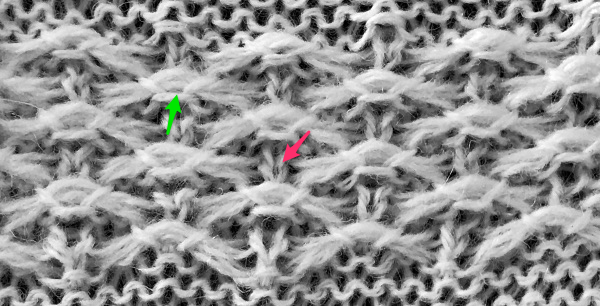
back to the drawing board and working things out first as a hand technique

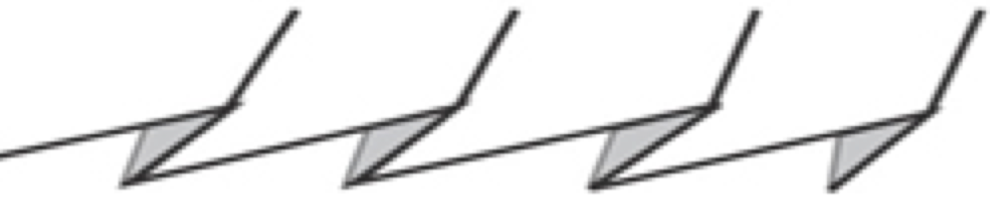
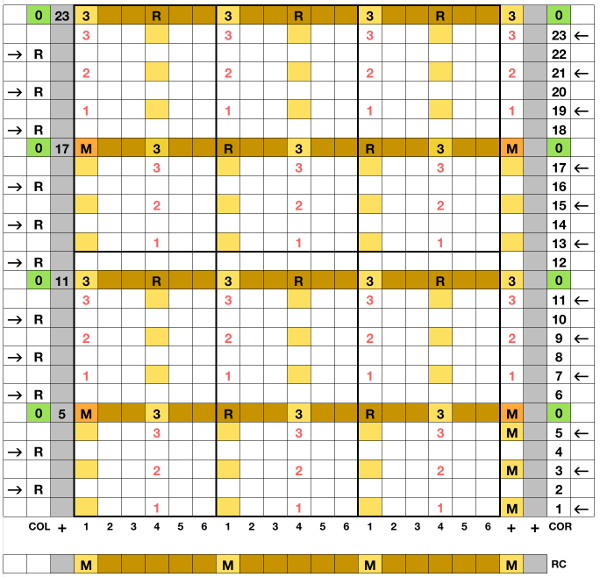
I began with my carriage on the right (COR), after setting up the repeat on a multiple of 6 stitches +3 as indicated above. The last stitch on either side on both beds is never transferred, and the short loops of every other set (rows 5 and 17 in the chart) are not hooked up. This will produce a slightly rolled edge on each side. The larger number of border stitches becomes problematic. The photos were taken while knitting 2 different swatches, so needle tape markings are not the same in all photos. To produce the circular knit, opposite part buttons are pushed in so with carriage on the right (COR), the settings would be

Cast on in any preferred method, ending with all stitches on the ribber Configure main bed needles as illustrated in a stand-alone setup row at the bottom of the chart With carriages traveling from right to left, the main bed knits on those single needles, creating floats between them and the ribber slips. When carriages travel from left to right, only the ribber knits, and the main bed slips. Here the carriages have traveled to the left, and back to the right 
With row counter (RC) set to 000 at the start of the knit, hand techniques occur on RC 5, 11, 17, 23, 29, and so on. Hooking up loops and transferring stitches between beds always occur with carriages on the left (COL). On those rows, the floats are hooked up on the center needle of the 5 empty groups. In this photo, the ribber is dropped to show what is happening on each bed. The last stitches on each bed are not moved, and those short floats, when created on completion of alternate repeat top halves, are not hooked up 
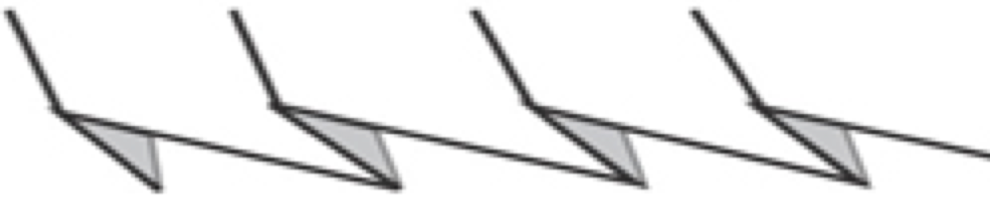
after the three floats have been hooked up, with COL each time, the in-between main bed stitches are transferred back down to ribberCOL: be sure when hooking up floats that all in the series are picked up. The space between the beds is fairly narrow, and the tool used is purely preference-based. Shifting the main bed needles forward will provide a visual check for loop count as you go. I bring needles with multiple loops out to hold before transferring to the ribber, and then also the transferred stitches on the ribber out to hold to ensure they will all knit on the next pass from left to right. Patterning occurs on every 6th needle on both beds, except border stitch groups

this is the needle arrangement/position in my final swatch, knit in 2/8 wool, COR

So what can be automated in the process? The knit bed needs to work the stitches that form floats every other row, while the card or mylar need to advance every row. Trying patterns out as an all-hand technique helps determine tolerance on the part of the machine and the degree of patience available. With thinner yarn, the fabric would be more compressed, and maneuvering stitches more frequently to achieve similar finished size knits, so I switched to a thicker yarn. I found more than 3 rows of floats were too hard for me to manage successfully.  “Air knitting” to determine the placement of knitting on any bed before patterning helps determine the number of needles in use, especially if edge needle placement or count matters: here is the first pass using my mylar  eliminating needles to any desired width, leaving only one needle in work on each side of selected needle each bed for this fabric 
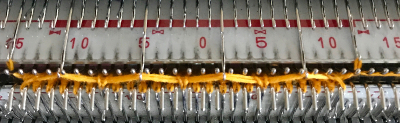
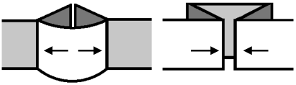
reducing main bed count so only one needle is left on either side of a selected one that needle (green arrow, gets transferred down to ribber now the number of needles involved on both beds is evident on both beds

While knitting in the pattern the ribber pitch is set on P (point to point) to keep stitches on opposing beds centered (P pitch also makes it easier to transfer directly from one bed to the other). If the cast-on is for every other needle rib with stitches then transferred between beds for pattern knitting set up, the cast-on and all rib rows need to be knit in H pitch, with a switch to P for transfers and knitting in pattern to be completed. With the first row set up on the selected segment of the needle bed, there are additional steps to take.

This is my working repeat. Since it is 6 stitches wide, it could be worked out on a punchcard, punching out all black squares. On my mylar, I marked yellow squares only, with no color reverse
To work consistently with the method described in the larger chart, the first row was manually set up on both beds preparing for the pattern with COL: change knob set to KCII (cancel end needle selection, not every needle in work on the main bed), KC set to slip <–>, so non selected needles slip with each pass of the carriages, advancing the mylar or card one row. The ribber set to N/N or as below will knit from left to right. Pre-selection row is made traveling to the right, ribber only knits

With COR: set RC (row counter) to 000. Make certain proper part (slip) buttons are engaged. MB knits in the pattern based on selected needles, ribber knits when moving from left to right. The fabric is tubularHand techniques will now also occur when carriages are on the left, on RC 5, 11, etc as described in the hand technique chart, on rows with no needle selection. As in hand tech, transfers and multiple loops containing needles are brought out to hold before moving the carriages from left to right and selecting the needles for the next set of floats with that same pass.

This is my resulting fabric, hand tech shown, the short mylar test above was cropped

Revisiting knit “bubbles” brother KM

Sometimes months or even years go by before I revisit previous posts. As I review the information, it may occur to me to think about it further, and /or to present it in a slightly different way. I find it hard to believe how much time has passed since 2013/09/06/more-knit-bubbles/ got published.  Here is another way to look at the fabric on Brother KM. Since I knit on a punchcard model or a 910 electronic one, I will refer to pattern repeats in terms of punched holes or black squares.

Bubbles and drop stitch lace share some of the same principles, the effect is created by stitches that are larger than others. Slip stitch setting can be used to automate needle selection. Black squares or punched holes will knit, unpunched areas or white squares will not, with needles left in the B position. Brother preselects needles for the next row of knitting, so when combining hand techniques with needle selection, one has the option to intervene before the next row in the design is knit. Using the card or mylar to read row 1 of the design helps determine where on the needle bed to set up your repeats. In this instance, the ribber knits every stitch, every row, with one extra needle on the left (or more on each end if preferred) in addition to repeats # required to achieve the desired width. All needles are in work every row on both beds. Main bed knits in response to programming.
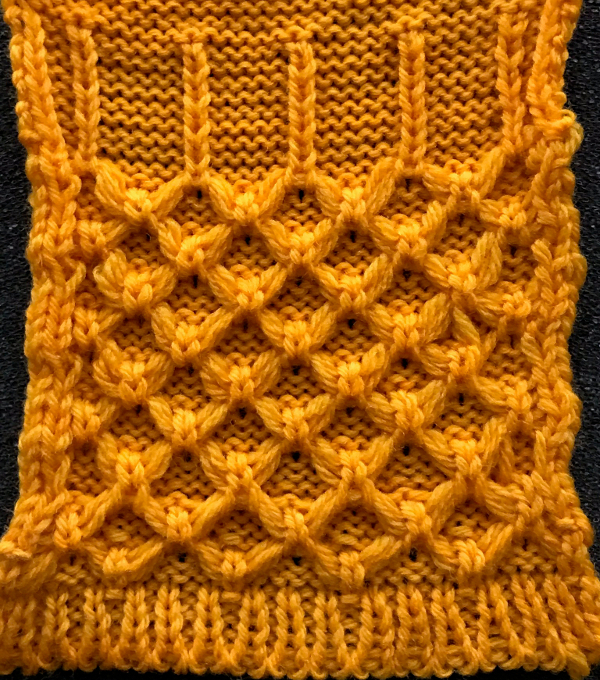
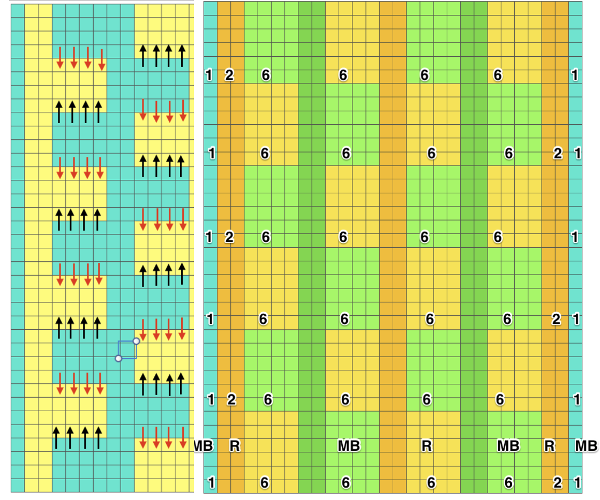
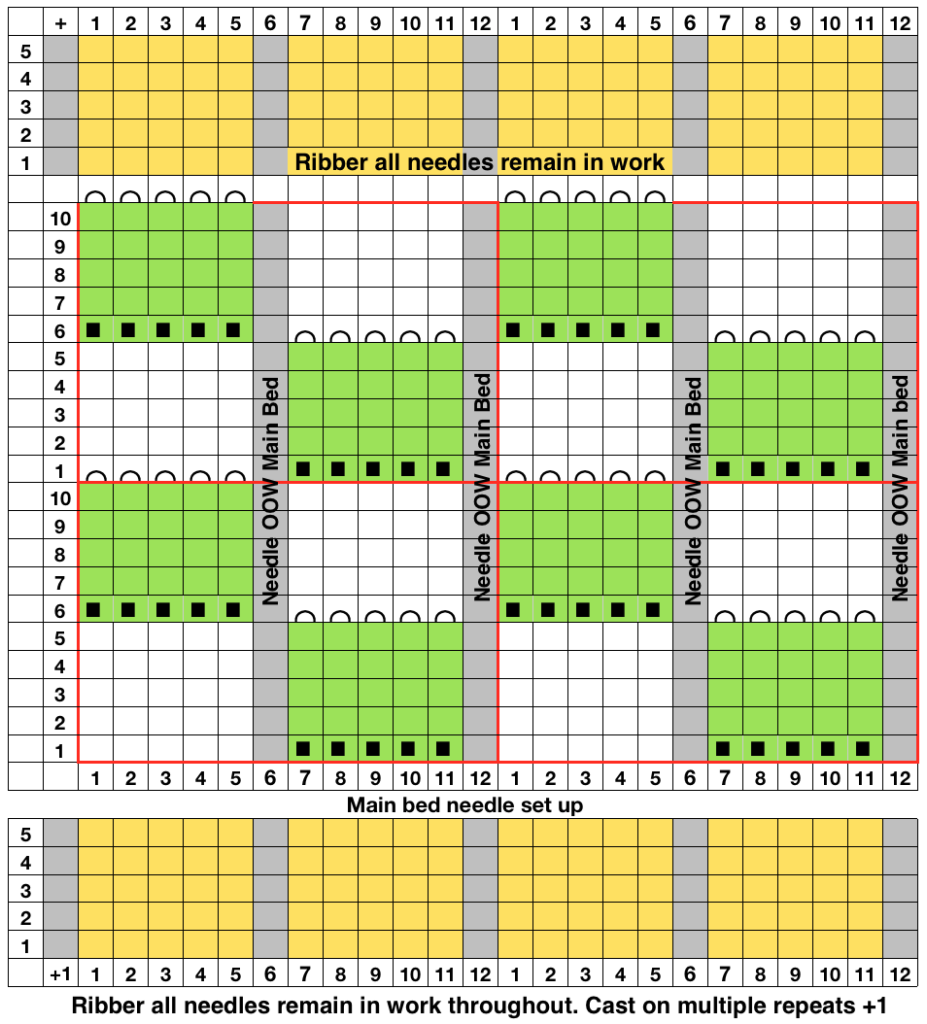
Working in multiple of repeat -1 on the top bed, plus one needle in work at each end on the ribber. Considerations need to be made to align the design properly. The markings on my metal bed are from a different project. 
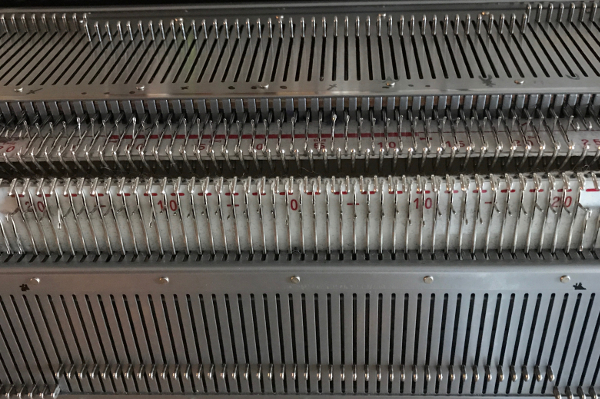
The goal is this needle arrangement “air knitting” with carriage set to KC will help identify patterning repeats. Groups of 7 include a needle on each end which will be pushed back to A position in the body of the knit/ NOOW (needle out of work) indicated in the chart for the main bed needle setup the first selection row 
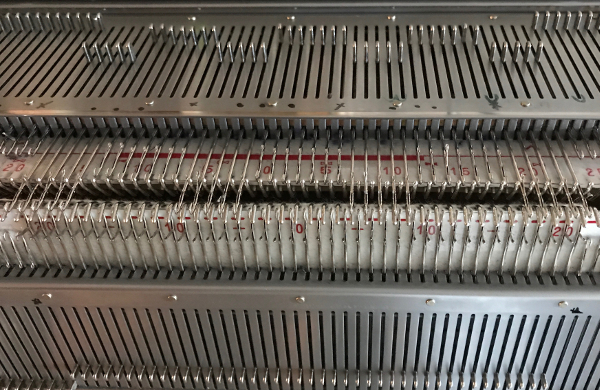
a needle on either side of the groups of 7 is pushed back to A position, remain there throughout the piecean extra needle is brought into work on the ribber on either side of repeat ends. Machine settings: main bed set to slip <->, ribber set to normal knit
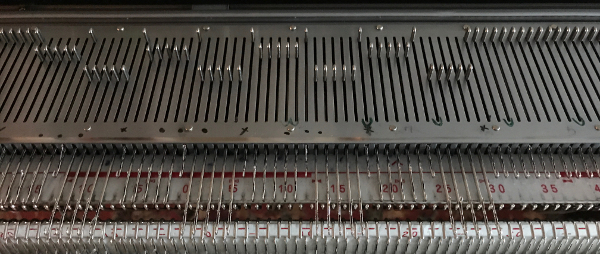
the ribber has now been set up for knitting every needle, every row, with the caston and desired edging completed. The first row is selected on the main bed for pattern knitting. since there are needles out of work and pattern knitting is involved, if KCI is used or end needle selection is not canceled, the end needles on the areas being slipped will be selected to the knitting position, so patterning errors will occur. The first row knit on both beds is shown on the remaining needlesBrother knits a row while preselecting for the next one. Here the needles in B would slip/ not knit on the next row, and needles out to D (Brother skipped the letter C in needle positions) will knit. Before knitting that next row, stitches on the now non-selected needles should be dropped across the bed this shows those stitches have been dropped, their needles are now empty, and returned to B position

end knitting with the same treatment as it bottom (swatch was simply dropped off).
It is possible with solid geometric shapes such as these to release stitches after each shape. The type of yarn used and loop behavior upon dropping stitches are variables that influence success in doing so (other swatches ).
An acrylic yarn was used: the first image is the fabric’s “relaxed view”.after steaming and pressing
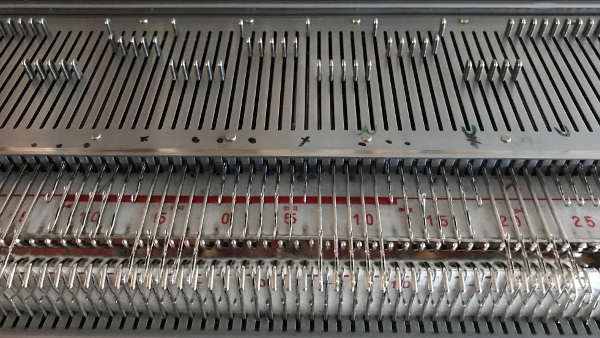
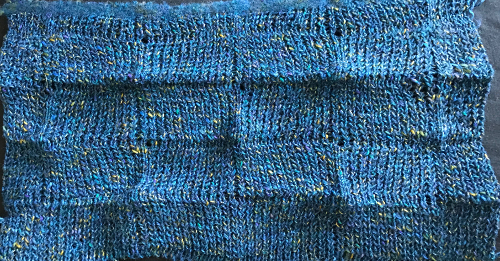
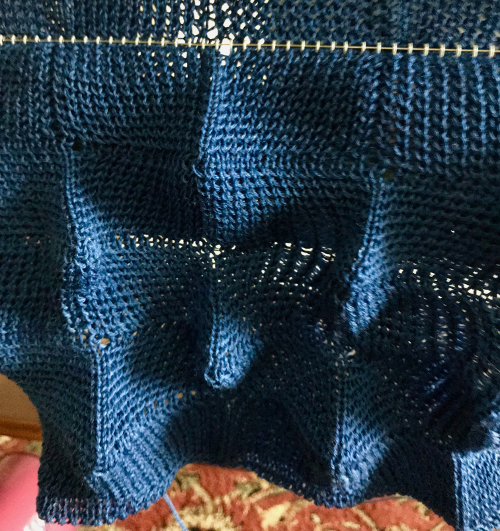
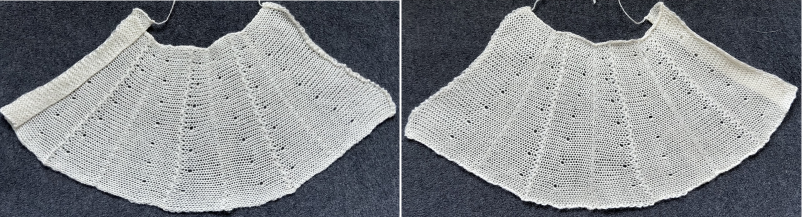
the variation in width is due to adjustments in tension, the swatch folded over itself shows the difference in another way

Tuck lace trims and fabrics 2

Working between electronic and punchcard machines needs to take into account that repeats on a punchcard KM must be a factor of 24 (2, 3, 4, 6, 8, 12). An electronic tuck stitch repeat may be any width.  
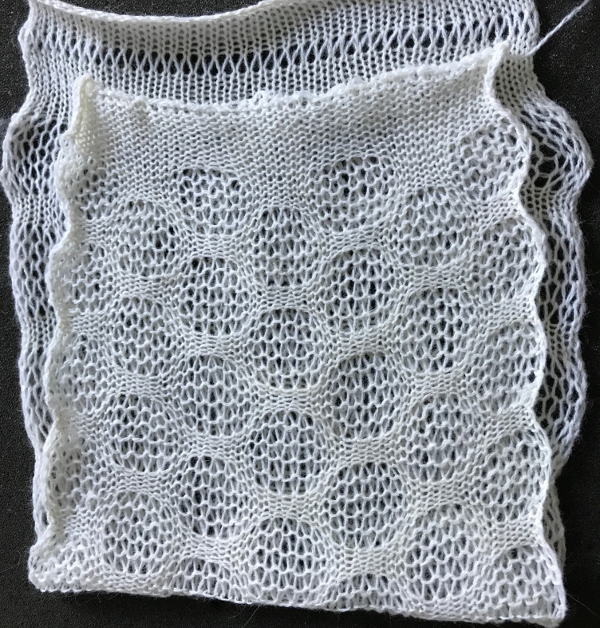
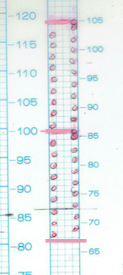
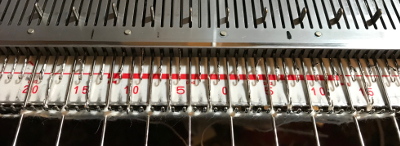
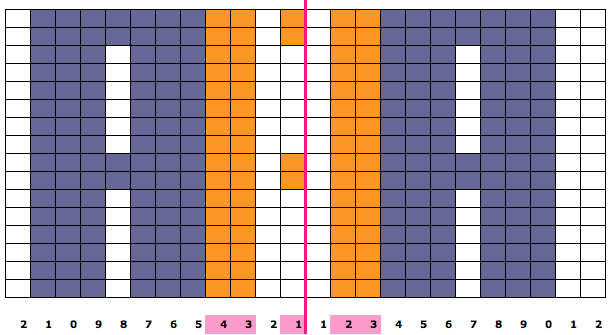
Since the above is seven stitches wide, if punched accordingly it would occupy 21 out of 24 stitch units on a punchcard. As is unless those extra needles on the far right or left are left out of work for ladders or transferred down to the ribber, it would not be suitable for an all-over fabric. It can, however, be used for a trim. If the latter is the intent, only one series of vertical repeats as seen in the chart needs to be punched. The numbers below the image indicate Brother needle tape markings. The Brother needled tape has a center O position marking, with numbers beginning count with one and radiating out marked in groups of 5 in both directions. This is a 6-row tuck fabric, thinner yarns should be used if the pattern is automated, as tuck loops build up in needle hooks. If you wish to experiment with slightly thicker yarns, decrease the unpunched areas to 4 rows, or execute the repeat using holding. Held stitches sit on top of the needle shank, tolerance is determined by how many rows it either takes for knit stitches on sides of the loops jump off needles or accumulated loops in hooks or any stitches become unable to knit off consistently on the next all knit pass.
To test the yarn and repeat out, try the technique by using holding, then punch your card. Automating makes the process less prone to error and faster if great lengths of trim are needed. It is also possible to punch or program only the part of the card that is planned for the repeat. 
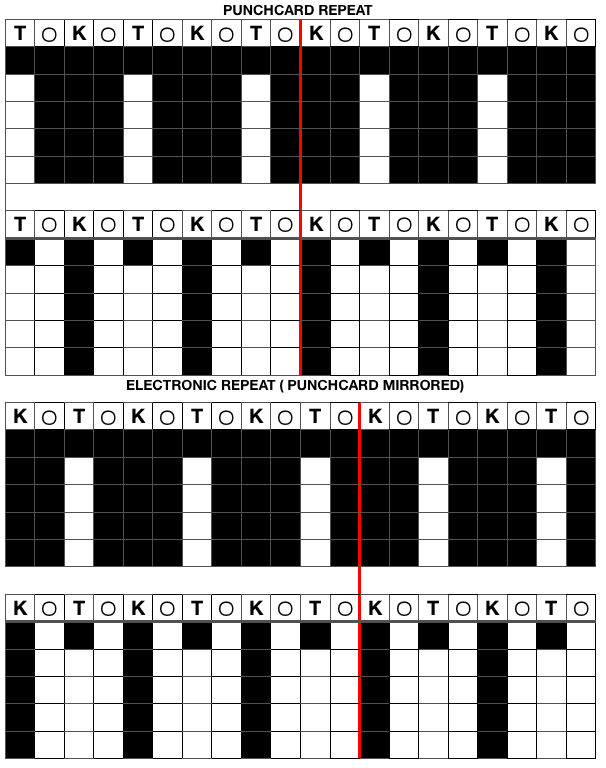
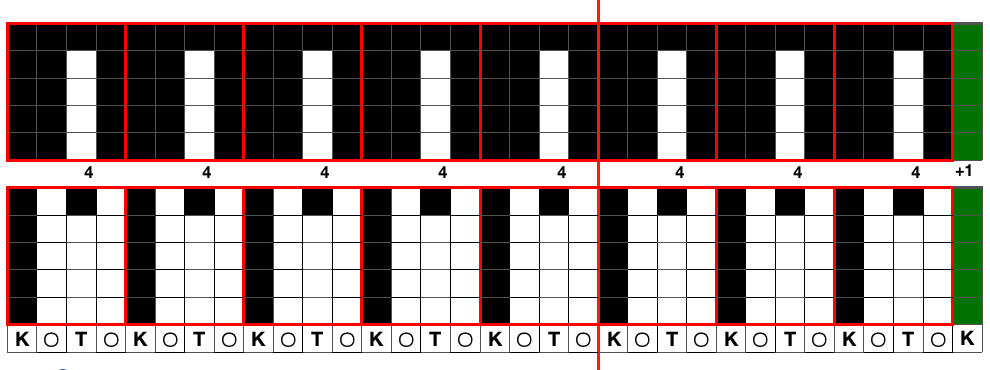
The single-width repeat may be programmed as pixels, on left, or punched holes on right. In electronics a single 8-row repeat is adequate, punchcard knitters repeat 5 times to 40 pattern rows punched. 
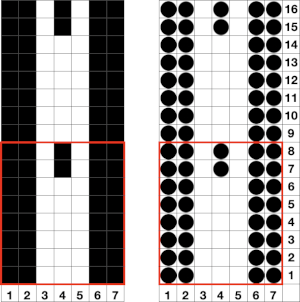
I prefer starting such designs on a knit row. To do that, the design repeat start may be shifted 
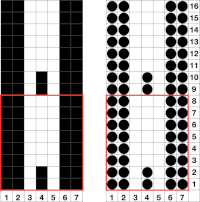
Using the trim as the cast on edge for a garment: determine the length required after a technique test. Knit a bit extra and remove on waste yarn, so more may be added or some be unraveled if needed or you wish to change the configuration using it as your cast on. Rehang and cast on later when it is completed. The flared-out portions of the trim will be used to “cast on” the edge of the piece, continuing with some needles out of work. An attempt at a line drawing of the “trim” sideways 
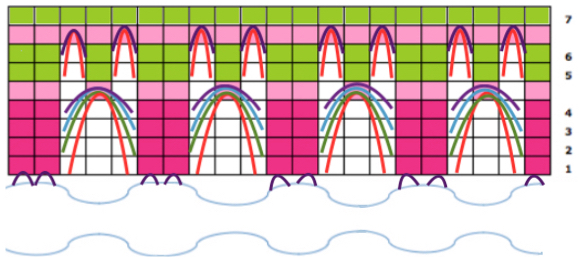
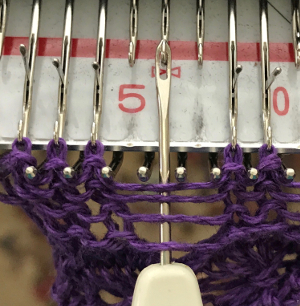
Using the curved out edge of the trim, hang half stitches if possible, or one full stitch away from its edge as illustrated below. Knit 4 rows. With a tool pick up all ladder loops created by NOOW (RC 1-4) and hang them on the center empty needle. Knit rows (RC 5, 6), hang ladder loops on still empty needles, knit across all needles, continue with garment

needle arrangement picking up loops 

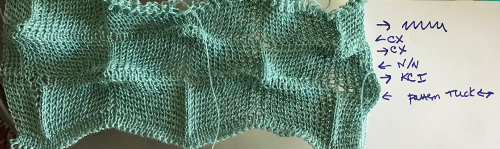
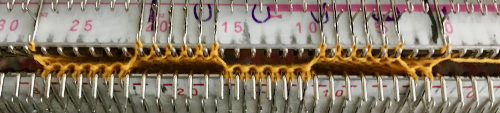
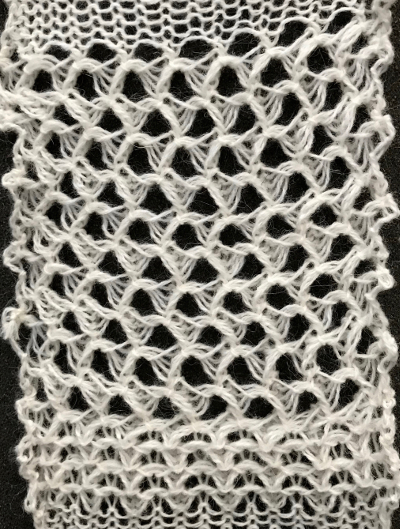
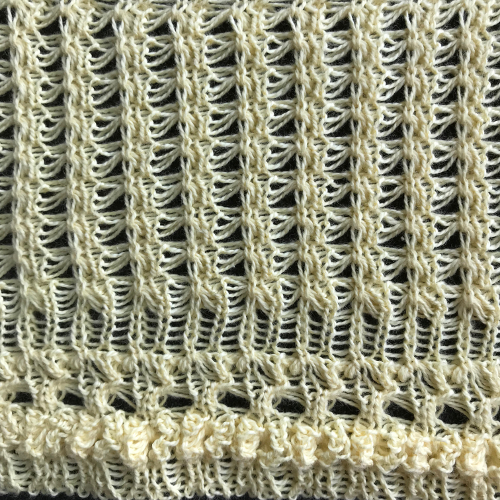
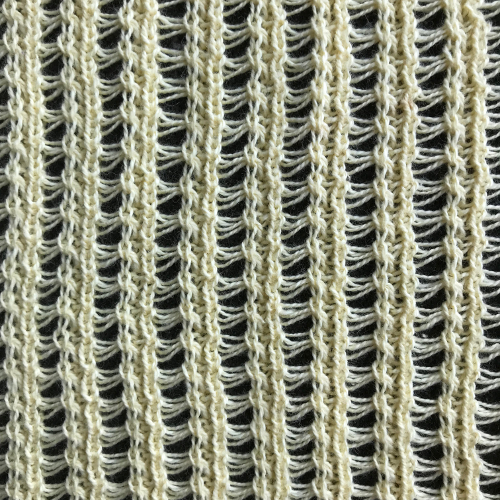
The yarn used is cotton and appears to have a tendency toward biasing on knit rows as seen in the tendency to lean in one direction in the above photos. It has no stretch, so stitches that knit off several tuck loops remain elongated. A look at the structure on the purl side: 
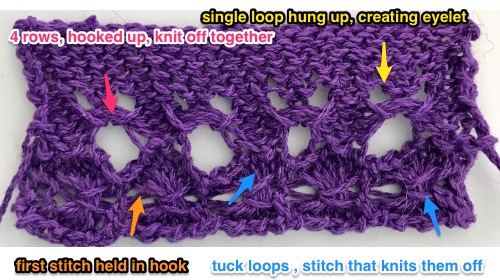
For more trims in this family, please see later post Tuck trims 4 and other edgings

In Brother knitting when needles are out of work, the automatic end needle selection may interfere with the pattern, and this is a consideration in many stitch types.
All over fabrics, analyzing a published Brother tuck lace punchcard repeat:
Single bed
: to test the pattern, arrange the needles as shown below the full pattern repeat.
Cast on and knit a few rows, set the change knob to KCII, knit one row. Push in both tuck buttons, and knit the desired number of rows. 
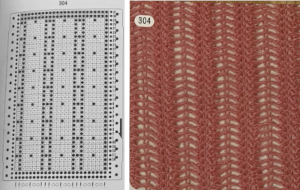
If using the pattern on electronic machines, the needle selection needs to match on the top bed. Depending on the model electronic, the pattern may have to be reversed for accurate needle selection.
I prefer to start on a row where all needles in work are selected, providing an added visual check that indeed the proper needles are in use.
Begin with waste yarn and ravel cord, followed by a permanent cast on.
I like to use a crochet cast on and bind off, with extra chains where needles are out of work. The fabric will stretch sideways depending on the number of rows tucked as well as needle set up, so casting on and binding off needs to accommodate that stretch in finished pieces.
Punched holes or black pixels represent knit stitches, as always unpunched areas of the card, or white squares represent tucked rows.  The knit stitch (blue) above which tuck loops (red) are formed becomes elongated for as many rows as unpunched cells or white pixels in the pattern until that same stitch is selected forward to be knit 
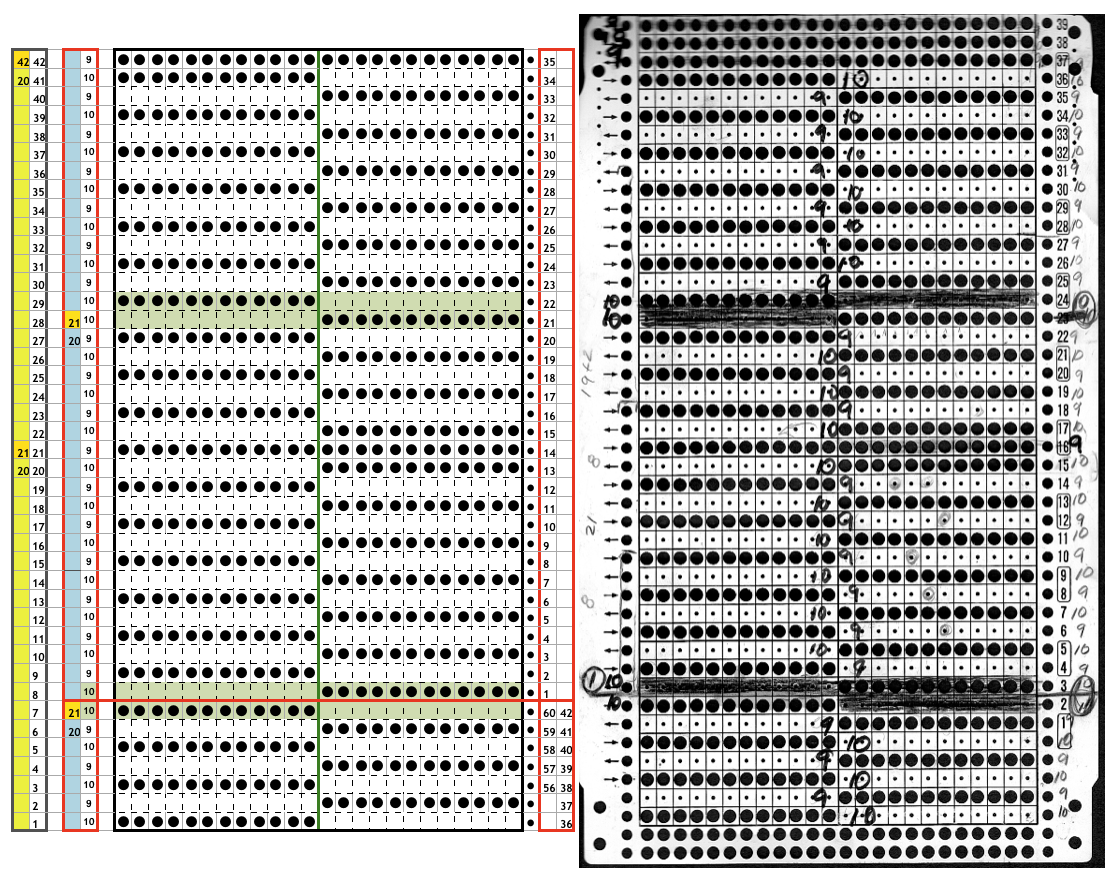
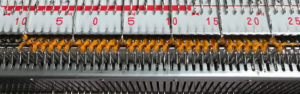
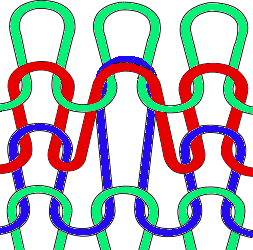
When using card 304, tucking happens for 3 rows forming loops that span across needles out of work, then all stitches on needles on rows with numbered markings on blue cells knit for one row. Orange gradient-filled cells represent rows on which tuck loops are being formed on the held single stitches, which in turn grow in length. The full 24 stitch repeat, shifted for my preference, with the smallest electronic 8 stitch repeats outlined with red border In electronic knitting, repeats may be planned across the number of needles in work based on personal preference. Here the repeat is adjusted to produce knit stitches on both sides of the swatch, 35 stitches X 16 rows. 
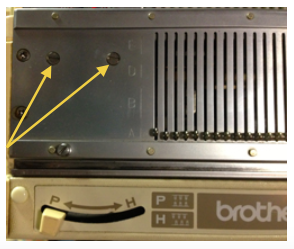
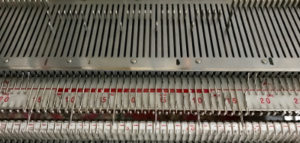
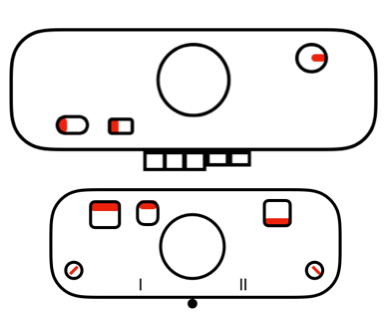
On the 930: the odd number of needles are automatically placed on the left, with the pattern used in the isolated design setting.
Air knitting the selection for the first row will bring proper needles to forward position, odd number on left, even number on right.
Unselected needles on the right and left must be taken out of work, knitting will continue on the remaining selections.  Double bed: there are a couple of options for varying the fabrics. In one, to retain the laciness of the knit transfer only stitches creating those long vertical columns on the top bed down to the ribber. In the other, any or all out-of-work needles on the main bed will be transferred down to the ribber. Hybrid combinations of both modes of transfer could explore the knit further in yet more ways.
If casting on in rib, set half pitch lever on H, racking indicator on 5. Cast on the desired number of stitches and knit base rows.
Set half pitch lever on P, transfer stitches between beds arranging them as shown with NOOW on both beds. Set change knob to KCII, knit one row. Push in both tuck buttons on the main bed, knit in pattern for the desired number of rows.
Lately, I have been experimenting with chain or crochet cast ons and bind offs with extra chains between needles in work, and actually began my single bed swatch in pattern immediately after the cast-on row on the needles preselected in air knitting for row 1. Some weight, distributed evenly across all stitches is necessary. The main bed remains set to tuck in both directions throughout, the ribber when used is set to knit in both.
The bottom of the swatch shows the single bed fabric, the top a double bed version.
When knitting on the double bed, in this instance, the stitches where those all knit vertical columns occur on the main bed, marked with red dots, were transferred down to the ribber. Here the main bed needles, continuing in pattern, are selected forward for knitting on the next carriage pass, here the elongated stitches and tuck loops are shown after they have been knit together on the main bed. Transferring all non-selected needles down to the ribber: 
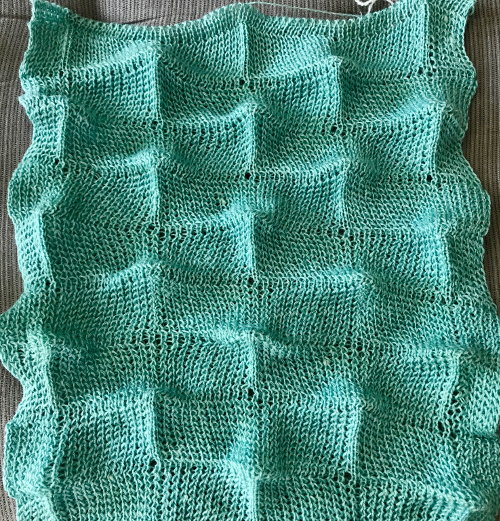
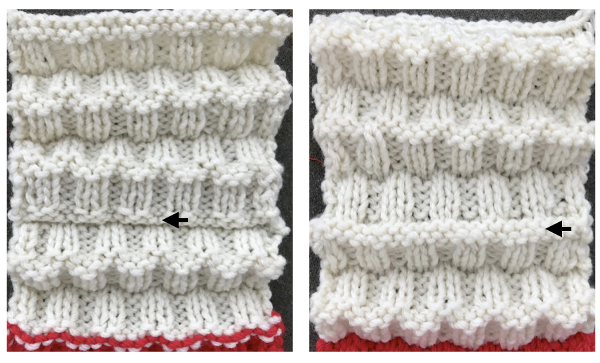
the tuck loops still form on the main bed, the ribber is set to knit every needle in both directions. 
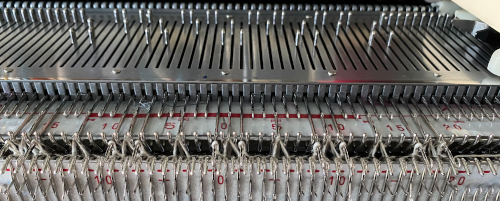
The resulting knit, very different in appearance and in width than the previous sample, using the same tensions
For how-tos, illustrations, and swatches showing fabrics knit with all needles in work on both beds, please see post: Ribber fabrics with main bed tuck patterning 1/ pick rib