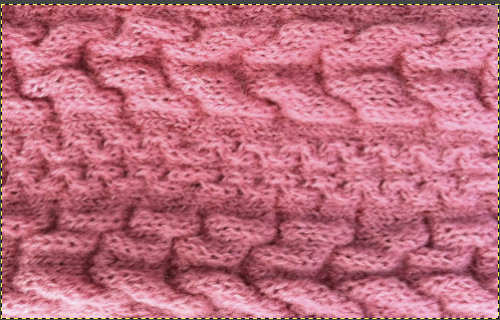
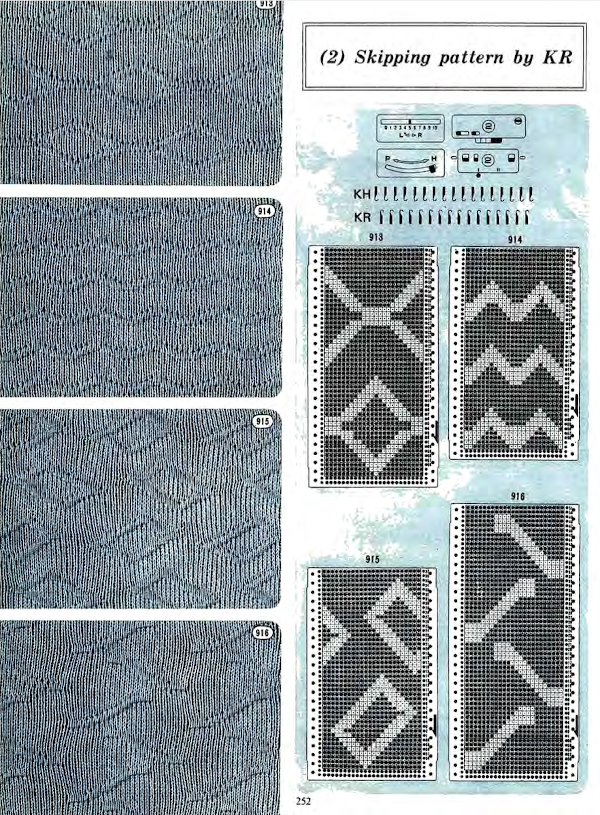
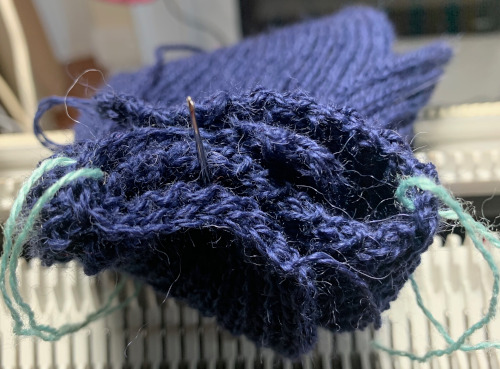
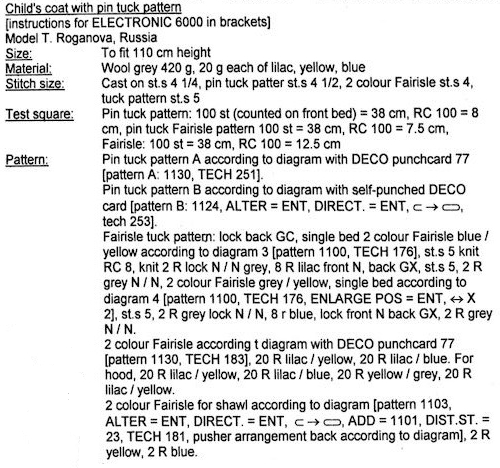
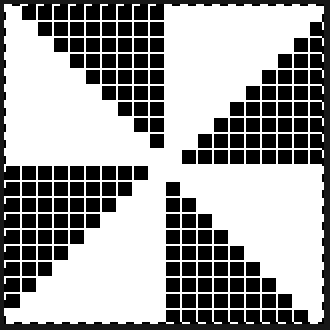
Decades ago UKI used to offer 92 colors in a 3M elastic, and for some time lots of folks were experimenting with using it as the second color in fair isle. A company now defunct called Impresario used to even sell pattern books for garments using the technique, with the no stretch ground yarns creating ruffled details in cuffs and sleeves. One of my students during that time made a whole collection where the elastic was used in shaping segments of pieces and even in a whole dress. Since pleating, folds, blisters, bubbles have been intermittent themes in my blog posts the elastic and “unusual” fiber use seems to be a natural follow up in my swatch knitting experiments.
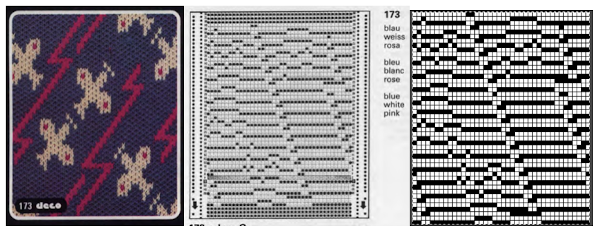
Early published designs can be found using elastic in patterning. Thread lace was an early feature in Silver Reed machines, so if that is a fabric that is attractive, downloading Studio specific punchcard books or those for their electronic designs is well worth it and provides a wealth of inspiration for the related knits. The knitting technique is often referred to as punch lace in early pubs If a clear color contrast is desired, FI is the better option. One such source:
 The above patterns are decoded for use on Brother electronics in a subsequent post
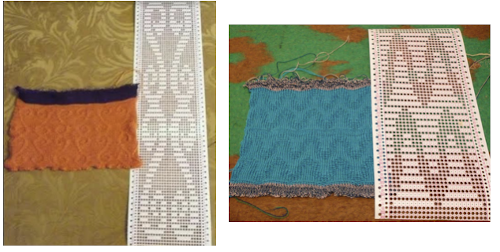
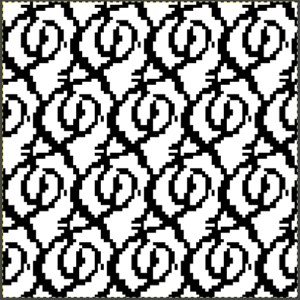
In an earlier post on “pretend cables” I shared a demo swatch from my teaching days (shown sideways) that became the springboard for the mentioned student collection
 and its accompanying punchcard repeat:
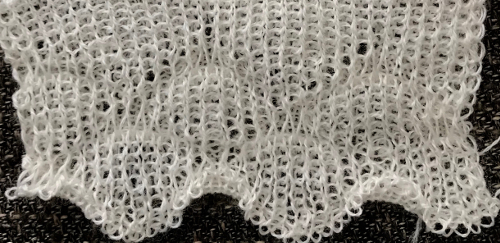
 UKI is no longer available. I recently acquired some Yeoman elastomeric nylon-lycra yarn. The latter is supplied on 1450 yards per pound cones in 23 colors.
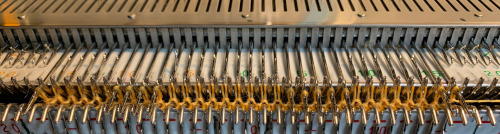
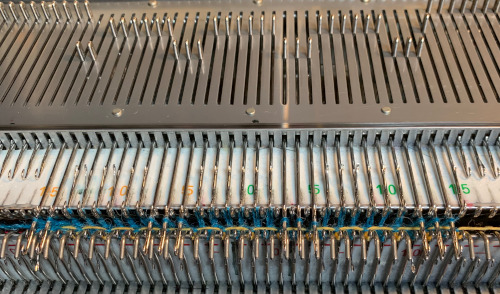
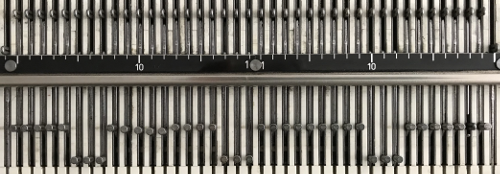
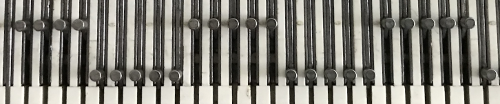
There were several things to be sorted out for the elastic to feed smoothly. The first was to separate it into more than one cone with the intent of using at least 2 strands since one did not seem to work predictably. After trying a variety of trial methods including bypassing the tension dial in the yarn mast, ultimately the best results were obtained by threading the elastic as any other yarn but taping the metal disks spaced apart in the assembly thus reducing the pressure and upper tension on the elastic as it advanced through the mast for knitting.
The normal threading
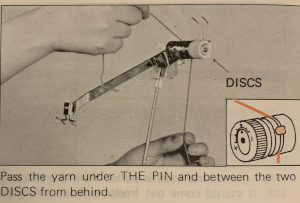 Here the white yarn shows position beneath the pin
 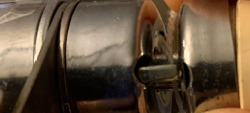 and scotch tape in place to adjust the amount of pressure exerted on the elastic.
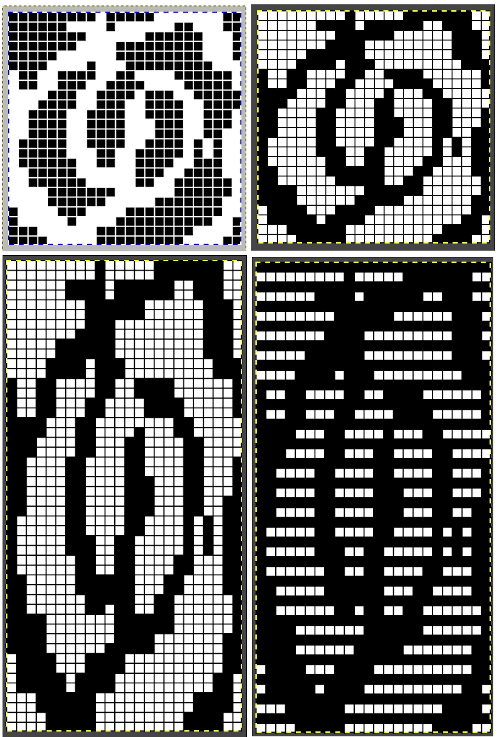
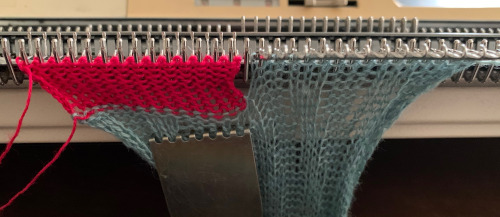
 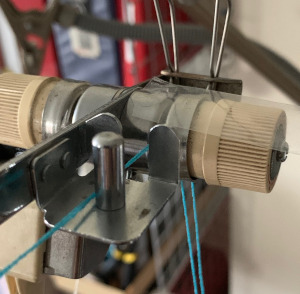 As a matter of routine, even if the goal is to knit the fibers double bed, it is always best to make certain one gets familiar with yarn feeding, tensions, changes when larger widths of knitting are attempted, etc. on the single bed. The first tests were knit using the fair isle and thread lace settings single bed. Though I am using img2track to download to a 930, I do not have a 930 carriage (910 ones do not have a thread lace option), so I worked the swatches using a punchcard model carriage. The repeats used were planned to include borders on each side to ensure those stitches would knit in the second, B feeder color in fair isle (black squares, punched holes), or together in white squares (unpunched holes) in thread lace. Fair Isle produces a double set of floats on the purl side.
 ![]()
 Thread lace produces a single set of floats (in this case the elastic), the white border is not visible in the repeat below, it is the same as the above fabric, with colors reversed. I prefer the single float backing. In addition, for these fabrics the elastic is placed in the A feeder, the yarn in B
![]()
 I found the standard sinker plate kept having issues with the thread lace option, getting needles caught up in it as it attempted to move across the bed. The sinker plate that was provided with the punchcard machine was actually different, and when I switched to using it I had no further problems. Arrows point to differences, I have long since replaced all brushes with wheels on all my sinker plates. Be aware when purchasing any of them that the bulky KM ones are slightly larger.
 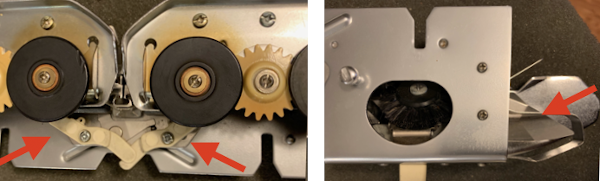 A second thread lace variation:
![]()
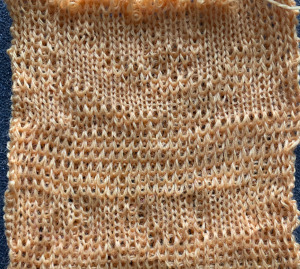
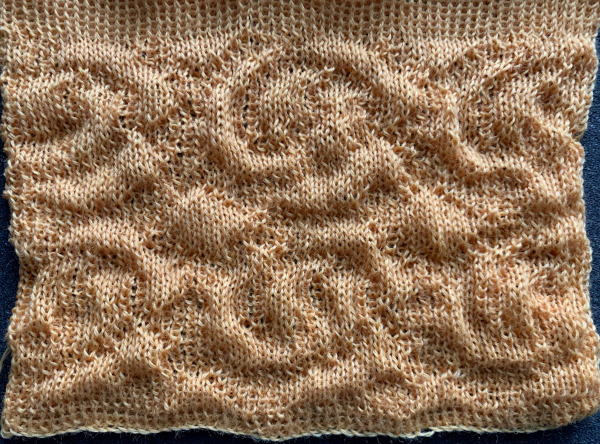
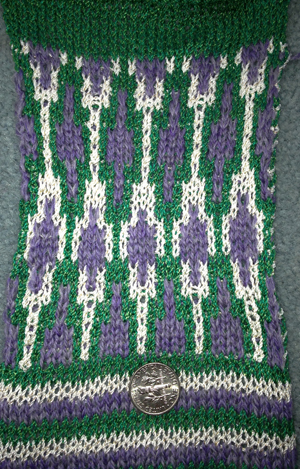
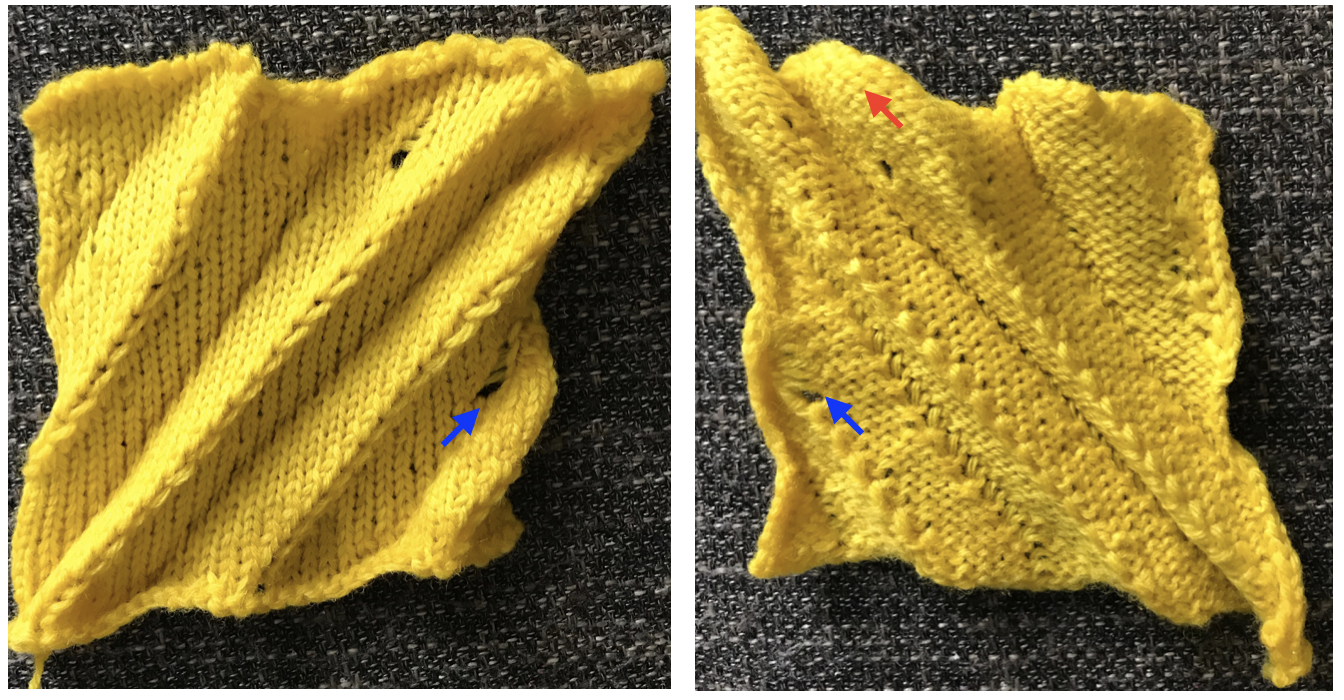
 The multiple folds and creases, as opposed to smooth blister in all the above, are very interesting to me.
There are many scientific papers being written on 3D knitting that explore pleating achieved by using knit and purl combinations which to some degree could be emulated on home knitting machines equipped with a G carriage. Other work explores properties achieved by using elastics in the mix, they can be found by searching for “axometric knits”.
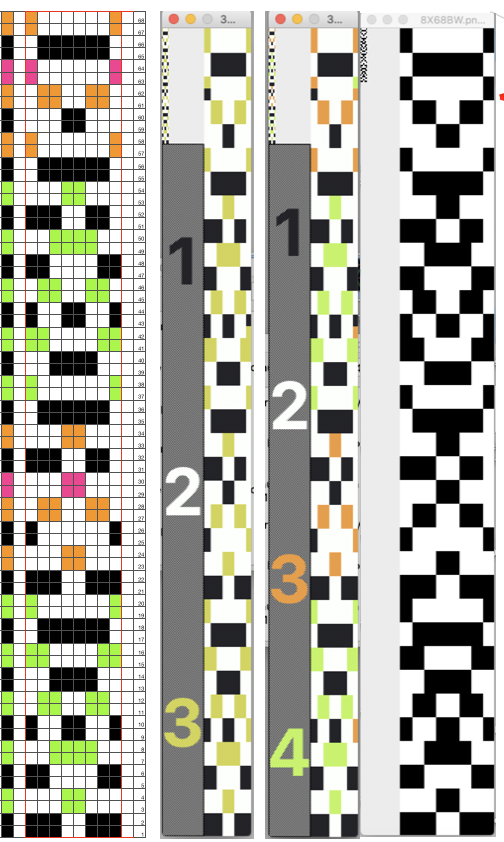
Many interesting pleating effects may be achieved by using knit and purl combinations. Unless one has a mechanical aid such as a Gcarriage transferring between beds can be tedious and hard to do correctly for lengthy pieces of knitting. I illustrated one sample in the post 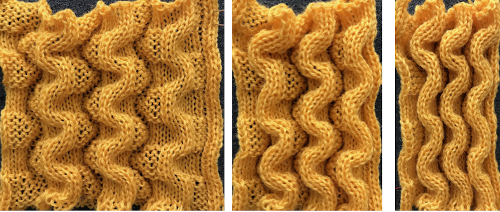 I decided to now test a similar block structure using the thread lace setting, first with a large check and then a far smaller one
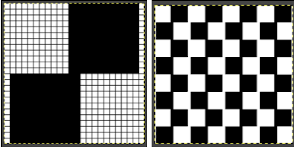
 The spots, where the elastic and yarn knit together, are compressed, so the results are quite different than what might be expected from studying the chart
 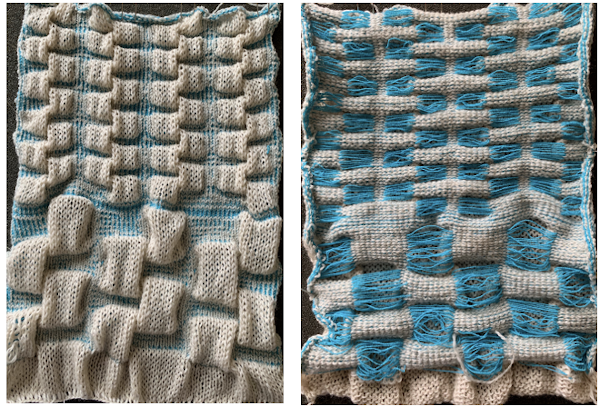 A quick, imperfect sample using a fine cotton and a single strand of the elastic, each with its own upper tension disk adjustments.
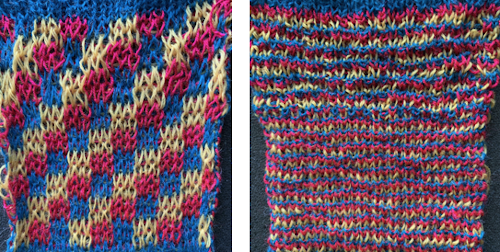
 a close-up of the elastic and cotton, though they are knitting stocking stitch together, the cotton does not have the same stretch factor, so the loop formation as viewed on the purl side is different
 What of knitting on a double bed? An axometric shape, a tentative repeat worked out and in turn elongated X2 and tiled to check alignment.
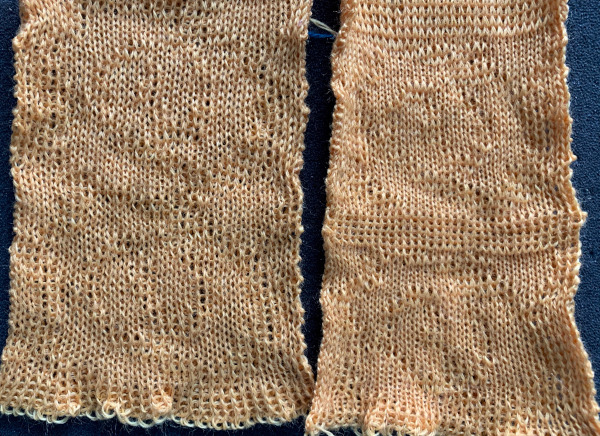
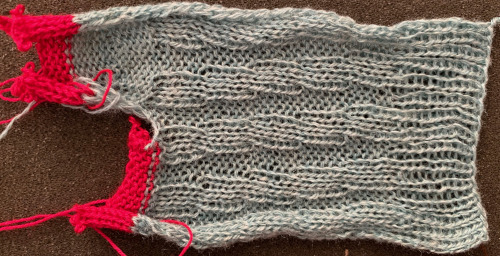
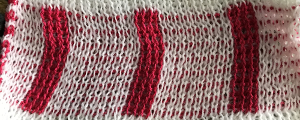
 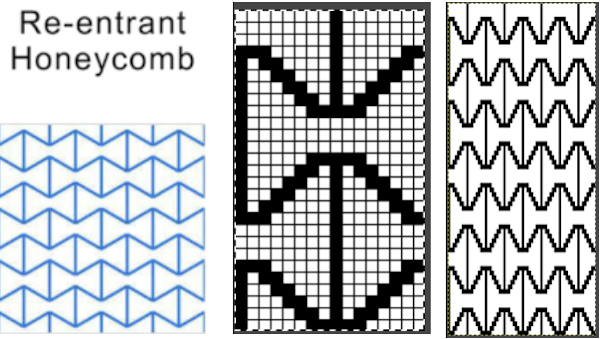 The original repeat is composed of an odd number of rows in height. Usually, double bed knitting relying on color changes or automatic DBJ KRC separations require an even number of rows in the motif. The first sample was executed using single-ply cotton and elastic yarns respectively, fed through separate upper tension disks but knit together as a single color. The swatch is 72 stitches in width but measures only 14.5 mm (5.7 inches) in width, producing a gauge of nearly 13 stitches for inch, not achievable when knitting with standard fibers on a standard 4.5 mm machine. The pattern is subtle, more visible on the knit side, hard to tell there are pockets in the knit. The cotton is space-dyed, and as true when using such yarns, that causes some confusion in immediately identifying a clear pattern. The ruffled effect is simply from a plain knit start and color-changing stripes to test tension and knittability on the planned needle width. Machine settings: opposite part buttons, no lili
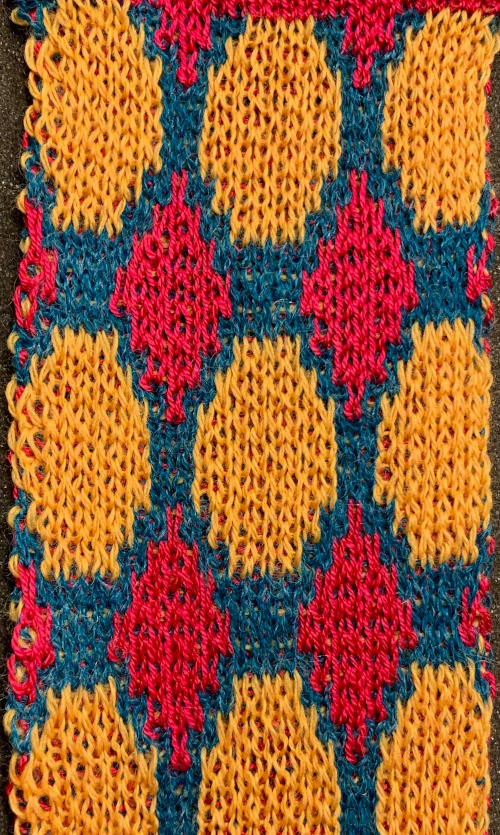
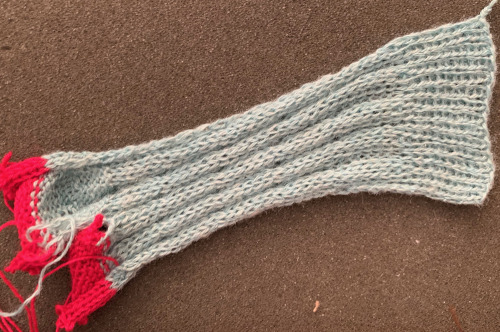
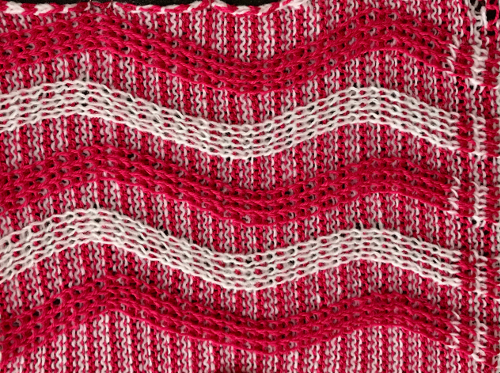
 Here the same pattern was executed on the same number of stitches with the white wool used above, but the elastic was plied with a 2/24 acrylic yarn and knit as DBJ with the blue, stretchy combination creating the solid color backing
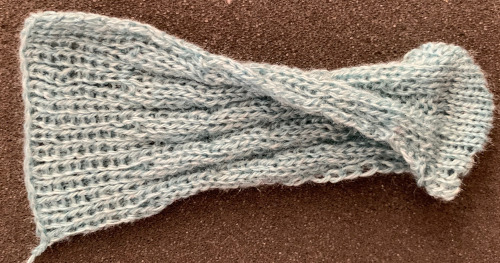
  a comparison in scale
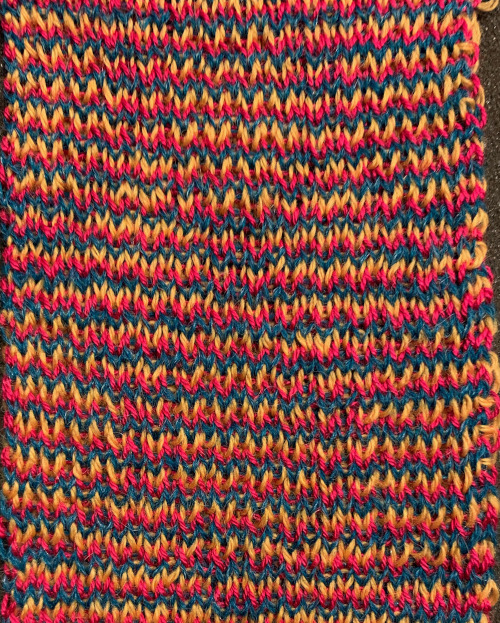
  My future intent is to try for some of the 3D shapes obtained with racking, but prior to that, I tested the yarn and tensions on some simple every needle rib racked patterns. Because of the movement required across the metal bed for racking to occur, I chose to continue using the same wool as above, rather than thin cotton likely to break from the stress of those movements. A plating feeder would do a better job of distributing the colors, which here become muddied as seen any time 2 contrasting colors are knit together and are used as “one strand”. Racking every 2 rows (swatch bottom) will stress the yarn less than every one row (swatch top). The knitting was fairly easy at tension 4 and 3 respectively. Both carriages were set to knit in both directions. The weighted rib on the machine measured 16 inches, 10 when off it and relaxed. The width nearly doubles when fully stretched.
 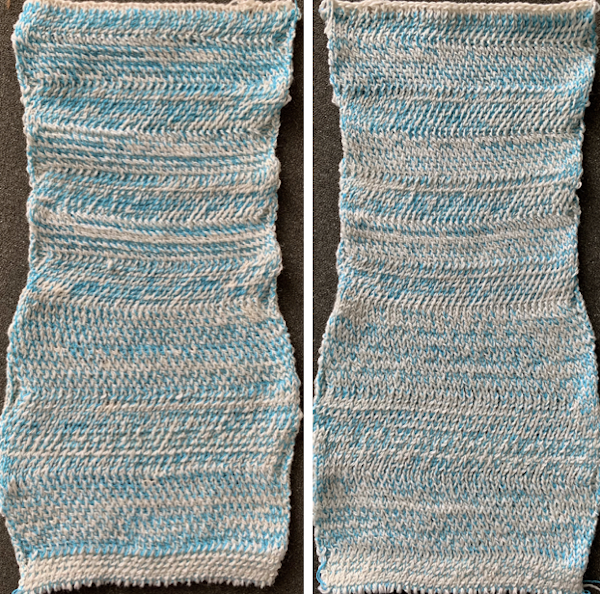 I was curious to try a pattern previously tested in an all wool
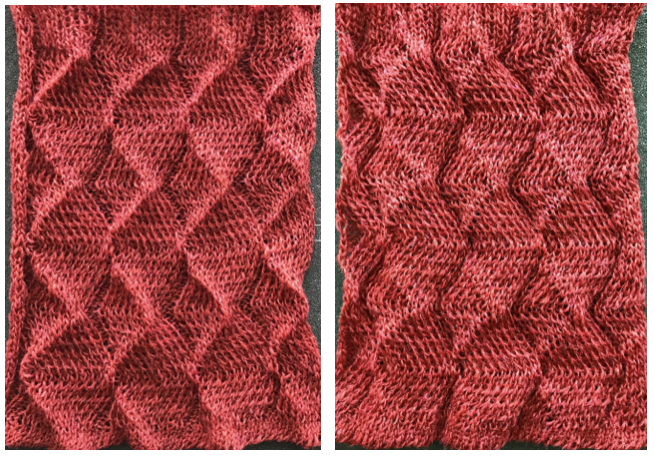
 The stitches were quite compressed, the color mixing makes the shapes harder to trace, the fabric measures nearly double in width when fully stretched in width, the needle arrangement is more visible at that point.
 The needle arrangement was changed. The finished swatch measured 24 inches when weighted and on the machine, approximately 18 inches when off and relaxed. The maximum width was expanded from 4 to 12 inches
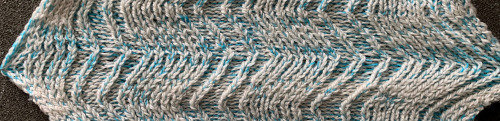
  The “pleating” arrangement is noticeable in this view
![]()
 Working with a similar arrangement I decided to try having patterning on the top bed, with the aim to tuck on the single needles in work in the repeat (bottom line of black squares). Not all ideas are an immediate success. Wanting to see the effect on the single-ply wool I began with that at the tension that appeared to be required for knitting it along with the elastic and stitches were far too loose.
 I had more success and a bit better definition of the fabric by knitting with both strands together from the bottom up. In an effort to attempt to have better color distribution I used the plating feeder and had some issues with stitches not knitting off properly. The result was not significantly different than that obtained by simply feeding both yarns together. When using plating feeders both on the single and the double beds one of the yarns may have a tendency to jump out, to prevent that from happening here is one “hack”.
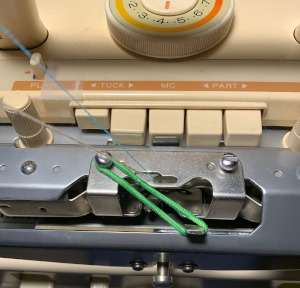
 The tuck stitches do help with the definition of the shapes, as do the dropped stitches, a fact worth keeping in mind with a return to pleats and their formation, but likely in another post. Likely the last test in this series, I attempted a version of dragon scales at first using a yarn I knew would be too thin for the effect alone, then added the elastic. The combined yarns did not tolerate tuck and racking combined, so I then used slip stitch <– –>. The yarn alone sample was too loose and thus nearly flat and when the elastic was added the resulting knit became compressed and lost any semblance of 3D
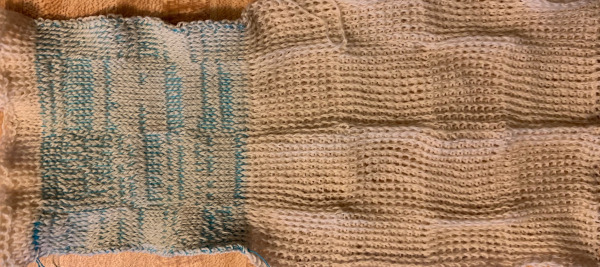 The same yarn as above, also knit in tuck setting, showing the difference in size and dimension between slip setting on left, tuck on right
 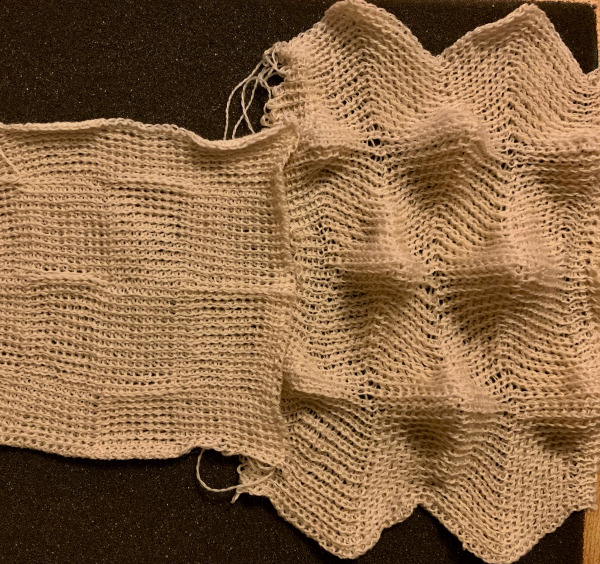 As with any knitting, keeping an eye on what your yarn is doing still matters. Such as this will lead to a series of circumstances that may bring your project to a far earlier end than planned ;-(
 A very last effort at attempting the scales with elastic and wool knit at a far looser tension that in previous tests, ended when elastic broke as a result of above, IMO an unremarkable fabric
 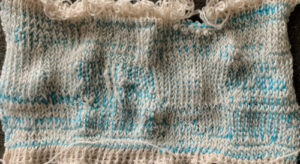 For more swatches and information see post on knitting with elastic 2


 The “striped” repeat produces essentially the same fabric. The knit carriage may be set to slip in both directions when using it since the row of all punched holes or black pixels will knit every stitch on every needle selected while in the previous samples the cam button set to knit in one direction performed that function regardless of any markings on the design repeat. The ribber is set to knit in one direction, slip in the other. Reversing sides for cam button settings produces the same fabric

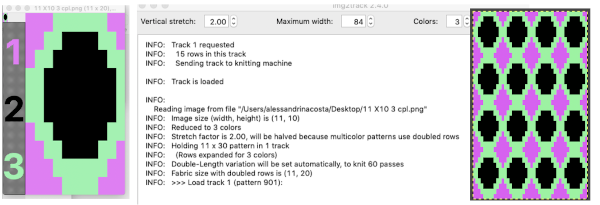
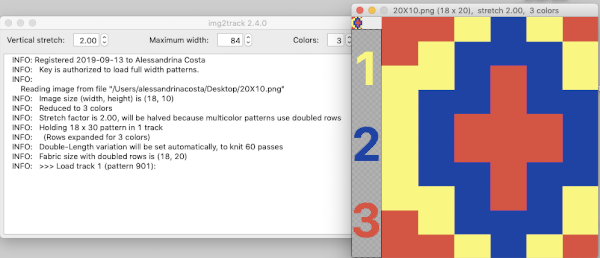
 The
The  The repeat I chose is designated as suitable for the Garter Carriage. It is 24 stitches wide by 48 rows high, shown below as provided, charted in Gimp as .png for download, and tiled to help visualize how continuous repeats might line up. The image .png was downloaded with img2track to my 930, with a stretch factor of 1.0, retaining the original repeat size
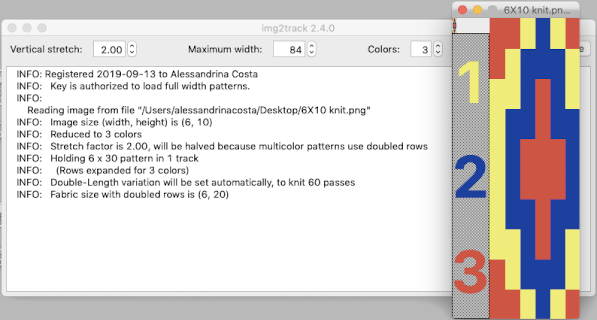
 The design is automatically flipped vertically, so it will appear as intended on the knit side of the fabric. Yarn colors may be placed in the color changer matching the order in the assigned color numbers to match the placements in the original image. The program automatically adjusts for the vertical stretch, which changes the aspect ratio of the shapes. On my 930 I received prompts on which color to change to prior to doing so, eliminating any confusion. With no such prompts generally one can tell which color was knit last because it will appear on top of the previously used one on the left of the knit. With a stretch factor of 1 selected in img2track, the image height was reduced by half.
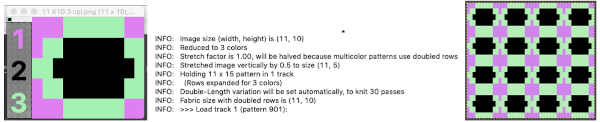

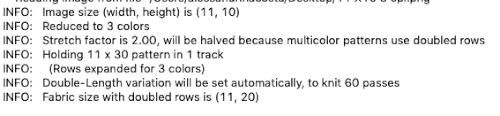 In the past, I have preferred to elongate the design prior to importing with plans for download rather than to rely on memory for changing settings either in the download program or in the machine itself in future uses of the same design.
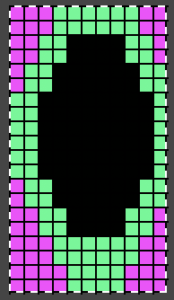
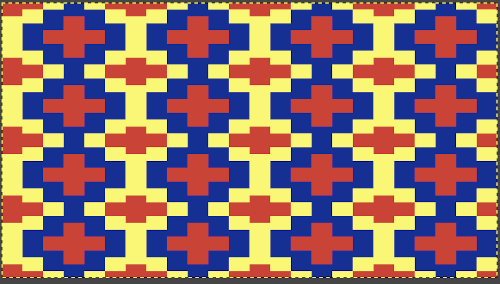
 The same yarns, tension, the total number of carriage passes, and settings were used showing the difference in aspect ratio between single color per row knitting and the img2track built-in color separation.
 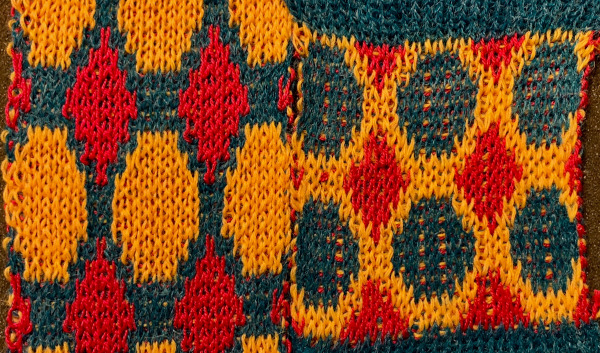 The width of both swatches is essentially identical.
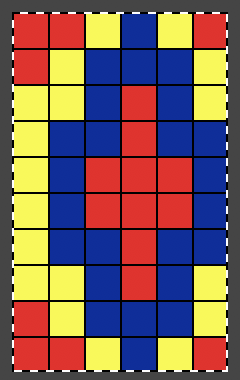
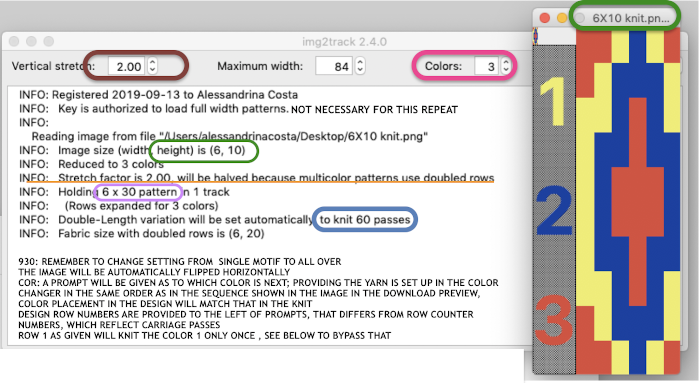
 The 930 will provide prompts for the next color to be selected by pushing the matching number button on the color changer, avoiding any confusion in terms of what should be picked up next. img2track will also flip the design horizontally automatically so the image will appear as originally drawn on the knit side. Images are loaded as single motifs, so the change in the selector needs to be made manually for an all-over pattern.
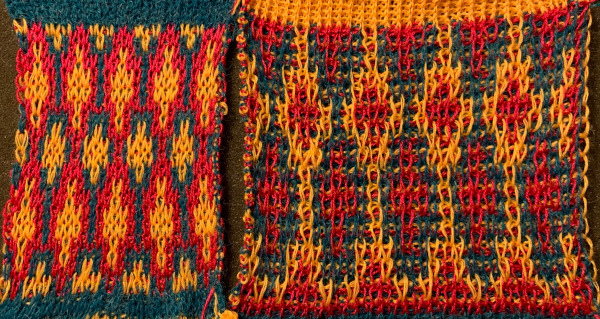
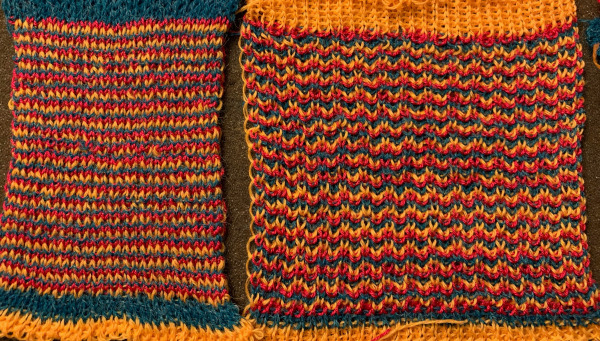 Obviously a success in terms of the single row for each color reducing elongation of the design shape. While knitting occurs using the same yarns, at the same tensions, there is a clear difference in the length of each stitch on the main bed and their appearance. The reverse. Checking the ribber carriage I noticed on the left side it was set to knit only, not to slip: OOPS!
  N is king, so the ribber set as shown is knitting every other needle when moving to the right, but even with lili buttons in use, it knits on every needle when moving back to the left. Every other needle on the ribber will then be knitting for 2 rows as a result. The more knitting on the ribber for each pair of rows, the longer the stitches on the opposite bed. The backing is an interesting variation (half) birdseye. The elongated stitches on the main bed show more of the backing in between their shapes, it is referred to as bleedthrough. In some instances, the result can make the knit surface resemble weaving and its appearance far less familiar in a surprising, pleasant way. Beauty is in the eye of the beholder.
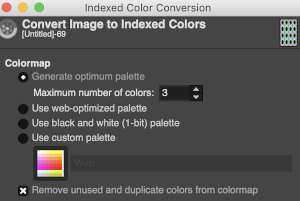
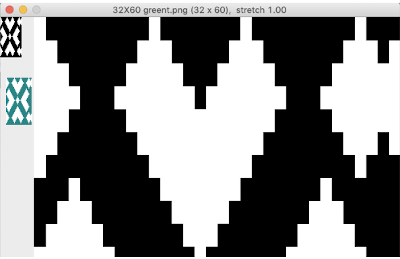
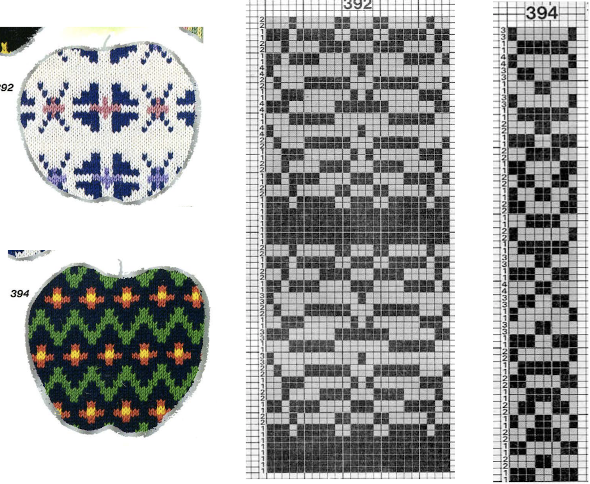 The images could be replicated as given in a paint program, using only one color for the squares, but “should be reduced to black and white”. Attempting to import an indexed 2 color image drawn in a color other than BW may result in strange results.
 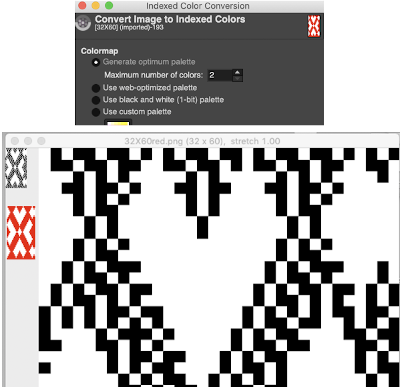 That said, if glitched knits are the goal, the above could work just fine. Curiously, here is the same process, using a different color, and a successful import. Checking again, I had forgotten to save the image after indexing it from RGB mode to 2 colors.
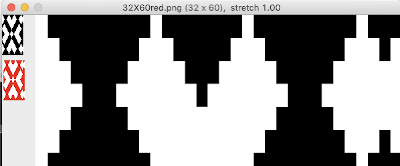

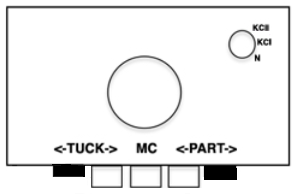
 Note to self: if you are determined to use a punchcard carriage on your electronic machine remember there is no KCII to cancel end needle selection!
 Getting that first row to knit twice instead of a single time if that matters in your technique or is your preference:
 pick up color 1 in yarn changer
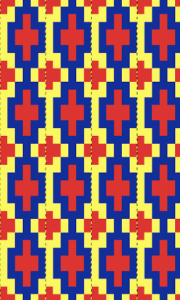
 If black and white repeats are already in your library, one may easily recycle them adding a third color. Here I did so with a repeat intended for a very different topic in future posts. The image was altered and tiled in Gimp for a repeat alignment test and is also shown imported into img2track for possible knitting.
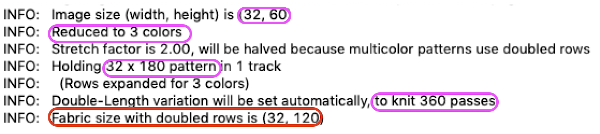
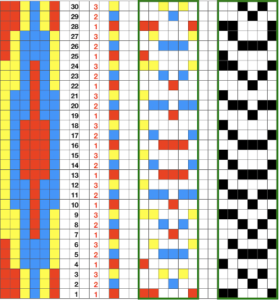
 The image of the separation on the above right has not been proofed for accuracy. If it were, the next step would be to elongate it X 2 for color changes every 2 rows. One method is to elongate the original in a paint or photo processing program. The width is fixed (40), the height is scaled X 2. The resulting BW indexed image may be imported, using a 1.0 stretch factor, it remains unchanged. When I tried to elongate the unstretched image in img2track by 2.0 my first try failed. It turned out the reason was I had saved the import without first indexing it to 2 colors. With that corrected, the result matched the one from scaling X 2 in height in the paint program
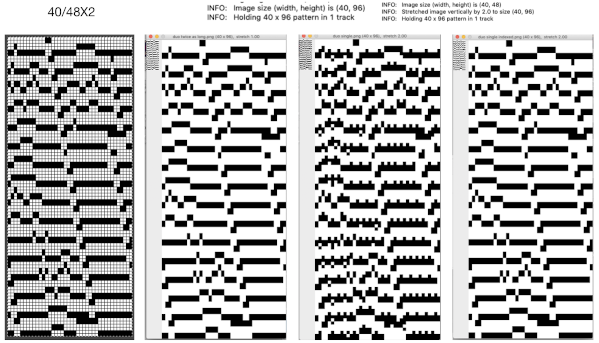
 Here the image is scaled properly for each color represented for a single row in height, and also scaled again for double-height for possible knitting in Gimp. The Gimp scaling failed to be accurate for me (second image from left) until I indexed the original to 4 colors as well instead of 3. The no color rows as we view them actually serve as a fourth color in the separations. Importing the proper size png into img2track for separation of 4 colors per row now gives results that make sense: note the daunting estimate for the total number of carriage passes for a single repeat height
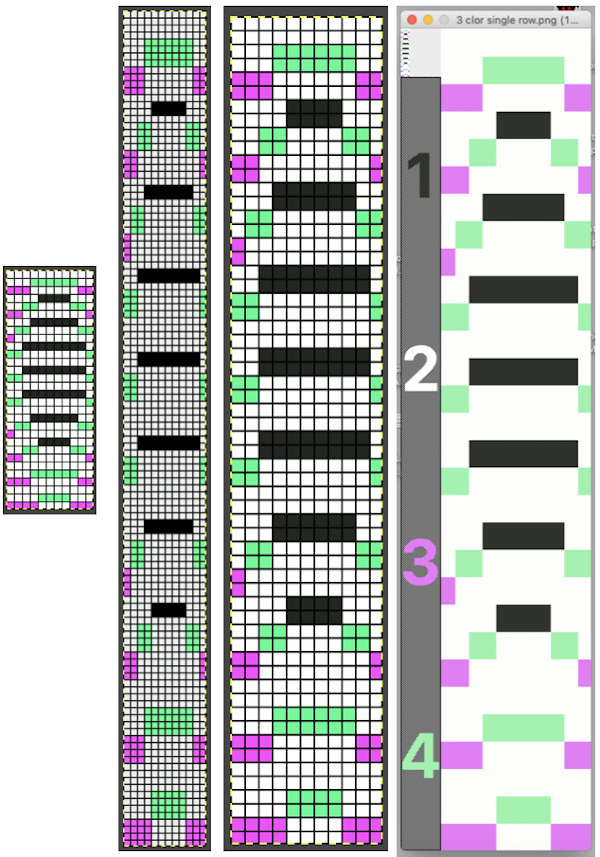 If the ribber has knit on every needle by its return to the color changer and the machine is set to slip both ways with no needle selection on the main bed, the “no color” can be executed as an empty yarn holder in the color changer combined with no yarn in the feeder. The rows involved should simply not knit on the top bed, with no dropping of any of its stitches since no needles will have been selected thus coming forward with the yarn in the hooks and traveling behind the latches and in turn, slipping off the needles as a carriage with no yarn pushes the needles with now empty hooks back to B position.

 Punchcard knitters may have the easiest knitting variable color sequences since cards may be visually marked up with colored pencils matching needed change locations and taking into account your eyes are a number of rows above the row being read by the card reader. This number depends on the machine’s brand and model.
 the initial method:


 following that up, I planned for the 60 rows needed to complete the repeat, hid 30 rows, using this menu
 copied and pasted the black and white repeat on the above right, then unhid the 30 hidden rows (see previous posts using command key selections), having a new color separation repeat, created the final 2 color BMP in Gimp (whew!)
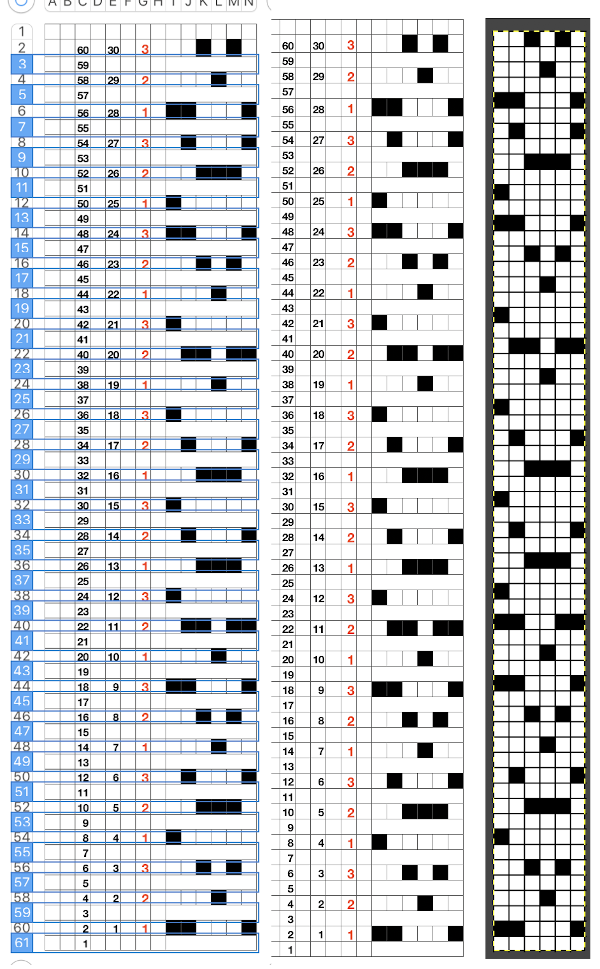 Since my separation is planned on 2-row sequences, I began with COR and my preselection row was from right to left.


 Again, there is some bleed-through, and even with this technique there is some elongation of each of the shapes, but less so than with other techniques. The backing of all these fabrics produces single lines in each color used
 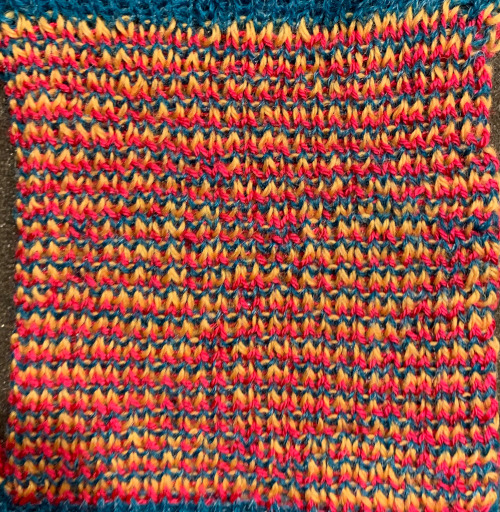 Even fairly small repeats can take time to color separate in this manner. The technique, however, is the only method available to punchcard knitters. Electronic machines with download cables and varying software open a very different world in terms of ease and range in repeat size possibilities.
 from the Brother Ribber techniques book
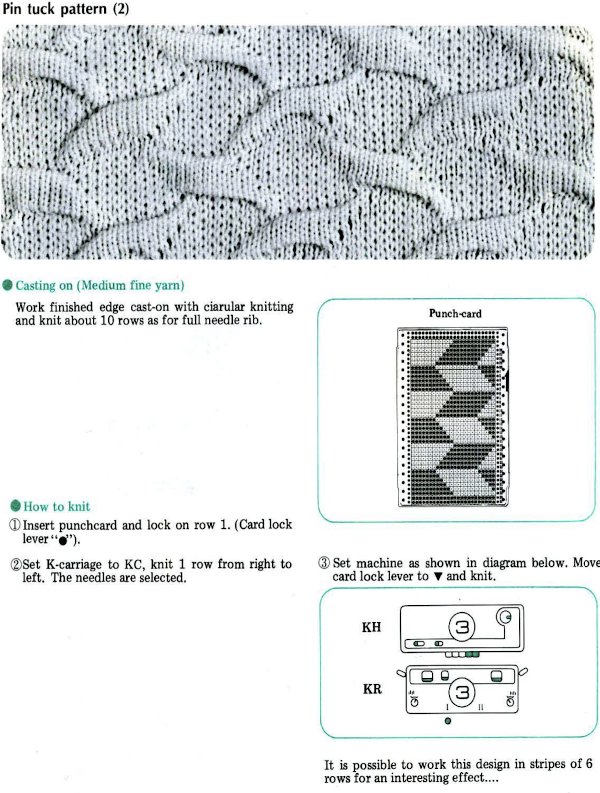


 Patterns from manufacturers: Superba manual


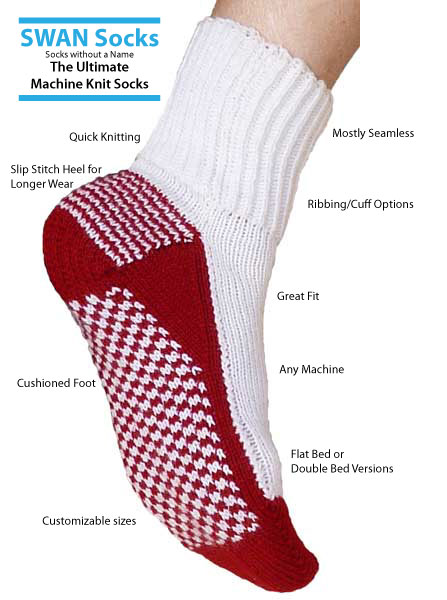
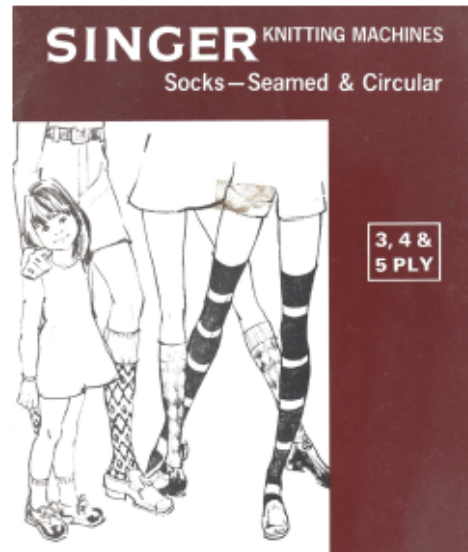
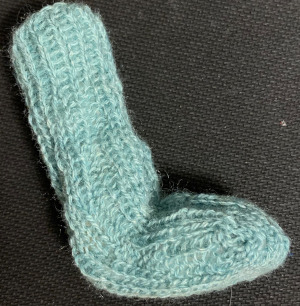
 on page 38 a repeat and instructions are offered for a spiral tube sock. The latter has no heel shaping, but traditional toe shaping can be added.


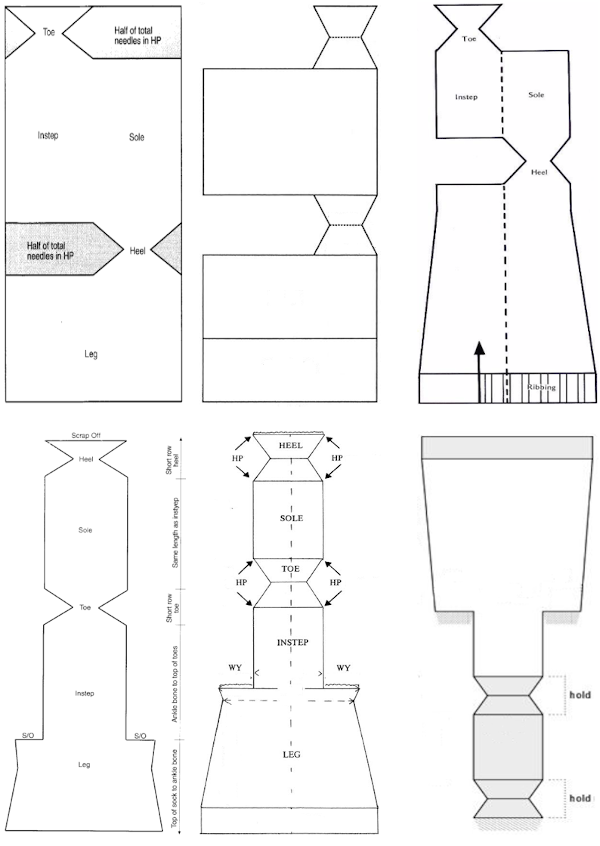
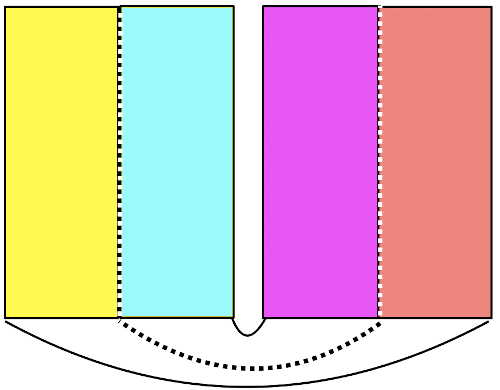
 Lastly, it is possible to knit socks sideways (as well as gloves), usually in garter stitch and in hand knitting. This is a crochet illustration that points to the general construction method.

 The elongated stitches at the top of the “band” are due to an extra needle in use on the ribber. To review, the proper settings from the Ribber Techniques Book:
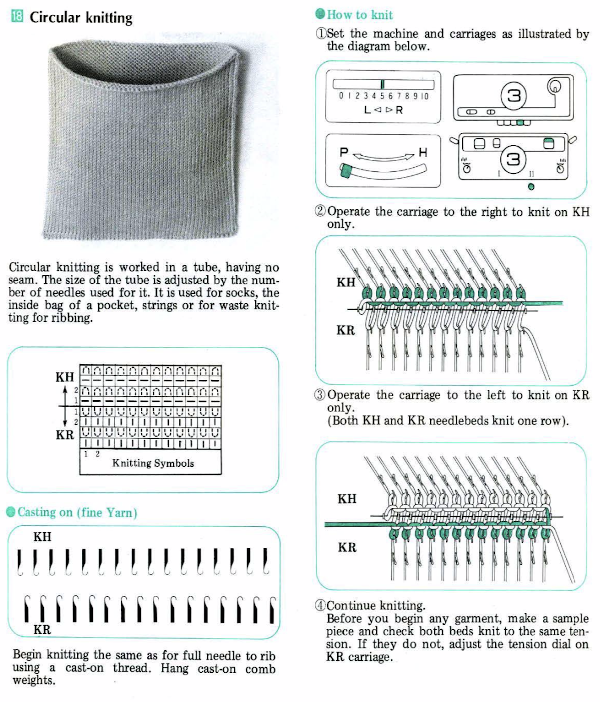
 The only way to find out is to try it. The lesson already learned: use a yarn that is crisp or capable of retaining memory for maximum effect. Here the swatch is knit in a 3/14 cotton. To start with, racking was from position 0 to 6 and back. Racking every 2 rows at the bottom of the sample, every row at its top
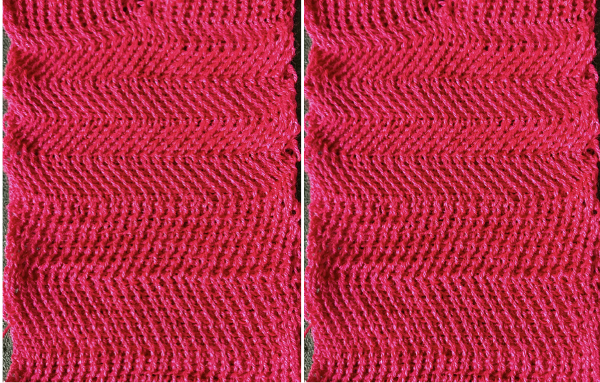 Now adding needles out of work with the expectation of folds at approximate center of each fold
 Racking started in center position 0, then swung to 3 left, to 3 right, ending on 0. I long ago got frustrated with the Passap numbering, marked the racking positions with a permanent marker from 0 on the right to 6 on the left. The knit result is definitely a rolling fabric, though a bit less so than the Brother sample which was able to move across more racking positions
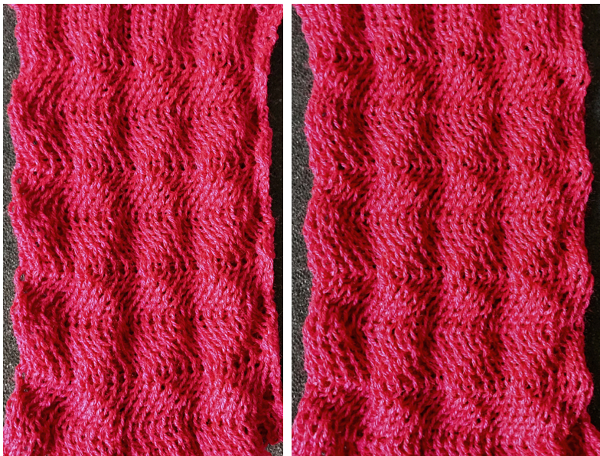
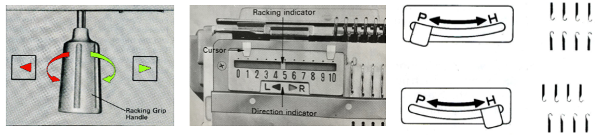
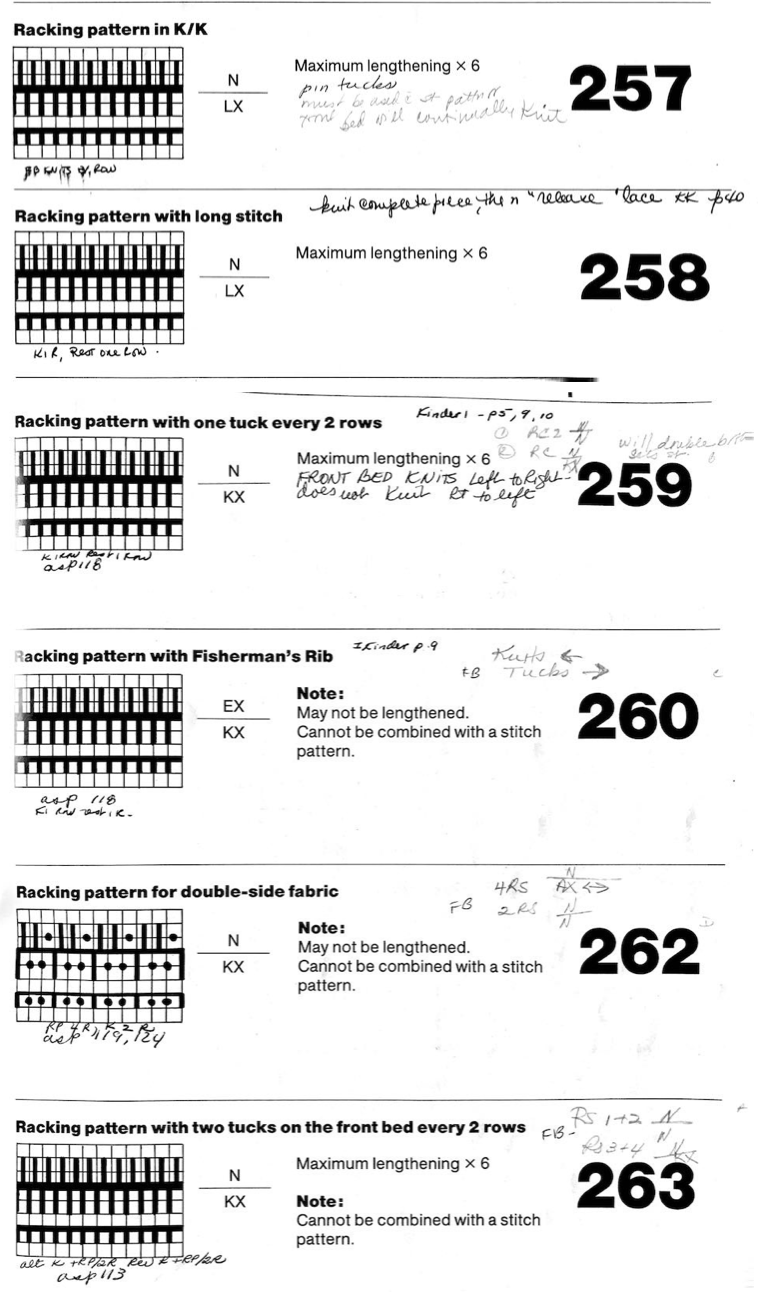
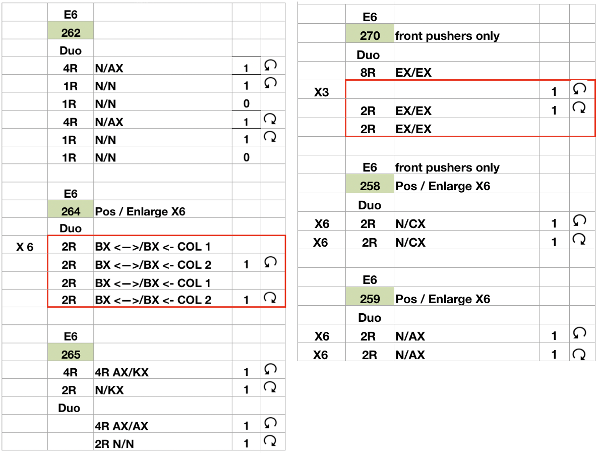
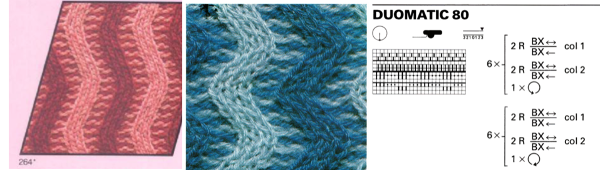
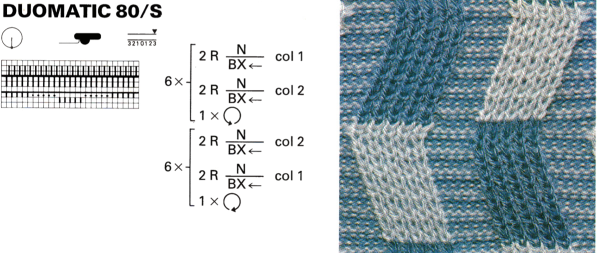
 Passap E6 manual shows racking patterns possible with console built-in designs on pp. 118, 119, 120, 121, techniques used in racking patterns number 257-272. The console gives prompts for the direction in racking sequences. Self-programmed designs would need a separate knitting technique entered into the console as an additional “design”. This can be done with a card reader combined with a pattern download from a computer. Programs that automated the function to any degree are no longer on the market. Typically, in published patterns for either brand, if the starting point for the racking sequence is important, it will be given along with the frequency of movements such as in this design from the Duo 80 book
 Some Duo symbols and their meaning
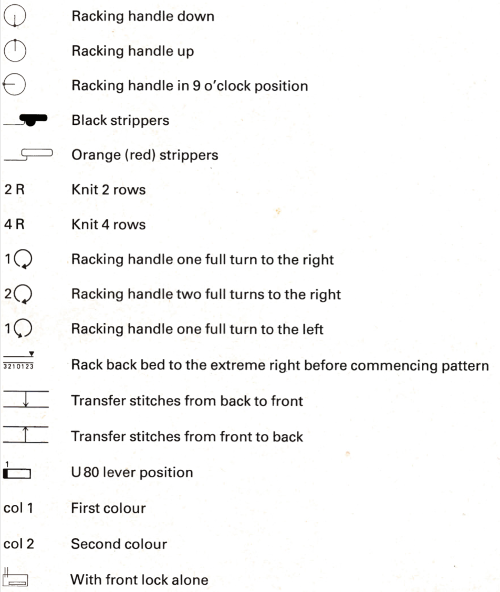

 My sample was knit in a tightly twisted cotton, and when off the machine had an interesting and unexpected fold 3Dquality

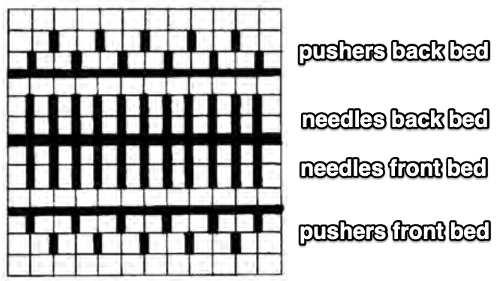
 The setup is essentially the same, with white squares representing needles and pushers that need to be out of work. Tech 258 uses LX (slip) on the front bed, back bed si set to N. The duomatic pattern has a different OOW needle arrangement, the front lock is also set to tuck = FX (E6=KX), adding another layer of texture and complexity. Needles are also out of work on the back bed.
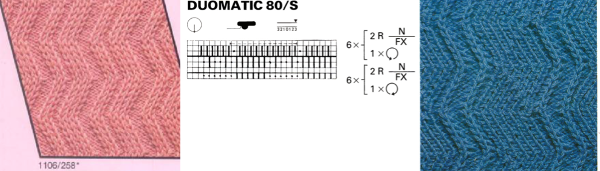
 What is knitting in terms of black and white squares if one continues:
 this repeat is what is required to match the technique diagram

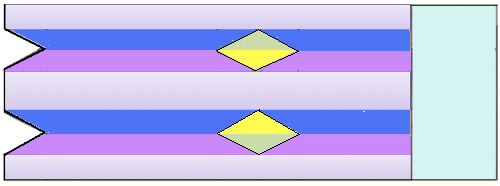
 Below the pattern alternates blocks of 5 black squares, 5 white, color changing every 2 rows and reversing racking direction after every 24 rows. The full repeat is 48 rows. If rows knit in the zig-zag are counted, they amount to 12 because each color slips it is not knitting for 2 rows. Note that to achieve the color reversal at the halfway point of the repeat the same color (2) knits for 4 rows, at the top of the repeat color 1 does the same.
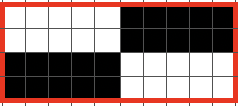

 Back to acrylic yarn, light color for more visibility creative yarn snag on the left midway, full swing movement is shown, each is 48 rows in height. As always it helps to check whether stitches are obliging by staying on the needle bed. The top half of the swatch is shown.
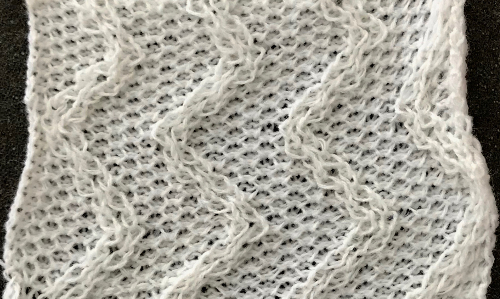 In turn, I programmed # 1000 X 6 in height but pusher selection was all up for one row, one down. I left it alone, and lastly, worked with pusher selection on the back bed, BX <–. Patterning advances a fixed repeat every row or every other, determined by original hand-selected up for selection and down above rail for out of selection. The front lock is left on N (disregard front for setting it to LX) there is a whole other world of possibilities, while the console racking sequences can be used from built-in techniques.
 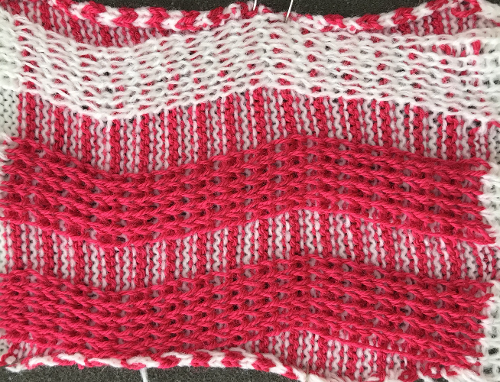 Any ribber needle selection on Brother other than the use of lili buttons would have to be done manually.
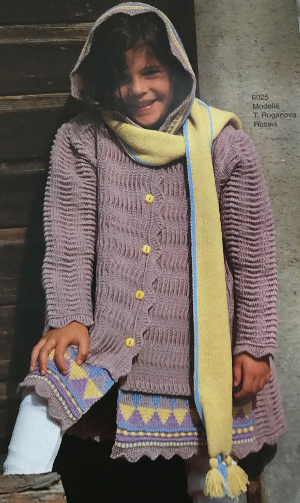

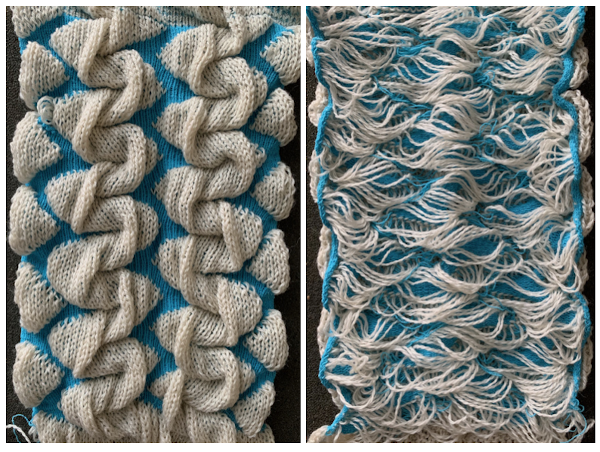
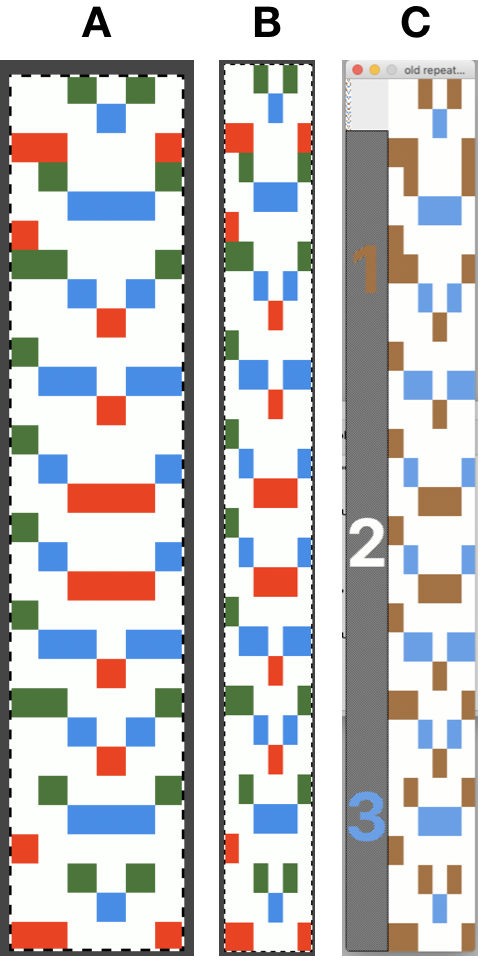
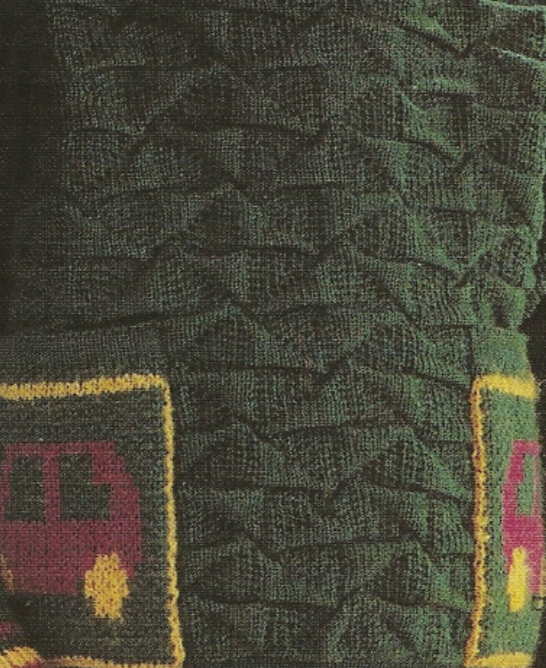
 tiled repeat to get a sense of the movement of the triangles:
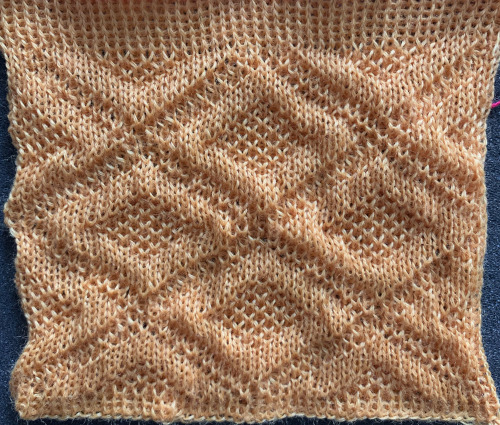
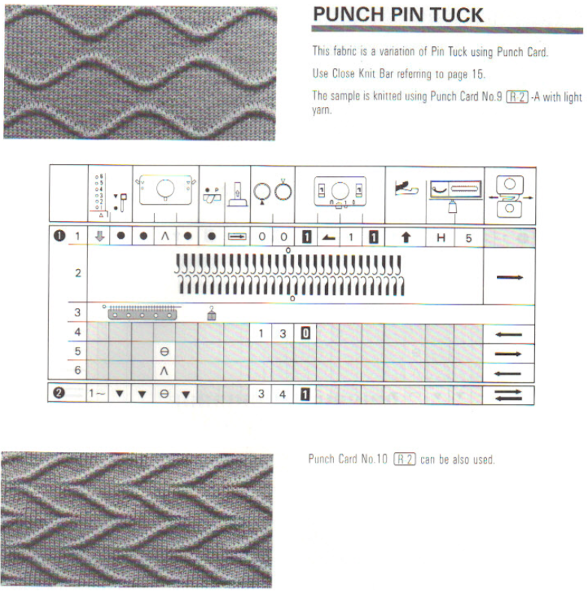
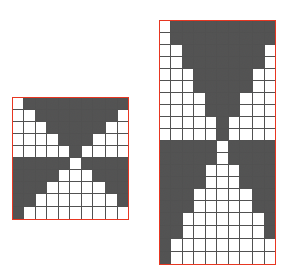
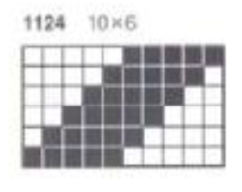
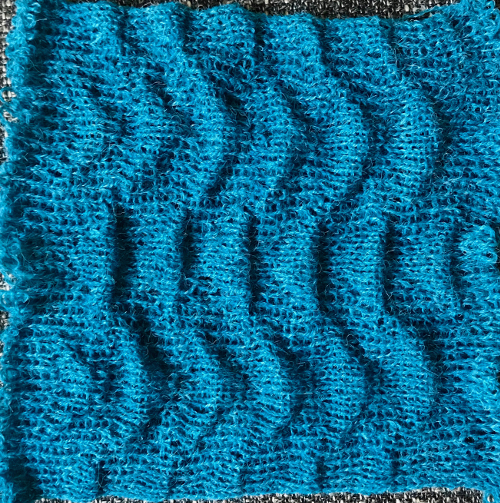
 note: the direction of the chart pattern repeat for 1124 is reversed in the blisters. It appears as drawn on the knit side of the fabric, where stitches are slipped and elongated to create the pintuck texture on the purl side
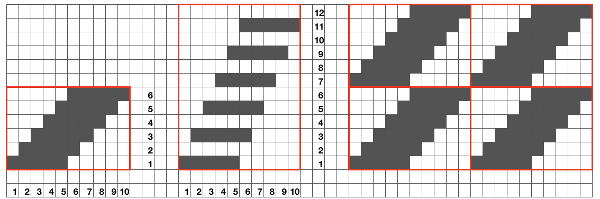

 In the Duo HX setting the front bed normally knits or slips according to the design for one row, and slips the next row. Again, the chart illustration is for the Duomatic and the lock there takes over the function performed automatically by the E6 technique. The back bed in this instance knits every row. In the E 6000 the front lock is set to LX (slip <– –>). The fabric created may be referred to as blister or pintuck (nothing to do with tuck stitch/brioche). The bubbly texture appears on the purl side. Stitches that slip on the bed with needle or pusher selection elongate, pulling extra rows together eventually, helping to form pockets that are sealed periodically by all knit rows. With pushers down, no needles selected the front (knit) bed skips/ slips associated needles. With the back bed (ribber) set to N, its stitches will knit every row.

 This shows the pattern as knit on the Passap, reduced to black and white squares
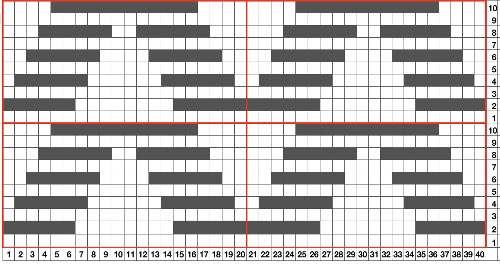
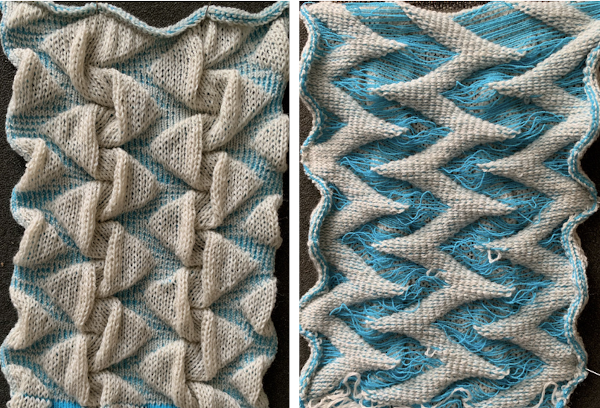
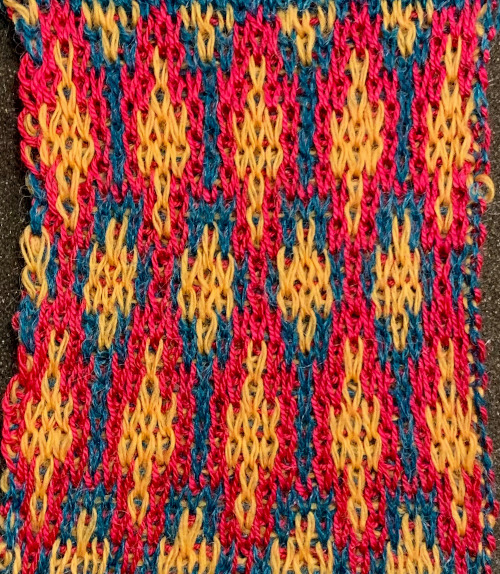
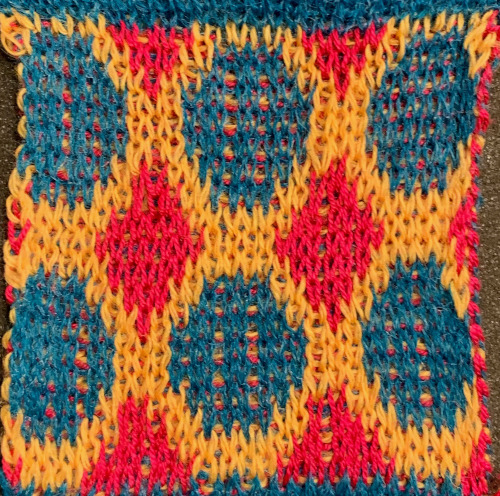
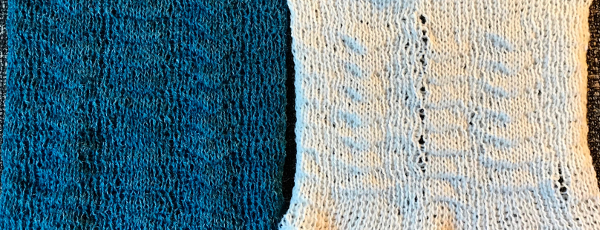
 Going for the safe repeat on Brother machine: color makes a significant difference in how visible the pattern will be. Both yarns are supposedly the same weight, the white was hard to knit, and there was a needle that dropped stitches regularly. The blue yarn knit with no problem
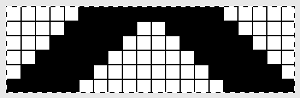

 The last swatch in the series: I am now able to use Ayab once more, img2track is having issues for me with its use on the 930. My repeat, therefore, is planned for the maximum width I may wish to test knit on the 910 machines, emulating tech 253. Every other row there is no needle selection on the main bed except for the first and last needle if KCI is used. On those rows the ribber only knits, there are more rows in the blister “pockets”. I knit the sample quickly, not checking every row, and in this instance had two dropped stitches on the main bed and no breaks. Yarns with memory ie wool are the best for texture retention, acrylics such as my blue yarn would flatten permanently if pressed, resulting in a very different fabric. It takes experimentation to sort out whether the extra step is worth the effort or is problematic during lengthier knitting
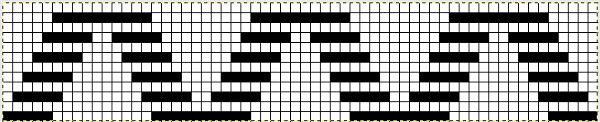
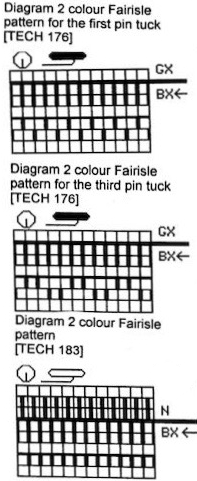 Tech 176: knits one color selection for 2 rows, then the alternate color selection for 2 rows; Pattern 1100,
  in the next sample the same repeat 1100 is programmed via the console and enlarged <–> X2, which means in the number of stitches only


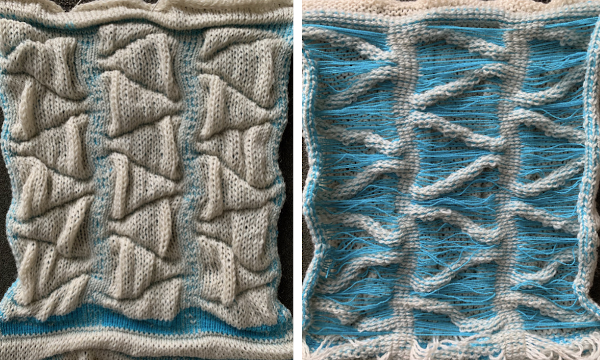
 the repeat is 20 by 20 stitches wide, E6 Tech 253 is suggested, white squares form the pintucks, the same technique used in my sample knit using console design 1124
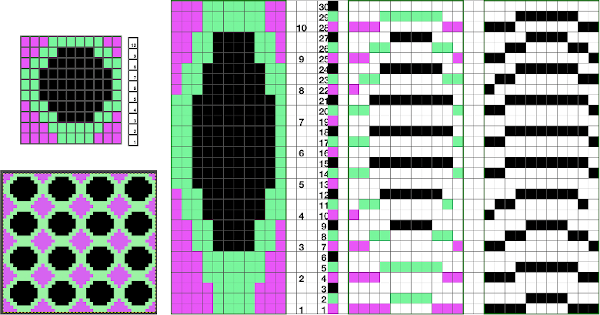
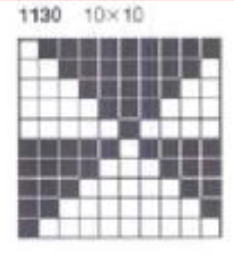
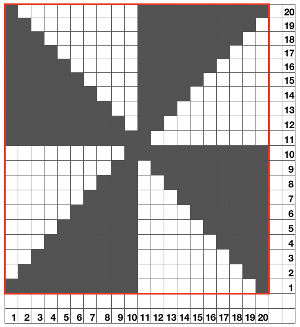 Working with simple shapes such as triangles can be an easy way to help one begin to understand how various techniques build up stitch or row counts, altering the original. Several of my DBJ posts are written using a cousin of pattern 1130 and include images of corresponding swatches executed on the Brother machine. In Brother, with rare exceptions (such as when needles are left out of work while in pattern) black squares (punched holes) knit, white squares (unpunched areas) slip. Slipped stitches are held until a black square or punched hole is reached, getting longer while the stitches on the opposite bed knit every stitch every row with that bed set to N/N. It is helpful to be using a yarn that does not break easily. Pockets are created of varying depths. As with any knitting, the color reverse option may produce an interesting variation or a “disaster” depending on the original motif. In the above chart, if knit as is, white squares would be slipped for 1-9 rows. Blisters of knit stitches will appear on the purl side. Tiling helps visualize the movement of the design in repeat.
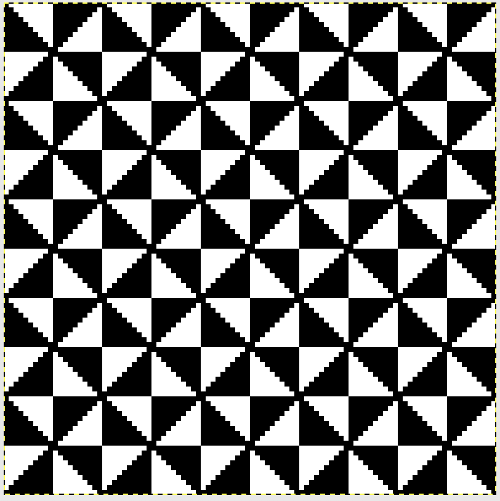
 its tiled view
 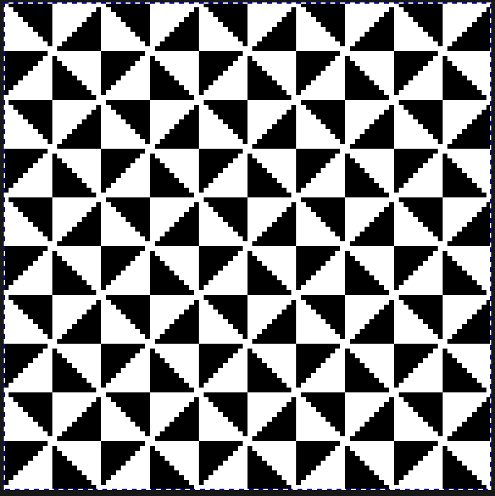 the expanded view of the original repeat emulating tech 253 now increases the height of the pattern to 40 rows from 20

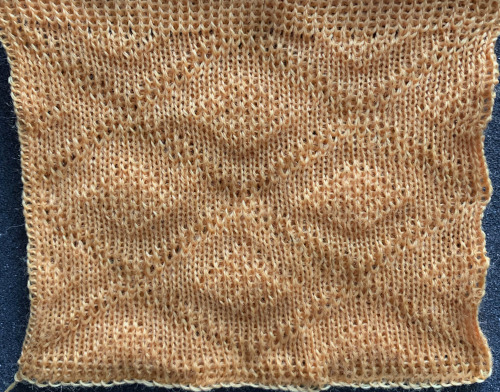
 Using the expanded 20X40 repat I did not have a slipped stitch issue such as yarn breaking, but because the pockets were so deep and so many stitches on the ribber were knitting for so many consecutive rows, the ribber stitches began to refuse to stay on their bed. I got this far: a large knit area can be seen, as well as slip stitch loops
 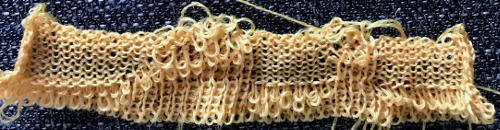 Can the same expanded repeat be used in another way? The color reversed version results in a subtle large scale pattern that might be quite interesting in a shiny rayon or other fiber
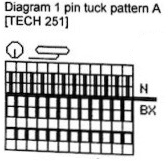
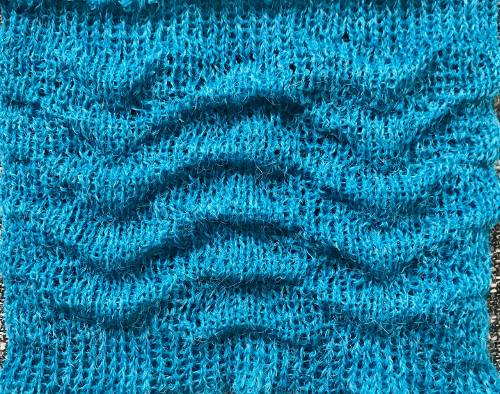
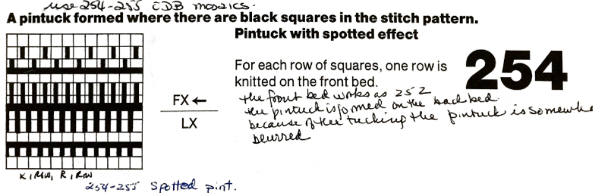
  To review: Passap E6000 knitting techniques for pintucks are numbered 250-255. When using 250, 252, 254, the pint tucks are formed on the back bed on the needles that are opposite those with the pushers selected down in accordance with programmed black squares. The corresponding odd numbers 251, 253, 255, select pushers down according to programmed white squares (253 in the manual should say white, not black squares).
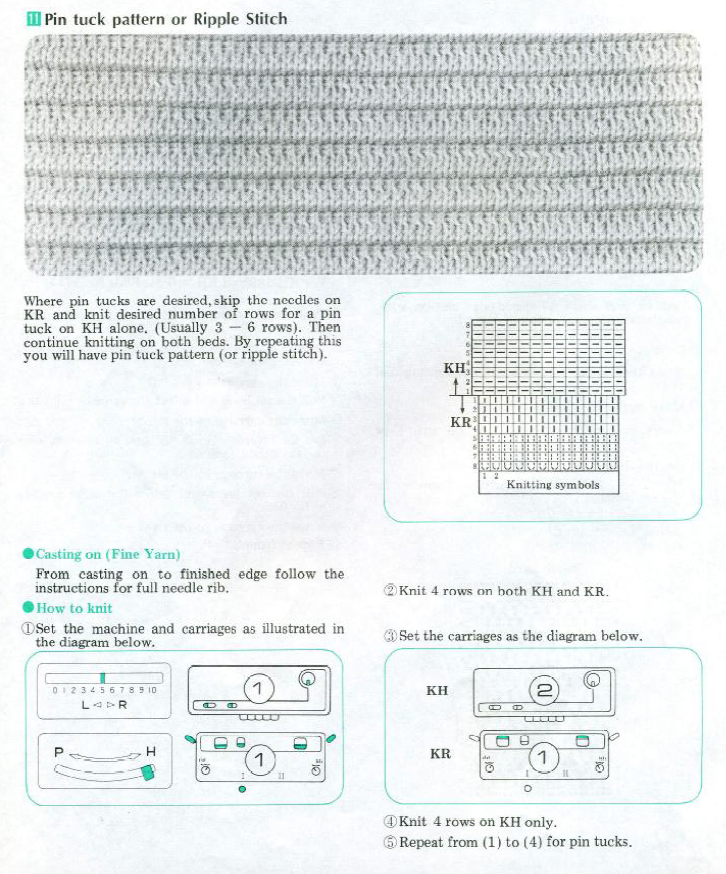

 The fabric had an interesting twist and roll if tugged in opposite diagonal directions when first off the machine.
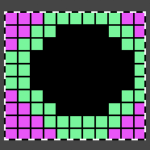
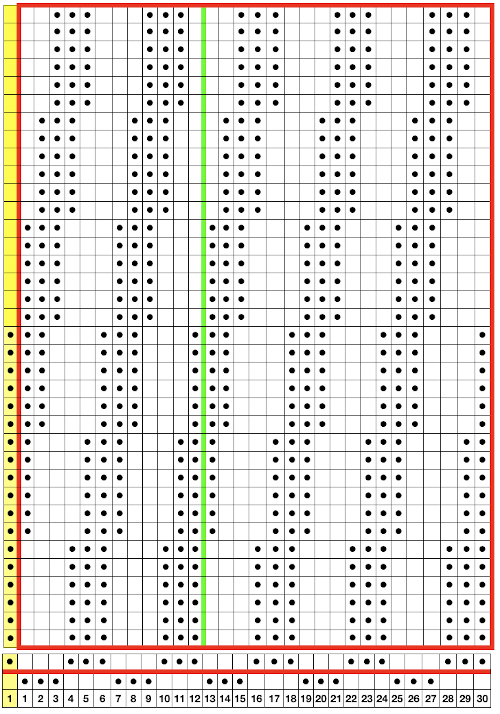
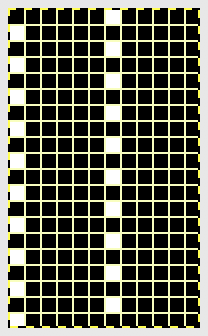
 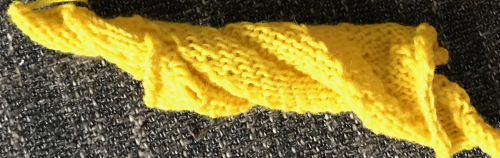 This is the working repeat, suitable for a punchcard machine. On the far left it is shown for use with electronics and color reverse, with the green grid highlighting black squares indicating holes that would need to be punched in a card, and lastly, as a tiled repeat looking for any errors in repeat sequences.
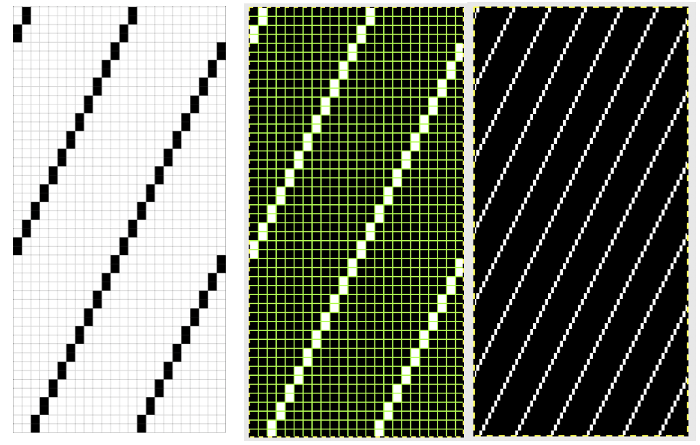
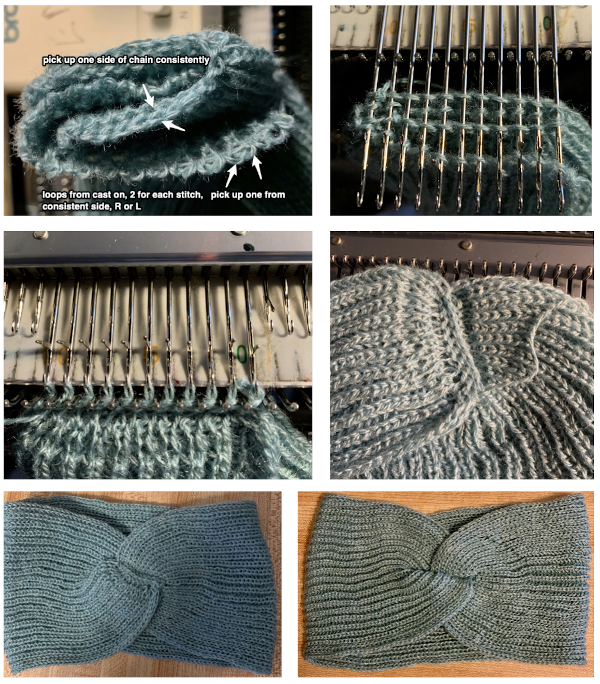
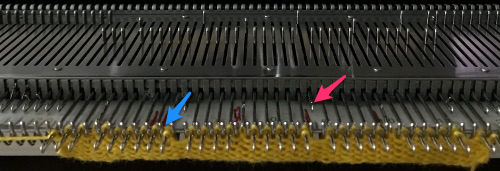
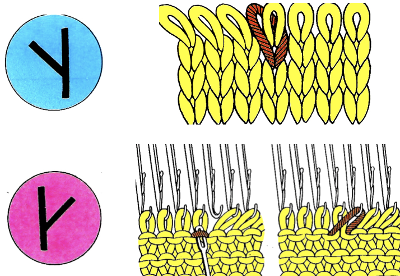 This shows my swatch in progress. ? indicates operator error, in evidence if needle count on each side of the future tuck stitch or ladder space is checked
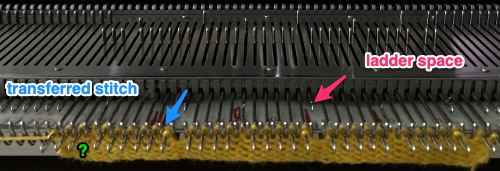 picking up loops from the row below to keep ladder width constant
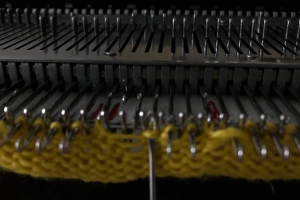
 Check that stitches have knit off properly
 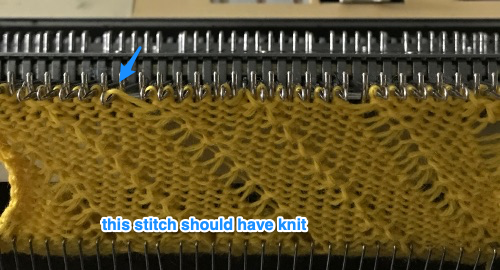 Needles with transfers or moved stitches may be brought out to hold position (E in Brother machines) for easier knitting. If this is done, be sure not to disturb needle selection or lack of it in location for next pair of tucked rows.
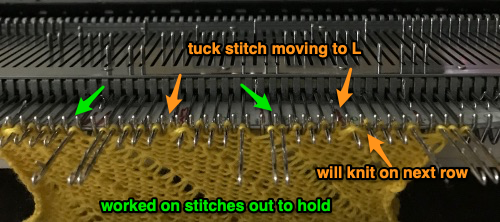
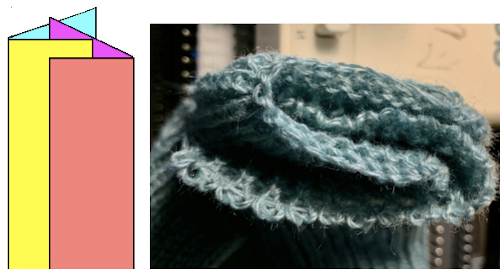
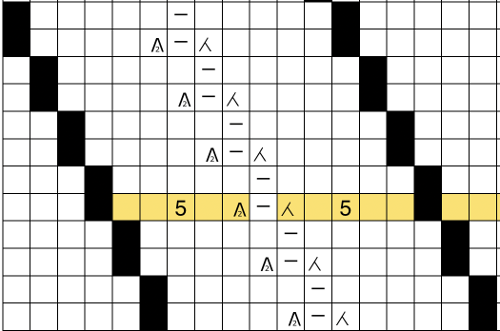
 Setting up a working repeat with blue representing tuck, purple slip (or vice versa). The distance between the vertical column, in this case, is fixed and seven stitches in width for a center folding repeat width of 16, color reverse is required
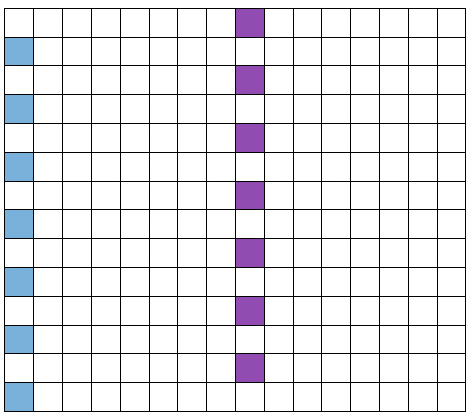

 Set up the cast-on as preferred. I used plain knitting, weighted it, and began my pattern work from the right-hand side of the machine. COL my preselection row was made from right to left. White squares in the chart with black ground and green grid become non selected needles on the main bed. Transfer nonselected stitches down to the ribber. Set the ribber to slip to the right, those stitches just transferred will slip moving to the right, knit on the return pass to the left. The knit carriage is set to knit until that first row is completed
 COR the ribber will knit on the next pass to the left. Set the knit carriage to tuck while the ribber is knitting
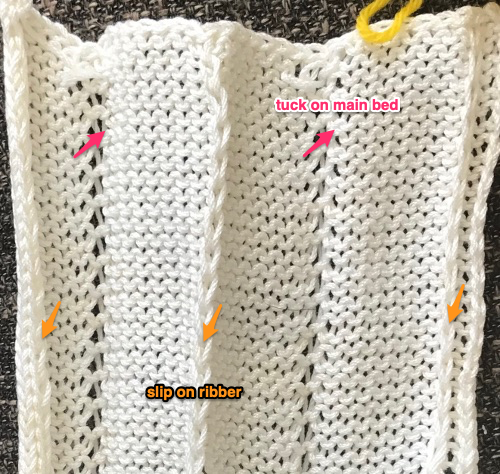
 Continue in pattern to the desired length. Fabric narrows considerably, so several panels may be required for items ie. skirts. The repeat on the knitting bed should also be adjusted to allow for as close to invisible seaming as possible. The stitches on either side of the single needle in work on the ribber may be inclined to drop off. I was unable to use tuck on those same needles for any significant length for that reason. It pays to visually check for stitches knitting off properly to avoid this
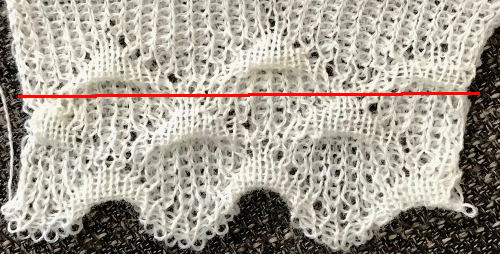
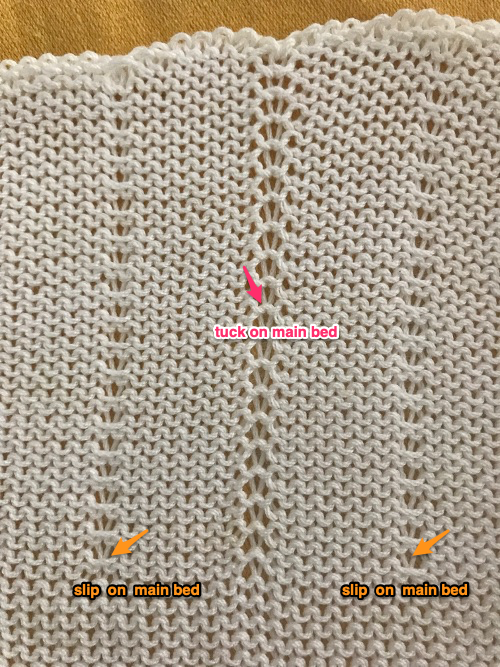
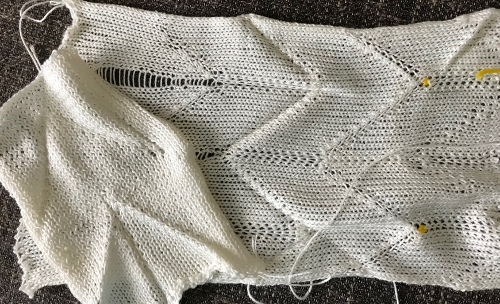
 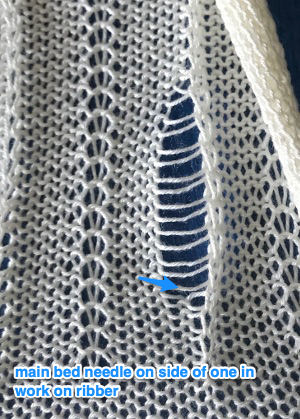 The start of vertical pleats, with the slip stitches folding to the purl side, the tucked stitches folding to the knit side on the machine, just after binding off.
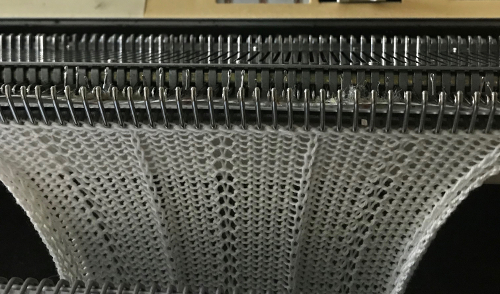

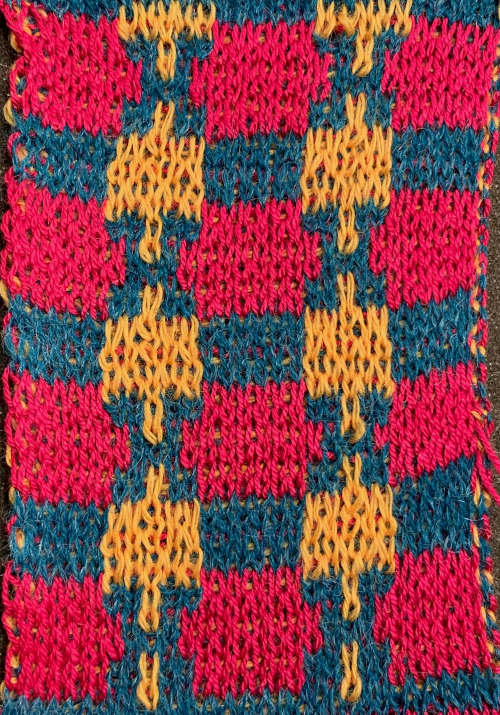
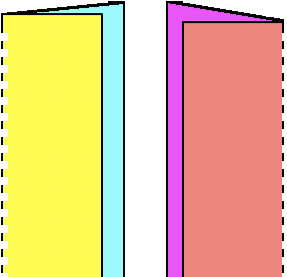
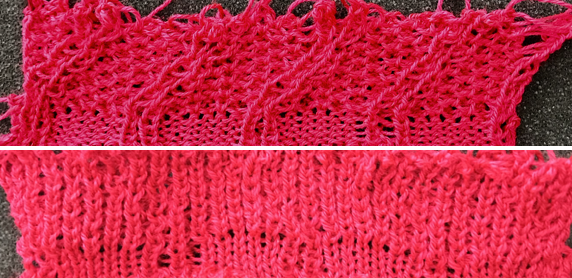
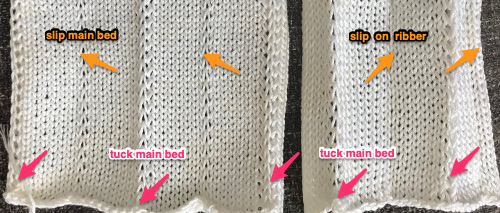 Different fibers can produce varying results in fold and drape. Setting either bed function for the wrong direction will produce an all-knit fabric (top of the red swatch).
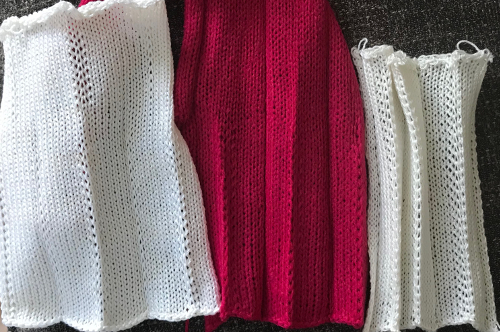
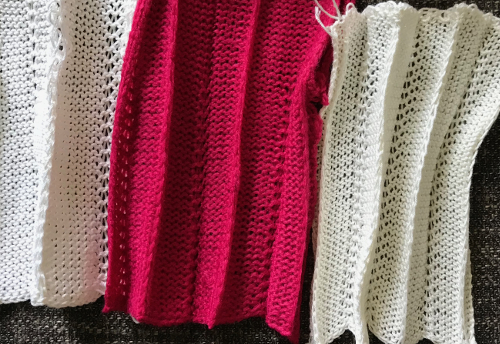 This starts to address incorporating hand techniques and manual ones from the diagonal swatch and the one with vertical folds while also developing a design repeat to aid with planning or actions to be taken. It will be altered in future experiments
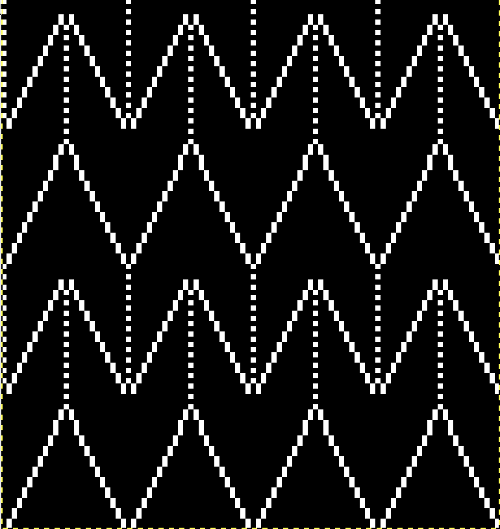
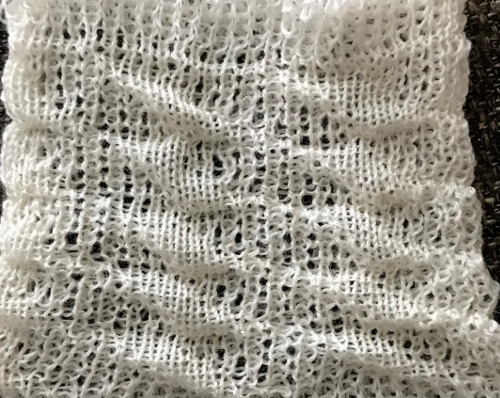
 This swatch is knit in wool, trying to sort out what does what and by how much. I am starting to get a bubble, but not a dramatic folding effect. The bottom folds more than the top. The filled eyelet technique has a hand-tooled tuck column on the reverse side. The top is automated using tuck stitch.
 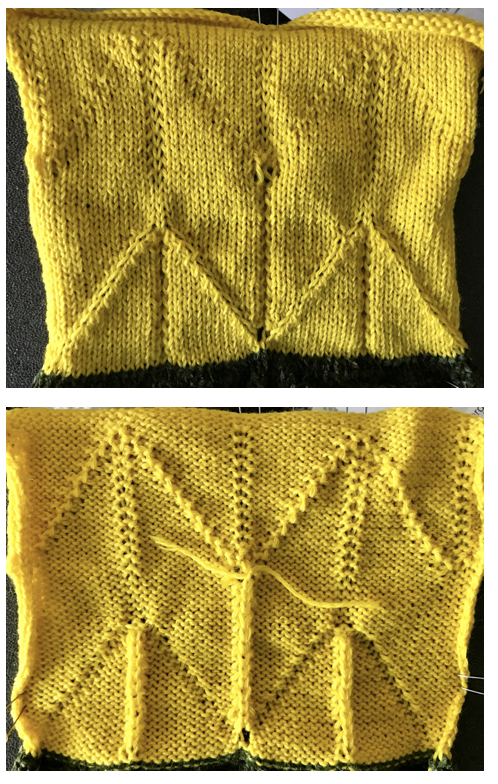 A different repeat: the bottom with carriage set to knit with needle selection as a cue to hand transfers, the top set to tuck automatically. Transition rows need to be considered further and altered where the twain meet.
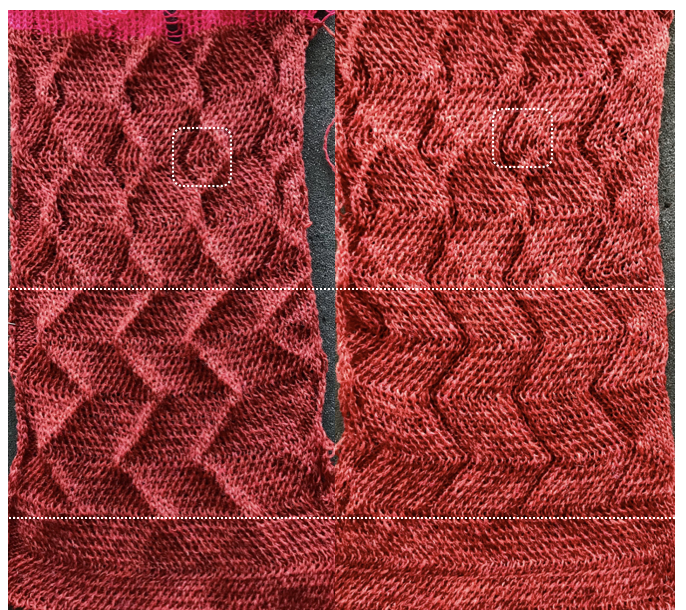
 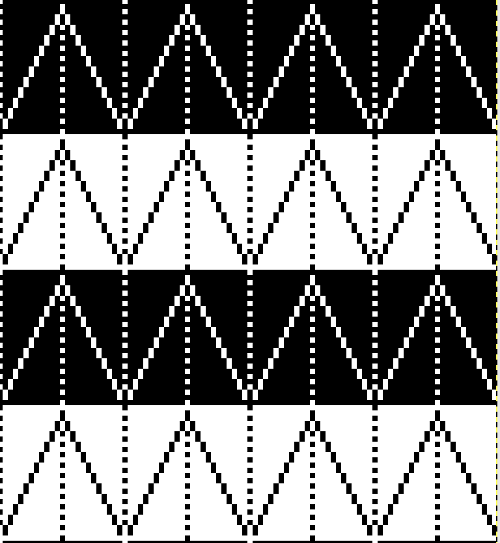 Returning to simpler creases and folds: a first experiment in racking double bed with NOOW. The setup and racking positions were not pre-planned. I knit 4 rows without racking at unplanned intervals as well; they produce a noticeable change in texture. The fabric is reversible, I actually rephotographed it adding a marker to make certain I had not shot the same side twice. The needle set up:
  the resulting swatch presented sideways for the sake of space:
 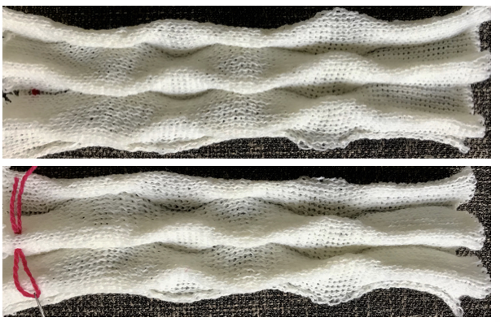 working with single needles out of work rather than two, with even spacing between them on each bed
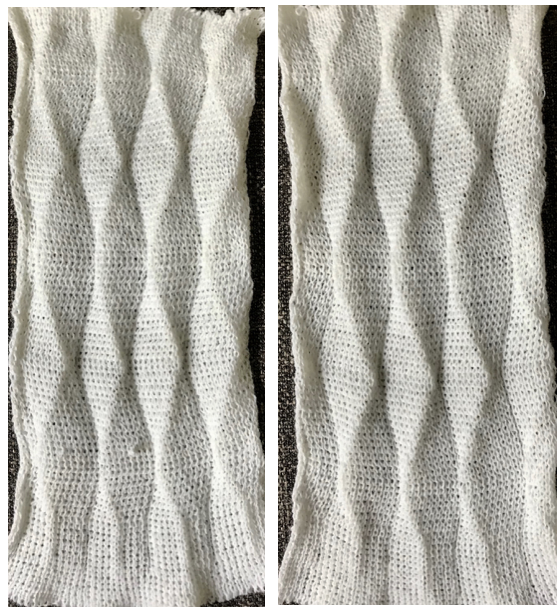 both swatches flattened to note differences between needle arrangement folds
 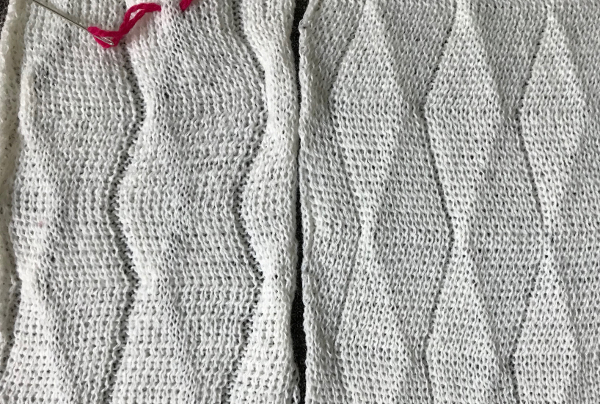 getting more organized, with a planned repeat: the needle set up
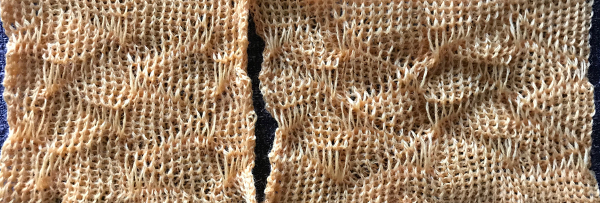
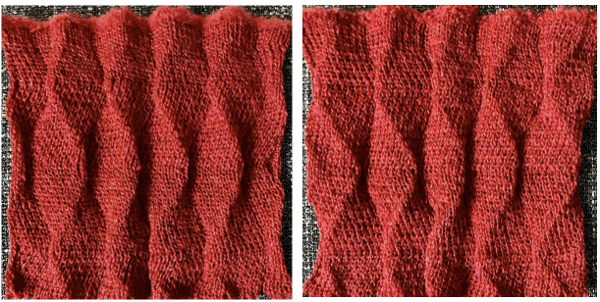 Here the arrangement here is with 2 needles out of work, racking every 2 rows in the same sequence. The resulting fabric has clear “spring” and foldsRR
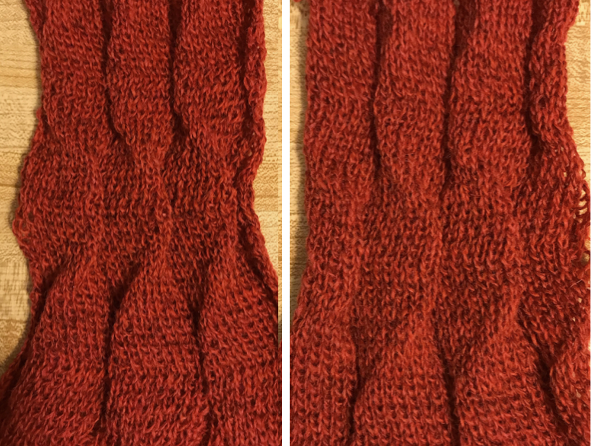 Returning to the previous needle set up, now racking every row from position 5 to 0, knit 1 more row with no racking; rack to position 10, knit one more row with no racking, reverse direction, end knitting on position # 5
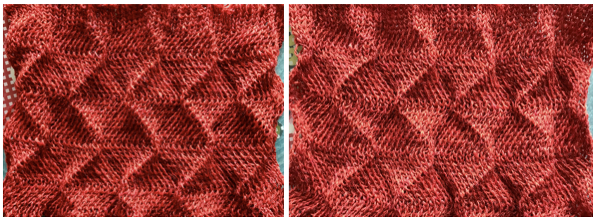
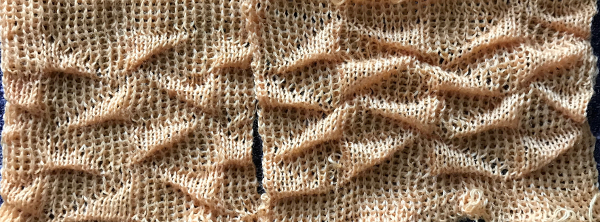
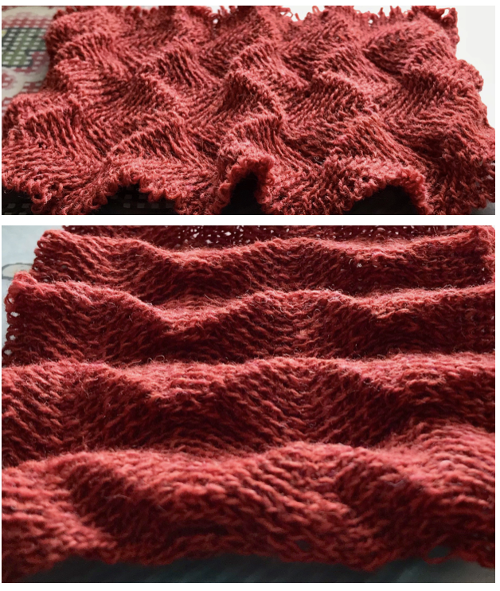 This last in the series is a personal favorite. I found racking from the center to 10, to 0, and back easy to track. One moves in the opposite direction when not allowed to go any further in the continuing direction by the machine. Single needles out of work appear to be enough to create the folds.
 Racking starting position on 7: