Though written in 2017, the post on revisiting drop/release stitch lace 1 has had new swatches and updated design ideas added. It includes information on how to use punchcards intended for other fabrics as possible design ideas and a cumulative list of previous posts on drop stitch lace.
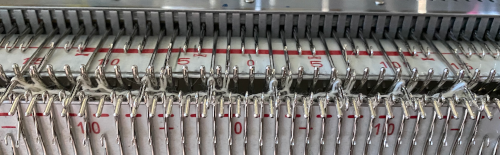
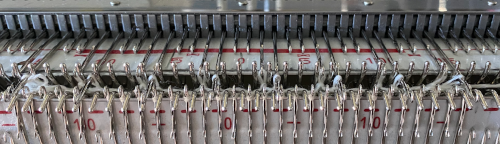
The Brother publications have offered this idea for end release drop stitch in one of their volumes of punchcard patterns. 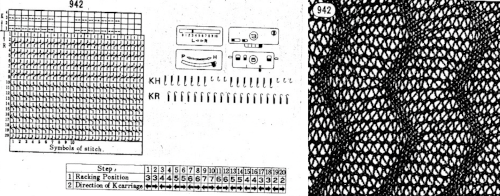 Many published designs recommend beginning the knitting with the racking handle in the center position, 5 of 1-10 positions in Brother, and 0 of 6, 3-3 in Passap. Often the starting position is relative and when a lot of racking is involved, they may be varied, though not the sequences in terms of the number of movements, to different starting points if that seems to offer an easier way to track position numbers. It is one of the many things that once the method is sorted may be adjusted to personal preference. Some of my swatches below were started with the racking position on 10, some with it on 5.
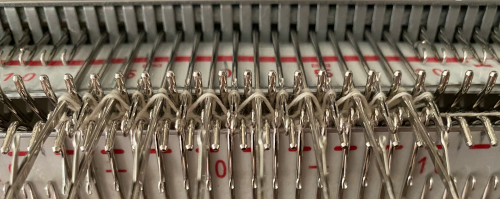
Many knitters in forums appear to have success with end release drop stitch. My experience has been that episodic release of the stitches even as often as after 2 rows knit yields far more predictable results. It is how I worked my shawls produced in the technique, including these two, knit in days when I did not always photograph all my pieces 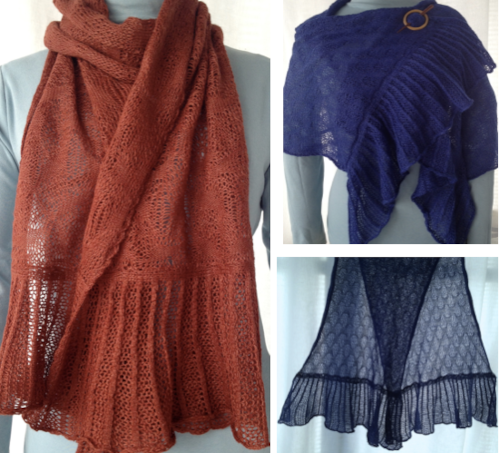 Giving end release another go, this was my initial needle set up. With the majority of the needles in work on the main bed, the larger stitches in the final fabric will dominate. The stitches after the cast on have been transferred down to the ribber.
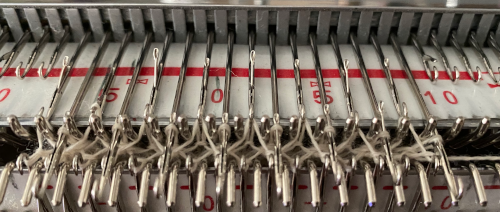
 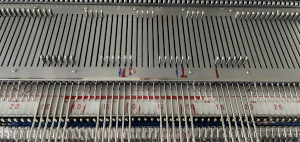 The work on the machine, with stitches on the main bed released at the end of the swatch.
  There is a long stitch DBJ single color pattern happening which may prove to be an interesting fabric if no stitches are dropped, to preserve it, all stitches would be transferred to the top bed, and bound off.
Here the racking took place in single positions after every knit row. Dropping stitches on completion of the swatch, particularly along the edges was so fiddly and such a nuisance I simply gave up in spots, some indicated by red dots. 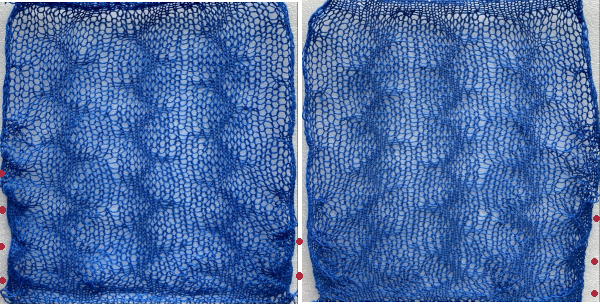 This watch had stitches released at the end of each shape, racking in the top portion occurred after every 2 rows knit
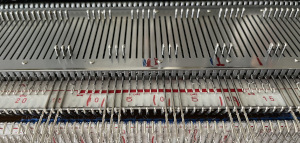
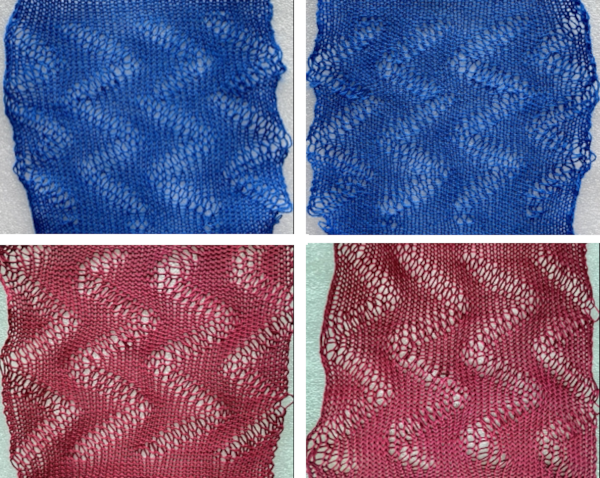
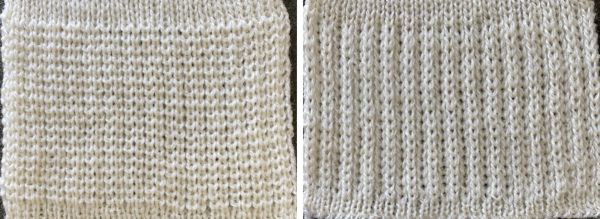
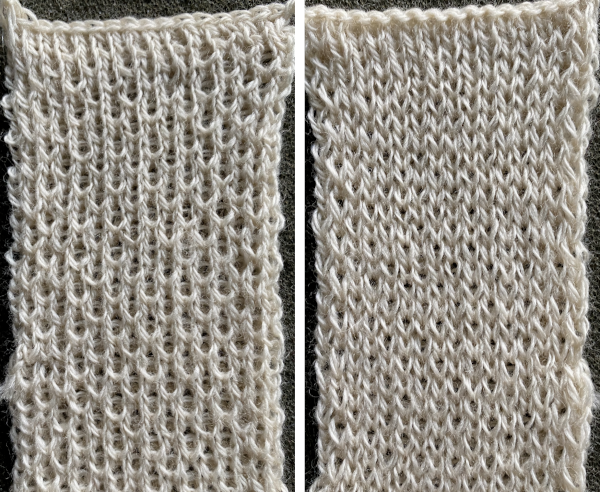
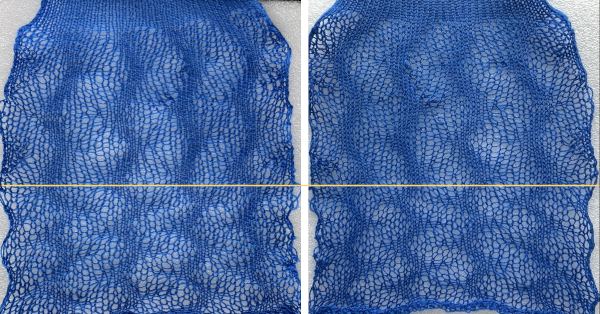 Here the same design was knit using different yarns. The first is knit using the same blue wool, the second a tightly spun rayon.
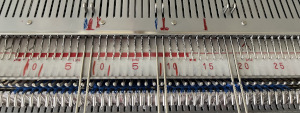
 So many fabrics can be automated, sometimes the fabric is a vague look-alike cousin of the original, close enough to be a reasonable compromise. Slip stitch patterning across the top bed can offer a quick solution to bypassing a lot of hand manipulation. Assuming that was possible for this fabric, my starting repeat, 10X30 pixels:
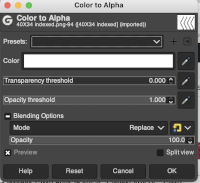
 ![]() and the plan would be to knit it in a 40 stitch swatch, placed in a way so that the “mock racking” would move equally from side to side. Working on a larger than needed canvas, the design can be placed on a magnified work area with a visible grid, at the chosen starting point. If the background is left as white in BW images, moving repeat spacing may erase black pixels as copy and paste in place are used. The solution is to make the background transparent using the Layer menu, as explained in other posts on using Gimp.
and the plan would be to knit it in a 40 stitch swatch, placed in a way so that the “mock racking” would move equally from side to side. Working on a larger than needed canvas, the design can be placed on a magnified work area with a visible grid, at the chosen starting point. If the background is left as white in BW images, moving repeat spacing may erase black pixels as copy and paste in place are used. The solution is to make the background transparent using the Layer menu, as explained in other posts on using Gimp. 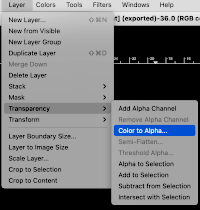
 To save the repeat as a BW bmp or png, remove the alpha channel
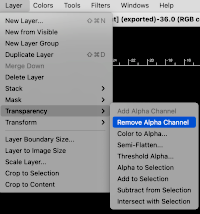
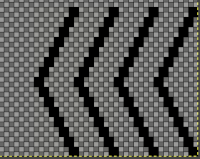
 The final repeat is 40 stitches wide, 34 high,
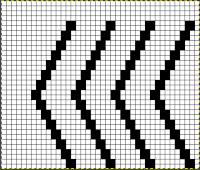
![]() with blank rows added to its top to serve as a place to drop stitches and have knitting happening on the ribber only.
with blank rows added to its top to serve as a place to drop stitches and have knitting happening on the ribber only.
Depending on the download program or the knitting machine model number, repeats are automatically mirrored, so if direction matters, mirroring of the repeat may need to be performed once more.
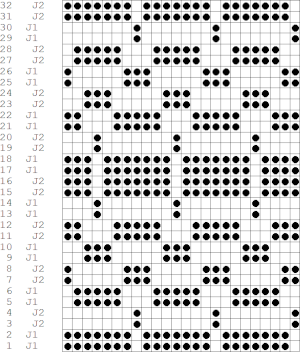
Why the repeat will not work for drop stitch: if the KC is set to slip in both directions, the function will happen on all needles in work on the top bed. On any given row, only black pixels (or punched holes) will knit. The slipped/ skipped stitches keep elongating until a black pixel replaces the white one in that needle location. The degree of elongation is illustrated in the chart in color for part of the repeat, the yellow marks the widest gap between knit stitches. If knit as is the repeat will soon cause serious knitting problems and carriage jams. 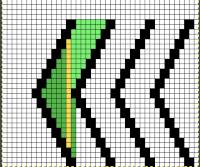 Though designing for one type of fabric may fail, this repeat or similar could be used successfully double bed in other ways, using hand transfers on the top bed or down to the ribber. In this case, I chose to transfer down to the ribber, which avoids concerns about restoring correct needle selection, and the repeat was not mirrored for use on my 930, so the resulting knit appears as drawn on the purl side, but is mirrored on the knit side.
The fabric is far removed from the drop stitch idea, but as for drop stitch lace, stitches after the cast on are transferred to the bottom bed.
Newly selected empty needles will create eyelets with the next 2 carriage passes, and texture will appear on both sides at the transfer down locations.
The shapes created do not travel on the knitting bed any longer.
End needle selection needs to be canceled at any time that slip stitch patterning is used and does not occur on every needle on the top bed.
If the pattern is to be interrupted by all knit rows here seen as rows with no preselection in the programmed repeat, then any needles with stitches on them need to be transferred down to the bottom bed before continuing to knit.
As preselection begins again, those needles should be filled by picking up from the stitches below them on the ribber, and then the process may be repeated.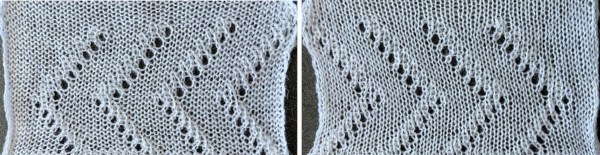
Category: Slip Stitches
Making a 2 color drop stitch “work”
I usually try to leave opinions out of my shares, but this post includes some along with “don’t do what I did” tips.
This was a pattern available for sale decades ago, sold directly to customers. At frequent intervals over time questions come up in forums as to possible DIY techniques and methods of design and execution to create the knit, or similar, followed by speculation.
The images from the ads online are small. 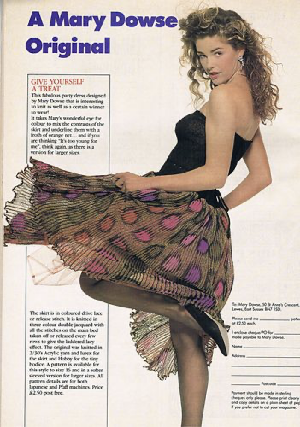 Trying for a bit more detail, there is a see/peek-through quality.
 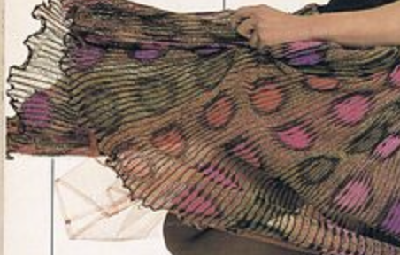 At first, I thought it might be a version of the stitch using 3 colors, but later, looking again, I came to believe it to be a 2 color drop stitch fabric with a dark constant motif color creating the donut-shaped designs with changes to three different colors in the background.
I am planning to execute the fabric as a modified end release, releasing stitches at intervals based on needle selection.
First flub: I was thinking of this as an addition to a prior post, and I got happy cleaning up and deleting stuff. Getting here I realized some of that stuff had to do with the original repeat used and the gimp layer images illustrating the steps used to obtain my repeat.
It is possible when that happens to reverse construct the images. That brought me back to this image, 20X16, drawn as less of a circle since the fabric technique will lengthen the design. ![]() It is scaled double length to 20X32 for processing in layers.
It is scaled double length to 20X32 for processing in layers. ![]() Though the image is far too small to help define the quality of the stripes between the circles, the goal here is to include areas of solid stripes in drop stitch in the alternating colors between the shapes. All white pixel rows will not create long stitches on the top bed, only all knit rows only on the ribber, not the intended fabric.
Though the image is far too small to help define the quality of the stripes between the circles, the goal here is to include areas of solid stripes in drop stitch in the alternating colors between the shapes. All white pixel rows will not create long stitches on the top bed, only all knit rows only on the ribber, not the intended fabric. 
![]() The tiled repeat:
The tiled repeat:  I wanted to add solid color drop-stitch stripes, the solution being to add all black rows. Every needle will select every row in those areas, colors are changed every two rows, creating the desired effect when the corresponding stitches are dropped.
On any row where every needle is preselected, all needles can be pushed forward to E position dropping the whole row of stitches, and needles are pushed forward to E again after the release so that the second row of loops composing the stripe will be created on the top bed on the next pass to the opposite side.
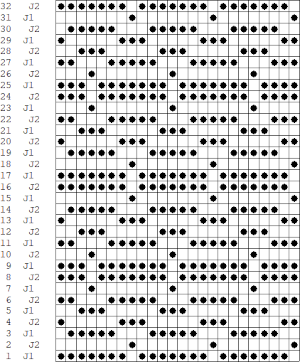
My final png planned as a single motif test on the 930 is modified to 46 stitches by 72 rows. ![]() Imagining the 2 colorwork in repeat, estimating if the pattern and ground fall in the proper place
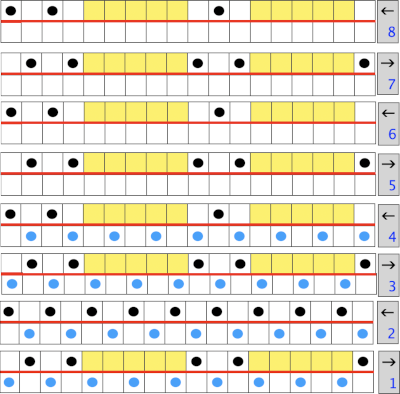
Imagining the 2 colorwork in repeat, estimating if the pattern and ground fall in the proper place 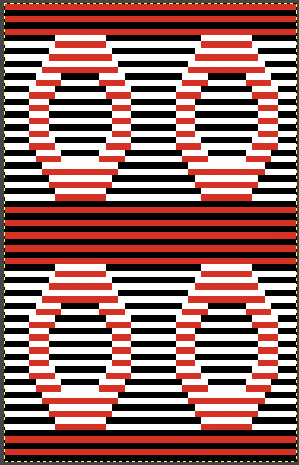 A visual summary with an added color change column and row numbers with rows on which dropping all loops can occur marked with different color numbers. In this case, the ground is in the dark color, the shape in the lighter one.
 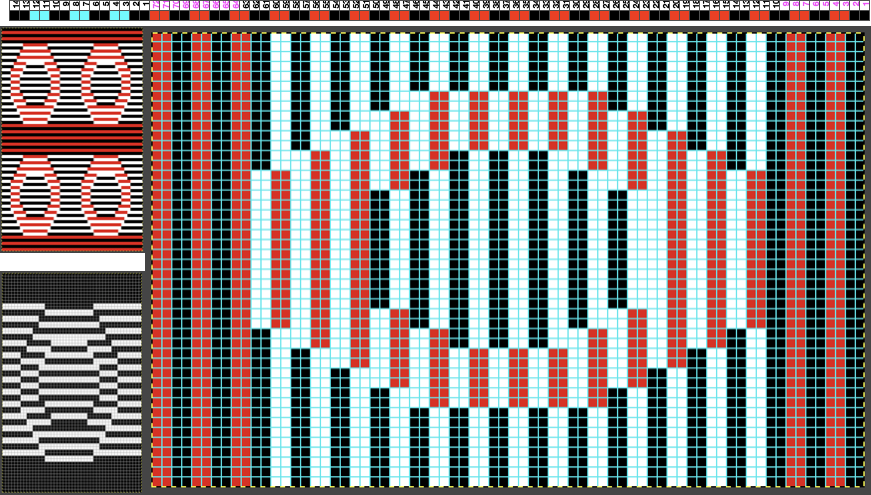 Determining whether the shape or the ground stripes knit the dark color is simply done by beginning the first all knit rows with the dark color or the light.
Getting to the knitting: the yarn I am using, knit at tension 4/5, is significantly thicker than that recommended in the ad for the pattern.
When every needle knits every stitch on either bed, adjustments need to be made in tensions used approaching that used for the yarn when knitting stocking stitch single bed. Brother ribbers also tend to knit tighter than the top bed.
When working every needle rib with sporadic needle selection on the top bed, it takes a bit of testing to find the ideal tension so that stitches are formed and knit off properly on either/both beds.
When lots of needles are being knit on the top bed, the carriages are likely to become harder to push.
A far thinner yarn would change the scale of the overall design even if using the same repeat.
The first swatch encountered aargh moments.
A: the color changer was frequently trying to share 2 colors at once. When I attempted to change the design color, the yarn got caught around a gate peg at the start of the row, and the knitting dropped to the floor.
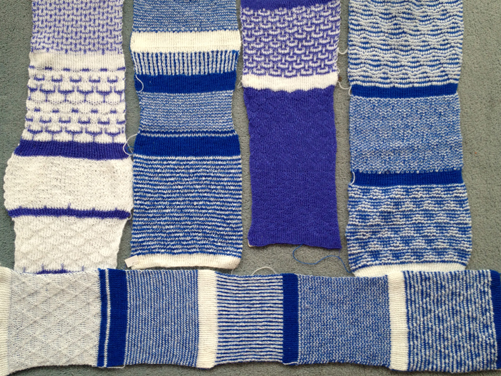
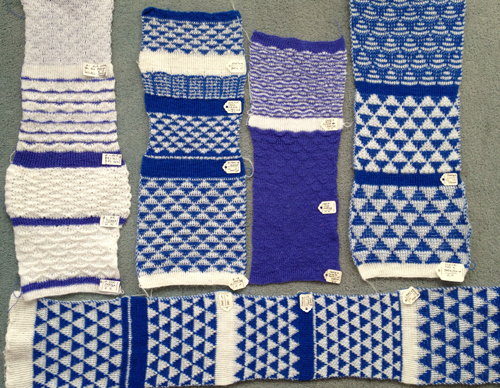
B: testing reversing the colors. When the dark color was switched to red, C, the contrast and definition of the newly forming “circle” was not enough to my taste. 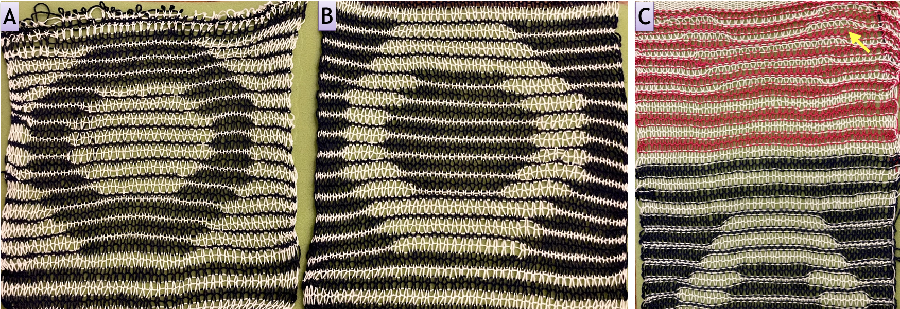 Giving it another go, the theory worked, the details in the fabric underneath the swatch can be seen peeking through,
 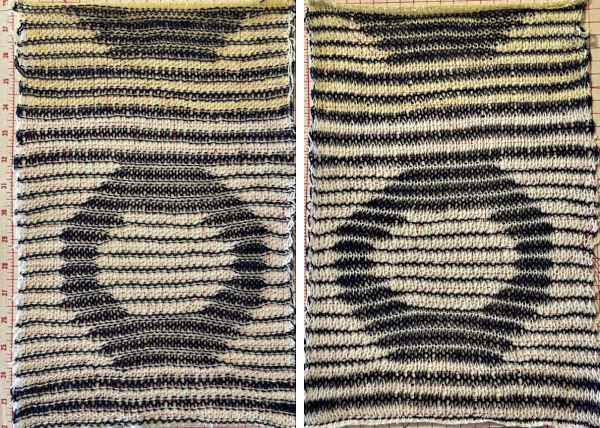 but I would like to have stripes in the solid lighter colors as opposed to 2,
  and more space between the shapes. A new, untested draft is now 50X76
  but those rows for the solid colors need to be rendered again with black pixels.
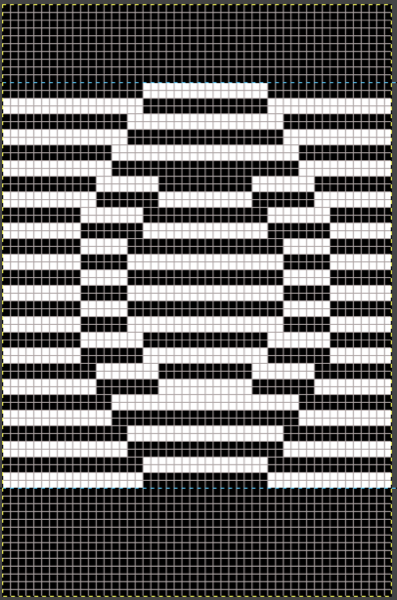
 Here some of the peek-through quality of the fabric is shown again. When any fabric is gathered sideways, it is likely the repeat will appear narrower and longer.
 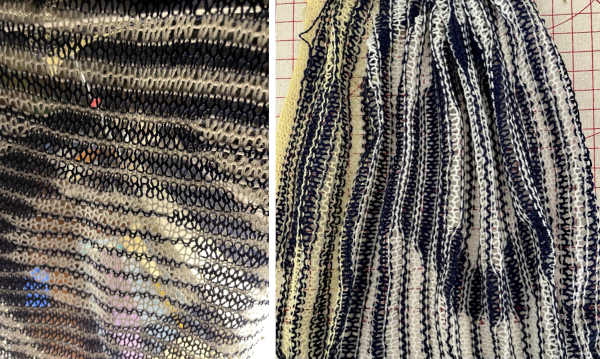 Using a 16/2 cotton at nearly the same tension produces a fabric that is even sheerer.
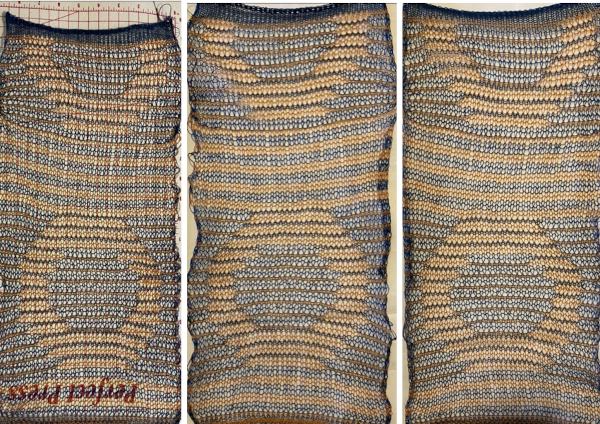
 And now those solid stripes in 2 rows knit are really bothering me, thinking they should be switched to only one row of loops, making the original repeat without those added black rows the better repeat?
 ![]() Only one of the two colors would pick up loops, with the second knitting 2 rows on the ribber only. Aaargh! So what of this?
Only one of the two colors would pick up loops, with the second knitting 2 rows on the ribber only. Aaargh! So what of this? ![]() Different day, yarns used before, same tensions, a very different result. The colors look different because the sun is finally out and this photo is taken in natural light as opposed to weird artificial lighting. The navy color is slightly thicker than the white, the single dropped row is not immediately visible. Stitches were dropped on any rows after all needles flatlined, and they were returned to B position prior to the next carriage pass.
Different day, yarns used before, same tensions, a very different result. The colors look different because the sun is finally out and this photo is taken in natural light as opposed to weird artificial lighting. The navy color is slightly thicker than the white, the single dropped row is not immediately visible. Stitches were dropped on any rows after all needles flatlined, and they were returned to B position prior to the next carriage pass.
Lo and behold the joyful experience of having yarn break when the stitches are pulled in order to drop them! 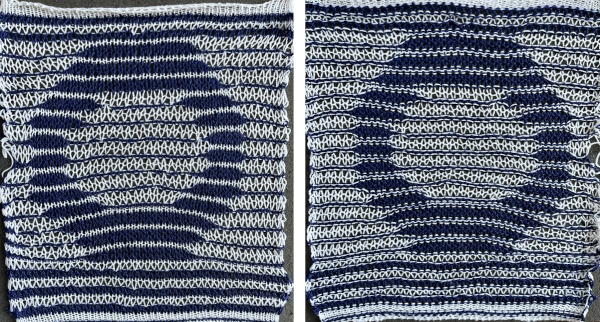 A potential use is for the thinner knit is for it to be used as a layer over a different pattern or the same design as seen here, in the thicker yarn
 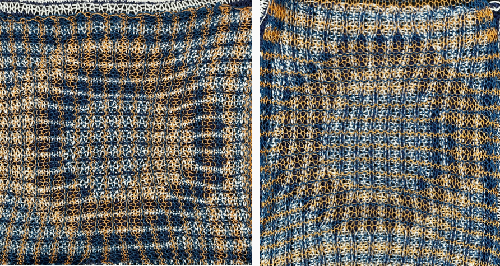 I have never been a fan of this fabric, and for a while.
To my eye, all over geometrics rather than floating forms on solid ground are more attractive, one such sample: 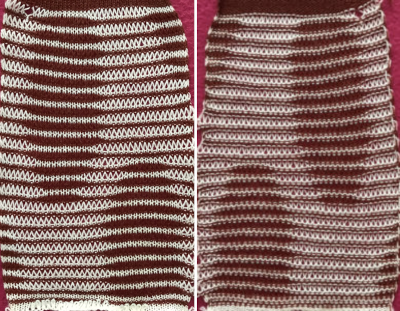 seeking a rounder, smaller donut shape:
 ![]()
 The red is a thicker yarn than the pale yellow, the fabric had an interesting slight curl evocative of shadow pleats. Other possible changes include the elimination of the top and bottom row in the original design.
 What seems a possible easy fix is not. The above repeat knit creates an elliptical shape rather than a circular one
 ![]()
 A more stable fabric with areas of stitches dropped for a single row in each of the alternating colors.
 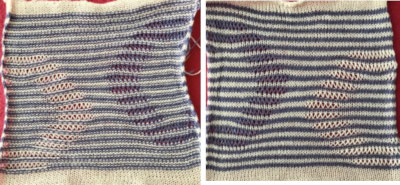 How to for both are found in the post.
I need a break from long stitches for a while, though this is yodeling. Never say never. ![]() It takes time and effort to develop any fabric to the point where it is considered a satisfactory one, let alone to write and publish accurate patterns using the technique. People who do both deserve to be paid for their time and effort, and are due respect, so no sharing if the pattern is copyrighted or is an original one available for sale presently online is proper.
It takes time and effort to develop any fabric to the point where it is considered a satisfactory one, let alone to write and publish accurate patterns using the technique. People who do both deserve to be paid for their time and effort, and are due respect, so no sharing if the pattern is copyrighted or is an original one available for sale presently online is proper.
That said, techniques or merely repeats are not subject to the same “restrictions” and certainly may be adapted for use in different, more personal, or new ways. If an item like a scarf is made using a particular needle arrangement and texture and someone else makes a dress using the same stitch type but shaping pieces, adding details, pattern instructions, the scarf maker, IMO, cannot really claim their work has been copied.
To my mind, credits when sharing anything if available are a matter of courtesy.
Another garment illustrated in the FB comments on the last search query for the Dowse pattern or similar fabric was created with FI shadow pleats. Shadow pleats rely on the contrast between thick and thin yarns to create folds. The double density in the traditional FI segments and the subsequent shift to using thinner yarn for the second color still have floats on the purl side of the knit and are unlikely to produce a sheer knit.
Ribber fabrics with stitch transfers between beds 2
A collection of embossed patterns created by isolated groups of stitches being brought in and or out of work on the ribber
2021/05/09/double-bed-embossed-patterns/
2021/02/25/brother-shadow-lace-rib-transfer-carriage/
2021/03/11/slip-stitch-patterns-with-hand-transferred-stitches-double-bed/
2020/08/13/ribber-fabrics-with-stitch-transfers-between-beds-1
2017/12/20/combining-kc-patterning-with-racking/
The inspiration fabric in the 2020 post and one of the resulting swatches 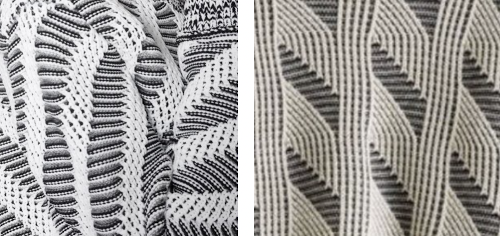 The inspiration fabric recently found online, source not known
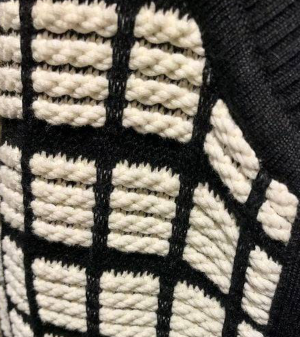 Analyzing the structure: it appears the fabric is knit with slip stitch textured patterning on the top bed, and occasional needles in work on the ribber creating elongated stitches that float on top of the light-colored rows.
Slip stitch textures narrow the fabric width considerably, so the single-color areas would need to be knit in slip stitch as well, here a 1X1 repeat is chosen.
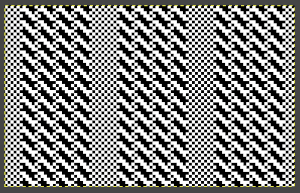
Needles brought up to work on the ribber are planned to interact at intervals with stitches on the top bed. The starting concept working in Numbers 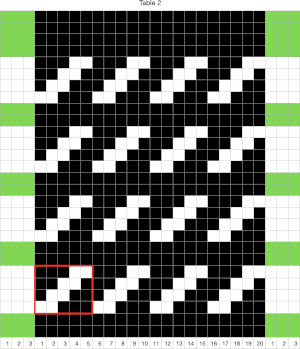 In slip stitch patterning the white pixels slip, the black pixels knit. This repeat is 20 stitches wide, so not usable for a punchcard machine. The first draft is 20 stitches wide by 32 rows high
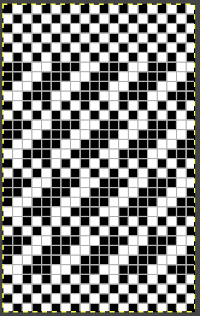
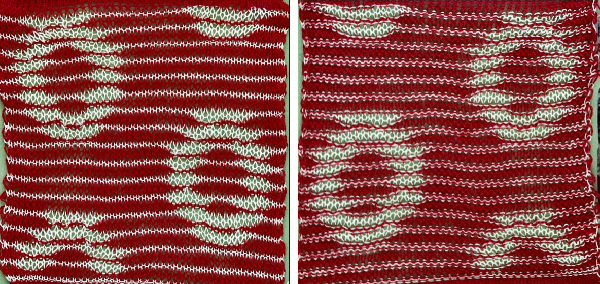
![]() The test swatch:
The test swatch:  Any adjustments in the dark color stripe between will need to be made within the repeat itself, the floats in the light color will be wider by using a simple color reverse. The color reversed, modified repeat is now 20 stitches wide by 28 rows
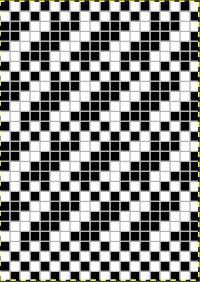
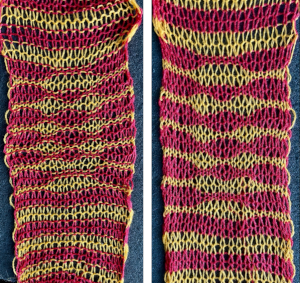
![]() The test swatch was executed using the same red/yellow yarn combination, then in black and white using different yarn thickness and tensions.
The test swatch was executed using the same red/yellow yarn combination, then in black and white using different yarn thickness and tensions.
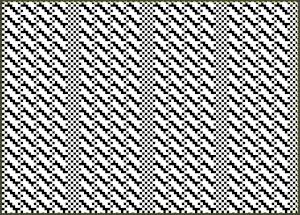
The width of the spaces between stitches on ribber can be varied, creating shifting size “window panes” resulting in a knit fabric with a very different aesthetic.
The reverse surface is not particularly exciting. 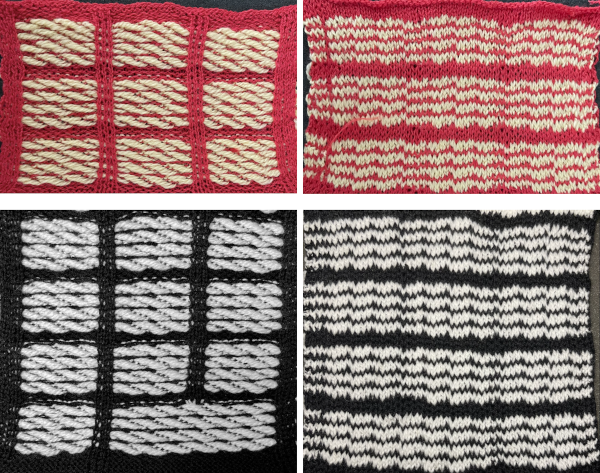 A comparison to the mirrored original inspiration, likely knit in thicker yarns
 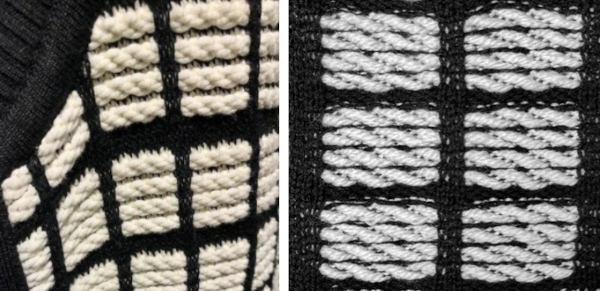 The knitting process: with any textured or very lacy knits casting on and binding off require special consideration.
In test-swatching, knit the pattern single bed first to sort necessary tensions and visual appearance, follow with plain knit rows using the dark color,
use the ribber cast on comb to poke through the knit, hang ribber weights, bring needles into work on the ribber, stitches will be formed on it with the next pass. The ribber stitches need to be knit as loosely as possible, test the rib pattern and tensions.
If using only the coupled knit and ribber carriages, the first preselection row is made toward the color changer from right to left, the dark color knits first.
Needle pre-selection changes serve as guides to both color changes and to carriage setting changes on the ribber.
After every other needle preselection, the dark color knits with the ribber set to knit.
When the needle preselection changes to the alternate patterning, the color is changed, the ribber is set to slip in both directions. The main bed only will knit, in this instance, for 4 rows each time.
After every other needle has been preselected again, the color is changed to dark, the ribber carriage is set to knit in both directions, the process is repeated throughout.
I used a modified KC sinker plate and a second knit carriage selecting needles as shown in the 2018 post
A possible alternative for casting on a finished piece:
cast on every other needle rib from right to left
knit 2 circular rows, followed by an all knit row, the carriage will be on the left side once more
transfer all ribber stitches up to the main bed, bring up the desired needles on the ribber to pick up loops for new stitches before the next pass, with the first and last needles in work on the ribber. 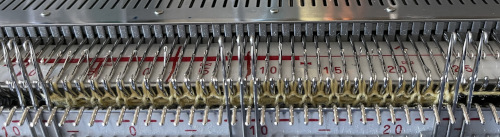 Read the first row of the pattern, cam set to KC1 to ensure end stitches are knit when patterning occurs only on the top bed.
Knit to the left.
The first stitch on the left may need to be filled picking up a ridge from the stitch above it to form properly.
The knit carriage is now set to slip in both directions and knitting continues as described previously.
Once a pattern is set up, the same design can be explored in different ways.
Here the swatch was knit in a single color with the ribber set to knit in both directions on every row.
Because there are many more rows on the ribber knitting than on the main bed, the vertical line created by its stitches is not smooth and is forced up at the top of the piece, creating a wavy edge. 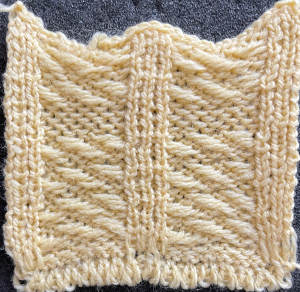 The cast on was deliberately loose. To tighten it up at the edge of the body of a narrower knit, every other loop can be picked up with a latch tool or crochet hook moving toward the yarn end at the cast on edge and is pulled through the previous one, producing a chain stitch. When the end of the row is reached, the yarn is pulled through the last chain and secured.
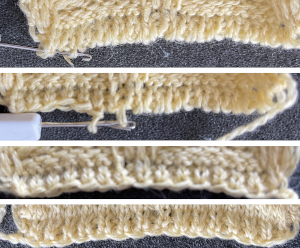
DAK DBJ color separations, templates, other software
Over the years I have written on an assortment of methods for color separation in knits including DBJ, a summary post with links to previous shares: dbj-and-color-separations-some-previous-posts-links/
and in the-start-of-a-blog-index/
A variety of textures and patterns may be used to achieve fabrics that are very different in appearance, using a very simple pattern along with cam button or lock setting changes. The first chart was generated at that time using Intwined Pattern Studio, a program that for a time appeared to be very promising and then moved on to lack of updates for Mac making it useless in 2013, followed by none for Windows as well, with no successful use of it reported in forums in years, but one may still purchase it 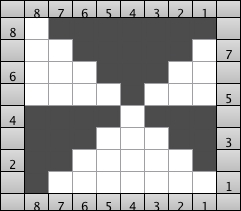 The manual color separation method for punchcard machines.
The elongated X2 repeat version of the triangle drawn in Gimp 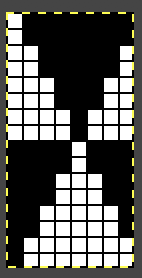
 As for more than 2 colors per row, performing the color separations may be achieved manually, various software is now available for performing the work in instants. Ayab offers an elegant color separation solution, heart-of-Pluto, that will knit single passes for each color per row on the front of the knit, resulting in 3 color patterns with limited design stretch, and no worries about the placement of one color over any stitches preceding it in the same color on the previous pass. The difference in the same design being knit with the standard, elongated version, allowing for two passes with the same color prior to each color change and the Pluto version.
  knit using img2track, the vertical stretch is manually set to X2,
 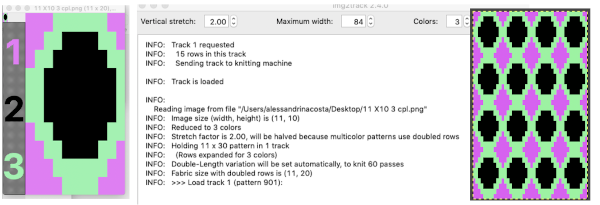 A “hack” 2021/01/24/img2track_multiple-colors-per-row-dbj-each-color-knitting-only-once/
There is a Russian punchcard site that will allow entering personal repeats or selecting one from their extensive library, where it is possible to obtain related 2-color dbj separations as well. The punchcard color separation may be created manually, a slow process, while the punchcard templates in Dak are achieved with a few, quick clicks of a mouse. The repeat may be created as a graphic file, in my case a png created with Gimp, the elongation in Arah because Gimp fails to scale small repeats cleanly. The image may then be opened as a graphic file, 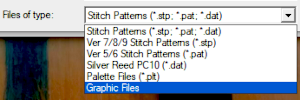 stitch and row counts should match, and save the stp
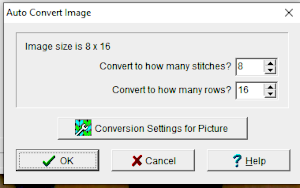
if experimenting with changing selections and this window appears it is OK to click on No 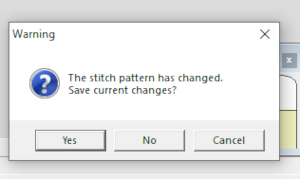 The separation methods in DAK:
Method C separates each color row into separate rows of knitting, rows do not have to be repeated in pairs, and the double-length switch will need to be used in Japanese knitting machines 
![]() The elongated triangles repeat template is different from what would be produced with the above set at double length, may be used as is to produce a variety of fabrics including quilting
The elongated triangles repeat template is different from what would be produced with the above set at double length, may be used as is to produce a variety of fabrics including quilting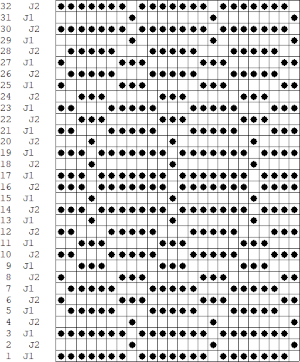 Yarn choice and design make a big difference. Here the yarn is far too thin, and the repeat too narrow in width, but the possible result is illustrated. The main bed is set to slip in both directions throughout. The ribber setting needs to slip in both directions for every other pair of rows. When the ribber slips, the main bed will knit the color that will create the pockets, where there are many single stitches selected here, the KC was set to KC1. When the color is changed and the ribber is set to knit again, stitches in that color will knit on both beds, sealing the fabric in those areas and forming a solid color background on the reverse side. Here the white forms the pockets, and the floats after a pair of passes are seen in this photo.
 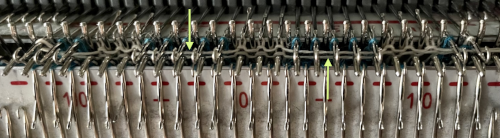 Because the yarn is so thin there is a considerable grin through on both sides, the areas marked with arrows indicate where the white pockets were lightly stuffed with yarn ends
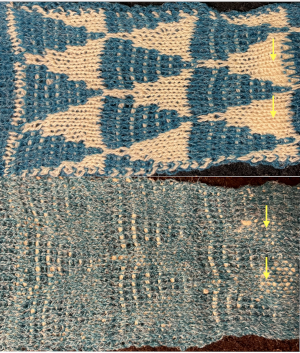
![]() For a review of quilting on machines including Passap see 2018/02/15/revisiting-machine-knit-quilting/, and using a second knit carriage with a modified sinker plate for knitting stitches on main bed only, making ribber settings fixed throughout, and allowing for tension adjustments for each color yarn.
For a review of quilting on machines including Passap see 2018/02/15/revisiting-machine-knit-quilting/, and using a second knit carriage with a modified sinker plate for knitting stitches on main bed only, making ribber settings fixed throughout, and allowing for tension adjustments for each color yarn.
Method A works on pairs of rows. If the pattern does not consist of identical pairs of rows there are likely to be yarn error messages. The original triangle elongated to 8X16 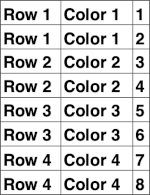
 If pngs are created outside the program, they may be doubled in length unless the repeat is designed that way.
 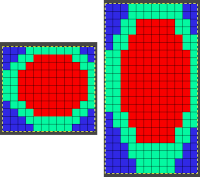 The associated menu options in Dak when the plan is to work in double jacquard
 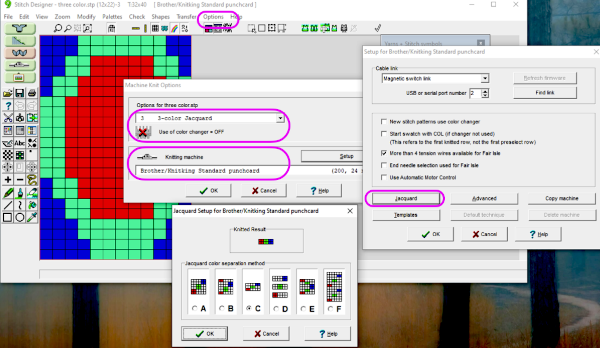 How the different jacquard setups process the specific repeats:
Method B creates the same separation as the default built-in KRC one in Japanese electronics. If knitting DBJ it may be used with DAK if the pattern is downloaded as fair isle but the machine will then need to be set for dbj. If additional colors are used, pairs of rows will follow a single pass for color1. The print preview templates, if generated within the stitch count restriction for use on punchcards, may be used as guides for punching the required holes, this would be the card for that 8X8 triangle repeat, a tad shy of the recommended 36 rows, 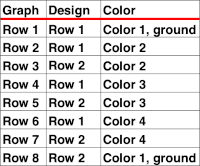
 Passap card reader techniques saved from long ago experiments.
 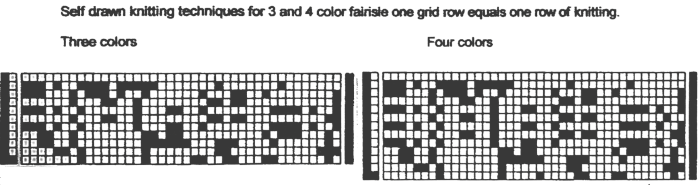 Method C see the top of the post
Method D separates each color into a separate reader card and is used to download to the PEI or Passap, appears to use superimposing of layers, and matches method 4 in my post.
Method E is suitable for machines with a color changer on each side, like the Brother CK 35
Method F is a Half Milano separation. Each pattern row is separated into a pair of passes for each color, but the second row for each color has no patterning, so the ribber stitches only knit as the carriage returns to the left side, a possible way of creating repeats for drop stitch lace on Brother machines. The elongated triangle template was split into 2 pages for viewing, they are combined in this image  This may be the associated Passap Reader technique, but I have no way to test it
 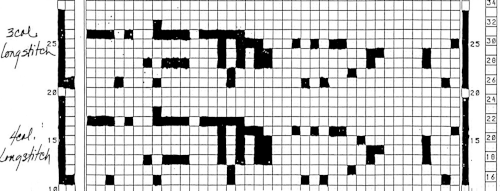 Processing the template using numbers: a table is created twice the length of the 8X16 triangle repeat, followed by hiding the 32 odd-numbered rows, positioned in front of the scaled punchcard template, stitch markings are traced
 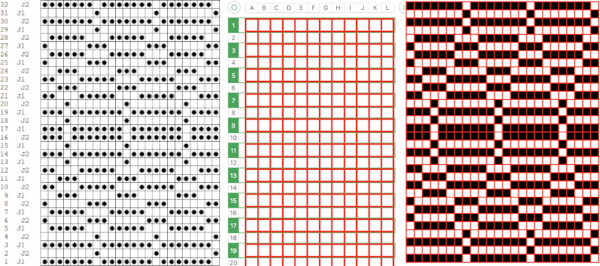 the rows are then unhidden, the repeat is checked, matched here to the F jacquard separation in Dak
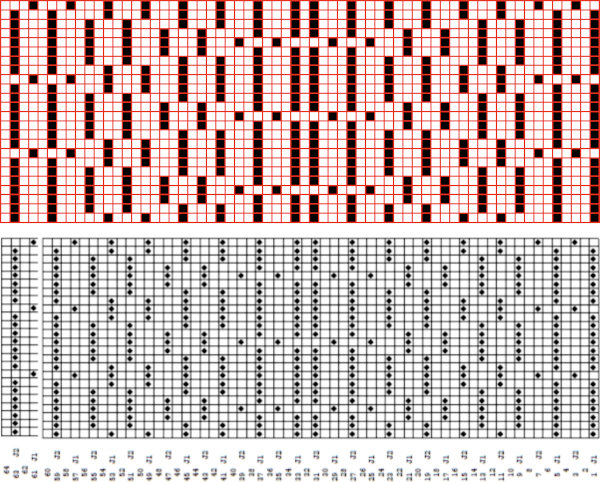 The numbers table is processed in Gimp to obtain the png for knitting the now 24X64 pattern
 ![]() Proof of concept swatches: the long stitch in 2 colors,
Proof of concept swatches: the long stitch in 2 colors, 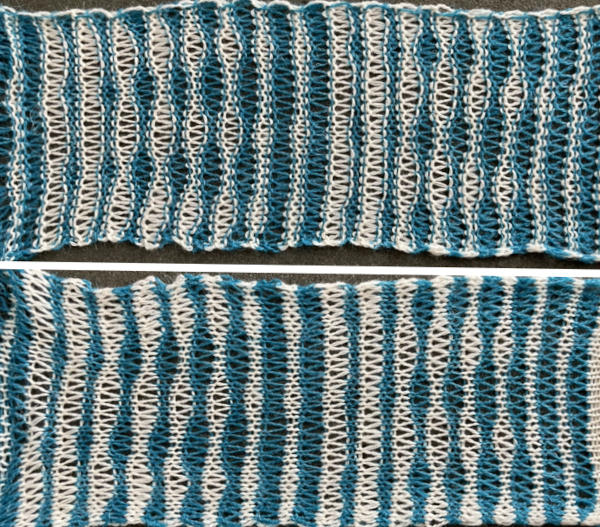 and the pattern executed as a tubular FI knit: I had yarn issues, hence the dropped stitches. Both swatches were knit to approximately the same point in the pattern repeats, there are obvious quality differences in width and length. In tubular knits, there are differences in the width and height of the knit on each side. The front is actually a slip stitch with floats, drawing the fabric in, while the ribber knits every stitch every other row. With a good choice of yarn and pattern, loosening the tension on the top bed may ease this problem. As often happens, casting on and binding off need special considerations ie to allow for any fabric stretch when off the machine or in order to leave a tubular knit open at either or both ends if that is the goal. More info on tubular knits including on Passap
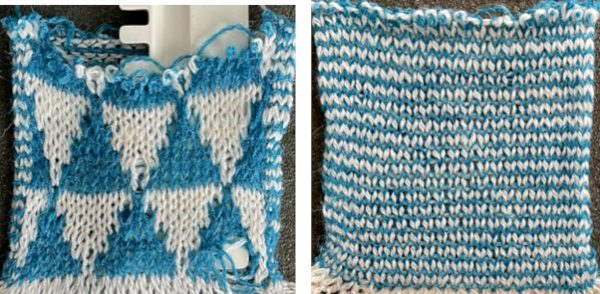 DAK has been a purchase made out of curiosity, and my use of it has been very limited since my designing needs are met by using other programs that are free to users and generate and accept files in multiple formats, while the Brother Knitleader or even simple use of the magic formula solves knitting any desired shape in any gauge.
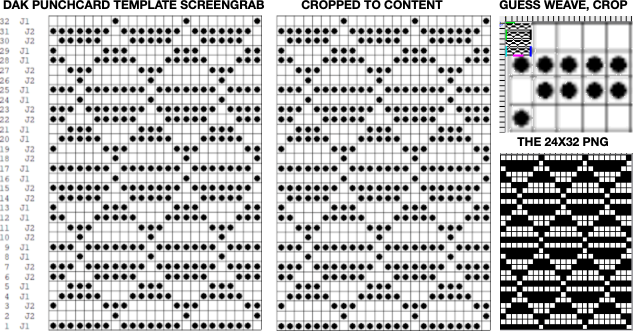
That said, if one can generate the templates produced in DAK, the screengrab of the result may be used to generate a PNG with ArahPaint using the weave-from-grid feature that is then knit-ready on any electronic machine able to accept downloads. The method is far quicker than using Numbers and Gimp. 
![]()
![]()
Geometric shapes on ribber fabrics with tuck stitches 3
Previous related posts:
2 color ribbed brioche stitch on Brother knitting machine 1
Geometric shapes on ribber fabrics with tuck stitches 1
Geometric shapes on ribber fabrics with tuck stitches 2; knitting with 4 carriages
The last post on using Gimp: 2021/07/18/gimp-update-for-mac-2/
The method for color separation used for mosaics
The sources of inspiration from hand knitting or industrial knitting machine designs are endless. There are many features that simply cannot be duplicated, sometimes compromises can be reached that can achieve only imitations of the original. To my mind when knitting garments or long pieces the greater the degree of automation, the less likely one is to have patterning errors occur, in ribber fabrics, they are also more complicated to correct than single bed knitting.
I recently came across a pin of a Ravelry hand knit pattern which led to my return to this topic once more, including perhaps the addition of more colors. 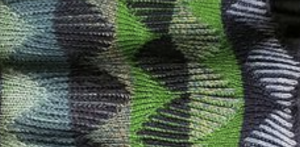 The plan is to create a repeat which may be knit using color changes every 2 rows. Each design row knits each color twice, so the standard built-in KRC separation is not a consideration, though the same cam settings may be used in those fabrics as well.
The required color separation has been discussed in several posts on the various forms of DBJ, a review:
The initial test repeat is 18 stitches by 44 rows, designed using 2 X 2 blocks, to begin with. How it might appear knit in fair isle: 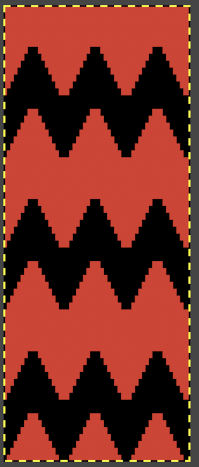 Transitions in charting visualizations:
A: FI repeat with pattern progression in two-row increments
B: every even-numbered row beginning with row 2 is color reversed
C: B repeat is doubled in length to 18X88 for initial samples
D: repeat adjustment for a first try at introducing 2 additional colors 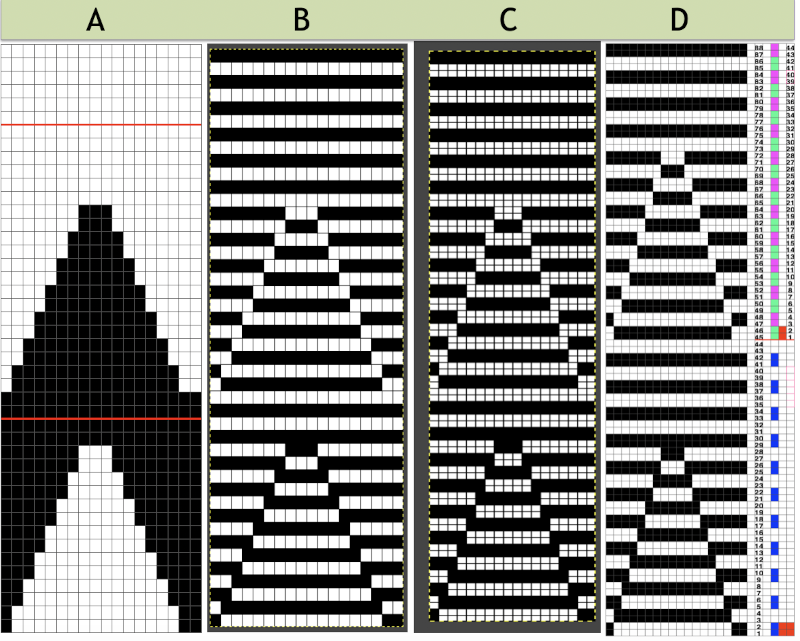
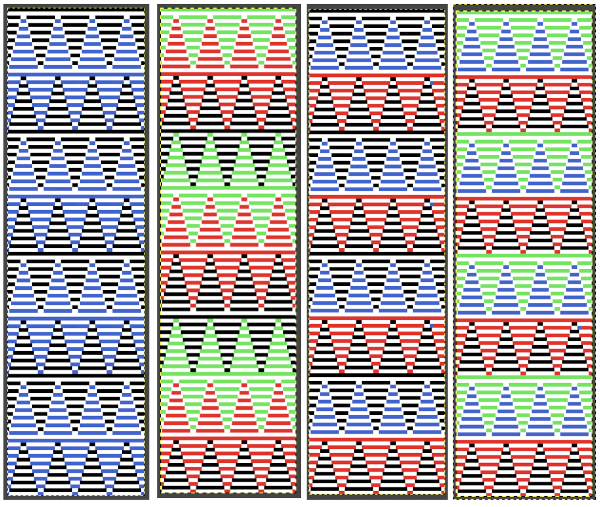
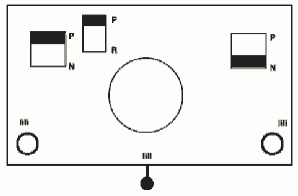
![]() End needle selection is canceled, the first and last needles are in work on each side on the ribber knitting every row, the first preselection row is from right to left, cam buttons are set after the left side is reached. Knitting in these samples began with the blue yarn in the number 2 position in the color changer. The ribber remains set for knitting in both directions throughout, the images on the right do not reflect the amount of surface 3D textures.
End needle selection is canceled, the first and last needles are in work on each side on the ribber knitting every row, the first preselection row is from right to left, cam buttons are set after the left side is reached. Knitting in these samples began with the blue yarn in the number 2 position in the color changer. The ribber remains set for knitting in both directions throughout, the images on the right do not reflect the amount of surface 3D textures.
with the main bed set to tuck in both directions: 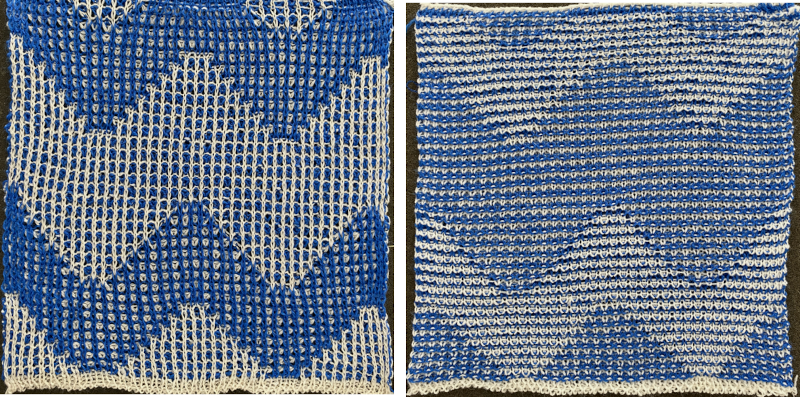 Lock settings are easier to achieve on the Passap than switching out cam buttons in Brother machines. This was knit using 4 carriages. Color one knits with the main bed set to tuck both ways, color two knits with the main bed set to slip both ways. The slip stitch reduces the width of the fabric considerably
 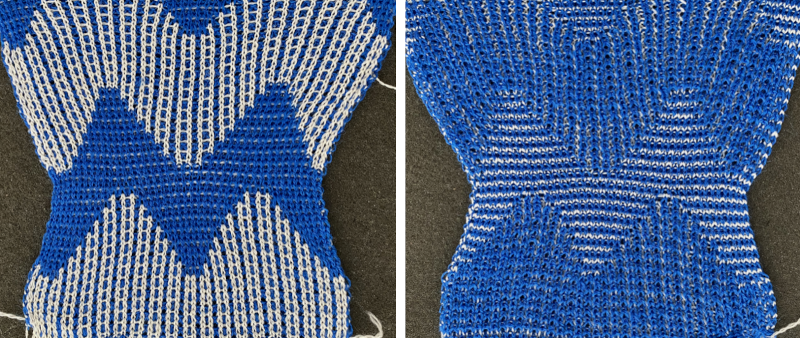 Here each color alternately tucks and slips. The choice of cam buttons matters, tucking first from left to right, slipping from right to left, with cam buttons set COL after the first preselection row
 This last cam setting appears to my eye to produce a texture “close enough” to the inspiration fabric. Attempting to add more colors: the repeat, D, is still 18 X 88 but is now shifted slightly.
 ![]() Somehow the slip cam button was not set, so the knit carriage tucked in one direction while knitting in the other. I am vaguely reminded of illusion knits. Considering altering both the color choices and placements again.
Somehow the slip cam button was not set, so the knit carriage tucked in one direction while knitting in the other. I am vaguely reminded of illusion knits. Considering altering both the color choices and placements again. 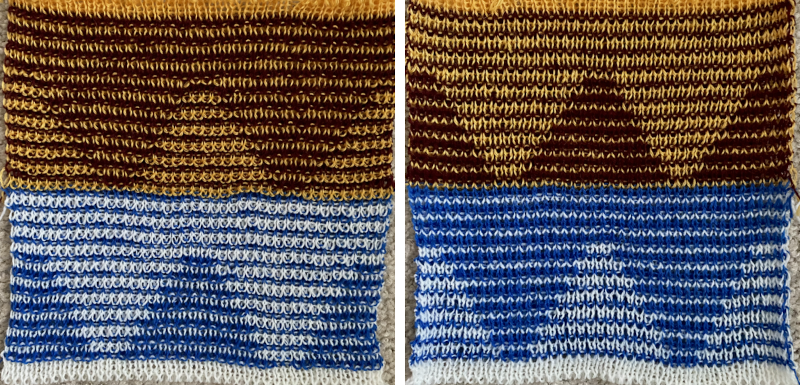 A way to imagine exact color change placements beginning with solid colors repeats once more, which can be followed by new color separations.
 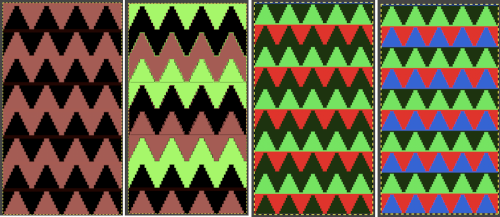 The existing repeat may be reduced further to 18 X 64, eliminating some of those extra rows in the center of the chevron shape
 ![]() The new BW image, tiled:
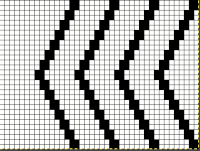
The new BW image, tiled: 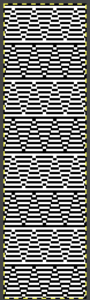 Whether or not the design is intended to retain chevron shapes in alternating textures, actions may be plotted pre knitting in any way that visually makes sense to the person designing the pattern and tools available to them.
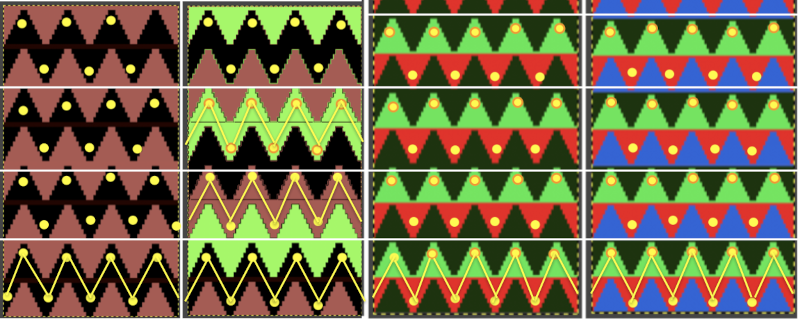
 Reversing the png so that the more textured stitches will begin with the color in yarn position 1
![]() Using either repeat, color changes now occur after every 32 rows knit. Another color change location clue is in the needle selection change above and immediately following the red border in the chart on the left.
Using either repeat, color changes now occur after every 32 rows knit. Another color change location clue is in the needle selection change above and immediately following the red border in the chart on the left. 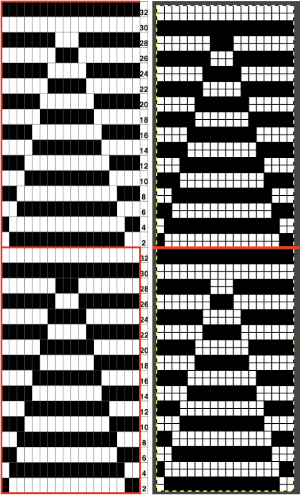 Adding colors can be planned cautiously or allowed to happen randomly depending on the preferences of the designer and end-use. Ribber fabric designs are not visible until several inches have been knit, too late to catch color sequence errors. Some machines allow for memo placements or sounds to help track color changes, but only within the initially programmed repeats. A quick spreadsheet can provide customizable checkboxes or added information. For an attempt to retain chevron shapes in different textures:
 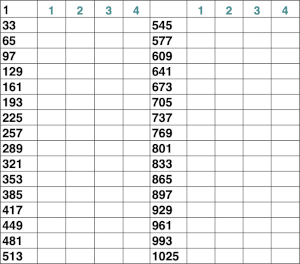 When using 3 colors, rather than 4, the texture of the zigzags on any specific color, will vary in placement. It is easy to change colors in any chart to approximate those that will actually be used in the knitting.
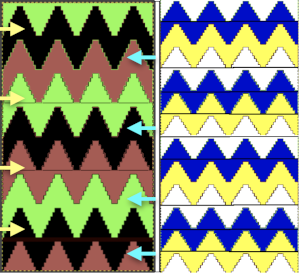
 Proof of concept: each of my yarns is slightly different in both thickness or fiber content from the others, which can be a drawback in resulting textures. As in any 2 color dbj, if 4 consequent rows are knit in one of two colors the positive and negative portions of the image reverse, as seen at the top of the swatch. The green was not intended to be used originally, the white yarn simply ran out. Such accidents at times may provide pleasant improvements. There is bleed-through of each color behind the other in the tighter knit areas as well which contributes to visual color blending, noticeable even in the areas with fewer tucked stitches.
 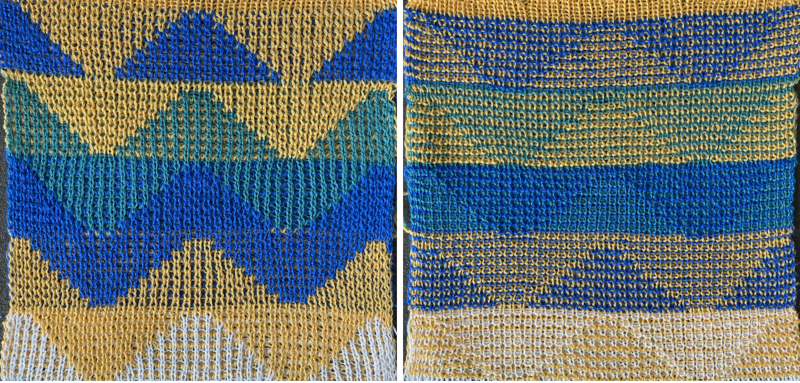 Splitting zig-zags into triangles, working color 1 with color 2, followed by color 3 with color 4 pairings
 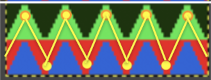 A PDF including row numbers and space for notations zig zag
An editable Excel spreadsheet created as an export from numbers zig zag
For Mac owners a Numbers doc. zig zag
A simpler repeat suitable punchcard owners as well using only 2 colors 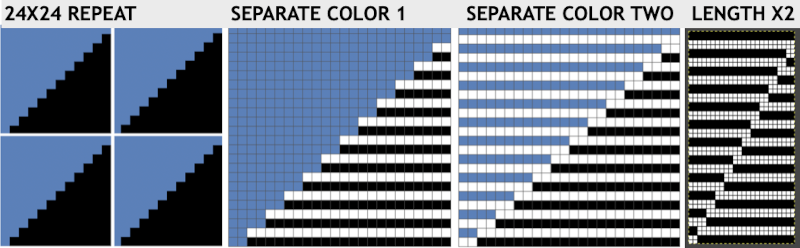
![]() The test swatch and observations: patterning was begun with color 2, yellow.
The test swatch and observations: patterning was begun with color 2, yellow.
The yellow yarn is 12/16, the maroon is 2/15 in thickness.
The triangle, because slip and tuck stitch settings are used, is compressed in height, while there is enough tuck happening to still make the knit wider.
The pattern is 24 stitches wide, the swatch was knit on 40 needles. Smaller swatches are fine for testing tension and colors. If committing to larger pieces, tests on at least 100 stitches by 100 rows are needed for gauge calculations in any double bed work or very textured patterns on the single bed. On some occasions when a far larger number of needles are in use, problems may turn up that require going back to the drawing board in terms of items ie tension settings, weight used, etc.
A: patterning was begun with thicker yarn, the yellow, in color changer position 2, both yarns are 100% wool
B: KCI, end needle selection on, a 2 color “beaded” edge is created
C: KCII, end needle selection canceled, patterning occurs on end needles
D: transferring to the top bed and using the standard latch tool bind off for these fabrics is far too tight 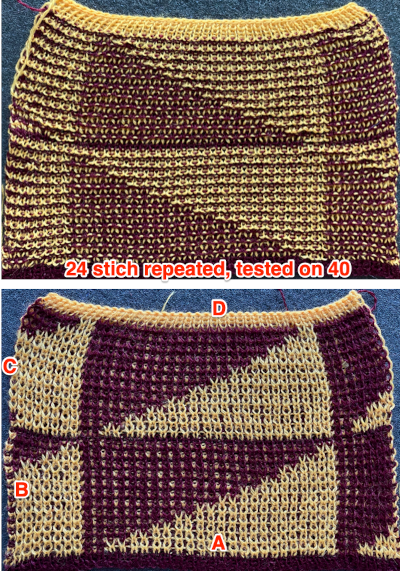 The tiled repeat, 24X48, does keep the stitch quality constant for both colors, Assumptions based on optics of tiling are not always accurate clues to potential patterning errors, here those darker lines are part of the actual design
 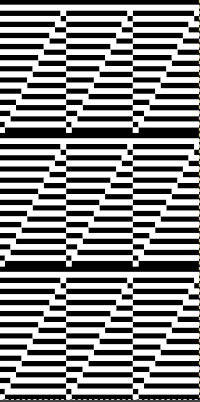 Continuing on a 24 stitch repeat, the original design may be rendered at double height and separated once more, doubling the separation height to 96 rows
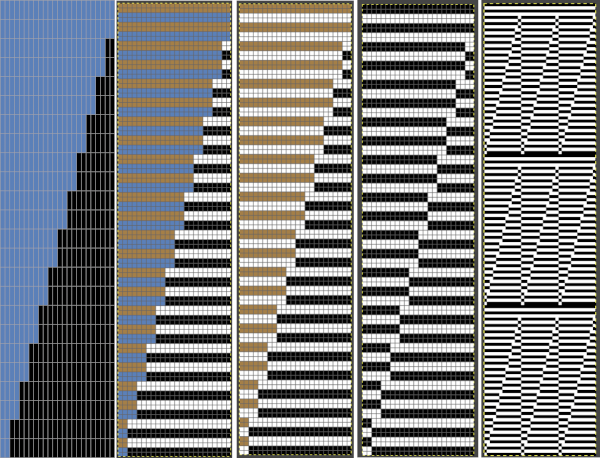
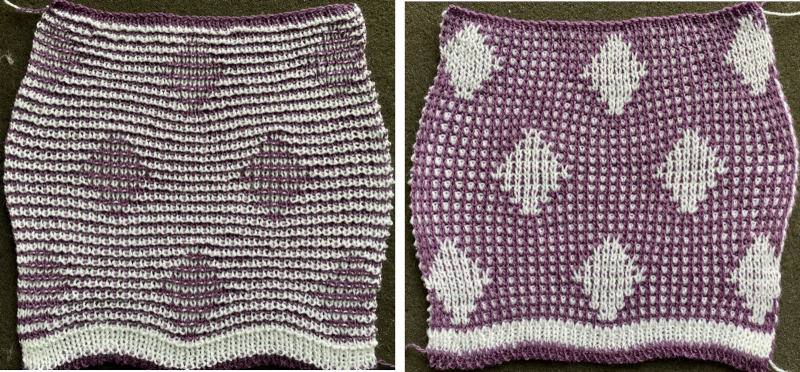
![]() There are days when either or both machine and knitter need a break. At the start of the first swatch, the cam buttons were not set, resulting in plain knit stripes. At its top, the purple did not get picked up properly from the color changer, and the knitting of course fell off the machine. On a second try, the same issue happened again with the purple yarn. Multiple incidences of such events were fondly nicknamed “dropitis” by my students. The test is on 24 stitches, the width of a single repeat, the triangles are much more balanced in size, this knitter is putting this pattern to rest.
There are days when either or both machine and knitter need a break. At the start of the first swatch, the cam buttons were not set, resulting in plain knit stripes. At its top, the purple did not get picked up properly from the color changer, and the knitting of course fell off the machine. On a second try, the same issue happened again with the purple yarn. Multiple incidences of such events were fondly nicknamed “dropitis” by my students. The test is on 24 stitches, the width of a single repeat, the triangles are much more balanced in size, this knitter is putting this pattern to rest. 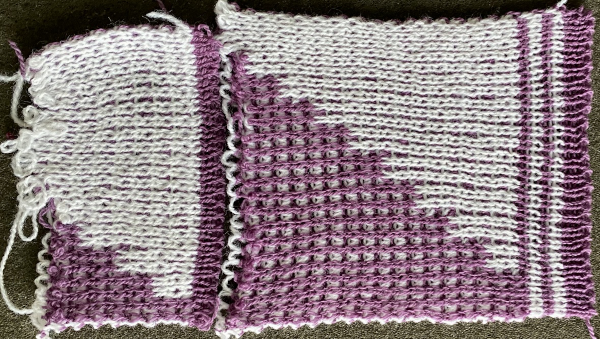 Another try at the diamond shapes that began this topic. The first .png
![]() when tiled appeared to not have enough space between the shapes, was amended to this
when tiled appeared to not have enough space between the shapes, was amended to this ![]() the differences when tiled
the differences when tiled 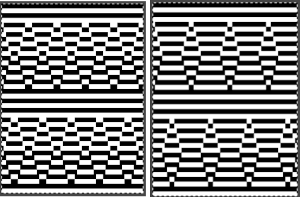 the color separation can happen completely within Gimp using color invert
 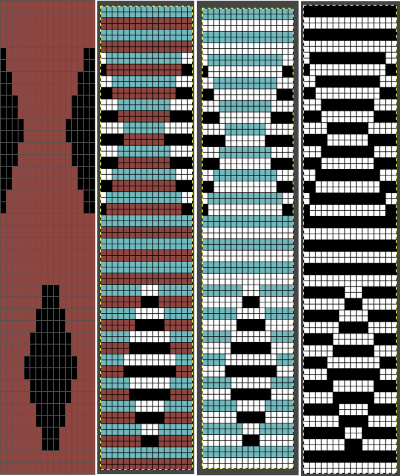 the white yarn is an acrylic, slightly thicker than the purple toned one. Sometimes simply exchanging yarn positions can change the qualities of the overall fabric.
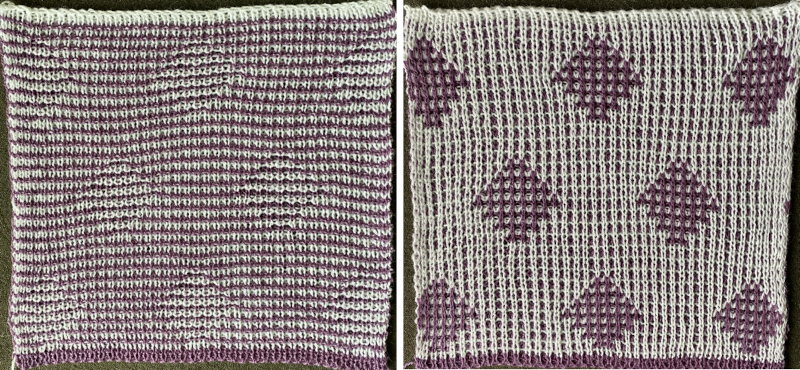
 The repeat begins with 2 blank rows. To achieve the tighter white shape as opposed to the honeycomb purple one, at the start of the repeat that color needs to be in use on rows where knit stitches happen as the KC, set on slip to the right, knits needles brought forward to D position. Red in this chart segment marks pertinent rows
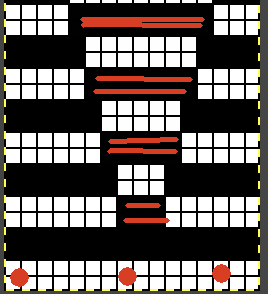 Both with hand knits and commercial knits because of the hand actions possible on both sides in the first, and as many as 4 beds selecting and knitting on the other may be in use at the same time with more complex needles as well, there are fabrics that are difficult or even impossible to duplicate. There often are obvious differences in the results, but the journey may still yield results that are pleasing and worth pursuing.
 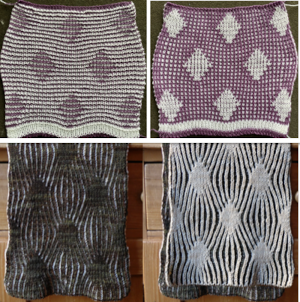 Another even more complex inspiration from a sweater attributed to Falke, Spring 20 collection, using similar stitch structures, but in addition, also transferring stitches between beds exposing a purl striped ground.
Interlock explorations 2; adding needles out of work
Most variations using tuck settings will loosen the fabric structure, slip stitches will narrow it. The behavior is consistent in working on both single and double beds. Color changes may be added.
There are only very short descriptions and schematics for the more complex tuck interlocks online, making attempting them a puzzle, where efforts at piecing it may not necessarily lead to correct answers, but still produce interesting knits. The ISO (the International Organization for Standardization) is a worldwide federation of national standards bodies that draft international standards for subjects including knitting. My charts for the tuck interlocks were personal interpretations based on a few of their illustrations, among which is this for cross tuck 1, which appears to be the most straightforward, with every needle knitting on one bed, while the other works the basic 2X2 stitch alternating repeat on either one of the 2 beds 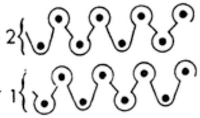 translated for knitting, patterning may be used on either bed, with the opposite bed set to knit every stitch. If patterning is on the ribber, have the first and last needles in work on the main bed.
  The top bed is set to tuck in both directions, the fabric is shown lightly stretched
  and could conceivably be used to create a ruffled edge when followed by narrower stitch types ie. every needle rib or Milano variants
 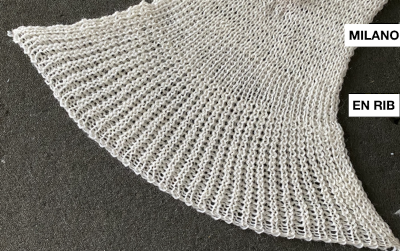 Changing settings: with the knit carriage set to slip in one direction, knit in the other, the ribber knitting every row

 Needles may be taken out of work to create pleats in every needle ribs, alternating their placement between the 2 beds. Knit stitches stabilize tuck ones. Here every other needle is taken out of work on only one bed. The tuck loops are more visible in any open spaces between the vertical rows of ribbed stitches. The ribber will knit every row on the same needles aligning directly above each other, thus ruling out full pitch.
 The needles are set up so that the first and last are in use on the ribber, ensuring that a knit stitch will be on the side of any tuck stitch selected on the top bed,
 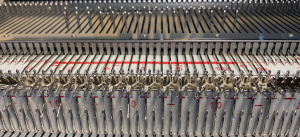 on the top bed the every other needle tuck selection reverses as the direction of the knit carriage does, needles brought forward knit, the ones skipped hold tuck loops in their needle hooks,
 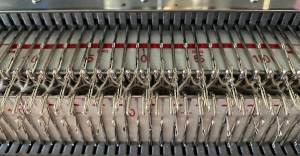 the resulting fabric
 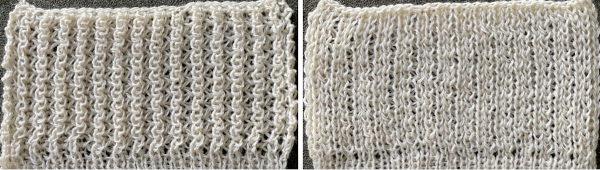 Other explorations with needle out of work:
Milano waffle: single color, 4 passes with every needle knitting, 4 passes tubular, more passes of each may be added to distribute color changes. The number of needles in work on the main bed remains fixed. 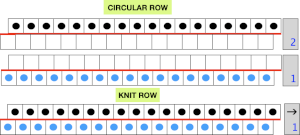 Choosing spacing between needles in work on the main bed
  A working repeat with 4 circular rows, 6 full rows knit
 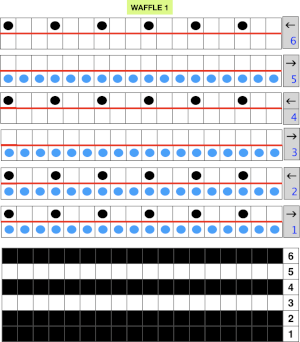 My first swatch in the technique was in response to a Ravelry member share describing the stitch pattern used in a finished garment
  The main bed is programmed, set to slip both ways after the first preselection row. After 2 rows knit on both beds, the ribber is then switched to slip in one direction, knit in the other in response to needle selection on the top bed. Main bed needles out ribber slips, main bed needles in B, ribber knits. After 4 circular passes, the ribber is again set to knit for 2 rows. The appearance during knit rows
 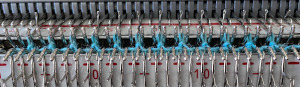 followed by float formation when only the top bed knits
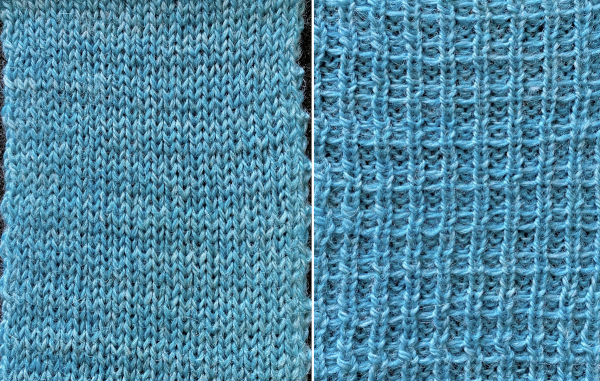 The resulting grid may be used as a guide for hand techniques off the machine in isolated areas or all over
 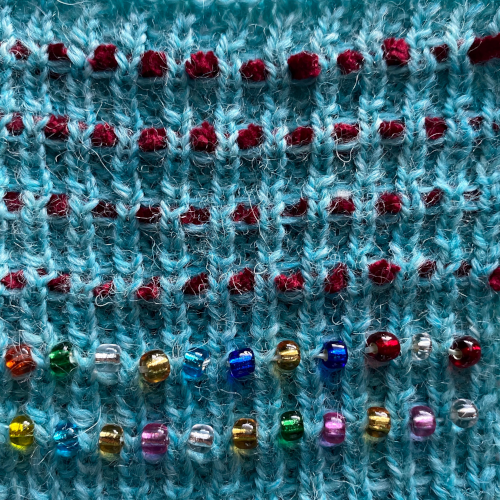 Repeating the experiment with 2 stitches on each edge, this time disengaging the ribber and knitting 2 rows only on the top bed only rather than knitting circular rows and changing ribber settings. The floats are brought closer together, the fabric is far quicker to knit.
 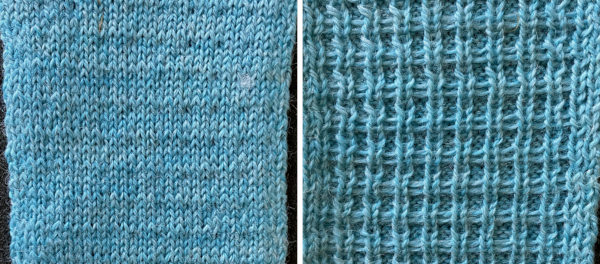 Needle arrangements may be varied to accommodate thicker yarns, or alter the texture by varying both the number of knit rows and circular ones
 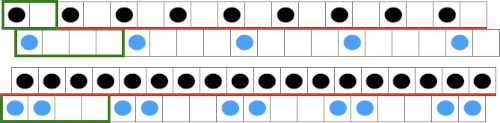 Windowpane bourrelet: beds are supposedly at full pitch, I had better success at half-pitch. The same bed is used for single bed rows as for basic bourrelet, a color change to try: every 6 rows
 ![]()
 Because the top bed needles are in pairs, the EON selection remains evident, each of the first 2 passes completes one row of knitting.
 When only the top bed knits, floats are formed between the needles in work
  Knitting went more smoothly when 3 needles on the top bed were used on each end
 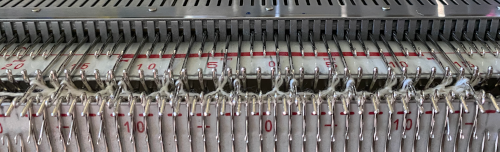 The ribber carriage was disengaged to allow the pattern to knit only on the top bed. When there are needles out of work, floats will be created between the needles in work. The length of the swatch was determined when I noticed the yarn was not properly placed in the feeder, and I had already begun to drop stitches on the left side. It is one of the things to watch for, and which may merit a small preventive hack to keep the yarn from accidentally slipping out of its proper place.
 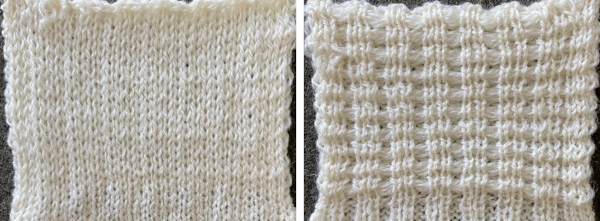 Half Milano with tucked long stitch: the main bed needles will tuck one row, then slip one row. The ribber needles will first knit a row, then slip a row while the second bed knits both rows. Then the ribber needles knit one row then slip a row while the second bed knits two rows.
 ![]() I have had no success with trying to execute my interpretation of the directions without getting floats on the top bed, and the photo in Machine Knitter’s Guide to Creating Fabrics is not clear enough to distinguish if there indeed are floats on the surface of the fabric. The experimental repeat
I have had no success with trying to execute my interpretation of the directions without getting floats on the top bed, and the photo in Machine Knitter’s Guide to Creating Fabrics is not clear enough to distinguish if there indeed are floats on the surface of the fabric. The experimental repeat 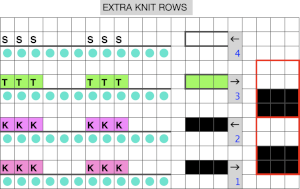 Having the ribber knit every row produces many more rows on the purl side than on the knit, so the vertical all knit columns do ripple a bit. In this stitch version, with pattern knitting beginning from the left, the main bed is set to alternately tuck and slip using the half-pitch setting
  row one preselected for knitting
  the first row has been knit, the second knit row preselected
 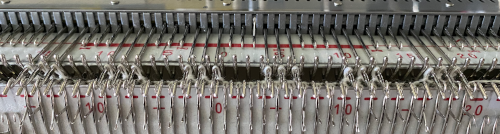 the second row knit, no preselection for tuck or slip
 the tuck row is formed with the knit pass to the right, no preselection
 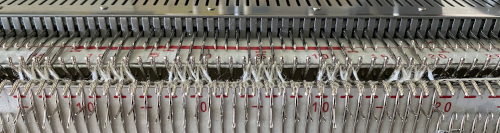 the row of stitches is skipped on the way to the left, preselecting for the next first knit row, tuck loops visible on top of the hooks of the selected needles
  the process is repeated. The resulting fabric:
 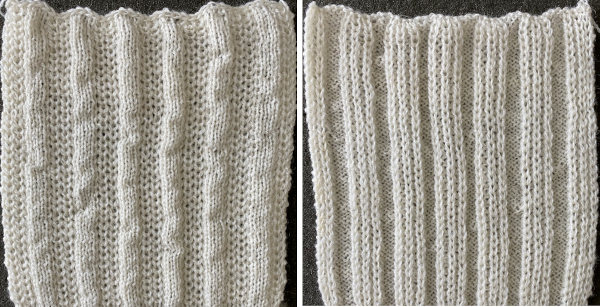 Tucked pique: knit the same as for pique, but with cams set for tuck on the top bed, set beds at half-pitch.
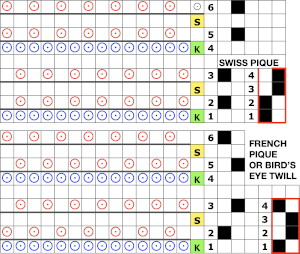
 In DIY the potential for exploration is endless. As always, if needles are out of work on the main bed, end needle selection is canceled. Here slip setting in both directions is used, along with needles out of work on both beds, the 1X1 needle repeat is programmed.
![]() Set up is with ribber needles in work between needles preselected for knit stitches on the top bed.
Set up is with ribber needles in work between needles preselected for knit stitches on the top bed. 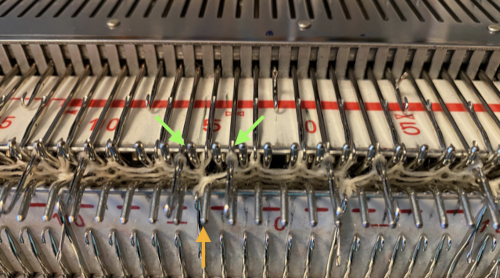 Beginning patterning on the left after the initial preselection from the right, the ribber setting:
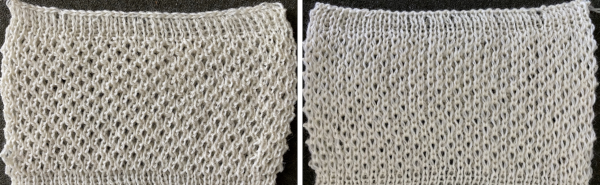
 the result has floats on the purl side, a slightly pleated look on the knit side.
 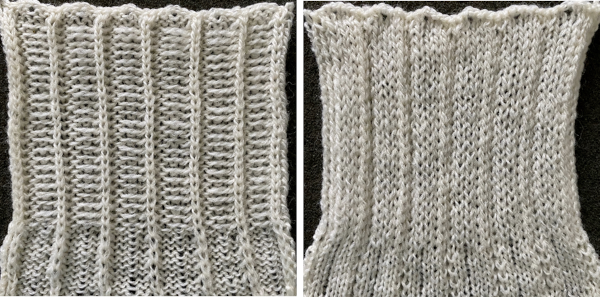 Playing with color and texture: use 2 or 3, change colors every 2 rows, every 4, or at the end of each full pattern repeat.
Change one or both cams from slip to tuck.
Try adding racking when using tucking on the main bed
Vary working needle arrangements with interlock settings.
The ISO illustrations gave clues as to whether the same number of needles are at work in any pass on each bed. The intent with the second pass in each pair of passes is to create a slipped, tucked, or knit stitch in between the alternate needles on the opposite bed.
Cross miss interlock: in this instance, tuck loops alone with no in-between knit stitches are created on the top bed, in the same spots where stitches were slipped on the previous pass. Starting side does not matter, but being consistent makes experimentation easier to understand and follow. The lili buttons, set to slip in both directions remain unchanged on the ribber carriage throughout. The knit carriage is set to slip in both directions as well as to hold. My swatch began with a knit stitch selection on the top bed, marked with a red line the length of the repeat below, and needles were arranged accordingly. The tuck loops are created using a hand technique and holding combined with patterning
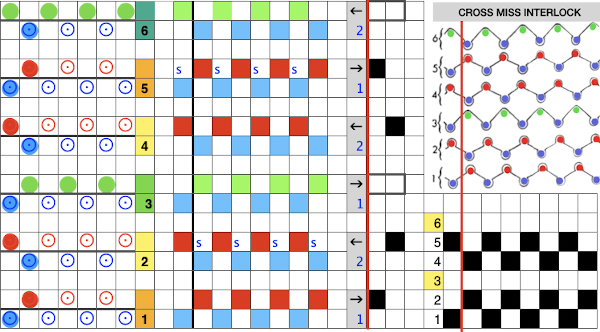 This shows the elongated stitches between ones that will be knit on the next pass. On rows 3 and 6 of the pattern, there will be no needle pre-selection, but the elongated slipped stitches will still be identifiable.
 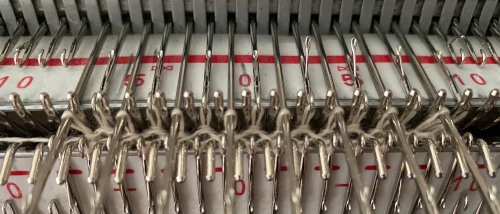 After both no preselection row bring alternate needles out to hold using any EON needle tool. In my case, COL, I began with needle 1 on the left on row 3, alternating beginning with needle 2 on the left on row 6. The number of rows in between hand techs is an odd one, so sides for the hand tech will alter as well. This shows the tuck loops formed EON as the carriages travel to the right.
 Prior to resuming pattern knitting, needles with loops on them need to be returned to the B position, maintaining the EON needle preselection for the next pass
 Repeat the process when design row 6 is reached, beginning with needle 2 on the left. The texture appears on the purl side of the piece, shown on the left
 This repeat uses 6 passes as well. The tuck loops on the top bed occur above slipped stitches in the previous pass, which may be replicated, but the real problem is that every third row on the ribber is also having to tuck on specific needles with no knit stitches between them. The tuck loops happen directly above knit stitches formed in the previous row if the tucking lever is changed manually from R to P on those rows. That is a lot to juggle, a no.
 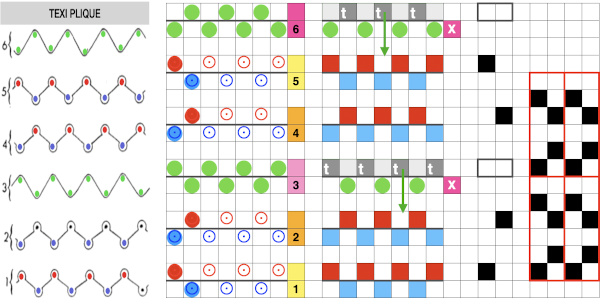 Here the eon tuck would fall on slipped stitches in the previous pass, so that is doable. It is possible to fool the lili selection into believing there are extra needles in work on each side of the ribber, which can “make” the first stitch on either side knit rather than slip or tuck. The method is used in creating a striper backing in Brother DBJ and would require fiddling with needles on the ribber in an irregular selection repeat as well as the hand technique on the top bed. Another definite no.
 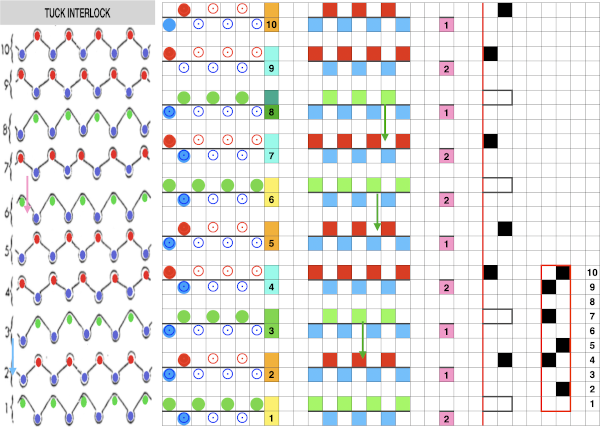 This pattern repeat is a short one, the changes are more regular on the ribber. The hand tech tuck stitches could be formed for 2 rows with all stitches getting worked back to B position in between those preselected for the next pattern row. The lili buttons need to get fooled after alternating pairs of rows, the start of several nos for me.
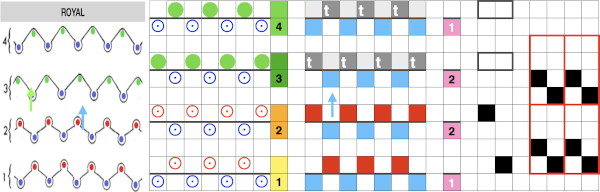
Interlock explorations 1
Interlock is produced commercially on special circular machines and some double system flatbed knitting machines. The patent for the associated circular machine was applied for in 1907, and a copy may be found in the google patents archive. The stitch originally commonly used cotton, in machines that were able to produce a gauge of 20 stitches per inch, often used in T-shirt knits. As technology expanded so did the possibilities for a wider range of gauge and expanded structures.
I have found references to accordion, fleecy, Piquette, cross mix, and bourrelet interlock versions, enough to make one’s head ache when considering forming them on home knitting machines.
The fabric lies flat, relaxes in width but is fairly stable in height. It has good shape retention, raw or cut edges don’t curl, and it will unravel only from the last row knit. There are many variations including eight-lock, bourrelet, Ponte di Roma, and waffle weaves. Many directions are included in Machine Knitter’s source. Interestingly enough, they are shared in the chapter on knit weaving. The instructions given are for punchcard machines, often accompanied by a hand selection of needles in either or both beds. Hand selection on the ribber is easier to track by having an even number of needles in work on the ribber, bringing the first up on the left, then the first up on the right, so the illustrations for stitch formations are written that way, the selected needles knit. Lili button selection begins with slipping the first stitch, followed by knitting the second stitch on both sides. In most fabrics, as long as the remaining repeat aligns starting with a slip stitch on the ribber does not matter, as the complete repeat is shifted over by a needle.  The structure can be knit with color changes to produce vertical stripes of various lengths. My initial proofs of concepts are usually in single colors.
In interlock, alternate stitches are knit on each bed, so it takes two complete carriage passes to complete a single row of knitting, making the resulting fabric thicker and heavier, with the same appearance on both sides, making it reversible. Carriage passes need to be distinguished from design rows. Charts indicate both, but not necessarily numbers reflected on mechanical row counters.
The usual rib configuration 
 Planning for interlock:

The fabric may be executed on Brother knitting machines by programming 1X1 needle selection on the main bed, with the smallest component bordered in red. The Brother ribbers have a matching needle selection to 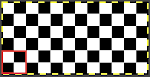 when the lili buttons are used with the machine set to slip in both directions. Studio or Knitmaster knitters would require an RJ1 ribber carriage. I refer to the marks on the Brother ribber needle tape as blanks and dashes. When lili buttons are in use, one must work on an even number of needles. Pairs of both are required. The starting placement on either of the 2 marks does not matter, the first needle on the carriage side on the left will always slip, with the last stitch away from the carriage always being knit. This observable if one “air knits”, slowly moving the ribber carriage from side to side. As in any pattern knitting, needles selected to D or E will knit, the ones lined up in B position will slip or tuck.
 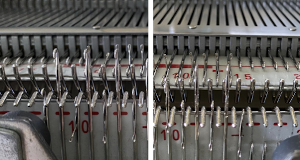 The needle selection needs to be coordinated so that needles opposite each other are not selected at the same time. Since the first needle on the ribber will slip, the first needle used in the pattern preselected on the main bed must be selected forward to knit, and the number of needles in work set up accordingly. Many published illustrations begin patterning from the right. I prefer to do so from the left. My final repeats were planned with needle placement shifted over by one so as to begin with a knit stitch on the top bed, a slip stitch on the ribber due to the fact that the ribber lili selection is fixed to always begin with a slipped stitch. Starting with the carriages beginning on the left side, the first needle in work on the ribber is on the left, the last needle in work on the top bed is on the right, an even number of stitches are in work on each bed. The setup after the first preselection row, with COL:
 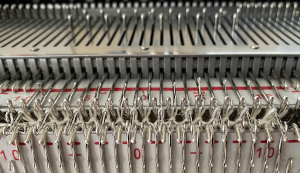 Imagining the sequences required to complete a single row of knitting. I prefer to start with a knit stitch on the left, top bed, end needle selection is canceled
 When testing new ideas, particularly in rib setups, I often begin on a small number of needles and in a way that feels “safe”. This was my first test, with the ribber set at half-pitch. There is an obvious difference in rib before the slip stitch segment and the every-needle, EN, segment.
 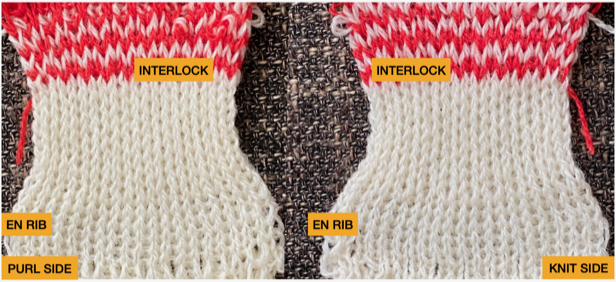 Using a very thin space-dyed cotton, tension 4 on both beds, produced a soft, drapey, squishy fabric. Because once the cast on and needle set up are complete, the knitting occurs on every other needle in alternate directions, full-pitch is used without any problem even though every needle is in use on both beds.
 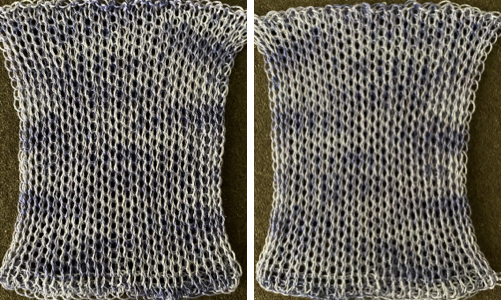 These fabrics will knit both at half-pitch and full-pitch once the pattern needle selection is established. The difference may not be noticeable depending on yarn choice and tension, or ribs may appear to group together in pairs. Pleating in interlock may be produced by removing needles alternating from each group. The tuck setting may be used in these experiments as well, resulting in additional width.
Pique variants: rows 1 and 2 complete one row of knitting using both beds
row 3 knits on the main bed alone
rows 4 and 5 complete one row of knitting using both beds
row 6 knits on the ribber alone
charting out possible actions and repeat adjustment. 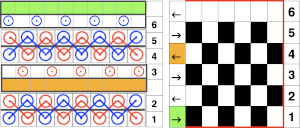 The rows where only a single bed knits will create long stitches due to their being skipped on the opposite bed. Reversing and alternating the selections make the fabric reversible. The tricky part would be canceling out lili action on the ribber every 6 rows when the top bed alone needs to knit, row 3 in the design repeat. To accomplish this, after row 3 is preselected with the carriage on the left by releasing the ribber carriage, lean it forward so it will not engage any needles in work on the ribber resulting in dropped stitches, and moving it to the opposite side of the machine. One can actually get into a rhythm doing this.
 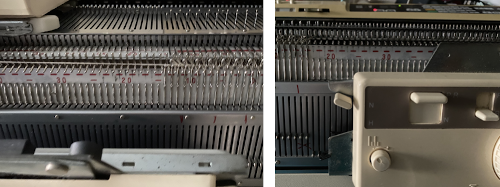 As the knit carriage moves from left to right, only the main bed needle selection will knit. When the KC reaches the right, engage the ribber carriage, and knit until the same design row is reached. The blank row at the top of the 6-row repeat automates and allows for the carriages to knit from right to left on the ribber only, again creating some long stitches on skipped needles.
The selection continues to be EON after proper needle set up, so the full pitch setting is used once again prior to continuing in the pattern. 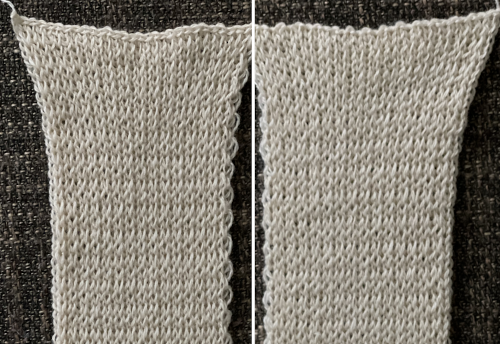 This is an instance of cast-on and bind-off edges that will tend to be pulled a bit wider than the remaining knit. Depending on the final use for the fabric, that may or may not be a consideration.
I usually begin with tentative charts in a spreadsheet to consider what components may be automated and what might be the most advantageous selection of patterns on the main bed. At this point, my solution for no stitches knitting on the ribber for single rows remains to knit the carriage forward and remove it from the equation for that row.
Swiss pique or overknit is a half-pitch fabric. It looks like French pique but is a little narrower. Looking at completed knit rows, identifying the top bed patterning, isolating patterning selections 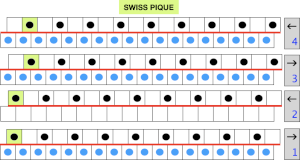
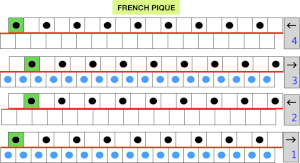 carriage passes required The ribber here knits in one direction, slips in the other. The first preselection row is made toward the color changer, needle set up is checked as for previous samples, the ribber is set to knit to the right, slip to the left
 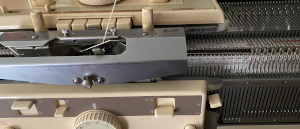 the appearance of the stitches when both carriages knit
 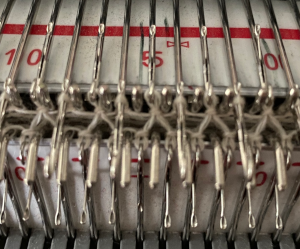 after only the top bed knits with slip stitch floats behind every skipped stitch, which, in turn, will appear longer on the knit face
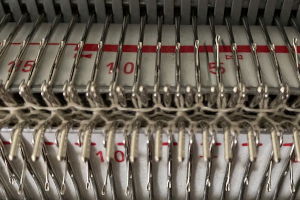
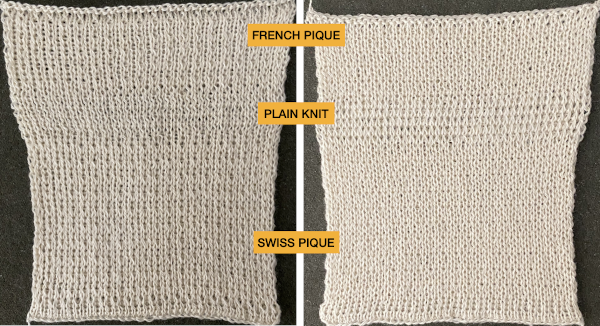 Ponte di Roma
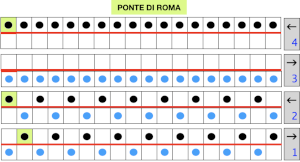
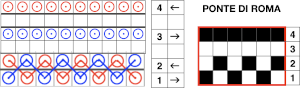 the modified version of the repeat used in my test swatch
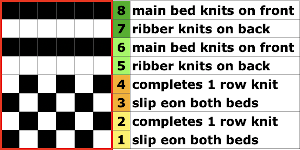 Pairs of rows of interlock are followed by pairs of circular rows. The repeat was changed and the second color was used to define the difference in stitch formation between the two groups, color changes were made every four rows.
 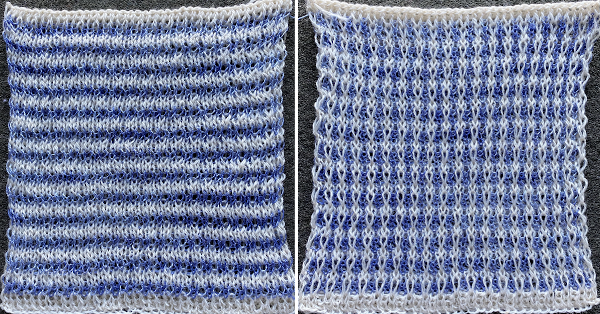 Using a single pair of carriages and having to constantly change cam settings appears far too complicated to manage for producing any length of fabric. My hack for making things easier and faster was to resort to knitting with 4 carriages. One pair was set for interlock operating from the left, the other set so as to achieve tubular knit. The ribber carriage is set to knit from right to left and to slip from left to right when the main bed knits. The knit carriage is set to slip in both directions so that the pattern selection remains continuous. It will slip all stitches while moving to the left on rows with no needle preselection, knit on all preselected needles on its return to the right.
Extension rails are used since both KCs are selecting patterns. I wrote about the concept of using 4 carriages in 2019, in the Geometric shapes on ribber fabrics with tuck stitches: knitting with 4 carriages post. The difference here is that the carriages on the left do not have the added benefit of support from the color changer. The elastics placed as shown may have been more for my psychological well-being than for the continued proper function of machine parts. There is a limit to the width of knitting that may be produced this way with the carriages coupled on each end. The knit carriages may travel off the top bed and onto the extension rails safely, but the ribber carriages must remain anchored enough on the rear rail so as not to go flying off on their own while clearing the end of the belt on each side. 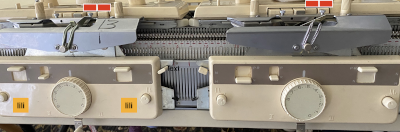 I prefer leaving the slide lever in the center position in all my rib knitting and am not convinced as to a visible difference between knitting at half or full pitch in the swatches with the yarns I have used so far.
Bourrelet is characterized by horizontal relief ridges on one side, is made with an interlocking base, is sometimes referred to as ottoman rib or ripple stitch, is sometimes referred to as Evermonte, is knitted at half-pitch. The combined carriages knit for 4 rows, followed by four rows knitting on the top bed alone.
 Seeking a workaround other than disengaging ribber carriage or canceling lili selection and leaving the carriage on the slip setting in both directions on rows where only the top bed knits, one option to speed up the process is to hack a main bed sinker plate. The result is the ability to use a second knit carriage to select and knit patterns on the top bed only, operating from the opposite side. Four passes on either bed complete 2 rows of knitting. The post on ribber fabrics produced with 2 knit carriages selecting needles describes the process in more detail.
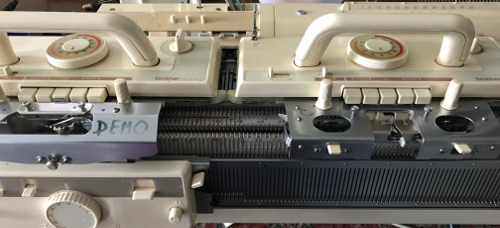
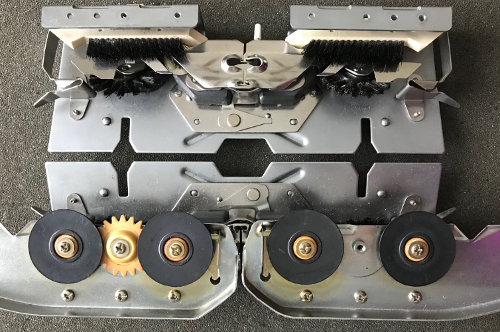 To use the yarn from the right, only before the first carriage pass to the left, its end needs to be knit through a stitch on that side to anchor it. A different cone or ball of the same color and weight yarn may be used, or in my case, I used a thin, different fiber in a second color.
The swatch was knit in four-row sequences, there is a subtle ridge apparent on the knit side created when only its rows knit, which could easily have enhanced by knitting more rows on the single bed. 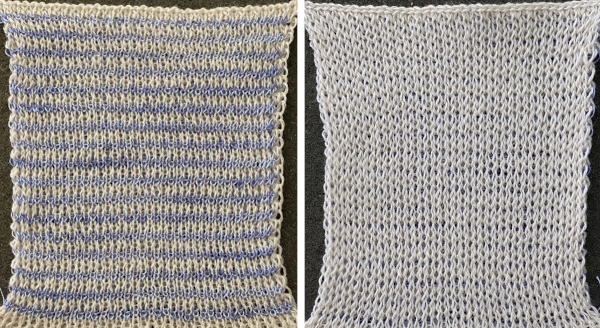 In eight lock hand selection is required on the ribber, the technique reminds one of the double-faced aka reverse jacquard fabrics.
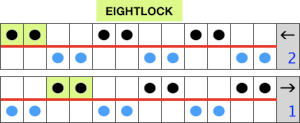
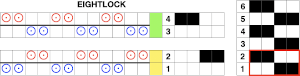 My initial test was to knit twice as wide a repeat, thinking it might be easier to identify stitch formation, working on 4 X an odd number of stitches, in this case, 36, beginning and ending with knitting on the top bed,
  but 1: I actually cast on 34. In a swatch, such adjustments 2: are easy to make. The only automated selection of needles on the ribber is EON using lili buttons, in any other configuration there is no choice but to hand-select needles in between selected needles on the main bed. Casting on at half-pitch begins with the first needle in work on the top bed, the last in work on the ribber. Once the first row has been preselected, and the pitch is changed to P the ribber moves to the left, leaving an even number of needles in work opposite each other on both beds. Both carriages are set to slip in both directions. The knit carriage will knit the automatically selected needles, slip the unselected, while the ribber knits needles brought up manually to D position, skips the remaining ones in B.
A 2X2 needle selection tool for a 9 mm machine or a 7 prong transfer tool may be adjusted and used to help bring up the proper needles to E position on the ribber. 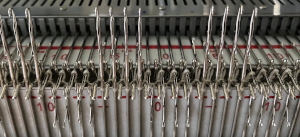
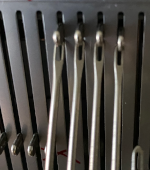 single row pockets are formed.
 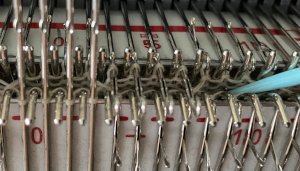 Even though the needles are in full pitch, if an error in needle selection 3: happens across a row a tip-off will be that floats are created on the main bed between selected needles, and there will be a textural change across the row of knitting unless the error is corrected.
If another yarn end or a second color is added, as always, check and make certain the first few stitches knit. Proper lighting and using a yarn color and thickness that can actually be distinguished on the needle bed are useful to avoid 4: dropped stitches not being noticed. The color change 5: shows that a single row is indeed completed with every 2 passes of the carriages, and there is a shift visually in the linear pattern.  The same process could be applied to the charted repeat. A needle selector can speed up the manual work on the ribber for 2X2 selection
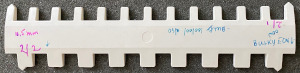
Tuck variations: tuck, cross tuck, royal, texi plique. So far these are my tentative charts for the stitches, each pair of rows represents a full single row of knitting. There are situations where cam settings would require changing from slip to tuck and some locations where the same needle selection repeats on subsequent rows, leaving lots to ponder about and proof, my starting charts are often edited and at times abandoned as the work progresses and both eyeballs and brain have had a break. In this instance, the topic will be reviewed again in a future post. 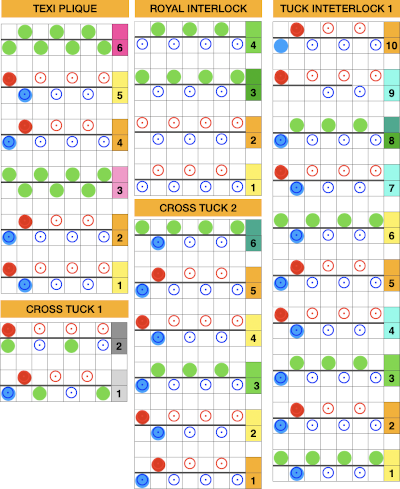
Since most of my swatches are experiments and I work by trial and error, I am now rethinking my repeats and reached the what am I doing? point.
I have some interesting or even pretty fabric swatches so far. Illustrations in published sources are often shown for interlock fabrics on every other needle, my supposition has been that with every needle in use on both beds, at half-pitch placing the needles on one bed in the center of those on the other and working in thin yarns the same repeats would work for achieving knits in these families, so in my illustrations, the symbols are placed to represent needles in work between each other on alternate beds, rather than truly on every other needle. To review, the differences between pattern selection using the slip or the tuck setting: with every needle in work on the ribber, the repeat  is programmed on the top bed with the first preselection row from right to left, the needle setup, depending on the starting and ending needles used.
 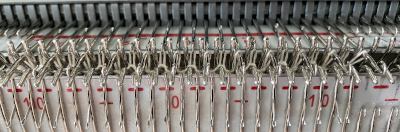 With both part buttons pushed in, in every needle rib, the needles in D will knit, the ones in B get skipped completely. As the carriage passes to the right, the needles for the next row are preselected, come forward holding only the skipped stitches in the row just knit, while the alternate needles are set up to be skipped on the next pass to the left
 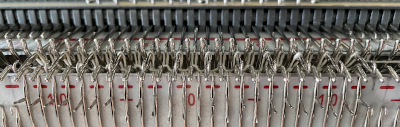 After the two passes one full row of knitting is completed on the patterning bed. The needle preselection is now on the next row of the repeat, in this case, row 1.
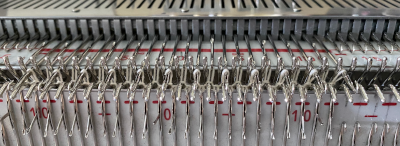 Tuck setting using the same repeat behaves differently. With both tuck buttons engaged, by default, the needle on either side of the tuck stitch will knit, with every carriage pass. The starting preselection is the same as for the slip stitch version, after the first pass to the right, the preselected needles to D will have been knit, with tuck loops formed on the previously non-selected needles. Because the repeat alters needle positions every row, as the right side of the bed is reached, the tuck loops from row one will appear on the shank of the newly preselected to D position needles, ready to be knit, and the alternate group of needles is held back to create the next row of tuck loops as the carriages return to the left.
 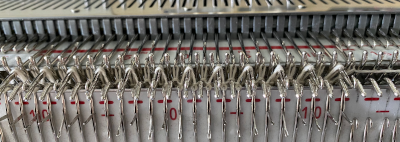 The process repeats throughout. Two passes complete a single row of knitting. The carriage actions for completed passes 1 and 2
 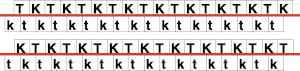 The result is a very pliable fabric that when relaxed off the machine and stretched shows the tuck structure more, is reversible. The basic repeat elongated on the top bed creates a vertical striped pattern if color changes are added, coordinated with needle selections, and are made every 2 rows. As an experiment, the double-length patterning was tried at the top of the swatch. At that point, the fabric is no longer reversible unless the 1X1 fixed needle selection is altered manually on the ribber. My yarn is thin, and the tension used on the loose side.
 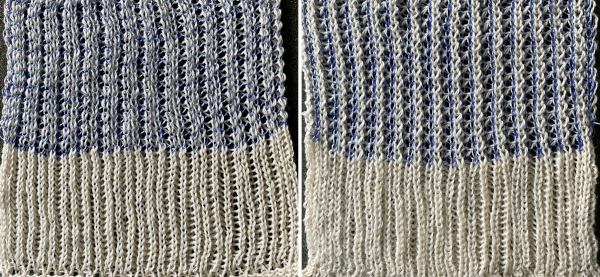 The close-up begins to make the tuck loops a bit more visible. The swatch was knit at half-pitch. Using full pitch in patterns that allow for it, diminishes the appearance of “ladders” between rows of stitches, indicated by cyan arrows.
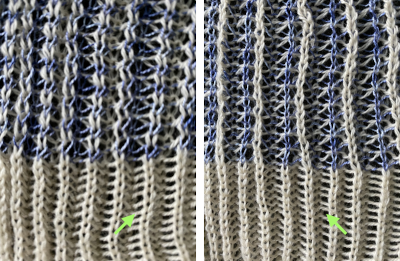
More basics: on the ribber, whether using lili buttons or not, these are the lever and change knob positions available 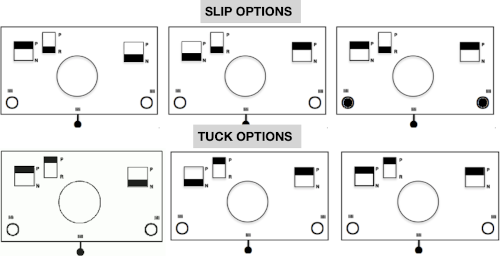 Manually the tucking lever position can be changed from R to P for a single row or more of tucks and then returned to the R placement. Switching between the 2 stitch types on the ribber is far easier and less complicated than changing cam buttons on the main bed, however, there are no rows where only tucked loops are created without knit stitches beside each of them if the lili buttons are in use. Using the slip-tuck Brother selection on the main bed allows for slip and tuck settings to be used at the same time in the same row as long as opposite cam buttons are in use. Some of the old punchcard books include patterns referred to as “lace-like” using the setting. The starting side makes a difference in results as to whether one leads with a slip stitch float or a tuck loop in the actual knitting. Swatches in this post have begun with the first needle in work on the ribber and a forward, to be knit, stitch selection on the first needle on the top bed, with an even number in work on both beds. The end needle selection is canceled unless stated otherwise. The cam setting used for these tests
 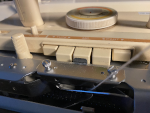 the setup row with the first preselection row knit from the right, ending COL
 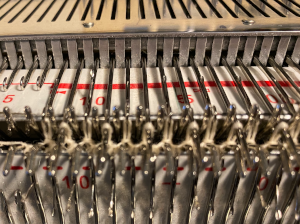 as the carriage moves back to the right, the previously not selected needles will slip and get a tad longer while being preselected forward to D for the next carriage pass. Once the pass is completed, the needle selection has reversed, the now non-selected needles will tuck as those same needles are preselected for the next pass from the right.
The appearance COR 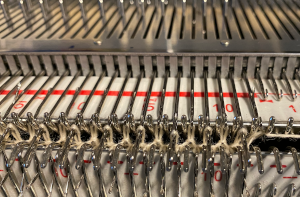 After the return pass to the left, the tuck loops are evident on top of the needles preselected forward to knitting position on the next pass to the right. Two carriage passes fill one row of knitting, here ending COL.
 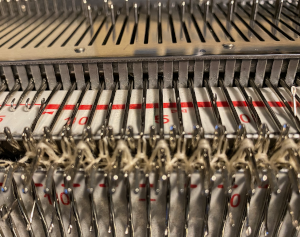 On the ribber, as seen in the thumbnails, one may choose slip or tuck in one direction alternating with an all knit row in the other, or tuck or slip in both directions in an alternating pattern EON_EOR, on an even number of needles with the addition of lili buttons. The appearance on the ribber of the formation of the loops echoes that seen on the main bed changing needle placement unless the carriage is set to tuck in only one direction.
 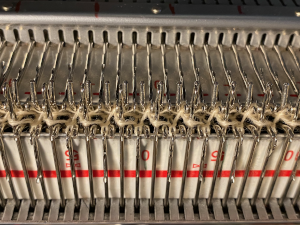 A variant of the single bed capability for changing stitch type formation with direction may be achieved on the ribber by manually changing the tucking lever from R to P when the other side of the knitting is reached.
 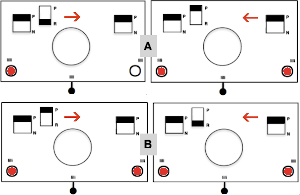 A test can quickly be made to observe the stitch formation with the main bed set to knit every row. I chose the left tucking lever down to R when the carriages were on the left, up to P when the carriages reached the right. The tuck stitches with no further action line up over the knit stitches in the previous row
 ![]() There often are aaargh moments in knitting. This has happened to me with some 7 prong transfer tools before, here it did with a double eye tool on my transfer row prior to binding off. There must be a split in the eye of the tools not visible to the human eye resulting in the stitch entering the eye. So far I have been able to rescue the stitches involved, but not without lots of fiddling and some cursing
There often are aaargh moments in knitting. This has happened to me with some 7 prong transfer tools before, here it did with a double eye tool on my transfer row prior to binding off. There must be a split in the eye of the tools not visible to the human eye resulting in the stitch entering the eye. So far I have been able to rescue the stitches involved, but not without lots of fiddling and some cursing 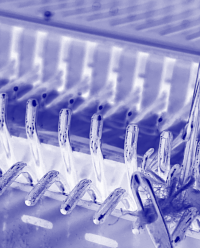 Experiments outside the interlock family: the two-by-two repeat is supplied in most packets of cards that come with the purchase of a punchcard machine. At one point in time, Kate Armitage published a book containing 104 variations of knitting using the card, both single bed and combined with ribber use. There was also the equivalent for card #3, the point being variations are limited only by time and imagination.
 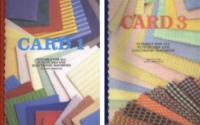 Because I am now completing posts over time online as opposed to working offline and then publishing, the opportunity is there to share mistakes as well as what appear to be successes at the moment. Once again I fell into the not-writing notes because it is so obvious mode and there was enough time lapse between my first knit swatch below and my writing about it that I was no longer certain about the settings used when sharing it. The knit has more stretch and texture than seen in the photo
 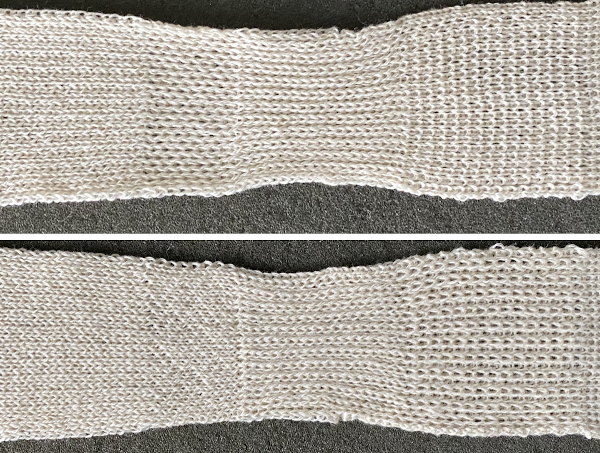 Re-swatching for possible variations, with notes this time and with lili buttons in use. If the cams are not in the up position on the ribber carriage, stitches will knit, not slip. N is king, without cam buttons in use in either bed, stitches will knit even if a pattern is being selected. There is an adequate stretch at the top allowing the fabric to relax achieved by transferring to the main bed and using a latch tool bind off around 2 gate pegs. The possible variations are endless, note to self: remember to keep good notes.
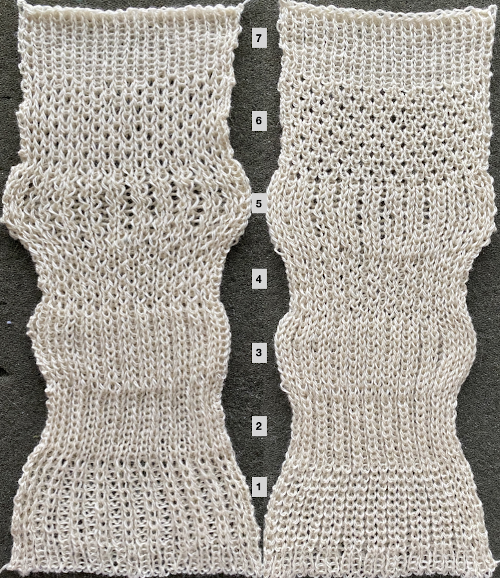
Visualizing maze or mosaic potential from tuck or slip stitch repeats
I have written extensively on mosaics and mazes, color separations required for drawing their motifs, and visualizing the resulting patterns while planning slip stitch or tuck repeats. A recent exchange with a knitting friend, Tanya Cunningham, brought up her idea of using Gimp to investigate the potential of self-drawn tuck patterns becoming pleasing mazes or mosaic designs in color. Tanya has worked extensively with img2track, can be found in the FB group and Ravelry. It had not occurred to me to reverse engineer designs for this purpose. Tanya uses Gimp in a different way than I do, I am hoping she will share her process for this purpose when documented.
I have grown comfortable and fast with the combined use of Numbers and Gimp to achieve what I desire in terms of color separations. At the moment, on the assumption that estimating the overall shape is the goal, a black and white processed rendering may be a sufficient representation of the result.
Punchcard books are a great source of “safe” tuck designs. The best are those that have columns one stitch wide by 2 rows high. They are also more interesting if there are areas of solid black. Patterns from publications intended for use on electronics are often color reversed to start with in order to minimize drawing pixels or to make the design easier to read and will have lots of blank areas. Punchcard users would need to punch the ground as opposed to the design, electronic users can achieve the goal by the flick of a switch or a quick software command. For my first series of steps and methods, I am using the repeat that appeared as a knit using different settings in the post on mazes and mosaics from universal patterns.
Presented on the left, the repeat would be suitable only for thread lace or FI with very long floats. Color reverse allows one to use it for tuck and slip stitch, whether in one color or with color changes every 2 rows. 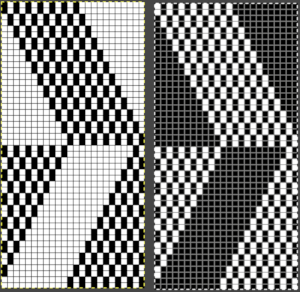 The color separation to approximate the result with color changes begins with the same process as that used for designing mosaics. Once the image is rendered as a correct B/W png with no apparent errors, it is copied and pasted on a larger canvas, the mode converted back to RGB. The red cells make it easier to keep track of rows that need to be color inverted. Using the shift key and rectangle tool, multiple pairs of rows can be selected sequentially and color inverted. Beginning the selection with the very edge of the black squares on the left does not interfere with changing the color of the extra columns on the left side of the design. If pixels are added accidentally drawn in any of the 4 extra columns on the left, they can easily be removed when the completed conversion is cropped to selection for the final repeat.
 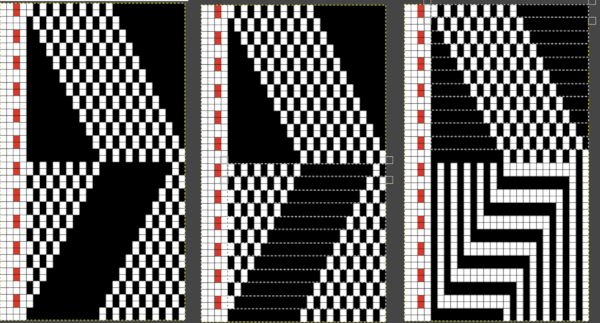 The completed color separation can then be bucket filled to match imagined colors
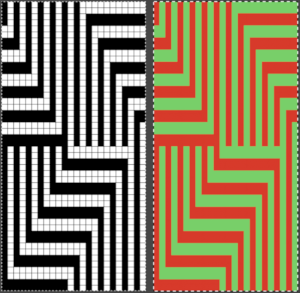 Tiling the repeats to imagine the final knit presents the problem that results from working on a square grid and comparing the results to a knit, which usually produces a rectangular one. The representation for the linear patterns produced on the knit side of the piece cannot factor in some of the added distortions created by the stitch type used. I process my images in Pages or Numbers, depending on which document contains my most recent work and happens to be open. It is also possible to perform the final rescale in Gimp. Most knits approach a 4:3 ratio, with gauge variants in highly textured fabrics. To preserve a clean design, tile and save the original, screengrab the resulting image, load it in Gimp, and rescale. Repeat the motif for the same number in both height and width when tiling it.
 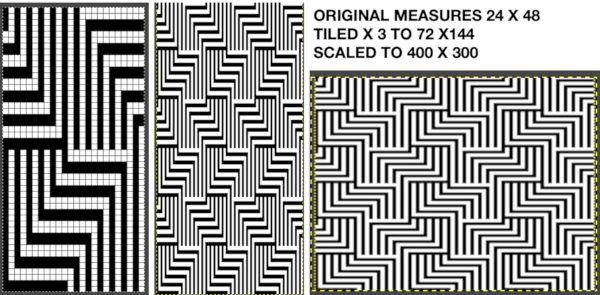 The colored versions before and after scaling, compared with the slip stitch swatch.
  It is possible to produce a rectangular grid to start with on which to draw in Gimp, but the larger canvas size occupies a significantly larger space on the screen, complicating the process. For small designs, however, that may be an option to give one the sense of aspect ratio for the design in the final knit ie in representational FI. To resize the grid in uneven proportions, the chain-link below the spacing values needs to be broken
 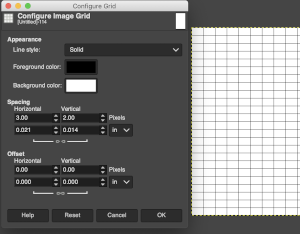 This repeat is designed for an electronic, requires color-reverse. Since it is 24 stitches wide and it may also be modified and used on a card. In this instance, the original marks for rows and stitches are single height. The image is processed, matching the original, rendered double-height, color reversed, and then alternate pairs of rows were color inverted to render the repeat used in the test swatch
 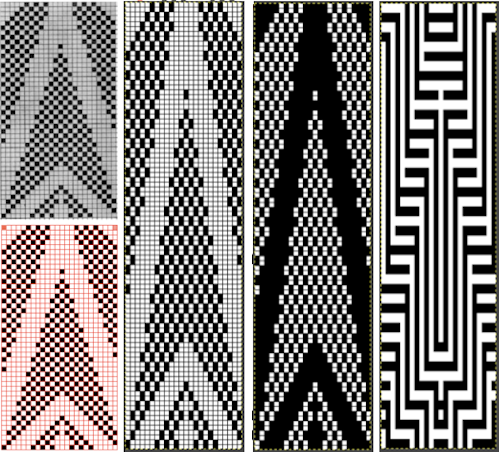 Once again, the possible change in scale is estimated. The repeat though only 24 stitches wide, is 92 rows high. On the left the repeat is shown as it appears on a square grid, to its right is the scaled 4:3 version, in a pixel count approximating the size of the swatch. It takes a bit of squinting to see the pattern more recognizable in the longer repeat in the larger tile
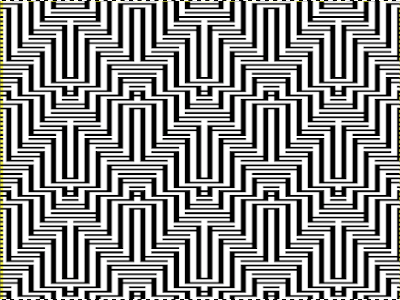
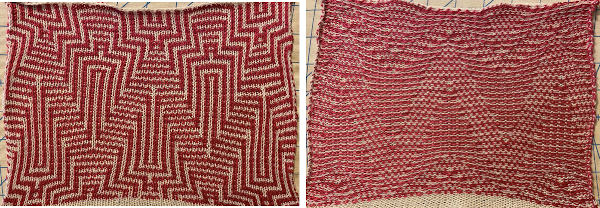
![]() The swatch was pressed, becoming wider than when first off the machine. It was knit using the slip stitch setting, could also be executed in tuck stitch, which would both widen and shorten the fabric and make the purl side more interesting. The software can provide a preview of the result far more quickly than knitting samples, but again, the previews are only approximations of the scale, and cannot show distortions to lines as one adds more texture.
The swatch was pressed, becoming wider than when first off the machine. It was knit using the slip stitch setting, could also be executed in tuck stitch, which would both widen and shorten the fabric and make the purl side more interesting. The software can provide a preview of the result far more quickly than knitting samples, but again, the previews are only approximations of the scale, and cannot show distortions to lines as one adds more texture.
Repeating the process starting with a diamond shape that as given is only suitable for thread lace or FI with problematic floats, 
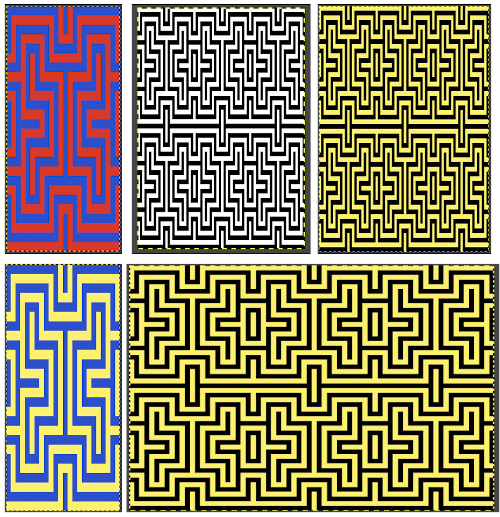
![]() and with a check tuck pattern that may change in aspect ratio considerably when knitted
and with a check tuck pattern that may change in aspect ratio considerably when knitted 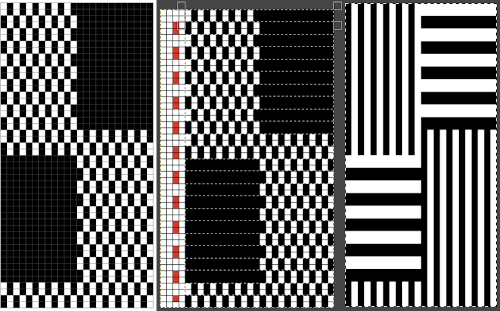
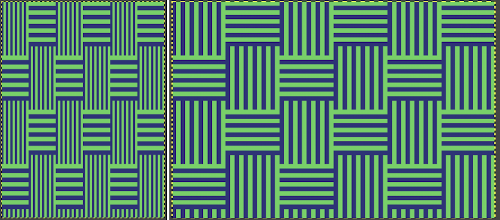 The proof of concept swatch, knit in tuck stitch, begins to show the distortion by the stitch formations, textures vs plain knit, easily seen at the top edge. The bind-off is around 2 gate pegs in order to allow enough stretch.
 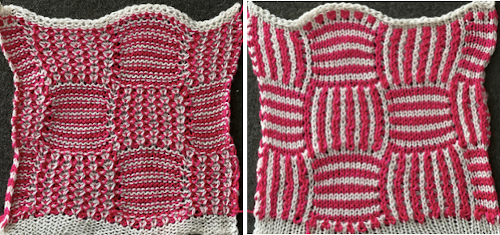 Anyone familiar with either or both programs may find this a very quick way to visualize the scaling and moving of motifs within DIY designs and their possible outcomes prior to test knitting
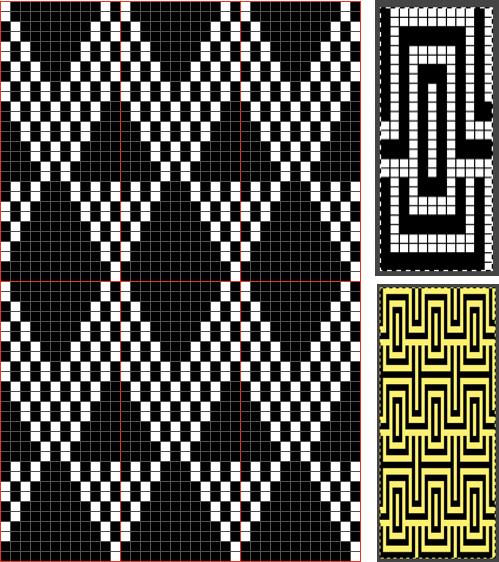
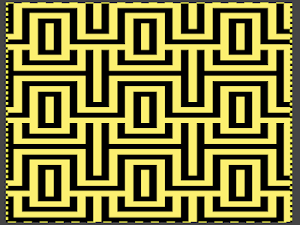
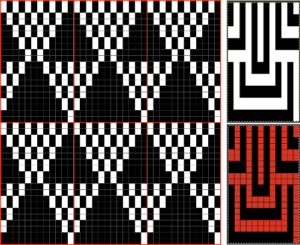
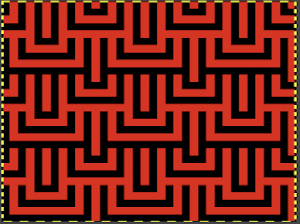
Bowknot aka butterfly or dragonfly stitch in more than one color
There has been a resurgence of interest in this stitch in the FB machine knitting group and discussion exploring a variety of methods for creating it. The inspiration, taken from a commercial sweater-knit: 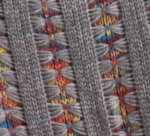 For some single-color variations see Bowknot/ Butterfly stitch on the machine and No longer a mystery pattern.
I program repeats whenever possible, and find it useful in eliminating errors, particularly in longer pieces. My first experiments for this fabric were conducted using the fair isle setting, which is essentially a slip stitch automatically working 2 colors with each pass of the knit carriage single bed.
Slip stitch patterns with hand-transferred stitches, single bed explores some of the methods for bringing slip stitch floats to the knit side of these fabrics, which is part of the hand techniques necessary to achieve the colored versions. As with any knit fabric yarn qualities, color contrasts, and tolerance for proper stitch formation are all variables.
For vertical columns in 2 colors, it is only necessary to program a single, fixed row with a punchcard or electronic, or choose any pixel-based repeat akin to this with full pairs of alternating stripes. I like to plan with selected needles at each end of the sample 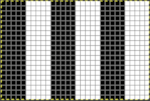
![]() With the machine set to FI, needles not selected will knit a ground color, while selected needles will knit the color in the B feeder. It is easier to manipulate the slip stitch floats from purl to knit side if working in the non-selected groups of needles. Having the columns in odd numbers of stitches makes it easier to handle steps that require finding the center needle in each group if one is wanting to maintain symmetry. In my first test, I manipulated only the selected groups of needles to work the float movements, leaving the floats from the other color undisturbed, which makes the process far more convoluted than it needs to be. In this and the subsequent sample, I manipulated the left and right-hand pairs of floats moving them to the front of the knit, leaving the choice of what to do with the remaining center floats. In A they were brought up on top of the center needle in E position before knitting the next row. In B they are lifted into the hook of the needle and brought out to the B position so that the stitch is knit in color 1, while in C the remaining single stitch floats are simply left alone. In a couple of spots the yarn split, getting hooked up creating bleed-through, and what would result in an issue if that happened on the group of floats that were to be moved.
With the machine set to FI, needles not selected will knit a ground color, while selected needles will knit the color in the B feeder. It is easier to manipulate the slip stitch floats from purl to knit side if working in the non-selected groups of needles. Having the columns in odd numbers of stitches makes it easier to handle steps that require finding the center needle in each group if one is wanting to maintain symmetry. In my first test, I manipulated only the selected groups of needles to work the float movements, leaving the floats from the other color undisturbed, which makes the process far more convoluted than it needs to be. In this and the subsequent sample, I manipulated the left and right-hand pairs of floats moving them to the front of the knit, leaving the choice of what to do with the remaining center floats. In A they were brought up on top of the center needle in E position before knitting the next row. In B they are lifted into the hook of the needle and brought out to the B position so that the stitch is knit in color 1, while in C the remaining single stitch floats are simply left alone. In a couple of spots the yarn split, getting hooked up creating bleed-through, and what would result in an issue if that happened on the group of floats that were to be moved. 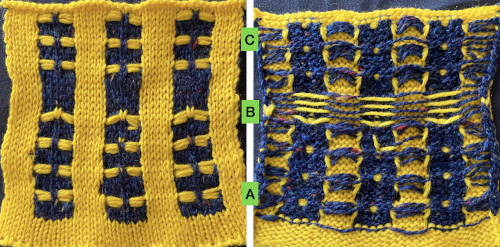 As stated, the process is easier and quicker working on non-selected groups. Above, the yellow yarn was thicker than the blue. To maintain proper color selection in the non-selected column, the center needle needs to remain in the B position, with the slipped stitch forming floats below it before the next row knits. If the needle is brought out to E, it will knit in the contrast color, forming floats in that color on the purl side, and a knit stitch in what was planned as an all-solid column on the knit. The results are seen at the top of the first sequence in the swatch. I chose to limit my number of floats to 4 to keep the process manageable, moved stitches on the left of the center needle to the front of the knit, and then followed with those to its right. One of the many things to explore in hand technique fabrics is finding a way to handle tools that may be more comfortable than others, practicing on single blocks of color first can help establish that. Below both yarns are equal in weight and thinner. The floats formed by the color in the B feeder are also hooked up on the center needle in each vertical group in that color, forming a pattern on the purl side as well.
 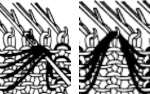 The needle position for selection for B feeder yarn also needs to be maintained. Bringing the needle out to E ensures it will knit on the next pass. In both of my tests, the slip stitch floats on the knit side lie more horizontally than the lifted-up floats on the purl.
 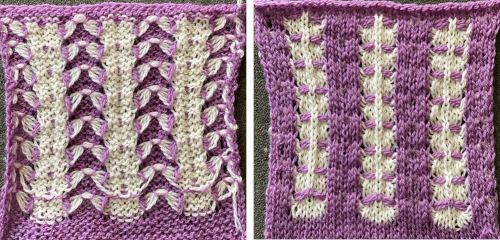 Other ways of working the fabric, along with a history of the FB thread offered by Claudia Scarpa including a single bed slip stitch version with an English downloadable PDF http://ratatatata.it/dragonfly/.
Her youtube video illustrates a different way of managing floats than mine.
JuliKnit offers 2 videos knit on Silver Reed 1, and 2. Both are knit using the ribber, the first method uses holding to gather loops on each of the beds, and the second begins to address automation for needle selection on the top bed using DAK, with the selection on the ribber remaining manual. The stitch illustrations generated in DK offer knit stitch simulations such as these  Executing her versions on a Brother machine requires some interpretation. The fabric is constructed using the ribber in conjunction with the main bed. The vertical columns are 5 stitches wide.
Colors are worked one at a time. If a color changer is to be used, an even number of rows would be required for each pattern segment. For 4 floats followed by an all-knit row, the repeat would be 5 rows high, so one consideration would be operating with the second color from the right, requiring free passes. Studio machines release the top of the knit carriage at an angle from the bottom, so that explains the move seen in the video for the carriage to be moved to the right. Brother machines use the slip stitch setting in either or both directions, to achieve that. Using both buttons avoids any confusion. All needles in use must be in the B position for the “free pass” to avoid dropped stitches. The number of rows gets adjusted in the videos eventually to 6.
When working on the top bed, the ribber is set to slip both ways.
For those unfamiliar with Studio settings a brief review: the Studio SRP60N ribber introduced the option for knitting emulating the lili selection in Brother.  The grey plastic piece on the left of the studio ribber, the autoset lever, when cleared would essentially duplicate setting Brother levers to slip manually in both directions, clearing it again would return it to knit.
 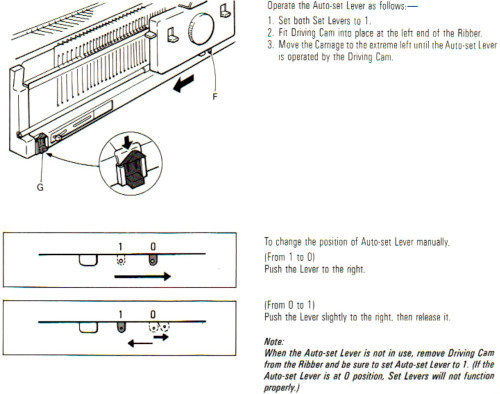 Cast on either EON or EN rib. Transfer needles in a 5X5 rib beginning and ending with a single needle in work on the ribber on the far left and right, setting up the initial needle arrangement for the fabric. Black dots represent needles in work on both beds, and the red ones the initial needles that will be worked in the holding position on the top bed.
 ![]() The video knits each color for an even number of rows. Bring the first and last needle into work on the ribber before knitting each row. The remaining stitches are knit only on the main bed. The knit carriage is set to knit, the ribber to slip in both directions. Pick up the chosen color on the left, and knit for an odd number of rows, when the carriages are on the right, push held needles back to work position so they will knit on the pass back to the color changer. The ribber knits the next color. A review of the Brother ribber carriage for those not familiar with it
The video knits each color for an even number of rows. Bring the first and last needle into work on the ribber before knitting each row. The remaining stitches are knit only on the main bed. The knit carriage is set to knit, the ribber to slip in both directions. Pick up the chosen color on the left, and knit for an odd number of rows, when the carriages are on the right, push held needles back to work position so they will knit on the pass back to the color changer. The ribber knits the next color. A review of the Brother ribber carriage for those not familiar with it 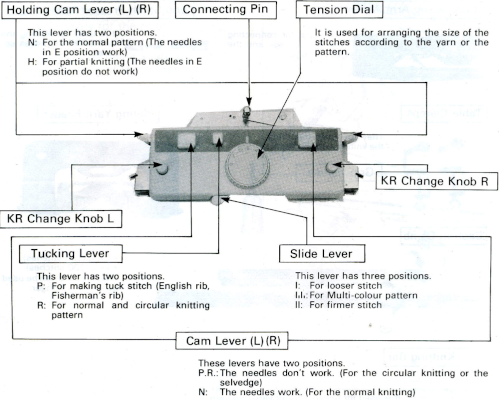 COL: the main bed will now slip in both directions, set it accordingly. The ribber only knits. The center needle on the top bed that held the butterflies is transferred down to the ribber, illustrated in the red dots over black ones. The center needles in the blank areas on the ribber, blue dots, are brought up to hold, the ribber levers are set to knit in both directions, holding levers are set to hold in both directions as well,
 ![]() knit for an odd number of rows, with carriages on the right, push held needles back to work position so they will knit on the pass back to the color changer. COL: the knit carriage changes back to knit settings, and the ribber slip setting in both directions is restored. The center stitches that formed ribber butterflies are transferred up to the top bed, and needles at the center of the blank areas on the top bed are brought out to hold. The color is changed, and the process begins again.
knit for an odd number of rows, with carriages on the right, push held needles back to work position so they will knit on the pass back to the color changer. COL: the knit carriage changes back to knit settings, and the ribber slip setting in both directions is restored. The center stitches that formed ribber butterflies are transferred up to the top bed, and needles at the center of the blank areas on the top bed are brought out to hold. The color is changed, and the process begins again. ![]() My first efforts were met with dropped stitches after a few rows and expletives. My second effort fared no better, I simply could not avoid dropped stitches on either bed, perhaps because of my yarn choice and the small tension it required. Working on the single bed once more, using the slip stitch setting and knitting one color at a time, I achieved a fabric more similar to the original photograph. The chart reflects the number of needles in my test swatch, with a 2 knit stitch border added on each side
My first efforts were met with dropped stitches after a few rows and expletives. My second effort fared no better, I simply could not avoid dropped stitches on either bed, perhaps because of my yarn choice and the small tension it required. Working on the single bed once more, using the slip stitch setting and knitting one color at a time, I achieved a fabric more similar to the original photograph. The chart reflects the number of needles in my test swatch, with a 2 knit stitch border added on each side  Each color knits for 4 rows. At the end of each 4-row sequence, the non-selected needles allow for manipulation of the floats.
 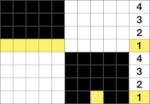 The transfers in the piece begin on row 5. Before the next row is knit in the alternate color, the slip stitch floats are reconfigured, bringing stitches 1 and 2, 4 and 5 in each group to the knit side of the fabric, leaving the center floats undisturbed.
 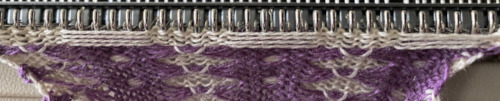 Bring the whole group out to the E position so they will form knit stitches with the first row of contrast as the carriage moves to the right.
  Knit 4 rows. The carriage will once again be on the left unless 2 carriages are in use from opposite sides. The center needle in each group of 5 will be left unselected.
  Lift floats up onto that center needle, and bring it out to E position so that it will form a knit stitch in the next color to be used.
  The final result is closer to the original
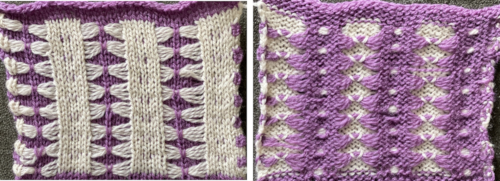
Slip stitch patterns with hand transferred stitches, double bed
It is also possible to create solid color patterns on the purl side on a striped ground by at first transferring all stitches down to the ribber, then, in turn, using slip stitch selection on the top bed to choose only the stitches that will be manipulated on the main bed. A similar repeat worked on the single bed, may be found in the previous post on Slip stitch patterns with hand transferred stitches, single bed. And a relative, including a double bed version: Bowknot/ Butterfly stitch on the machine, and: A no longer “mystery pattern”.
When working over a striper backing, the color changer is generally in use, and changes happen in even numbers of rows. In my test swatches changes are made every two rows, and whether single or double bed, the color yarn creating the solid color shape needs to not knit while the alternate color is worked only in the background. The held stitches grow in length.
End needle selection is canceled in my samples.  The extra needle selection prior to the next all knit row helps track the direction of the moves, stitches are moved three at a time, there are no cable crossings
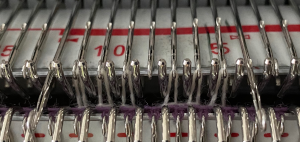
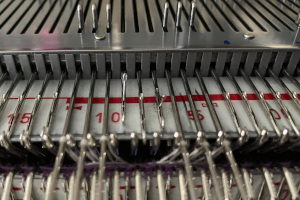 Things do not always “work”, that is part of the process
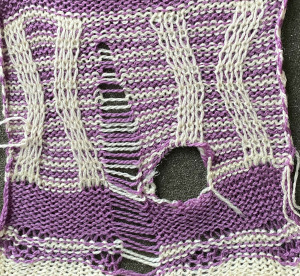
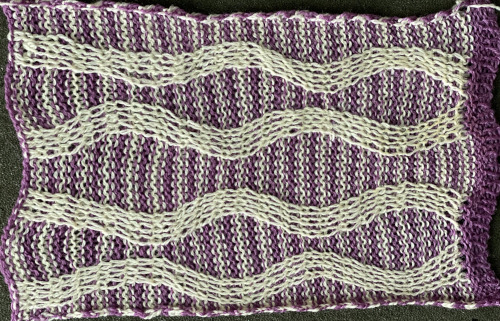 The next step for me was to explore cable crossings on elongated stitches working double-bed. A basic pattern on any programmable machine for playing with elongated stitches on one bed while knitting every stitch on the other is to program pairs of blank rows followed by solid punched or black pixel rows. The yellow line in this chart illustrates the row on which cabling might occur.
 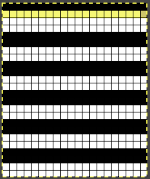 Programming the width of the needle bed allows for only the stitches forming vertical columns in chosen locations to be put into work, allowing one to place groups that will involve crossings anywhere on the chosen pattern width. A base is knit in the ground color, which slips for 2 rows on the main bed, creating the elongated stitches that will be cabled. I had no problem with 2X2 cables,
 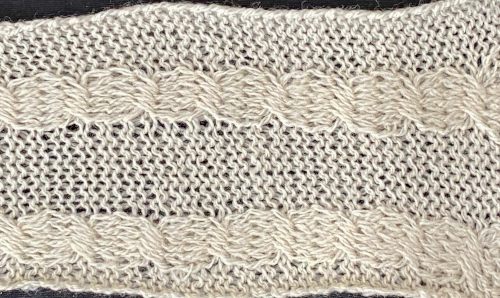 but as in working on the single bed, for me, straightforward 3X3 crosses were not cooperative, even when I attempted to introduce extra knit stitches on the sides that were then dropped for added give on the last slipped row, taking me back to the drawing board.
 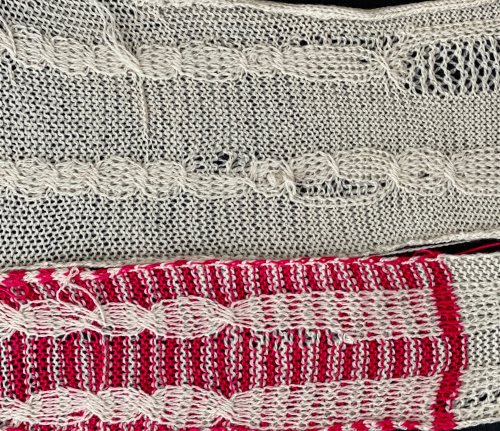 Cabling, returned to in a later post, with adjustments, making things work.
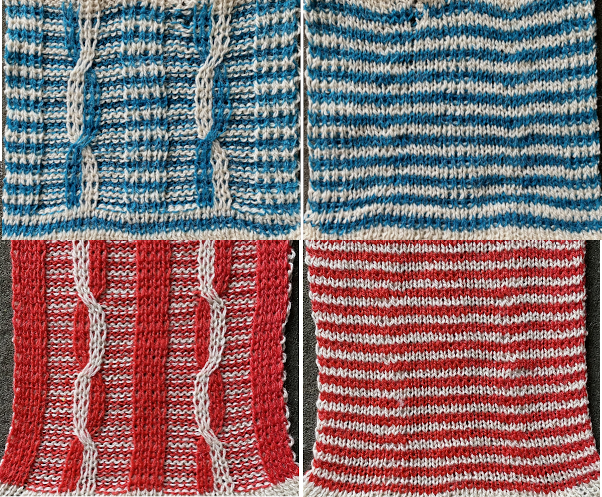 Continuing with shapes on striped grounds, this is the result of a self-drawn pattern
 ![]() The approach is different than in the blog post on Brother shadow lace, rib transfer carriage, where shapes were created in only one color, and the textured patterns by bringing needles in and out of work on the ribber. To create the striped ground in the above, color changes happen every 2 rows. The ribber knits every needle, every row. With the ribber on half-pitch, the transfers are all made from the main bed needle to the needle immediately below it and slightly to its left.
The approach is different than in the blog post on Brother shadow lace, rib transfer carriage, where shapes were created in only one color, and the textured patterns by bringing needles in and out of work on the ribber. To create the striped ground in the above, color changes happen every 2 rows. The ribber knits every needle, every row. With the ribber on half-pitch, the transfers are all made from the main bed needle to the needle immediately below it and slightly to its left.
In the chart on the left, the green cells represent black pixels that will be programmed for patterning on the top bed, red cells, the stitches on the top bed that need to be transferred down to the ribber on the respective row.
Grey cell rows stand in for all blank ones in the final repeat. ![]() This design is too wide for punchcard machines, but the fabric is possible there as well in different widths, isolated or all over. After casting on, all stitches are transferred to the ribber. Border, plain knit stripes can be added by simply having a larger number of needles in work on the ribber than the planned pattern width. With no needles selected in the pattern on the top bed, those ribber stitches will simply knit every row.
This design is too wide for punchcard machines, but the fabric is possible there as well in different widths, isolated or all over. After casting on, all stitches are transferred to the ribber. Border, plain knit stripes can be added by simply having a larger number of needles in work on the ribber than the planned pattern width. With no needles selected in the pattern on the top bed, those ribber stitches will simply knit every row.
These fabrics are a little different than those with needles out of work on the main bed while using the slip stitch setting, in which case KC II on electronics, end needle selection needs to be turned off on all models. When all needles are in B position, depending on the pattern, KCI may be used. Simply using KCII eliminates any guesswork.
The first preselection row is toward the color changer with the knit carriage set to slip in both directions, only patterned area needles need to be in work. Non-selected needles, as usual, perform no function while those corresponding to where black pixels or punched holes occur will pick up loops on the top bed, initially creating eyelets, and then continue to form knit stitches until any of the corresponding stitches are transferred down to the ribber. The pattern yarn forms a short stitch in one direction, an elongated one in the other. A detailed close-up of stitch formations 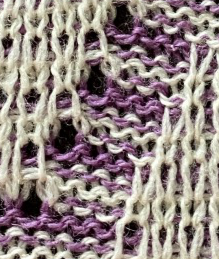 Plain striped rows in areas without the design continue to be knit in the slip stitch setting, or every needle in work on the top bed will pick up loops.
When hand manipulating stitches it pays to be mindful of maintaining all needles in the pattern in B position, not accidentally sliding them back to A. ![]() In the past, I have attempted pile knitting on my machines. Studio machines produce the best fabric in the category, I have read Toyota performed as well. Books such as this are a good source for pile designs, including the card repeat used in my proofs of concept
In the past, I have attempted pile knitting on my machines. Studio machines produce the best fabric in the category, I have read Toyota performed as well. Books such as this are a good source for pile designs, including the card repeat used in my proofs of concept  Punchcards, in theory, may be used as given and set to double length, while for use in electronics drawing the pattern single height and using the double-length setting is also an option. Starting sides and fixing errors have always been more confusing for me when using the double-length feature, I prefer to punch holes or program pixels as I intend to knit them. The isolated reduced repeat for use in the electronic is charted, with an initial one-pixel error in 2 consecutive rows, marked with red cells. In transcribing any design, it is worth checking repeats multiple times after eyeballs and brains have had a rest. This was my start:
![]() The design process using Numbers before exporting the repeat to Gimp for reduction to B/W png: in this approach, the repeat is drawn double height to start with. The red cells represent stitches that will be transferred down to the ribber before knitting the next row in the pattern color from left to right.
The design process using Numbers before exporting the repeat to Gimp for reduction to B/W png: in this approach, the repeat is drawn double height to start with. The red cells represent stitches that will be transferred down to the ribber before knitting the next row in the pattern color from left to right. 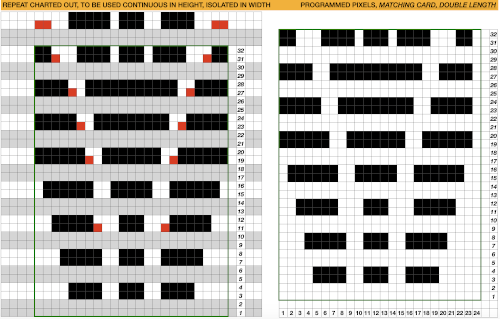 The first test is of an isolated motif. The yellow arrow points to the pixel error, the cyan to the positions where some needles in the full repeat were “accidentally” placed in A position, not B, resulting in pattern stitches not being formed.
 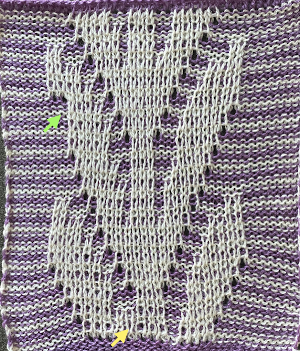 Another review of the original card, a final adjustment in the repeat:
![]()
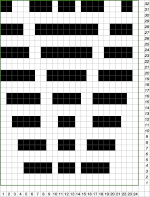 Tiled view, committing to the result,
  the larger test swatch
 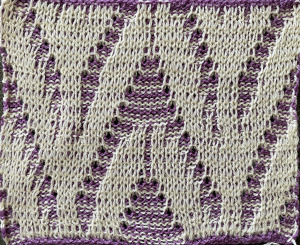 Two other options for charting the fabric in numbers: A. draw the repeat as given
B. starting cell size used was 20X20, change the height to 40
C. mark corner blank cells and screengrab for Gimp import
D. the repeat processed in Gimp matches the first version
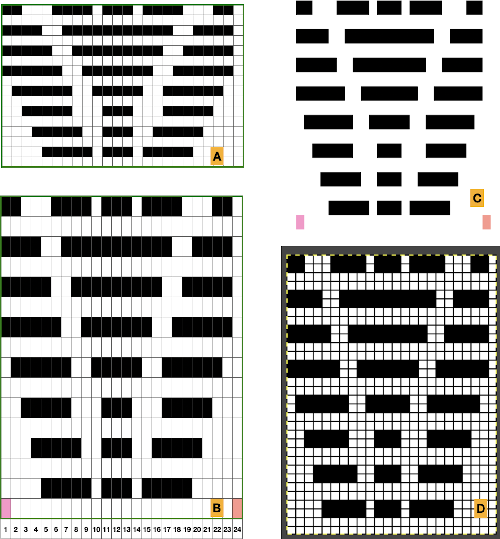 Any simple Fair Isle repeat may also be used. The numbering in the charts matches what is normally seen on the left edge of the tables
A. the FI repeat, 8 rows high
B. a table slightly longer than double the repeat height, hide even-numbered rows
C. copy and paste the FI design on the table with hidden rows
D. unhide rows, isolate the repeat, adjust cell height, and continue to process as described above 
The original punchcard design may be used in a different manner if the goal is a single color fabric. The design may be copied as is, then filling in the blank lines with the same holes or pixels as in the row directly below it. Here, in addition, the repeat is altered to accommodate a half drop repeat on the right with a few pixels changed.
![]() My initial proof of concept is 32 stitches wide, narrower than the full repeat
My initial proof of concept is 32 stitches wide, narrower than the full repeat 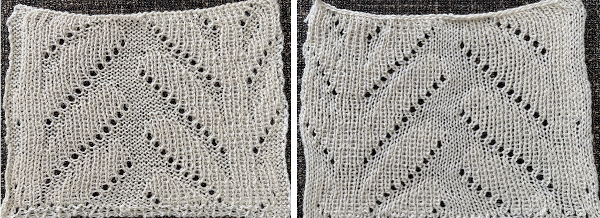 The rows need to be scanned before every pass, as transfers to the ribber are not symmetrical due to the shapeshift on the right of the design.
 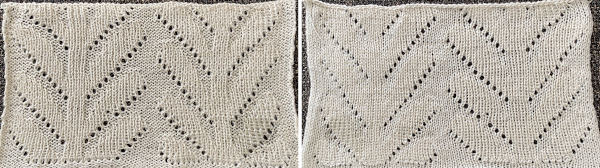 The world of possibilities grows even further for single color shadow lace, when, examining the same design, one recognizes that the pile knit card, with the blank rows filled in in pattern, is the same as the fair isle version of the repeat, rendered double long
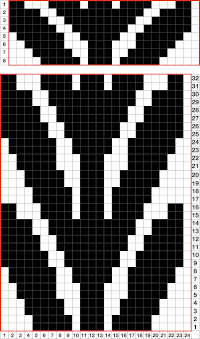
![]() Some authors have suggested plaiting as an alternative to creating shapes with true brioche, which can be complex. To my mind, plaiting falls in the beauty being in the eye of the beholder category, I prefer far crisper color distinction in my knits. This sample from the previous shadow lace post uses thick and thin yarns
Some authors have suggested plaiting as an alternative to creating shapes with true brioche, which can be complex. To my mind, plaiting falls in the beauty being in the eye of the beholder category, I prefer far crisper color distinction in my knits. This sample from the previous shadow lace post uses thick and thin yarns 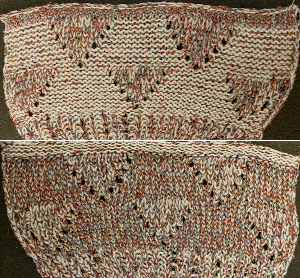 Using the image adapted from the studio pile card once more, I tested using 2 yarns of similar weight, the adjusted test repeat:
 ![]() its accompanying test swatch
its accompanying test swatch 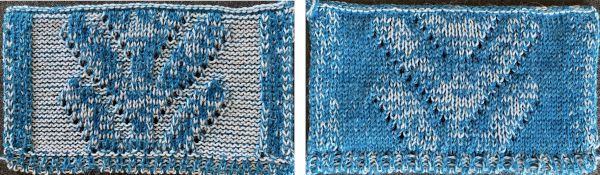
I have long been interested in pleated knits, both single and double-bed. Working single color or with plaiting makes the repeats easier for DIY designing. Seeking proof of concept for possible “origami” pleating: on the left, yellow marks the spots for transfers to the top bed, which will create folds out toward the knit side. For folds toward the purl side, stitches are manipulated on the ribber, with the final design repeat shown on the right. 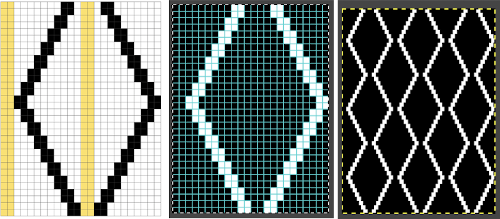
![]() The ribber carriage is set to knit throughout. The needle from which the stitch is transferred to the main bed is moved completely out of work. After the transfer, the main bed needle accepting it is returned to the D position.
The ribber carriage is set to knit throughout. The needle from which the stitch is transferred to the main bed is moved completely out of work. After the transfer, the main bed needle accepting it is returned to the D position.
The knit carriage is set to slip in both directions, end needle selection is canceled. Subsequently, non-selected needles, 1 in the photo, serve as guides for transfers to the ribber, made every two rows. The needles emptied from the transfers need to be maintained in the work, B, position. The selected needles, 2 in the photo, will pick up loops automatically, creating eyelets as seen in previous swatches. 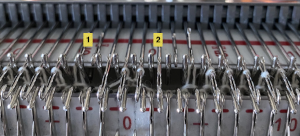 The swatch would have benefited from tighter tension or thicker yarn, the folding effect is greater than reflected in the photo. Initially, those pairs of center stitches were not transferred up to the main bed, showing the absence of that fold when that action is omitted. Any of these patterns benefit from deliberate planning of the placement of the pattern on the main bed, not done in this instance.
 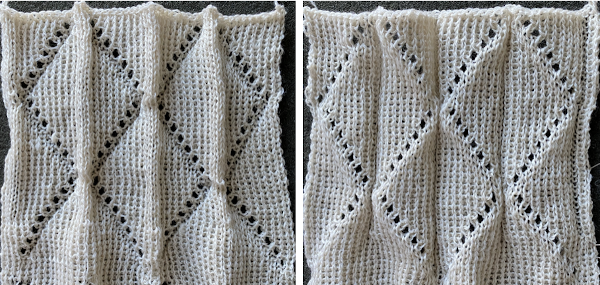 Transitioning to smaller repeats, tiling will help avoid patterning “errors” as seen here where the full diamond shapes reverse
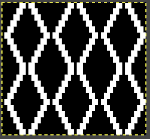
![]()
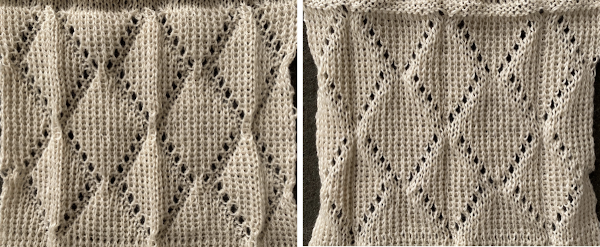 Graph paper or spreadsheet planning will help avoid misses in necessary transfers in areas where all needles have been selected
 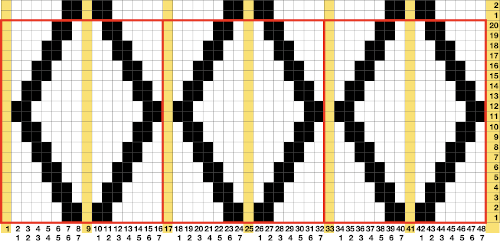 the file for multiple repeats after color reverse
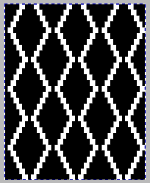
![]() the test knit as using transfers as described above
the test knit as using transfers as described above 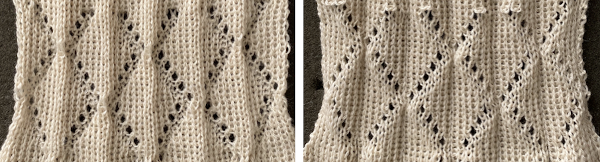 and here the empty needles creating the eyelets were filled by picking up the purl bar from the stitch below on the ribber. A lot of work for a change that is not significant in the structure of the fabric.
 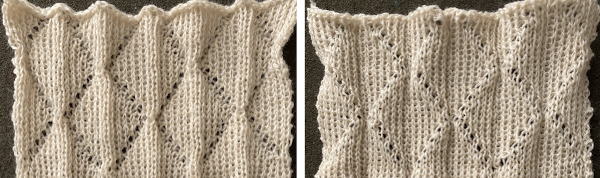 In my last test on eliminating holes and how that affects the degree of the folds, transfers to fill in newly selected needles on the top bed were made from below the adjacent needle on the top bed, B, as opposed to immediately below on the ribber, A
 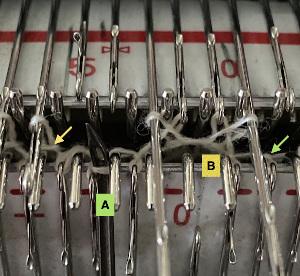 If patterning is used to track transfers, needle selection on the top bed needs to be maintained throughout, the result of this process is not interesting enough and just too fiddly and time-consuming for me to be interested in exploring it further
 ![]() There is an interesting scale and depth of fold comparison between this version and the first using the repeat, achieved by tightening the tension as much as possible, and possibly by reducing the size of the eyelets.
There is an interesting scale and depth of fold comparison between this version and the first using the repeat, achieved by tightening the tension as much as possible, and possibly by reducing the size of the eyelets. 
Exploring manipulations with more than one color patterning on the main bed: there is a type of DBJ that relies on knitting the same color for 2 rows that is inherently different from the KRC built-in separation that is the default in the Japanese model machines. It causes elongation in the design, while the KRC version minimizes it. The differences and methods of the corresponding color separations have been discussed in other posts. Stitch manipulations may occur when working DBJ as well. Simple designs make the best start for beginning to explore the topic 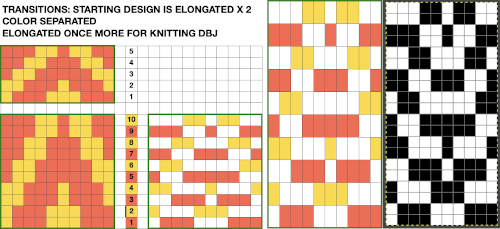 An easy variation is to plan full repeat segments mixed with a striped ground worked only on the ribber
 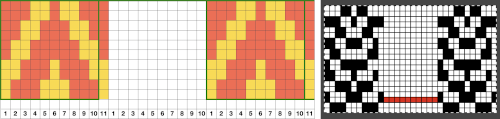 Take care if copying and pasting single columns to alter a repeat width that the whole column is indeed copied and that if using the pencil tool flood fill is not used unintentionally. The original intent was also to correct the elongated slip stitch segments on the edge of the programmed vertical designs marked in blue, but the paste with errors in red accomplished creating the same issue
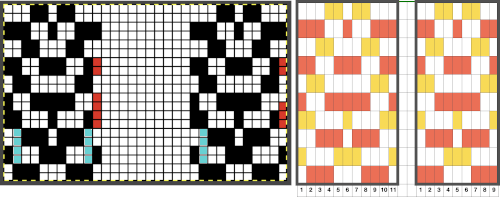
![]() The design is programmed for DBJ. Because of the color separation used, the first preselection row is from right to left. Before knitting the first pattern row, all 10 non-patterning needles on the main bed were transferred down to the ribber.
The design is programmed for DBJ. Because of the color separation used, the first preselection row is from right to left. Before knitting the first pattern row, all 10 non-patterning needles on the main bed were transferred down to the ribber. 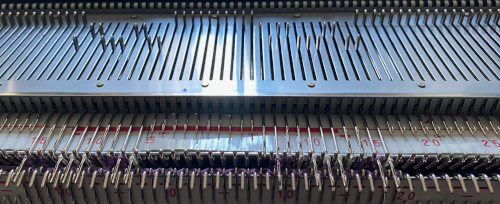 The first segments were knit using striper backing, with the ribber knitting every stitch, every row, in both colors. When a slip stitch is used with needles out of work on the main bed, end needle selection should be canceled. In A it was not. The result is that end needles alongside the out-of-work column knit with each color in each row. In B, end needle selection was canceled, and one can now see the elongated slipped stitches that result from areas that should have been marked with the contrasting color
 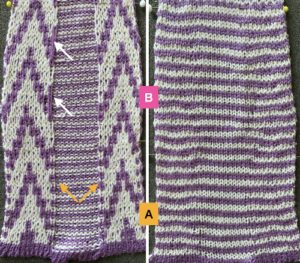 As long as the number of stitches on the ribber is even, lili buttons may be used, affecting the scale of the pattern in both height and width. In A, they were used with the ribber set to slip in both directions, in B, set to tuck in both directions. C marks the return to the N/N setting, with needle transfers to mark a possible pleat.
 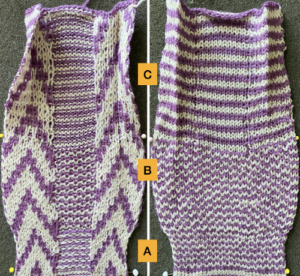 The initial pleat idea charted out for single stitch folds, stitches transferred to ribber in the R columns, to the top bed in the T columns
 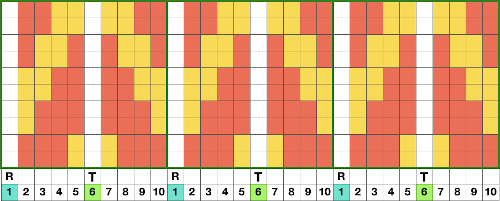 The result is a fairly soft pleat, the choice below was to retain end needle selection.
 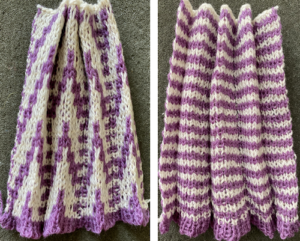 Various ribbed pleat configurations are explored in Pleats: ribbed, folding fabrics. This repeat may not be the best to use for a variety of reasons, but experimenting while using the same design and yarns can be useful in understanding stitch formations. Theoretically, the alternating direction of folds should create sharp or knife pleats.
  Paired transfers in the planning stages: because the repeat is small and has a single center pivot point, it is rendered once more, adding columns
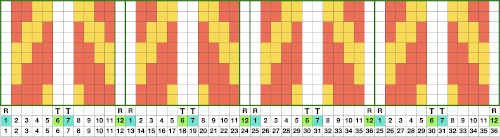
![]() Here the transfers planned to opposite beds are marked on a 48 stitch repeat with red cells.
Here the transfers planned to opposite beds are marked on a 48 stitch repeat with red cells.
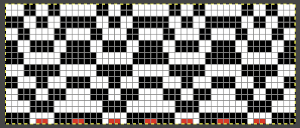 The resulting fabric relaxed on the left, lightly steamed on the right
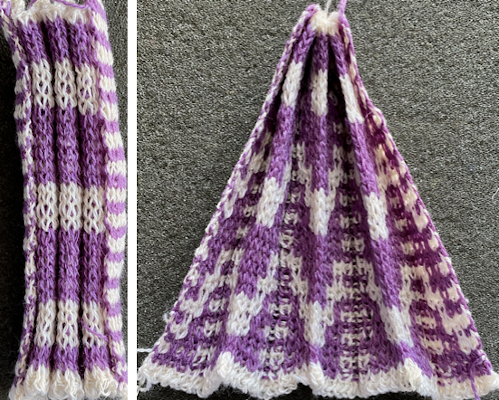
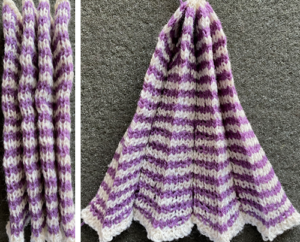 Note: the color positions in the design have been reversed from those in the first swatch. If “floats” are noted at any time in the spaces where needles are out of work on the ribber, look for dropped stitches.
Vertical bands of color, even in patterns may be transferred to and from beds to achieve a sort of intarsia effect. One option is to work with vertical bands of fixed color, using the KRC built-in separation. When shifting gears it is useful to remember the starting side for the preselection of the first row of patterns. With many of the previous patterns, designed for color changes every 2 rows, starting side was on the right, toward the color changer. With KRC in use, the first preselection row is away from the color changer on the left, moving toward the right. With either method, starting on the wrong side will knit stripes as opposed to planned patterns. ![]()
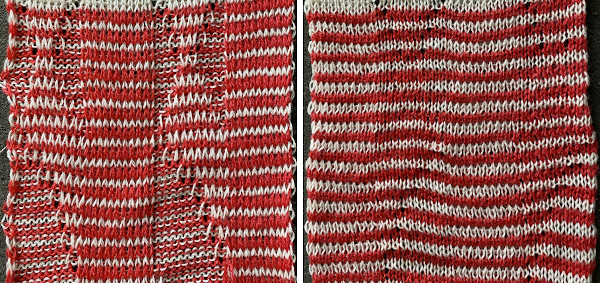 Needles in locations where only the backing is to be shown are transferred down to the ribber. Leaving the eyelets, they were transferred back up to the main bed when brought into work to reverse or change the shape. Addition and subtraction of stitches take place before the next pass with the alternate color. Here movement is random, to get some sense of the effect, it could be made deliberate by following a chart or color separating and automating the pattern, with its starting side on the right.
  This sample is from a much earlier post. Transfers could be made less frequently to change the angles in the resulting shapes, always onto the same color
 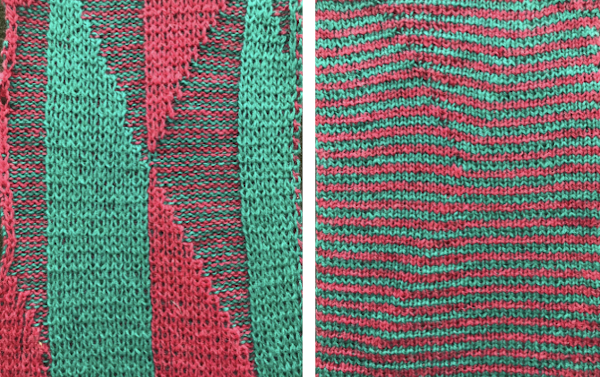 What of having shapes appearing in each of the 2 colors on a striped ground? Eliminating some of the guesswork I used the repeat from a previous single-bed blog post on block slip stitch color separations
 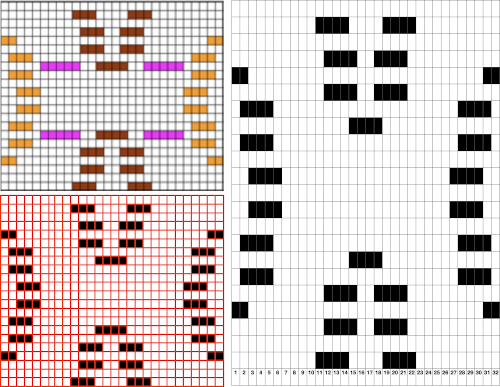 The repeat, 32X44
![]()
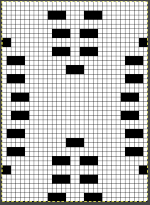 The resulting sample, the yarn is thin, might have benefited from tighter tension and more contrast.
 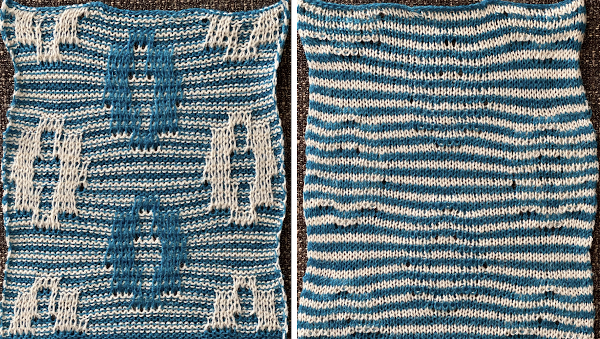 These fabrics and related shadow lace ones fall in the category of double bed embossed patterns, many more variations are possible, and deserving of their own post.