It is also possible to create solid color patterns on the purl side on a striped ground by at first transferring all stitches down to the ribber, then, in turn, using slip stitch selection on the top bed to choose only the stitches that will be manipulated on the main bed. A similar repeat worked on the single bed, may be found in the previous post on Slip stitch patterns with hand transferred stitches, single bed. And a relative, including a double bed version: Bowknot/ Butterfly stitch on the machine, and: A no longer “mystery pattern”.
When working over a striper backing, the color changer is generally in use, and changes happen in even numbers of rows. In my test swatches changes are made every two rows, and whether single or double bed, the color yarn creating the solid color shape needs to not knit while the alternate color is worked only in the background. The held stitches grow in length.
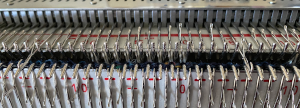
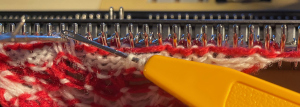
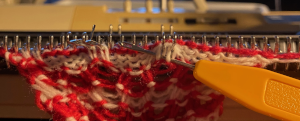
End needle selection is canceled in my samples.  The extra needle selection prior to the next all knit row helps track the direction of the moves, stitches are moved three at a time, there are no cable crossings
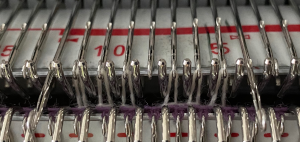
 Things do not always “work”, that is part of the process
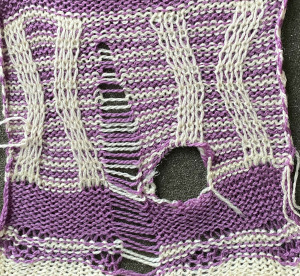
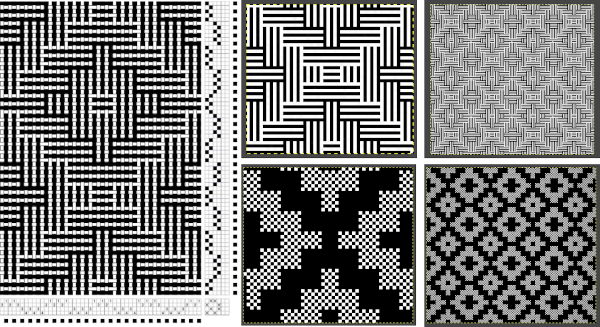
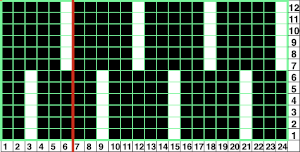
 The next step for me was to explore cable crossings on elongated stitches working double-bed. A basic pattern on any programmable machine for playing with elongated stitches on one bed while knitting every stitch on the other is to program pairs of blank rows followed by solid punched or black pixel rows. The yellow line in this chart illustrates the row on which cabling might occur.
 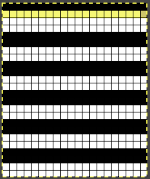 Programming the width of the needle bed allows for only the stitches forming vertical columns in chosen locations to be put into work, allowing one to place groups that will involve crossings anywhere on the chosen pattern width. A base is knit in the ground color, which slips for 2 rows on the main bed, creating the elongated stitches that will be cabled. I had no problem with 2X2 cables,
 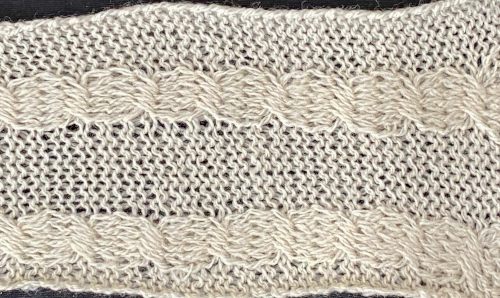 but as in working on the single bed, for me, straightforward 3X3 crosses were not cooperative, even when I attempted to introduce extra knit stitches on the sides that were then dropped for added give on the last slipped row, taking me back to the drawing board.
 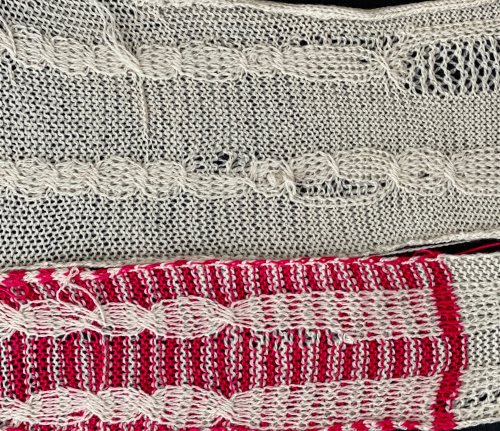 Cabling, returned to in a later post, with adjustments, making things work.
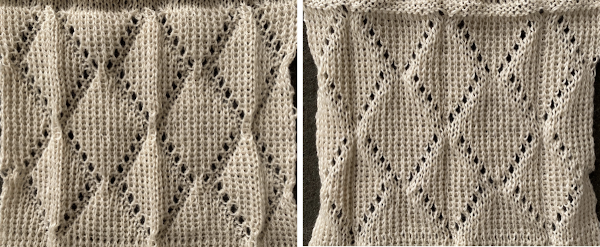
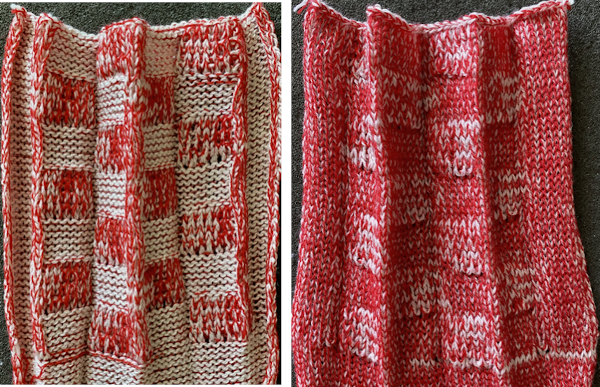
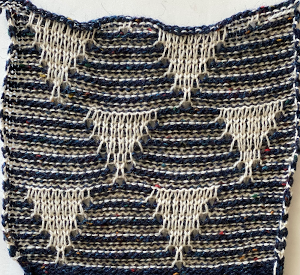
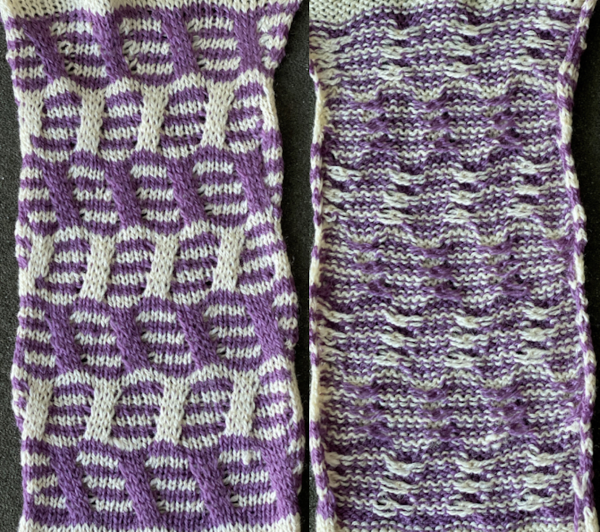
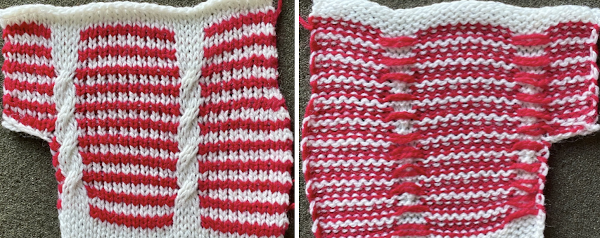
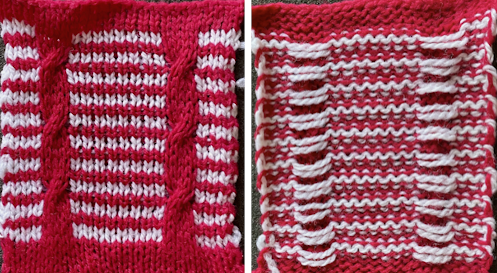
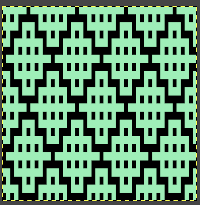
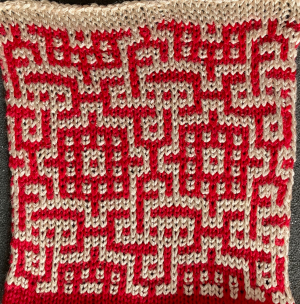
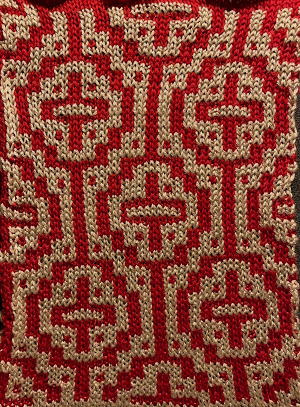
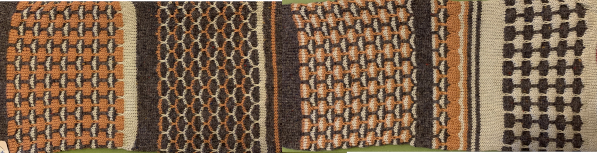
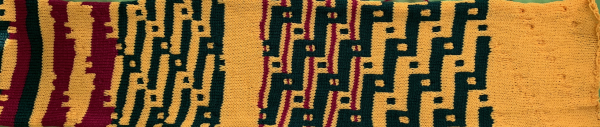
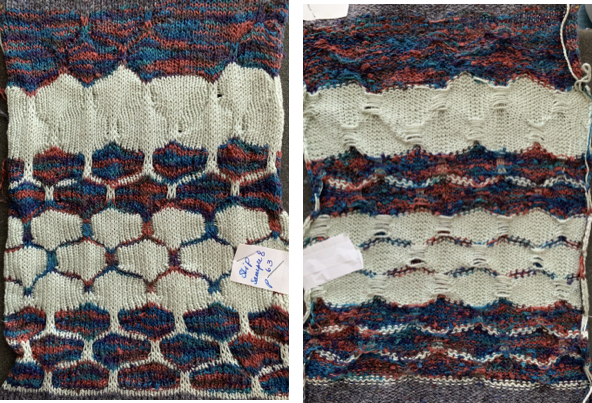
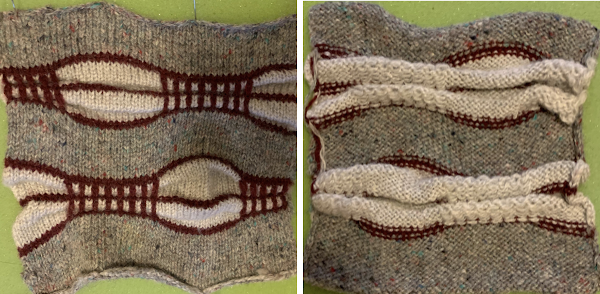
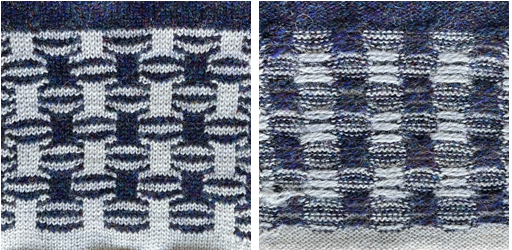
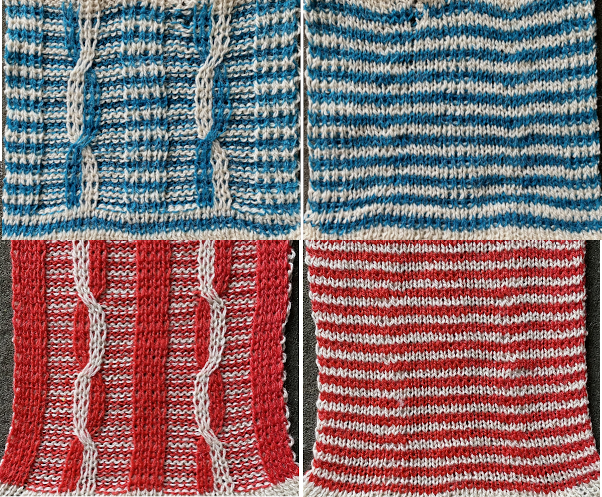 Continuing with shapes on striped grounds, this is the result of a self-drawn pattern
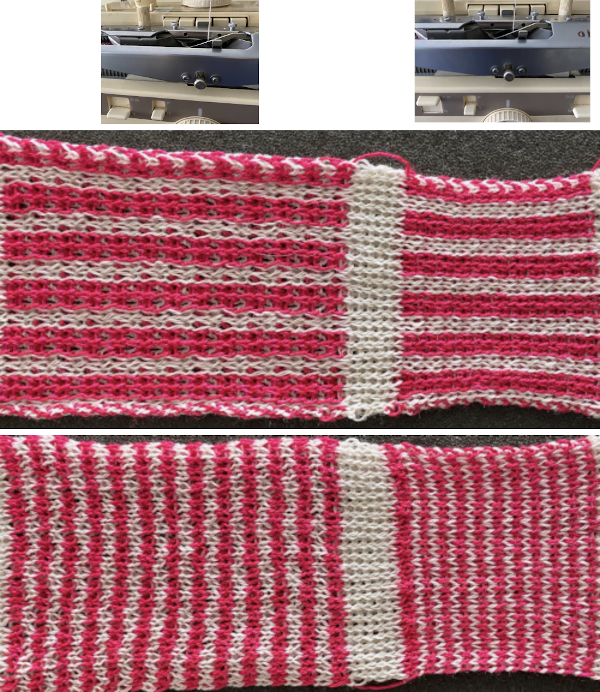
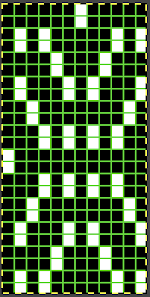
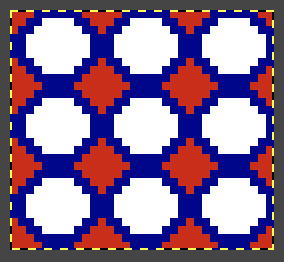
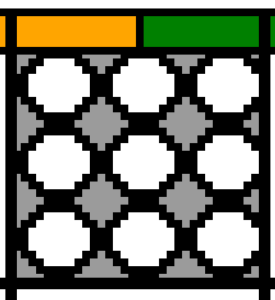
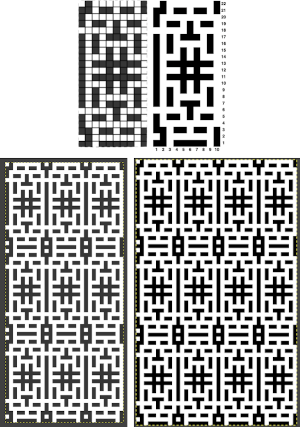
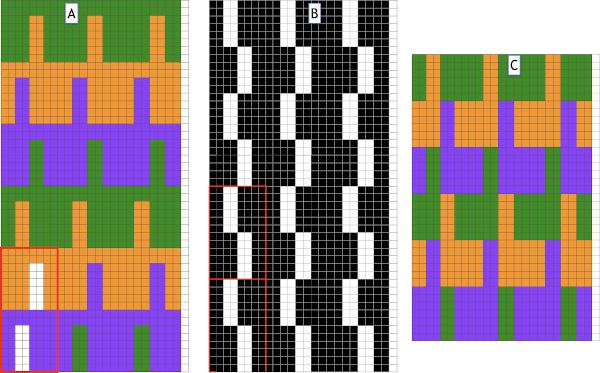
 ![]() The approach is different than in the blog post on Brother shadow lace, rib transfer carriage, where shapes were created in only one color, and the textured patterns by bringing needles in and out of work on the ribber. To create the striped ground in the above, color changes happen every 2 rows. The ribber knits every needle, every row. With the ribber on half-pitch, the transfers are all made from the main bed needle to the needle immediately below it and slightly to its left.
The approach is different than in the blog post on Brother shadow lace, rib transfer carriage, where shapes were created in only one color, and the textured patterns by bringing needles in and out of work on the ribber. To create the striped ground in the above, color changes happen every 2 rows. The ribber knits every needle, every row. With the ribber on half-pitch, the transfers are all made from the main bed needle to the needle immediately below it and slightly to its left.
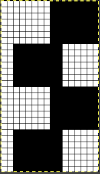
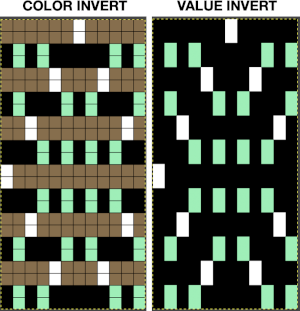
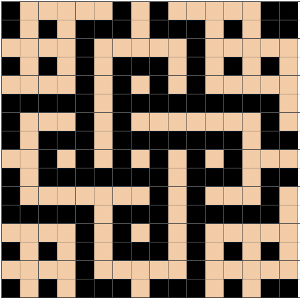
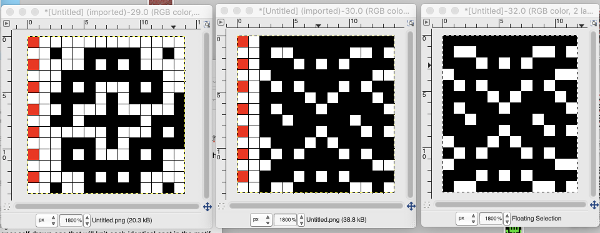
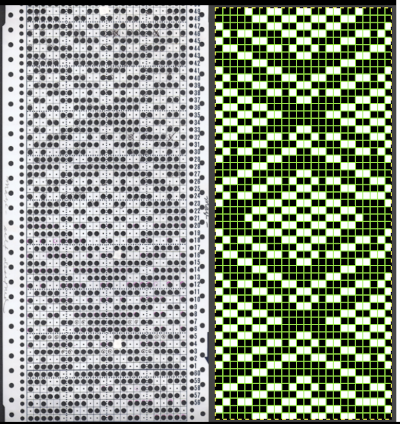
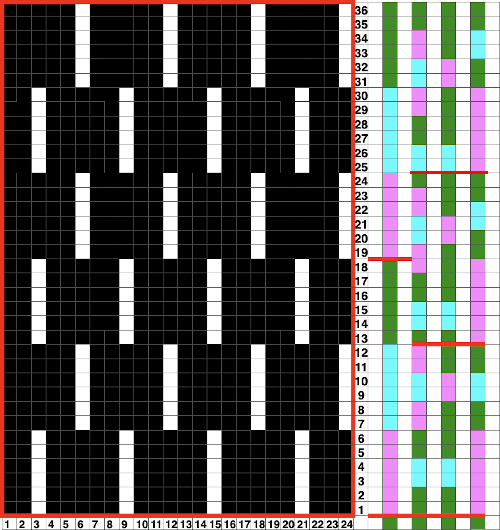
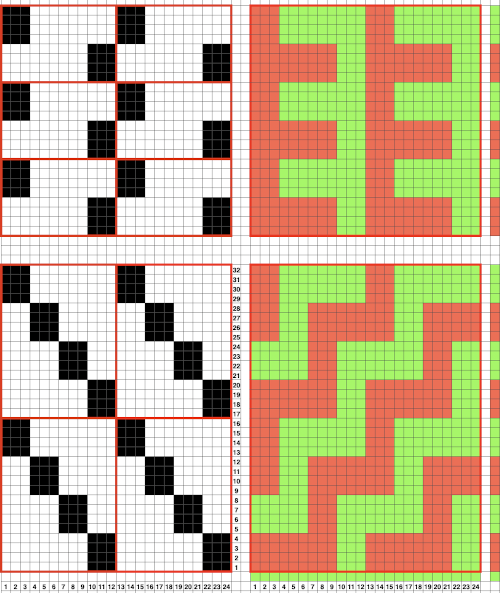
In the chart on the left, the green cells represent black pixels that will be programmed for patterning on the top bed, red cells, the stitches on the top bed that need to be transferred down to the ribber on the respective row.
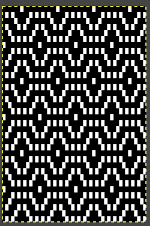
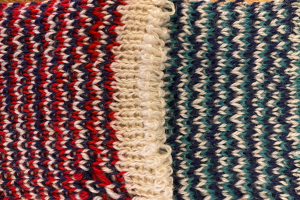
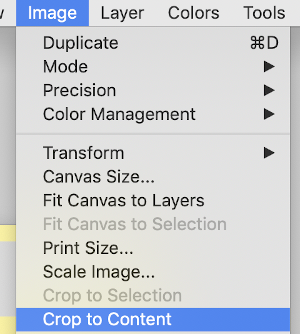
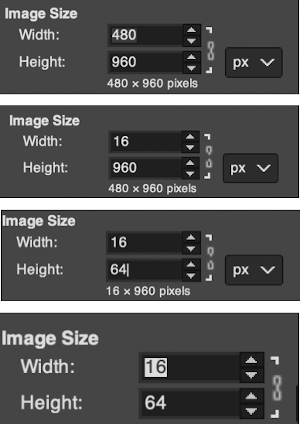
Grey cell rows stand in for all blank ones in the final repeat. ![]() This design is too wide for punchcard machines, but the fabric is possible there as well in different widths, isolated or all over. After casting on, all stitches are transferred to the ribber. Border, plain knit stripes can be added by simply having a larger number of needles in work on the ribber than the planned pattern width. With no needles selected in the pattern on the top bed, those ribber stitches will simply knit every row.
This design is too wide for punchcard machines, but the fabric is possible there as well in different widths, isolated or all over. After casting on, all stitches are transferred to the ribber. Border, plain knit stripes can be added by simply having a larger number of needles in work on the ribber than the planned pattern width. With no needles selected in the pattern on the top bed, those ribber stitches will simply knit every row.
These fabrics are a little different than those with needles out of work on the main bed while using the slip stitch setting, in which case KC II on electronics, end needle selection needs to be turned off on all models. When all needles are in B position, depending on the pattern, KCI may be used. Simply using KCII eliminates any guesswork.
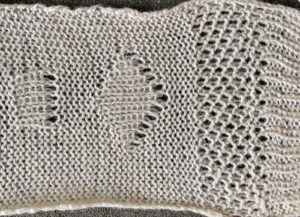
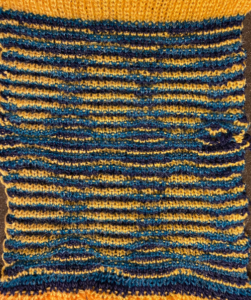
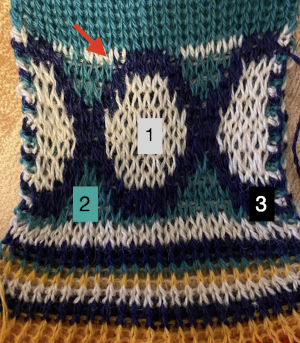
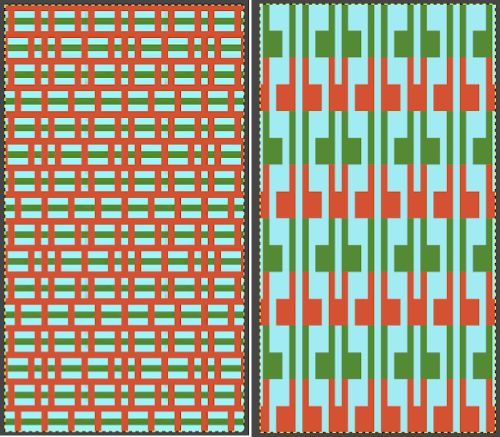
The first preselection row is toward the color changer with the knit carriage set to slip in both directions, only patterned area needles need to be in work. Non-selected needles, as usual, perform no function while those corresponding to where black pixels or punched holes occur will pick up loops on the top bed, initially creating eyelets, and then continue to form knit stitches until any of the corresponding stitches are transferred down to the ribber. The pattern yarn forms a short stitch in one direction, an elongated one in the other. A detailed close-up of stitch formations 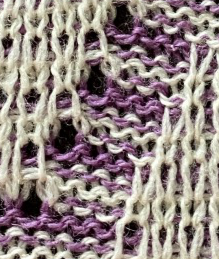 Plain striped rows in areas without the design continue to be knit in the slip stitch setting, or every needle in work on the top bed will pick up loops.
When hand manipulating stitches it pays to be mindful of maintaining all needles in the pattern in B position, not accidentally sliding them back to A. ![]() In the past, I have attempted pile knitting on my machines. Studio machines produce the best fabric in the category, I have read Toyota performed as well. Books such as this are a good source for pile designs, including the card repeat used in my proofs of concept
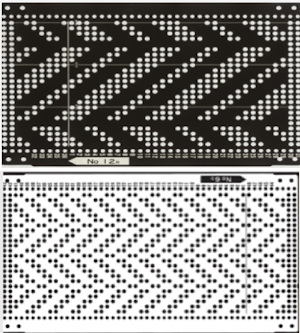
In the past, I have attempted pile knitting on my machines. Studio machines produce the best fabric in the category, I have read Toyota performed as well. Books such as this are a good source for pile designs, including the card repeat used in my proofs of concept  Punchcards, in theory, may be used as given and set to double length, while for use in electronics drawing the pattern single height and using the double-length setting is also an option. Starting sides and fixing errors have always been more confusing for me when using the double-length feature, I prefer to punch holes or program pixels as I intend to knit them. The isolated reduced repeat for use in the electronic is charted, with an initial one-pixel error in 2 consecutive rows, marked with red cells. In transcribing any design, it is worth checking repeats multiple times after eyeballs and brains have had a rest. This was my start:
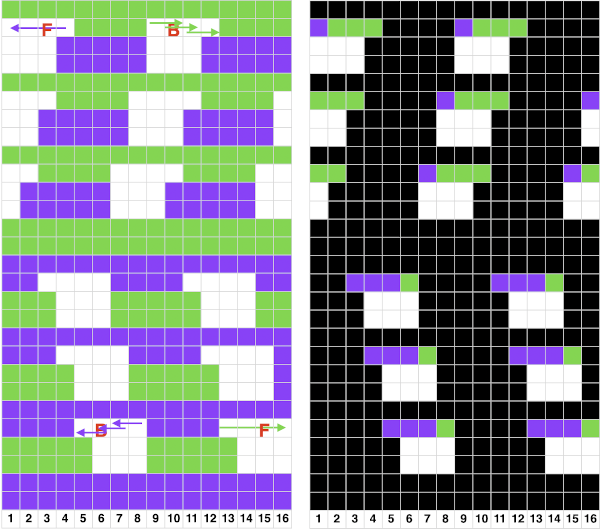
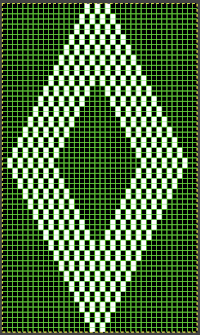
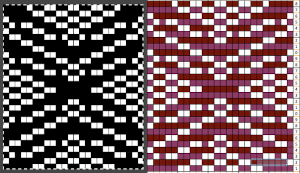
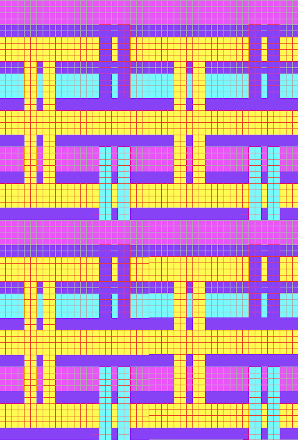
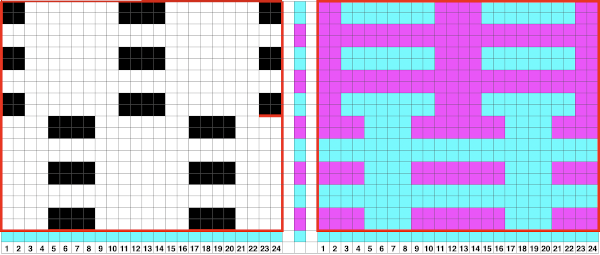
![]() The design process using Numbers before exporting the repeat to Gimp for reduction to B/W png: in this approach, the repeat is drawn double height to start with. The red cells represent stitches that will be transferred down to the ribber before knitting the next row in the pattern color from left to right.
The design process using Numbers before exporting the repeat to Gimp for reduction to B/W png: in this approach, the repeat is drawn double height to start with. The red cells represent stitches that will be transferred down to the ribber before knitting the next row in the pattern color from left to right. 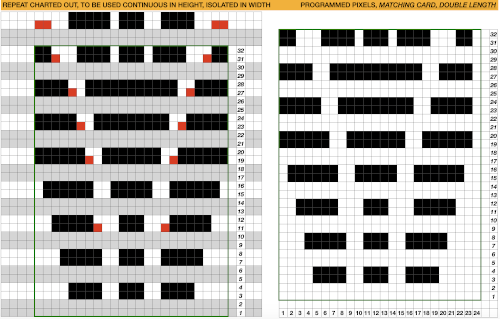 The first test is of an isolated motif. The yellow arrow points to the pixel error, the cyan to the positions where some needles in the full repeat were “accidentally” placed in A position, not B, resulting in pattern stitches not being formed.
 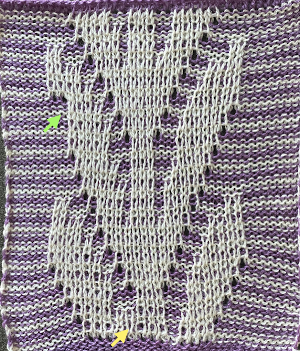 Another review of the original card, a final adjustment in the repeat:
![]()
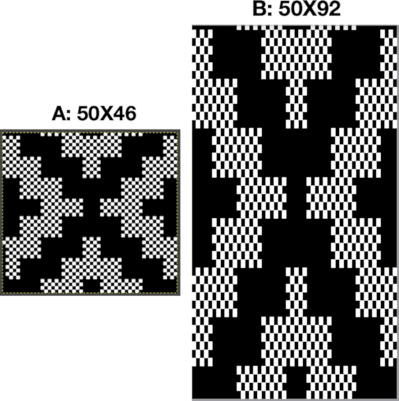
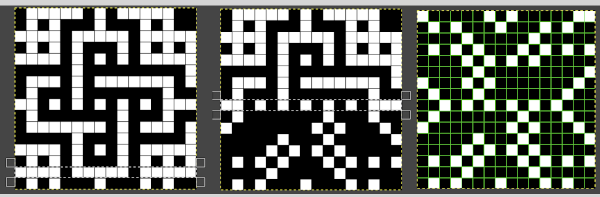
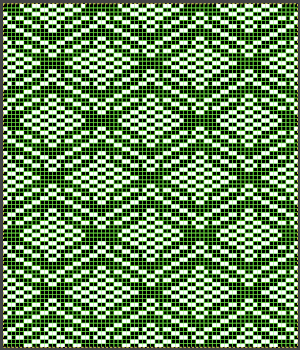
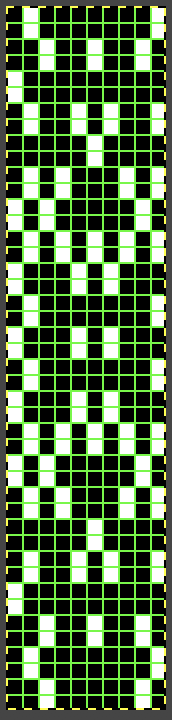
 Tiled view, committing to the result,
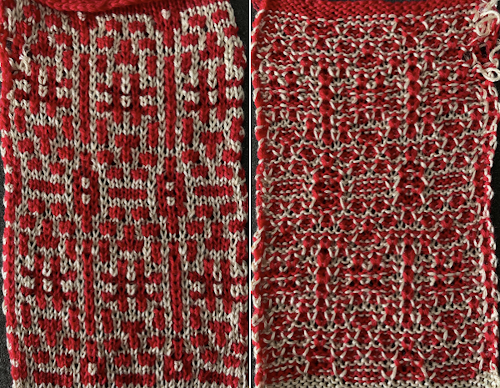
  the larger test swatch
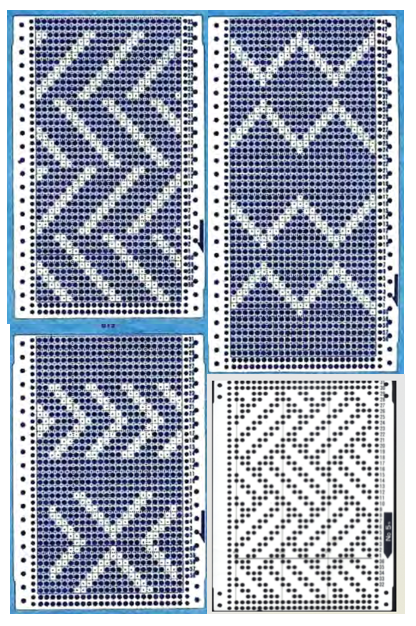
 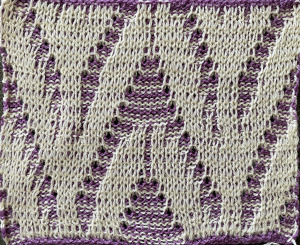 Two other options for charting the fabric in numbers: A. draw the repeat as given
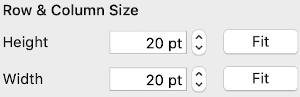
B. starting cell size used was 20X20, change the height to 40
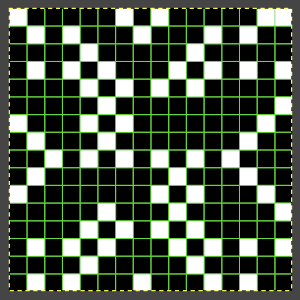
C. mark corner blank cells and screengrab for Gimp import
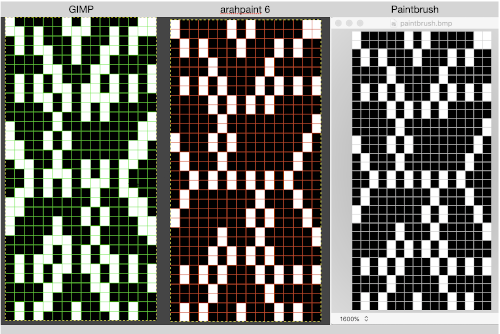
D. the repeat processed in Gimp matches the first version
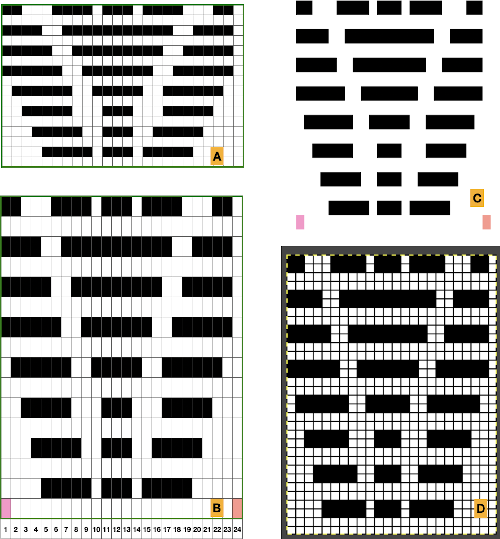 Any simple Fair Isle repeat may also be used. The numbering in the charts matches what is normally seen on the left edge of the tables
A. the FI repeat, 8 rows high
B. a table slightly longer than double the repeat height, hide even-numbered rows
C. copy and paste the FI design on the table with hidden rows
D. unhide rows, isolate the repeat, adjust cell height, and continue to process as described above 
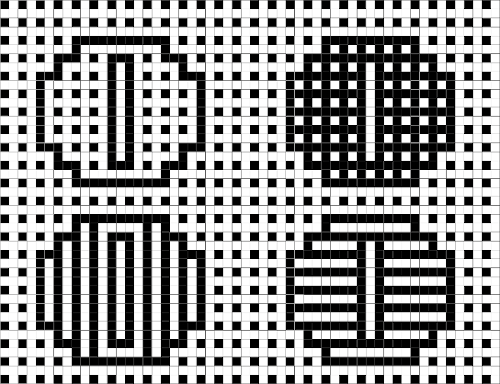
The original punchcard design may be used in a different manner if the goal is a single color fabric. The design may be copied as is, then filling in the blank lines with the same holes or pixels as in the row directly below it. Here, in addition, the repeat is altered to accommodate a half drop repeat on the right with a few pixels changed.
![]() My initial proof of concept is 32 stitches wide, narrower than the full repeat
My initial proof of concept is 32 stitches wide, narrower than the full repeat 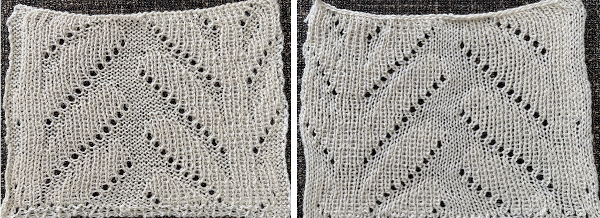 The rows need to be scanned before every pass, as transfers to the ribber are not symmetrical due to the shapeshift on the right of the design.
 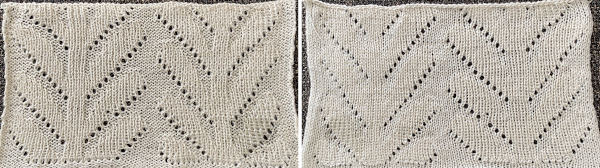 The world of possibilities grows even further for single color shadow lace, when, examining the same design, one recognizes that the pile knit card, with the blank rows filled in in pattern, is the same as the fair isle version of the repeat, rendered double long
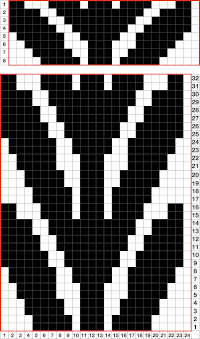
![]() Some authors have suggested plaiting as an alternative to creating shapes with true brioche, which can be complex. To my mind, plaiting falls in the beauty being in the eye of the beholder category, I prefer far crisper color distinction in my knits. This sample from the previous shadow lace post uses thick and thin yarns
Some authors have suggested plaiting as an alternative to creating shapes with true brioche, which can be complex. To my mind, plaiting falls in the beauty being in the eye of the beholder category, I prefer far crisper color distinction in my knits. This sample from the previous shadow lace post uses thick and thin yarns 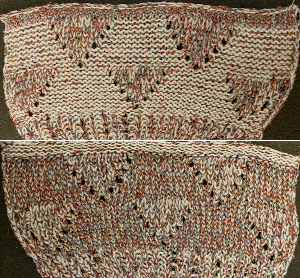 Using the image adapted from the studio pile card once more, I tested using 2 yarns of similar weight, the adjusted test repeat:
 ![]() its accompanying test swatch
its accompanying test swatch 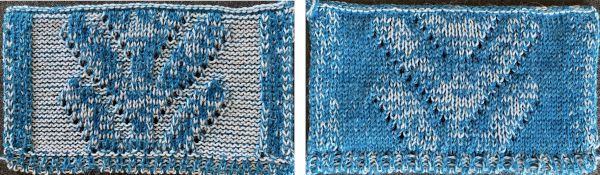
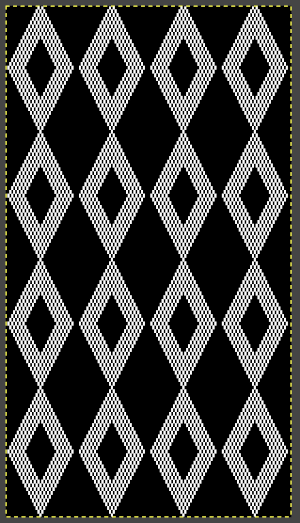
I have long been interested in pleated knits, both single and double-bed. Working single color or with plaiting makes the repeats easier for DIY designing. Seeking proof of concept for possible “origami” pleating: on the left, yellow marks the spots for transfers to the top bed, which will create folds out toward the knit side. For folds toward the purl side, stitches are manipulated on the ribber, with the final design repeat shown on the right. 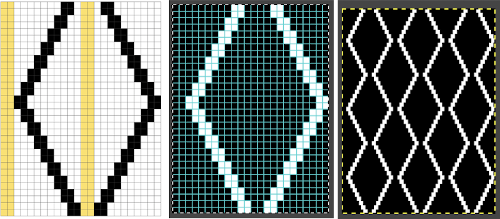
![]() The ribber carriage is set to knit throughout. The needle from which the stitch is transferred to the main bed is moved completely out of work. After the transfer, the main bed needle accepting it is returned to the D position.
The ribber carriage is set to knit throughout. The needle from which the stitch is transferred to the main bed is moved completely out of work. After the transfer, the main bed needle accepting it is returned to the D position.
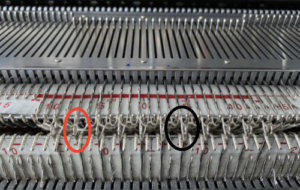
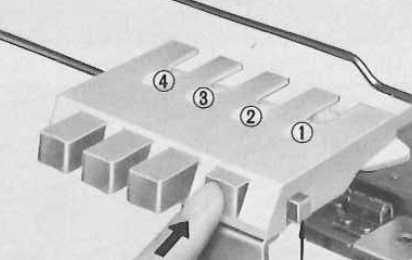
The knit carriage is set to slip in both directions, end needle selection is canceled. Subsequently, non-selected needles, 1 in the photo, serve as guides for transfers to the ribber, made every two rows. The needles emptied from the transfers need to be maintained in the work, B, position. The selected needles, 2 in the photo, will pick up loops automatically, creating eyelets as seen in previous swatches. 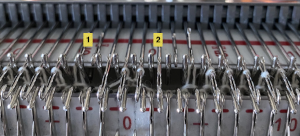 The swatch would have benefited from tighter tension or thicker yarn, the folding effect is greater than reflected in the photo. Initially, those pairs of center stitches were not transferred up to the main bed, showing the absence of that fold when that action is omitted. Any of these patterns benefit from deliberate planning of the placement of the pattern on the main bed, not done in this instance.
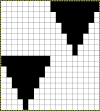
 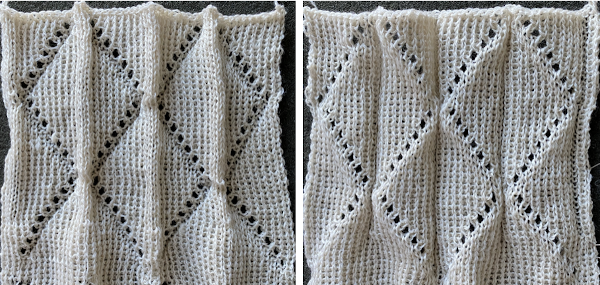 Transitioning to smaller repeats, tiling will help avoid patterning “errors” as seen here where the full diamond shapes reverse
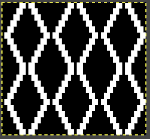
![]()
 Graph paper or spreadsheet planning will help avoid misses in necessary transfers in areas where all needles have been selected
 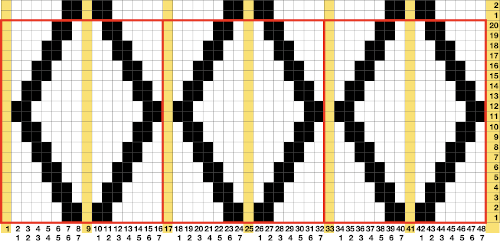 the file for multiple repeats after color reverse
![]() the test knit as using transfers as described above
the test knit as using transfers as described above 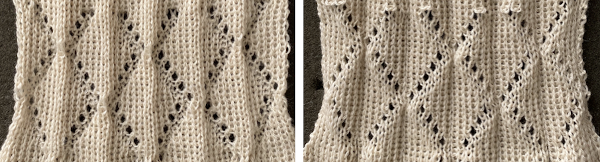 and here the empty needles creating the eyelets were filled by picking up the purl bar from the stitch below on the ribber. A lot of work for a change that is not significant in the structure of the fabric.
 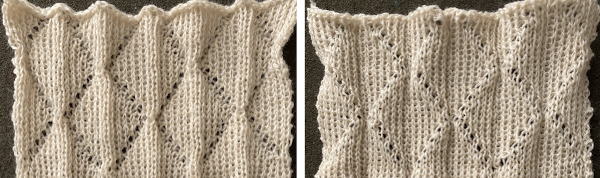 In my last test on eliminating holes and how that affects the degree of the folds, transfers to fill in newly selected needles on the top bed were made from below the adjacent needle on the top bed, B, as opposed to immediately below on the ribber, A
 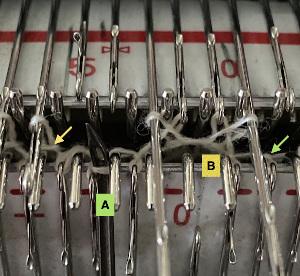 If patterning is used to track transfers, needle selection on the top bed needs to be maintained throughout, the result of this process is not interesting enough and just too fiddly and time-consuming for me to be interested in exploring it further
 ![]() There is an interesting scale and depth of fold comparison between this version and the first using the repeat, achieved by tightening the tension as much as possible, and possibly by reducing the size of the eyelets.
There is an interesting scale and depth of fold comparison between this version and the first using the repeat, achieved by tightening the tension as much as possible, and possibly by reducing the size of the eyelets. 
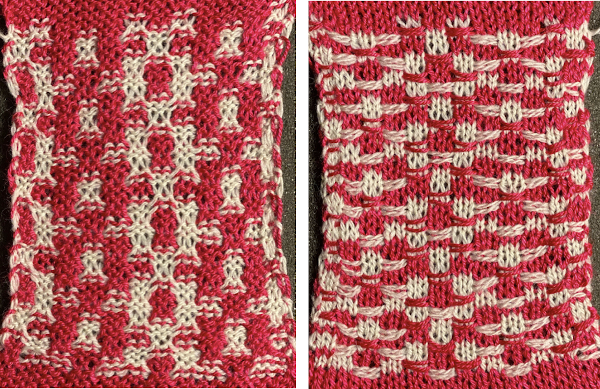
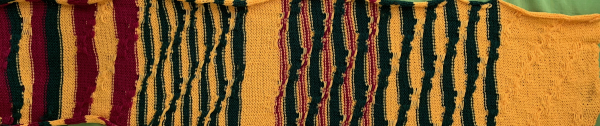
Exploring manipulations with more than one color patterning on the main bed: there is a type of DBJ that relies on knitting the same color for 2 rows that is inherently different from the KRC built-in separation that is the default in the Japanese model machines. It causes elongation in the design, while the KRC version minimizes it. The differences and methods of the corresponding color separations have been discussed in other posts. Stitch manipulations may occur when working DBJ as well. Simple designs make the best start for beginning to explore the topic 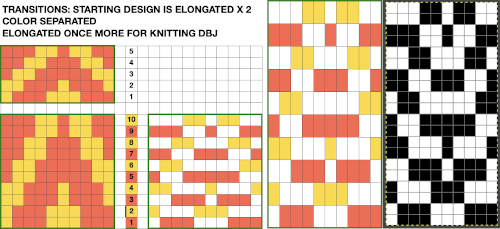 An easy variation is to plan full repeat segments mixed with a striped ground worked only on the ribber
 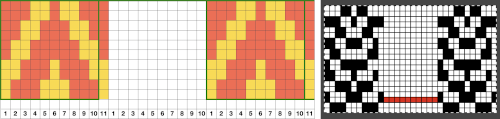 Take care if copying and pasting single columns to alter a repeat width that the whole column is indeed copied and that if using the pencil tool flood fill is not used unintentionally. The original intent was also to correct the elongated slip stitch segments on the edge of the programmed vertical designs marked in blue, but the paste with errors in red accomplished creating the same issue
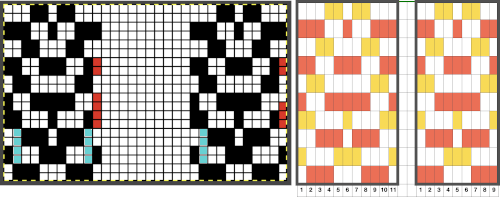
![]() The design is programmed for DBJ. Because of the color separation used, the first preselection row is from right to left. Before knitting the first pattern row, all 10 non-patterning needles on the main bed were transferred down to the ribber.
The design is programmed for DBJ. Because of the color separation used, the first preselection row is from right to left. Before knitting the first pattern row, all 10 non-patterning needles on the main bed were transferred down to the ribber. 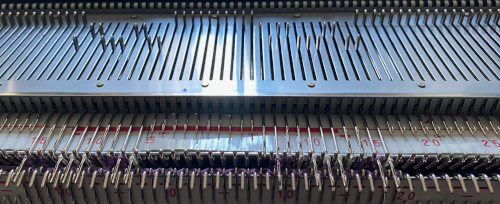 The first segments were knit using striper backing, with the ribber knitting every stitch, every row, in both colors. When a slip stitch is used with needles out of work on the main bed, end needle selection should be canceled. In A it was not. The result is that end needles alongside the out-of-work column knit with each color in each row. In B, end needle selection was canceled, and one can now see the elongated slipped stitches that result from areas that should have been marked with the contrasting color
 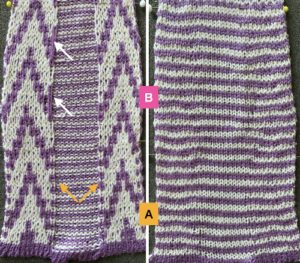 As long as the number of stitches on the ribber is even, lili buttons may be used, affecting the scale of the pattern in both height and width. In A, they were used with the ribber set to slip in both directions, in B, set to tuck in both directions. C marks the return to the N/N setting, with needle transfers to mark a possible pleat.
 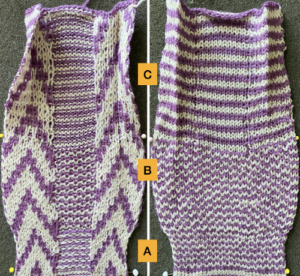 The initial pleat idea charted out for single stitch folds, stitches transferred to ribber in the R columns, to the top bed in the T columns
 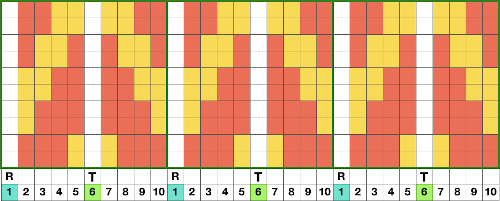 The result is a fairly soft pleat, the choice below was to retain end needle selection.
 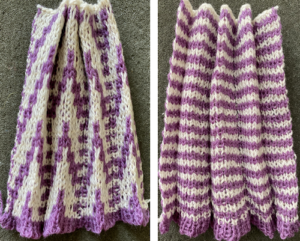 Various ribbed pleat configurations are explored in Pleats: ribbed, folding fabrics. This repeat may not be the best to use for a variety of reasons, but experimenting while using the same design and yarns can be useful in understanding stitch formations. Theoretically, the alternating direction of folds should create sharp or knife pleats.
  Paired transfers in the planning stages: because the repeat is small and has a single center pivot point, it is rendered once more, adding columns
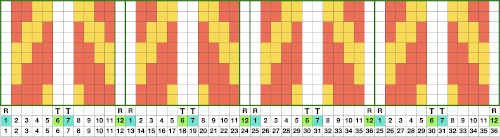
![]() Here the transfers planned to opposite beds are marked on a 48 stitch repeat with red cells.
Here the transfers planned to opposite beds are marked on a 48 stitch repeat with red cells.
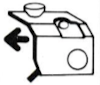
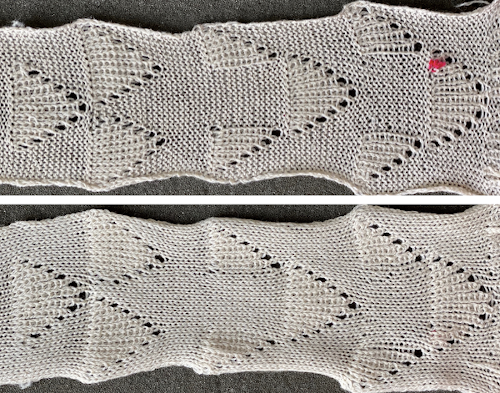
 The resulting fabric relaxed on the left, lightly steamed on the right
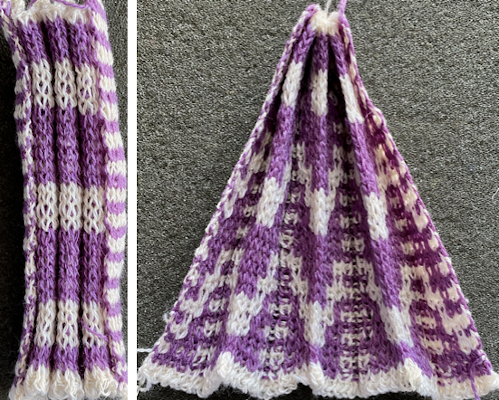
 Note: the color positions in the design have been reversed from those in the first swatch. If “floats” are noted at any time in the spaces where needles are out of work on the ribber, look for dropped stitches.
Vertical bands of color, even in patterns may be transferred to and from beds to achieve a sort of intarsia effect. One option is to work with vertical bands of fixed color, using the KRC built-in separation. When shifting gears it is useful to remember the starting side for the preselection of the first row of patterns. With many of the previous patterns, designed for color changes every 2 rows, starting side was on the right, toward the color changer. With KRC in use, the first preselection row is away from the color changer on the left, moving toward the right. With either method, starting on the wrong side will knit stripes as opposed to planned patterns. ![]()
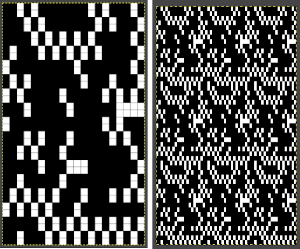
 Needles in locations where only the backing is to be shown are transferred down to the ribber. Leaving the eyelets, they were transferred back up to the main bed when brought into work to reverse or change the shape. Addition and subtraction of stitches take place before the next pass with the alternate color. Here movement is random, to get some sense of the effect, it could be made deliberate by following a chart or color separating and automating the pattern, with its starting side on the right.
  This sample is from a much earlier post. Transfers could be made less frequently to change the angles in the resulting shapes, always onto the same color
 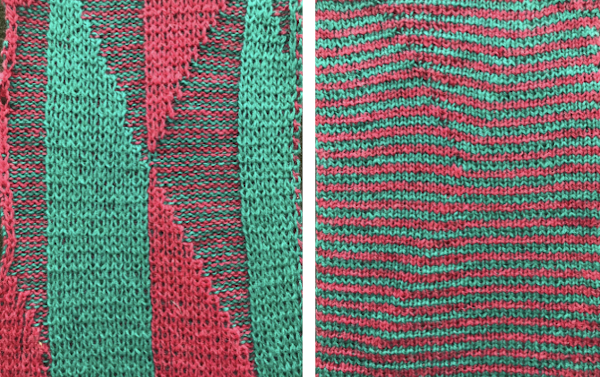 What of having shapes appearing in each of the 2 colors on a striped ground? Eliminating some of the guesswork I used the repeat from a previous single-bed blog post on block slip stitch color separations
 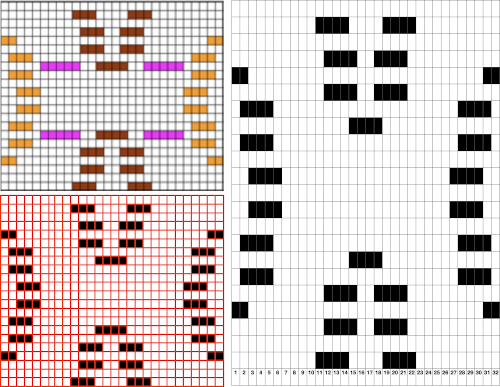 The repeat, 32X44
![]()
 The resulting sample, the yarn is thin, might have benefited from tighter tension and more contrast.
 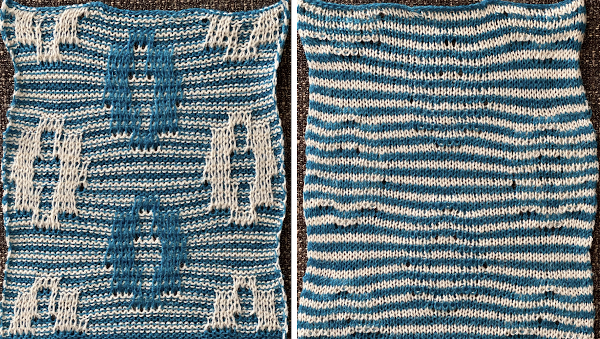 These fabrics and related shadow lace ones fall in the category of double bed embossed patterns, many more variations are possible, and deserving of their own post.
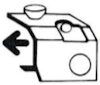
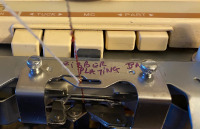
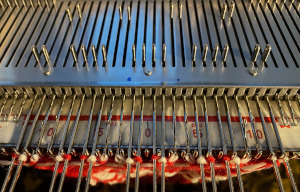
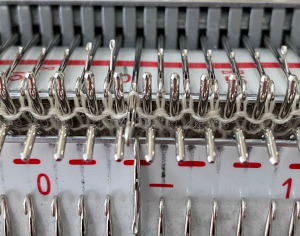 In terms of positioning the carriage, a wire that is akin to that found on Passap strippers is on its underneath. In positioning the carriage on the beds, check visually that it is indeed lying between the gate pegs of both beds prior to attempting to travel with it to the opposite side
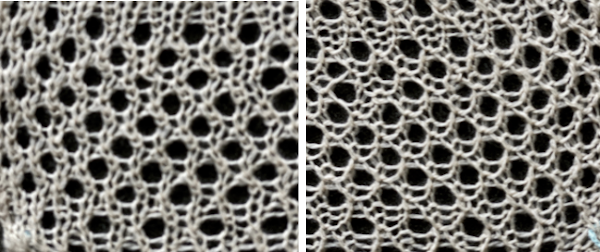
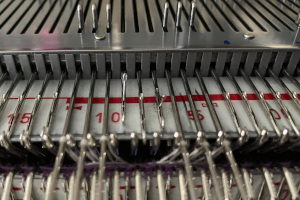
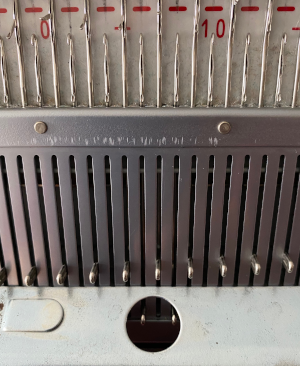
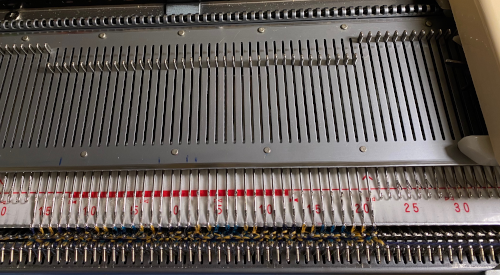
 For my test I used EON needles on the ribber, planned alternating selection for each new transfer. This could be done by selecting dashes and blank spots on needle tape ie. dash in the above photo, blank spaces below
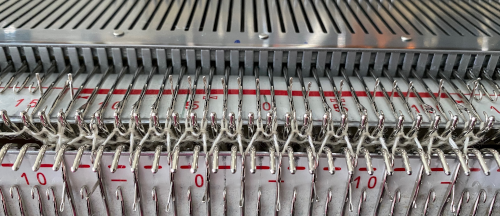
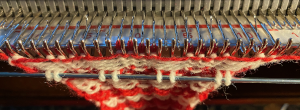
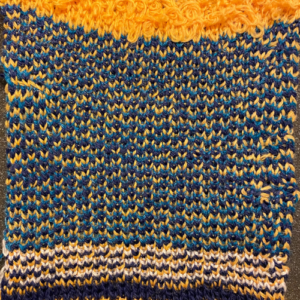
 My first attempt at creating shapes includes a band at the bottom where the EON transfers as above were made, but every row. Simply bringing needles into work on the opposite bed creates an eyelet. They can be eliminated by sharing stitch “bumps” on the opposite bed, but for the moment they are a design feature. The texture created appears in the areas involved on both sides of the knit
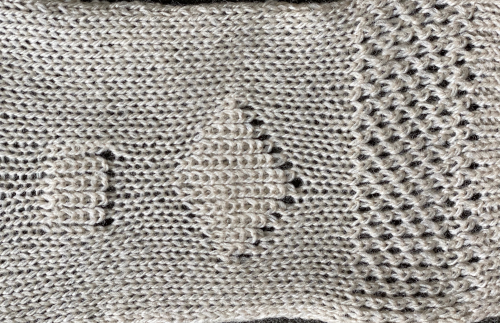
 It is possible to transfer single needles at sides of shapes ie
 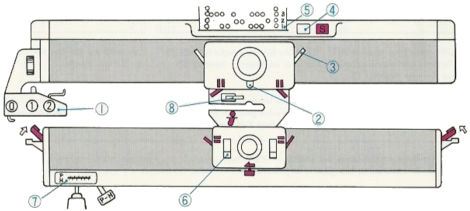 The enclosed punchcards:
 Transfers of stitch groups, whether by hand or using the accessories are made on rows where no needle preselection occurs on the main bed
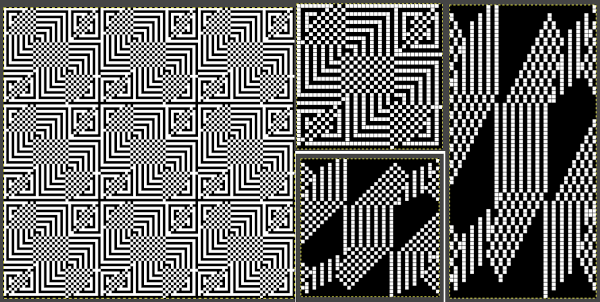
 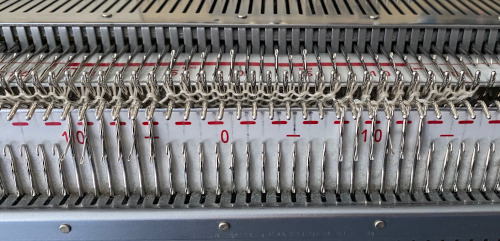 This series is a proof of concept for my approach to developing electronic cues
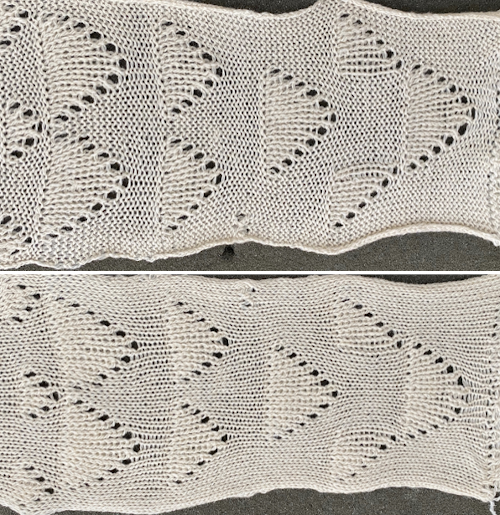 The original repeats were modified to include 2 blank rows between segments that allow for transfers between beds not hampered by needle preselection on the top bed. The motifs are color reversed, but not the blank rows between them.
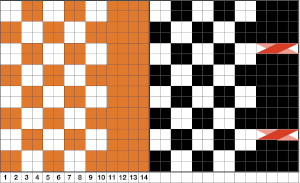
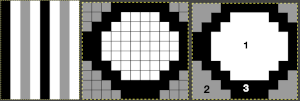
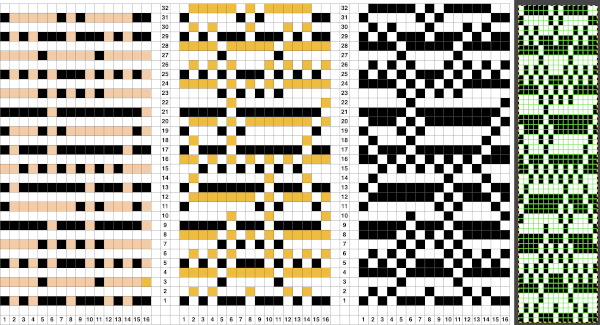
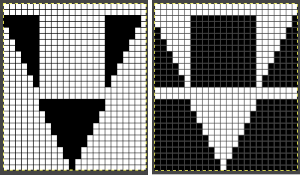 The knit carriage is set to select needles KC I or II, end needle selection does not matter. All needles on the top bed knit every stitch, every row, whether or not those design rows contain black pixels. No cam buttons are pushed in. Blank areas between black ones indicate the number of needles that actually need to pick up loops on the ribber to create shapes, filling in spaces between selected needles until an all-blank row is reached for making transfers. The chart on the far right illustrates a shape where the easiest method becomes one where stitches on the ribber are manually transferred to the top bed in order to reverse the shape and maintain every row preselection. The selected needle corresponding to the black square marked with the top of the red arrows is pushed back, the ribber stitch below is transferred onto it, the needle with the couples stitches is brought to E position, moving across the bed in proper locations prior to knitting the next row.
 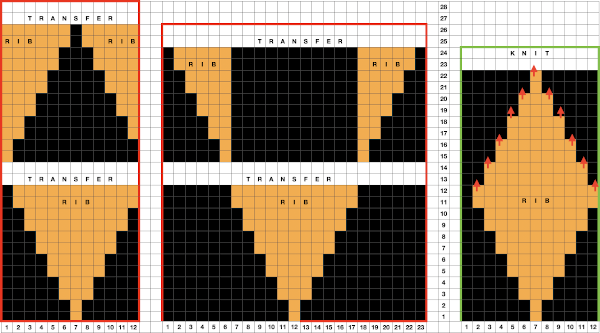 In this repeat, the side vertical panels of ribbed stitches are added. The knit stitches on each side of them roll nicely to the purl side, creating what in some fabrics can actually be planned as an edging.
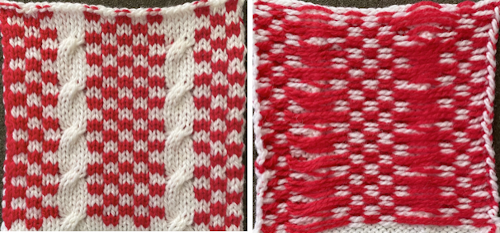
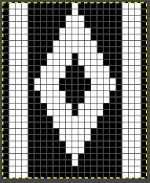
 In the first sample, equal thickness yarns were used, the colored yarn was a rayon slub with no stretch and slippery nature.
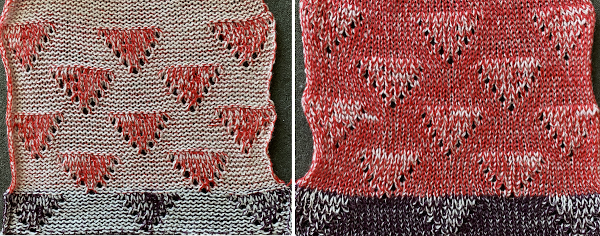
 If any stitches are pushed all the way back or in mixed alignment during transfers,
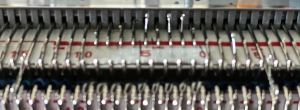

 A closer look
 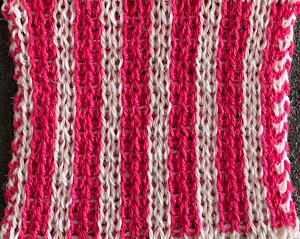 The same repeat may be used to produce a tucked version. In many punchcard machines, a card is supplied with a 2X2 check. With the main color, in a suitable yarn, cast on for 1X1 rib. Set the knit carriage to tuck and the ribber carriage toknit. Knit 2 rows with the contrast color, followed by 2 rows with the main color, repeating for the desired length of the rib. Knit the last row in the main color with both carriages set to knit. Transfer the ribber stitches to the main bed to continue knitting single bed.
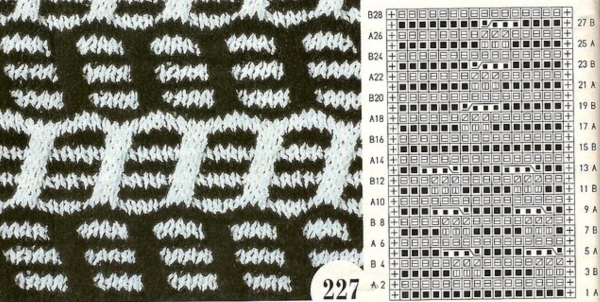
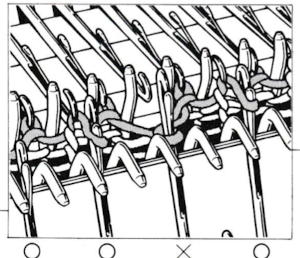
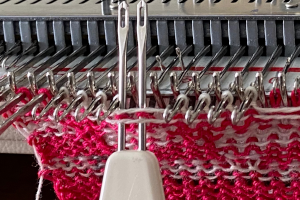
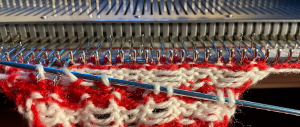
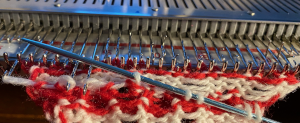
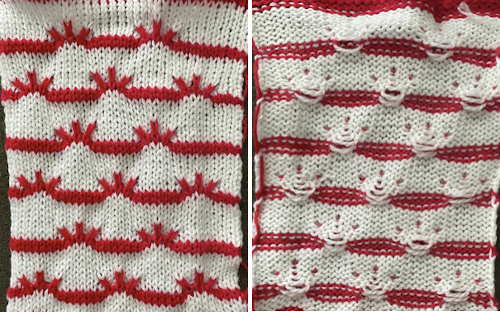
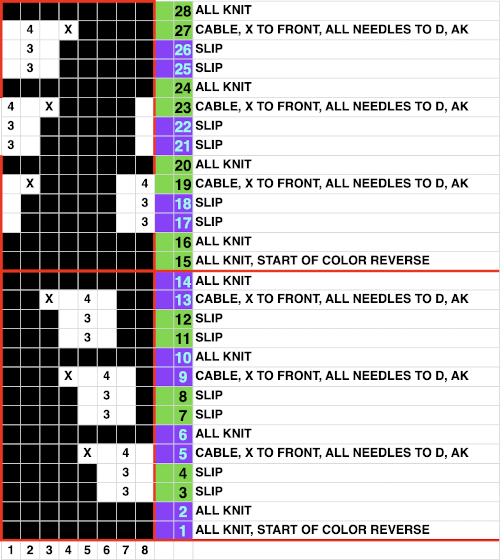 The repeat is suitable for punchcard machines as well. The first preselection row is toward the color changer, end needle selection is on. Cable crossings, 1 front, 3 back, are made every 4 rows except where the color reverses at the midpoint, where 4 all knit rows are preselected and occur. The fourth, extra non selected needle, X, is removed on a tool and held in front of the work. The three adjacent stitches are then also removed on a tool, moved to fill in the now empty needle to the left in the bottom segment of the repeat, to the right in the top half. The remaining held stitch is then transferred onto the newly empty needle. All stitches in the transfer group are brought to D, the remaining needles should have been preselected. If any have been disturbed, line them up as well so all the needles will knit with the carriage set to slip.
 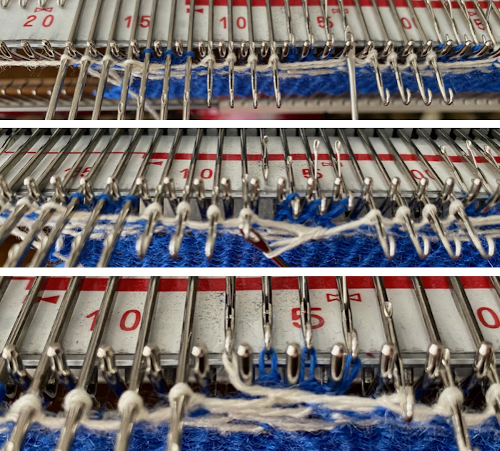 The color is changed, and the row with the completed transfers becomes the first all knit row in the next color pair or rows.
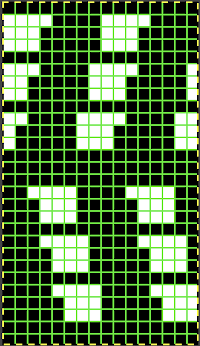
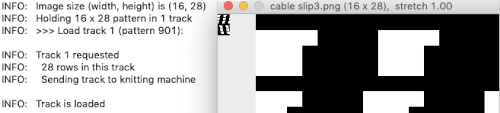
 Working on a single bed is for me, more user-friendly than double bed. I like to program the width of my repeats when possible, they can then be treated as single motifs, the default in the 930 with downloads using img2track, and I do not have to rely on notes, memory, or position programming to place the work predictably on the needle bed. My full repeat
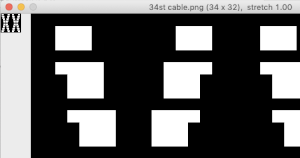
 The knit carriage was set to KC I and to slip in both directions, the same design and execution methods were used as for the first swatch. The yarn is 2/18 wool, the tension was set at 4.., the slipped and crossed stitches pull the fabric in both width and height, the swatch was steamed and pressed to flatten it. Small eyelets occur along the edges where the single stitches were moved to one side or the other across three needle positions. It was not possible to produce a 3X3 crossing at the center of the shapes.
 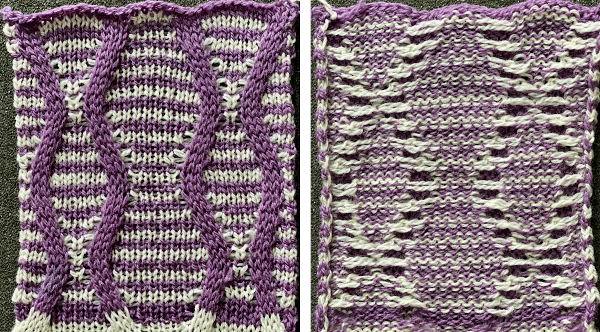 Over time I have encountered illustrations of unraveled knit or slipped stitches being brought out to the purl side, creating thread patterns on the knit surface, and changing the color structure on the purl. This illustrates a slip stitch being created via a hand technique
 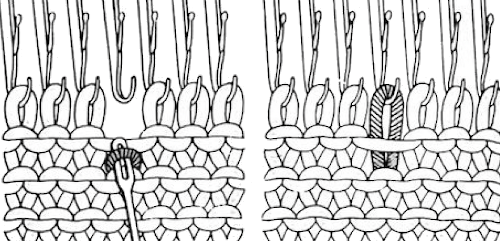 Here the dropped stitch is hooked up on the purl side
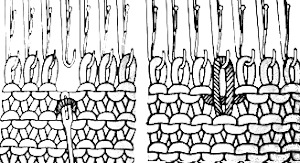
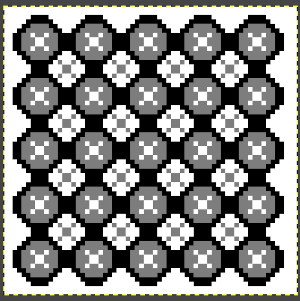
 In testing techniques, a simple design that is recognizable with the preselection of needles makes it easier to track progress and accuracy. Though these patterns may be executed in a single color, working in contrasting, bright yarn colors is helpful in isolating stitch formations and understanding their structures. More than one stitch may be moved at any one time. I found when using more than 2 rows of slip the ground fabric began to look gathered and distorted, so my tests are knit using 2X2 pixel blocks.
 push tool back toward the needle bed
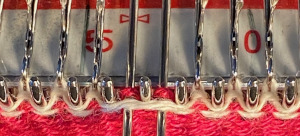
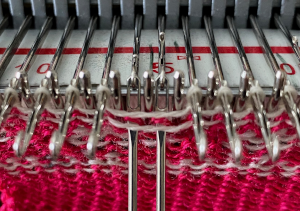
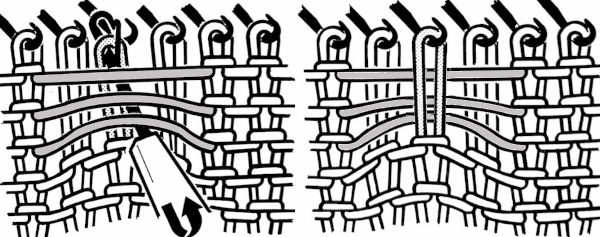
 insert a latch tool from behind between the prongs of the multiple eye tool,
 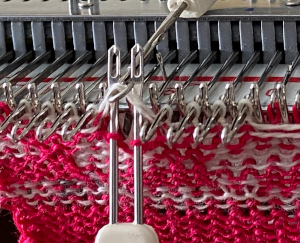 lift the floats over the eyes of the tool, placing them behind it and the slipped stitches, being careful not to hook them up onto gatepegs,
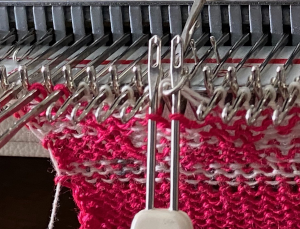 now lift the original slipped stitches back onto their previous place on the needle bed, they will be part of the first all knit row in the contrasting color;
 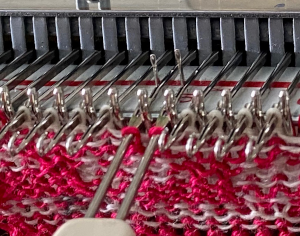 bring the needles with the restored stitched out to E, thus making certain they will knit as the carriage makes its next pass
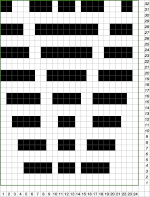
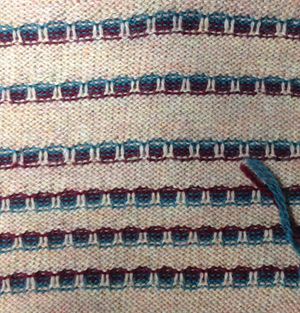
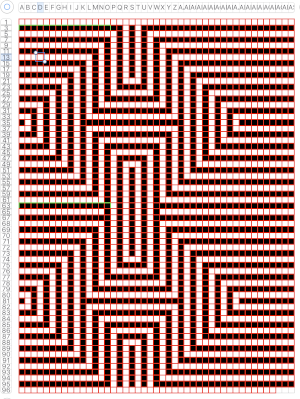
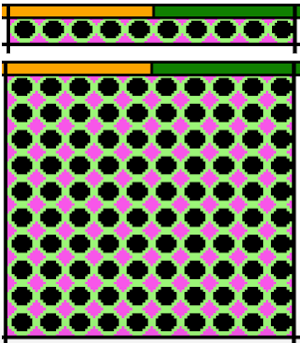
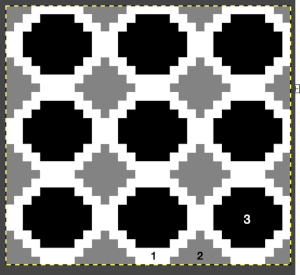
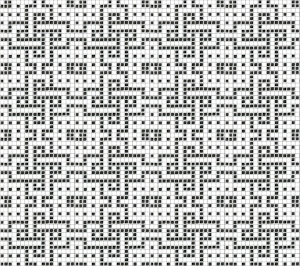
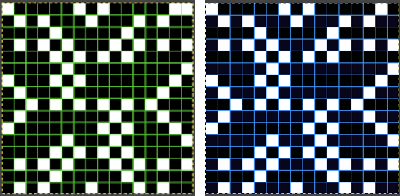
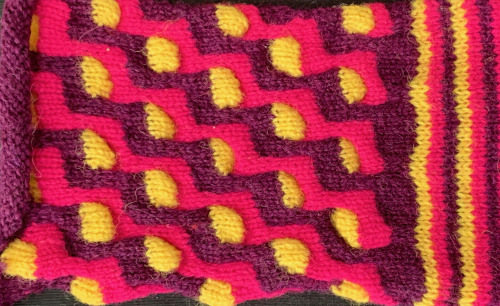
 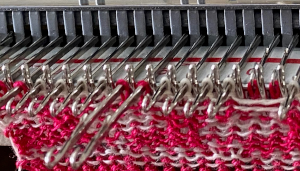 The pattern is charted below in development, color changes were planned every 2 rows. The third blank row in each slip stitch location marks the spot for the above manipulations to take place, noted in the chart with grey cells marked with pink dots. After the initial preselection row toward the color changer, only for the first all knit pattern row, push non-selected needles out to hold, E, to ensure all stitches will knit in the ground color. Subsequently, the first design row is part of the continuing repeat. The next color change will begin to form the floats.
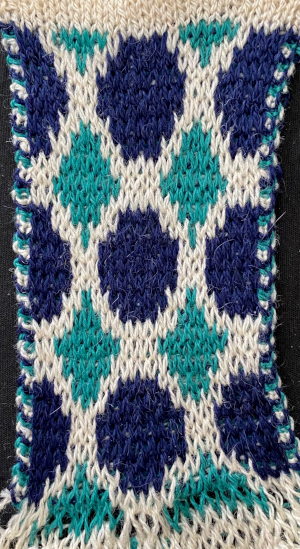
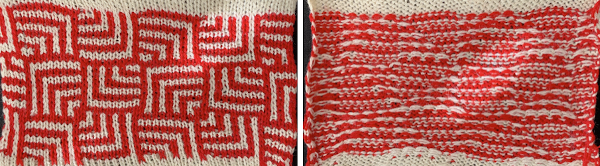
 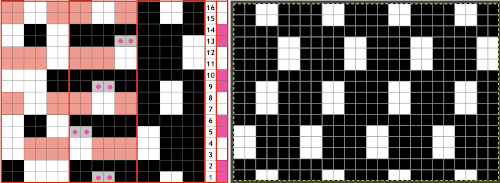 The sequence at the bottom of the swatch is off because I had a change of heart about which color I wanted to form the solid color shapes
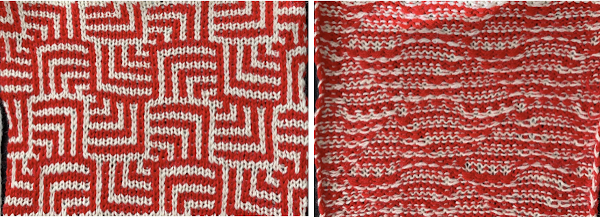
 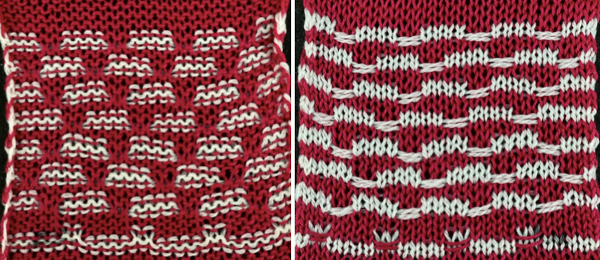 To my surprise, the process became oddly meditative, and I moved onto a different motif built with 2X2 pixel blocks. As seen with mazes and mosaics, a design intended for standard fair isle, tuck, or slip, with color changes every 2 rows, will produce an altered final shape,
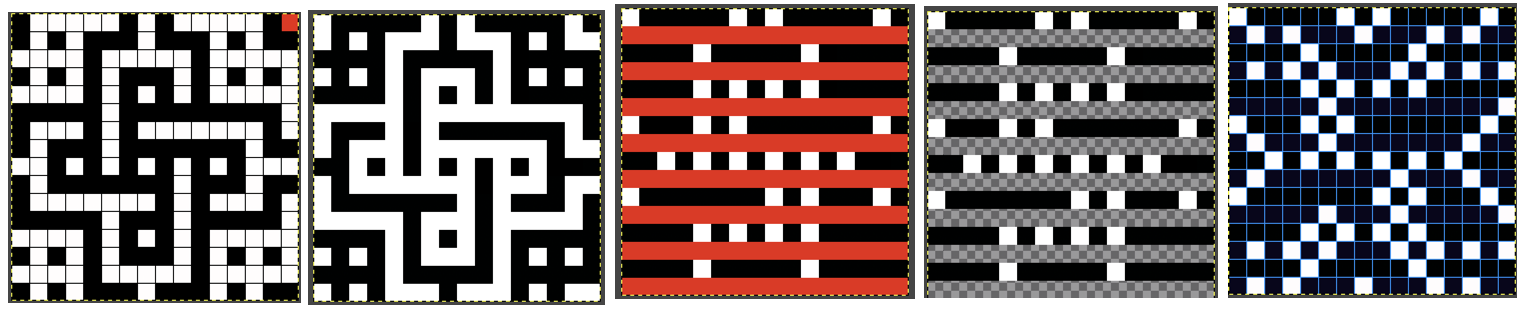
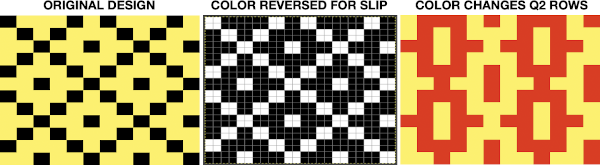
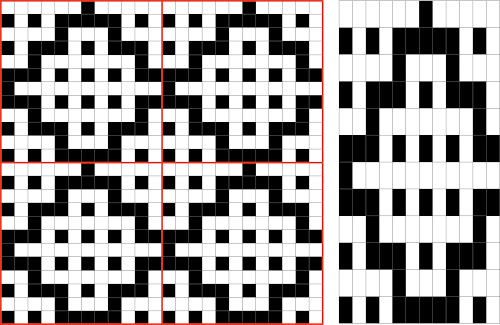
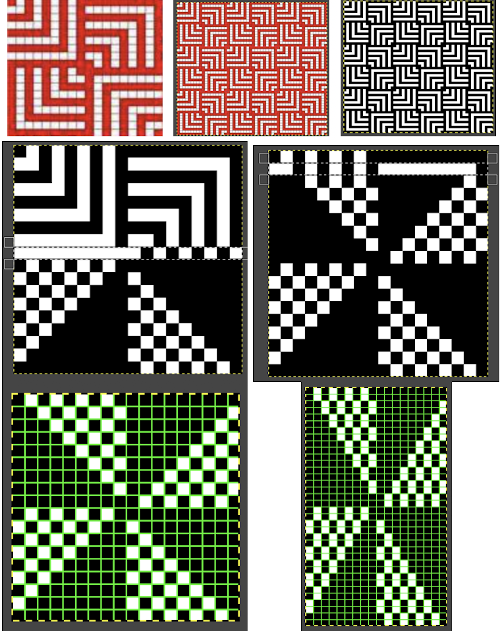
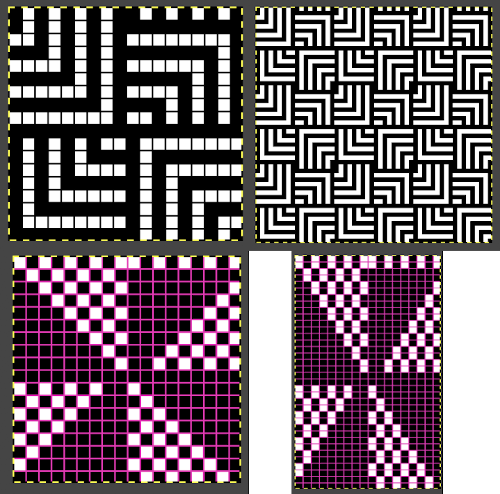
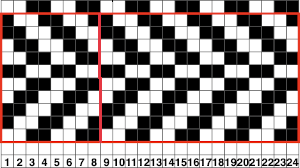
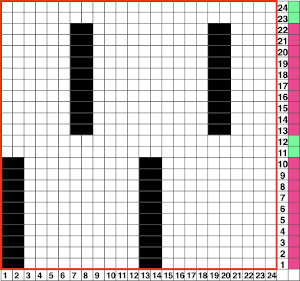
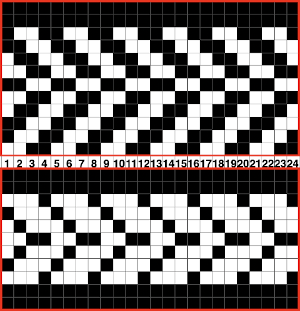
 Combining hand techniques: the starting chart begins to address the movement of stitches. On the left, the placement of crossed colors is shown, but technically the design produced is different. On the rows marked with X and red cells, cable crossings are made. All stitches in that row are then pushed out to E, the color is changed and the result is that row and the preselected next one are going to knit on every stitch, those rows are highlighted with red cells on the right as well. Black cells reflect punched holes or repeat for a 24 stitch brick repeat
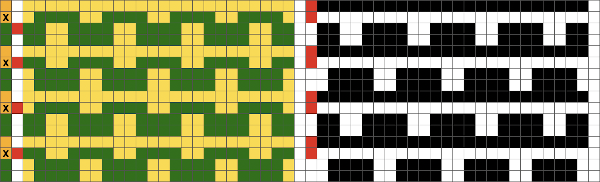 Two types of crossings were used in the swatch, one moving the elongated slipped stitches on the knit side of the work, the simpler process,


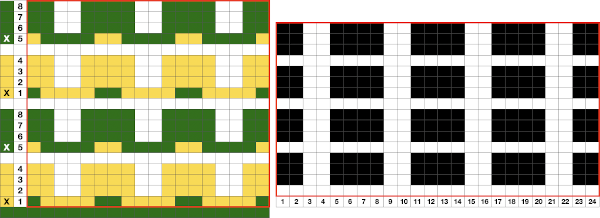 The repeat appears to use slip-stitch in a vertical column, not ever possible in standard knitting. The explanation is that on those blank rows, crossings are made prior to knitting the next row. The chart on the left reflects the needle placement of each color after the crossings. All pattern needles are then brought out to E, maintaining the needle selection. Slipped stitches will have been replaced by knit ones in the alternate color.
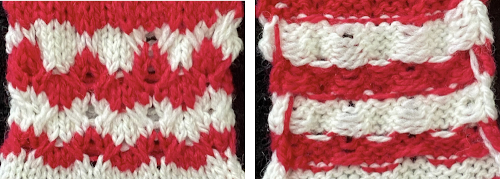 The charted repeat
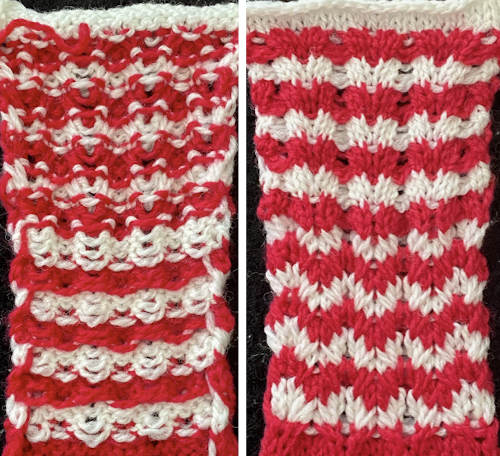

 A couple more ways to transfer those slip stitch floats to the front of the fabric: floats can be lifted on top of the needles that formed them and behind the stitches on them, a fine knitting needle or tool can be inserted through the stitches across the row, a few, or a pair at a time, being careful not to twist the stitches. In turn, the stitches can then be dropped off the main bed, held on the needle or tool, and be replaced carefully on the needles in question across the row. Crossings are then made, the proper needle set up is manually chosen for the next carriage pass, and the process starts over again. Folks who like lifelines could thread a ravel cord threaded through a needle and use them to remove the same stitches off the bed instead of the knitting needle.
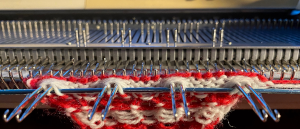
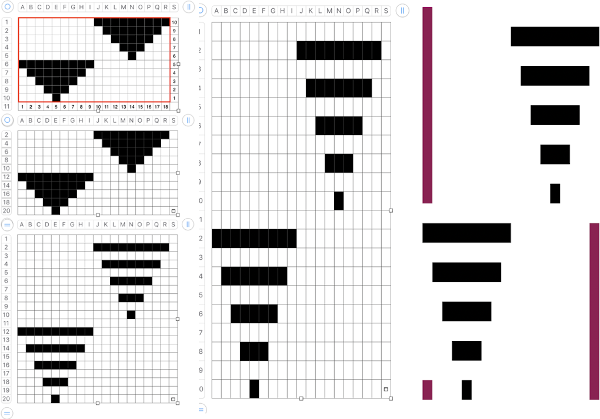
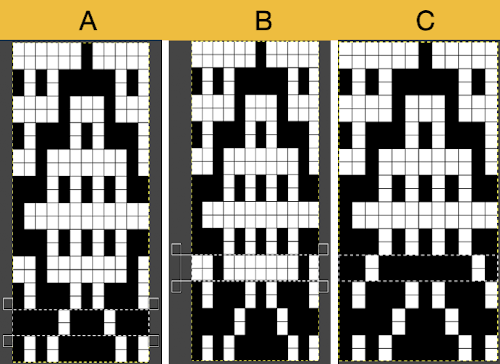
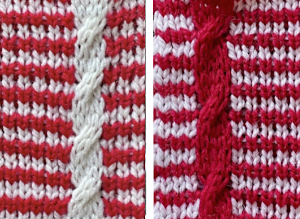 The charted repeats are for the red cable with the second spacing, illustrating options for cabling on row 7 or row 11, pulling needles out to E after making the transfers before knitting the last row of the design. Pairs of slipped and all knit rows are added to lengthen the distance between cables and to reduce some of the extra lengths in all striped areas
 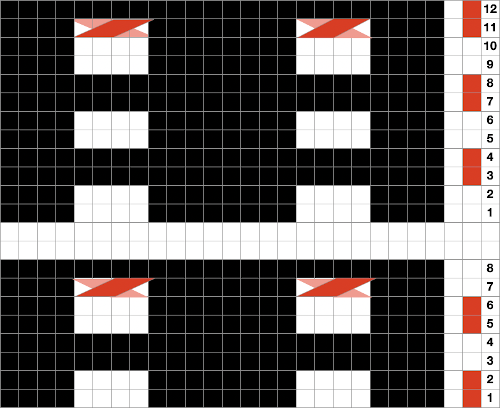 This idea may work in a border or a trim as well. I did not test bringing the slipped stitches to the purl side. The chart shows adjustments in the placement of the repeat to make tracking crossings easier
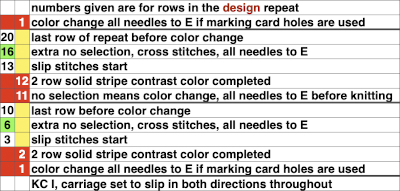
 One more to try
 Another approach is to bring elongated stitches created manually up on the purl side. The resulting fabric will be more gathered on the knit side, with no formation of slip stitch floats, it is referred to as
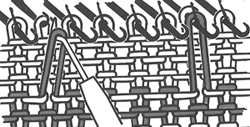
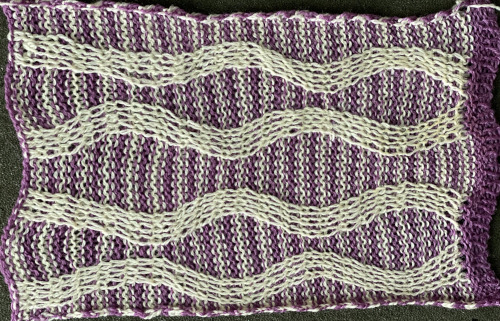
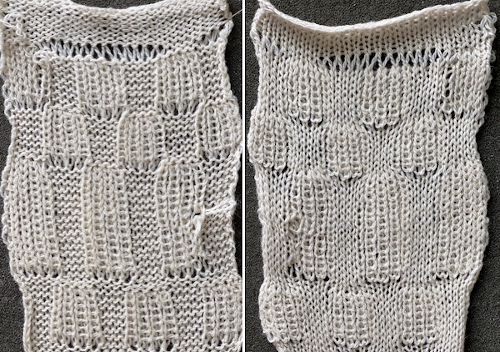
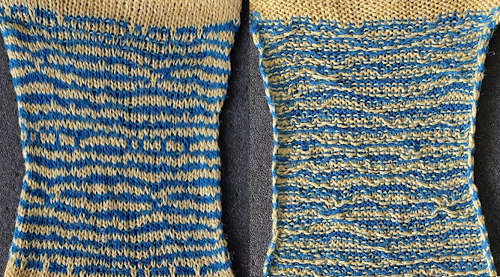
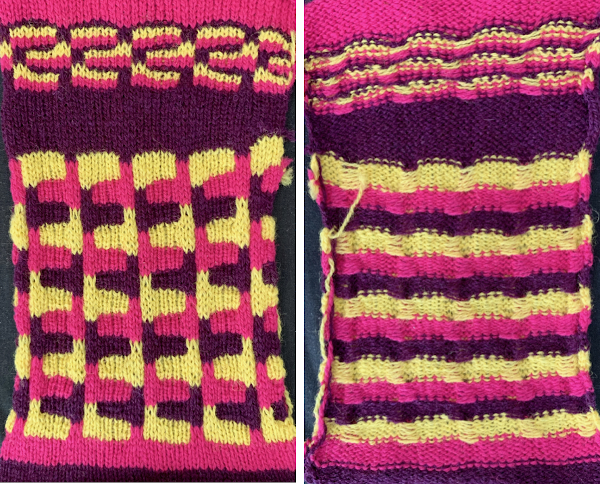
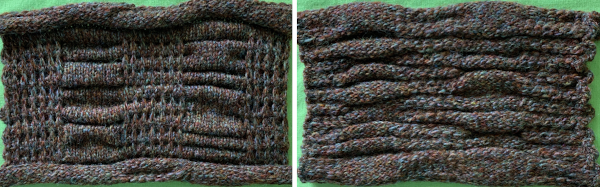
 Proof of concept: the bottom half is knit using the slip stitch setting, the top half in the tuck setting. The added texture on the tuck stitch purl side makes the fabric a more interesting, reversible one, and wider than its companion.
 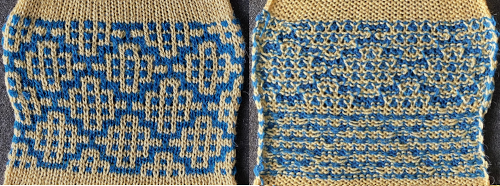 For a different way of working with two-color initial images using only Gimp, see tips in
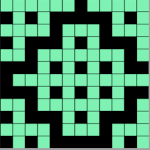

 Numbers processing to ready the repeat for final gimp editing:
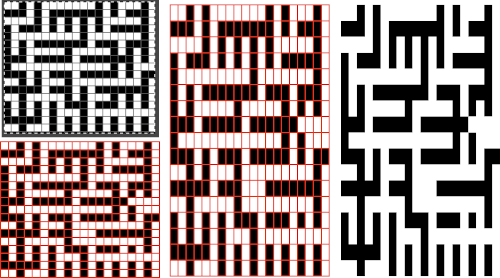
 Getting back to clearer pattern results: when using electronics, it is possible to create far wider and taller repeats for download. The technique to achieve them uses the same process. That said, there are quicker ways to attain the final repeat illustrated in the 2024 posts on using Gimp color to alpha through the Layer> Transparency option or Colors> Color to Alpha.
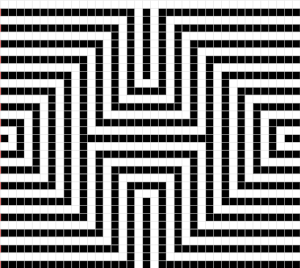
 the isolated repeat, double-length
 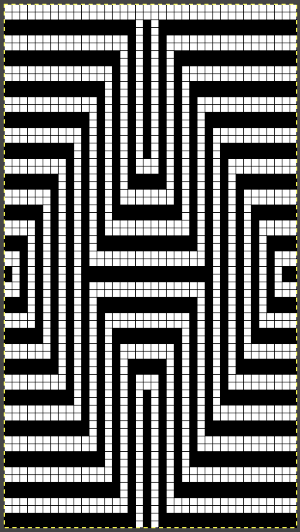 the color separation in progress
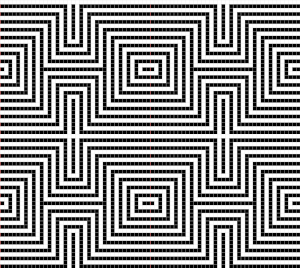
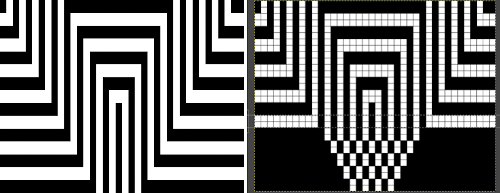 When knit, that white cell pair of rows break up the overall shapes and shifts the pattern in the top and bottom half
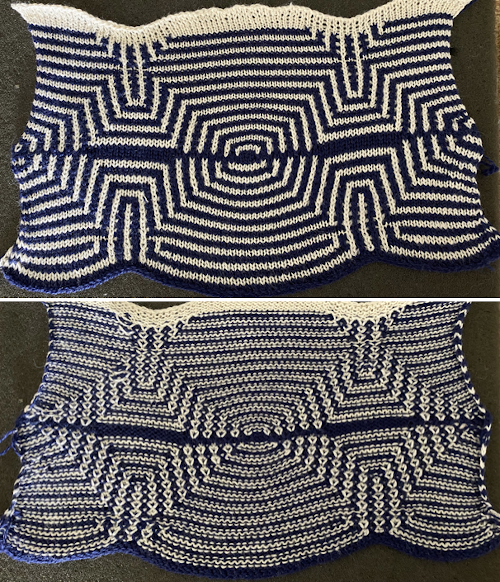
 The final adjusted repeat
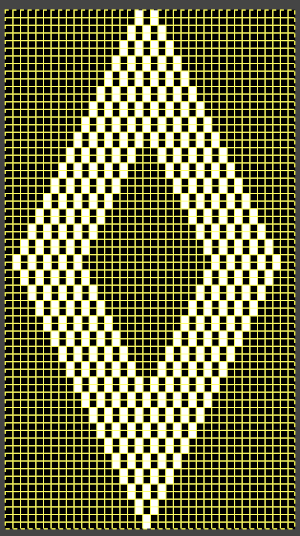
 knit using the tuck stitch setting in both directions, KCI, first row left to right, leading with the dark color
 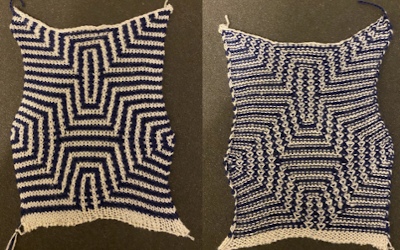 and here with the lighter color
 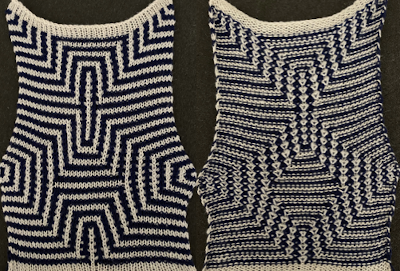 In progress, on the km
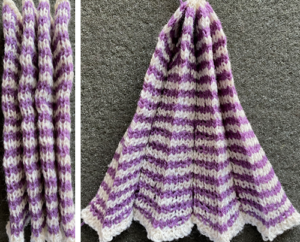
 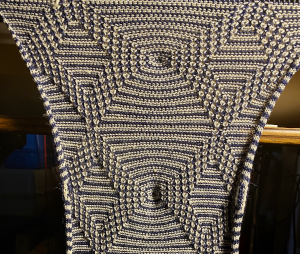 the relaxed, 3D-ish view on the reverse
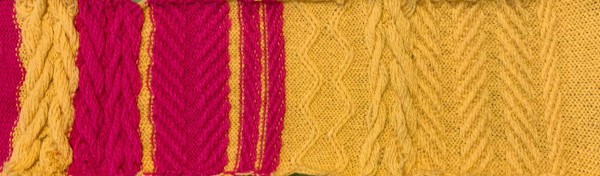
 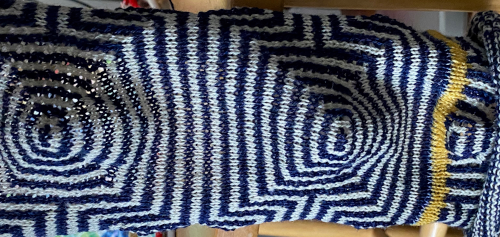 why projects can take longer than planned
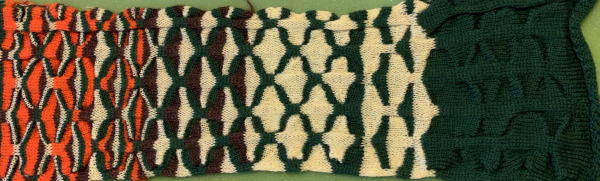
 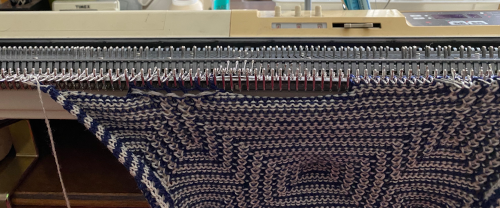 The finished, relaxed scarf with pressed edges only, retaining the conical striped forms
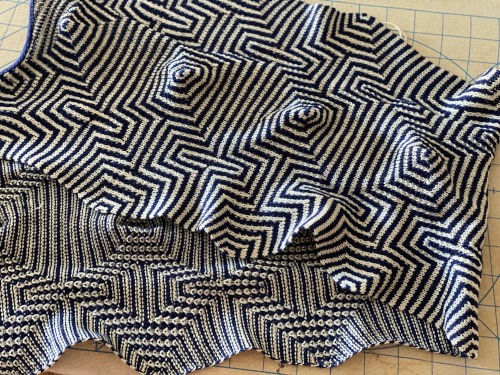 The repeat knit double length, changing colors every 2 rows, becomes something quite different, with a sharp curl to the purl side
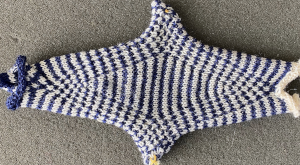
 with my color changer in this threading sequence throughout
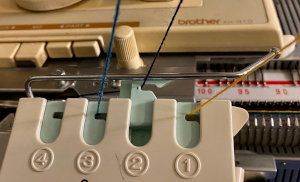
 where normally each color in each design row knits twice. Because selection occurs for pairs of rows, the first preselection row is from right to left. To decrease the backing rows, the ribber is set for birdseye. I prefer to have an end needle on each end on the ribber, keeping in mind that the total number of needles in use there needs to be even. The machine provides reminders as to which color should be knitting. My samples are knit using KCI on the top bed. Because the preselection happens twice, it is easy enough to knit in pattern from left to right,
 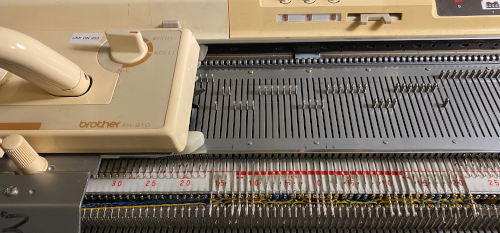 when the carriages have reached the right side, simply use a ribber comb to push all needles back to B.
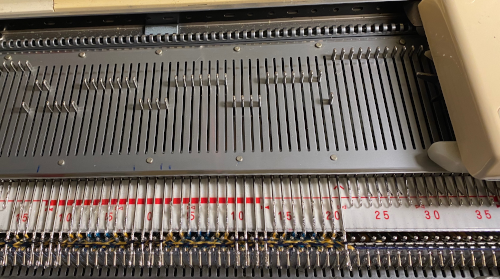

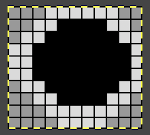
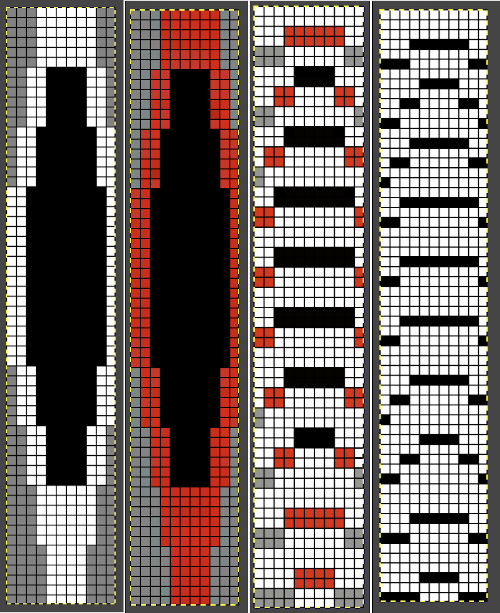
 Speeding things up with color separation, beginning with the method that will have each color, each design row knitting twice. The repeat is 10 rows high, so it is expanded X6 to 10 by 60 rows. In the final result, the second row for each color in the separation is in turn erased. The red was added to make all 3 colors visible while working the separation, avoiding confusion with the white ground. The knittable result as usual is in a black and white png
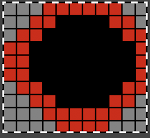
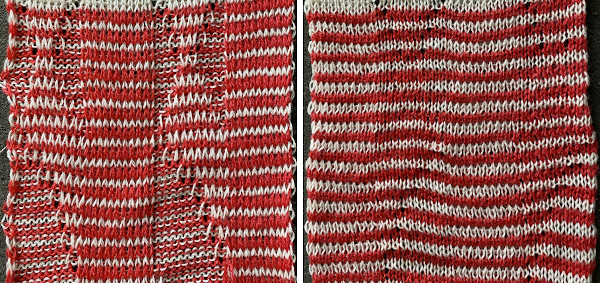
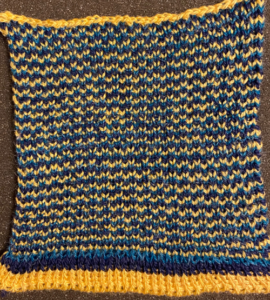 The ribber can also be set to knit every row, resulting in elongation on the knit side, while creating an interesting striper backing
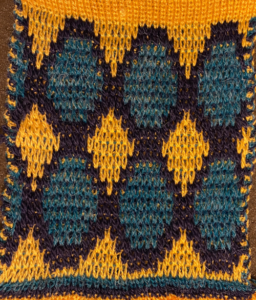
 Comparing this version to the birdseye backed one for repeat height
 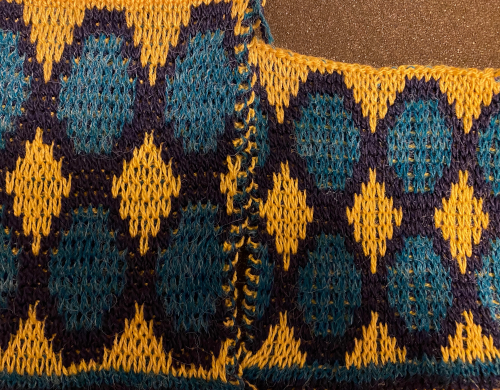 Comparisons: HoP, pushing back needles to B, and color separation results. In the latter, the design is likely elongated in part due to a change in the distribution of thinner yarns to larger design areas with no tension adjustments
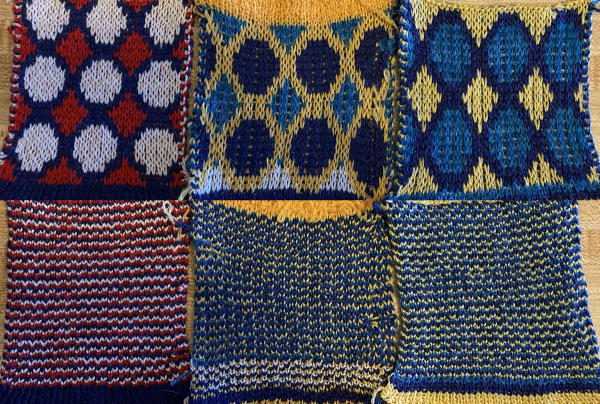

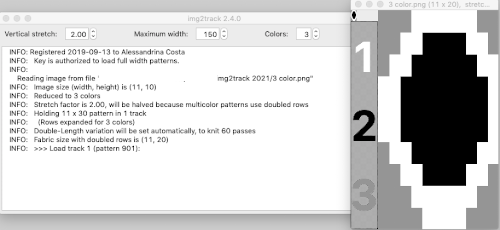
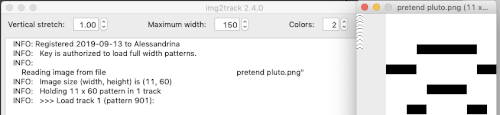
 The Ayab lettering as opposed to numbers move from right to left. The manual states that the color separation order is: white C, grey B, black A with their sequence = C (3), B (2), A(1). If the prompts for changing colors as given are followed it provides a very valuable in tracking them, but if out of habit one knits in the usual 1,2,3 sequence, the color placement occurs in an unexpected order and may result in errors. The on-screen letter prompt corresponding to the anticipated color change sometimes occurs with the knit carriage on the right, sometimes as it approaches the changer, and the size of the font was hard for me to see since the screen was not close enough for easy visibility.
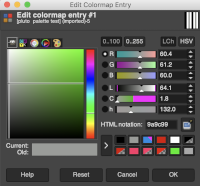 The small file makes for a quick test of proper color selection for each of the three colors used
 Having some idea of stitch counts for each color in the design in the first few rows can help identify proper, planned color placement errors
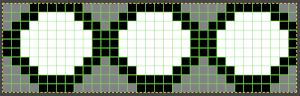
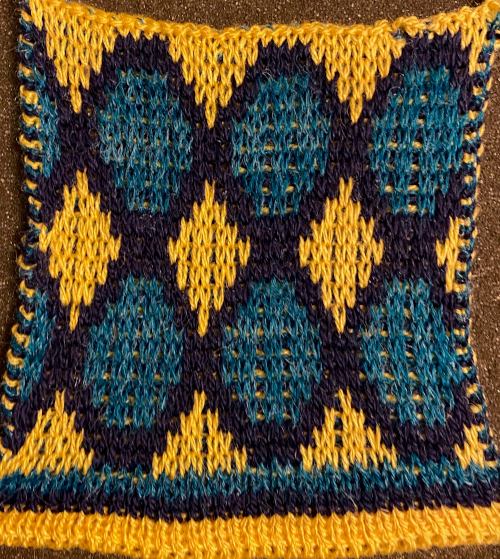
 My first swatch using the heart of Pluto separation and a greyscale motif
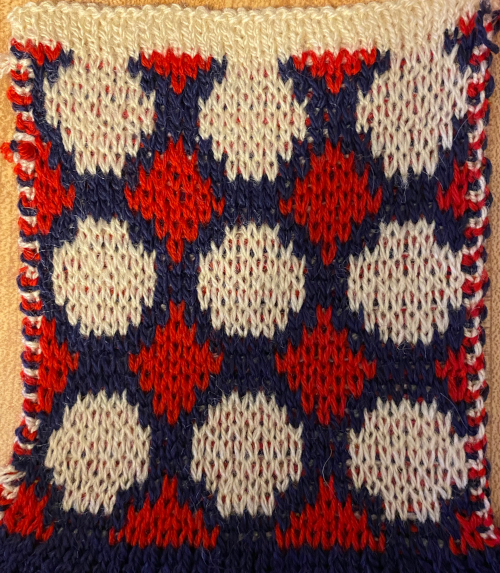
 My tested color change sequence is #1, #2, #3 colors throughout, I disregarded the prompts for color changes at the bottom of the Ayab screen. Some things to ponder: in pieces that require color changes, starting with waste knitting in the same colors can help assess the best tension, whether each color will be picked up properly, and if the colors work well together. Looking at these 3 small tests, it appears that a choice should be made when casting on about using color 1 or 2 for the preselection and cast on rows. If the setting to slip is forgotten for the first move to the left, the color in the feeder will knit every stitch rather than a pattern selection. Always check settings when on the right, making certain lili buttons are set as well. This pattern does not contain 3 colors on every row. In addition to that, when working DBJ with other color separations one is likely used to seeing knit bed needle selections on every row. That is not true here, is a function of the technique, not a patterning error. On rows that have colors missing, when that color is in use, the main bed slips, the ribber works every other needle, first in one direction, then the other, adding to the row count on the purl side of the knit.
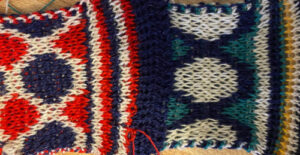
 The mess at the bottom was due to the green yarn getting caught on the needle bed and not knitting the necessary stitches on the ribber, so dropped stitches were formed
 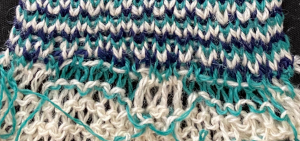 The assumption is that if the C, B, A rotation and prompts are to be followed, the middle color 2 can stay in place, and the placement of 1 and 3 can be exchanged.


 Generally when creating these patterns on Brother machines, patterning selection varies for each pairs of rows. I got distracted while making the above swatch by a phone call, got to the point where there is a very obvious solid black all knit row in the repeat, but “forgot” its presence. I assumed I was having a selection or a carriage issue and scrapped the knitting off. Note to self: “remember to always check the programmed design before you do that again in the future”.

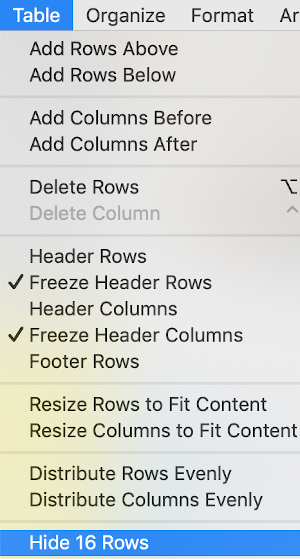
 The working design repeat is 16X16. Create a new table that is 16 cells wide, twice its height, 32. While holding down the command key, select all the odd-numbered rows planned for the final chart repeat, any errors can be corrected by clicking again on the same spot, still holding the key down. The process may be done in steps, releasing the key in between selecting groups
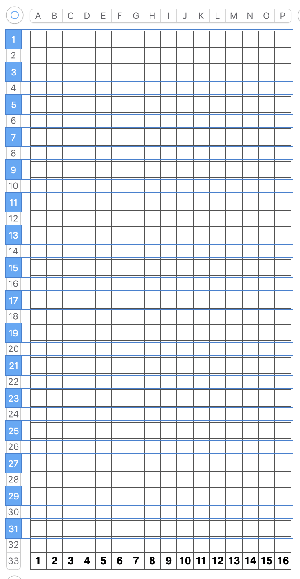

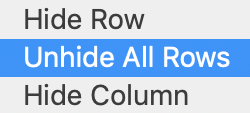
 will swap black and white cells in that row. Continue the process on every other row. It is not necessary to select the tool each time, as you advance and select the next row, the one just left remains briefly outlined in white dashes, making it easier to advance correctly in the design.
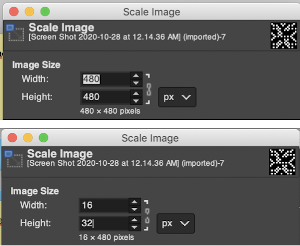
 This repeat posed by a quandary. The file may be used as-is and doubled in length after download. For doubling the height in Numbers, prior to importing the final screengrab into gimp, please see post:
 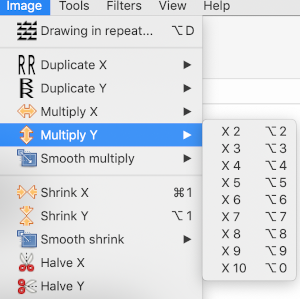 and
and 


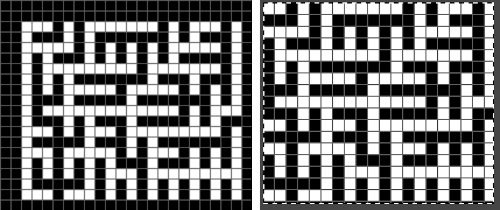
 adapted for maze knitting, eliminating long floats, to be lengthened to double-height
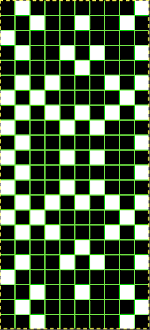
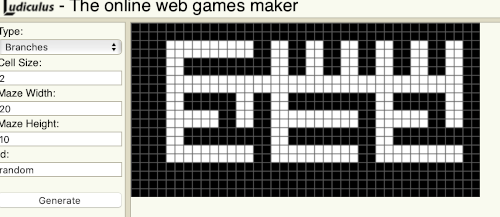
 Using the maze generator by
 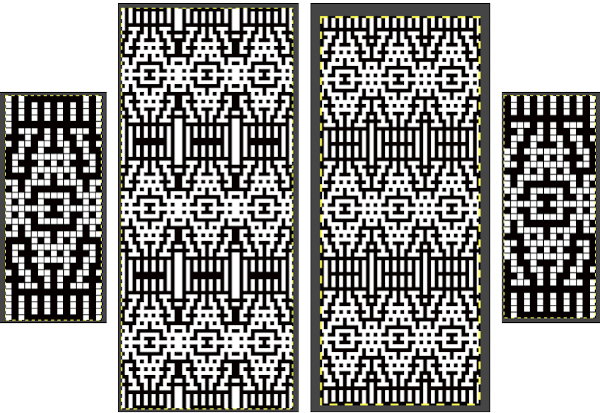 The proof of concept swatch for the version on the right, knit in tuck stitch
 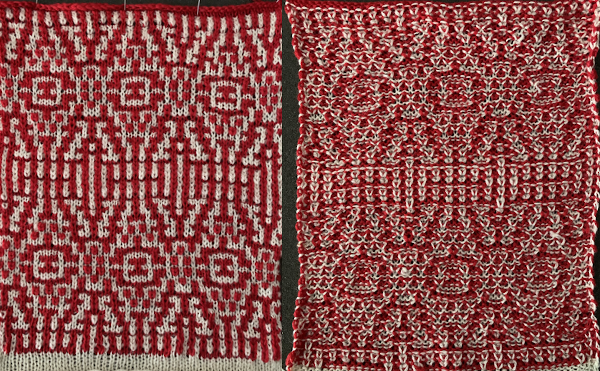 the double-length BMP ready for knitting, 14X68
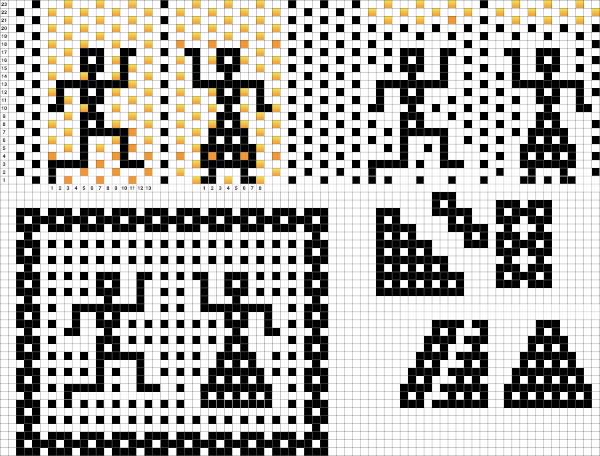
 a planned color change on the next row would require needles that had been skipped, marked in red, being pre-selected forward for knitting back toward the color changer and returning to the previous or next planned color selection
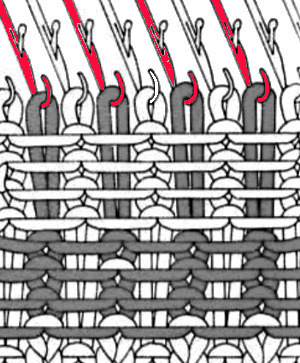
 Remember that punchcards knit the image as viewed on the purl side of the fabric, so to match any swatch photos given in published pattern books, the exact repeat unless it is perfectly symmetrical, will usually need to be mirrored horizontally for use in electronic machines.
 tiling to check the alignment of the 8X10 repeat.
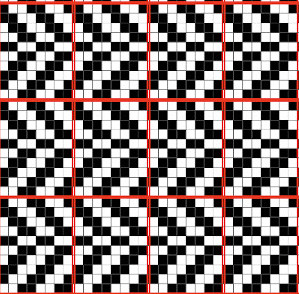
 When evaluating published repeats, keep in mind the basics; these are suitable for electronic KMs that will allow for color reverse
 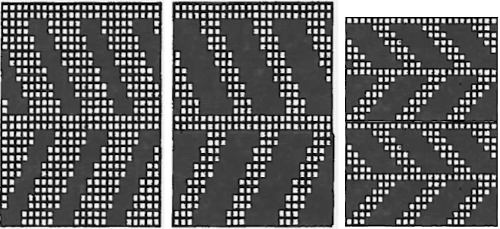 punchcard knitters would have to punch white squares, resulting in this arrangement
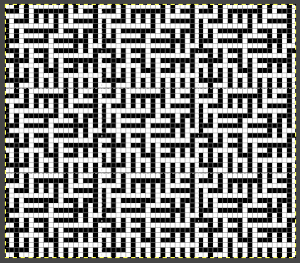
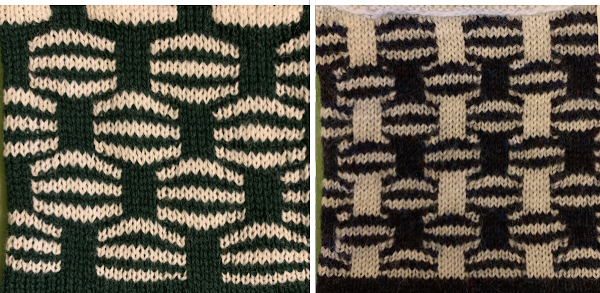
 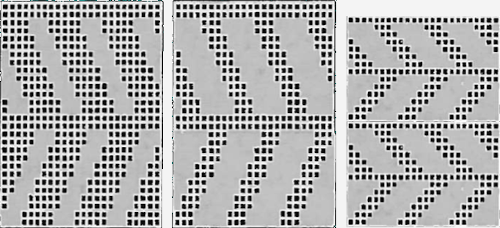 The knit side is not necessarily always interesting. With knit stripes in a different color breaking up the textured segments a secondary pattern will begin to emerge. A closer look at the samples below reveals one repeat is actually the other, drawn double length. This is an easy option, even in punch card machines. When knitting long pieces especially, however, I prefer not to use double-length built-in features, finding it easier to sort out where I am in terms of design rows if errors occur.
 Depending on your machine ie Passap Duo requires 40 stitches punched repeats or modifying for electronics, vertical black columns or additional white squares may be added to the original design repeat units. The corresponding cells are filled with the color gray
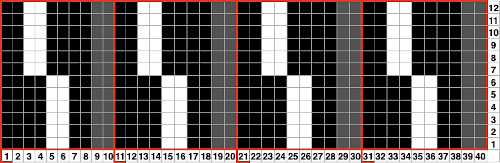

 I have begun including .pngs with some of my posts. Check that your import method does not automatically change the mode to RGB. It is a common problem with such grabs from FB. If that happens, index the image to B/W and save it again before using it in download to KM software.
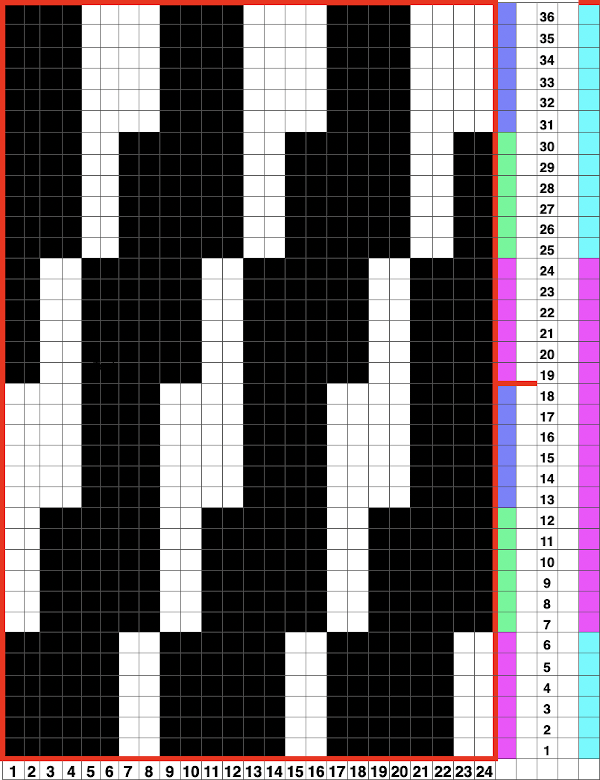
 From long design studio inspiration swatches: the secondary shapes are created by varying the number of rows in the color change rotation and placement, the bottom swatch shows the purl side of part of the completed length. Float counts can help duplicate the repeat or color placements if notes are skipped during knitting.
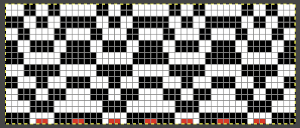
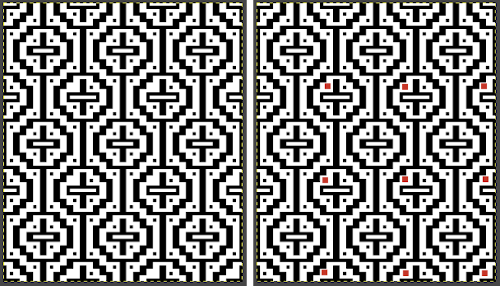
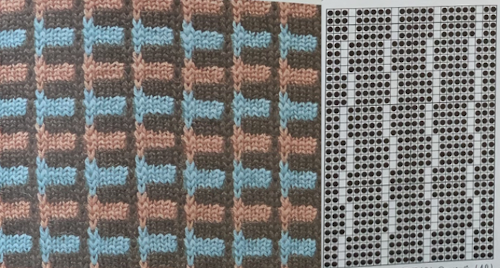
 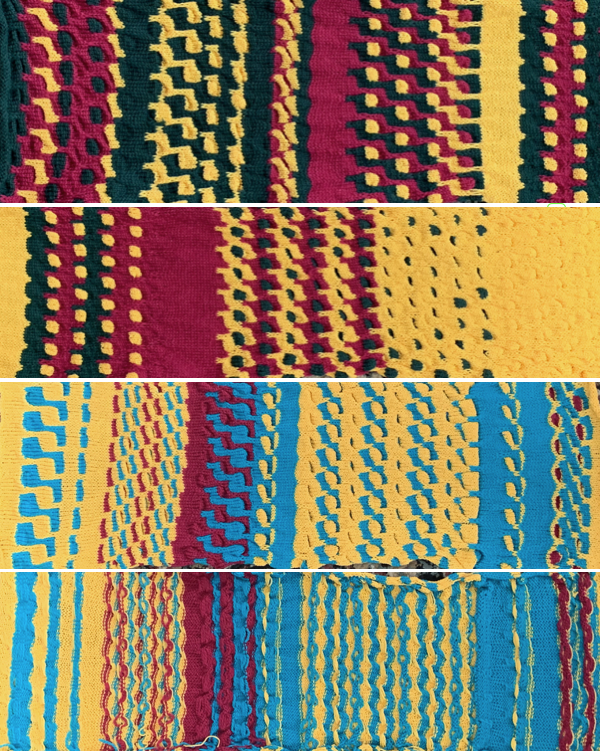 Working with multiple slip stitch “bars”: this shows my punchcard, marked with color changes once the final rotation was decided, remembering to begin markings 7 rows up from the bottom for Brother (5 for Studio).
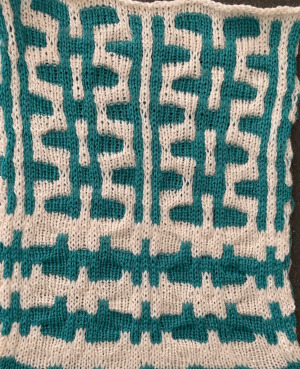
 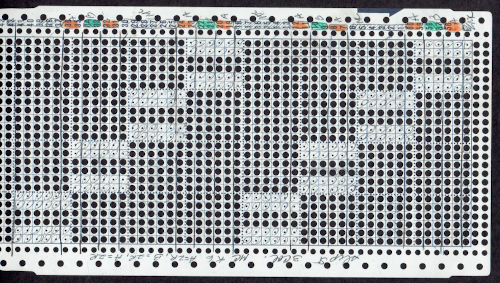 This design produces a fabric that is fairly flat on both sides: the .png is in the same orientation as the punchcard repeat, which you can see is produced with shapes reversed on the knit side in the swatches below it. Instructions on how the repeat was converted to .bmp for download using Gimp in
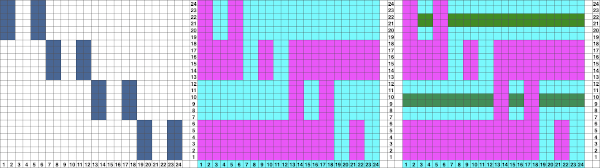
 This swatch segment illustrates the possibility of removing the slipped stitches from the needle bed and bringing them to the purl side, rehanging them on the same needles, bringing all needles out to hold before executing the next all knit row. The “floats” at the bottom of the swatch are from threads that were missed and not brought to the back of the slipped stitches
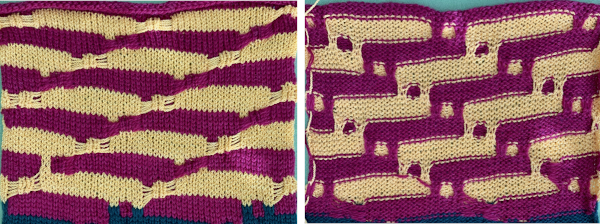

 Reducing the number of slipped rows
 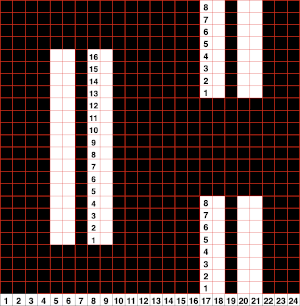 reducing columns to produce a trim, being certain as to placement on the needle bed
  This repeat produces a ruched fabric when no all knit rows are included, and a sort of “honeycomb” effect when additional color changes on all knit rows are added. The first long swatch
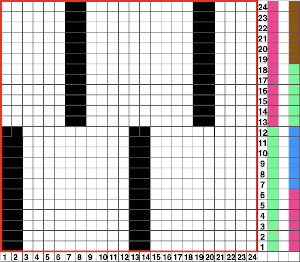


 Shifting slip stitch units to form shapes
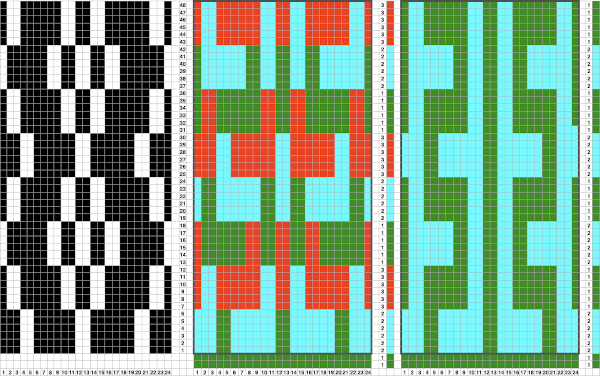

 If the slip stitch units begin and end with the same color knitting just before them and immediately after, the color carried on the knit side will be consistent throughout.
 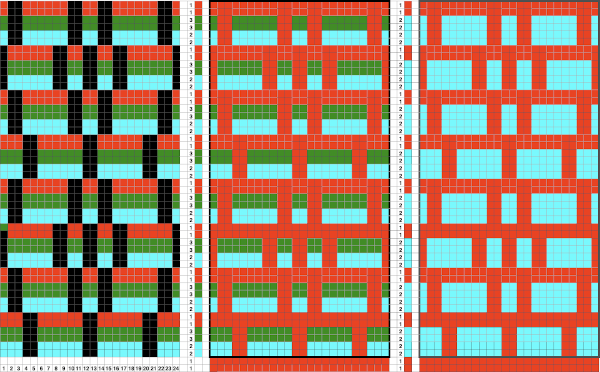 A sure way to get the shapes to match your design is to assign a number matching the number sequence in the color changer for your machine to each of the yarn colors. Imagining the results in a spreadsheet or even graph paper
 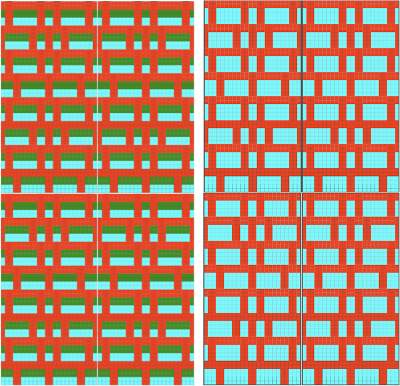 Expanding each section to 8 rows, the repeat now becomes 64 rows high and allows for 3 colors to show behind the slipped stitches in the chart on the left. On the right, the color-changing order shifts to 6 rows at a time in sequences 1,2,3,2,1,2,3. Design row 1 would begin the piece using the color red, the last row in the repeat is blue, shifting the color then carried up the front of the piece to blue.
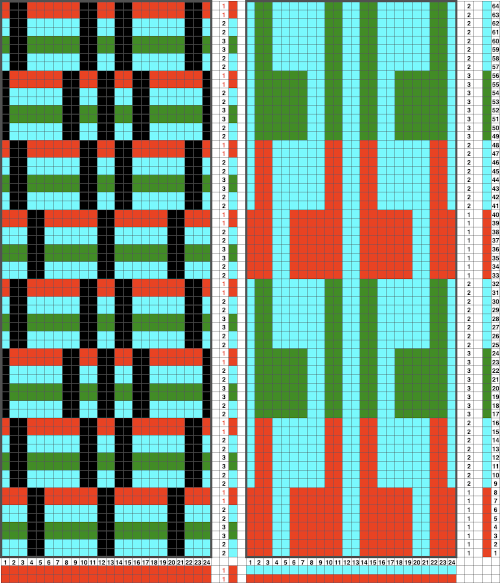
 Once the basics are understood, changes in scale and amount of ruched textures along with fiber content are easier to execute
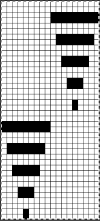
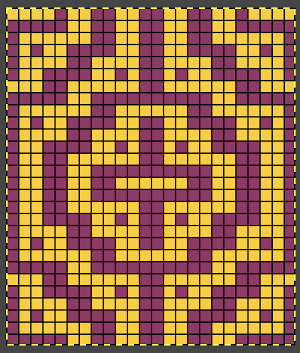
 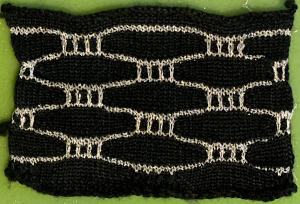 The chart for the sample below is 30 stitches wide by 84 rows high, and is shown turned counterclockwise
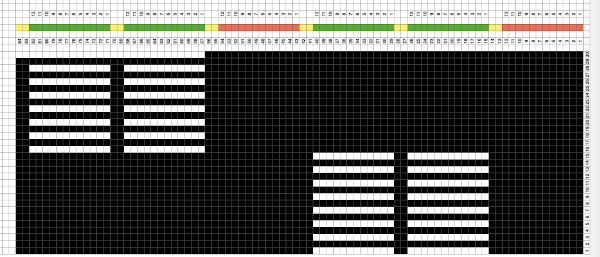
 This fabric has a more compressed shape, the blocks of slipped stitches are in a vertical arrangement directly above each other. A possible building unit for similar structures:
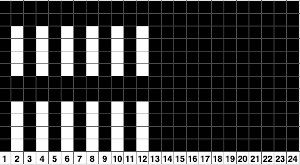
 An all-knit border on either edge will automatically create a ruffle on each side.
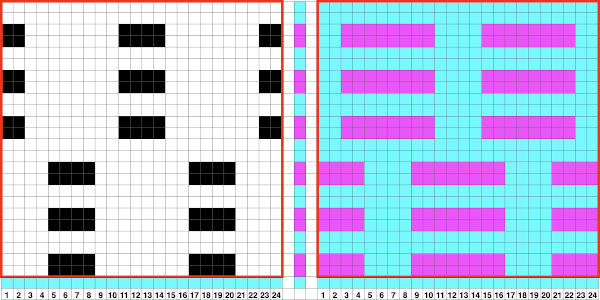

 The 24X20 repeat for the swatch on the above right, with the floats easily identified on the purl side of the swatch
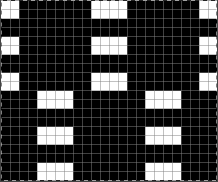