The tarn knit on Brother 260

Knitting the T-shirt yarn on the 260 is possible. As when using any other unknown yarn it is a good idea to begin to knit with a familiar one. Space dyed segments are knit with worsted weight wool. An every needle tarn knit is hard to push for both the operator and the KM, making a wide, taut fabric. The transition multi-colored stripe is to allow for the transfer of stitches in use to every other needle set up. Subsequent tarn sections follow in plain knit, every other needle tucking in alternate needles in one direction, knitting in other, by pulling them to hold-position, and after some plain knitting lastly by tucking on alternate EON in one direction, knitting in opposite direction, using the studio #2 card and automatic needle selection. Most of the swatch is knit at T8, the very top at T4, all with lots of weight. The last segment was harder to knit, is stiffer, but stitches get forced apart on the knit side, making it more interesting.

the purl side

the bits of color are from a faded image printed on the Tshirt’s exterior

the punchcard repeat

On my crochet hook

Lots of crochet patterns of late have featured chains and bobbles as components. I have been playing around with the idea of combining both. The fabric could be shaped by varying the number of chains and double crochets creating bobbles, and with very thick yarn the fabric may appear nearly solid. This is my working graph. Ovals represent chain stitches, beginning at the left chain is created, first bobble row is represented in red/orange; second bobble row is represented in green, crochet after work is turned over, and when the opposite side is reached, visually it will appear as though a single row of 5 bobbles has been completed. The numbers represent the number of triple crochets in each popcorn, the crosses are joining single crochets for anchoring chains to previous rows, and closing off popcorns. The graph was created in Excel.

The yarn in use here is a very soft acrylic, intended for someone who cannot wear wool.

a thicker wool, less open space

Nearly any crochet fabric has the potential to be incorporated into knit items of clothing and accessories.

Some long stitch / loop swatches/ single bed

These date back to my teaching days, are not resolved fabrics, were part of my demos, have been shot straight from storage, with no additional care to them ie pressing or steaming

tension changes

selective loops

moved in groups

some with beads

combined with e wraps and beading

combined with ladders

felted wool, ladders treated with water proofing agent did not felt

both loops and stitches in one below, along with beading

chenille worms and is a poor choice for loops unless that is the desired effect

selective looping and e wraps

combined with twisting of loops on knit surface

weaving ribbon into ladder spaces rather than long stitches

Large diagonal eyelet lace

This card may appear vaguely like the one used in my previous post using tuck stitches to fill in some “extra” empty needles to create large eyelets (April 15th, 2011: so hard to believe more than a year has passed!). I wanted to create a large, diagonal mesh for some trial new shapes that would allow me to get the movement without short row holding or angling the fabric 45 degrees.

This was the original card, using a repurposed one with “mistakes”, taped over, and more tape over new punching errors. OK for short term use, but probably not for any extended knitting

Here is the final card: orange lines are visual marking rows where knit carriage travels for 2 rows from right to left and back, pencil lines mark each design pattern repeat, blue lines the visual marking row for the end of each pattern repeat. The latter becomes important if one wants to flip the card over to get the eyelets traveling in the opposite direction, and knitting the fabric with lace carriage on right, knit carriage on left, keeping the repeat intact. In this instance, the first preselection row with the LC moving from left to right is made with the card locked.

The lace is created by single transfers in opposing directions, resulting in 2 adjacent needles being left empty immediately prior to knit row sequences. When 2 needles are empty, ladders occur unless they are alternately filled in. If the lace carriage is not engaged and the knit carriage continues to make passes, ladder stripes will break up the pattern and can be a design feature. Here the problem is eliminated because the lace transfers to the left help anchor down one of the two loops. The diagonal mesh sequence is easy: 4 transfer rows followed by 2 knit. The KC is set to knit throughout. The selection with alternating groups of pairs of needles do not affect the pattern, they provide a clue to the fact the opposite carriage is used on the next carriage pass and from the opposite, right side. Proper tension and weight for the used fiber are important to keep the fabric from getting hung up on gate pegs. The patterns using the concept may be varied by knitting more rows between transfers, creating smaller eyelets by changing sequences, starting transfers from row 2 and with lace carriage on right, and more. Two sample trial swatches:

A brief return in 2020 analyzing the actions of the lace carriage a different way 
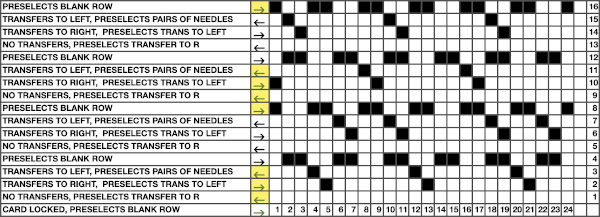
and a new test swatch

Back to lace

Recently I came across a photo in a magazine with what I thought of at the time as an unusual knit leaf. One of my first instincts upon viewing such patters is often to explore whether I might be able to reproduce the knit on the machine more quickly and whether in addition there may be a way to “automate the design” by coming up with a repeat that would work with the use of the lace carriage. I will share some of the many ways to explore such transitions in a series of posts. As written they will specifically apply to knitting on Brother/Knitking/Taitexma brand knitting machines.

The original “culprit” pattern:

One way to interpret those triple stitches leaning to the right and left in HK is to knit three together for right-leaning, and slip, knit two together, PSSO for left-leaning on RS (“right” /knit side). The same steps on the KM would involve moving around those triple stitches to achieve the correct lean of the leaf edge on the knit side of the fabric. The number of rows for transfers to achieve a similar look makes the fabric impractical to knit using a lace carriage on the KM, so back to hand knitting.

In yet another instance of “it’s a small world” since I first came upon the repeat and began looking for interpretations, I did find several hand-knit patterns on Ravelry and some magazines using the same or similar motif.

The pattern repeat in my first hand-knit sample in a 4.5/inch gauge wool

In turn, this led to my developing my own repeat design, which is now on 2 needles, becoming a scarf for my granddaughter, which can be shared in the future.

I work predominantly on a Mac, OS Lion. Last year finally got turned on to using excel for knit design after finding excellent online tutorials such as those by Marnie MacLean and Fleegle’s blog. Over the past week I finally got around to playing with iWork, using Numbers instead of excel, and in conjunction with Pages have come up with final images such as the ones below. Am pretty much flying by the seat of my pants in this, so I can’t really share a step-by-step method but have been pleased with the instinctive qualities of the Apple programs and the results.

In subsequent graphs: blue represents knit as it appears and may be worked on the knit side, while pink represents how the knit appears and may be worked on the purl side, and as such on the KM to achieve the same design

Common Lace transfers and symbols

moving multiple stitches

now: starting to play with a hand-knit repeat with the intent of translating it for use on the KM: triple stitches in one location in any single row are eliminated, as well as sets of double lace holes in any single row while retaining the diagonally slanting leaf motif

garter stitch will be eliminated by adding a needle out of work in its place, creating a ladder space between repeats; repeat will be adjusted to work within restraints of punchcard limitations in terms of stitch width and row height requirements, more on next post.

_____

“Wisteria” 2

A follow-up to the previous post on the “horizontal cable“: it has a relative that produces a flat or textured “lacey”  fabric depending on the number of rows knit in each segment.
The relative: after some initial rows of knitting (whether waste yarn or edge of actual piece or swatch), beginning with knit carriage on the right-hand side, moving right to left, the knit is created by knitting on a multiple of chosen # of stitches plus needles out of work (OOW, A position). In the instance below a multiple of 9 + 8 is cast on, with an OOW needle (represented by blue) between repeats. The ladders created where needles are in A also make it easier to visually identify stitch groups that need to be moved in/out of work

an attempt at a graphic representation of the corresponding knit 
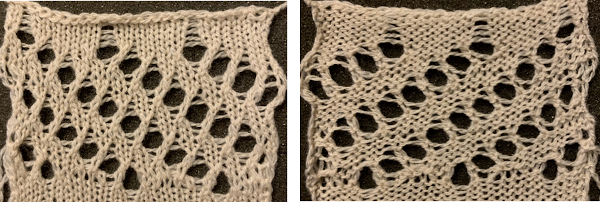
the swatch knit side, orientation as knit    the swatch purl side, rotated 90 degrees as it would appear in a sideways knit the knit tends to curl along edges to purl side as seen above, could be embellished with stitching for more contrast and color
To knit:
first pattern row:
the numbers in parentheses reflect markings on the last colored image
COR: knit 8 rows on the first group of stitches on the right (1)
push the second group (2) into work and knit 8 rows
push the third group (3) into work and knit one row
push group (1) on its right out to hold, knit 7 rows across the remaining  16 stitches
bring a new group on the left into work, knit one row
bring the group to its right out of work, repeat the process across the  row
when the second to last 2 groups on the left (6 and 7) are reached, knit  8 rows on both,
push the second to the last group out to hold (6)
COL knit 8 rows on the last group on the left (7)
second pattern row:
COL: reverse the process from left to right for the second pattern row, begin by knitting 8 rows once more on the first group on the left (9), that first group will now have been worked for 16 rows
The row that picks up the adjacent group of stitches helps create a joined fabric, with movement resulting from the direction in which each “pattern row” is knit.
Varying the ladder space and the number of rows knit will change the overall look of the fabric.
Turning the fabric sideways after varying the size of the holes across the now horizontal rows could also affect the overall shaping ie narrowing and widening of segments.
Going from larger holes on one side to narrower in the opposite will make the knit “ruffle” on the edge with larger holes, etc.
If one knits vertical segments that are 8-16 rows in turn, cutting the yarn at the end of each sequence, then there will be straight slits/ strips that may, in turn, be left as such when knitting is resumed, twisted in a variety of sequences with alternate groups as one would a cable, rotated on their axis once for 180 exposing some of the back/opposite surfaces of the knit single or multiple times as desired.
A strip of slits may, in turn, be “latched up” in a chain, stitched, or otherwise altered after the knitting is completed.
A sample with wider ladder spacing and a slightly different sequence. Note that the first row of holes is smaller than those achieved when shaping begins to be reversed. Ending the pattern can be planned to match its start.

Horizontal “cable”

I live in the East Coast of the United States.

In the 80s there used to be a yearly machine knitting seminar that was fairly well attended. There were droves of machine knitting publications. Susan Lazear, the founder of Cochenille, was just beginning to develop her knit design software ideas on the Amiga Computers, and a fellow Californian, who happened to be Japanese, used to travel here with the Pandora box of foreign knit magazines. At the time translating knits from one language to another amounted to guesswork and some leaflets. Subsequently, there were fliers, then articles, and even books on translating from Japanese to English and multiple language translations for knits and crochet.

One year there was a “Guess how this was done and you get a prize contest” for a technique appearing on a sweater with only Japanese instructions. The design was dubbed wisteria by some, has been reincarnated as a trim, insertion, bandings on sleeves and cardigans, and is beginning to reappear in magazines now again.

Here is one method for this “horizontal cable” created by short rowing across the width of the fabric.  Brother machine needle positions are A, B, D, and E, and a lever sets KH for holding in both directions Studio needle positions follow the alphabet, and Russel levers on each side must be set for holding.  The directions below are for Brother.

Reminder: when the machine is set for holding the needles in B or D position knit, needles pushed out to E will not knit. Weight is used as needed, watch for dropped stitches particularly along the edges of the sections as the rows of knitting are built up.

1.cast on the desired number of stitches knit several rows at garment tension, end COR (Carriage on Right)

2.COR, set the carriage not to knit needles in HP (hold position)

3.leave 6 needles at the right of knitting in WP (work position), push the remaining needles out to HP (hold position)

4.knit  10 rows over the 6 stitches, ending COR

5.push back 3 needles to D position at the LEFT of the 6 needles now in WP

6.knit one row from right to left (9 needles in WP) end COL (carriage on left). Push the needles now in WP on the far right to HP; 6 needles will remain in WP

7.knit 9 rows on these 6 needles,  end COR

8.repeat steps 5 through 7 across the fabric row until the last 6 needles remain. Knit 10 rows over  these last 6 needles, end COL

9.set the machine to knit needles in hold (holding lever to N), knit 2  or the desired number of rows across all the needles

10.holding lever on H. Repeat the procedure from left to right, reversing the sequence.

If the sequence is not reversed a bias fabric will be created. For maximum texture use a yarn with memory ie. wool. Anything that can be “killed” by pressure or ironing will flatten considerably and yield a very different fabric.

My demo samples were made out of colors that would make them easy to find, and unlikely to get “permanently borrowed”, so none of these were studies for actual finished garments

this swatch combines a boucle and a rayon; the latter has become flattened over time

this is a wool rayon, knitting is not reversed, resulting in biasing

these samples show the same technique, applied to much larger groups of stitches

a segment of a magazine recent garment photo, no origin given as to source, appears to use the above technique

online source for patterns using this technique

more cable like/structures/textures

A few i-cords and more to try

The top illustration below creates what some demonstrators back in the day would refer to as a heart cable trim. The width of the strips of knit may vary, and the size of the holes need to be accommodated to suit the subsequent threading. The second illustration set results in a more traditional “pretend” cable. I-cord could be used for the second sample. Narrow strips of knitting will curl in, however, and in many instances may be substituted for true i-cords. Because each pass of the carriage knits a row as opposed to slipping alternate rows, the knitting is twice as fast. In the instance below a series of holes are created for threading cording (or other chosen material)

The following illustrates the threading option with a single length of the cording, which will need to be secured at each end with some stitching. Separate colors could be used on alternate sides for more color variation, and other threading sequences as well

some publications with inspiration photos

its online relative

from foreign blog

part of another image

from MonTricot Magazine #26, 2011

from Mon Tricot magazine

A hand knitting book with many ideas for cord and strip use that could easily be adapted for machine knitting

A commercial foreign knit incorporating cables and woven cords link no longer active in 2019

Some “real” cables on KM

2/8 wool

slippery rayon: fabric flattens with pressing and remains that way

a couple of twist samples: wool/rayon blend

Fair Isle, any punchcard locked on a single row of every other stitch selection: there were whole books of HK patterns based on this idea, sequence of moving stitches can create a variety of secondary patterns. On the KM fair isle is essentially a slip stitch, short and skinny, tension needs to be loosened considerably to try this, stitches in cables cannot be brought out to “hold” position to ease knitting off on the next row, as this will affect the color pattern. Larger crossings are possible, but more difficult

another FI and cable variant: mistakes are probably from needles that were out just a bit too far and knit in the alternate color

a blast from the past: knit on my metal no punchcard bulky (first KM) and ribber more than 2 decades ago. Ribs at waist and armholes are hand knit twisted rib

Pretend/ mock cables 1: i-cords, holding

I have literally hundreds of machine-knit swatches from the days I taught in a design school program. I periodically revisit them and since cables and their look-alike relatives have recently caught my attention I thought I would share photos of some of the samples in the next few posts.
They are not necessarily resolved fabrics, some of them are the result of random demo efforts/ stitch play.
In any discipline over decades, one cannot help but become aware of how materials and styles cycle, and this is oh so true in fashion and certainly in knitting. For a while more than a decade ago knit i_cord yardage/ tubular yarn was marketed by several manufacturers, and it is now making its reappearance.
One way to create pretend cables in varied color combinations is to apply purchased yarn, or machine knit cording/ tubular knit to the purl facing the knitter side as the piece progresses. The application may be done in an organized manner, using a punch card to select needles on which the yarn will be hung, or more random, even with wide knit strips in contrasting colors.With tubular knit cord in addition to hooking up, anchoring may require some stitching, “seaming as you knit” at planned intervals would make the joins “invisible ” Strips using holding techniques or stitches hooked onto the knit to create texture, in turn, joined in the “seam as you knit method”Cording may also be inserted into single stitch lace “holes”or larger holes created through holding techniquesKnit i-cords, ribbon, twisted cording, etc. may also be threaded/woven through holes created at cable crossing as a way to add color and dimension to standard cables, mimicking their movement on the fabric. A recent foreign magazine cover including a variant of the above technique