Return to circles, knit and crochet “pies” 1

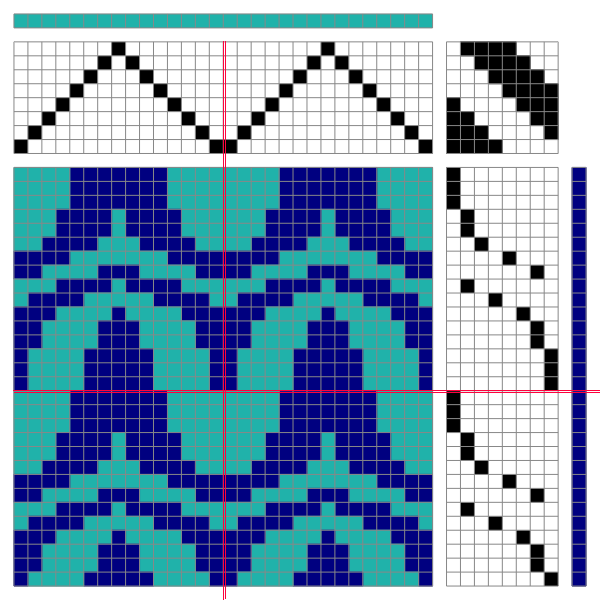
I began a series of posts on miters and spirals created on the knitting machine back in 2011. The oldest posts, knitting math and piesback to that pie, a bit of holding, and revisiting miters and spirals to form varied shapes begin to address creating flat circles in machine knitting using holding techniques.

Hand-knitting in circular format and crochet share some similarities. There are 2 methods of constructing circular work in crochet. 1: in rounds, (akin to knit miters in shape) where the end of each circular row is joined up to its own beginning to form a ring. A new starting chain (s) is formed to take the row to the proper height for the next row to remain constant. Depending on the pattern, one has the option of continuing by turning the work or not at the end of each row. Doing so allows the opportunity of altering textures and work on the fronts or backs of stitches. 2: in spirals. Rather than joining the ring, one continues on by going to the tops of the posts in the previous row.

With spirals, it is useful to mark the beginning of each round. Knitting markers shaped like safety pins are handy for that purpose. A line in a contrasting color can also be created using a separate strand of yarn and alternating carrying it back or to the front prior to forming the first stitch in the new row.

As with knitting, crocheted circles are not true circles, but rather, they are polygons. The way to make shapes more circular is to scramble the location of the increase points, putting them in different starting positions in each round (always spacing them equally and keeping the formula). Within limits, one may make the starting number of stitches in the first round a multiple of the number of segments in the finished shape.

With the creation of a flat circle in mind, the number of stitches needed depends on the height of the stitch. The taller the stitch, the greater the number of stitches required. If the stitch stays the same throughout, the number of stitches added on each round is constant. Test work regularly at intervals as the work grows by placing it on a firm, flat surface, to see if working only one stitch into each stitch is required / enough at that point to maintain the shape. The more segments, the smoother the circumference.

Unlike in hand-knitting, the first loop on the hook does not count as a stitch until you make it into something.

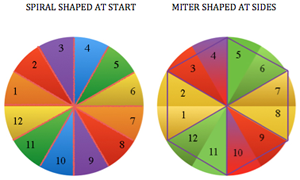
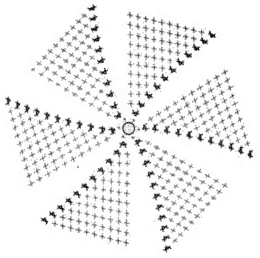
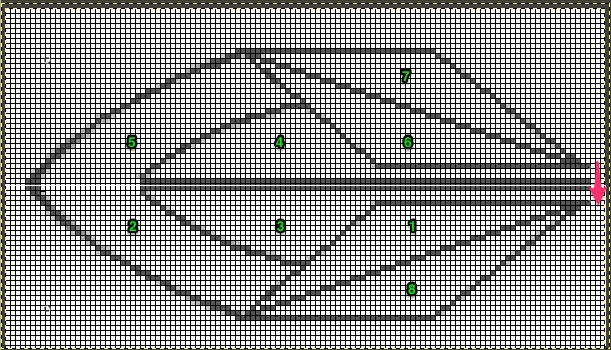
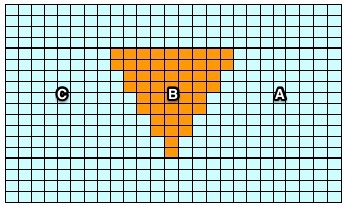
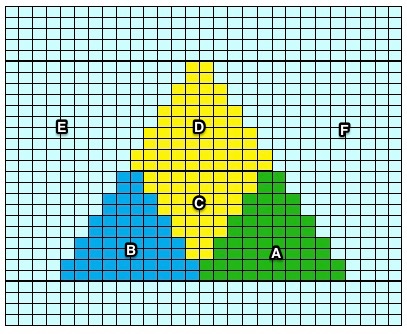
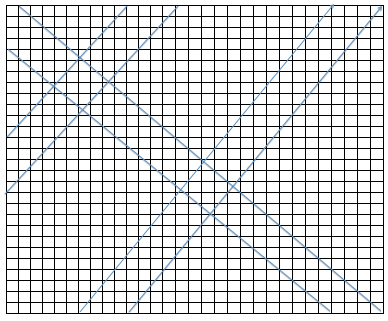
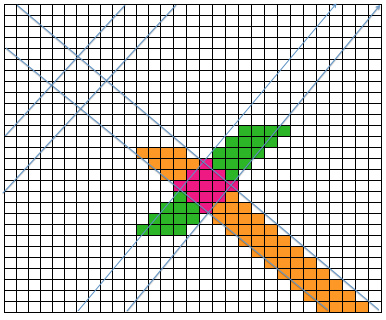
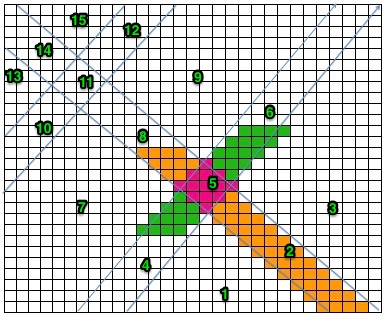
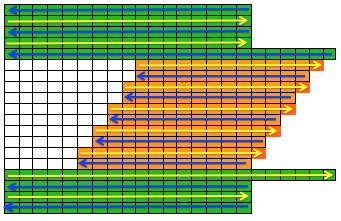
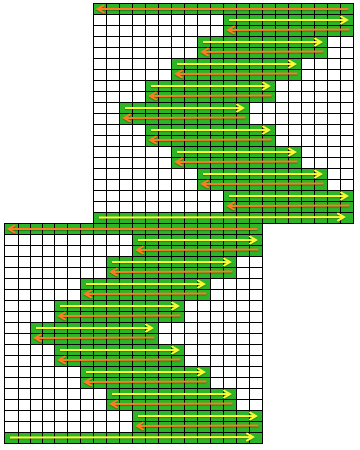
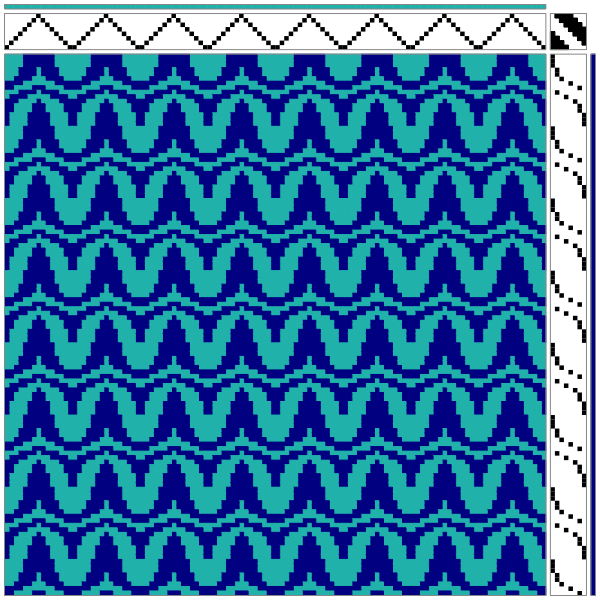
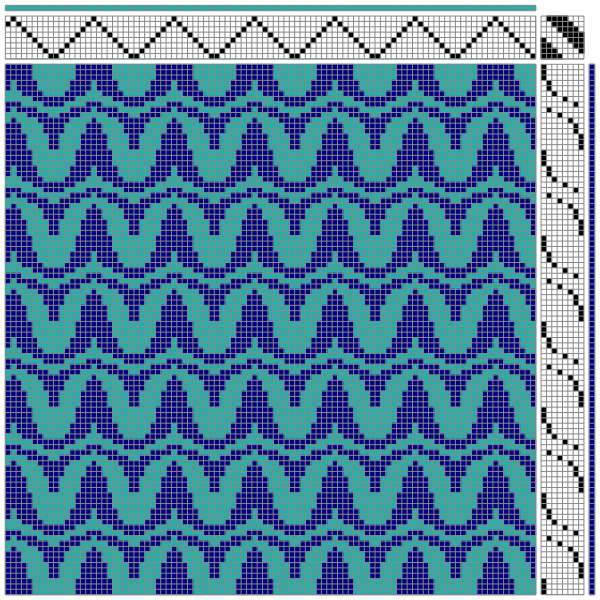
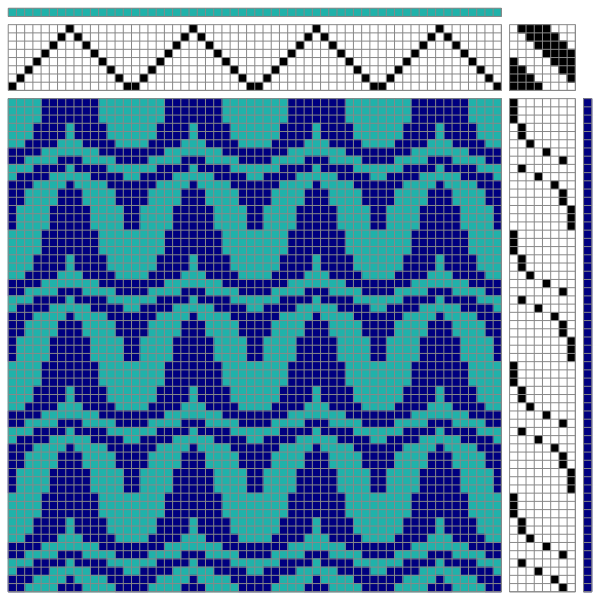
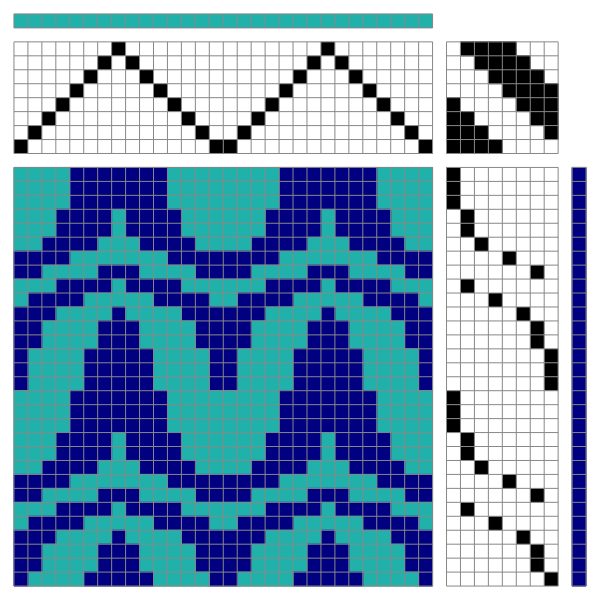
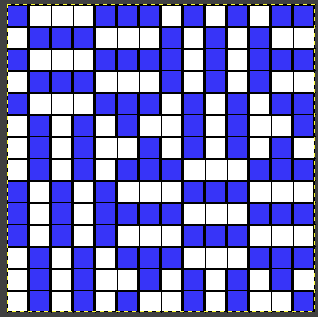
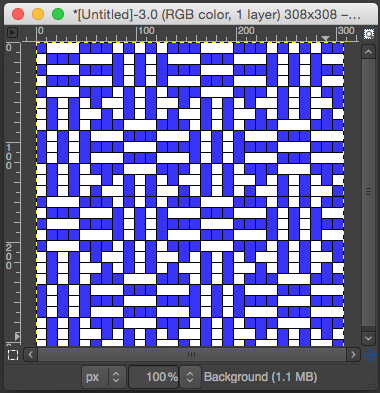
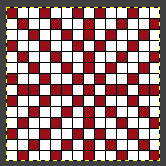
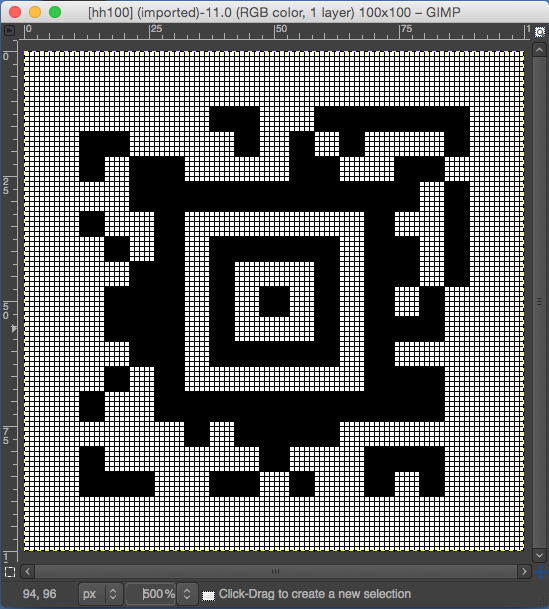
Spirals or miters knit on the machine begin with their radius; one possible construction method may be inferred from these images

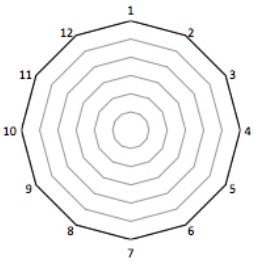
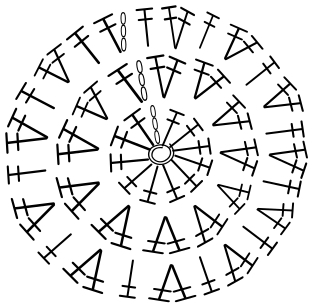
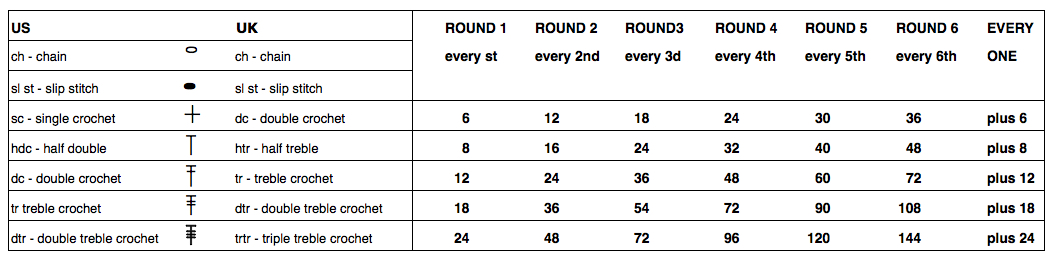
Spreadsheet programs such as Excel and Numbers have pie charts and other tools that can help visualize or even plan the work with symbols. Unlike machine knitting, both crochet and hand knitting may begin and grow from the center out or from the outside in. Calculated shaping with increases or decreases along circumferences at different points on the pie creates the desired shape. For the purposes of this discussion, I will address stitches in US terms. There are various published guidelines with some variations. The fiber content and matching gauge (if required) may need editing of the numbers, but, as starting points:
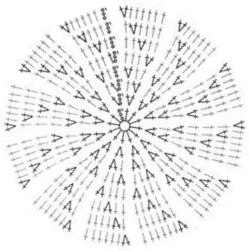
Single Crochet [sc]: Start with 6 sc and increase 6 sc in each round so that the total stitch count in each round is a multiple of 6
Half Double Crochet [hdc]: multiple of 8
Double Crochet [dc]: Multiple of 12
Treble [tr]: multiple of 16

Some symbols and number of stitches required in base rows in table form, for working from the center out:
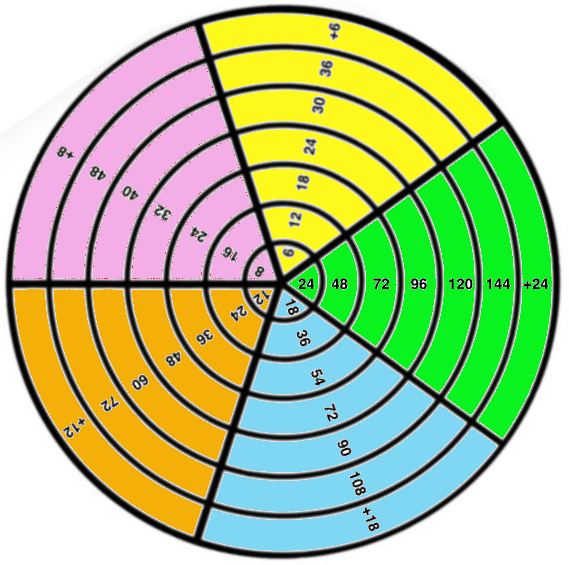
the more wedges in the pie, the smoother the circumference no matter what the method. Single crochet is worked in 6 wedges double crochet in 12 wedges,  wedges may be reduced to simple line segments 
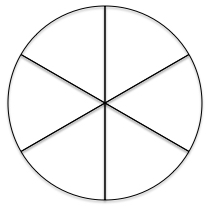
rounds may also be created to log in and track more details 
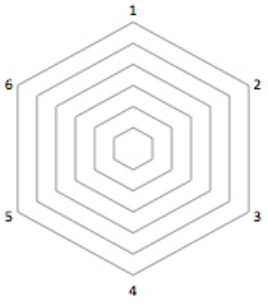
adding wedge outlines before filling in symbols

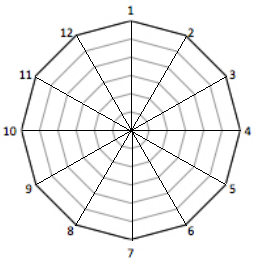
single crochet worked with a slip stitch at the end of each row will produce  points similar to those seen in miters in machine knitting

spirals produce a rounder shape 
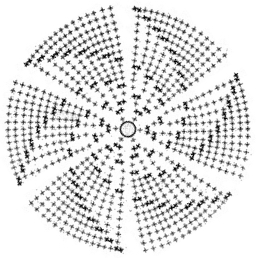
double crochet echoes the forms 

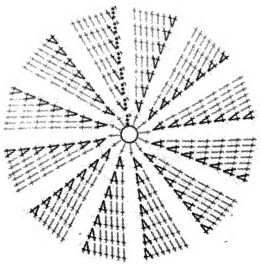
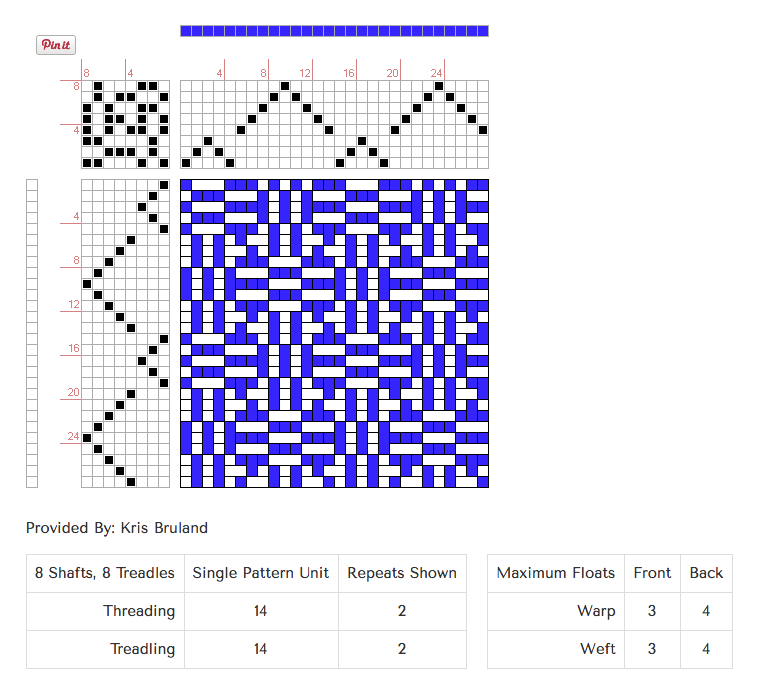
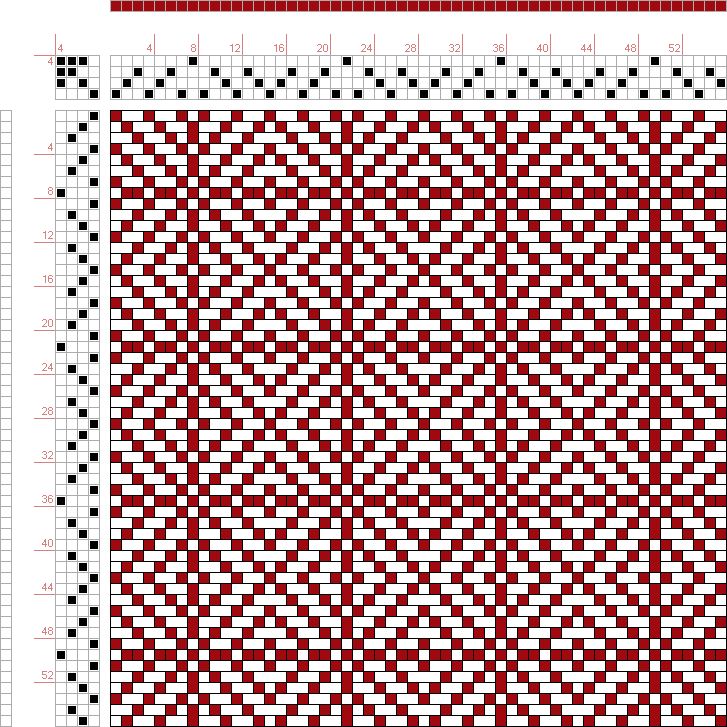
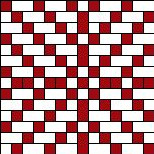
Building your own charts requires vector programs to allow for the rotation of symbols around an axis. My chart was quickly produced in Inkscape, which is free to download for both Mac and PC users. Mac users in addition will also need to download XQuartz to run the program. I created the chart with my own symbols and freeform and laid them down while viewing the grid. It turned out, however, that there are 2 published videos on how to use the program for charting crochet stitches, part 1 and part 2 by StitchesNScraps.com

Two YouTube videos on the topic:  using Illustrator CS 5.1, Marnie Mac Lean’s video, and using StitchWorksSoftware. An online generator by Stitch Fiddle, and its associated video.

if donuts are the goal: find your round 

An example: in single crochet, if round 3 had been completed, there would be 18 completed stitches. Chain 18, either slip stitch or continue in a spiral to match the count at that point. For round 4: increase every 4th, round 5: every fifth, round 6: every 6th, and round 7: every 7th stitch. 
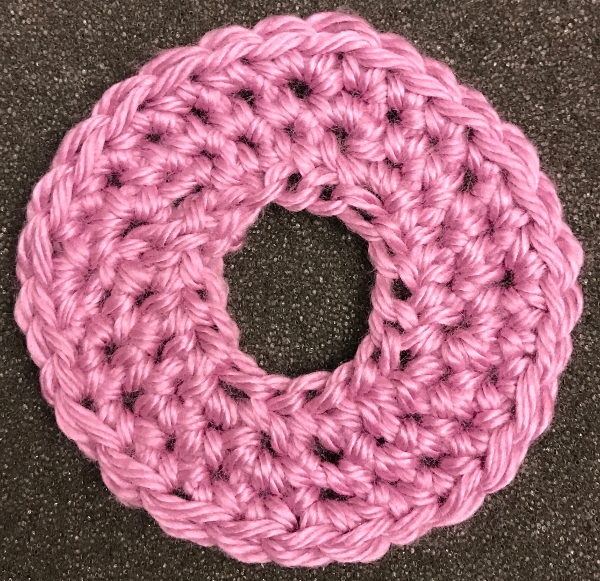
Different stitch heights:

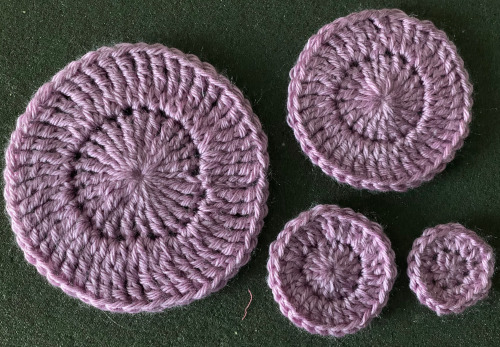
A few sites to see for crochet tutorials:
magic ring start: no chain stitches, no center hole
https://www.youtube.com/watch?v=sLUaywX0-WE
working in spirals
http://snovej.com/archives/freeform-crochet-spiral
a nice ending
https://www.youtube.com/watch?v=W_sW4xX_O70

https://www.youtube.com/watch?v=8L_rtWt78Jw&t=32s
crocheting a flat circle in single crochet: note the start “magic circle”
https://www.youtube.com/watch?v=8oDubbFVE3Y
https://www.youtube.com/watch?v=LZiCnCGP_NQ
changing colors https://www.youtube.com/watch?v=U8cLufFeenU

I tend to swatch in easy-to-see colors, and “friendly” yarn, and use tools that allow moving in and out of stitches easily until I have techniques sorted out. When knitting circles in the round, things get a bit more complex, particularly if one begins introducing items such as round yokes with patterns into garments where gauge matters significantly.

Some of the same principles may be used in hand knitting. For the magic loop start with circular needles: KnitFreedom and on DPs Webs yarn

A bit of holding 5: intarsia and more 2

So you have some shapes you love and know: wanting to go large, mixing them up, requires thinking things through. Testing on small swatches will help determine holding sequences and whether the results are predictable or even liked. I no longer have access to Adobe Photoshop or Illustrator, so some of my image editing is now achieved in Gimp. Labeling below is with Skitch, and charting is with Excel.

A starting freehand swatch experiment and some observations: shape variations in red areas occur by altering sequence for knitting first and last 2 shapes in the holding position

tulip_knit

tulip_purl

Planning possible sequences out in charting can be confusing. The image direction will be reversed on the knit side. Approaching the technique like intarsia with individual yarns or bobbins eliminates the need for some of the concerns where 2-row sequences or specific starting sides are necessary to keep yarns continuous or for the execution of the desired shape. Trying to imagine the shapes that create the larger one together in a simple 2D drawing can get one started, but then shapes need to be rearranged. I usually began by “playing”, trying to figure out steps needed, and follow that by trying to produce an executable chart. Making the process as easy as possible to track is always a consideration.

screenshot_09possible stitch counts and adding a center-line “stem”/ stripescreenshot_10its knitting sequence tulip_numbereda resulting swatch, stitch counts not consistent with the chart
labeled_075

600_076

In the chart below the design is worked with 2 needles brought out to work or pushed back into work at any one time, making tracking changing numbers in hold unnecessary. Pink rows indicate starting and ending knit rows, orange “stitches” are cast on and bound off in turn, creating a shape extending out from the edge of the knit. Arrows indicate where shapes meet to create forms.knittable_marked

Holding sequence for each shape may be worked begin with carriage on either side; with experience, this may be planned at times to eliminate some of those cut yarn ends that later must be woven in. Getting back to arrows indicating carriage moves, using the center shape for illustration purposes and beginning with CORdirection
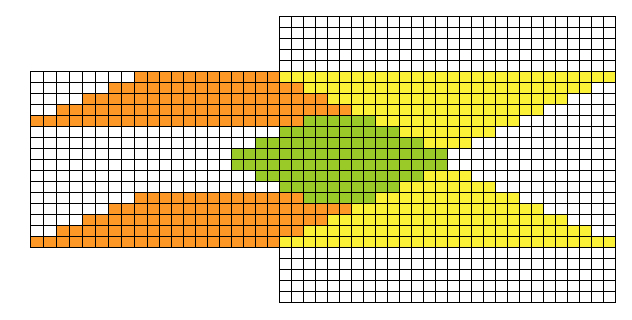
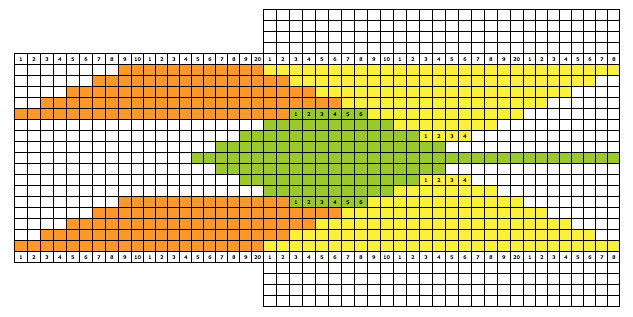
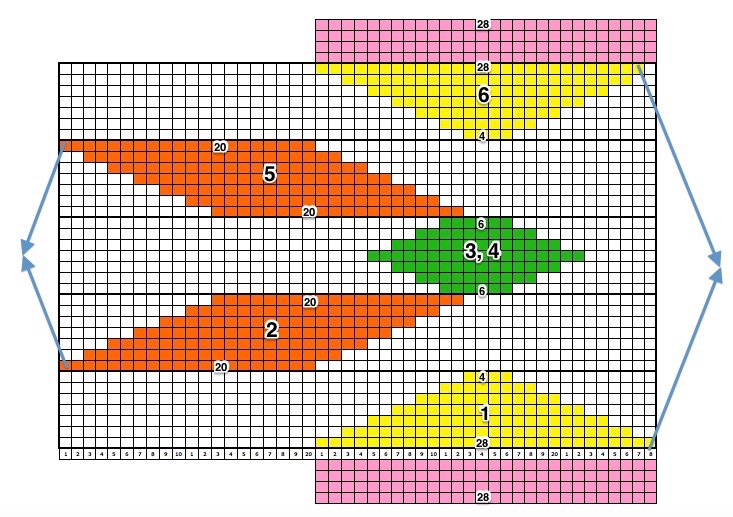
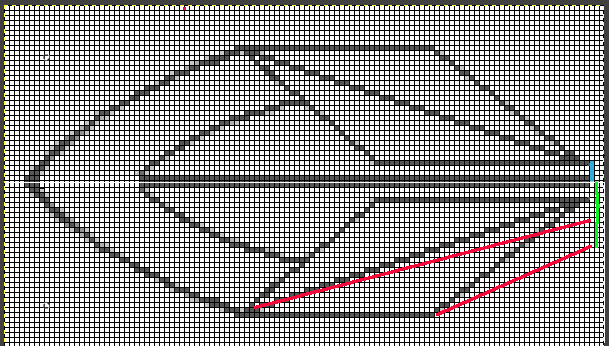
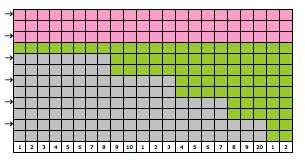
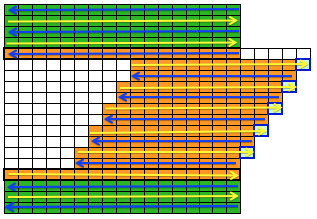
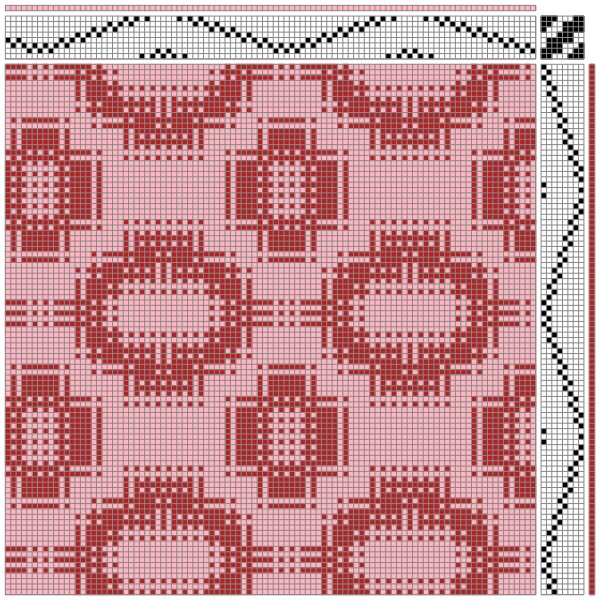
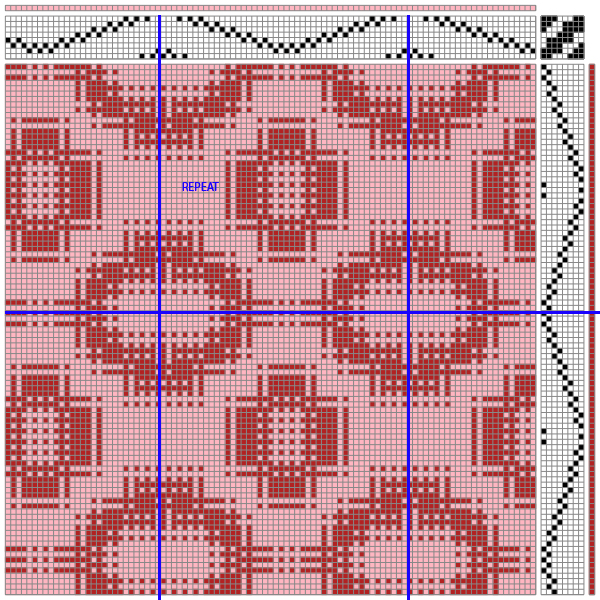
if beginning with COL, simply flip the image horizontally
direction flip

labelled_077600_078
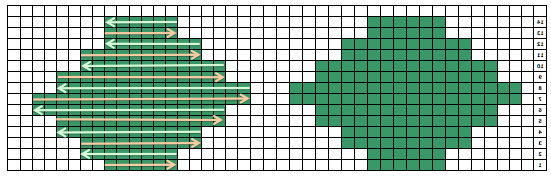
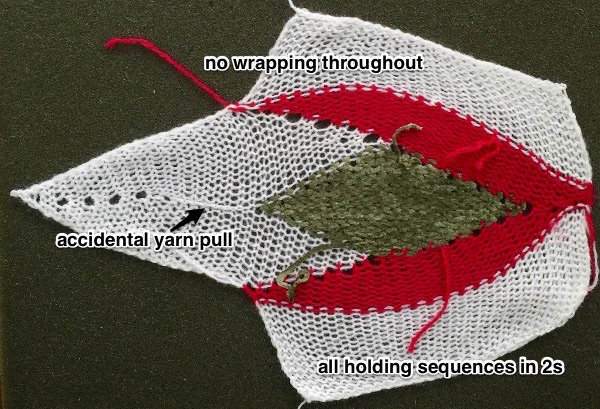
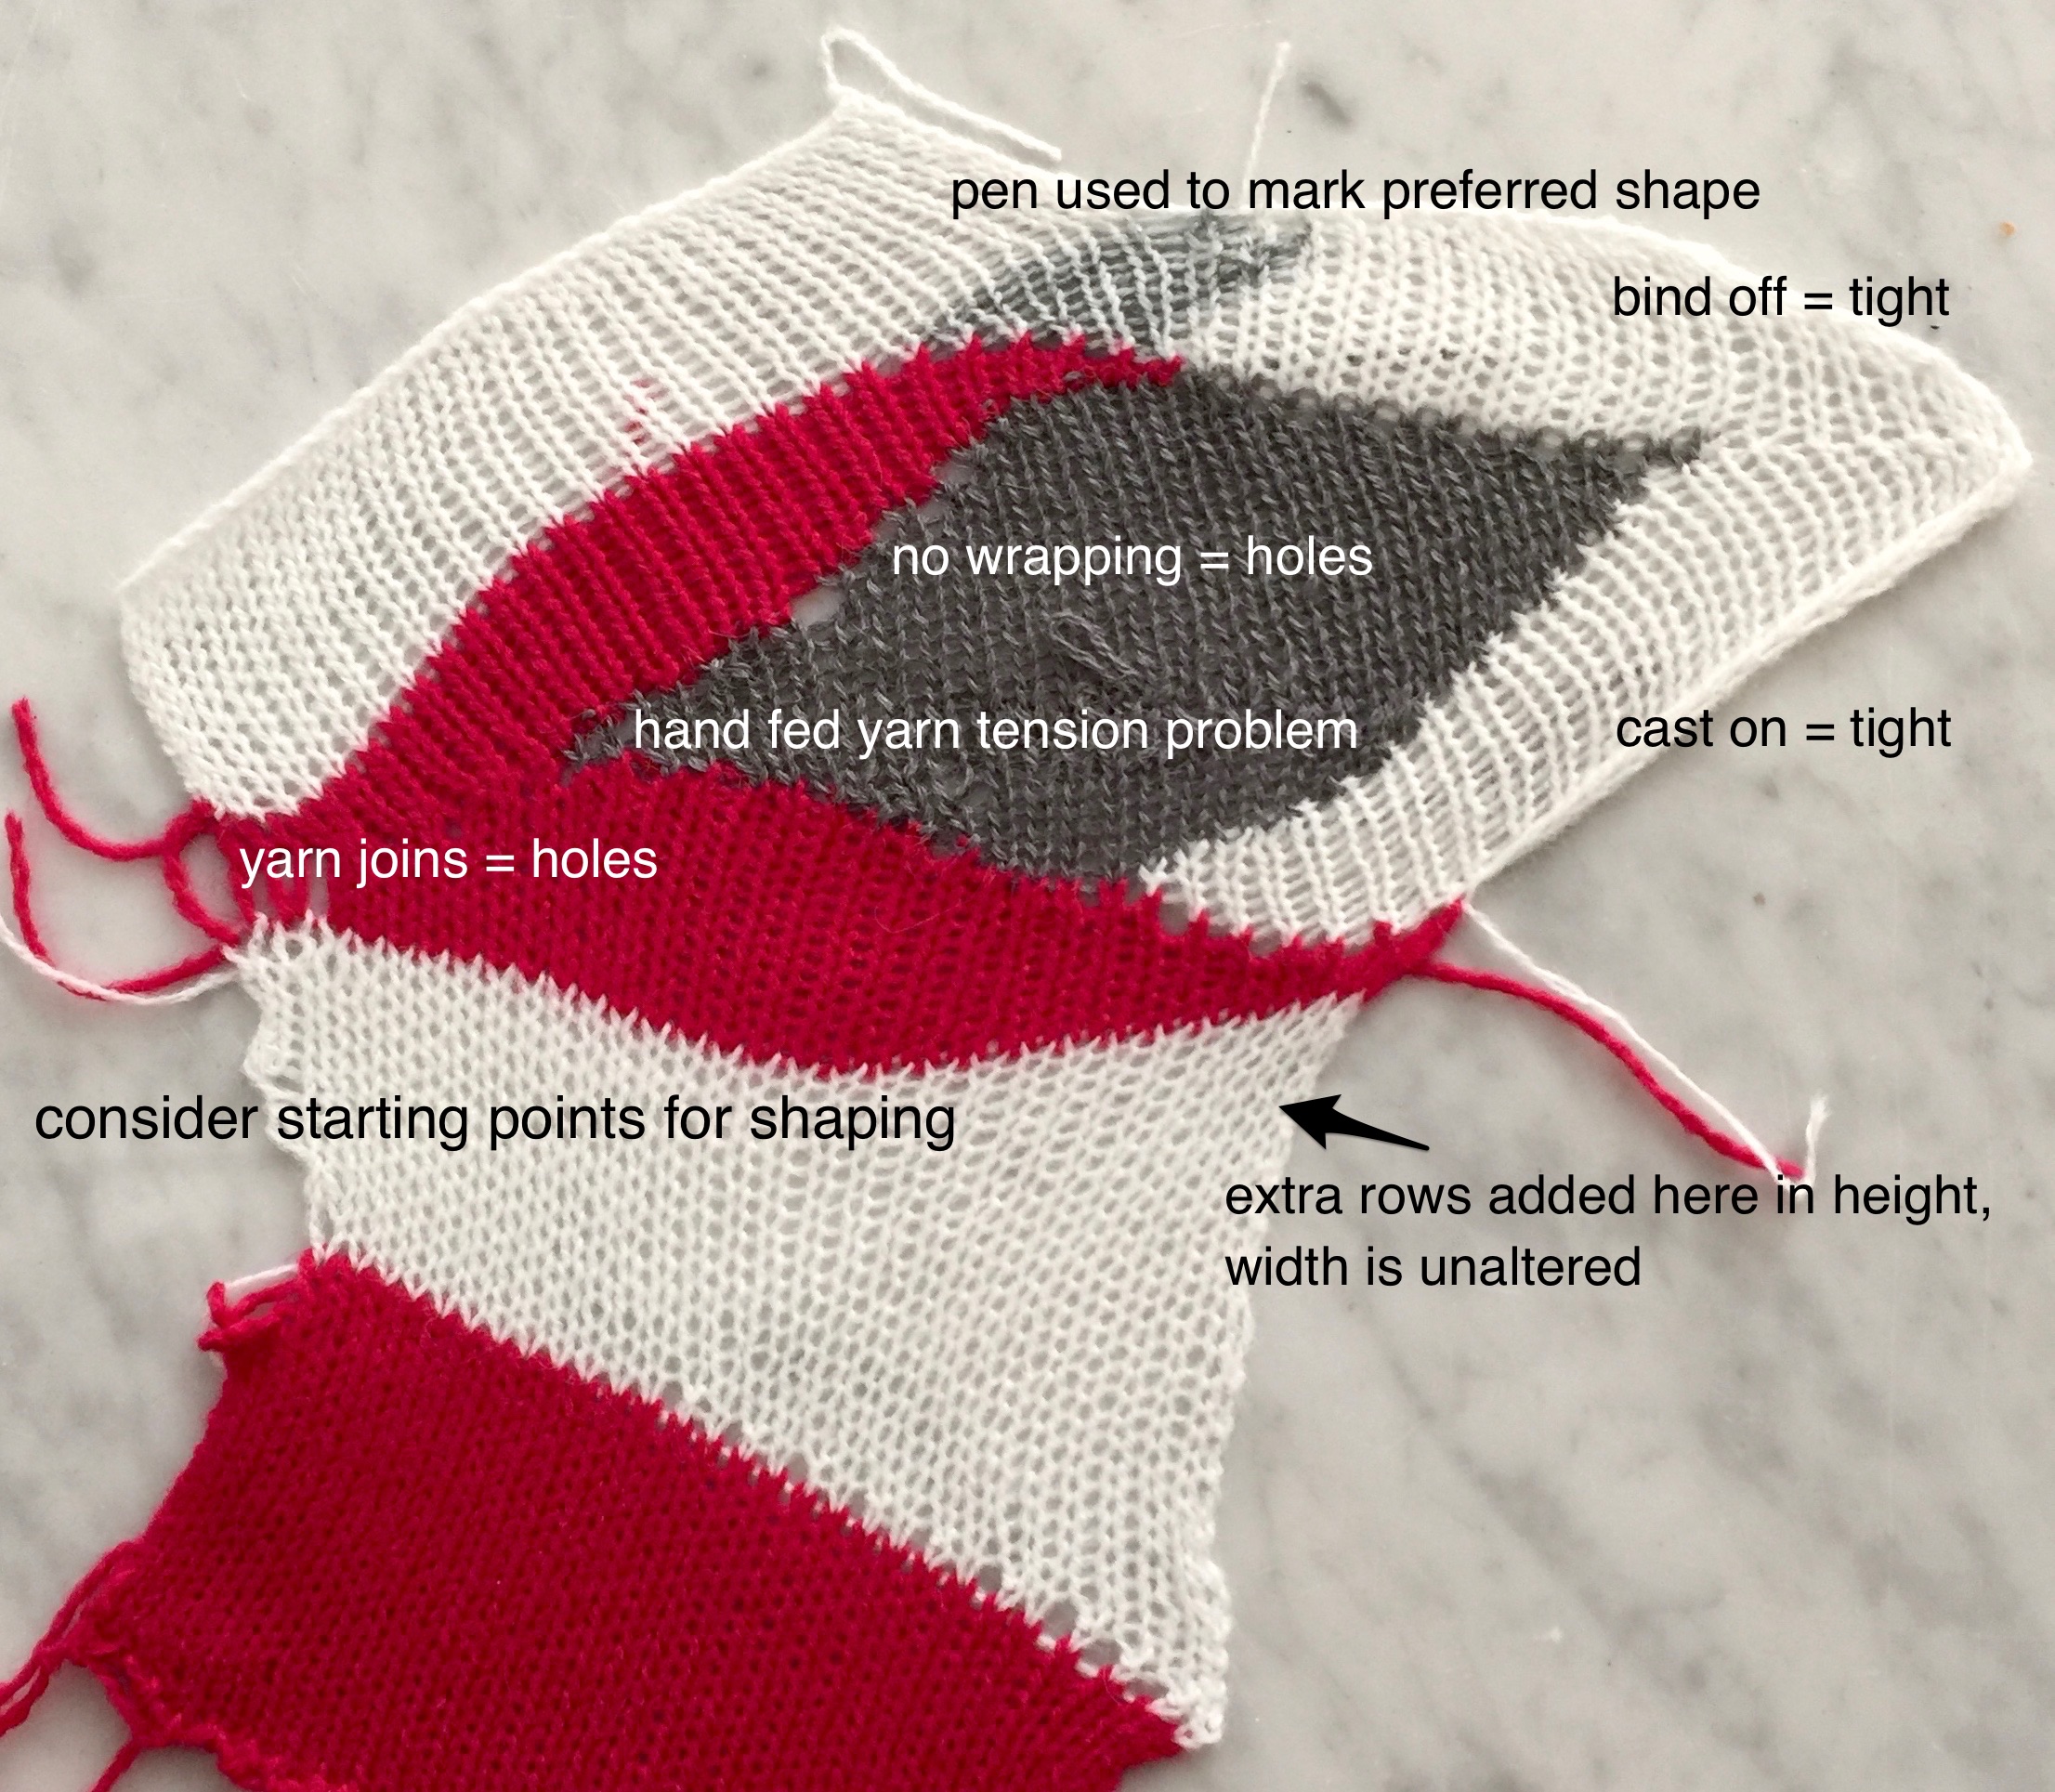
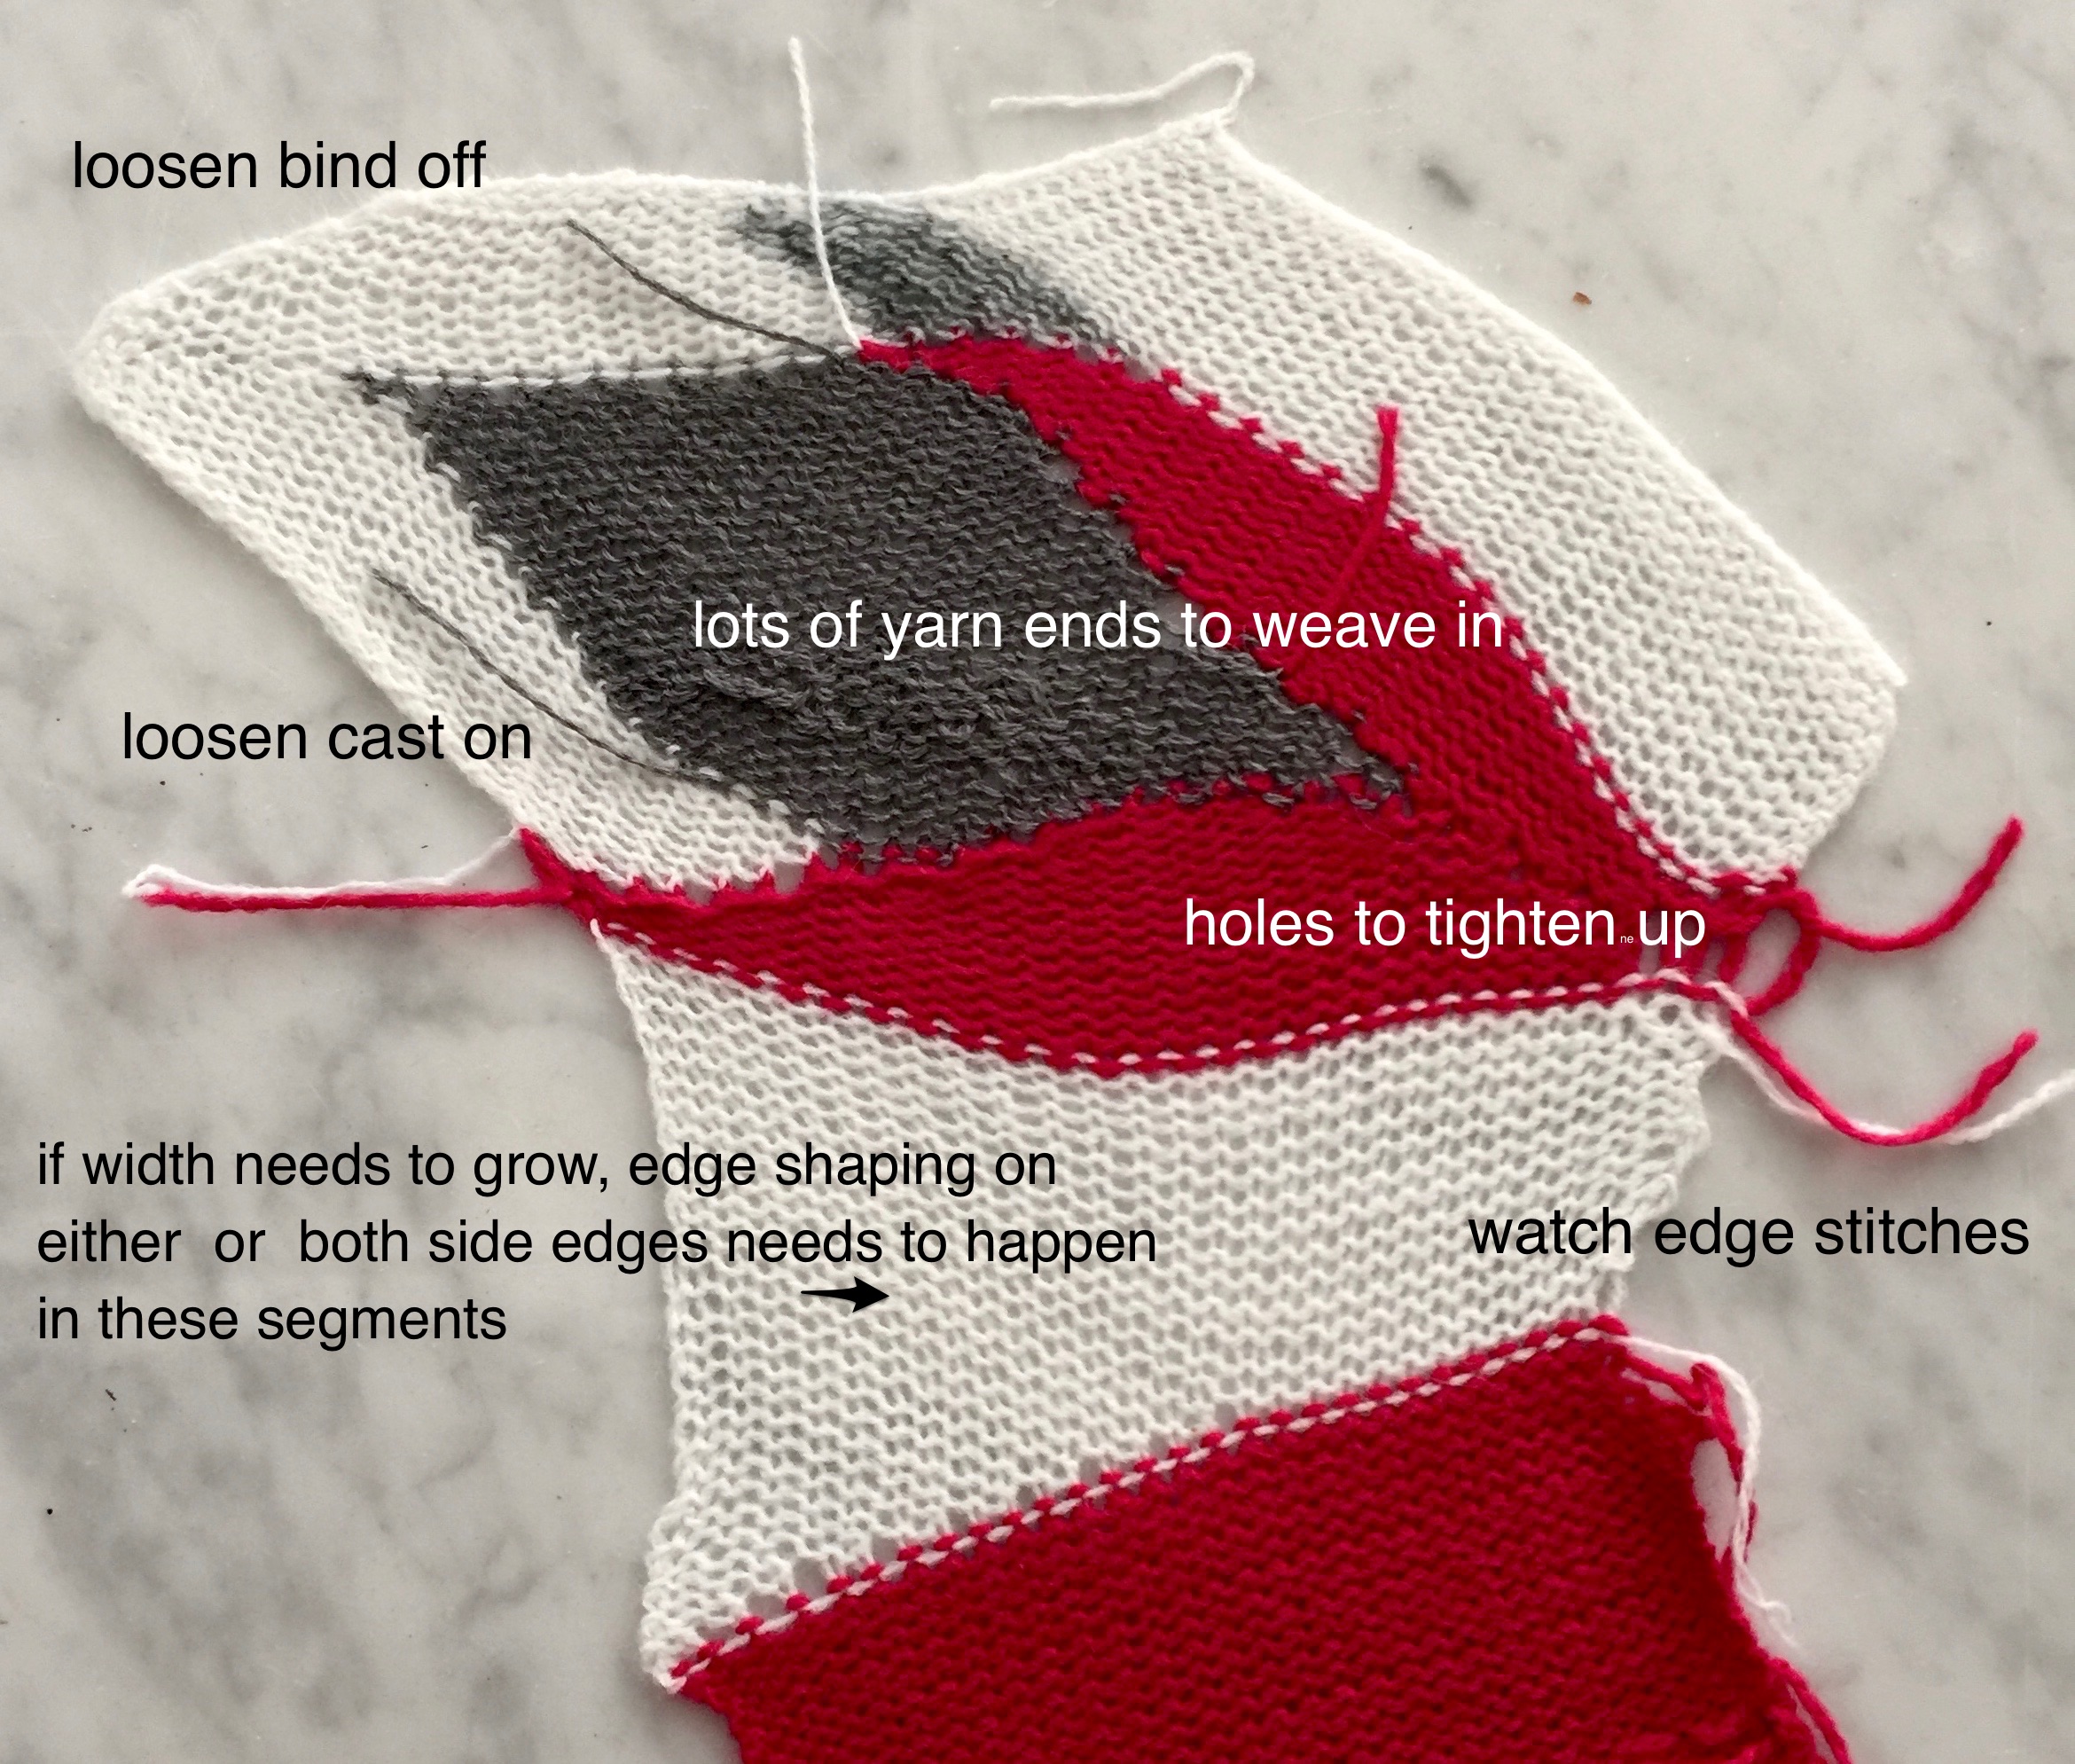
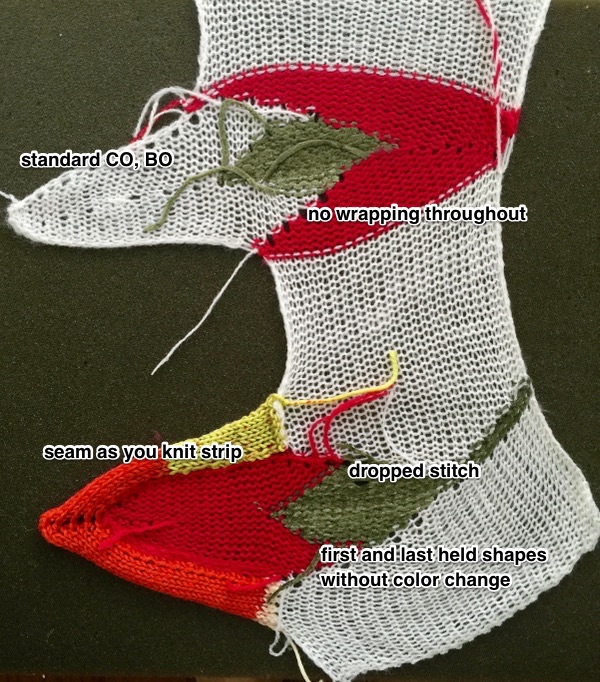
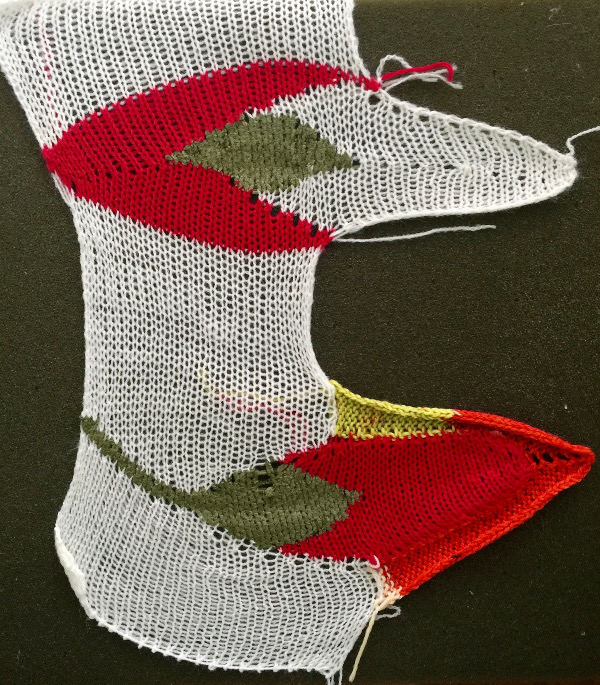
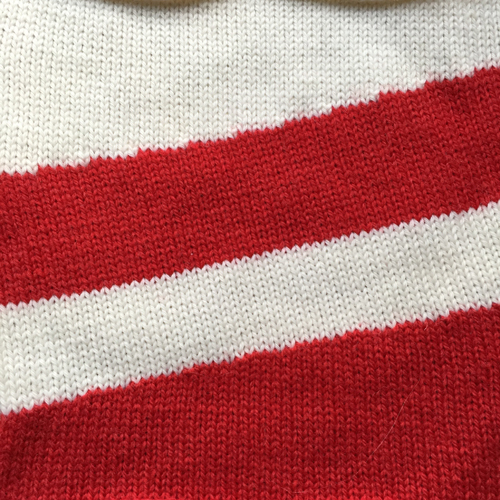
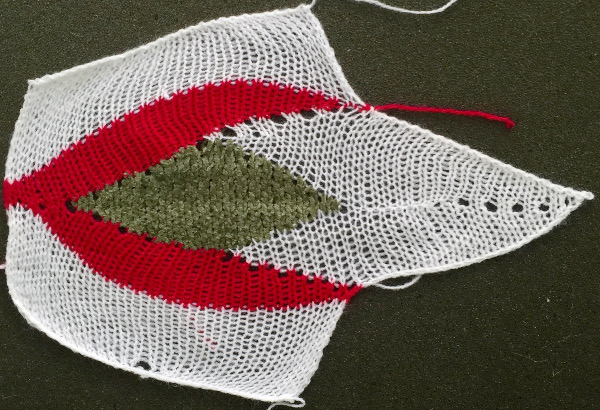
The yarns used were “throw away acrylics” in white and red. The green is a rayon chenille, which required a looser tension, resulting in the other colors looser than I would want in a piece of the final fabric.
An idea for a larger image in the process of being editedscreenshot_07A possible sequence in knitting if it is to be executed as shown. The arrow marks rows that knit all needles across the width of the piece. The piece segments are numbered to create a starting line for later joining.
numbered1If the goal is knitting as close to a flat circle as possible, eliminating rows will create a smaller center hole as well after the form is completed and seamed. Knitting segments 1-6 should be adequatecircle2Larger pieces ie shawls, adding knit rows without adding stitches can be done by altering #8, 1, 6, 7. The red line indicates changing angles. Blue and green lines below indicate increasing rows knit at the center of shapes as a result. extededKnitting and cast on sequences flow around left purl edge, straight or diagonal edges on a chart such as above may become foundation rows that are later seamed. Sort out your sequence and preferences on smaller swatches, keeping notes as you go. Additional shaping can happen along the edges of any plain knit rows between shapes by increasing or decreasing on either or both sides to create crescent shapes or triangle variants.

Now a quandary if gauge matters: knit stitches are not square. One option is to generate a grid appropriate graph paper. In holding sequences happen in 2-row sequences. Graph paper cells may be created at twice the height desired. Each rectangle will represent a single stitch, 2-row sequence. To create your own knitting graph paper in excel please see post as a place to start. A common knit ratio is 4W X 6H. An editable workbook in 2W X 6H ratio that takes into account the following outline in 2 row holding sequences: landscape2X6. Links for designing knit graph papers online:
http://www.tata-tatao.to/knit/matrix/e-index.html
http://www.theknittingsite.com/knitting-graph-paper/
http://sweaterscapes.com/lcharts3.htm
http://www.thedietdiary.com/knittingfiend/KnittersGraph.html
http://incompetech.com/graphpaper/asymmetric/

Using the 4X6 model reduced to 2X3 this is a sample generated using excel, with borders in a 2X6 ratio, so in execution, every single cell represents one stitch and 2 rows knit. The shape is one from the shape menu in the program, easily resized. The yellow bars show the gradations in holding. These cells are too small for adding text within the program itself. The math can be double-checked: there are 70 stitches, 34 rows in the rectangle at the center of the shape. Holding happens over 5 chart units (10 rows actual knitting) at the top and bottom of the center shape; 70/5 = 14 X5, matching the drawing shape on gridThe accompanying, editable workbook Excel 2008  landscape2X6

So the goal is a shawl or garment, graph paper is becoming impractical to follow? Time to pull out your knit leader. Draw out each wedge or piece full size, number segments breaking sections into knitting sequences, and let the KL guide you. For consistency, if the same shape is to be repeated many times and accuracy matters, it may be worth “air knitting” it while noting shaping as you go, keeping a row by row flow chart. An editable workbook to help track holding patterns, increases, decreases, etc. as a starting point for your own preferences: tracking knit.

Gauge or shape does not matter? time to scrumble it all and be surprised!


A bit of holding 4: intarsia and more

Picture knitting/intarsia may at times be achieved using holding techniques. As in any such knitting, supplies include extras such as bobbins, clothespins, or weighted clips, but no separate carriage. If the ribber is in use and one is working on a large piece, ribber covers allow the yarns to hang in front of the ribber bed.

Some of the rules for accomplishing this using short rows: it is helpful to work from a chart. Two-row sequences are required, so having the working chart double-length makes the process easier to visualize. “Follow” knitting directions with any tool to determine that the pattern is executable, with no long floats or slits.

The bottom of any diagonal line is always knit first.

Needles are brought out to hold on the carriage side, and pushed back into work opposite the carriage; one exception to this rule is if “automatic wrapping” is used. In the latter one, fewer needles are brought into hold than needed opposite the carriage, the row is knit, then with the carriage on the alternate side the first needle in hold next to stitches just knit is brought out to hold, resulting in a “wrap” and correcting the count to the desired number. Any number of needles may be pushed back into work at any time. More than single stitches brought to hold on the carriage side will produce floats.

When knitting shapes the only needles in work are those being worked to create that shape.

Base rows of knitting, whether in waste yarn or as part of the pattern, are needed prior to working in the holding position.

Remember that you are working on the purl side, so any image will be flipped horizontally on the knit side. Reverse the chart horizontally before working it if direction matters.

Begin with a simple shape. Letters indicate the knitting sequence for short-rowed sections. Patterning in these charts begins with COR, bold lines separate areas of plain knitting, letters indicate the order for executing short row segments. The fabric produced lies flat, with no noticeable 3D protrusions.

screenshot_08

screenshot_09

screenshot_07marking sequences with numbers is easier for me to follow; color changes help define segments, but do not reflect final colors in the design diamond_29

diamond_sequencea supermini swatch: holes are typical both in intarsia and in short rows if no wrapping occurs  IMG_2439be prepared to weave in a lot of yarn ends  IMG_2901going larger, note the wider “steps” created 500_717stripes500_716more complex geometry:  line drawing on “graph paper”complex_30the start of color placement screenshot_01sequence for executing segments at the completion of the design  complex_number_01in actual knitting the pattern must be elongated X2

I find it helpful to use familiar yarn and to work variations of a familiar shape prior to taking on more complex patterns. Below is a cousin of the first shape illustrated in this post, with a pattern worked beginning COL, repeated across the row, increments in the number of stitches worked in short rows but mirrored on both shape sides (shown in the first swatch segment).

screenshot_01filling in to produce a flat fabric, with straight sides: the bottom segment  screenshot_02the top segment  screenshot_04the amended chartscreenshot_05

Some of the same shapes may be placed on a shaped edge. The repeat will likely need some editing; arrows indicate the direction of knitting for that row. If the background color is used for casting on and binding off, then the isolated shape floats on the ground, and the horizontal line of contrast color is eliminated.

screenshot_18edge 1creating an outline of shape with Color 1screenshot_23edge_21horizontal rotation to achieve “leaf” shape screenshot_05melding shapes no wrap_28don’t like wrapping? for smaller holes offset the return to work position upper half of the shape by one less needle at the start, added at the end.
A first look at  knitting direction leaf_25and at stacking shapes, with bound-off stitchesstacking leaves

combo_2934

combo_2935
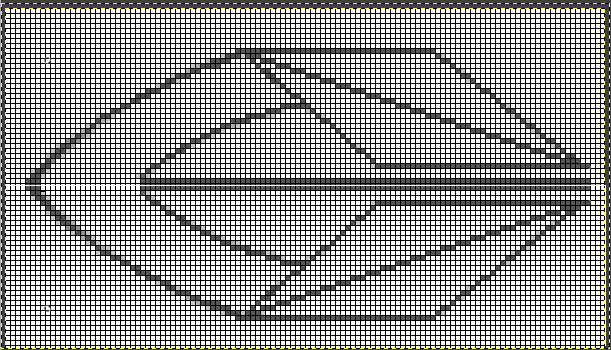
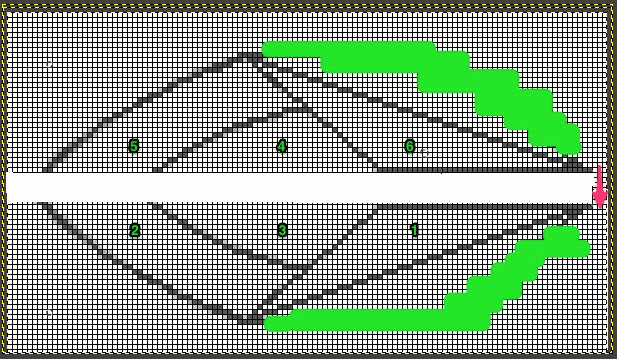
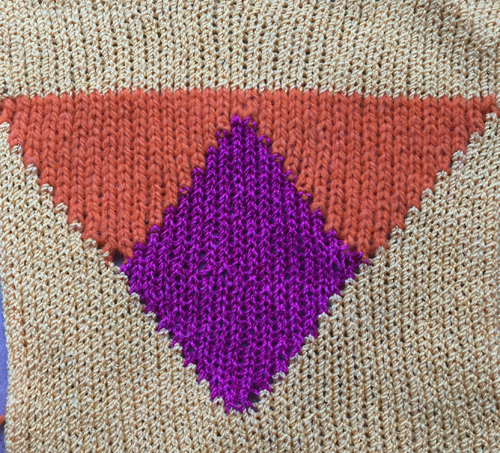
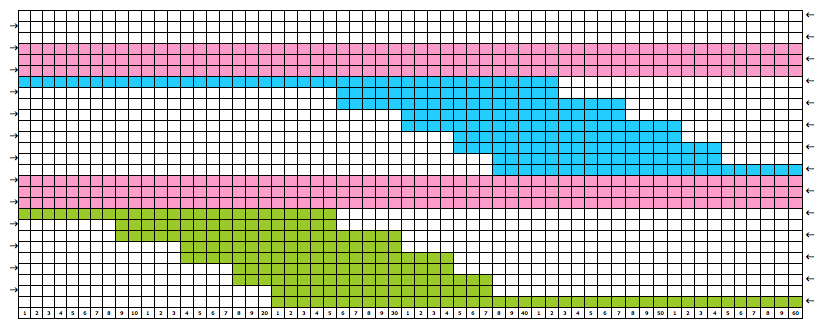
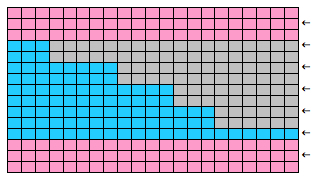
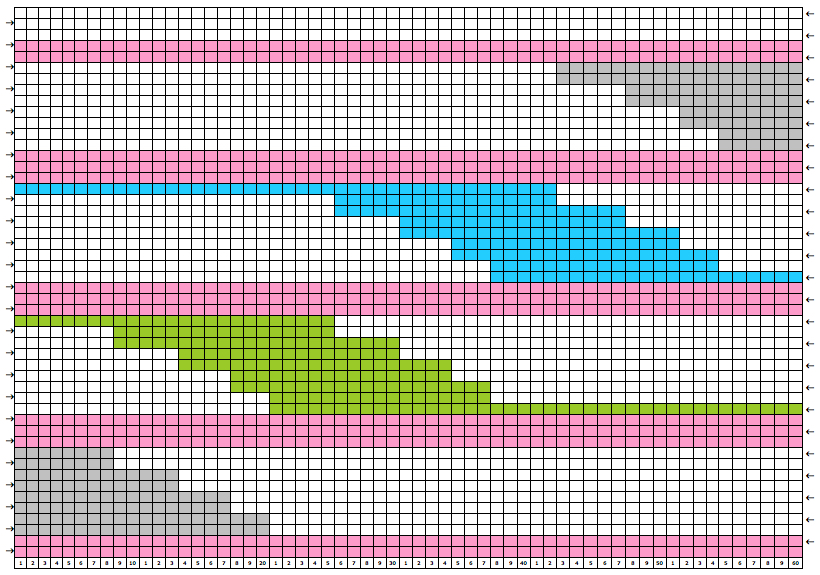
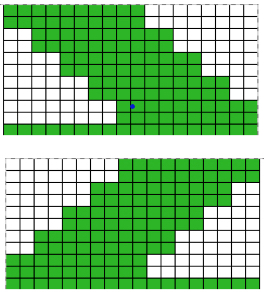
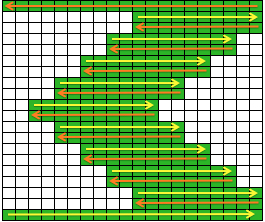
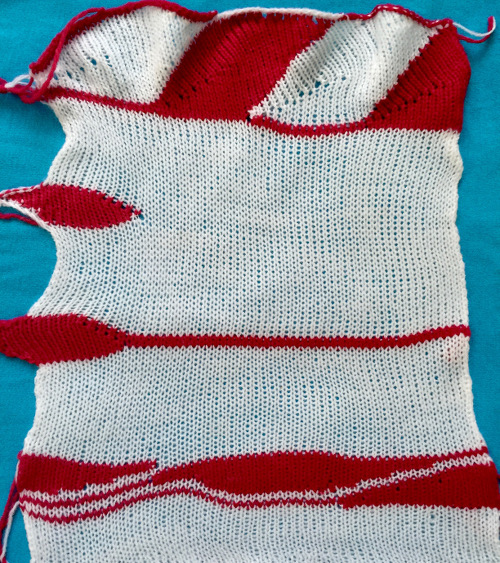
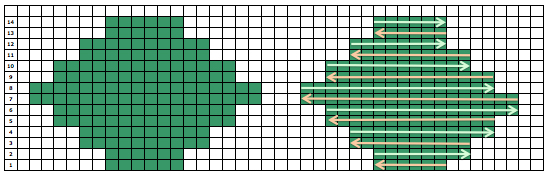
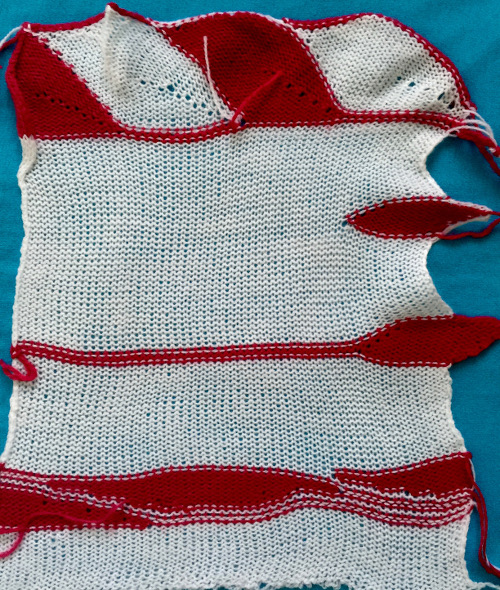
The start of a smooth shaping sequence for those “leaf shapes” on the machine

The yarn used is acrylic, so pressing helps to make the shapes lie flat. Once again, using wool or any other yarn with “memory” will result in considerable curl at the side and at the top and bottom of the knit piece, so that is a consideration in putting in the effort. The more striping, the more yarn ends to weave in and row counts to watch. Using space-dyed or sock yarns may produce pleasing though unplanned stripe patterns in any of the shapes. My samples are not resolved final fabrics. There are many inspiring patterns available for purchase or at times free on the internet for hand knitting, usually in garter stitch as well as holding, resulting in a nearly square gauge, flat-lying knit.

Taking it to garments: accessories are easiest, since the gauge may not be significant. Shawl shapes in HK are often knit on circular needles, without the constraint of the fixed number of needles on any particular model KM. Sometimes, with adjustments, the same shapes may be rotated sideways on the KM. Segment sizes may differ due to the resulting change in gauge. Sampling techniques and shapes in smaller versions help work out the kinks.

Sources for inspiration: large-scale shapes

http://www.garnstudio.com/pattern.php?id=7365&cid=17
http://www.garnstudio.com/pattern.php?id=7543&cid=17
http://www.garnstudio.com/pattern.php?id=7375&cid=17
http://www.garnstudio.com/pattern.php?id=7099&cid=17
http://www.garnstudio.com/pattern.php?id=6729&cid=17
http://www.garnstudio.com/pattern.php?id=6333&cid=17
http://www.garnstudio.com/pattern.php?id=6001&cid=17

more details, varying concentration, and placement: free pattern
http://www.garnstudio.com/pattern.php?id=7606&cid=17

for purchase on Ravelry
http://www.ravelry.com/patterns/library/endless-rainbow
http://www.ravelry.com/patterns/library/rigoles
http://www.ravelry.com/patterns/library/dreambird-kal
http://www.ravelry.com/patterns/library/scarf-with-flames
http://www.ravelry.com/patterns/library/phoenix-wing—phoenix-flugel
http://www.ravelry.com/patterns/library/spring-plumage
http://www.ravelry.com/patterns/library/hundertwasser-neptunia
http://www.ravelry.com/patterns/library/swingtrelac

Cellular automata charts for knitting, etc.

I have written before on the fact that since my knitting is done primarily on a Brother 910 and a Brother punchcard models, I am ever curious re and exploring ways to produce chart images that will allow me to knit patterns via mylars or punchcards, with an occasional wincrea download to my Passap via an ancient laptop. My eternal wish list to date has included the option to download to a hacked Brother model I already own, or to my Passap, directly from my Mac (presently Mavericks OS). Mathematical knits via hacked or commercial knitting machine use have been explored by some, including Claire Williams  and Fabienne. With the help of online generators, even with a lack of understanding of the math involved, one can produce charts for knitting or other textile applications.

The Wolfram site is a resource for both Mac and Windows platform users who are interested in math, computation, and its visual results. There is a downloadable CDF player that allows exploration of documents and provides for download, CDF format explained, demonstrations projects, search for cellular automata. Below are some samples obtained through browsing the site. In some instances show mesh option will provide a gridded motif, show scale will indicate “stitch counts”
screenshot_28

screenshot_29

then there is this

screenshot_31an isolated segment
screenshot_30the image  in Photoshop (CS3) photoshop no gridas it appears with the program’s self-color-adjusted grid photoshop gridGIMPGIMP_cellular2creating a colored grid grid for easier countsgimp color grid

see previous blogposts on isolating repeats, drawing additional markings, and other uses for GIMP.

A visual guide to  automata “rules”

Weaving drafts as inspiration for other textile techniques

July 2021: since this post was published I have written on using a combination of Mac Numbers and Gimp to modify repeats from punchcard and electronic published sources including:
Numbers and GIMP: online punchcard patterns to electronics
Numbers and GIMP: online punchcard patterns to electronics 2
Numbers to GIMP to create images for electronic download
I am now adding a shorthand version for those with some familiarity with both programs using an online draft from Luminescence to obtain a knitting repeat. Images saved from the site even if drawn in black and white do not convert easily and cleanly to black or even 2 colors indexed images in Gimp, are workable using this combination software method.     

As previously published:
Weaving drafts can be a source of inspiration for other textile mediums as well. Luminescence is an online weaving program developed by Andrew Glassner. There are ample instructions and help files on site with regards to weaving. My first instinct, however, is often to interpret images of all sorts for knits (I abandoned weaving many a year ago). I am sharing some very quick first experiments with the software with that possible intention. The same charts might be used for other counted stitch unit textiles.
The first draft I chose to load from the app’s pull-down menu was called High Seas. The numbers indicate “Fabric Size”, stitch and row counts in knits

120High Seas120

Quoting from the help files: “Show grids: This is another cosmetic choice. Turning this on draws the internal grid lines for all 6 grids (warp pattern, warp colors, weft pattern, weft colors, tie-up, and fabric). These let you easily count the cells, which can make it easier to match a published draft. As with Show threads, this checkbox and its effect are disabled if the Fabric size is 100 or more.” “

“To save an image of the fabric, just right-click on it. You should get a pop-up menu that offers you a few options. One of these will be Save Image As… (or something close to that). Choose that, and you’ll get a standard dialog box that lets you put the image where you want it. Using Firefox on the Mac allows the image to be saved in the standard PNG format, which offers the highest quality. You can change that to JPG or anything else using almost any image editing program.” Safari is problematic with saves, allowing only for a web archive or screen capture.

99 Hi seas99easier to see and/ or count units, clear tiling: 60hig seas 60enough to easily sort out repeats: 30hi seas30

your preferred paint program may be used to draw lines that isolate single “knit” repeats; threading and tie-up sequence repeats are used as guides, making the process fairly straightforward

hi seas30 repeatimagining possible related borders screenshot_51a more complicated draft kiss me you fool 99isolating the much larger repeat kiss me you fool REPEAT

kiss me REPEAT

always double-check tiling prior to knitting for accuracy, any “surprises”, and the possible pattern placement on the knitting machine’s needle bedtile check

got a draft from an online pub? always good to start with a recognizable,  simple design screenshot_01isolate the repeat (GIMP):  crop tool and size control154crop

in this instance, the result is a 154X 154 pixel square image, with 14 X 14 unit desired subdivision, making my grid preferences setting 11 X 11 pixels

200_11_11gridtiling test: looks like a match!tiled_04

line width, colors, etc. may all be set and changed to suit individual needs and preferences. Please note superimposed grid lines are lost when the image is tiled or exported from GIMP, some version of screen grab or snap must be used to capture and save gridded images

an additional draft, the same process

3ae712f7a512a61537a3983aff9d98b2

second sample

screenshot_07

screenshot_08

A bit on the charting: after launching the program and loading an image, the GIMP windows options will become available. I leave my toolbox always active. Tool Options give the opportunity for controlling crop size, pencil line width, etc. As you click on/ select any tool, the options windows will change and offer selections for managing that particular tool

windowscrop croppencil brushpencil

notes from a  previous post on charting for straight-line drawing on Mac: “first select color and pencil tool. Place a pencil dot where you want the line to start. If you press the shift key, a crosshair will appear, press the command key in turn as well for straight-line mode, click where you want the line to end. Consecutive clicks will continue drawing straight lines that originate from the end of the last line. Pressing both the shift and the command one at once after the initial pencil mark will call up the color picker and require a color selection and an “OK”

QR codes for knitting (2) or other textile techniques: “happy holidays” a few ways

I reviewed, edited, and added information to an earlier blog post on QR codes and knitting earlier today. The results from the same steps in processing the generated images may be applied to any fiber technique which results from using counted, single units.  In light of the coming season, I thought I would offer some “happy holidays” variants. In assembling them, I found an additional free online generator that allows for far more control on output code pixel dimensions than others I have previously experimented with.

Aztec (smallest unit possible 100 pixels square)QRA100onto the morovia website the “blanket” size QR150 getting back to knittable, less than punchcard width screenshot_45QR21a less than 50 wide repeat for mylar, and surprise!screenshot_53QR49

A bit on ribbers: Japanese KMs, alignment, and symbols 1

Before approaching using ribbers in relationship to cables I thought I would mention a bit on alignment. An online source reviewing the topic with downloadable PDF: http://machineknittingetc.com/brother-kr120-kr710-kr830-kr850-kr230-kr260-service-manual.html. Studio machines’ how to may be found on a youtube video by Roberta Rose Kelley. Before making any adjustments check that the clamps that hold the ribber in place are flush with the table and securely clamped; that the screws in the setting plate are not loose, and that they, in turn, are installed at the same depth.  As adjustments are being made, and the thumbscrew is tightened, the setting plate may actually slide toward the main bed, narrowing the gap. To prevent that from happening I had to use a metal spacer between the stopper and the main bed.

Make any adjustments based on needles at each end. Ribbers tend to bow in the center with wear and age. To check how needles in both beds line up in relationship to each other: with the racking lever on 5, the pitch lever on P, pull forward at least 10 needles on each end of both the main bed and the ribber, they should line up point to point. If any of the needles do not touch or line up, loosen the 2 screws to the left end of the ribber just a bit (a quarter turn is usually enough), tap the end of the ribber with your hand just enough to the right, or left to line up needle positions. Recheck the alignment on several spots across both beds, tighten screws, check again.

Another visual option for checking alignment is offered by Studio machines in their manual for the RT1 transfer carriage  
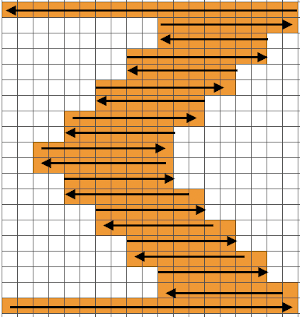
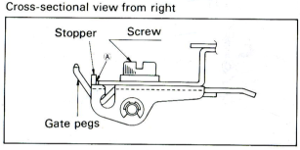
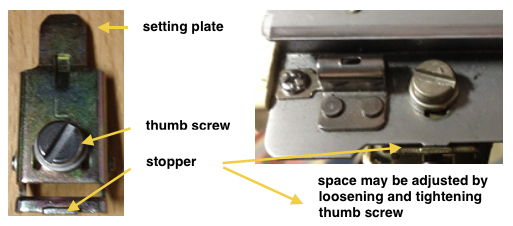
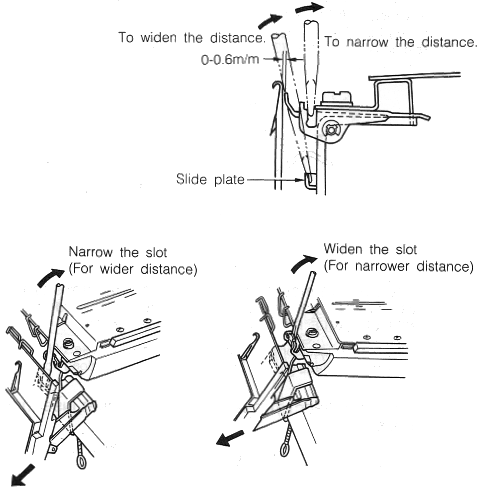
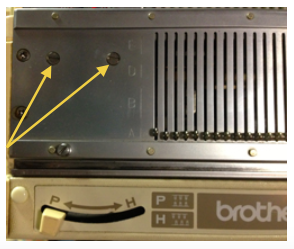
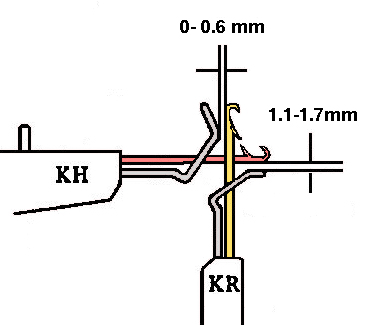
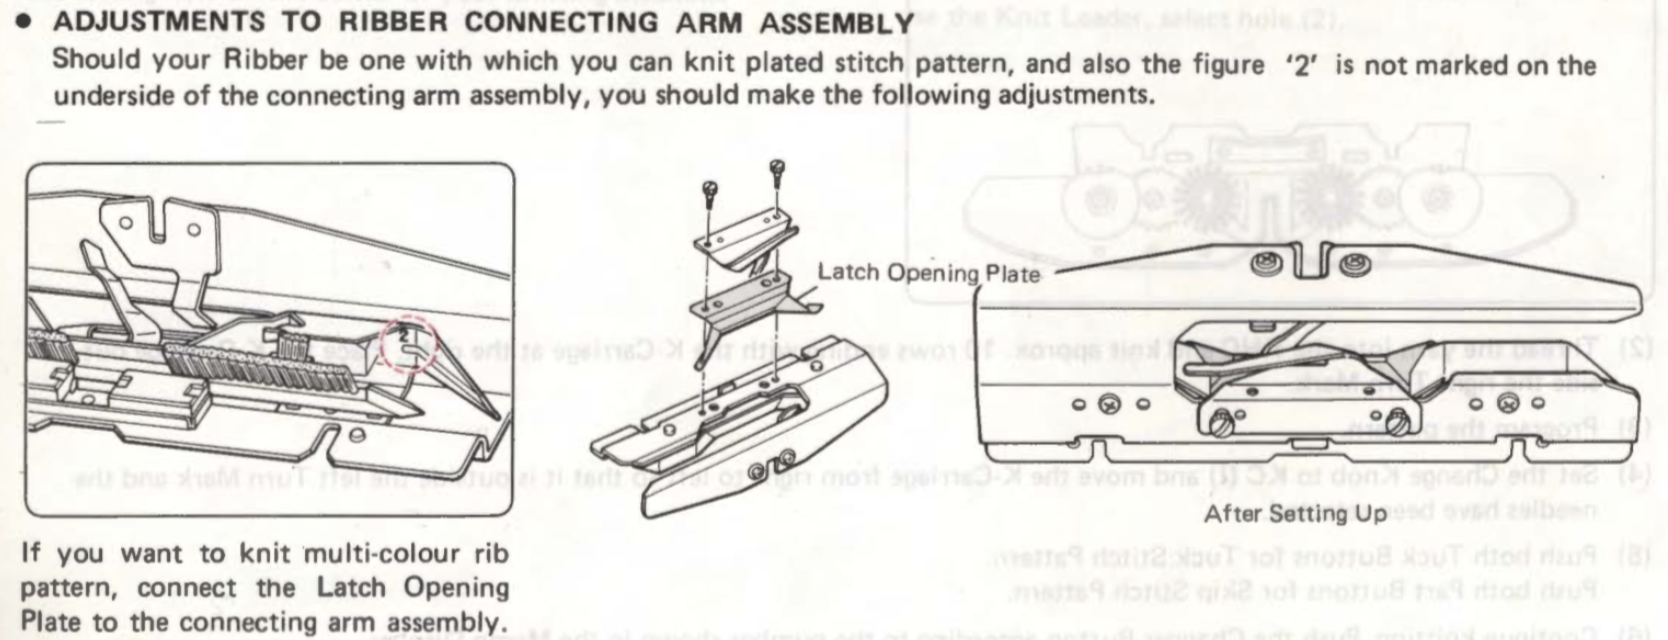
To check the height of the ribber: pitch lever on H, bring it to the full up position (Brother has 2 up positions), and bring forward at least 10 needles at each end of the main bed. Use spacers ie. a credit card, or claw weight hangers that came with ribber as measuring aides; they should slip easily between main bed needles and ribber gate pegs, the recommended distance between the back of the KR needles and the KH gate pegs is 0-0.6 mm.

The online PDF has additional photographs of the nut that needs to be loosened in order to change the height. To loosen it, the ribber needs to be brought to its down position. Use the spacer tool, start with a quarter turn, to begin with, (lefty loosey, righty tighty). Lift the ribber into place. By moving the thin metal lever (adjuster plate) up and down the height may be adjusted, one side at a time. Bring the ribber down to tighten the bolt, up again for a final check.

Lastly, with main bed needles out of work bring groups of ribber needles out to E. A single claw weight should slip behind the ribber needles and in front of the main bed gate pegs. Repeat adjustments if needed so the space between the beds is as equal as possible. The space between the bottom of the main bed and the top of the ribber gate pegs should be between 1.1 and 1.7 mm.

To adjust the distance between the 2 beds: bring at least 10 needles out at each end of the ribber. Use the spanner to loosen the thumbscrews, and a screwdriver to loosen the flat clamps.

If the nut should become completely loose for any reason: the part in question I believe, is #24 in the service manual, the “slide plate guide stud”. In the image below b= the bolt that became completely loose on one of my brackets. I discovered after getting things back together that a, which secures the ribber bracket, is actually directional with a barely perceptible change/ difference in shape. If it is accidentally rotated 180, it will keep the ribber bracket from changing height positions and working properly. Rotating it restored expected actions for me. 

Yarn thickness and needle arrangements may also require some tweaking of height and other adjustments. Listening for changes in machine sounds as the fabric is knit, and visual checks over time are a great help in avoiding problems. Here are positions for bracket lever as indicated in the service manual 

A reminder: if the needle presser bar on the ribber (all plastic) is to be removed, it is reinserted back in with ridges facing, and flat side down I have several sinker plates. An accessory that began to appear with ribbers at some point, seen here in this illustration:

below is a close up showing markings on the right side of upturned connecting arms in 2 different model year ribbers
and here the latch opening plate has been secured into place in the connecting arm without the #2 marking, where it makes a noticeable change, bringing the unit closer to needles when on the machine during knitting And,  speaking of ribbers and clamps, not all clamps are created equal though they may appear to be doing their job until some attachments cause problems.
Studio (shorter) vs Brother in place 
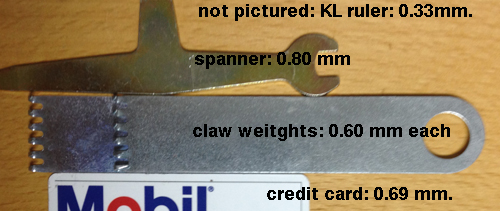
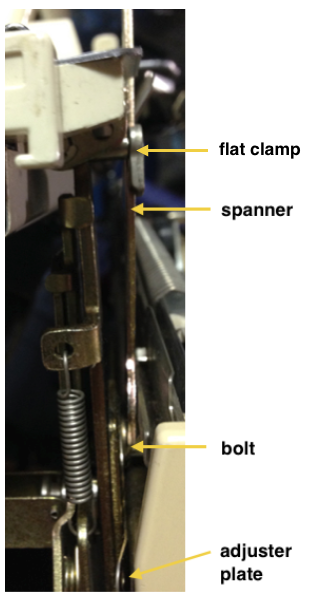
Brother bulky on top of the standard clamp, its shorter cousin
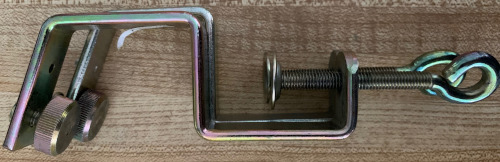
 Knitting symbols used for the ribbing attachment show what the stitches would look like on the “wrong” side of the knit. In the Brother system, KR refers to the ribber bed, KH  to the knit one: typical illustration of symbols as found in Brother punchcard pattern and technique books:

rib set up

ribber_5

ribber_4

A brother publication on Japanese symbols for knitting available in English, French, and German, may be downloaded from http://machineknittingetc.com/japanese-symbols-for-knitting-machine.html  ; page 15 is missing from the document. Another resource: http://tata-tatao.to/knit/japanese/e-index.html


More on charting, foreign symbols, and cables

This topic has come up as part of previous posts. I recently reviewed links and thought I would re-group them a bit differently here, adding some new.  Please click on continue reading to have the list appear as active links if they do not immediately do so in your browser. The latest additions are at the post bottom.

http://www.stitchmastery.com

https://www.myfonts.com/fonts/adriprints/stitchin-knit/

https://www.softbyte.co.uk/designaknit.htm

http://www.envisioknit.com/features/

https://stitch-maps.com/about/key/

pixelated lettering

http://www.fontpalace.com/font-download/Notice+3+Std/

http://www.fonts2u.com/munro-small.font

http://www.fontspace.com/ten-by-twenty/munro

letters in knit stitches

http://www.fonts2u.com/knitfonta.font

http://www.fonts2u.com/knitfontb.font

http://www.fontspace.com/honey-and-death/knitfont

care labels

http://www.fontpalace.com/font-download/Notice+3+Std/

I have been trying to navigate Mac Numbers again, but in playing at my own latest charting with software after the Yosemite update, I find I am drifting back to using Excel once more as my primary “graph paper”. Charts published in foreign languages and magazines, and particularly those in Russian (where the same symbols appear to have different functions depending on the publisher) provide challenges in translating for using charts provided in hand or machine knitting.

Some sources from/for different countries that may help with interpretations:

http://www.knittingfool.com/Reference/KF_Symbols.aspx

http://www.garnstudio.com/glossary.php?langf=it&langt=en

Anna Burda magazine symbols PDF includes HK how-to illustrations:  ab2  2/1/15

 Verena chart from older pubs easily found on Pinterest

A partial volume of an out of print book on Japanese symbols 

4/24/15: Sconcho is a GUI for creating knitting charts that come with a built-in stitch library. A manual is available. Custom stitch symbols may be created in Inkscape to form personal vector shapes.  X11 may be required to run Inkscape on your computer as well, all are free.

6/14/2020 a free for iPhone and iPad app Knitting Chart  also includes crochet symbols


Holding stitches/ short rows

I am planning a thread on motifs and miters, here is a brief review of holding stitches in preparation: short rows are just that. Instead of going the full width of your stitches across, you knit only a portion of the stitches on the machine, turn, and go back to the beginning, which results in one portion of the fabric knitting more rows than the other side of the fabric. It is also referred to as partial knitting. It is used to create many angles and curves. The machine’s knit carriage needs to be set appropriately; needles pulled to the furthest position (E_Brother_holding lever, D _ Studio _Russell levers, Passap will need pusher adjustments) will not knit. To return stitches to work in increments push stitches back into the upper working position (C or D depending on machine brand). In patterned knitting, stitches must be returned to the proper position for patterning with a transfer tool. In Brother machines needles need to be arranged manually in the proper location for the pattern to knit correctly, Studio machines will do it automatically since they select and knit on the same row. When using holding with the lace carriage held stitches are knit back to A using ravel cord and returned to the needle hooks in work position when they need to be knit. Because knit row sequences are in pairs (or more) there will be slits or “holes” perceived at the edge of the held knitting, these can be considered a design feature or nearly eliminated by “wrapping” the first adjacent held needle before knitting the second row, or knitting one stitch less than the required amount toward the held stitches, and then bringing the remaining needle into work before knitting back. Bringing more than one needle into hold on the carriage side will create “floats, so multiple stitches are usually brought out to hold opposite the carriage. Knits often tend to stretch more in width than in length, so in garments such as pleated skirts, it is likely the piece (knit sideways) will grow in length and tighten in width, with tension and garment weight providing 2 more factors. Large swatches and having them rest in the position in which the knit in the final piece will be worn are a necessity in calculations. Some references:

Settings and images of wrapping to avoid holes: this site is now down, the information may be found in webarchives , will take a little bit of time to load content
http://www.getknitting.com/mk_holdposition.aspx.
Calculating frills and triangles online http://www.getknitting.com/mk_0603frilled.aspx http://www.getknitting.com/ak_0603triangle.aspx

Short row one side only http://needlesofsteel.blogspot.com/2008/10/short-rowing-part-1-one-side-only.html.
Diagonal corner http://needlesofsteel.blogspot.com/2008/10/short-rowing-part-2-knitting-diagonal.html.
Short rowing 2 sides at once http://needlesofsteel.blogspot.com/2008/11/short-rowing-part-3-both-sides-at-once.html.

Shaping shoulders and necklines (Studio) Knitting: site no longer exists http://www.guagliumi.com/free_stuff/downloads.html for PDF download info Machine Geometrics – Susan Guagliumi – Threads magazine, April-May 1987, pp 66-71. The Studio knitting tips series of articles were originally published for dealers only, may now be found in http://machineknittingetc.com/catalogsearch/result/?order=date&dir=desc&q=studio++tips

A Ravelry post on the topic with hints for hand knitting by Rox Knits http://www.ravelry.com/twir/86/ask-a-knitter-26

TechKnitting on HK topic http://techknitting.blogspot.com/2009/10/basic-short-rows-theory-and-method.html
http://techknitting.blogspot.com/2009/10/short-rows-method.html


Online Pattern generators, hacks, free KM manuals, and more

I welcome being contacted re any problem links
generators that require color changing every 2 rows using a color changer (or 2 carriages)
mazes on gridded output, easily adaptable to knit http://www.ludiculus.com/maker/mazes.html
more mazes  http://www.billsgames.com/mazegenerator/
maze pattern http://www.unikatissima.de/e/?page_id=2062 blog closed 
cellular automaton http://www.unikatissima.de/e/?page_id=2148 blog closed  
Some unikatissima blog content may be found here, but generators fail as they relied on Flash Player, now defunct 
other generators that can help with shaping garments, or some basic knit motif design
Truchet tiles generator https://dmackinnon1.github.io/truchet/gen.html
knitting pattern http://kpg.sourceforge.net
top-down circular raglan calculator http://kpg.sourceforge.net
Icelandic round yoke design does not work any longer in later version browsers, on Mac even with the installation of Silverlight, on Ravelry, it was noted the program does operate in internet explorer  http://knittingpatterns.is/#/Design
random square patterns http://www.unikatissima.de/e/?page_id=3638  blog closed
punchcard generator and how to use videos
https://patternpunchknit.com/
 beta online tool 11/2022 
math calculators for knitting
free online manuals, magazines
machineknittingetc.com now https://mkmanuals.com/
hacking
a hacking history https://www.beautifulseams.com/2014/10/29/tricodeur-writeup/
only the intro is in German: a nearly hour-long presentation by Fabienne
another approach for Brother models KH”‘930, 940, 950i, and 970: http://daviworks.com/knitting/ and the associated group on Ravelry 
970 how to hack instructable 
for additional cumulative information, software compatibility and hardware specs see Claire Williams’ website
GitHub
PatternUploader
color reductions/ conversions for large, nonrepetitive images Mac
online dither generators
https://ditherit.com 9 dithering types
https://app.dithermark.com  a huge range of possibilities
Hand knitting websites worth a browse:
https://www.knittingfool.com/Pages/Reference.aspx
pattern generators/ web design
open-source charting program http://sourceforge.net/projects/sconcho/
quick screenshot

1/21/2016: Online weaving program by Andrew Glassner ; associated blogpost 

11/26/17 a simple, user-friendly free motif design paint program for Mac, last updated April 2019: Paint Brush