Machine knit cables: using patterning as a guide to transfers

If you have a machine that selects needles to the forward position, you may use a punchcard, mylar sheet, or program to select needles for indicating cable placements. On the single bed, the selected needles act as the signal to actually create the cable crosses. When working on the double bed, the needle selection on the row before the cables are crossed may serve to remind you to put extra needles in work on the ribber, thus providing some extra yarn for the crossings. Previous posts on topic

https://alessandrina.com/2011/12/19/aran-knits-a-new-thread/

https://alessandrina.com/2012/01/07/a-simple-braided-cable-and-card/

Keeping crossings all in the same direction and having ladders to mark vertical placements makes the process far easier. The stitches on either side of the cable may be knit, dropped every X# of rows, and latched up to create a purl ridge on either side of the cable, at times there is enough slack in the ladder created to achieve the same. End needle selection needs to be canceled (KCII) in any pattern with needles out of work. In simple patterns using selection to keep track, ladders are not needed to stay in a clear vertical.

An alternative repeat for combining 2X2 cables and 2 twisted stitches is illustrated below. The repeat is suitable for punchcard use, must be drawn in multiples to meet machine requirements (at least 36 rows in length). Spacing between twists and crossings may be far more varied in machines that use mylars or programs

punchcard repeatfor an all-over pattern

twists and crosses

for a 22 stitch repeat or vertical panel, with ladders added

ladder

22 st repeat

If using the ribber, stitches marked for “ladders” may actually be transferred to the ribber to create the purl ridges on either side of the cables and twists.

Pile knitting

I live in the northeast US, and the past few weeks have been taken up by a whole lot of time moving snow and not knitting or even thinking about knitting. A Raveler, however, recently asked about pile knitting which got me contemplating knit fabrics again. I thought I would start a thread here on some of the techniques and possibilities involved, editing, and adding further information as I can.

Pile knitting may be done on any machine. The quality of the fabric varies, depending on the method and yarns used. Loops are often created every other row, and “normally do not pull out”. They may be made either on the main bed or on the ribber. Some of the techniques result in a much looser fabric than others. In those instances, using a ground yarn that will felt, and slightly felting the finished knit will make the fabric much more stable. If it is to be used in garments, by default, it is best to make those pieces larger than required, and to plan to use them in cut and sew projects.

Beginning with the machine manuals and suggestions: in Studio/Singer knitting machines the ribber features specific options for such fabrics. These pages are from the Singer SRP-50 ribber manual and one of their punchcard books and share some principles while illustrating setting and card design. Food for thought on any adaptation for use on other brands

Two weights of yarn are used: a lightweight yarn for the pile, and a fine yarn for the background. The usual set up is for every needle rib, half-pitch. The finer yarn is threaded into the auxiliary feeder.

Studio machines use the P Carriage with the P pressor attached to drop the loops. If using a punchcard or mylar, the punched holes create the design, the unpunched holed knit the ground. The Singer P carriage information (from SRP60N ribber manual) singer_PCarriage

knit sample

500_481

500_482

Studio punchcard sets and Volume collections offer many designs and inspiration for DIY. A page from one of their collections

Toyota had a small accessory offered for knitting pile using the ribber and the simulknit setting. Both yarns knit on the main bed, the ribber only catches loops in the “S” yarn. Manual available for Toyota pile knitter 

Kathleen Kinder was credited with first using FI designs for pile knitting, resulting in loops being created in every row rather than every other. In the method, loops are still required to be dropped after every row. Cards with bold areas of each color are most suitable. Since the fabric has a tendency to spread horizontally, doubling the length may become necessary if the goal is to retain more of the motif shape.

A natural follow up is to use double jacquard cards and color separations to achieve multiple color pile. A color changer is a must when using multiple colors. Loops will be formed every row here as well, may be dropped every row, or just before each time the color is changed.

Pre-selection of needles in Brother poses an interesting problem: patterning needs to be retained, dropping stitches disrupts it, and there is no accessory such as the P Carriage to make the process quicker.

Cables in color

Fair isle, like any slip stitch fabric, is “shorter and skinnier” than any produced using the same yarn colors in plain knitting, single bed. Cables also narrow the fabric considerably. Begin with tension set at least 1-2 numbers looser than usual, and make tension swatches large enough to include all cable variations. After the cable crossings, be sure to return the needles to correct pattern selection before knitting the next row. Do not pull the whole group out to holding (E), as the whole group will then knit the color in the B feeder, and you will have a striped “mistake” on the next row knit. Leaving any needles OOW in the knit will select the needle on each side of the ladder to come forward, knitting the color in the B feeder. This may not work for you in terms of how the motif is affected by the vertical line created. If ladders are required, the vertical line in the B color may be eliminated by canceling end needle selection (KC II), or by dropping those stitches before you cable (which will give you a bit extra yarn for those crossed stitches). Ladders may be also latched up if you like, but watch where those floats are going in the fabric.

Making your own cards: try to control the length of the floats. Pre-punched cards with lots of punched holes can produce areas to be cabled by selectively masking areas with tape (both sides of cards). Conversely, you may punch diamonds, squares, etc. in the center of other shapes that would normally have floats too long for FI, to produce a B feeder color area for cabling.

Like color, most often, needs to land on like color, so stitches need to move further than they would in a one-color knit. Reversible ribbed cables share the principle of like needing to land on like (knit on knit, purl on purl). Starting out with a single row punched card, mylar, or program repeat, with the card locked, provides a quick test for tension, keeping track of patterns, etc. There are many, so at least initially, cabling on a constant number of rows apart may help avoid errors.

beginning to visualize the crosses

FI cables2

another of my “quick reference – some to try” handouts

color_cables

Machine knitting cables: single bed, introducing the ribber

Using two beds is the obvious means of creating a purl ground in combination with your cables, it will be addressed in later posts. If you are trying to cable more than 4 stitches on the main bed, using the ribber to provide extra yarn for the cross over may solve problems in accomplishing the cross. The ribber needs to be set at half-pitch the row before the cables. Needles on the ribber are kept out of work until that row, pushed up to work position, and the row is knit. The loops formed on those needles are then dropped off, the ribber needles are put out of work, and the cables are crossed. The main bed knits until the next row before the cable crossings are once again due. I have recently begun to use water-soluble markers to mark needles positions on metal beds clearly for help in keeping track of locations for specific manipulations.

An illustration of 2 (or more) possible places to pick up extra yarn for a 6 stitch cable crossxtra_yarn

Below is a revision of a punchcard used in a previous post to track crossings for 3X3 cables, with punched holes added, taking into consideration locations for picking up extra yarn on the ribber. After 2 needles are selected on the main bed, one needle on the ribber on either side of them is brought into work. As the carriages knit across, the ribber needles pick up loops, while 6 needles are selected indicating the location of the cable cross on the next row. Ribber loops are dropped, and the needles creating them are returned to out of work position. The cable stitches are then crossed, and knitting resumes, continuing until needle selection once again indicates that an action is required.

IMG_1681

An alternative solution: reverse the beds, with the ribber doing the knitting. A card may then be drawn to select needles for picking up those extra loops, now on the main bed. The knit carriage is set to slip throughout. Punched holes (or programmed pixels in downloads, black squares in mylars) will preselect in Brother KMs, not only keeping the needle selection error-free but also tracking rows knit between cable crosses being made. Brother ribbers tend to knit more tightly than main beds, so tensions will require adjustment as well. With a bit of planning ahead and doing some “air” knitting, all needles not involved in picking up the extra yarn may be noted and placed out of work. Only the needles for selection will remain in work, thus making it easier to drop the loops formed on them during knitting.

This method allows for creating the cables while retaining a somewhat tighter tension. Since the ribber carriage has no wheels or brushes to help hold the knit in place, weight must be used. Too much of it will lead to more frequently dropped stitches. It is always good to bring cable group stitches out to holding (E) in order to visually check that transfers have occurred properly,  and that there are no dropped stitches before continuing to knit.


Some cables to try, hand knit

The first repeat below is for a vertical cable panel 24 stitches wide, 12 rows high (2 repeats shown); within the repeat, odd rows are all knit, even rows are all purl. Colors are indicative of cable crossings.

Borders in the swatch, or area in between multiple vertical panels, may be worked as 1. purl on even-numbered rows, knit on odd-numbered rows to create a purl ground behind the cables on the “right side”, or 2. knit every row for garter stitch in same areas.

Abbreviations : RS: right side, WS: wrong side. CF and CB indicate where the cable needle (CN) is held during the process.

CF: CN to front | LC: Left Cross, cable leans toward left

CB: CN to back | RC: Right Cross, cable leans toward the right

Dotted borders in chart outline columns 3 stitches wide; all cables in the sample are 3X3 crosses.

An alternative way to picture things: numbers on the left of the chart below indicate row numbers; on the right, they indicate the number of stitches knit before crossing cable stitches begins on that row

the hand knit swatch

IMG_1656Adding a purl stitch ground: a shortened chart using Aire River Design font, odd rows only shown

screenshot_02

screenshot_03

using color in Excel, showing every row

screenshot_04A

screenshot_03Avisualizing multiple repeats

in repeat

a very quick, hand-knit test swatch, knit with needles a bit too large for yarn used

300_1658

another possible charted in Excel, multiple repeats shown

screenshot_13

If patterns are for publication in specific venues, conventions in symbols may, or should have to be observed. To keep track of personal projects we often differ in what format or shorthand makes the most sense to us. If the like of the above result appeals to you, I am sharing a workbook with pertaining puzzle pieces. I find working at 200% magnification is the easiest for me, which may be easily changed to suit.

cable_purl_share

PS: My working palette in the original document was as seen in the images above. You may find some of the colors will be different in your download, depending on your computer. I have read on other sites in the past that the color change can be an issue in excel knit charting downloads. The image below reflects such a change. It is a quick capture of part of the chart when I tested the download myself. The large color blocks are the ones affected and may be easily changed to match the cable crossing colors.

color change

A bit on ribbers: Japanese KMs, alignment, and symbols 1

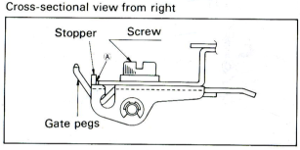
Before approaching using ribbers in relationship to cables I thought I would mention a bit on alignment. An online source reviewing the topic with downloadable PDF: http://machineknittingetc.com/brother-kr120-kr710-kr830-kr850-kr230-kr260-service-manual.html. Studio machines’ how to may be found on a youtube video by Roberta Rose Kelley. Before making any adjustments check that the clamps that hold the ribber in place are flush with the table and securely clamped; that the screws in the setting plate are not loose, and that they, in turn, are installed at the same depth.  
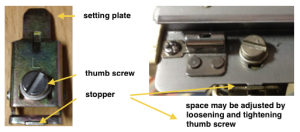
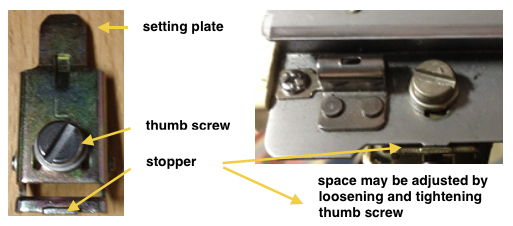
As adjustments are being made, and the thumbscrew is tightened, the setting plate may actually slide toward the main bed, narrowing the gap. To prevent that from happening I had to use a metal spacer between the stopper and the main bed.

Make any adjustments based on needles at each end. Ribbers tend to bow in the center with wear and age. To check how needles in both beds line up in relationship to each other: with the racking lever on 5, the pitch lever on P, pull forward at least 10 needles on each end of both the main bed and the ribber, they should line up point to point. If any of the needles do not touch or line up, loosen the 2 screws to the left end of the ribber just a bit (a quarter turn is usually enough), tap the end of the ribber with your hand just enough to the right, or left to line up needle positions. Recheck the alignment on several spots across both beds, tighten screws, check again.

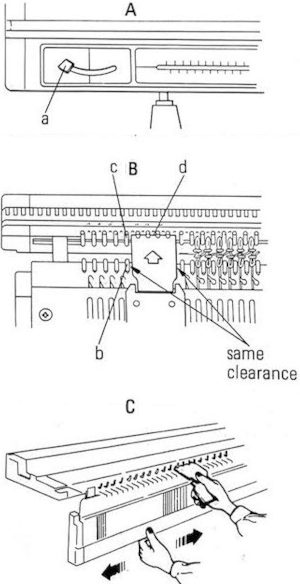
Another visual option for checking alignment is offered by Studio machines in their manual for the RT1 transfer carriage  
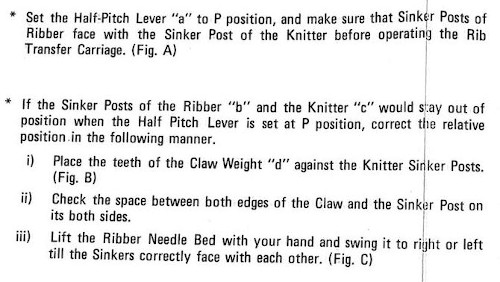
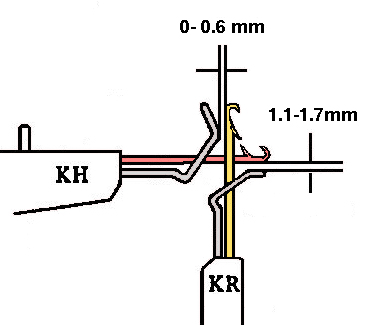
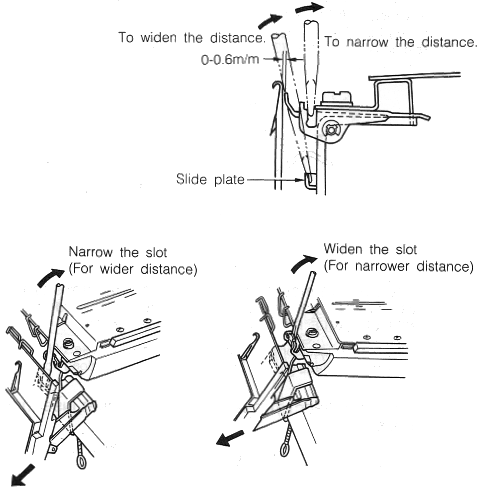
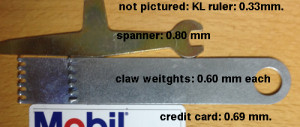
To check the height of the ribber: pitch lever on H, bring it to the full up position (Brother has 2 up positions), and bring forward at least 10 needles at each end of the main bed. Use spacers ie. a credit card, or claw weight hangers that came with ribber as measuring aides; they should slip easily between main bed needles and ribber gate pegs, the recommended distance between the back of the KR needles and the KH gate pegs is 0-0.6 mm.

The online PDF has additional photographs of the nut that needs to be loosened in order to change the height. To loosen it, the ribber needs to be brought to its down position. Use the spacer tool, start with a quarter turn, to begin with, (lefty loosey, righty tighty). Lift the ribber into place. By moving the thin metal lever (adjuster plate) up and down the height may be adjusted, one side at a time. Bring the ribber down to tighten the bolt, up again for a final check.

Lastly, with main bed needles out of work bring groups of ribber needles out to E. A single claw weight should slip behind the ribber needles and in front of the main bed gate pegs. Repeat adjustments if needed so the space between the beds is as equal as possible. The space between the bottom of the main bed and the top of the ribber gate pegs should be between 1.1 and 1.7 mm.

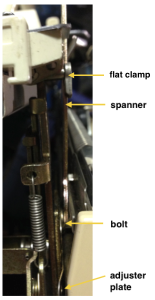
To adjust the distance between the 2 beds: bring at least 10 needles out at each end of the ribber. Use the spanner to loosen the thumbscrews, and a screwdriver to loosen the flat clamps.

If the nut should become completely loose for any reason: the part in question I believe, is #24 in the service manual, the “slide plate guide stud”. In the image below b= the bolt that became completely loose on one of my brackets. I discovered after getting things back together that a, which secures the ribber bracket, is actually directional with a barely perceptible change/ difference in shape. If it is accidentally rotated 180, it will keep the ribber bracket from changing height positions and working properly. Rotating it restored expected actions for me. 

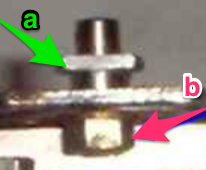
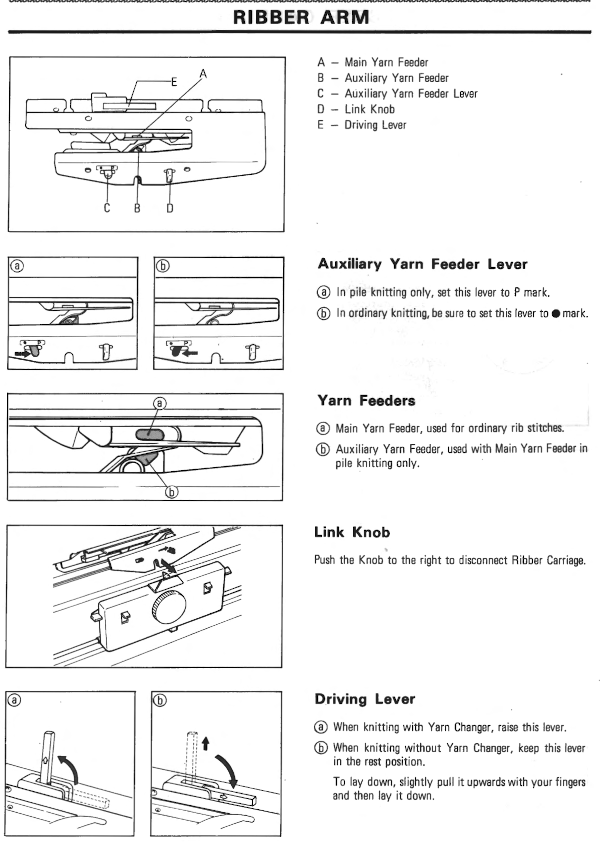
Yarn thickness and needle arrangements may also require some tweaking of height and other adjustments. Listening for changes in machine sounds as the fabric is knit, and visual checks over time are a great help in avoiding problems. Here are positions for bracket lever as indicated in the service manual 

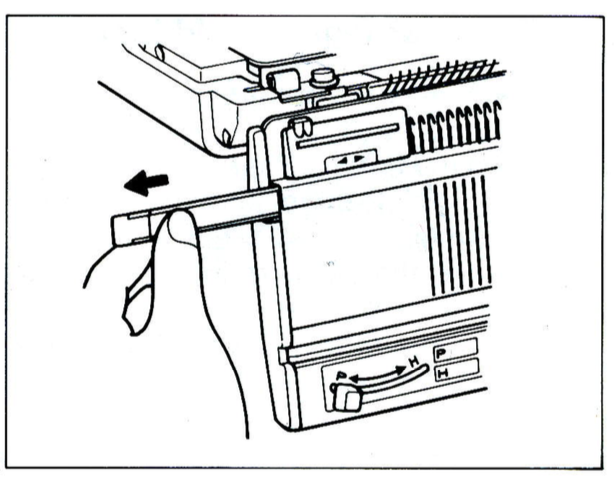
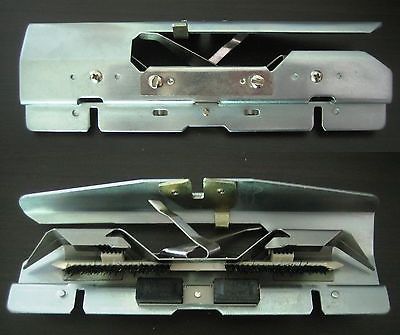
A reminder: if the needle presser bar on the ribber (all plastic) is to be removed, it is reinserted back in with ridges facing, and flat side down 
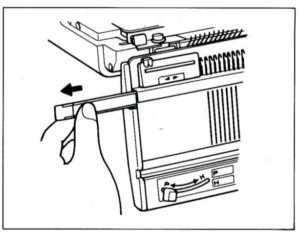
I have several sinker plates. An accessory that began to appear with ribbers at some point, seen here in this illustration:

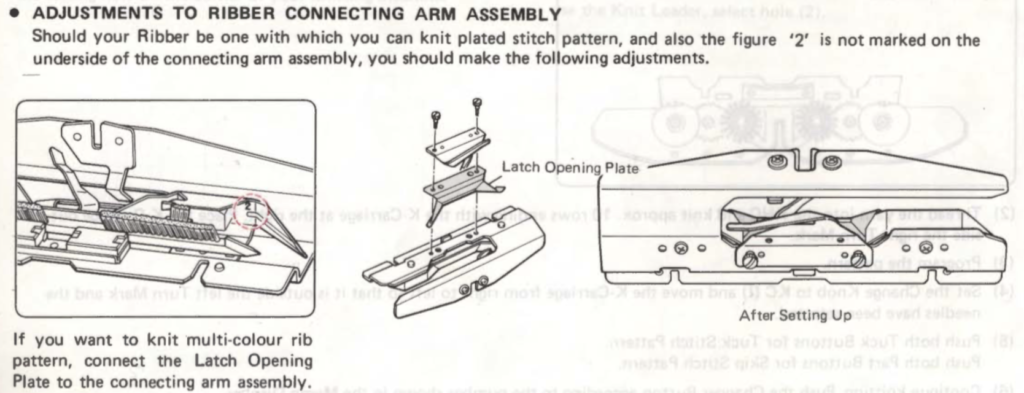
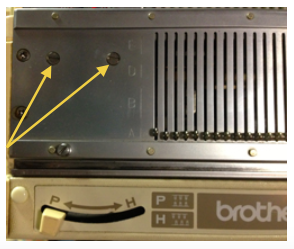
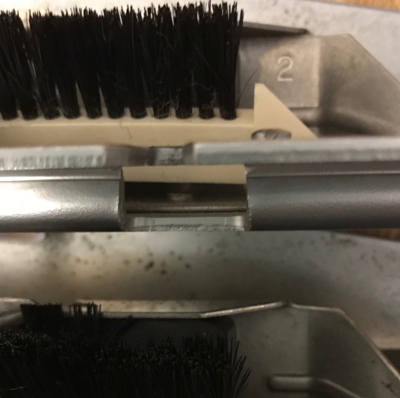
below is a close up showing markings on the right side of upturned connecting arms in 2 different model year ribbers
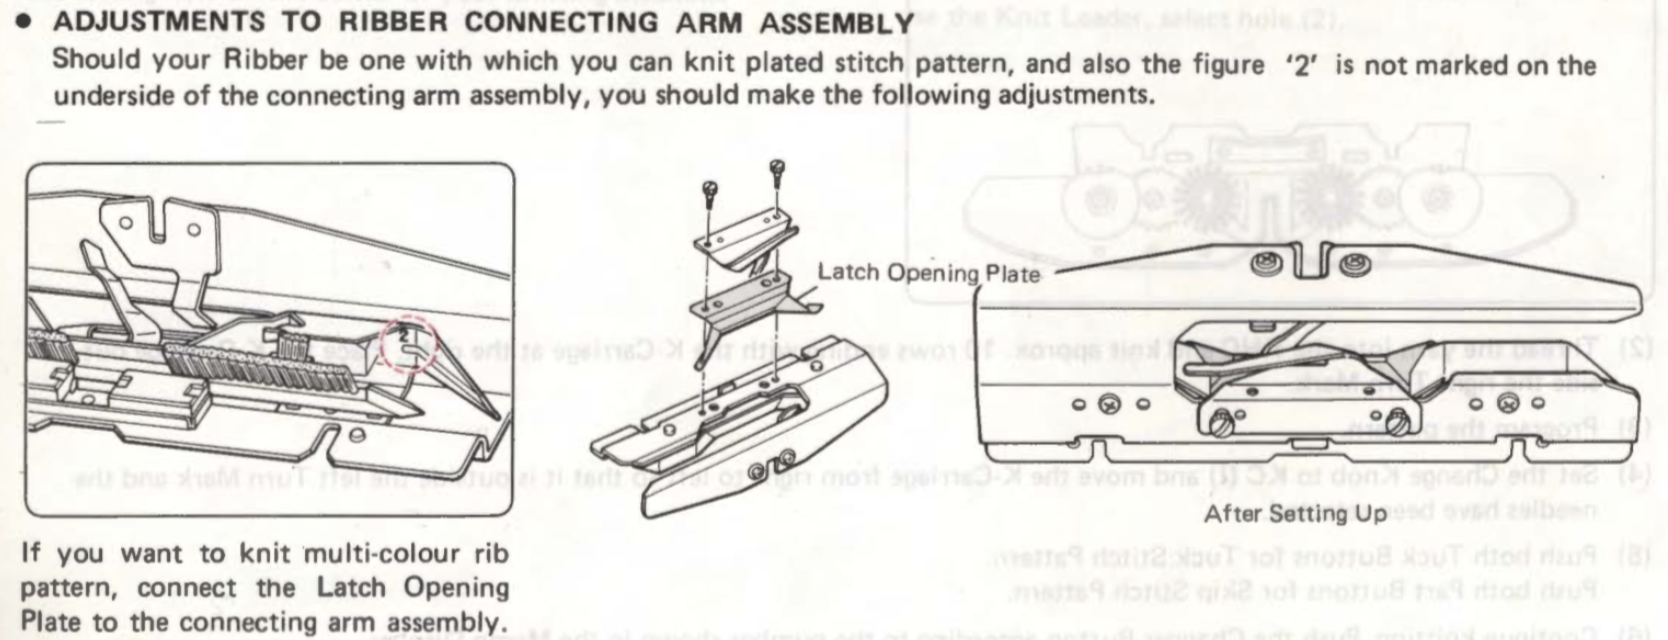
and here the latch opening plate has been secured into place in the connecting arm without the #2 marking, where it makes a noticeable change, bringing the unit closer to needles when on the machine during knitting 
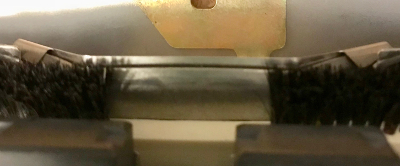
And,  speaking of ribbers and clamps, not all clamps are created equal though they may appear to be doing their job until some attachments cause problems.
Studio (shorter) vs Brother in place Brother bulky on top of the standard clamp, its shorter cousin 
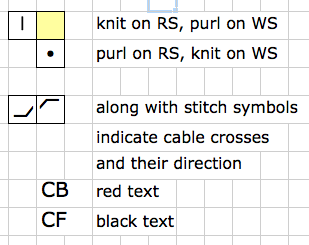
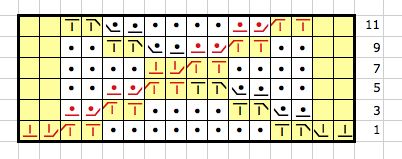
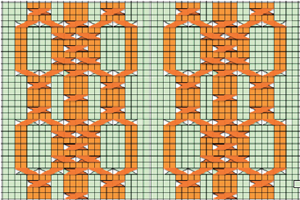
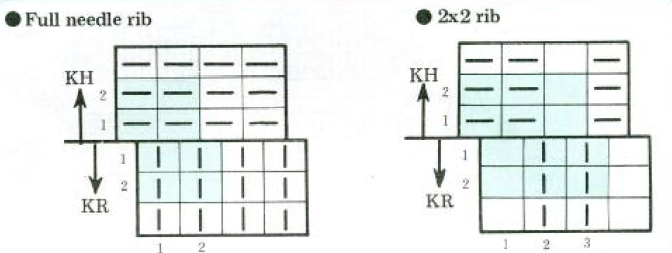
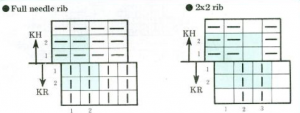
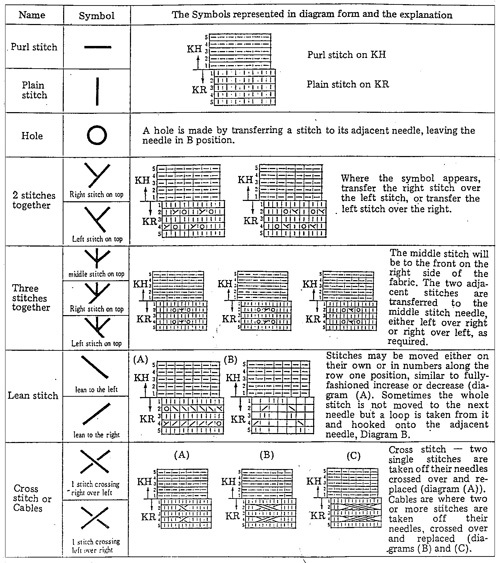
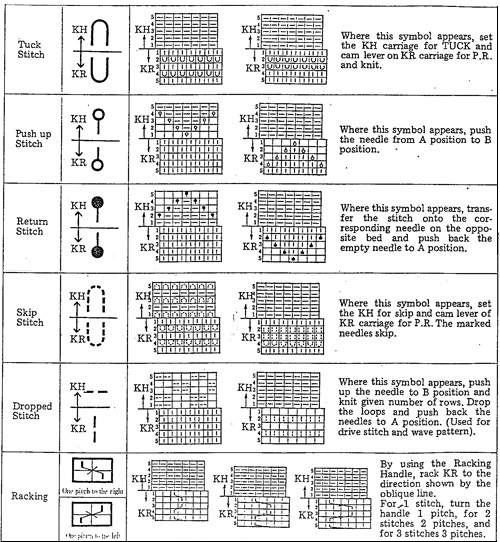
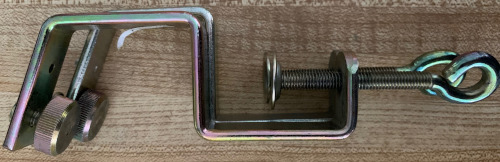
Knitting symbols used for the ribbing attachment show what the stitches would look like on the “wrong” side of the knit. In the Brother system, KR refers to the ribber bed, KH  to the knit one: typical illustration of symbols as found in Brother punchcard pattern and technique books:

rib set up

ribber_5

ribber_4

A brother publication on Japanese symbols for knitting available in English, French, and German, may be downloaded from http://machineknittingetc.com/japanese-symbols-for-knitting-machine.html  ; page 15 is missing from the document. Another resource: http://tata-tatao.to/knit/japanese/e-index.html
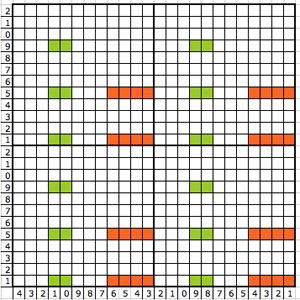
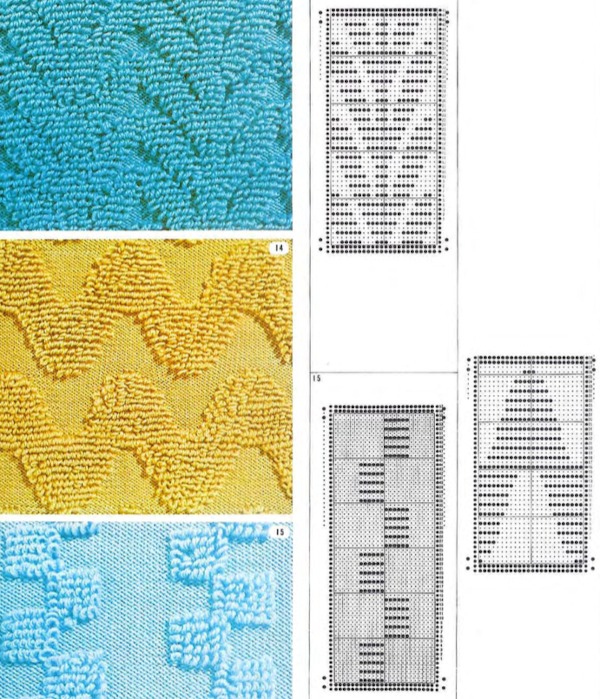
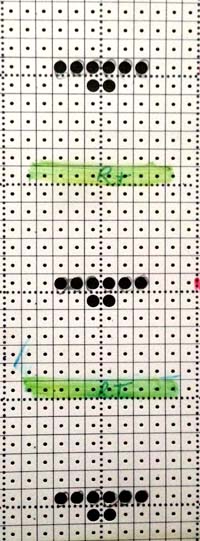
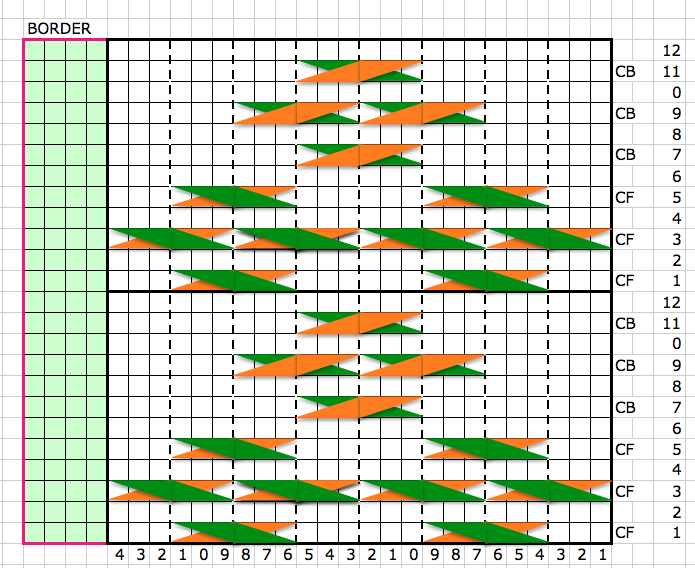
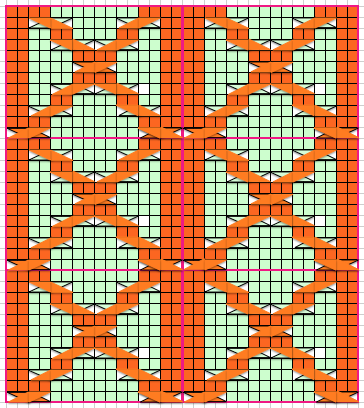
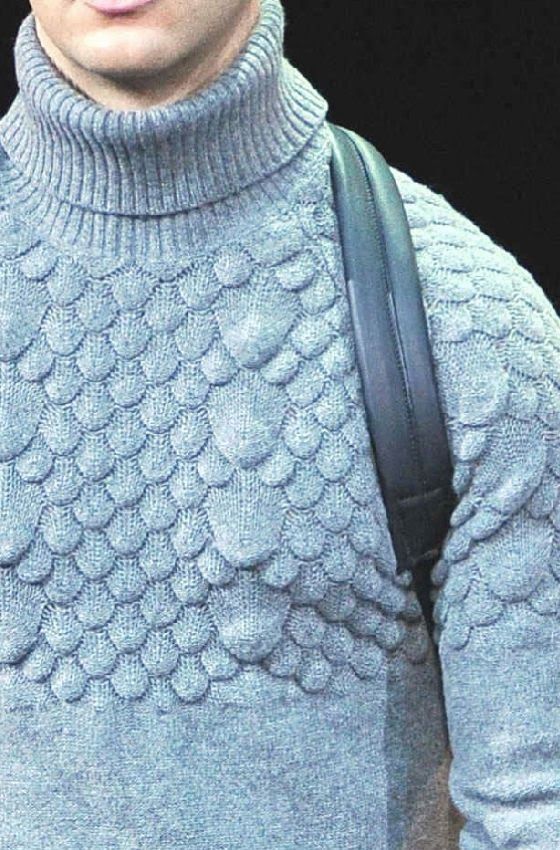
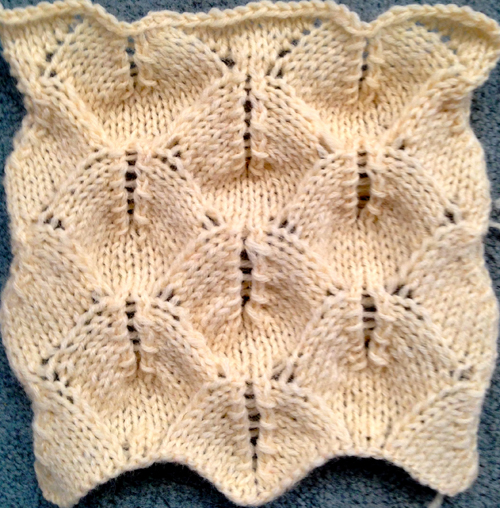
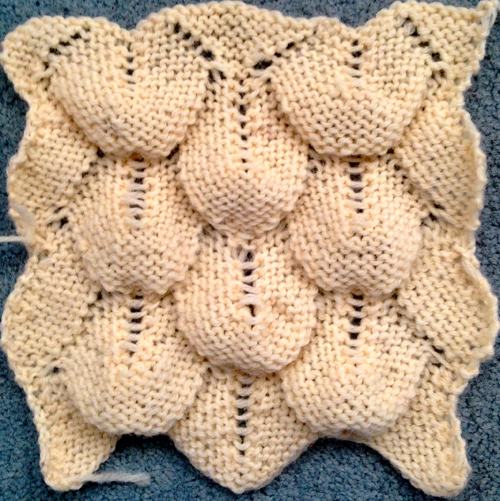
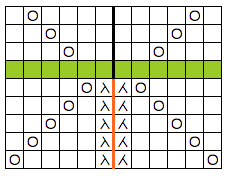
 

A swatch experiment

A while ago the image of a sweater attributed to Armani caught my attention on Pinterest, and I became obsessed with creating a variant.

13f255bf1c030f6b7f6d5710caf2d860

Lace is actually an interesting 3D fabric until it is blocked and made to lie flat. I went the lace route to work out my “scales”. The swatch I created below is hand-knit knit, and could be reproduced as a machine-knit hand technique with the aid of multiple transfer tools. I would recommend a yarn with “memory”, such as wool. The bottom of 3 sets of “shells” were knit on #  7 needles and the remainder on #5. I found I preferred to control the lean of knit-together stitches on the knit side but did not deem it necessary on the purl.

the knit side

IMG_1646

and purl side!

IMG_1645

my working notes  (Excel) showing multiple repeats

scales_in_repeat

symbols used symbolsa printable PDF  scales_all_info

A mini-me version knit on a 4.5 mm. machine, using the same yarn as in the hand-knit sample above, at tension 10+. Repeats are worked out around 2 center needles, on which stitches are doubled as transfers are made. When the pairs of doubled-up stitches are reached with loops on either side of them after the last transfer/knit one row in sequence, and knit one additional row across all stitches before reversing the direction of transfers. That row is represented in green in the chart below. Symbols used are minimal since the same side of the knit is in constant view (incomplete full pattern repeat)

KM_repeat

knit side

IMG_1648

purl side

IMG_1647

see update3/28/2015