A Ravelry question on the possibility of executing a particular fabric on the machine has led to the experiments in this post. The pattern that led to the discussion is a free hand knit one, shared and published on the Purl SOHO website and on Ravelry. The gauge for their project is 4.75 stitches = 4 inches in stitch pattern, it includes garter rows. Such rows may be executable on home knitting machines by transferring from ribber (Passap front bed) to main bed, alternating with reversing the process at a predetermined frequency, depending on stitch type. K1b is the hand knit equivalent of tuck for that stitch on that row, adding to the mix. Not practical for G carriage use, as the latter does not form tuck loops, and hand retooling would be required for all k1b stitches.
Using holding to create tuck stitches in non-auto patterning days was commonly used, and I chose to do so here. As machine knitters, we are conditioned to believe that single color rows are impractical to execute and that the yarn would need to be cut on each side after the one row. Color changers are on one side or the other, making striping with frequent color changes is practical if executed in even multiples of rows. Transfer carriages are available that will help move stitches from one bed to the other, I personally have never had the patience to work with them enough to get good at using them without dropping stitches, so I went back to even lower tech than usual, using the garter bar on the bulky, and beginning pattern row 1 with COR.
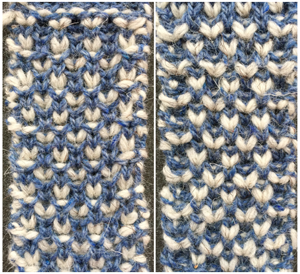
Before attempting nearly every row turns, it is helpful to have some practice with turning work over using a garter bar, develop a sequence of repetitive actions, keeping careful notes as to what works for you, and using contrasting yarns in tests to better understand stitch structure. In my sample the white yarn was thicker than the blue, reversing colors or balancing yarn thickness would change the visual look of the fabric. Beginning on small samples helps work out issues and the making of the decision to try on a larger project or simply as a border.
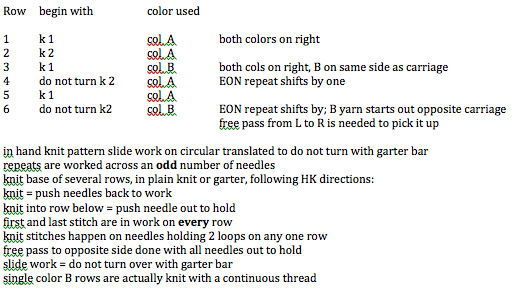
Analyzing the pattern repeat:
 tools to help with EON needle selection
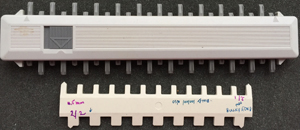
the results of rows beginning with k1 sequence after the row is knit, note the “tuck” loops on top of E position needles, which will be knit off on the next row knit 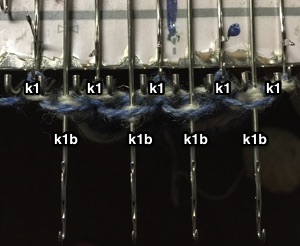
a row that begins with a k2 sequence, before it is knit; the needles holding the single, blue stitch will form the loops on top of the needles as the yarn moves across to the opposite side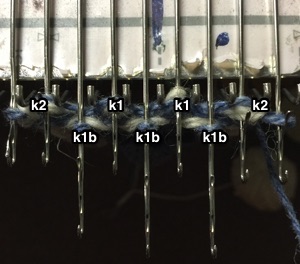
E position prior to transferring stitches onto garter bar, also for a free pass to the opposite side to pick up yarn after stitches are removed on bar 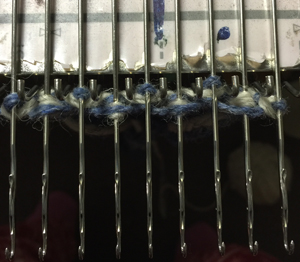
1 begins and ends with K 1; COR select needles, col A * knit row, COL, bring all needles out to hold, remove on garter bar, free pass carriage to theopposite side, COR, flip garter bar over, replace stitches onto needles push all stitches against gate pegs *
2 begins and ends with k 2; COR select needles for row 2, col A repeat * to* end COR
3 begins and ends with k1; COR select needles for row 3, change to col B, knit one row, do not turn, do not cut yarn; COL bring all needles out to hold, a free pass to the right to pick up col A on next knit row, end COR
4 begins and ends with k 2; col A, COR select needles for row 4, repeat from * to *
5 begins and ends with k 1; COR select needles for row 5, col A, repeat from * to * do not turn
6 begins and ends with k 2; COR select needles for row 6, change to col B, repeat from * to *
publisher’s project photo
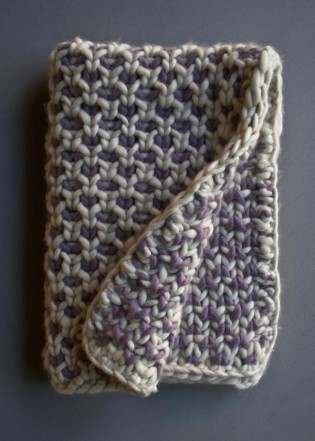
my swatch, knit on a whopping 9 stitches