2011: There are several brand KMs still around and in use, most are no longer being manufactured. Questions often come up on how to use one KM brand pattern card on another. Card readers inside the machine are below eye level, so exterior number/other markings on cards or mylars reflect that, providing the knitter with a visual cue as to where they are in the repeat. If machines pre-select, the needle selection may not bear any relationship to the actual design row on the punched card or mylar as opposed to what one sees. In addition to this variable in lace one often has 2 carriages in use. It is possible to develop cards etc. from lace hand knitting graphs, but there is enough going on so a good place where to start experimenting is with pre-drawn ones. Lace preselection on any single row may have no obvious relationship to where the lace hole will ultimately end up.
Here are some random facts gathered from both sources and experience, they are applicable only if the knit carriage is set for plain knitting and no other function ie. slip or tuck is involved; plain knit rows do not advance the card reading mechanisms. In mixed structure fabrics, the rules change.
The Brother and Toyota lace cards can be used on studio punchcard machines as long as they are patterns which have 2 blank rows after each transfer sequence
Brother and Toyota have u shaped arrows to identify when to knit with the knit carriage, both brands read cards 7 rows down
The first row on Brother is transferred from right to left, while on Toyota it is transferred from left to right; Brother and Toyota cards are interchangeable provided the card is mirrored vertically (or a simple cheat: use carriages on opposite sides of usual)
For Studio knitting find the row number of the U shaped arrow and circle the 2nd and 3d row below that row that number to identify rows in which carriage is changed/set to knit
Brother knitting ends with 2 blank rows
Studio starts with 2 blank rows
on Studio begin brother card by locking card 4 rows before row 1, on row 3
Brother/Knitking lace carriage does not carry yarn, does not knit or trip the row counter; the stitches get transferred in the direction that the lace carriage is being pushed
Studio/Singer has a lace carriage available that transfers as it knits; on more complex laces one is sometimes instructed to set the carriage not to knit for a specified number of rows, the yarn may be removed, other adjustments are often required
though Studio and Brother lace cards are not directly interchangeable; aside from the numbering issue the transfer method is different, so a studio lace card working on a Brother or vice versa is a happy accident and likely to result in different fabric
Brother information is applicable to its new clone, Taitexma
A few references :
Machine Knitting: the Technique of Lace by Kathleen Kinder
Knitting Lace and A Machine Knitter’s guide to Creating Fabrics by Susanna Lewis
Machine Knitting: the Technique of Pattern Card Design by Denise Musk
John Allen’s Treasury of Machine Knitting Stitches
The Harmony Guide to Machine Knitting Stitches (their Colorful Guide to Machine Knitting Stitches does not include lace)
322 Machine Knitting Stitches (Sterling Publishing,1988)
2013 In this instance I am exploring the use of punchcards that are designed for transferring and knitting at the same time as seen in Studio simple lace in machines such as Brother, where the operation is the result of using 2 different carriages.
The studio card used  the resulting fabric
  The method: both carriages are used to select needles, use lace extension rails on both sides of the machine. Cancel end needle selection on knit carriage underside if possible, or push end needles back manually if needed to avoid their corresponding stitches being transferred throughout the piece. Set up for knitting the pattern as usual, punchcard row 3 (marked in pencil) becomes row 1 of the design when the above card is used in the Brother machine. The arrows always indicate the direction the lace carriage will move across the knit to make transfers in the direction of that same arrow.
- 1. begin pattern knitting with COR, card locked, change knob on KC, no cam buttons in use. This will result in needle selection, but the fabric produced is in stocking stitch. The lace carriage is engaged on the opposite side, and moves toward the knit carriage to make the transfers, as it travels across the bed the now empty needles will once again be in the B position.
2. (lace carriage) travels back to the right and is released off the machine (same needle selection appears, but those needles are now emptied of yarn)
3. COL: KC moves left to right, knitting the single row, all needle hooks are now full, and new needle selection occurs
4. LCOL: makes transfers toward the knit carriage, and then makes a second pass to return to the opposite side and is released.
These 4 steps are repeated throughout the knitting, with the knit carriage knitting and selecting, the lace carriage following its selection to make the required transfers. Not every transfer row will match the direction of the arrows as marked on the studio punchcard.
If there is no pattern needle selection with the KC pass on any row(s), continue to knit until there is needle selection, and begin the process using lace carriage to transfer toward the knit carriage from the opposite side and once again releasing it after its second pass.
A caution: hesitation and reversal in the movement of carriages in Brother machines advances the card in the reader, and results in mistakes in patterning; if errors are to be corrected or such movements need to be made for any reason, it is worth locking the card, checking row numbers, remembering to release the card before continuing, and visually checking pattern after the next knit row.
2013: While working out yet another HK to MK lace pattern, I sorted out the following method for using Studio simple lace on the electronic KM. It is a method that does not work on the Brother punchcard to produce the same fabric, however; on punchcard machines, as either carriage is moved to select from the opposite side of the bed, the card will not advance on the first pass, interrupting selection. I tried a swatch and got a very different lace design; depending on the starting pattern the results may be interesting (do not use elongation), but not the ones intended to match any original.
The knitting samples shown below were knit on a Brother 910. On electronic machines, as seen in previous posts on knitting with 2 carriages, the mylar (or otherwise programmed) repeat advances a row with each pass of the carriage, no matter on which side of the bed the pass originates. Dropped stitches are harder to repair in these fabrics than in patterns for multiple transfer lace (there knitting can be unraveled to the start of a sequence where 2 or more knit rows usually occur), so checking transfers, gate pegs, and adjusting stitch size and weights matter even more. There is no need to mirror the image horizontally if using a mylar; draw repeat as it is on punchcard, all variation buttons down
start knitting with KC (knit carriage) on left, Lace Carriage (LC) on Right program pattern 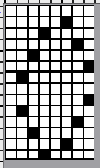 double length
 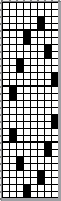 on the first row the LC selects, the next row it will transfer; LC always makes 2 passes first toward the KC, then away from it, even if those 2 rows in repeat have no needle selection. It is then removed from the bed to be returned to the bed on the opposite side after the knit row with KC that follows. In summary:
KC knits a single row to the opposite side
*LC is placed back onto machine opposite the KC to make 2 passes, is removed.
KC follows with a single knit row to the opposite side*. * to* steps are repeated
3 total carriage passes complete one row of knitting.
The preselection is repeated on the empty needles where stitches were just transferred.
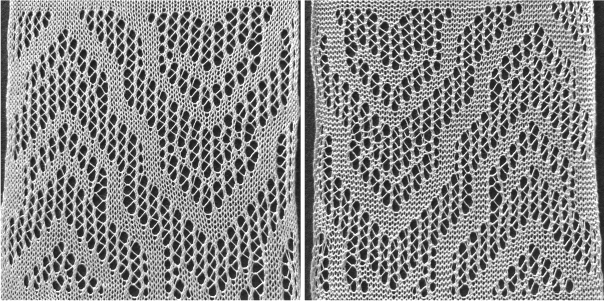
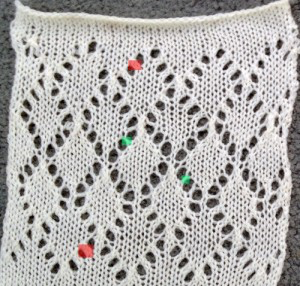
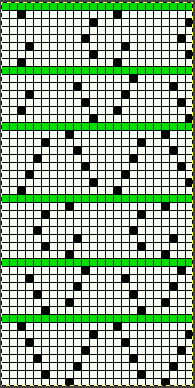
The chart below shows actions and placement of carriages 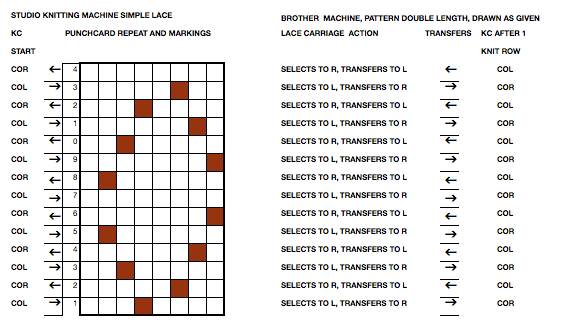 This sample was knit beginning with lace carriage on left, as can be seen in marked areas, the alternating repeats have a different quality in the sets of transfers marked red vs green
 The successful swatch knit beginning with KC on the left, and LC on the right in the method described above
 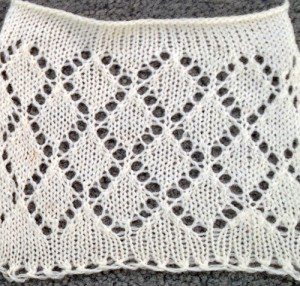 April 2019 I attempted the same repeat on the 930 with img2track. I mirrored the repeat horizontally and elongated it X 2 prior to knitting it. The arrows in the chart indicate the movement of the lace carriage, beginning with the first preselection row from the left
 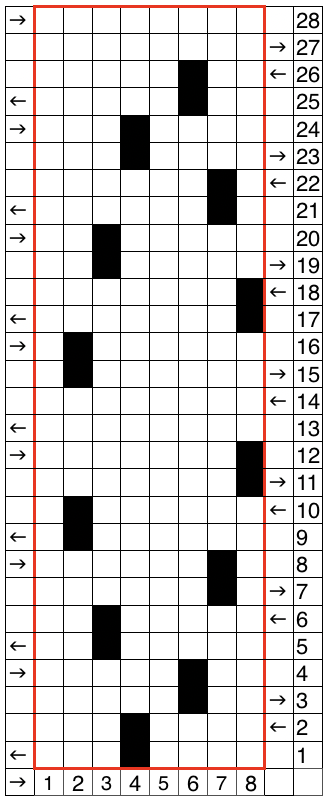 I had issues with the proper needles being selected (proofed also in fair isle), but with random stitches not being transferred. A switch in lace carriages, needle retainer bar, yarn, did not eliminate the problem. I finally had to perform some of the transfers by hand. This swatch also shows the joy of missed dropped stitches in lace knitting, the yarn used is a thin acrylic.
 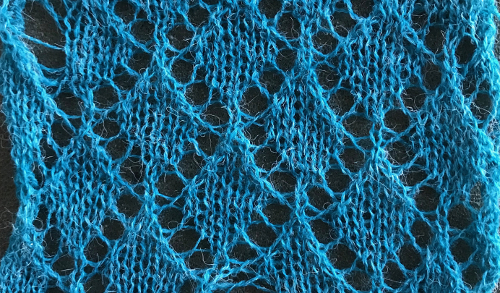 Different year (2023), even thinner yarn, with the image mirrored horizontally on the 930 using the method described above, the new knit proof of concept:
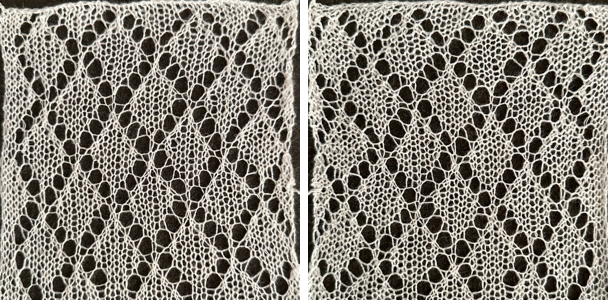
An interesting method using 2 electronic lace carriages found on youtube. The repeat used in the video is a variation of the one used in my sample above, programmed using img2track. The repeat is mirrored prior to knitting, there are extra knit rows to allow LCs to continue the pattern from alternate sides. The machine being used appears to be a 930. The requirement for mirroring of any pattern may depend on the model of electronic KM used to knit the lace and whether the download appears as drawn on the purl or the knit side of the piece 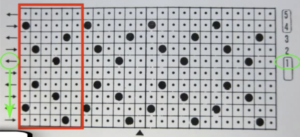 A comparison of my repeat using a single LC and the Knitlabo pattern expansion including memo options for use with 2 lace carriages
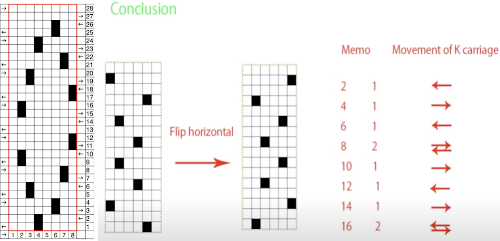
Studio transfer lace on Brother bulky and standard machines 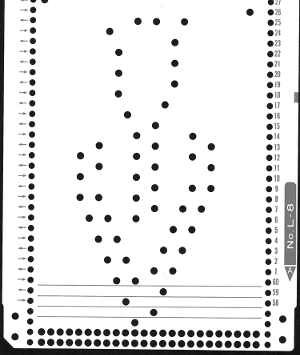
Studio multi transfer lace punchcard use on Brother punchcard machines
112, 113 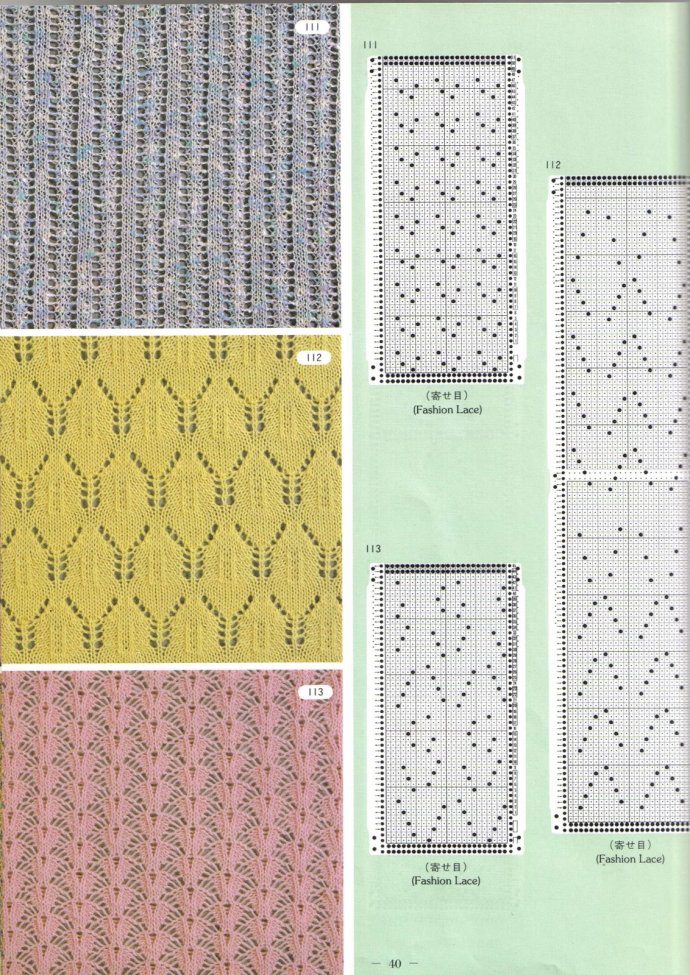 113 has single rows between repeat segments, requiring added manipulation of the knit carriage
 the 24X48 png
![]() On a 930 with img2track use the # 1 variation key with the pattern repeat as shown, or flip horizontally before downloading.
On a 930 with img2track use the # 1 variation key with the pattern repeat as shown, or flip horizontally before downloading.
Ayab knitters before the latest software release: mirror repeat, tile repeat width across the number of stitches to match the number of needles to be used in your final piece. There will be no needle selection at the end of each sequence, signaling the need to release the LC, knit one row, and continue with LC brought to the opposite side. This is a very fussy knit. At several points, it is loops formed on previously empty needles that get transferred rather than full stitches. They love to get hung up on gate pegs. It took a significant amount of time to produce a proof of concept swatch. It is a lovely lace. Knitting it on a punchcard would give one the luxury of frequent pauses and markings to make for additional clues
LCOL 9 passes, release
KCOR knit one row to the left
LCOR 7 passes, release
KCOL knit one row to the right
LCOL 5 passes, release
KCOR one row to left
LCOR 3 passes, release
KCOL knit one row to the right
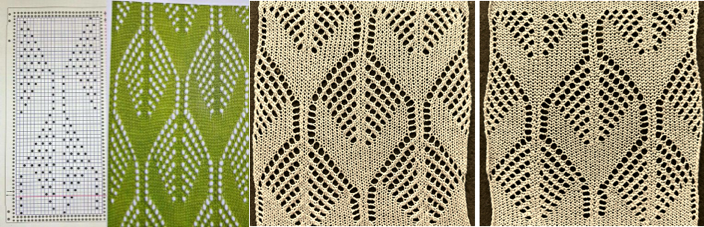
In # 112 there are the standard pairs of rows between transfer segments. The punchcard pattern is composed of two 12-stitch matching vertical repeats, here 1 of the two halves is shown rotated counterclockwise. The additional extra knit rows in the Studio design have been eliminated. If knit as given this overall appearance will be different than that in the swatch pictured in the source. Brother machine knitters would need to track the midpoint location in the design, after the first 50 carriage passes, to place those extra knit rows, making six passes with the knit carriage rather than the standard 2. 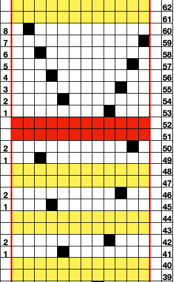
 The 12X104 png, on a 930 with img2track remember to use the # 1 variation key
 ![]() If one makes a choice or is required to repeat the width of the design to the number of needles used on the needle bed, it is easy to accidentally use the pencil in a paint program when working between windows. This test swatch clearly shows selection errors on a side edge only.
If one makes a choice or is required to repeat the width of the design to the number of needles used on the needle bed, it is easy to accidentally use the pencil in a paint program when working between windows. This test swatch clearly shows selection errors on a side edge only. 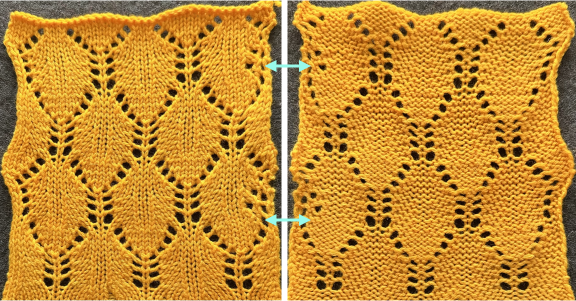 One way to check the repeat, handy when repeats are much larger or visually confusing: open the faulty one in Gimp, working in RGB mode, select by color and change black pixels to red, and make the white background color transparent by using Layer/Transparency/Color to Alpha. Open a new image, and carefully draw the design in repeat once more in the same location as in the first work window. Copy and paste the red pixels onto the black, revealing the missing pixels and the associated transfers on that edge. Fill red pixels with black, return the image to BW indexed mode, and save the new PNG to knit the piece.
 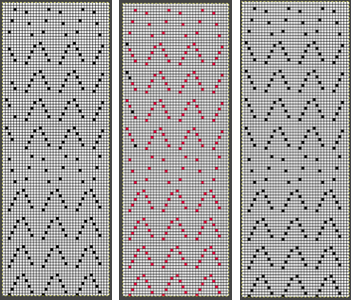 Redesigned for use on Brother machines with the LC operating from the left and the standard 2 knit rows between each design segment
 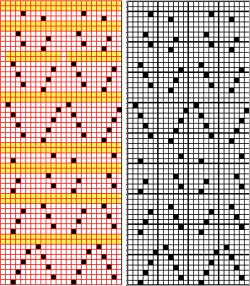 the 24X56 png
 ![]() knit mirrored horizontally on the 930, using a 2/18 wool
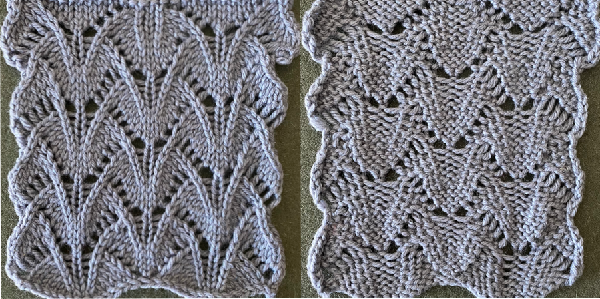
knit mirrored horizontally on the 930, using a 2/18 wool 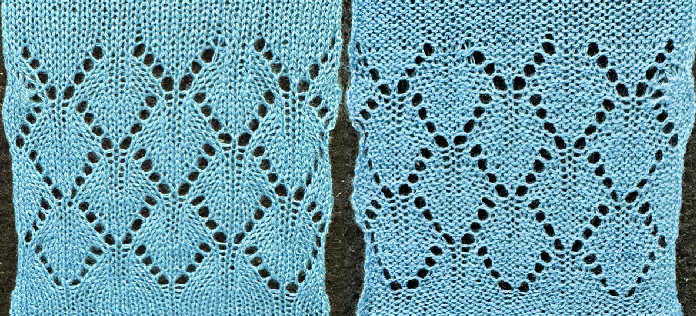 comparing both versions
 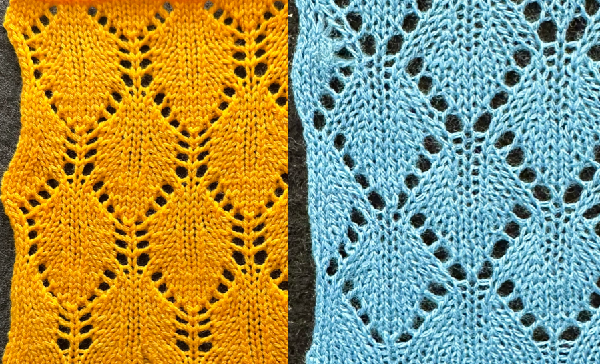 a cousin version executed as a bulky knit
 Yet another method, illustrated in Swatches based on adapting random online published repeats
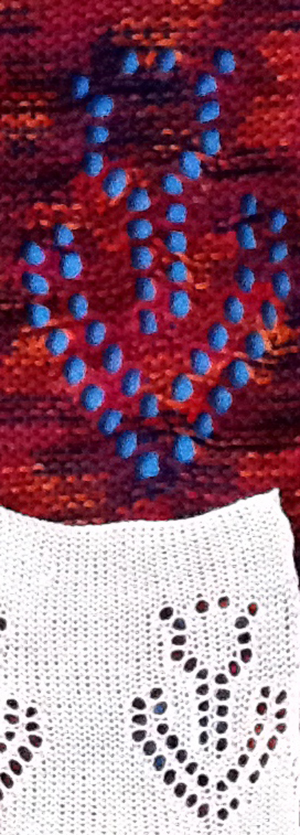
 Mesh experiments using thread lace punchcards. This image also illustrates the yarn lines created in the eyelet spaces: a single thread when single rows are knit between repeats and twisted double threads when 2 rows are knit between transfers.
 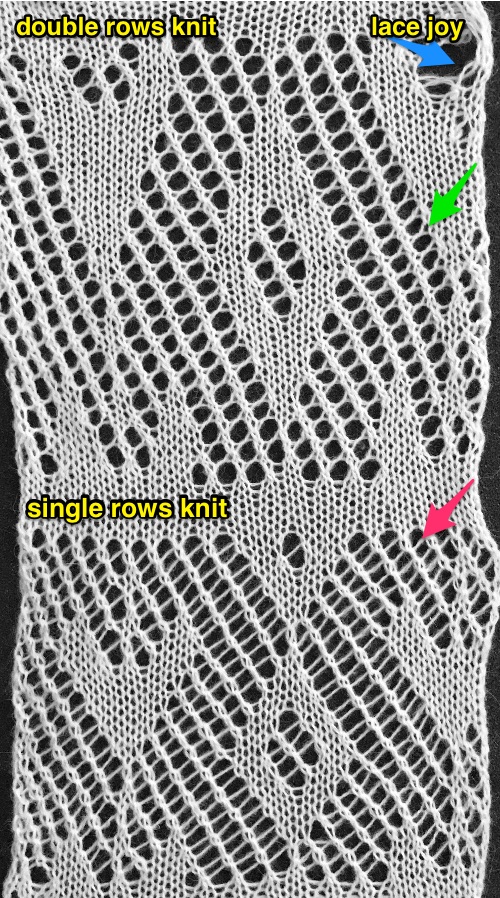 A later experiment Using StitchWorld #545
 ![]()