In the past, I have explored several ways to knit scale-like fabrics aka dragon teeth/scales, and a multitude of other names. My test swatches were created using racking, pattern repeats were provided for both punchcard and electronic machines. Some of the archived material:
2018/07/19/more scales and chevrons racked fabrics 4
2016/02/22/ hand knit dragon scales
2016/02/02/ vertical racking 3: automating half fisherman in pattern-2
2016/01/13/ racking 2: vertical chevrons and herringbone
With summer here and a long absence from lace knitting, I was curious about producing scaly fabrics for the single bed. Lace transfers may be used to create folding fabrics with permanent pleats, so what about 3D shapes? I began with a repeat suitable for a punchcard machine and its limitations, adjusting it in 3 different ways 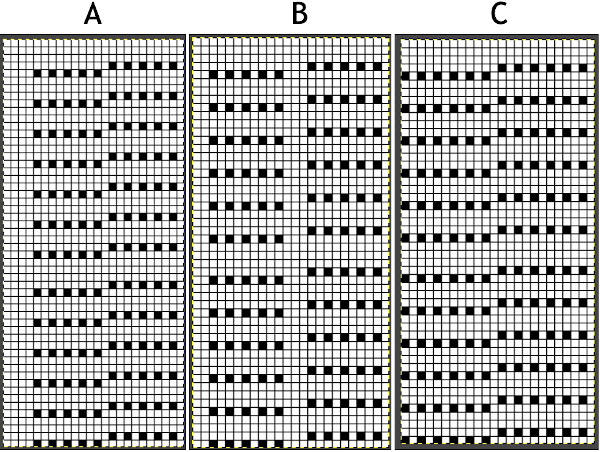 A variation of Card C, with 2 rows blank after each pair of transfers throughout was used in borders in some of my lace shawls including these, made in 2011.
 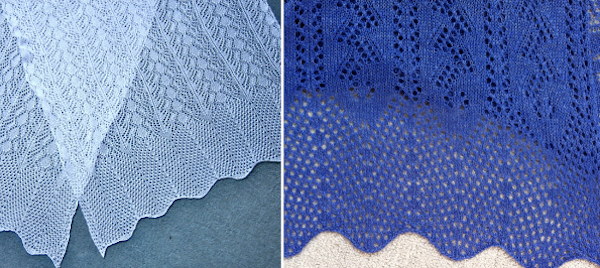 All 3 card designs share the fact that the lace carriage (LC) makes 4 passes followed by 2 rows using the knit carriage set for normal knit to complete the eyelets with exceptions. The exceptions are in areas where there are extra blank rows, where the lace carriage will make 6 passes in order to reverse the direction of transfers. Brother lace cards usually start with punched holes on the very first row, have 2 blank rows between LC passes that complete one sequence (here each sequence is 2 rows in height), and 2 blank rows at the top of the card. Lace markings are few and far between, errors are easy to make when punching long cards and working in designings with pixels in particular. In this case, I did not notice until I began composing the post, and after I had completed the first test swatches that the repeat on the left has an extra 4-row segment in the top half, making it 24 stitches X 54 rows as opposed to the other two at 24 X 50.
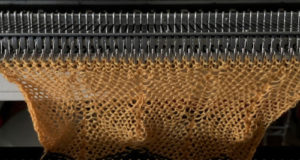
In any lace patterning if a zig-zag is wanted in parts of the design, having 3 blank rows in planned locations will reverse the direction of the transfers from those below them. Blank squares in rows containing no punched holes (or pixels) will have no transfers, so in their absence stitches in those areas will be knit, producing extra stocking stitch rows. The spacing for such knit areas on the card may be adjusted to suit. This segment of the above designs identifies the areas in both rows and columns with no punched holes (or pixels)![]() The knit side of the fabric is the most interesting. The swatches were first photographed as they were immediately after their removal from the knitting machine. I also tried to photograph them at an angle to show the protrusions from the surface. Pattern A:
The knit side of the fabric is the most interesting. The swatches were first photographed as they were immediately after their removal from the knitting machine. I also tried to photograph them at an angle to show the protrusions from the surface. Pattern A:  A short test version using cards B, and C
 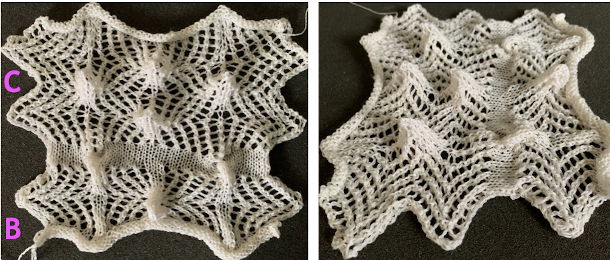 When using card A, the shapes alternate vertically between all mesh ones with all knit rows at the outer edge of the folds. Using Card B, all protrusions have a fixed number of knit stitch rows at the outer fold. Card C produces an all-mesh fabric that made me think of ocean waves somehow. Turned sideways, and pressed to set the folds, the resulting fabric could provide a springboard for a host of other, different ideas:
 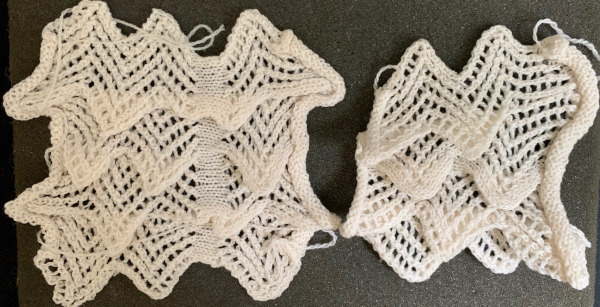 A larger swatch started on waste yarn, with 2 rows of knitting at the bottom and at the top before binding off. The design is card B, with 4 rows added to each half of the design. I am still working with the constraints of a punchcard machine, and for the moment, of retaining symmetry in the width of the “scales”. The working chart, turned counterclockwise to save space
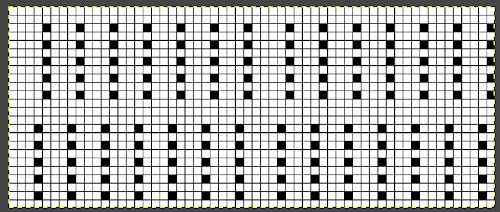
![]() Planning for 3 repeats based on 24 stitch widths
Planning for 3 repeats based on 24 stitch widths  the above arrangement will, in turn, need to be mirrored for the lace pattern. My sample was knit using 2/15 wool at tension 7, using needles 36 left to 35 right
  The actions are reviewed here once more
 The knitting in progress
 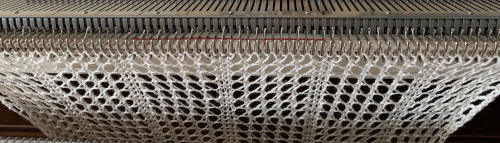 I cast on loosely enough, but the bind off was too tight at the top, which should always be tested on swatches before committing to a project. The resulting fabric was photographed immediately as it was removed from the machine. I tried to touch the edges only with an iron, and mine is now overheating and doing a good job of burning my wool, thus the color changes in spots
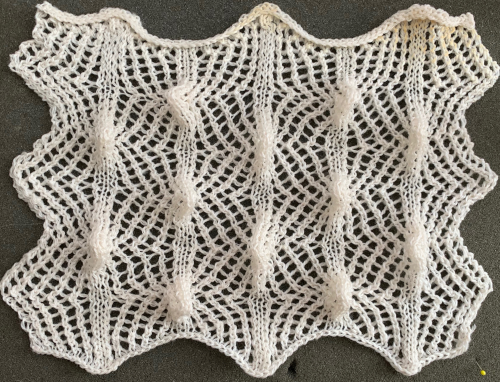
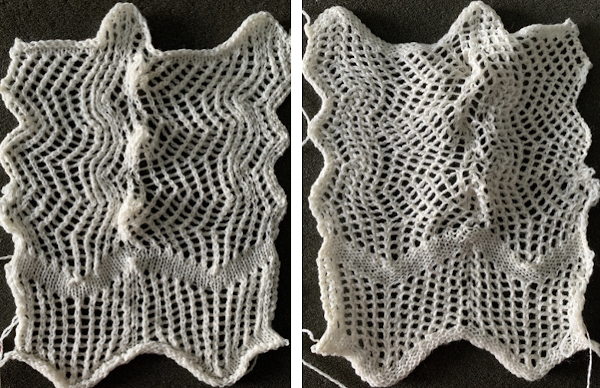
 With an attempt at some steaming and pressing, the folds are retained
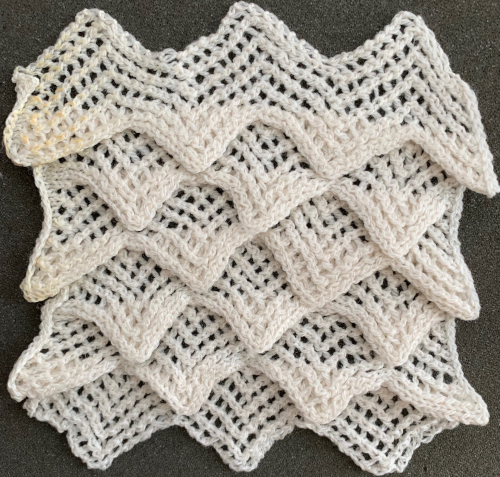
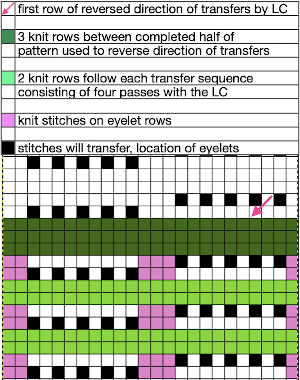
 Often the question of what fine lace is and how it is made comes up. Fine lace is a fabric against which I have a personal bias. It seems to involve a lot of work for the result unless one is using a light-colored yarn with a smooth surface to show the subtle and at times hard to observe surface changes. It fares better visually when mixed with eyelets. The yarn is shared between the needle that would normally be left empty and the one with the formed stitch already on it to its right or left depending on the direction of the transfer. If the shared yarn is dropped instead of staying in the hook of the transfer needle, as the next 2 rows are knit there will be eyelets on the ground lacking them anywhere else. Card C, knit using only the fine lace setting on the LC, looks very different from the previous fabrics, both knit and purl sides are shown, with a couple of spots where the yarn was not shared by 2 adjacent needles, forming eyelets
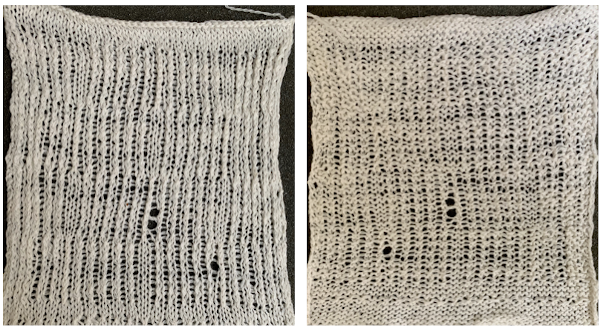 Now evaluating the possibility of mimicking my hand-knit version:
 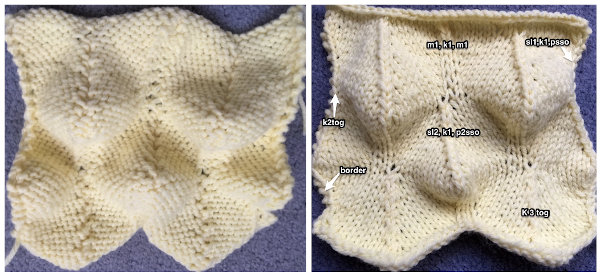 Planning out a repeat in chart form:
![]() Knitting began with working in a 2/15 wool, tension 6, using a 7 prong tool with all prongs engaged to transfer groups of stitches onto their new positions on the needle bed. The first two images review picking up from the row below to fill in needles emptied by transfers. It is one of the machine-knit equivalents for the M1 direction in hand-knitting patterns. As a result, the number of stitches being knit remains constant throughout the piece.
Knitting began with working in a 2/15 wool, tension 6, using a 7 prong tool with all prongs engaged to transfer groups of stitches onto their new positions on the needle bed. The first two images review picking up from the row below to fill in needles emptied by transfers. It is one of the machine-knit equivalents for the M1 direction in hand-knitting patterns. As a result, the number of stitches being knit remains constant throughout the piece. 
 The stitch structure so far appeared too loose to me, so I then switched to a 2/8 wool, at tension 7 with the intent to test knitting as tightly as possible while still facilitating the multiple moves of stitch groups on each row. The resulting fabric was stiff and wanted to curl strongly to the purl side, needed pins to help it lie flatter. The shapes refused to stay poked out to the knit side.
I seldom wash my swatches, viewing them simply as proof of concept of technique concepts, not usually as springboards for finished pieces. Generally, I stop at steaming or ironing if needed.
When I made garments for sale in wool I usually tested the swatches and washed the finished garments as well. The “hand” and the behavior of the finished piece can change considerably. The hand-washed sample in the second illustration below lies flat and has a soft, drapey feel absent in the unwashed, retains the flatter shape with no encouragement needed. In its 2/15 portion, the “scales” became more flattened as well.
Washing wool removes any sizing and excess dye. Open spaces in the knitting become reduced in fulling, as opposed to closing tightly in felting. Using a constant temperature in both the wash and rinse and avoiding excessive friction, in turn, avoids excess shrinkage. ![]()
 On electronic machines, one does not have the same limitations in terms of the width of the repeat maxing out at 24. For example, the number of eyelets on either side of the block components of the repeats may differ, the greater the number of eyelets, the wider the spacing between the 3D shapes. Gradations may be planned in height and width of repeat blocks across the full needle bed, limited only by patience in designing, the capacity to download, and the tolerance for both the yarn and the operator to complete wide, long pieces using the technique.
Experimentation can yield quick results, sometimes with unexpected but pleasant surprises. One of my best-selling felted items for a couple of decades was an accessory that was planned deliberately to mimic a test piece that had almost been tossed in the trash. It’s good to return to things after a break for another look, and then it is really helpful if notes were kept. Another variation of the A-C cards in single repeat was tested at the bottom of the swatch below 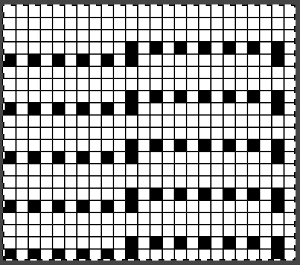 and in a staggered one, tested at the top of the swatch
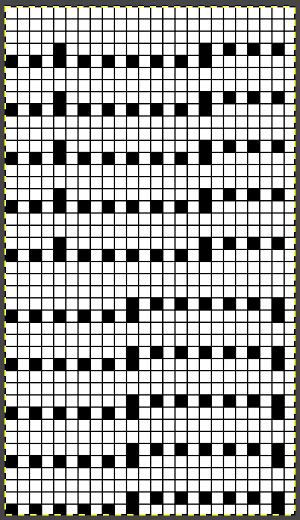
 The “scales” were more like twisty bumps, with subtle variations vertically in some of the stitch groups. That said the results were dramatically different when color changes were added to the pattern knitting in the shorter repeat. Blocking may make an even more marked difference depending on whether the mesh (lightly steamed) or the tighter knit (vertically pulled, should be washed) produces the preferred effect. The looser stitches at the top outside edge ie at the top left corner are the result of a stitch that got away from me. The cast on was a bit too loose, I knit 4 rows at the bottom after the cast on and 4 rows at the top of the repeat before binding off.
 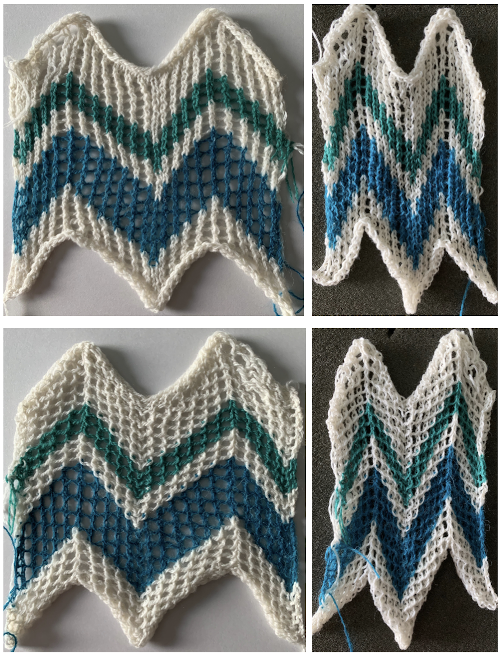 The differences in the width of the same fabric are dramatic. Any overall mesh/ lace fabric blocked for openness such as on the left will grow in length over time, is best stored flat, and will benefit from episodic pressing/ steaming to reset the width. Then I began counting eyelets, which were equal in number in the schematic for the repeat, but not equal in number on either side of the center pivot for the bend in the herringbone shape when the piece was finished. Any extra eyelet rows in the same direction will result in increased biasing in those sections. Time to test more mesh variations, a topic for another day.