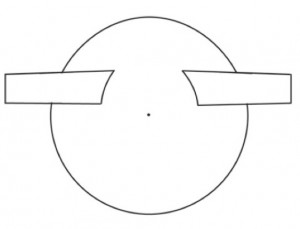
Circular sweaters and vests have been in the pattern marketplace for a while, and there are very few online resources for purchasing patterns for machine knitting. My first attempt at one such pattern was a hand-knit for my granddaughter. It began on long circulars and was worked from the outer diameter, with stitches decreased at intervals, eventually bound off at the center. Most adult sweaters and vests both in HK and crochet are worked from the center out. A common diagram for such sweaters regardless of approach is seen below, a vest could result by simply omitting the sleeves.
Diagram A
Placement and shapes of sleeves are crucial to fit. A straight sleeve top as seen in dropped shoulder sweaters can result in the sleeve opening occurring on the arm inches below the shoulder, making the top of the circle that forms the collar flop around, and the sweater is hard to keep on (the result in my hand knit). Better shoulder fit and having a cap at the top of the sleeve, whether traditional or raglan and adjusting back garment width can achieve stability. In large sizes created by simply making the circle larger, the fit becomes very different in the front, and there are other, better ways to achieve a similar look. Calculations involved in planning these garments share common methods with “doilies”, shawls, ruffles, and more.
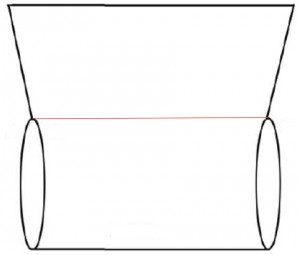
In hand knit/crochet another approach is to knit a square/rectangle variant, which can begin and end in open stitches. This piece is folded in half, circulars are used to pick up all the open stitches which now become the inner diameter of a circle, and increases are made regularly, evenly across the rows at intervals to achieve the desired outer diameter. The opening created by the folded fabric becomes the armhole, which may have to be partially stitched closed upon completion of the piece depending on size requirements.
Diagram B: red line represents fold
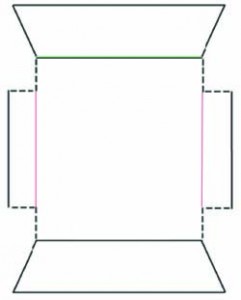
On the home knitting machines evenly spaced increases and decreases are possible but not practical, requiring removal of the kniting whether on garter bar or ravel cord, with rehanging of all the stitches after adjusting the number of needles in use. Patterning can continue if this is done on plain knit rows, and design shifts are taken into consideration. Though circular knits can be achieved using a ribber, there are distinct differences in tension between the two beds in Japanese machines, not so in Passap knitting. Here again, increasing/decreasing evenly across rows impractical if not impossible. Increases along the outer edges of the knit are easy, but the result is a series of triangles meeting and pointing down from the garment on that edge, a common sight in the marketplace at the moment, but not so good if a circle is the desired shape. One approach on the machine can be seen in the diagram below. The central shape is shared with the above diagram, but the circle is broken up so the garment becomes a flat construct. “Extra” smaller rectangles on the side represent a possible longer cap sleeve. Here the whole piece would be folded in half and seamed. If the center shape has straight sides adjustments can be made in seaming for the desired armhole measurement. The remaining problem: how to get that outer “diameter” created by the bottom and top of the piece to approach the width needed without increases and decreases across rows. With this approach the seams that bring the top and bottom sections together will move toward the front of the garment, so the joining method and its visibility is a consideration.
Diagram C


