Recently, in the Machine Knitting Facebook Group, a post by Jeannette/eKnitter describing her method with an associated YouTube video on Transforming a Brother Stitch World Lace Pattern sent me down a new-to-me, what-happens-if-rabbit hole.
Results for any lace designs vary considerably based on the yarn used and the number of rows of plain knit planned between design segments.
My opinion on the altered lace patterning is in the closing comments.
The appearance of the yarn crossing the open spaces created by eyelets can vary from single strands to twisted double ones.
The blog post Revisiting the use of lace patterns, Studio vs Brother machines includes a range of samples, including this very early analysis of the differences, 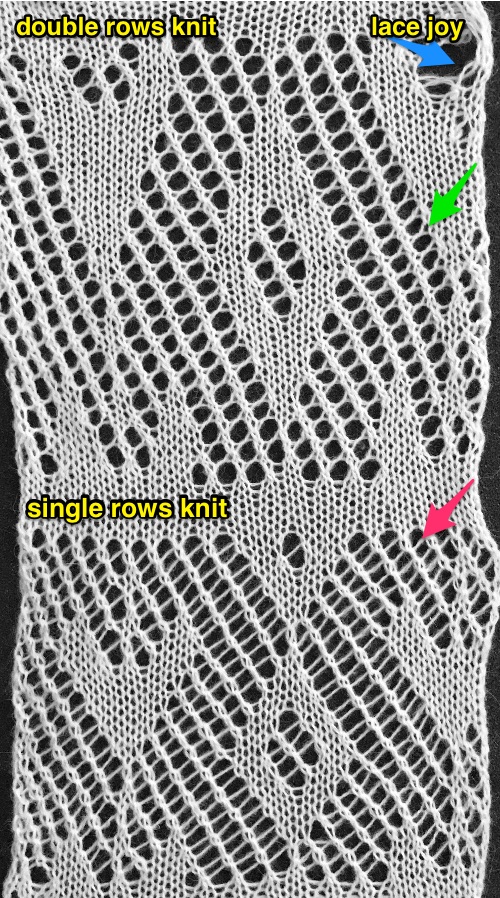 and associated links.
The method of using any carriage engaged with the belt to select from opposite sides will not work in punchcard models, as the carriage switches sides, the same needle selection repeats.
The process for achieving the new repeats can likely be AI-assisted vibe-coded for ease and speed in altering the original repeats containing an even total number of multiple pairs of 2 blank rows, alternating between transfer segments, adding 1 row to one pair for a new total of 3 rows, while removing 1 row from the next pair, reducing it to 1 row. The convention for commands is to start in reverse order from the top, with the conventional two blank ending rows converted to one, and progressing, changing sequences moving toward the bottom of the design.
My tables, visualizing the steps required, are worked out in a spreadsheet using Mac Numbers, adding and deleting single rows alternately in the body of the table where needed.
The total number of rows programmed remains the same.
My first effort began with the same SW 121 repeat in the video.
Working out the changes that need to happen in the design itself in a spreadsheet, things to notice:
The repeat is 44 rows in height, an odd multiple of 4
The LC in the original, 12X44 design,  moves for 4 passes from and back to the left, followed by 2 rows knit using the KC from the right throughout, an easy-to-track sequence.
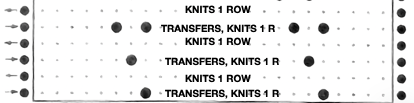
In this method to alter the original, passes of the LC still happen in 4 row sequences, but they are followed by single knit rows rather than pairs with the knit carriage, and the LC is moved to the opposite side for the alternate groups of 4 passes.
When no cam buttons or KCI or II are used, the knit carriage does not engage the belt, and the pattern is not advanced with its passes.
The technique shortens the height by half the number of knit rows, compressing the finished pieces in the number of passes to the finished height ratio.
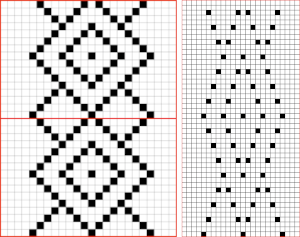
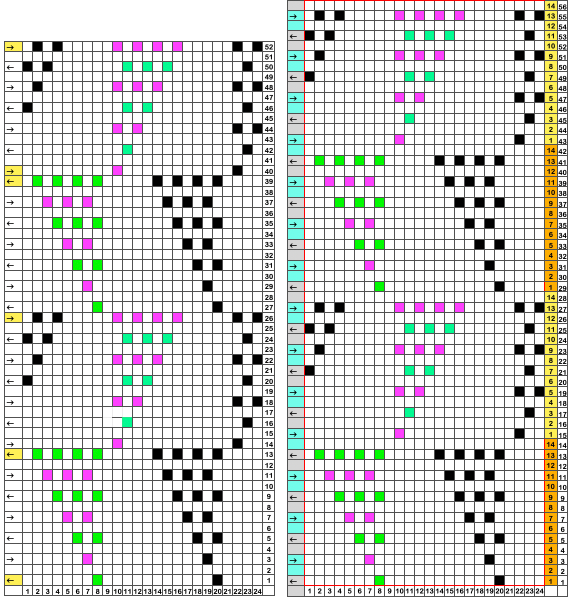
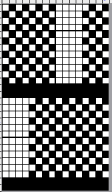
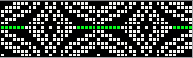
In the top half of the 44X2/88 row repeat, there is a shift in the LC starting side that results in a change in the knit structure, seen in the chart with only the altered rows shown on the far right.
The first pair of blank rows between lace repeat segments is changed to 3 rows, with the next pair reduced to one row, repeating the process.
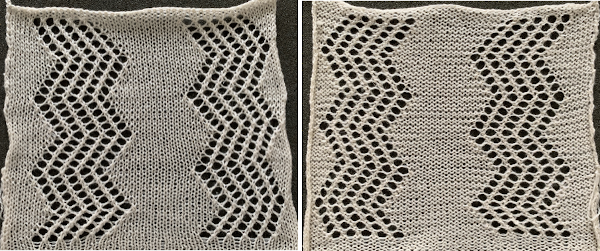
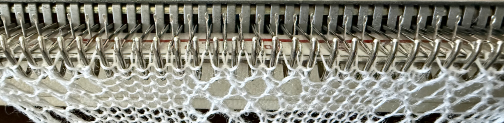
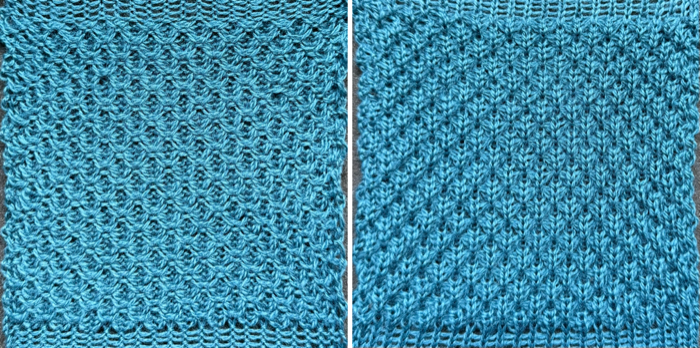
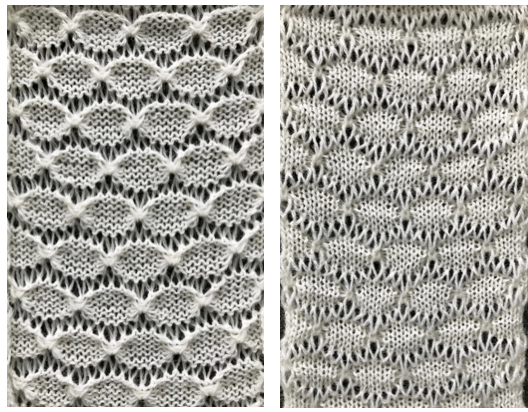
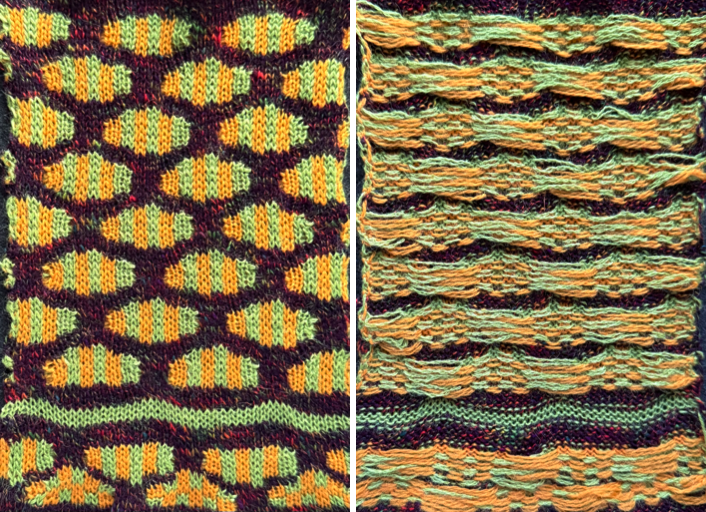
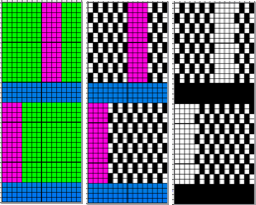
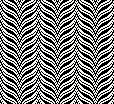
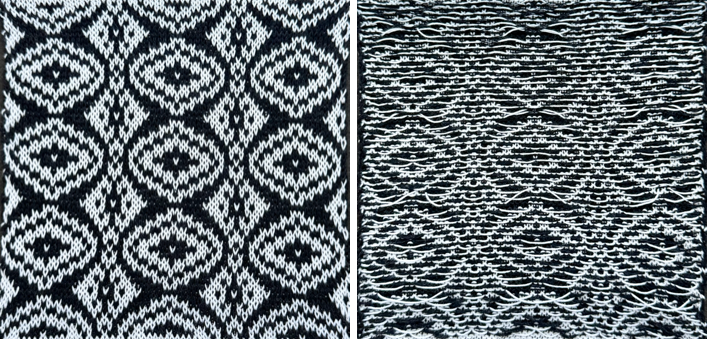
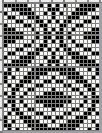
The height of the original repeat does not change.  The samples were knit using 2/18 wool. Not paying full attention to the task at hand resulted in the extra knit vertical columns in the test of the original on the left, along with the joy of dropped stitches that can occur in lace knitting.
The amended design, 12X44 pixels, was used on the right and knit for 132 rows, checking the vertical alignment.  A new repeat, SW 128, 18X64,
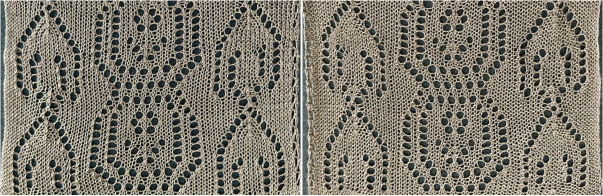
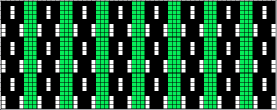
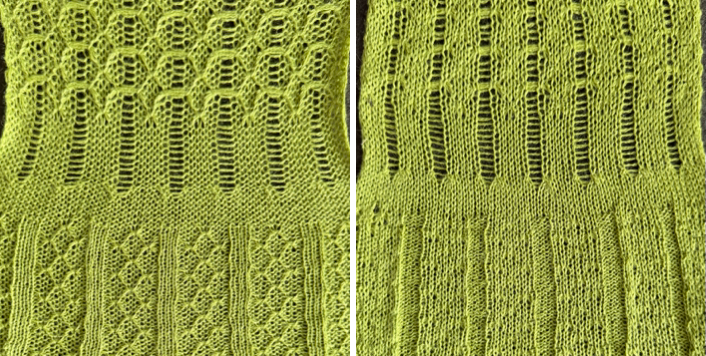
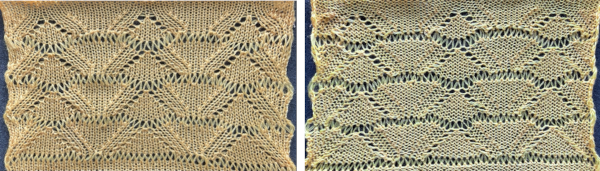
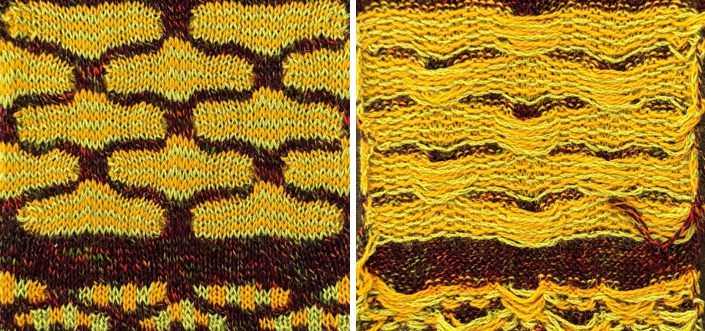
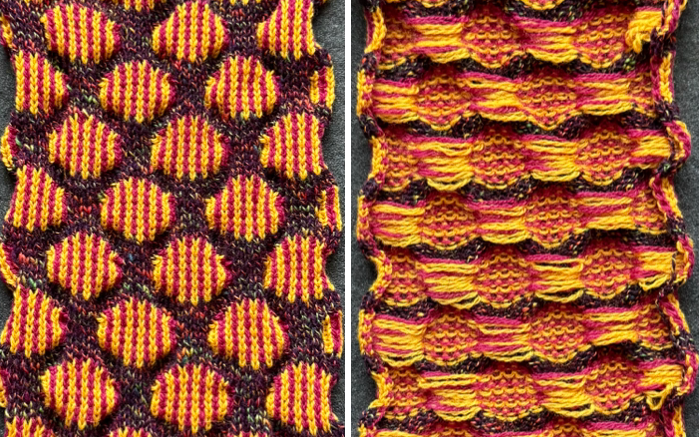
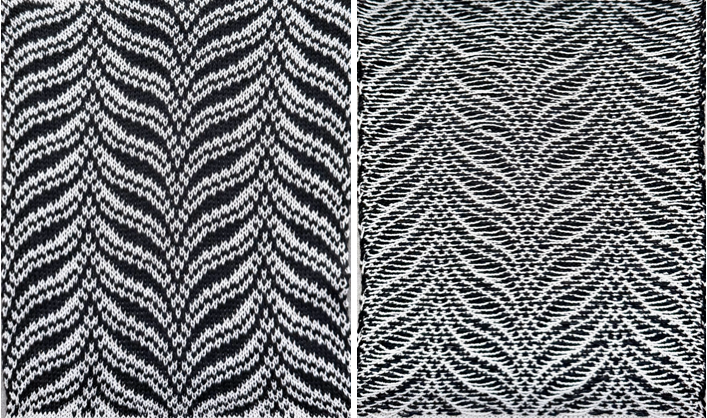
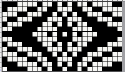
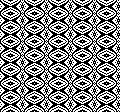
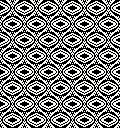
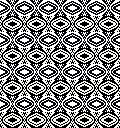
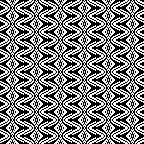
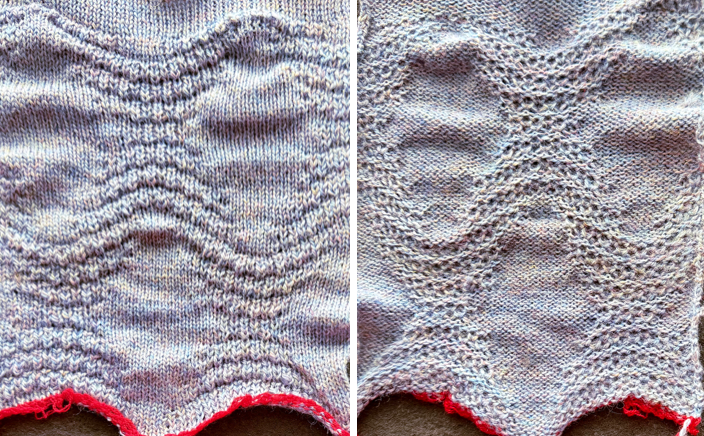
  again is intended for operating with the LC from the left, with two knit rows using the KC from the right, following each repeat segment. The sample from the pub is shown on the left, and a cheated copy and paste X2 in height of the new knit repeat is on the right.
The 64 row height is an even multiple of 4, resulting in a more symmetrical arrangement of eyelets and threads traveling between them. 
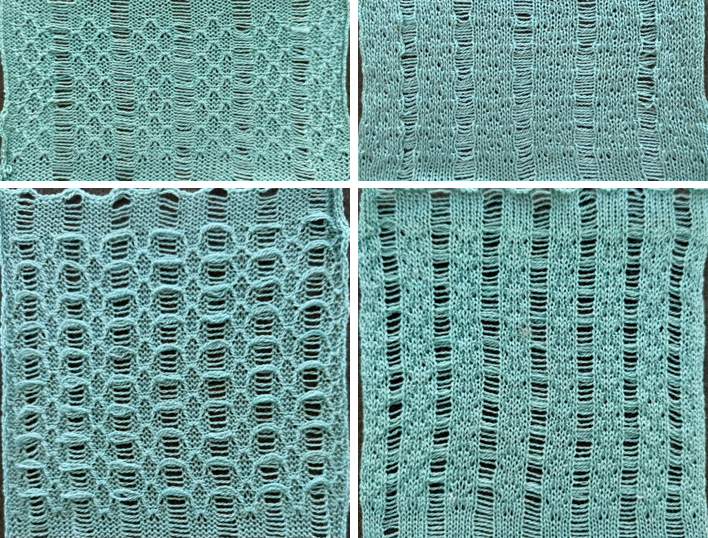
 The design is tested on 36 stitches, twice in height.
On one side, the transfers were made close to the edge, while on the other, a several-knit-stitch border was taken for a test run. Side edges are another consideration when planning finished pieces or seams.  A planned try at another SW design, my last on this topic.
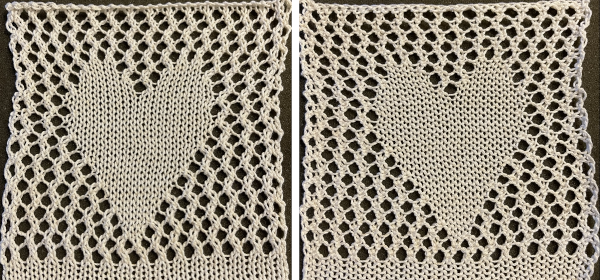
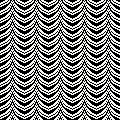
  It is 13 stitches wide and 44 rows in height, as published, another odd multiple (11) of 4 again,
  the spreadsheet manipulation,
  the new file, also 13X44,
  knit-tested on 39 stitches.
 The side-by-side comparison.
  There is a degree of unpredictability in the final result in DIY pattern drafts; one must trust the process, and progress in the actual knit length is slow.
All these samples in this post used original design repeats with recommended 4 LC passes followed by 2 rows knit throughout.
In theory, the technique should apply to other Brother transfer lace with variable numbers of LC passes between knit rows.
Brother published electronic patterns do not require mirroring, while if starting off with a punch card design, mirroring may be required, depending on the machine model and download software.
Users of knit from screen programs have the added advantage of clues as to when to change carriage sides.
Without the benefit of such clues, remove the carriage from the machine as soon as the 4 rows are completed to avoid making another set of transfers from the same side.
Check needles with 3 stitches on them after transfers, making certain that they have knit off properly after the single knit row, and periodically also check that no loops or stitches are hung up on gate pegs.
If a second row is knit after the LC passes, it can easily be unraveled.
It is possible to add beeps in some models, or to generate DIY reminders on switching carriage sides, i.e., for an 88-row repeat or more. Before committing to using the technique in finished pieces, knit a large swatch to test whether the necessary steps are maintainable without error, block it, treating it the way you would the finished project, and let it rest hanging.
With so much open space in some of the other repeats being offered in FB, if a predictable gauge is necessary, it may be a hard thing to maintain even after blocking.
Tiny stitches require a larger number of needles in work; experimenting with thicker yarns and tensions that tolerate the transfers is worth it when planning beyond test swatches.
I completed a lace scarf in a very thin cotton at one point, which I discarded simply because it was too limp when finished.
For me, the results from this process raise the question as to whether one should simply because one can.
The lace designs may be new and different, but as to whether they are better and worth the effort? The ultimate choice and preference to pursue this type of lace work or not, as in the use of any other techniques, remains a personal one.
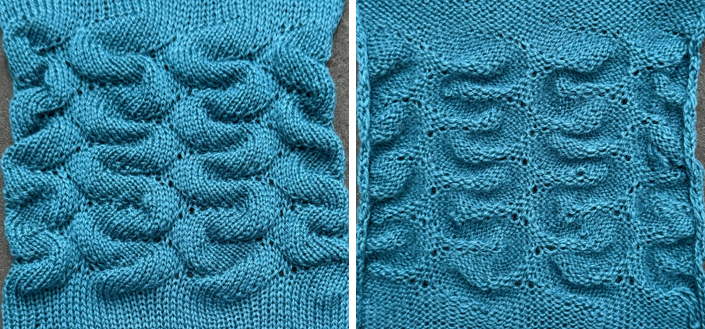
After seeing Emanuela Mammarella‘s FB comment on the thread discussing the electronic patterns and her Instagram feed mentioning achieving a similar concept with a single row knit between transfer lace segments in Brother punchcard machines, I gave it a try.
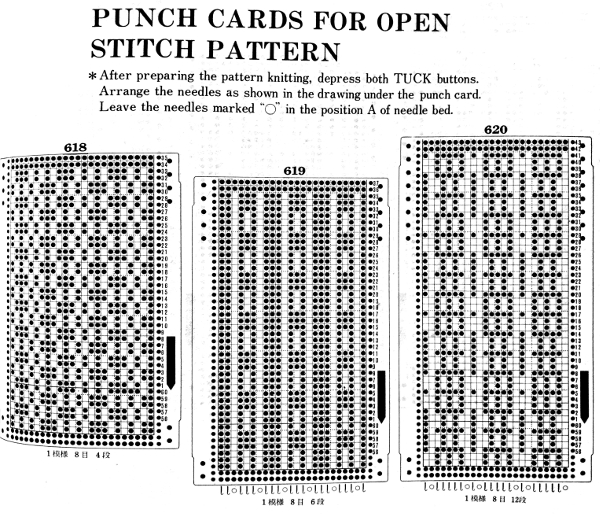
The card used for my swatch was randomly chosen, 19S. It met the requirement of the recommended 4 passes of the lace carriage, followed by two rows knit throughout, and came in the basic pack of cards included with my punch card machine purchase.
I prefer to use yarn color and thickness that allow me to identify stitch structures easily.
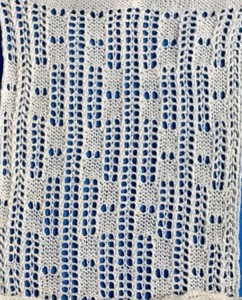
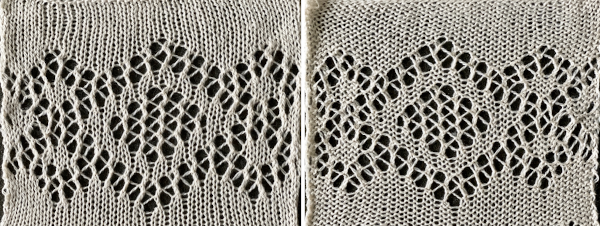
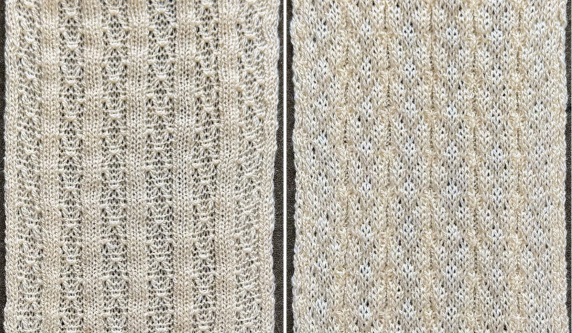
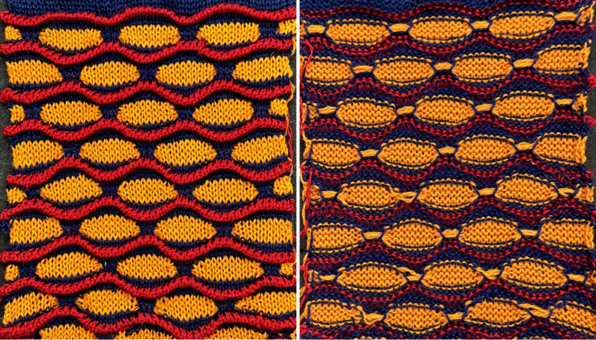
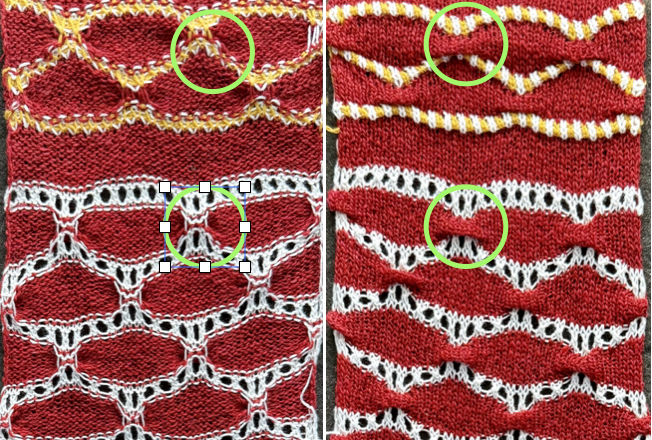
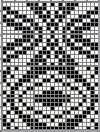
This sample is knit using a 2/18 wool, with modified LC selections at the bottom of the images, and traditional ones at the top. The effort is worth a try, and helps inform the decision as to whether the results are to one’s liking, and again, if one should simply because one can.
The bottom of the swatch is knit in the new technique, the top in the traditional published method.
I found it easier to disregard row numbers and counts.
After the second series of transfer was completed in each group, with the lace carriage on the side opposite the carriage again, sometimes after a required additional pass, I removed the LC, knit a single row with the knit carriage to the side opposite its last place, returned the LC to the bed from the side opposite it, and began moving toward the knit carriage making transfers as needles were selected once more.
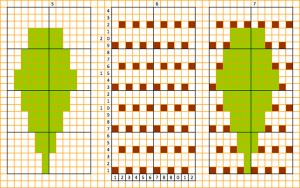
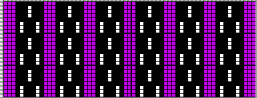
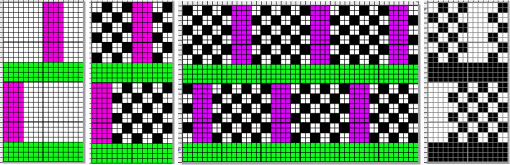
There were many rows with carriage passes, and no needle preselection, added to the sum since each move and start from the opposite side does not advance the card, but rather, repeats the last preselection.  And then, trying to get a PNG for the same repeat, you notice one of the 3 vertical repeats in each half is an odd duck. Just when I thought I was finished with all this!
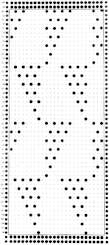
Comparing the factory-supplied punch card to the amended “correct” design repeat,  for a very different, more symmetrical result.
The PNG for the amended repeat, 24X48, can only be used in the traditional method, not to achieve the modified version. 
 This yarn is also a 2/18 wool; the blue yarn used in the other swatches has reached its end.
  Studio machines and their published simple lace patterns are by far the easiest way to achieve eyelets with single rows knit between them, unless otherwise indicated by extra blank rows in the cards.
My closing advice? If the effect is really liked, and there is interest in collections of production items without the involvement of additional carriages, borrow a Studio km and cards from a friend. 😉
That said, there are other hacks for achieving the look of lace with single rows knit after transfers, rather than pairs of rows.
On electronic machine models, one method is to use select tuck or thread lace designs, such as this 24X40 design,  doubled in height to 24X80, so each needle preselection repeats twice,
  and tested on 48 stitches.
  The programmed design starts with LC on the left, the first pass to the right, toward the knit carriage, selects needles, while the second pass makes the transfers to the left.
Remove the LC; it will make the next pair of passes from the right.
Knit a row to the left, KC stays on the left.
LC makes the first pass from the right, preselects needles on its first pass to the left, and transfers stitches on them to the right as it travels back to the right.
Remove the LC.
Knit a single row to the right, the KC stays there.
Return LC to the left, and repeat the process.  The same design knit as thread lace.
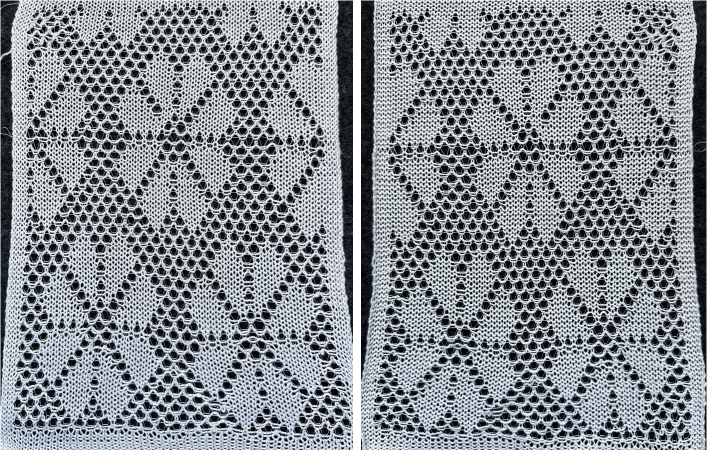
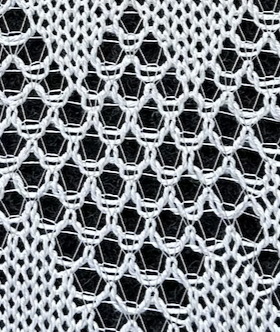 A similar inspiration knit in 2011 as a mock filet mesh with traditional LC operation from the left side, the image was rotated sideways whwn shared.
 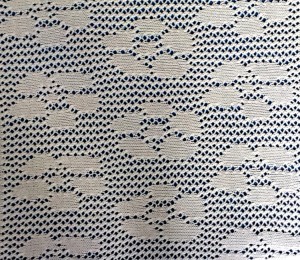 The partial card repeat shared at the time,
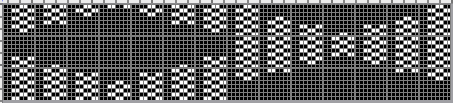
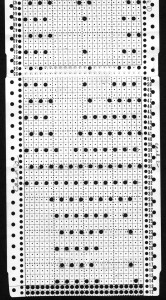 and the full 162-row punchcard, located more than a decade later, was rotated to view factory row numbers on the right.
  Taking it to a PNG, and modifying the result: the full repeat, 24X162.
The LC makes 2 passes for transfers to the left, 4 passes for transfers to the right.
Punch cards may be rolled forward manually in the reader to any chosen spot, locked into place, and released after the first pre-selection row to modify the start of the design.
 A 24X84 segment was in turn isolated,
  drawn in brick repeat, 24X168,
 visualizing both files drawn in repeat, easy to achieve with present software.
 The swatch, tested on 60 stitches, helps to determine whether other DIY arrangements, i.e., widening the repeat or altering the edges of the shapes for use only on electronic machines, should be made.
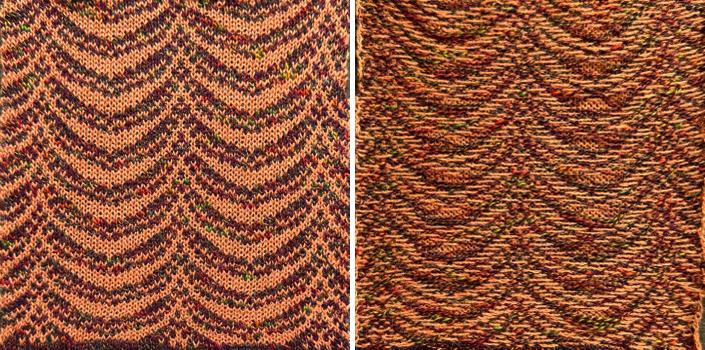
For some reason, the yarn used, which had posed no problem in recent swatches, was particularly cranky in transfers today. The swatch has several dropped stitches.  The original repeat, used in one of my limited edition shawls, with a coordinated border.
  Using a Studio card to achieve a similar knit on the bulky, #18 was randomly chosen from my stash.
  Lock the card on row 3. The Studio card reads the first design row 5 rows below the #1 marking on the right, Brother 7 rows below.
Cancel end needle selection on the knit carriage, which is set to select pattern needles, but for plain knitting, with no cam buttons pushed in.
COL knit one row to the right.
Release the punchcard.
COR Transfer all preselected needles away from the knit carriage, to the left.
Knit one row.
COL Transfer all preselected needles to the right, away from the knit carriage.
Knit one row, returning COR.
COR Make transfers to the left, and continue alternating transfers consistently away from the knit carriage after single knit rows to the opposite side.
This test swatch, containing a couple of operator errors, was knit on 28 stitches, using a random 4-ply wool on tension 5, and measures 8.25 inches in width, at a gauge of about 3.4 stitches per inch. 

 and with the addition of ladders and increasing numbers of segments to form shapes other than larger triangles,
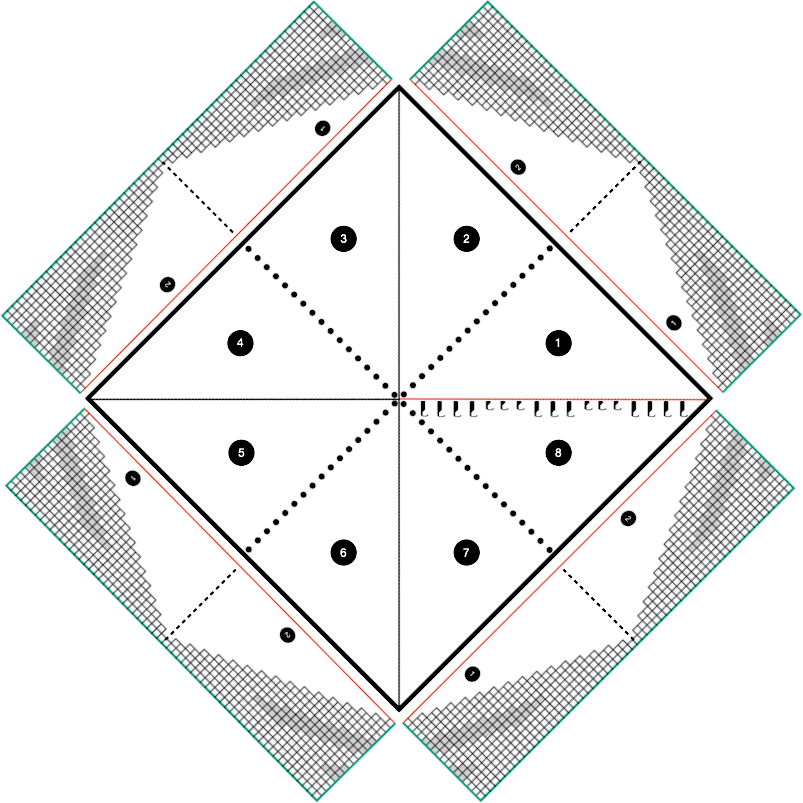 which requires some practice and patience.
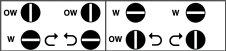
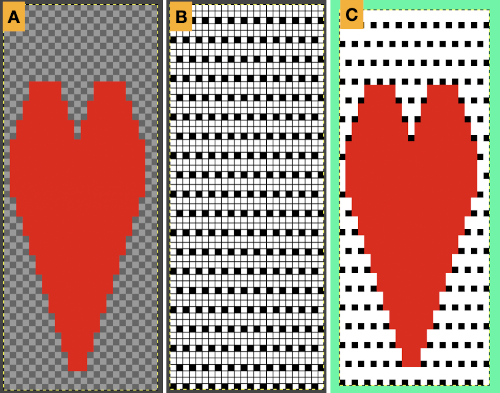
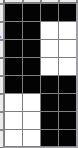
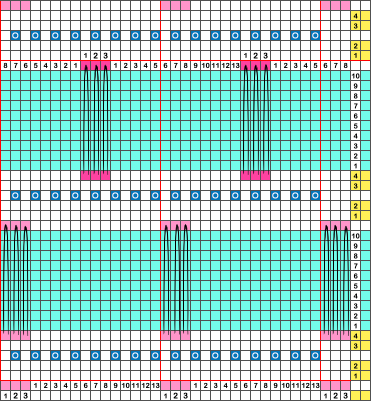
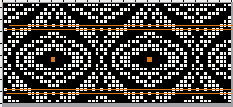
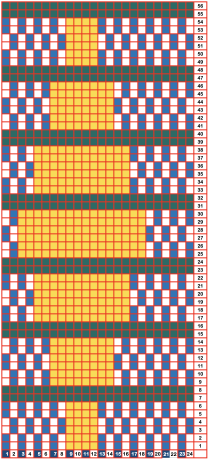
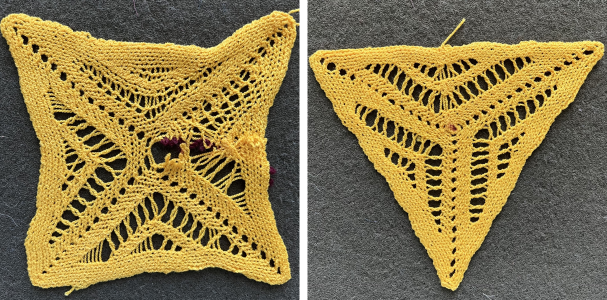 The printed 64-row repeat chart can prove useful in tracking the required hand techniques. It is intended to be followed with the first row executed from left to right, and then with holding pairs of rows from right to left. The chart can be mirrored horizontally and followed for operating from the opposite side. Grey cells represent needles out of work forming ladders and eyelets.
 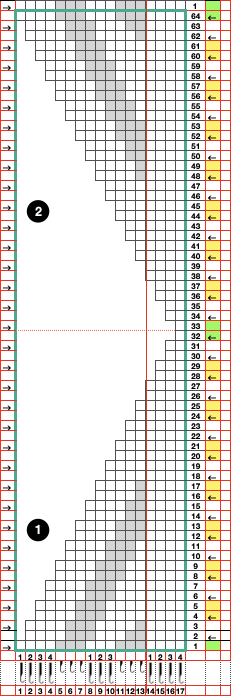 Eight segments form a square with sides that, depending on yarn choice, may bow toward its center and move away from straight lines.
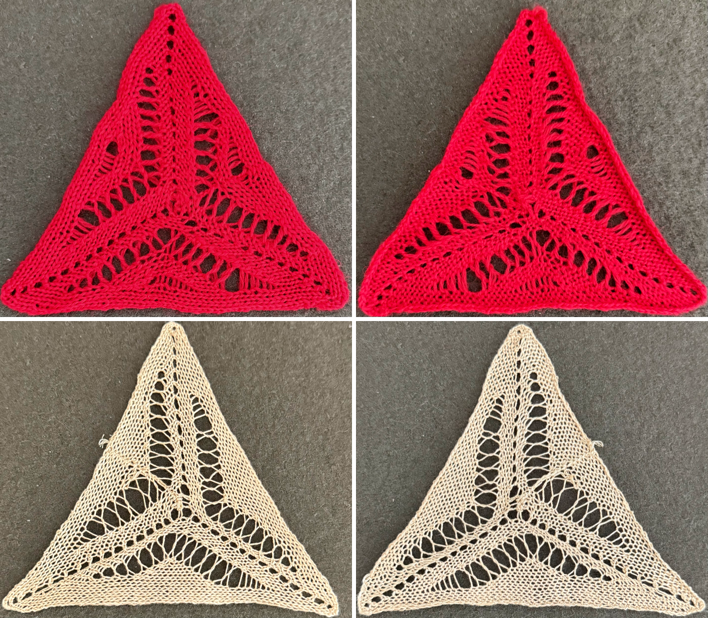 and an attempt at going square.
  In a last try at forming a square, the new, taller repeat has more constant stitch counts, making transfers and held stitches easier to ID.
 This swatch was the first ever that I blocked to coax a more permanent, final square shape, using ribber comb wires. The base is an old, bulky felted swatch, my go-to when steaming/ pressing swatches.
  The result after resting, perhaps needing a few more small tweaks.


 The difference in yarn thickness can make the match harder to recognize; here, the result is compared to the working repeat for the original.


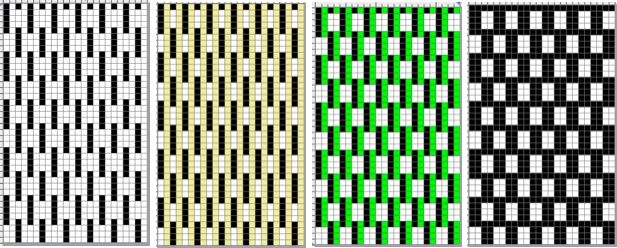
 Any of the following arrangements can be planned for asymmetrical or random arrangements of all components as well, once the stitch structure is understood.
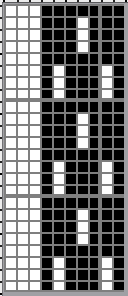
 This is a modified needle count and arrangement with tuck columns 7 stitches wide to accommodate ladders represented by cyan cells in the chart; extra black cells were added for knit stitch side edges.
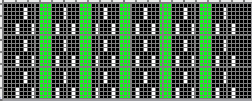


