I wrote this post (unaltered) in March 2018, returned to the topic of automated lace edgings on Brother machines in July 2020. As often happens after some distance, details may be freshly observed or seen in a different light, and approaches then in turn vary or change.
Some of these edgings have been reworked, and new ones added in subsequent shares.
My blog posts include my notes as I work through concepts, not every chart represents a successful repeat.
As of this year (2020) I no longer own a 910 or an Ayab interface, so I am unable to provide further tested revisions or advice on their use.
The edgings outside this post were knit using img2track, but the same repeats should work in the 910 with Ayab with adjustments for starting row and mirroring.
At some point in time I began to include pngs as well as charts for my designs, they will be added for these trims as I review content.
A reminder: although I make an effort to include punchcard knitters in my writings, the 24 stitch repeats shared and used for my swatches testing this technique and knit on an electronic, are not suitable for use on punchcard machines. They would need to be adjusted along their full height.
When 2 carriages engage the belt selecting needles as the carriage from the opposite side first comes into use, the punchcard does not advance, selecting the same design row once more.
Many early published trim repeats were intended for use with hand transfers combined with plain knit rows. Such designs may be translated for use on electronic models using this technique.
The initial goal here is to produce a knit fabric using lace transfers in a familiar way, but the knit carriage will now be set to slip in both directions, also selecting needles with each pass.
In routine transfer lace knitting, the KC is set for plain knit, does not preselect needles, or advance the mylar, punchcard, or rows in electronic patterning.
This image, where all blue squares represent knit stitches and white squares unworked ones, is the start of planning it to produce a piece of knitting on the machine.
The initial hand technique approach might be to use a single prong tool to move the edge of the blue in one stitch to the right for a decrease and out one needle to the left for an increase.
When the decrease is made on the bottom curve, the needle from which the stitch was taken must be pushed back out of work.
When an increase is made, an empty needle is moved to work on left, and the last stitch on that side is transferred onto it. As knitting continues, that now empty needle location will create an eyelet.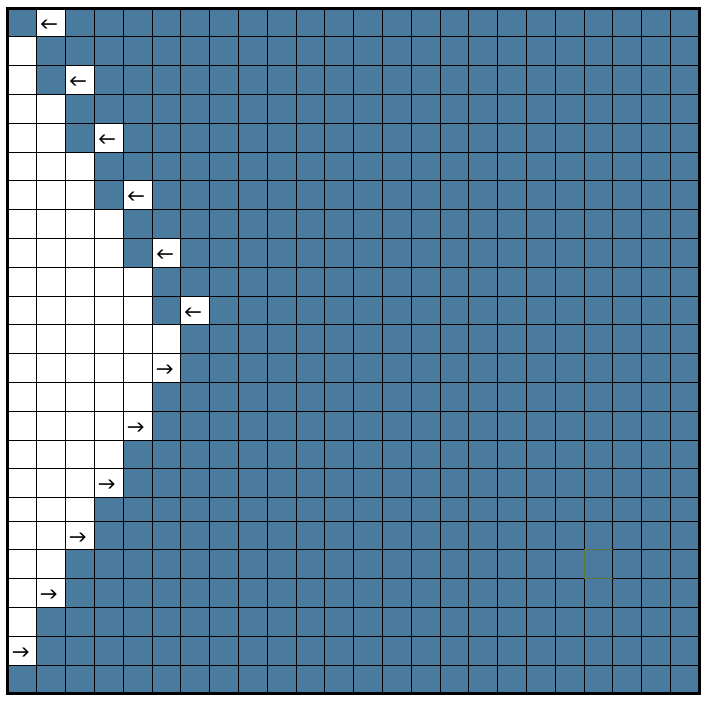 The stitches on the needles at the decreased edge will hold two stitches after the transfers, the ones at the increased edge will hold single stitches after the transfers, producing a different quality.
I decided to “wing it” for the first swatches. This illustrates the same knit shape. Blue rows represent all knit rows and stitches, the empty pairs of rows leave areas to insert lace eyelets in a pattern.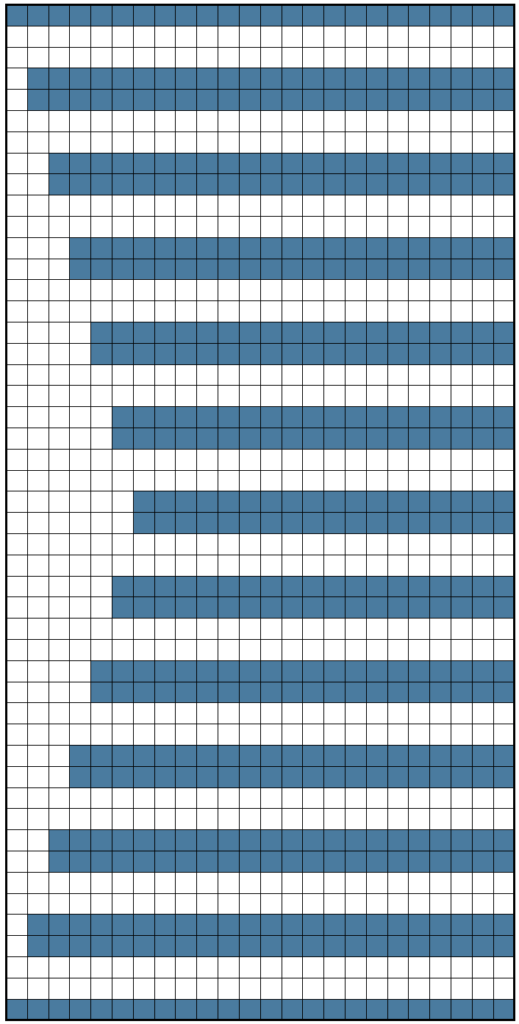 Arrows indicate the movement of the lace carriage on left, knit carriage on right. Red squares now represent transfers to right, green ones transfer to left
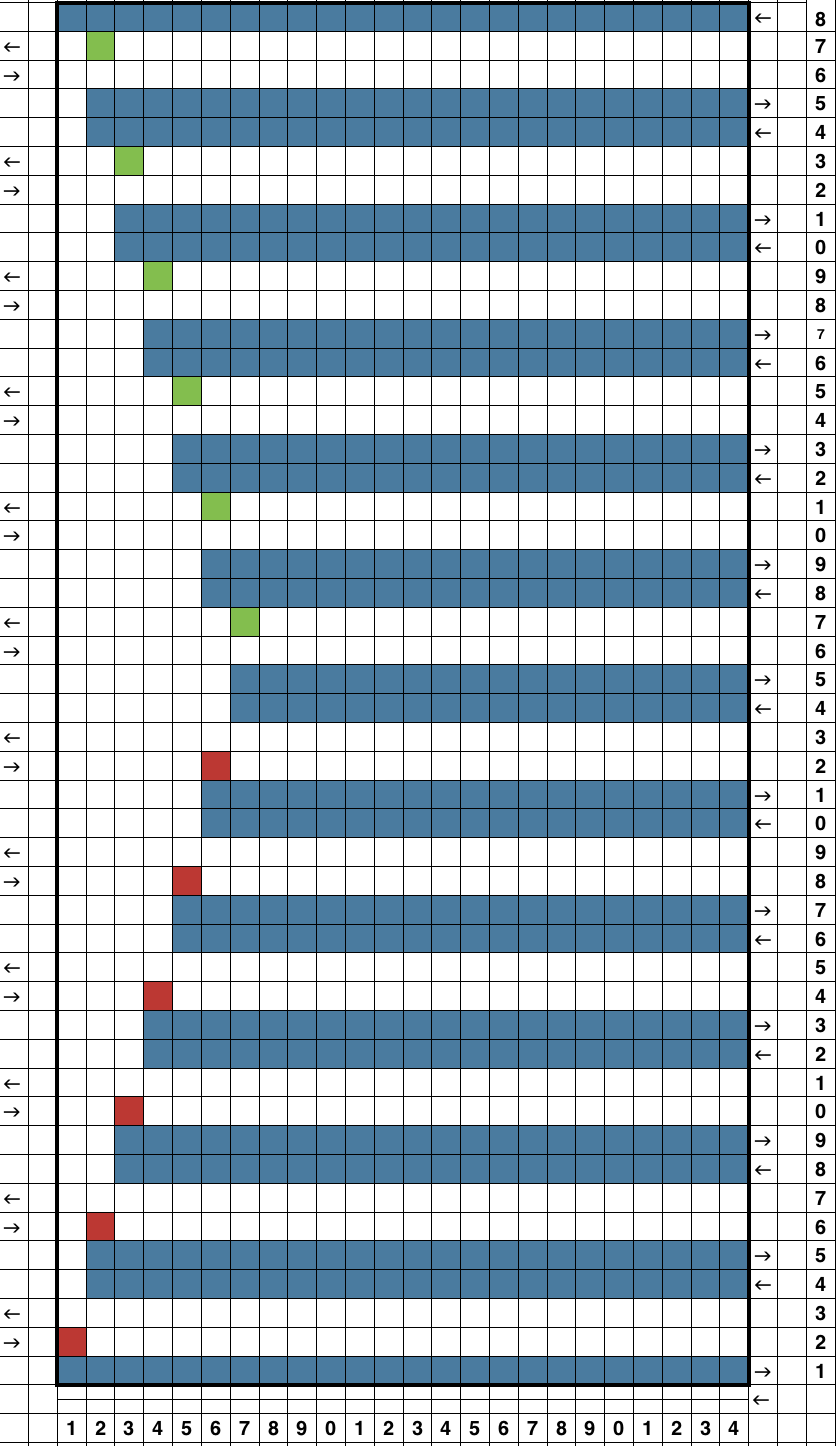 A second transfer to the right is included in the pattern close to the left edge of the trim to create eyelets next to the decreases, matching those eyelets created by stitches moving out in the increase segment of the chart
![]() A theoretical series of right and left transfers is then inserted, creating a shape in the center of the trim’s width
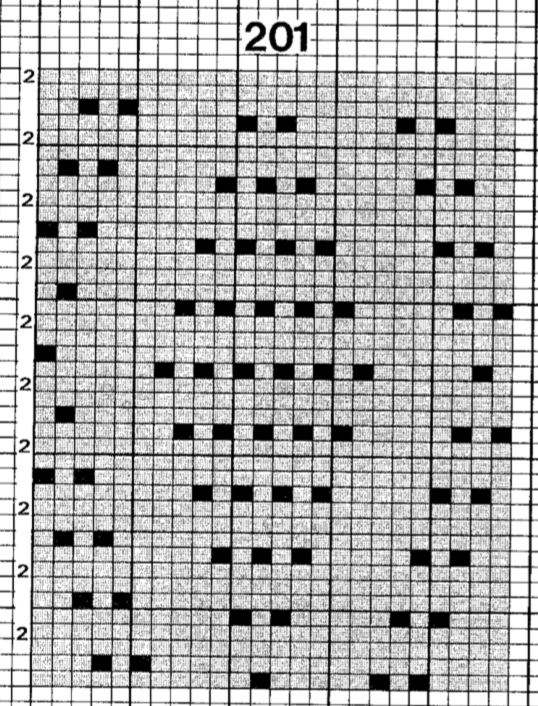
A theoretical series of right and left transfers is then inserted, creating a shape in the center of the trim’s width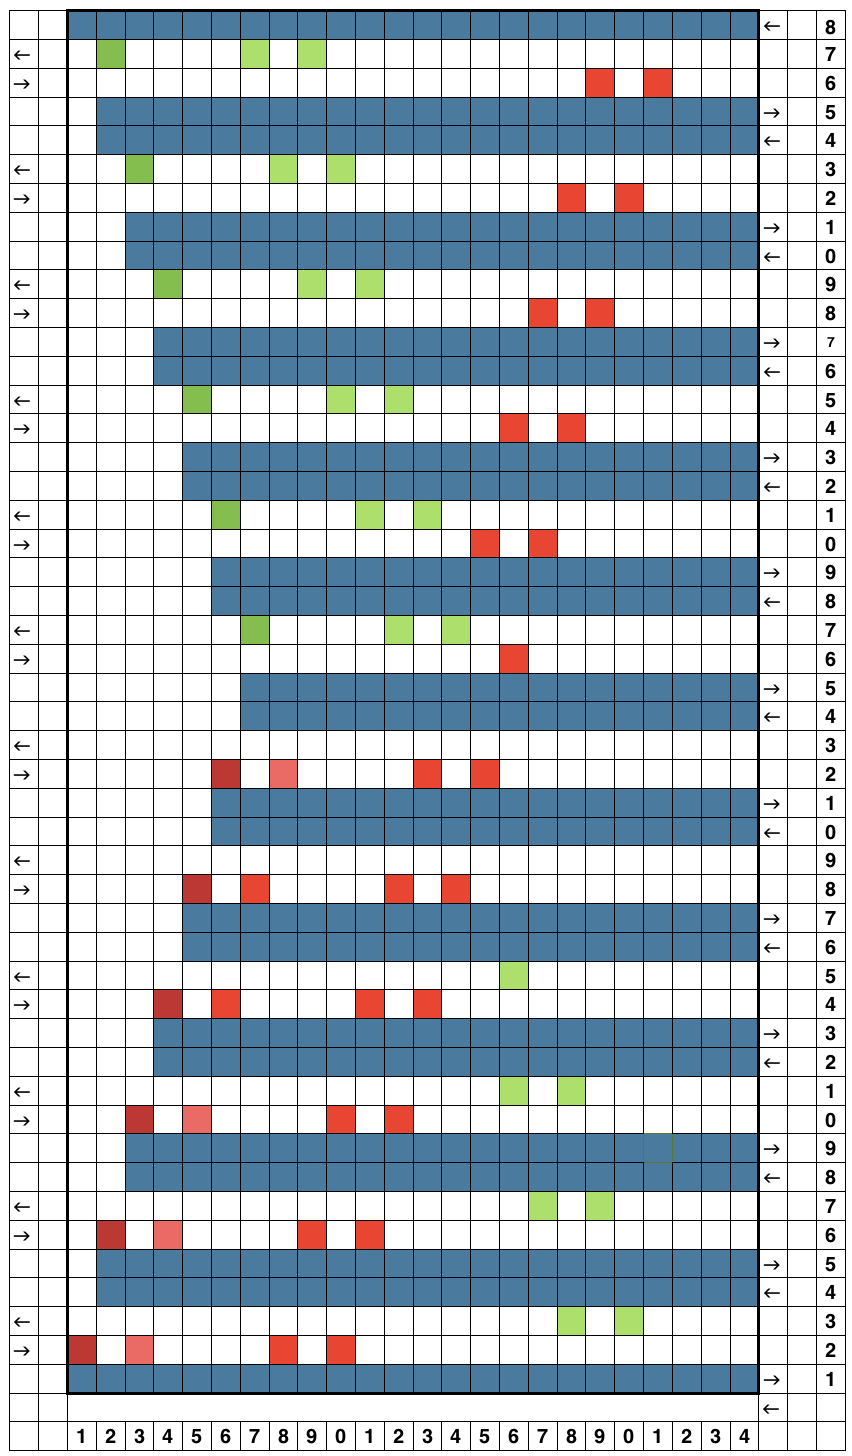 Now reducing it all to black and white squares or pixels for first preselection from right-hand side using an electronic. This repeat is not suitable for use in a punchcard machine even though it is 24 stitches wide. Electronics advance a design row with each pass of the carriage when cam buttons are pushed in and with both carriages set to needle select. Punchcard machines in those circumstances do not advance when the alternate carriage is brought into work from the opposite side.
This charted repeat and any designs beginning with a single row of black pixels are usable as shown on an unaltered910 using a mylar, or download programs that allow for the first preselection row from right to left.
The LC operates in the traditional manner from the left, KC from the right but in the decreasing shape, the transfers begin to the right instead of the traditional left. This requires a shifting of pixel placement since the traditional start in published Brother designs is usually with transfers to the left. Planning the repeat in that manner reduces the number of blank rows.  For use with Ayab software two other things need consideration.
Ayab mirrors lace repeats, so either mirror the repeat of the original design or choose action mirror in the software prior to knitting.
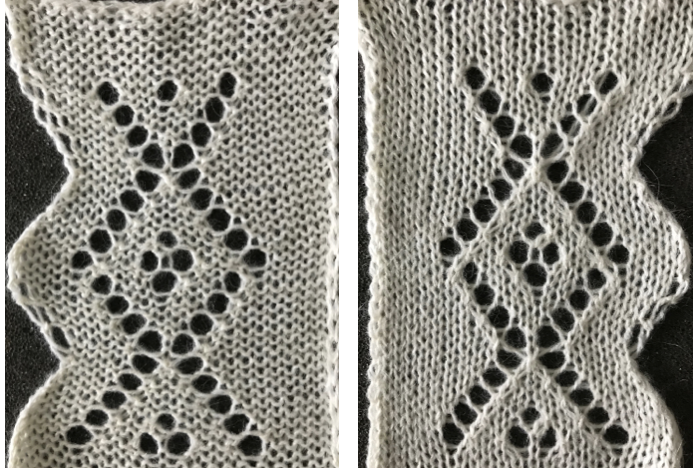
This is a screengrab of the repeat used for the initial test swatch.
The designs shared are not always resolved, problem areas are pointed out in proof of concept fails.
The section where the diamonds cross in at the center of the design was altered in the later repeat.  Since the knit carriage in the present Ayab version needs to preselect with the first pass from left to right, and to knit two rows with two more KC passes to return it in position on the right, the top row of the proposed design was moved down to row 1 position, resulting in two rows of all black pixels.
That can be achieved manipulating the starting row count or simply planning for mirroring and black pixel row starts in the DIY png.
Brother preselection can be confusing to new users. Carriages can knit one preselection while concurrently preselecting the next row.
Design rows as numbered in any chart may differ from those on a KM row counter or prompts from software.
To review: the KC here preselects left to right, knits black squares to left, preselects the same needle selection again to knit those same stitches traveling back to its home on the right, creating the two knit rows that in “normal lace” would be worked with the KC simply set to knit.
As the KC now knits the second row, it preselects needles for the first row of transfers, rests on the right
LC transfers to the right as it travels to the left preselects the next row of transfers. As it moves back to left it transfers to left, preselects for first of 2 all knit rows, rests on left
The sequence is repeated until the piece reaches the required length.
In these first repeats where the designs begin with two all knit rows, end needle selection is off on both carriages.
As LC travels to left, because of no end needle selection, the first needle on the right is not selected. An option is to manually pull that needle out to insure it knits. I preferred the chain created by those single stitches knitting only every other row, but was not happy with the elongated stitches on alternate rows edge stitches on the increase side. These would be the carriage actions 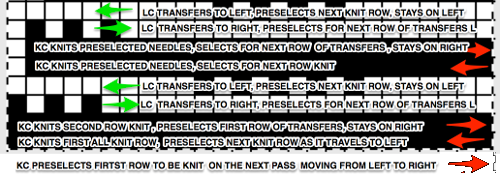 I had a serious yarn tangle on the right about halfway up the swatch, with some of the evidence visible near thecenter of the swatch photo
  changing that crossing of the diamond outlines, still “winging it”
 My fiber is now crisp cotton, unmarked weight, tension 8, and it is much easier to observe areas that may still be a problem for me as the designer.
Ideally, I would prefer the lines created by the transfers marked in cyan to match the quality of those immediately below or to the ascending part of the diamond on their opposite side, which would require changes in the transfer sequences and space between knit rows.
The LC non-selected stitches on the straight creating every other row slipped stitch is still something I like.
The difference on the edge stitches in the ascending angle is happening because with each transfer out, there is a single thickness of yarn on the new edge stitch, and moving the stitch over a needles space elongates it.
Longer loops are also created when single increases are made by bringing needles into work on the carriage side prior to knitting a row across all needles. In the trim’s decrease edges, the transfers in each new edge stitch have double the yarn thickness contributing to a different appearance, highlighted with magenta arrows. There are 2 rows that have no edge transfers programmed intentionally in the center before reversing direction, so that area has no resulting edge eyelet. 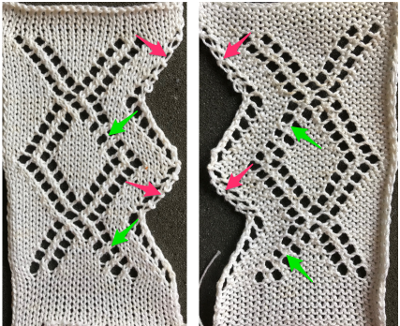 The last shot at adjusting the repeat, with improvement in those cyan, marked areas. Plain knit rows may be added between each repeat, the edge of the knit will be different than in the remaining trim on each side
 Going back to the wheel that has already been invented, how can pre-drawn published MK lace repeats be used instead of “winging it” endlessly or not having the confidence to perform the necessary assigning symbols and proceeding with the required separation? Still trying to work with a pattern that knits for 2 rows, transfers for 2, a chart from Stitch World:
 marking the 2 all knit rows that will be plain knit by programming black squares
  The pattern is actually for an all over lace. All the transfers in the central diamond actually are happening in the same direction. If the repeat was programmed in the usual manner, beginning with LC on the left, those transfers on the first design row and in the whole of the center diamond shape would all be to the left. I can live with them all being to the right, and would be interested in more eyelets at the edge of the trim. Here is a new repeat, with the increased eyelets at the curved edge
  There is a disruption for 2 rows in the very center of the diamond, where no increases or decreases occur on the shaped edge prior to reversing the shaping. It was there in the earlier sample marked with arrows as well, but not as noticeable where the edge was created with the addition of single eyelets on increase and decrease rows.
 For pngs for this reworked, more resolved repeat see Lace edgings on Brother machines- automated with slip stitch 2.
 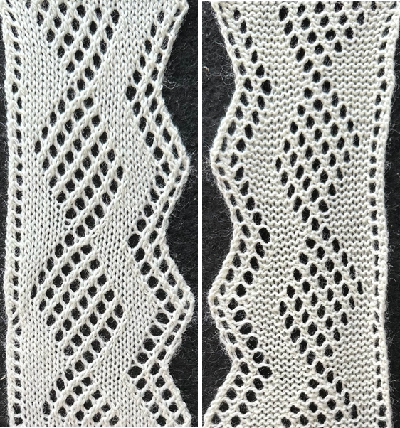 3/7/18: a lace punchcard repeat with transfers in opposite directions
 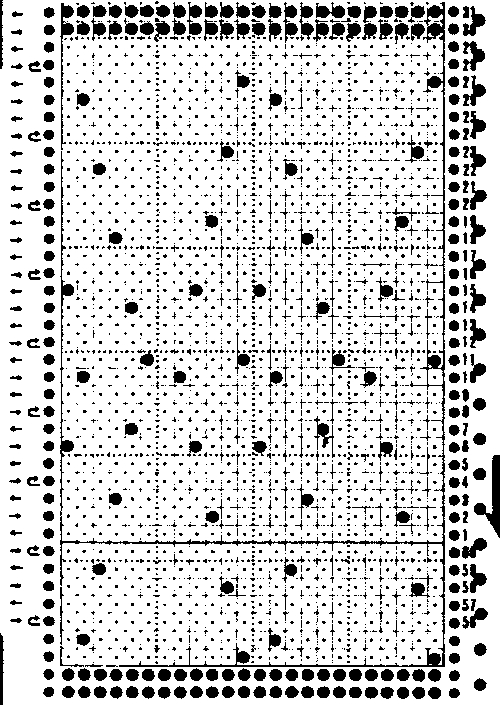 Assigning colors to transfers: red to left, blue to right. In theory the same repeat could be used flipped horizontally for operating the lace carriage from the right. Yellow lines highlight the 2 blank rows in card that will be replaced by black squares/ pixels (remember rules are different for slip and lace in punchcard knitting)
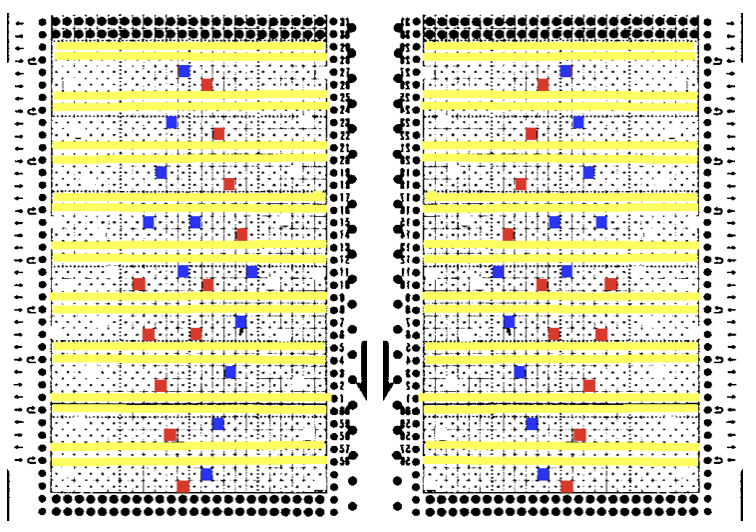 Since the goal is a trim, things are rearranged for knitting to begin on the full 24 stitches
 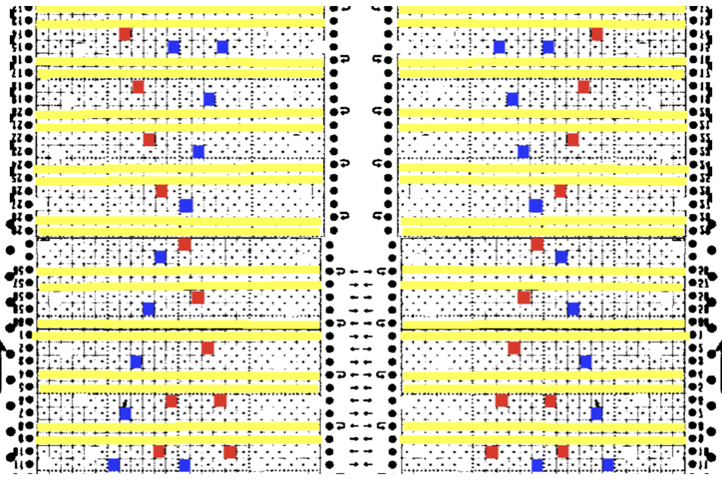 There are 2 ways to get the above repeat to work, one is by adding extra blank rows. I chose to reverse positions for transfers, moving left transfers up one row, and red down one row. With lace carriage operating from the left this is my new repeat, with edge shaping added for trim edge
 KC is set to slip after the first preselection row, first set of transfers is selected on its second pass to the right. The first transfers with the LC are made to the right, the second set to the left. If knitting the repeat using Ayab remember the above is mirrored by the software, so choose action mirror prior to configuring it.
I knit a swatch using the thinner yarn again. The difference in increasing angle can be seen here as well, the pattern is short, so the outer curve of the trim reflects that
 3/10/18: an adaptation of Susanna’s automatically shaped trim for Brother KM, p. 223 of “A Machine Knitter’s Guide to Creating Fabrics”.
This chart shows the first rows of the published punchcard. Please note: using my own lace carriage, when I tested canceling end needle selection, the problem was not solved. Brother setting recommendations made for a similar transfer pattern in an edging published by them, are given and repeat is pictured at the end of my post.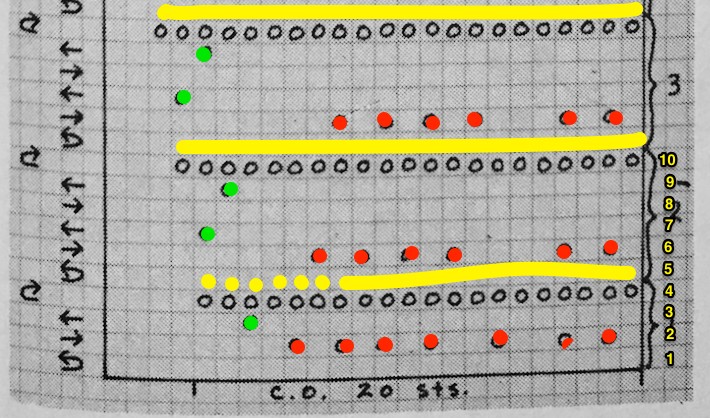 Row 1: LC moves to the right, no needles selected
Row 2: LC moves to left, preselects next row of transfers
Row 3: LC moves to the right, transfers preselected needles to right (red dots), selects needles (if any) for next pass to left
Row 4: LC travels to and transfers to left (green dots), preselects for the first row to be knit by KC In this particular pattern the direction of the arrows match the direction of the transfers with movements of LC operating from left
Row 5: KC from right, set to slip <– –> knits all needles in D position, repeats the same selection as it travels to left (yellow marks)
Row 6: KC travels back to right, in the second shaped knit row, preselects for the next transfers to be made by the LC
Row 7: LC travels to and transfers to right, preselects for next row of transfers
Row 8: LC travels to left, transferring to left if any needles have been preselected on the previous pass, and the process continues
The numbers on the punchcard chart do not reflect actual row numbers in knitting because when row 4, 10, etc is reached, on the next pass (a blank row in the card), the card does not advance and the previous selection is repeated. For each carriage to make an even number of passes to travel to and from its original position, the total length of the repeat must be an even number of rows.
Here is my series of steps in attempting to adjust the 24 stitch repeats for knitting on the electronic.
A for an unaltered 910
B indicating the direction of transfers (red to right, green to left). Arrows mark the problem row, and my solution to it
C on the far right, the repeat converted to black and white pixels, with a single all black pixel row
 Both KC and LC are set not to select first and last needles in the directions. When the decreases start to happen on the left of the chart because the end needle selection for transfer to the right again does not happen in areas marked with magenta arrows, there is an extra stitch that remains on the left that does not get transferred (orange dot) so it is not knit off and simply get held as subsequent rows of knitting take place.
Restoring needle selection in the LC is not a solution for the problem, so the final repeat has been amended by me to get that edge transfer.
The pattern starts on cast on 20, not the full 24 stitches. Ayab knitters: use the LC to begin selection from left.
The first pass will select for a knit row, push those needles back to B, and the LC will select for transfers to right on the next row as it moves to the left. When knitting is to take place there is a clear distinction in the number of selected needles (black squares).
The KC will be set to slip <– –>. Make certain to remember to return the remaining 4 of the 24 total stitches back to B so the full repeat is in work on the needle bed before continuing in the pattern, otherwise there will be needles there to accept stitches moved over for increases to left.
The two extra passes of the LC in this method result in a 2 stitch border on the increasing and decreasing angles of the piece, creating a much nicer edge than that in the samples at the top of the post. The eyelet so close to the right edge stitch which also winds up being slipped every other row made for very messy loose stitches in the thicker cotton that I could not control. The sample did better when I pulled the non selected needles on knit rows out to hold prior to moving across them with KC.
 Adding extra stitches knit on the right side of the original repeat made it possible for me to use my cotton again, giving me a controllable edge on that side without having to pull stitches out to make them knit.
To my eye, I find the extra passes with the LC and extra knit stitches are well worth the effort along with planning extra knit vertical columns in the finished piece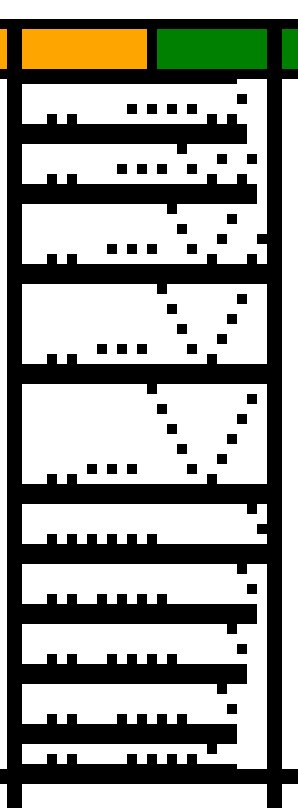
 I prefer to start my repeats on the full width of the repeat, this 24X70 png shifts the first segment to allow for that, still with a single all knit row start, making it suitable for non-Ayab knitting, its png is mirrored as it might be, depending on end use prior to download
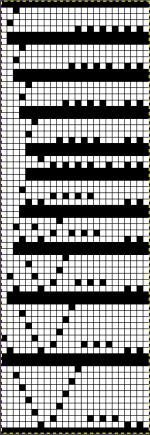
![]() The 26X70 repeat with start at the narrow end
The 26X70 repeat with start at the narrow end 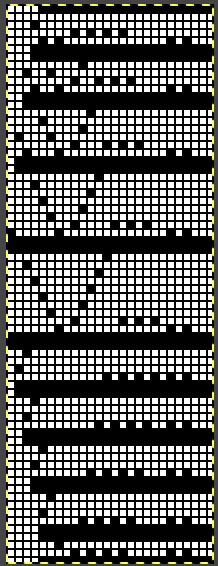 its matching png without mirroring, and beginning on the narrow end of the design.
 ![]() Something to try: I found instructions ascribed to Brother for another version of edging using a pattern that has the same eyelet sequences along the shaped edgings. Their recommendation for a 950i is to remove the non-selection mechanism on the lace carriage, and mention was made of the “rubber wheels on the carriage” being uppermost, allowing the end needles to be selected.
Something to try: I found instructions ascribed to Brother for another version of edging using a pattern that has the same eyelet sequences along the shaped edgings. Their recommendation for a 950i is to remove the non-selection mechanism on the lace carriage, and mention was made of the “rubber wheels on the carriage” being uppermost, allowing the end needles to be selected.
My lace carriage at this writing has fixed, old fashioned brushes, not rubber wheels, and my eliminating end needle selection did not solve the problem with that single stitch in the center of the repeat. And if there is not enough to keep track of, this also combines fine lace and traditional transfer lace, would work fine as just lace.
Many patterns recommending switching between fine fine transfer lace and traditional can be attempted without switching settings, as all transfer lace.
In fine lace, stitches are shared between two needles, the technique is sometimes referred to as half- lace stitch. Any resulting eyelets are significantly smaller, and the texture created by the partial transfers is subtle 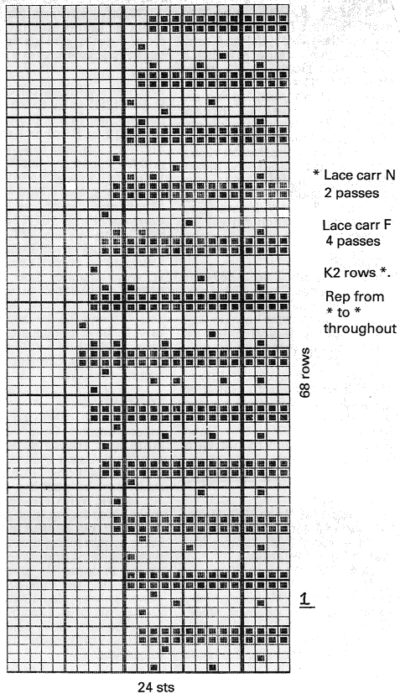 3/15/18 after more testing I have come to the conclusion that end needle selection cancellation on my 910 LC is working properly, but is not operative when I am working with my Ayab interface.
Yes, I have access to hand knitting patterns for lace from multiple sources. There are complexities to translating them for use on the knitting machine, discussed in previous posts. When adding bobbles or make ones as part of the HK pattern, it would be nearly impossible to duplicate patterns on the KM without sacrificing some of the features and investing huge amounts of time and concentration into the design process and ultimately the project.
Do you have access to Shetland lace hand knitting patterns, there are lots of lace edging patterns there?
This is very interesting , rushing out but will take with me to try and read during the day.