Previous posts with some related information:
A lace mesh series: using GIMP 8/17
To mesh or not to mesh 1 5/11
To mesh or not to mesh 2 5/11
To mesh or not to mesh 3 5/11
To mesh or not to mesh 4 5/11
To mesh or not to mesh 5 7/17 a collection of mesh design repeats
To mesh or not to mesh 6: chevrons 6/20
Lace knitting tips, to mesh or not to mesh 7 7/20
To mesh or not to mesh 8: more Numbers meet Gimp 5/21
Unconventional uses for punchcards 2: thread lace cards for “filet” mesh 8/17
It is hard for me to imagine a decade or more has passed since I began to blog. My approach to post content has evolved since then as has my shifting familiarity and use of software programs. Periodically topics resurface to my attention. Lace is one that crops up every few years, resurged after my purchase of Dak and my experiments with testing the lace module, and has persisted, so here I am once more looking at superimposing shapes onto a preferred mesh repeat.
There are always multiple ways to achieve a goal. Punchcard knitters are not excluded from the processes and without spreadsheets, similar planning may be executed on graph paper using colored pencils.
My go-tos now for planning out my charts on a new iMac with M1 chip and OS12 are
Mac Numbers 11.2
Gimp 2.10.24, Rosetta required
ArahPaint 6.0
img2track for download to a 930 to knit swatches, presently from a Windows 10 PC
InSync for file sharing between the Mac and the PC
The final repeats created with any of these methods need to be checked or edited to make certain they observe the rules for placement of punched holes or cells on proper rows for the specific brand and model knitting machine being used.
If the aspect ratio is particularly important, then more cautious planning may be needed.
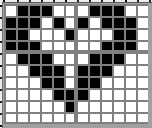
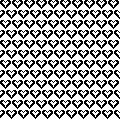
For an indeterminate reason, the shape for superimposing on a mesh in these experiments is a heart, plotted out here in Gimp for use in a 24 stitch wide limit repeat. It is good to begin on a canvas longer than the estimated motif, magnification to 800-1800X with a 1X1grid and snap to grid make the execution and filling in of small-scale designs easy to plan and view.
In terms of drawing tools, the bucket-fill paint tool may be set to fill with the foreground color, background color, or pattern. The pencil tool normally uses the foreground color. If switching between the two tools, remember to choose the proper tool before continuing to edit repeats.
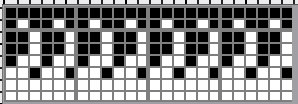
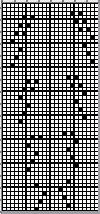
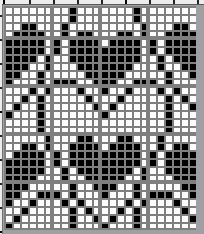
The heart was plotted out and cropped to 21 stitches by 15 rows, on a 24 stitch grid, and the image was saved, it is deliberately planned for an odd number of rows in width and height. 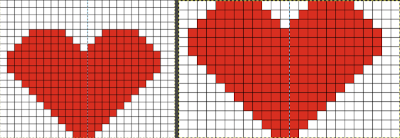 My chosen lace mesh repeat is 2 stitches by 6 rows.
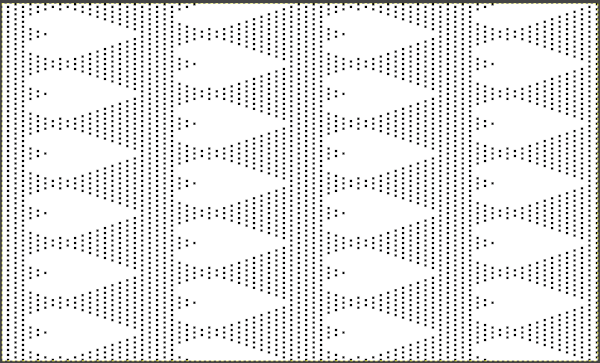
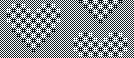
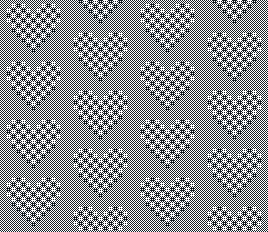
 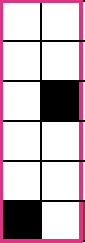 Planning a base mesh in Gimp with the above repeat saved as a pattern and used to bucket fill the canvas:
 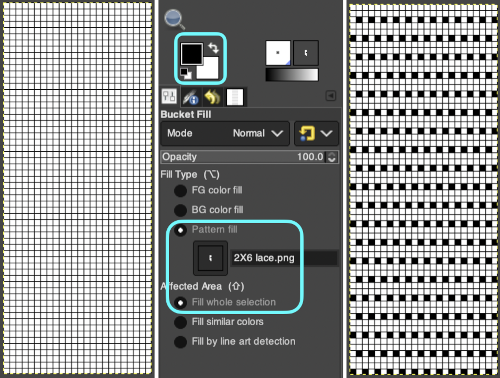 The overall mesh repeat png is saved. Blank areas in every third row in the first and every third row will be skipping transfers in those areas and knitting the stitches composing the shape. The heart shape itself needs to be superimposed onto the mesh base. It is relatively small, with increases and decreases forming it easy to follow, so in the simplest method, red squares for each pattern row are filled in on the grid transfer rows, using the single-pixel pencil tool and working in RGB mode. If satisfied with the placement of the shape, use bucket-fill set to ground or foreground to eliminate red cells by filling them with white, and the mesh design is ready. If working with a card, punch black cells only.
 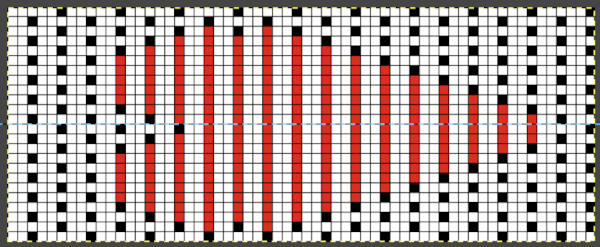 This placement is tested and kept in mind in other explorations.
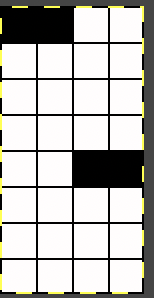
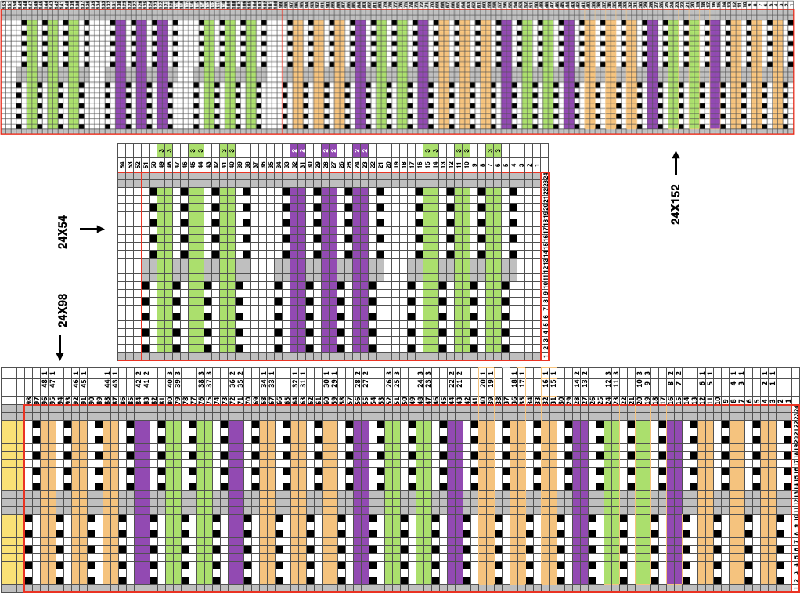
 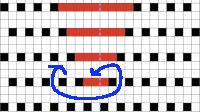 Using a spreadsheet: the same sort of chart may easily be created quickly in Numbers. In this instance, my table is still planned for 24 stitches in width, but 54 rows in height. An extra column is added and used on the far left to mark rows to be hidden. Beginning at the bottom left two rows were filled in a different color, the third row is left blank, all 3 cells are selected. When multiple cells are selected, depending on which side of the selection box one hovers over with the mouse, a yellow dot/ handle will appear.
 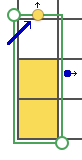 The tool acts on the selection. Clicking on it and dragging it with the mouse will, in this instance, repeat the selection until the mouse is released. This may be done in any direction and quickly fills in whole tables. It is not necessary to perform this extra step before hiding rows, but I find having that extra color makes it easier visually, especially when working on long repeats. It also makes for easy return to selection if hiding rows is done in shifts.
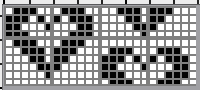
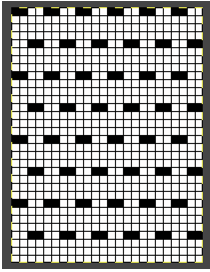
Beginning at the top of the table, holding down the command key, select rows marked with yellow cells, in this version of Numbers, table row numbers are green rather than blue,  continue to the bottom of the chart, and under the Table menu, choose to hide 36 rows. With rows hidden the mesh repeat shrinks from 6 rows to 2.
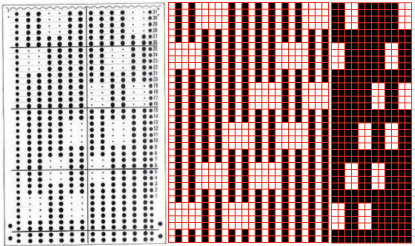
 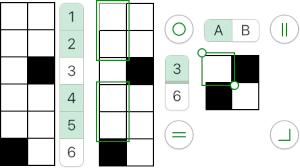 A new 4 cell table is created. The 4 interior cells were chosen, copied, and pasted in the lower-left corner of the reduced height table. Once pasted, selecting the repeat again will allow one to use those yellow handles to fill the contents first toward the top, then to the right. The image on the left shows the results, with only the numbers for the unhidden rows shown on the left. In turn, the heart was the pencil tool to draw it using a third color in the chosen location.
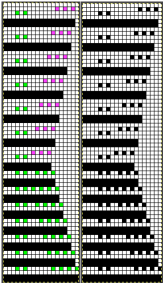
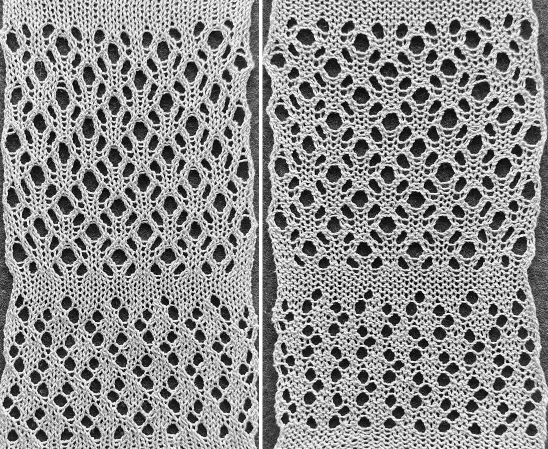
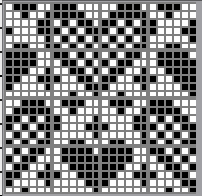
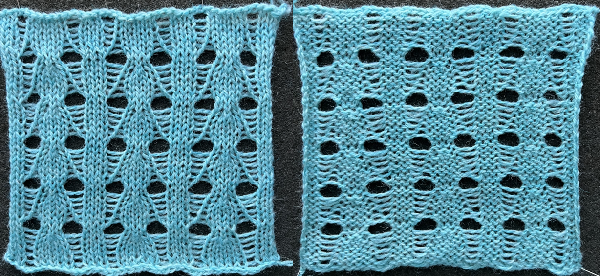
 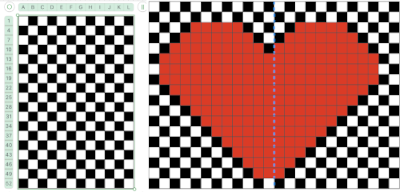 The unhiding rows function produces the expanded repeat with all knit stitches in red on the mesh grid ground. The column with the yellow cells is deleted before converting the Numbers repeat to an electronic or punchcard, the how-to discussed in other posts. Comparing the hand-drawn heart in Gimp alone on the left, to the spreadsheet results on the right, there appears to be a difference in the starting rows, and in only one other row, two black cells appear that can easily be altered in either repeat. Brother machine knitters would need to shift those 2 blank rows at the bottom of the repeat on the right to its top or to to start lace patterning on row 3.
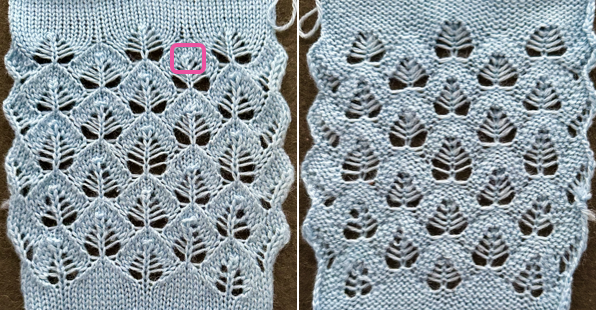
 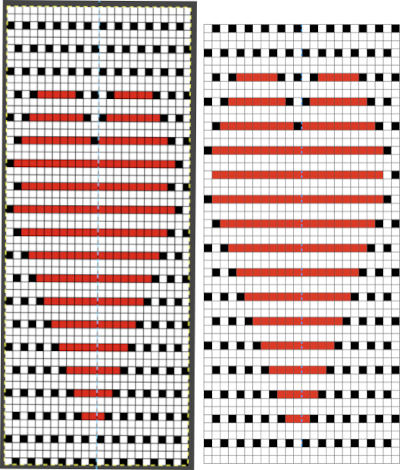 Keep in mind that lace patterns in particular, with their infrequent markings, even in color reverse, grabbed from a spreadsheet and scaled in Gimp to final repeat size, often require a lot of “clean up. This repeat, intended for use in another post shows the difference between these 2 different programs once more.
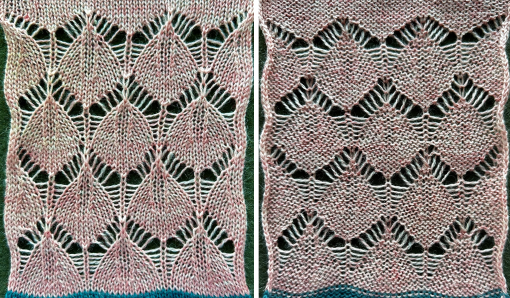
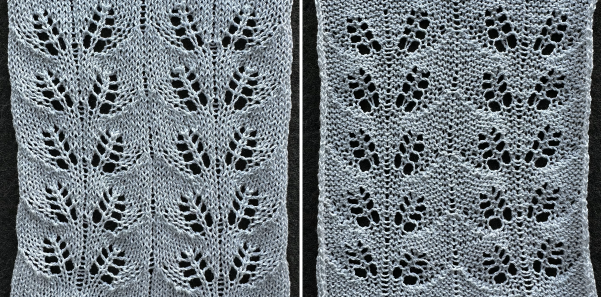
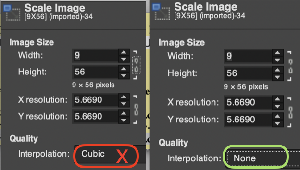
 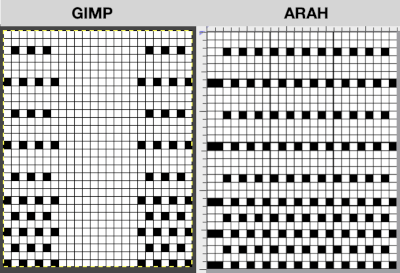 Superimposing shapes onto the same mesh requires that they be elongated X3. Gimp does not do this well, while ArahPaint does so elegantly. The result using Gimp, with the image Mode converted to 2 colors indexed and scaled in height X3 is shown on the left with marked error areas. The Arah YX3 result on the right is correct, created, and saved
 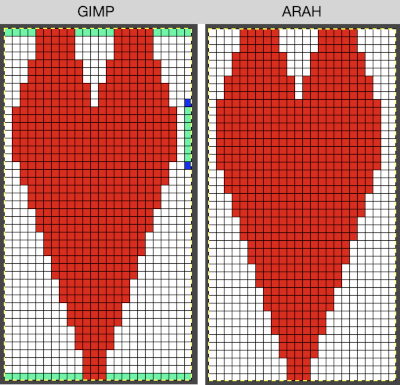 More choices exist, continuing to place the heart 3 rows up from the bottom, and not using multiple layers.
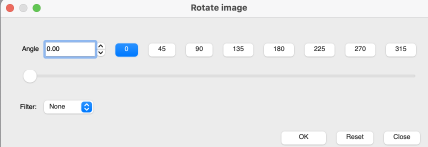
 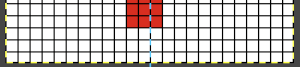 For the heart to be pasted in place on the mesh, its white background needs to be made clear/ transparent. That is achieved by using Layer, Transparency, Color to Alpha,
 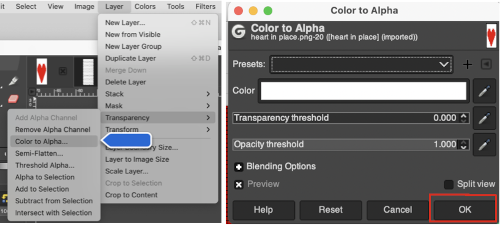 The layer-to-alpha image may be saved as a png with transparent background for any future use.
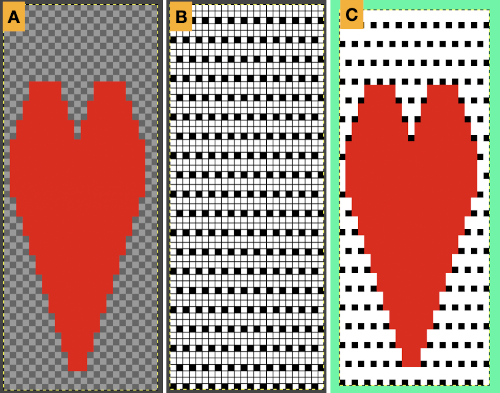
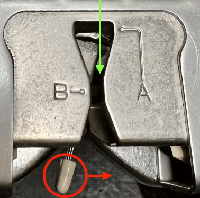
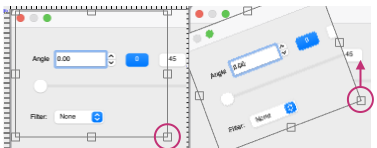
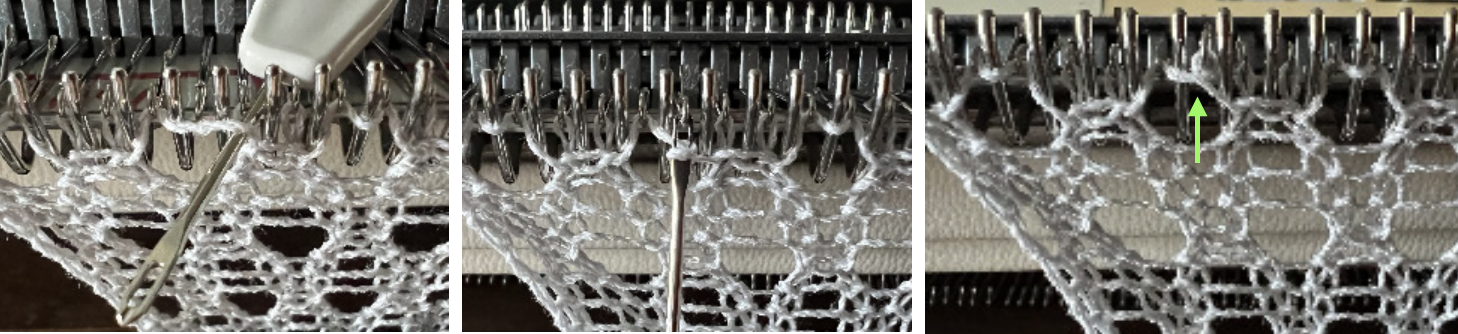
Work using 2 windows, A simple copy and paste will fix the image in an arbitrary location. Instead, click on the rectangle select tool, selecting and copying the heart image, paste it on the ground in the second window, where it remains as a floating selection that can be dragged to the desired location and is not anchored until the mouse is released. This may be undone and repeated multiple times. A, copied and pasted in place on the ground, B, resulting in C
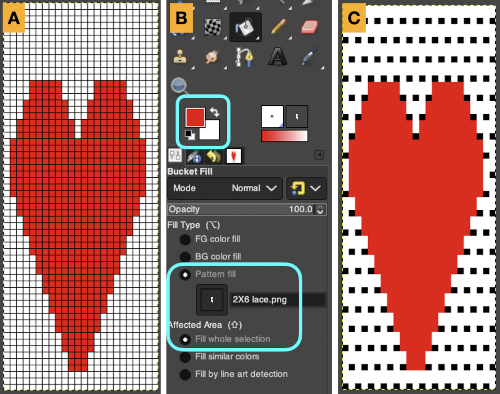
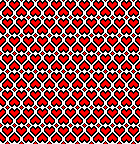
 Even easier, working with the full-color, white ground heart repeat placed 3 rows up from the bottom, A, set red as the foreground color, and then use the bucket fill tool B to fill its ground with the mesh pattern, seen in C
 Comparing the all in Gimp Drawing to either of the last 2 patterns, two differences appear, an extra row of transfers before removing transfer stitches to start the heart shape, and those 2 extra black pixels/eyelets
 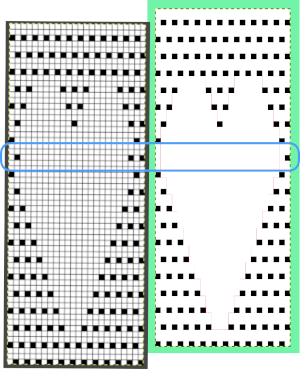 Committing to the first design, 24X60,
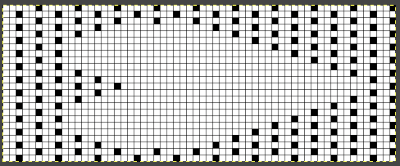
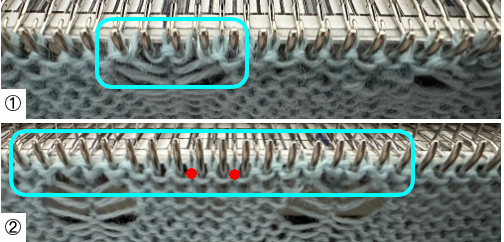
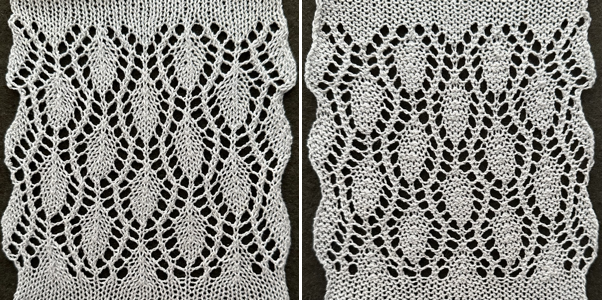
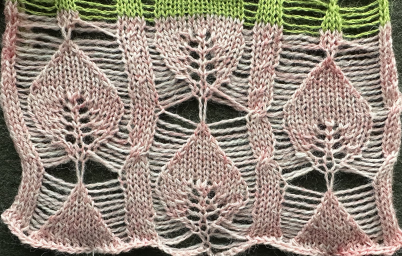
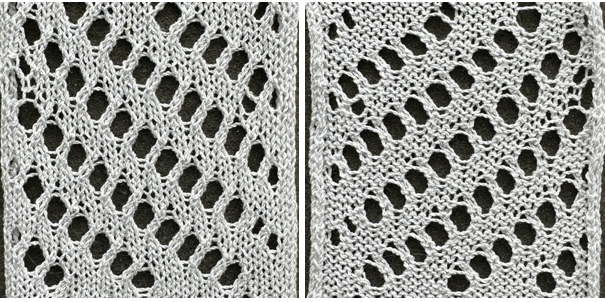
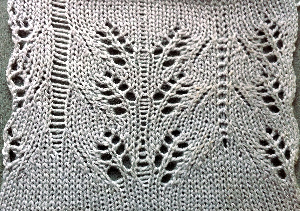
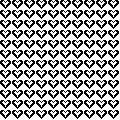
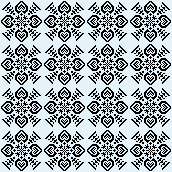
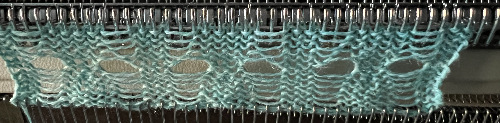
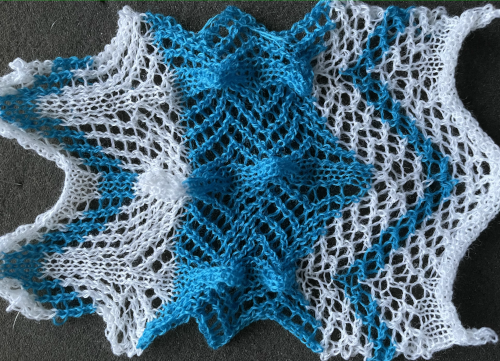
 Proof of concept for the single repeat:
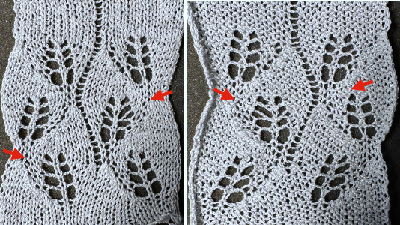
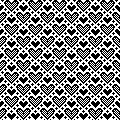
 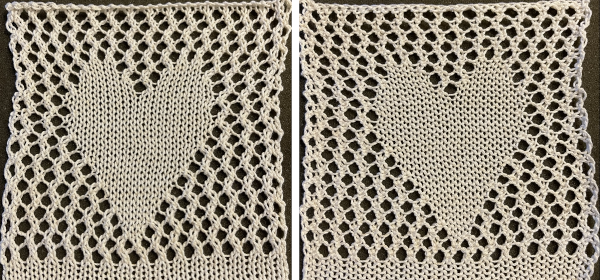 Tiling the repeat before knitting helps one visualize secondary shapes that will be formed by it, here those pairs of extra dots are removed in areas marked with red lines, helping to make the decision about keeping them or not
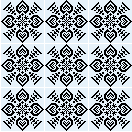
 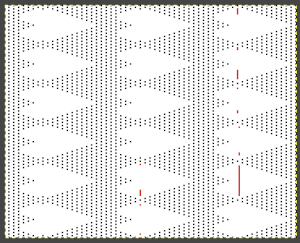 Developing brick repeats or half drop is possible with offset and brushes in Gimp, but, to my mind, easier in Arah. Using the Arah drawing in repeat, the design is now 24 stitches wide by 120 rows high in a brick arrangement offset by 12 stitches.
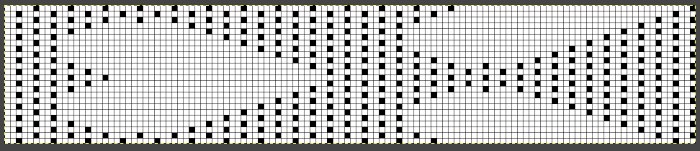

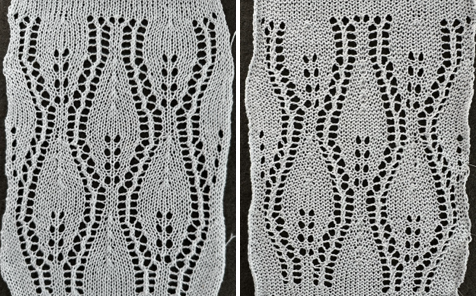
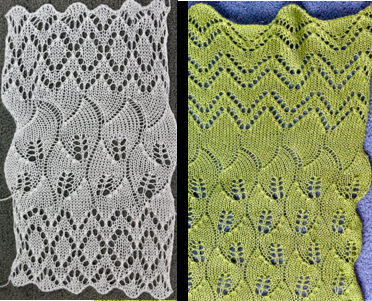
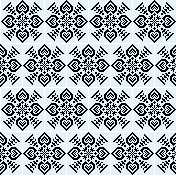
 The same heart, in half drop repeat, offset by 30 rows, now double wide, 48X60, suitable only for an electronic machine
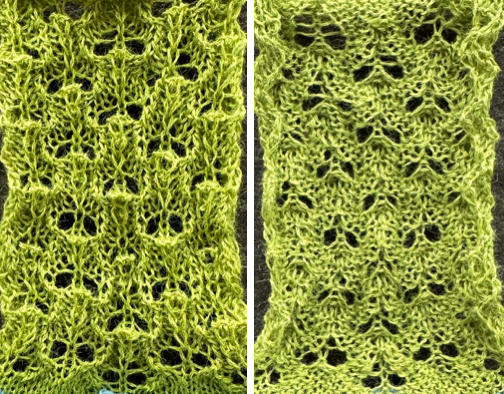
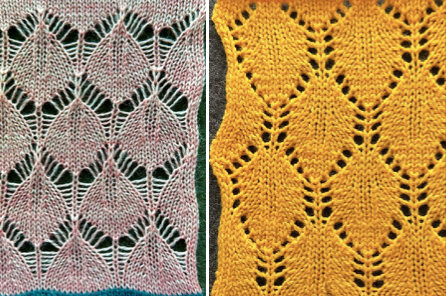
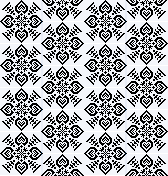
 Changing the background grid for other stitch types: the heart is rescaled for use by 2 or 4 times in height. Again, the differences between Gimp’s incorrect scaling, A, and the Arah drawing in repeat, B
 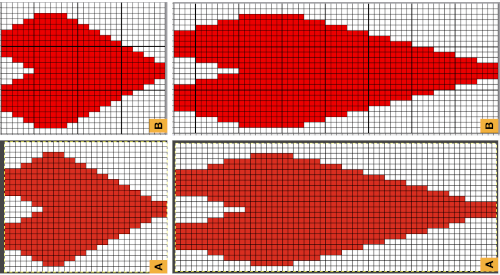 The differences between the clear ground heart image dragged and dropped onto the new background or navigating between 2 windows and using the rectangle tool as described to copy and paste.
 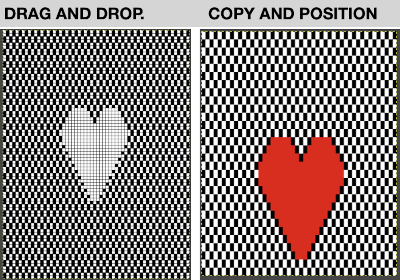 Possible applications
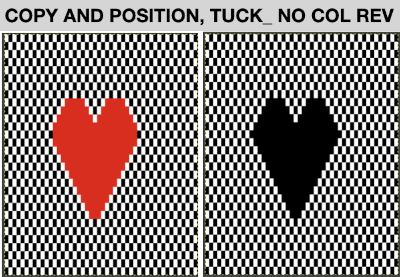
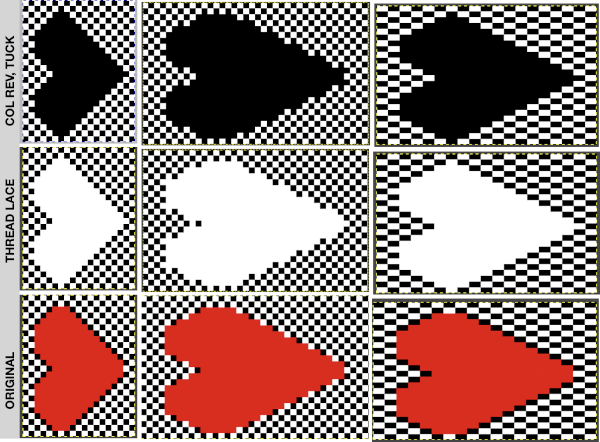 This begs the question of working on larger images. For use on a lace mesh, simpler designs apart from overall size are best, but if a mesh base is not your favorite fabric or goal, tuck, slip stitch, thread lace or even fair isle patterns may be created with more overall flexibility, using the same principles on backgrounds.
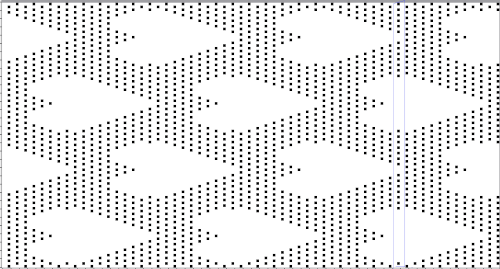
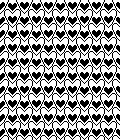
Thread lace, depending on the yarns and tension used, can provide the illusion of eyelets behind images of any size. The steps: image to alpha selected and pasted onto the ground, color reversed 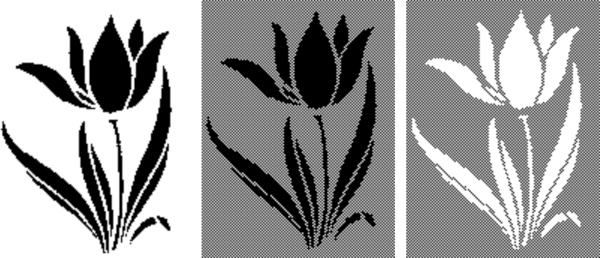 The final png is 129 stitches wide by 172 rows high
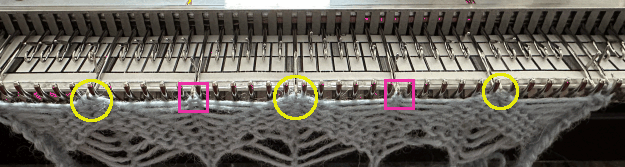
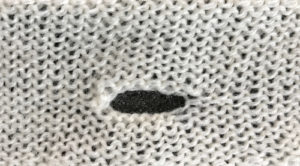
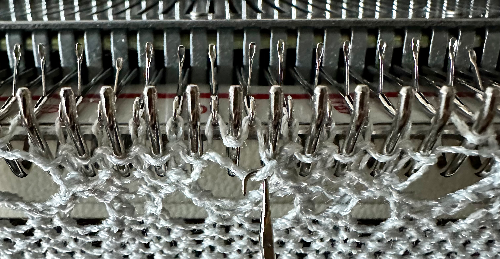
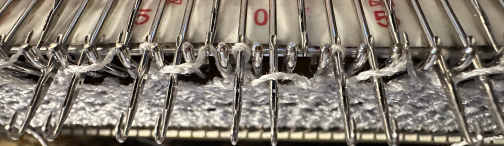
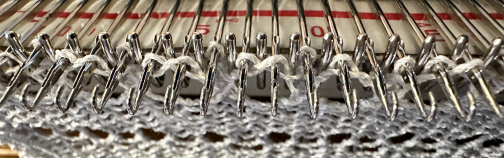
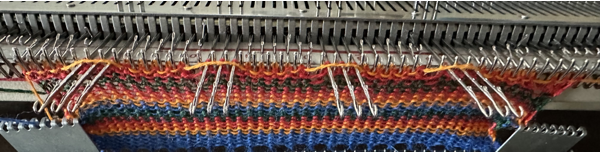
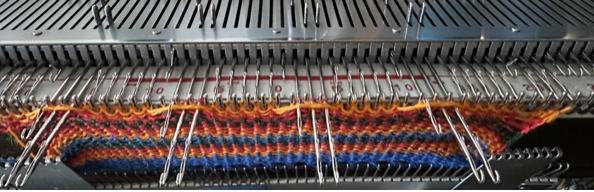
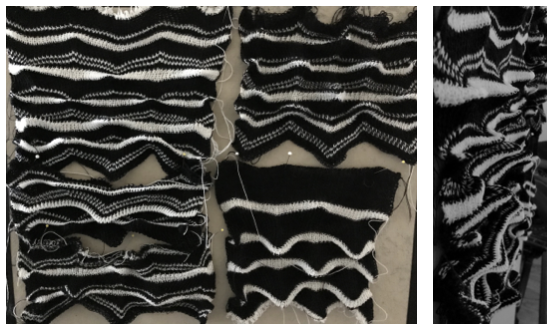
 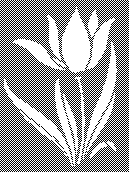 This is the first attempt at a partial repeat test proof of concept. I have been telling people serger monofilament withstands ironing and light pressing, and periodically I test advice I have given formerly. To start with, the darn monofilament, which I even used in double bed garments, but nearly 2 decades ago, refused to feed properly or at all. Because it is nearly invisible, my knitting started with it pulling too tight, and I wiped out 12 needles out of 72 in different places on the needle bed in a single carriage pass. Determined, I sorted how to hand feed it, got the rhythm, complete a swatch. A marks an error I made in loading the second track in img2track, resulting in an added, wrong pattern row. The holes, B, C, and D were nonexistent until I tried flattening the fabric a bit with an iron, and the monofilament simply melted in various places.
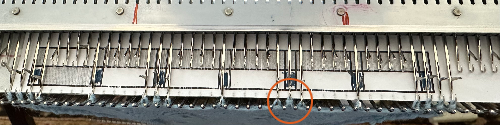
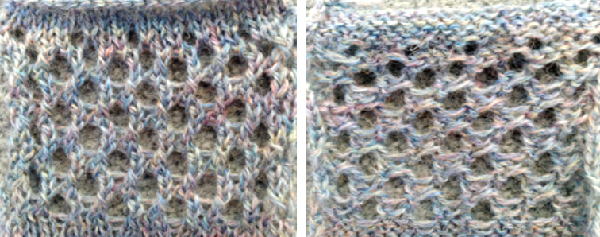
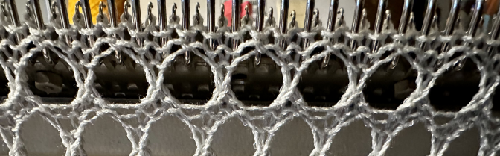
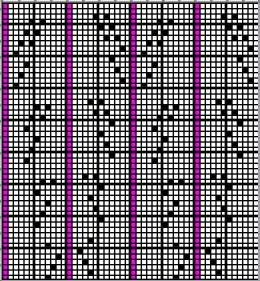
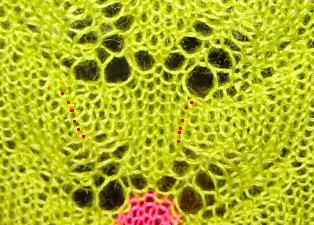
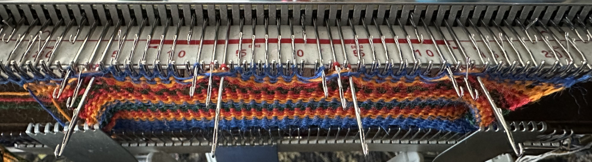
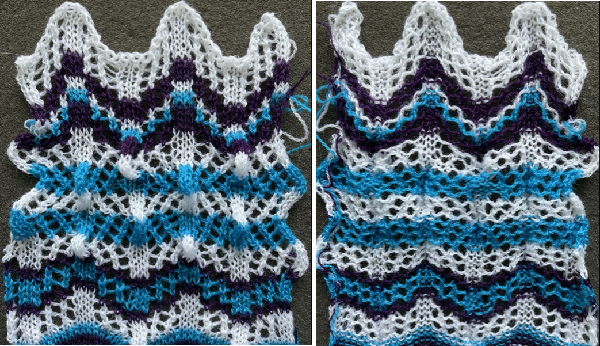
 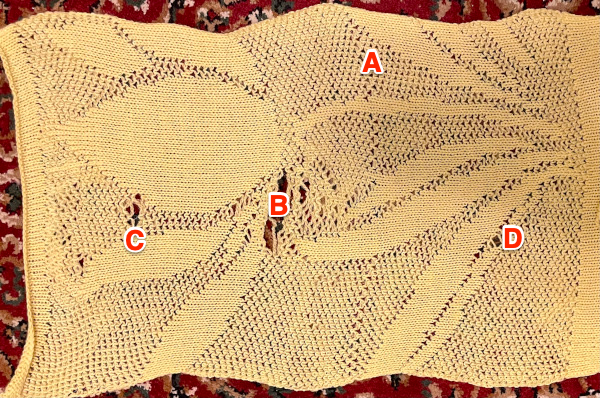 Other observations: there is some bubbling in the all knit areas. With ironing, that effect was lost and the areas with more mock holes widened as can be seen at the side edges. In thread lace, the end needle selection is canceled so as to have the paired yarns knit the end stitch, but pattern needles can still be selected, so if end needles are forward in pattern, it is best to push them back to B position by hand. One way to eliminate having to do that, which also reduces knitting time, is to create vertical all-white lines on either side, as in this version of the repeat now 144 X 200 pixels.
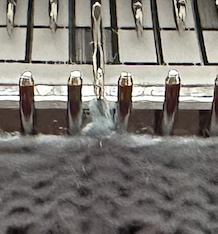
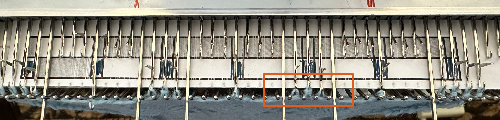
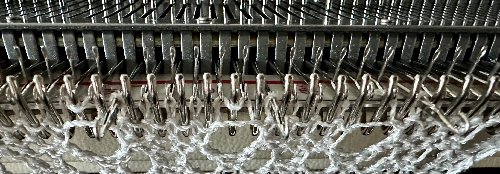
 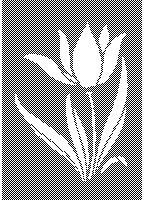 I had interesting issues with having needle selection visually appear correct throughout, and the pattern itself appearing correct when checked at 1800 magnification. While the smaller sample was accurate until the filament began to melt, here I had 2 needles not knitting the yarns alternately but together, and an odd change in the center that looks as though yarn selection in those areas was reversed. The thicker yarn here is cotton, the thinner rayon. Troubleshooting is required. Unplanned tucking is a sign of damaged needles, but because the second yarn used herd is so thin, the effect was not obvious until the vertical pattern in the same area on the bed became apparent.
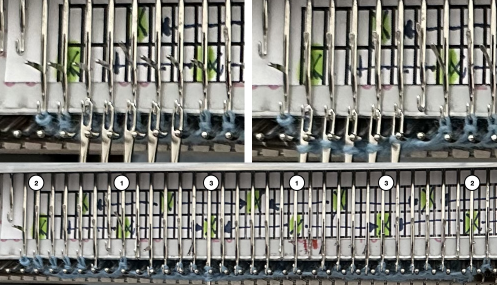
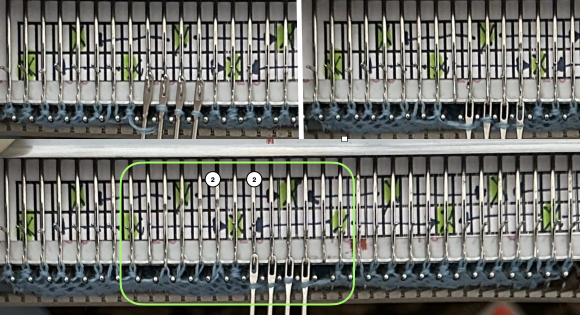
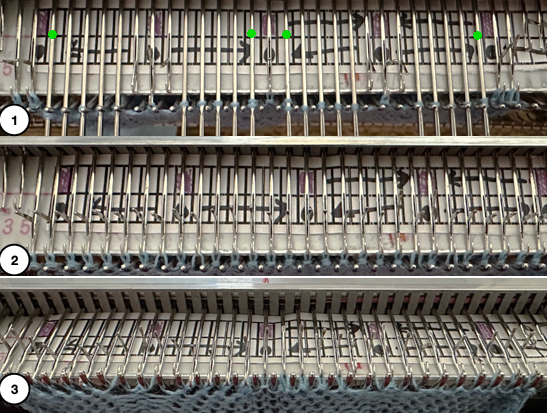
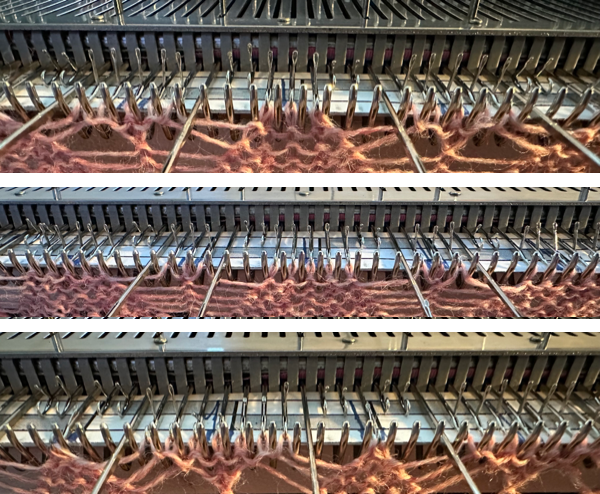
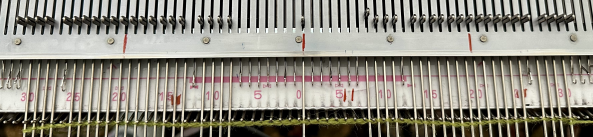
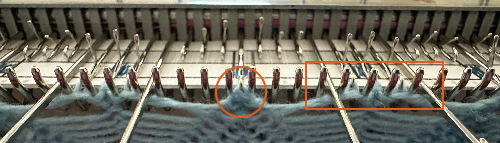
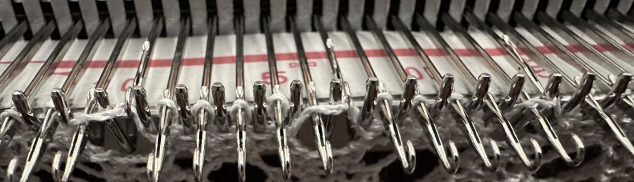
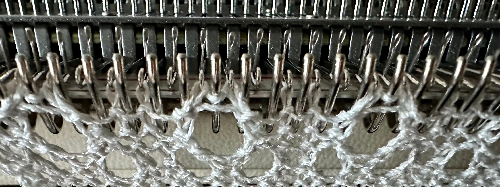
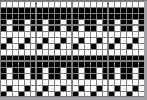
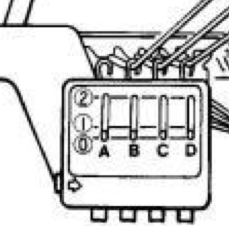
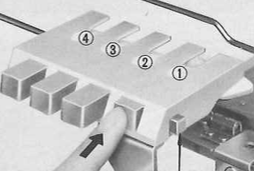
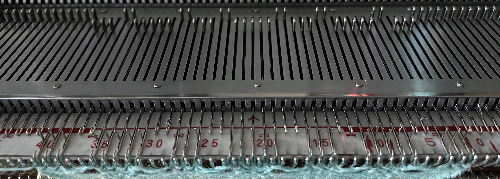
I am using a punchcard carriage on an orphaned 930 for the thread lace, and have not knit on more than 90 center needles in the past. Some days both operator and machine need a break.  The cam buttons and undercarriage were oiled. The first selection tests involved programming this
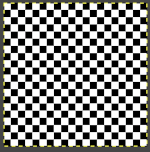
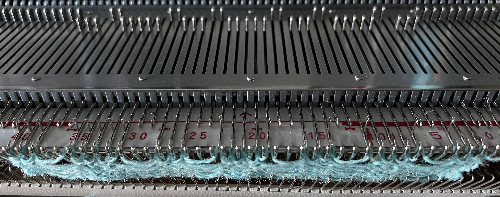
 as an all-over design. When only using part of the needle bed in a pattern, the center of the needle bed needs to be cleared by the knit carriage for the pattern selections to advance and knit properly. Doing so on part of each side of the center in thread lace and changing the culprit needles eliminated those single stitch issues. Before committing to a large width of fabric in thread lace, perhaps a practical, visible, and easy place to start for checking patterning and needle selection is to knit the ground in this pattern as a fair isle pattern before proceeding with the intended large-scale design.
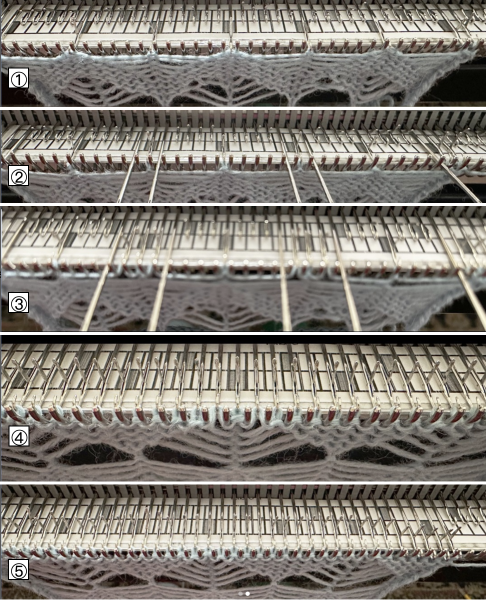
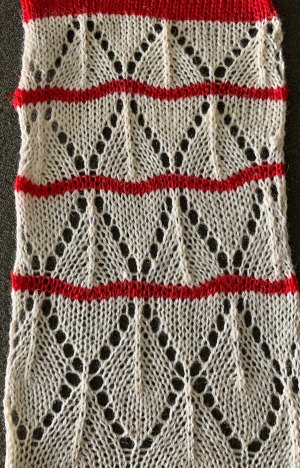
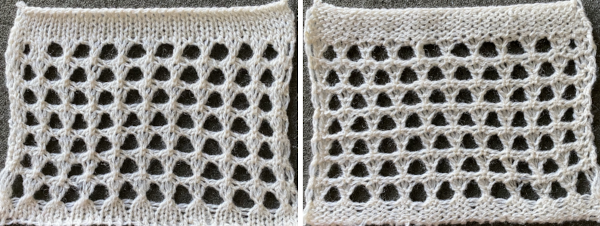
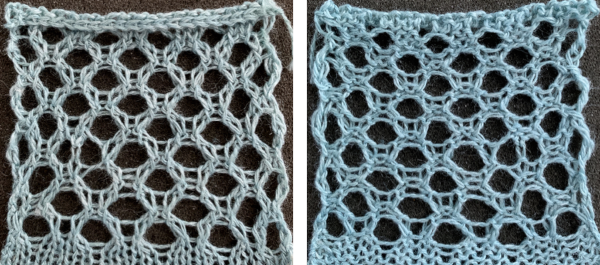
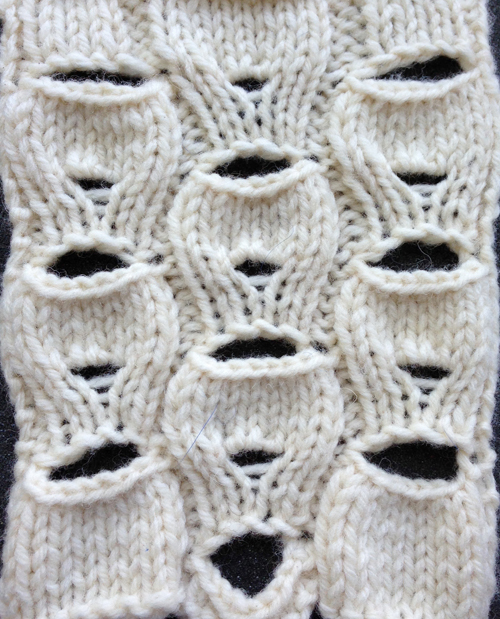
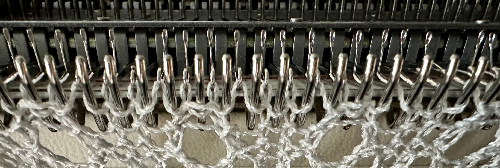
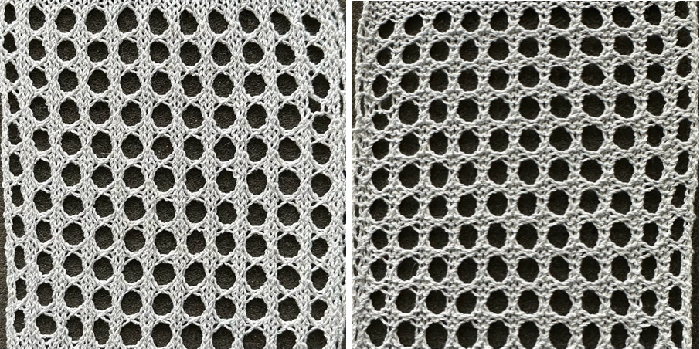
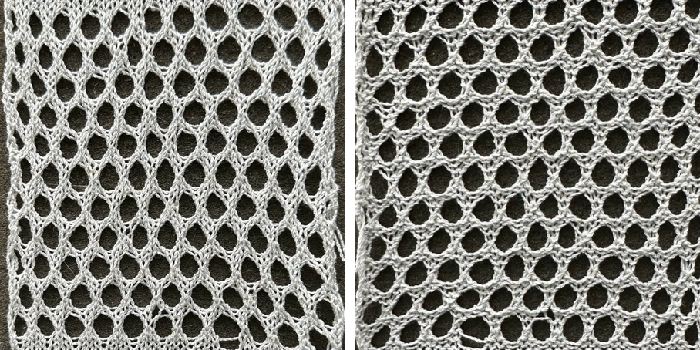
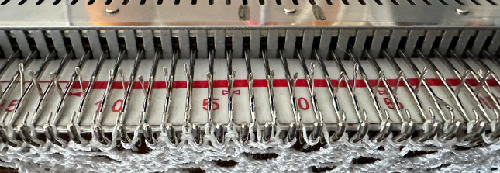
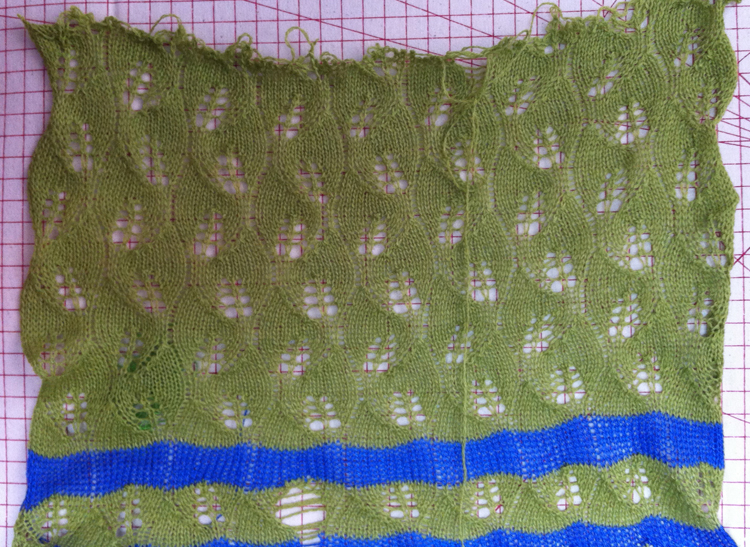
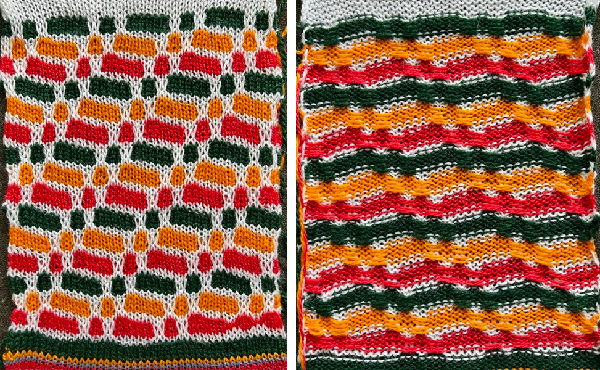
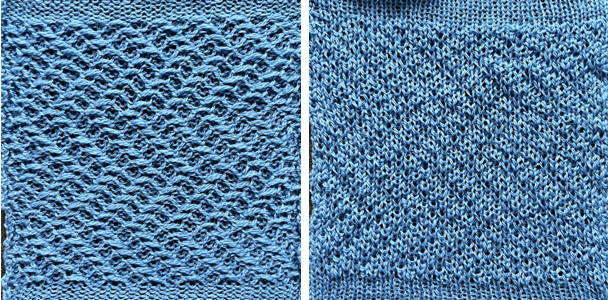
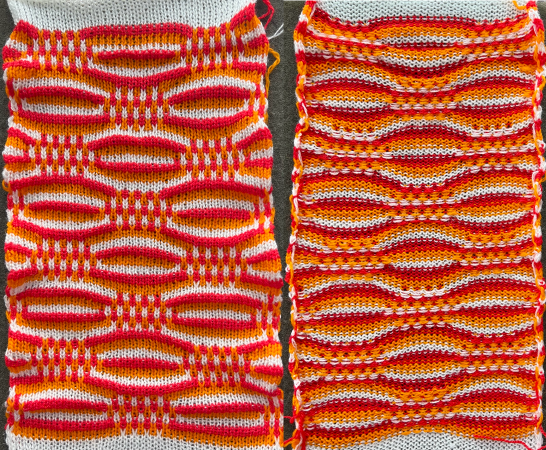
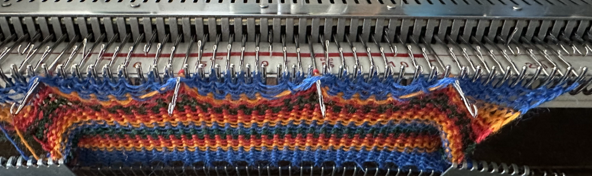
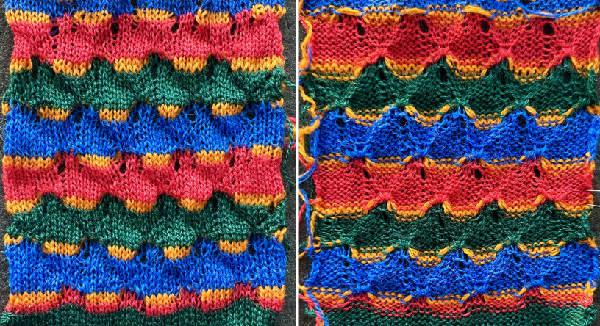
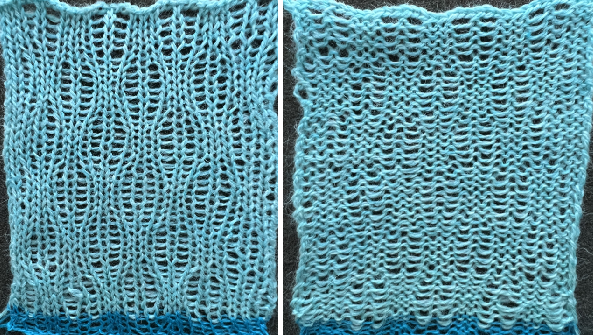
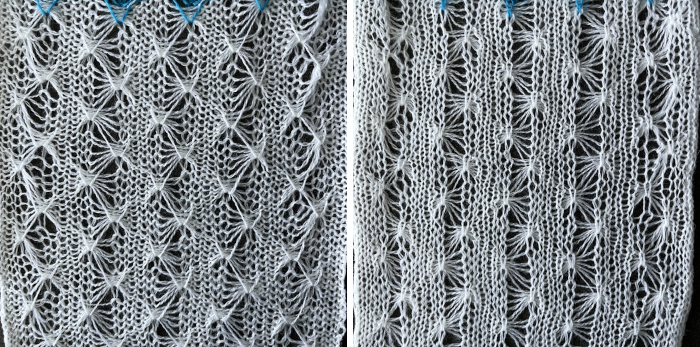
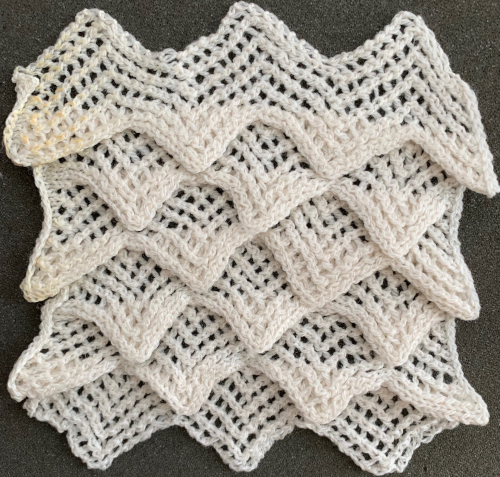
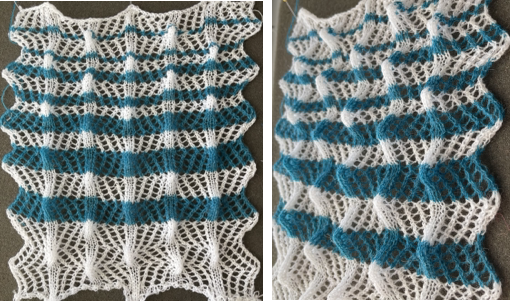
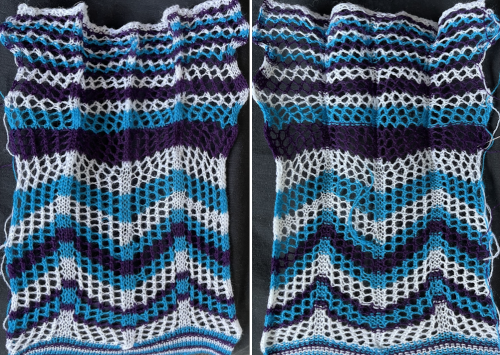
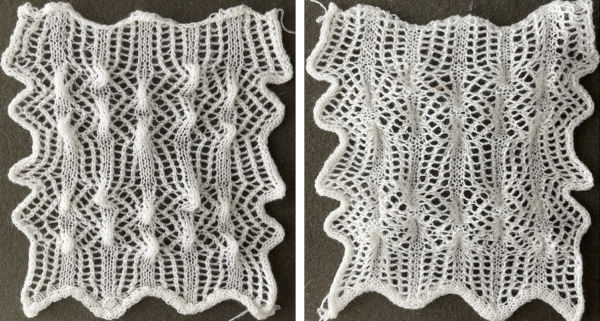
  The finished test swatch: because of the disparity between the number of all knit stitches vs patterned ones where one of the colors is slipped on every pattern row for every other stitch, the fabric shrinks dramatically when off the machine. The knit areas pop out a bit, and a lengthwise tug makes enhances the effect
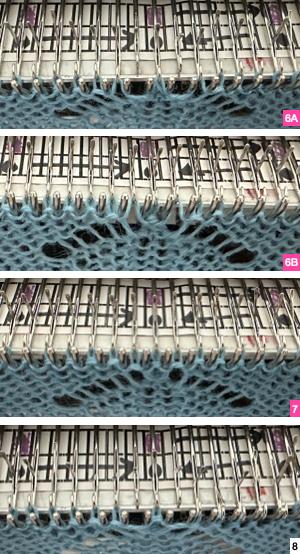
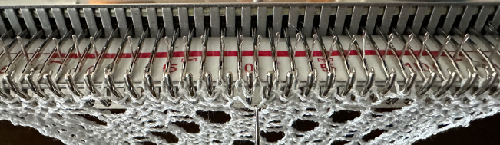
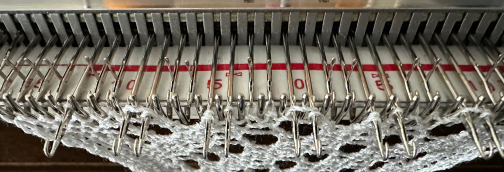
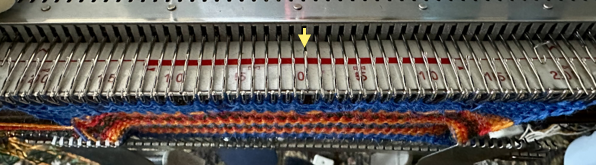
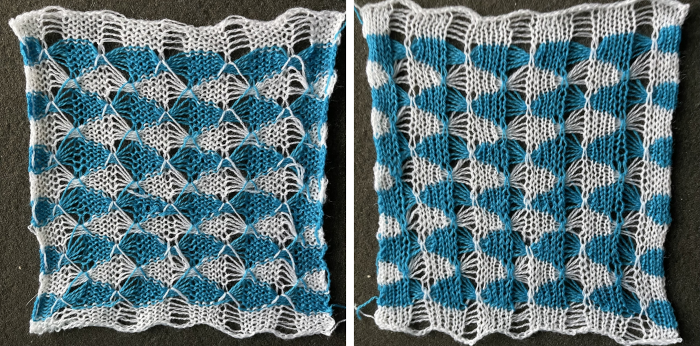
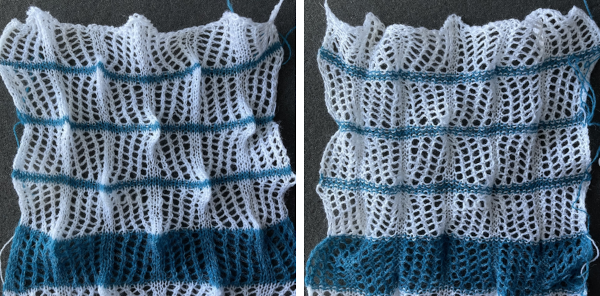
 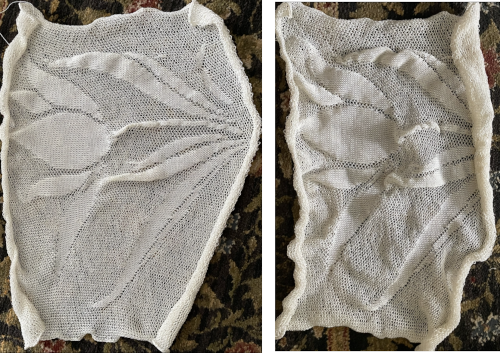 If the goal is a flat fabric panel, then blocking is a necessity. Here the piece is casually pressed, no pins, letters point out issues:
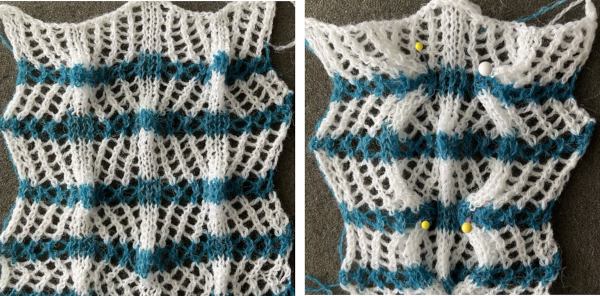
A: knit rows before any pattern selection
B: an attempt to knit stitches with a cast on comb, and no weights, lots of uneven float loops on the reverse
C: changing the amount of weight; if knitting in multiple tracks using img2track, remember to be outside the set mark with the knit carriages before selecting the next pattern row to avoid selection errors
D, E: there are occasional improperly formed tuck stitches
F: “My piece is almost finished, the weights are touching the floor but I have just a few rows left, too lazy to move the weight”, the price: some messy loops on the reverse again to match the start
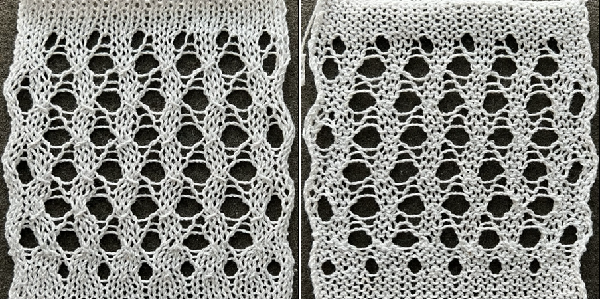
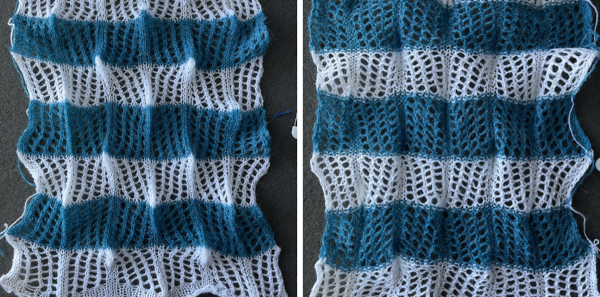
G: all knit rows again, the latch tool bind off around single gate pegs was a bit snug 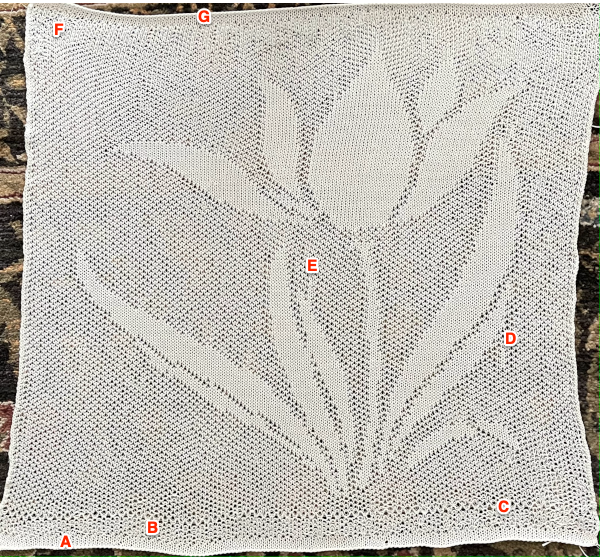 The mesh effect was noticeable after resting, the piece measures 25 inches in width by 25 inches in height.
When moving weights up, using a ribber cast on comb carefully poked through the knit may cause less snagging and issues than using the single bed cast on comb.
This fabric evolved because of a discussion that began with a knitter who is working on sculptural shapes emerging from textured backgrounds.
I see thread lace as having potential for developing all sorts of blistered, 3D elements that have nothing to do with flowers or wearables and am planning follow-up posts using the technique for texture rather than mock lace. To be rendered usable, this piece would definitely need blocking, maybe even starching in order to be stable enough to hold its shape over time.
I have blocking wires, but over my decades of knitting have maybe used them twice, my blocking has been far more casual.
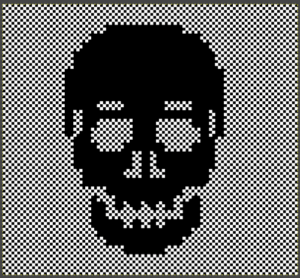
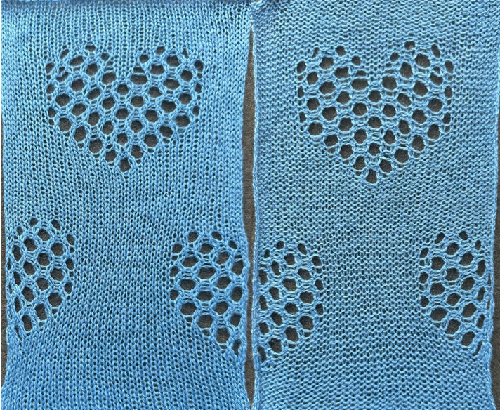
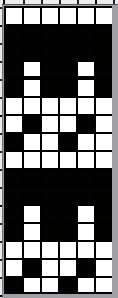
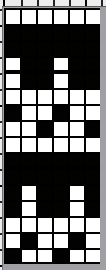
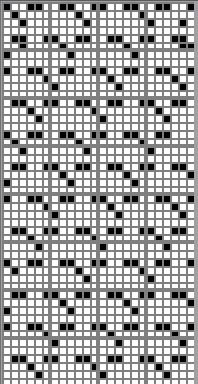
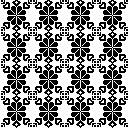
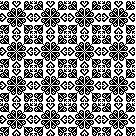
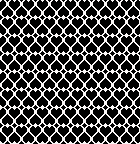
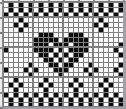
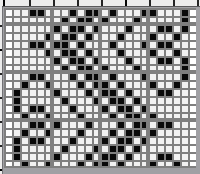
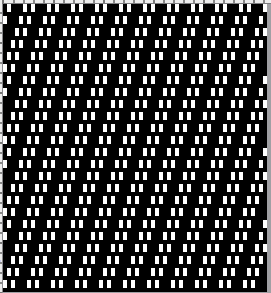
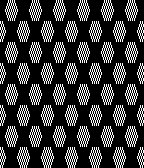
Friends lately have asked about skulls over thread lace mesh, this is an electronic repeat with room for resizing or border additions, keeping in mind that in thread lace the white areas knit both yarns, the dotted areas create the illusion of holes. The design was initially created working in black and white, with an alpha channel added  a new file was opened, bucket-filled with the ground 2X2 pattern, the above was copied and pasted in the chosen position, resulting in this
 The 100X92 png
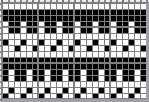
  which in turn needs to be color reversed for use as a thread lace pattern
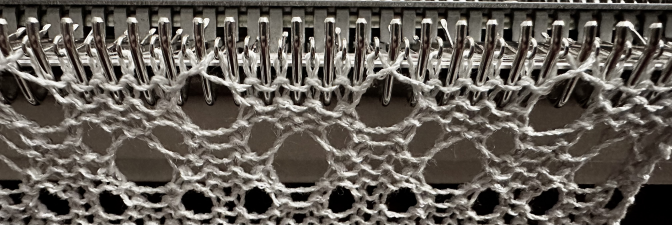
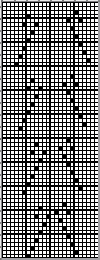
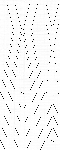
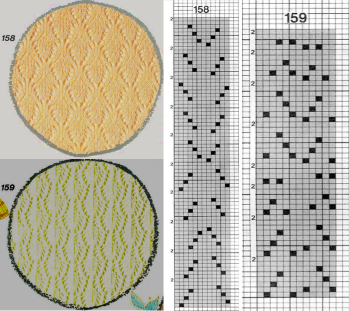
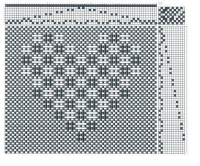
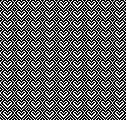
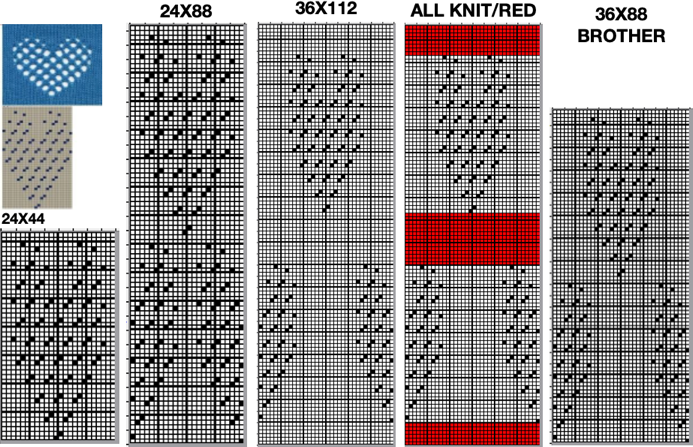
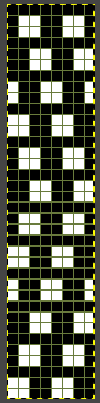
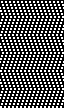
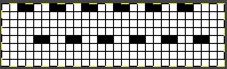
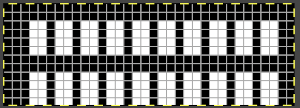
 The 20X70 png, may be in need of mirroring depending on the KM model being used and/or the download program. When in doubt, the needle selections are easy to recognize and some air knitting helps ensure that the pngs are oriented properly on your needle bed.
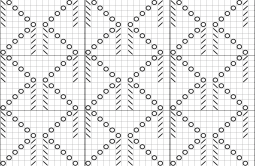
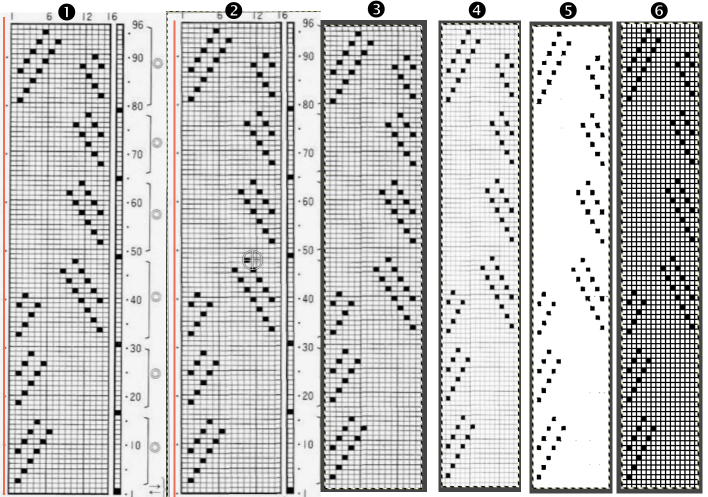
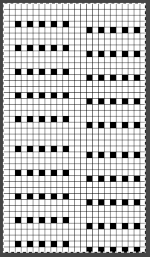
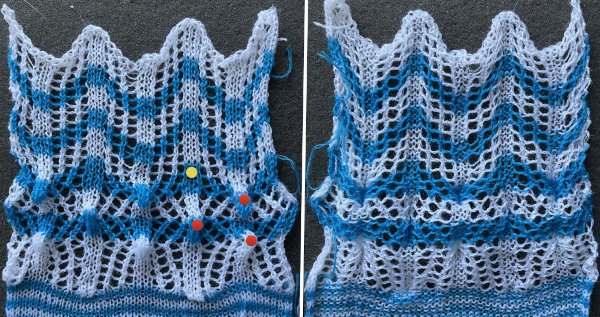
  For a narrow end start with the LC making the first preselection row from the left, the repeat, provided here in a larger view, can be shifted as indicated by red markings, and used after several rows of of base knit
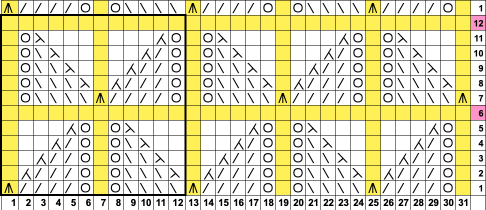
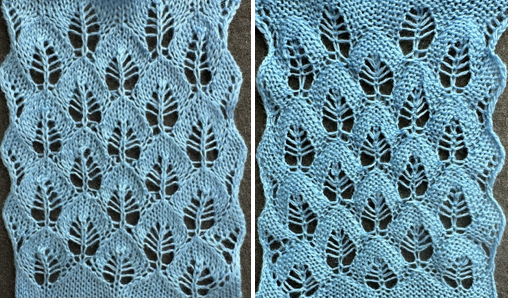
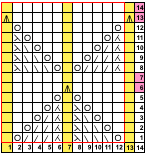
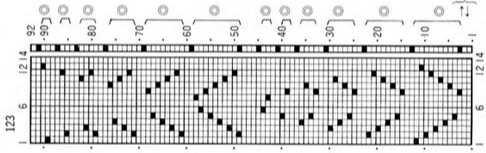
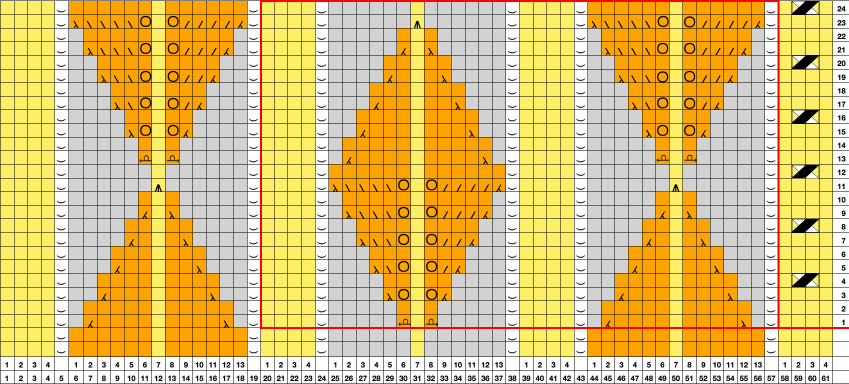
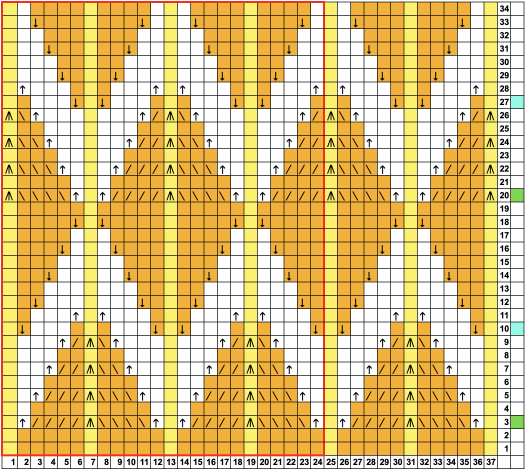
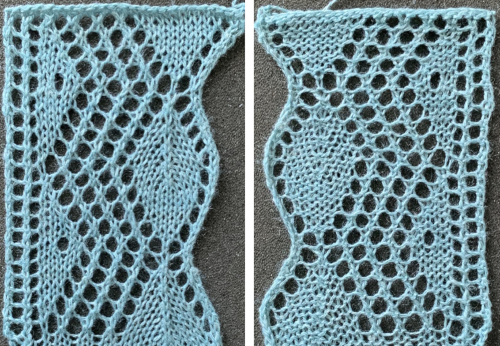
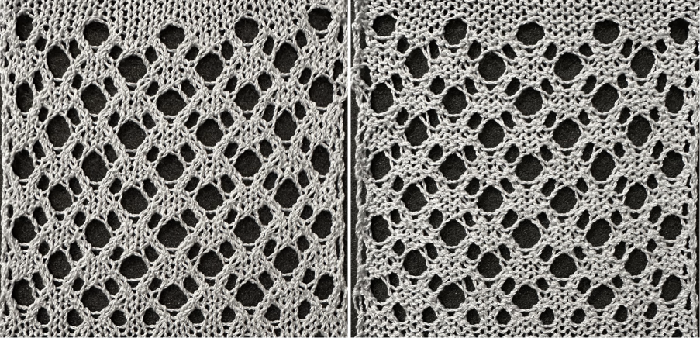
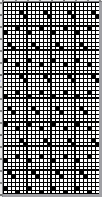
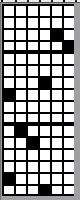
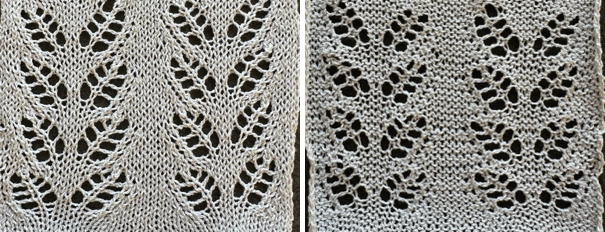
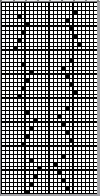
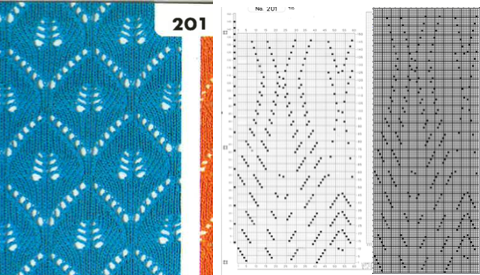
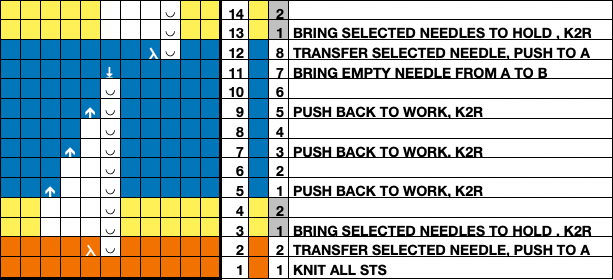
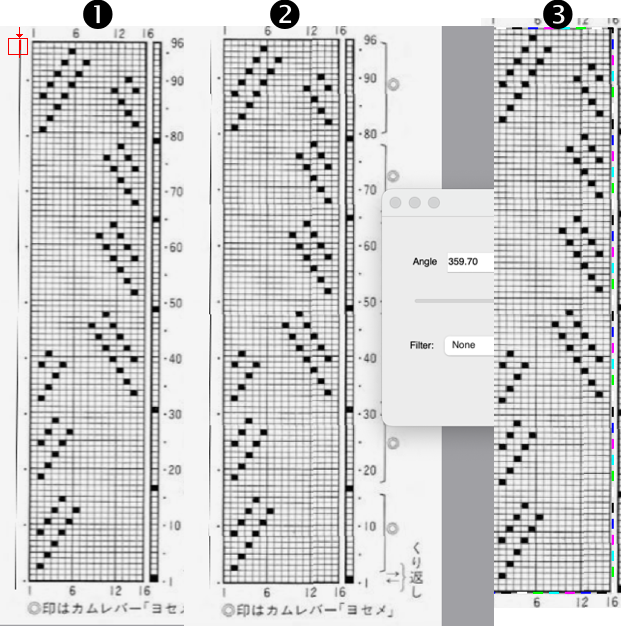
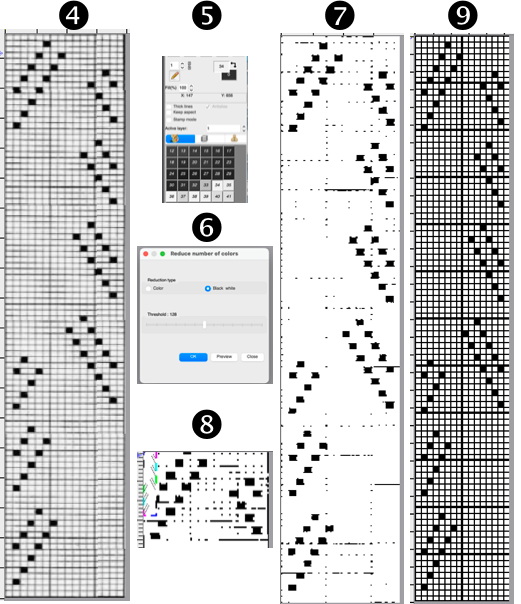
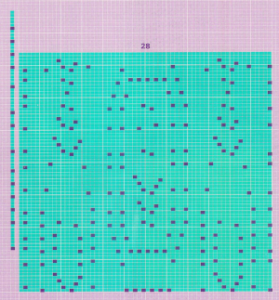
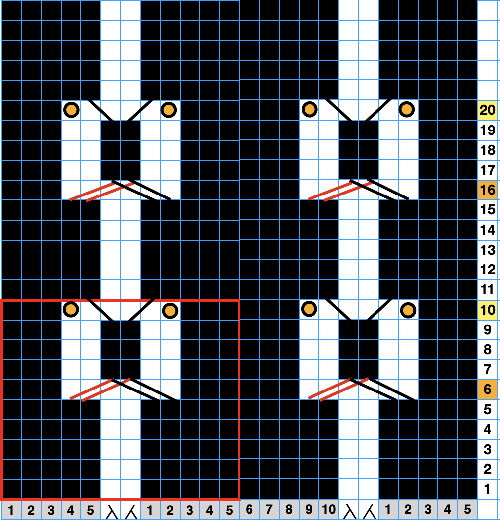
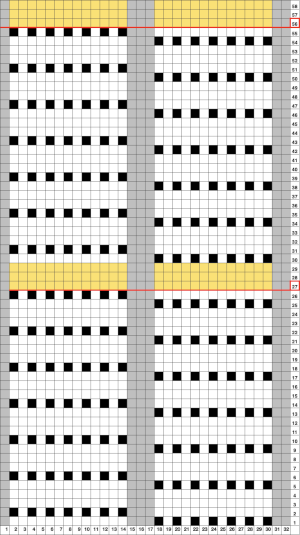
 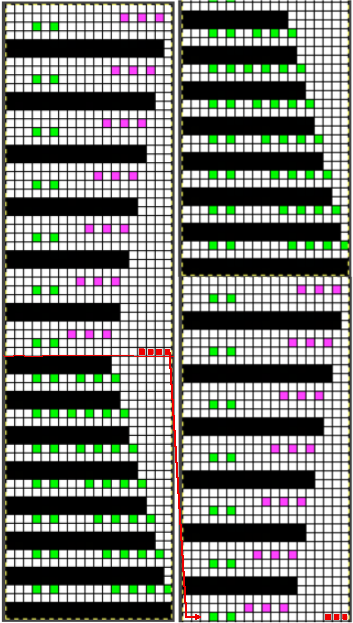 This 22X60 png, is charted with a start at the narrow for use with the LC preselecting the first row from the left for the increasing angle, then divided in for a start with the decreasing angle and the KC preselecting the first row, also from the left. The chart on the right shows the BW pixels actually programmed.
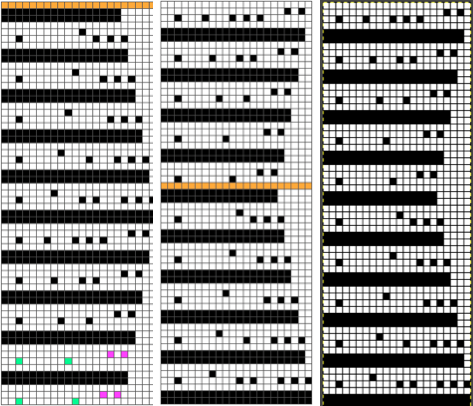

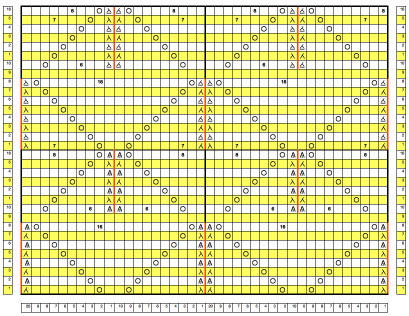
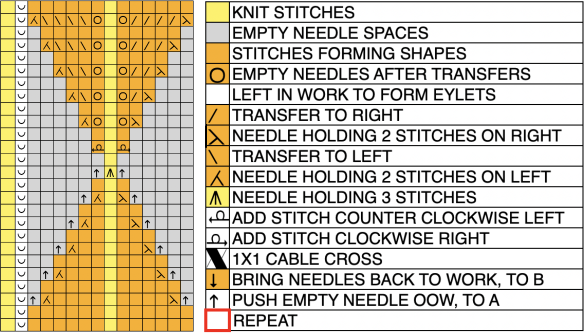
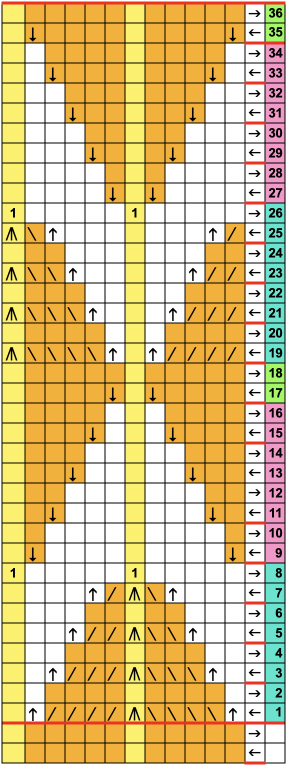
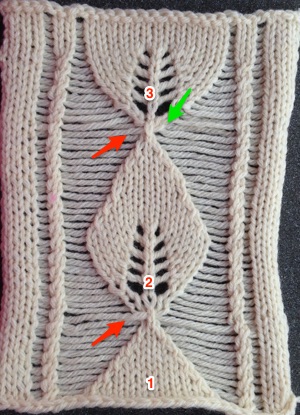
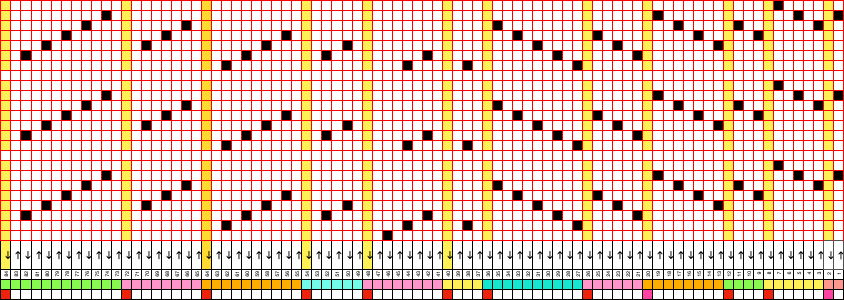
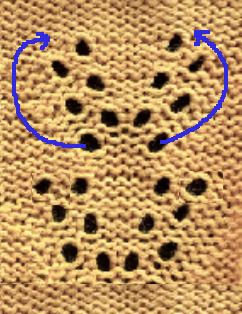
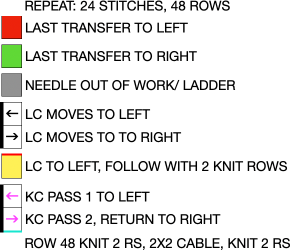
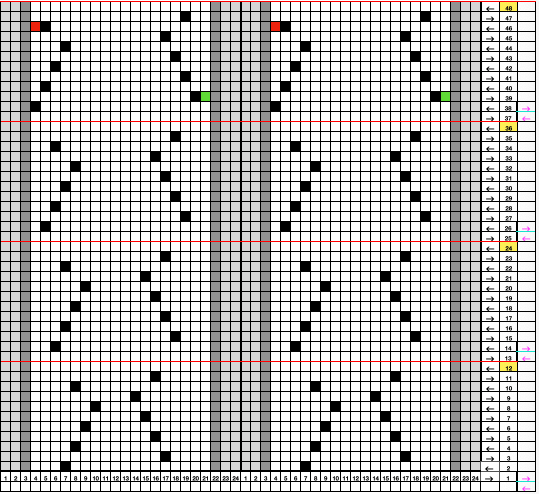
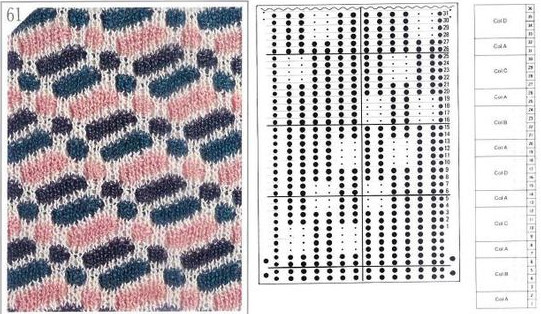
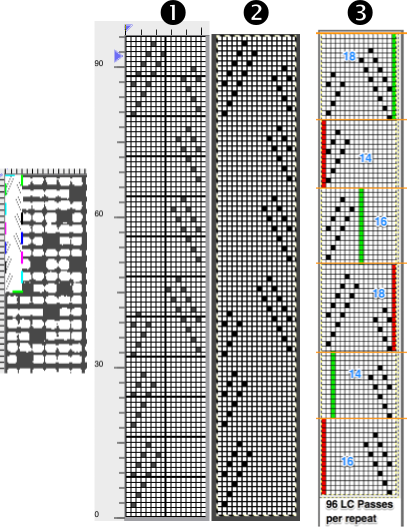
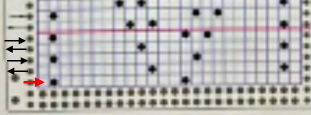
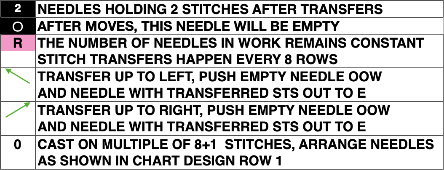
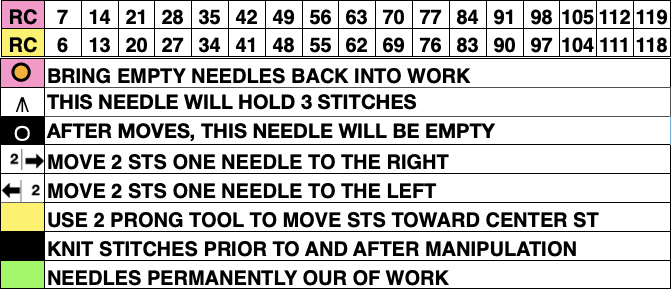
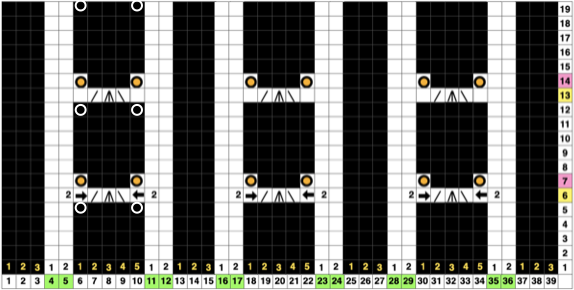
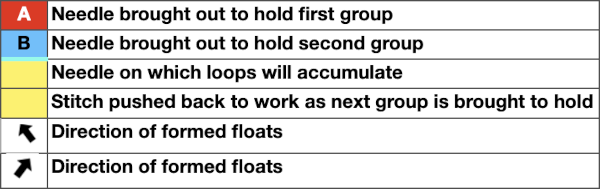
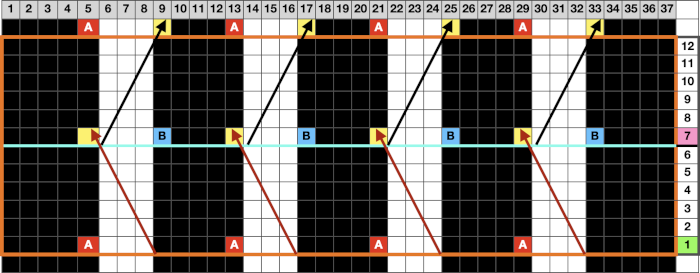
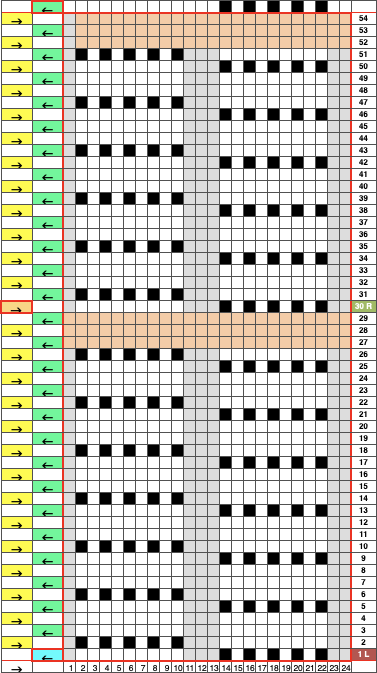
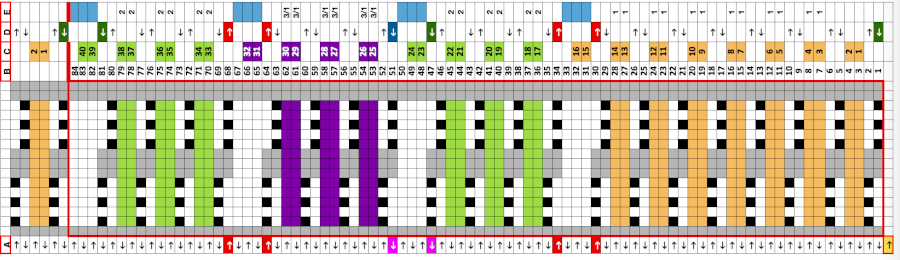
 When charting in spreadsheets, in addition to assigning a color to the direction of transfers made by the LC, arrows may be added to indicate the direction of the respective carriage movements.
 Working in Numbers the image was mirrored and duplicated, planned for a shaped edge on the left. Arrows mark the direction of movements for each of the carriages
  The repeat adjusted for automated shaping
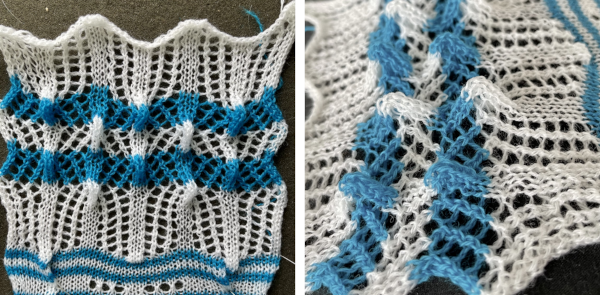
 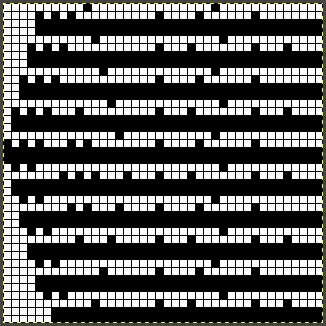 The 40X40 png required mirroring on my 930
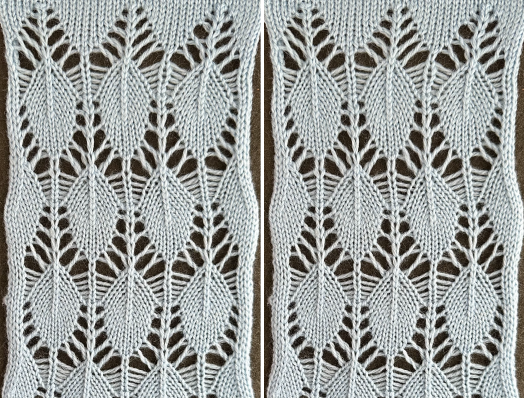
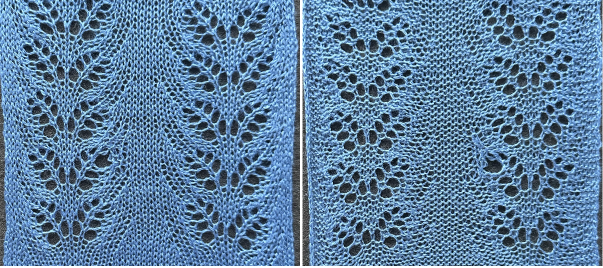
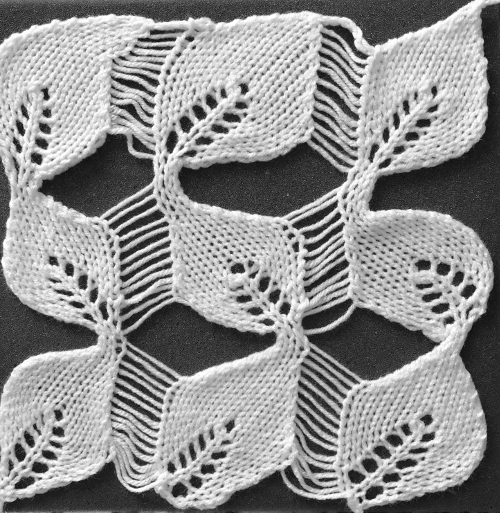
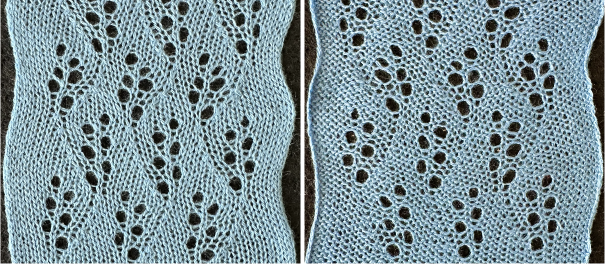
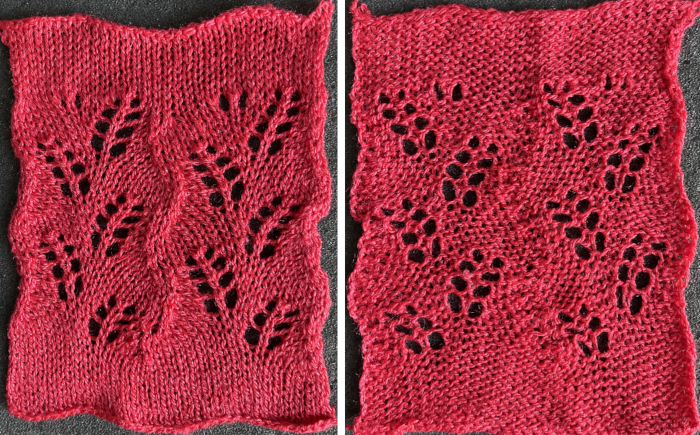
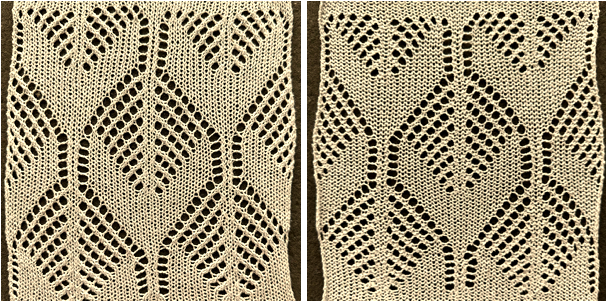
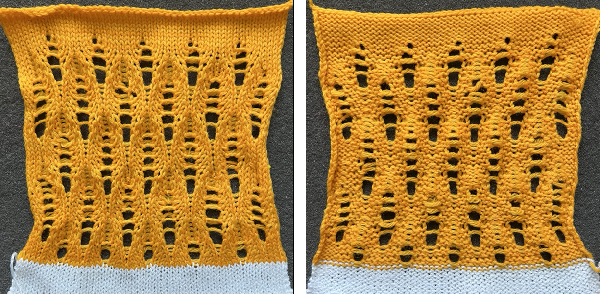
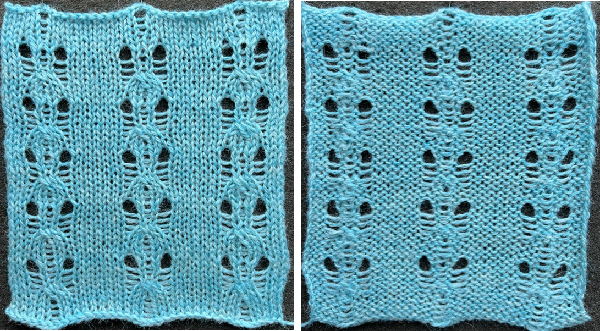
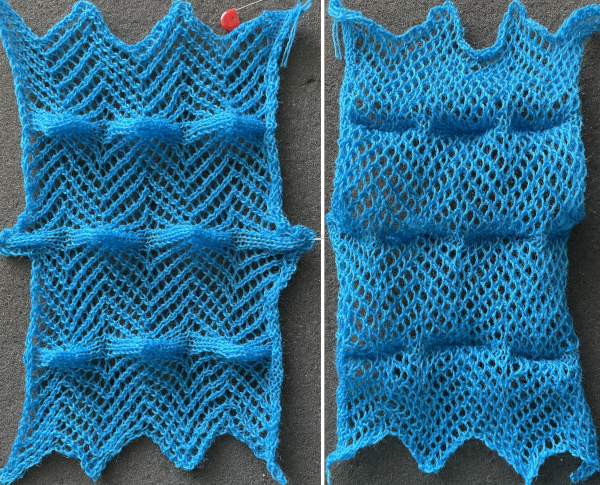
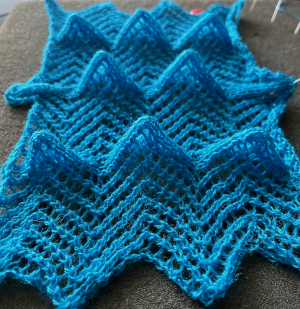
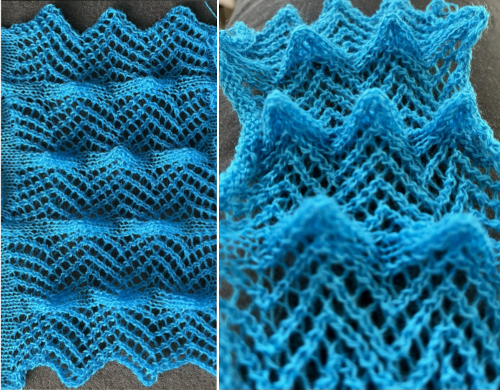
  The proof of concept swatch
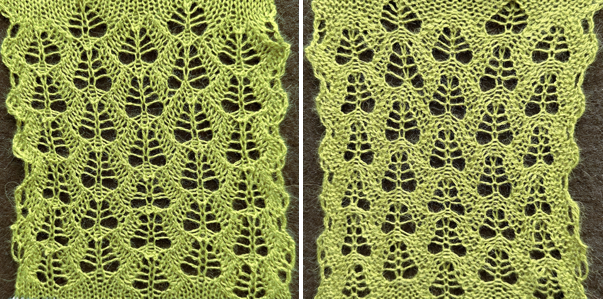
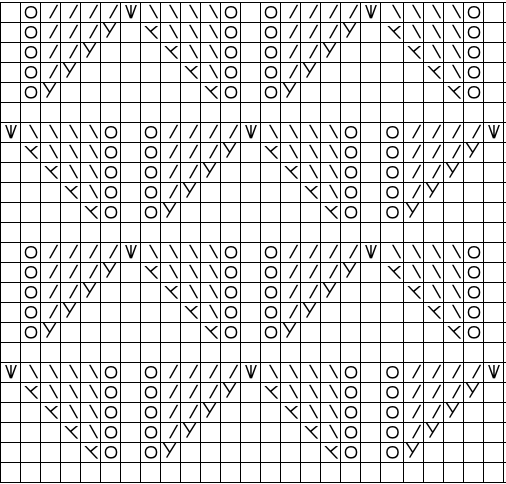
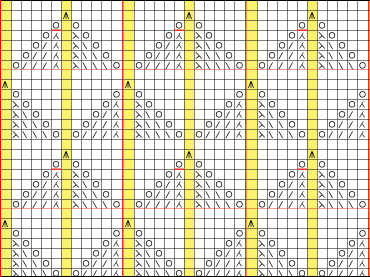
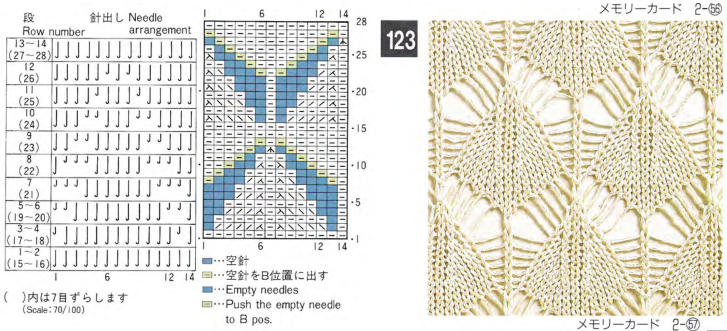
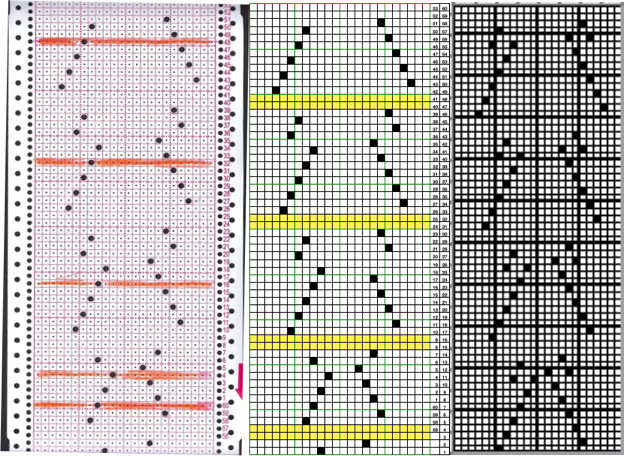
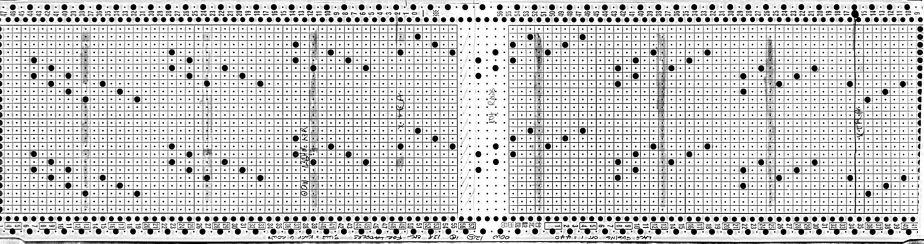
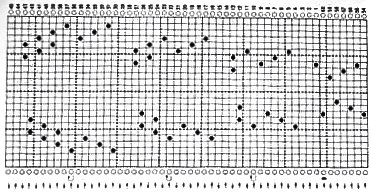
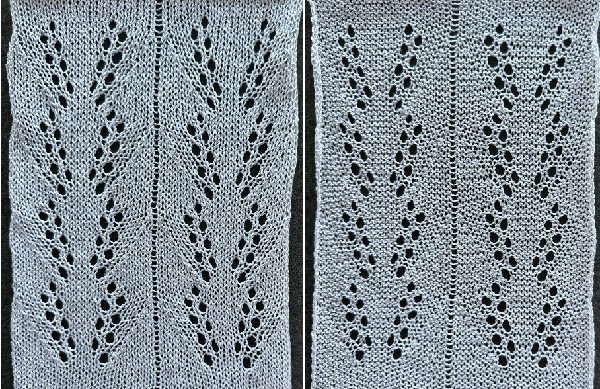
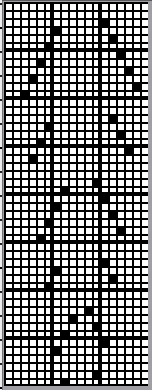
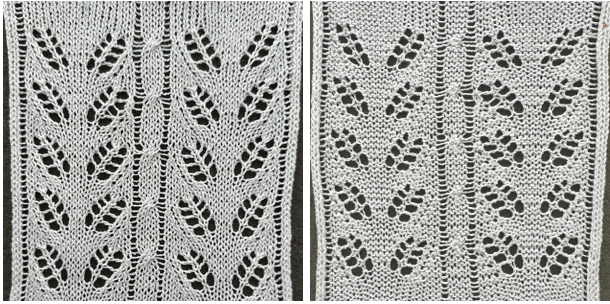
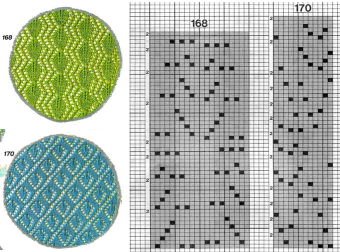
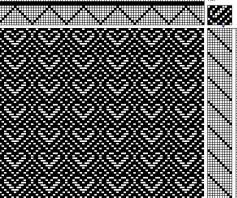
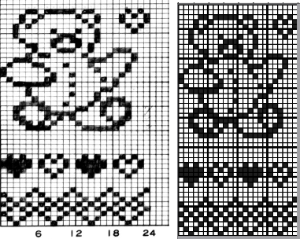
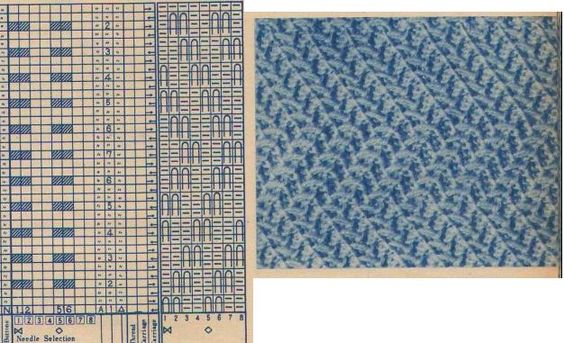
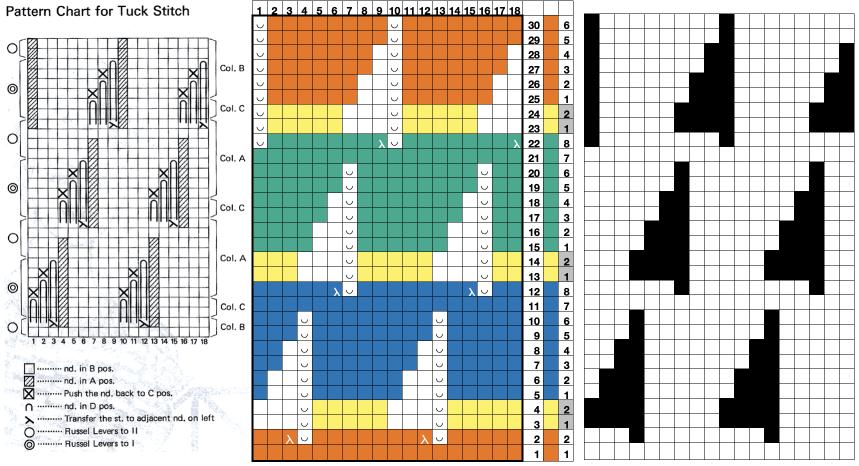
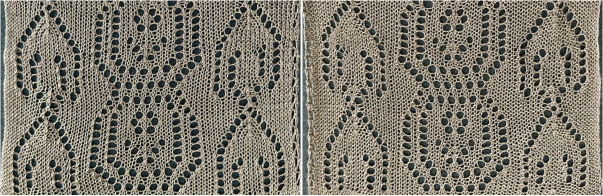
 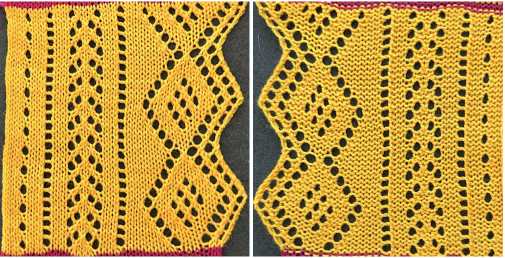 If the chosen design inspiration is from a punchcard pattern and the goal is to match the transfer sequences intended by the pub beginning with the fist row of transfers to the left, the approach is different.
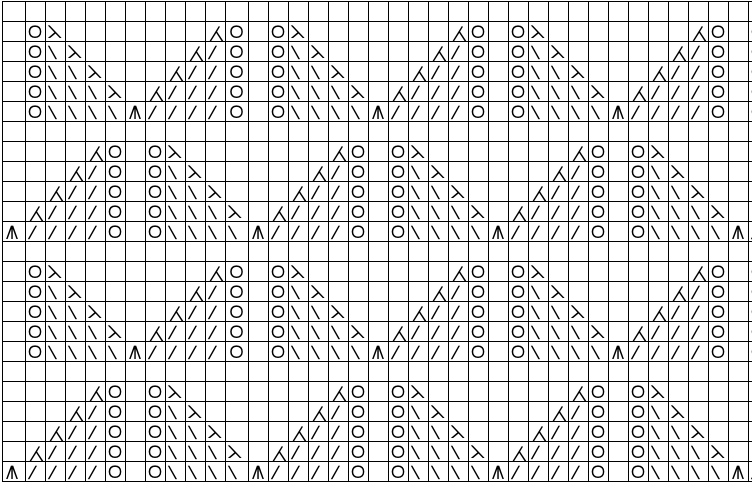
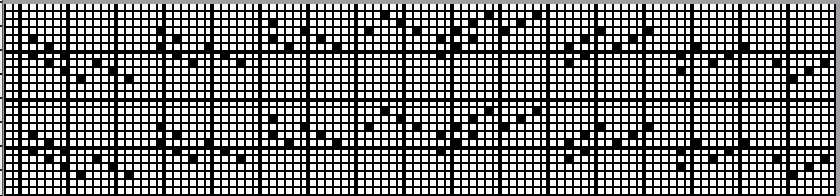
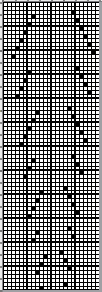
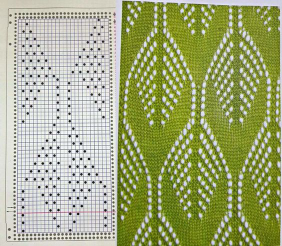
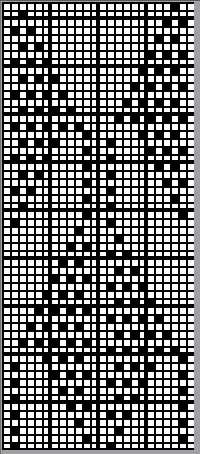
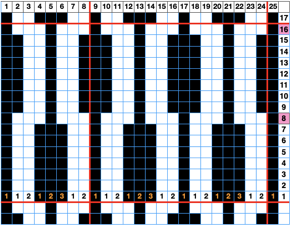
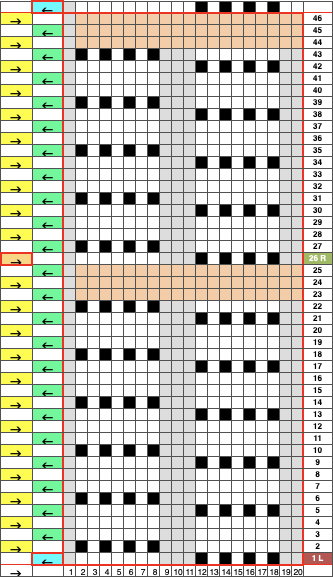
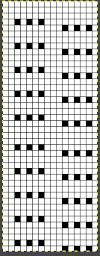
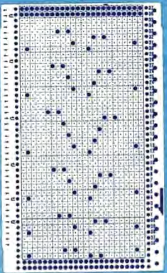 pairs of rows are added after each transfer segment and in this case, a 42 row repeat becomes a 54 row one. In addition, pixels are shifted to form double eyelets along the straight edge on the right, and added and subtracted for shaping with increases and decreases that form matching eyelets on the left.
 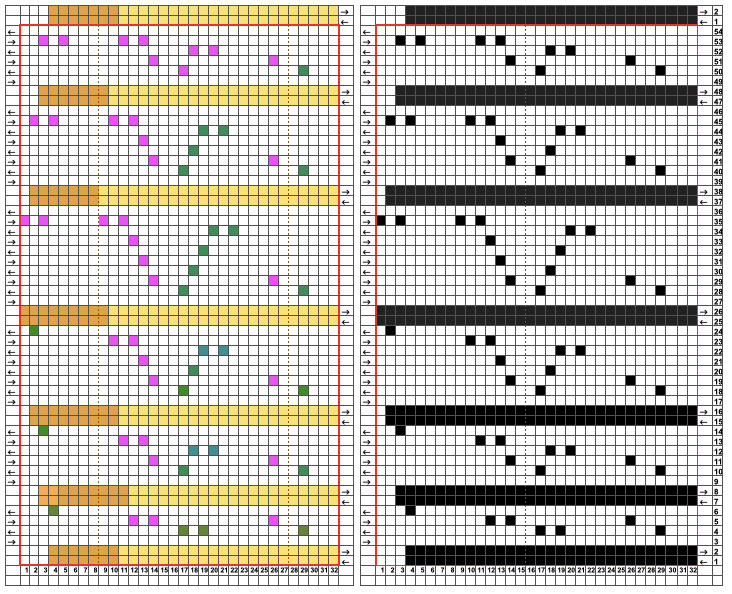 The png 32X54 png, used mirrored on the 930
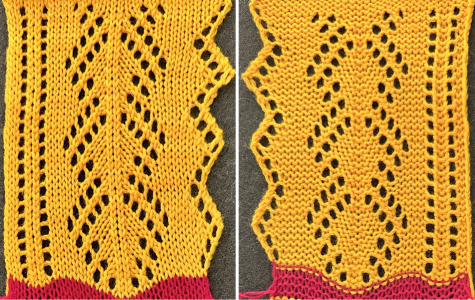


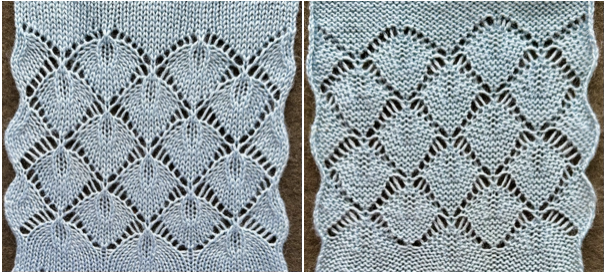


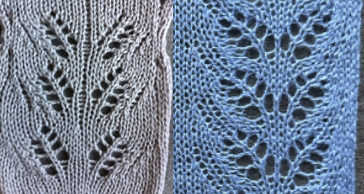
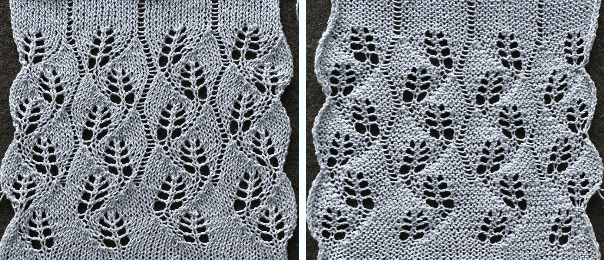
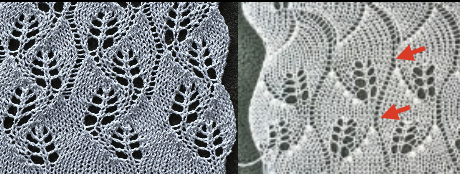
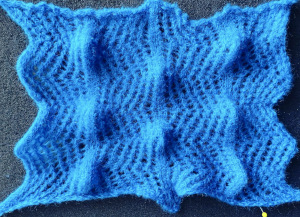
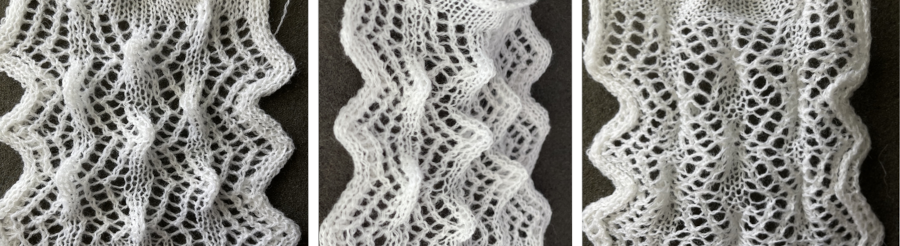
 and this, with both patterns shared in the same blog post


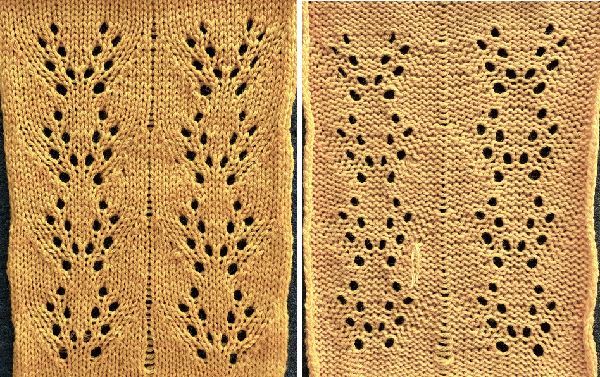


 the 60X74 png


