This sweater by Namesake, in the Fall 2024 collection, led to a FB query as to how to produce a cable version inspired by its color movement on home knitting machines. 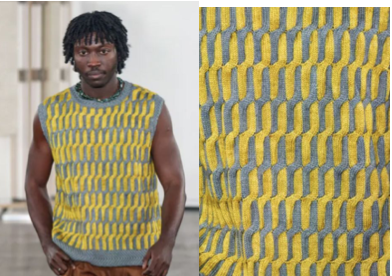 The discussion leads back to how to produce cables in 2 colors on home knitting machines best and accurately.
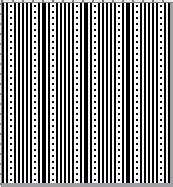
One way to achieve color movement is to begin with using and modifying vertical lines.
Due to the fixed width between machine needles, it is best to use a fiber with a bit of stretch such as wool, and often 2X2 crossings appear to be the limit for designs containing them in frequent, all-over patterns.
When working in single colors there are ways to obtain extra slack to make the crossings easier, but using the FI settings makes the knit tighter as in any slip stitch, limiting the use of such measures. In addition, returning the needles to the proper preselection position in pattern after the transfers needs to be performed manually.
A starting best-guess rule is to knit a minimum number of rows between crossings matching the number of stitches moved ie. for a 3X5 cable, knit at least 8 rows before repeating.
Tracking transfers can be achieved in several ways. The needle bed or tape can be marked with water-soluble ink, custom paper needle tapes may be printed to size, or paper strips simply marked and slid under needles in work.
In machines such as Brother, where needles are preselected, that fact can be used to advantage in establishing guides for the cable locations within the programmed design.
This swatch can be knit using a 1X1 locked needle selection.
While hand knitters have the advantage of seeing the color movement clearly on the knit side, machine knitters can find it harder to follow their locations with only the purl side facing them. 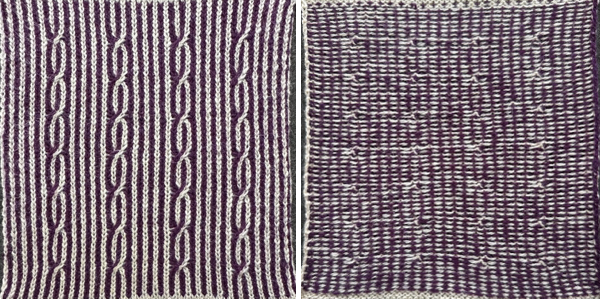 The vertical stripes can be interrupted at intervals by additional patterns or shifting cable locations.
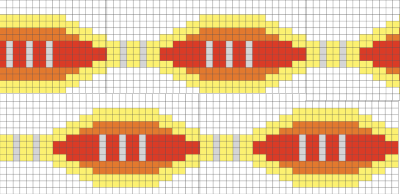
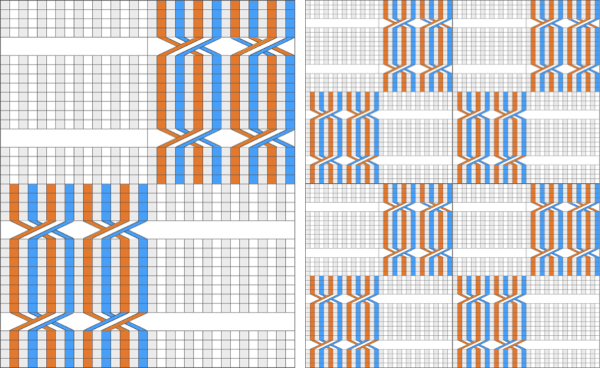
My charts begin in a spreadsheet, Mac Numbers. The first trial effort: 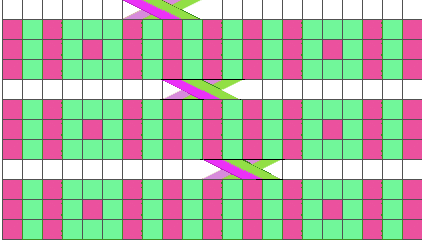 To begin with, the goal was to avoid the 2 by 3-pixel blocks that occur with tiling, which upon later consideration, might aid in avoiding placing cables in the wrong columns,
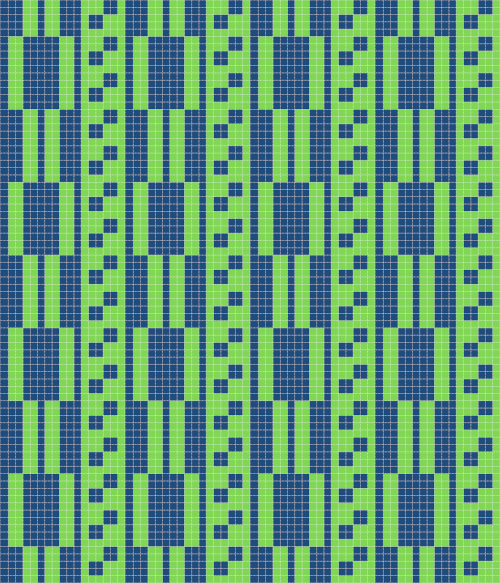
 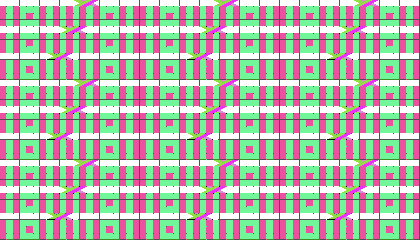 resulting in a 20X18 design. Black pixels represent the dark color, or simply the color in the B feeder.
![]()
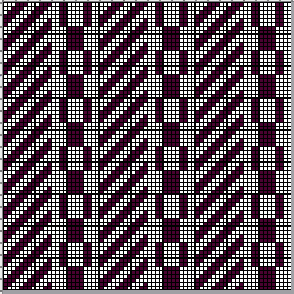
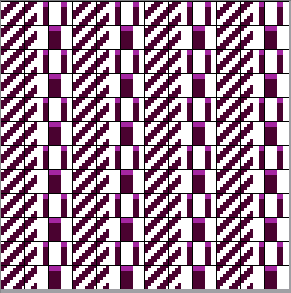
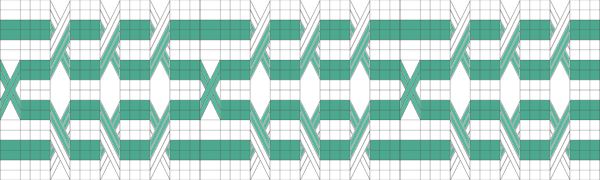
 The alternate repeat to yield those double-width blocks, 21X18
 ![]()
 When matching hand-knit designs such as in complex arans, the direction of the crossings matters and may need to be reversed throughout.
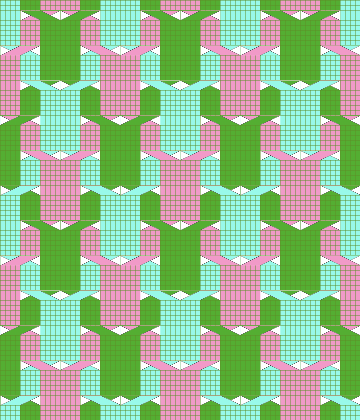
 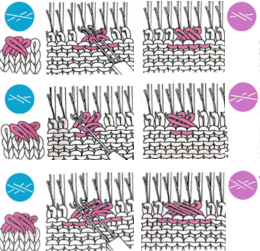 In these instances, it is enough to be consistent, and their direction can be a personal choice. I prefer cabling right over left.
 ![]()
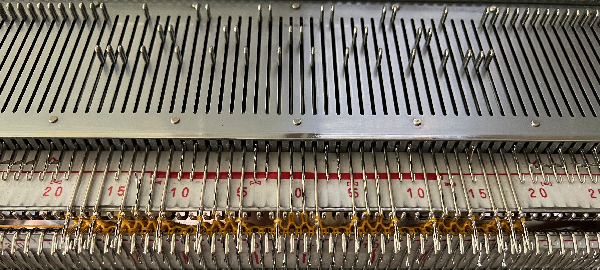
![]() In the first test, using the 20-stitch repeat, I marked up a paper strip placed under needles in work and followed markings for Row Counts and needle GrouP shared in the table on the right.
In the first test, using the 20-stitch repeat, I marked up a paper strip placed under needles in work and followed markings for Row Counts and needle GrouP shared in the table on the right. 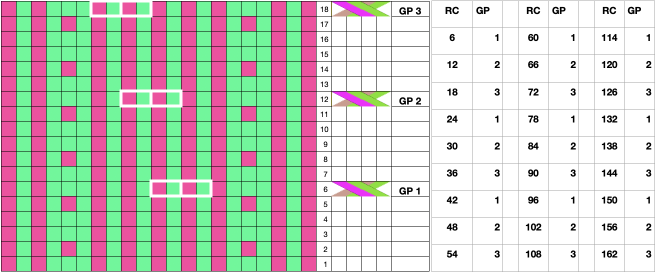 The result begs the question of how to avoid cables in the wrong columns and the possibility of repeating them more frequently than every six rows. Occasional stitches in the wrong color may be duplicate-stitched to mask them, but small cables in the wrong place or the wrong direction are problematic.
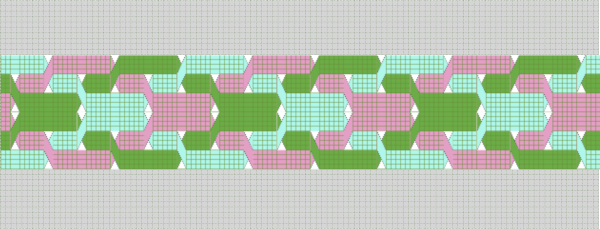
 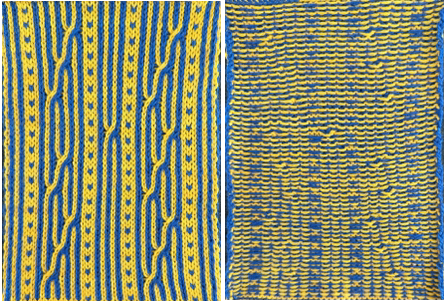 This repeat is 20X12 pixels, and it includes areas missing needle selection that will serve as visual cues on the needle bed for where stitches need to be crossed, now every 4 rows. Using the repeat on the 930 required mirroring horizontally to achieve the desired direction
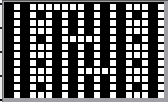
![]()
 Returning to the inspiration sweater, imagining a possible repeat keeping in mind cable crossings no wider than 2X2,
 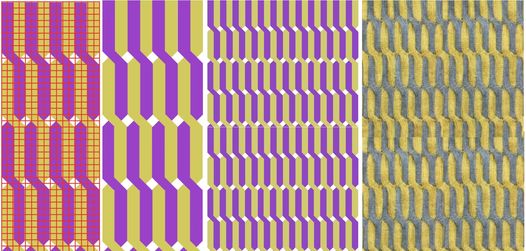 The knit tests were knit using 2/13 wools at T10+.
It proved impossible to use a tighter tension or to across more than 24 stitches along any single row without stitches dropping from becoming too small or the yarn breaking. The solution was to place the cabled details in a center panel. Using similar panels between undisturbed plain or patterned columns could become planned design features.
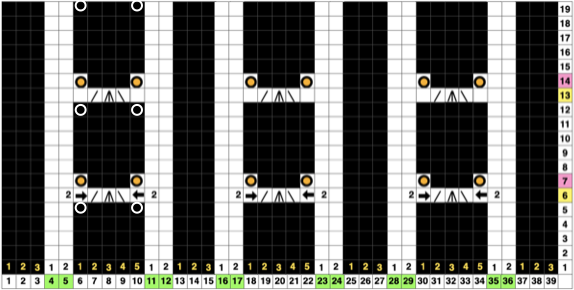
The full swatch repeat, 40X20 pixels, reversed on the 930. 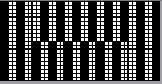
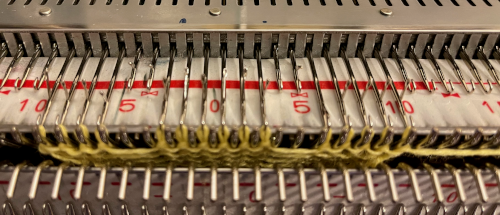
![]() The end needle selection is canceled, and cable crossings are all made in the same direction. The left pair moves under the right pair to the right, and the right pair moves to the front and behind them onto the two empty needles every 10 rows, immediately after the change in needle preselection and before the following knit carriage passes.
The end needle selection is canceled, and cable crossings are all made in the same direction. The left pair moves under the right pair to the right, and the right pair moves to the front and behind them onto the two empty needles every 10 rows, immediately after the change in needle preselection and before the following knit carriage passes.
A printed needle tape can help track their locations. 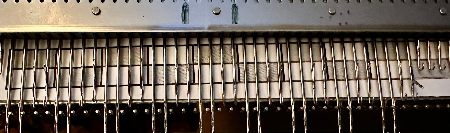 It is placed on the proper preselected needles, bring those needles out to the E position, check that transfers have been made properly, and knit the next 10 rows, repeating the process.
 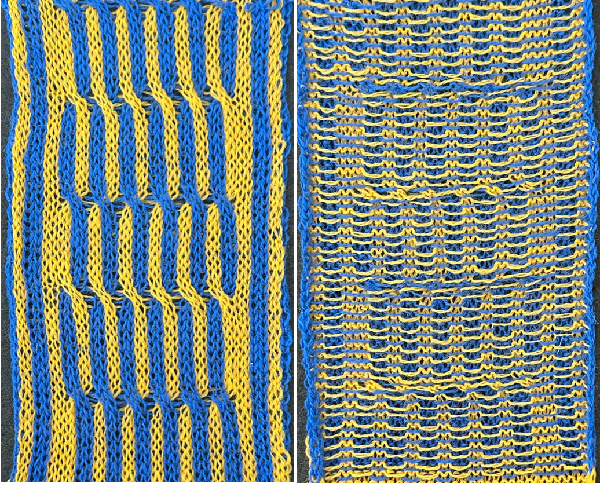 Maintaining diagonal details requires planning a repeat that works as an all over design, then choosing a panel to add to cable details. One such repeat, 12X12
 ![]() the smallest repeat, 6X6,
the smallest repeat, 6X6,  could be used for bucket filling parts of designs with pattern in Gimp
tiled alignment test: maintaining diagonals with cable crossing blocks,
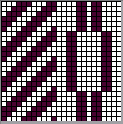


 The proof of concept after testing yarn tolerance for crossings, using the 24 stitch repeat suitable for punchcard model machines as well:
 ![]()
 Fails are easily predicted in a paint or image processing program when rows are added keeping the repeat at 24 wide, the diagonal is not changed, but the spacing between cables is increased ie by 2 more rows:
 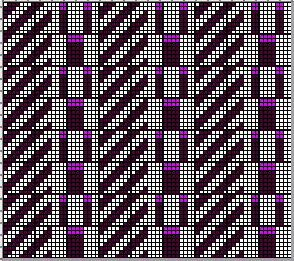 Making it work: 24X48 rows
 ![]()
More on developing DIY cable charts:
Visualizing knit cables 3_ using Numbers and Gimp
Visualizing knit cables in color 2_ using Numbers and Gimp , includes cumulative links
ArahPaint is often a part of the process now as well
Category: Cables and Twists
Using punchcards (3) or electronics to track small cables in pattern
Previous shares on aids to tracking cable transfers
Using punchcards to track small cables in pattern 1
Using punchcards to track cables and twists in pattern 2
Visualizing knit cables in color 2_ using Numbers and Gimp
Hand knitting patterns are usually depicted with the knit side facing.
If crossings are intended to match them exactly when working on knitting machines, they are made on the purl side, and their direction needs to be mirrored.
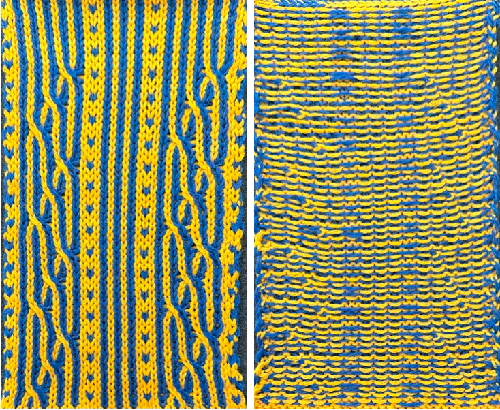
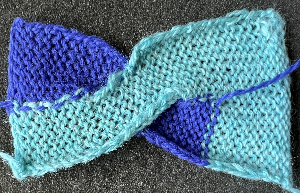
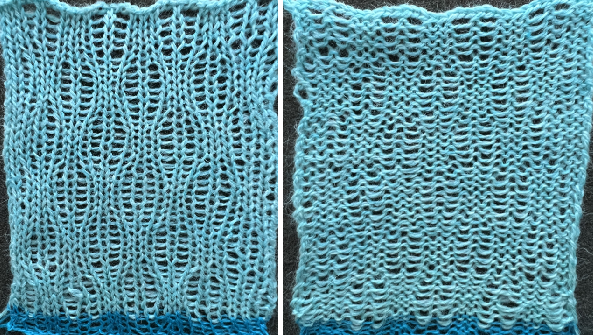
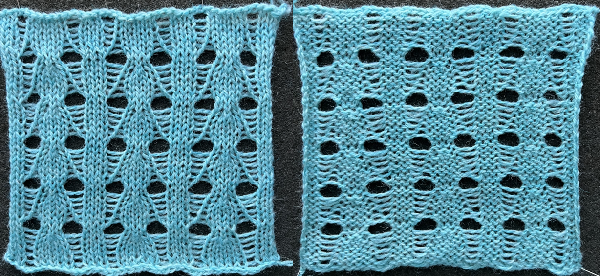
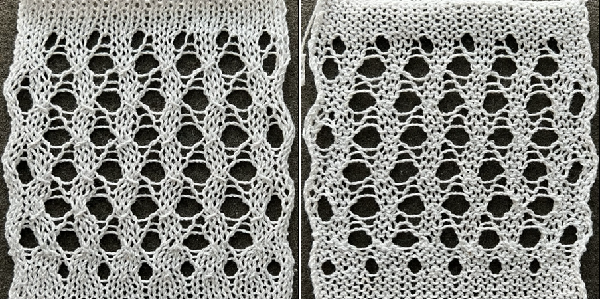
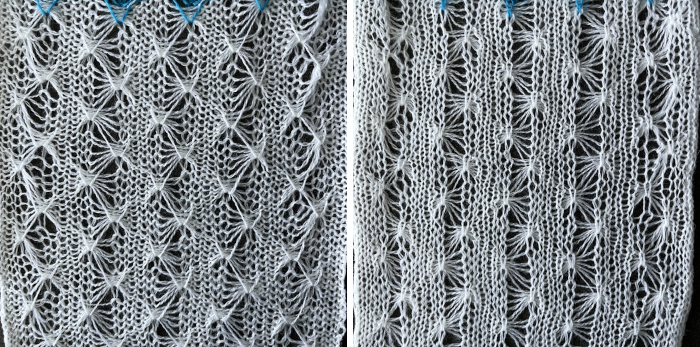
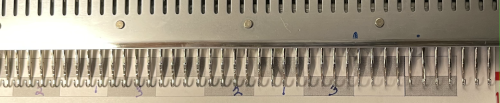
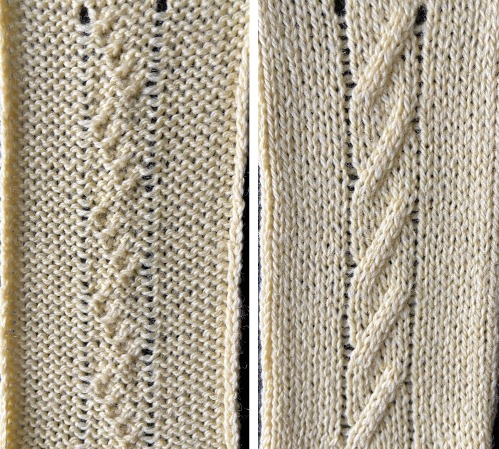
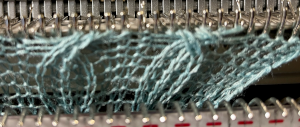
The blue dots illustrate hand-knit symbols, and the pink dots the machine-knit companions I was recently contacted about the possibility of reproducing the swatch on the far right. The image on the left is an actual knit, first tested with cable crossings mirroring each other along vertical columns.
The inspiration swatch was likely knit on the bulky, twisted every 4 rows, mine on a 4.5 mm machine, twisted every 5 rows.
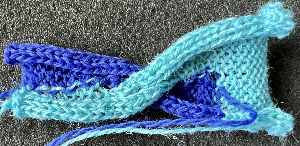
It is possible to crop, copy, and paste initial photos, as in the center image, to visualize how the process may be altered prior to spending time creating new charts or any actual knitting. 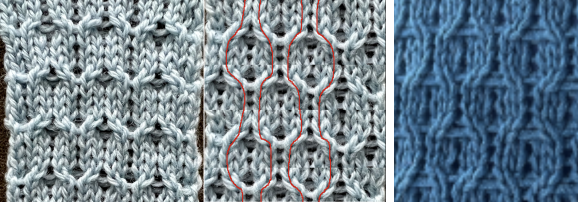 Building charts in a spreadsheet:
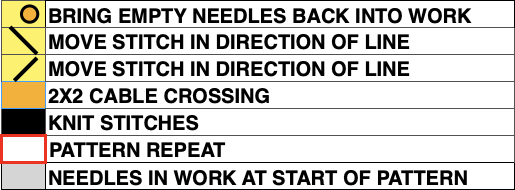
begin with creating and saving custom shapes, which can be made editable, and outlined if preferred (magenta) to further define the stitch brought forward, with the other moved behind it (blue).
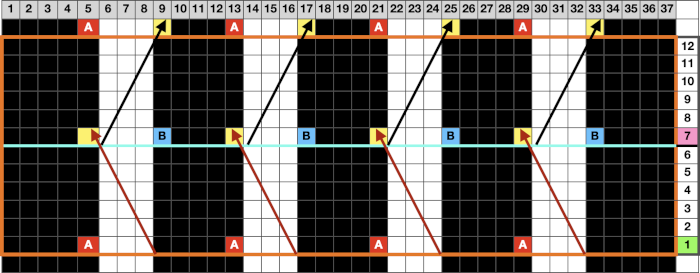
Symbols used:
1. black cells/ knit stitches
2. white cells/ needles out of work, creating ladder spaces and non-selected needle areas where stitches are to be moved in the direction of superimposed arrows
3. red arrows/ stitches that are lifted off the needle bed, brought to the front on the purl side. The stitch on the adjacent black cell/selected needles is removed, travels behind it, and replaces it. The held stitch is then placed on the now-empty needle. Both stitches are brought out to hold/E position to knit properly on the next carriage pass.
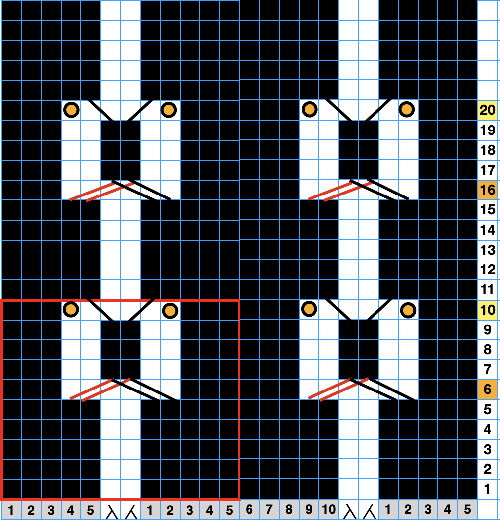
The plan is to use the slip-stitch setting in both directions.
Since there are needles not in use, the end needle selection needs to be canceled.
Proper needle placement is required for patterning accuracy.
One option for achieving it is by air knitting the first row of the design, another is to program the width of the planned knit in electronic machines, establishing pairings, and using the single motif setting with no guesswork.
A chain cast-on can be performed, followed by dropping chains in ladder locations and taking those needles out of work to A position.
Even weight is useful if crossings are to begin after only 4 rows of knitting.
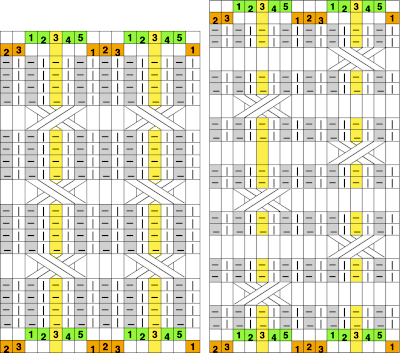
Each repeat is 8 stitches wide, punchcard users repeat it X3 in width, and in the charted height X3. 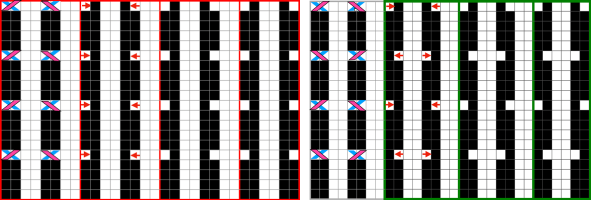 Proofs of concept: 30X20 electronic repeat for vertically mirrored transfers,
 ![]() and the alternating twisted arrangement
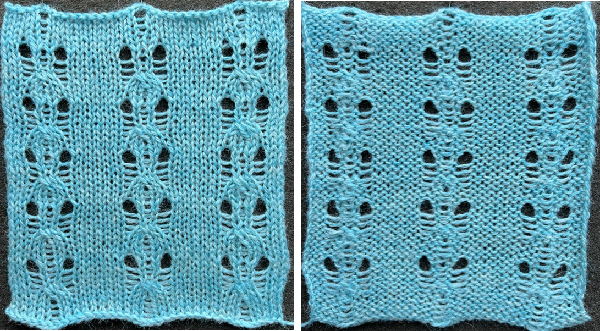
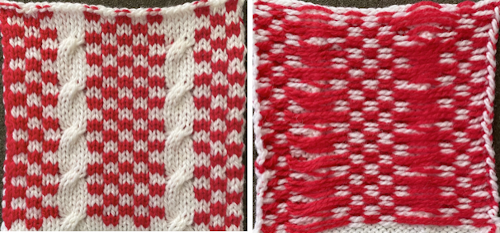
and the alternating twisted arrangement ![]() The work on the machine
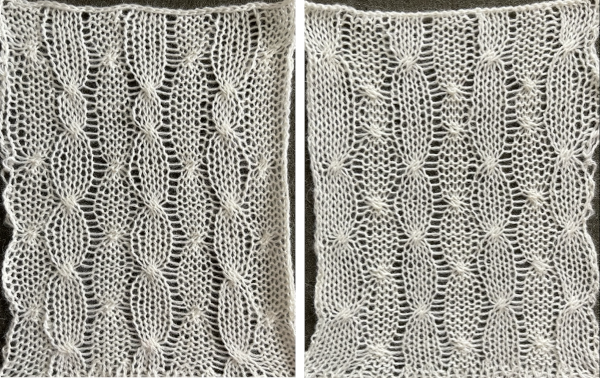
The work on the machine 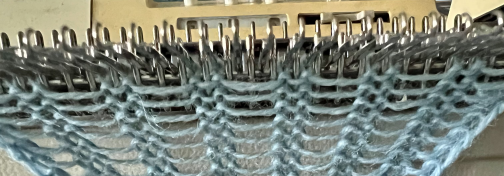 In the resulting swatches, patterning errors such as the marked one become difficult to repair after the fact as stitches grow in size and ladders nearly disappear
 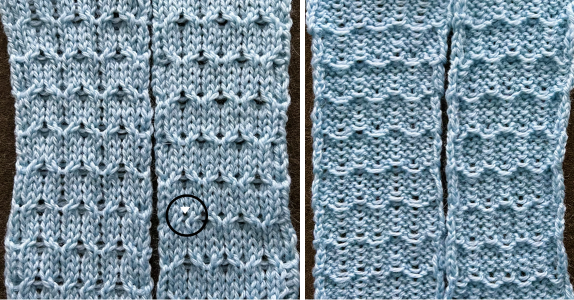 Both swatches measure less than 2.5 inches in width, another reason to explore the results on bulky models if they are to be used in garments.
If planned as panels combined with stocking stitch, careful planning is due to overall gauge differences and those in row counts when seaming and joining.
A return to plaiting and double bed hand transfers
These two sweaters, by Denimist on the left, and Chloé on the right, 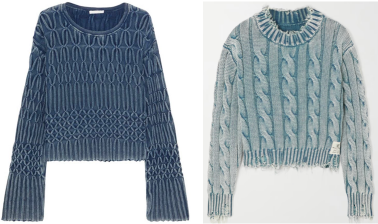 led me to reconsider plaiting, and as usual, whether any repeat may be programmed to make tracking of any hand techniques easier.
A review of plaiting on Brother machines.
The black cells represent needles in work and knitting on the top bed. Cast on for every needle rib, change the configuration so that stitches on needles represented by white cells are transferred down to the ribber.
Needles left empty after transfers are pushed back to position A, out of work/ OOW.
The first repeat was planned for 30 stitches, but some of my tests were knit on slightly different stitch counts. 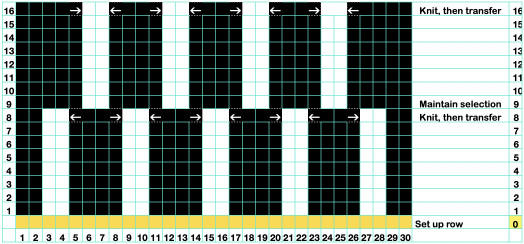
![]() The main bed is set to KCII. Any time empty needles are part of the design repeat, the end needle selection is canceled. The stitch count remains constant throughout.
The main bed is set to KCII. Any time empty needles are part of the design repeat, the end needle selection is canceled. The stitch count remains constant throughout.
The main bed does not need to be set to slip stitch, it can be left set for plain knitting.
The needle selection is used only as a guide to the transfers, which are made using a 2-prong tool in the direction of the arrows on the knit bed every 8 rows.
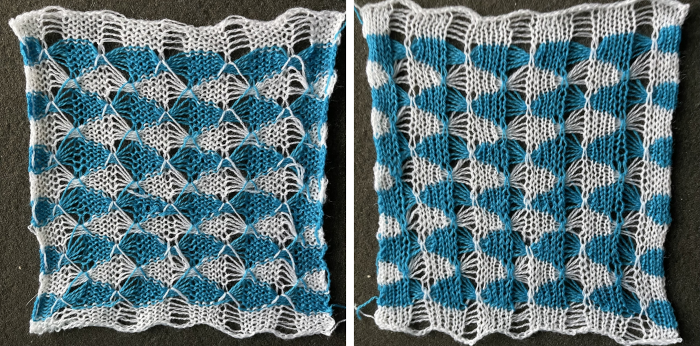
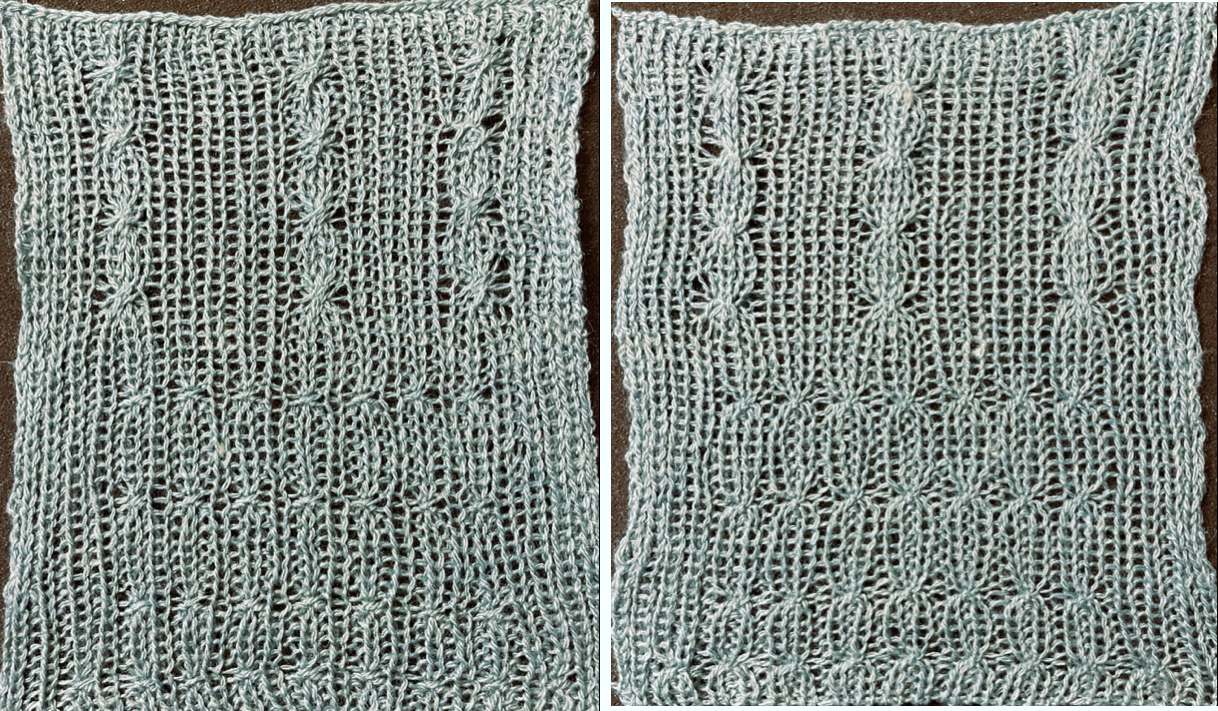
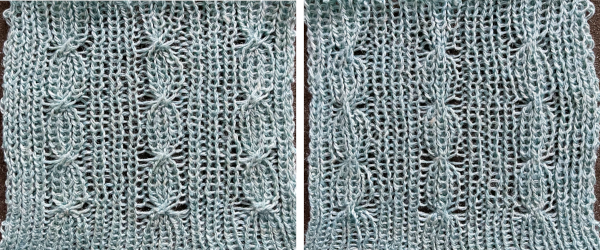
The swatch on the left was knit using 2/8 wool and no-stretch serger thread for the plaiting yarn, on the right the thicker yarn is 2/15, with fiber content for the thin yarn no longer readable. 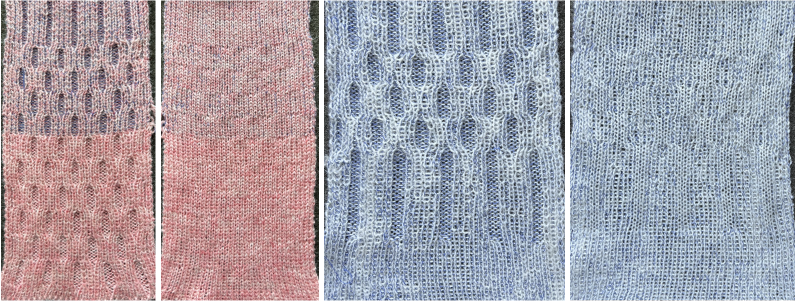 An equal-thickness dark is added on the left, with visible color distribution issues. On the right, the light is a 2/28 Italian import, the red a 20/2 rayon, and I began to test the introduction of possible cable crossings along with considering the width of all knit vertical side borders.
  Varying the overall spacing and the number of rows knit before cable crossings, 4 on the left, 6 on the right. The yarn in the latter swatch is a thin, coarse, inexpensive wool. The cabled stitches were hard to knit on the next pass, the low color contrast in the finished surface makes the texture effect subtle.
 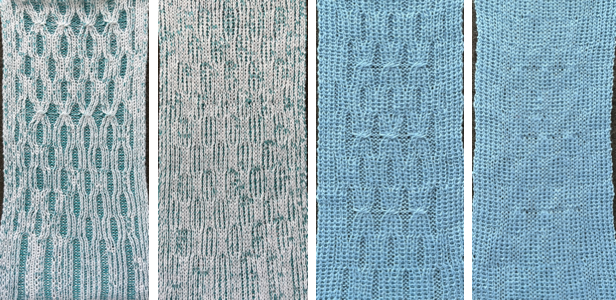 The instructions here in principle are as given above. The single stitch in the 1X2 cable crossings is always brought forward on the purl side prior to any transfers of the corresponding stitch pair.
A single repeat segment imagining actions to be taken, ![]() and a full chart for the proof of concept, 34 stitches in width
and a full chart for the proof of concept, 34 stitches in width 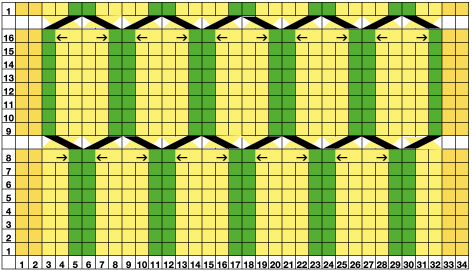 Stitches are moved after every 8 rows knit in the direction of the arrows using a 2-prong transfer tool, filling in a single empty needle to the right or left as indicated by arrows.
The empty needles are pushed back to the out-of-work position after the transfers.
The initial needle selection may be used for more than 8 rows at the bottom of the piece and the top if preferred.
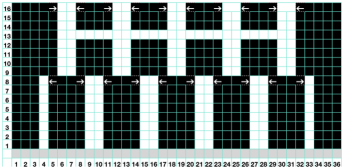
A 36-stitch programmable repeat shifts the 8-row repeats shown in the colored chart ![]()
 The blank cells on row 13 will serve as the area on which the 2X2 cable crossings are made.
The initial setup
 after the first set of transfers
 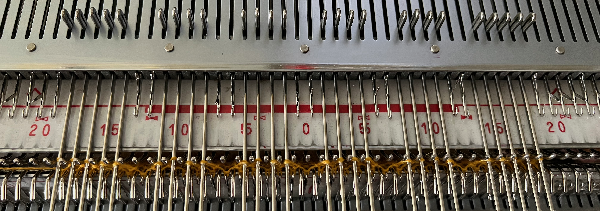 groups of needles with no needle preselection
 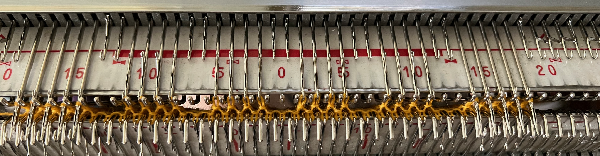 serve as markers for the 2X2 cable crossings
 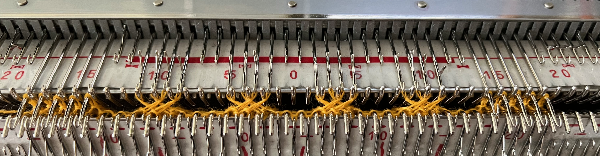 Bring needles with crossed stitches forward for easier knitting on the next carriage pass and continue knitting until needle preselection changes once more.
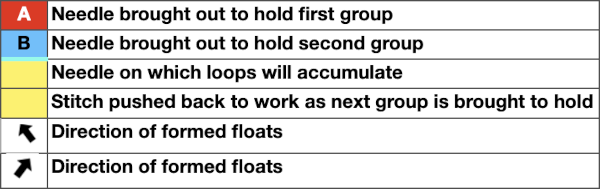
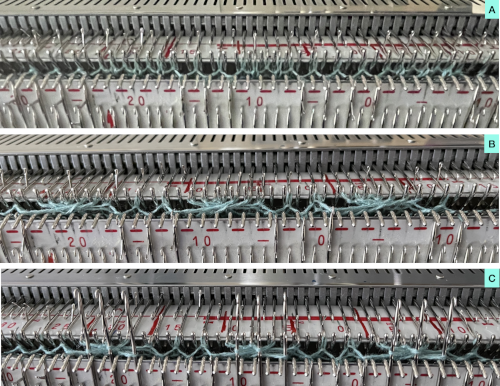
A: fixed needle selection
B: stitches moved with 2X2 cable crossings
C: fixed needle selection once more. Switch yarn feeder to plaiting accessory, add plaiting yarn, with 2 yarns of equal thickness in use tension is adjusted
D: stitches moved with 1X2 cable crossings
E: stitches moved with 2X2 cable crossings
Return to A selection. End the swatch matching the number of rows on the fixed needle selection at its start.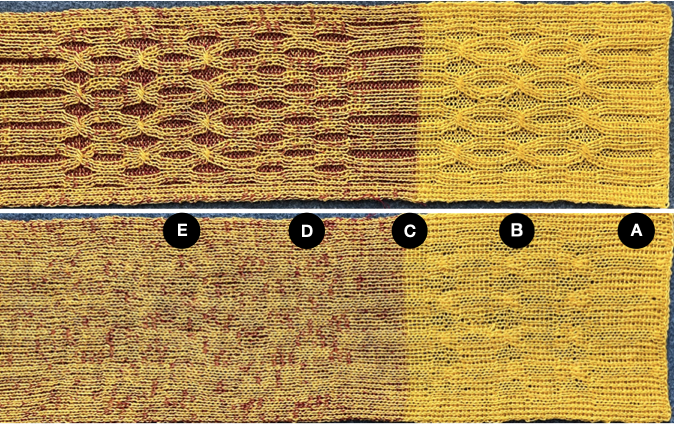
Long vertical button holes/ slits in knit fabric 1: intarsia
There has been a long thread in the machine knitting FB page lately that arose from a share of these 2 images. 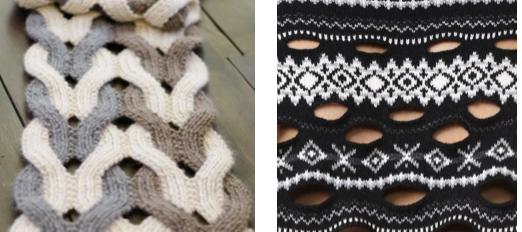 There are three hand-manipulated methods available on most machines. True intarsia knits all parts of a design simultaneously and is best suited for complicated designs. Short-rowing is best suited to diagonal shapes, while the slip method is to vertical shapes. Both knit designs one section at a time and have no floats between shapes on the purl side.
True intarsia is also called bobbin or tapestry knitting.
Members contributed their concepts along with some of their swatches illustrating the idea that effects similar to the cables on the left could be executed in intarsia.
One member shared an Instagram link with a body of work by cari + carl using the technique.
I have been knitting for decades. Intarsia on the knitting machine along with cables or most hand-technique-only finished garments is something I have avoided at times, simply because they were too time-consuming when knitting items for sale in shows or even galleries, at others because some evoke my personal flight response.
I used to hand knit as well, preferred lace, intarsia, and most definitely complex cables knit on 2 needles.
Prior to attending a design school as a student, I worked in a shop that happened to sell knitting machines but whose main income came from selling yarn and lessons to hand knitters. As part of my responsibility, I had the job of hand knitting bulky intarsia sweater samples which at the time featured large images, often of birds or other animals, that were sometimes wrapped over the shoulder and onto the back or sleeves.
As I began to work on Brother machines, I acquired all the related accessories. My intarsia carriages other than in demos were stored unused for years. I gave away my yarn-brake years ago, 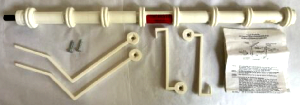 and very recently shipped my Brother 260 bulky intarsia carriage to a Parsons student, so by default any of my experiments at present will be knit on a standard km.
I was stuck on the idea at first of large stitch count cable crossings being made by using holding techniques and initially could not imagine how the same could be done using an intarsia carriage. It took a while for me to sort out in my brain that slits may be created in intarsia by simply not wrapping stitches as the knitting continues and maintaining color changes across the row of knitting, resuming yarn crossings in the areas that require joining.
Some considerations: using the intarsia carriage, the stitches are formed in stocking stitch, so the resulting knit strips will tend to curl to the purl side, far more noticeable in narrow strips, perhaps less so in yarns that will result in stitches that are permanently set by blocking. Using bulky yarns on appropriate gauge machines may also lessen the curling.
Experimenting with familiar yarns helps determine whether the familiar knit carriage tension when using them on the single-bed matches that achieved when the intarsia carriage is in use.
My Brother Machine Intarsia Standard carriage is the KA-8210 model: 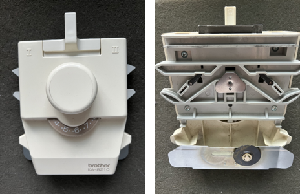 It was intended for use on early Brother punchcard models listed in the manual. Trippers were required to advance the row counter in later models.
 The B tripper doesn’t engage in my carriage, the A tripper does, and triggers the row counter in my 930.
The yarn placement for intarsia knitting is the same as that used in knit weaving.
“Sinkers” are provided with the accessory, and frequently turn up in the “identify this please” questions in forums. I have a tendency developed early on to use clothes pins as small weights when needed, used them in the swatch that follows, and if bobbins filled with yarns are used instead of the yarn balls or cones, their weight will be enough to keep yarn lengths manageable.
Each area of color has its own yarn supply, usually wound on bobbins.
Yarn bobbins are available in a variety of materials and sizes from cardboard to plastic or even wood. The overall shape may vary, but the concept of wrapping yarn around the center of a narrowing shape and slipping an end through a slot to secure it is shared by all types related to the image on the left. It is possible to make your own in similar configurations out of any material that will hold its shape.
The clamshell version became my preferred version of the tool. The small ones come in handy for holding ravel cords or even wire. 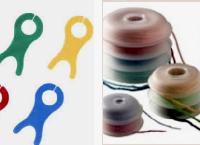 When knitting more than a swatch it is likely far easier to work without a ribber in place. I like to do all my knitting with the main bed anchored and angled with ribber clamps rather than flat.
 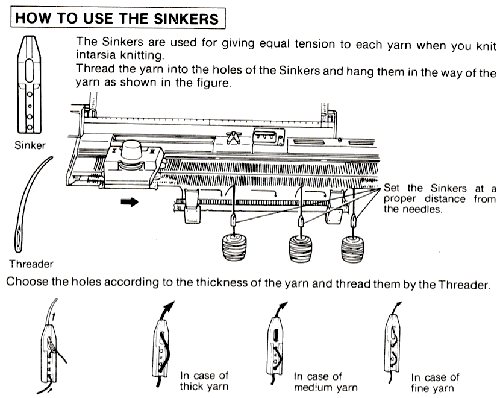 If the threader is missing from the supply of sinkers, floss threaders can help, and are also handy when beading on the machine. The used yarn here is 2/18
 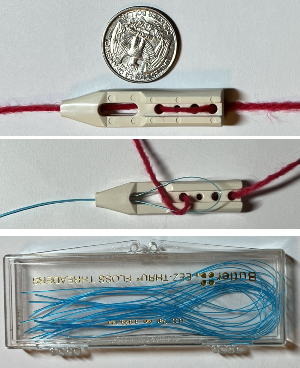 To knit: begin with a familiar yarn. This carriage may actually produce a different stitch size and resulting gauge than the result when using the same tension number on the knit carriage, a factor if the plan is to combine intarsia segments with the main carriage for any stocking stitch across all needles in use.
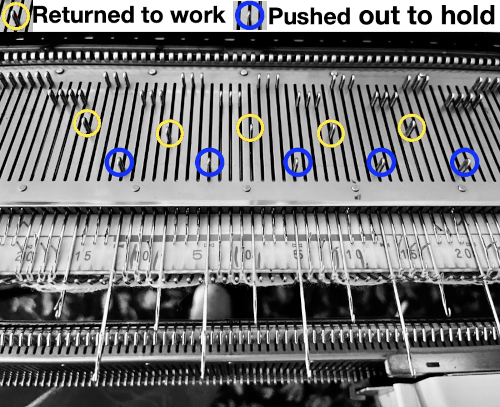
Brother knitters are familiar with the preselection of needles when patterning. When using the intarsia carriage all the needles in work, B, are aligned in the D position. They are seen below just behind the latches.
Knitting may begin on either side. Start on waste yarn and ravel cord if working on a large piece, cast on, and knit one row unless casting on in different colors matters.
Remove the knit carriage and continue using the intarsia carriage, beginning with it opposite the side on which the knit carriage had been removed, leaving a yarn end. 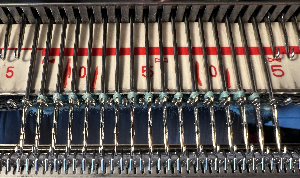 If any latches are closed, the stitches will drop on the next intarsia carriage pass. They will drop as well if the yarn skips being laid over any of the needles in the D position. There will be an eyelet at the very start of the process which is eliminated when the yarn ends are woven in. A reminder for Studio knitters: Brother needle positions are A, B, D, and E, C was present in very early models but was then eliminated permanently, while Studio kept the alphabet in proper order.
Laying on the yarn 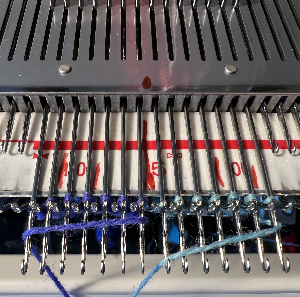 An illustration of the crossings to eliminate holes.
 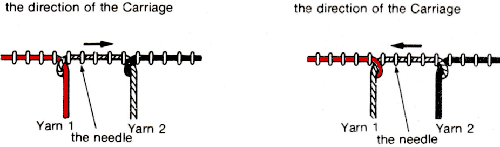 I had initially begun on an uneven number of stitches, then decided it was more practical to be able to use 7 prong tools for my planned cable crossing, so I decreased on each side accordingly.
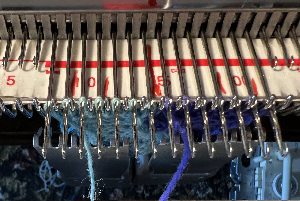
Eliminating the crossings will deliberately cause separations between the colors.
If the intent is to cross the resulting strips, then the side of each where transfers stop matters. 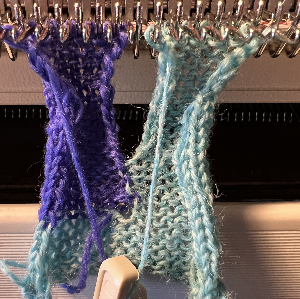 Using the appropriate tools remove the stitches onto them.
 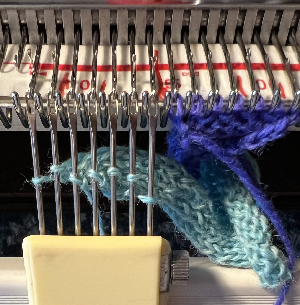 The yarn ends need to be kept free for the next intarsia carriage pass, the needles are aligned in the B position after the cable crossing is created.
 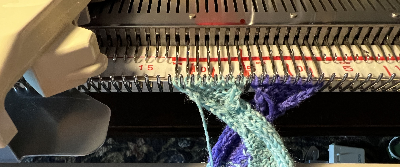 Remove the carriage by sliding it off the bed or using the release knob
 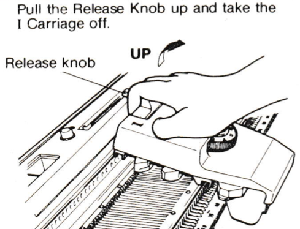 Return it to the opposite side to make a free pass and return to the side of the needle bed where the necessary yarn ends will be available to proceed.
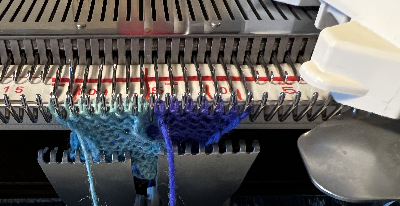
 Resume wrapping to join the strips once more
 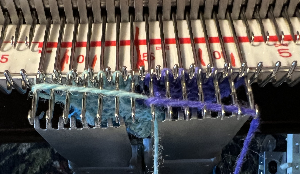 Knit to the desired length, and bind off in one or more colors.
When off the machine the stocking stitch strips will curl. 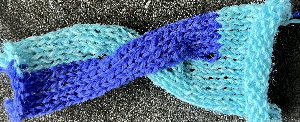
 Here the knit is exposed to steam and some light pressing
 This gigantic swatch, for me, is the end of my intarsia knitting, though it is best to never say never.
Tips and techniques for the Studio AG 50 Intarsia Carriage
Brother Intarsia without an intarsia carriage
If cable crossings are the goal for this and following slit techniques, planning the crossings in color can help track the process. This is one of my earliest illustrations for doing so, from my Excel days, followed by a series of later blog posts on the topic. 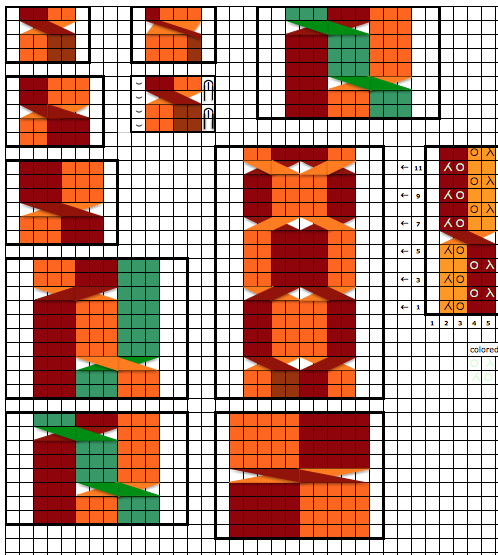
Building more textures in needles out of work spaces
A collection of previous posts exploring some variations on the topic:
Ladders with lace, (leaf) “making things work” 1 3/15
Ladders with lace, (leaf) “making things work” 2 3/15
Ladder lace 8/13 Instructions reviewed in 2022, one of the accompanying swatches: 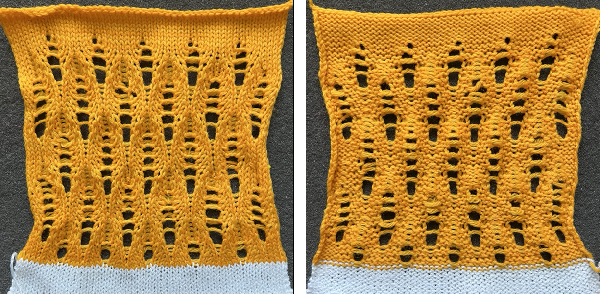 Ladders and Lace 8/13. MK ladders, and a bit of crochet 12/16
Tuck “lace” trims (and fabrics 1) 6/17
Tuck “lace” trims (and fabrics 2) 6/17
Tuck “lace” trims or fabrics 312/17
Automating tuck stitches combined with “lace” 2 6/17
Combining tuck stitches with “lace” 1 3/15
Many fabrics other than the traditional ones familiar to hand knitters and machine knitters that create eyelet patterns by transferring and combining stitches with yarnovers often include the term lace in their name, one such is ladder lace.
No matter what machine is in use, charts may be developed and followed that include row-by-row directions for needles out of work and any movement of stitches to alter the look of the floats created in the resulting spaces.
Knitology offers endless video inspiration for lovers of hand techniques including ones relying on patterns including ladders.
There are several aids in maintaining the desired repeat in NOOW (needles out of work). When establishing the initial needle configuration, punchcard knitters can punch a single row to match the required needle selection if the repeat works within the 24-stitch constraint, and use locked preselection to make transfers in base knitting.
Electronic knitters may use the same concept, I prefer if doing so to plan for programming the width of the stitches in use on the needle bed, adding pixels for knit borders on either side. Punchcard users may need to disregard some needle selections to form them.
Another option for hand technique tracking in addition to marking the needle tape or even the needle bed is to print custom needle tapes created in a spreadsheet.  They can be marked as needed to guide hand technique selections, with colors added if preferred, and are easily swapped out if corrected or additional tapes are needed for different segments of the same technique.
A variety of printable tapes for multiple gauge knitting machines is offered by Claudia Scarpa in her blog post.
A series of printable sheets for tracking row counts at even intervals may be found at the bottom of this post.
In laddered fabrics, the edge stitch on either side of the float may widen and grow in size over time.
The 8/13 swatch uses lace transfers that produce doubled-up stitches to help with stitch stability.
Adding hand techniques serves a similar purpose in wide or varying ladder space designs created on the knit bed.
The length of the item produced combined with the added weight in the finished piece as it is hung or worn may quicken any lengthening and narrowing of the piece, requiring blocking again or at the very least pressing and steaming.
The fiber used makes a difference in the retention of the blocked shapes, in this case, man-made fibers may serve better than wool with its spring back.
If a needle is emptied, if left forward or brought back to the B position, it will pick up a loop on the next pass, and when followed by a second knit row, an eyelet is formed in the loop location.
If a loop on a previously empty needle is dropped after it is formed, the resulting ladder grows in width.
Latching ladders while on the machine creates knit stitches on the purl ground.
Stitches may be removed and returned to the needle bed, cable crossings may be involved.
Picking up the heels of specific stitches on designated rows below and placing them on the knit stitches to the right or left of the ladder space is a way of adding non-vertical shaping.
If experimenting with the number of rows knit before adding hand techniques, keep good notes in order to be able to reproduce segments in an all-over pattern. Beginning patterning with simple transfers in stocking stitch ground, here the needle configuration shifts but remains constant throughout. My proof of concept swatch is knit in 2/8 wool. 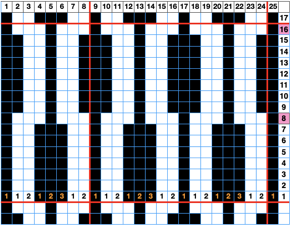 Visualizing the necessary actions:
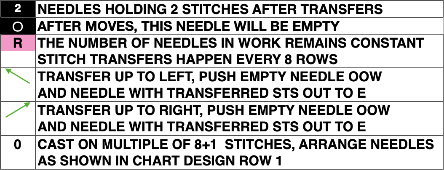
 The proof of concept:
 Adding 2X2 cable crossings: this repeat is 12 stitches wide.
A chain cast-on allows for dropping the 2 chains in the location of the starting ladders, with some weight applied to the starting rows one may proceed to the first cable crossing.
On row 6, and then again at 10-row intervals from there, the designated pairs of stitches are crossed consistently in the same direction. The needles aside from the crossing are pushed back to the A position.
Knit 4 rows.
On row 10, and then again at 10-row intervals from there move the left stitch of the pair of the center needles to its left, and the right stitch to its right, restoring the empty column at the center of the chart. Return the remaining empty needles to the B or E position
Knit 6 rows.
Repeat the process, ending with 6 knit rows. ![]()
 This variation uses transfer lace stitch crossings to produce larger eyelets than seen in the above swatch. Row counts for specific hand techniques can be tracked in a written or printed document if preferred.
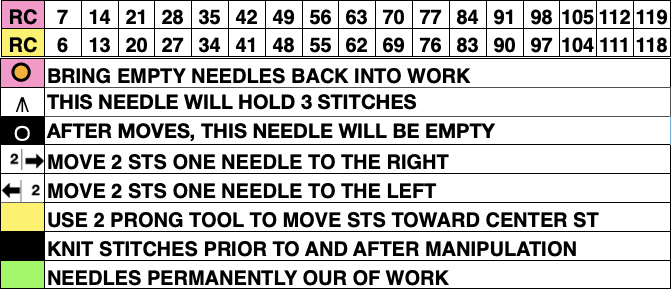
 The knitting in progress: the initial needle spacing:
 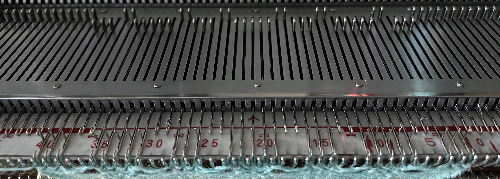 Emptied needles are in the process of being returned to work after the transfers to restore the initial setup, the first knit row will create loops on those needles, and the stitch is completed with the next knit pass from the opposite side
 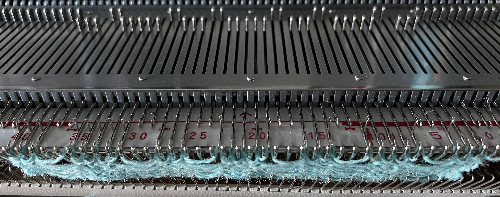 The growing pattern becoming apparent
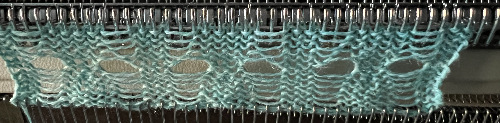
 After updating the 8/13 post, these experiments continue exploring the above concept. The yarn now used is a wool rayon, which appeared not to split, and retains blocking if it is used.
The samples use an 8-row repeat with different transfer methods. The first uses two-stitch transfers. The 24-stitch version is suitable for a punchcard, 48 rows in height. 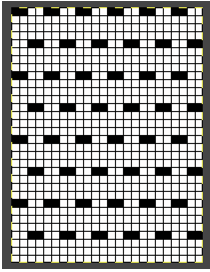 the smallest electronic repeat
 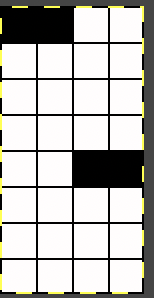 tiled to a 28-stitch repeat for the electronic, in the width of my planned swatch, only for the required 8-row height
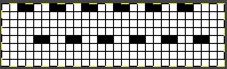
![]()
![]()
![]() The now familiar double loops
The now familiar double loops 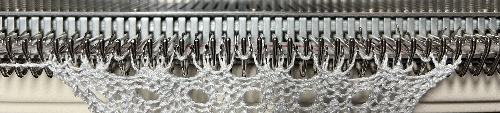 Beginning ladders
 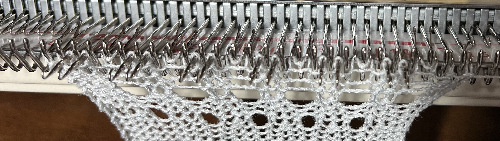 A partial row view of stitches moved 2 at a time toward the higher end stitch count, treating the loops as one would stitches
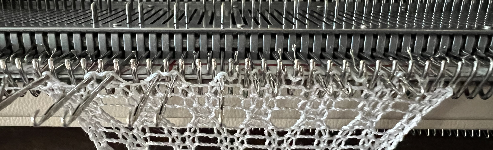
 e-wrapping one of the two loops consistently in the same direction at the top of the piece will form equal eyelets on the next pass
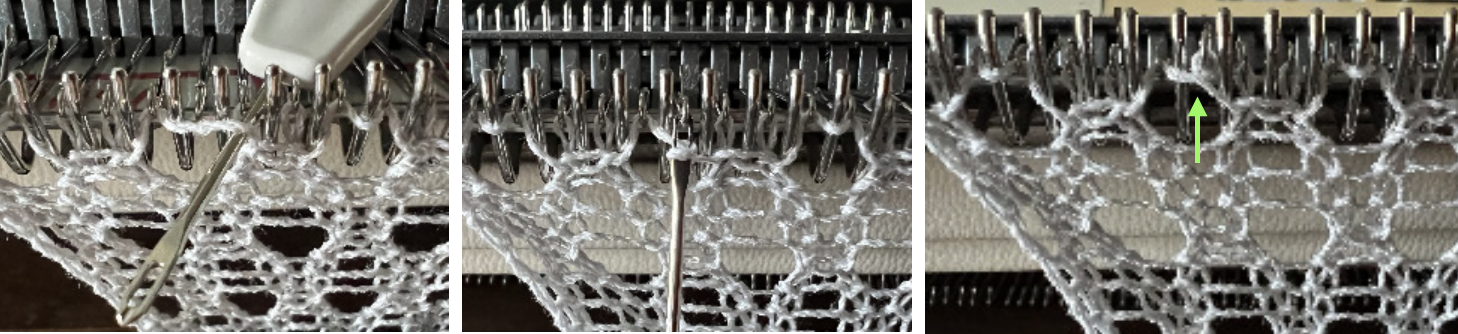
 Working with multiple loops held in hooks of specific needles: the following swatches were actually the beginning for what became the above thread
I tend to web surf in the early morning hours. Sometimes that includes coming across YouTube videos where contributors show fantastic dexterity at handling tools while developing complex fabrics using only hand techniques.
This is one example:
https://www.youtube.com/watch?v=IoJbbInlxck.
As usual, I attempted to automate as much as I could and failed to be able to execute a truly similar fabric.
In my first modified version, I introduced knit rows as seen below to make tracking of hand techniques easier and to facilitate knitting stitches/ loops groups.
The result is of course quite different from the swatch in the video.
To knit: begin with a permanent cast on over the planned number of needles. In this case, 2 needles are included to form vertical all-knit borders on both sides.
I knit most of my proof of concept swatches on an electronic machine and download a plain design repeat with a stitch count equal to the entire width of the number of needles in use on the bed.
On a punchcard model, the all-knit border needles would have to be brought out to E on every row for them to knit with each carriage pass.
Using provided repeat pngs as shared may require mirroring the repeat horizontally depending on the download program and the knitting machine model used, as well as changing the image mode back to indexed BW since downloaded designs from the posts may be converted to RGB mode as they are copied.
If working on a finished piece, knit several rows of waste yarn, followed by a row of ravel cord and a permanent cast-on, otherwise simply knit enough to hang a comb and some weights, required for most tuck knitting.
I happen to have a 2/20 wool as my go-to for most experiments that result in 4 or more loops building up in the needle hooks.
The beginning concept: hand transfers and automated tuck patterning

![]() The programmed repeat is planned for two rows of knit stitches between sets of loops
The programmed repeat is planned for two rows of knit stitches between sets of loops 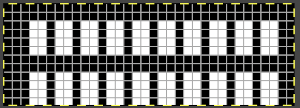
![]() After the cast-on and base knit rows, program the machine and preselect the first pattern row. The starting side does not matter unless the use of the color changer is planned, in which case, the first preselection row would need to move toward it.
After the cast-on and base knit rows, program the machine and preselect the first pattern row. The starting side does not matter unless the use of the color changer is planned, in which case, the first preselection row would need to move toward it.
Because some needles are taken out of work, end needle selection is canceled.
After the first preselection row, the machine is set to tuck in both directions.
My test repeat was programmed as a single motif on the 930, with the image mirrored horizontally.
Each pattern segment is 6 rows high, the full repeat is 12 rows tall. Color changes could be introduced every 6 rows.
Following the chart for the first segment, transfer the A marked nonselected location needles to the adjacent preselected ones on their left, push the emptied needles out to A position, OOW after each transfer, and its adjacent needle with the combined stitches/loops out to E position.
After 4 tuck stitch rows, push any needles previously placed out of work to A position out to E so they will knit appropriately on the next pass as part of an all-knit row.
As the carriage moves to the opposite side, the second all-knit row will preselect. As the carriage again moves once again to the previous side, it will knit the whole row, while preselecting for the first hand-technique row once more.
Prior to the next carriage pass, transfer each of the marked B location nonselected needles to the adjacent preselected ones on its right, push the emptied needles out to A, OOW after each transfer, and its adjacent needle with the combined stitches out to E.
Form loops for 4 more rows, and push any needles previously placed back to A position out to E so they will knit appropriately on the next pass, forming an all-knit row. As the carriage moves to the opposite side, the next all-knit row will preselect, followed by preselection for loops and transfers again as the carriage moves again to the previous side knitting every stitch.
Repeat the process for the desired length.
End the piece with at least 2 all-knit rows after a full or half design repeat. Cast off loosely to compensate for the widening due to the type of stitch formation. ![]() This fabric is executed as a hand technique/ short rows with no automated tuck patterning assistance. I have found when using the tuck automated setting in Brother models there is often a limit for accumulating no more than 4 strands in the hooks of the needles, while in using holding, manually pushing needles out to hold and back to work can be far more forgiving.
This fabric is executed as a hand technique/ short rows with no automated tuck patterning assistance. I have found when using the tuck automated setting in Brother models there is often a limit for accumulating no more than 4 strands in the hooks of the needles, while in using holding, manually pushing needles out to hold and back to work can be far more forgiving.
In this instance, loops are formed for 6 consecutive rows.
There are no all-knit rows. The color changes were made every 6 rows prior to knitting across the newly adjusted needle positions.
Visualizing knit cables 3_ using Numbers and Gimp
As our knitting experience grows, there are likely to be some techniques that engage us and others we choose to avoid completely if possible. Cables are in the latter category for me. I have hand-knit complicated pieces using them but dislike knitting them on the machine immensely. That said, I am periodically drawn to revisiting the topic in my blog, the resulting swatches are as proof of concept.
Small crossings may be used in sequence to create more complex cables, and charts illustrating them may be simplified, using little or even no added color. 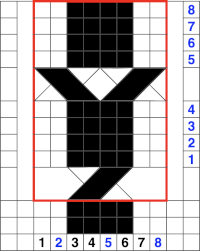 The repeat is 8X8 and the above movement can be seen in the purl view.
Ladders and knit columns between vertical sets of cables make the process easier to track, one needs to be alert to accidentally bringing the ladder back into work resulting in knit stitches, seen in the bottom left of the knit side swatch. 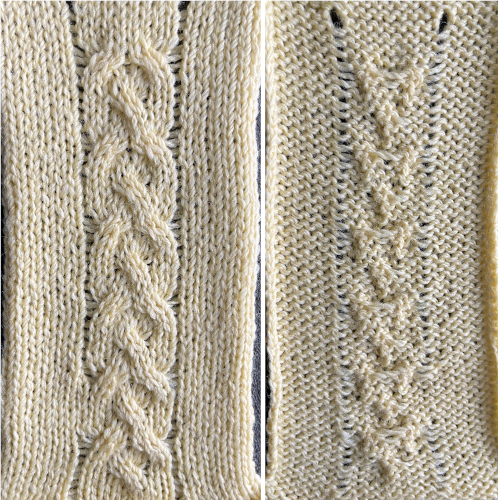 A spreadsheet table may be created to help with tracking multiple series of cables across a knit and their direction. It can contain as little or as much information as one wishes. Included here: the RC for possible crossings, and their direction on the purl side for machine knitting (reversed for hand knitting). Columns may be added including how many needles are left in or out of work between cable knit spaces or other info.
 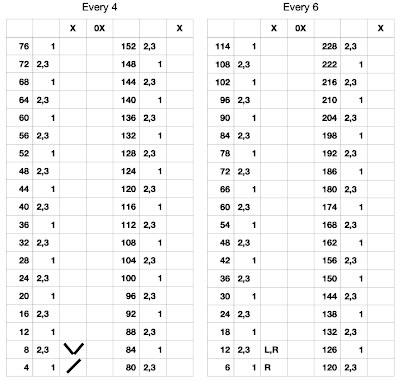 It is also possible to print a custom needle tape to place underneath the involved groups of needles instead of marking the needle tape or the knit beds. On a standard km, the needles are 4.5mm apart. A conversion reference for needle spacing point values
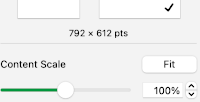
 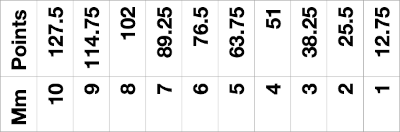 Four needles X 12.75 =51 points, the width of the table cells, which in this instance are all equal in size. Colors and any other info may be added within each cell. Print in landscape orientation, making certain the image is not set to fit the page, but at 100%.
 A narrower series of twists are made after every 2 rows knit, the chart shows crossings on the purl side on the left, as opposed as to how they would appear on the knit side on the right
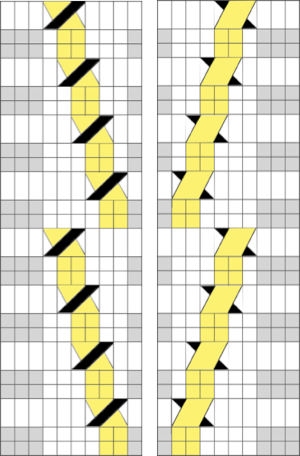
 Which leads to the topic of creating shapes by combining the repeats
 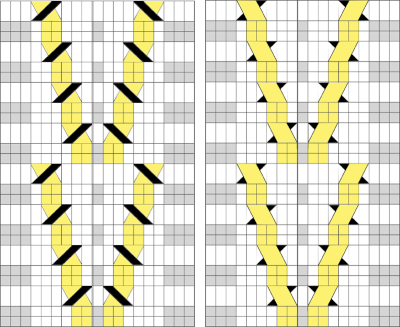 A brief effort containing at least 5 errors leads me to wonder about programming needle selection to help track crossings more easily and avoid mistakes. The center ladder here was latched up during knitting.
  Adding the ribber: the simplest knits using the ribber are made with transfers to the ribber of single or multiple stitches to create what is sometimes called trailing stitches, with cables occurring at determined distances and appearing as knit stitches on a purl ground. Some samples of elongated ribber stitches with crossings on a striped ground may be found in the post on Slip stitch patterns with hand transferred stitches, double bed, the technique may be executed in a single color, or as shown here with color changes every 2 rows.
 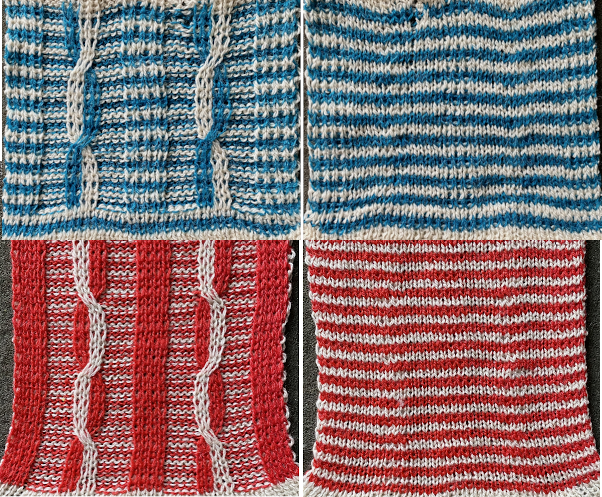 If only the knit stitches or purl stitches are crossed on one the same bed when knitting ribs, they will appear so on one side only. One example
 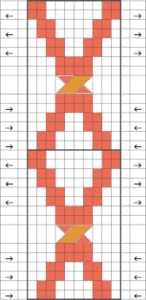 If the start is on the top bed, stitches on the ribber may be created by picking up bars from the top bed
 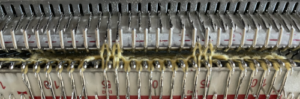 the yarn above was a 2/8 wool, which refused to cable on the ribber, and having the crossing was preferred to not
 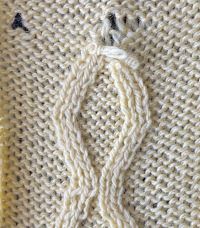 changing to a thinner wool-silk solved the problem.
  Using a punchcard or electronic program to track movements and cabling on the knit bed, each stitch in each pair of punched holes or pixels is crossed over or under the other. This is a very time-consuming fabric, not friendly to distractions or interruptions. Any crossing mistakes in the swatch were due to “operator error”.
 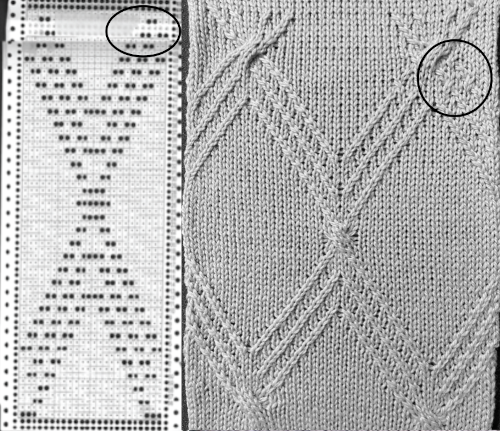 In reviewing the post after linking to it here I realized the now marked punchcard error at its top. The amended longer chart reworked in Numbers is also added to the older post. It is shown here aside from its tiled chart, checking for alignment, a habit developed as my skill and comfort in using spreadsheets grew,
  A png of the repeat, 24 stitches wide by 72 rows
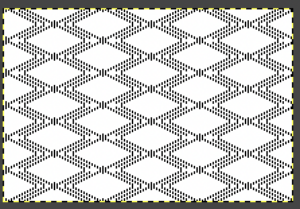
 ![]() Tiled for alignment in Gimp as well.
Tiled for alignment in Gimp as well.
 It is possible to use the repeat working 1 X 2 stitch crossings for a very different look.
A large swatch is worth doing before committing to a large piece.
Correcting crossing errors (purple arrows) after the fact will be harder than doing so in some other instances or in a bulkier knit.
Keeping the fabric visible as opposed to between the beds begins to show a pattern on the reverse, which can also guide the direction of movements.
There are spots in this repeat where the center larger cables are not possible because of cables in opposite directions already occurring on either side of the group of selected needles (red arrows).
Transfers occur by bringing single needles forward and crossing pairs of stitches behind them, moving away from the center of the triangular half of the diamond as it is formed. The sequence is retained until after the wider cabled segments occur (black arrow and line), where there is no other needle selection aside from stitches to be crossed.
The number of plain knit stitches between crossings is always even.
The cabled knit areas have a depth that makes them project out and appear almost beaded in texture. 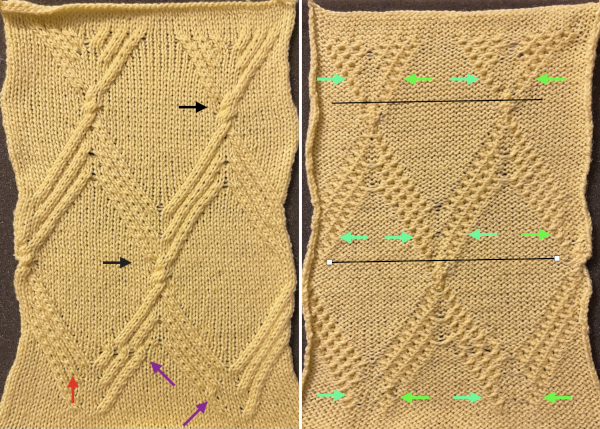 Assigning colors to crossings in a chart may be helpful or too much info depending on one’s perspective, the bottom of the repeat is on the right.
 ![]()
Periodically, the topic of reversible cables turns up in discussions for both hand and machine knitting. They are possible when working in ribbing on the knitting machine.
Keep in mind that ribs narrow when off the machine, cables do as well, so a looser tension is generally required, and the basic fact that knit stitches are purl stitches on the other side and vice versa.
Cable crossings are made over purl stitches that separate them or the reverse. Changing rib needle arrangements will result in fabrics that may not always “match”, appearing different on one side from the other.
Using the half-pitch position before any transfer rows brings needles closer together, G carriages may be a boon but may have a hard time knitting the row immediately following the cable crossings and even jam.
On the machines, a 3X3 crossing is likely to be the limit. A general starting guide when trying out repeats is to knit the same number of rows between crossings as there are stitches in the cross, so 6 rows knit before a 3X3 cable.
A published illustration of bringing the ribber into play. 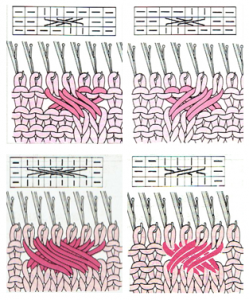 Creating extra slack if possible on the row before stitches are moved is helpful here as well as when working on the single bed.
Stitches may be crossed on either or both beds. If trying that out, crossing on one bed, knitting a row, then crossing on the other is another thing to try. As with any ribber fabric, the view of results is limited, dropped stitches may be easily missed.
A straightforward idea to test: in a wide vertical rib make cables on both beds, testing whether it is necessary to reverse the direction of the crosses or not, the number of rows to knit plain, etc. The chart shows a staggered arrangement. The number of rows between crossings can be changed to suit. 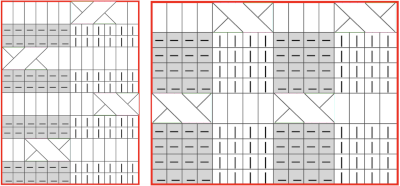 In my first test crossings occur on both beds and on the same row. Even using the thinner blue yarn at maximum tension the transfers were hard to execute. I had more success when I added 2 empty needles between the vertical ribs and brought one on each side of each rib into work on the top bed prior to knitting the last row between transfers, creating a bit of extra yarn to ease the crossings.
After the row is knit the same needles are pushed back to A position, dropping the yarn, and crossings are made before continuing to knit.
Results vary depending on the yarn, tension, machine model, and operator patience. The arrows mark the location of what appears to be a damaged needle, the tuck stitches were not deliberately planned.  Here the repeats are staggered, the edge with the ladder close to the end stitch is shown again to be far less stable than the one with more knit stitches. Spacing is varied, exploring the tolerance for the yarn to be crossed. The setup while working:
 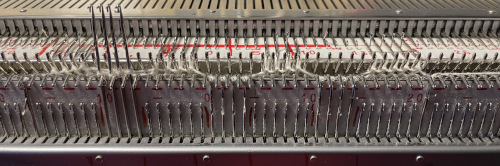 If transfers are made after every 5 rows knit, crossings on multiples of 10 could be assigned to one bed, while row counts containing the number 5 could be made in the other. Sporadically pairs of transfers on the same bed may provide more surface interest.
The set up after transfers to top bed prior to binding off 
 Trying out a simple repeat in smaller rib configurations will provide some idea as to whether the technique falls into the love of or not something to do simply because one can.
Charting can happen using the same method as in illustrating crossings in color, with some alterations, sometimes less information is more or enough.
The first repeats were knit with most stitches on the main bed, and a 2 stitch ladder on either side of the ribs involved in cabling to help visually with keeping the stitch location constant. The grey, purl cell blocks are as viewed from the back, the white cells represent stitches on the ribber. 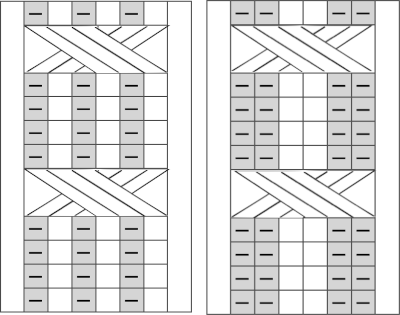 A: the set up single bed, with needles out of work on each side of the planned cable space, tension is tested and 3X3 crossings every 6 rows are made first only on the single bed
B. the ribber needle configuration is set up
C. the cables are made after transferring ribber stitches up to the top bed, and then the same stitches are returned down to the ribber before continuing to knit
D. the ribber stitches are transferred up to the top bed, and the swatch was bound off. Note the difference in width in areas where no crossings are made.
![]() The step-by-step instructions apply to both instances: the chart shows 4 rows knit between crossings, instead, here 6 rows are knit in both tests.
The step-by-step instructions apply to both instances: the chart shows 4 rows knit between crossings, instead, here 6 rows are knit in both tests.
The photos documenting the 2X2 rib: the single bed starting point
 the rib configuration set up
 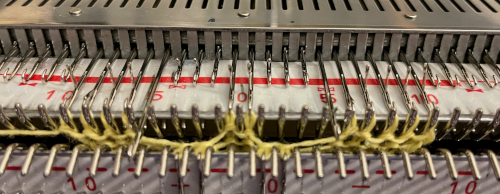 1. after 5 rows knit, bring an extra needle in work on the top bed to pick up extra yarn for the cross
 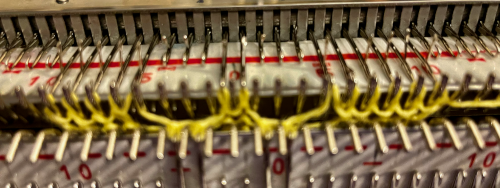 2. drop the extra loop, make certain the empty needle returns to A position
 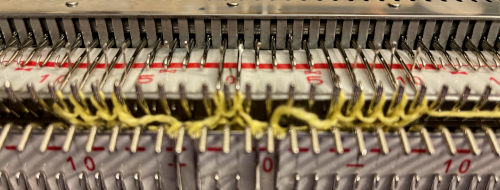 3. transfer all cable ribber needles to top bed
 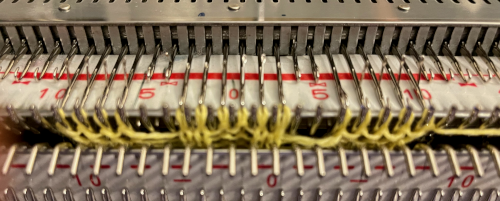 4. cross the stitches with two three-prong tools
 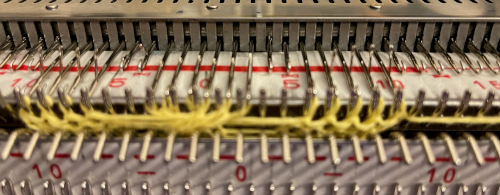 5. transfer stitches back down to the ribber
 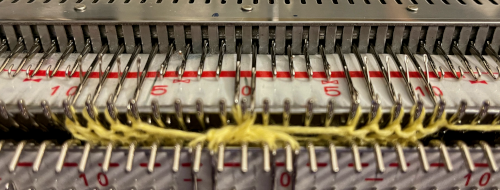 knit 5 rows, repeat steps 1 to 5.
The appearance of each side of the fabric differs
A: the knit was begun on the single bed
B: the ribber configuration was set up
C: cable crossings were made as shown above
D: stitches were transferred to the top bed and bound off 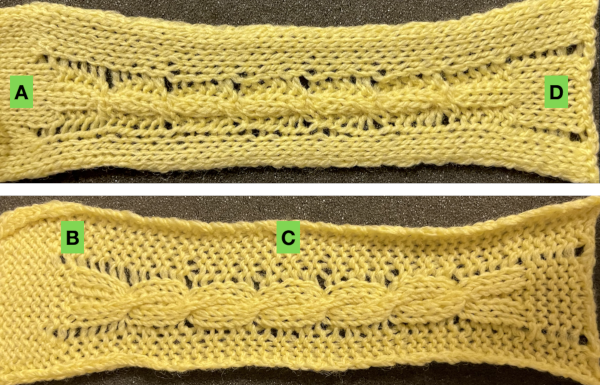 An attempt at a larger swatch using 1X1 ribs:
the intended concept, 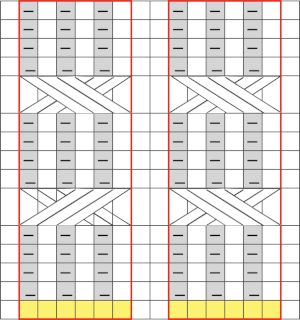 a custom needle tape
  rib set up for the yellow yarn
  the cable crossings using it were impossible, starting over with a thinner yarn at the same tension
 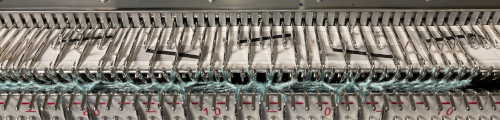 the ribber may be dropped after transfers up to the main bed, keeping stitches and crossings visible, making it possible to make corrections in any cables if they are needed before re-engaging the ribber and transferring stitches back down
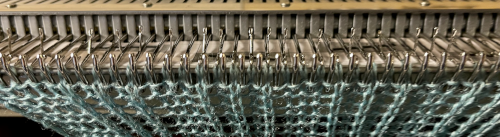
 The concept is an interesting one and many arrangements based on the idea are possible.
 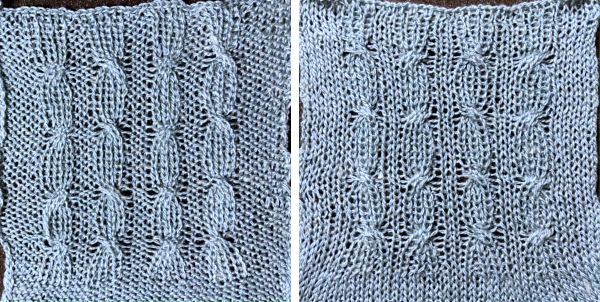 In the above swatches, when any transfers were made to the top bed, after crossings, a row was knit before returning stitches to the ribber. The extra row may or may not be noticeable, depending on the yarn and colors used.
More variants, analyzing columns in color using a crossing over single center stitch first and eliminating the extra knit row, and transferring stitches back down to the ribber immediately after making the cables. The rib will have a tendency to spring back when relaxed and off the machine, so the texture may be hard to see. Using a fiber that allows for some spreading out with some blocking helps to make the work more visible. A reference chart can be developed ahead of time for repeat variations.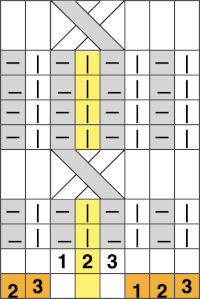
 The number of rows between crossings can vary. When the crossing row is reached:
A: stitches are moved up from the ribber to the main bed
B: cable crossings are made
C: stitches that had been moved up are returned back to the ribber, keeping the original ribber needle configuration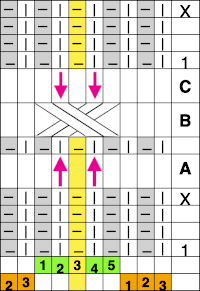

 Assigning colors to columns reveals that stitches are not moved onto the same stitch type when moved over a single, undisturbed, fixed center stitch.
  Shifting the needle arrangements when cabling, moving across a center column of two stitches that remain fixed on the main bed, the cable direction as it would appear on the purl side on the left, the knit side on the right is straightforward here:
 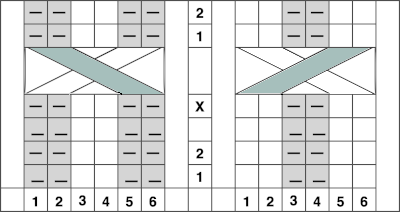 I found the above impossible to knit, even with ladders for extra slack, and the swatch stopped when the yarn broke
 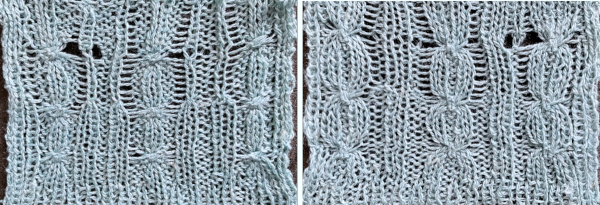 Returning to 1X1 rib, looking at the column alignment in color
 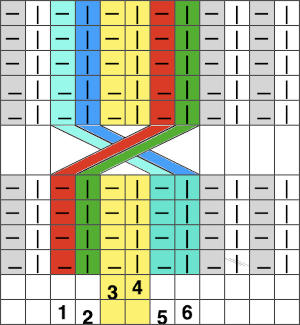 There appears to be enough slack produced in the formation of stitches between beds to make the planned crossings possible.
A: the needles transferred to the top bed
B: crossings are made over the 2 center stitches
C: the stitches that had been moved up to the main bed are now returned to the ribber. Bringing cable stitches out and or up to the hold position helps ensure that they will knit properly on the next carriage passes.
The similarity between both sides of the fabric is increased
 From a Brother pub, small crossings for a smocked effect
  The same approach may be used to create fabrics in tubular tuck patterns, easy to execute in one color. Once yarn, possible crossings, and their minimum frequency have been determined, the start of far more complex shapes can be explored using colors to represent the necessary direction of movements before any decisions are made has to how frequently to cross the cables and to get some idea of negative spaces created between traveling stitches. In hand knitting, a purl ground is easier to plan and maintain.
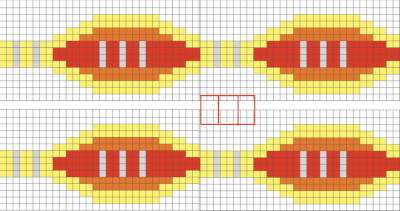
 Adding and removing rows in the tables or even changing colors is easy and quick in a spreadsheet, tiling in repeat with scaled screengrabs provides a quick reference for possible improvements/corrections before any actual knitting takes place
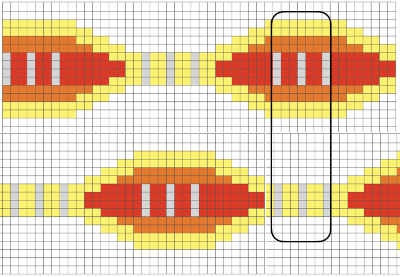
Visualizing knit cables in color 2_ using Numbers and Gimp
Though this post presents cable movements in colors using multiple stitches, the resulting repeats may be knit by hand or at times on the machines in single color textures and the number of stitches in any column may be reduced or expanded, keeping the direction of the cable crossings the same.
Though DIY charting may not be your goal, perhaps the charts themselves will inspire similar stitch movements. Segments of any of the charts may be clipped, saved, and manipulated for easy versions of other options.
My first published experiment with cables created in vertical columns of alternating colors was in 2012, 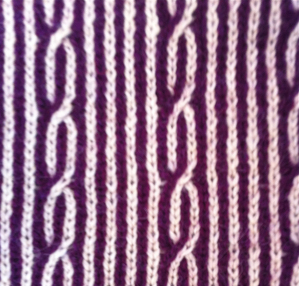 A quick way to imagine variations of the same pattern is to choose segments of the swatch photo and alter their direction and/or placement
 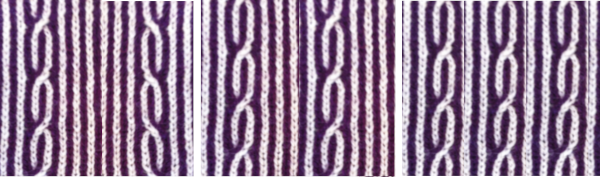 Using the spreadsheet, shifting crossings are imagined, adding a half-drop variation, creating secondary shapes.
 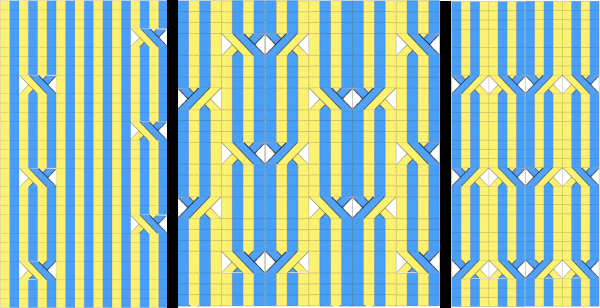 A variation doubling the width of the cable crossing in a half-drop repeat
 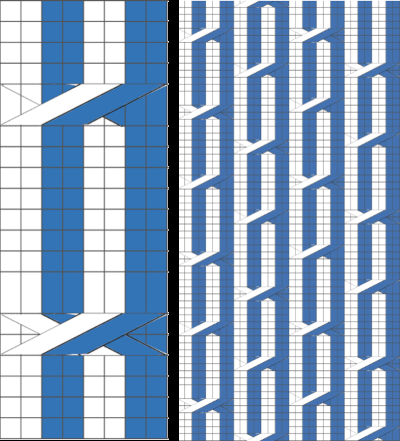 In machine knitting, one is looking at the purl side, and the ability to move stitches is often limited by the fact that their placement on a metal bed is fixed distances apart. Simpler repeats can be executed as isolated vertical bands on solid color or striped or even FI grounds, adding the ribber for even more complexity in execution.
Hand knitting makes moving multiple stitches possible more easily, and because the crossings are usually made with the knit side facing, it remains easier to keep track of directions in which to move the stitches.
There are other choices in charting for either, cable crossings happen as a row progresses in hand-knit, and in machine knitting, knitting stops, and crossings are made before continuing with the next row. If color changes are planned every two rows then cables need to have multiples of 4 rows between each set of crossings. Hand-knit possibility on the left, with expanded charting for machine knitting  I continue to be fond of visualizing results in color in a spreadsheet prior to knitting swatches. As usual, as the sample charts multiply, the techniques often evolve as well for creating them.
Without access to Excel, I am presently using Numbers 11.2 in macOS Monterey 12.0.1, a version with several changes from the previous. Working with shapes does not remain my preferred method, but shapes are useful and worth considering in drafts of charts for many stitch patterns outside this topic.
Notes on my process: to start with, a table is created with enough cells to accommodate more than one repeat of the planned cable crossings in both height and width. I prefer working on a cell size of 20X20 pixels and using magnification if needed to make work details more visible, decreasing it before screengrabs for illustrations here.
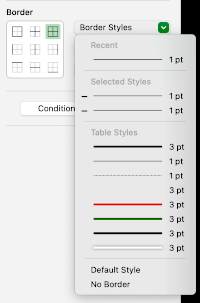
The choices for cell border styles may be made both in terms of colors and line quality or eliminated altogether 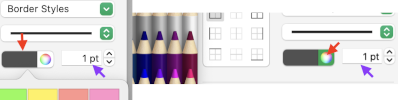
 To add a shape, in the toolbar, search for shapes and select a category on the left,
 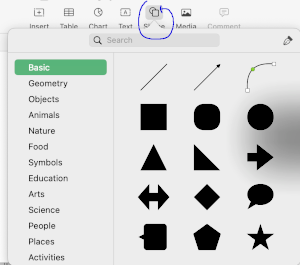 then click on the shape or drag one onto the sheet to add it.
To browse all shapes move the pointer over the shapes pane and scroll down.
It is possible to create and save custom shapes.
To make a shape editable
1: click on a shape to select it
2: choose Format, Shapes and Lines, Make Editable from the format menu at the top of your screen, 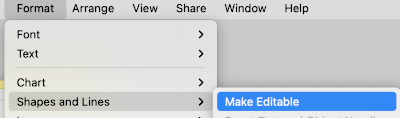 handles will appear. In this case, a red square in each corner, and a small circle on the left side
 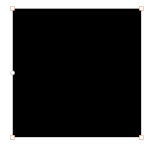 3: double click a white handle to change the line from curved to straight, handles represent different types of lines
Squares with a red outline: lines that connect to this point are straight
Circles with a red outline: lines that connect to this point are curved
4: click outside the edge of the shape when done editing it
Saving custom shapes
1: Click a custom shape to select it, then choose Format, Shapes and Lines, Save to My Shapes (from the Format menu at the top of your screen). 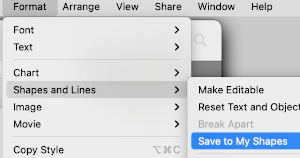
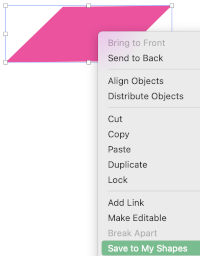 The shape is saved in the My Shapes category of the shapes library, which appears only when you have custom shapes. Shapes appear in the library in the order you create them, this order cannot be changed.
2. Type a name for the shape in the field that appears below it, or click the name to change it.
To delete a custom shape, Control-click it in the shapes library, then choose Delete Shape.
Color choices are the same as for any work with colored cells, for the default palette, left-click on the marked area, and choose from current fill selections 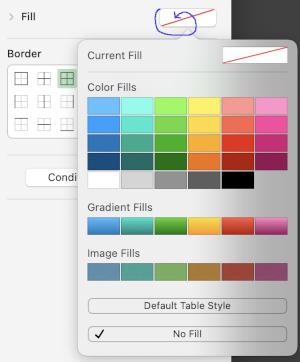 Choosing custom colors: left-click on fill, then on the colored globe, new selections appear, click on any one of the pencils to select the new color, it will move up from other selections, the change will be reflected, can be undone and repeated several times
 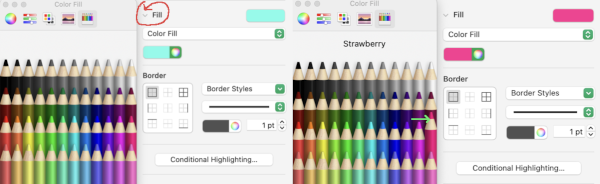 Creating the first cable crossing shape: choose the square from the basic shapes, if the first plan is to work across 3 cells, change its size to the width of 60 pixels, 20X3, and single height of 20 pixels, also changing colors if desired. To do so, left-click on it, uncheck constrain proportions, and change values to desired ones
 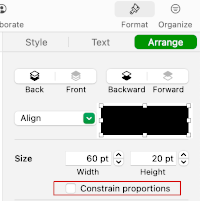 Change its color
  It is a good idea to copy and paste a few shapes outside the table in case they are needed
A: place the shape on the cell grid
B: make the shape editable
C: click on the left upper corner of the shape on the small white square, it will turn red, drag, and place it where desired, and release it
D: repeat with the small white square in the lower right corner, release
E: check image size, adjust to 60 pixels wide, 20 high, make editable again if tweaking is needed,
F: the first crossing shape is completed 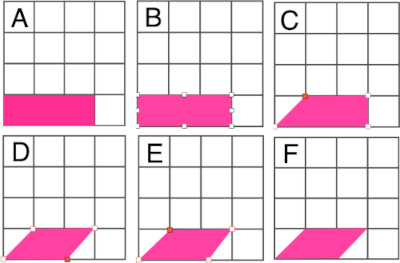 Right-click on the final shape, copy it, and paste it several times on the sheet away from the table.
Copying and pasting shapes on a single cell will fit any image within its borders, to remove it choose the cell, color fill, no fill, from the format menu 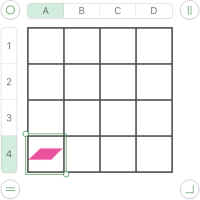 To use the shape, left-click on it, drag it into the desired position.
Cable crossings are usually in pairs, so a companion shape will be needed, 60 pixels wide by 20 high, in a contrasting color, the results of making the larger image editable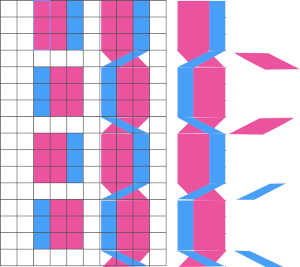
 The combined images may be created in a paint program such as Gimp and the resulting file, in turn, may be used in a spreadsheet. Pngs can be custom filled with any color of your choice in Gimp or its equivalent
 ![]()
![]()
![]()
![]() To draw a straight line in Gimp when applicable, select your preferred brush tool, click the point that begins your line, hold the Shift and Command keys in a Mac, drag the cursor to where you want the line to end. Click the endpoint, this creates a straight line between the two points with your selected brush. After the line is drawn, release the Shift and Command keys.
To draw a straight line in Gimp when applicable, select your preferred brush tool, click the point that begins your line, hold the Shift and Command keys in a Mac, drag the cursor to where you want the line to end. Click the endpoint, this creates a straight line between the two points with your selected brush. After the line is drawn, release the Shift and Command keys.
When charts are for personal use only, individual preference guides visualization methods, considerations for publishing may be different.
Yarn colors may be used in the charts, moving wider columns of stitches may be difficult if not impossible on a machine, but hand knitting opens a different world of opportunities for pattern use.
Working in a spreadsheet is easier for me than only using Gimp.
Seeking out a method for better definition of cable stitches to facilitate following crossings visually, cable crossing rows here are now double-height for added clarity; other choices include showing grid or not, and using BW for stitches crossed to the front in any direction.
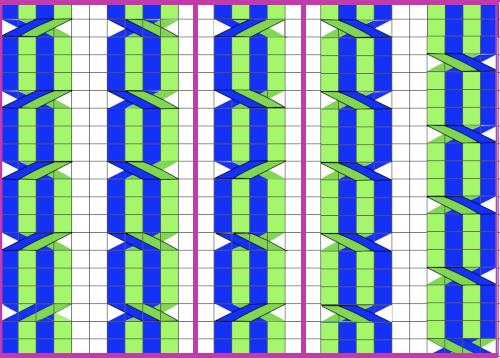
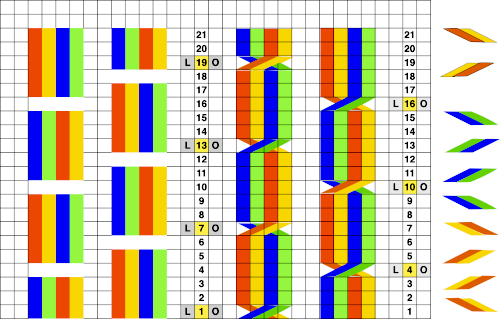
Disregarding the grid, each column of color could be any number of stitches wide, while having the grid allows for easy counting of rows. Any chart may be used in knitting using a single color as well. 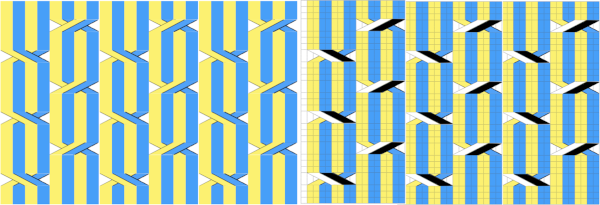 Fair isle repeats: when working cables in FI, in addition to tracking cable directions, the needles must be placed in the proper needle positions B and D for correct patterning to continue.
A series of cables executed along vertical lines of the same color. The red border surrounds the full repeat. These illustrations are as they would appear for hand knitting, with crossings made as knitting progresses along the corresponding chart rows on the knit side of the fabric 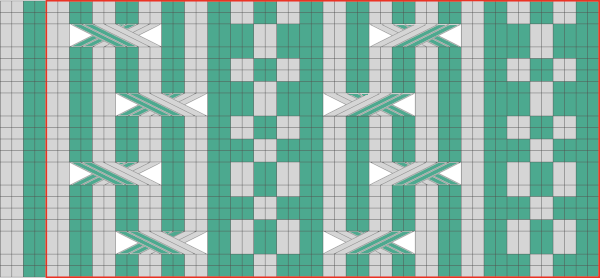 Fair isle on mixed striped ground
 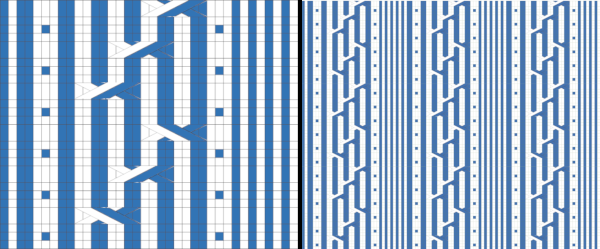 Fair isle with repeat changes, expanded further by mirroring
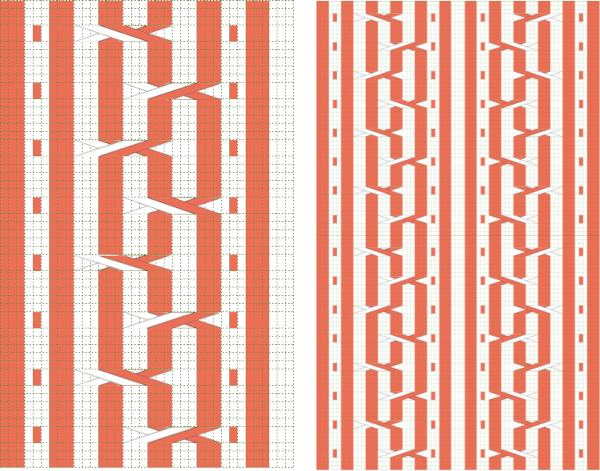

 An expanded MK illustration
 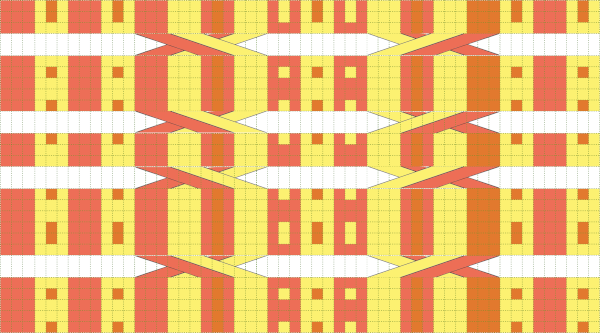 A FI sample shared in 2015.
 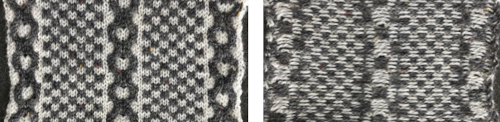 From Slip stitch patterns with hand transferred stitches, single bed 2/21
 When using fair isle patterning as a guide to forming cables on the machine, crossing directions matter more since one is no longer simply placing color on like color: this chart transitions from the original idea to the placement of the crossings, a full repeat with their direction reversed based on which color is wanted to travel to the knit side is drawn, and on the far right, the look of the final FI repeat
 Adding a third color, possible intarsia knit as all over pattern or isolated as a panel. Even in hand-knit, the latter may be in a contrasting gauge and joined to pieces of the garment after their completion.
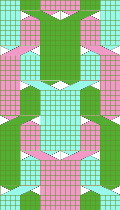
 These repeats may be worked as vertical panels between rows of plain knit or rib
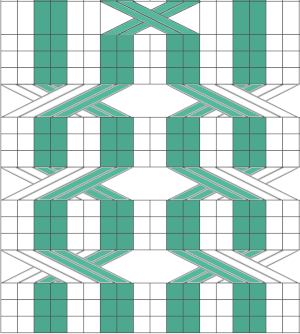
 Symmetry is not always needed,
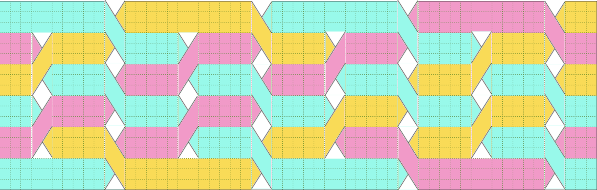
 MK, adding the ribber: one of the things that may lead to confusion is the use of the term every other needle knitting. If one is working on every needle on both beds, the needles on either bed are centered between those on the opposite one, thus patterning occurring on either bed that becomes EON. Colors are used to track the movement of stitches, not colorwork, which happens on the same needles, either bed, or the plaiting feeder may be used to produce the illusion of additional colors.
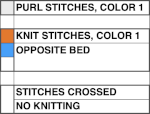
 Part of an experimental swatch using the ribber and tuck settings
 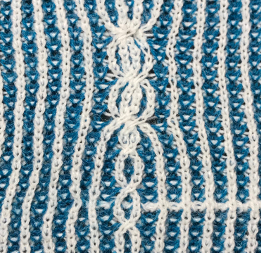 In attempting brioche on the machine the color changes happen every 2 rows, so a minimum of 4 rows or a multiple of 4 rows are planned between moving any stitches. Although the same color will be used in the crossings each time, using 2 colors for cable segments may make the chart easier to follow
  Using the ribber, one of the crossings on striped grounds: Slip stitch patterns with hand transferred stitches, double bed. 2/21
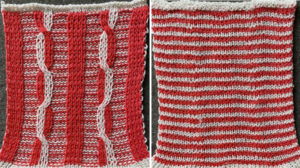 A range of experiments with associated samples:
Some cables to try, hand-knit 1/15
A hand-knit stitch tale 2: a bit of cables and lace, charting, HK to MK 7/14
Chain cable HK experiment 1/13
Machine knitting cables: single bed, 1 12/14
Machine knitting cables: single bed, introducing the ribber 1/15
Some “real” cables on KM 1/12
Hand to machine, symbols 4: cables 2/13
A simple braided cable (and card) 1/12
Machine knit cables: using patterning as a guide to transfers 2/15
Using punchcards to track cables and twists in pattern 2 12/11
Using punchcards to track small cables in pattern 1 1/12
Holding and “cables” 12/11
Pretend/ mock cables 4: revisiting i-cords 1/13
Pretend/ mock cables 3 7/18
Pretend/ mock cables 2 1/14
Pretend/ mock cables 1: i-cords, holding 1/12
A few i-cords and more to try 1/12
Cables with lace transfers 12/11
Cables in color 2/15
Visualizing knit cables in color_ Excel 1/15
Knit charting in Mac Yosemite; visualizing knit cables 11/14
Double bed embossed patterns
Some of the previous blog posts containing applicable samples:
Ribber fabrics with stitch transfers between beds 1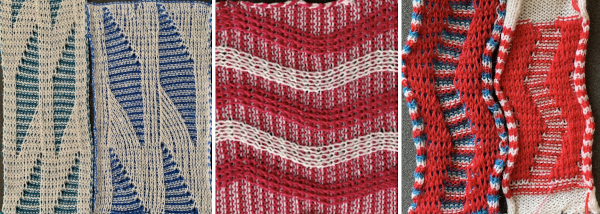 Slip stitch patterns with hand transferred stitches, double bed
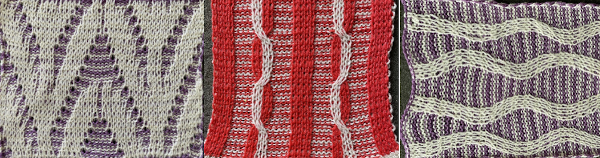
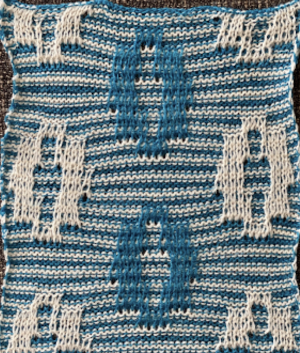 Brother shadow lace, rib transfer carriage
 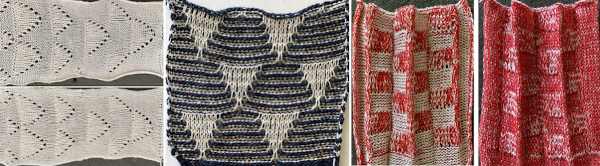 Combining knit carriage needle selection with racking
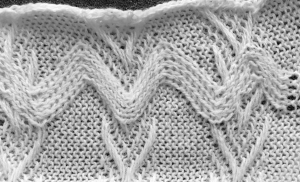
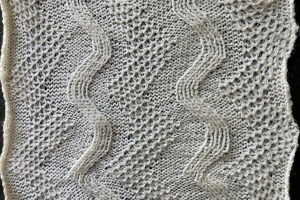 Racked patterns 5: Passap/Brother 2
directions and samples from manuals including racking on tuck stitch and other ground variations, this on a tucked ground, in a thin yarn 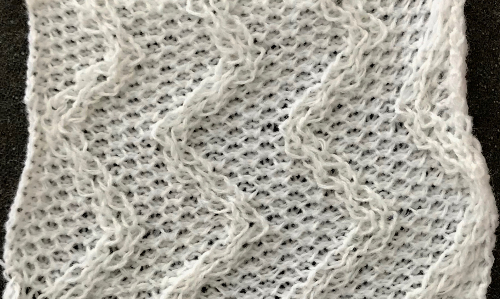
Embossed, raised textures are familiar in single bed work using stitch structures such as tuck, slip, weaving, gathered and ruched hand techniques, and in double bed as pile, blister, lace, and ripple patterns.
When embossing is done double bed, the background fabric is knitted in purl stitches on one bed, and the raised design or panel in knit stitches on the other. The first method produces double knit patterns where all needles are working on the back bed, coupled with selected needles for the pattern on the opposite be. The raised, embossed portion is a double knit, showing relief on a purl ground. The second method is to use knit/ purl combinations, easiest to execute with a G carriage.
The striped ground occurs in areas where there are no needles in work and selected for patterning on the main bed. A cabled pattern to try: color changes in these instances are every 2 rows.
Because there are needles completely out of work on the main bed along with pattern selection, this is an instance where end needle selection must be canceled.
The first preselection row is from right to left toward the color changer.
Any transfers or stitch manipulations between or on either bed are made before the first pass to the right with the next color.
The knit carriage is set to slip both ways on the first pass in pattern from the left and stays there, the ribber is set to knit in both directions throughout. Depending on the yarn and the pattern distribution the all striped areas will be longer than those gathered by slipped rows. As usual, begin with a plan. After the first preselection row, transfers are made down to the ribber as indicated at the top of the chart. Cable transfers are made after every 14 knit rows, with stitches crossed on rows 15 and 31. After the cable cables are twisted, the stitches in the color that is going to knit in the next pass are brought out to E so they will knit in that color before the pass to the right, and again before the pass to the left, rows 16 and 32, Y.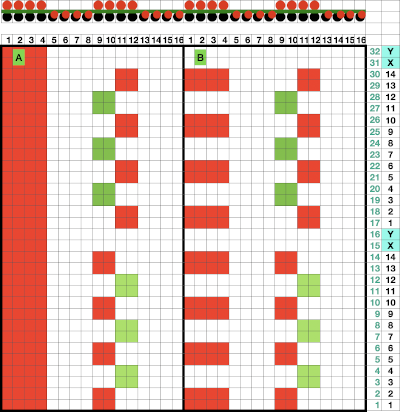 If the intent is to have solid vertical columns of color, those areas as in column marked A, need to be adjusted for using alternating colors as well. Using the repeat on the left of the chart
 ![]() After the first preselection row to left, transfers are made down to the ribber, stitches that will compose cables are selected in the pattern,
After the first preselection row to left, transfers are made down to the ribber, stitches that will compose cables are selected in the pattern,
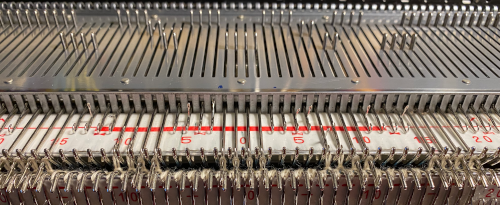 colors are changed after return to the left, and every 2 rows, stitches in the color that does not knit become elongated.
 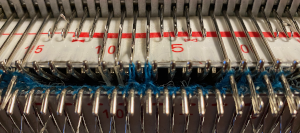 Because column A was not color separated for alternating colors, each color in the corresponding needles will knit with every two carriage passes, and the result will be a striped vertical column
 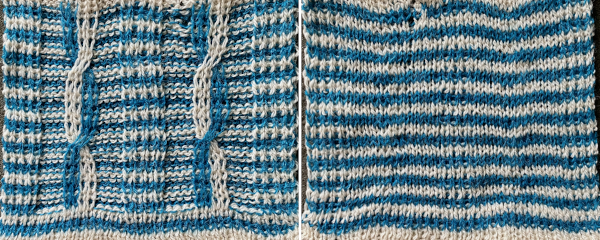 Cable twists should be planned to retain the correct movent, can alternate each time or repeat in series, charts for location and direction of twists are helpful to avoid errors. The solid vertical columns here are planned in only one color, could be programmed to alternate as well. The repeat used in my swatch includes a solid column on each side of the finished piece, the color swap in the twist at the top can be an unplanned error or serve as a deliberate design change
![]()
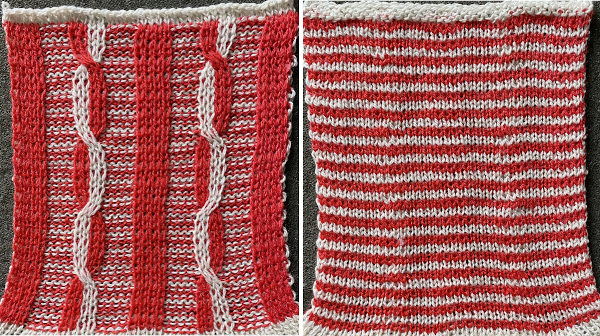
Analyzing the stitch structures involved for planning 2 color DIY:
two-color ribs on a striped ground require cards or electronic repeats that select each color alternately. Fabric where the backing on the ribber or back bed in machines such as Passap knits all stitches every row is often referred to as half or full Milano. The backing may be also be knit using slip/ tuck settings.
Working in a single color, in half Milano and every needle rib course is followed by a plain knit row on the opposite bed, it is a 2-row repeat. In full Milano fabric, a row of every needle rib is followed by a plain knit row on one side of the fabric, and then by a plain knit course on the other. The repeat is three rows high. On every third row, the ribber carriage must be set to slip for one row, in the direction in which the carriage will be moving, prior to knitting a row with every needle preselection on the top bed. The setting is changed back to knit for 2 rows when the carriages reach the opposite side. The required cam change will happen on alternate sides. 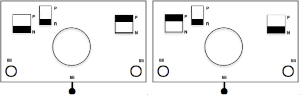 Both sides of the fabric have small stitches alternating with longer ones formed by slipped rows. half Milano
 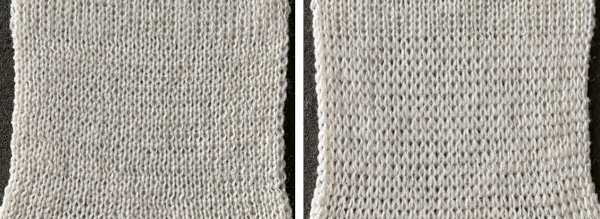 full Milano
 Often an all slip setting is used on the top or front bed, the result has less elasticity than a full needle rib, and the knit will have a tendency to curl toward the side which shows fewer knit rows, so in a finished piece side borders in the same stitch type should be considered.
Adding color changes in the ground requires altering the repeats.
Hand techniques may be used to modify ribs by cabling, racking, transferring stitches to the backing. When knitting again on empty needles, if you want eyelets, simply keep knitting. If not, hang the pull loop from the adjacent stitches on the opposite bed before resuming knitting.
Cable color placement must be reversed at the cable crossing.
Racked sequences are made along with stitch transfers.
To emboss other than vertical ribs the needle selection needs to be changed every 2 rows. This can be done manually, following a chart, or with programmed patterning whether with punchcard or electronic options.
Plaiting can produce 2 color variations without color separations.
When increasing stitches, moving the adjacent stitch onto the new needle, leaving it empty, will change the eyelet location a stitch away from the edge.
When moving stitches for decreases, lateral transfers may be made with multiple stitch transfer tools for different effects.
Transfer carriages can speed up the process.
To start the pattern one can begin with a cast on only on the ribber or back bed, or transfer non-selected stitches after the first preselection row on Brother as seen in most of my previous swatches, with 2 rows knitting on the backing alone, and 2 rows of the main color knitting on both beds. With either cast on, the preselection row is made toward the color changer with needles in work position on the main bed, so the knit carriage needs to be set to slip so as not to pick up unwanted loops on the top bed as it moves toward the color changer, and will remain set to slip both ways throughout the pieces.
As mentioned, the term Milano refers to ribs composing weft knit structures where one side of the fabric knits more rows than the other.
In half Milano, a single long stitch is created in the pattern color, in full Milano small stitches alternate with a row of longer stitches created when traveling back to the color changer.
The preselection start is determined by the type of long stitch, and how the repeat is programmed. I prefer to start my repeats with knit rows.
A half Milano swatch is begun with all stitches on the ribber bed, COR: the needle actions for each design row if patterning were on every needle are shown below. Designing may be easier to plan or chart on a template, followed by actions for each pattern design row with the second color. Half Milano on left, full Milano on right for use in 2- color-work. 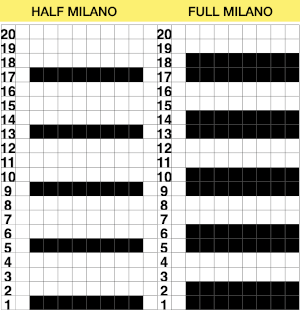

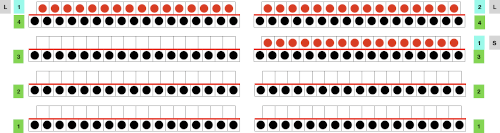 Half Milano stitch formation on the left, full on the right
 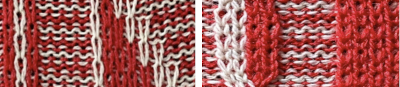 Planning for a half Milano shape design outlined with added borders and with vertical columns at intervals in the alternate color: every 4th row is marked in yellow as the underlying template. A simple shape is charted out, marked with black cells, the pattern starts with a knit row. Preselection in slip stitch is made toward color changer, black pixels will pick up stitches moving to the right, slip top row moving to the left. Decreasing to maintain the dominant color shape is not necessary, while the border, in this case, is shaped by decreases made by transferring non-selected needles to the ribber before knitting with that color from left to right. Border cells are added immediately up and to the side of those planned for knitting on the previous row, their respective cells are outlined in green. Software programs make it easy to alter the repeats and add borders if wanted
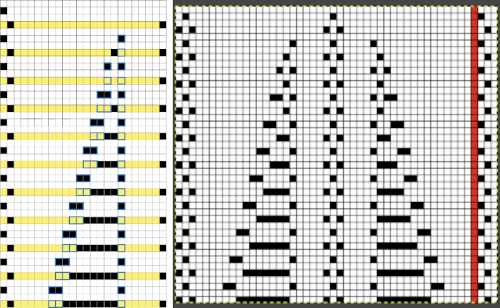
![]() Actual knitting will indicate whether adjustments are needed in making the repeat continuous vertically or with some added striped ground only rows in between. I had not noticed a stitch hung up on a gatepeg, explaining the distortion in the row marked by yellow arrows, where the yarn was caught and pulled up.
Actual knitting will indicate whether adjustments are needed in making the repeat continuous vertically or with some added striped ground only rows in between. I had not noticed a stitch hung up on a gatepeg, explaining the distortion in the row marked by yellow arrows, where the yarn was caught and pulled up. 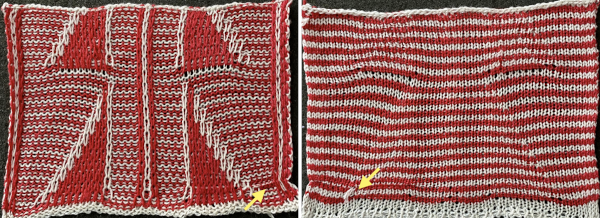
These techniques share some features with the category of double bed appliqué, where one bed knits the main fabric while the other creates the shapes, which are attached to the fabric as you knit. In the finished fabric the purl side is the right side, the ground may be created in a solid color or striped. Both shapes are knit at the same time, as opposed to performing the technique on a single bed. As usual, the color changers should be threaded so that yarns feed smoothly and do not cross. With simple shapes as in shadow lace, no punchcard may be necessary, while cards or electronic repeats simplify the steps and help prevent mistakes.
In Japanese machines, for each row in the charts 2 rows are knit in the background first on the ribber, followed by 2 rows in the shape color on the alternate bed.
Smooth yarns and contrasting colors that still allow identifying knit structures easily are best. There is a limit to the number of colors that may be knit at once. Beginning with hand techniques: it is good to chart out the design before tackling it, and with color changers limited to holding 4 colors, if planning several shapes, the sequences in the color changes may need to be plotted out ahead of knitting as well.
Purl loops are the tops of the stitches in the row immediately below the stitches on the needle on the opposite bed, marked in green, while sinker loops consist of the yarn that is between the stitches on the needles, marked in red. Hanging the purl loops will help to eliminate or reduce the size of the eyelets. Take care not to use the sinker loops between the stitches, marked in red. 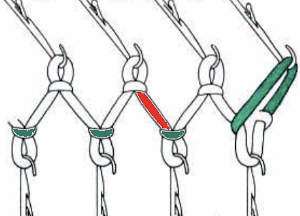 In executing the fabric as a hand technique, the main bed is still set to slip in both directions, the ribber to knit every row
1. Knit 2 rows on the ribber alone
2. Bring needles to be worked in the pattern at the upper working position D or E, hang loops from ribber if there are increases if preferred, knit a row
3. Bring needles in pattern manually to D or E again, knit the second row of the appliqué
Repeat steps one and 2
In published directions color 1 usually refers to the ground color, which knits on the ribber only. Color 2 generally knits on the patterning bed as well. When most needles are in work on either bed, the tension for the yarn on that bed approaches the one used for that same yarn if it were being used single bed.
Punching all squares in 2 consecutive rows, or programming 2 all-pixel rows filled in completely across followed by two unpunched blank or all white pixel rows makes the process quicker. Punching or filling in single rows may be done as well, but requires elongation X2. ![]() Increases or decreases may be done on more than single stitches, and less frequently than with every pattern pass.
Increases or decreases may be done on more than single stitches, and less frequently than with every pattern pass.
Fully fashioned shaping alters the edge of the appliques and places the eyelets in pattern, at or away from the edges. In Brother machines preselection of needles needs to be retained after any stitch manipulations.
Adding shapes with additional eyelets: practice shaping, keep notes, fully fashioned=FF  Begin with simple shapes, examining the quality of increases and decreases, whether single or multiple, eyelet formation. Picking up from the row below before the next pass with the contrast color eliminates eyelets
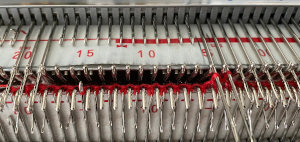 picking up from row below at any point during knitting
 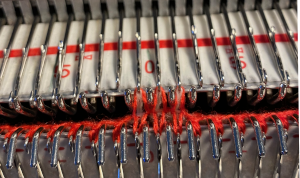 decreases in the number of stitches, in contrast, may be made by transferring down to the ribber prior to changing back to the ground color
 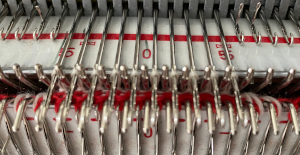 Simple increases or decreases are made by moving stitches laterally in either or both directions. Increases may be made by moving contrast color stitches laterally, followed by the choice as to whether to fill in the empty needle or allow it to create an eyelet.
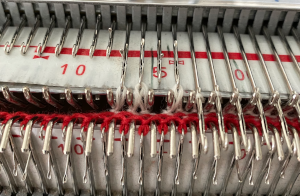

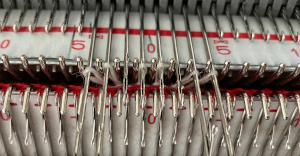 Fully fashioned increases or decreases are made by moving a stitch or a group of them to the adjacent needle/s to the left or the right and then taking the double stitches back to the original position, leaving a single empty needle for the planned eyelet formation. There should not be multiple needles with no stitches on them unless the goal is to expose a stripe of ground
 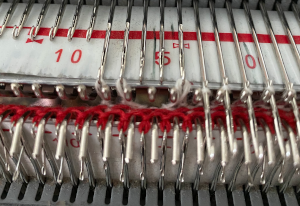 typically, in these exercises, there should be single empty needles after transfers, making certain proper needle selection for the pattern group is maintained
 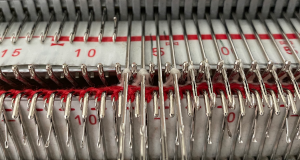 Combining eyelets with lateral increases
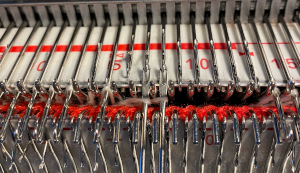

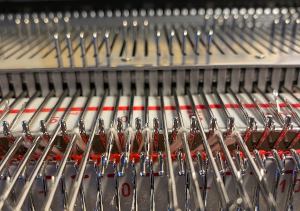 When transferring stitches, watch for any loops getting caught on gate pegs, as seen on the left below, increases and decreases may be pre-formed on more than single stitches
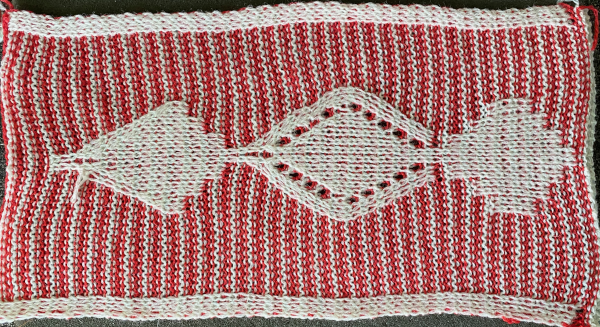
Planning a medallion: cyan cells represent transfers to the left, the magenta to the right. 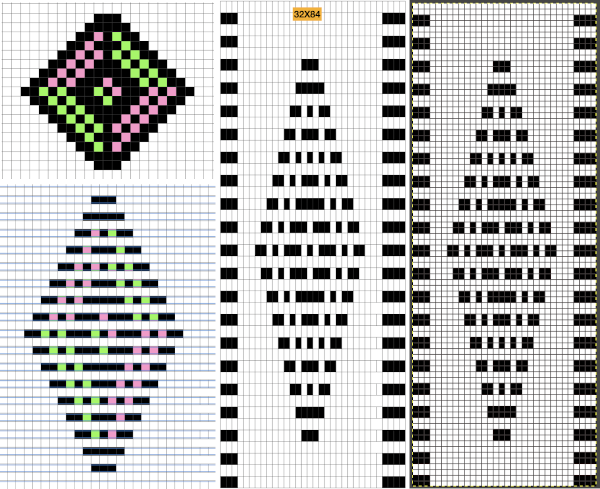
![]()
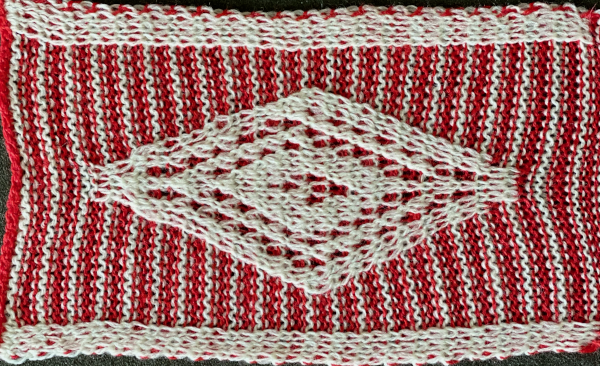 At the top of the single medallion, the stitches were transferred to the ribber prior to knitting with the same color once there was no needle preselection for it on the top bed.
Programming repeats to help track needle transfers as well: it is possible to start with a published repeat, though once the principle is understood, required markings for DIY become easier. Electronic machines leave one free in planning repeat width. In this test, a repeat from the Stitchworld pattern was used. In its built-in memory format, it will not work, the repeat needs to be altered. Each sequence of passes with the LC consists of 4 passes, followed by two rows knit with the KC. Two rows are added to each lace passes sequence, which will knit on the ribber only, in the contrasting color. Transfers to left and right are marked in cyan and magenta. The specific software used or machine model may require that the repeat be flipped horizontally prior to being knit, true on my 930. Markings on the left are for ribber actions and settings, those on the right for the main bed. K indicates that that bed will be slipping, K that it will knit. 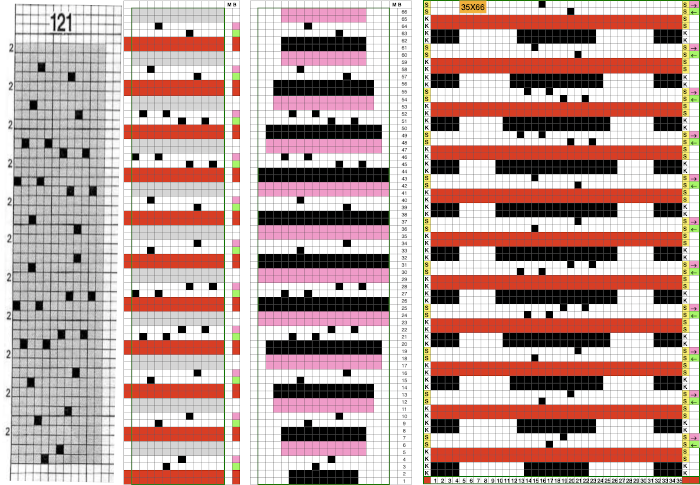 The first preselection row after the chosen cast on is from right to left with end needle selection canceled and the knit carriage already set to slip in both directions, with all required needles on the top bed in the B position.
Transfers are made prior to carriage passes made with the pattern color, in this case, white. If a transfer patterning row follows a white row on the ribber, extra white rows will appear on the striped ground seen in this test, where the ribber remained set to knit every row in both colors 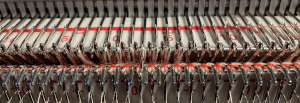
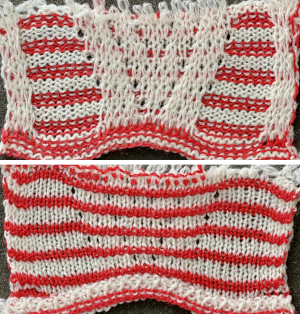 To eliminate the extra white rows, the main bed stays set to slip every row, the ribber settings alternate. It is set to slip for two rows immediately after knitting with the red yarn, then will be reset and knits for 4 consecutive rows. Transfers to create eyelets are made on selected needles on each of those two rows, always toward the carriage, even as the transfers themselves change directions as the angles of the shape decrease toward its center on the top half of the design. After the first transfer and the carriages travel to the right, a long float will be evident, will “disappear” on the return to the left.
 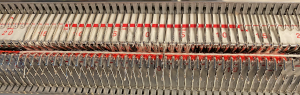 Patterning selection will reappear as the carriages return to the left.
  The color is not changed. The ribber is set to knit in both directions again, forming stitches on both beds for the first two rows, followed by a color change and knitting in the red, on the ribber only for 2 rows, completing a sequence of 4 knit rows before the ribber being set once more to slip. For consistency, I changed the settings on it to slip before picking up the white, changed it again after preselection of lots of needles meant the top bed stitches needed to be knit on both beds again. The first proof of concept, observing choices: as with other samples, the first patterning row after all stitches are transferred to the ribber
 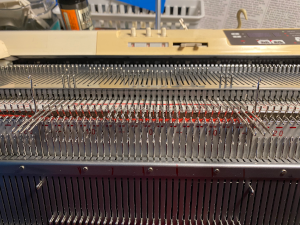 requires a choice as to whether to pick up from the row below or simply allow empty needles to pick up loops on the next pass, the choice throughout here, marked A. Reducing stitches may be done by transferring down to ribber, B, or lateral transfers, C. D marks the spot for a possible shape design shape. Arrows on the purl side point to the direction of transfers, cyan to left, magenta to the right
 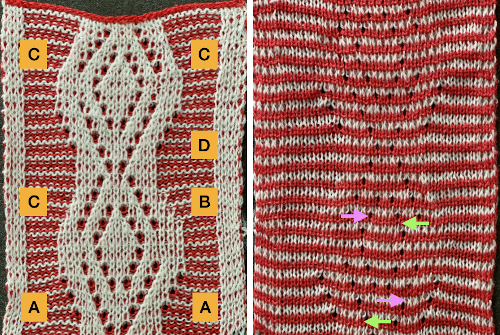 As with single bed lace, the first pass after transfers creates loops on empty needles, which here need to be kept in upper work, D position after transfers. For non Brother knitters, Brother positions are A, B, D, E, skipping C.
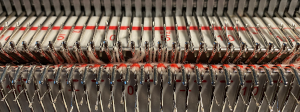
 Knitting over the loops on the next pass on that bed completes the stitch. This design is knit as continuous, the striping at the bottom is wrong because the red was not picked up after the first 2 rows knit in pattern with white, most sequences for the remaining fabric are 4 passes with white in the feeder, followed by 2 in the red. All eyelets here are reduced in size by picking up from the row below, all transfers for decreases are made laterally, the border is set to a width of 4 stitches, the pivot point for the repeat has been narrowed
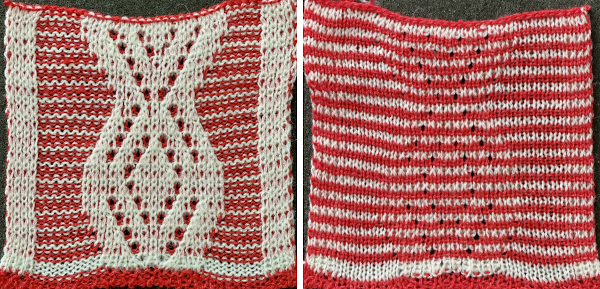
![]() the differences at the edges of the shapes.
the differences at the edges of the shapes. 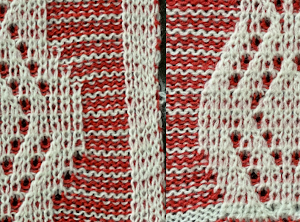 Many of the same principles may be applied to designs using tuck stitch settings, where the striping will appear vertically rather than horizontally
2 color ribbed brioche stitch on Brother knitting machine 1
Lace transfers meet fisherman rib, 2 color ribbed brioche on Brother machines 2
Geometric shapes on ribber fabrics with tuck stitches 1
More on Lace transfers in single color rib
Slip stitch patterns with hand transferred stitches, single bed
This post originally included samples worked using needles on the ribber as well, now in another in progress post: Slip stitch patterns with hand transferred stitches, double bed
An earlier post with a range of single-color experiments: A hand-knit consult to machine knit slip stitch
The inspiration source for the topic here was found on Pinterest 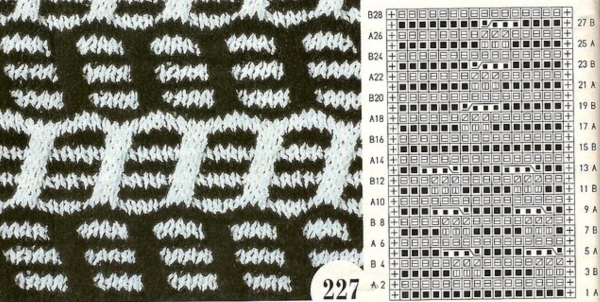 Adapting the motif for machine knitting, visualizing the actions needed.
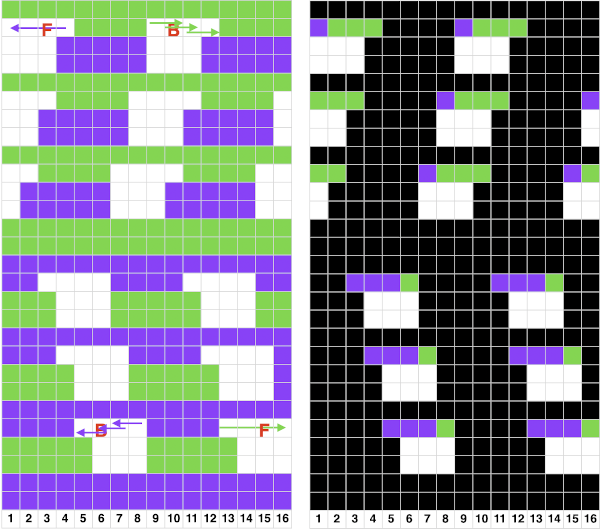
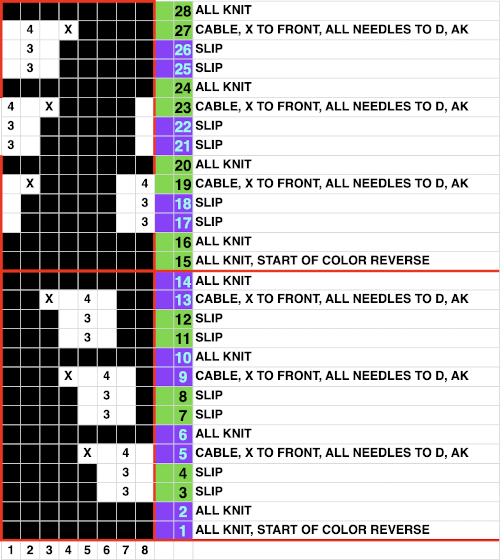 The repeat is suitable for punchcard machines as well. The first preselection row is toward the color changer, end needle selection is on. Cable crossings, 1 front, 3 back, are made every 4 rows except where the color reverses at the midpoint, where 4 all knit rows are preselected and occur. The fourth, extra non selected needle, X, is removed on a tool and held in front of the work. The three adjacent stitches are then also removed on a tool, moved to fill in the now empty needle to the left in the bottom segment of the repeat, to the right in the top half. The remaining held stitch is then transferred onto the newly empty needle. All stitches in the transfer group are brought to D, the remaining needles should have been preselected. If any have been disturbed, line them up as well so all the needles will knit with the carriage set to slip.
 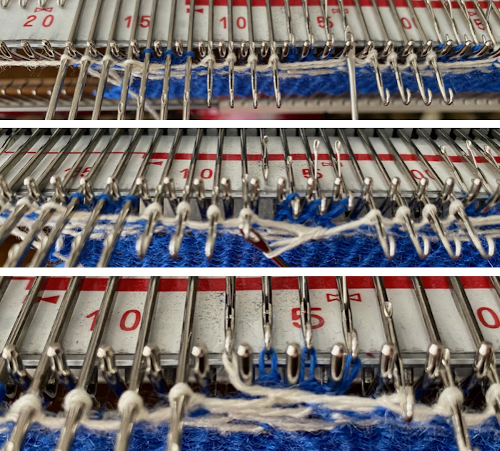 The color is changed, and the row with the completed transfers becomes the first all knit row in the next color pair or rows.
The repeat as programmed into my 930
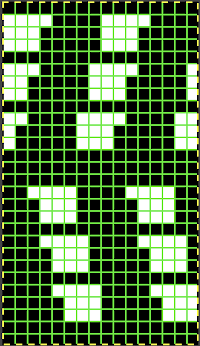
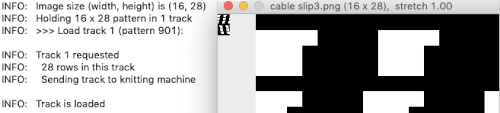
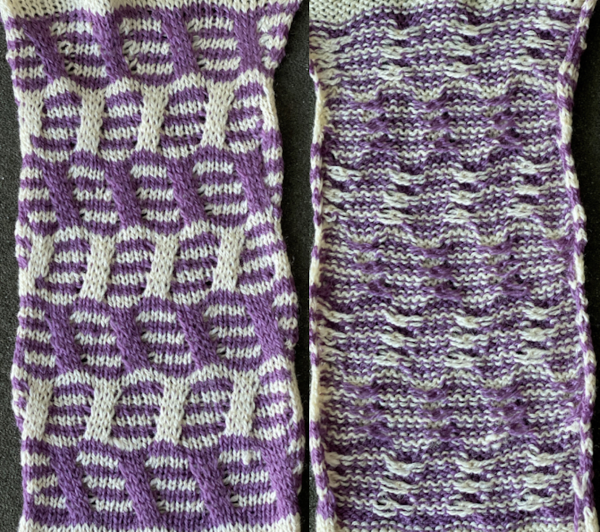 Working on a single bed is for me, more user-friendly than double bed. I like to program the width of my repeats when possible, they can then be treated as single motifs, the default in the 930 with downloads using img2track, and I do not have to rely on notes, memory, or position programming to place the work predictably on the needle bed. My full repeat
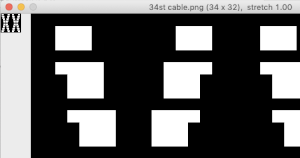
 The knit carriage was set to KC I and to slip in both directions, the same design and execution methods were used as for the first swatch. The yarn is 2/18 wool, the tension was set at 4.., the slipped and crossed stitches pull the fabric in both width and height, the swatch was steamed and pressed to flatten it. Small eyelets occur along the edges where the single stitches were moved to one side or the other across three needle positions. It was not possible to produce a 3X3 crossing at the center of the shapes.
 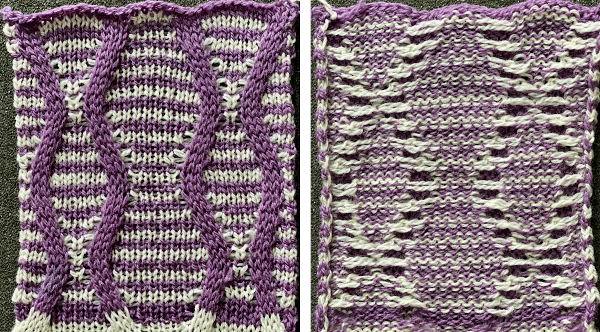 Over time I have encountered illustrations of unraveled knit or slipped stitches being brought out to the purl side, creating thread patterns on the knit surface, and changing the color structure on the purl. This illustrates a slip stitch being created via a hand technique
 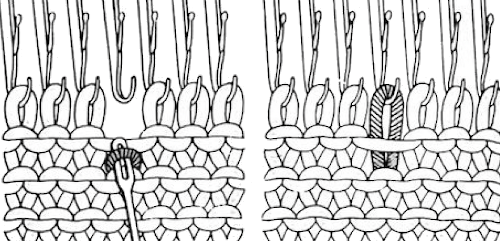 Here the dropped stitch is hooked up on the purl side
 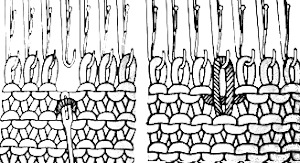 Using the automated slip stitch setting simplifies the technique. The method often described to deal with moving the elongated slipped stitches is illustrated below. Using a latch tool inserted behind the slip floats, remove a single slipped stitch at a time, passing it under the slip stitch floats, and rehanging it in its original needle position.
 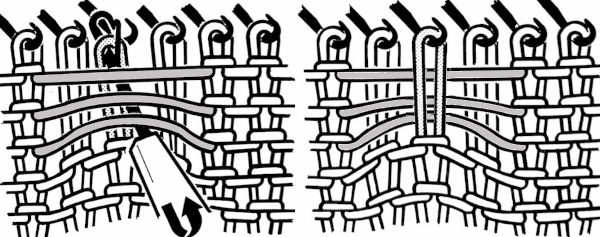 In testing techniques, a simple design that is recognizable with the preselection of needles makes it easier to track progress and accuracy. Though these patterns may be executed in a single color, working in contrasting, bright yarn colors is helpful in isolating stitch formations and understanding their structures. More than one stitch may be moved at any one time. I found when using more than 2 rows of slip the ground fabric began to look gathered and distorted, so my tests are knit using 2X2 pixel blocks.
To move the slipped stitches, slide a multiple eye tool under the slip stitch floats that are to be moved to the front of the knit, holding the tool parallel to the knit bed, lift floats up and onto the non selected needles,  pull tool forward, so stitches and floats move behind the latches
  push tool back toward the needle bed
 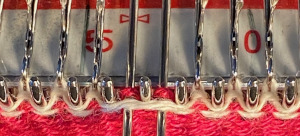 lift the slipped stitches and floats together onto the tool
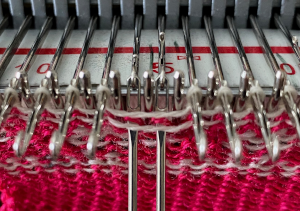
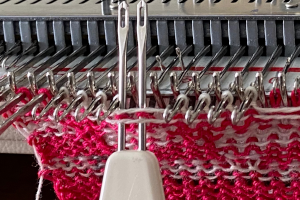 insert a latch tool from behind between the prongs of the multiple eye tool,
 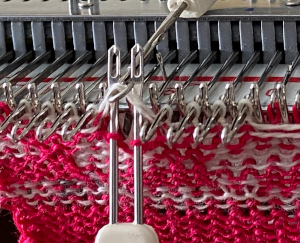 lift the floats over the eyes of the tool, placing them behind it and the slipped stitches, being careful not to hook them up onto gatepegs,
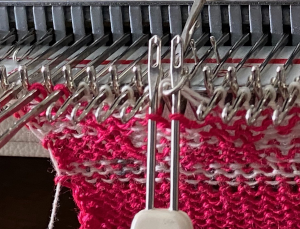 now lift the original slipped stitches back onto their previous place on the needle bed, they will be part of the first all knit row in the contrasting color;
 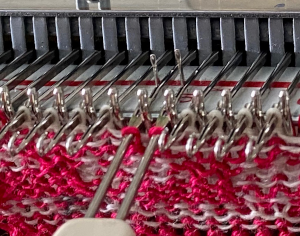 bring the needles with the restored stitched out to E, thus making certain they will knit as the carriage makes its next pass
 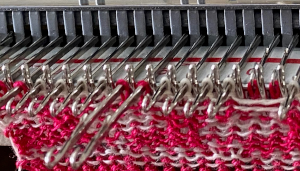 The pattern is charted below in development, color changes were planned every 2 rows. The third blank row in each slip stitch location marks the spot for the above manipulations to take place, noted in the chart with grey cells marked with pink dots. After the initial preselection row toward the color changer, only for the first all knit pattern row, push non-selected needles out to hold, E, to ensure all stitches will knit in the ground color. Subsequently, the first design row is part of the continuing repeat. The next color change will begin to form the floats.
 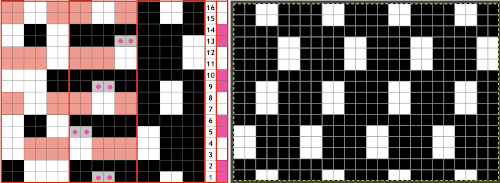 The sequence at the bottom of the swatch is off because I had a change of heart about which color I wanted to form the solid color shapes
 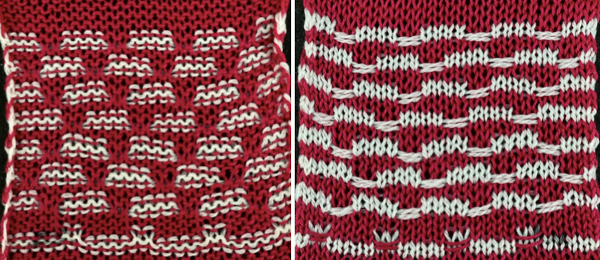 To my surprise, the process became oddly meditative, and I moved onto a different motif built with 2X2 pixel blocks. As seen with mazes and mosaics, a design intended for standard fair isle, tuck, or slip, with color changes every 2 rows, will produce an altered final shape,
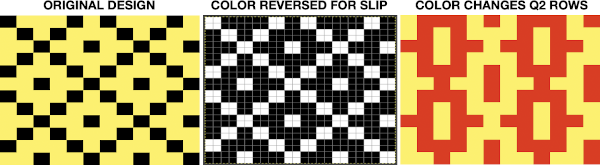
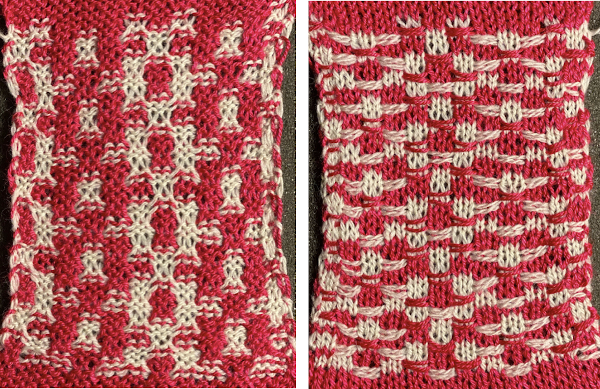 Combining hand techniques: the starting chart begins to address the movement of stitches. On the left, the placement of crossed colors is shown, but technically the design produced is different. On the rows marked with X and red cells, cable crossings are made. All stitches in that row are then pushed out to E, the color is changed and the result is that row and the preselected next one are going to knit on every stitch, those rows are highlighted with red cells on the right as well. Black cells reflect punched holes or repeat for a 24 stitch brick repeat
![]()
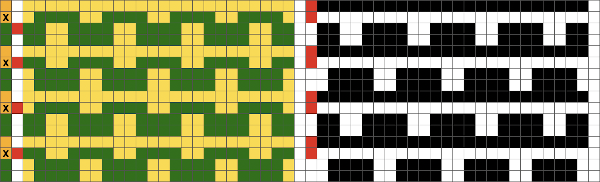 Two types of crossings were used in the swatch, one moving the elongated slipped stitches on the knit side of the work, the simpler process,
  the other involves moving the slipped stitches to the purl side of the work which the purl side after slipping the slip stitch floats behind them in the first steps, followed by performing all crossings to the purl side, then bringing all the needles out to E, changing the color, and continuing in the pattern.
  The blank line indicates the crossing row, the numbers the rows actually knit.
  The resulting knit proof of concept: the fabric has a 3D effect. My red yarn is an acrylic chosen simply for thickness and contrast that flattened with a bit of steam. The white yarn travels in two opposite directions for the crossings, creating eyelets in the center of each pair of moves. The slip stitch floats brought to the knit side in the top half nearly disappear on the knit side. Both surfaces are “bumpy”
 ![]() A design with each color being crossed: the attempted visualization and repeat.
A design with each color being crossed: the attempted visualization and repeat. 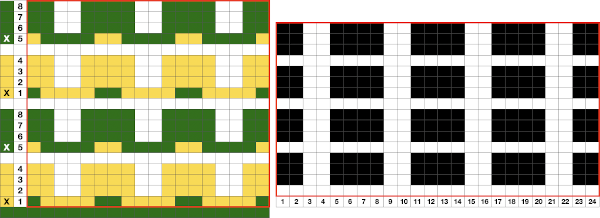 The repeat appears to use slip-stitch in a vertical column, not ever possible in standard knitting. The explanation is that on those blank rows, crossings are made prior to knitting the next row. The chart on the left reflects the needle placement of each color after the crossings. All pattern needles are then brought out to E, maintaining the needle selection. Slipped stitches will have been replaced by knit ones in the alternate color.
When ready for cabling, there will be 3 floats in one color, and a fourth, single one, in the other.
For the first row of knitting, there will be no preselection. Bring all those needles out to E with color 1, then continue as described.
My first test had 2 more rows in each pattern segment, I found the stitches persistently wanting to jump off the needles due to the amount of texture. 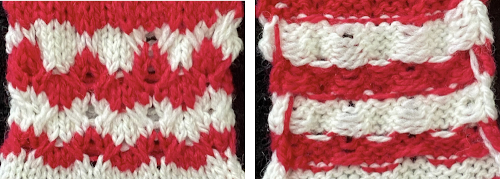 The charted repeat
 ![]()
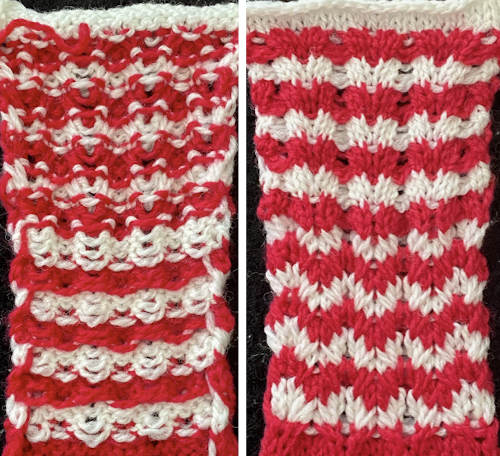 Transferring the slip stitch floats to the knit side was fiddly, I actually prefer the texture created by moving the elongated loops on the knit side. All cabled fabrics narrow considerably. My swatch is 24 stitches wide, knit at tension 9, 14 transfer repeats measure a whole 2.25 inches in width, 4.25 in length. The white yarn is a 2/8 wool, the red a 2/11.5 acrylic.
The very first preselection row and those blank rows in a card or in pixels will only select the first and last needle if the cam button is set to KC one, signaling action needs to be taken  the needle selection is fixed, so it easy to ID and restore after transfers are made.
 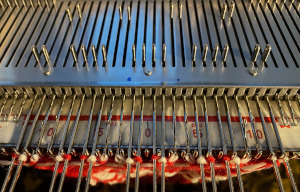 A couple more ways to transfer those slip stitch floats to the front of the fabric: floats can be lifted on top of the needles that formed them and behind the stitches on them, a fine knitting needle or tool can be inserted through the stitches across the row, a few, or a pair at a time, being careful not to twist the stitches. In turn, the stitches can then be dropped off the main bed, held on the needle or tool, and be replaced carefully on the needles in question across the row. Crossings are then made, the proper needle set up is manually chosen for the next carriage pass, and the process starts over again. Folks who like lifelines could thread a ravel cord threaded through a needle and use them to remove the same stitches off the bed instead of the knitting needle.
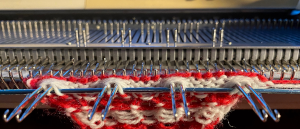
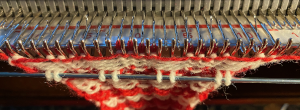
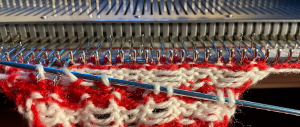
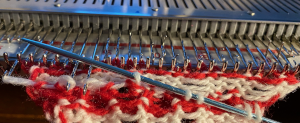
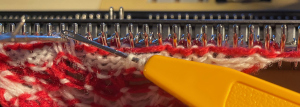
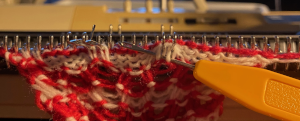
Returning to cabling with crossings showing only on the knit side, attempting wider cables: several issues need to be worked out. The more frequently one color is slipped, the more rows the alternate color will knit, which will lead to distortion of the fabric in the striped areas. The greater the number of stitches crossed, the harder the cable is to achieve, so my tests use 2X2 cables. Dark colors are harder to see both when moving stitches, and often in the final fabric. Spacing between the cabled columns and whether or not to place them or all knit rows on the edges is another choice that needs to be made. 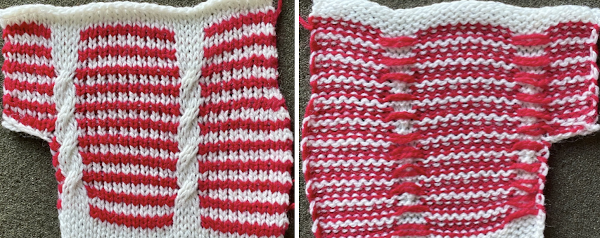
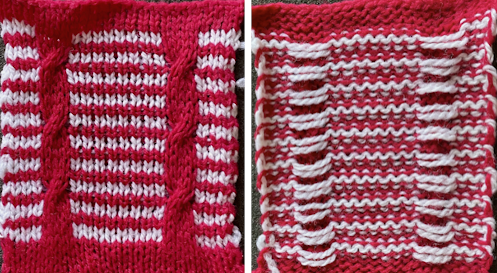
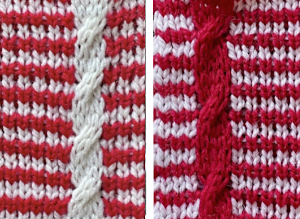 The charted repeats are for the red cable with the second spacing, illustrating options for cabling on row 7 or row 11, pulling needles out to E after making the transfers before knitting the last row of the design. Pairs of slipped and all knit rows are added to lengthen the distance between cables and to reduce some of the extra lengths in all striped areas
 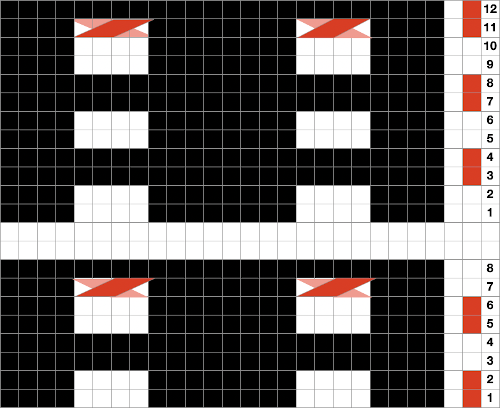 This idea may work in a border or a trim as well. I did not test bringing the slipped stitches to the purl side. The chart shows adjustments in the placement of the repeat to make tracking crossings easier
 ![]() The actions taken
The actions taken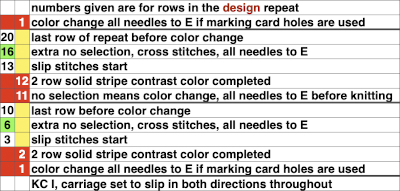
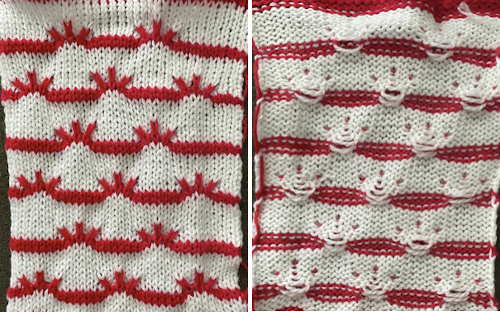 One more to try
  If the goal is to add checks along with solid color cables, the best way to achieve the fabric is to use the fair isle setting. There will be 2 sets of floats formed with each carriage pass. A blank segment may be added at the stitch crossing location as in previous repeats, with those needles brought out to E before the next row is knit, remembering that proper needle preselection needs to be maintained throughout
 ![]()
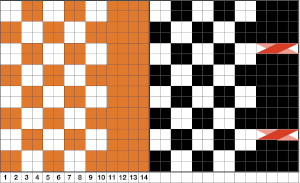 Another approach is to bring elongated stitches created manually up on the purl side. The resulting fabric will be more gathered on the knit side, with no formation of slip stitch floats, it is referred to as ruching, and may serve as a compromise when color changes are made over 2 rows of contrast
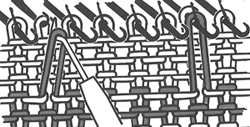
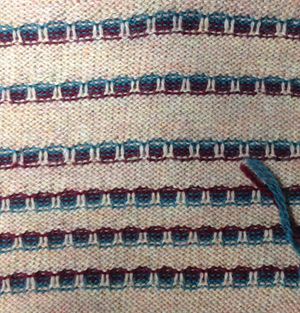
A hand knit consult to machine knit slip stitch
I was contacted via a comment here about the possible methods for reproducing this handknit pattern 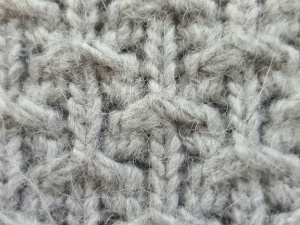 Observations: there are elongated loops on the knit side of the fabric, likely created with slipped stitches. There appear to be eyelets on the purl side. The total number of stitches remains constant throughout the knit. The row repeat spacing is fairly close, so at least to start with I tried single repeats to achieve the look, was not pleased with any of the initial results. That led me to an online search for what would visually appear to have similar qualities in handknit samples. Knittingfool.com is an extensive resource and, to my eye, this slip stitch pattern, “little birds”, shares similarities with the above swatch
 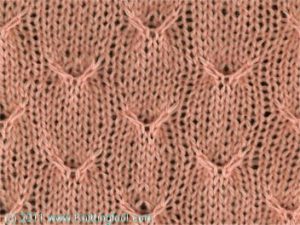 as do “oats” found in a 1984 handknitting publication
 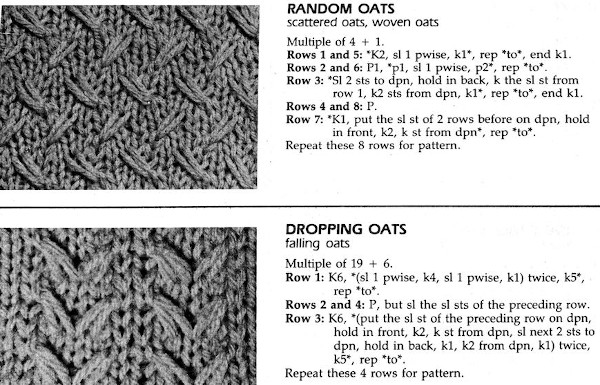 I have a hard time with longhand written instructions for patterns nowadays, have grown so used to creating or working from published charts. As usual, I plan out tentative repeats and ideas, began with this, toying with where to place slipped stitches
 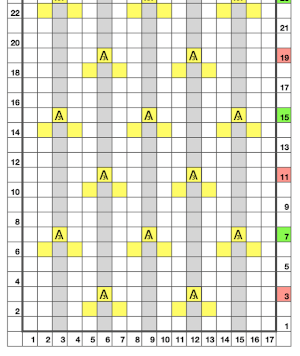 and then transitioned to translating any repeats for use in machine knitting, keeping in mind that in hand knitting actions are made as the row is being knit, while in machine knitting they take place prior to returning the carriage to the opposite side thus knitting that row. This was my first repeat after replacing cells with squares representing knit stitches with black and white planned pixels for electronic download.
 On the machine, the distance between stitches is fixed, so for any crossings or lots of movement across the needle bed it is best to use yarn with a bit of stretch, and a stitch size large enough to allow for the desired actions. I found slipping for 2 rows only did not create enough loop length, so I changed the slip stitch areas to 3 rows in height.
 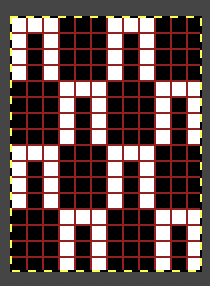 The slip stitch setting is used in both directions throughout. White squares represent areas where needles on the bed are skipped/slipped, not being selected forward and thus knit. This happens for 3 rows, resulting in the required elongated stitches. On the 4th pattern row, the group of 3 not selected needles is where the stitch transfers and crossings occur. Any cabling, eyelet fill-in, etc, needs to be performed prior to knitting that row and moving the carriage to the opposite side. The work is always done with purl side facing, so matching the direction of patterning to a hand-knit may also require mirroring of crossings, depending on your knitting machine model. The goal is to have the K3tog with the long loops in front of the single knit stitch in the center position.
To execute the slip stitch crossings in front of the center knit stitch on the knit side of the fabric transfer the center stitch in the group of 3 and hold aside, take the left elongated stitch and move it onto the now empty needle at the center position of the group of 3 transfer the elongated stitch on the right onto that same center stitch. This may be done in the reverse order to have loops move in the opposite direction on the knit side of the fabric.
 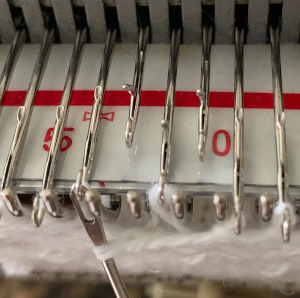 Move the stored original center stitch back onto that center position, there will now be 3 stitch loops held on the single needle
 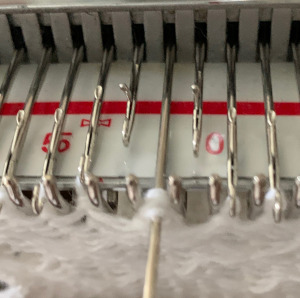 fill in the empty needles to avoid large eyelets, picking up from the row below
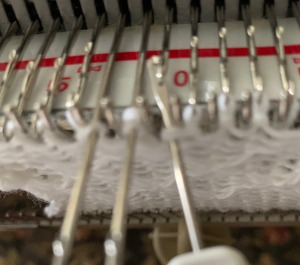
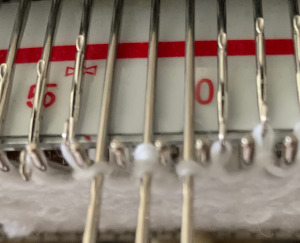 repeat the process across the bed, bring all the needles used out to hold position prior to knitting the next row
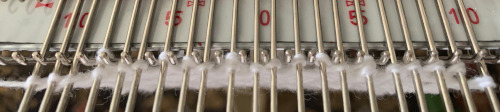
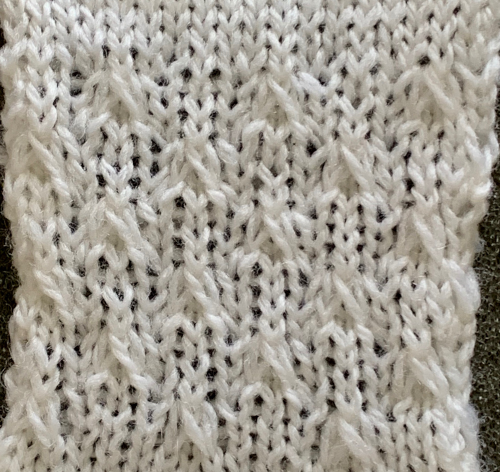
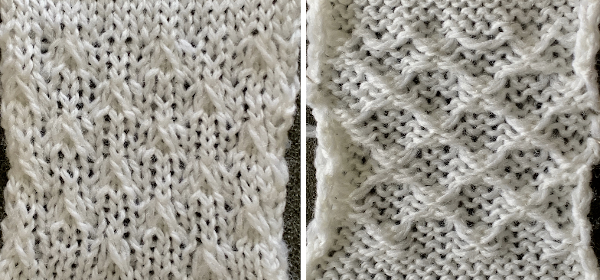 The yarn used was 3/8 wool at loosest tension possible, the result is subtle as any spaces between stitches get pretty well filled in. Moving on to denser patterning
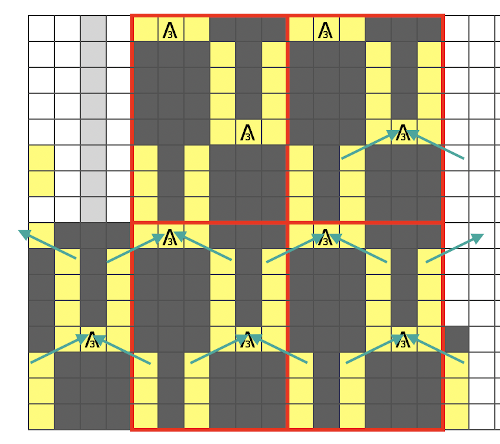
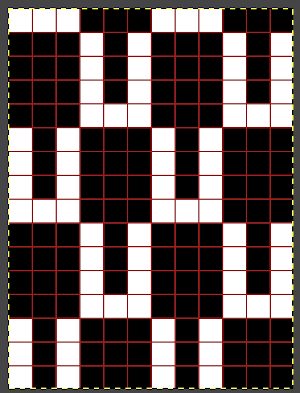 The elongated stitch crossings now happen every 4 rows, but across two needles, not one. I used a tightly twisted rayon for the test swatch thinking they might be more visible, but the openness in the stitch formation because of the fixed spacing on the metal bed confuses the texture a bit. Simply leaving the empty needle out of work and continuing to knit (1) created too large an eyelet to my taste. Trying to pick up the third slipped loop (2) had the same effect. The best result was obtained by picking up from the row below on each side of the three stitches that are removed and then returned to the needle bed (3).
When pattern row 4 is reached, the not selected stitches are removed on a 3 prong tool, the elongated stitches are moved onto the center needle of the now resulting group of 5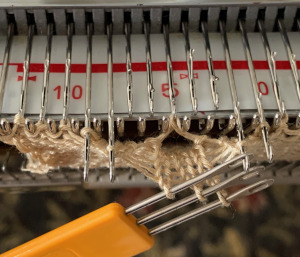 e wrapping the third row of floats can be tested by inserting a single eye tool front to back, twisting either counter or clockwise and rehanging on an empty needle, thus casting on an “extra” stitch
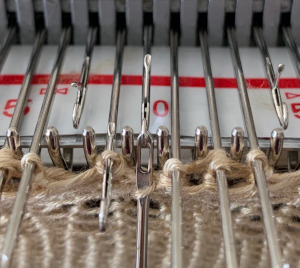 going back to picking up from row below
 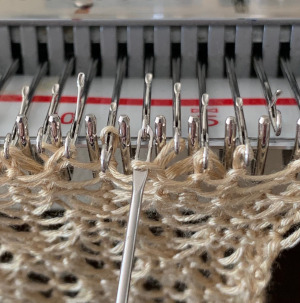 this shows the number of skip stitch floats in each test
 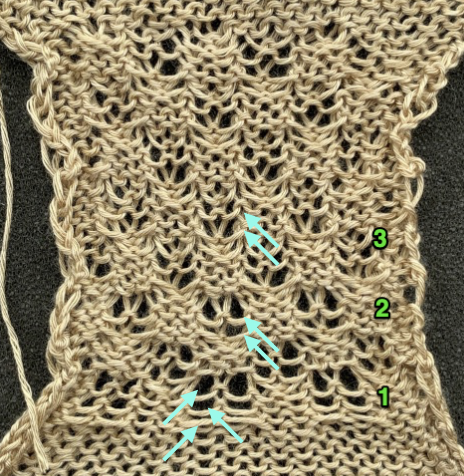 the appearance on the knit side
  comparison to the handknit.
  Charting the actions for a hand-knit version: the top images illustrate the moves on the purl side while on the machine, below it those on the knit side when hand knitting the pattern
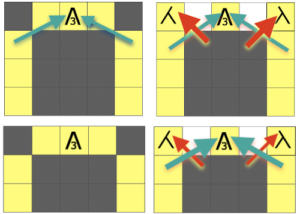 Plotting out borders and repeats for a small test including make-1 increases in order to keep the total stitch count constant. I do little hand knitting nowadays, so when doing so I add as much information as possible including some stitch counts until the pattern is established and I can visually follow it more easily.
 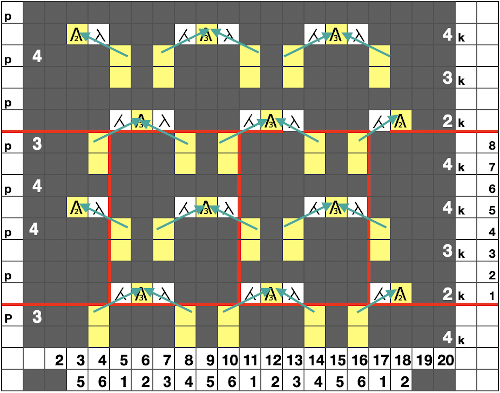 The resulting test swatch
 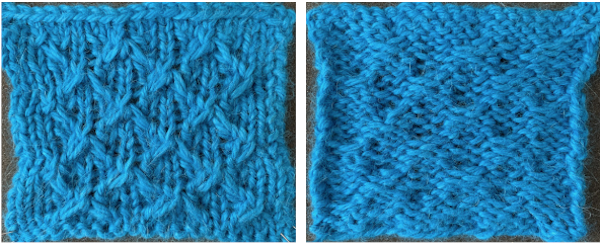 Comparison with the original: I knit 3 together through front loops, so my long stitches are crossed in the opposite direction of the original. Knitting through the back of the 3 stitches would reverse it and yield a matching result.
 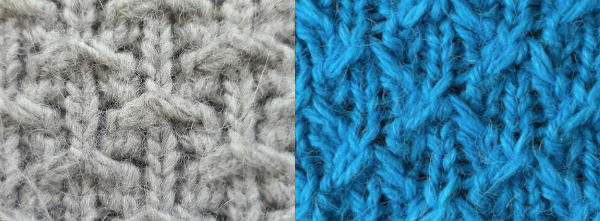 This is an illustration of the method I used to “make one”, in my swatch I kept the direction constant
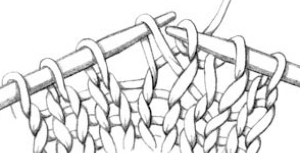
A later post that includes color explorations: Slip stitch patterns with hand transferred stitches, single bed