Previous shares on aids to tracking cable transfers
Using punchcards to track small cables in pattern 1
Using punchcards to track cables and twists in pattern 2
Visualizing knit cables in color 2_ using Numbers and Gimp
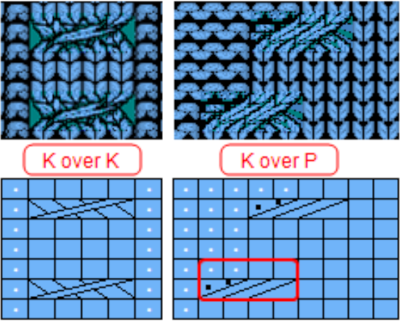
Hand knitting patterns are usually depicted with the knit side facing.
If crossings are intended to match them exactly when working on knitting machines, they are made on the purl side, and their direction needs to be mirrored.
The blue dots illustrate hand-knit symbols, and the pink dots the machine-knit companions 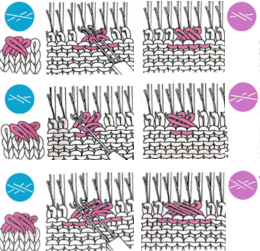 I was recently contacted about the possibility of reproducing the swatch on the far right. The image on the left is an actual knit, first tested with cable crossings mirroring each other along vertical columns.
The inspiration swatch was likely knit on the bulky, twisted every 4 rows, mine on a 4.5 mm machine, twisted every 5 rows.
It is possible to crop, copy, and paste initial photos, as in the center image, to visualize how the process may be altered prior to spending time creating new charts or any actual knitting. 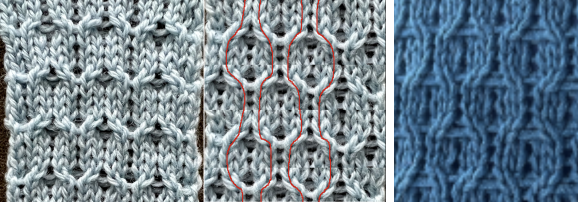 Building charts in a spreadsheet:
begin with creating and saving custom shapes, which can be made editable, and outlined if preferred (magenta) to further define the stitch brought forward, with the other moved behind it (blue).
Symbols used:
1. black cells/ knit stitches
2. white cells/ needles out of work, creating ladder spaces and non-selected needle areas where stitches are to be moved in the direction of superimposed arrows
3. red arrows/ stitches that are lifted off the needle bed, brought to the front on the purl side. The stitch on the adjacent black cell/selected needles is removed, travels behind it, and replaces it. The held stitch is then placed on the now-empty needle. Both stitches are brought out to hold/E position to knit properly on the next carriage pass.
The plan is to use the slip-stitch setting in both directions.
Since there are needles not in use, the end needle selection needs to be canceled.
Proper needle placement is required for patterning accuracy.
One option for achieving it is by air knitting the first row of the design, another is to program the width of the planned knit in electronic machines, establishing pairings, and using the single motif setting with no guesswork.
A chain cast-on can be performed, followed by dropping chains in ladder locations and taking those needles out of work to A position.
Even weight is useful if crossings are to begin after only 4 rows of knitting.
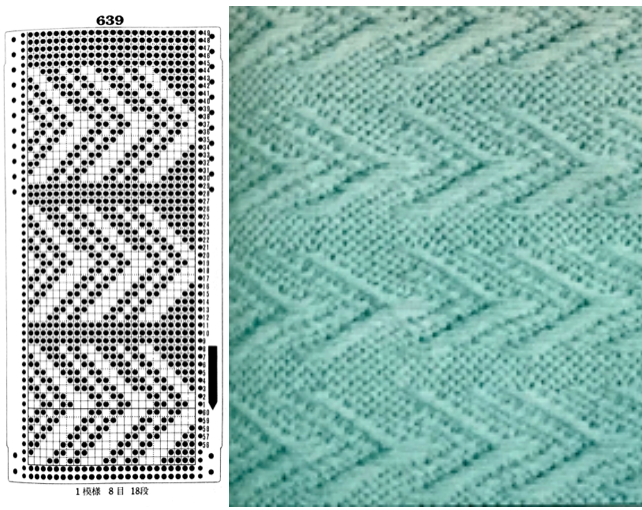
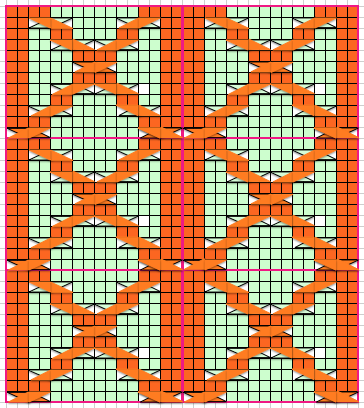
Each repeat is 8 stitches wide, punchcard users repeat it X3 in width, and in the charted height X3. 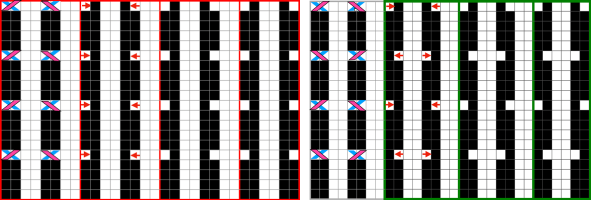 Proofs of concept: 30X20 electronic repeat for vertically mirrored transfers,
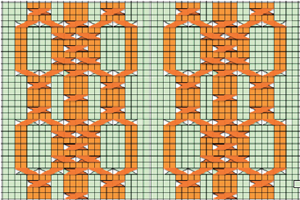
 ![]() and the alternating twisted arrangement
and the alternating twisted arrangement ![]() The work on the machine
The work on the machine 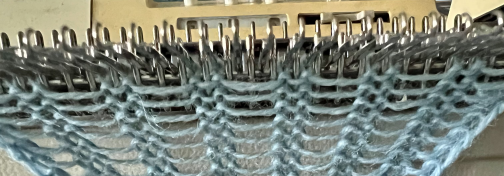 In the resulting swatches, patterning errors such as the marked one become difficult to repair after the fact as stitches grow in size and ladders nearly disappear
 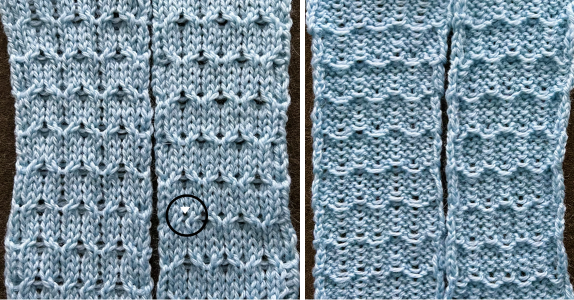 Both swatches measure less than 2.5 inches in width, another reason to explore the results on bulky models if they are to be used in garments.
If planned as panels combined with stocking stitch, careful planning is due to overall gauge differences and those in row counts when seaming and joining.
Category: Symbols and Fonts
Machine or hand knit symbols DIY charts with copy and paste in Gimp
Over the years I have accumulated different knitting fonts, some not now compatible with Mac OS 12 or long since unavailable, while others are from encounters with less common fonts, Webdings, and Windings, or self hand-drawn.
Knitters interested in creating simple charts with no access to spreadsheets or with symbol-producing design software, but with some familiarity with photo editors such as in this case Gimp, may find this an alternative way to produce knitting charts, working on large grid units to start with or with magnification.
This first image is 12 cells wide, and 28 high, composed originally in my spreadsheet program, Mac Numbers, using cells 50 pixels wide and high, the final table image was screen grabbed and opened in Gimp, it is rotated here for sake of space. To use it, click on the image, a larger scale version will open in a different window, save that image by whatever means you prefer, and open it or copy and paste it in Gimp. Use image, transform, to rotate 90 degrees clockwise to change its orientation to upright, check scale, adjust slightly if needed before continuing, it should measure 600 pixels in width by 1400 in height,  A grid of 50 pixels in width and height for the image can be configured and shown on top of the image to check the size and placement of the symbols.
 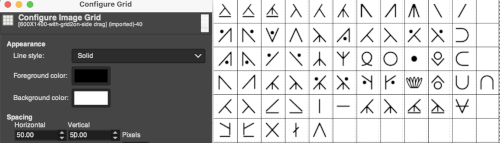 It is hidden in the original, the finer grid lines are used as guides for isolating the symbols that will be used in your chart.
Choose file new, retain the same size, and configure its grid to 50X50 pixels. At that point, the image may be trimmed to a smaller number of units to accommodate your repeat. Navigating between the two screens, use the rectangle tool to select symbols you wish to use in your chart, copy and paste them into the new image in the center of the appropriate cells. 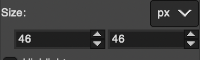 Another option if lots of symbols are to be used repeatedly is to copy each into a part of the new image that will not be a part of the final chart once, and then repeated copy and paste can happen from there on the single screen
 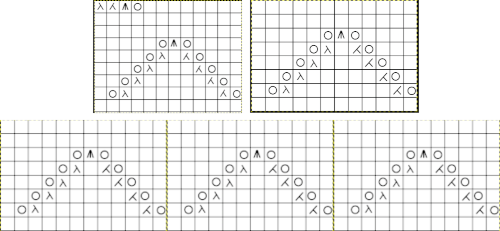 For more on grids and guides see Gimp update for Mac 2.
The image for use with a 26-pixel design grid when rotated it will measure 312 pixels in width, 728 pixels in height, ![]() A few cable samples, the file is 390 pixels wide by 286 high on 26-pixel cells, not all these cables are executable on the machine, extra yarn lengths would be required to allow stitches to move over far enough on the metal bed for the next row to form knit stitches properly,
A few cable samples, the file is 390 pixels wide by 286 high on 26-pixel cells, not all these cables are executable on the machine, extra yarn lengths would be required to allow stitches to move over far enough on the metal bed for the next row to form knit stitches properly, 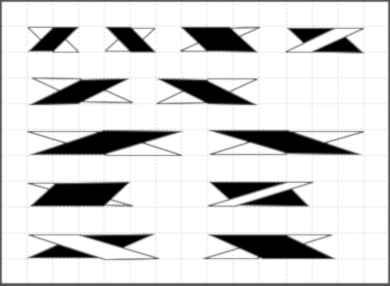 A sample cable with knit columns added to each side, colors, more symbols, and widths of repeats can all be adjusted. If the images are saved in the full size as pngs, the grids are lost. To retain the grid, the image needs to be screengrabbed and in turn rescaled to the desired size.
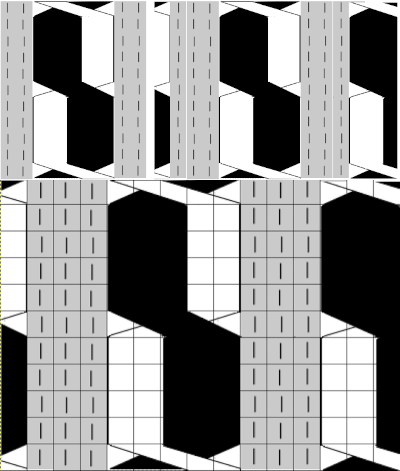 more copy and paste to visualize a larger repeat
 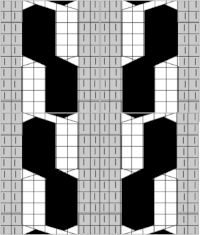 An added note on Gimp: my blog posts are now created on an iMac with OS12 and M1 chip. Rosetta needed to be installed for the program to run. I have found some issues with the pencil tool not working at all or properly or commands no longer working after several steps. Quitting the program did not eliminate the problem. What appears to solve the issue is to go to Preferences Folders, and then to choose the reset brush folder command.
 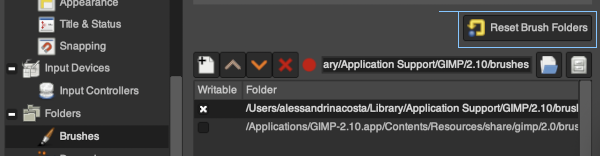 Of course, since the program is a new install, my previous collection of custom brushes will need to be recreated.
For an extensive collection of knitting symbols and their meanings, inspiration for adding your own as needed, see http://www.knittingfool.com/Reference/KF_Symbols.aspx
Hand to machine, symbols 6
WORK IN PROGRESS
This document is created using Mac Pages and Numbers, stitch illustrations have been borrowed from magazines and manuals long out of print and edited, the symbols and charts are self-drawn. Using shapes in Numbers now makes the process of creating DIY symbols in the spreadsheet significantly easier than in my early Excel days.
The transfers are illustrated as they would occur if hand-knit or tooled as opposed to created by automated machine functions, blue dots are associated with knit side facing, pink with purl side facing. This series observes single bed work
Cable crossings:  To visualize cable crossing in the opposite direction, images can simply be mirrored horizontally
  More cable crossings including working double bed
Crossing stitches by pulling one through another, 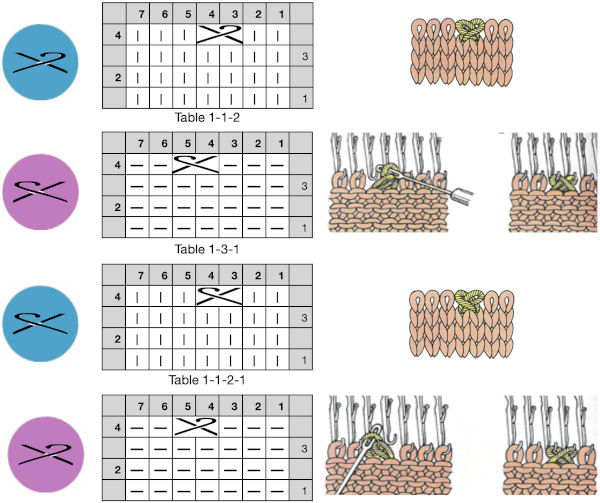 an alternative symbol for the same technique.
 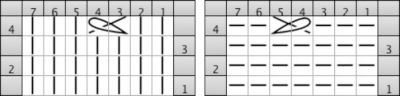 The techniques may be used in variations, using 3 or 4 stitches. Yarn and tension are significant factors when any number of stitches are moved across a fixed span on a metal bed machine.
Slip stitch creates a short float where a needle is not worked and an elongated loop on the knit side of the fabric. There are patterns where the elongated stitch is removed and brought behind the float, to the purl side of the fabric 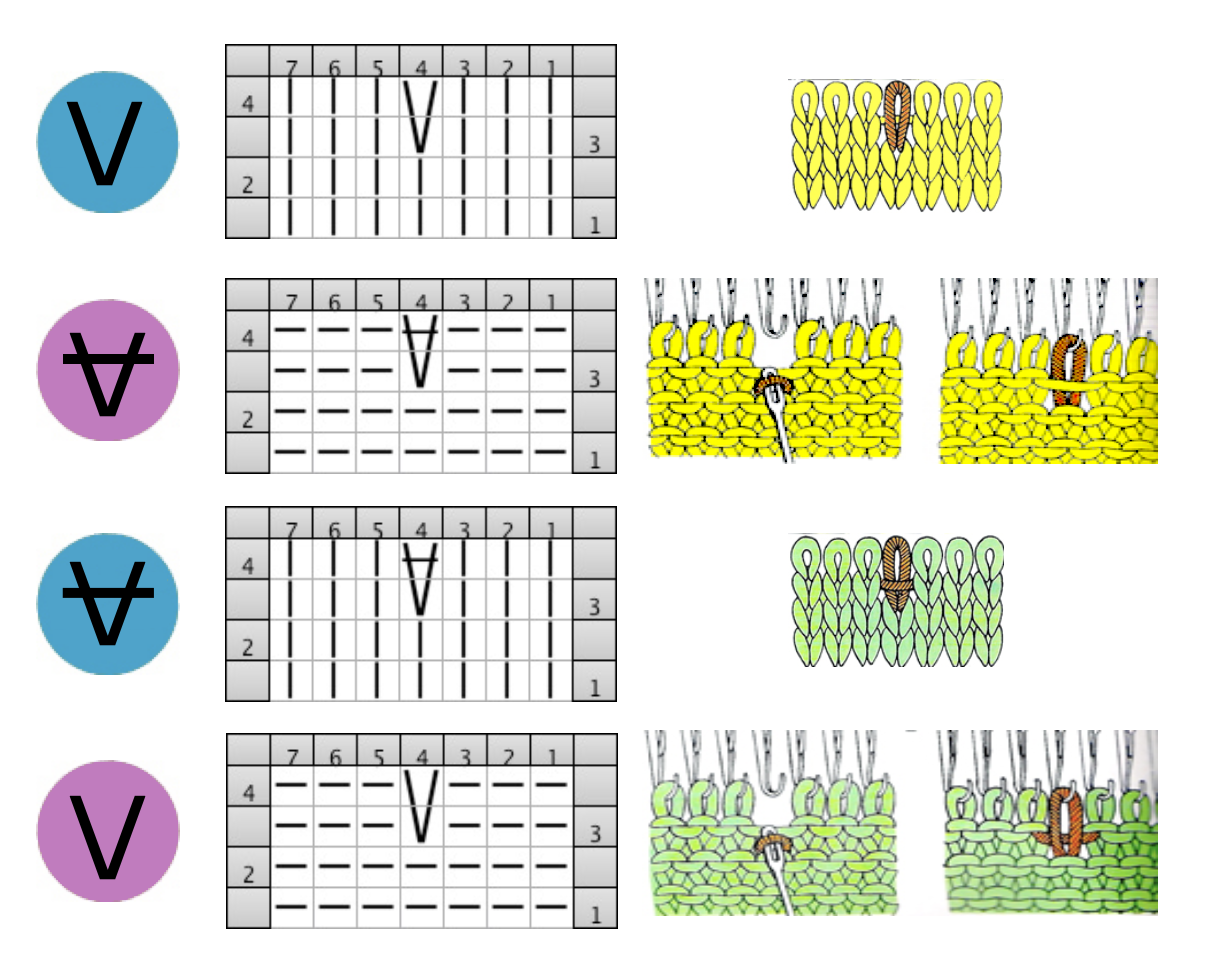 Tuck stitch groups of stitches are gathered in needle hooks, commonly with knit stitches on either side of the gathers.
 Tuck stitch with a twisted elongated stitch. The effect will depend on the yarn being used.
 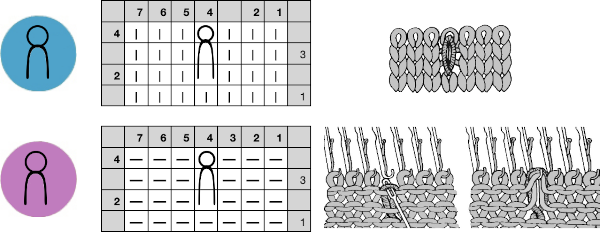 More on tuck and slip stitch /2020/09/13/single-bed-tuck-and-slip-stitch-fabrics-1/
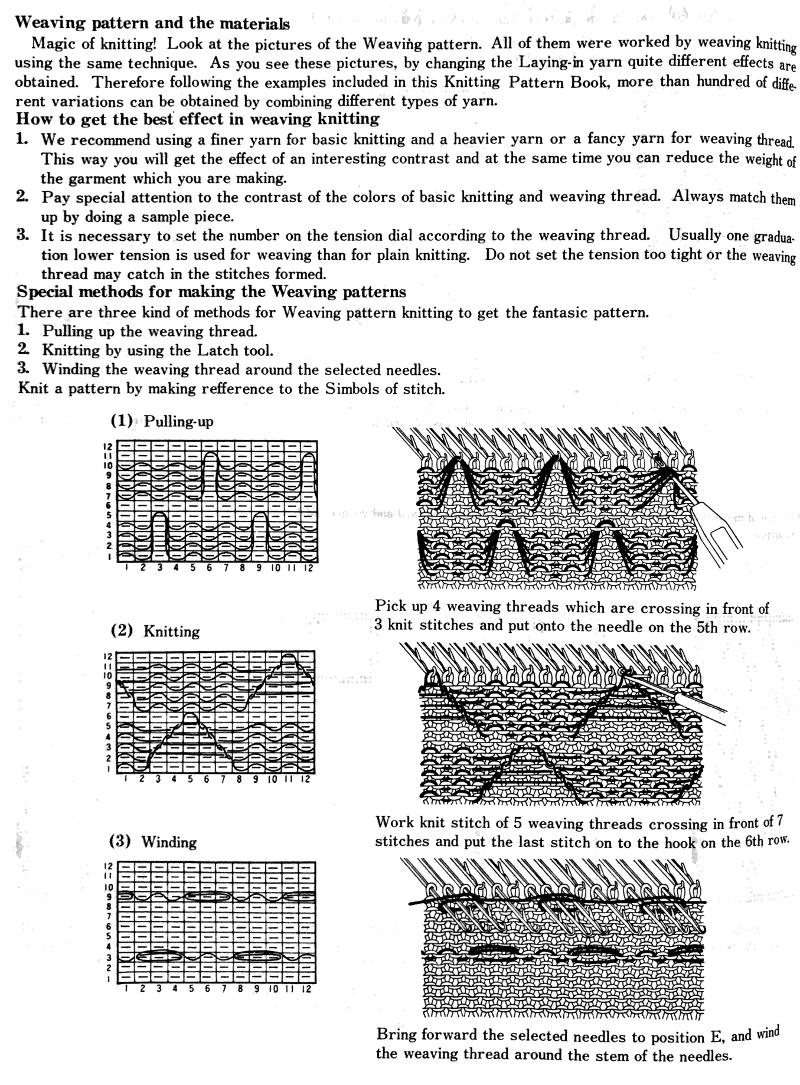
When combining techniques symbol placement in charts is often up to the creator. In the top sample, 1, a three-row pattern, the first stitch is pulled up, gathers it and the stitch right above it on the shank of the needle, in turn latching the third stitch through the first two, creating a purl stitch on the knit side at the top of the gather, and a knit stitch on the purl.
The next pair of images, 2, illustrates a simple picking up a stitch, stretching it, and hanging it on a knit stitch several rows above. This is also called ruching which may be done over any number of rows, not necessarily in vertical alignment, and may result in episodic pleated effects on the knit side. Because no “tuck” loops are being combined in needle hooks in addition to the stretched stitch, multiple side-by-side stitches may be hooked up this way. Very short elongated loops ie for one or two rows as marked 3, are not as visible on the purl side and do not create very visible gathers on the knit side.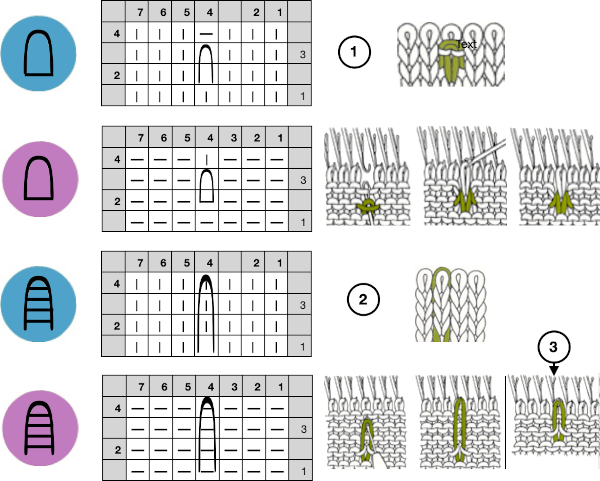
A single fully fashioned increase is illustrated in the charts. The same technique may be used in the body of the knit, moving stitches in any one row, leaving single needles out of work at regular intervals, and picking up from rows below as pictured on the right to “fill in” empty needles. 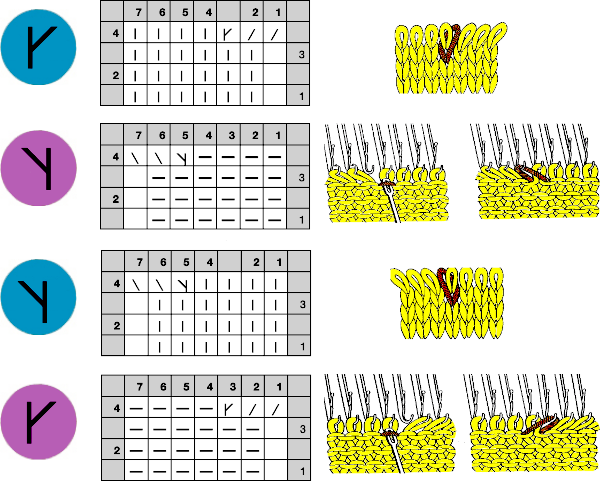 Stitches may be twisted in the body of a knit on the machine by inserting a tool front to back through the stitch, twisting it to the right or left, rehanging the stitch in the same location.
 This technique may be used with multiple stitches to create mock cables, and patterning, whether electronic or punchcard may be used in machines with needle or pusher preselection to track the placement of the twists. E wraps may also be used to cast stitches on side edges of the knitting, whether the result is satisfactory is determined by the knitter’s preference.
When vertical spaces are created between knit stitches, the term often used to describe the floats that are created is ladders. One can drop a worked stitch at the end of the knitting, or in machine knitting, a needle may be left out of work and as it is skipped, the ladder is created. Dropped, previously worked stitches create wider ladders than those with skipped needles When a ladder needs to be eliminated, there are several ways to deal with returning any empty needles to work. If an empty needle is brought back into work, the first pass to the opposite side will create a loop on the empty needle, the second pass will complete the stitch on that needle, and an eyelet is created. If one wishes to minimize the eyelet, one method is to pick up the purl ridge from the row below on either the right or the left of the empty needle, as illustrated in the fully fashioned increase chart, another is to twist the last ladder and rehang the twisted loop. If multiple needles are out of work, then an e wrap cast on by twisting stitches on every other needle is needed unless needles are brought back into work one at a time, creating secondary eyelet patterns.
Blog posts related to or using symbols, in historical order:
Machine or hand-knit symbols, DIY charts with copy and paste in Gimp, 12/21
Symbols in knitting charts, 11/21
Revisiting lace repeats, symbols, and charting, 10/21
Punch cards to electronics: book symbols and samples, 12/17
More on charting, foreign symbols, and cables, 12/14
Machine or hand-knit symbols, DIY charts with copy and paste in Gimp, 7/14
Machine knitting symbols, 8/13
Hand to machine symbols 5: lace, 12/21
Hand to machine, symbols 4: cables, 2/13
Hand to machine, symbols 3, 2/13
Hand to machine, symbols 2, 1/13
Hand to machine knitting symbols 1, 1/13
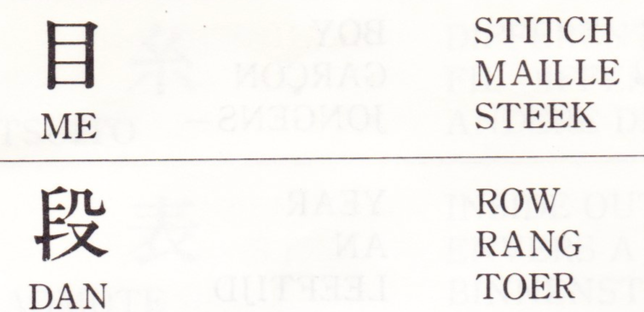
Knit terms: translations 2/12
DAK is a program that allows for designing with illustrations created both as symbols, or unique to programs for in-home use, representing the intended fabrics as knit stitches, seen here for a lace repeat. The availability of the symbols does not necessarily translate to knittable fabrics 1, 2, more lace info 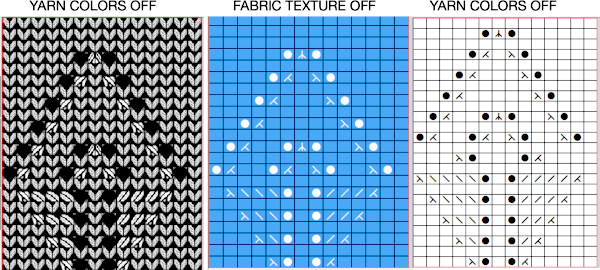 Cable illustration as from the DAK manual, with single bed and knit and purl stitches represented
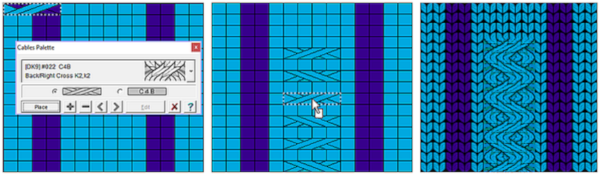
 Many cables that can be created in hand knitting are not executable on the knitting machine because of the fact that the yarn needs to move across fixed widths on a metal bed and the moved stitches need to be large enough to allow the knit carriage to form new stitches properly as it travels back to the opposite side on the following pass. There are techniques that can help to make wider cables possible, it is best to test crossing tolerance before planning or following full repeats whether published or self-drawn.
The same symbols may be used for hand-knit charts, taking into consideration whether working on 2 needles, in the round, with the knit or purl side as the public one, or the fabric is intended as having reversible surfaces.
Symbols in knitting charts
Many of the symbols associated with both hand and machine knitting cannot be separated from the history of lace frame knitting. In 1764 an eyelet lace attachment was invented for hand tooling transfers on the existing knitting frames, and nearly 200 years later the first home knitting machine appeared, the Brother 585, in Japan, with an accompanying transfer carriage.
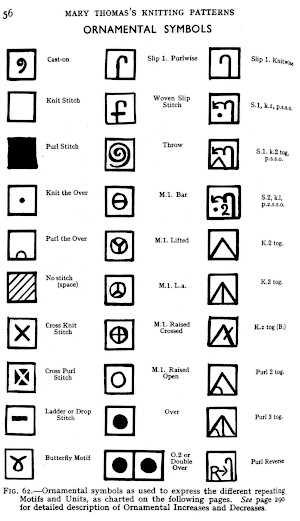
Mary Thomas, a hand knitter, began to explore the need for symbols in the 1930s, these are found in her book of knitting patterns, first published in 1943
 Japan’s contributions to lace patterning in particular are readily available in early punchcard books for Toyota, Singer (Juki), Knitmaster (Silver-Seiko), and Brother, expanded over the years to include larger repeats for use in electronic machines.
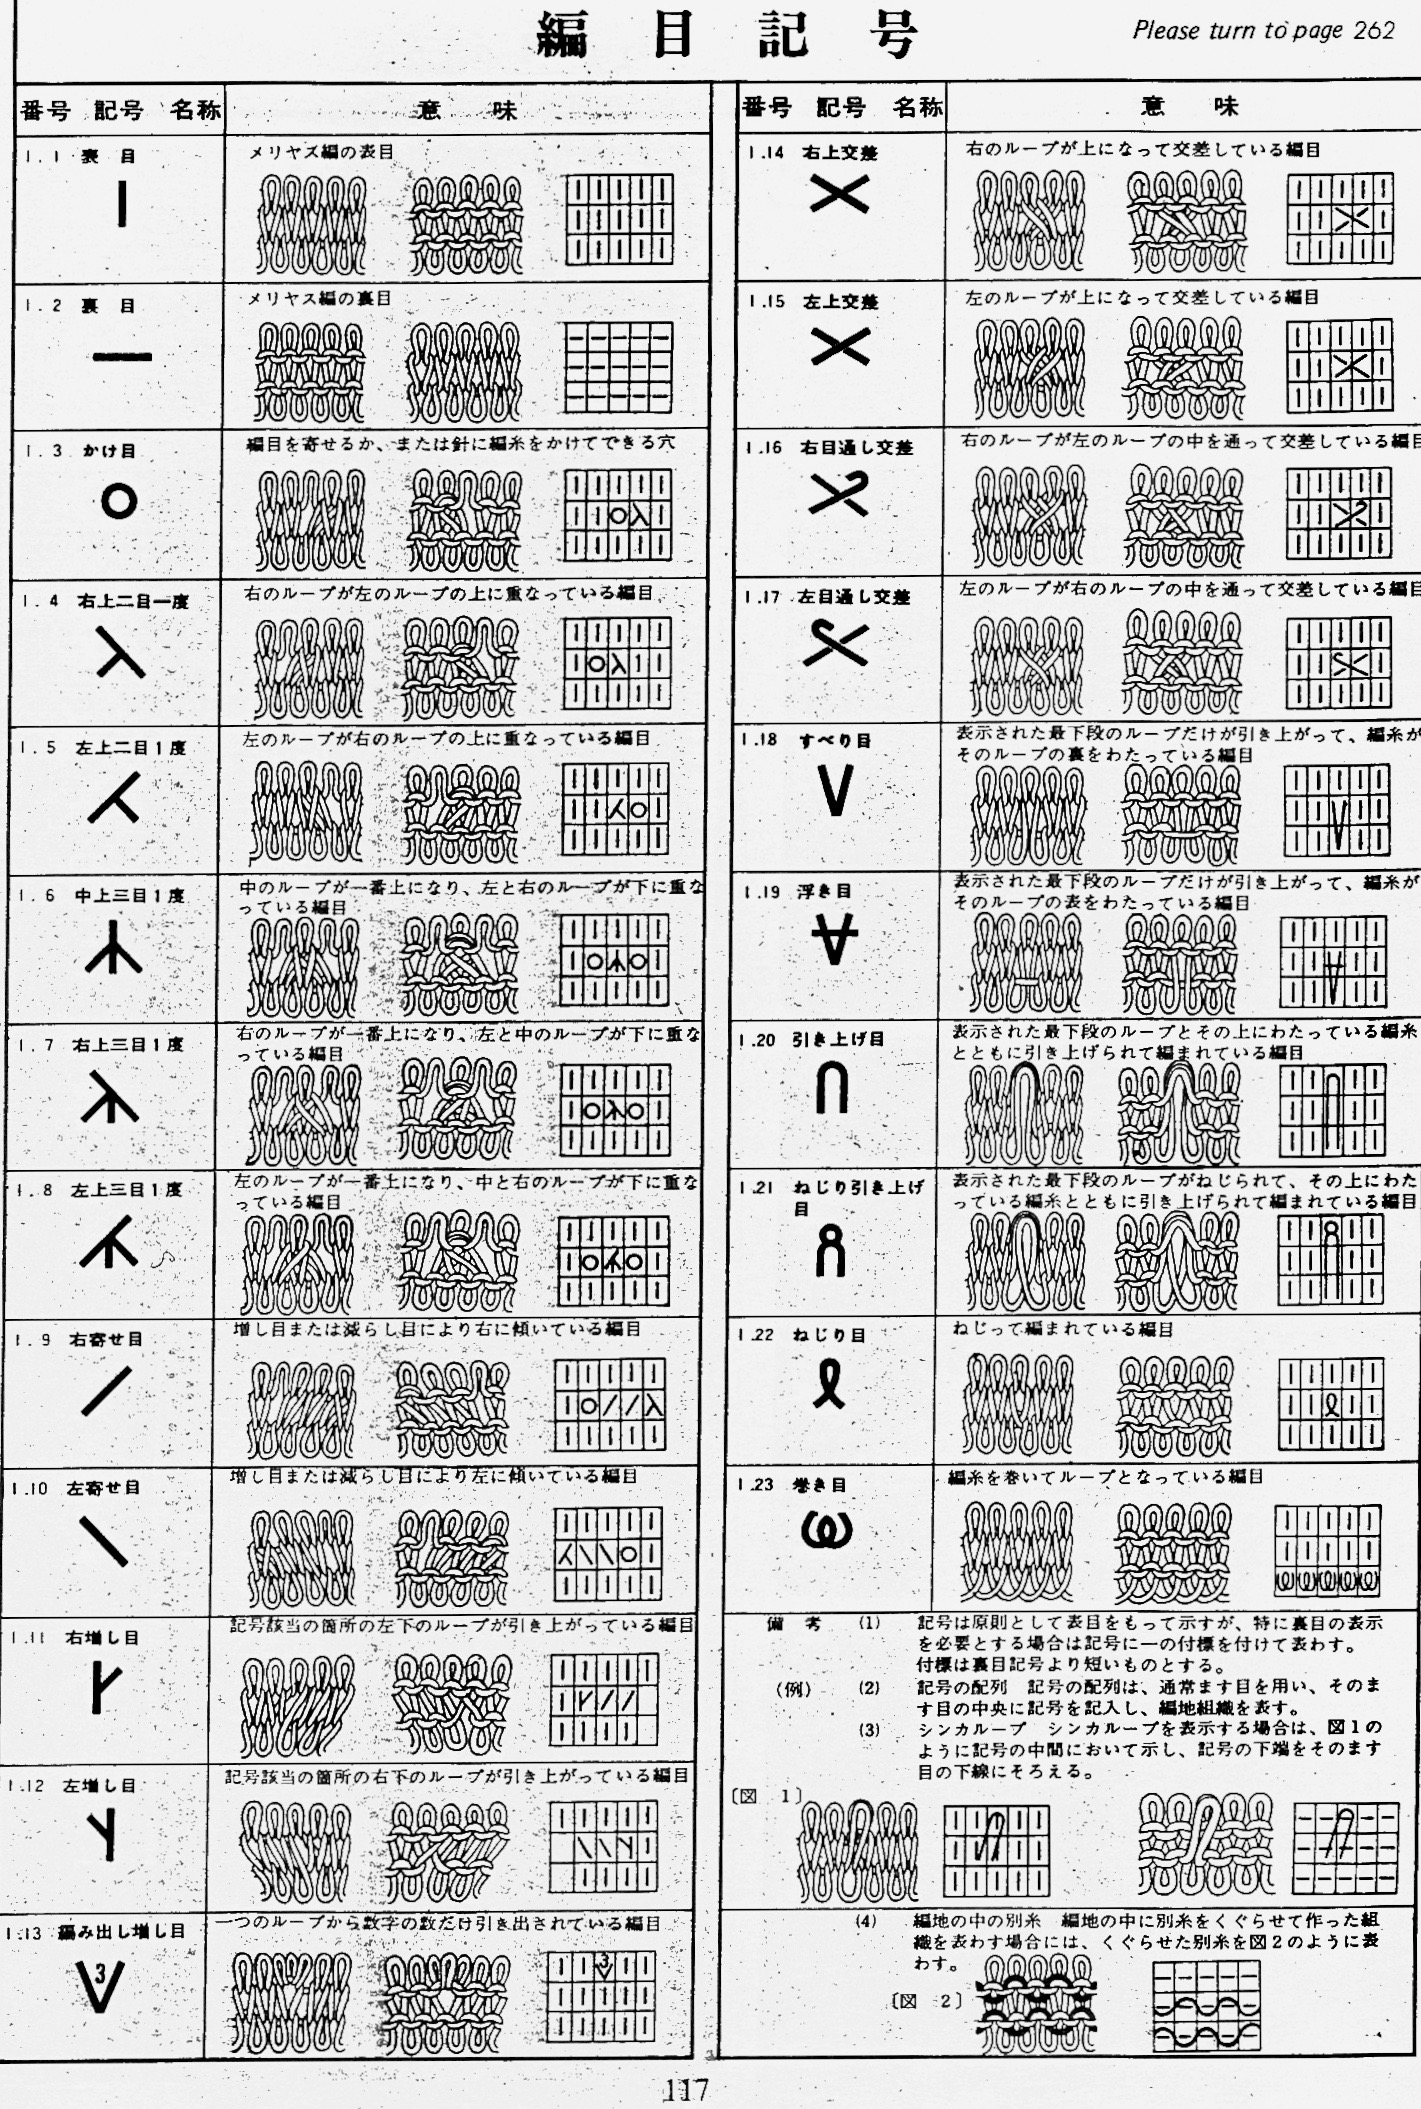
When Brother first published their list of symbols, they used ones as given for hand knitting, and it took a while for them to catch up to reversing the symbols to represent transfers on the purl side. They are seen here showing illustrations of formed stitches for both knit and purl sides, with the direction of the symbols often matching the knit face, as seen in the Brother Home Study Course. 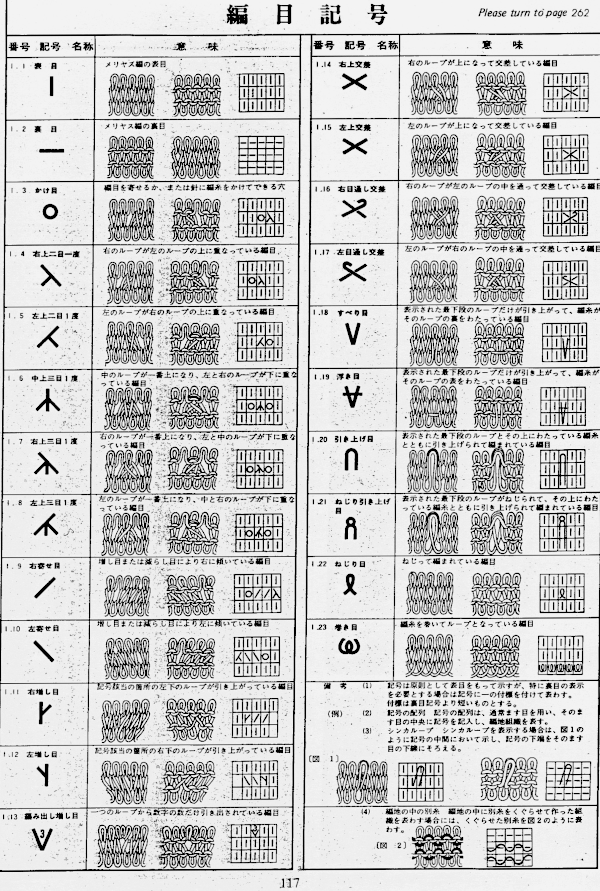 A clue as to surface being represented is that it is a convention that vertical straight lines | represent knit stitches, horizontal ones — knit.
Hand knitting symbols have proliferated, are not always consistent with functions assigned to them. The latter varies depending on the part of the world hard copies of patterns have been published, and there is increased potential for DIY meaning assigned to symbols in an era of self-publishing patterns and software that allows one to create their own.
A cumulative, extensive collection of symbols may be found @ http://www.knittingfool.com/Reference/KF_Symbols.aspx
My first exposure to symbols and textures provided in addition to paint functions on gridded canvases with cells that could be adjusted in size and zoom, along with drawing in repeat, was to Cochenille Stitch Painter back in Commodore Amiga days. My last use of the program Windows gold version was in 2012, I was never interested in the less supported and updated Mac version. These illustrations are from its manual at that time. The knitting and crochet symbols were said to follow Japanese standards. 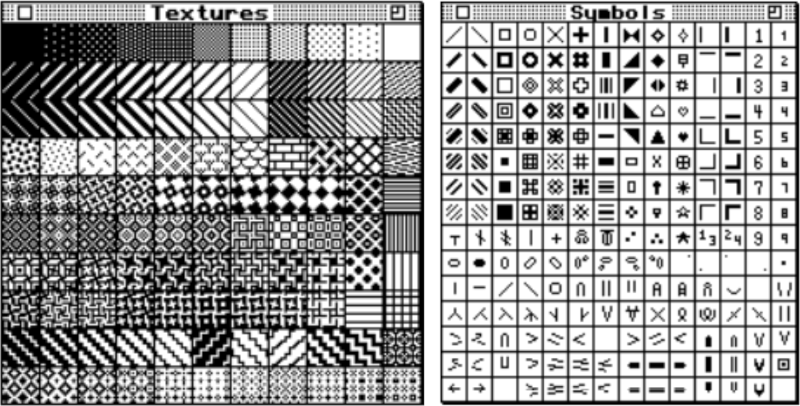
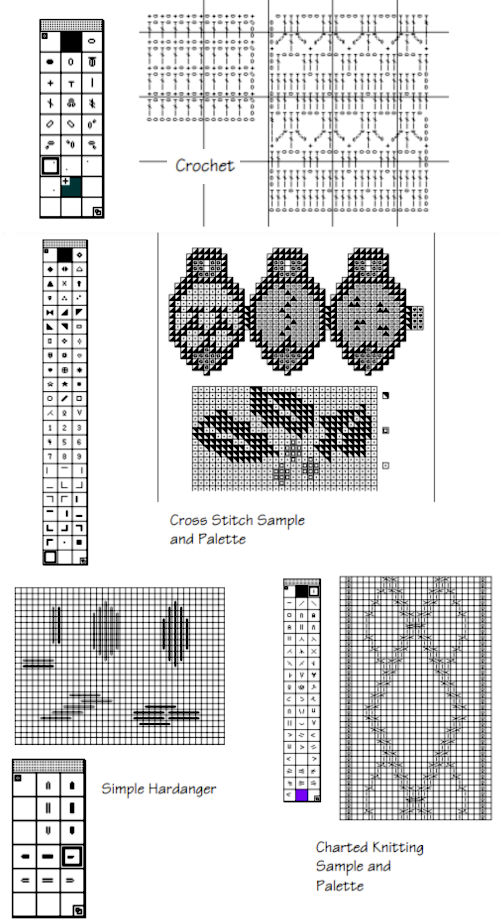 My teaching days were in a Brother punchcard lab with a couple of 910s available for final projects. Punched holes and black squares seemed to be more than enough to meet any machine knitting needs.
Programs like stitch Painter and DAK offer symbols as alternative palettes. Outside either universe, the availability of fonts whether free or for purchase has varied over the years.
As I published posts, I began to create charts that needed symbols to represent stitch movements or actions. My most used font for this purpose has not been available for download for several years. This is its associated keyboard chart, from 2008 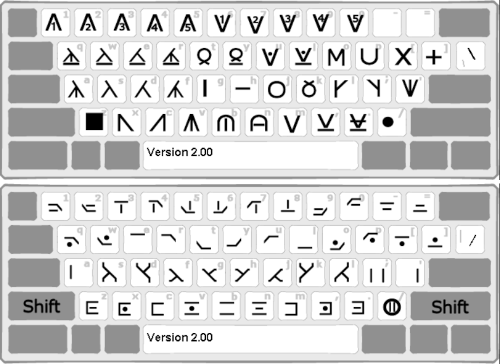 Knitter’s symbol fonts by David Xenakis, were enclosed in frames, though extensive, I did not find them helpful, a sample:
  DAK at present time
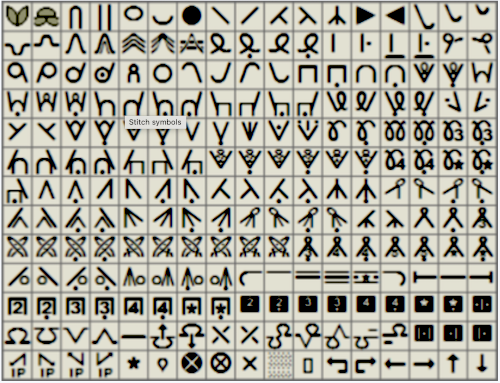 The company has trademarked their ascii based font as “Knitwrite”, info on using the symbols may be found in their stitch design module manual pp. 251-276. The pencil tool is used to draw with them, here the symbols are viewed in color in the associated keyboard
 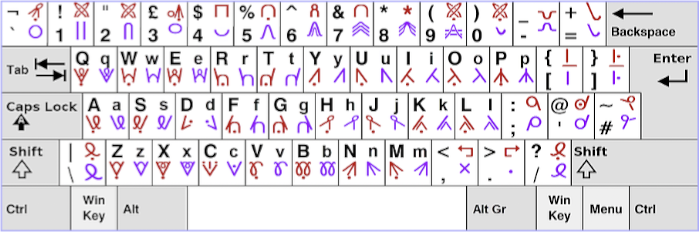 Cables symbols and their use are explained in pp. 284-292, a sample illustration of the potential appearance of a work in progress
  Programs for purchase at this time: envision knit, is available for MacOS 10.11 through 12 (Monterey) and Windows 11/10/8/7/Vista, offers a free demo, may be purchased for $99, from their online manual:
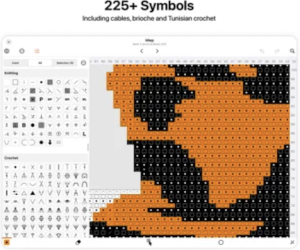
 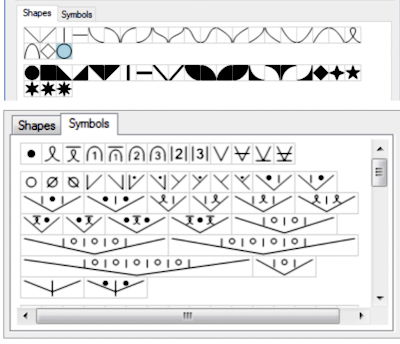 iPad and iPhone users: Knitting Chart is available for use in a few ways, Requires iOS 14.0 or later, the ad free pro version may be purchased for $15.99. Its symbols are familiar
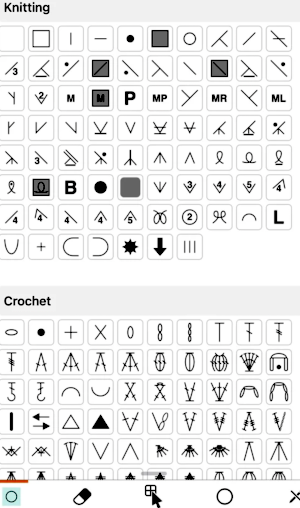
 but other attractive features include illustrating crochet patterns in the round (done here using Illustrator and a for purchase font ), and row by row written instructions for charts. The latter was a draw for me with Intwined Pattern Studio, which still maintains a website for its purchase, but has not been supported for Mac since it failed there completely in 2013, and supposedly runs in Windows up to version 10 on both 32-bit and 64-bit operating systems. There is an associated Ravelry group with nothing shared in 3 years, I would caution against buying it.
 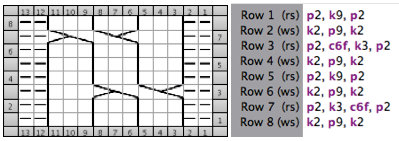 Knit fonts that are still available, but may be problematic or not display properly in the latest OS, for purchase: https://stitchmastery.com/fonts/https://www.myfonts.com/fonts/adriprints/stitchin-crochet-pro/
https://www.myfonts.com/fonts/adriprints/stitchin-knit/
Sconcho is a GUI for creating knitting charts, it is free, for Mac OS 10.6
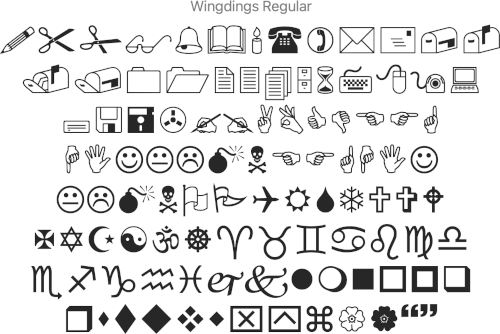
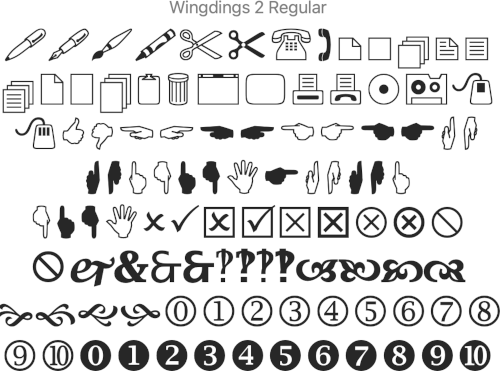
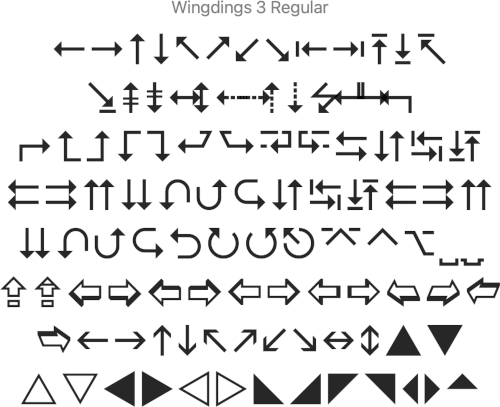
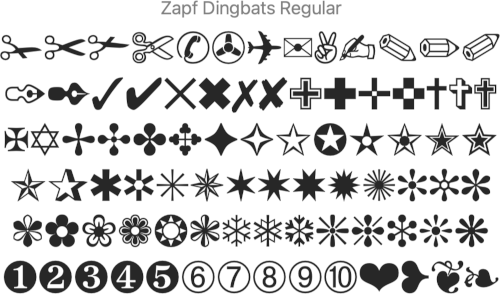
Some symbols in hand knitting and foreign symbol charts may be found mixed among Webdings and Wingdings, a printable cheatsheet @https://www.thespreadsheetguru.com/blog/
Commercial machines like ShimaSeiki use a combination of symbols and color-coding to program needles, cable crossings are represented by straight-line color blocks ![]() a Stoll sample.
a Stoll sample. 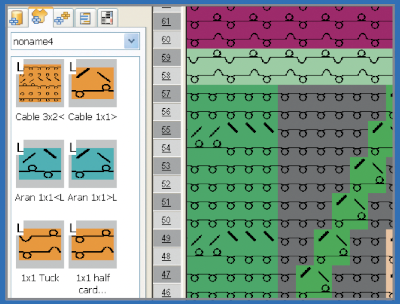 Limitations are encountered when using symbols in any self-drawn chart if there are no bridging units between cell units both horizontally for cables, and vertically for stitches and textures worked between both beds.
In machine or hand knitting charts, an alternative is to use color to indicate crossings. I wrote experimental posts in 2015, in reference to knitting them in fair isle 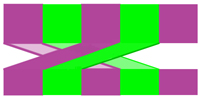 1,
1,
 and 2.
 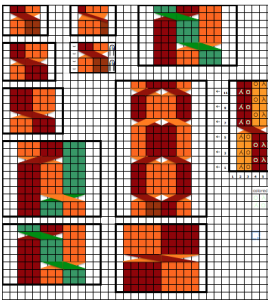 Long since then, I have no longer had access to Excel, the topic may merit a revisit using Numbers.
An interweave article was published in 2018.
Additional links including pixelated lettering fonts, care labels, alphabets in knit stitches, and foreign symbols may be found in post
Things get more complicated if it is necessary to represent stitches formed on a grid and the relationship of needles on both beds to each other. One method presents the information in a linear manner such as in this instance, 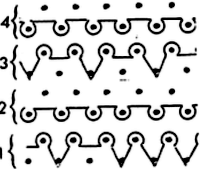 while Japanese pattern books began to represent both beds with actions in symbols on knit and purl grounds corresponding to each bed
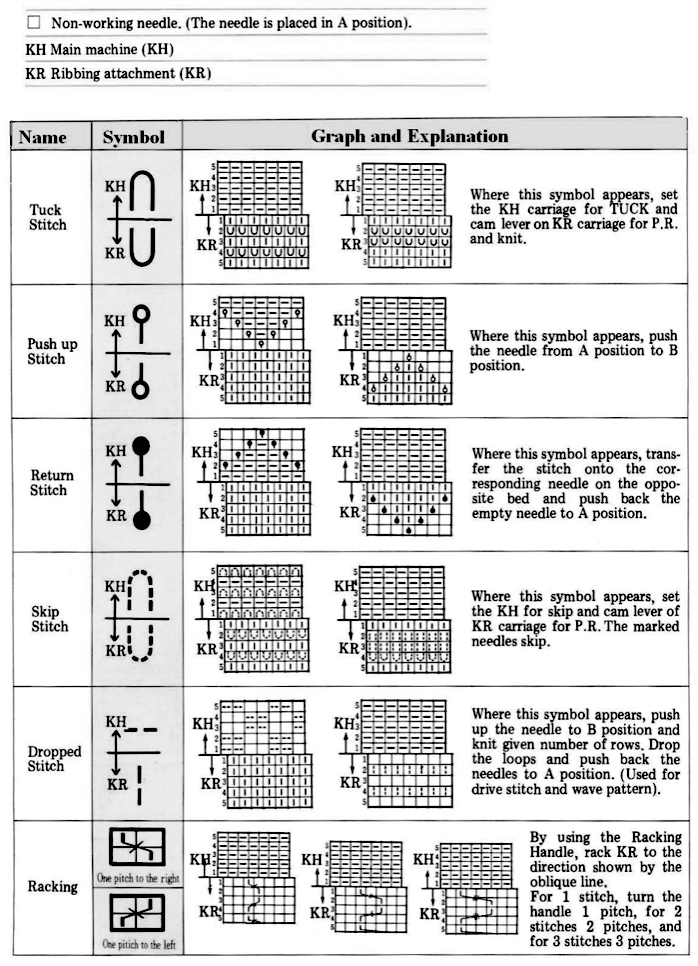 DIY charts for double bed knitting are left to invention for the sake of clarity or meet limitations of unclear symbols being automatically scaled to fit in cell sizes.
Punch cards to electronics: book symbols and samples
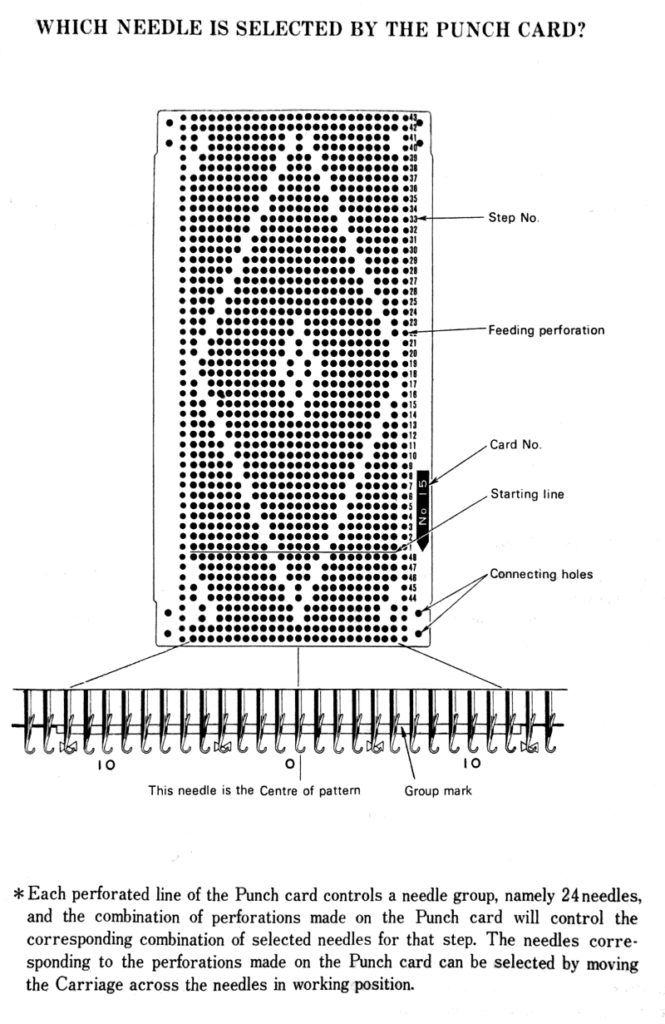
A number of variables need to be considered when adapting punchcard patterns for use on electronic knitting machines. These images pertain to Brother use, but the principles are shared between KM brands. I will add more information as time goes on. Online free downloads for magazines, manuals, etc. may be found at
http://knittsings.com/knitting-machine-manuals/
http://toyotaknitting.blogspot.com/
machineknittingetc.com
https://www.knititnow.com/ManualAndDocuments/
some additions of late include designs in 12, 18, and 30 stitch repeats in addition to the familiar 24 and 40 ones, and to help with interpretations of symbols: Japanese symbols for machine knitters
Punchcard collections for all brands @ needles of steel
For a later post including information on scanning and editing published designs electronically see https://alessandrina.com/2018/07/02/numbers-to-gimp-to-create-images-for-electronic-download/
As the transition was made from manual machines to push-button, and then to punchcard selection systems, the early collections included diagrams of symbols familiar to hand knitters, and interestingly worded text that disappeared or was reduced in later punchcard books. I am presenting information in the order in which it appeared in this particular collection’s paper version, I have not found this volume in the above-mentioned sources for free download. Images are gathered from more than one source, so there is some repetition of information
LACE KNITTING 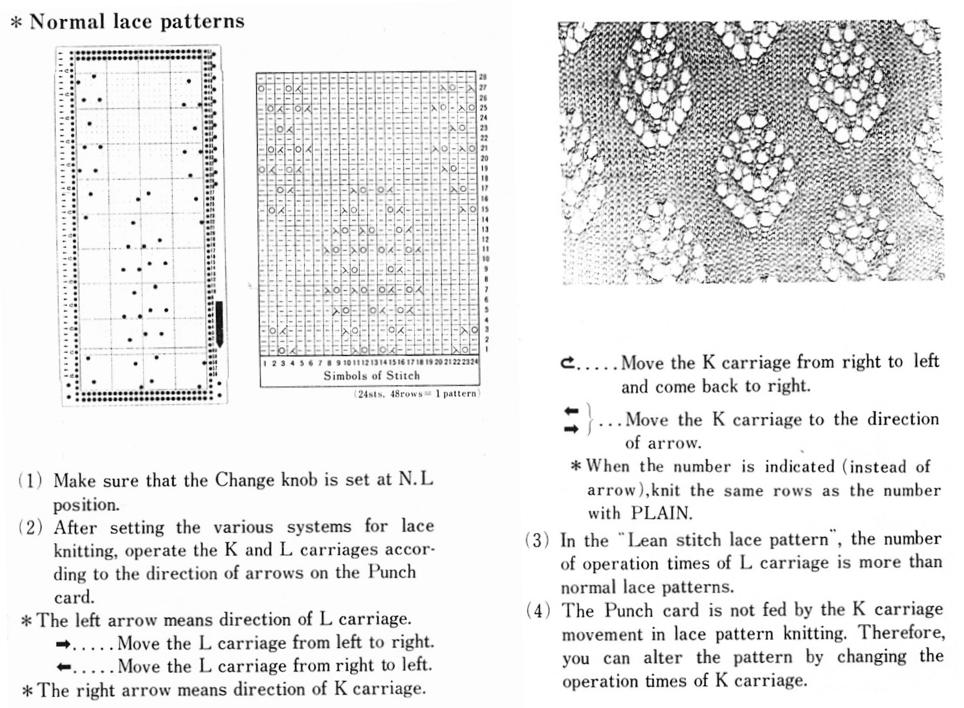
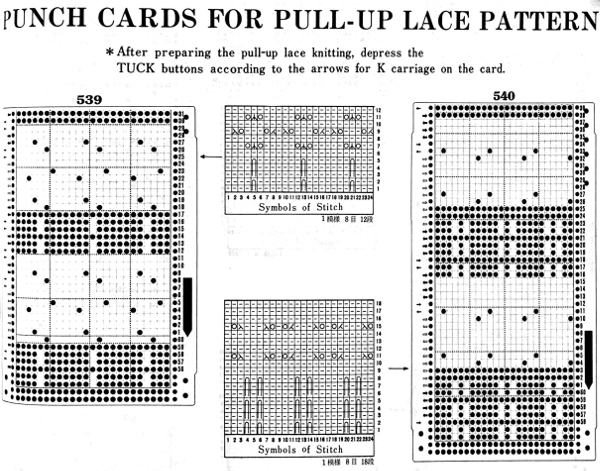
Punchcards may be used to guide one for hand techniques, here a version of e-wrap is used on selected needles for weaving effect, and the diagram on the upper left is for a different fabric. Punchcards may also be used to help track twisted stitches, cables, and racking 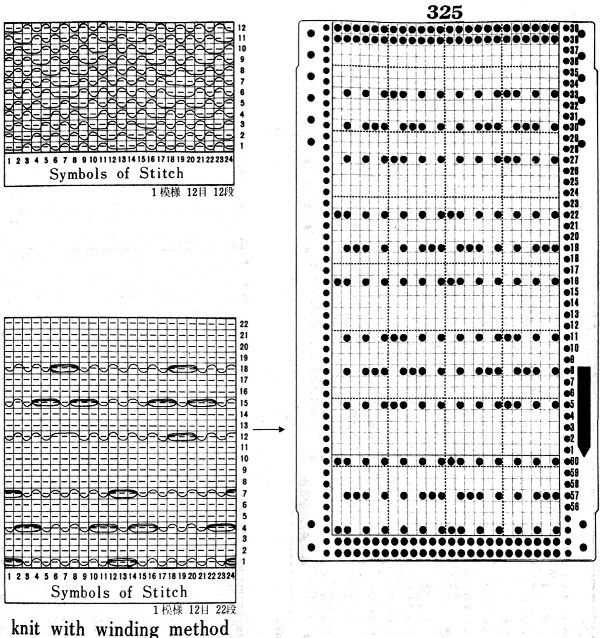 This is a 2 carriages patterning operation, lace extension rails must be used, with each carriage disengaged from the belt while the other is moving across the knitting and back to its resting place.
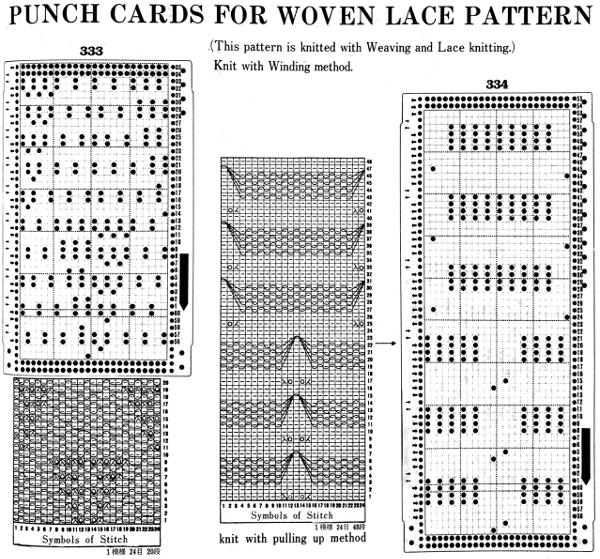

SYMBOLS IN PATTERN KNITTING
 Below each punchcard, the repeat is identified in numbers for stitches and rows. The cards presented are the minimum length required for the card to roll smoothly within the reader when joined for continuous knitting (at least 36 rows). Electronic knitters may isolate the individual, smallest repeat, draw only the squares that appear as white in the cards, enter them via mylar or download, and use color reverse.
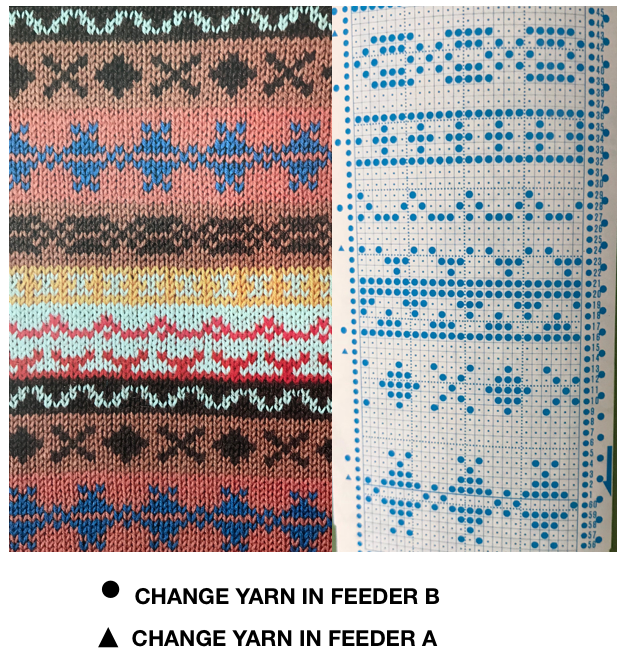
Skip is aka slip or part. These cards would work for tuck stitch as well, may even tolerate elongation, depending on yarn thickness.
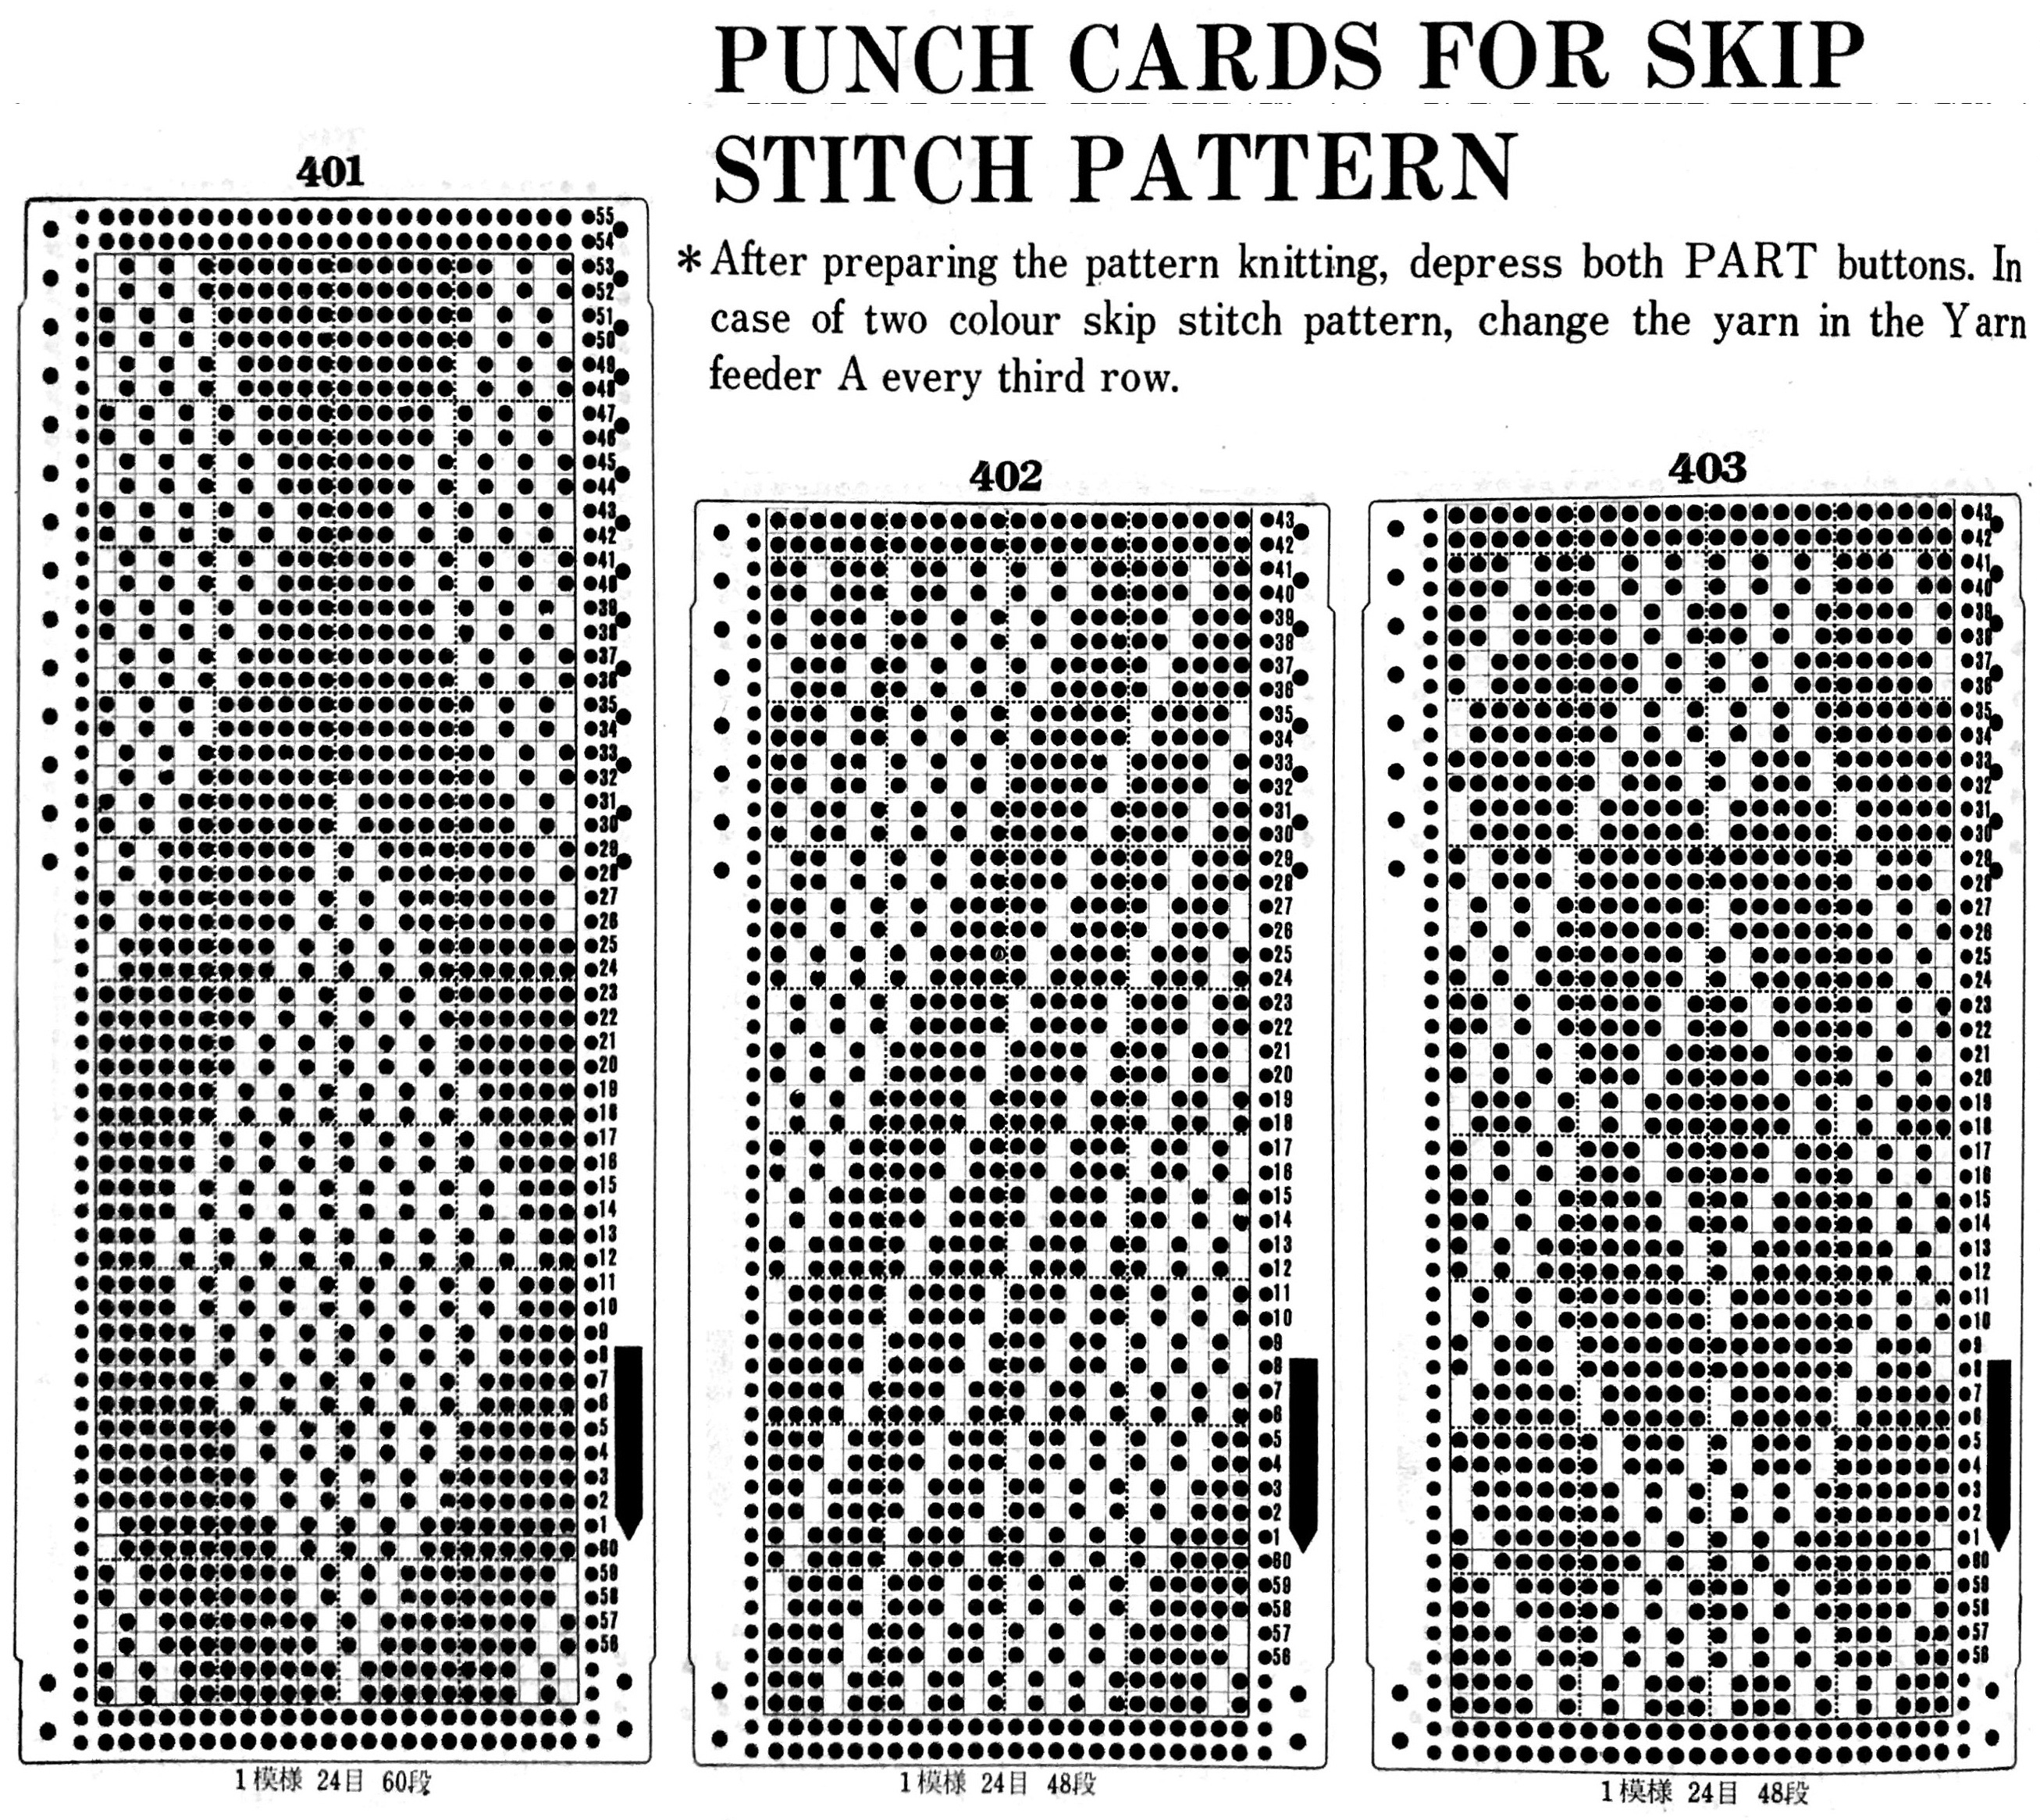
Opposite cam buttons are in use, the fabric changes appearance depending on which of the 2 stitch types is forward, so if instructions with cards are to be followed, then the starting side for the attern in this instance should be COR. Both tuck buttons (or slip) may be used as well, for a different fabric. If the tuck or slip texture is created over an even number of rows (2, 4), changing colors for each paired row sequence can create some interesting color patterns with very short floats akin to planned mosaics and mazes. 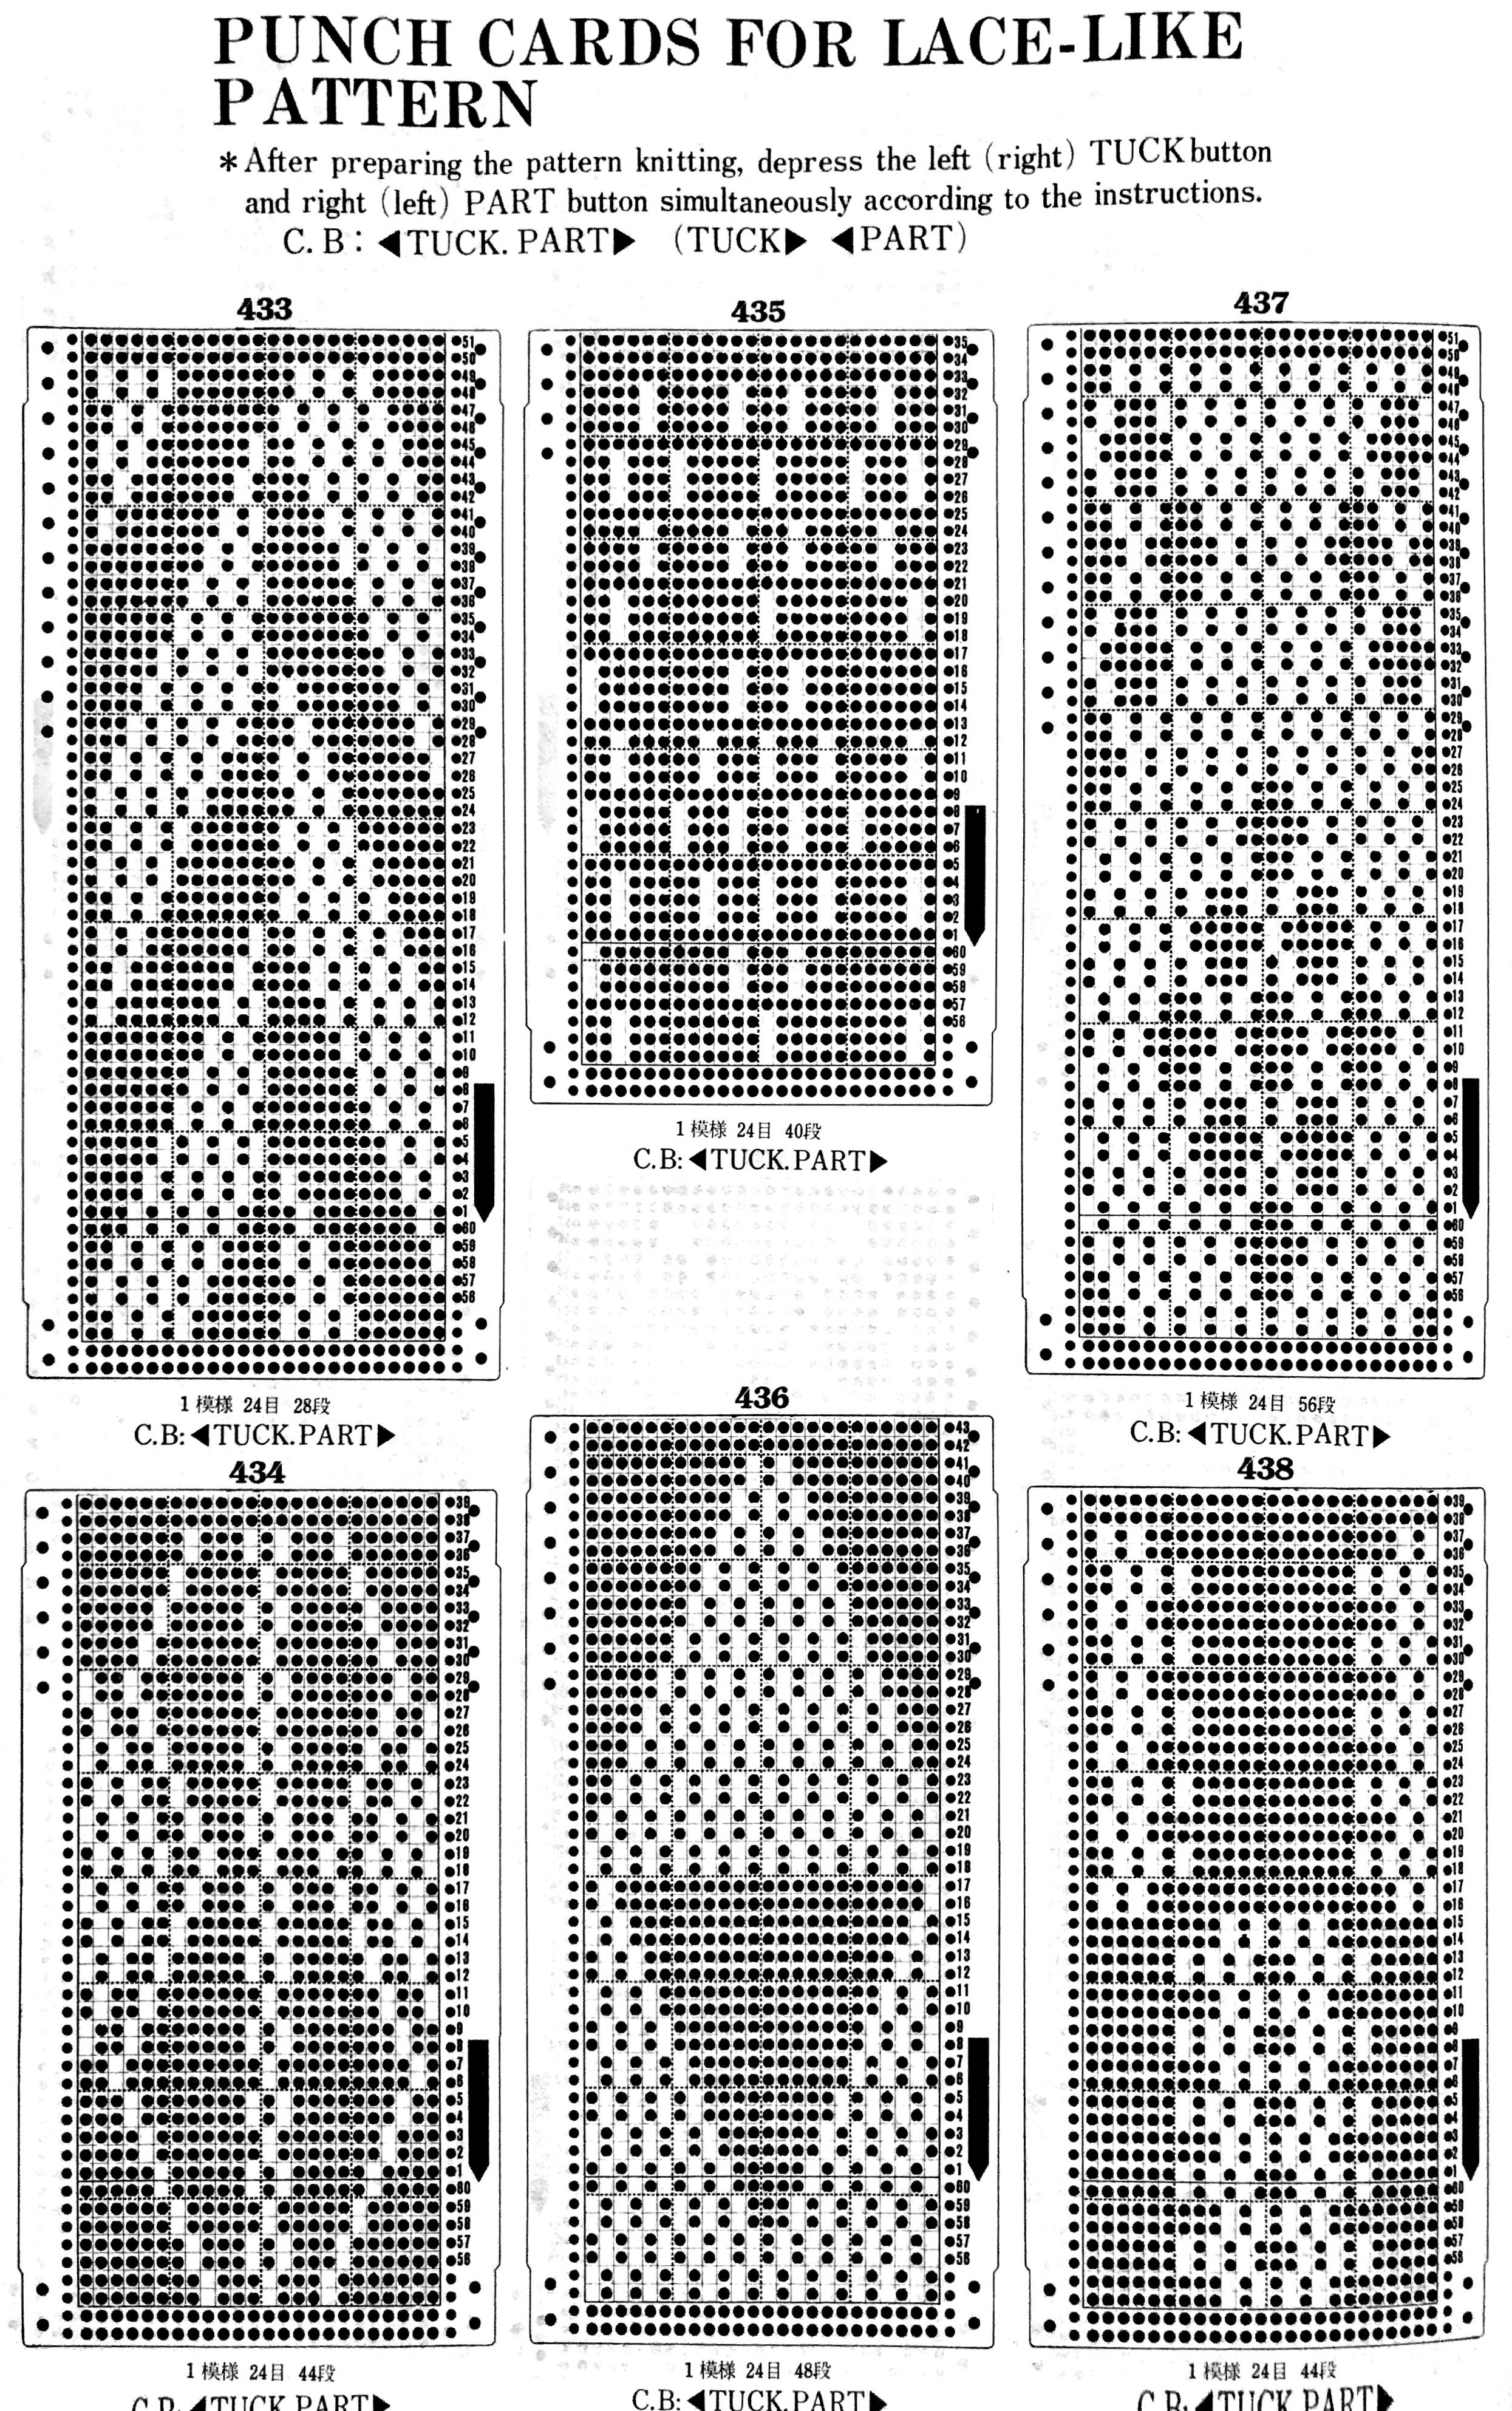
The fair isle patterns below are actually poor choices in terms of float control, pushing its limits. It is usually recommended that floats be no wider than 5 stitches, and even then, they may have to be controlled to make the finished garment easier to wear. 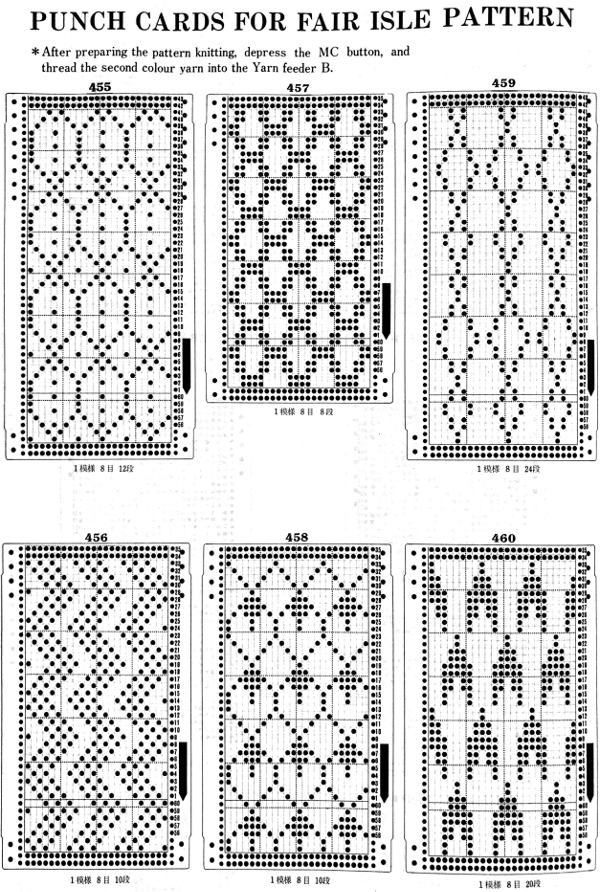
Brother only produces a transfer lace (as opposed to studio simple lace, where the carriage transfers and knits with each pass of the carriage). The lace carriage is the one advancing the punch card. The knit carriage does not select needles, but rather, knits 2 (or more) plain knit rows
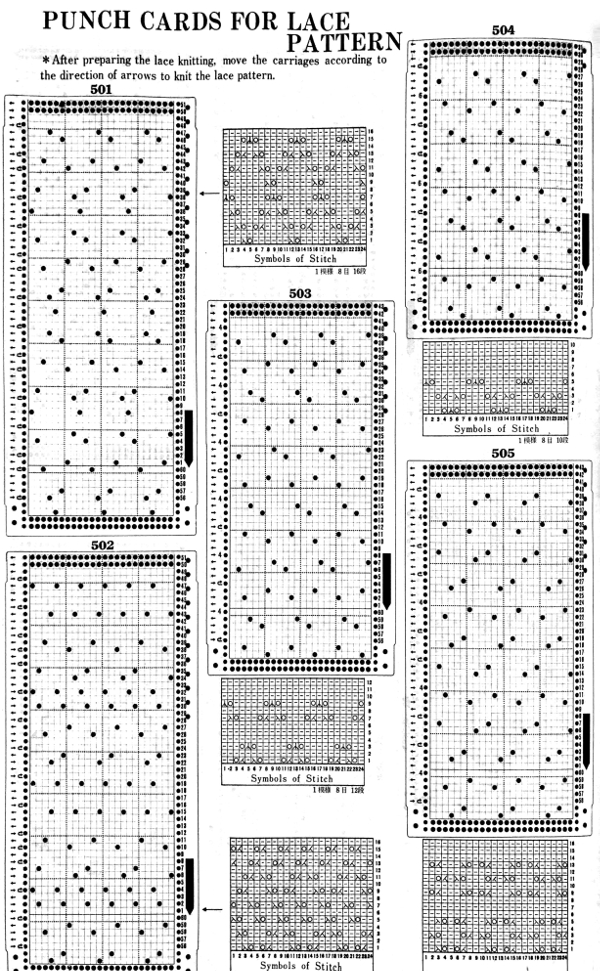
Lace card markings, including those for fine lace: in the latter, stitches are transferred and shared between pairs of needles, best knit in a light color, with smooth yarn so the surface texture becomes more noticeable.
Lace point cams may be used on the punchcard machine to create vertical bands of lace. This is also achievable on the electronic by programming for knit stitches between vertical (or horizontal bands).
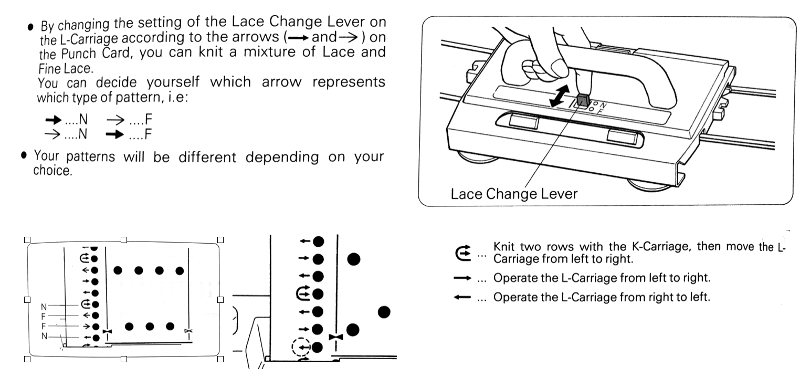
Tuck (left) and weaving (right) may be combined with lace. In these fabrics both carriages are selecting needles, so extension rails must be used. The two-column on the left of the cards indicate movements for the lace carriage on left and the knit carriage on right. Straight arrows indicate single carriage passes, curved ones 2.
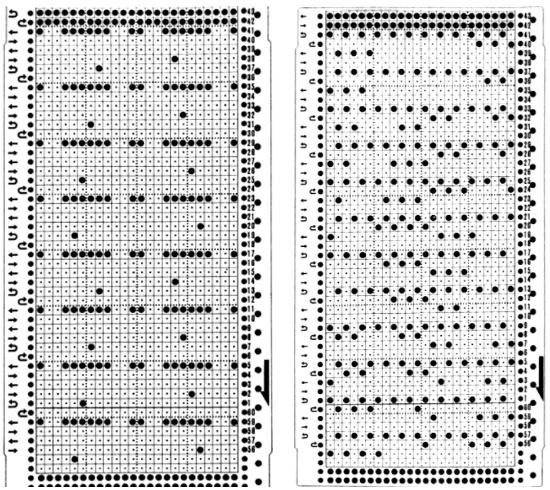
Yet another fabric using 2 carriages selecting needles for patterning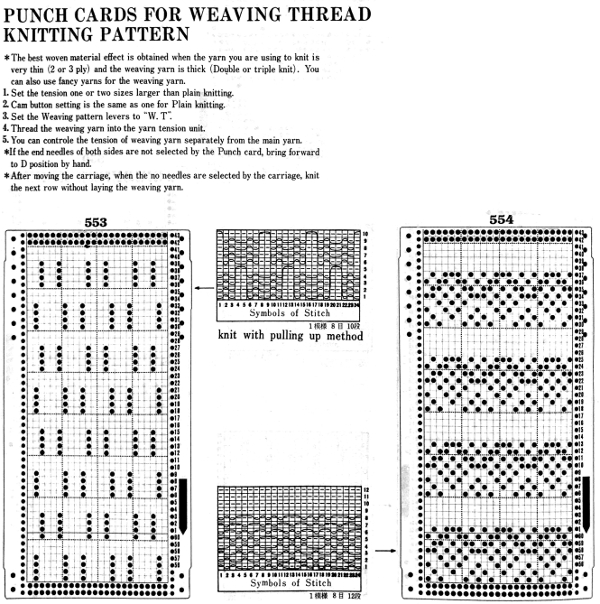


Here the “openness” is created by having the appropriate needles out of work, creating ladders in those spaces. Some interesting results can be obtained by transferring the recommended out of work needles’ stitches to the ribber. “air knitting” can help with verifying proper needle placement is in use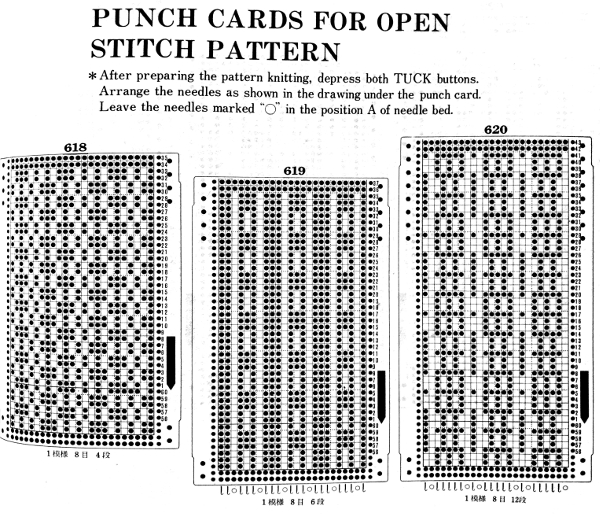
to match the location of the out of work needles to markings for punchcards, which are often given with lines delineating 0 needle position, the image will need to be mirrored horizontally
THREAD OR PUNCH LACE is possible only on machine models that have 2 buttons in mc position  The thicker yarn knits along with the thinner one where there are unpunched areas or white squares, the thinner yarn knits alone where the punched holes or black squares occur, with the thicker yarn floating behind it
  more information on this fabric
Suitable for tuck and possibly tolerant of elongation as well: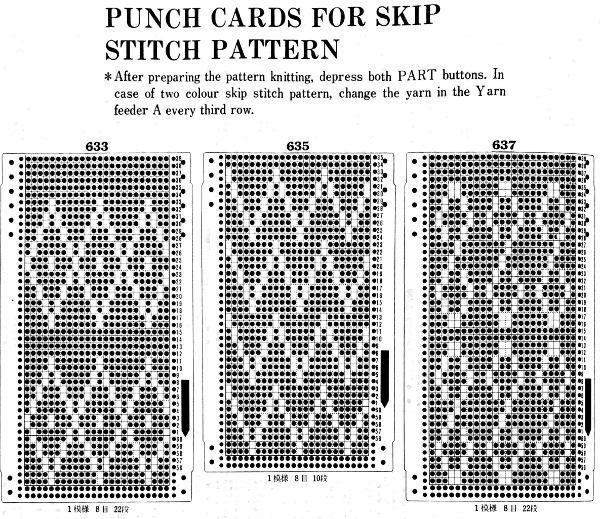
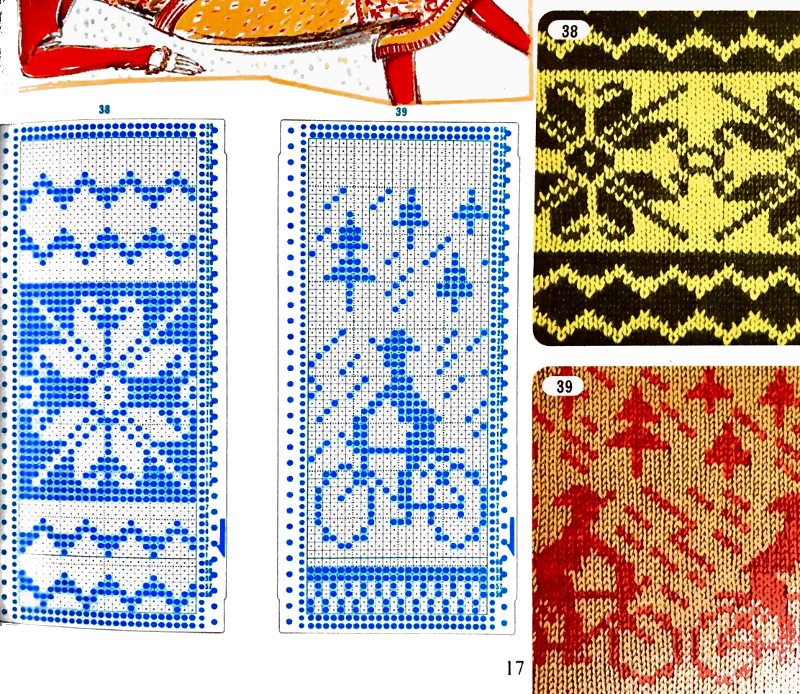
Punchcard machines mirror motifs when knit. This may not be noticed when copying small repeats, but it becomes more evident in larger ones. For knitting on the 910, the supplied motif would need to be mirrored when programmed to retain the intended direction. With other machine models, one needs to know whether the “image” on the card will appear on the purl side, matching punchcard pattern and needle selection, or the knit side, thus reversing it.
Here are 2 FI samples: the one on the left is fairly evenly distributed, so little if any difference is noticed, the one on the right sends the biker to a different forest
 reversal of lettering
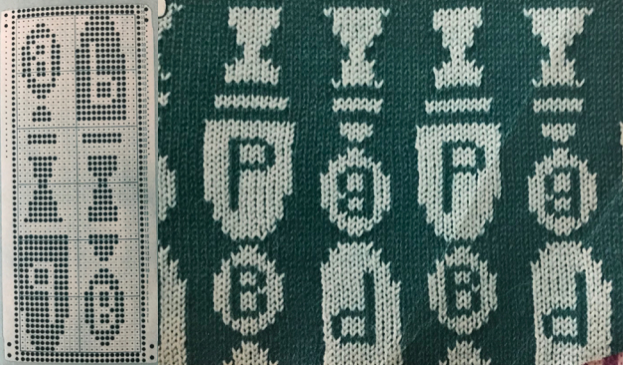
 When you think that that is all sorted out in your head, there are these in slip stitch, the direction of stitches matches, because the purl side is used, images are reversed on the knit side.
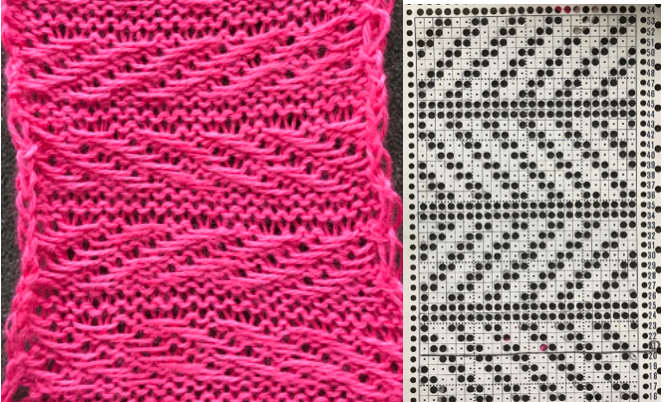
the mirrored punchcards 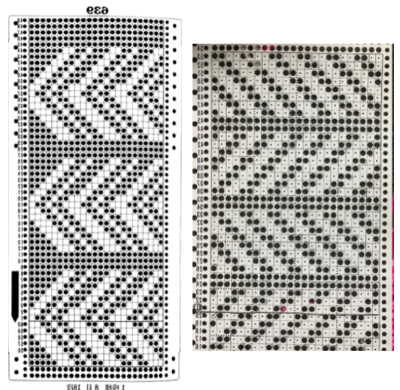 the punchcard change knob has selections for single motif and pattern knitting (KC)
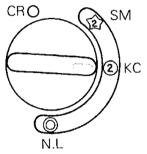
the 910 has settings KC I and II, KC II cancels end needle selection, while in punchcard machines this has to be done manually if the pattern stitch requires it. One such example is when any patterns are made with needles out of work. End needle selection would make the needles on each side of the empty space select forward and create a knit stitch. In tuck or slip, that would be an out-of-pattern knit stitch, in FI, a vertical line of the color in the B feeder would appear along on each side of the OOW needles.
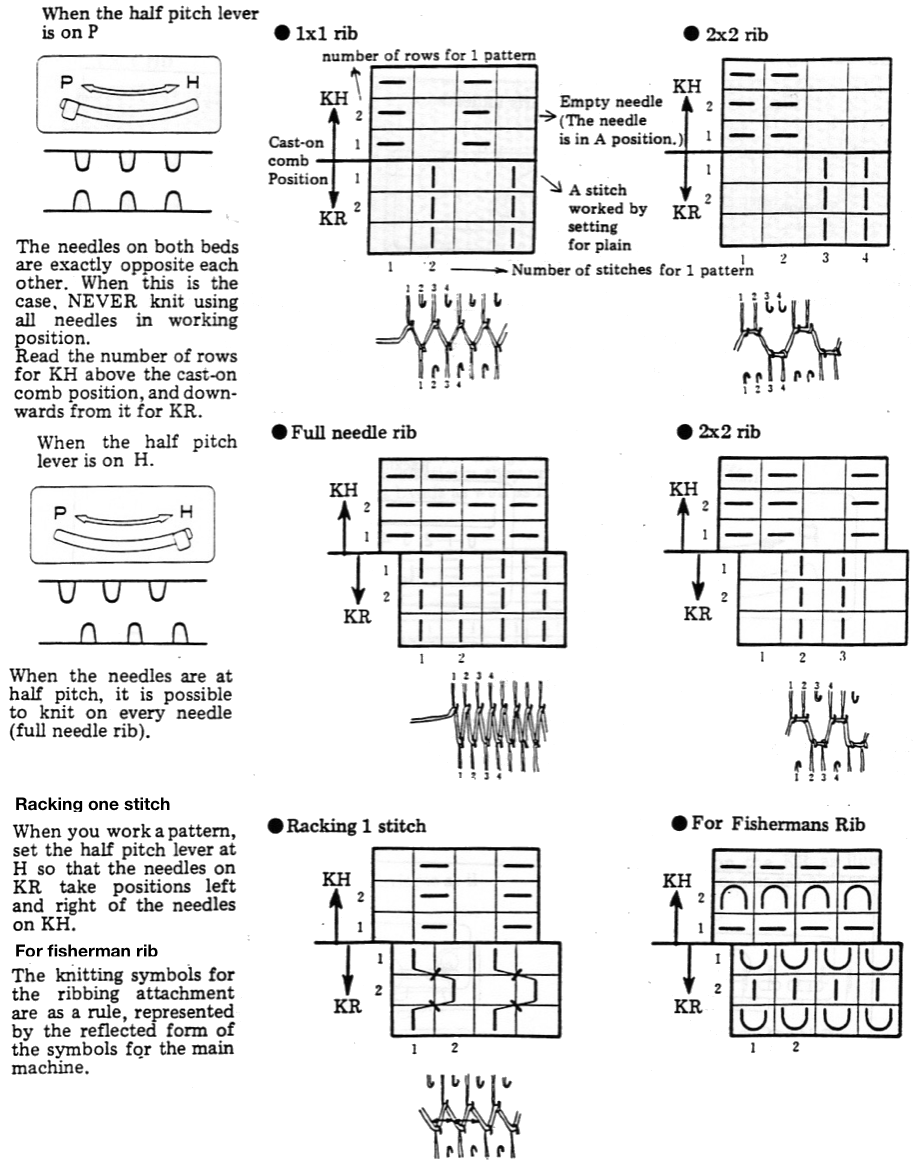
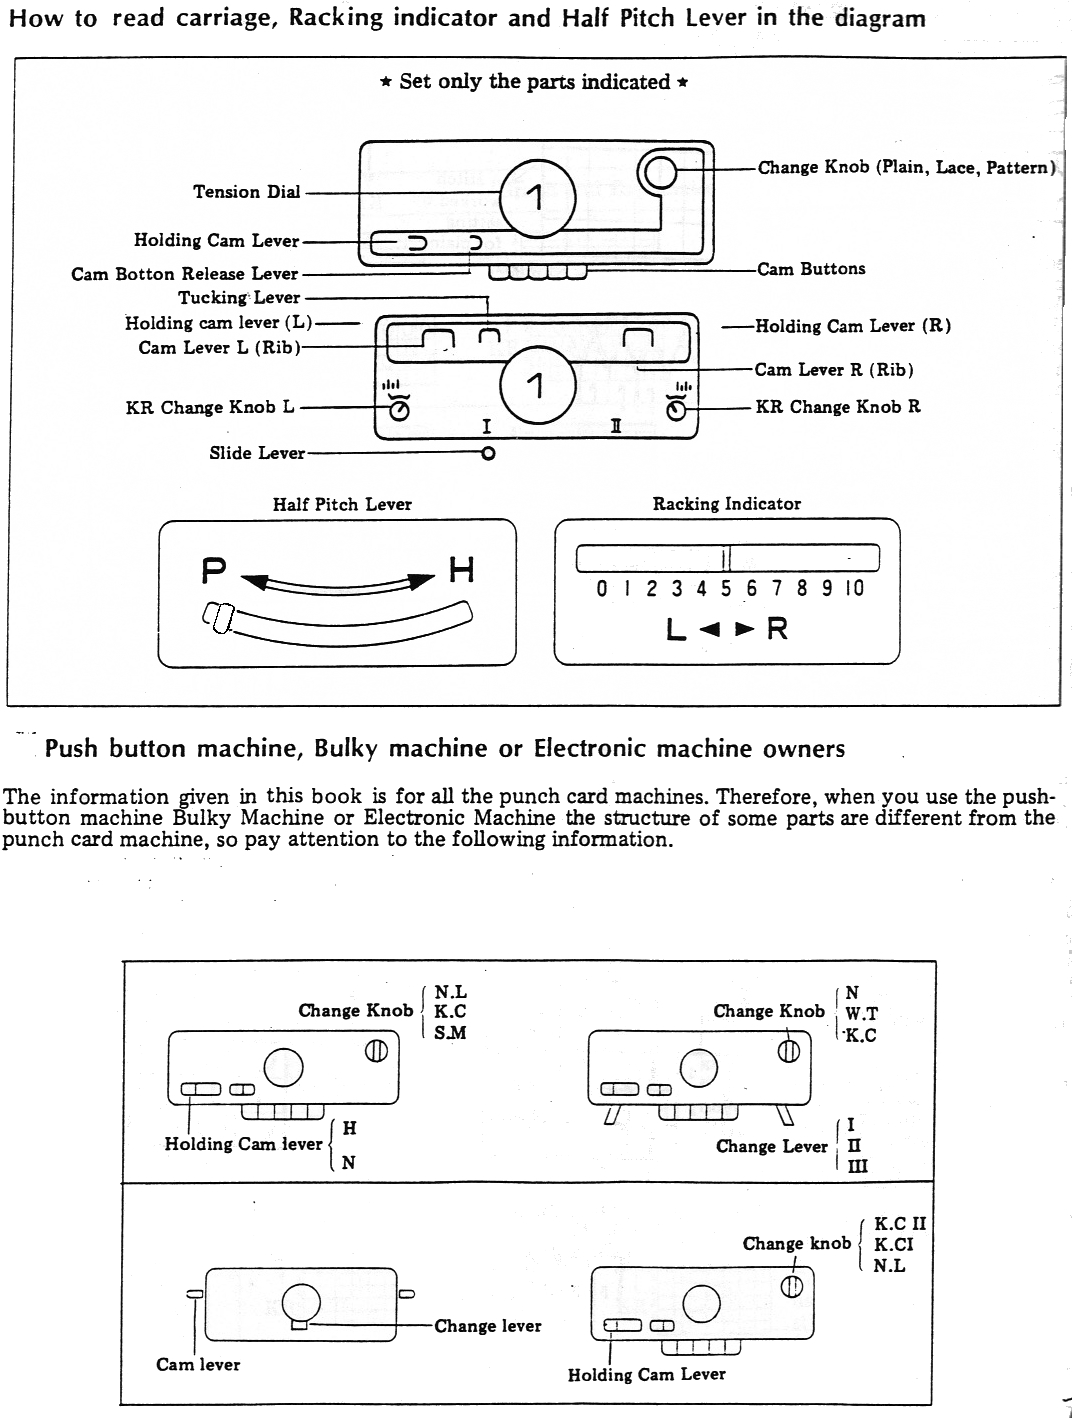
Ribber settings and symbols for Brother machines


Some cables to try, hand knit
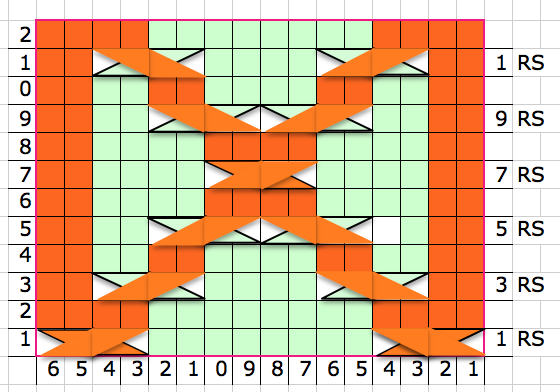
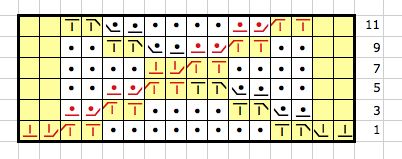
The first repeat below is for a vertical cable panel 24 stitches wide, 12 rows high (2 repeats shown); within the repeat, odd rows are all knit, even rows are all purl. Colors are indicative of cable crossings.
Borders in the swatch, or area in between multiple vertical panels, may be worked as 1. purl on even-numbered rows, knit on odd-numbered rows to create a purl ground behind the cables on the “right side”, or 2. knit every row for garter stitch in same areas.
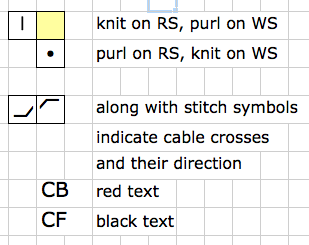
Abbreviations : RS: right side, WS: wrong side. CF and CB indicate where the cable needle (CN) is held during the process.
CF: CN to front | LC: Left Cross, cable leans toward left
CB: CN to back | RC: Right Cross, cable leans toward the right
Dotted borders in chart outline columns 3 stitches wide; all cables in the sample are 3X3 crosses.
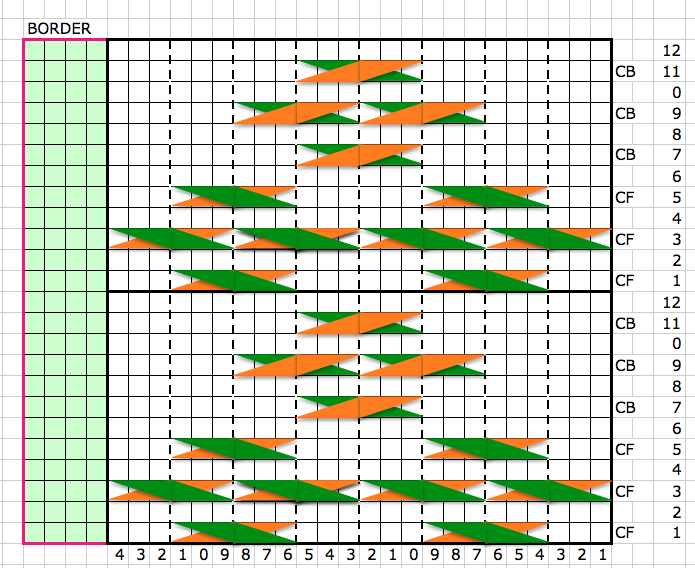
An alternative way to picture things: numbers on the left of the chart below indicate row numbers; on the right, they indicate the number of stitches knit before crossing cable stitches begins on that row
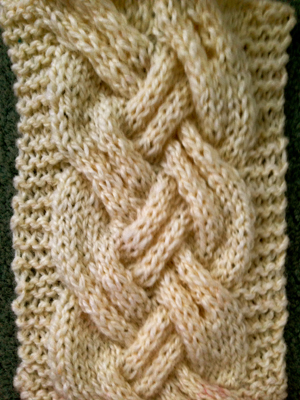
the hand knit swatch
 Adding a purl stitch ground: a shortened chart using Aire River Design font, odd rows only shown
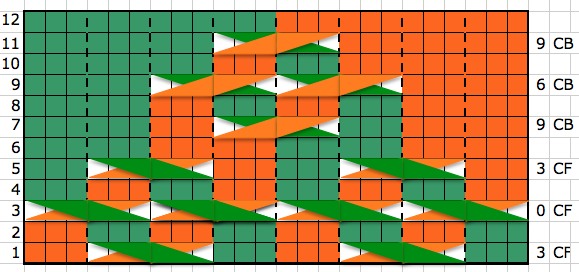
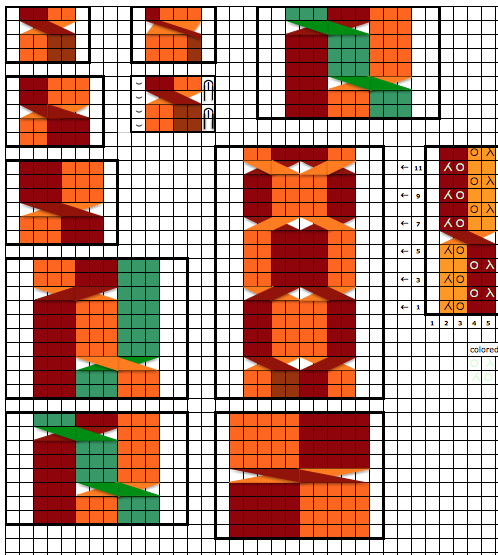
using color in Excel, showing every row
visualizing multiple repeats
a very quick, hand-knit test swatch, knit with needles a bit too large for yarn used

another possible charted in Excel, multiple repeats shown
If patterns are for publication in specific venues, conventions in symbols may, or should have to be observed. To keep track of personal projects we often differ in what format or shorthand makes the most sense to us. If the like of the above result appeals to you, I am sharing a workbook with pertaining puzzle pieces. I find working at 200% magnification is the easiest for me, which may be easily changed to suit.
PS: My working palette in the original document was as seen in the images above. You may find some of the colors will be different in your download, depending on your computer. I have read on other sites in the past that the color change can be an issue in excel knit charting downloads. The image below reflects such a change. It is a quick capture of part of the chart when I tested the download myself. The large color blocks are the ones affected and may be easily changed to match the cable crossing colors.

Visualizing knit cables in color_ Excel
In the past, I have suggested methods for working in Excel and provided links to excellent material shared by others online. Of late I became interested in using the program to produce simple color graphics for cable illustrations. It is helpful to have prior experience in using Excel for knit charting. This is not intended as a complete tutorial. I am providing a document for experimentation. I would suggest copying and pasting the individual shapes to a different part of the document before playing with color changes, resizing, etc. This may be done within the chart in progress, or separately, and then copying /pasting or moving the final result into place.
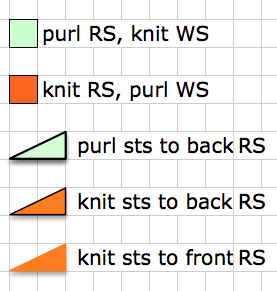
The resulting charts may be used in both hand and machine knitting. My illustrations here are intended for machine knits, so they do not combine purls and knits on their ground. Images represent single side view: as they would appear on the knit side facing hand knitters, or the purl side facing the machine knitter. Stitch, row marking, and text may be added as wanted.
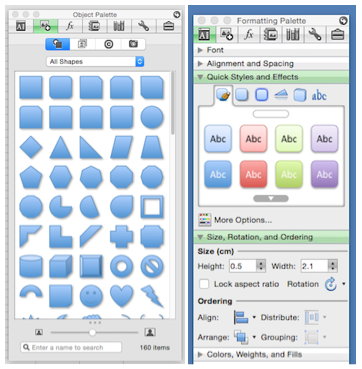
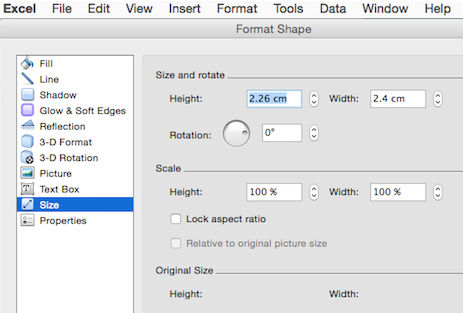
Chosen from the view menu, the object palette allows the selection of built-in available shapes. Once a shape is drawn into the workbook, the formatting palette allows access to image size, rotation (including flipping both vertically and horizontally, and alignment (moving front to back and reverse).
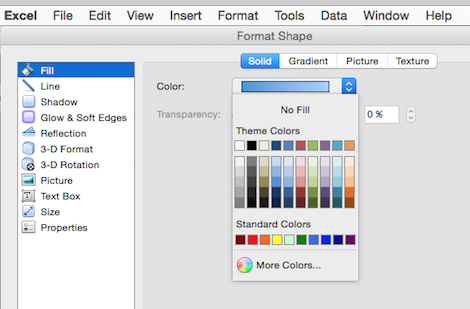
Color fill – unless standard colors are chosen, there will be issues matching colors combined when using with bucket fill from the toolbar to add color to cell(s)
toolbar
![]()
formatting options: fill
shape border: line, color (or not)
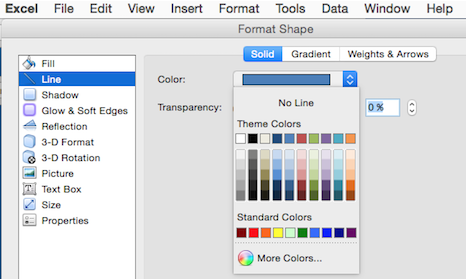
one of the ways to access size, rotation, aspect ratio
sample results
an in-progress document for experimentation: blog_color_cables. Adjust zoom to personal preference for either viewing or working, grab portions of working screen for images of sections of the workbook to save, or save as, and explore PDF options.
More on charting, foreign symbols, and cables
This topic has come up as part of previous posts. I recently reviewed links and thought I would re-group them a bit differently here, adding some new. Please click on continue reading to have the list appear as active links if they do not immediately do so in your browser. The latest additions are at the post bottom.
https://www.myfonts.com/fonts/adriprints/stitchin-knit/
https://www.softbyte.co.uk/designaknit.htm
http://www.envisioknit.com/features/
https://stitch-maps.com/about/key/
pixelated lettering
http://www.fontpalace.com/font-download/Notice+3+Std/
http://www.fonts2u.com/munro-small.font
http://www.fontspace.com/ten-by-twenty/munro
letters in knit stitches
http://www.fonts2u.com/knitfonta.font
http://www.fonts2u.com/knitfontb.font
http://www.fontspace.com/honey-and-death/knitfont
care labels
http://www.fontpalace.com/font-download/Notice+3+Std/
I have been trying to navigate Mac Numbers again, but in playing at my own latest charting with software after the Yosemite update, I find I am drifting back to using Excel once more as my primary “graph paper”. Charts published in foreign languages and magazines, and particularly those in Russian (where the same symbols appear to have different functions depending on the publisher) provide challenges in translating for using charts provided in hand or machine knitting.
Some sources from/for different countries that may help with interpretations:
http://www.knittingfool.com/Reference/KF_Symbols.aspx
http://www.garnstudio.com/glossary.php?langf=it&langt=en
Anna Burda magazine symbols PDF includes HK how-to illustrations: ab2 2/1/15
Verena chart from older pubs easily found on Pinterest
A partial volume of an out of print book on Japanese symbols
4/24/15: Sconcho is a GUI for creating knitting charts that come with a built-in stitch library. A manual is available. Custom stitch symbols may be created in Inkscape to form personal vector shapes. X11 may be required to run Inkscape on your computer as well, all are free.
6/14/2020 a free for iPhone and iPad app Knitting Chart also includes crochet symbols