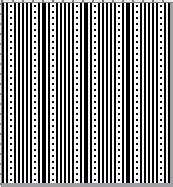
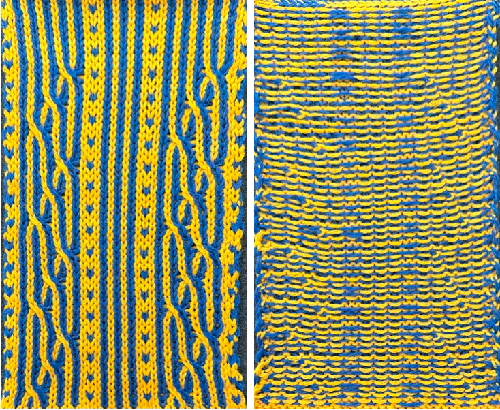
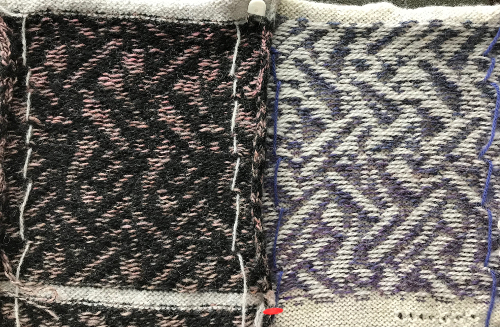
This sweater by Namesake, in the Fall 2024 collection, led to a FB query as to how to produce a cable version inspired by its color movement on home knitting machines. 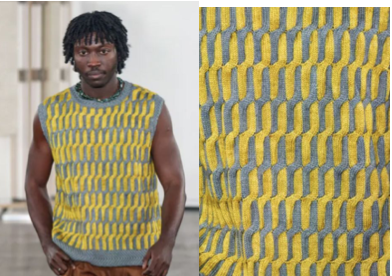 The discussion leads back to how to produce cables in 2 colors on home knitting machines best and accurately.
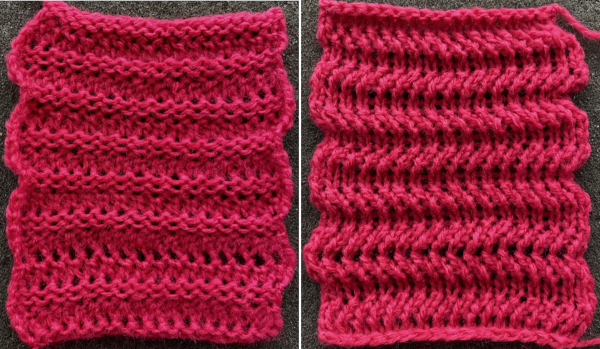
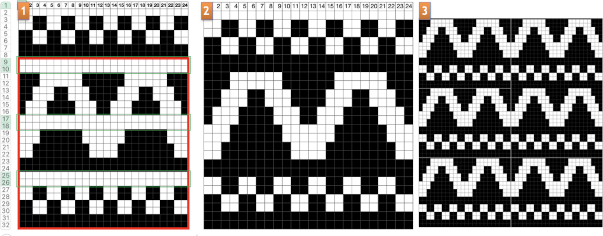
One way to achieve color movement is to begin with using and modifying vertical lines.
Due to the fixed width between machine needles, it is best to use a fiber with a bit of stretch such as wool, and often 2X2 crossings appear to be the limit for designs containing them in frequent, all-over patterns.
When working in single colors there are ways to obtain extra slack to make the crossings easier, but using the FI settings makes the knit tighter as in any slip stitch, limiting the use of such measures. In addition, returning the needles to the proper preselection position in pattern after the transfers needs to be performed manually.
A starting best-guess rule is to knit a minimum number of rows between crossings matching the number of stitches moved ie. for a 3X5 cable, knit at least 8 rows before repeating.
Tracking transfers can be achieved in several ways. The needle bed or tape can be marked with water-soluble ink, custom paper needle tapes may be printed to size, or paper strips simply marked and slid under needles in work.
In machines such as Brother, where needles are preselected, that fact can be used to advantage in establishing guides for the cable locations within the programmed design.
This swatch can be knit using a 1X1 locked needle selection.
While hand knitters have the advantage of seeing the color movement clearly on the knit side, machine knitters can find it harder to follow their locations with only the purl side facing them.  The vertical stripes can be interrupted at intervals by additional patterns or shifting cable locations.
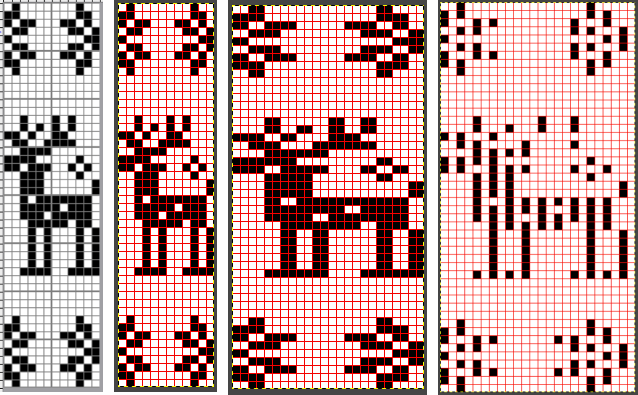
My charts begin in a spreadsheet, Mac Numbers. The first trial effort: 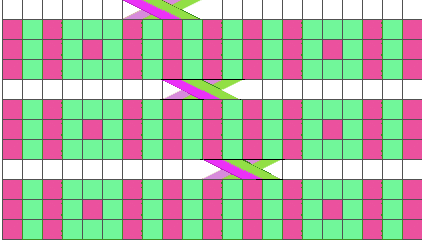 To begin with, the goal was to avoid the 2 by 3-pixel blocks that occur with tiling, which upon later consideration, might aid in avoiding placing cables in the wrong columns,
 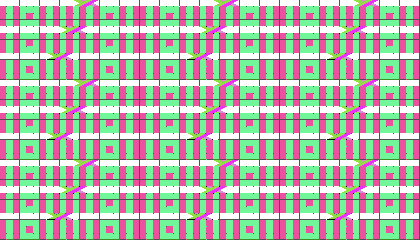 resulting in a 20X18 design. Black pixels represent the dark color, or simply the color in the B feeder.
![]()
 The alternate repeat to yield those double-width blocks, 21X18
 ![]()
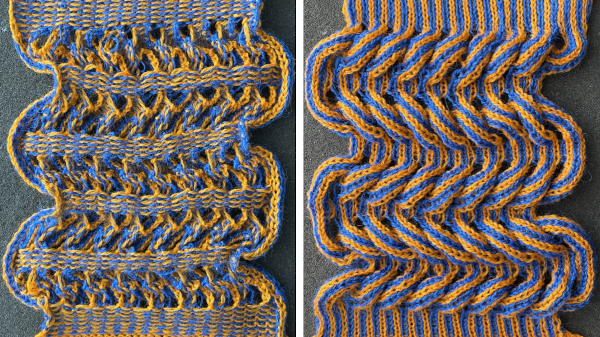
 When matching hand-knit designs such as in complex arans, the direction of the crossings matters and may need to be reversed throughout.
 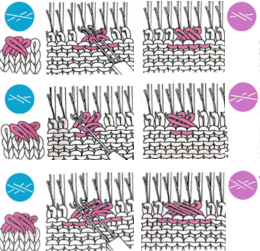 In these instances, it is enough to be consistent, and their direction can be a personal choice. I prefer cabling right over left.
 ![]()
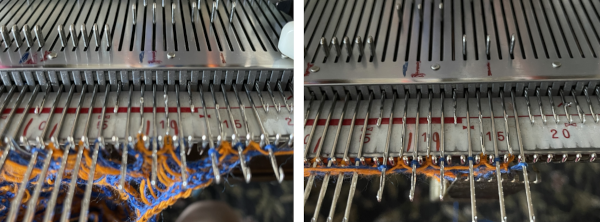
![]() In the first test, using the 20-stitch repeat, I marked up a paper strip placed under needles in work and followed markings for Row Counts and needle GrouP shared in the table on the right.
In the first test, using the 20-stitch repeat, I marked up a paper strip placed under needles in work and followed markings for Row Counts and needle GrouP shared in the table on the right. 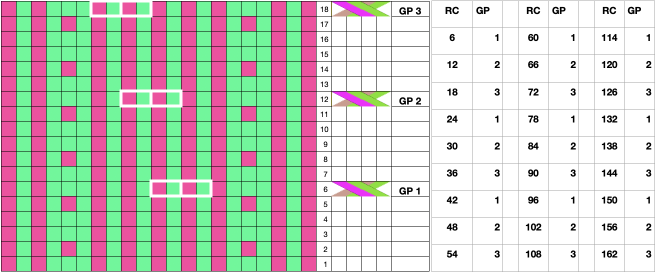 The result begs the question of how to avoid cables in the wrong columns and the possibility of repeating them more frequently than every six rows. Occasional stitches in the wrong color may be duplicate-stitched to mask them, but small cables in the wrong place or the wrong direction are problematic.
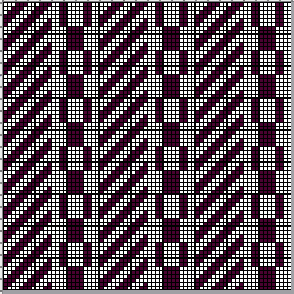
 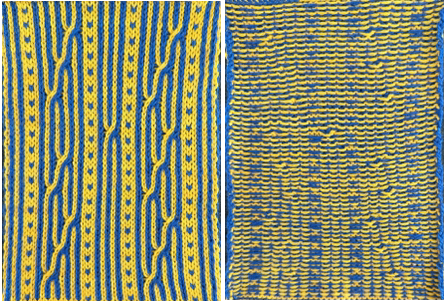 This repeat is 20X12 pixels, and it includes areas missing needle selection that will serve as visual cues on the needle bed for where stitches need to be crossed, now every 4 rows. Using the repeat on the 930 required mirroring horizontally to achieve the desired direction
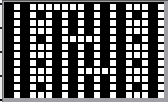
![]()
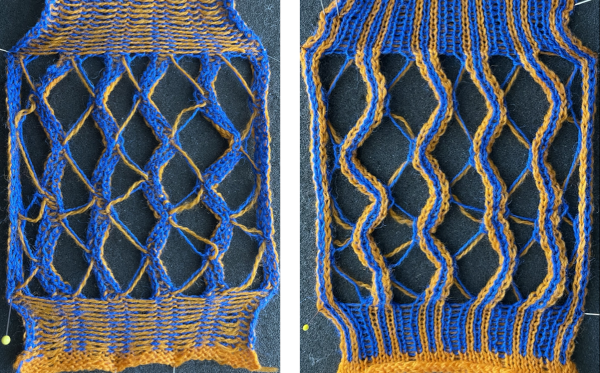
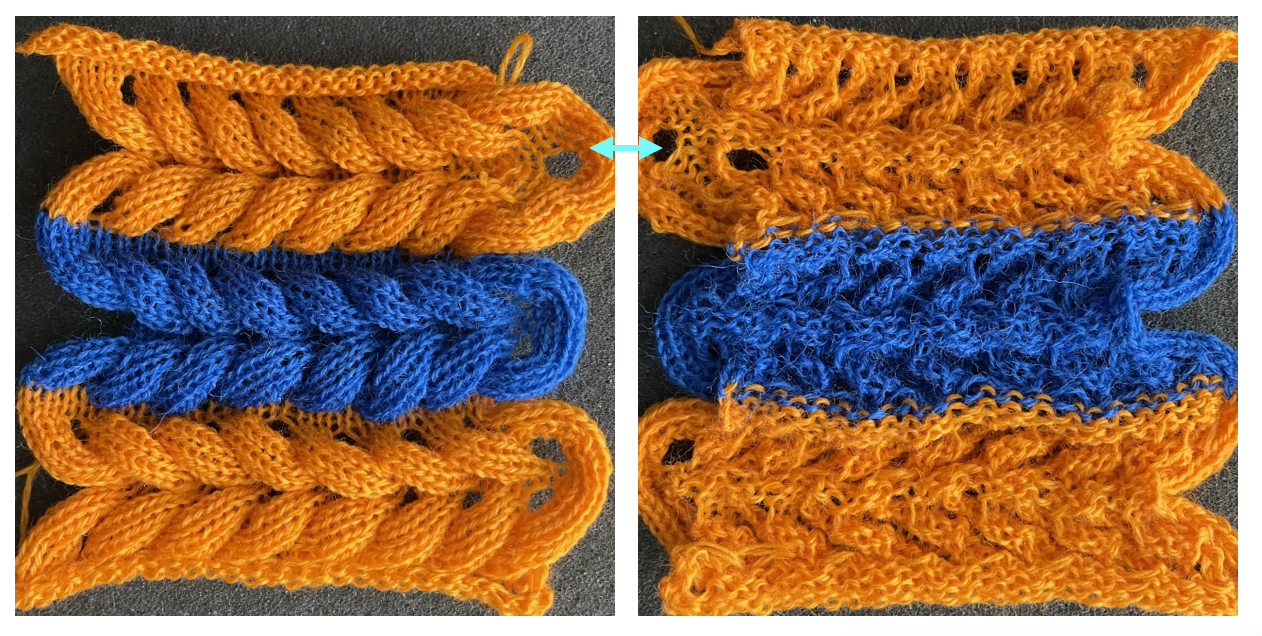
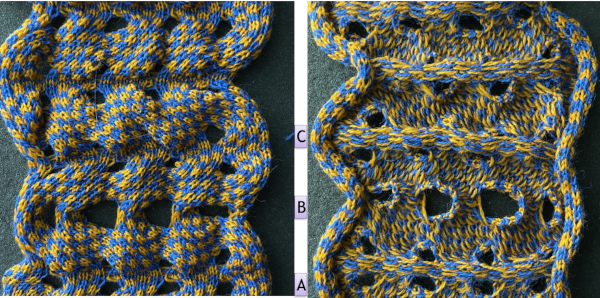
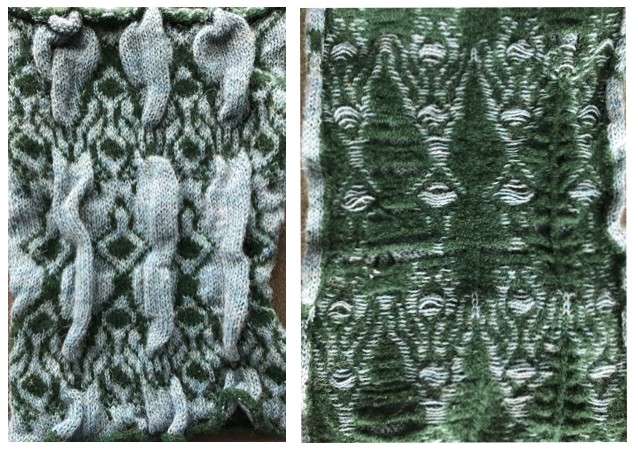
 Returning to the inspiration sweater, imagining a possible repeat keeping in mind cable crossings no wider than 2X2,
  The knit tests were knit using 2/13 wools at T10+.
It proved impossible to use a tighter tension or to across more than 24 stitches along any single row without stitches dropping from becoming too small or the yarn breaking. The solution was to place the cabled details in a center panel. Using similar panels between undisturbed plain or patterned columns could become planned design features.
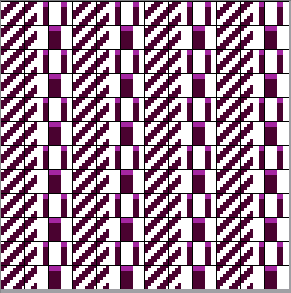
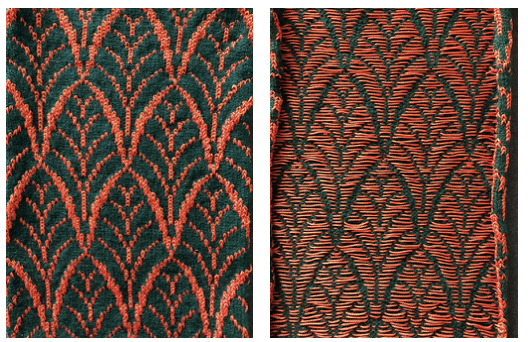
The full swatch repeat, 40X20 pixels, reversed on the 930. 
![]() The end needle selection is canceled, and cable crossings are all made in the same direction. The left pair moves under the right pair to the right, and the right pair moves to the front and behind them onto the two empty needles every 10 rows, immediately after the change in needle preselection and before the following knit carriage passes.
The end needle selection is canceled, and cable crossings are all made in the same direction. The left pair moves under the right pair to the right, and the right pair moves to the front and behind them onto the two empty needles every 10 rows, immediately after the change in needle preselection and before the following knit carriage passes.
A printed needle tape can help track their locations.  It is placed on the proper preselected needles, bring those needles out to the E position, check that transfers have been made properly, and knit the next 10 rows, repeating the process.
 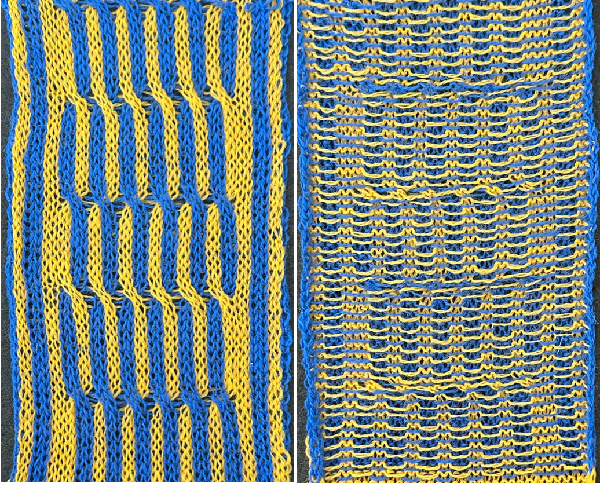 Maintaining diagonal details requires planning a repeat that works as an all over design, then choosing a panel to add to cable details. One such repeat, 12X12
 ![]() the smallest repeat, 6X6,
the smallest repeat, 6X6,  could be used for bucket filling parts of designs with pattern in Gimp
tiled alignment test: maintaining diagonals with cable crossing blocks,
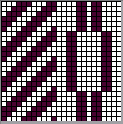


 The proof of concept after testing yarn tolerance for crossings, using the 24 stitch repeat suitable for punchcard model machines as well:
 ![]()
 Fails are easily predicted in a paint or image processing program when rows are added keeping the repeat at 24 wide, the diagonal is not changed, but the spacing between cables is increased ie by 2 more rows:
 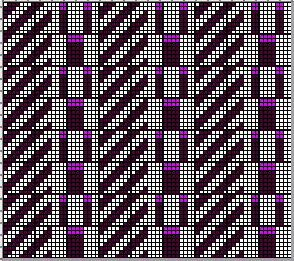 Making it work: 24X48 rows
 ![]()
More on developing DIY cable charts:
Visualizing knit cables 3_ using Numbers and Gimp
Visualizing knit cables in color 2_ using Numbers and Gimp , includes cumulative links
ArahPaint is often a part of the process now as well
Category: Fair Isle
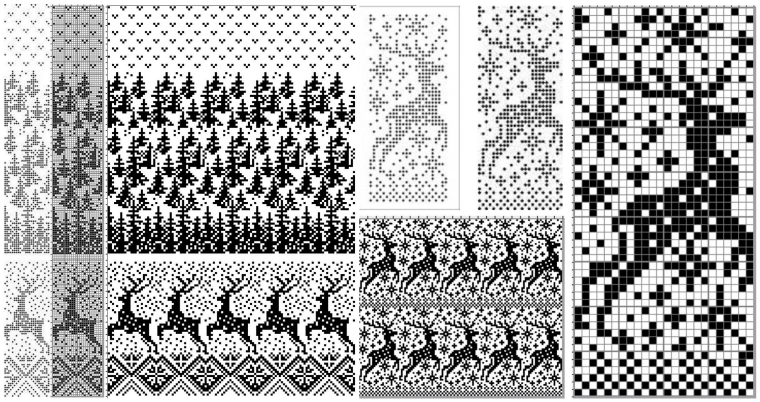
Seasonal knits inspired by published repeats 1
In previous posts, ie Numbers and GIMP: online punchcard patterns to electronics 2, I shared some ways of converting online images from varied published sources.
This series was edited using primarily ArahPaint and some Gimp, both are available for free.
DAK users have the ability to achieve similar results in that universe, producing stp proprietary files. There is no export (or import) available to other formats ie png or bmp possible.
Fair isle is not in my preferred wheelhouse, especially in season specific designs, but that said, I have been sharing these repeats in the FB machine knitting forum and thought I might make them available to others here as well.
The pngs are editable for further DIY modifications.
 24X189
![]() 24X94
24X94 ![]() 24X85
24X85 ![]() cropping given repeats for desired tiling, # 1068
cropping given repeats for desired tiling, # 1068 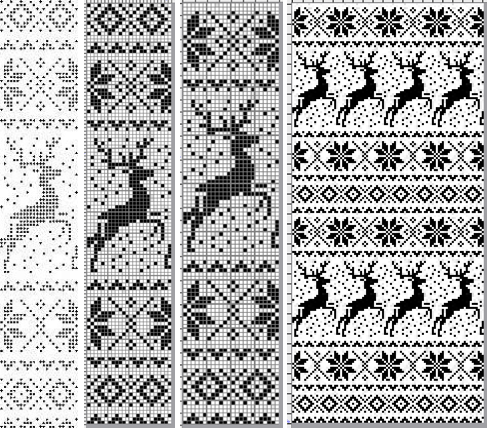 the original 24X119 png
 ![]() cropped to 24X105
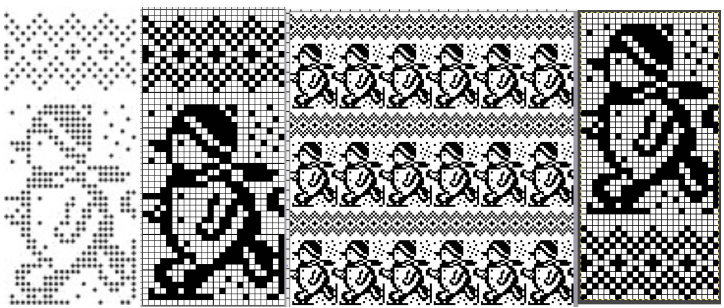
cropped to 24X105 ![]() My first encounter with “naughty reindeer” was during a Brother dealer-sponsored small machine knitting club meeting. A present update, using a Pinterest find as the source
My first encounter with “naughty reindeer” was during a Brother dealer-sponsored small machine knitting club meeting. A present update, using a Pinterest find as the source  the original 24X60
 ![]() with 2 rows added to 24X62
with 2 rows added to 24X62![]() in brick repeat, 24X124
in brick repeat, 24X124 ![]()
A 40 stitch Madag design 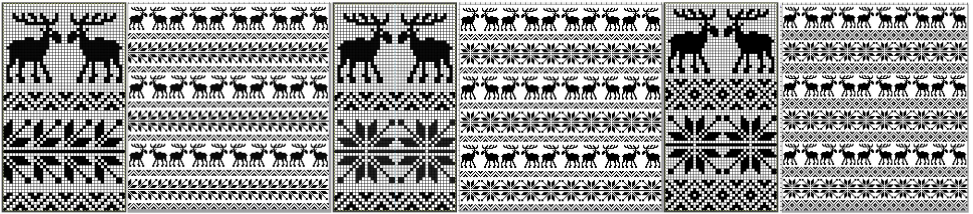 40X68_1
 ![]() 40X68_2
40X68_2 ![]() A 24 stitch version, with the moose, and without
A 24 stitch version, with the moose, and without  the original, 24X152
 ![]() cropped to 24X118
cropped to 24X118 ![]() with the moose edited out, 24X84
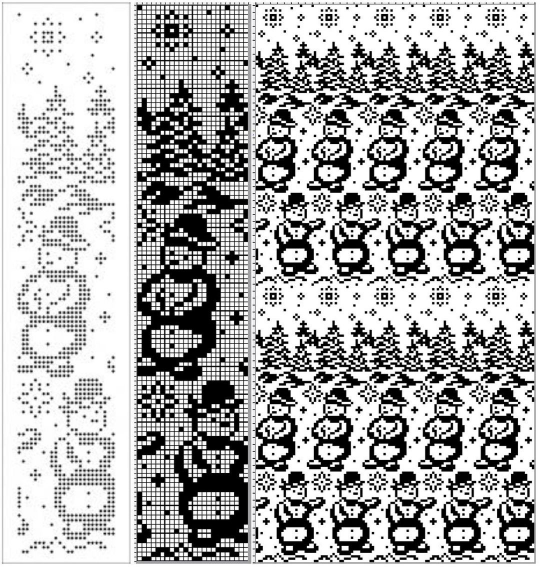
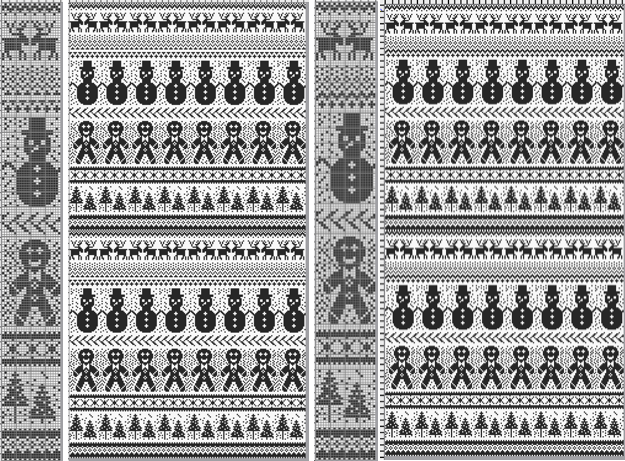
with the moose edited out, 24X84 ![]() Snowmen and trees
Snowmen and trees
 24X120
![]()
 24X50_1
 ![]() 24X50_2
24X50_2 ![]() testing tiling prior to knitting, editing out unwanted symbols
testing tiling prior to knitting, editing out unwanted symbols 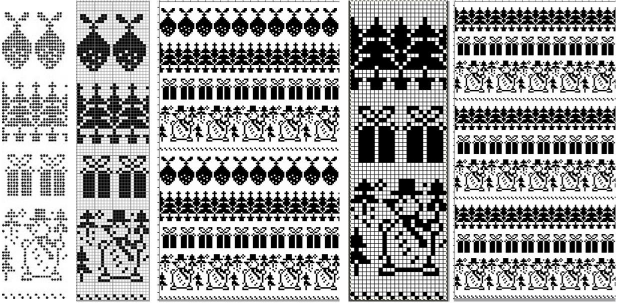 the original 24X99
 ![]() the edited 24X74
the edited 24X74 ![]()
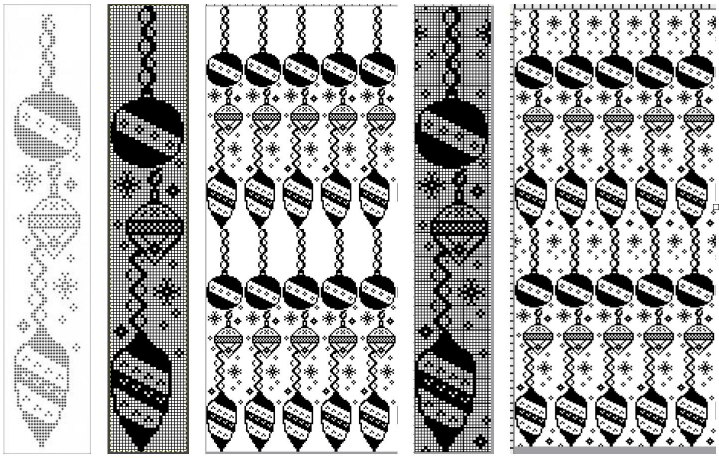 As a 24 stitch repeat, this is suitable only for single motifs, since repeating them horizontally would join the darker ball shapes. Adding a blank pixel column on the far right changes the horizontal alignment. A few pixels added at the top of the motif form an unbroken join vertically, the final 25X146 shown on the right
 ![]() This Santa was identified as being attributable to Knittery, a company long defunct that offered pre-punched cards for purchase. Images where the background is punched out make it possible to introduce striping it with the color changer or using the chart for duplicate stitch embroidery on a knit ground.
This Santa was identified as being attributable to Knittery, a company long defunct that offered pre-punched cards for purchase. Images where the background is punched out make it possible to introduce striping it with the color changer or using the chart for duplicate stitch embroidery on a knit ground. 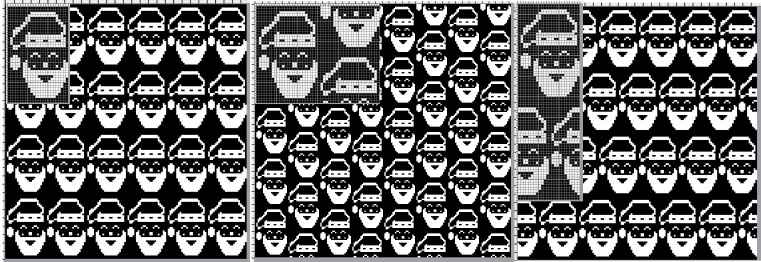 the original, 24X38
 ![]() in half drop, 48X38
in half drop, 48X38 ![]() and in brick repeat, 24X76
and in brick repeat, 24X76![]()
the original, 24X185 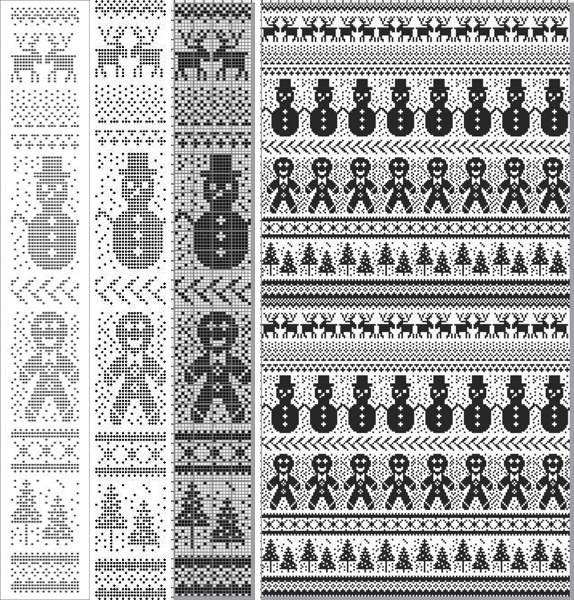
![]() with the elimination of some rows, first at the very top
with the elimination of some rows, first at the very top 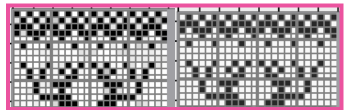 and then just above the snowman’s hat
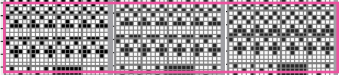
 the final 24X182 png
 ![]() The question as to how to adjust repeats for use on 12 stitch knitting machines often comes up in forums.
The question as to how to adjust repeats for use on 12 stitch knitting machines often comes up in forums.
Continuing in the seasonal vein, the easiest method is to begin with a 12-stitch repeat that occupies only half of the card vertically and twice in width. Here the original “half” is 12 stitches wide, 46 rows tall.
One method for the conversion is to work on a spreadsheet:
Begin with a table 24 cells wide, adding enough rows to the expected planned height to repeat the snowflake border, 46 cells in total
configure the cell borders for easy viewing, ie with a 3 pt red lines
hide 12 columns beginning with the second from the left
fill in black cells matching the original design or the DIY version
unhide all 12 columns for the final repeat 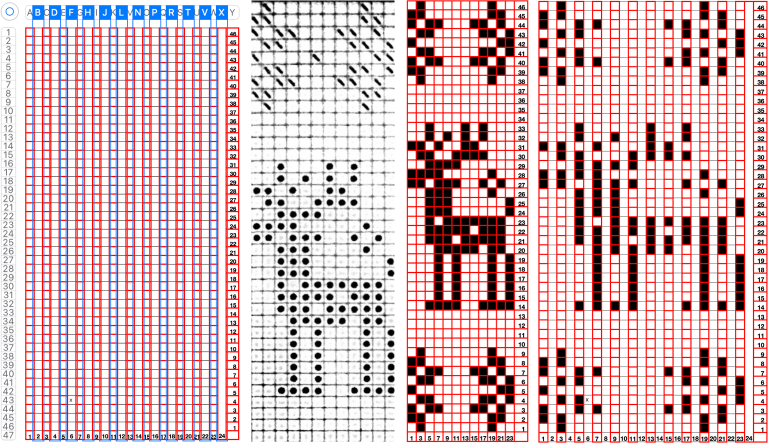 When converting the screen grab from a spreadsheet to png in Gimp, before scaling to final size, a first scaling may be required to make certain the result is divisible by the expected number of stitches and rows using the broken chain link, and then scaled again with closed chain link, the first png
 ![]() Working in Gimp or any paint program
Working in Gimp or any paint program
draw the “original” and save it, mine now has 2 added rows, one above and one below the deer, making it 12X48 pixels ![]() scale it to twice the original width
scale it to twice the original width ![]() configure the grid properties for contrast/easy viewing
configure the grid properties for contrast/easy viewing
fill in every other column with white using a straight line white pencil. To do so, select a pixel with the mouse, hold the shift and command keys down to draw the lines, and release the mouse to stop. The first white pixel may be placed within an easy-to-follow section of black ones and then the mouse may be held and moved up and down to complete each column. Save the result.
 Proof that it is always a good idea to draw the initial image in repeat before committing to color separations or any downloads and actual knitting:
  Two possible alternatives in adjusting the design to one’s preference are marked in 6X6 grids in ArahPaint to match markings on blank Brother factory blank cards:
the first removes a snowflake border and is reduced to 12X39 pixels, ![]() the second adds 4 rows at the top of the second snowflake border, 12X52
the second adds 4 rows at the top of the second snowflake border, 12X52 ![]() the number of rows between motif segments can be varied for planning the introduction of stripes in added colors
the number of rows between motif segments can be varied for planning the introduction of stripes in added colors  If only Gimp is available, I have not found a way to vary colors in grid borders in blocks other than to use guides, appearing as dotted blue lines.
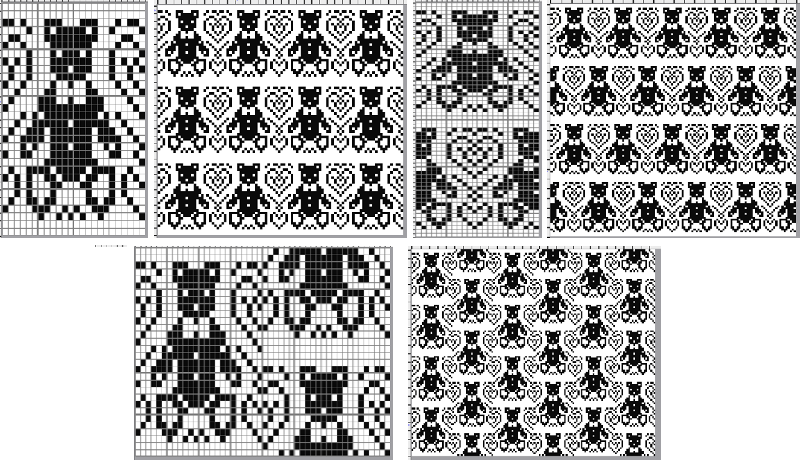
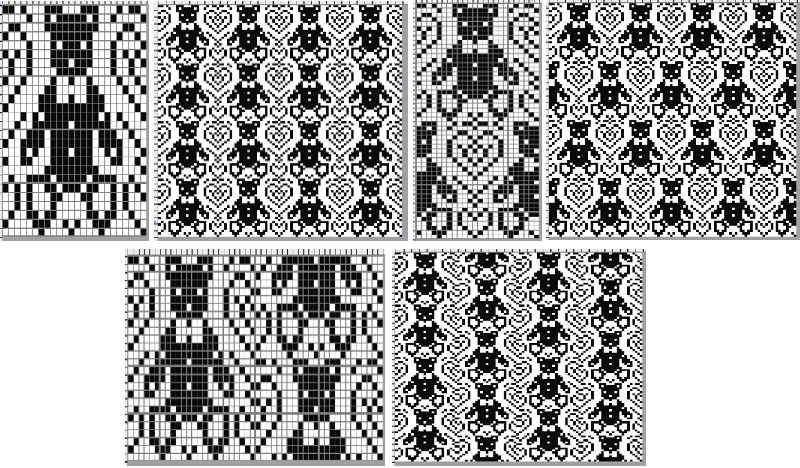
  A break from reindeer, teddy bears, and hearts follows, perhaps for a baby gift or to save for Valentine’s Day. When there are clear horizontal borders added to motifs the half-drop repeats will produce mixed results.
 the pngs:
24X39![]() 24X78
24X78 ![]() 48X40
48X40 ![]() 24X60
24X60![]() 24X30
24X30![]()
48X30 ![]()
24X26
![]() 24X52
24X52 ![]()
48X26 ![]() Bell motif variations
Bell motif variations 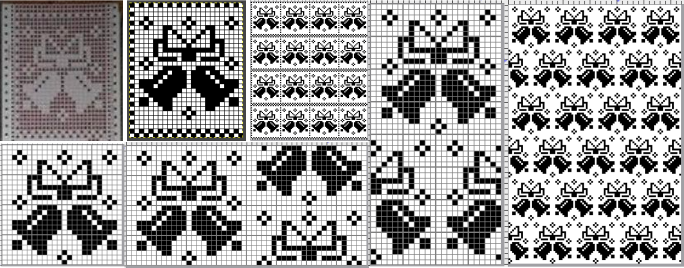
24X30![]() 24X48
24X48 ![]() 48X24
48X24 ![]() The last in this series, a nutcracker motif inspired by a larger scale cross stitch design, reduced by me to a workable 24 stitch MK design with varied borders and collaged small motifs in the background
The last in this series, a nutcracker motif inspired by a larger scale cross stitch design, reduced by me to a workable 24 stitch MK design with varied borders and collaged small motifs in the background 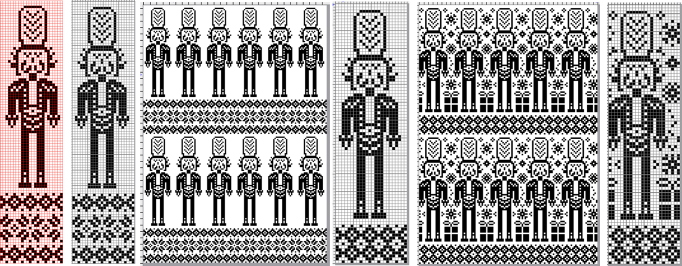 24X101
 ![]() 24X87
24X87 ![]() 24X87 with added background designs
24X87 with added background designs ![]() Considerations in choosing a design are guided by its end use, tiling the repeats leaves fewer surprises in any actual knitting.
Considerations in choosing a design are guided by its end use, tiling the repeats leaves fewer surprises in any actual knitting.
This might appear in casual observation to be a “snowflake”.
The full 25X25 pixel version can be isolated, with matching fragments around the whole. Magenta lines indicate cropping points depending on end use if double stitches not immediately obvious or planned are to be eliminated. 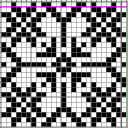
![]() A: the full design as a potential knit border
A: the full design as a potential knit border
B: trimmed a one-pixel width column on the right to 24X25 while retaining matching top and bottom rows ![]() C: trimmed the single top row as well to 24X24 for an all-over execution, drawn in repeat for an opportunity to evaluate whether the design as it now appears produces the initial imagined shapes and effect
C: trimmed the single top row as well to 24X24 for an all-over execution, drawn in repeat for an opportunity to evaluate whether the design as it now appears produces the initial imagined shapes and effect ![]()
 Then there is the optical effect change that happens with color invert, for which an easy test may be made during knitting by simply switching yarn color positions in the knit carriage sinker plate
 ![]()
Adding fair isle patterning to short row patterns creating eyelets
In Brother knitting one of the issues encountered when combining fair isle patterning with short rows is that if the fair isle pattern is to be maintained, one must hand-select needles to the proper position prior to knitting across needles newly returned to work.
The short row method here is a modified version of that used in the “wisteria” post, with the addition of needles regularly left out of work.
Analyzing what is happening in fabrics in this group: the working repeats need not be symmetrical, but for the purposes of beginning to understand the moves required and developing an awareness of how the stitches on the needle bed behave, it is easier to begin by using hand selection that is rhythmic and consistent.
Avoiding dark colors is helpful in recognizing dropped stitches in time to pick them up.
With some exceptions, most machine-knitting short-row patterns are worked in two-row sequences with stitches brought out to hold opposite the carriage and into work on the carriage side.
Typically the first row of eyelets will be approximately half size, and the knitting may be stopped at the top of the piece to match that.
This chart begins to visualize a pattern composed of vertical columns with colors knit on every other needle, produced using the repeat.  The arrows indicate carriage movements.
The grey cells represent needles out of work.
The blocks of black and white columns represent the colors in the FI pattern selected and relate to the A and B yarn feeders. In this exercise, preselection is kept constant to facilitate maintaining proper patterning as needles are pushed back into work. Often, after an initial number of rows, all but the first group of stitches in the pattern are brought out to hold. In my swatch, the fair isle pattern had already been established across the needle bed for several rows.
Here one would begin with the knit carriage on the right, COR.
COR: the first group is knit for an even number of rows, ending COR.
COR: a number of needles are pushed back into work on the left, FI needle position is restored with needles placed in proper positions, knit on one row on the combined groups to the left
COL: bring the first group’s needles out to hold, knit an odd number of rows, ending COR.
Repeat moves and selections until the last group of stitches is reached, knit an even number of rows, and end COL.
COL: reverse the process, moving from left to right.
This method results in threads appearing between the short rowed shapes. 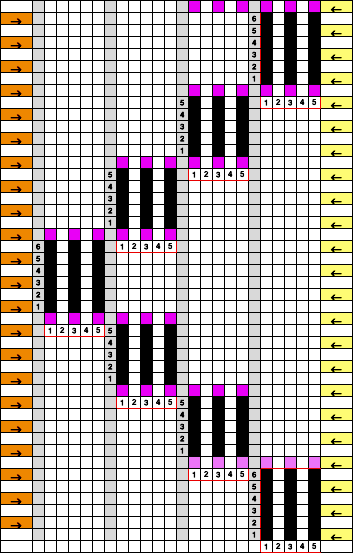 The first preselection row is made from left to right. End needle selection is canceled. Cast on is over a multiple of 6 stitches ie 36, with every 6th needle out of work. I began the sequence COR with 10 rows knit, returning COR, followed by 9 as the odd number of rows once the next group of needles is brought into work, and the last group worked is pushed out to hold, then reduced the even number to 8, the odd to 7 in the top half of the swatch.
Here the work is seen on the machine, on the left, COR, and the needle selection for the pattern in the next group to its left is restored. On the right: after knitting to the left, the initial group of needles worked is brought out to hold before continuing to knit.
 A mini version in a single color
  Changing the holding sequence to eliminate the long threads between held shapes, beginning once more to sort out the how-to before adding fair isle patterning: cast on 36 stitches, with every sixth out of work moving from left to right, knit several rows.
  To knit: each group of 5 stitches in work has a reference number, 1-6
first pattern row:
COR: Set the machine for hold, leaving only group 1 in work
COR: knit 8 rows on the first group of stitches on the right (1)
push second group (2) into work and knit 8 rows, returning to COR
COR: push the third group (3) into work and knit one row to the left
COL: push group (1) on its right out to hold, knit 7 rows across the remaining 10 stitches, returning to COR
COR: bring a new group on the left into work, knit one row to the left
COL: bring the group to its far right out of work, repeat the process across the row
when the second to last 2 groups on the left (6 and 7) are reached, knit 8 rows on both, returning to COL
COL: push the second to the last group out to hold (6)
COL knit 8 rows on the last group on the left (7)
COL, reverse the process repeating all selections moving from left to right for the second pattern row. Begin the process by knitting 8 rows first on the first group of five stitches on the left, which will now have been knit for 16 rows in order for the stitches to create the large eyelets that will now form.
In my swatch, I occasionally varied the odd number of rows knit between seven and 9. Even a couple of rows can make a noticeable difference depending on the color of the yarn, the tension used, and other usual suspects. Test out the idea in the swatch to help make the decision as to whether unraveling is required to keep a constant quality to the holes as the project grows, and to practice unraveling rows back to the proper location. If fair isle patterning is added, corrections become a bit more complicated.
The resulting proof of concept swatch:  With the addition of the fair isle patterning: note that here, when the last set of needles was reached, they were not worked twice before reversing direction, so the edge eyelets are of a different size than those in the remainder of the row, forming smaller waves on each side.
 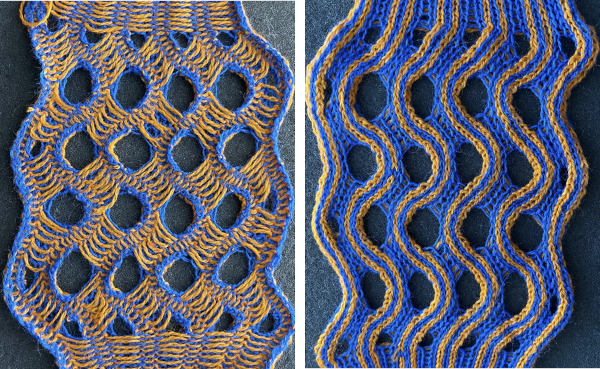 Any openwork fabric will likely be wider than that knit in stocking stitch or fair isle on the same number of needles, making it necessary to consider providing stretch in any rows knit at the bottom or the top of the planned project or using the contrast as part of the final design.
Adding hems to the above technique is also possible 
The short row repeat used here is a modified version of the “fern leaf” one in the post. The sequences are different, every needle is in work.
I began by casting on 36 stitches, knitting 12 rows for the even number, and 11 for the odd, with random variations.
Results need not be symmetrical either in the length of the shapes or in the direction of the knit, but rhythmic repetition can help one understand stitch formation, other changes that follow can then be deliberately planned rather than accidents or errors, keeping notes while the work is in progress, will help reproduce effects.  The knitting method, and tips: the fair isle repeat is 2 stitches wide by one row high, and the respective cells are bordered in red, it may be programmed to suit. When using a punchcard model, the card could simply be locked on any row with every other cell punched. The result will be vertical lines on every other needle, slanting in the direction in which short-rowed shapes are knit.
I chose to begin my design with the first needle on the right selected to pick up the color in the B feeder and used that as the basis for adjusting selections in subsequent groups of stitches.
Electronic machines have the option of mirroring the pattern to change that, punchcard knitters can move the knitting one needle to the right or to the left to get the selection they prefer.
As additional needles are brought into work, the A and B yarn feeders selections need to be restored so as to maintain proper FI patterning.
If you have not worked with this type of technique before, it is good to start using a light color and to work in small stitch groups, not adding added patterning until later.
Attempting to visualize the movement of the stitches across the needles in work: the colored cells illustrate the movement of stitches across the needle bed as they are brought in and out of work, and the number of held rows is altered to reduce the chart’s height, does not match the directions for the test swatch that follow it exactly. The black cells represent all knit rows. 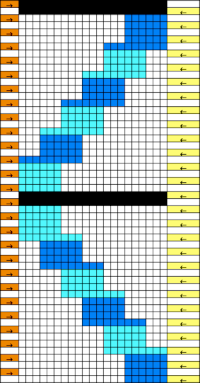 1. Cast on the desired number of stitches, in this case, 27, a multiple of 3, and knit several rows at tension appropriate for stocking stitch when using the same yarn
2. COR. Set the machine to not knit stitches brought out to the hold position.
3. Leave 6 needles (3X2, double the number in each working group) on the right in the work position, and push all the remaining stitches out to hold.
4. Knit 10 rows (an even number), ending COR.
5. Push back the first 3 needles on the left back into the work position
6. Knit one row from right to left (9 needles), end COL, and push the 3 needles on the right out to the holding position (6 needles will now be in work again).
7. Knit 9 rows (odd number) ending COR
8. Repeat steps 5-7 until you reach the last 6 stitches, knit 10 rows (even number) over these last 6 (3X2, double the number in each working group) needles, ending COL.
9. Set the machine to knit all needles out in the hold by pushing needles back or releasing the hold lever, and knit 4 rows over all the needles. It is possible to vary the number depending on one’s preference, but for me, only two rows simply were not aesthetically enough.
10. Holding lever on H, reverse shaping from left to right, beginning again on 3X2=6 needles, (double the number in each working group).
Reverse the process, moving in the opposite direction, beginning with knitting an even number of rows on the first chosen group of stitches on the left.
The difference in the edging of the swatch, marked by arrows, is due to a variation in the sequence for working on the specific group of stitches. If performed as an error, it will appear as an obvious deviation if not corrected while the work is in progress. The same action may also be performed deliberately as part of the overall design.
Color changes may be made easily where the 4 rows are knit in between segments on every needle used. End with 2 rows in the first color, knit with two rows with the second color before returning to the holding sequences.
 Worked on a significantly smaller scale in one color.
 This far more symmetrical result than the first effort worked in the vertical stripe fair isle pattern on 40 stitches: begin with some FI patterning, end COR
COR: bring all but the first 8 needles closest to the carriage out to hold,
Proceed as described for the single color design, but this time 4 stitches are pushed into work and returned out of work rather than 3. Knit 12 rows when even numbers are required, 11 for the odd number.
Four rows of fair isle patterning are knit at the end of each repeating segment.
 It is possible to work with far larger groups as well,
  thus providing an opportunity for adding larger fair isle patterns into the mix.
  Cast on 48 stitches.
In this sample various size eyelets were produced, using 12 rows, A, which did not seem to yield the degree of 3D texture I wanted. More rows were tried where larger holes appeared, B. Four rows of fair isle patterning separated each row of the held shapes.
 To produce a more symmetrical knit, begin working short rows COR with a group of 16 (8X2) stitches on the right, knit for 20 rows as the even number (in the range of 8X2X1.5), 19 for the odd, returning groups of 8 stitches into work knitting moves across the needle bed, ending the pattern with working 20 rows on the last 16 stitches in work on the left. Knit 4 rows restoring fair isle needle selection across the needle bed, returning COL. COL reverse shaping.
 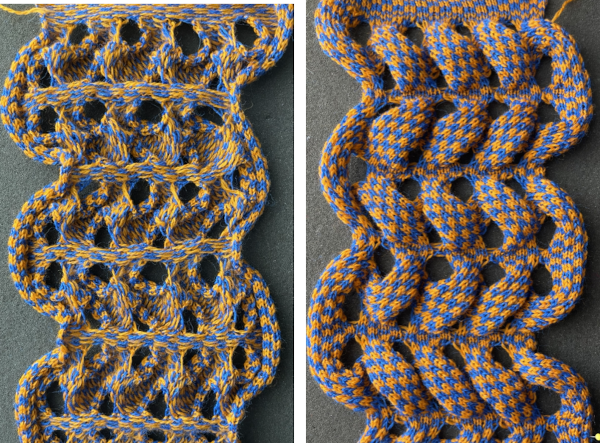 Knitting all the holding sequences in the same direction for multiple rows as in any eyelet fabric will result in a knit that biases to a degree proportionate to the number of stitches and rows in each unit. The start of yet another idea:
Pintucks 1 vs shadow pleats
Pintucks are in the family of ripple stitches. The size of both is limited by the number of rows that may be knitted before the stitches on the bed creating the ripples begin to ride up and off the needles. The number of rows possible for the rolls varies with the model knitting machine used and the type of yarn. The Passap strippers make their knitting easier. Generally, extra weight is required.
Basic pintucks are formed across the width of the fabric, no punchcard selection is required. For some basic instructions on forming them in a single color see the blog post on Shadow pleats knitting. Its follow-up, Shadow pleats with added patterning made me curious about the possibility of creating 2 colors, FI patterned pintucks.
For a very brief period of time, some designs were published creating similar effects by hooking up elongated fair isle patterns at regular intervals on the knitting bed. The preselection for the next row knit in Brother machines poses interesting issues in restoring and maintaining the proper pattern throughout the design.
A lot of changing cam button settings can make many fabrics almost possible but not practical on home knitting machines. Some of the constant switchings of functions may be achieved by knitting with separate pairs of carriages selecting the pattern, which in electronic models advances every row, making this an electronic “special”.
Ribber fabrics produced with 2 knit carriages selecting needles introduced the idea of using a KC with a modified sinker plate to make some fabrics easier and includes a knit sample of patterned ripple fabric.
The goal here is to try to create rolls evocative of the shadow pleated swatches in a double knit.
Because of the rolling on the knit surface, designs should be lengthed at least X2. The initial test used the same pattern as that in the shadow pleated samples with the number 4, double-length key selected on the 930. ![]() The carriage setups
The carriage setups 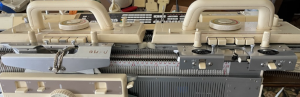 The width of the fabric is limited. Though the KC on the right may be moved off the machine if needed, the coupled carriages cannot be since the ribber and KC used on the left do not lock together in any way, and with the stops removed the ribber carriage could conceivably slip completely off its bed. The end of the belt still needs to be cleared, but this is about as far as one can safely move, with the KC just clear of the set mark on the left of the top bed.
 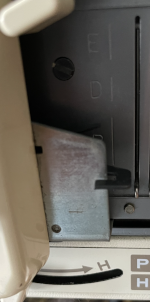 End needle selection is used in both knit carriages.
Extension rails are required.
The coupled carriages although selecting needles will be knitting on both beds to begin and end the fabric and to seal the folds setting the pleats.
To begin, test the tolerance for the number of rows knit on the top bed only. It is possible to coax extra rows by pushing fabric down between the beds by inserting a thin knitting needle between the beds at the start of the pintuck or halfway through and weighing each end. Longer rolls and hems tend to flatten.
The main bed will be knitting on every needle and FI is essentially a slip stitch, so the tension needs to be at least that for the yarns used in single bed knitting. More pronounced rolls may be produced if the tension and stitch size are adjusted accordingly.
Normally the sealing row would be knit in the light FI color. In these samples, the yellow yarn is used to help assess how those knit rows interact with the folds and to what degree they are visible.
The first try:
1. tested a solid color 8-row pintuck a single time, then switched to 6-row sequences and continued. Even though a contrasting color is used to seal the tucks, it is not immediately visible
2. the second carriage is set to FI and begins to operate from the right. Out of habit, I knit with weaving brushed down, a bad idea in this instance
3-4. this fair isle design is used double-length and forms some very long floats repeatedly, not the best choice even for single bed FI, definitely problematic here, time to regroup.
 Comparing the surface to the shadow pleat fabric
  For a different execution of the same design using a different main color on a different knitting day, see the bottom of the post.
Moving on to a simpler, random, smaller, 12X10 repeat ![]() planned for knitting on a 33 stitch swatch and rendered double-height planning six-row pintucks,
planned for knitting on a 33 stitch swatch and rendered double-height planning six-row pintucks, ![]() Visualizing the possible design along with placement of sealing rows represented by all-white pixel rows in the diagram. The single 8-row fold advances the remaining pattern by 2 rows, resulting in a subtle change in the design:
Visualizing the possible design along with placement of sealing rows represented by all-white pixel rows in the diagram. The single 8-row fold advances the remaining pattern by 2 rows, resulting in a subtle change in the design:  My swatch used white for the ground as in the above right, the 8-row transition is marked by the red arrow.
 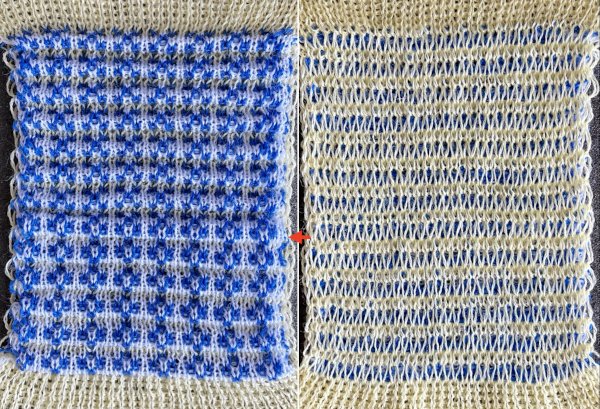 Knitting was easy and smooth, the 8-row tuck required a bit of coaxing. The fabric lies flat, does not have the drape of the single bed shadow pleats, it is not suitable for the same end-use.
Plain every needle rib knit is quite a bit wider, a consideration for casting on and binding off or transitioning to another fabric if this technique is used as part of a different fabric. This file was also downloaded and lengthened X2 ![]() The pattern is not very pronounced, but the short floats make for easy knitting.
The pattern is not very pronounced, but the short floats make for easy knitting.  Comparing the fabric to the single bed shadow pleat using the same design
  The pintuck main bed FI yarn could be slightly thicker. Since the 6-row sequence appears to work well, if the fabric is to be pursued, the design could be planned and adjusted accordingly.
Issues encountered in DIY deliberate design planning: beginning in Numbers, a table is set up with enough rows to accommodate more than the height of the planned design. Since the fabric planned would knit 6 rows on the top bed, then followed by 2 rows on both beds not affecting the design, starting at the bottom of the table, use the command key and work on hiding 2 rows following groups of 6 for the height of the table 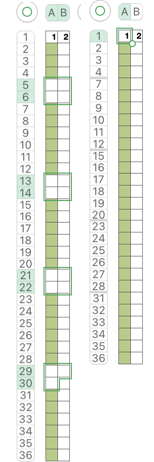 The theoretical design in beginning stages:
1: the rows marked in green are hidden
2. a design is drawn using 2-row blocks and shaping
3: it is tiled, appears worth pursuing.
 The expected carriage actions, color reversing the repeat so that the dark color will knit in feeder A of the FI single bed sinker plate
 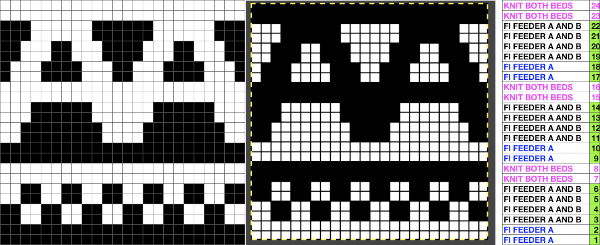 Points to consider while removing the use of the ribber from the equation:
both knit carriages are set for the end needles to select. When knitting fair isle this is necessary to keep the contrast color knitting from separating from the base color along the design edge. If at any point there are single-color stripes, the end needles if selected need to be pushed back to the B position, or the second color will catch the first and last needles in work, forming a float from side to side. If the yarn is removed from the B feeder and end needles are not pushed back to B, stitches on them will drop. My first try ![]() The transition to color reverse shown tiled
The transition to color reverse shown tiled 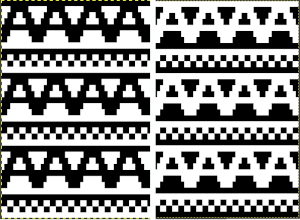 Leaving the contrast color in the B feeder on the all knit black pixel rows created the first mess. Because of preselection, the return to knit dark rows has every needle coming forward as the single bed KC is traveling back to the right, resulting in another mess.
Regrouping so the first pair of rows with no preselection will knit the dark color, the second pair of rows with no preselection will knit using the paired carriages, sealing the fabric, the larger geometric shape has 2 rows with no needle selection nearly at its halfway point. 
![]() The broken threads are due to stitches getting hung up on gate pegs, missed until more knitting had been completed. With more attention, knitting went more smoothly, and the planned design is identifiable.
The broken threads are due to stitches getting hung up on gate pegs, missed until more knitting had been completed. With more attention, knitting went more smoothly, and the planned design is identifiable. 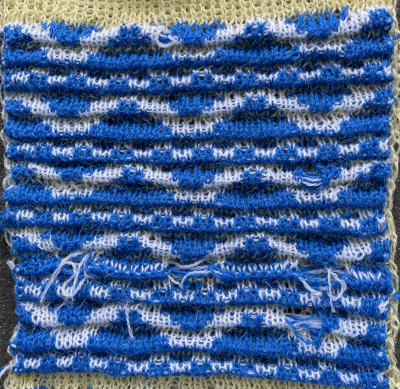 Perhaps as a farewell to the topic or out of sheer stubbornness now that the above had been knit and I have had some practice, I returned to the more straightforward knitting of that double-length flower pattern with far improved results. Some of the floats trapped behind the long stitches created on the ribber can be seen bleeding through on the right.
  Comparing the scale once again to the shadow pleats
  This fabric may fall in the category that need not be knit simply because one can. That said it may serve well in bands joined onto larger pieces, or any use for it may only be limited by patience and imagination.
Shadow pleats with added patterning
Knit skirts have been present in runway and online publications again. Another Mary Dowse pattern has stirred up interest in a design knit in fair isle shadow pleats.
Shadow pleats knitting began to present some of the techniques involved in creating this type of fabric fold.
The permanence of the folds relies on blocking from careful and almost aggressive to far more casual approaches depending on the fiber content and end-use for the knit.
As mentioned in the older post, for a while, skirts in shadow pleats were very popular. One of the tips for blocking them at the time when acrylics were also new and in trend, was to hang completed pieces with the bottom evenly weighted inside a large trash bag “sealed” as tightly as possible at the top, with steam entering from the bottom of the bag ie from a portable electric teapot. I always had a hard time imagining the specific activity, and the method may have been part of the reason as to why published patterns for such items quickly disappeared.
Simply using a yarn with memory in the rows composing the larger folds always seemed a more viable option to me.
Ribber needle setups may be used to produce a rounded appearance in the resulting folds
rolled single pleats 
![]() double rolled pleats mirror needle groups
double rolled pleats mirror needle groups![]()
![]() accordion rolled OOW needles are spaced evenly on both beds
accordion rolled OOW needles are spaced evenly on both beds ![]()
 A large variety of pleats may be knit on the single bed as well, one being shadow pleats. The resulting knits also need to be gathered on one of the 2 edges in items like skirts at waistlines, and the number of knit rows needed for the volume required can be daunting and a large commitment of time if not effort.
Very large swatches in colors that one guesses to be appealing guide decisions based on evidence and personal preference.
Old published patterns often called for specific brands of yarn which decades later are likely to no longer be available. In addition to searching for substitutes that will produce a similar gauge, the behavior of the newly found yarn may simply be different than expected and as described in the instructions.
Inspiration photos found online are often small and do not reveal clear details, so attempts to reproduce the pictured knitting techniques may yield unpredictable results.
Assuming traditional yarns are in use, the larger rolled shapes in the fabric formed by the higher number of rows knit in the thick yarn tend to roll toward the purl side, the familiar effect seen in any single bed stocking stitch.
Part of the inspiration photo that began a renewed forum interest in the fabric  The appearance is of a fair isle pattern interrupted by the use of thinner yarn(s) in one or both feeders. Blocking long pieces can alter the aspect ratio of the original design, so in some cases, the width of the repeat or even the length would need to be doubled.
My initial repeat was 20X22 pixels: ![]() In this view, obvious places are highlighted for a possible switch to thinner yarns. If changing yarns manually, it is easier to change those in the sinker plate’s B position. If necessary, the planned motif may be color inverted to make those actions easier.
In this view, obvious places are highlighted for a possible switch to thinner yarns. If changing yarns manually, it is easier to change those in the sinker plate’s B position. If necessary, the planned motif may be color inverted to make those actions easier. 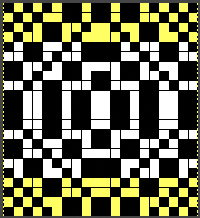 Both yarns used are wool, a yarn that has memory and spring-back. In the potential fold rows, the red color was replaced with a thin ply with the same fiber content. The first folds were knit in an *8 with thin, 14 with thick, 8 with thin** color sequence. Watching the knit as it progressed showed the thicker fair isle areas folding inward, with the thinner areas folding outward. The remainder of the swatch used a 4 thin, 8 thick sequence. The knit was steamed and pressed, the folds are soft but permanently present with the lower edge of the piece lying quite flat after a considerable amount of time.
 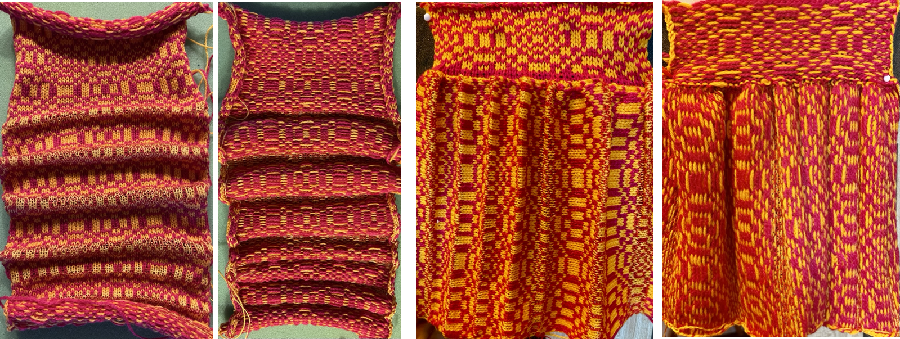 Here the red yarn used is acrylic, the black wool. An 8 thick 4 thin sequence was used, but in the thin areas, both colored yarns were replaced with single plies. The pattern is 48X54 pixels and from one of the Brother mylar sheets.
 ![]() The first swatch sports black flowers, the second, red ones. The knit sequences were the same, the change in texture in the areas may be seen here.
The first swatch sports black flowers, the second, red ones. The knit sequences were the same, the change in texture in the areas may be seen here.  The black flowers swatch was ironed, becoming permanently flattened, aka “killed”. The hope is to manage the red flowers swatch in a better way. The thinner yarns are in slightly different shades of the base colors, so a subtle striping occurs in the areas where they are used. Both swatches were knit on the same number of needles and at the same tension.
  The blocking saga: I do own blocking pins but honestly have only used them in demos, and on rare occasions such as this, or to cut them down when I needed a fast replacement for a ribber cast on comb lost wire.
Whether extremely detailed blocking is ever needed can be a very emotionally charged topic for some, best saved for another day.
With an optimally gathered edge at the waistline secured, the wire is threaded very evenly through the bottom of the “skirt”, and evenly distributed weights are placed across it. The fabric is likely to grow considerably in length, another reason for knitting very large test/gauge swatches to calculate the width/length required.  I downsized a few years ago letting go of most of my professional equipment. My only iron at the moment when and if it generates steam, did not appreciate being held vertically, spitting hot water at my feet, so the amount of steam used to set the pleats was likely short of optimal. That said, with the wire and weights removed, that edge is staying flat, and the pleats appear to be permanent a month later.
 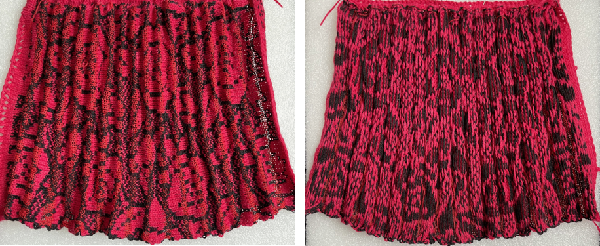 Knitweaving can be used to produce very interesting patterns, both all over or for edgings, and it may offer a viable alternative for patterning using multiple colors in the more prominent purl side rows of the knit. A 1x1selection is a good place to start.
 ![]() Returning to using wools, my efforts with the first yarns I grabbed failed with knit weaving, but since every other stitch every other row is selected, I was able to knit 8 rows in fair-isle with the thicker yarn in the B feeder, the thinner in A, followed by 4 rows of plain knit. The task is easier to accomplish with 2 knit carriages, one patterning, the other knitting stocking stitch.
Returning to using wools, my efforts with the first yarns I grabbed failed with knit weaving, but since every other stitch every other row is selected, I was able to knit 8 rows in fair-isle with the thicker yarn in the B feeder, the thinner in A, followed by 4 rows of plain knit. The task is easier to accomplish with 2 knit carriages, one patterning, the other knitting stocking stitch.
The colors were chosen for contrast making it easier to observe stitch formation.
The swatch, just off from the machine  after a manual tug
  after steaming and pressing
  A bit more tugging and gathering on one edge, pleats are set.
  The swatch view on the left illustrates well the pleating roll formed by the thin yarn to the knit side, the inward roll of the fair isle segment to the purl.
Floats formed by the yarns not used traveling up the sides of the knit should be considered the finishing of the final pieces.
Transitions could be made in any one piece between the ratio of the thick/thin number of rows, perhaps for sections ie yoke shaping, or varying the fold sequences from one texture to the other and back.
Most fabric is only limited by materials, tools, and the imagination of its creators.
Other ways to create permanent pleats
single bed
Origami folds inspired pleats 1 6/19
Revisiting pleats on the knitting machine: single bed 5/18
Pleats created with lace transfers 8/17
Pleats: automating “pleating”, single bed 1/1
double bed
Origami-inspired 2: more pleats and fold using ribber 3/21
Knit and purl blocks to create folding fabric_ “pleats”
Pleats: ribbed, folding fabrics 4/15
Binary alphabet knitting patterns
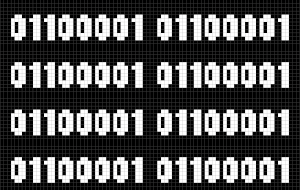
There are moments while surfing the net that trigger memories of long ago popular knitting patterns. One such is the piano scarf, usually knit double bed. For a while, knit QR codes, or even bar codes were “the thing”. Decades ago, long before online converters and easily available information, there were a few articles on converting alphabets to binary codes for knitting. Far more recent versions with different interpretations: using ones and zeros for pattern, hand-knit https://knitty.com/ISSUEwinter06/PATTbinary.html  A collection of machine-knit versions https://knithacker.com/2017/03/sam-meechs- knitted-binary-scarves/
 I prefer the more abstract to the literal interpretation using numbers, happen to have a 12 letter first name, and thought I would go for converting it. Because of the number of letters involved, the repeat would of necessity have to be a vertical one. I used 2 converters to double-check the result, noticing that when one of the letters repeats, the code for each of the 2 letters is slightly different. Of the many choices, I used these converters https://www.prepostseo.com/tool/text-to-binary-converter, and https://www.convertbinary.com/text-to-binary/
Each letter is converted to 8 digits, making results easily adaptable for punchcard use. 01000001 01101100 01100101 01110011 01110011 01100001 01101110 01100100 01110010 01101001 01101110 01100001. My spreadsheet in Numbers refused to allow me to enter the 0s at the start of each sequence, so the 0 has its own column, and in the larger chart, it is illustrated as a blank vertical row 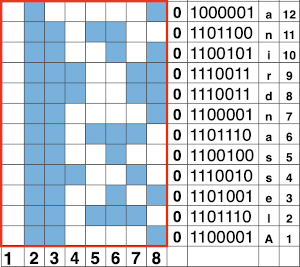 The problem if such repeats are used for fair isle knitting is that the results are likely to separate along those long vertical lines and to curl to the purl side even if blocked flat to start with. Converting the pattern for use on the double bed with any DBJ technique and backing is the better solution. My results, with letters from the bottom up
 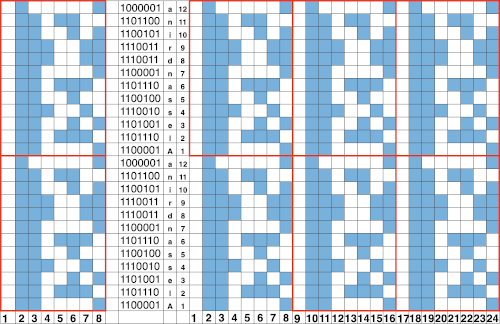 Programming the width of the number of needles to be used for the “scarf”, allows for the addition of a border stitch (or more) on either side. Start the base with and use the dark color for your first knit row from right to left in most of the automatic 2 color separations. Here is a tentative 72+1 stitch version
 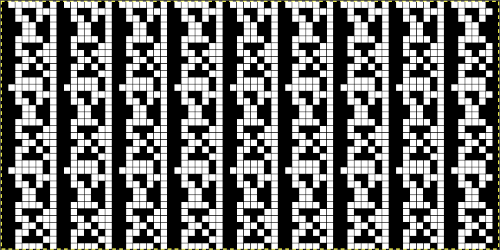 If numbers are your preference, with a bit of playing around digits may be adjusted in width and height
  going a bit bolder, the 8 individual letters as numbers could repeat horizontally across each design row.
  A repeat for the letter AX2 planned for the first segment of an 82 stitch wide scarf,
  with the number of knit rows between each letter group started at 5. An attempt to visualize the final look using only the letter A.
 G carriages may be used to knit the same patterns in knit and purl stitch combinations.
Fair isle variations
A review of links with associated hints and info:
Measuring gauge swatches, general information
Matching patterns across sweater bodies and sleeves
Float control
Scarf experiments
Design inspiration: binary alphabets
Adding hand techniques/ cables/ punchcard repeats
FI meets transfer lace on Brother machines
Adding the ribber, FI on main bed Tubular machine knit fabrics: fair isle, Brother/Passap
Altered patterning using bleach discharge on knits
These are random FI samples from my collection, most from my teaching days. None of them were ever intended for use in the finished product. They were knit to illustrate some of the possibilities for the different techniques using each of the cam button combinations. Some were knit during class demos. The colors made them easily identifiable as mine, knit using a personal yarn stash. The contrast helped identify how stitches were formed.
In this swatch, marking for measuring stitches per inch is done by leaving a needle out of work. The width between the resulting ladders should be checked at various points after the swatch is treated in the way you plan to treat (block) the finished fabric. Adding a third color per row would require altering the pattern to a color-separated slip stitch one, or one may add that color with duplicate stitching. The spots in this test are colored in with a permanent fabric marker. At the height of the art to wear movement one artist, in particular, was producing limited edition knitwear by knitting the same design in black and white, and in turn over-dyeing the white for different effects in each piece in the series. Eyelets at the bottom of the swatch are tension markings for the piece. The vertical line created by end needle selection (normally used in FI to avoid separation of colors et vertical edges) is interrupted in rows that are knit in only one color.  Recommended maximum width for floats is usually 5 stitches. How much the floats droop and cause potential “problems” on the purl side depend on fiber content. Sometimes such floats are intentionally created and worn on the outside of the garment as planned design features. The longer blue floats are seen below in the areas of the ladders where only the yellow is knitting, creating a wider span of the alternate color.
  These repeats are very simple. They are commonly associated with card #1 and card #2 in basic factory packs supplied with knitting machines purchases. Card #2 is reproducible by using card #1 elongated X2. A reminder: if using either repeat in pieces of garments ie baby leggings, etc. take note of which yarn feeder each color is in. Even if the repeat is correct and placed properly, the surface of the knit will appear different to the eye if the color placement is reversed in alternate pieces. The repeats may be used as backgrounds for a variety of other more complex fabrics in DIY designing.
 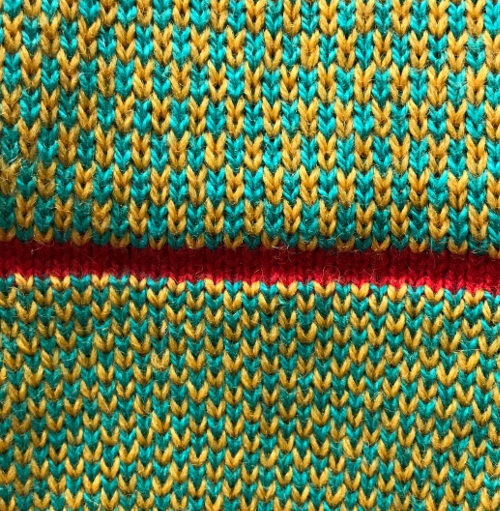 Here stainless 32 gauge wire is used as the second “color”, making the piece moldable and shape-retaining.
  Color may be added or “taken away” as seen in the post on bleach discharge on knits
  Another factory-supplied punchcard is used. Thinner yarns in lighter colors may have noticeable bleed-through of darker colors traveling behind them, as seen on the left, not an issue with the thicker wool on the right. Forgetting to set the card to advance can result in vertical lines, which may alternately be planned as a design feature.
  The longer floats seem manageable in these yarns, there is a bit of hooking up on the bottom right. The yarn traveling up the swatch on the right is an alternative way to mark for gauge measurements. A previous post provides some information on float control.
 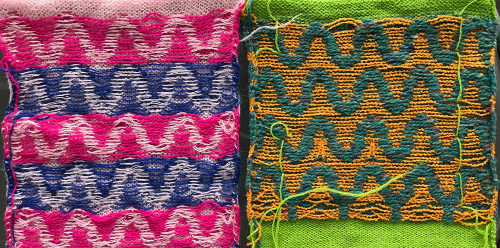 Varying the colors, fiber content, and considering complementary borders is worth exploring thoroughly at the swatch level, before committing to a larger piece. Truly contrasting yarn used at the bottom and top of the area to be measured for row gauge makes the process easier. As attractive and quick as single bed FI can be, keep in mind that long pieces knit in yarns with “memory” such as wool, will tend to roll to the purl side vertically even after blocking, and certainly with wearing of pieces such as scarves or shawls.
 Tone on tone chenille and all rayon, with “color reverse” by switching yarn positions in feeder
  less effective with a flat yarn as the alternative to the chenille
  Using the same card: every needle, 4.5 mm electronic machine.
  Transferring stitches to every other needle, odd needles in work on one side, even-numbered needles on other using worsted weight (2 needles in the center in work side by side.
  The motif is now used twice as wide with every other needle in use across the fabric width
  It is possible to vary designs by using the 3 functions of the card reader: locked, normal rotation, and elongation. Designs with long vertical features tend to separate at the edges where the 2 colors meet. Lining the fabric with a fusible makes the knit lose stretch, but it may be an option for stabilization, float control, and offers an opportunity for mock quilting by inserting some stuffing under floats before it is ironed on. High contrast colors are best for sorting out how stitches are formed. Embroidery alters the “step ladder” effect outlining the shapes.
 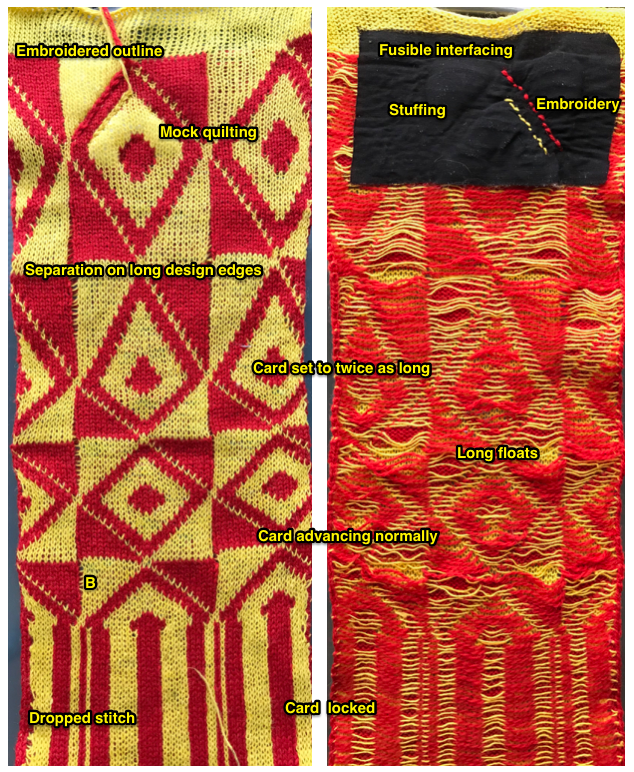 Hooked-up floats are not just for float control; note puckering on the knit side where they have been hung up in groups.
 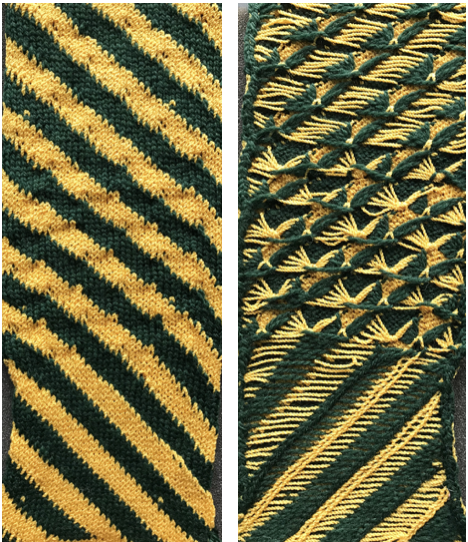 These swatches were worked from the bottom up, starting with positive/ negative comparison, sorting out the possible placement of the ladder with the intent of adding ladder lace details. Cancel end needle selection because of needles out of work, but bring needles into D or E position to avoid separation of colors and/ or dropped stitches at side edges.
 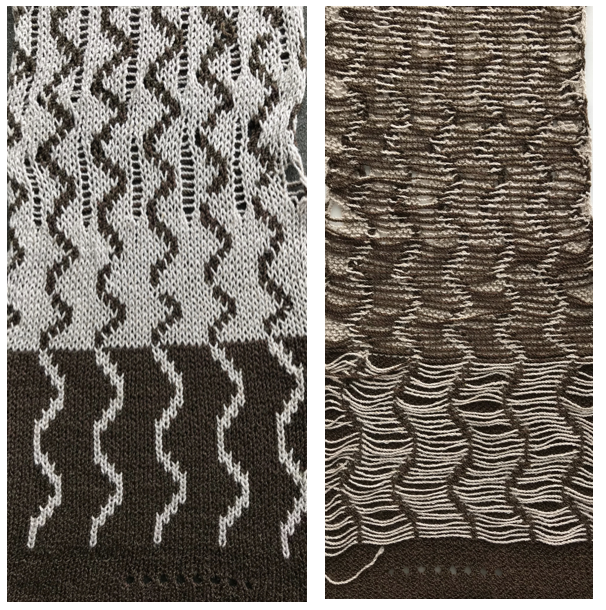 From the bottom up, transitioning from a ladder resulting from a single NOOW (needle out of work) to 2 NOOW, hooking up floats on opposite sides, ending in “lace” pattern alone
 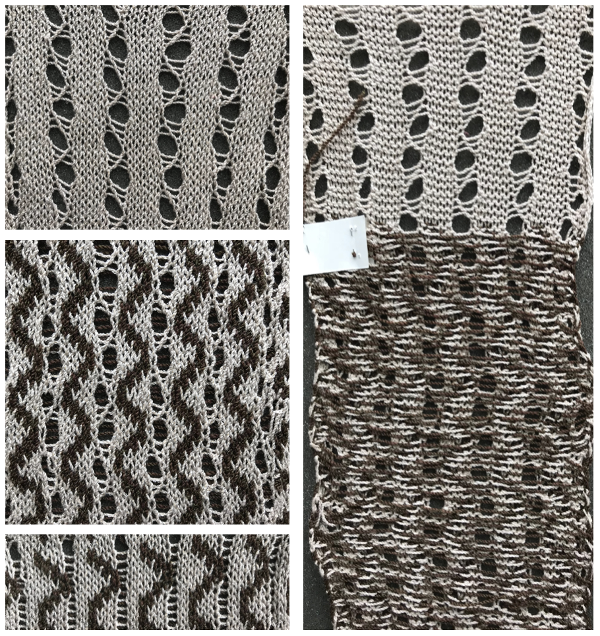 Combined with transfer lace Hand techniques (in this case cables) can be combined with FI. In Brother, it helps to be familiar with the pattern, as needle selection may have to be manually restored after the technique is performed to stay in the correct pattern.
With cables: some punchcard repeats
 With using a sewing machine: there is a vertical, single stitch line due to end needle selection in the contrast color formed on either side of any needle(s) out of work which provides a visual guide for altering the fabric. This swatch was knit with wide NOOW spaces, then sewing machine stitching joined the contrasting vertical lines to form a 2 color “fringe” on the knit side (left) and purl side (right)
 Variations with fibers for exploring surface textures: wool with raffia on the bottom, fishing line on top
 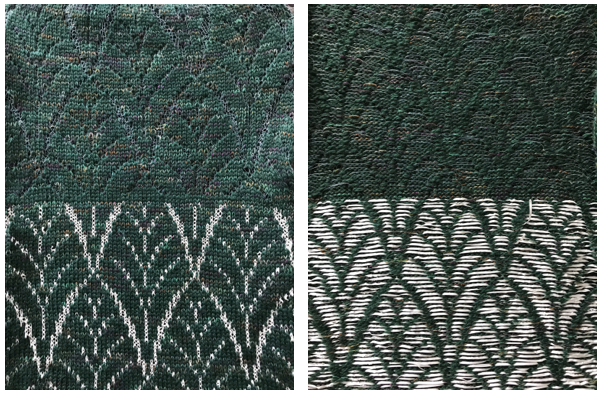 The same swatch continued on, using 3M elastic as the second color
 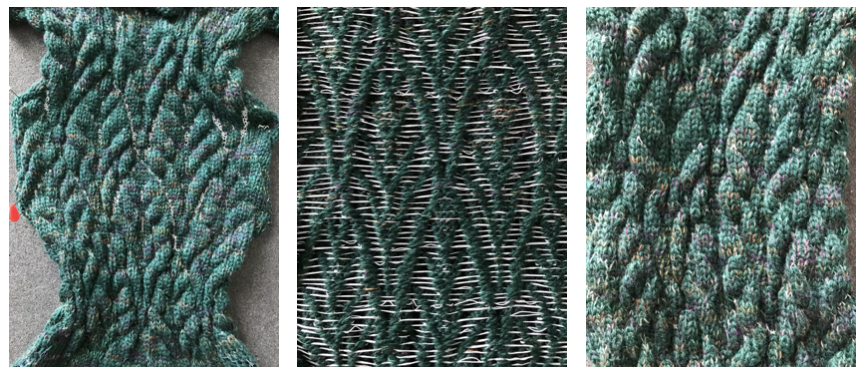 The same repeat in a rayon chainette and wool, followed by some felting. The rayon “bubbles” more visibly when the wool creates the wider floats
 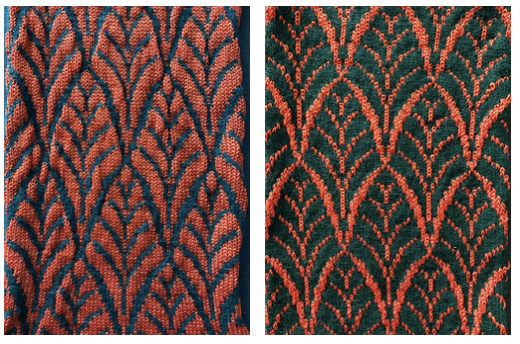 reversing color positions
 The punchcard is limited to varying the vertical repeat automatically in 3 ways: locking the card, normal rotation, and double length. Repeat width is fixed. Felting can produce interesting surfaces if one yarn is capable of being felted (green), and the other not (blue). The stitches knit with the latter will create puckers/ blisters. Since the knit will shrink in both width and height, the repeats here were used at double length. Note the added drooping of the blue floats on the purl side.
 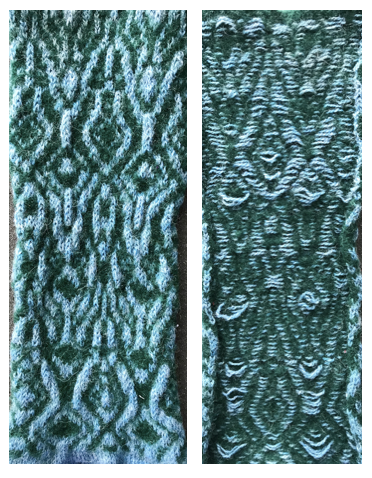 A punchcard can be further manipulated by masking areas with tape. It is not a good solution for production knitting, but adequate for testing out ideas before committing to punching a full, new card. The surface blisters here are much more dramatic. The green floats do not felt as much as in the previous swatch, and are considerably wider. On the right, far side you can see some of them were latched up, creating yet another design detail.
 The reverse of both swatches shows the resulting difference in relative width.
 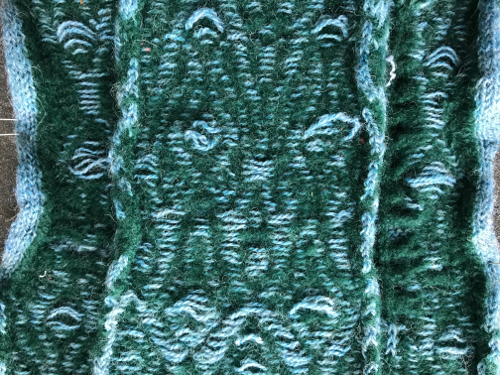 The contrast using a factory-supplied punchcard pattern with short floats, also felted. The fringe is created by ending on one side (in this case on the right) with a group of needles out of work and the outermost 2 needles in work, essentially producing a large “ladder”. Decreases and increases on needles close to the edge of the knit were brought in and out of work to create the “zig-zag”. The two edge stitches of the ladder may be trimmed before felting. The knit side is shown on the left, the purl side on the right, no clearly visible, separate floats, its surface is fairly flat.
Punch cards to electronics: book symbols and samples
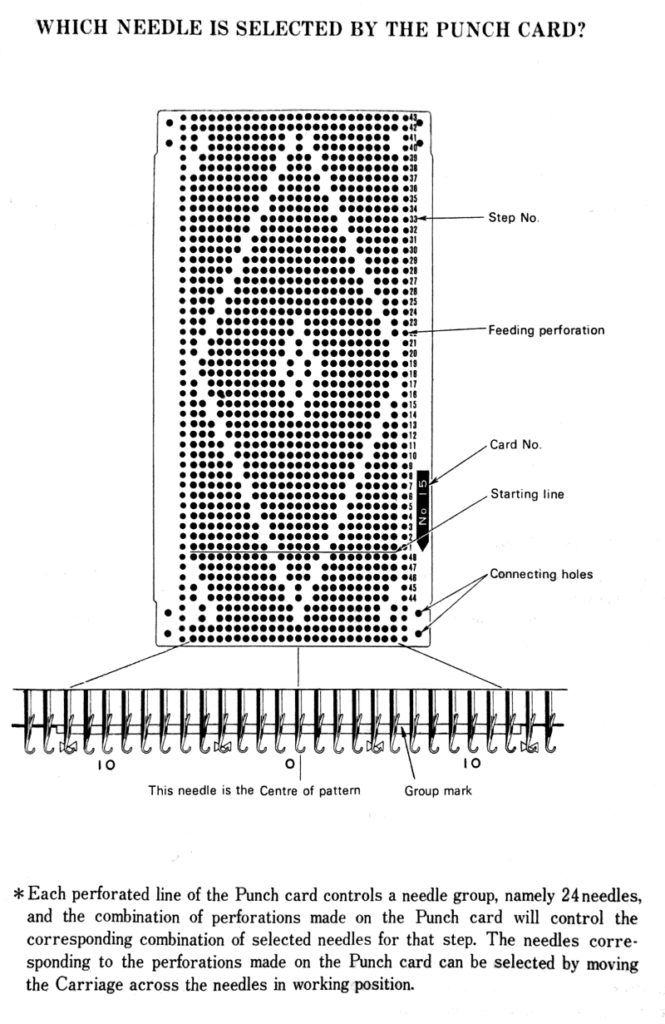
A number of variables need to be considered when adapting punchcard patterns for use on electronic knitting machines. These images pertain to Brother use, but the principles are shared between KM brands. I will add more information as time goes on. Online free downloads for magazines, manuals, etc. may be found at
http://knittsings.com/knitting-machine-manuals/
http://toyotaknitting.blogspot.com/
machineknittingetc.com
https://www.knititnow.com/ManualAndDocuments/
some additions of late include designs in 12, 18, and 30 stitch repeats in addition to the familiar 24 and 40 ones, and to help with interpretations of symbols: Japanese symbols for machine knitters
Punchcard collections for all brands @ needles of steel
For a later post including information on scanning and editing published designs electronically see https://alessandrina.com/2018/07/02/numbers-to-gimp-to-create-images-for-electronic-download/
As the transition was made from manual machines to push-button, and then to punchcard selection systems, the early collections included diagrams of symbols familiar to hand knitters, and interestingly worded text that disappeared or was reduced in later punchcard books. I am presenting information in the order in which it appeared in this particular collection’s paper version, I have not found this volume in the above-mentioned sources for free download. Images are gathered from more than one source, so there is some repetition of information

LACE KNITTING 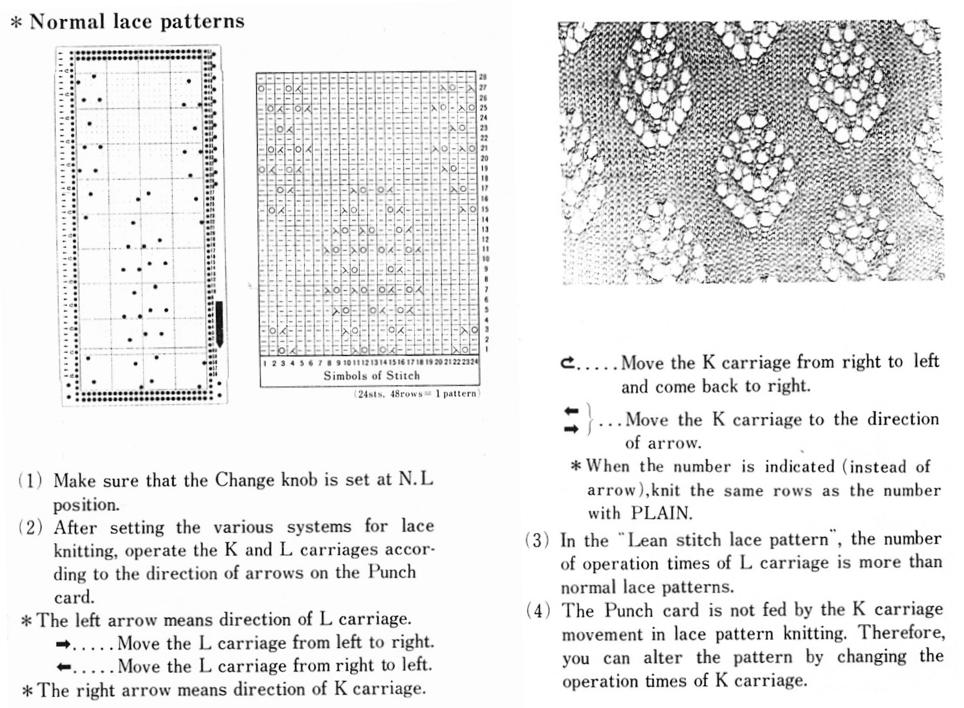
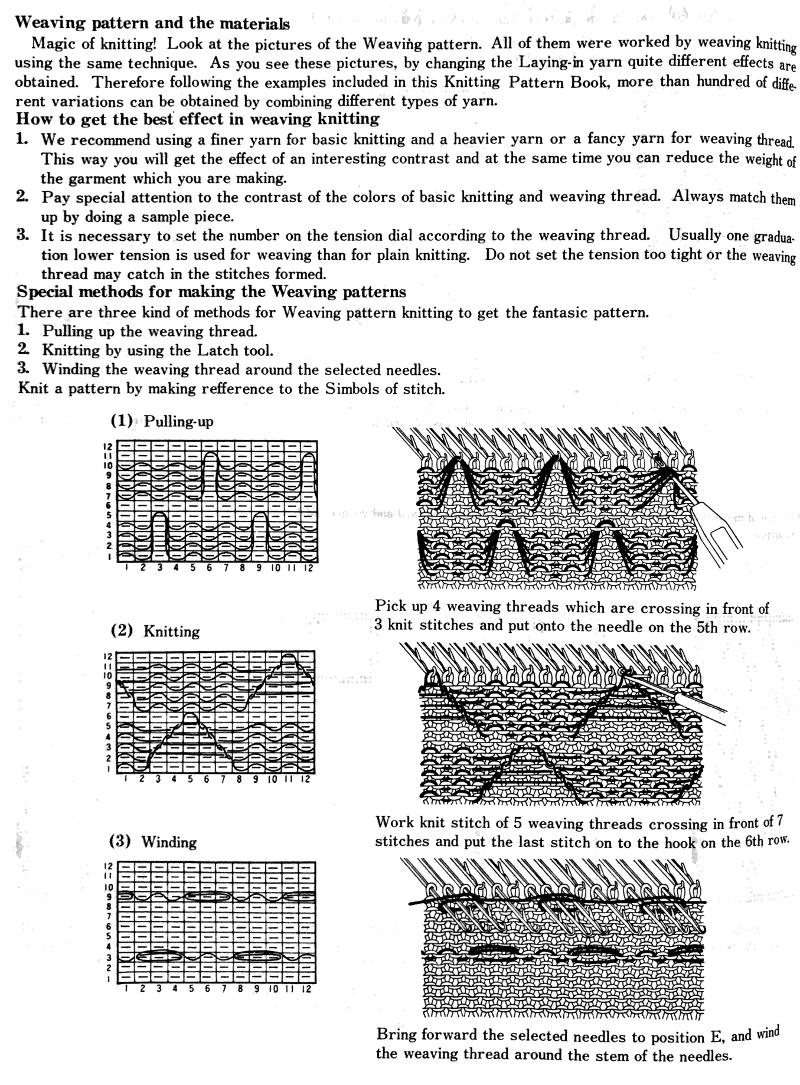
Punchcards may be used to guide one for hand techniques, here a version of e-wrap is used on selected needles for weaving effect, and the diagram on the upper left is for a different fabric. Punchcards may also be used to help track twisted stitches, cables, and racking 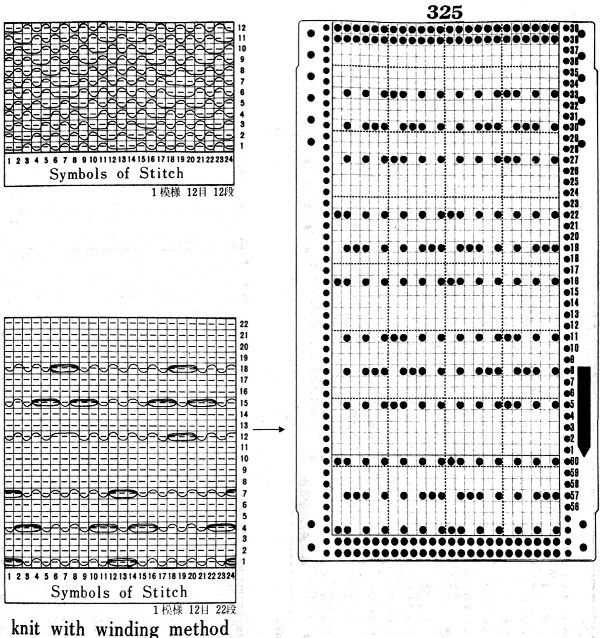 This is a 2 carriages patterning operation, lace extension rails must be used, with each carriage disengaged from the belt while the other is moving across the knitting and back to its resting place.
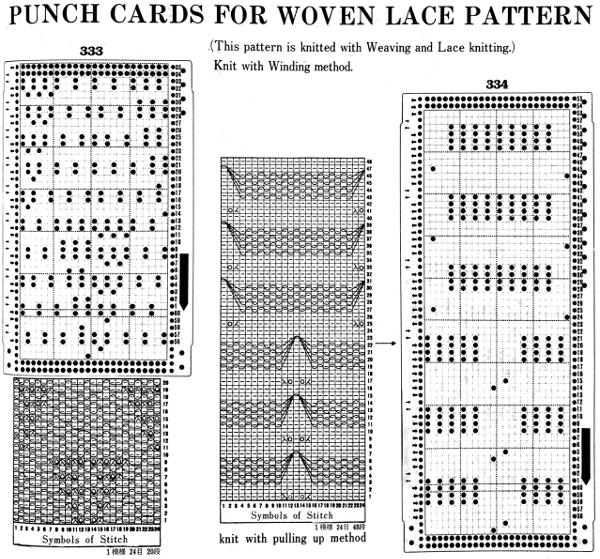

SYMBOLS IN PATTERN KNITTING
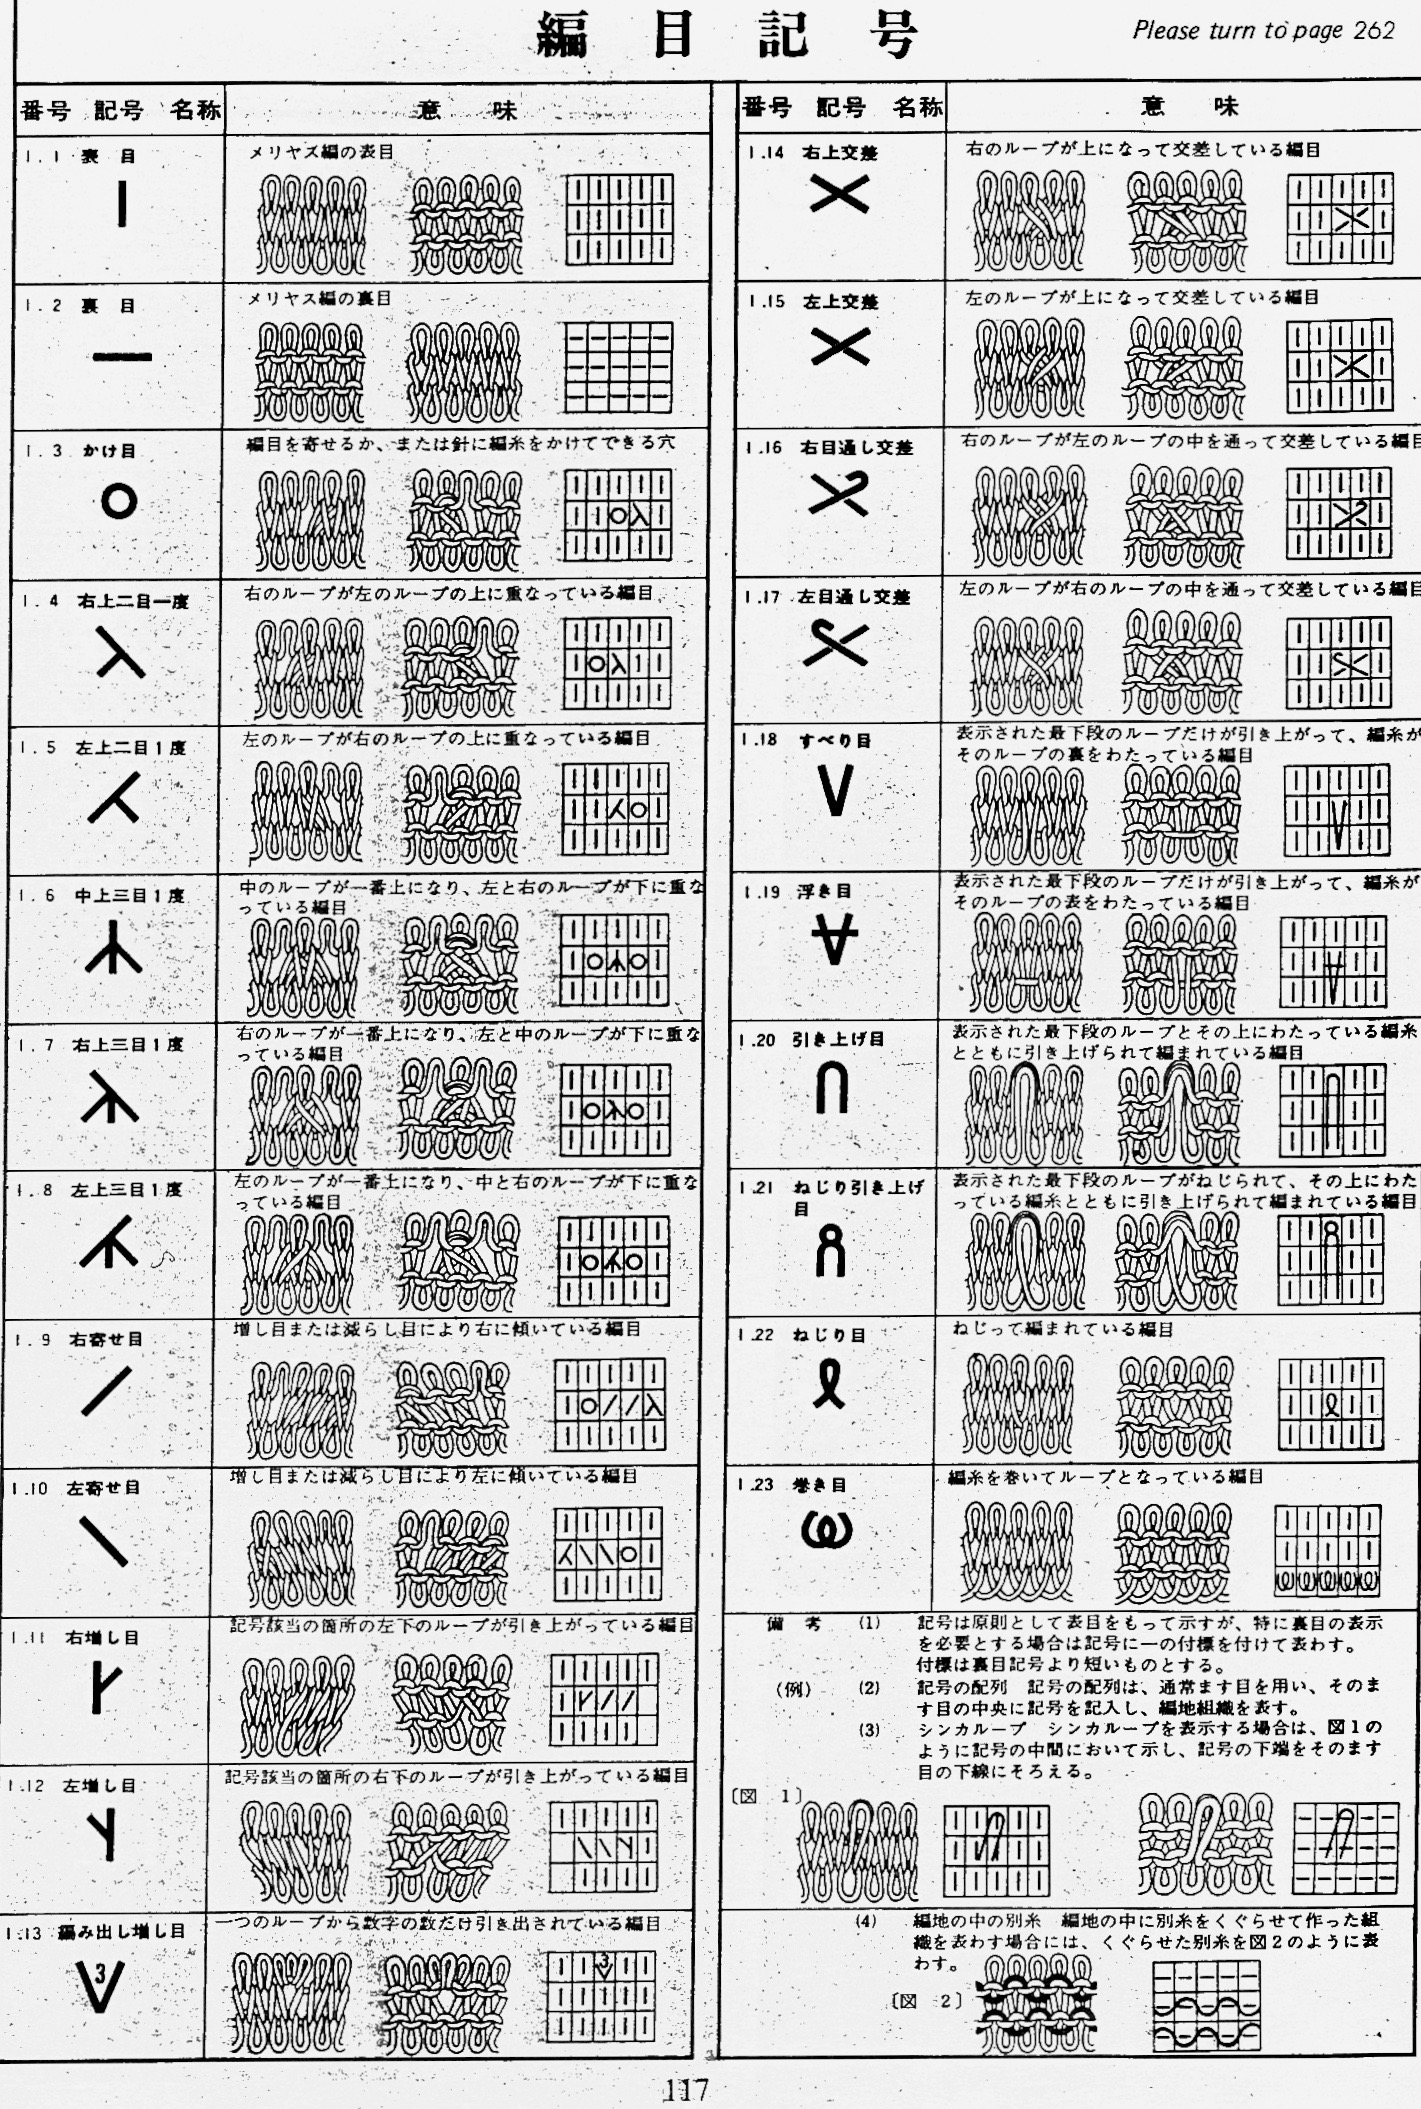 Below each punchcard, the repeat is identified in numbers for stitches and rows. The cards presented are the minimum length required for the card to roll smoothly within the reader when joined for continuous knitting (at least 36 rows). Electronic knitters may isolate the individual, smallest repeat, draw only the squares that appear as white in the cards, enter them via mylar or download, and use color reverse.
Skip is aka slip or part. These cards would work for tuck stitch as well, may even tolerate elongation, depending on yarn thickness.
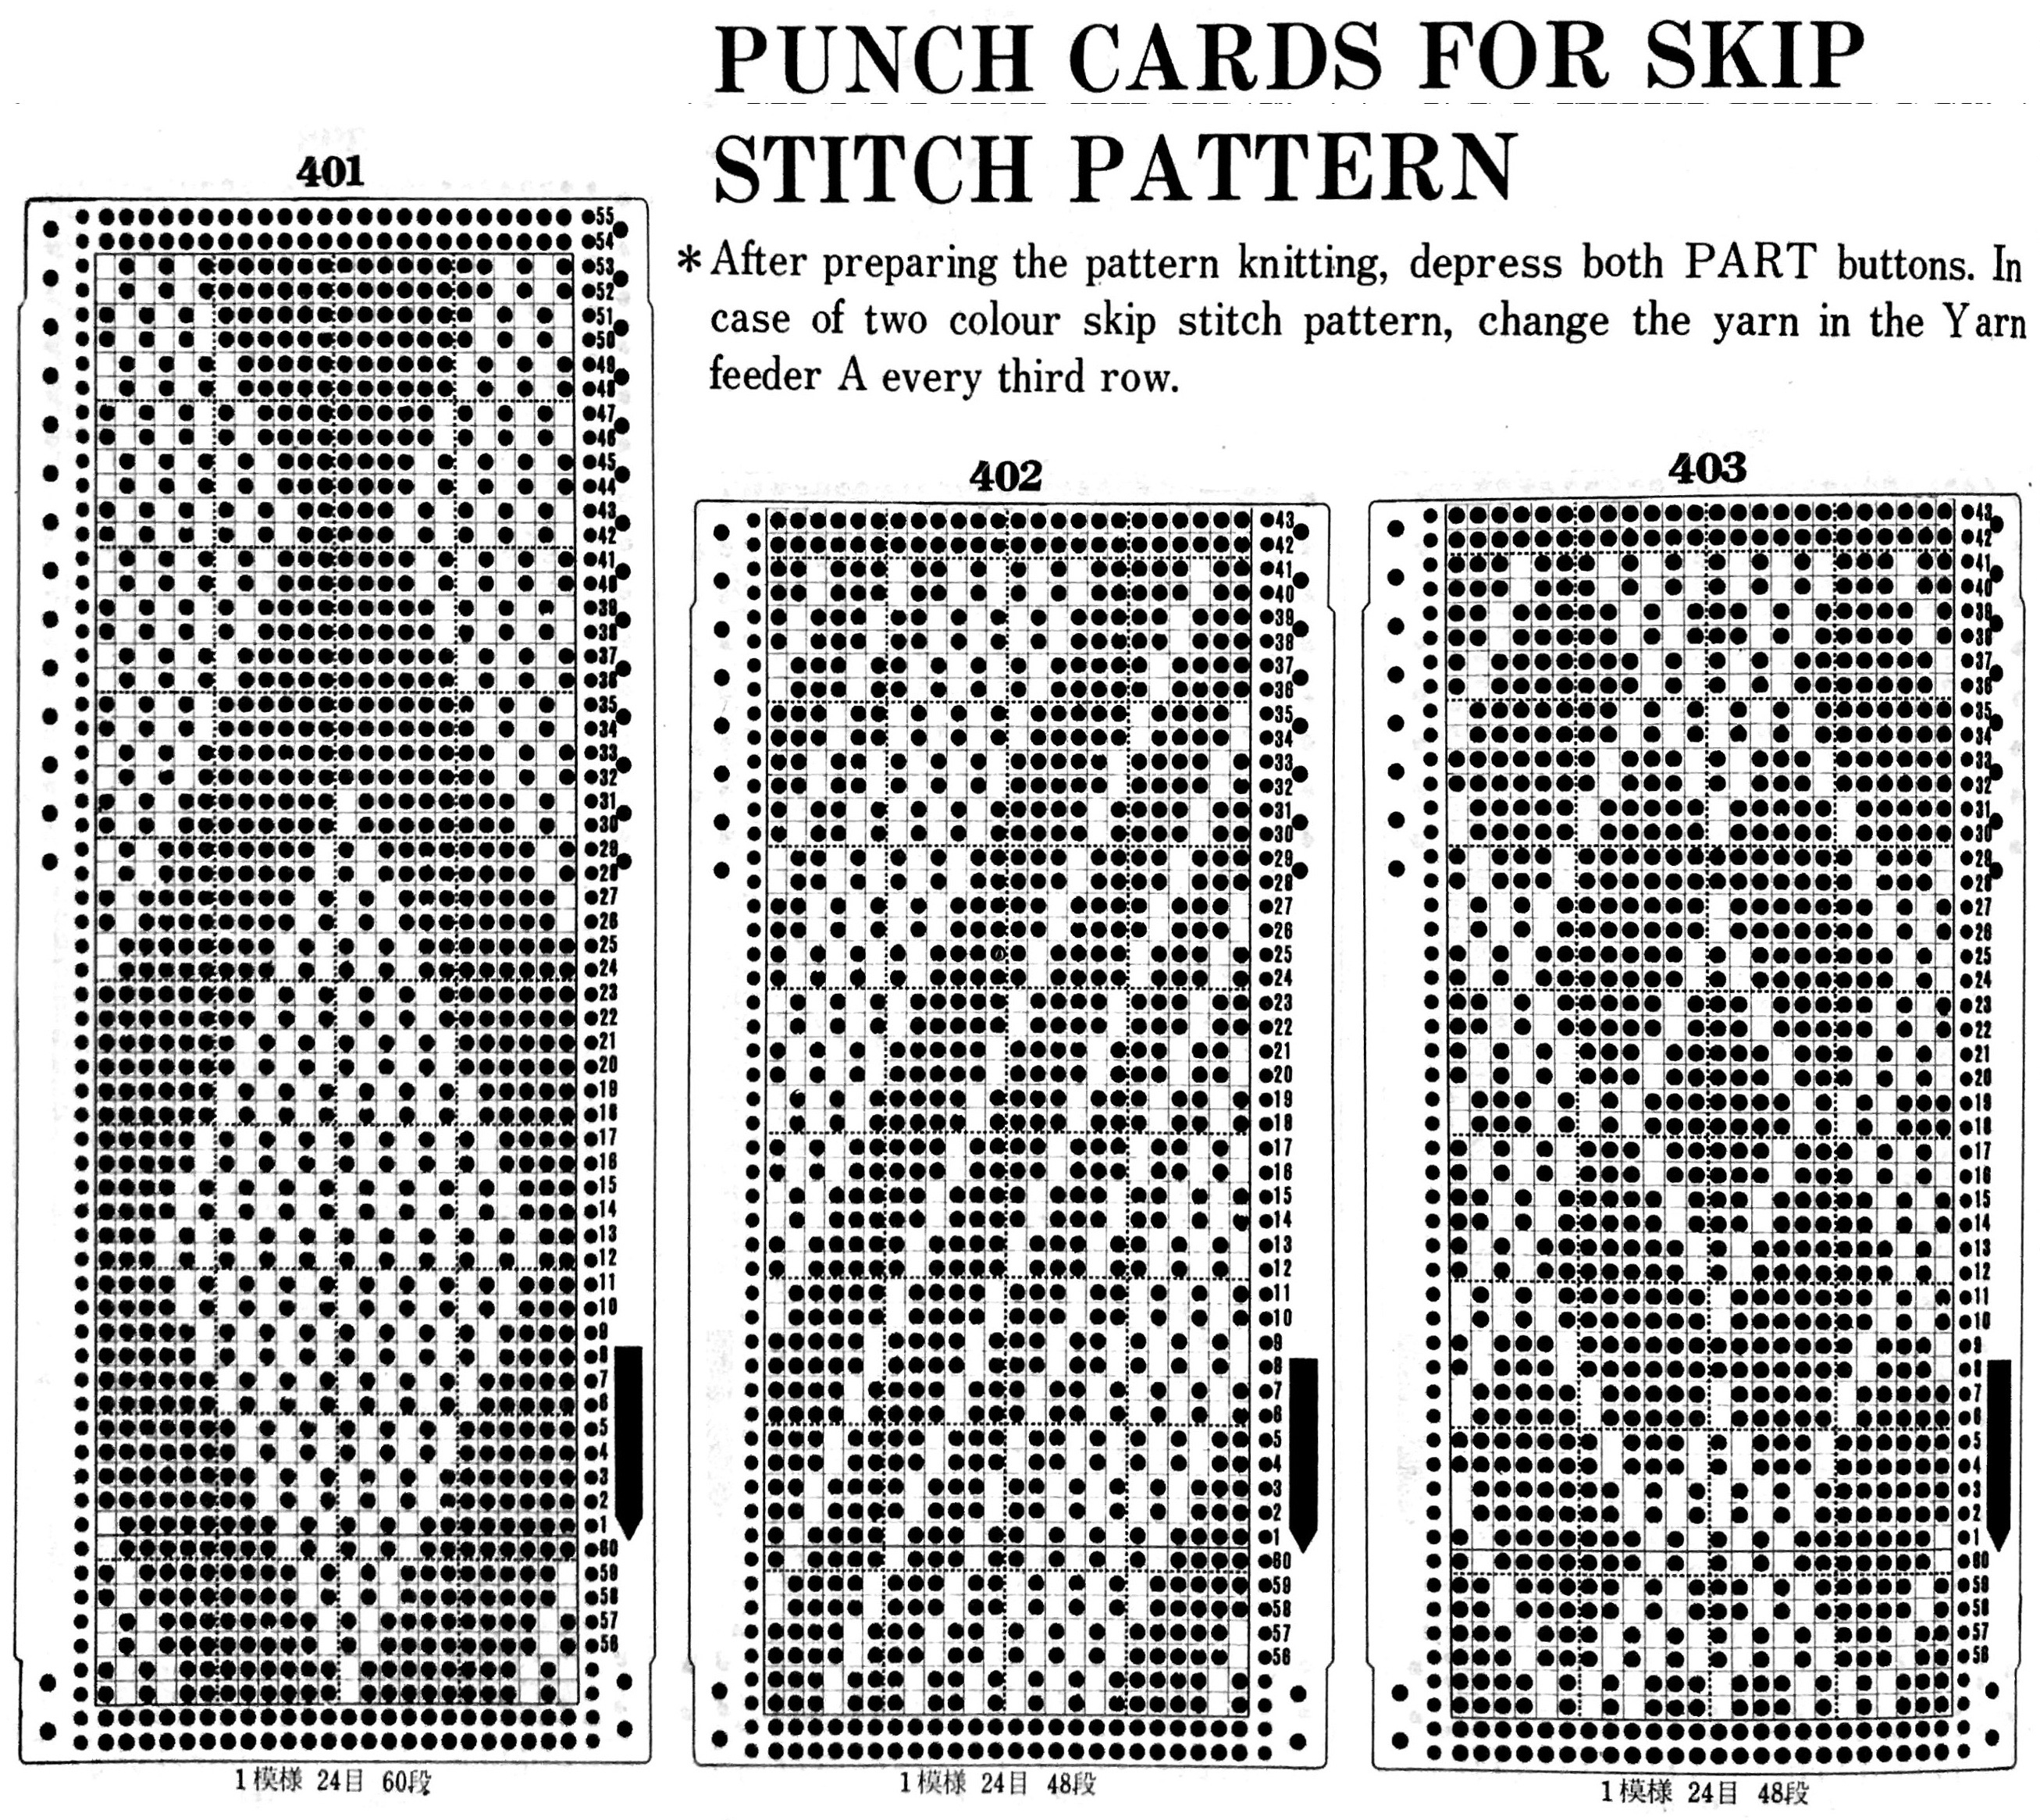
Opposite cam buttons are in use, the fabric changes appearance depending on which of the 2 stitch types is forward, so if instructions with cards are to be followed, then the starting side for the attern in this instance should be COR. Both tuck buttons (or slip) may be used as well, for a different fabric. If the tuck or slip texture is created over an even number of rows (2, 4), changing colors for each paired row sequence can create some interesting color patterns with very short floats akin to planned mosaics and mazes. 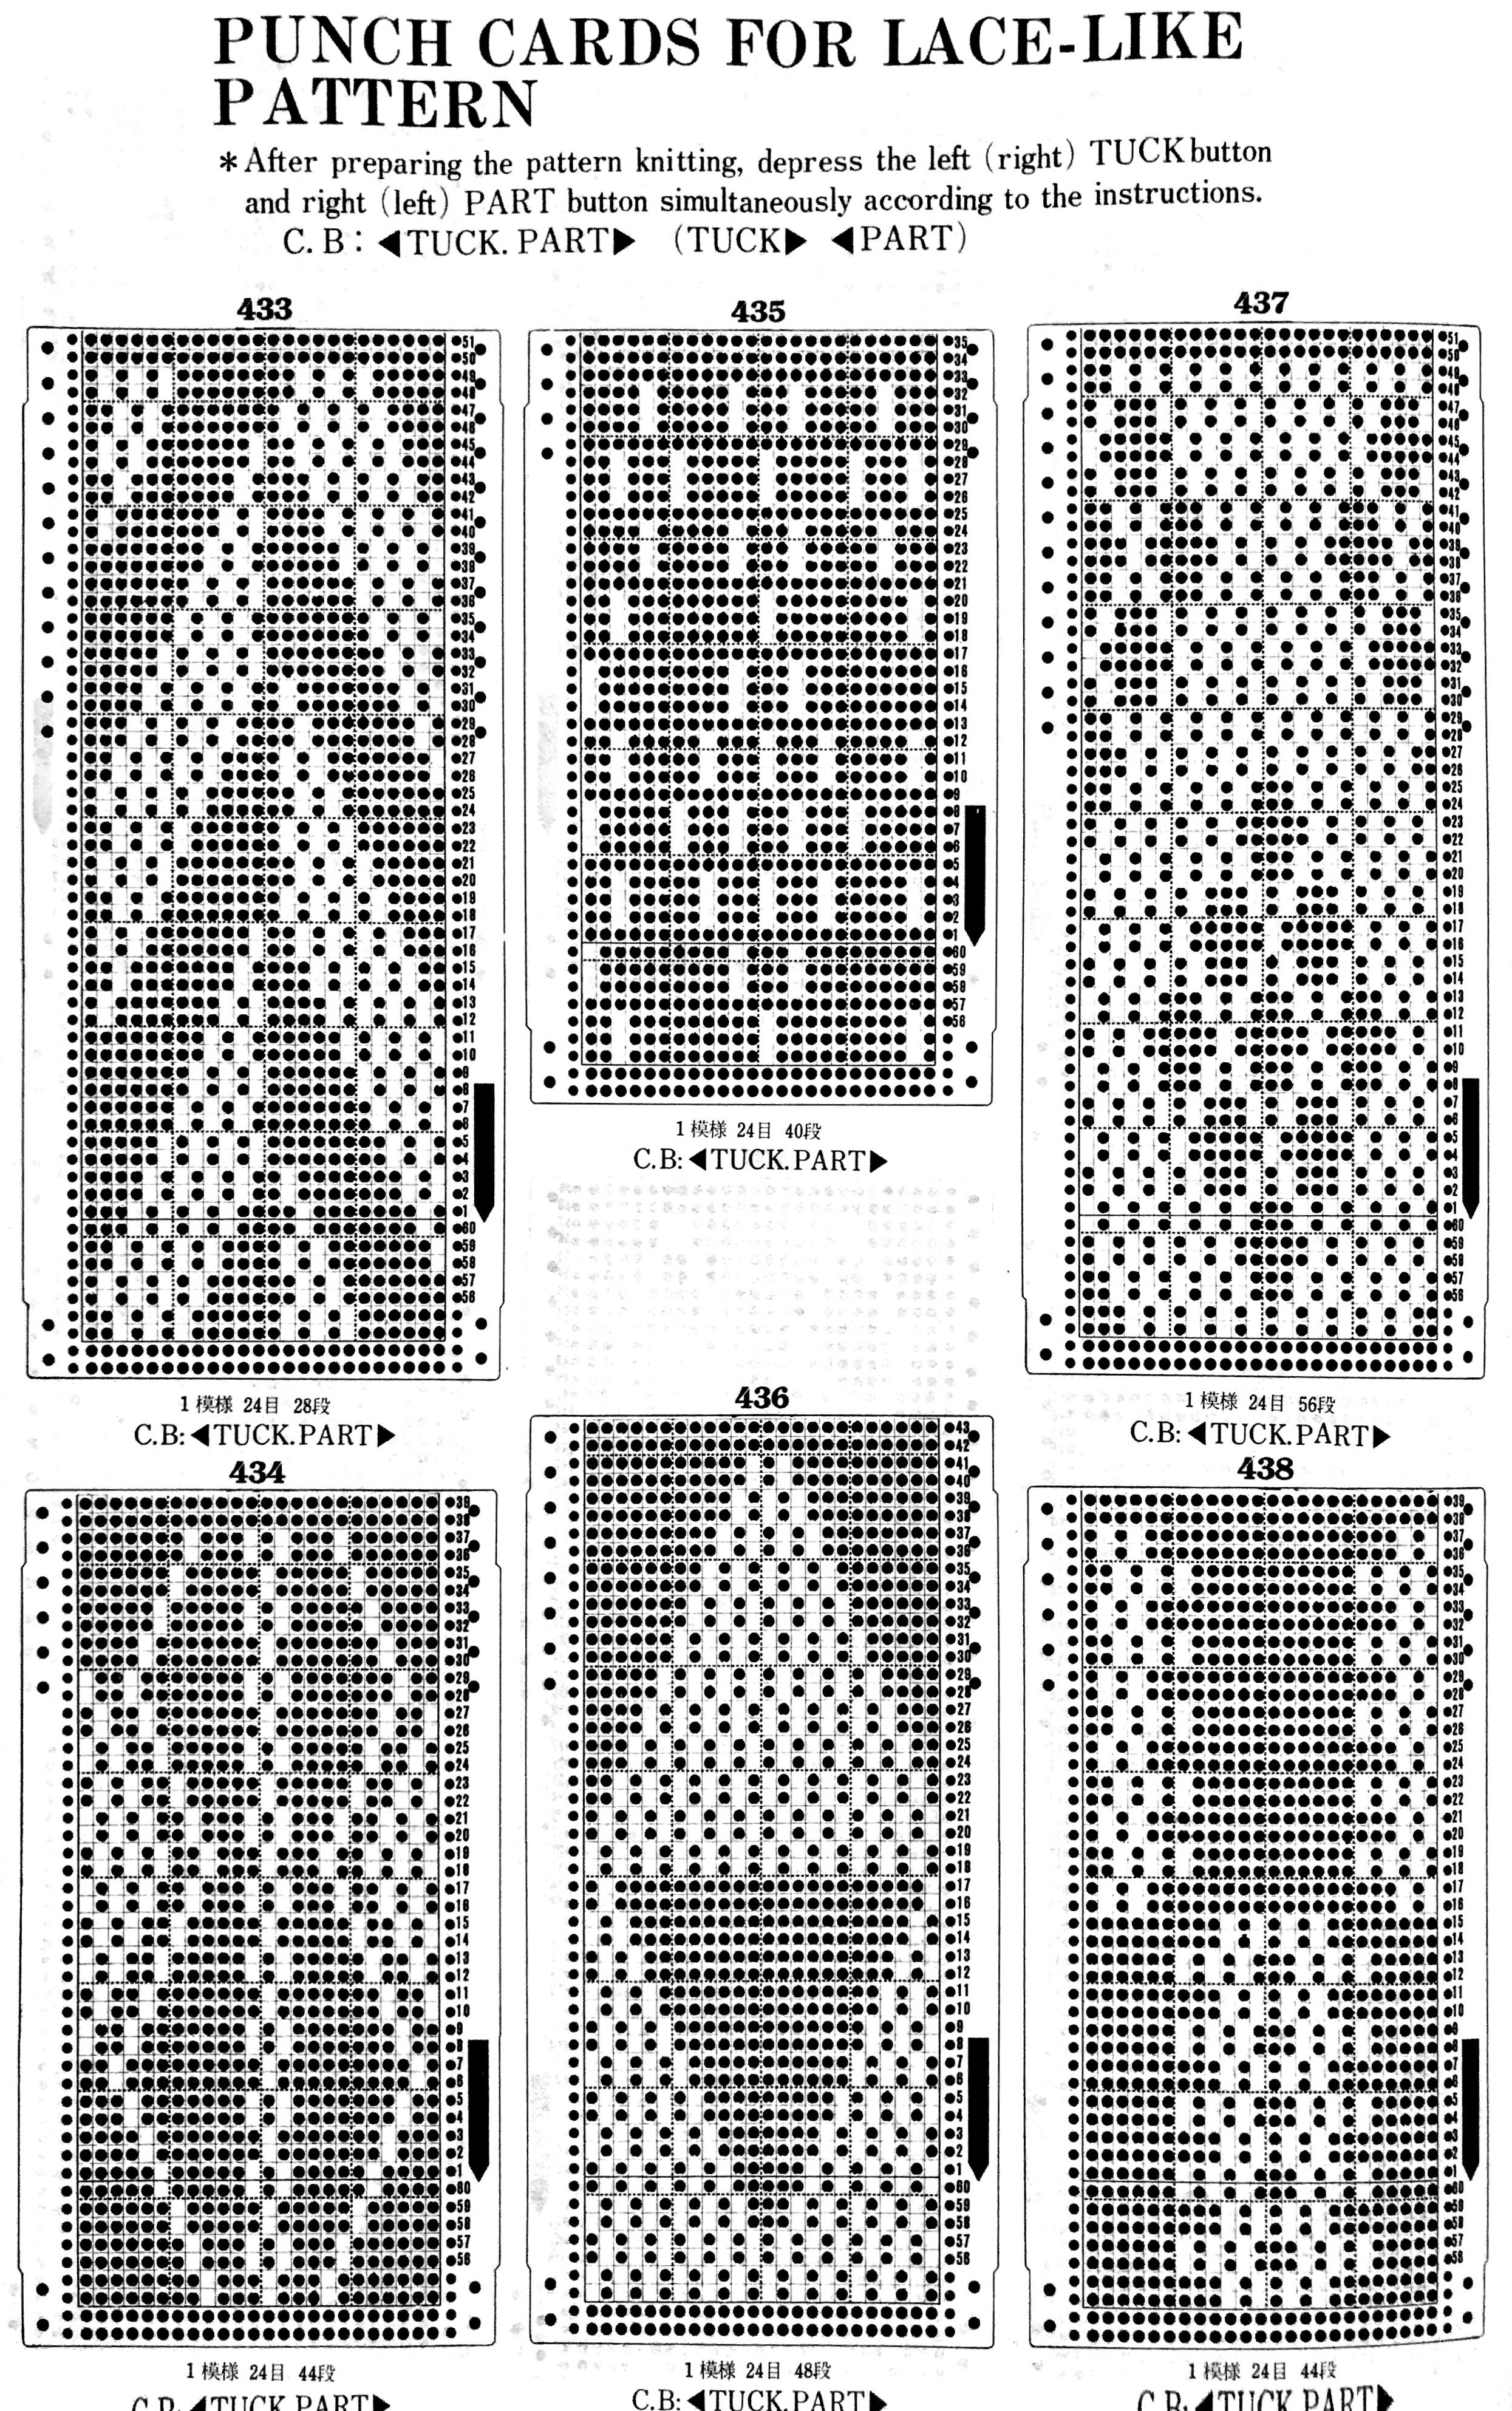
The fair isle patterns below are actually poor choices in terms of float control, pushing its limits. It is usually recommended that floats be no wider than 5 stitches, and even then, they may have to be controlled to make the finished garment easier to wear. 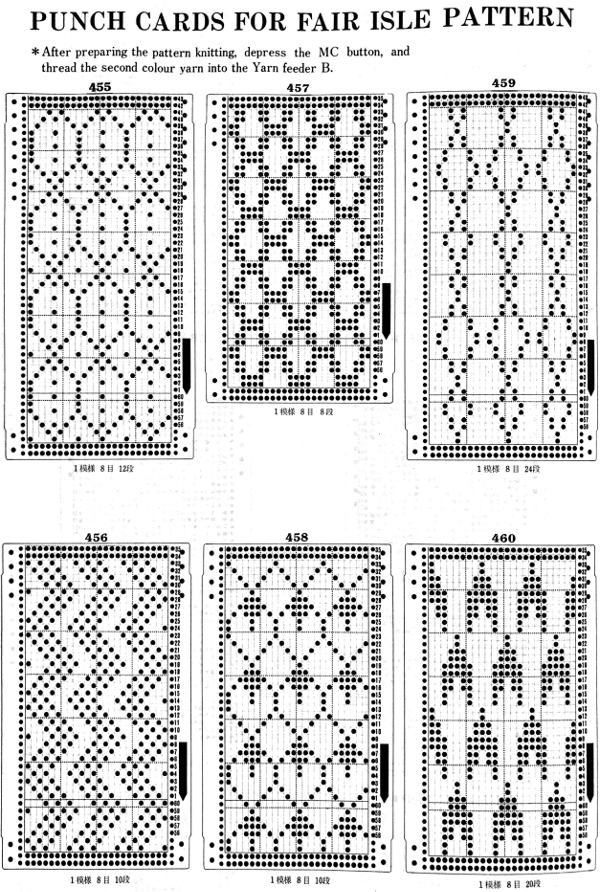
Brother only produces a transfer lace (as opposed to studio simple lace, where the carriage transfers and knits with each pass of the carriage). The lace carriage is the one advancing the punch card. The knit carriage does not select needles, but rather, knits 2 (or more) plain knit rows
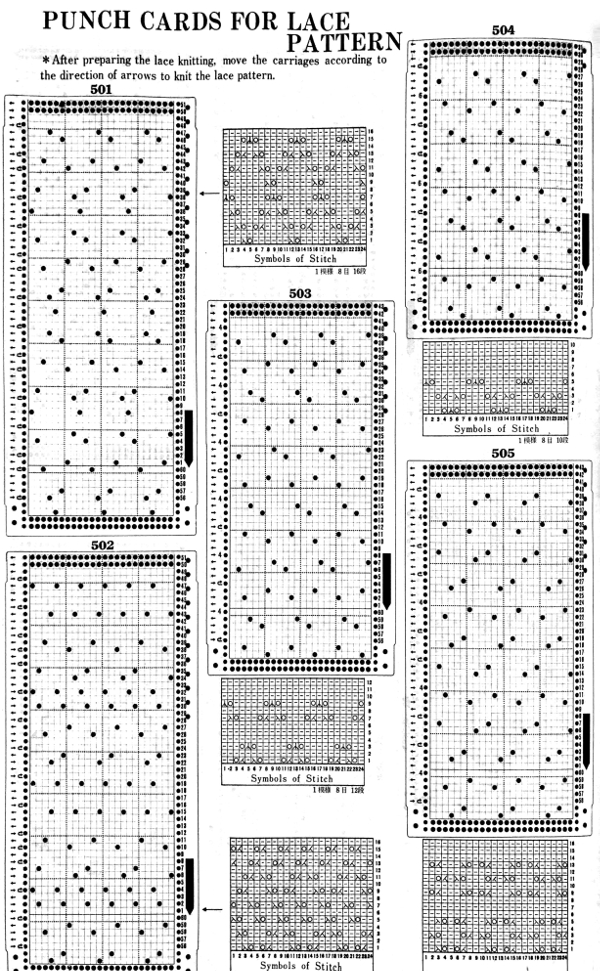
Lace card markings, including those for fine lace: in the latter, stitches are transferred and shared between pairs of needles, best knit in a light color, with smooth yarn so the surface texture becomes more noticeable.
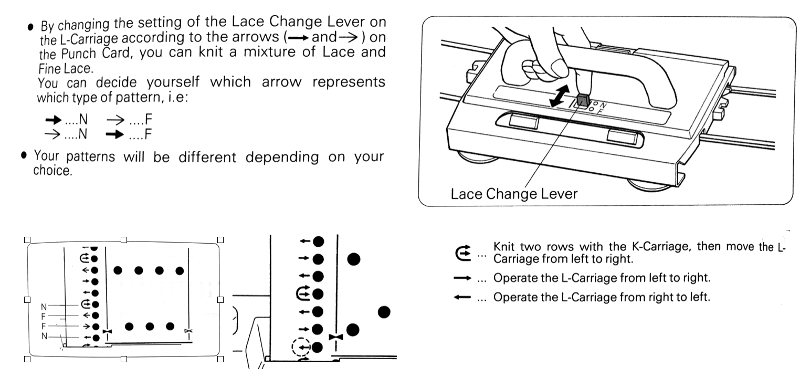
Lace point cams may be used on the punchcard machine to create vertical bands of lace. This is also achievable on the electronic by programming for knit stitches between vertical (or horizontal bands).
Tuck (left) and weaving (right) may be combined with lace. In these fabrics both carriages are selecting needles, so extension rails must be used. The two-column on the left of the cards indicate movements for the lace carriage on left and the knit carriage on right. Straight arrows indicate single carriage passes, curved ones 2.
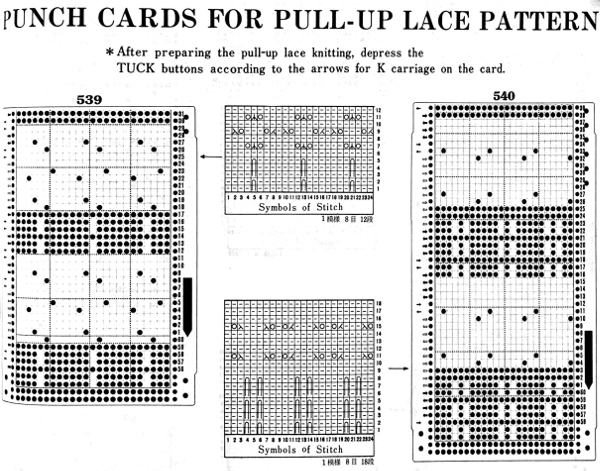
Yet another fabric using 2 carriages selecting needles for patterning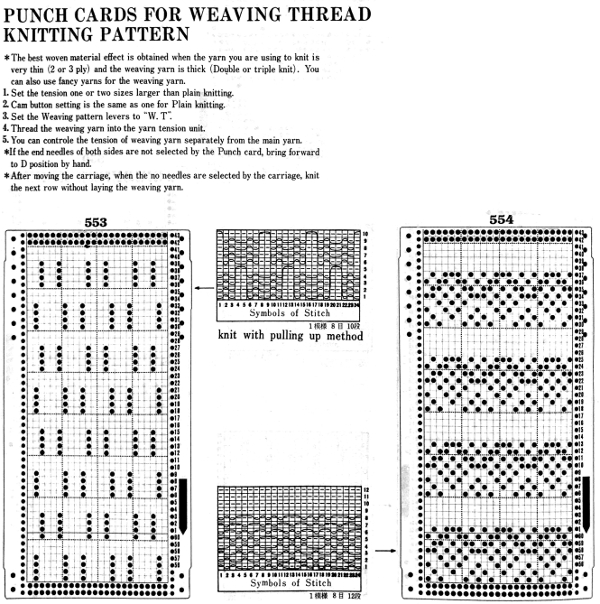


Here the “openness” is created by having the appropriate needles out of work, creating ladders in those spaces. Some interesting results can be obtained by transferring the recommended out of work needles’ stitches to the ribber. “air knitting” can help with verifying proper needle placement is in use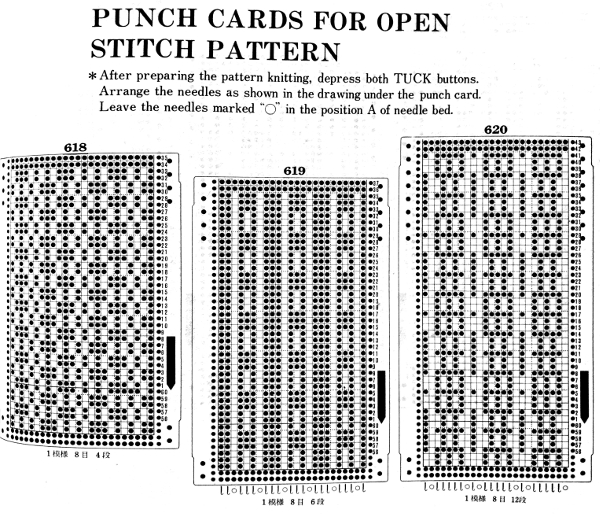
to match the location of the out of work needles to markings for punchcards, which are often given with lines delineating 0 needle position, the image will need to be mirrored horizontally
THREAD OR PUNCH LACE is possible only on machine models that have 2 buttons in mc position  The thicker yarn knits along with the thinner one where there are unpunched areas or white squares, the thinner yarn knits alone where the punched holes or black squares occur, with the thicker yarn floating behind it
 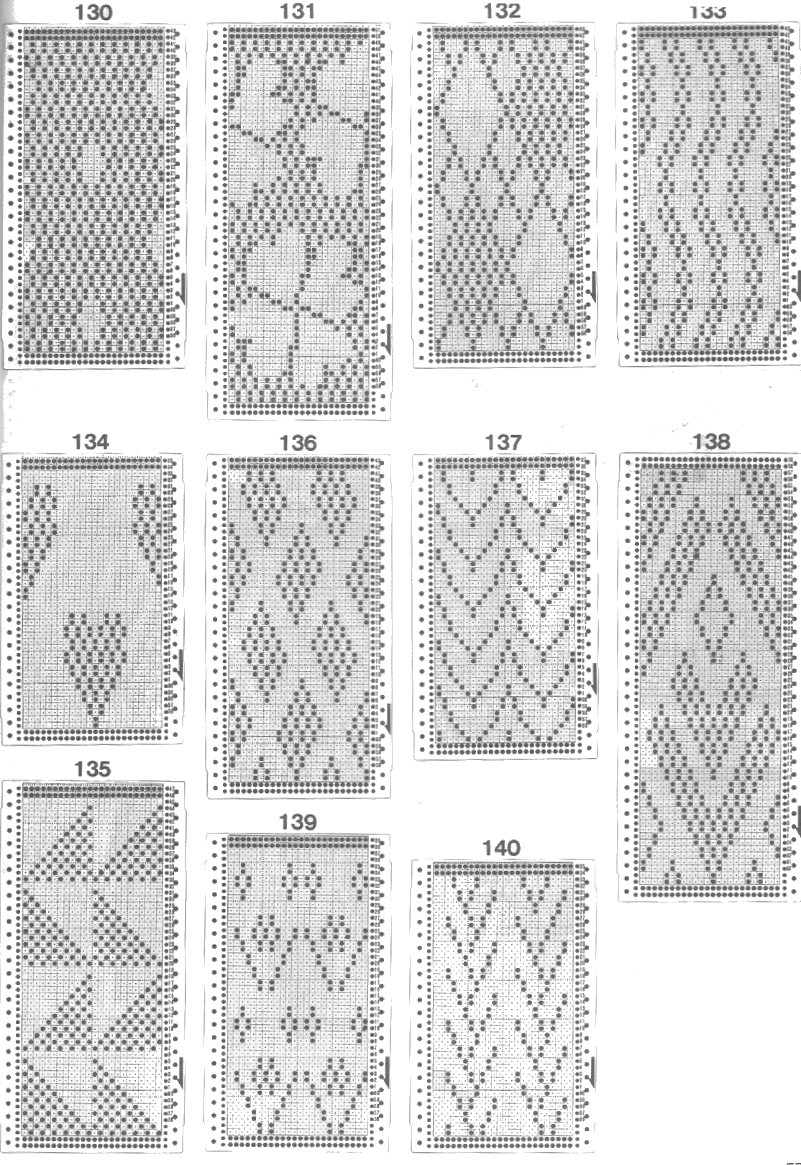 more information on this fabric
Suitable for tuck and possibly tolerant of elongation as well: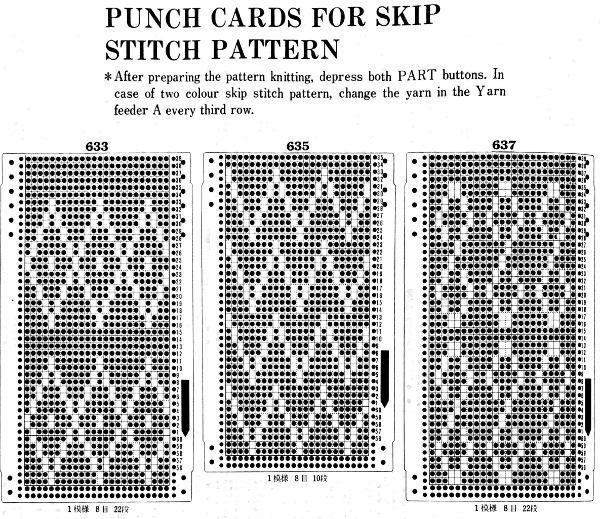
Punchcard machines mirror motifs when knit. This may not be noticed when copying small repeats, but it becomes more evident in larger ones. For knitting on the 910, the supplied motif would need to be mirrored when programmed to retain the intended direction. With other machine models, one needs to know whether the “image” on the card will appear on the purl side, matching punchcard pattern and needle selection, or the knit side, thus reversing it.
Here are 2 FI samples: the one on the left is fairly evenly distributed, so little if any difference is noticed, the one on the right sends the biker to a different forest
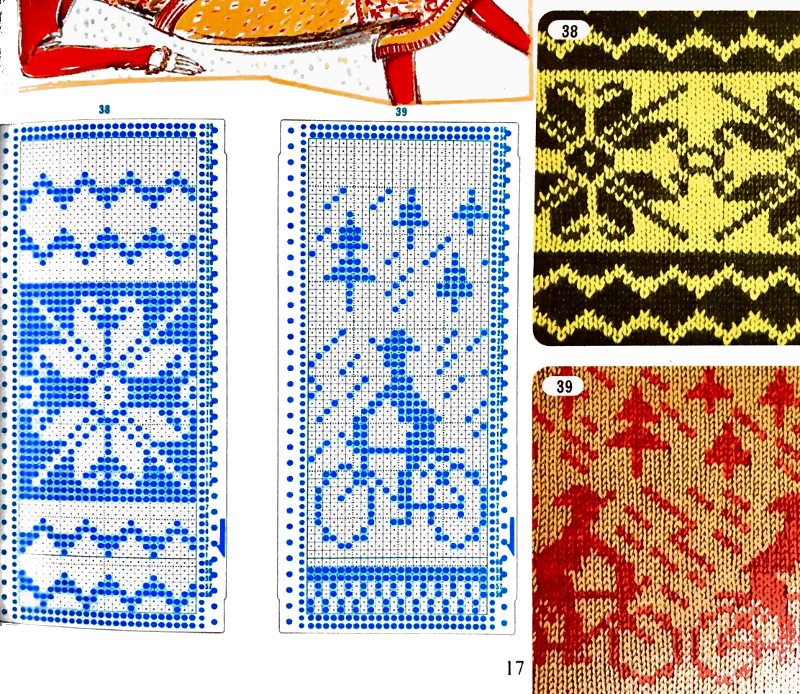 reversal of lettering
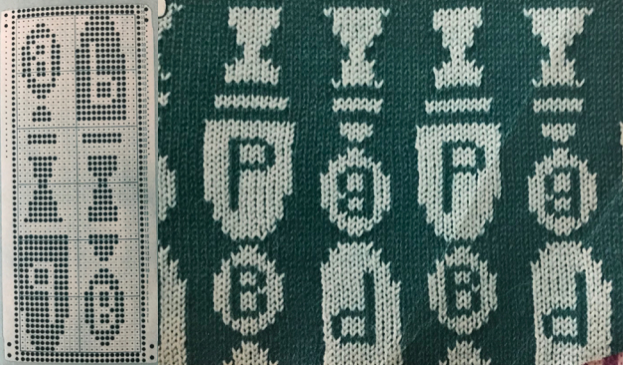
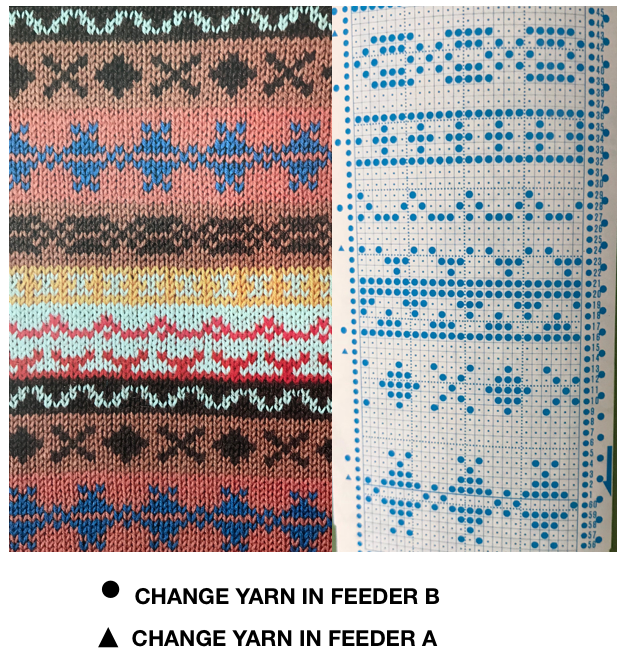
 When you think that that is all sorted out in your head, there are these in slip stitch, the direction of stitches matches, because the purl side is used, images are reversed on the knit side.
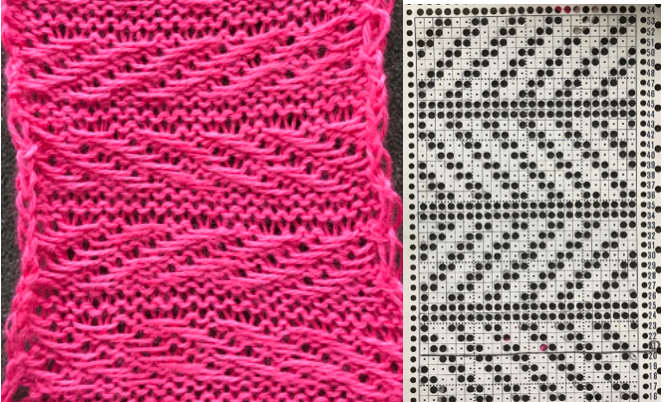
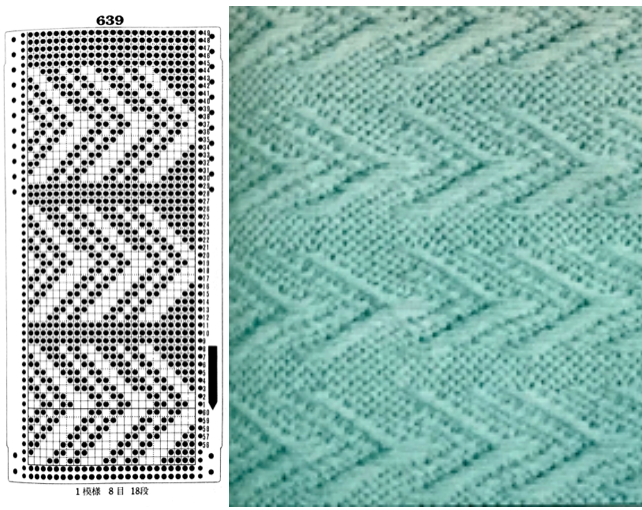
the mirrored punchcards 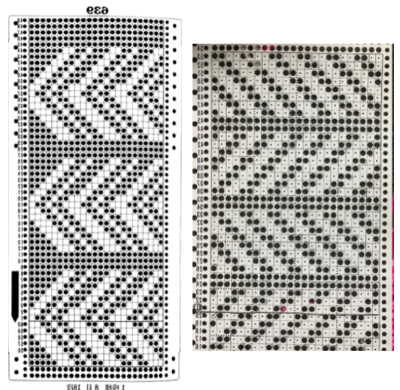 the punchcard change knob has selections for single motif and pattern knitting (KC)
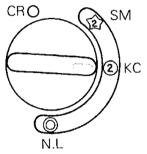
the 910 has settings KC I and II, KC II cancels end needle selection, while in punchcard machines this has to be done manually if the pattern stitch requires it. One such example is when any patterns are made with needles out of work. End needle selection would make the needles on each side of the empty space select forward and create a knit stitch. In tuck or slip, that would be an out-of-pattern knit stitch, in FI, a vertical line of the color in the B feeder would appear along on each side of the OOW needles.
Ribber settings and symbols for Brother machines


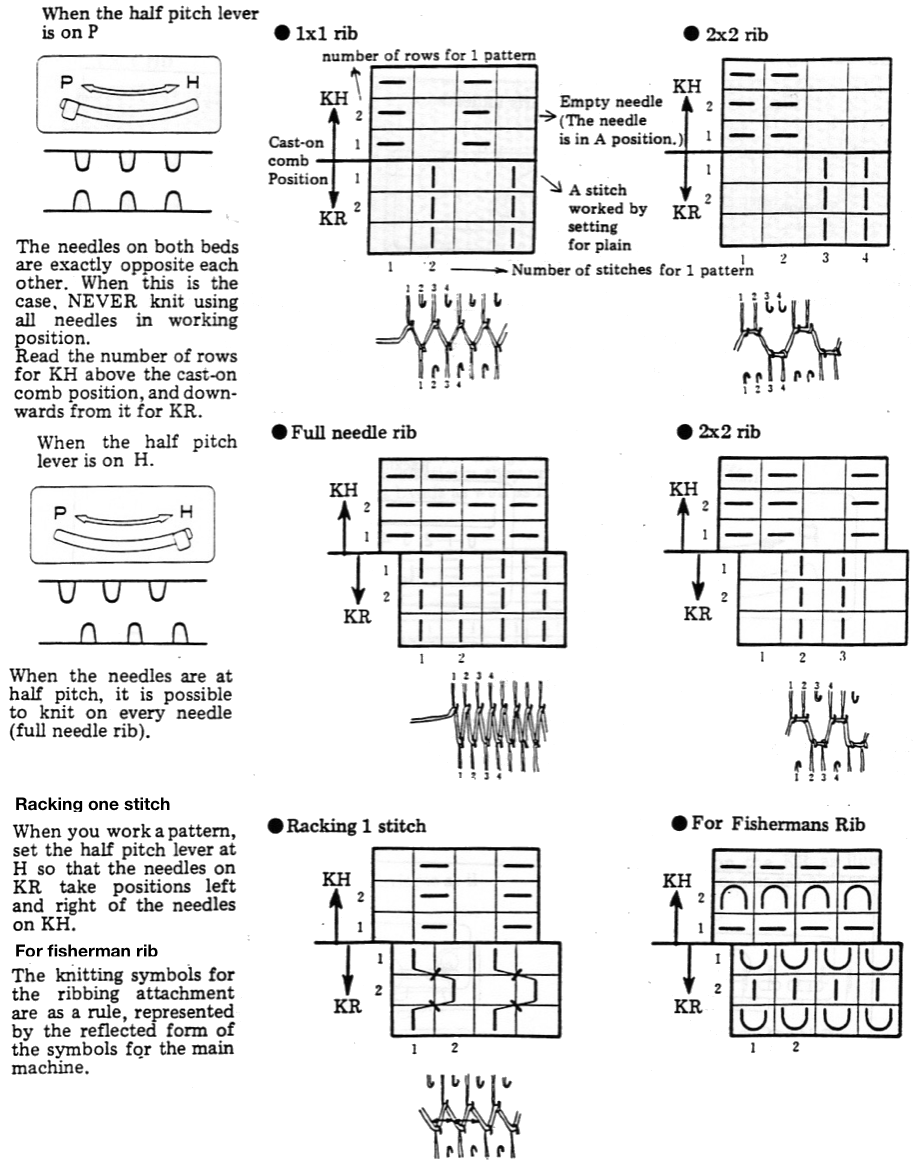
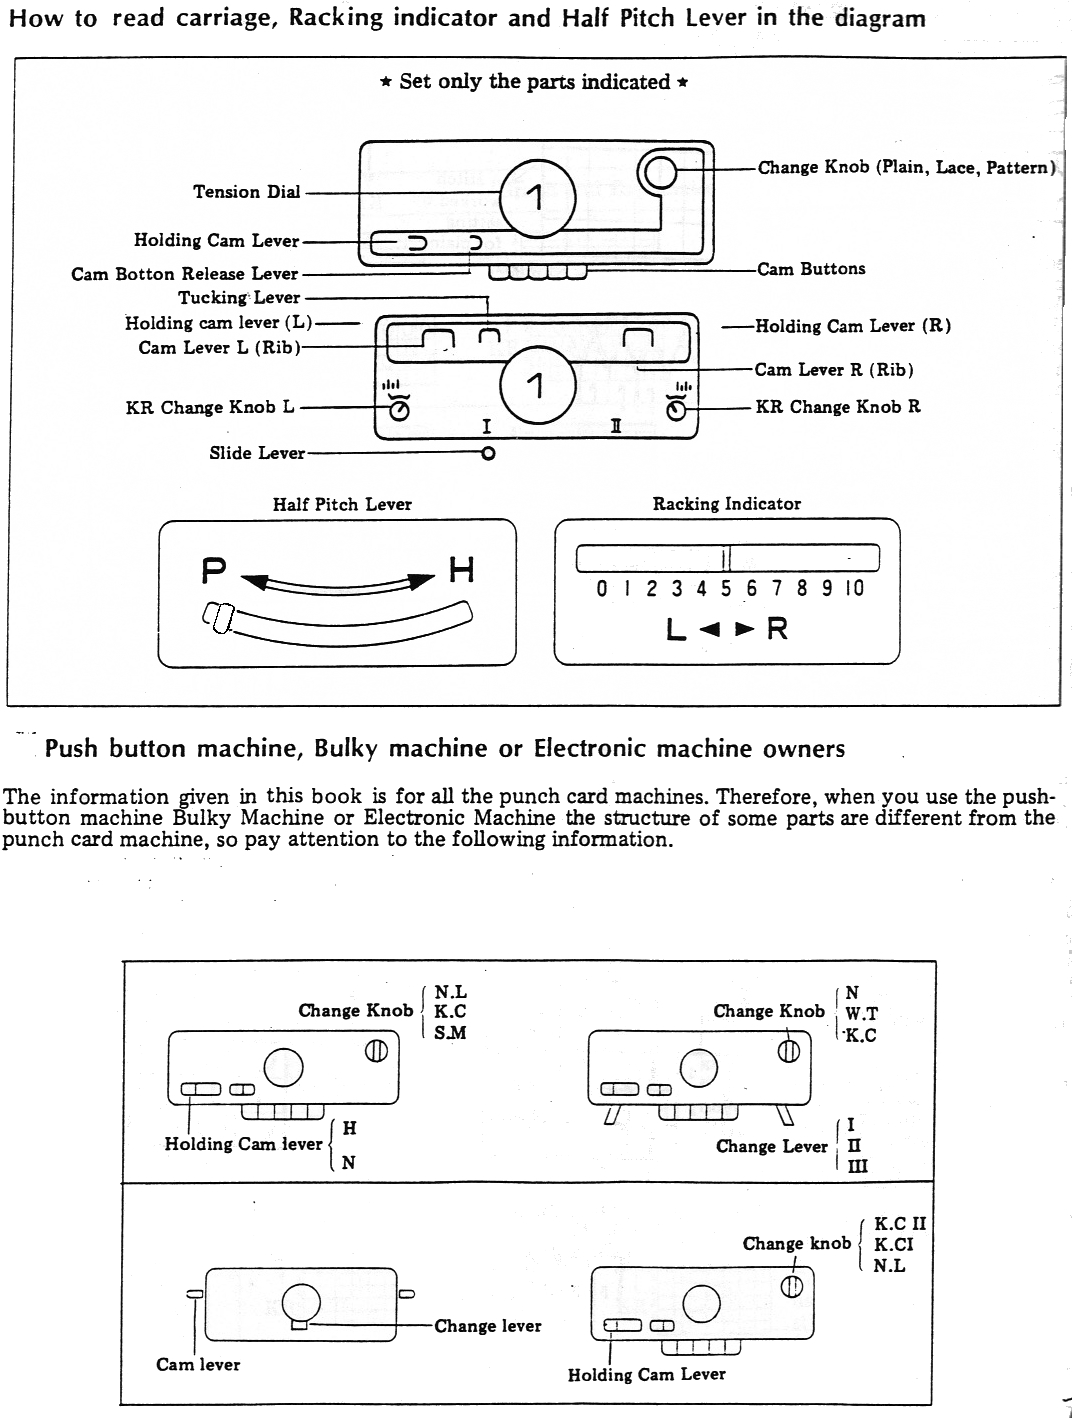
Cables in color
Fair isle, like any slip stitch fabric, is “shorter and skinnier” than any produced using the same yarn colors in plain knitting, single bed. Cables also narrow the fabric considerably. Begin with tension set at least 1-2 numbers looser than usual, and make tension swatches large enough to include all cable variations. After the cable crossings, be sure to return the needles to correct pattern selection before knitting the next row. Do not pull the whole group out to holding (E), as the whole group will then knit the color in the B feeder, and you will have a striped “mistake” on the next row knit. Leaving any needles OOW in the knit will select the needle on each side of the ladder to come forward, knitting the color in the B feeder. This may not work for you in terms of how the motif is affected by the vertical line created. If ladders are required, the vertical line in the B color may be eliminated by canceling end needle selection (KC II), or by dropping those stitches before you cable (which will give you a bit extra yarn for those crossed stitches). Ladders may be also latched up if you like, but watch where those floats are going in the fabric.
Making your own cards: try to control the length of the floats. Pre-punched cards with lots of punched holes can produce areas to be cabled by selectively masking areas with tape (both sides of cards). Conversely, you may punch diamonds, squares, etc. in the center of other shapes that would normally have floats too long for FI, to produce a B feeder color area for cabling.
Like color, most often, needs to land on like color, so stitches need to move further than they would in a one-color knit. Reversible ribbed cables share the principle of like needing to land on like (knit on knit, purl on purl). Starting out with a single row punched card, mylar, or program repeat, with the card locked, provides a quick test for tension, keeping track of patterns, etc. There are many, so at least initially, cabling on a constant number of rows apart may help avoid errors.
beginning to visualize the crosses

another of my “quick reference – some to try” handouts
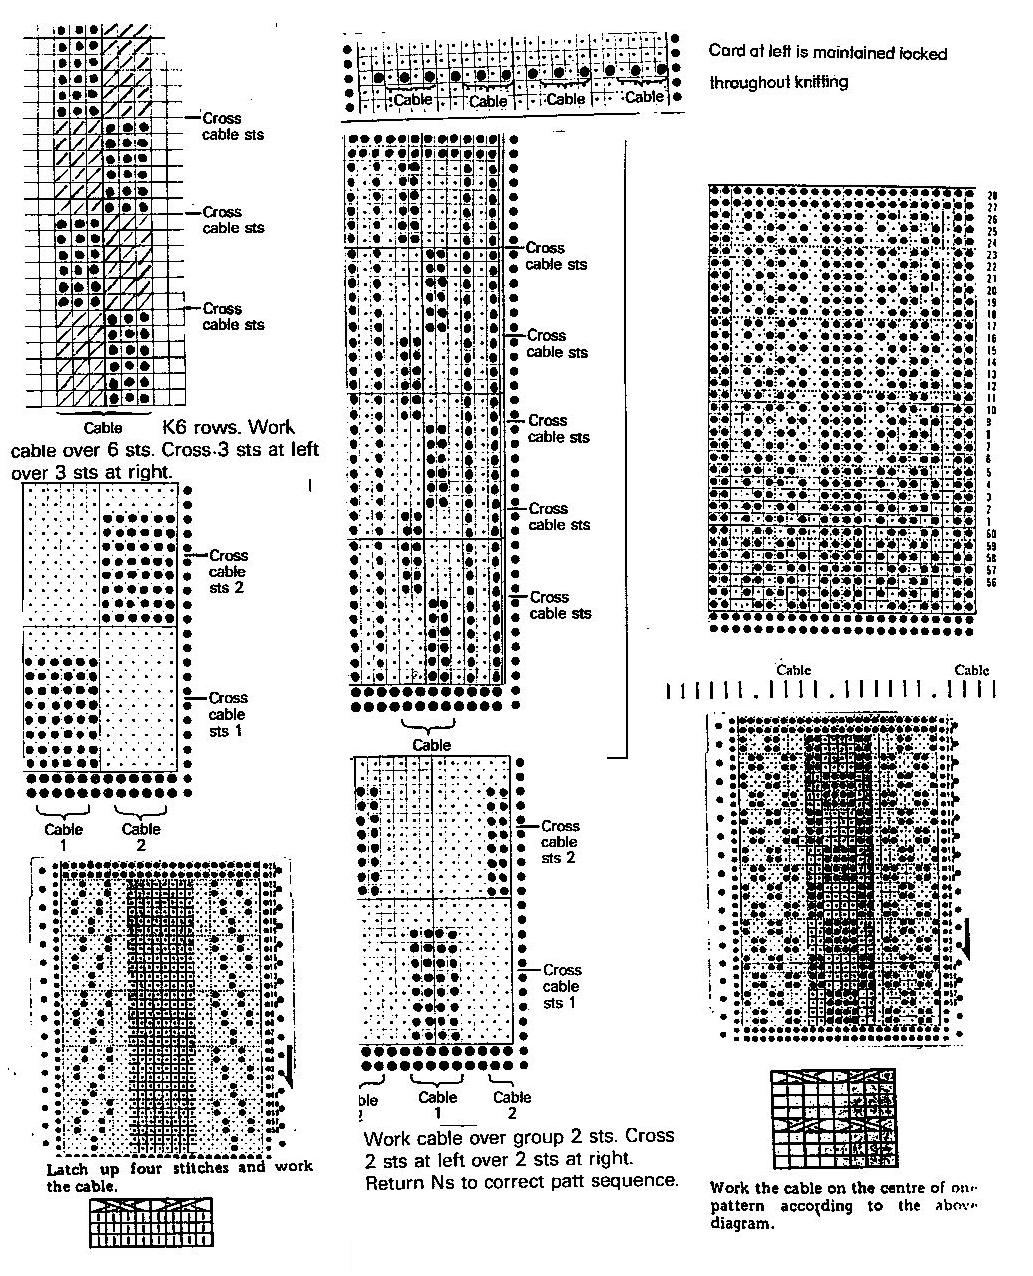
Ruching 2: more working with stitch groups
Reviewed and in the process of being edited with added charts and photos 12/2022. My working and presentation methods have evolved, resulting from evolving working methods and skill in using the new generations of available hardware and software including new generation iPhones with their built-in cameras. This post will continue as a hybrid of sorts.
The previous share on this topic: Ruching 1, a fern pretender,  and more.
An illustration of what part of the stitches to pick up  Going straight up: in the 2014 chart color blocks illustrate needle groups that get picked up and transferred onto the same color row on the machine, with no specific references to needle tape or any other markings.
 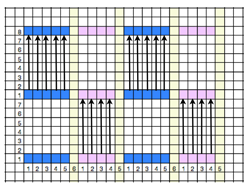 When repeating the operation in the same needle locations, having NOOW (needles out of work), thus creating ladders, makes it easier to keep track of groups in configurations.
The yellow lines represent needles taken completely OOW at the start of knitting.
Any of these fabrics may be executed in a single color or varied color sequences. Sometimes changing the color in swatches and using sharply contrasting ones helps one understand the structure of the resulting fabric a bit more easily.
The number of rows knit between picking up stitches can be varied to suit, and not all horizontal stripes need to match in height.
Stripes in plain knit rows in the same color or an alternate one can add interest and decrease the total number of carriage passes in the overall piece.
In a different approach at the same visualization, all blank vertical rows represent locations where needles are in the A position, out of work, and remaining that way throughout.
To maintain equal edges in the piece, this setup is on a multiple of 6+5 needles: 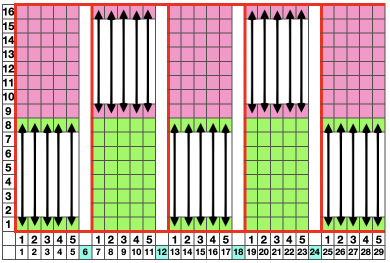 The block layout can be varied,
  along with adding all knit stripes in any chosen color.
 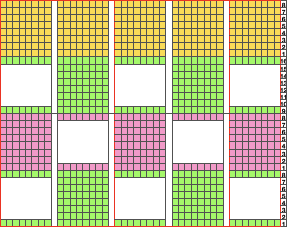 Variations in picking up sequences may be seen here creating different secondary patterns.
  The red dots in the first photo indicate a row of additional ruching in the center of solid striping.
Cast on a multiple of 12+4 stitches: 

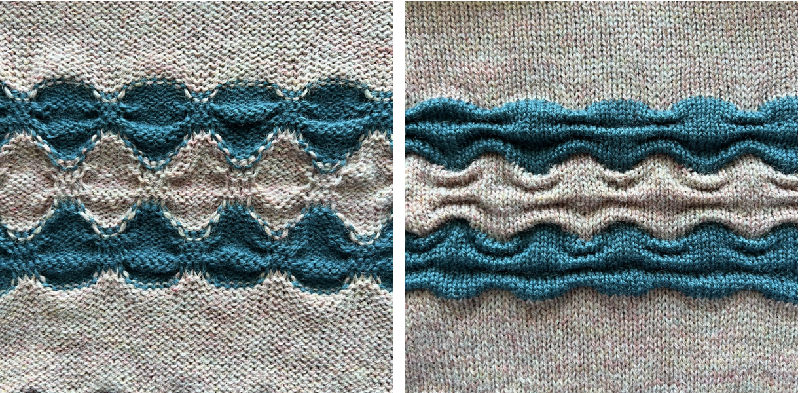 In response to the comment on this post, here is a proposed variant of the technique to try on a 40-stitch (36+4) sample.
Visualizing the brick layout single stripe segments: 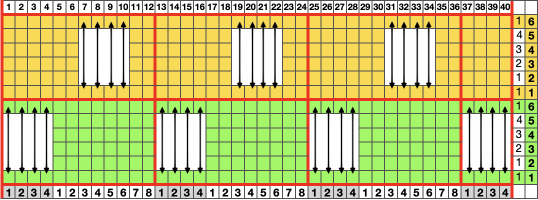 Maintaining the brick layout, each segment may be repeated the desired number of times, creating stripes in extended textures.
 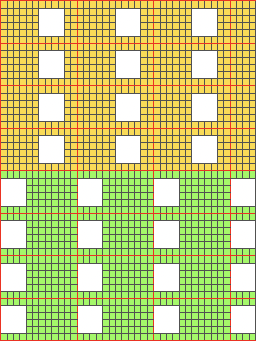 Varying spacings and rows, the setup is on a multiple of 9+8 needles.
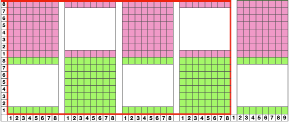
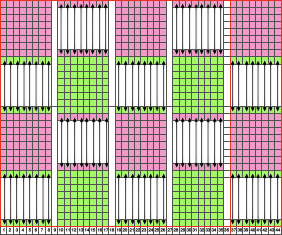
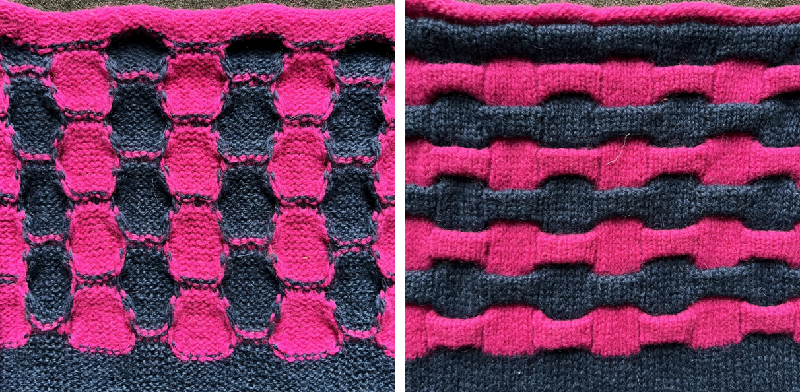 Far less dense, a proposed spacing, the bubbles will be more prominent if 2 stitches rather than one are hooked up,
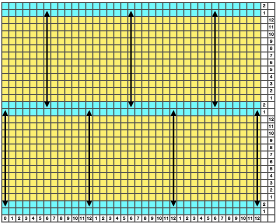
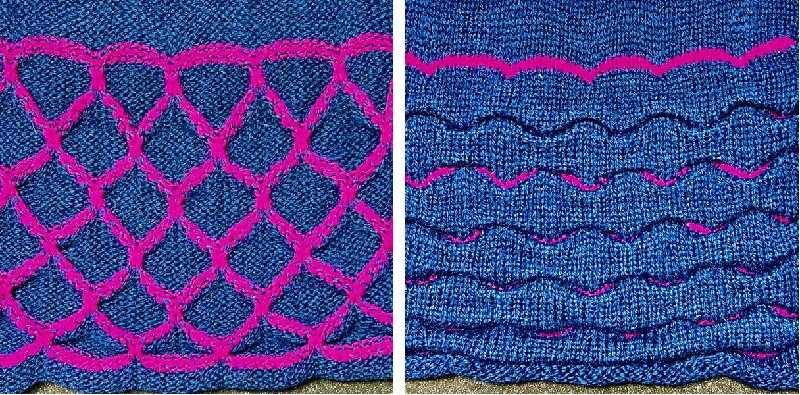 with the concept used to form intermittent design bands,
 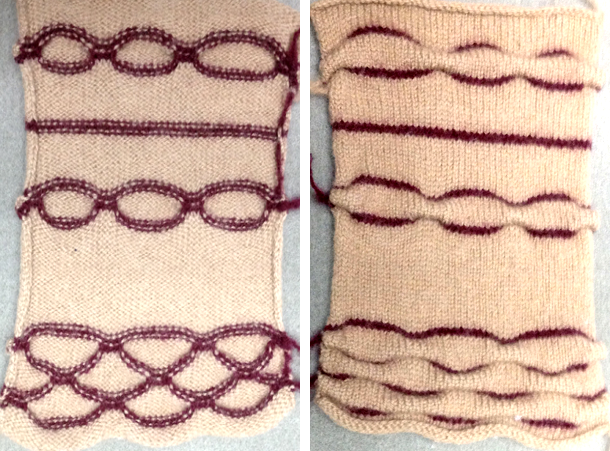 ruching partway, gathering one side, using thick and thin yarns
 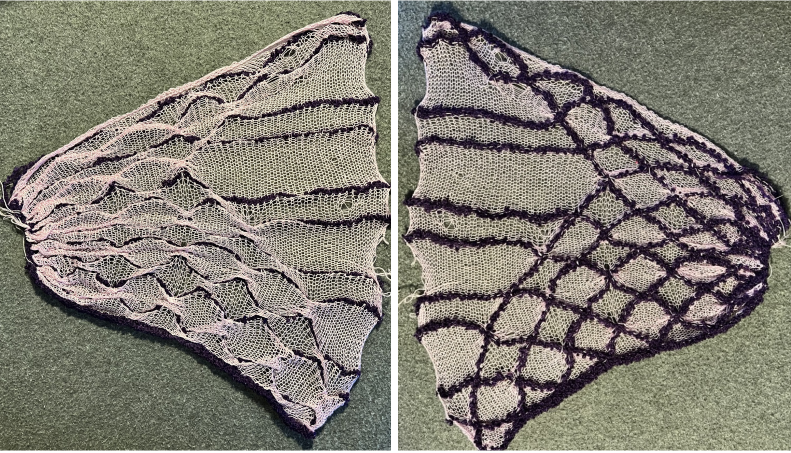 working in narrow stripes and very small repeats.
 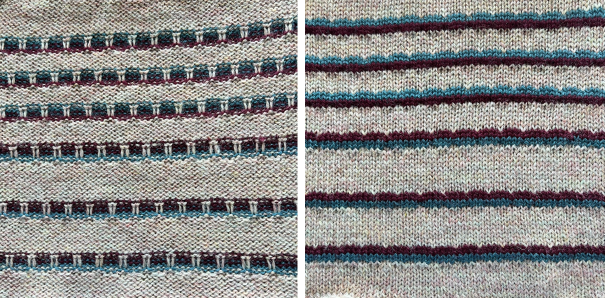 Returning to the diagonals previously depicted this way,
  now with some changes.
 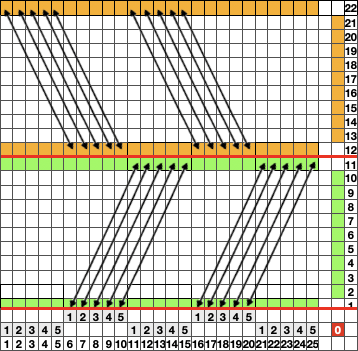 Repeating the pattern on a wider knit, considering shaping for even side edges
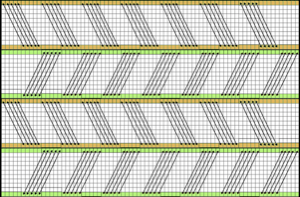
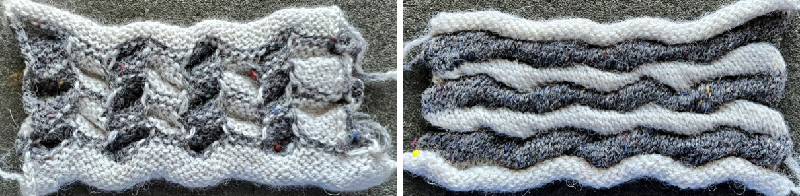 Applying the same technique in bands rather than all over
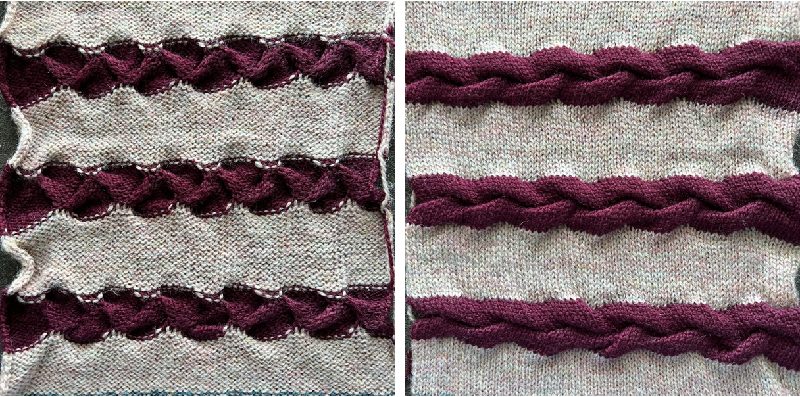 Adding wide ladders: both the number of stitches lifted and hooked up and the number of needles left out of work can be varied to suit, even in the same piece. In this illustration, the colored columns represent knit stitches, the white ones needles left out of work. Repeats are 10 rows in height, with stitches hooked up every 5 rows in alternate columns
 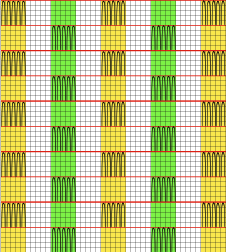 A swatch utilizing the concept:
 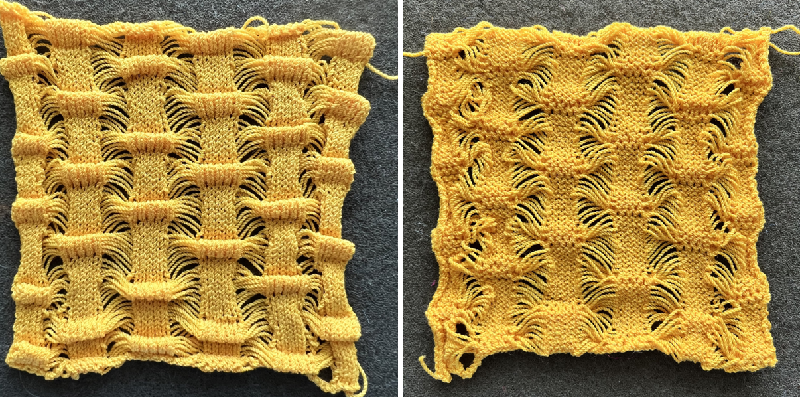 Ruched Fair Isle: when using Brother machines, to keep the pattern uninterrupted, prior to knitting the row with the completed hooked-up selections, the correct needle preselection for each pattern group needs to be hand selected.
 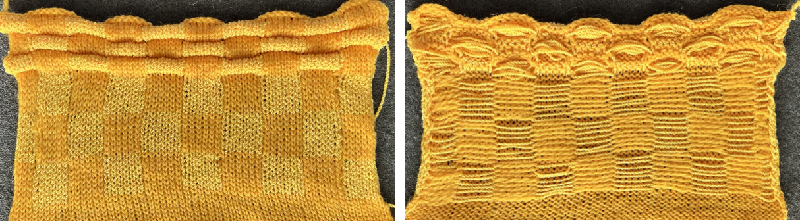 Some tips on ruched FI knitting: the fabric will shrink considerably in length, so most motifs will need to be elongated to accommodate that.
Having a pattern that may be tracked easily by watching the floats on its reverse is helpful as may working in bands where the colors swap spaces (changing yarn feeder positions).
In very textured knits, 2 all knit rows could be added at the point of ruching, pushing end needles in if selected by the machine so as not to form floats from one side to the other. One row could serve as well, but then there are decisions about what to do with added yarn ends. The added rows can be left unpunched, will knit color in A feeder, and may not be visible in the finished knit. As always, test before committing to large pieces.
If small groups of stitches are to be picked up and rehung, markers with segments of nylon thread or yarn may be placed on the corresponding needles and be temporarily knit in. In addition, the needle tape or needle bed may be marked with a water-soluble pen to indicate locations for rehanging, or a custom needle tape may be printed.
Varying striping, and segment sizes. 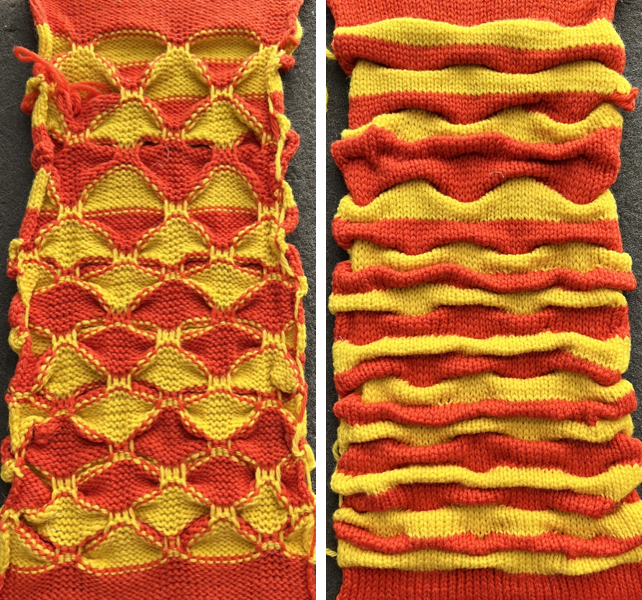 Working in a single color, with ruching forming hems in the center of the piece, followed by light felting.
  Here the hems are 2 in different heights and all on the same edge, also felted.
  Using unconventional materials: wool and raffia, followed by felting
 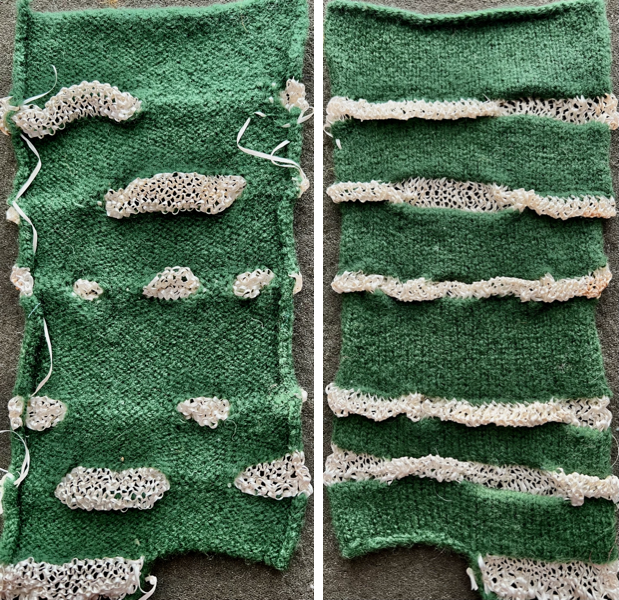 If every stitch is hooked up across a row, the result on the reverse side will form from a roll to a hem depending on the number of knit rows completed at the time