Pintucks are in the family of ripple stitches. The size of both is limited by the number of rows that may be knitted before the stitches on the bed creating the ripples begin to ride up and off the needles. The number of rows possible for the rolls varies with the model knitting machine used and the type of yarn. The Passap strippers make their knitting easier. Generally, extra weight is required.
Basic pintucks are formed across the width of the fabric, no punchcard selection is required. For some basic instructions on forming them in a single color see the blog post on Shadow pleats knitting. Its follow-up, Shadow pleats with added patterning made me curious about the possibility of creating 2 colors, FI patterned pintucks.
For a very brief period of time, some designs were published creating similar effects by hooking up elongated fair isle patterns at regular intervals on the knitting bed. The preselection for the next row knit in Brother machines poses interesting issues in restoring and maintaining the proper pattern throughout the design.
A lot of changing cam button settings can make many fabrics almost possible but not practical on home knitting machines. Some of the constant switchings of functions may be achieved by knitting with separate pairs of carriages selecting the pattern, which in electronic models advances every row, making this an electronic “special”.
Ribber fabrics produced with 2 knit carriages selecting needles introduced the idea of using a KC with a modified sinker plate to make some fabrics easier and includes a knit sample of patterned ripple fabric.
The goal here is to try to create rolls evocative of the shadow pleated swatches in a double knit.
Because of the rolling on the knit surface, designs should be lengthed at least X2. The initial test used the same pattern as that in the shadow pleated samples with the number 4, double-length key selected on the 930. ![]() The carriage setups
The carriage setups 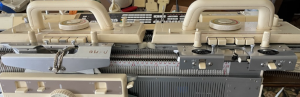 The width of the fabric is limited. Though the KC on the right may be moved off the machine if needed, the coupled carriages cannot be since the ribber and KC used on the left do not lock together in any way, and with the stops removed the ribber carriage could conceivably slip completely off its bed. The end of the belt still needs to be cleared, but this is about as far as one can safely move, with the KC just clear of the set mark on the left of the top bed.
 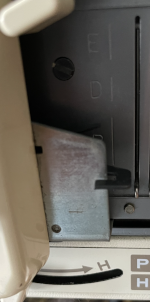 End needle selection is used in both knit carriages.
Extension rails are required.
The coupled carriages although selecting needles will be knitting on both beds to begin and end the fabric and to seal the folds setting the pleats.
To begin, test the tolerance for the number of rows knit on the top bed only. It is possible to coax extra rows by pushing fabric down between the beds by inserting a thin knitting needle between the beds at the start of the pintuck or halfway through and weighing each end. Longer rolls and hems tend to flatten.
The main bed will be knitting on every needle and FI is essentially a slip stitch, so the tension needs to be at least that for the yarns used in single bed knitting. More pronounced rolls may be produced if the tension and stitch size are adjusted accordingly.
Normally the sealing row would be knit in the light FI color. In these samples, the yellow yarn is used to help assess how those knit rows interact with the folds and to what degree they are visible.
The first try:
1. tested a solid color 8-row pintuck a single time, then switched to 6-row sequences and continued. Even though a contrasting color is used to seal the tucks, it is not immediately visible
2. the second carriage is set to FI and begins to operate from the right. Out of habit, I knit with weaving brushed down, a bad idea in this instance
3-4. this fair isle design is used double-length and forms some very long floats repeatedly, not the best choice even for single bed FI, definitely problematic here, time to regroup.
 Comparing the surface to the shadow pleat fabric
  For a different execution of the same design using a different main color on a different knitting day, see the bottom of the post.
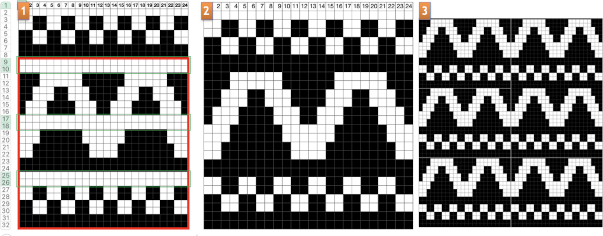
Moving on to a simpler, random, smaller, 12X10 repeat ![]() planned for knitting on a 33 stitch swatch and rendered double-height planning six-row pintucks,
planned for knitting on a 33 stitch swatch and rendered double-height planning six-row pintucks, ![]() Visualizing the possible design along with placement of sealing rows represented by all-white pixel rows in the diagram. The single 8-row fold advances the remaining pattern by 2 rows, resulting in a subtle change in the design:
Visualizing the possible design along with placement of sealing rows represented by all-white pixel rows in the diagram. The single 8-row fold advances the remaining pattern by 2 rows, resulting in a subtle change in the design:  My swatch used white for the ground as in the above right, the 8-row transition is marked by the red arrow.
 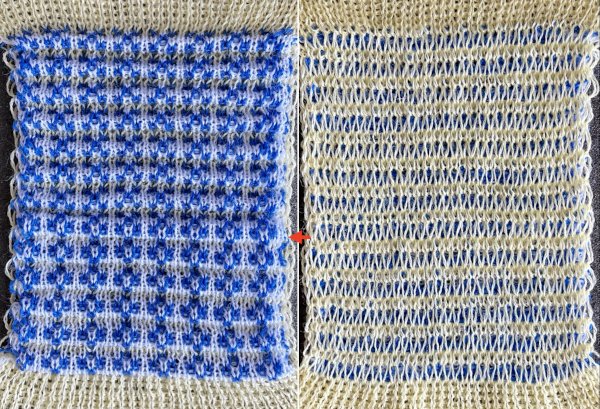 Knitting was easy and smooth, the 8-row tuck required a bit of coaxing. The fabric lies flat, does not have the drape of the single bed shadow pleats, it is not suitable for the same end-use.
Plain every needle rib knit is quite a bit wider, a consideration for casting on and binding off or transitioning to another fabric if this technique is used as part of a different fabric. This file was also downloaded and lengthened X2 ![]() The pattern is not very pronounced, but the short floats make for easy knitting.
The pattern is not very pronounced, but the short floats make for easy knitting.  Comparing the fabric to the single bed shadow pleat using the same design
  The pintuck main bed FI yarn could be slightly thicker. Since the 6-row sequence appears to work well, if the fabric is to be pursued, the design could be planned and adjusted accordingly.
Issues encountered in DIY deliberate design planning: beginning in Numbers, a table is set up with enough rows to accommodate more than the height of the planned design. Since the fabric planned would knit 6 rows on the top bed, then followed by 2 rows on both beds not affecting the design, starting at the bottom of the table, use the command key and work on hiding 2 rows following groups of 6 for the height of the table 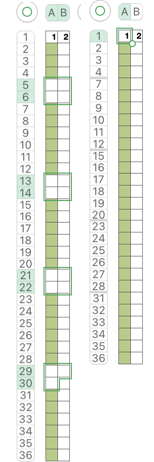 The theoretical design in beginning stages:
1: the rows marked in green are hidden
2. a design is drawn using 2-row blocks and shaping
3: it is tiled, appears worth pursuing.
 The expected carriage actions, color reversing the repeat so that the dark color will knit in feeder A of the FI single bed sinker plate
 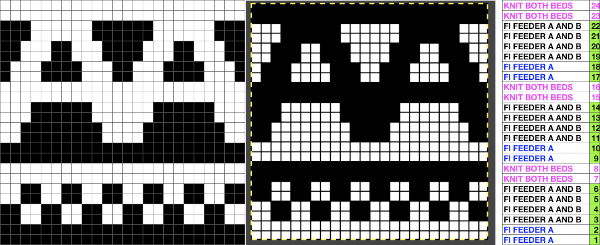 Points to consider while removing the use of the ribber from the equation:
both knit carriages are set for the end needles to select. When knitting fair isle this is necessary to keep the contrast color knitting from separating from the base color along the design edge. If at any point there are single-color stripes, the end needles if selected need to be pushed back to the B position, or the second color will catch the first and last needles in work, forming a float from side to side. If the yarn is removed from the B feeder and end needles are not pushed back to B, stitches on them will drop. My first try ![]() The transition to color reverse shown tiled
The transition to color reverse shown tiled 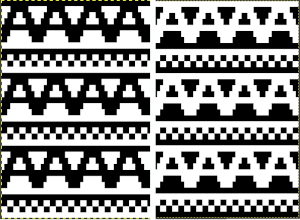 Leaving the contrast color in the B feeder on the all knit black pixel rows created the first mess. Because of preselection, the return to knit dark rows has every needle coming forward as the single bed KC is traveling back to the right, resulting in another mess.
Regrouping so the first pair of rows with no preselection will knit the dark color, the second pair of rows with no preselection will knit using the paired carriages, sealing the fabric, the larger geometric shape has 2 rows with no needle selection nearly at its halfway point. 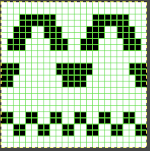
![]() The broken threads are due to stitches getting hung up on gate pegs, missed until more knitting had been completed. With more attention, knitting went more smoothly, and the planned design is identifiable.
The broken threads are due to stitches getting hung up on gate pegs, missed until more knitting had been completed. With more attention, knitting went more smoothly, and the planned design is identifiable. 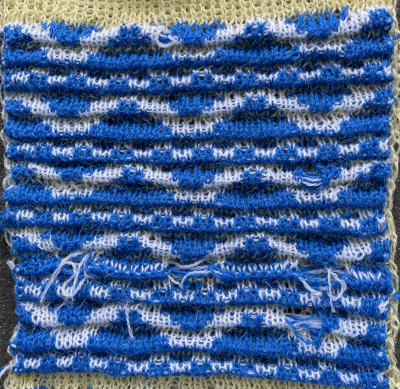 Perhaps as a farewell to the topic or out of sheer stubbornness now that the above had been knit and I have had some practice, I returned to the more straightforward knitting of that double-length flower pattern with far improved results. Some of the floats trapped behind the long stitches created on the ribber can be seen bleeding through on the right.
 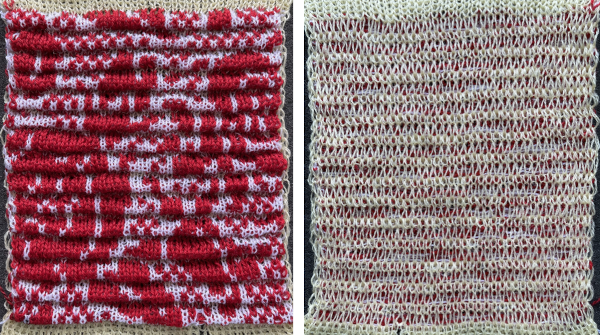 Comparing the scale once again to the shadow pleats
 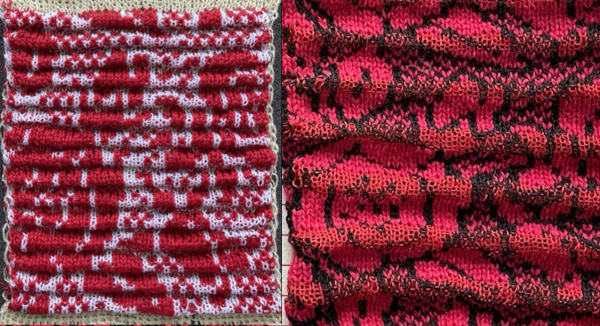 This fabric may fall in the category that need not be knit simply because one can. That said it may serve well in bands joined onto larger pieces, or any use for it may only be limited by patience and imagination.