There are a number of ribber fabrics that are produced by altering the settings on the ribber’s carriage to slip for an even number of rows in both directions. This requires manually changing the ribber setting from slip to knit and back for the length of the piece. In electronic machines, where the pattern advances with every pass of the carriage, there is another option. For example, to produce DBJ with the backing in one color, settings would be changed manually every 2 rows, using the color changer on the left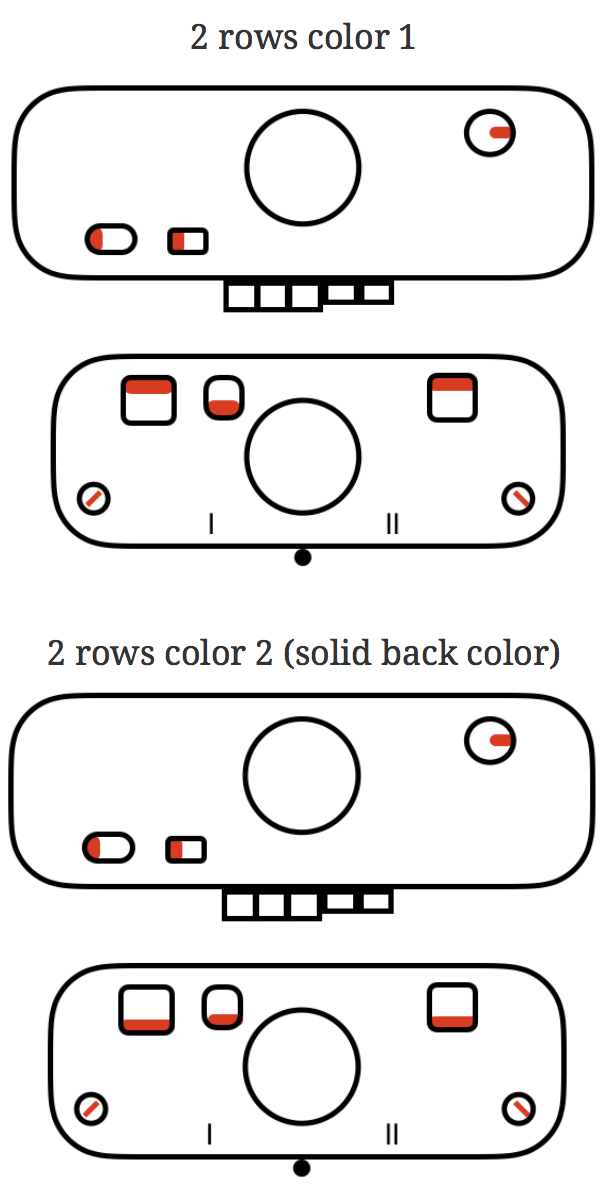
Some things to remember: when 2 carriages are selecting, each carriage needs to move far enough at the end of the needle bed so as not to be locked onto the belt. Extension rails are required. On the Brother ribber bed, there are stops that keep the combined carriages from going off the beds. There is one on each side (magenta arrow on left, the blue arrow on right), and to remove the ribber carriage off its bed, it, in turn, needs to be tilted forward prior to reaching the stops in order to clear them on either side.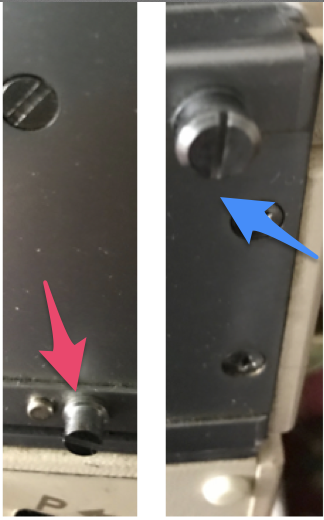
Altering the KC sinker plates and arm: remove 6 small screws from the sinker plates, leaving only their arm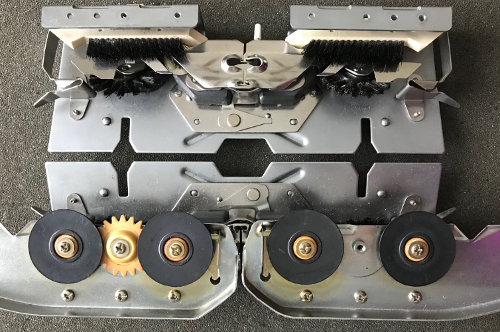
The carriage with the altered sinker plate in place, in turn, will then be used to replace rows that were to be knit with the ribber set to slip in both directions <– –>. In my sample, it operated from the right, with the combined carriages (KC2), from the left.
For consistency, I am editing the original post and will continue to refer to the coupled carriages= KC2, the altered single bed one= KC1. KC is the abbreviation commonly used in publications for Knit Carriage. The change knob, which affects end needle selection, is marked on the KC as for I (end needle selection, indicated by black arrow) and II (cancel end needle selection). Initials KR in publications are often used to refer to ribber carriage in setting discussions. 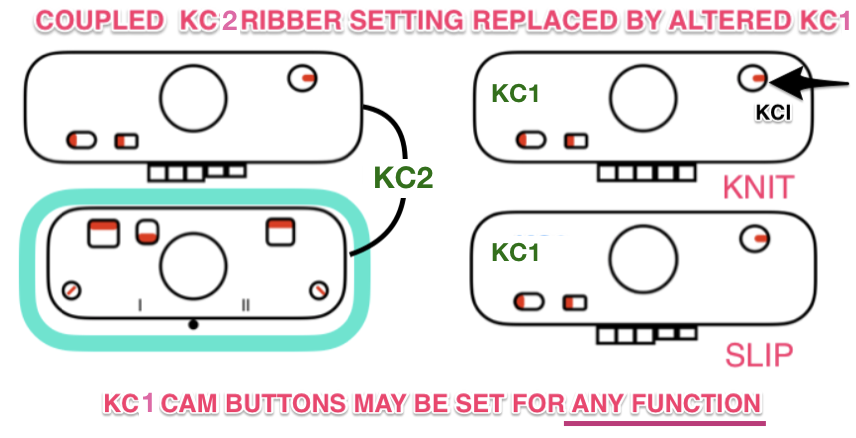 My beginning swatches were knit using ayab software’s ribber setting, which matches the KRC (2-color double jacquard separation) function in the unaltered 910. With my first try, I made no effort to consider which color gets chosen first in the color separation (ayab = black, 910 = white). There is a limit as to how far the single carriage from the right (KC1) can travel on the needle bed to the left because the combined carriages on the left (KC2) are held in place by the pin.
It would be possible if needed to separate KC2 and push further out on the extension rail, but perhaps not practical, so there are some constraints on the fabric width able to be produced.
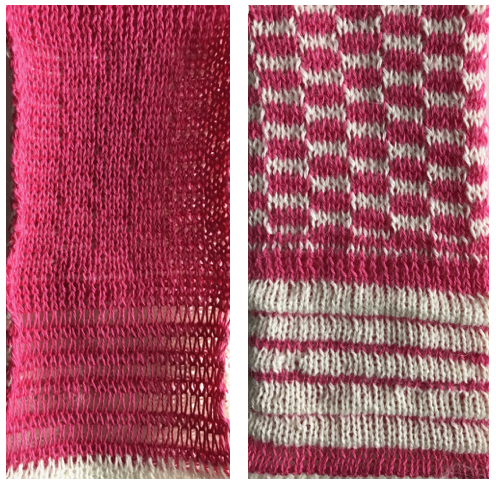
My first swatch has some manually created pintucks on the knit side (white only knitting extra rows, joined together by all knit rows with pink). The reverse, purl side, is knit by the ribber set to N/N, all in one color. The stitches held on the ribber while the white only knits on the top bed are visibly elongated (left swatch bottom). There is some color confusion on the knit side on the first couple of rows of DBJ, solved in the second swatch. My repeat for the planned width using Ayab:
Knitting on 910 a single repeat may be programmed, start knitting with color intended for white squares, which will also serve as the solid backing color.  For more similarities and differences between the original and the altered 910 see ayab diary post.
To knit using Ayab: begin the knitting with the color intended to be used for areas marked in black squares, which will also serve as the solid backing color. Preselect the first row from left to right with ribber set to knit (N/N), it will remain set that way for the remainder of the process. When on right, set coupled carriages (KC2) to slip <– –>, knit one row to left, both carriages stay on left. Knit the next 2 rows for DBJ using KC1 with altered sinker plate operating from the right, using color intended for areas marked with white squares. The main bed only will knit. Set change knob to end needle select (KC I) to ensure first and last needles in use knit. Return the KC1 to the right, on the extension rail, and knit the next two rows with KC2 operating from left. Repeat, changing carriages and consequently colors every 2 rows.
Blisters or pintucks are created when one bed knits more rows than the other, whether as simple knitting or in the pattern. Periodically the knitting is sealed by at least one-row knitting across all stitches on both beds. In this version, sealing rows must occur in pairs to allow for color change. The first chart shows a tentative repeat, planning for black squares to create the blister shapes, drawn in 2-row blocks to allow for color changes every X even number of rows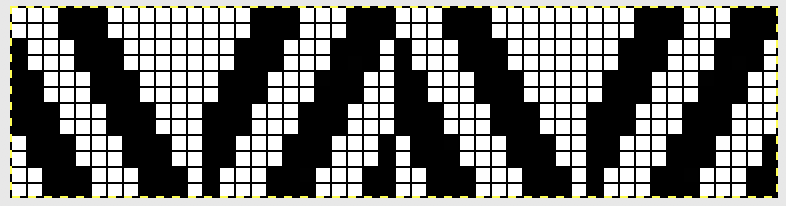 The image color inverted, so white areas will create the blisters in slip stitch (col 2) while black squares will knit (col 1)
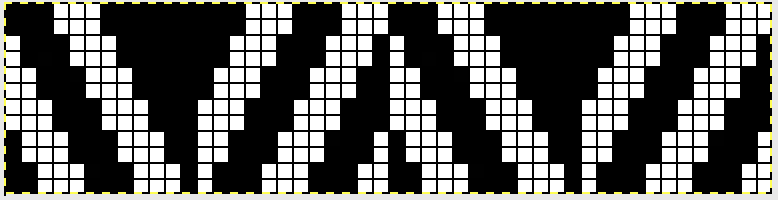 Most published patterns for these fabrics will also include an all knit rows to seal the shapes knit on the main bed only
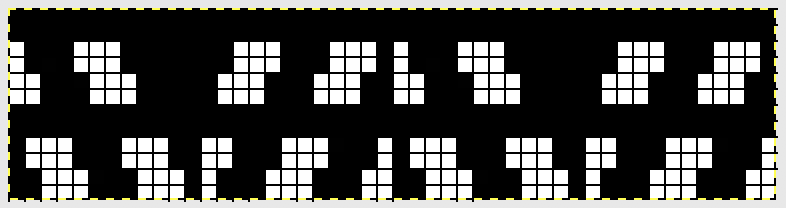
By using 2 carriages to select needles, one (KC1) may be set to slip <– –>in order to knit X number of rows on the top bed only, while the pairs of carriages (KC2) are set to normal knit on both beds, its cam button set to select needles, KCI. Selection will continue, but no patterning occurs as a result. A proof of concept swatch knit on only 24 stitches, the pink knits for 4 rows, the white for 2; the pink yarn is a cotton, the white an acrylic/wool blend: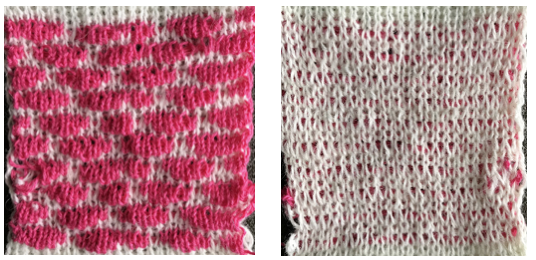
An expanded pattern repeat is planned for a larger test swatch. Here there are 2 black squares added at each end of the repeat to ensure that those stitches on the top bed are knit on all slip stitch rows. The new color is wool, this time knit for 6 rows in slip stitch prior to sealing with 2 passes of the combined carriages with the contrasting color.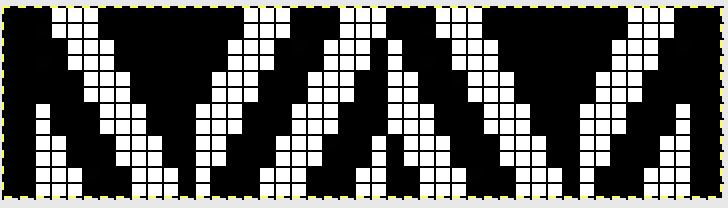
Single bed slip stitch rows appear on the knit side in color 2, the reverse, purl side is in a single color (1), and formed by the all knit rows. Its stitches are in turn elongated, since they are held and not knit while the opposite bed knits for multiple rows. In the sample, the first and last stitch on each side were on the ribber, creating a single white slip stitch edging. One can adjust such details to suit. The first preselection row was made after cast on with both carriages(KC 2)set to knit, moving from left to right with color 1, where they stay. KC 1 with altered sinker plate was threaded with color 2, and begins from and returns to the left-hand side.
A detailed shot of the edge: note the white, single, elongated stitch uppermost, and the pairs of contrast color ones in the “border” Designs with the deliberate placement of white blocks representing each blister can be created. It is a good idea to test tolerance for each of the yarns involved as a hand tech or repeat such above before planning significantly longer repeats. All black rows are required at intervals if the fabric is to be knit changing ribber settings for all knit rows. The same rows could be left blank if using carriages in the above manner, and lack of needle selection would be an indicator for switching to the double carriages for the 2 sealing rows, while not having to track the count for the slipped ones.
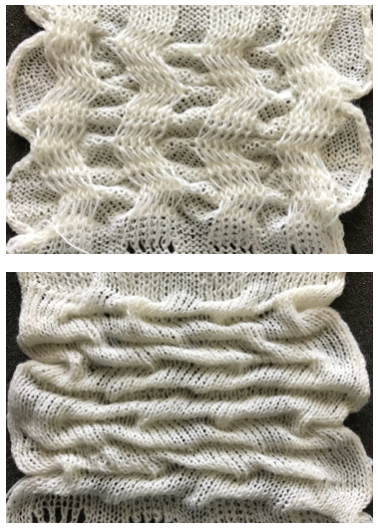
I am always interested in automating stitches to facilitate as many details as possible in creating fabrics that imitate hand techniques, without relying on row counts and a lot (in this instance) of “hooking” stitches up manually. The swatches below were part of a series of posts on ruching as a hand technique
 The hand tech chart mirrored, as the springboard for my automated fabric
  Both led to my exploring the possibility of a cousin, working on the double bed, and using the 2 carriages. The process began with a proof of concept swatch. Two colors were used to highlight what the stitches knit with each of the 2 carriages are doing. Both KC1 and 2 were set to knit in both directions. I began with KC2 knitting the needle set up for the fabric in a dark color, on a small number of stitches
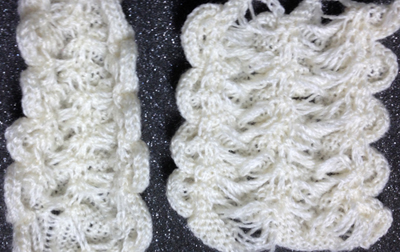
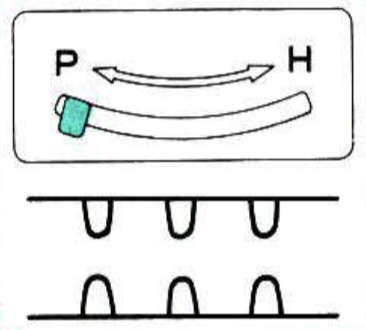
KC2 operated from left, KC1 from the right. With KC2 returned to left, KC1 knit 8 rows. It is best to work out the limit for how many rows will knit on the top bed without stitch problems prior to any automation of functions. *Two rows were knit with KC2 in the dark color, 8 rows with KC1, ribber racked to proper position**, * to** were repeated. The elongation of the stitches on the purl side results from the fact the ribber knits far fewer rows than the main bed, and in addition, the stitches on the row knit on its second pass in the pattern are pulled on across the bed at distances matching the racking positions. 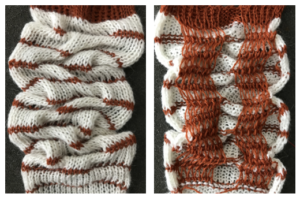 The plan is to automate the texture, knit it in one color, and find a way to track correct racking positions: cast on may be in any preferred method. With the pitch set to P, it is easier to transfer stitches between beds to the desired configuration. Every needle is in work on the top bed, for a multiple of 10+6
![]() ribber needles with stitches that will be moved with racking
ribber needles with stitches that will be moved with racking![]()
 placement of stitches on respective beds
![]() change pitch after transfers, ribber moves slightly to right
change pitch after transfers, ribber moves slightly to right 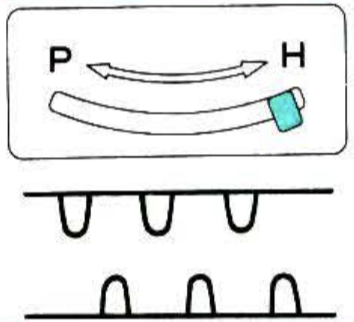 final configuration prior to patterning and racking sequence begins
![]()
The starting racking position is 5. Racking handle markings for Brother begin with 0 on left, 5 at the center, 10 on right. The ribber is set to half pitch since part of the needle bed will be knitting every needle rib. An often-overlooked clue as to what is happening or is about to is found in the arrows just below the racking position indicator. The red arrow indicates the direction in which the bed was racked on the last move. Since racking for my experiment will only be to 3 different positions, I began by choosing to use 5 pixels center, left, center, right for the full repeat sequence, but later amended the repeat to numbers of pixels equal to specific racking indicator number. The needles will be selected prior to the next row knit, a reminder of racking selection. Sequence will actually be 5, *0, 5, 10, 5,** 0, 5, etc. The racking indicator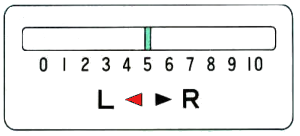
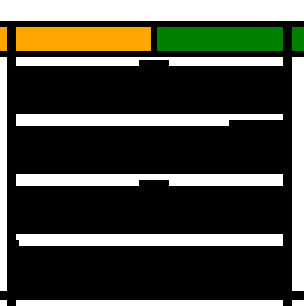
My first Ayab repeat was planned for use with 2 carriages: KC1 (single carriage) is set to knit but to not select end needles (KCII), and will be producing the multiple rows gathered to create the blisters/ hems. KC2 (coupled carriages) are also set to select needles, both KC (knit carriage, cam button also on KCII) and KR (ribber carriage) are set for normal knit. They will create the sealed stitches joining up the blisters/ hems. The same color yarn is threaded in both. Blank squares will knit because a carriage set to knit overrides needle selection or lack of it in stitches on needles in the work position. My repeat is 46 stitches wide. Because the knitting is started with the ribber already in racking position 5, the first move in the pattern is turning the handle to the right, toward 0. The concept illustrated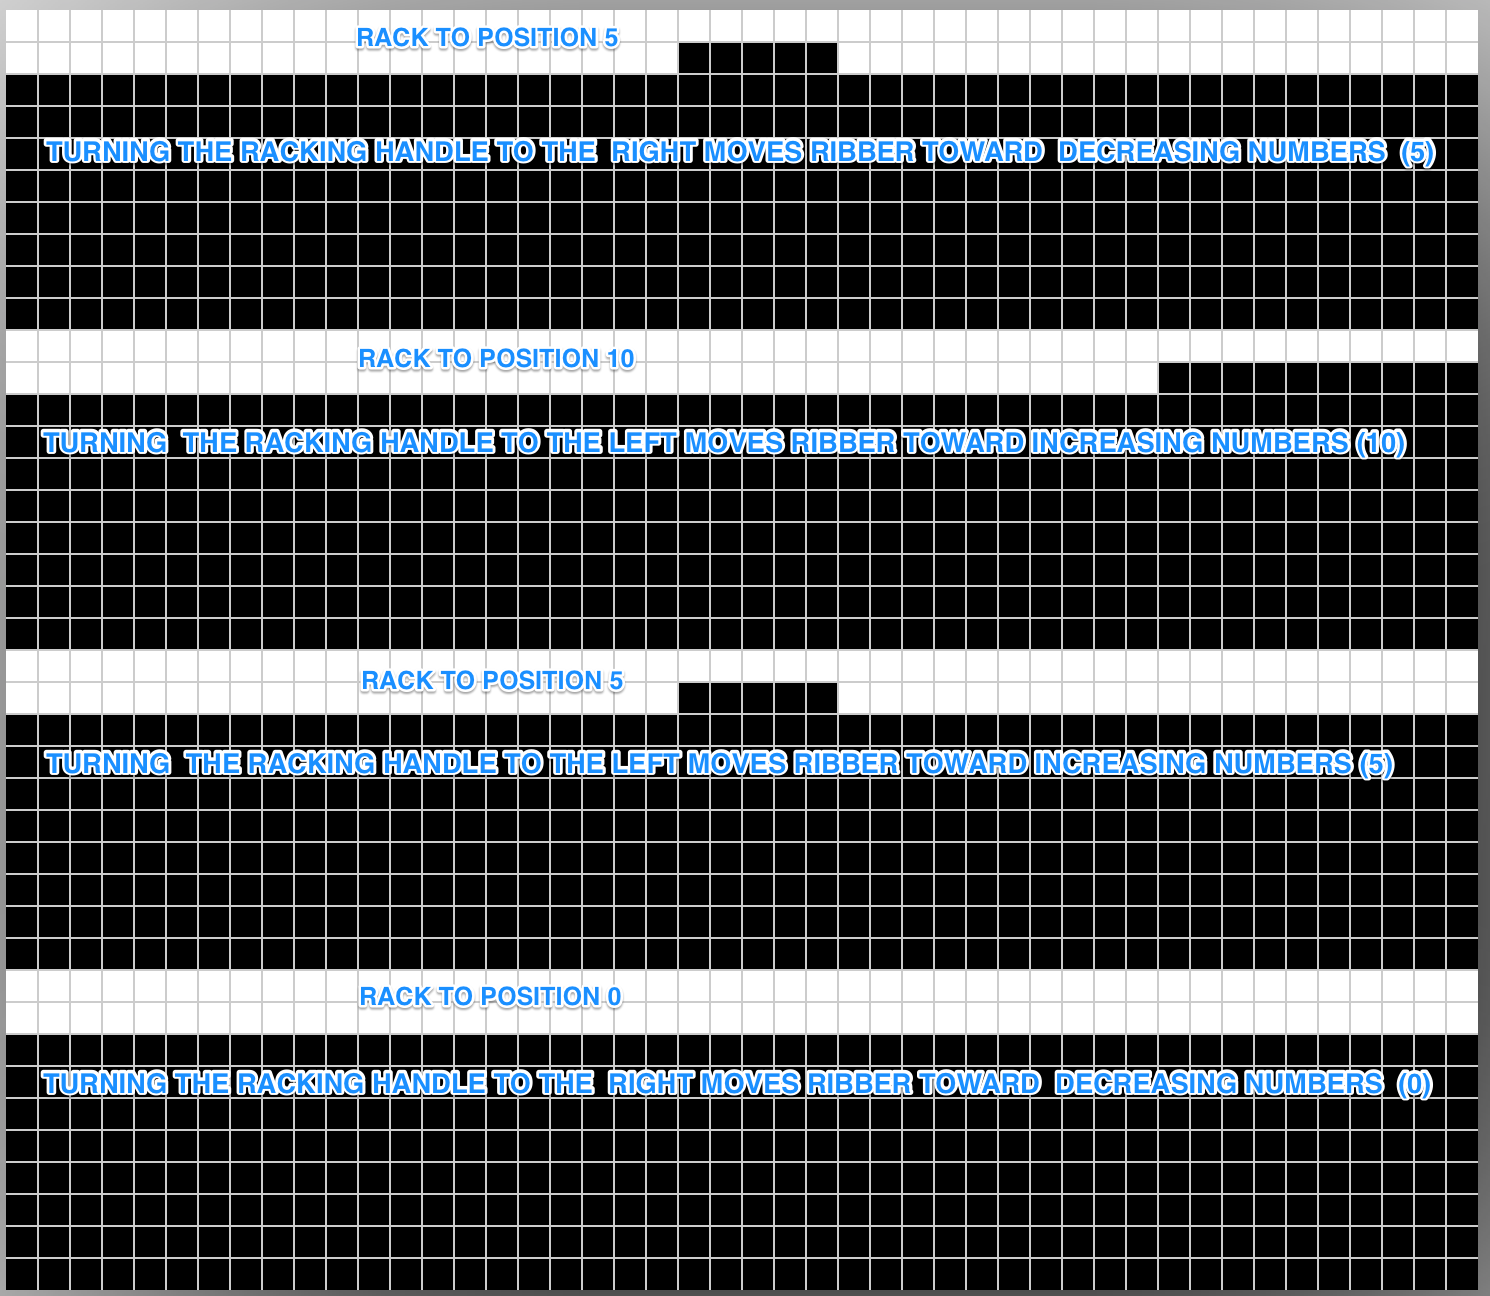
set up and ready to go, racking position 5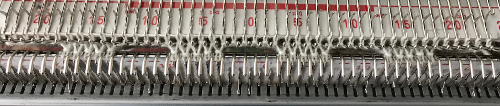
4/19/18 As is true in any knitting, things can go quirky. I began to have a single needle on the main bed not knitting on rows knit with the combined carriages, then ran into dropped stitches in racked groups. The problem was initially not with the software but appeared to be a ribber issue, which after checking and balancing was resolved.
4/22/18 And today’s problem is the software, with persistent, intermittent selection errors. I did achieve a sample by manually pushing wrongly selected needles out to D by hand on problem rows, which tended to be 5 and 7 in all black areas. Some reminders and observations: ayab auto mirrors all images. If this repeat is entered (I added a single square as a marker for racking position 0), the software will actually be knitting this, the “image as it would appear on the knit side of the fabric”. What to program? anticipating the above getting mirrored by the software I entered this 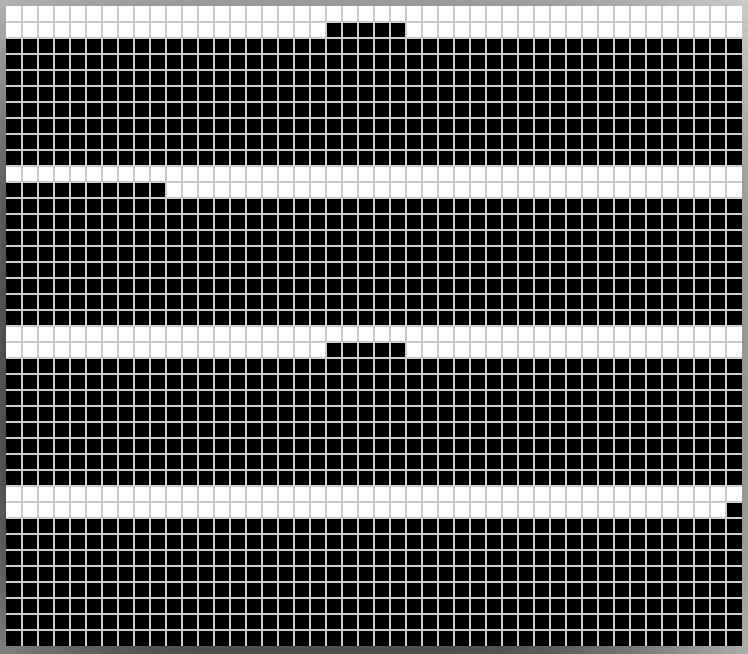 resulting in this
That said, remember that turning the racking handle to the left is toward increasing numbers on the indicator, to the right is toward decreasing numbers. For me that is counterintuitive. Mirroring the image again, and working with the repeat below can help with tracking racking movement even more. With the single dot on right, turn the handle toward it, to the right, and the movement will be towards 0. With the movement of marking row to left, turn racking handle to left, toward 5, and so on.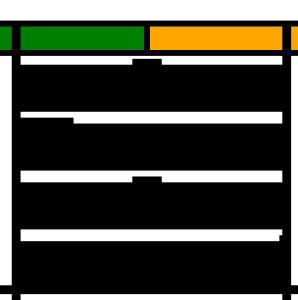
Next on the drawing board: a fabric using the same technique, but that I might like more. This image was a portion of a greyscale pin of a pattern book from a Russian pin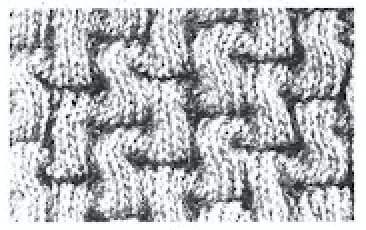 I tested a concept for recreating it as a hand technique, trying to sort out how many rows I could knit before racking and the racking sequence. The best result was with a single sealing row, which in turn required changing the ribber slip setting for one row only,
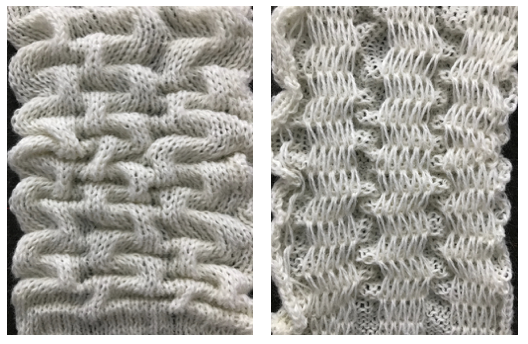
so it’s back to the drawing board. I think any automation is best done using the ribber to do the all knit rows, the main bed to needle select racking positions. Results will be added to the post on combining KC patterning with racking
The present set up with 2 carriages may be used for solid color backed quilting. Using the altered KC1 operating from the right with no yarn in feeder should work to drop stitches in drop stitch lace where the repeat is altered to allow for the knit carriage with no yarn to do the stitch ditching while selecting needles as well. Related color separation and swatch may be found in the last segment of the post: revisiting-drop-release-stitch-lace/