Previously published related posts:
Img2track_multiple colors per row dbj, each color knitting only once 1/21
DBJ: more than 2 colors per row 2 12/19
DBJ: more than 2 colors per row 1 12/19
Revisiting Ayab_multiple colors per row DBJ 2 1/20
Revisiting Ayab_multiple colors per row DBJ 1 1/20
Reducing the number of rows on the front of DBJ fabrics and the associated elongation of the planned design matters so some designers far more than others, at times only in specific projects.
It may remain something in one’s wheelhouse that is not worth doing because one can.
When I was knitting garments and art-to-wear pieces I found I preferred to work in 2 color dbj, plying thin, sometimes space-dyed yarns and dropping threads, replacing them with the next shade in the chosen color wheel spaces to add more colors per row.
Long before computer interfaces that made downloads or even color separations easy, most knit artists used punchcard machines, often the Passap Duomatic, lining up long individual panels to create large, non-repetitive images, Nicki Hitz Edson among them. That said, the topic has remained interesting to me.
In the post written on 12/19, an option was presented for having each color in each design row knit only once rather than twice. Tables in a Numbers spreadsheet were used to produce the necessary color separation.
The present goal is to repeat the separation process using other possible DIY methods.
To review: the dbj automated separations for more than 2 colors per row with the exception of the Heart of Pluto one when using the Ayab interface generally result in each color, in each design row knitting twice. This is also true of default console separations in the E6000.
The yarn for this fabric needs to be thinner, colors easily become muddied if not chosen with care, there are 6 carriage passes for each design row of knitting, and charts and downloadable repeats including all knit rows become considerably longer.
When experimenting with colors keep careful notes about your own color placement in each yarn changer location, they may not match those assigned by the download program or in the original chart.
DAK offers the option of printing templates for its DBJ separation methods. They may be used as guides for using the designs outside the program, whether for download to electronic knitting machines or to be followed in punching cards.
Files may be opened in the DAK Graphic Studio Module with the intent to convert them to stps for use in its universe or to adapt the design for other uses outside it.
My experience with several trials of small images in 3 colors is that the resulting design conversion is faulty. The file size morphed into a 40X40 repeat as opposed to the original 12X14, leaving no option but to draw the design from scratch in the stitch design module.
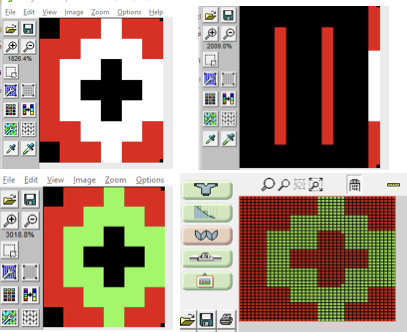 My third attempt finally got my 3 colors represented properly, but still in the 40X40 pixel size, not worth troubleshooting, redrawing the motif is far easier and more straightforward.
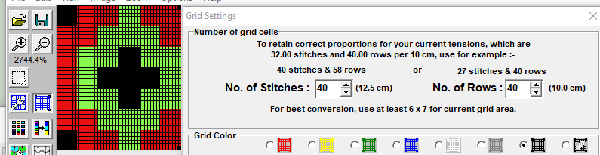
Img2 track will perform the separation but does not offer a charted view or template for it. It has the added interesting function of immediately reducing the file by half because upon download the image will be lengthened automatically by a default setting to double length on the Brother machine. 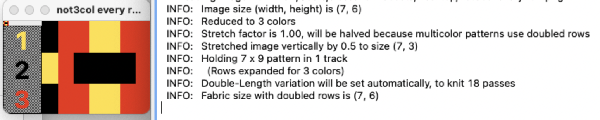 The issue may be addressed by doubling the file in length prior to selecting it with img2track or the stretch factor in the program may be changed to 2, also before selecting the file for separation.
I prefer to manipulate files as needed prior to opening them in any program for download, believe it makes patterning errors easier to correct, and avoids forgetting to change settings when returning to knitting the particular repeat again. 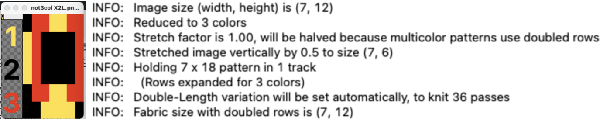 In the January 2021 post, I suggested manually pushing back to B position all needles in work prior to the carriages returning to the left on every other row as one way to reduce the resulting elongation in the designs. Here the plan is to achieve it by amending the color separation and its needle selections.
One of the advantages of DIY is that the color order in the separation may easily be matched by that in the color changer.
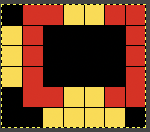
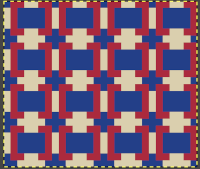
Repeats should contain an even number of rows and may also contain rows where not all colors are in use. The first starting repeat: ![]()
 The often published convention in performing dbj color separations is to begin ordering the colors based on the number of cells they occupy in the first row, here the yellow would be followed by black and then red. Other programs start with the first pixel color on the left by default.
After drawing the repeat in Stitch Designer, working with Dak choosing color separation C, and exploring print options, one may obtain a template. Its screengrab serves as a guide to tracing pixels, the results match the Gimp separation which follows.
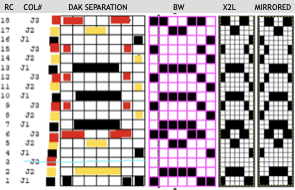 DAK automatically mirrors the motifs horizontally prior to working with them in any way. The mirrored DAK template compared to the in-progress Gimp separation:
 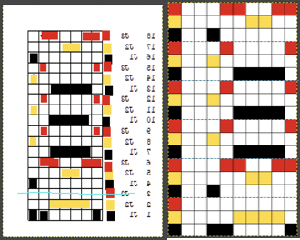 My goal is to produce the fabric with each color in each design row knitting only once by changing the separation, the function performed automatically by Ayab’s HOP code.
This technique applies to double bed work only, is not suitable for single bed 3 colors per row slip stitch.
The backing used is bird’s eye on the ribber, with slip stitch set in both directions and using both lili buttons. The result is that every other stitch knits on the pass to the right in any color used, the alternate needles knit on the return to the left completing one full row of knitting in that single color on the purl side.
The main bed needles are preselected on the way to the left, create stitches on the way to the right, as they flatline. Since there is no needle selection, as the carriages return to the left, no main bed needles will knit, resulting in only one row in the color being carried knitting on the top bed as well. Needle preselection continues to be made for the next row to be knit after the color change.
This makes for a more balanced fabric unless colors begin being skipped for multiple rows, in which case the ribber stitches may even form small ridges and the main bed stitches will become more elongated until the skipped color is repeated.
Working using Gimp alone
It is possible to color separate using only Gimp. One of the tricks is to use significant magnification, along with the view grid and snap-to-grid options when working with developing or editing designs.
In the latest version of Gimp for Mac, using the fuzzy select tool, selecting pixel color segments allows for color substitutions when converting charts to BW prior to the final png save.
It may be achieved by clicking on a single color, followed by holding the shift key, clicking on more colored pixels for multiple selections regardless of color, and then selecting bucket fill with the replacement color. Using select by color, followed by using the bucket fill tool, changes that particular color globally throughout the repeat.
As selections are made, dotted lines outline selections until after the color change and the image has been fixed.  Colors are fixed by choosing the rectangle tool and clicking in the work window outside the image, those dotted lines will then disappear.
This separation begins with black, the first color pixel on the left.
The original image is scaled X3 in height to 11X30, ![]() the file resulting from the separation will be scaled again X2 prior to knitting the repeat after it has been completed.
the file resulting from the separation will be scaled again X2 prior to knitting the repeat after it has been completed.
Copy and paste the scaled X3 results on a larger new file so that color markers for each row may be added, horizontal guides every three rows help define each expanded, now 3-row color sequence.
Following the color rotation markings for each row, erase colors unlike it and not represented in each design row to its right, so where the black marker pixel is on the left yellow and red are erased, where the yellow marker pixel is black and red are, and where the red marker is black and yellow are. That single row with no color red is left blank.
Those extra columns on the left are cropped prior to converting the file to BW. The results on the far right would need to be used double length, whether scaled before the final file save or after download, prior to knitting. Depending on the machine and the program used for download, if the direction of the design matters, the result may need to be mirrored as well. 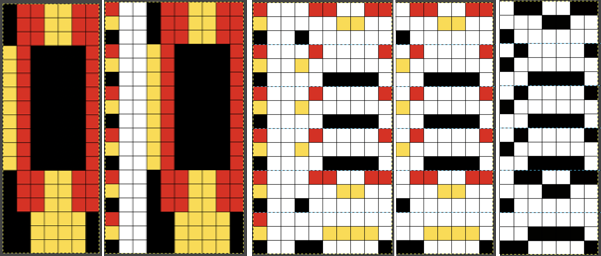 Developing the test png on the elongated repeat
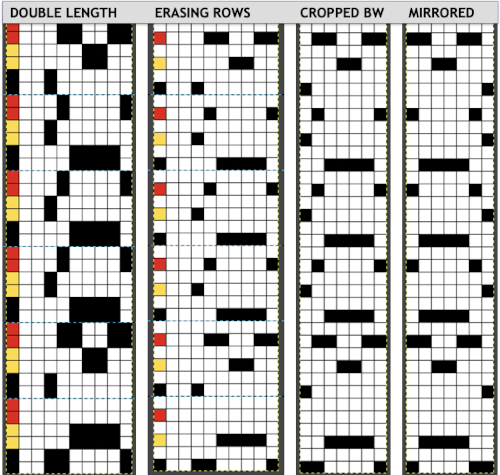 My test png, mirrored for download to the 930.
![]() I had color changer issues with yarns being picked up 2 at a time fairly frequently, which were likely static related and improved following a rare use of yarn spray and a humidifier.
I had color changer issues with yarns being picked up 2 at a time fairly frequently, which were likely static related and improved following a rare use of yarn spray and a humidifier.
Having end needle selection, KCI on the main bed helped avoid issues with edge stitches not forming properly.
I tend to grab yarns randomly when swatching. The resulting colorways are not planned for use in finished items, they are explorations that help illuminate subsequent choices.
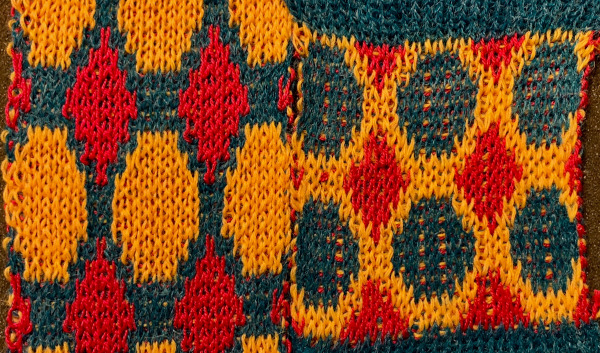
The yarns used in the swatch are of three different weights, so tension needed to be adjusted to accommodate the thickest yarn, resulting in more elongation of some of the stitches on the front of the fabric. The latter might be far less noticeable when knitting with thin, equal weight yarn selections. The design can be easily identified and it is also seen that colors are indeed knitting a single time for each design row. There is an exception on a single row toward the bottom of the swatch, where blue and white have knit together during tension adjustments on both beds. 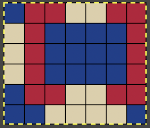

One drawback to this method is that since it is downloaded as a fair isle, the capacity of the machine to offer prompts and reminders as to which color is in use and which selection should follow in knitting 3 color dbj is lost.
Testing the concept on a design where more rows have less than 3 colors represented. The repeat is slightly modified, from the one used in the second 12/19 post  Here it is shown modified, with rows containing fewer than 3 colors marked.
 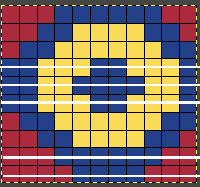 Separating the repeat using only Gimp:
the file on the right rendered double length
![]() and in turn with the second of every pair of black pixel rows erased
and in turn with the second of every pair of black pixel rows erased ![]() the comparison between the two
the comparison between the two 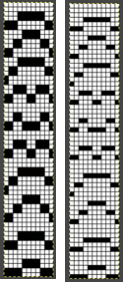 I left the color changer set up in the same sequence and yarns used in the previous swatch, so colors do not match their placement in the charted design. I stopped knitting when the color changer carried 2 colors across a whole row, and I did not notice the error until I had reached the other side. A repair can be made easily, but I chose to stop since the repeat was previously untested. There is a dropped stitch also missed on the purl side, an easy repair when a piece is finished.
The fabric is narrow as a result of the slip settings, the cast on and beginning and ending rows of knitting need to be adjusted or they will stretch out quite a bit compared to the remaining knit.
The proof of concept with each color in each design row knitting only once: 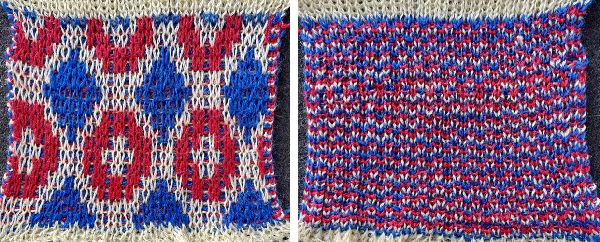 The 12/19 post also compares its repeat knit using the initial double-length file to the one resulting from the amended repeat with each row knitting only once for each color in each design row