Knit skirts have been present in runway and online publications again. Another Mary Dowse pattern has stirred up interest in a design knit in fair isle shadow pleats.
Shadow pleats knitting began to present some of the techniques involved in creating this type of fabric fold.
The permanence of the folds relies on blocking from careful and almost aggressive to far more casual approaches depending on the fiber content and end-use for the knit.
As mentioned in the older post, for a while, skirts in shadow pleats were very popular. One of the tips for blocking them at the time when acrylics were also new and in trend, was to hang completed pieces with the bottom evenly weighted inside a large trash bag “sealed” as tightly as possible at the top, with steam entering from the bottom of the bag ie from a portable electric teapot. I always had a hard time imagining the specific activity, and the method may have been part of the reason as to why published patterns for such items quickly disappeared.
Simply using a yarn with memory in the rows composing the larger folds always seemed a more viable option to me.
Ribber needle setups may be used to produce a rounded appearance in the resulting folds
rolled single pleats 
![]() double rolled pleats mirror needle groups
double rolled pleats mirror needle groups![]()
![]() accordion rolled OOW needles are spaced evenly on both beds
accordion rolled OOW needles are spaced evenly on both beds ![]()
 A large variety of pleats may be knit on the single bed as well, one being shadow pleats. The resulting knits also need to be gathered on one of the 2 edges in items like skirts at waistlines, and the number of knit rows needed for the volume required can be daunting and a large commitment of time if not effort.
Very large swatches in colors that one guesses to be appealing guide decisions based on evidence and personal preference.
Old published patterns often called for specific brands of yarn which decades later are likely to no longer be available. In addition to searching for substitutes that will produce a similar gauge, the behavior of the newly found yarn may simply be different than expected and as described in the instructions.
Inspiration photos found online are often small and do not reveal clear details, so attempts to reproduce the pictured knitting techniques may yield unpredictable results.
Assuming traditional yarns are in use, the larger rolled shapes in the fabric formed by the higher number of rows knit in the thick yarn tend to roll toward the purl side, the familiar effect seen in any single bed stocking stitch.
Part of the inspiration photo that began a renewed forum interest in the fabric 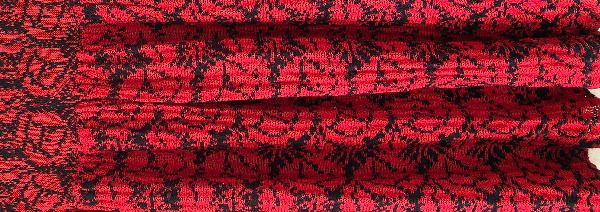 The appearance is of a fair isle pattern interrupted by the use of thinner yarn(s) in one or both feeders. Blocking long pieces can alter the aspect ratio of the original design, so in some cases, the width of the repeat or even the length would need to be doubled.
My initial repeat was 20X22 pixels: ![]() In this view, obvious places are highlighted for a possible switch to thinner yarns. If changing yarns manually, it is easier to change those in the sinker plate’s B position. If necessary, the planned motif may be color inverted to make those actions easier.
In this view, obvious places are highlighted for a possible switch to thinner yarns. If changing yarns manually, it is easier to change those in the sinker plate’s B position. If necessary, the planned motif may be color inverted to make those actions easier. 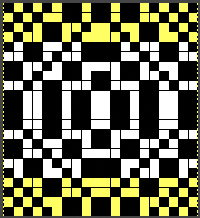 Both yarns used are wool, a yarn that has memory and spring-back. In the potential fold rows, the red color was replaced with a thin ply with the same fiber content. The first folds were knit in an *8 with thin, 14 with thick, 8 with thin** color sequence. Watching the knit as it progressed showed the thicker fair isle areas folding inward, with the thinner areas folding outward. The remainder of the swatch used a 4 thin, 8 thick sequence. The knit was steamed and pressed, the folds are soft but permanently present with the lower edge of the piece lying quite flat after a considerable amount of time.
 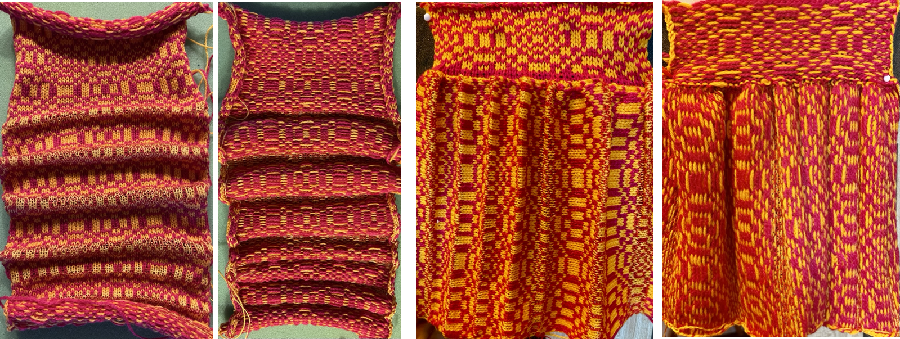 Here the red yarn used is acrylic, the black wool. An 8 thick 4 thin sequence was used, but in the thin areas, both colored yarns were replaced with single plies. The pattern is 48X54 pixels and from one of the Brother mylar sheets.
 ![]() The first swatch sports black flowers, the second, red ones. The knit sequences were the same, the change in texture in the areas may be seen here.
The first swatch sports black flowers, the second, red ones. The knit sequences were the same, the change in texture in the areas may be seen here. 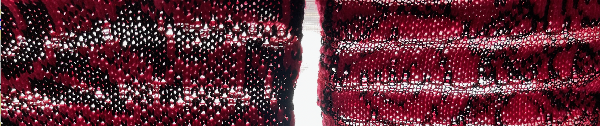 The black flowers swatch was ironed, becoming permanently flattened, aka “killed”. The hope is to manage the red flowers swatch in a better way. The thinner yarns are in slightly different shades of the base colors, so a subtle striping occurs in the areas where they are used. Both swatches were knit on the same number of needles and at the same tension.
 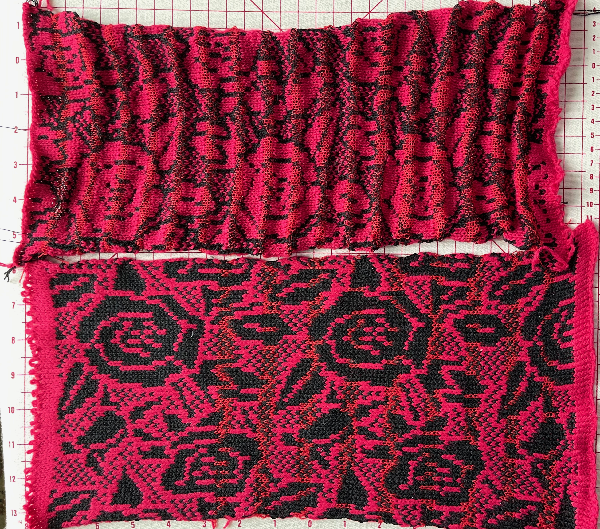 The blocking saga: I do own blocking pins but honestly have only used them in demos, and on rare occasions such as this, or to cut them down when I needed a fast replacement for a ribber cast on comb lost wire.
Whether extremely detailed blocking is ever needed can be a very emotionally charged topic for some, best saved for another day.
With an optimally gathered edge at the waistline secured, the wire is threaded very evenly through the bottom of the “skirt”, and evenly distributed weights are placed across it. The fabric is likely to grow considerably in length, another reason for knitting very large test/gauge swatches to calculate the width/length required.  I downsized a few years ago letting go of most of my professional equipment. My only iron at the moment when and if it generates steam, did not appreciate being held vertically, spitting hot water at my feet, so the amount of steam used to set the pleats was likely short of optimal. That said, with the wire and weights removed, that edge is staying flat, and the pleats appear to be permanent a month later.
 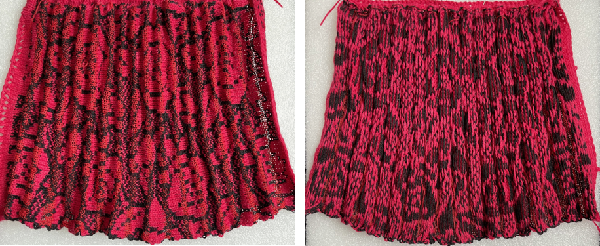 Knitweaving can be used to produce very interesting patterns, both all over or for edgings, and it may offer a viable alternative for patterning using multiple colors in the more prominent purl side rows of the knit. A 1x1selection is a good place to start.
 ![]() Returning to using wools, my efforts with the first yarns I grabbed failed with knit weaving, but since every other stitch every other row is selected, I was able to knit 8 rows in fair-isle with the thicker yarn in the B feeder, the thinner in A, followed by 4 rows of plain knit. The task is easier to accomplish with 2 knit carriages, one patterning, the other knitting stocking stitch.
Returning to using wools, my efforts with the first yarns I grabbed failed with knit weaving, but since every other stitch every other row is selected, I was able to knit 8 rows in fair-isle with the thicker yarn in the B feeder, the thinner in A, followed by 4 rows of plain knit. The task is easier to accomplish with 2 knit carriages, one patterning, the other knitting stocking stitch.
The colors were chosen for contrast making it easier to observe stitch formation.
The swatch, just off from the machine  after a manual tug
 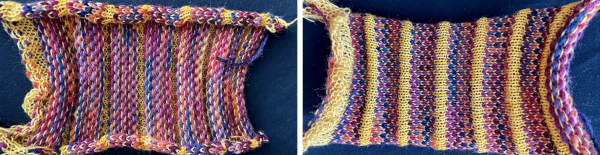 after steaming and pressing
 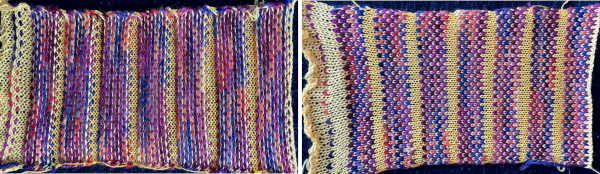 A bit more tugging and gathering on one edge, pleats are set.
  The swatch view on the left illustrates well the pleating roll formed by the thin yarn to the knit side, the inward roll of the fair isle segment to the purl.
Floats formed by the yarns not used traveling up the sides of the knit should be considered the finishing of the final pieces.
Transitions could be made in any one piece between the ratio of the thick/thin number of rows, perhaps for sections ie yoke shaping, or varying the fold sequences from one texture to the other and back.
Most fabric is only limited by materials, tools, and the imagination of its creators.
Other ways to create permanent pleats
single bed
Origami folds inspired pleats 1 6/19
Revisiting pleats on the knitting machine: single bed 5/18
Pleats created with lace transfers 8/17
Pleats: automating “pleating”, single bed 1/1
double bed
Origami-inspired 2: more pleats and fold using ribber 3/21
Knit and purl blocks to create folding fabric_ “pleats”
Pleats: ribbed, folding fabrics 4/15