Periodically the question of printing blank templates for DIY drawings or images from published sources to scale to produce traceable images used to mark cards for punching is asked in forums and very recently in Ravelry.
I primarily use Apple and open-source free software in my work.
Creating knit graph paper on Mac, using Excel and Numbers began with Working in Excel 2008 and Mac Numbers 3.2.
The topic was revisited by me here.
A far more recent variety of printable tapes for multiple gauge knitting machines is offered by Claudia Scarpa in her 2022 blog post.
With some exploration, trial, effort, and good note keeping goals can often be achieved with tools on hand.
The concepts for retaining aspect ratio can be applied to other platforms, programs, and printers.
Suggestions exclude using banner paper or legal size sheets.
The assumption is made that only 8.5 X 11 inches stock is available for use.
Acrobat Reader free downloads provide limited functions.
Factory punchcards are marked in what appears visually to be a square grid.
Using a ruler measuring in mm, the blank 24X60 punching content measures 108 mm in width and 300 mm in length.
The 300 mm content length will be adjusted depending on the height of the design repeat and whether the 4 rows of all-punched squares need to be considered in the printout.
The individual squares on the factory blanks measure 4.5 mm in width and 5 mm in height.
Cards can be joined together with snaps for longer repeats, and the additional pieces ought to be a minimum of 20 rows in height for the card to feed smoothly and accurately. Some added taping will further ensure it continues to do so if the card will be used often or in very long projects.
Two editable spreadsheets to download:
Traceable punchcard templates for DIY designs
1. Numbers 13, the greyed-out rows represent the first two all-squares-punched rows
Depending on the program used to process the file, there may be some juggling between the use of cm and mm values, a matter of a decimal point.
The shared table without numbers measures 10.8X22 cm.
The shared numbered table includes an extra column border marked needed to match the full blank card width markings, 14.2 cm in width, and the same length as the first table, 22cm.
2. A test PDF for a template including row numbers: punchcard-blank 35.
To print to scale using Acrobat Reader, select ![]() Matching results for both templates with a superimposed factory card segment.
Matching results for both templates with a superimposed factory card segment. 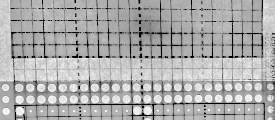 Custom needle tapes
Working in cm, considering that needles are 4.5 mm, 0.45cm apart, eliminates the need for conversion to points, the format used when planning to use the resulting charts for conversion to pixels per stitch PNGs.
Both Gimp and Numbers alter some of the values by default very slightly, as seen here in Numbers for 1-10 cm needle spacings for designing blocks for needle tapes. 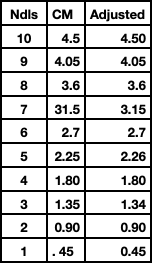 To maximize the available printing space, under print, setup, change all margin values from any preset default, seen on the left, to 0.54
 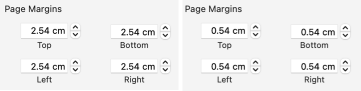 Although the print setup shows page numbers in cm, the page orientation measures are given in mm
 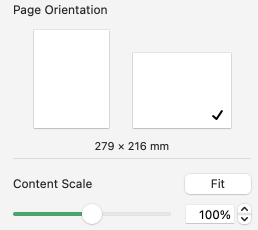 The 2.26 mm, 5 stitch cell unit tape in place on the machine
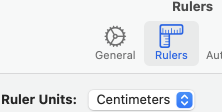
 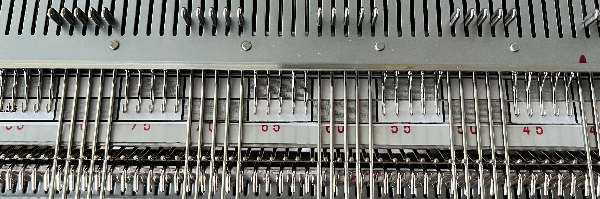 To change rulers in Numbers 13.2 to the Centimeter setting, and thus avoid the need for any conversions of the values to points, from the Numbers Menu at the top of the screen Choose Numbers >Settings, click and scroll on Ruler Units from the pop-up menu, then choose an increment, in this case, centimeters.
When returning to drafting for pixel charts, repeat the process for changing rulers back to points. 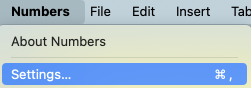
 The math in calculating table cell size is simple.
This export is a revised copy for use in Numbers 09 using cm rulers: needle-tapes-only.
If working in a later OS, this prompt may appear 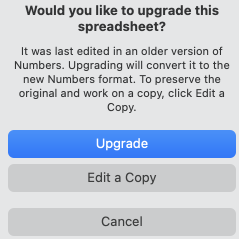 The matching document created in Numbers 13.2:
needle tapes only_numbers 2
Tapes printed in single blank units may be colored in or scribbled on easily, depending on end use  The same concept could be used to generate printed blank graph paper for intarsia and/or to obtain a sense of changes in aspect ratio resulting from knit stitches forming a rectangular grid while designing using pixels per stitch is commonly on a square one.
The mm ruler settings allow entering the values from the swatch gauge measured in mm and calculated to include decimal points.
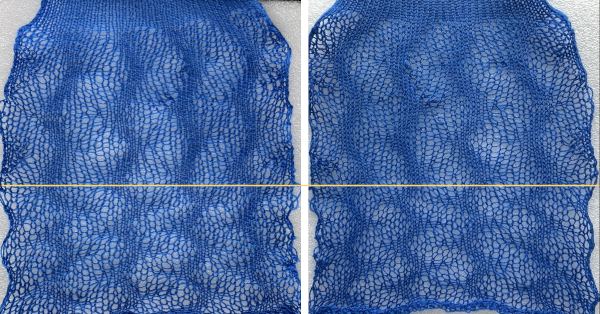
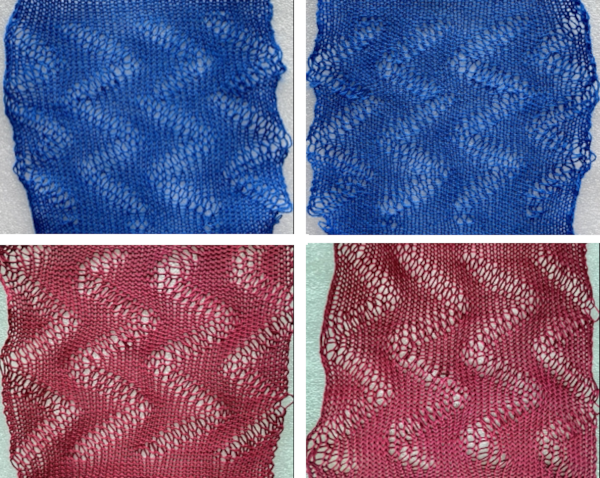
The chart grid on the left is shown in 6/4 proportion, a common width-to-height knit stitch ratio, while on the right it is in equal units. 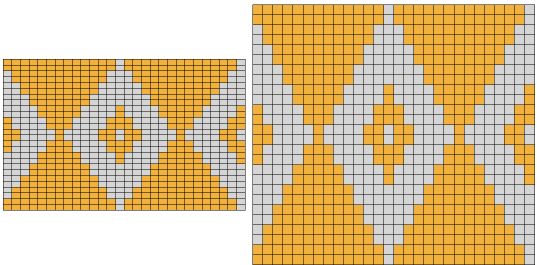 The elongation in most knitting is often reduced by the choice of technique or if working in DBJ, by choosing ribber settings such as slip stitch with lili buttons.
Online published repeats converted to traceable printouts for punching cards
It is possible to produce print-to-size copies of punchcards to trace in a variety of ways.
One alternative is to use Mac Numbers to ready the image for doing so.
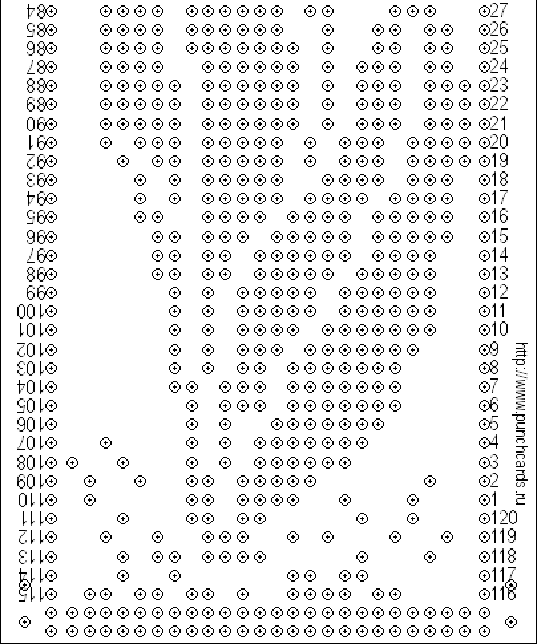
Two jacquard tests began with images from a source for massive punchcard repeat collections regularly mentioned in forums (translated to English link ), and at times in my previous posts.
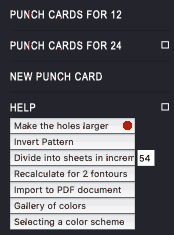
The first is for a border design, #4245 shown here with the holes made larger. 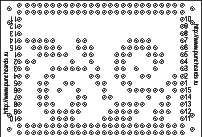 The second design is a far longer one, number 4937
  In the help menu on the right, select the first option, make the holes larger
 Save the image or simply drag and drop it into a new sheet in an existing Numbers document or create a new blank doc removing the default table.
Click on the image, and in the top menu right, choose image arrange.  With Constrain Proportions left checked, change the image width to 14.2 cm punchcard full standard width. The height will be adjusted automatically.
The first printout test. Some of the dots were also marked with a pen, not necessary if tracing over a light source. 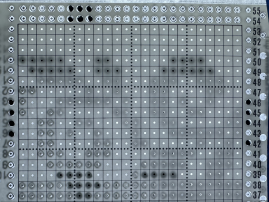 Numbers will split far longer images into segments/sheets, in this case, 3.
The top of the image is displayed on the first sheet, moving down rows to the start of the design in the following “sheets”.
Page margins are all set at .54 cm. Adjusting header and footer values changes and shifts the position of the segments to obtain full dots on each printout.
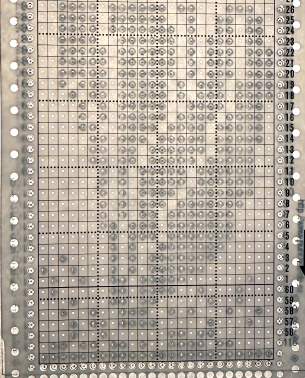
Scale contents to 100%, choose to print all sheets or any single one. 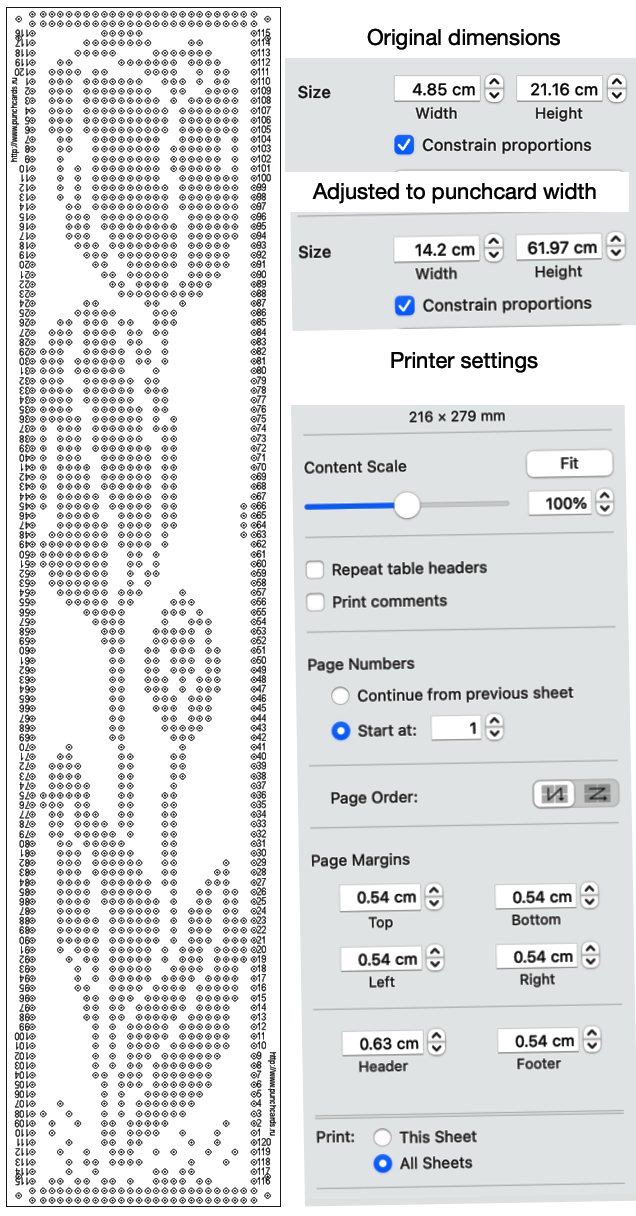 The printout is shown with a card laid over it, placed over a lightbox of sorts.
 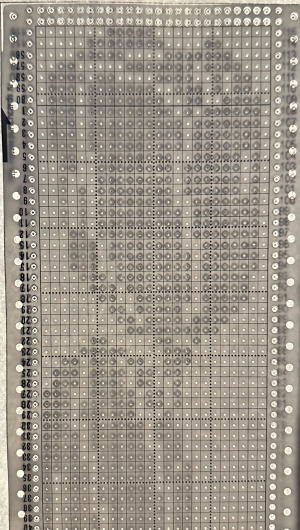 If a spreadsheet is not your preference, the same can be achieved with published cards using Gimp and Mac Preview. Printing from Gimp, even if the display is set to 100% appears not to appear to offer an option for dividing the file in scale automatically on more than one page.
A recent Ravelry query asked about printing individual cards from downloaded PDF sets for Brother machines, including this card for Brother Lace 18, from the set S  Open the full downloaded document, display the thumbnails by selecting the view button in the toolbar, and pick Thumbnails.
Select the thumbnail to print, it will be highlighted, and drag and drop the thumbnail for the punchcard to the desktop, it will be in PDF format as well.
Click on the chosen file, select open with Gimp, and an import PDF window will appear, as seen for this Fair Isle Design 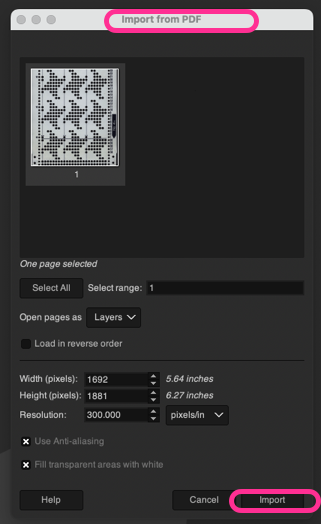 Because transfer lace cards have so few holes to punch and the placement is critical, the lace card 18s was chosen for testing.
Select Import and an image composed of 2550X3300 pixels will open, surrounded by white space.
Using Crop to Content will reduce it to 1485X3052.
Scale it by choosing mm values, and type in the 142 mm card desired width, reduced automatically to 141.99 mm. 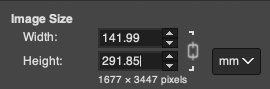 The value for the full, scaled image will still be displayed in pixels at the top of the work window, now 1677X3447 pixels.
Since the repeat is longer than 40 rows, it can be divided into two segments using the mm value. These are the cm and pixel values for my cropped top segment, exported as a PNG. The saved PNG was opened in Preview and with the option for scaling to 100% ![]() produced a good traceable result despite the printer needing a new ink cartridge.
produced a good traceable result despite the printer needing a new ink cartridge. 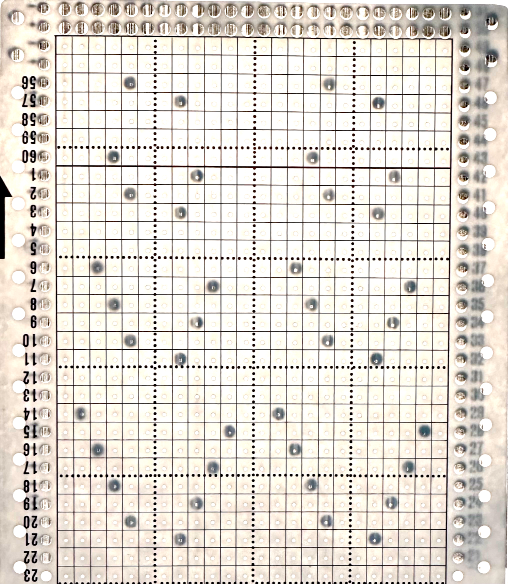 Letting Preview split the image into large enough segments can be achieved by altering page margins.
 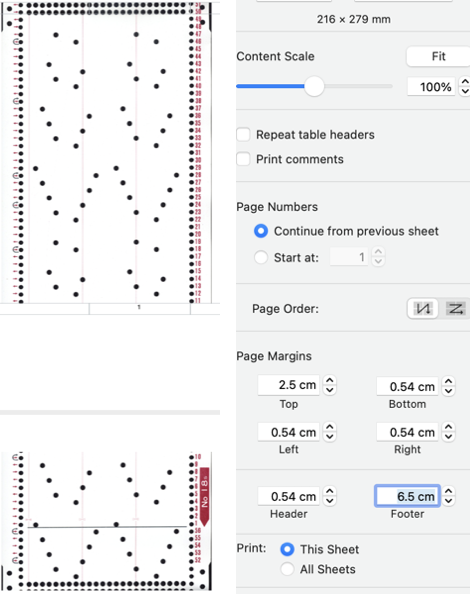 The bottom of the above split printed is good enough considering the starting image was a tad rotated to the left and incomplete.
 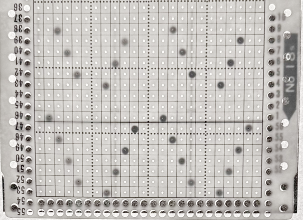 A fail, a screengrab from the PDF full page, working with a PNG and printing from Gimp: the grab, 910X1522, cropped to content 694X1526, scaled to the same mm values,
  yields an image with a very different pixel count from the PDF converted values,
  and cropped to a segment 694X642 pixels and printed from Gimp was not to scale,
  In the downloadable PDF for that fair isle design #4 from the R series, the punchcard is presented in the two segments required to meet the full punched height for knitting.
The bottom segment opened and scaled in Gimp first as a PDF Import and then as a screengrab PNG, resulted in the same failure in maintaining equal pixel aspect values with scaling for printing as seen with 18S 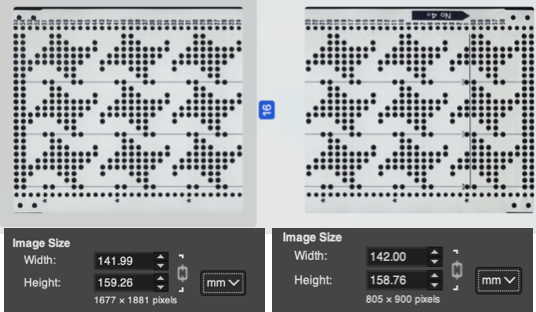 The process was followed on the tulip file PNG: a segment was cropped from the bottom of the saved “larger hole” image, scaled to cm value, and printed in proper aspect ratio,
 What of images from Brother Punchcard Volume 5, especially for those lace cards with so few dots?
Choose an image, open it in Gimp, crop it to the edges of the punchcard design
scale the image by multiplying both the number of stitches and the number of rows by 5 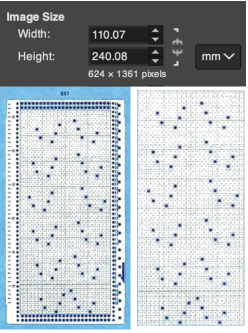 The result printing from Preview (and more ink)
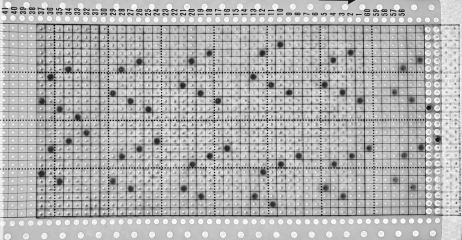 Dak is a Windows-only program. There are multiple volumes of stp files usable only in DAK, downloadable for free, including those for Brother Punchcard Volume 5.
The stp format is only read by the program, and stitch designs cannot be exported in other formats ie. PNGs.
Other posts have suggested hacks for converting screengrabs from DAK to PNGs for use in electronic machines.
I use InSync to move files between my Mac and PC and download to the 930 from there, using img2track.
There are many related ways to achieve the same task using only the PC.
If the goal is to use punchcard templates generated in DAK for traceable printouts to mark cards for punching, both Mac Preview and Numbers may once again be used.
The fixed full width for 24 stitches on a blank card is 108 mm.
Dak loads the files from the punchcard book in the smallest repeat for correct tiling when available, so lace #771 stp opens as a 12X34 stitch repeat.
A screengrab segment of the DAK window. 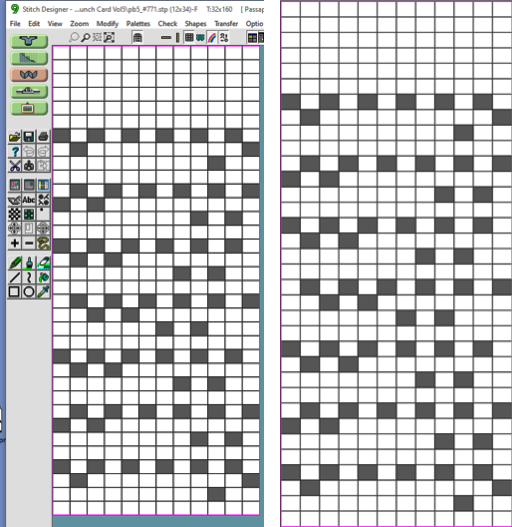 With the repeat isolated and cropped in Gimp, the entered values of 54X170 were adjusted to these by the program, the PNG was saved.
 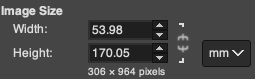 If Numbers is used for printing, under Image/Arrange, adjust the image size
 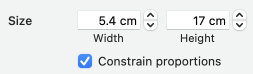 Or if opened in Preview, set the print scale to 100%
 ![]() The results for both matched
The results for both matched 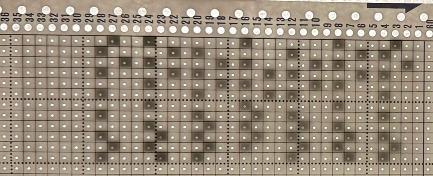 Analyzing the repeat, note the blank first row, not usually seen in a Brother transfer lace design.
Checking the Volume 5 source after the fact identifies the repeat as intended for lace combined with knit weaving, a different knit structure.
DBJ color separations other than the KRC built-in function in Japanese electronic machines require other software or manual color separations.
DAK performs a variety of separations easily and quickly.
In Volume 5, pattern #53 is shown as punched for fair on the left, and separated for DBJ on the right. 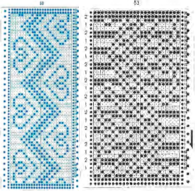 If the # stp is opened in DAK as the 2-color jacquard design.
To knit a traceable punchcard template for the DBJ, the print option generates usable images.
This screen grab of the DAK window shows the jacquard design in the background.
The Page Dimensions window icon outlined in red when selected offers 3 ways to mark the black cells including as dots.
Choosing other (mm) and entering 600 for both values will produce results in a size that allows their being grabbed and saved in full.
The program will conveniently split the design into pages if needed.
The center image shows the generated template for the specific stp, the right one, the image opened in Gimp on the Mac with the content cropped to the dotted chart, 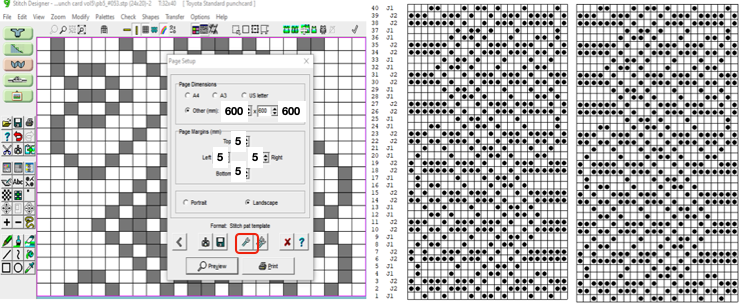 and scaled,
 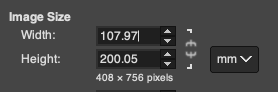 saved, and, in this case, printed using Preview. The punchcard is superimposed beginning with #1 only for an added visual check, punching always begins immediately above the first two all-punched rows
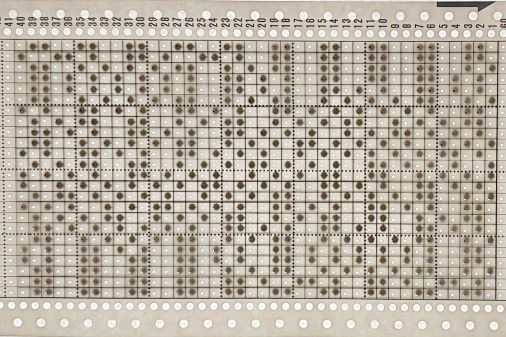
Category: Hints and Tips
More on casting on and binding off, random tips
In online forums, many knitters, often beginners, bring up questions about the best methods to cast on and bind off on their varied knitting machines brands, and problems they encounter, which led me to this review with the addition of more information.
The content will be another work in progress, subject to further editing and the addition of more photos and documentation.
Previous posts on the topic:
More shapes on ribber fabrics with tuck patterning, fantasy fair isle ribber latch tool bind off 2/22
Ribber cast ons: breaking the “rules” 12/19
Ribber cast on comb/ open stitch single bed cast on 2/17
Binding off, double bed 4/19
Casting on, double bed 5/19
Casting on, binding-off single bed 5/19
A look at single bed mock rib 1/17
Picot cast on for every needle rib 11/15
Racked ribber cast on and rib configuration tips 11/15
Transitions in ribbing from EON to FNR fabrics 11/15
The Brother Making Garments Book  has clear, step-by-step illustrations for many techniques.
This information presents some of the same techniques as illustrated in the previous post on casting on and binding off the single bed in a different visual sequence.
The starting side for any knitting technique does not often matter. Some exceptions are: starting from the left for preselection rows when knitting 2 color dbj using the KRC button in electronic machines, and when the carriage needs to operate to and from the right, from right to left when the color changer is in use in patterns that require color changing every 2 or even number of rows.
The weaving cast-on leaves open stitches at the start of the piece, with the yarn traveling through them.
The weaving brushes need to be engaged, down position, and levers up.
It is not necessary to deactivate them by raising the levers, I tend to do most of my knitting with them in the brush-down weaving position.
Check that they spin freely, not only can fluff get caught between the bristles but sometimes under the brush itself, keeping it from rotating properly and resulting in weaving fails whether during this cast-on or when knit-weaving in pattern.
1. Begin with the lever down, brush up, loosen, and remove the screw
2. with the lever up, the brush will slip out right side up, turned over, 3, will show any fluff or threads wrapped around it. Remove the accumulated fibers, and if any bristles are poking out of place, pull them out or clip them with scissors
4-5. lever up, slide brush in place
6. with the lever down, brush up, replace the screw, and as with any screws, do not over-tighten, check that brush spins freely. BTW screws in knitting machines both Japanese and European are metric, a set of metric screwdrivers is very useful. 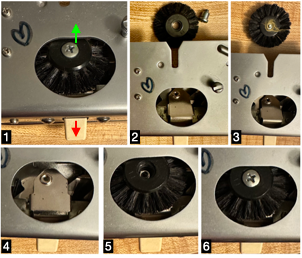 This is not a permanent edge, is handy when beginning with waste yarn, and if the piece is to be gathered at the center, the yarn end can be pulled, threaded into a needle, and passed through the open stitches again if needed, and secured.
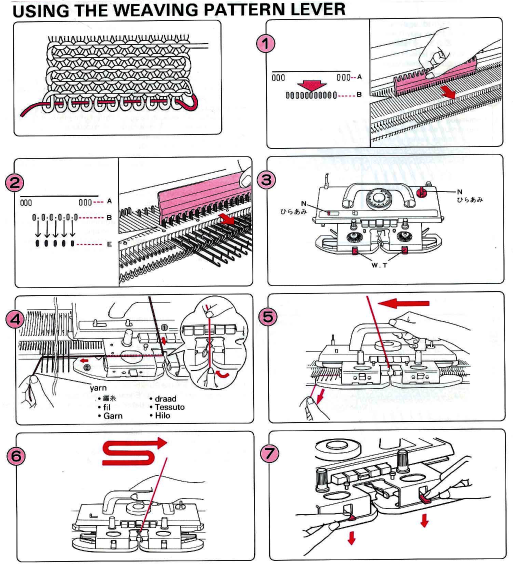
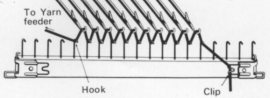
The Brother single bed cast-on combs, shown used immediately after the first cast-on row, are strictly a Brother thing. It is possible to continue knitting without them. My first machines were other brands and offered nothing like them.
If stitches do not immediately knit off properly, after any cast-on, bringing the needles out to hold position for the first 2-3 rows will generally solve the problem.
When I do use them I prefer to point their hooks toward the top bed rather than away from it
 EON e wrap cast on: forms a permanent edge that may also be used in decorative joining of pieces.
After e wrapping every other needle, in this case from left to right, place the yarn in the knit carriage A feeder and close the gate.
When inserting the comb front to back, the yarn end on the carriage side is easily caught in the hooks and would form a long loop on that side if knitting is continued  to avoid that, in any cast-on, lift the yarn up and over the gate pegs on the carriage side
 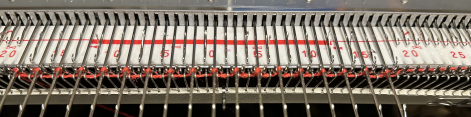 insert the comb, free the yarn from over the gate pegs
 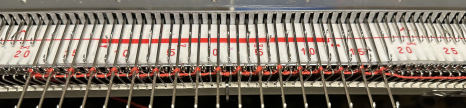 make the first carriage pass to the opposite side, the empty needles will pick up loops, eyelets will be formed as knitting continues
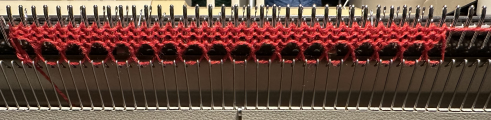
Every needle (EN) E wrap cast on creates a permanent edge. 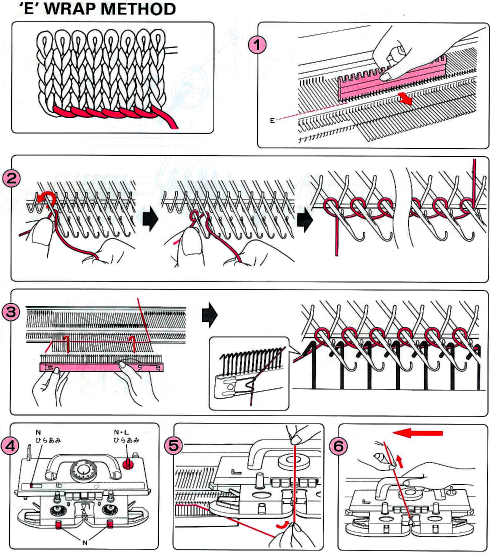 Using the needle bind-off method at the top of the piece will closely match the cast-on edge.
The crochet/ latch tool cast-on is my preferred one when decreasing multiple stitches as well. 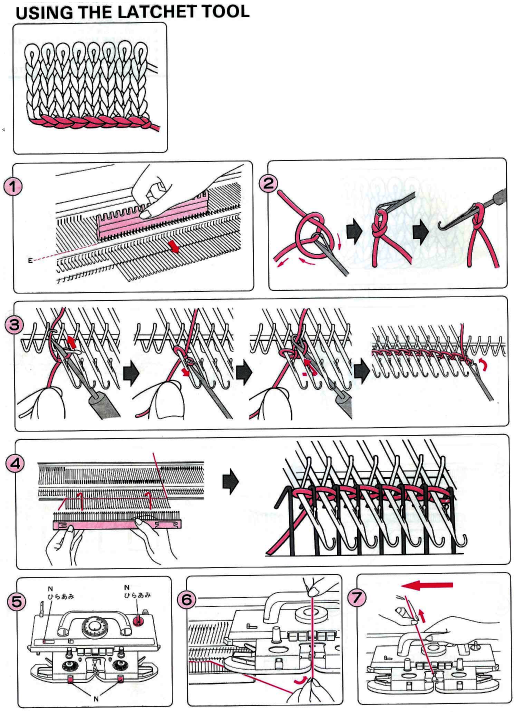 I prefer to lift the last single chain onto the last empty needle on the carriage side rather than continuing the chain and lifting the last open stitch onto it.
The latch tool bind-off around gate pegs will match its appearance. Both can be performed to create looser chains when needed.
Multiple decreases on both sides of a garment may be achieved by casting off the stitches opposite the carriage side using a separate strand of yarn using your favorite bind-off. My go-to is the crochet one.
In fair isle knitting, bringing all needles out to the E position opposite the carriage before knitting the row will ensure those stitches will be knit in a single color, for easy bind-off when the carriage reaches the opposite side, and 2 color knitting can resume.
A youtube video was shared on FB for a version of this bind-off, filmed on a Studio machine, suggesting it might be easier to use for knitters with hand or wrist problems.
On Brother machines, small tests are executable without the use of waste yarn and ravel cord.
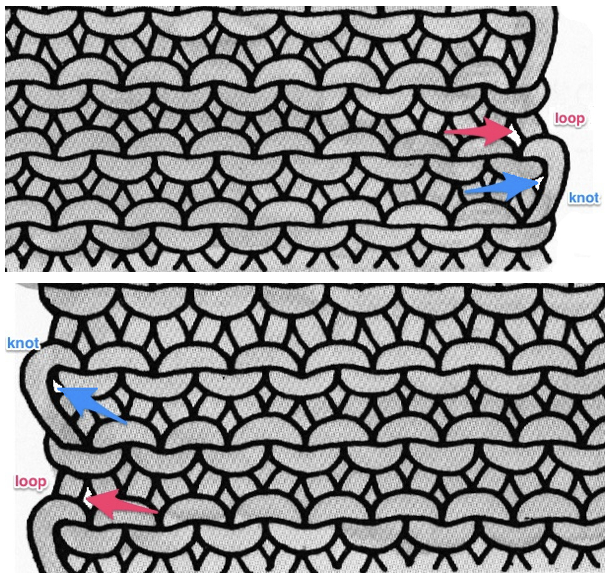
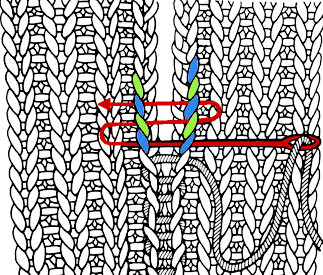
The technique takes into consideration the formation of the side edge stitches illustrated here for single stitch increases. When bringing one empty needle into work opposite the carriage, the yarn will twist and form a “knot” as the carriage moves to and from the opposite side. Knots (blue arrows) vs loops (red arrows) are shown in this illustration from the post on seam-as-you-knit
 Part/slip cast on: a single needle will be brought into work at a time opposite the carriage.
Use a familiar yarn, and set the tension one to two full numbers tighter than that appropriate for it in stocking stitch.
COR: set the knit carriage to slip in both directions
Opposite the carriage, bring the first needle on the far left of the intended group to be worked out to hold/E position.
As the knit carriage moves from right to left, the needle in the E position will knit and is returned to the B position.
COL: No knitting occurs as the carriage moves and returns to the right, that same stitch or any stitches in B will simply be skipped.
COR: Bring the second needle from the left out to the hold/E position.
As the carriage moves to the left the needle in the E position will be the only one to form a knit stitch and is returned to B.
COL: All stitches are slipped as the carriage moves and returns to the right.
Repeat the process, bringing single needles out to work moving from left to right until the cast on is complete.
Begin to knit the body of the piece slowly, making certain all stitches are formed properly.
Part/slip cast off :
Knit the last row at main tension, and end COR
Set the carriage to slip in both directions so that needles brought out to hold position will be knit.
Turn off any patterning mechanism, in Brother set the change knob to N-L
Hang a claw weight on the right.
Transfer the first stitch at the right onto the needle on its left, and pull that needle out to hold/ E.
As you move the carriage to the left the needle in the E position will knit, as it returns to the right the needle will be skipped.
COR: repeat the process beginning with the next needle on the carriage
side.
To pick up dropped stitches: 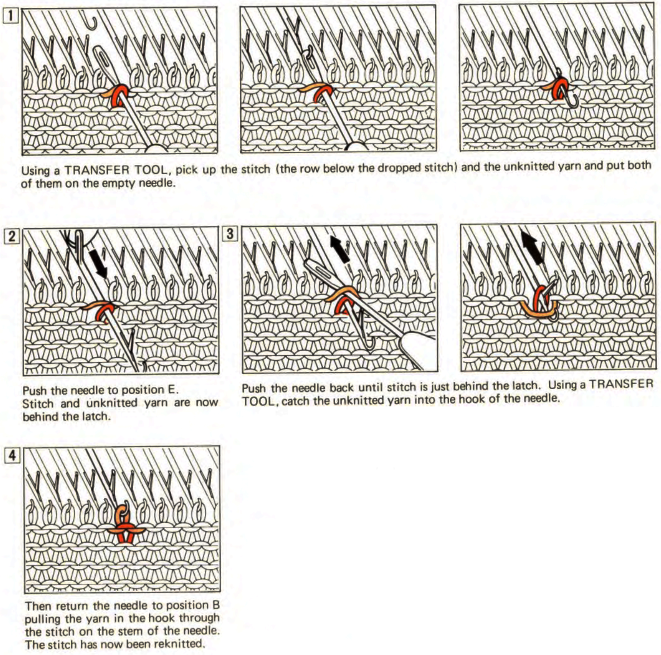
 Two stitches dropped side by side :
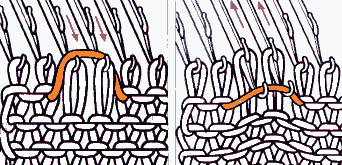
From the KH 800 manual: ![]()
More on standard and modified 1X1 and 2X2 ribs
Ribber manuals usually give instructions and diagrams for ribs, and in some early manuals, the way in which the needles should be set up so that side edges will match the when garment bands are seamed is not included.
In later model manuals, instructions began to call “perfect selvages”.
The position of the beds in relation to each other is dependent on the pitch lever. When both beds are being used, both the pitch and racking levers may be moved so that the ribber can travel one or half turns in either direction. A half turn is sometimes used to set up the position for some accessories, or may simply be what works best in the specific knit fabric and yarn.
If traveling between Japanese brand instructions, some of the names for parts differ.
Brother 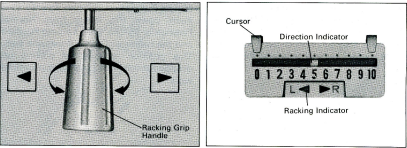 Studio or Silver Reed:
A: half pitch lever, B: swing handle, C: swing indicator 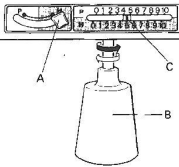 Not leaving out the Passap: the racking handle and racking indicator
 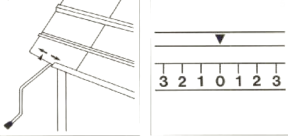 The Passap racking handle moves in a circular direction, clockwise or counterclockwise.
On the Bulky machines, after the zig-zag row, consider ladderback arrangements for less thick and stiff double bed work.
If the bulky rib was to be applied to single-bed work, I was never happy with direct transitions on the machine. Hand-knitters have some advantages when owning a range of needle sizes and types. One option then is to start on waste yarn, end with a row of ravel-cord, and begin the piece on open stitches. Upon its completion, pick up the open stitches on an appropriate size knitting needle, and knit and bind off the rib by hand.
If only the look of the cast-on row is not pleasing, another option can be to start ribbing after waste yarn configured to the necessary needle arrangement, ending with a row of ravel-cord and beginning the rib on open stitches while leaving a length of yarn for binding it off later.
After completing the piece, pick up the open stitches with a small gauge double-point knitting needle for added ease, but use an appropriate size hand knitting needle for binding off in rib configuration.
When choosing to leave a length of yarn for binding off a previously knit piece of fabric, wrap around all needles in work a minimum of four times, wrap it in a small bundle and secure it with yarn or another small tie, or wrap it around a bobbin like those used in embroidery or intarsia.
The third circular row is not needed after the zig-zag row and placement and addition of weights in ribber cast-ons. It actually will form a small float on one side of the fabric that will show if that side becomes the knit face of the finished piece.
That third row is recommended here, as in most pubs, in Brother Ribber Techniques.
The first setup given does not include any transfers between beds 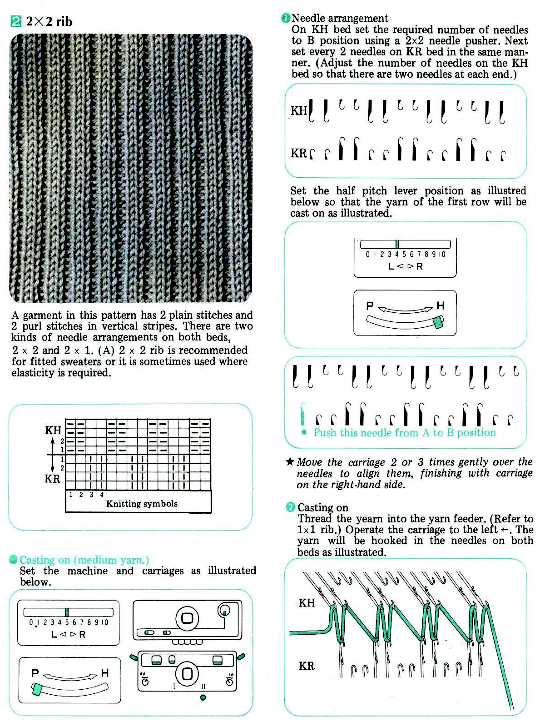
 The rib with transfers recommendation results in a commercial-type rib which is used when the garment is to be knit entirely on double beds or when using fine yarns so that stitches are brought closer together, resulting in less distortion. Its use can make ribbed bands appear narrower than the remaining part of the garment, with no buckling or distortions after the technique change, while allowing the needed stretch.
There are other arrangements that will form ribs that lie flat and make better joins when used ie as bands in cardigan fronts.
Test swatches should include transfers to the final fabric bed arrangement, whether single or double followed by treating the swatch as one would the final piece before calculating the gauge and committing to a garment or even an accessory.
Begin with a zig-zag row and tension suitable for the yarn being used, and knit 2 circular rows.
At this point, stitches are transferred. If the fabric is to be used with the purl side facing transfer stitches on the ribber, for the knit side facing make the transfer on the main bed.
In this post, it is assumed that the knit side will be worn on the outside in each case. Seaming edge stitch allowances are taken into account.
The tension used after any final transfers to the opposite bed will need adjustment based on the yarn thickness, twist, and machine being used. It is wise to begin any experiments with familiar yarns.
The racking lever position is recommended to be set to 5 prior to any cast-on. Other positions may be used as long as the ribber can still be moved by one to one-and-a-half positions to either the right or left if there is any reason to do so. Passap markings are different. When racking I found it easier to mark its bed with my own numbers since I usually work out most of my patterns on Japanese machines. They do not apply if any reader technique racking numbers are in use, since any console prompts are based on the manufacturer’s sequencing. 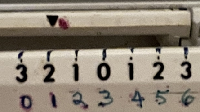 A practical reminder from Silver Reed: do not turn the swing/racking handle on any Japanese machine with all needles up to D on both beds on a serious collision course.
 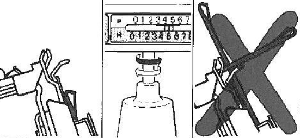 It can sometimes appear easier when making transfers to have needles point to point. If that or another bed adjustment is made to any personal preference, keep the desired final setup in mind, and before continuing to knit, check that the machine is set for half pitch.
Prior to casting on bring the main bed needles into work. Bring the same number of needles into work on the ribber, plus an extra needle on the right.
On Half pitch, H, for knit side facing, transfer stitches from the main bed to the ribber for a 1X1 effect. The number of needles in work on the main bed should be a multiple of 2+1. After the transfer, adjust the tension settings. The pitch remains on H ![]() For a 2X2 effect, the cast-on method is the same, with every 3rd stitch transferred down to the ribber. The number of needles on the main bed should be a multiple of 3+2
For a 2X2 effect, the cast-on method is the same, with every 3rd stitch transferred down to the ribber. The number of needles on the main bed should be a multiple of 3+2 ![]() When the band is complete, all stitches may be transferred up to the top bed and the piece continues in single-bed knitting.
When the band is complete, all stitches may be transferred up to the top bed and the piece continues in single-bed knitting.
Straightforward two-by-two bands knit and applied as a long vertical strip will want to curl when joined to a knit. Modified commercial rib variations will produce far better results.
If a sideways application is chosen, after all the stitches are transferred to the top bed, knit a row before applying the band by the chosen method. This row may appear as a stitching line on the finished piece.
Other variations: here the number of needles in work on the top bed must be a multiple of 4 +1
with half pitch on H bring needles into work on both beds ![]() A single needle on each bed seen here on the left, remains in place until the cast on is complete
A single needle on each bed seen here on the left, remains in place until the cast on is complete ![]() the ribber is racked to the left, half pitch now set to P, those 2 end needles on the left of the above chart are moved to make the edges of the work identical
the ribber is racked to the left, half pitch now set to P, those 2 end needles on the left of the above chart are moved to make the edges of the work identical ![]() With a multiple of 3+1 needles in work on the main bed, begin with every needle, on half pitch
With a multiple of 3+1 needles in work on the main bed, begin with every needle, on half pitch ![]() the ribber is moved 1 whole position with the racking lever to the left, the end stitches on the above left are moved so as to produce identical ends.
the ribber is moved 1 whole position with the racking lever to the left, the end stitches on the above left are moved so as to produce identical ends. ![]() The post Seaming, joining, picking up stitches 3, ribbed knits offers suggestions on seaming techniques.
The post Seaming, joining, picking up stitches 3, ribbed knits offers suggestions on seaming techniques.
Vertically worked bands require their own small gauge swatch. The weighing of a small strip is bound to differ from that distributed across a wider band ie that at the waistline, and the results need to be calculated accordingly. The same consideration is a factor in shaped sleeves vs. sweater bodies.
End the bands with waste yarn, then if too many rows have been knit they can be unraveled, or if more are required the stitches may be rehung on the machine for continued knitting.
Apply bands to garment pieces that have been allowed to rest.
Some binding-off methods have been discussed in the post on binding off on the double bed.
Binding off ribbing sparks discussions on which way is best, especially if both the cast-on and bound-off edges are both visible and the hunt is on to get them both to match.
To review, bind-offs may be done in a multitude of ways on the machine by transferring stitches between beds or leaving them where they are, as well as working them after removing the knit from the machine on waste yarn.
Instructions abound in hand-knitting pubs and machine-knitting demonstrators talk about smiles-and-frowns visualizations including in some youtube videos when discussing tapestry needle-sewn bind-offs.
There are techniques that can accomplish similar effects with the knitting still on the machine as long as there is room to jump up several tension numbers before knitting the last row with both carriages from right to left.
The drawback I find using a tapestry needle with the work when it is off the machine is managing the length of yarn necessary in pieces wider than demonstration swatches.
The process may be easier for some if the work is taken off the machine and onto a hand-knitting needle, preferably a double-pointed one with needle stoppers available. Any hand-knitting illustrations or videos then become easier to follow.
With a tapestry needle, one inserts the needle as if to purl into the first (knit, cyan) stitch and as if to knit on the second (purl, yellow), both stitches are left on the needle.
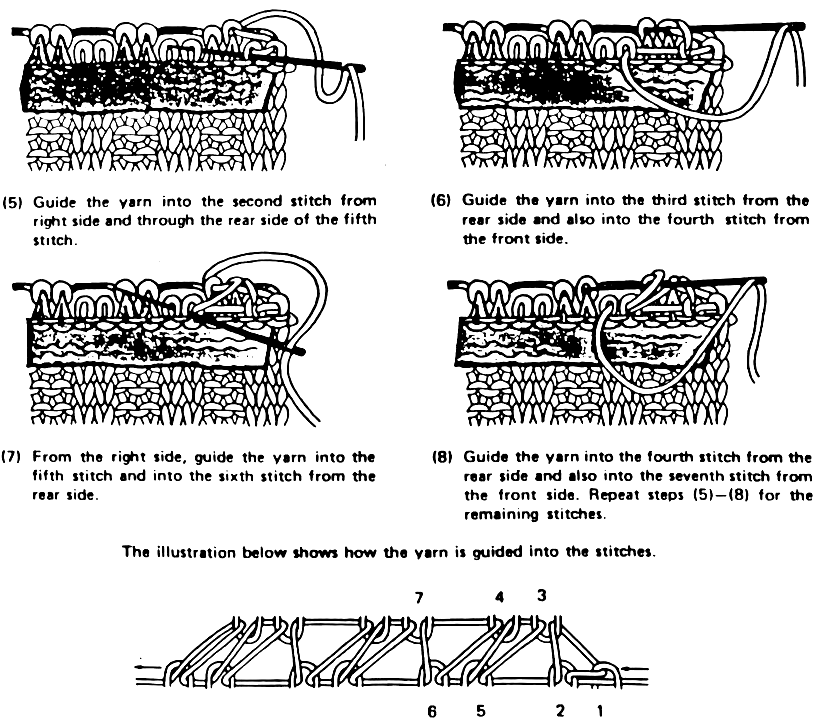
The first stitch is then “knit off” and the needle is inserted into the next stitch (knit) as if to purl. Both stitches are left on the needle. Repeat steps 1 and 2. I used to suggest my students think up ditties for repeated actions, here it might be “purl into a knit and knit into a purl”. 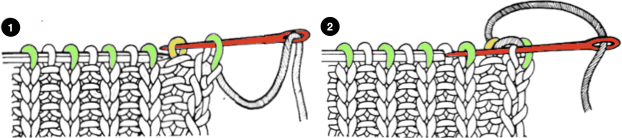 The steps after the work is scrapped off on waste yarn
 bring up discussions on how best to scrap off.
The missing how-to preparation for binding off:  When the rib is completed, transfer the stitches on the ribber up to the main bed, pulling needles out to E as you move across the bed
![]() Cut the yarn, leaving an end long enough for binding off.
Cut the yarn, leaving an end long enough for binding off.
Remove the ribber arm, exchange it for the standard sinker plate, place a contrasting color yarn in feeder A and secure it.
My test piece ended COR. Push in the cam button for slip stitch corresponding to the direction in which the carriage will move on its next pass, in this case, the left one. Another option is to simply push in both.
As the carriage moves to the opposite side, what is now identified as knit stitches will knit, and the B position needles will be skipped, creating a float. 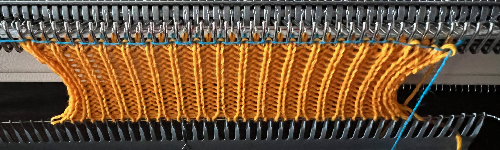 Knit at least 10 rows in the contrast yarn. No ravel cord is needed as knitting ravels down easily to be removed.
  When the piece is scrapped off, the all knit rows will roll nicely to the back of the swatch, and the rib can be stretched easily, with the top of the knit and purl stitches easily identified for sewing.
  Two by 2 ribs with stitches transferred to a hand-knitting needle:
 Using the same waste yarn scrap off keeping as for the one-by-one rib, but keeping the two-by-two needle arrangements when setting the knit carriage cam buttons to slip:
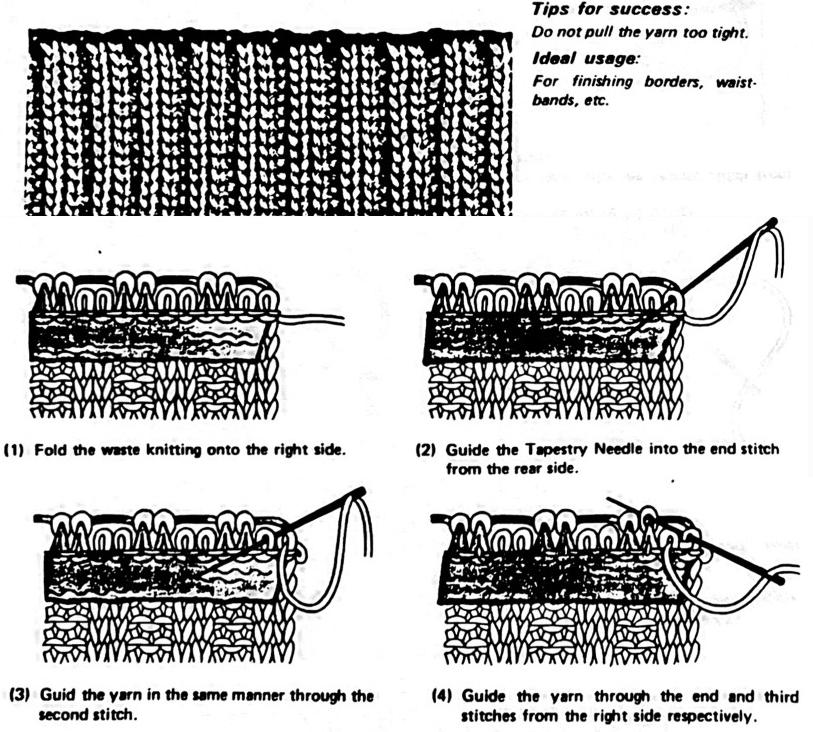
The collection of posts on casting on, binding off, and seaming ribs
Casting on, double bed
Ribber cast ons: breaking the “rules”
Picot cast on for every needle rib
Racked ribber cast on and rib configuration tips
Ribber trims 3: one trim, four variations
Ribber trims 2
Ribber trims/edgings 1
HK trim as MK edging
Binding off, double bed
More shapes on ribber fabrics with tuck patterning, fantasy fair isle
Seaming, joining and picking up stitches 3, ribbed knits
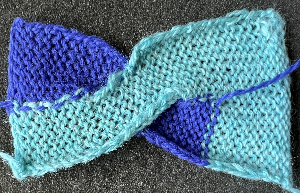
Twisted headband meet fisherman rib, seaming, variation ideas
Seaming, joining, and picking up stitches on knits 2
Transitions in ribbing from EON to FNR fabrics
When no ribber is available, single-bed mock rib
Seaming, joining, picking up stitches 3, ribbed knits
These illustrations are not my own work, they were taken from various out-of-print Japanese published resources including manuals for different machine brands, or handouts received decades ago, in the days of international machine seminars, and altered and resized.
For more information on seaming and joining also see the previous posts: Seaming, joining and picking up stitches on knits 2, which includes some illustrations on joining ribs as well
Seaming, joining, picking up stitches on knits 1
The plan here is to provide additional illustrations for joining ribbed stitches in various configurations so as to maintain the stitch arrangement 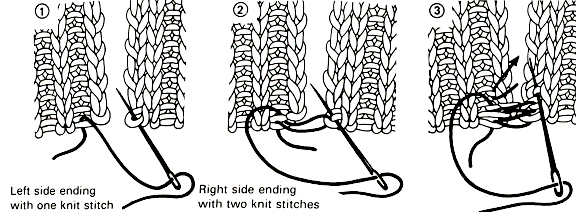

 rib join through the edge loops of knit stitches
 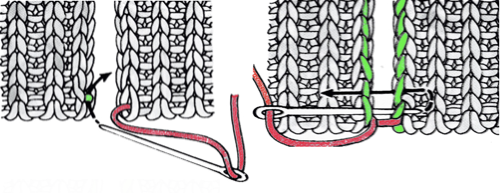 2X2 rib ending with one stitch
 ![]() 2X2 rib join ending with 2 stitches
2X2 rib join ending with 2 stitches ![]()
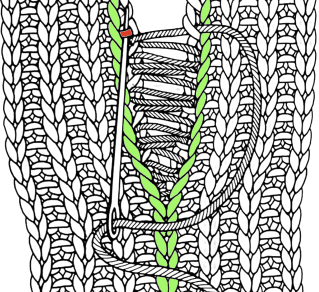
 2 X 2 rib join ending with 2 purl stitches, 1 full stitch from the edge
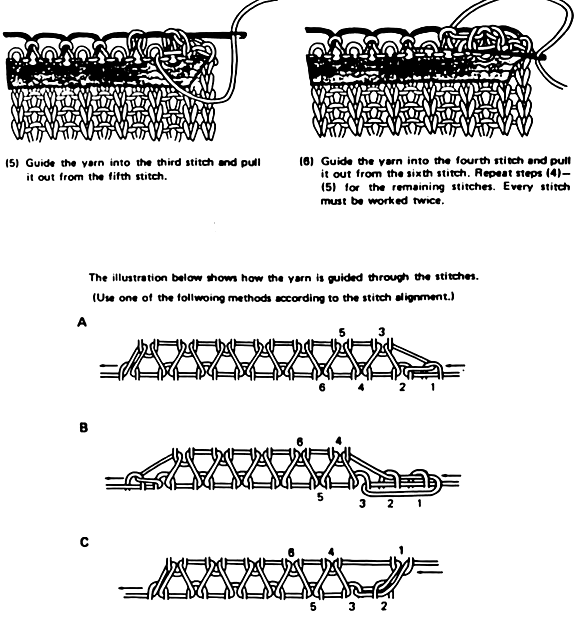
 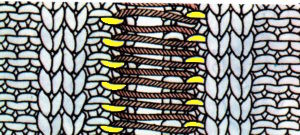 Attaching ribs to garments: it often is best to weave under and out of single bars at a time, particularly in bulkier knits and in short ribbed edgings. If the stitches are small, it is possible to weave under bars 2 at a time, always test on swatches before committing any technique to a garment.
In A there is a fully formed knit stitch on each edge while in B, some shaping may be seen. The gauge for the ribbed fabric vs stocking or other techniques may be quite different, so in joining, it may be necessary to adjust sequences of pick-ups on either side in order to ease any differences in fabric lengths and maintain a smooth, flat join. 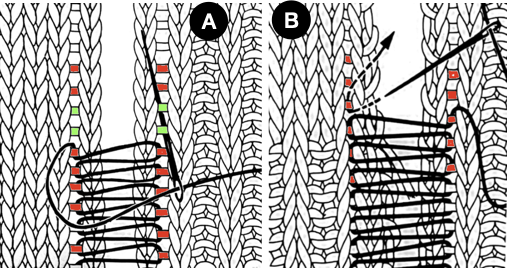 Attaching to a V-neck, adjusting for shaping
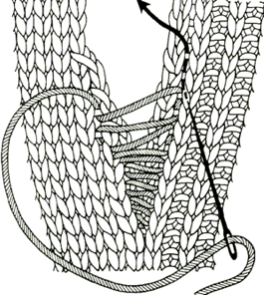
Long vertical button holes/ slits in knit fabric 1: intarsia
There has been a long thread in the machine knitting FB page lately that arose from a share of these 2 images. 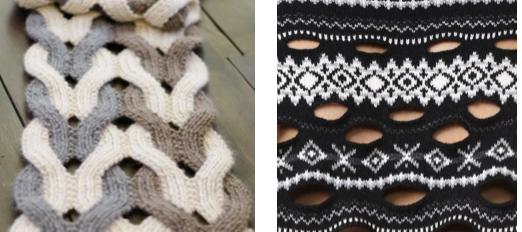 There are three hand-manipulated methods available on most machines. True intarsia knits all parts of a design simultaneously and is best suited for complicated designs. Short-rowing is best suited to diagonal shapes, while the slip method is to vertical shapes. Both knit designs one section at a time and have no floats between shapes on the purl side.
True intarsia is also called bobbin or tapestry knitting.
Members contributed their concepts along with some of their swatches illustrating the idea that effects similar to the cables on the left could be executed in intarsia.
One member shared an Instagram link with a body of work by cari + carl using the technique.
I have been knitting for decades. Intarsia on the knitting machine along with cables or most hand-technique-only finished garments is something I have avoided at times, simply because they were too time-consuming when knitting items for sale in shows or even galleries, at others because some evoke my personal flight response.
I used to hand knit as well, preferred lace, intarsia, and most definitely complex cables knit on 2 needles.
Prior to attending a design school as a student, I worked in a shop that happened to sell knitting machines but whose main income came from selling yarn and lessons to hand knitters. As part of my responsibility, I had the job of hand knitting bulky intarsia sweater samples which at the time featured large images, often of birds or other animals, that were sometimes wrapped over the shoulder and onto the back or sleeves.
As I began to work on Brother machines, I acquired all the related accessories. My intarsia carriages other than in demos were stored unused for years. I gave away my yarn-brake years ago,  and very recently shipped my Brother 260 bulky intarsia carriage to a Parsons student, so by default any of my experiments at present will be knit on a standard km.
I was stuck on the idea at first of large stitch count cable crossings being made by using holding techniques and initially could not imagine how the same could be done using an intarsia carriage. It took a while for me to sort out in my brain that slits may be created in intarsia by simply not wrapping stitches as the knitting continues and maintaining color changes across the row of knitting, resuming yarn crossings in the areas that require joining.
Some considerations: using the intarsia carriage, the stitches are formed in stocking stitch, so the resulting knit strips will tend to curl to the purl side, far more noticeable in narrow strips, perhaps less so in yarns that will result in stitches that are permanently set by blocking. Using bulky yarns on appropriate gauge machines may also lessen the curling.
Experimenting with familiar yarns helps determine whether the familiar knit carriage tension when using them on the single-bed matches that achieved when the intarsia carriage is in use.
My Brother Machine Intarsia Standard carriage is the KA-8210 model: 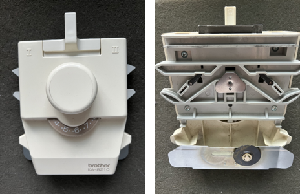 It was intended for use on early Brother punchcard models listed in the manual. Trippers were required to advance the row counter in later models.
 The B tripper doesn’t engage in my carriage, the A tripper does, and triggers the row counter in my 930.
The yarn placement for intarsia knitting is the same as that used in knit weaving.
“Sinkers” are provided with the accessory, and frequently turn up in the “identify this please” questions in forums. I have a tendency developed early on to use clothes pins as small weights when needed, used them in the swatch that follows, and if bobbins filled with yarns are used instead of the yarn balls or cones, their weight will be enough to keep yarn lengths manageable.
Each area of color has its own yarn supply, usually wound on bobbins.
Yarn bobbins are available in a variety of materials and sizes from cardboard to plastic or even wood. The overall shape may vary, but the concept of wrapping yarn around the center of a narrowing shape and slipping an end through a slot to secure it is shared by all types related to the image on the left. It is possible to make your own in similar configurations out of any material that will hold its shape.
The clamshell version became my preferred version of the tool. The small ones come in handy for holding ravel cords or even wire. 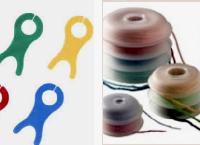 When knitting more than a swatch it is likely far easier to work without a ribber in place. I like to do all my knitting with the main bed anchored and angled with ribber clamps rather than flat.
 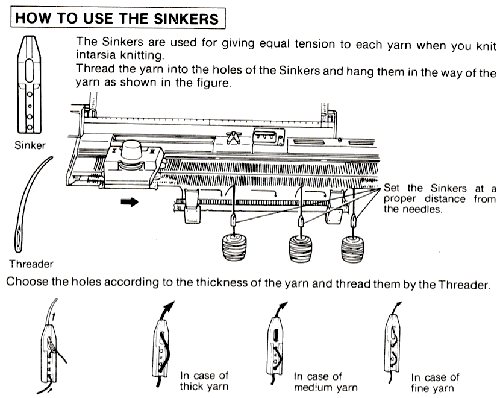 If the threader is missing from the supply of sinkers, floss threaders can help, and are also handy when beading on the machine. The used yarn here is 2/18
 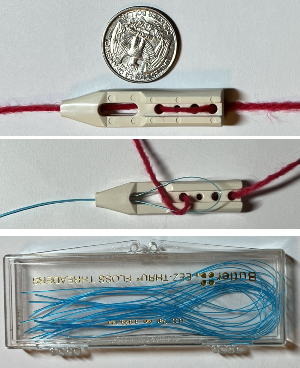 To knit: begin with a familiar yarn. This carriage may actually produce a different stitch size and resulting gauge than the result when using the same tension number on the knit carriage, a factor if the plan is to combine intarsia segments with the main carriage for any stocking stitch across all needles in use.
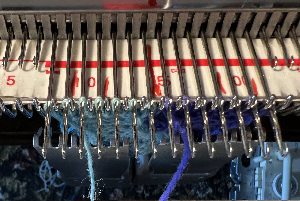
Brother knitters are familiar with the preselection of needles when patterning. When using the intarsia carriage all the needles in work, B, are aligned in the D position. They are seen below just behind the latches.
Knitting may begin on either side. Start on waste yarn and ravel cord if working on a large piece, cast on, and knit one row unless casting on in different colors matters.
Remove the knit carriage and continue using the intarsia carriage, beginning with it opposite the side on which the knit carriage had been removed, leaving a yarn end. 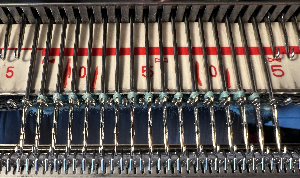 If any latches are closed, the stitches will drop on the next intarsia carriage pass. They will drop as well if the yarn skips being laid over any of the needles in the D position. There will be an eyelet at the very start of the process which is eliminated when the yarn ends are woven in. A reminder for Studio knitters: Brother needle positions are A, B, D, and E, C was present in very early models but was then eliminated permanently, while Studio kept the alphabet in proper order.
Laying on the yarn 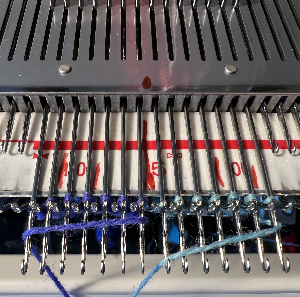 An illustration of the crossings to eliminate holes.
 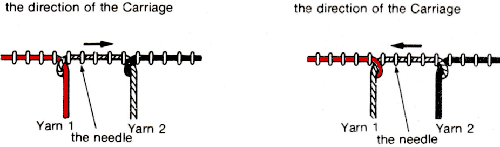 I had initially begun on an uneven number of stitches, then decided it was more practical to be able to use 7 prong tools for my planned cable crossing, so I decreased on each side accordingly.
Eliminating the crossings will deliberately cause separations between the colors.
If the intent is to cross the resulting strips, then the side of each where transfers stop matters. 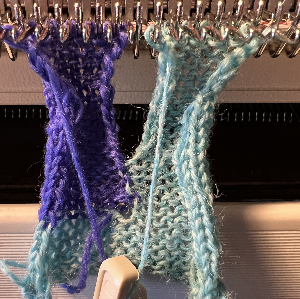 Using the appropriate tools remove the stitches onto them.
 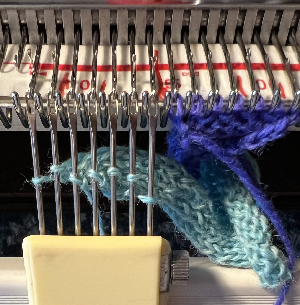 The yarn ends need to be kept free for the next intarsia carriage pass, the needles are aligned in the B position after the cable crossing is created.
 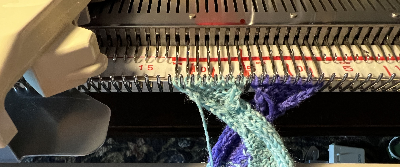 Remove the carriage by sliding it off the bed or using the release knob
 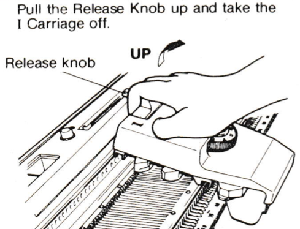 Return it to the opposite side to make a free pass and return to the side of the needle bed where the necessary yarn ends will be available to proceed.
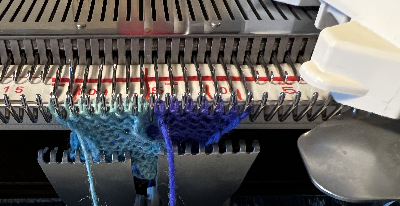
 Resume wrapping to join the strips once more
 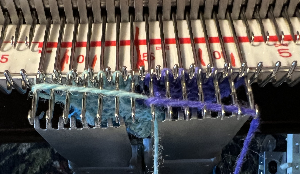 Knit to the desired length, and bind off in one or more colors.
When off the machine the stocking stitch strips will curl. 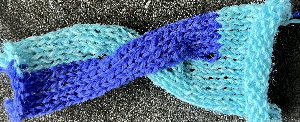
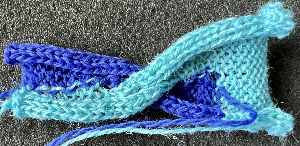 Here the knit is exposed to steam and some light pressing
 This gigantic swatch, for me, is the end of my intarsia knitting, though it is best to never say never.
Tips and techniques for the Studio AG 50 Intarsia Carriage
Brother Intarsia without an intarsia carriage
If cable crossings are the goal for this and following slit techniques, planning the crossings in color can help track the process. This is one of my earliest illustrations for doing so, from my Excel days, followed by a series of later blog posts on the topic. 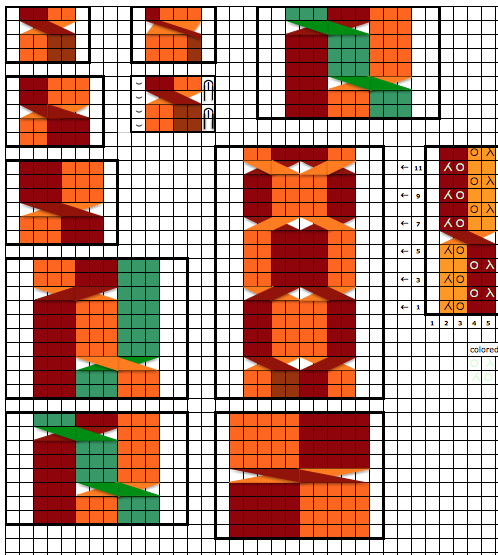
More “buttonholes” and slits
In the past few years, in many runway collections, knit pieces have featured slits that happen either/both horizontally or vertically, with some effects achieved by turning the fabric sideways.
My first post on horizontal slits was written in 2016.
This post will share published references describing additional various methods for creating them.
A review of grafting aka Kitchener stitch is illustrated here for hand knitting and used in some of the buttonholes/slits that follow. 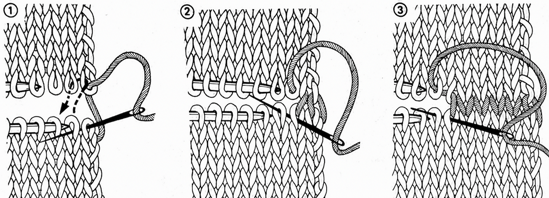 Some single-bed buttonholes were illustrated in the post. One of the many resources
  Horizontal single-bed: using a ravel cord and tapestry needle
 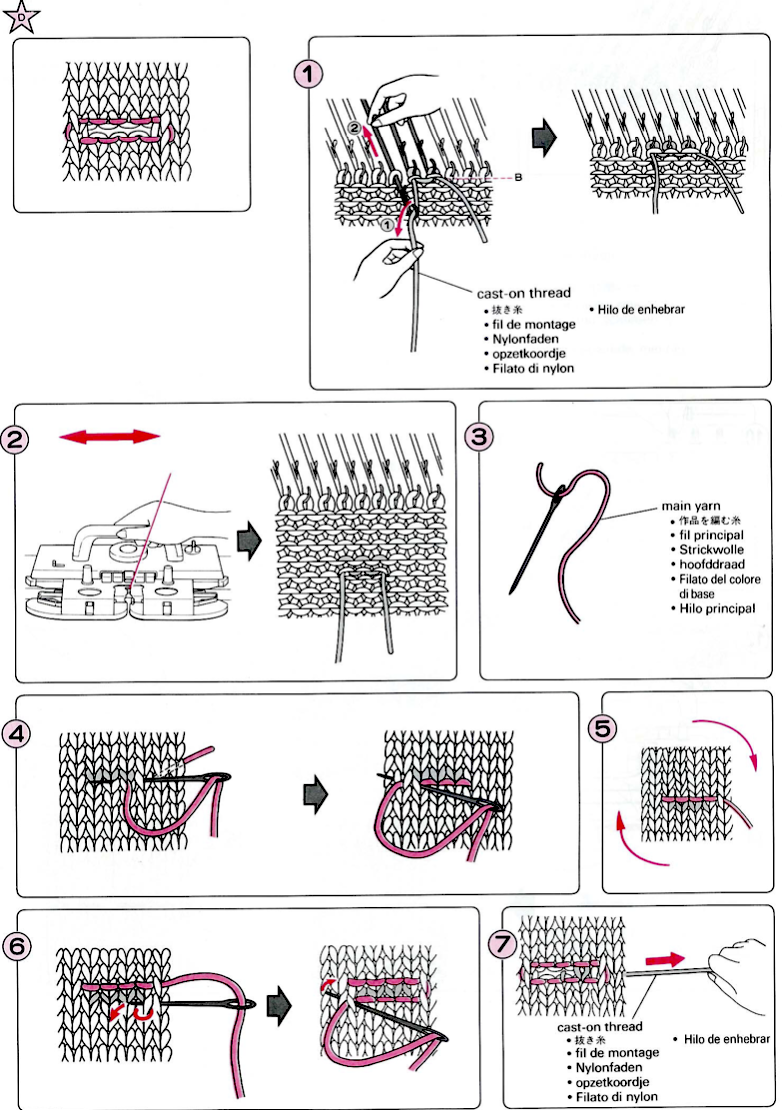 A vertical option
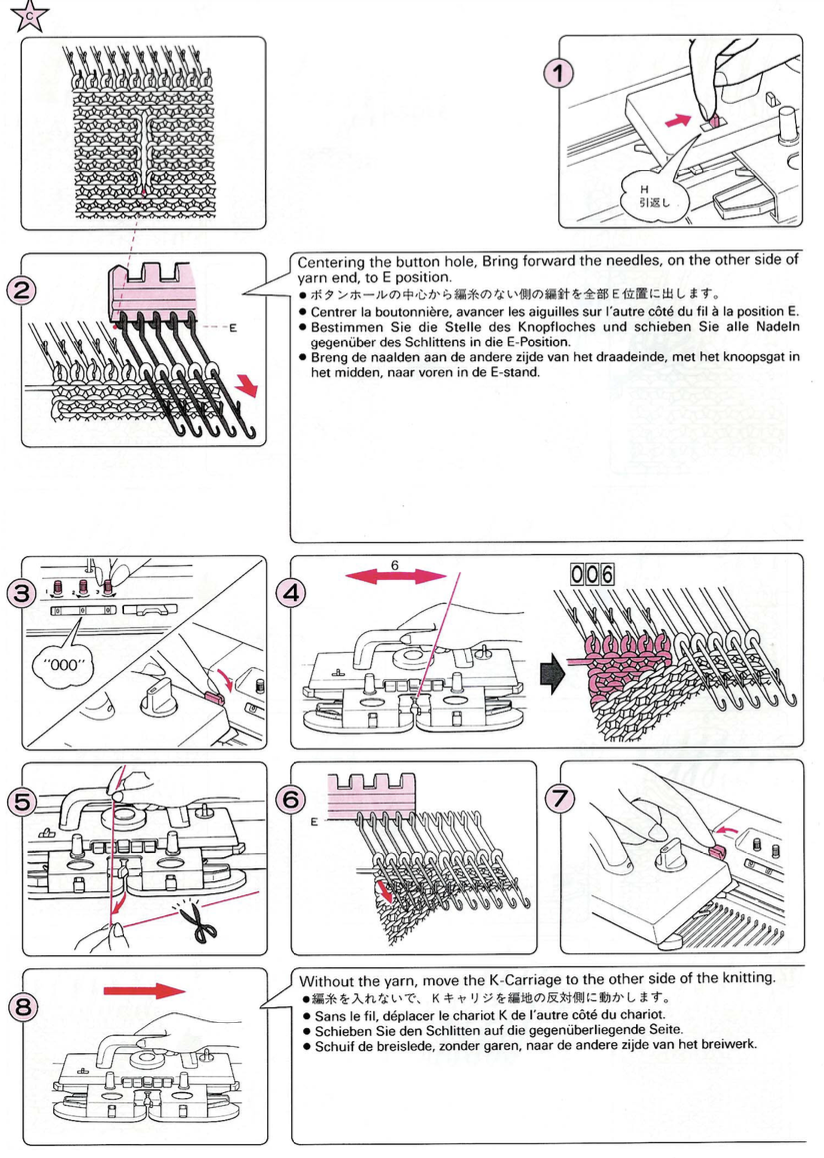
 Single stitch eyelet in knit one purl one rib, suitable only for small buttons
 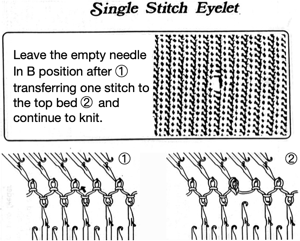 Another version: leave the needle in B position out of work for a few rows, slide latch tool under a couple of the resulting floats, pick up the next in the hook, and latch-up as shown.
 ![]() Using waste yarn/ ravel cord followed by sewn bind-off, possible on unfolded fabric bands
Using waste yarn/ ravel cord followed by sewn bind-off, possible on unfolded fabric bands 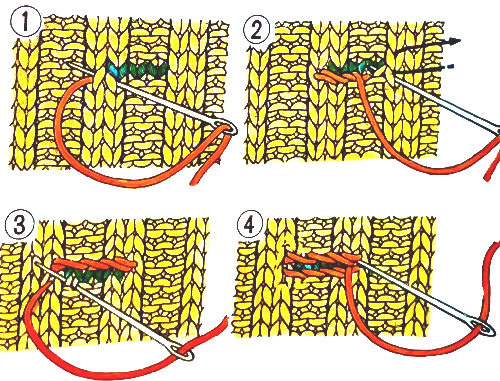 An interesting translation in the publication of horizontal 😉
 The published reference to waste yarn here implies the use of a contrasting color yarn in a fiber content that allows for it to easily be slipped out when the process indicates. Any smooth yarn that will not break easily and can be knit at the same tension as the knit piece for a comparable gauge may be used, ie crochet cotton or nylon. Although yarns that shed may function for this purpose, they may leave contrasting bits of fiber and color behind in the finished knit that will not be removable.
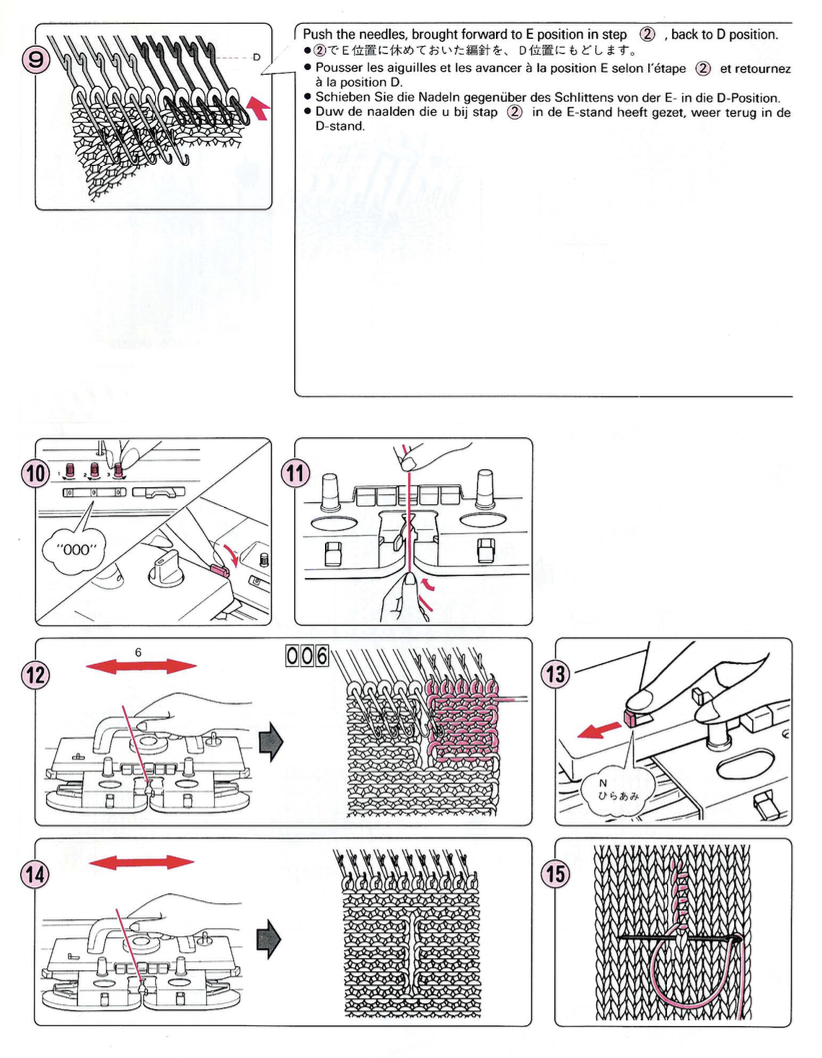
Double-layer buttonholes may be used in stocking stitch bands applied to the side edge of a garment ie cardigans upon completion of the piece or may be planned in hems if the piece is to be turned sideways. 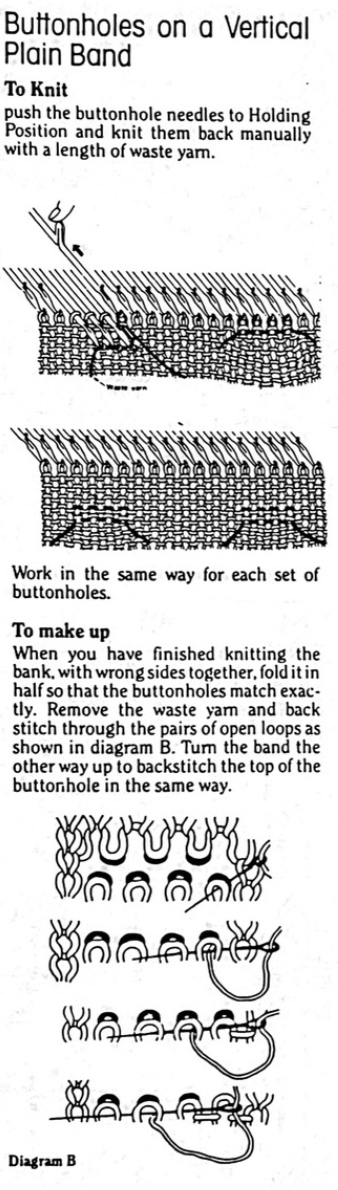 Here they are folded horizontally on a band that will be applied to the finished edge ie of a cardigan’s front
1: push the required needles to hold, knit them back with waste yarn
2: continue to the position for the next slit, and repeat
3: with a transfer-tool pick up the sinker loops of the first slit that were
created with waste yarn
4: place the sinker loops onto the needles in the holding position
5: push the needles back into the working position
6: knit loops through pre-existing stitches
7: to complete the lower edge of the buttonhole transfer the second
stitch to the first stitch of the buttonhole
8: transfer both stitches onto the empty needle
9-11: repeat the process
12: pick up the loop below the waste yarn
13: place the loops on their respective empty needles
14: continue to knit, and pull out waste yarn after a few rows to check for proper formation of the buttonholes 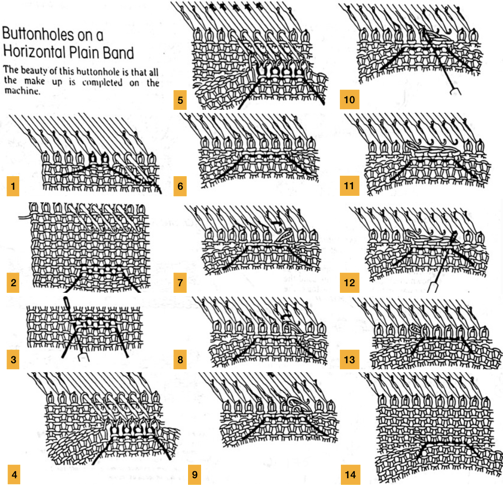 It is possible to work across a whole band, here the joining method uses a tapestry needle and is akin to grafting.
 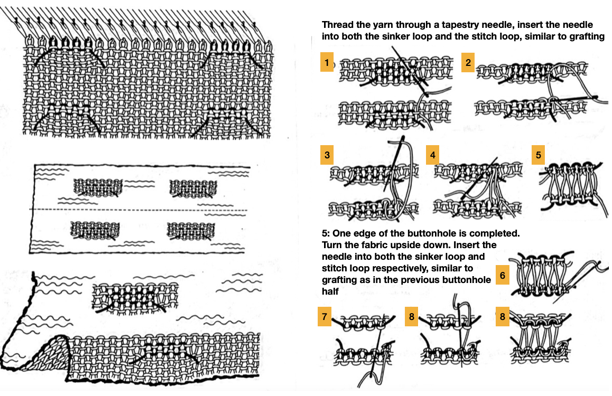 Buttonholes folded vertically are actually worked on live stitches. Pressing the fabric helps to set them.
 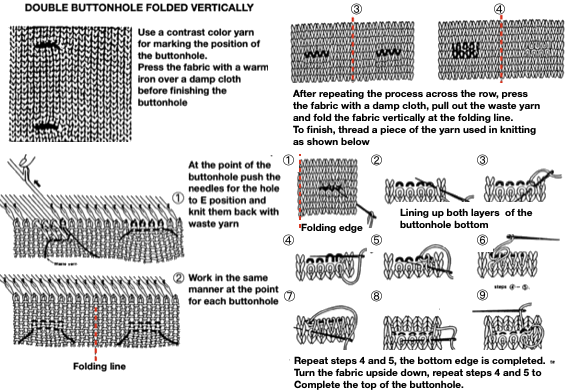 Another view:
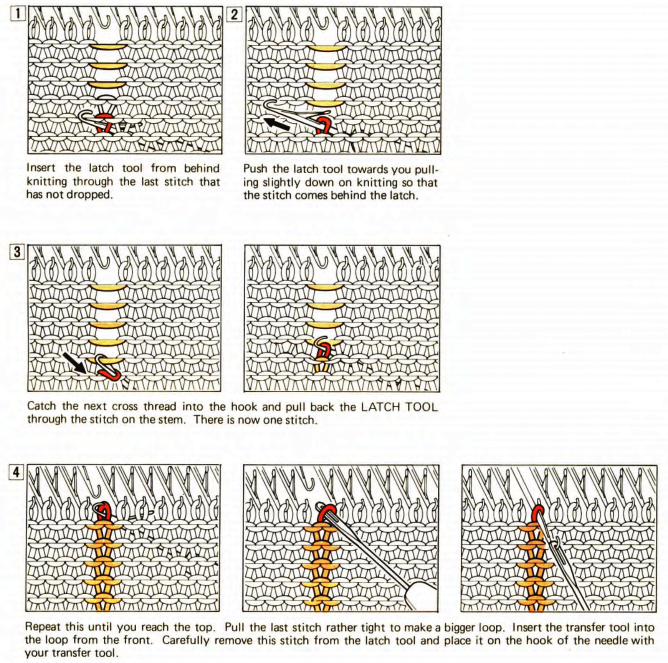
  This method uses holding on the ribber to create vertical openings tappet tool. The latter is the ancient term used for what has come to be known as a latch tool
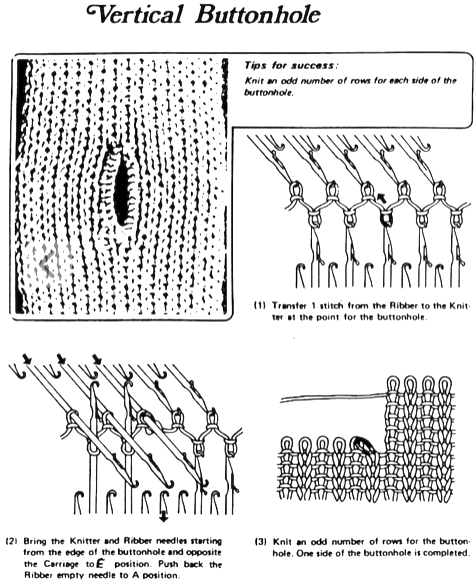

Machine knit fringes 4, long loop patterning
Related posts on creating loops:
long-loops-a-bit-on-method.
long-stitches-on-km/
some-long-stitch-swatches/
for double bed long loops in various designs in single or multiple colors see drop stitch lace
I became curious about creating long loop shapes on a knit ground using continuous strands of yarn, forming loops in the same direction, and allowing for knit rows between them resulting in returning the yarn to the starting loop formation side. My own preference is to make the loops with the knit carriage on the right, anchoring them with the following carriage pass to the left. To continue doing that, the yarn would either need to be cut leaving a yarn end, or it needs to travel back to the left, where it can form the next row of loops from left to right.
In these tests, the movement of the yarn back to the left was achieved by having it weave on every other needle from right to left.
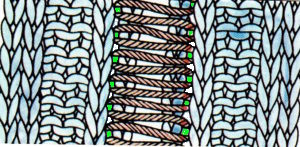
Triangular shapes are easily recognized, and I began with a moderately large one, at first planning for loops on every other needle. Black cells on the right represent loop locations, and green the weaving pattern formed as the carriage knits right to left. 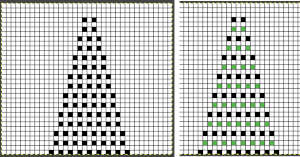
![]() The length of the loops determines end-use, long loops can become fringe, and short ones the macro version of pile knitting.
The length of the loops determines end-use, long loops can become fringe, and short ones the macro version of pile knitting.
Tools to aid loop formation that are fixed in height across the needle bed are needed if the pattern is not used as a single motif, but rather as a recurring one. Separate strands of yarn on bobbins or balls or cones would need to be used for each shape. The loops in this swatch are large, so there are extra knit rows between each set.
I use colors and yarns that are randomly on hand for swatches unless I am planning a specific finished item.
The first swatch is worked with loops on every other needle, the second with loops on every, as shown in the photos
Worked as a single motif:
KC II: preselection is made from left to right
COL: make loops moving from left to right using ribber gate pegs, I like to bring needles to be wrapped out to hold as I move across each row, wrapping frequency may be varied apart from needle preselection, 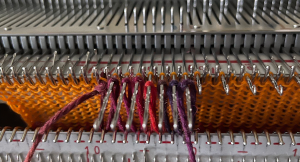 knit a row to left, anchoring them
 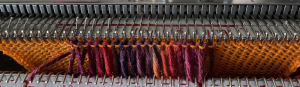 COL: knit to right, the needles for the weaving pattern to the left will preselect
 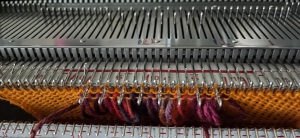 COR: check that weaving brushes are down, place yarn over preselected needles,
 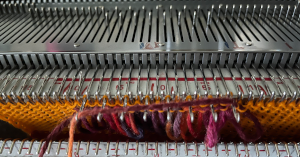 knit a row to the left, securing the weaving pattern, the yarn end will be on the left again
 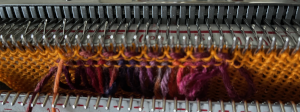 COL: knit a row to the right, needles for the next row of loops will be preselected
COR: use the yarn now on the left again to form loops from left to right, knit a row to the left to secure loops. Repeat the process. The resulting shape brings holiday knitting to mind.
The loops worked on every other needle 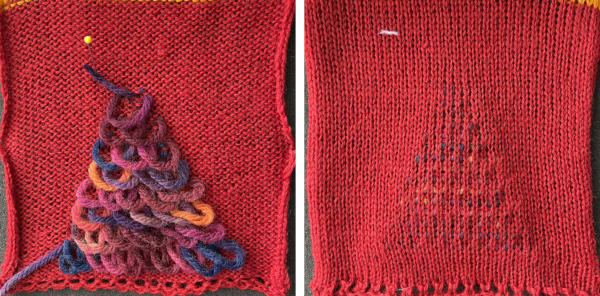 and on every needle. The original preselection repeat may be used. The only yarn ends that need to be dealt with are at the beginning and end of the shape, the reverse of the knit has the appearance typically seen in knit weaving, where the thicker yarn forces the stitches in the background one apart.
 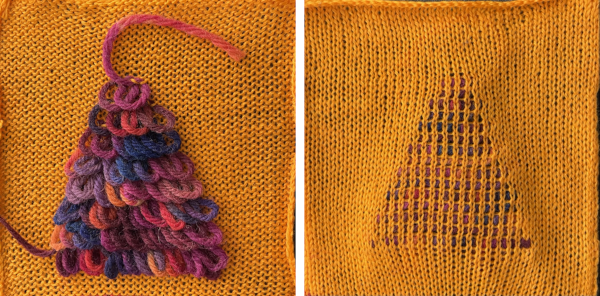 What of recurring shapes with reversing directions? It occurred to me plastic straws may prove to be handy tools for creating the loops and easier to manage than rulers. The maximum length of the straw is a limitation. Exploring the technique in a single motif gives one the opportunity to explore issues and limitations.
My straw is 10.25 inches wide, made of plastic, is not rigid, and can be squeezed flat easily. When using it as a loop guide, it was held low enough below the knitting on the top bed on the carriage side to allow some ease in the loops so the straw can have an easier time dropping below the sinker plate when the knit carriage passes over it, it can even partially collapse if needed.
I found managing the straw soon became rhythmic and easy.
The lengths of the straw on both sides of the loops serve as a handle on the left, and on the carriage, right side, the extra length can be guided down a bit to keep it from angling up and getting caught in the sinker plate.
Once the carriage begins to knit across I encountered no problems. The straw may get pushed slightly to the left with the carriage pass. 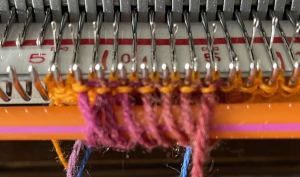 Planning possible actions and a starting repeat with single rows knit between loops. In this instance, loop formation happens when the carriage is on the right, and weaving when the carriage is on the left. The latter means the weaving yarn is laid over selected needles in the wrong direction, with the long end of the yarn away from the knit carriage. That said because weaving happens only on every other needle X3 and on a max of 7 on every other needle, the first selections were no problem, and the second was manageable with some caution. The arrows indicate the direction of the carriage movement after the loops are formed, and after the yarn is laid over the preselected needles for weaving.
The image on the right is the repeat tiled in Gimp to evaluate its vertical alignment. It is 14 pixels wide and 20 high, could be used in a punchcard and placed on the center of the card making it recur centered in each 24 stitch location on the needle bed.
If an attempt is to be made knitting several repeats, vertical columns of plain knit between the pile knit columns are desirable.
The needle preselection will begin on 14 stitches, so only for the first 2 rows, the needles preselected for the first 7 stitches of the 14, shown as grey cells, push the needles involved back to B.  Depending on the machine model and software used for the download, the repeat may need to be mirrored to achieve the result planned in the drawing, which is true in my 930. The starting png
 ![]() may be placed on a wider canvas in Gimp, here is a 30 stitch mirrored version for use on my 930.
may be placed on a wider canvas in Gimp, here is a 30 stitch mirrored version for use on my 930. ![]() The resulting design is quite dense but successful.
The resulting design is quite dense but successful. 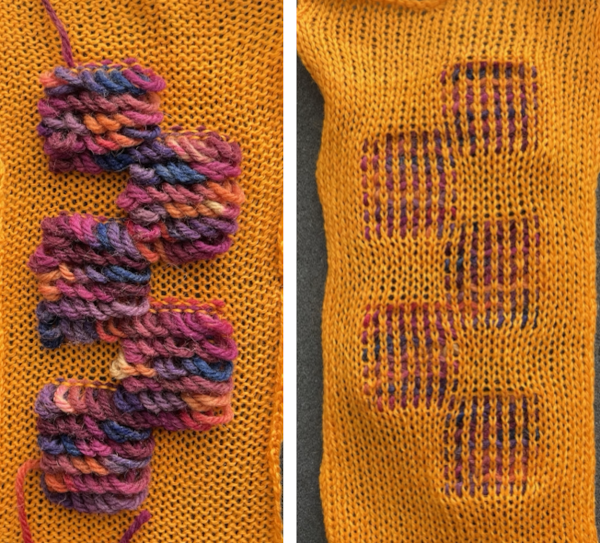 Planning moves on for weaving to happen with the yarn in the proper direction, particularly if more than one design is to be attempted horizontally, and to make the loops less dense. Extra rows of plain knitting are added between loop formation.
Here the design is placed once again on a 30 stitch ground but is now 40 rows high, drawn in the direction desired, not yet mirrored. It is expected the aspect ratio for the shapes will change, becoming elongated. Again, preselection for the first seven stitches on the right for the first two times selection occurs on those needles is canceled with needles pushed back to B.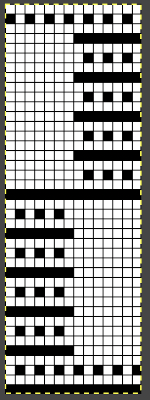
![]() Clothespins, as seen in the lower right, can come in handy to put slight weight on yarn ends to help hold them in place at the start of the piece or as it progresses.
Clothespins, as seen in the lower right, can come in handy to put slight weight on yarn ends to help hold them in place at the start of the piece or as it progresses. 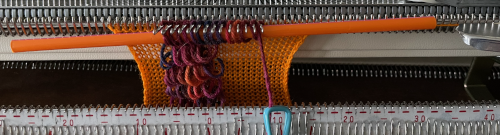 The proof of concept swatch shows a very different appearance in the distribution of the loops from the first sample.
 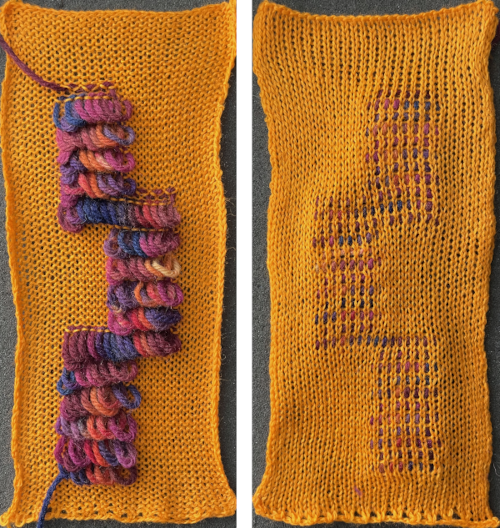 It is possible to knit more than multiple series of shapes. Enough spacing between the forms is required to allow for using of more than one straw.
I had the easiest result by leaving the straws uncut.
Each straw end on the carriage side again needs to be kept down until the sinker plate begins to pass above it.
It is a good idea to try the method first and practice some hand selections. 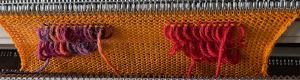 The rows where all 14 stitches in each group were worked required a bit of extra care, but knitting was quite manageable
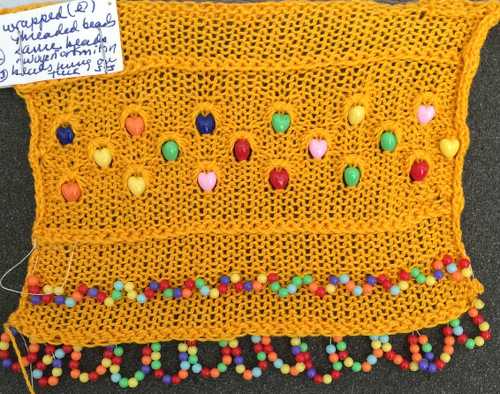
 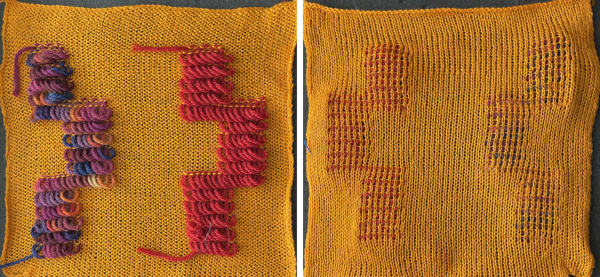 Long loops may also be created with i-cords, strips of knitting, or fabric, strung beads, and imagination is the limit depending on preference, available materials, and the specific design. Even tiny beads may be used to create loops as seen in this swatch. Dental floss may be used as the very strong “thread”, secured with e-wraps on the knit background where needed.
For threading the beads onto lengths of the chosen thread, a tool I have used (which also comes in handy for threading a serger) is an “EEZ-THRU” floss threader, recently available in this brand 
 Here strips of knitting are used along the edge and knotted, strips are also applied to the body of the swatch during knitting for contrasting color interest
  I cords may be applied to the edges of a knit ie scarves, but there are a lot of ends to weave in. There are trade-offs if techniques are explored to use continuous strands with limited or no cutting.
There is a hand knitting pattern called foxpaw, for which some illustrations may be found in the photos related to the advertisement for this class https://stitches.events/shop/classes/west-2022/intro-to-stacked-stitches-6/.
A while ago I was interested in trying out a simplified version using the knitting machine, the project has remained a UFO (unfinished object) since then.
The graduated size cording here were created by knitting lengths of i-cord on 4 stitches, knitting X number of rows, folding the cord upon itself, and joining the second half to the first using seam as you knit, continuing with the next shape immediately after completing the join. When applied to a cast on edge, if the goal is to use the technique for a substitute fringe, the double cords are a bit dense compared to the body of this particular knit and too close together. Perhaps creating a trim by applying the double cord to a side edge of a vertical strip and then in turn to where needed would produce a better result, or limited numbers of graduated cord lengths might provide interest in the body of a knit. 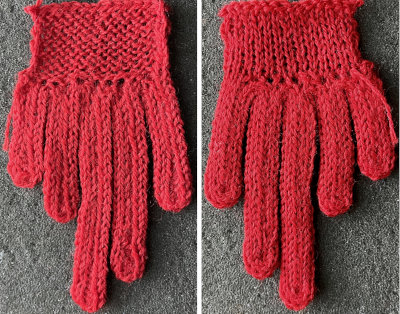
Geometric shapes in drop stitch lace 4, stitch release, added racking
Though written in 2017, the post on revisiting drop/release stitch lace 1 has had new swatches and updated design ideas added. It includes information on how to use punchcards intended for other fabrics as possible design ideas and a cumulative list of previous posts on drop stitch lace.
The Brother publications have offered this idea for end release drop stitch in one of their volumes of punchcard patterns. 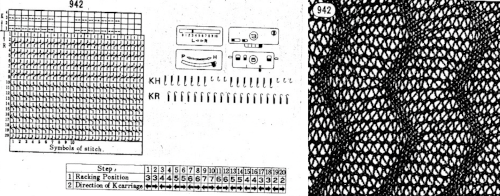 Many published designs recommend beginning the knitting with the racking handle in the center position, 5 of 1-10 positions in Brother, and 0 of 6, 3-3 in Passap. Often the starting position is relative and when a lot of racking is involved, they may be varied, though not the sequences in terms of the number of movements, to different starting points if that seems to offer an easier way to track position numbers. It is one of the many things that once the method is sorted may be adjusted to personal preference. Some of my swatches below were started with the racking position on 10, some with it on 5.
Many knitters in forums appear to have success with end release drop stitch. My experience has been that episodic release of the stitches even as often as after 2 rows knit yields far more predictable results. It is how I worked my shawls produced in the technique, including these two, knit in days when I did not always photograph all my pieces 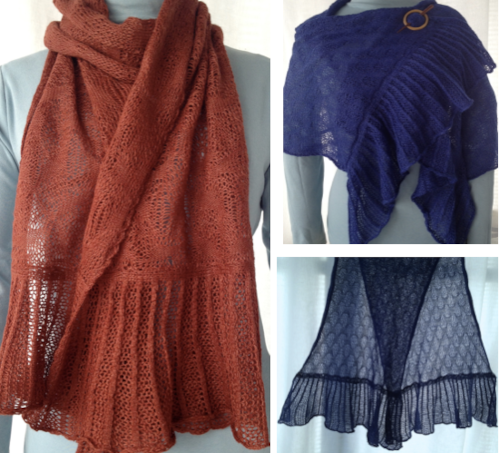 Giving end release another go, this was my initial needle set up. With the majority of the needles in work on the main bed, the larger stitches in the final fabric will dominate. The stitches after the cast on have been transferred down to the ribber.
 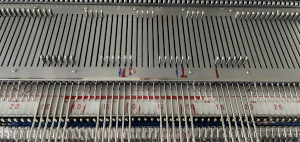 The work on the machine, with stitches on the main bed released at the end of the swatch.
  There is a long stitch DBJ single color pattern happening which may prove to be an interesting fabric if no stitches are dropped, to preserve it, all stitches would be transferred to the top bed, and bound off.
Here the racking took place in single positions after every knit row. Dropping stitches on completion of the swatch, particularly along the edges was so fiddly and such a nuisance I simply gave up in spots, some indicated by red dots. 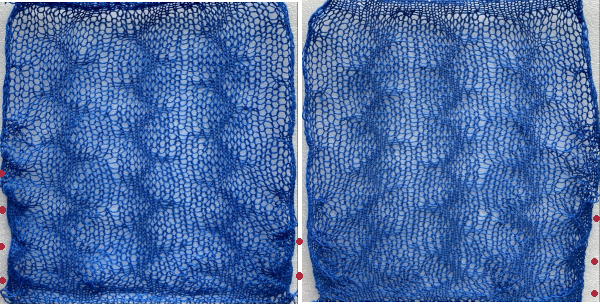 This watch had stitches released at the end of each shape, racking in the top portion occurred after every 2 rows knit
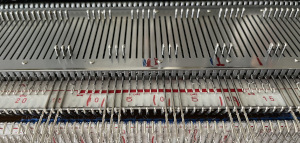
 Here the same design was knit using different yarns. The first is knit using the same blue wool, the second a tightly spun rayon.
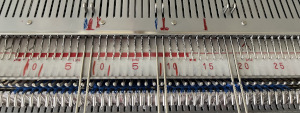
 So many fabrics can be automated, sometimes the fabric is a vague look-alike cousin of the original, close enough to be a reasonable compromise. Slip stitch patterning across the top bed can offer a quick solution to bypassing a lot of hand manipulation. Assuming that was possible for this fabric, my starting repeat, 10X30 pixels:
 ![]() and the plan would be to knit it in a 40 stitch swatch, placed in a way so that the “mock racking” would move equally from side to side. Working on a larger than needed canvas, the design can be placed on a magnified work area with a visible grid, at the chosen starting point. If the background is left as white in BW images, moving repeat spacing may erase black pixels as copy and paste in place are used. The solution is to make the background transparent using the Layer menu, as explained in other posts on using Gimp.
and the plan would be to knit it in a 40 stitch swatch, placed in a way so that the “mock racking” would move equally from side to side. Working on a larger than needed canvas, the design can be placed on a magnified work area with a visible grid, at the chosen starting point. If the background is left as white in BW images, moving repeat spacing may erase black pixels as copy and paste in place are used. The solution is to make the background transparent using the Layer menu, as explained in other posts on using Gimp. 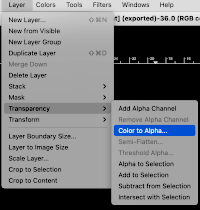
 To save the repeat as a BW bmp or png, remove the alpha channel
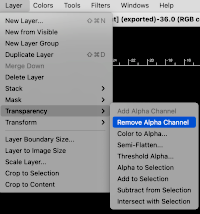
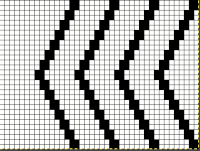 The final repeat is 40 stitches wide, 34 high,
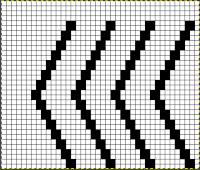
![]() with blank rows added to its top to serve as a place to drop stitches and have knitting happening on the ribber only.
with blank rows added to its top to serve as a place to drop stitches and have knitting happening on the ribber only.
Depending on the download program or the knitting machine model number, repeats are automatically mirrored, so if direction matters, mirroring of the repeat may need to be performed once more.
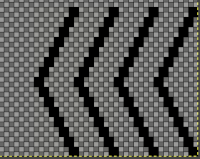
Why the repeat will not work for drop stitch: if the KC is set to slip in both directions, the function will happen on all needles in work on the top bed. On any given row, only black pixels (or punched holes) will knit. The slipped/ skipped stitches keep elongating until a black pixel replaces the white one in that needle location. The degree of elongation is illustrated in the chart in color for part of the repeat, the yellow marks the widest gap between knit stitches. If knit as is the repeat will soon cause serious knitting problems and carriage jams. 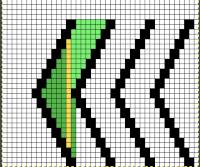 Though designing for one type of fabric may fail, this repeat or similar could be used successfully double bed in other ways, using hand transfers on the top bed or down to the ribber. In this case, I chose to transfer down to the ribber, which avoids concerns about restoring correct needle selection, and the repeat was not mirrored for use on my 930, so the resulting knit appears as drawn on the purl side, but is mirrored on the knit side.
The fabric is far removed from the drop stitch idea, but as for drop stitch lace, stitches after the cast on are transferred to the bottom bed.
Newly selected empty needles will create eyelets with the next 2 carriage passes, and texture will appear on both sides at the transfer down locations.
The shapes created do not travel on the knitting bed any longer.
End needle selection needs to be canceled at any time that slip stitch patterning is used and does not occur on every needle on the top bed.
If the pattern is to be interrupted by all knit rows here seen as rows with no preselection in the programmed repeat, then any needles with stitches on them need to be transferred down to the bottom bed before continuing to knit.
As preselection begins again, those needles should be filled by picking up from the stitches below them on the ribber, and then the process may be repeated.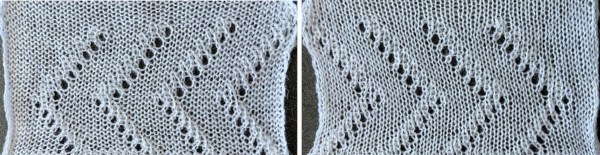
Machine knit fringes 3
The term fringe may be used to describe a decorative border of hanging threads left loose or formed into tassels or twists, used to edge clothing or material. Samples in these posts can apply to that definition
A collection of machine-knit fringes 1 9/19
Machine fringes 2: mock hairpin lace 10/19
Some methods for creating the long loops 8/12
Present fashion has fringe as an element in mixed locations in finished pieces. For the traditional fringed appearance, lengths of trim may be knit ahead of time followed by its application where desired. Depending on the location(s) and frequency of the applique, a repeat could be programmed to preselect needles in needle locations for hooking up the pre-knit trim or even simply cut lengths of yarn.
Dropping the ribber to its lowest position and using the ribber gate pegs to create continuous loops may provide the desired effect in a fringe or cover the surface of any knit completely.
In these beginning samples, the number of plies changes, but not the needle selection.
Many variations are possible, experimentation will help determine personal preference.
Images of loop formation in progress: 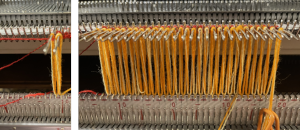 after a row is knit to the opposite side, needles may be brought forward again to ensure they will knit properly,
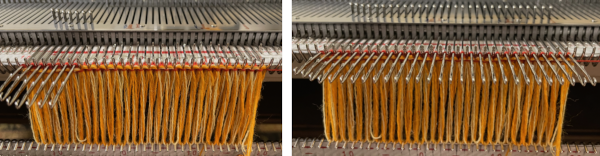 or to add a latch tool bind off in front
 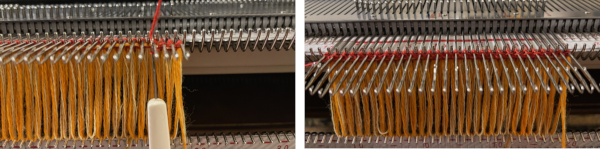 Latch tooling in back of the cast on to reduce roll to the purl side at the bottom of the knit or add color contrast, may also be added at any point in the knit, as surface interest or to serve as a horizontal line to add elements on the knit side on specific rows after the piece is completed.
 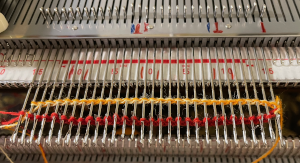 Possible applique use for varying lengths of narrow trim
 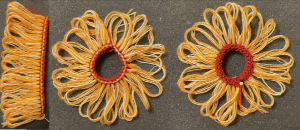 Leaving lengths of the yarns used in the project at each end rather than becoming enthusiastic about clipping them provides a good reference as to the number of plies used for the loops and the thickness of the background yarn.
Here 3 strands were used for the loops.
Crochet cast-on on every needle and knit a few rows, they will roll to the purl side. End on the side on which you find it easier to form loops.
COR: create a row of loops, I prefer to do so from left to right, bring all the needles forward, knit a row to the left securing them
COL: knit for a few rows in the ground yarn and bind off.
Turn the work over, with the roll away from you.
Rehang the trim using the hooked on a row with purl side facing as a horizontal guide, and continue to knit.
When the piece is completed, the roll will appear on the knit side and may be used as a decorative element. 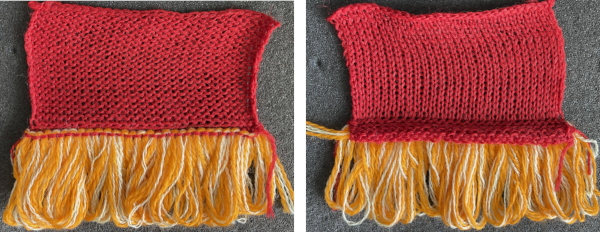 Method 2: uses two strands of yarn for the loops
COL: crochet cast on with the ground yarn and knit a row to the right.
COR: knit a row to the left.
COL: move the knit forward, crochet cast on behind the stitches on the machine with the loop yarn. Knit a row to the right.
COR: create a row of loops, bring all the needles forward, a
knit a row to the left securing them
COL: knit for a few rows, lift loops off gate pegs, and position them between the beds
Continue knitting in the ground yarn until the piece is finished. There is a single row subtle roll to the purl side of the ground. 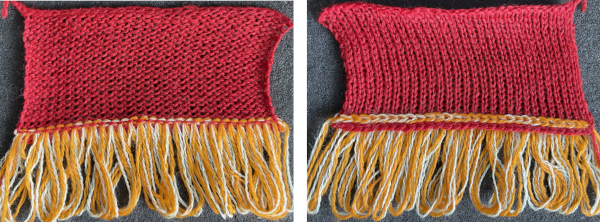 If the piece being knit is a scarf, the direction of the loops is a factor if the trim is added after turning the piece upside down
 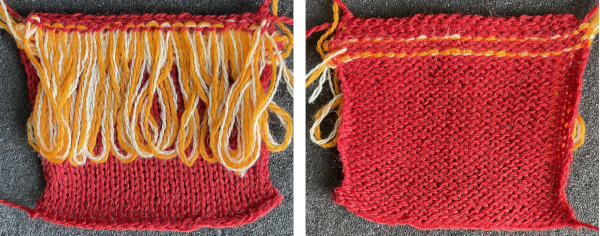 The solution is to produce the fringe as a separate trim which may be stitched upon completion or hung on the start of the piece and stitched on at the top with the piece off the machine after the bind off, or to knit 2 pieces with loops from the bottom up and graft them together at the center of the length of the accessory.
The method most likely to yield very long horizontal, even lengths of continuous loops or stitches as one knits at the bottom edge of the piece or in horizontal lines or patches as one continues up the piece is to remove the ribber if it is in use and use the cast on comb anchored with equal lengths of wire or something that will not stretch.
Add enough weight to it so it will not shift up as one moves across the row creating the loops, as shown in the 8/12 post. Here the yarn is fuzzy mohair wrapped on every other needle.  When wearables are trimmed with fringe, there can be a concern as to how the fringe will wear over time or how the yarn ends would behave if the piece is laundered. Twisting the plies provides an answer. The yarn thickness, number of plies, and the chosen color(s) can be varied to suit the piece.
Bullion fringe is one where there are no cut ends or knots, often seen with the twisted elements equal in length. It is available commercially by the yard, and if fiber content or other features are compatible with the knit piece, the purchased fringe may be hooked on and knit in where desired with consideration as to how to best secure or hide any cut ends of edges on either side. Even in a commercial sample intended for sewing, note that there are slight differences between the width of the resulting twists and their very bottoms: 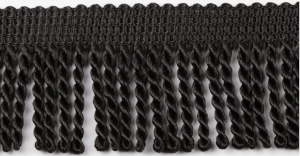 It is possible to produce fringe with a similar appearance on the knitting machine.
Playing with the number of plies, spacing of twists, whether the loops are added at the bottom edge or sides of the knit, and seeking a rhythm:  Note the long red loop in the background yarn occurred where the empty needle was not pushed back to the B position during working with sideways loops.
The first try at long loops across a horizontal knit: 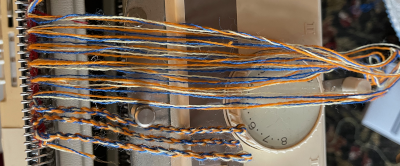 At present my ribber is set up, and since I am planning more double bed fabrics and fringes are a temporary distraction, I tried to form even loops around a quilting plastic ruler for more control of the process. Definitely clumsy and not a good idea for a wide piece. The handling of the loops remains the same.
COL: crochet cast on the width of the planned piece from left to right
COR: knit a row to the left
create a series of long loops on every other needle, done here by wrapping the large ruler  The plan was to knit loops through the stitches on the corresponding needles on the top bed, the ruler was removed, there was not enough slack in the loops, and some of the stitches created with the fringe yarn jumped forward
 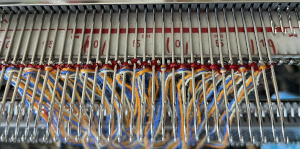 COL: to secure the row, knit a row to the right
COR: repeat a crochet cast on in front of all the stitches to the left 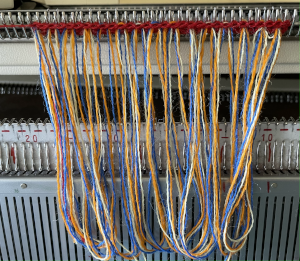 Twist the loops,
  to place them on the base knit, hang the small loop/eyelet formed at the end of the twist on the alternate needles between each of the stitches created by the original loops
 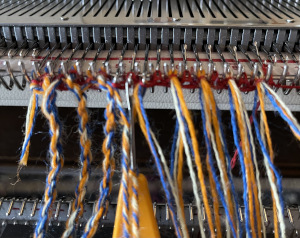 keep notes as to the number of twists in order to be able to replicate the effect, perhaps even try to twist pairs of loops together
 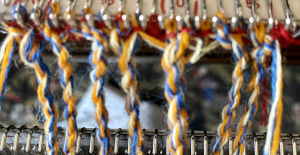 continue knitting the body of the knit.
A completed swatch with methodical twists and wraps. 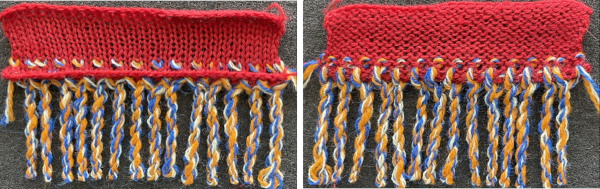 The quality of the braid, both in length and in its bottom edges is controlled by the number of twists and the tension applied when releasing the twist. It takes a bit of practice with the specific yarns and loops to keep fringe lengths and their appearance even. In a final piece, the stitch count needs to be considered so loops may need to be formed on each or a single end and hung on the first and/or last needle in use before continuing to knit.
The yarn ends on either side will need to be secured, adding them to the twist on each side will do that, but then the result is considerably thicker than the other bouillion.
The bottom of twists when their count is not adequate can form loose, little donuts.
What of creating those twists? the goal is to use a tool to turn the yarn in one direction, folding the result in half, securing it, and allowing it to twist. The method is different for hooked on pre-cut lengths of yarn.
Tools commonly used by weavers to twist fringes in any length, with cut lengths of yarn where the number of twists needs to remain controllable and even, with hand cranks allow for easy counting and achieving that goal: 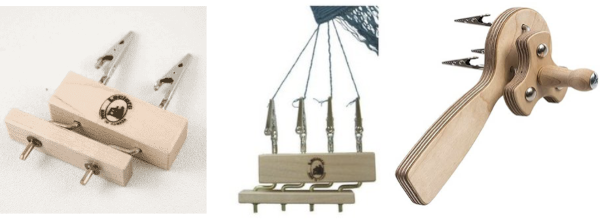 When applied cording is required and the number of twists does not necessarily influence the result, hair braiding tools may be used. They come in multiple configurations and the same model may be found in a huge range of prices.
There are 2 selections for twisting secured yarns, the first twists to the right, the second twists both yarns together to the left, resulting in the braid. Hair is attached in place, the twisted ends are secured with elastics often supplied with the twister or purchased separately. Yarn lengths would need to be knit in securely, knotted on the edge of the twisted lengths. Cording using the same tools would need to be secured with knots at both ends and may be used as trim, hooked onto knitting in progress, or stitched in place after completion of the piece. 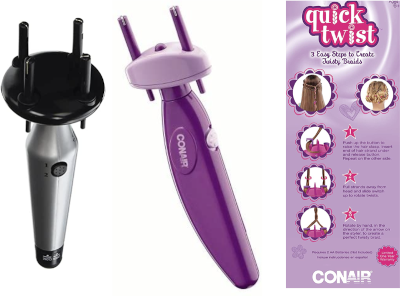 An easy, inexpensive DIY tool created with supplies I had on hand but it is also easily available for purchase.
A small cup hook was screwed and secured into a bobbin winder normally used for cross stitch. The body of the tool becomes a secure handle, the crank makes it easy to count twists and keep their number constant if a fringe with equal length and thickness elements is planned. 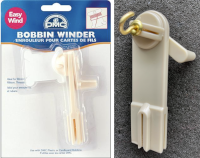 For fringe worked sideways, suitable for trims that can be placed anywhere on the body of the knit, the first sample is worked on a 3 stitch vertical base strip of knitting.
Crochet cast on from left to right and knit one row back to the left. Make a slip knot on the fringe yarn, knit it through the first stitch on the right 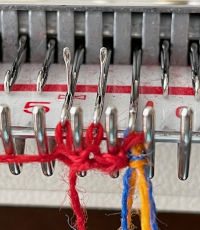 COL: knit to the right, thus securing the thicker knit stitch
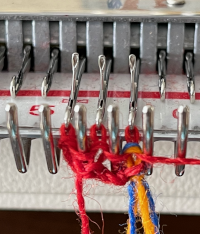 COR: wrap an empty needle further to the right to determine the length of the loop to be created. Its location can remain fixed throughout or varied if the intent is to experiment with different lengths of bullion.
Wrap the yarn plies around the empty needle, apply a light tension twist and lift the end of the loop onto the first knit stitch on the needle on the left, 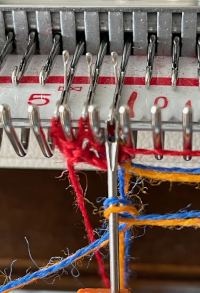 knit it through the stitch immediately above the wrap
  release the loop from the empty needle on the right, push it out of work so as not to pick up yarn a long loop of the ground yarn as the carriage knits a row to the left
 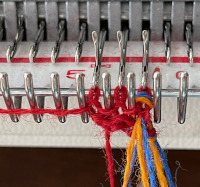 COL: twist cording and hang on the first needle on the right
 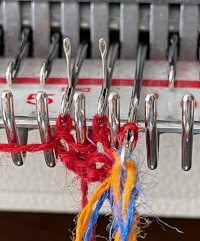 maintaining light tension on the twisted length, knit a row to the left, or knit the loop at the bottom of the twist through the stitch immediately above it before knitting to the right
 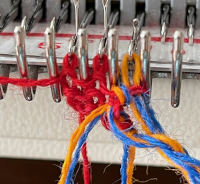 COL: knit to the right,
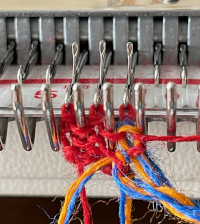
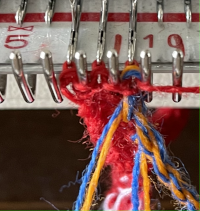 repeat the process.
A closer look: insert the tool, and removed the loop onto it. Be sure to push the empty needle back to B until it is needed again. ![]() Tug the loop lightly forward, and begin to turn the handle to twist the yarn until the twist appears evenly distributed while keeping count, different counts may be tried in the same test swatch.
Tug the loop lightly forward, and begin to turn the handle to twist the yarn until the twist appears evenly distributed while keeping count, different counts may be tried in the same test swatch.
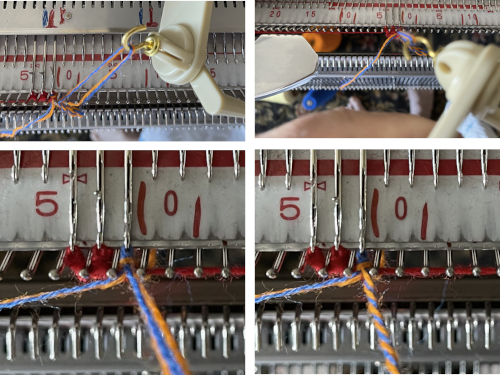 insert a single eye tool into the loop on the hook of the twisted cord, lift it onto the last stitch on the right on the top bed, it may be knit through or simply laid in the hook,
 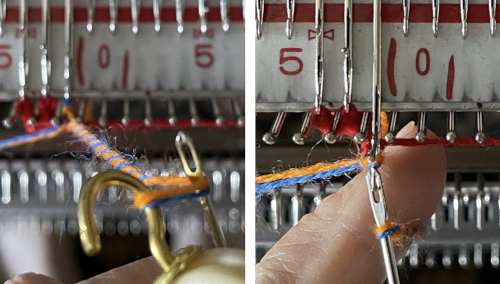 bring the needle with the multiple stitches forward, tug lightly on the bottom center of the twist, and release.
To complete the bouillion: knit a row to the left side.
Lift the twist away from the body of the trim, bring the plies up and in front of the twisted yarn, and use them to knit through any stitches on that needle.
Begin the process again. With some practice, you may find some different and preferred variations to the suggested sequences.  A variation: the first experiment was formed on a base of 3 stitches, here they are increased to 5
COL: crochet cast on 5 stitches, knit a row to the right
COR: knit a row to the left
COL: knit slip knot through the first stitch on the right as above
knit two rows
COL: wrap empty needle, knit through the first stitch on the left,
twist yarns and hang onto the needle,
bring needle forward,
knit two rows
COL: bring yarn ends in front of twisted yarns,
knit to the right securing the plies,
knit 2 rows,
continuing to form fringe bouillion as described. 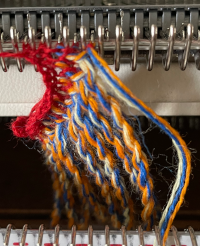
 If significant or even variable fringe length is required, cut lengths of yarn may be applied to the knitting, or make long loops and cut after they have been secured.
The lengths will be twisted two or more at a time, first in one direction, then in the opposite, and released.
This is a video for the tool sold by Lacis, which is very similar to my hair braiding tool. The twists are made clockwise on one setting, then counterclockwise and released. They can be overtwisted and when the twist is reversed and released, the results appear to find a common average for fairly consistent quality.
The knots to secure the yarns may be executed as you go or at the end of the twisting process, keeping the fringe length even or varied as needed.
My initial sample used loops with 2 plies in each
COL: begin with a crochet cast on from left to right
Knit a row to the left
COL: hang cut loops across the row, knitting each through the stitch previously on the needle
use the background yarn to repeat the crochet “cast on” in front of the loops to secure them, move the KC to the right
COR: continue knitting and bind off
For the test, I used loops sized on the same ruler as for the bouillion sample and then cut. Later, below, the comparison is made between the different finished fringe lengths.
The yarns plies got combed and trimmed to even lengths.
Enough yarn needs to be secured in the twister hooks so the ends will not slip out during the process, which is very quick, and it soon becomes evident how long to twist in one direction before reversing the twist setting.
The couple of rough spots evident in my trim happened when the yarn split and was caught in the hooks of the twister, so the release was not clean.
I varied the number of plies, in each hook, beginning with 2 in each, then three, four, and mixing things up a bit more in a couple of the series. The plies in the cut end below the knots remain available for counting to verify the numbers of plies used if notes are lacking.
A crochet hook or latch tool may be a useful aid when pulling the ends through a fringe loop, forming the knots. 
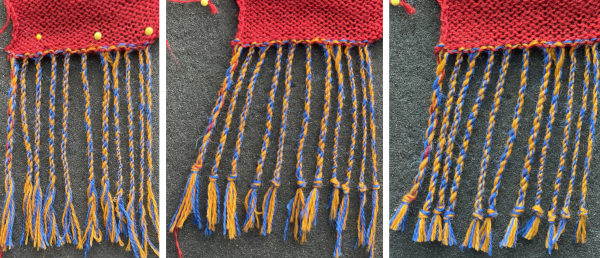 Comparing the bouillon fringe length to the above:
 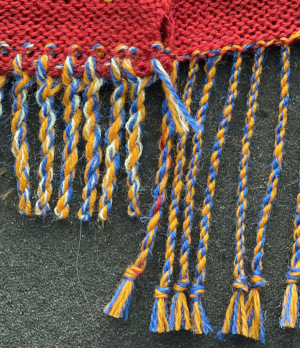 Here the loops are created using a factory 4 ply space-dyed wool. After a chain cast-on and a row knit in the ground yarn, the loops are knit through each stitch on the needle bed, then knitting continued for several rows and the piece was bound off.
The loops were cut open at their bottom, the hair twister was used to create the fringe, with 2 yarn thread lengths in each hook. 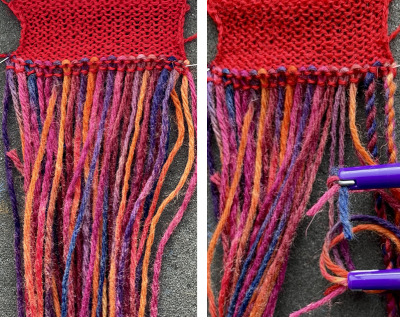
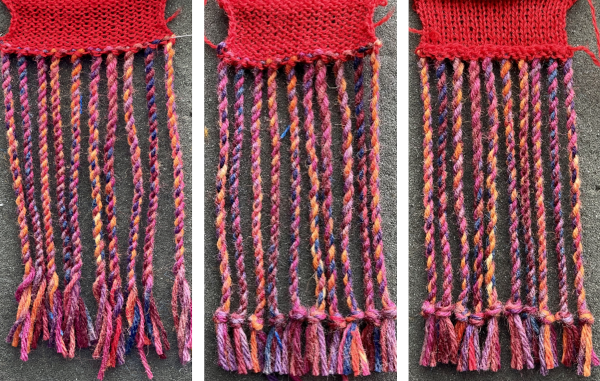 The results are quick to produce, and worth some further experimentation. There are many other possible variations, including blending fiber content in the fringe lengths.
Knit tubes, i-cords, and simple knit strips that are allowed to twist in on themselves are all options for fringing, but be prepared to weave in lots of yarn ends. One of my slip stitch scarves, with attached i-cords fringe  Series of loops, twisted or not, can also be applied in pattern anywhere on the knit, and folks who do not like fringe can create a variety of alternative edgings, some ideas will be shared in a future post.
Shadow pleats with added patterning
Knit skirts have been present in runway and online publications again. Another Mary Dowse pattern has stirred up interest in a design knit in fair isle shadow pleats.
Shadow pleats knitting began to present some of the techniques involved in creating this type of fabric fold.
The permanence of the folds relies on blocking from careful and almost aggressive to far more casual approaches depending on the fiber content and end-use for the knit.
As mentioned in the older post, for a while, skirts in shadow pleats were very popular. One of the tips for blocking them at the time when acrylics were also new and in trend, was to hang completed pieces with the bottom evenly weighted inside a large trash bag “sealed” as tightly as possible at the top, with steam entering from the bottom of the bag ie from a portable electric teapot. I always had a hard time imagining the specific activity, and the method may have been part of the reason as to why published patterns for such items quickly disappeared.
Simply using a yarn with memory in the rows composing the larger folds always seemed a more viable option to me.
Ribber needle setups may be used to produce a rounded appearance in the resulting folds
rolled single pleats 
![]() double rolled pleats mirror needle groups
double rolled pleats mirror needle groups![]()
![]() accordion rolled OOW needles are spaced evenly on both beds
accordion rolled OOW needles are spaced evenly on both beds ![]()
 A large variety of pleats may be knit on the single bed as well, one being shadow pleats. The resulting knits also need to be gathered on one of the 2 edges in items like skirts at waistlines, and the number of knit rows needed for the volume required can be daunting and a large commitment of time if not effort.
Very large swatches in colors that one guesses to be appealing guide decisions based on evidence and personal preference.
Old published patterns often called for specific brands of yarn which decades later are likely to no longer be available. In addition to searching for substitutes that will produce a similar gauge, the behavior of the newly found yarn may simply be different than expected and as described in the instructions.
Inspiration photos found online are often small and do not reveal clear details, so attempts to reproduce the pictured knitting techniques may yield unpredictable results.
Assuming traditional yarns are in use, the larger rolled shapes in the fabric formed by the higher number of rows knit in the thick yarn tend to roll toward the purl side, the familiar effect seen in any single bed stocking stitch.
Part of the inspiration photo that began a renewed forum interest in the fabric 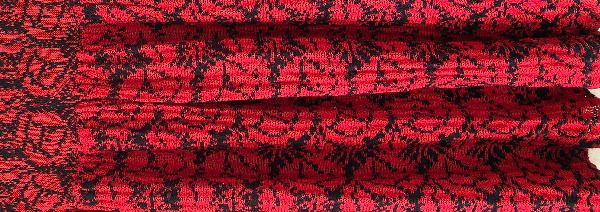 The appearance is of a fair isle pattern interrupted by the use of thinner yarn(s) in one or both feeders. Blocking long pieces can alter the aspect ratio of the original design, so in some cases, the width of the repeat or even the length would need to be doubled.
My initial repeat was 20X22 pixels: ![]() In this view, obvious places are highlighted for a possible switch to thinner yarns. If changing yarns manually, it is easier to change those in the sinker plate’s B position. If necessary, the planned motif may be color inverted to make those actions easier.
In this view, obvious places are highlighted for a possible switch to thinner yarns. If changing yarns manually, it is easier to change those in the sinker plate’s B position. If necessary, the planned motif may be color inverted to make those actions easier. 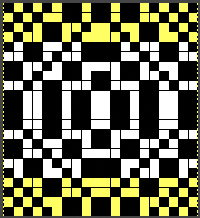 Both yarns used are wool, a yarn that has memory and spring-back. In the potential fold rows, the red color was replaced with a thin ply with the same fiber content. The first folds were knit in an *8 with thin, 14 with thick, 8 with thin** color sequence. Watching the knit as it progressed showed the thicker fair isle areas folding inward, with the thinner areas folding outward. The remainder of the swatch used a 4 thin, 8 thick sequence. The knit was steamed and pressed, the folds are soft but permanently present with the lower edge of the piece lying quite flat after a considerable amount of time.
 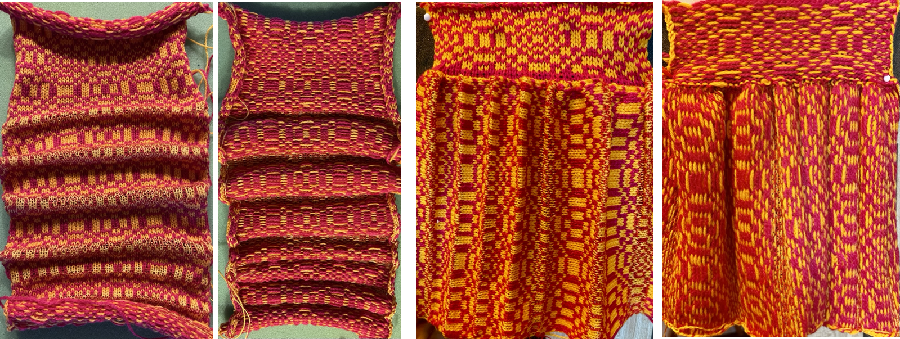 Here the red yarn used is acrylic, the black wool. An 8 thick 4 thin sequence was used, but in the thin areas, both colored yarns were replaced with single plies. The pattern is 48X54 pixels and from one of the Brother mylar sheets.
 ![]() The first swatch sports black flowers, the second, red ones. The knit sequences were the same, the change in texture in the areas may be seen here.
The first swatch sports black flowers, the second, red ones. The knit sequences were the same, the change in texture in the areas may be seen here. 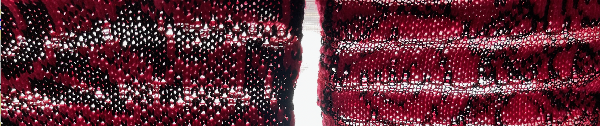 The black flowers swatch was ironed, becoming permanently flattened, aka “killed”. The hope is to manage the red flowers swatch in a better way. The thinner yarns are in slightly different shades of the base colors, so a subtle striping occurs in the areas where they are used. Both swatches were knit on the same number of needles and at the same tension.
 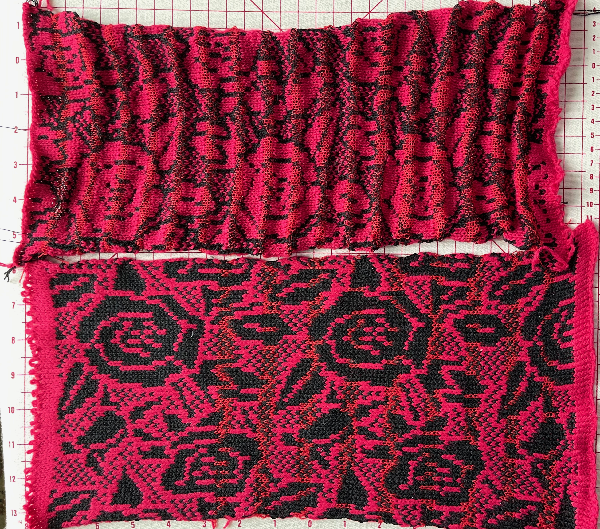 The blocking saga: I do own blocking pins but honestly have only used them in demos, and on rare occasions such as this, or to cut them down when I needed a fast replacement for a ribber cast on comb lost wire.
Whether extremely detailed blocking is ever needed can be a very emotionally charged topic for some, best saved for another day.
With an optimally gathered edge at the waistline secured, the wire is threaded very evenly through the bottom of the “skirt”, and evenly distributed weights are placed across it. The fabric is likely to grow considerably in length, another reason for knitting very large test/gauge swatches to calculate the width/length required.  I downsized a few years ago letting go of most of my professional equipment. My only iron at the moment when and if it generates steam, did not appreciate being held vertically, spitting hot water at my feet, so the amount of steam used to set the pleats was likely short of optimal. That said, with the wire and weights removed, that edge is staying flat, and the pleats appear to be permanent a month later.
 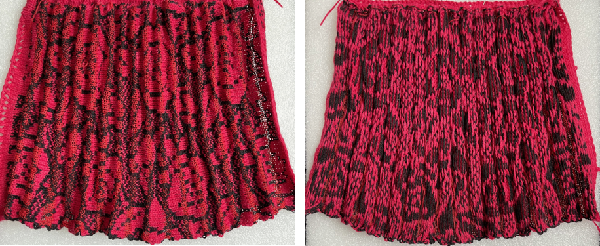 Knitweaving can be used to produce very interesting patterns, both all over or for edgings, and it may offer a viable alternative for patterning using multiple colors in the more prominent purl side rows of the knit. A 1x1selection is a good place to start.
 ![]() Returning to using wools, my efforts with the first yarns I grabbed failed with knit weaving, but since every other stitch every other row is selected, I was able to knit 8 rows in fair-isle with the thicker yarn in the B feeder, the thinner in A, followed by 4 rows of plain knit. The task is easier to accomplish with 2 knit carriages, one patterning, the other knitting stocking stitch.
Returning to using wools, my efforts with the first yarns I grabbed failed with knit weaving, but since every other stitch every other row is selected, I was able to knit 8 rows in fair-isle with the thicker yarn in the B feeder, the thinner in A, followed by 4 rows of plain knit. The task is easier to accomplish with 2 knit carriages, one patterning, the other knitting stocking stitch.
The colors were chosen for contrast making it easier to observe stitch formation.
The swatch, just off from the machine  after a manual tug
 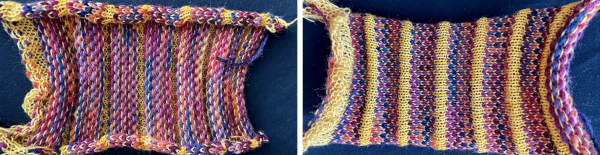 after steaming and pressing
 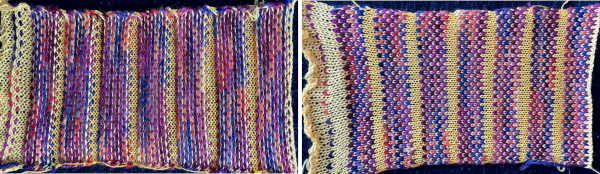 A bit more tugging and gathering on one edge, pleats are set.
  The swatch view on the left illustrates well the pleating roll formed by the thin yarn to the knit side, the inward roll of the fair isle segment to the purl.
Floats formed by the yarns not used traveling up the sides of the knit should be considered the finishing of the final pieces.
Transitions could be made in any one piece between the ratio of the thick/thin number of rows, perhaps for sections ie yoke shaping, or varying the fold sequences from one texture to the other and back.
Most fabric is only limited by materials, tools, and the imagination of its creators.
Other ways to create permanent pleats
single bed
Origami folds inspired pleats 1 6/19
Revisiting pleats on the knitting machine: single bed 5/18
Pleats created with lace transfers 8/17
Pleats: automating “pleating”, single bed 1/1
double bed
Origami-inspired 2: more pleats and fold using ribber 3/21
Knit and purl blocks to create folding fabric_ “pleats”
Pleats: ribbed, folding fabrics 4/15