Fantasy fair isle is the term often used to refer to dbj fabrics created using tuck settings on either or both beds. Typically in the required color separation used each design row in the repeat is expanded into 4 rows, with the same selection occurring for each color pair of consecutive rows. A tuck/plain combination is used here, with the backing essentially being a striper one, where each color knits every stitch on the ribber on every row.
In this illustration, the blue symbols represent knit stitches on either bed, the red, the tucked stitches on the top bed. The chart represents a single design row expanded into 4, the results would, in turn, be rendered double length in knitting the final fabric.  The last post related to this topic: 2021/09/07/geometric-shapes-on-ribber-fabrics-with-tuck-stitches-3/
Recently a friend shared images of a punchcard skull pattern she was using in a hat and followed with a query as to the possibility of using the pattern on a mesh grid. The inspiration for the conversation began with this image, the work of Claudia Scarpa.  The possibility of adding images on a true mesh transfer lace or mesh-like thread lace images may be found in 2021/12/14/to-mesh-or-not-to-mesh-9-more-on-mock-filet-design/
My DIY skull image in a potential thread lace pattern, in a 100X92 pixel png. 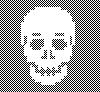 Concurrently the topic of illusion knits on the machine has also resurfaced in FB with some spectacular panels executed using the Garter carriage and changing colors every 2 rows. Some small geometric shapes begin to have a somewhat “similar” appearance using this technique, but as with beauty, the success in the imitation is in the eye of the beholder.
The techniques involved: my proof of concept was knit using img2track on a 930. Traditionally two-color designs may be opened and then downloaded, using the standard dbj built-in KRC function for the color separation, not suitable for this dbj version, while for designs in 3 or more colors the program will separate the repeat in a way that each color for each design row is knit twice, the separation required here.
At this point, the color separation is executed by filling in pixels and observing a variety of rules. DAK produces templates of jacquard separations of varied types that may be printed for use outside its universe. The same file may be screengrabbed, traced, and redrawn pixel by pixel for use in a Brother download using other download software.
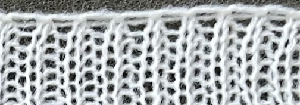
Passap by default separates knits for 2 color DBJ with each color for each design row knitting twice mode. Tucking on either or both beds is made easier because of the way stitches are formed on the Passap beds, along with the use of strippers which push down on tuck loops with each pass, ensuring that they will knit off properly. The fabric widens considerably when off the machine, requiring loose cast-ons and bind-offs. The dbj variant, dubbed fantasy fair isle, is often used to create lap or quilt blankets.
The Passap built-in reader techniques that are often recommended for large knit pieces ie blankets using the same design are 186 for throw size, 187 for lap blankets, and 183 for crib quilts. All three share the fact that the front bed pushers are selected in pattern in the up/knitting position alternating with the down/slip/tuck position alternating every 2 rows, producing the jacquard discussed here.
Slip settings produce narrow, short results, tuck short and wide ones. For non-Passap knitters, N is Passapese for plain knit, KX is tuck with patterning on the front/ knit bed, and AX for tuck patterning on the back/ribber bed.
Back in 2018, I began another post I meant to return to on traveling between the two brands.
My Passap E6000 manual is filled with scribbled notes from decades ago, expanding on how each technique may be used for a variety of fabrics. 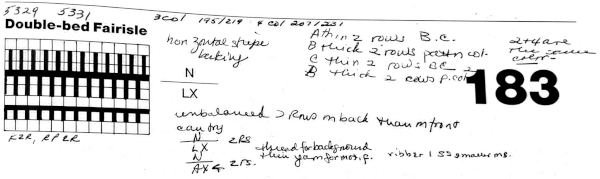
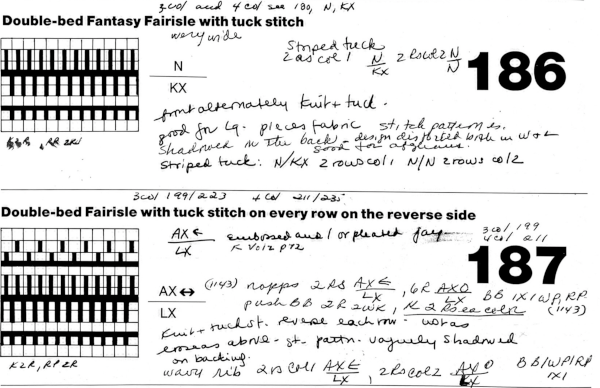 In Fantasy Fairisle knitting using 187 with alternating up and down pushers on the back bed and AX with 2 arrow keys would match Brother ribber knitting with lili buttons used on an even number of needles set to tuck.
Working with the large skull image the setting of knit every row on the ribber and tuck in both directions on the knit bed is used as in technique 186, with a critical difference. Passap knitters may download the original black and white image while for Brother knitting a color separation is required.
The original skull image is 100 pixels wide by 92 high.
Converting the white ground layer behind the skull to alpha produces an image on a clear ground that can be placed exactly where desired on a new file with a white ground using the grid and guides
The alpha double long skull, now 100 by 184 pixels  For the 1-pixel grid in Gimp to be visible on an editable image, a magnification of at least 800 is required. The options offered by default
 can be changed to suit by simply typing in a new number.
As described in other posts including in Gimp update for Mac2, I chose to mark every other row with a red pixel, making it easier to track color-inverting every other row. This is achieved by selecting the rows with red dots using the rectangle tool one row at a time and choosing Invert from the colors menu. The red dot will also change color, making it easy to locate converted rows in more complex patterns. The dotted blue line is a guide for placement.  in progress
  the processed image
 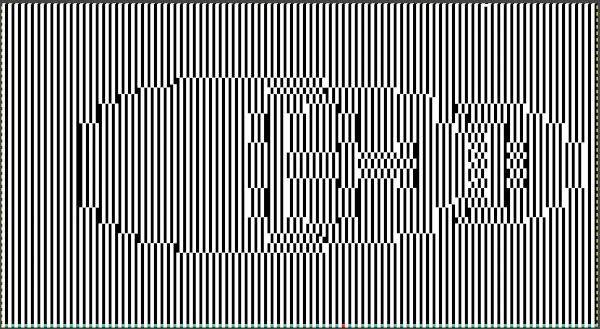 the trimmed 98X182 png
  doubled in length once more to 98X364
 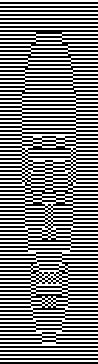 Knitting process on a 930 using img2track:
the 930 has a tiny brain, so the image is broken down by the software into multiple tracks of 96, 134, and 134 respectively. One of the critical differences when using this type of DBJ color separation is that the first preselection row is made from right to left toward the color changer rather than from left to right as in KRC separated 2 colors DBJ.
The first and last needles are in work on the ribber to ensure the edge stitch on that bed will knit every row.
The knit carriage is set to KCII, canceling the end needle selection.
Once the first row has been preselected and the planned color is chosen, with COL, set the main bed to tuck in both directions, leave the ribber set to knit, and continue knitting changing color every 2 rows.
In my swatch, the dark contrast color was used for the initial black pixel all-knit rows.
The work on the machine: 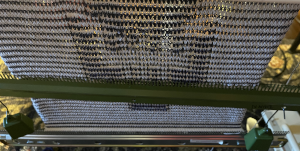 A reminder: in my experience, the Brother cast-on combs are usually chrome-colored, Studio grey, and Passap, and I believe Superba ones were traditionally green. The first 2 were designed for 4.5 mm machines, the latter for 5mm. The different mm spacing does not make the 5 mm combs suitable for casting on on Brother, but they can be poked through the knit in progress. I like to leave the first comb and weights on, insert the new comb closer to the beds, and then move the weight up, and then remove the lower position comb.
There are lots of side-by-side stitches tucking on the main bed, made possible by the fact that each is anchored in place by a knit stitch on the opposite bed.
The tension needs to be set so that the stitches will knit off properly while having tuck loops not so loose as to get hung up on gate pegs. It can take a bit of trial and error to find proper settings and they, in turn, may need to be adjusted again when moving from small swatches to knitting on a far larger number of needles.
The finished piece measures 25 inches in width by 24 in height.
The appearance on the bed set to N, in this case, the ribber: 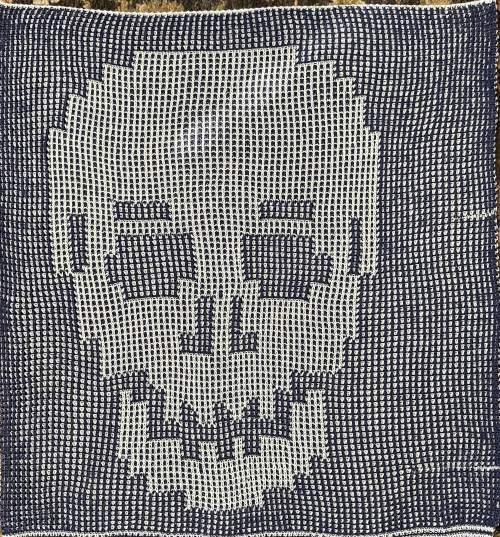 Those white lines on the right are spots where the color changer picked up both color threads, a problem that does not occur in Passap knitting, where each color is picked up in its own yarn holder.
  In the Brother model, sometimes the yarn is left in the wrong place below eye level rather than its own individual one corresponding to its button, and both yarns are picked up with the next color change.
  The more textured knit side of the piece,
 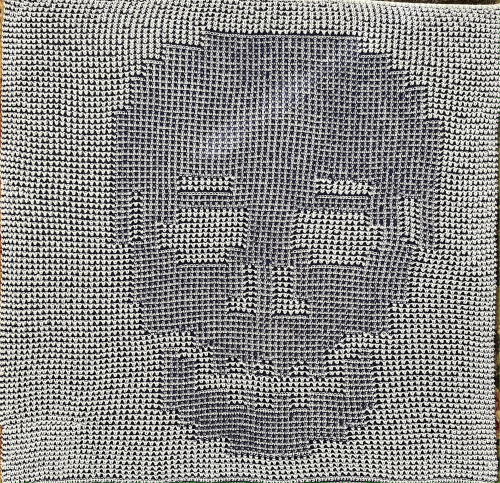 a close-up of the texture at an angle
  Claudia Scarpa developed a skull variation using only layers in Gimp
 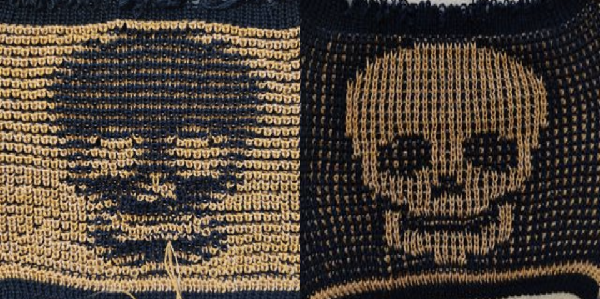 and has been kind enough to create a Youtube video illustrating the process. The separation is easy and quick as opposed to my more prolonged hack, and I will return to attempt to use it for various fabrics in a follow-up post.
This skull is more compact and better defined than mine. With the double-long original image superimposed on alternating pairs of black and white rows, the resulting png can not be lengthened again as tucking would then occur for 4 rows, not likely possible in a Brother machine. The variant is a very interesting cousin to mine.
In DAK using Method C color separation each color row separates into 2 rows of knitting and when using the result rows do not have to be repeated in pairs but the double-length switch will need to be used in Japanese knitting machines if working within the program. For those intending to use the separation outside the DAK universe, the color separation may be printed, traced/redrawn to create a png or bmp, scaled double length, and used as in the skull swatch. The template for the double long triangle in the post and the associated 24 stitches by 32 rows png, followed by the associated drawn png 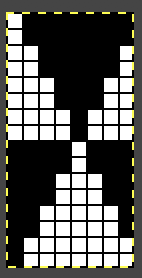
![]() The png doubled in length, 24 stitches by 64 rows.
The png doubled in length, 24 stitches by 64 rows. ![]() This is a small repeat, suitable for punch card machines. The test swatch is knit with the main bed tucking both ways and the ribber knitting every row.
This is a small repeat, suitable for punch card machines. The test swatch is knit with the main bed tucking both ways and the ribber knitting every row. 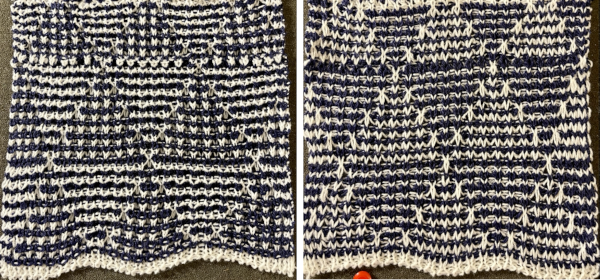 It is possible to work some repeats on some machines with the ribber also set to tuck both ways with EON needle selection.
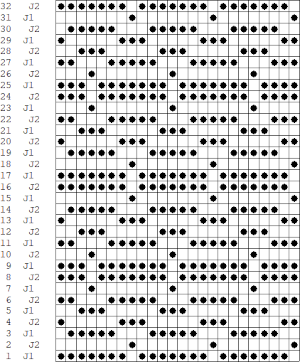
In Brother that is achieved by using lili buttons with an even number of needles in work on the ribber. The first and the last needle would be in work on the top bed, the KCI setting is used for end needle selection to ensure that the first and last needles on each side of the piece will knit. I did not find this method workable and soon had to stop because of a loopy mess. 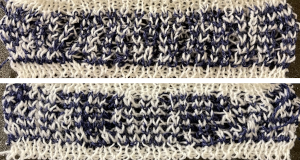 When using the Dak stitch design module, the color separation is automated. Choose any design repeat. This happens to be a 20X20 one, chosen from the thumbnail assortment, so not suitable for punchcard models. “Printing” the template using choosing the option of using dots rather than squares to represent knit stitches makes the resulting print screengrab easier to trace.
  the 20X20 repeat as a BW png
 ![]() The template was overlayed with a grid in numbers, filling in cells over the dotted areas.
The template was overlayed with a grid in numbers, filling in cells over the dotted areas.
A portion of the work in progress using the generated dbj option C template and tracing it transitioning from template to Numbers, to Gimp:  The result is screengrabbed, opened in Gimp, converted to BW mode, and scaled to the 20X40 expanded design size. Unless the double-length function in the machine is also used, it will need scaling again to double length prior to download.
Illustrations for the generated dbj option C template, tracing it in Numbers, processed in Gimp, 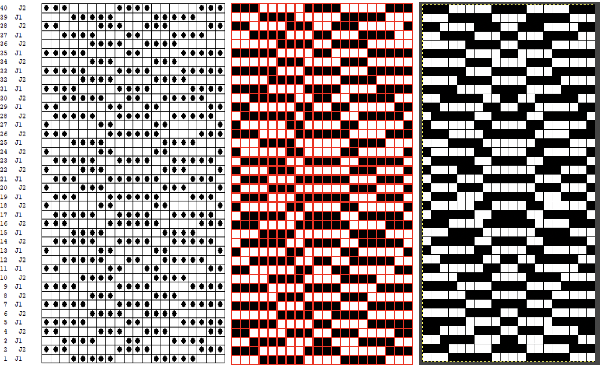 The final image double length, showing the difference between the separation using the template, and that using layers as in Claudia’s video, which appears different but is actually the same repeat, color reversed.
 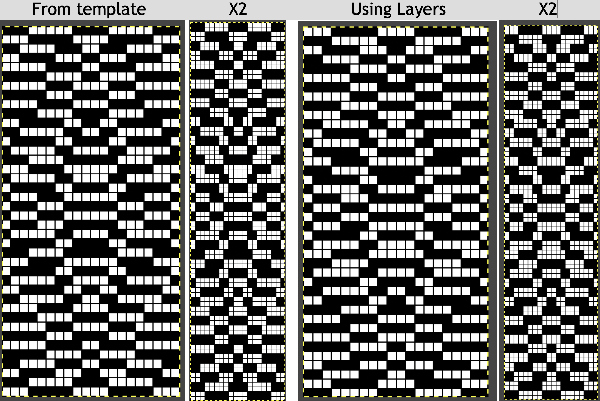 Using bucket fill for the ground in the second layer, as described in the video, the captured clipboard image can be very small
  or stripes any width may be captured, even up to that of the full repeat width
![]() Remember to click on the screen outside the area chosen with the rectangle tool before using the bucket fill in pattern tool.
Remember to click on the screen outside the area chosen with the rectangle tool before using the bucket fill in pattern tool.
The result is the same using either brush.
 Alternately, the initial design may be scaled X4 to 20 X 80 pixels
 ![]() and it is superimposed on a ground flood-filled with 2 black rows alternating with 2 white rows
and it is superimposed on a ground flood-filled with 2 black rows alternating with 2 white rows 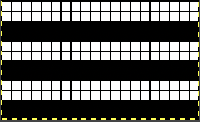 the steps resulting in a match to the previous elongated version
 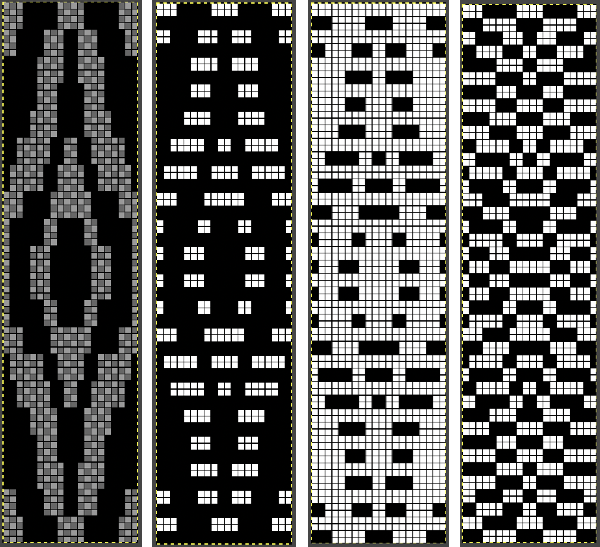 the 20X80 png
 ![]() In the related swatch patterning is used on 40 stitches by 100 rows. The relaxed fabric when off the machine measures 7 inches by 7 inches and the knit side view reflects the elongation of the design one might observe when using the same color separation in standard striper-backed DBJ. On the bottom, the swatch is stretched and the stitches are set with some casual steaming and pressing to 10.5 to 6.75 inches, gaining the familiar texture appearance seen in so many Passap blankets.
In the related swatch patterning is used on 40 stitches by 100 rows. The relaxed fabric when off the machine measures 7 inches by 7 inches and the knit side view reflects the elongation of the design one might observe when using the same color separation in standard striper-backed DBJ. On the bottom, the swatch is stretched and the stitches are set with some casual steaming and pressing to 10.5 to 6.75 inches, gaining the familiar texture appearance seen in so many Passap blankets.
The color differences are due to lighting, with the photos being taken at different times of day. 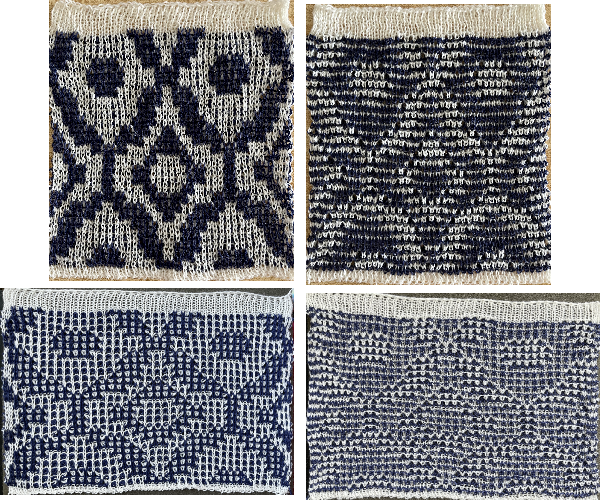 For a loose cast-on row, I used a racked version at the same tension as the body of the knit.
For a loose bind-off to accommodate the stretch, I used this method, one of many taught in Passap seminars.
To perform the same on Brother machines: knit the piece, ending with the carriages on the right.
Transfer all the stitches up to the top bed, ![]() bring the ribber needles up into work between them
bring the ribber needles up into work between them 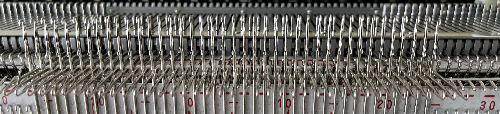 set the ribber to a looser tension number, here it was increased from 4 to 7. Knit one row from right to left, picking up loops on the empty ribber needles
 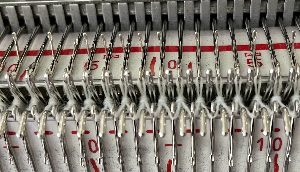 drop the ribber slightly by using this bracket lever position to elongate the main bed stitches.
  Using a latch tool, beginning with the first stitch on the right, insert the open latch tool into the first stitch on the right, then insert it into the second stitch moving down until the first stitch is behind the hook. Do not allow the second stitch to go behind the latch, keep it in the hook. Pull the latch hook up moving the second stitch through the one behind it, forming the first chain. Repeat across the row, going through the center of each stitch, continuing the chained bind-off.
 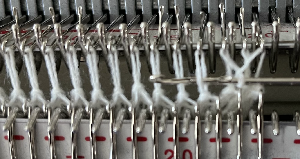 A yarn end is pulled through the last stitch and the now completed chained row is secured
  The beds are returned to the up position, and loops and stitches are dropped off all the needles.
An attempt at a more detailed look at the bound-off edge