2023 The layers menu in Gimp 2.10.34 no longer offers the difference mode.
From the manual: “If you need to stay compatible with older GIMP versions or you need to use the legacy layer modes for other reasons, look for the icon to the right of the layer modes selection.
This drop-down menu will let you choose between Default and Legacy. If you choose the latter, the layer modes list will only show the legacy layer modes and all modes will have “(legacy)” behind their name (the selected mode will use the short version (l). ”
To make the dialog available: 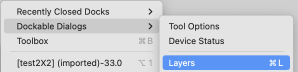 click on Legacy to switch mode selections.
 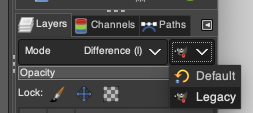 In December 2022 I began to experiment with layer transparency please see the post Gimp Update for Mac 3.
 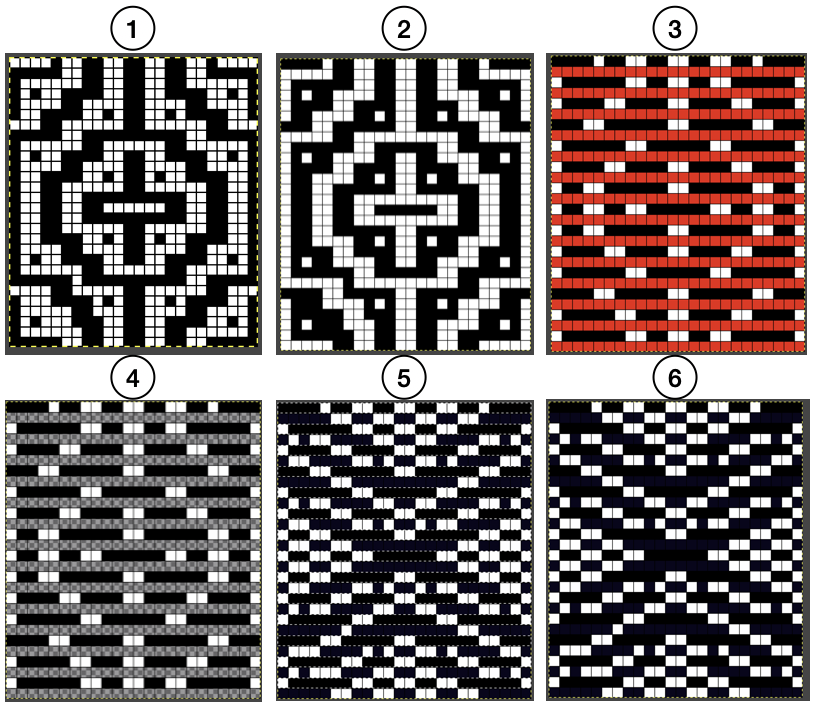 Over the years I have developed personal methods for creating color separations for many types of knit fabrics, born from lots of experimentation when published resources were absent or extremely limited.
I continued to share methods as they evolved from increasing familiarity with specific programs or as I was introduced to new ones.
Since I began to use paint programs including Gimp I had very limited experience using layers and did not consider how they might be used in color separations for BW knit repeats.
In my last post on fantasy fair isle ribber fabrics, Claudia Scarpa shared her layers method and subsequently published a Youtube video for obtaining a separation for a very similar fabric to the one I developed beginning with a large design motif that in her instance was also placed specifically on a larger ground.
Her method for separations in 2 color work sparked my interest in using the steps to yield knitting patterns for varied textures and stitch types, beginning with dbj.
Using
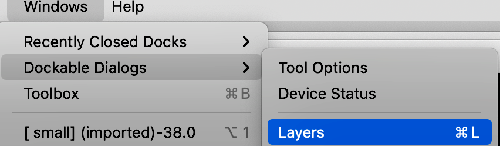 will display layer options in my Mac on the bottom right side of the screen
 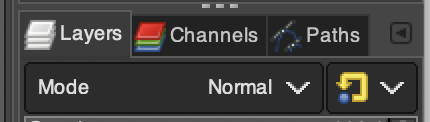 A simple geometric shape
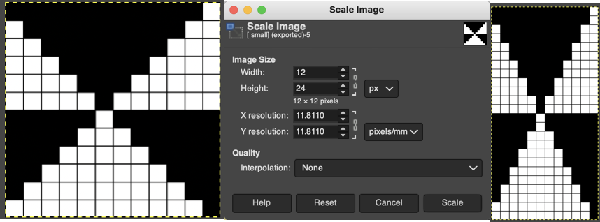
 ![]() is scaled in Gimp to twice its height, check that Quality Interpolation is set to None. I have sometimes had issues with scaling in Gimp, particularly when working with small repeats. The cause appears to have been that the Quality, Interpolation, needs to be set to None and may randomly change while working through several steps in processing any image or after a program restart. Arahpaint scaling is still an excellent option for knitters who have it available.
is scaled in Gimp to twice its height, check that Quality Interpolation is set to None. I have sometimes had issues with scaling in Gimp, particularly when working with small repeats. The cause appears to have been that the Quality, Interpolation, needs to be set to None and may randomly change while working through several steps in processing any image or after a program restart. Arahpaint scaling is still an excellent option for knitters who have it available.
 the white ground of the resulting image is rendered transparent by using Color to Alpha
 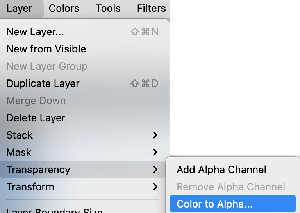 and will constitute the first layer for the separation process
 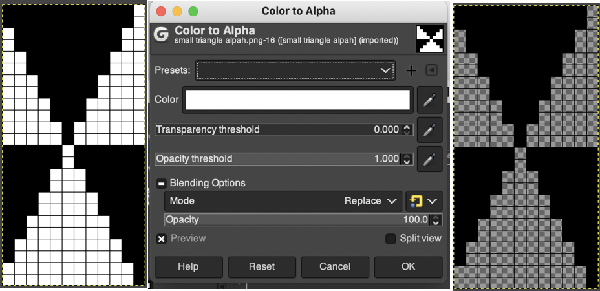 Select New Layer from the Layers menu (see chart), choosing the background or foreground color to have a white screen. It will share properties with the alpha repeat such as pixel count, magnification, and the grid view if used.
Use the pencil tool to draw a repeat that will be used to fill the new layer, followed by using the rectangle tool to select what will become the pattern used to bucket fill the whole layer.
The latter may be the smallest possible selection or even that of complete rows as in my chart. 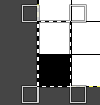 Copy the selection, and it will be saved to the clipboard and remain available for filling with the pattern unless the program is quit. It may also be saved as a pattern for future use.
After using the rectangle select tool, remember to click in the window outside the image to set the layer before using the bucket fill tool in the pattern fill setting, or the whole layer will simply fill in with a single color. 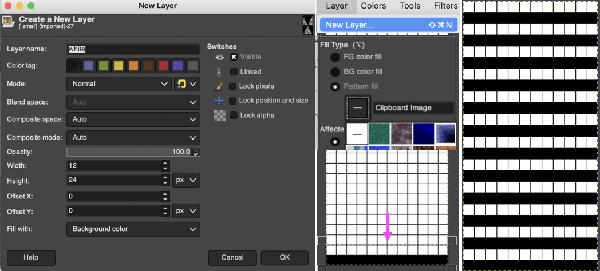 In the layers dialogue, use the mouse to drag and drop the alpha image icon for the triangle layer onto the newly created one. The selected icon will appear surrounded by a border when chosen, a new icon will appear during the step.
  Both layers measure the same pixel dimensions, no placement adjustments are necessary. The mode, highlighted here is changed in a later step.
 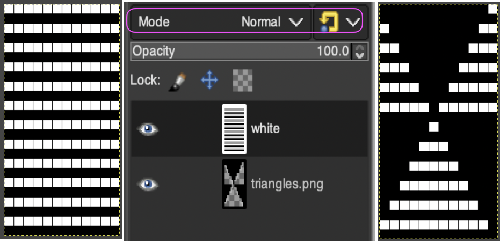 Color invert the new image
 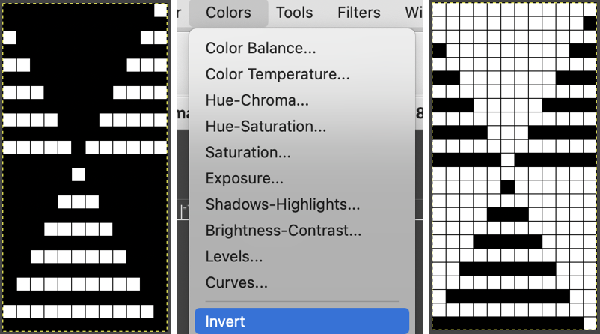 Click on the downward pointer to the right of Normal and select Difference. The result is a repeat that may then be saved and used doubled in height to knit DBJ in a variety of settings.
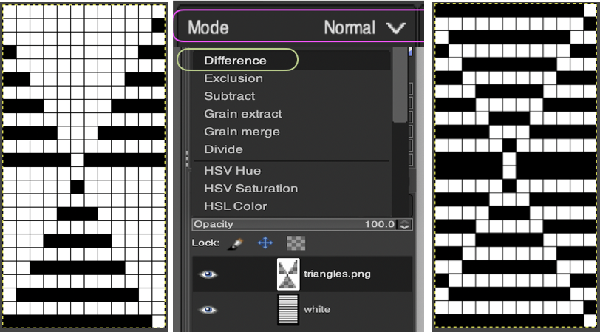 Elongation after download can be avoided by working with the same initial image scaled in height X4 and following the same process, saving and using the repeat on the far right.
 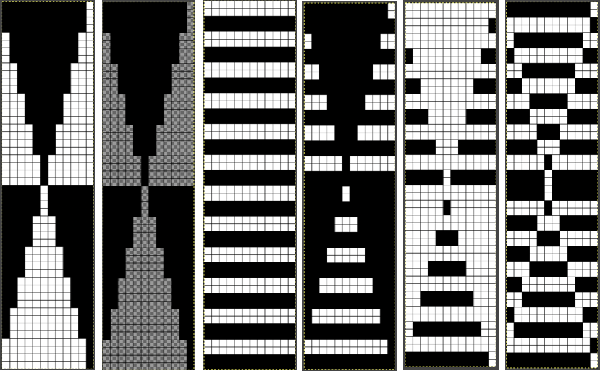 The same separation was achieved using other methods in the post on fantasy fair isle.
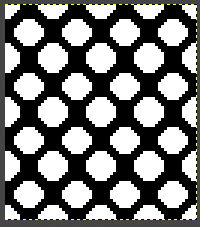
Possible DBJ settings on Brother machines using the elongated final repeat are shown in this grab, part of the post. EOR refers to a repeat that would require double length after the download, the same machine settings apply to any image created in a double-length format prior to download. 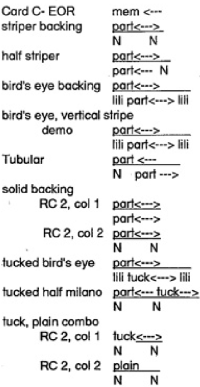 Are punchcard knitters left out? In the post on the color separation used for the KRC equivalent separation for a punchcard two results were presented, the full card
 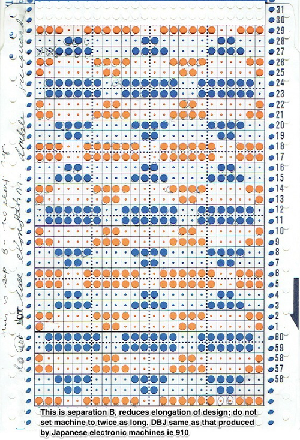 and the starting design shown with the color reversed repeat of the above.
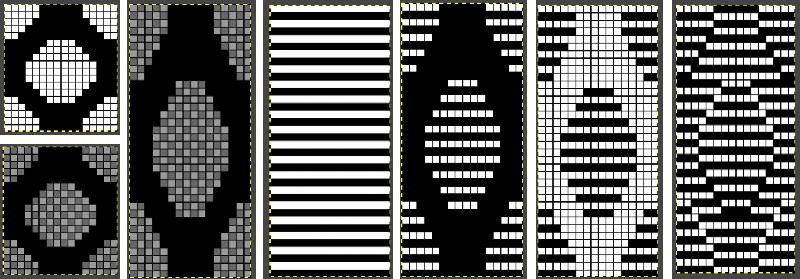
 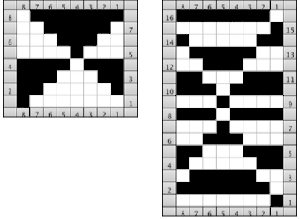 The process begins with obtaining the double-length separation
 ![]()
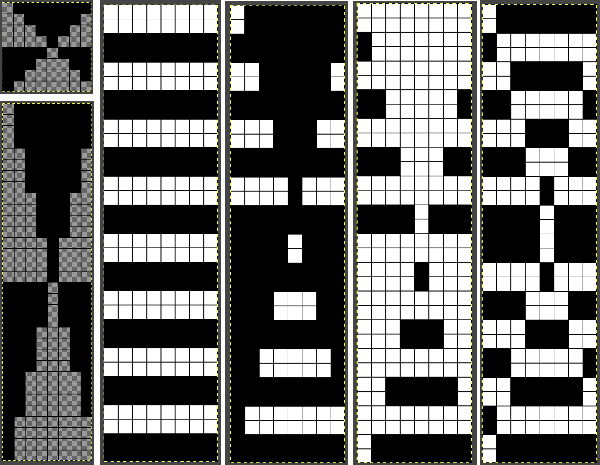 after saving the last file on the right as PNG
 ![]() discard any files still open. Open the saved png and process it the same way, changing the ground
discard any files still open. Open the saved png and process it the same way, changing the ground 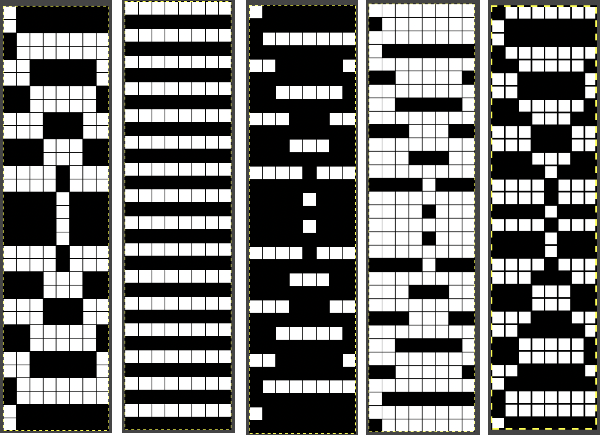 Save the last file as png. Punchcard knitters would need to tile the fileX4 in width and height X2 but the final repeat appears different than that in the punchcard post, the proof of success or failure is in the knitting. If the swatch is knit on electronic models, the first preselection row is made from left to right, as it would be if using the built-in color separation. The main bed for this fabric after the preselection row is set to slip in both directions, the ribber, using an even number of needles, is also set to slip in both directions with lili buttons. The 8X32 png
 ![]() The result from repeating it twice indicates the separation indeed works.
The result from repeating it twice indicates the separation indeed works. 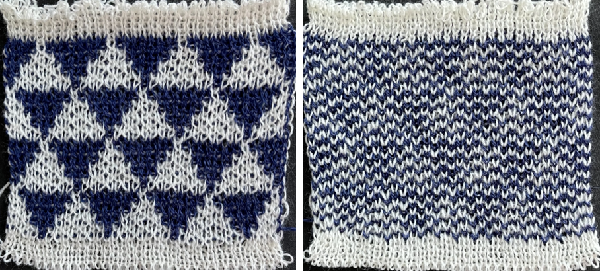 When a color separation is downloaded it is used as one would a fair isle. If the motif is representational and direction on the knit side matters, any repeats may have to be mirrored horizontally if they are automatically reversed by either your software prior to download or your machine model after it.
There has been renewed interest in the MK FB group on drop stitch lace recently. I plan to address using this repeat in a future post on knitting the fabric using img2track. ![]()
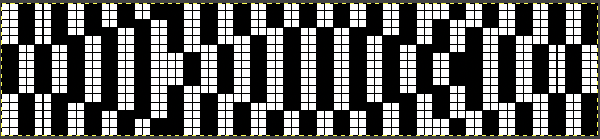 The 16X72 double-length PNG
 ![]() A quicker matching result:
A quicker matching result:
begin with the motif lengthened X4
open a new layer, bucket fill a striped ground and use transparency to change the white in the result to alpha. The layers are immediately combined into a new image
color invert the resulting file
change layer mode by selecting difference from the menu, save the resulting PNG
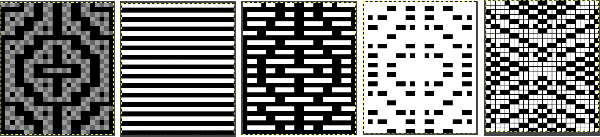
 Tiling to visualize alternative repeats, beginning with the 24X72 pixel file
![]()
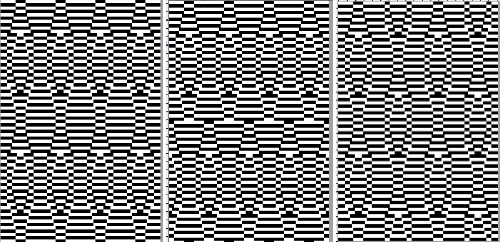 The file for the image in the center, modified to 24X144 pixels file for the image on the right, modified to 48X144 pixels
 ![]() Removing the color on every other row for use in specialty fabrics ie drop stitch lace using a modified stitch dropping tool with a now edited 24 stitch repeat, suitable for punchcard models:
Removing the color on every other row for use in specialty fabrics ie drop stitch lace using a modified stitch dropping tool with a now edited 24 stitch repeat, suitable for punchcard models: 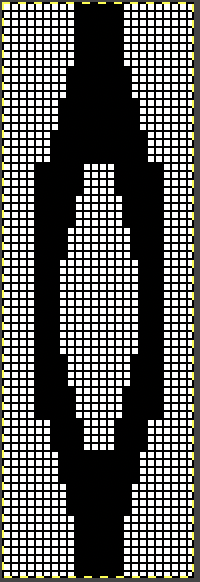 The image is processed as for the previous separation, the final png is exported. Open the saved in Gimp.
From the Layer menu choose new.
Create a pattern for bucket-fill in pattern using color, in this case, blue.
A new image immediately appears, export it as a PNG.
Open the saved 3-color PNG.
In the tools menu choose the second option for fuzzy select by color, the icon will change. 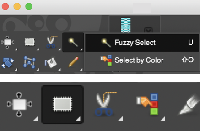 Using the rectangle tool, select a single blue row, after the selection, press and hold down the shift key and repeat selections of multiple rows in the same color. Each selection will be bordered by a dotted line.
 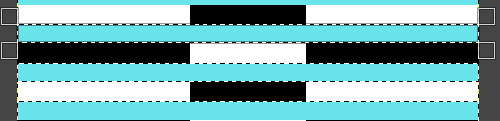 Release the shift key. Click on the rectangle select tool and then again in the work window outside the image to set it. The dotted lines will disappear. The same action is repeated if working on segments of the full file at a time.
Export the fully altered file as PNG ready for download, or print a gridded version to follow in punching a card. 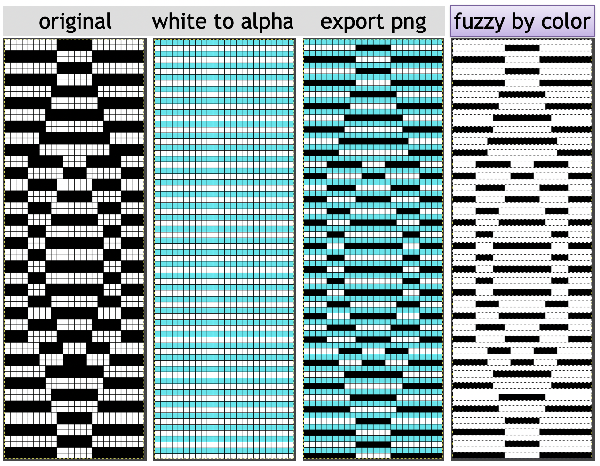 The 24X72 new png
 ![]() MOSAICS: For proof of concept, I intend to use separations for fabrics accompanied by knit samples in previous posts, beginning with a mosaic one, achieved in the post. The images shown are for the final repeat as separated there are shown at the top of this new image. Below comparisons are made between the original download file and its companion elongated repeat alongside the same developed using Layers
MOSAICS: For proof of concept, I intend to use separations for fabrics accompanied by knit samples in previous posts, beginning with a mosaic one, achieved in the post. The images shown are for the final repeat as separated there are shown at the top of this new image. Below comparisons are made between the original download file and its companion elongated repeat alongside the same developed using Layers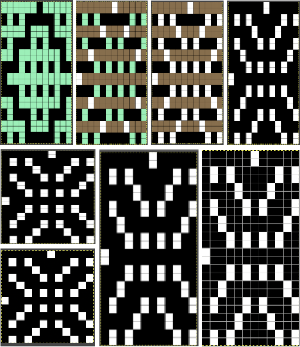 Both results require scaling X2 before knitting, whether by button setting changes in the repeat after download or in Gimp before.
 ![]() After reaching the step where the layer mode is changed to Difference (or Exclusion), stop and save the png, using color reverse at this point will revert to previous a previous layers view
After reaching the step where the layer mode is changed to Difference (or Exclusion), stop and save the png, using color reverse at this point will revert to previous a previous layers view 
![]() open the saved png in Gimp, use color reverse, then scale the result doubling its height, save the png for download and knitting without changes in any machine settings.
open the saved png in Gimp, use color reverse, then scale the result doubling its height, save the png for download and knitting without changes in any machine settings. 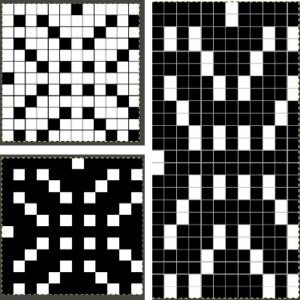
![]() Testing another image separated in a previous post: the original charted image is now rendered in black and white
Testing another image separated in a previous post: the original charted image is now rendered in black and white 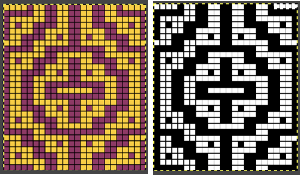 the repeat as a PNG
 ![]() tile check
tile check 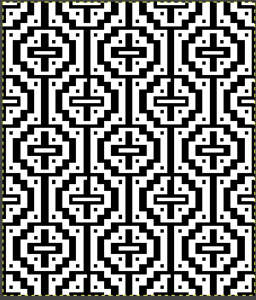 The process in Layers
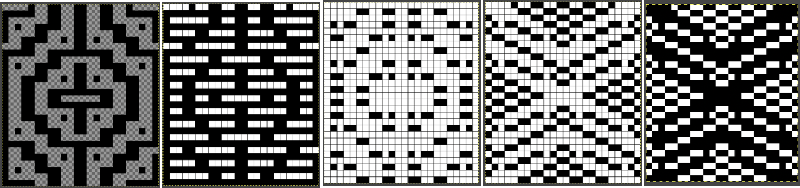 The very last file on the right is saved as a PNG. In turn, it is opened again in Gimp, scaled to twice its height
 ![]() The non-elongated repeat matches that in the punchcard, which was knit with the machine set to double length
The non-elongated repeat matches that in the punchcard, which was knit with the machine set to double length 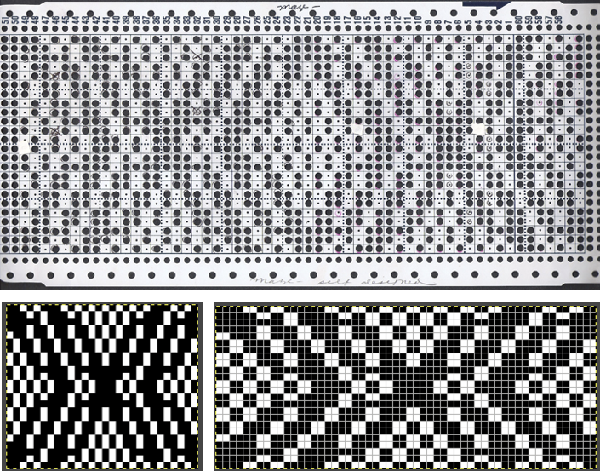 Exclusion is the alternative Layer mode which when following the same process yields identical results.
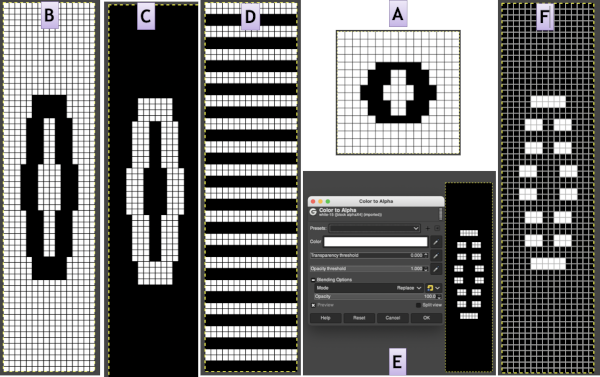
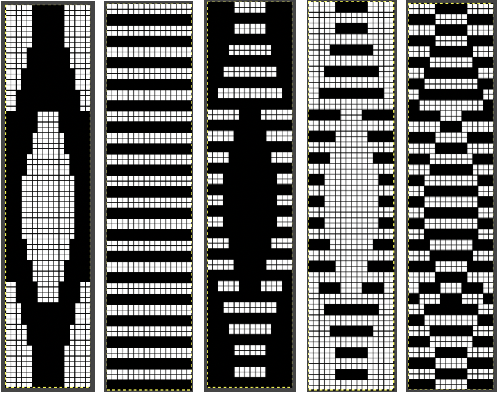
 A block slip stitch design from the post requires color inversion and doubling the length.
  A: design motif
B: lengthen X 4
C: color reverse
D: new layer filled with pattern
E: color to alpha immediately results in F
F: save the PNG for download