WORK IN PROGRESS
There are many fabrics where samples may be knit using the proper color separation and released just prior to binding off. Samples and designs may be found in several of my previous posts.
End release is a possibility depending on how the repeat is programmed but does not always produce good results. As can happen in any fabric, what works in swatch size may not when knitting far larger pieces. Fuzzy yarn is problematic in many knitting techniques, it is best avoided in these fabrics. No matter the yarn, after knitting longer pieces, I have found sections that simply refuse to unravel. In addition, if long stitch shapes are distributed on knit striped grounds, the release needs to happen at a minimum when the top of each shape is reached. A sample with drop-stitch interrupted by all knit rows with only one color released. 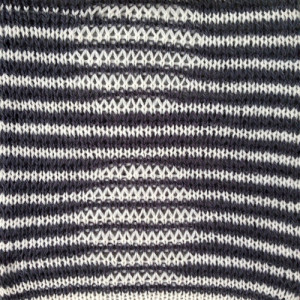 The repeats for designs may be self-separated to suit.
For more than 2 colors per row the built-in separation in img2track may be used, where any number of colors are selected for each design row and repeated twice. Passap separates for 2 colors with each pixel knitting twice on every row by default, but in Japanese machines, the pattern needs to be separated and programmed using other means.
The knitting method suggested here should work with more than 2 colors per row are separated by the software.
The post on Using Layers in Gimp for color separations illustrated a method for obtaining the necessary file to match those built-in variations when working in only two colors. The repeat is one that was separated and used in a previous post 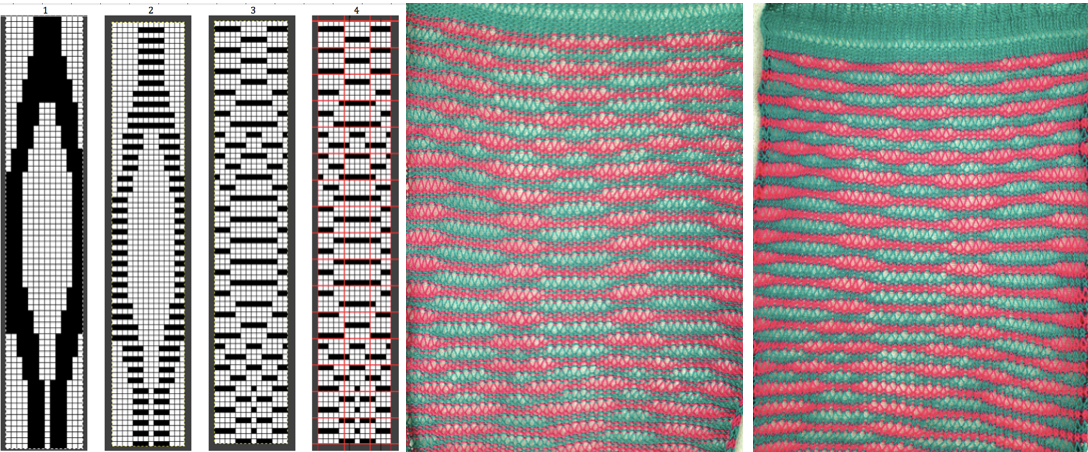 Here the file is separated quickly using Layer menus in Gimp alone
 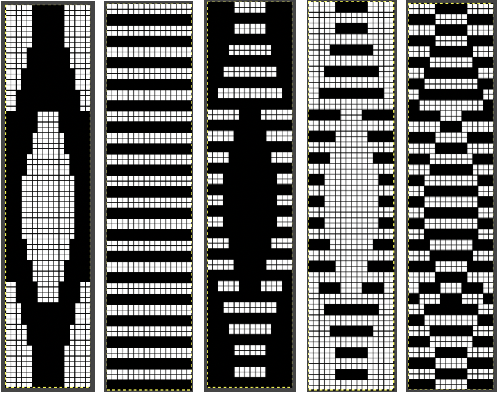 Three variations of the final png files are shared
 ![]()
![]()
![]() The last appeared the most interesting visually to me when tiled
The last appeared the most interesting visually to me when tiled 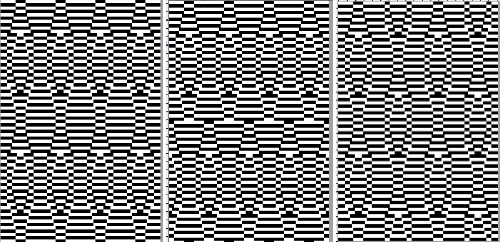 This is the appearance when a different design was entered in img2track. The separated file 3 color file in BW is not shared.
 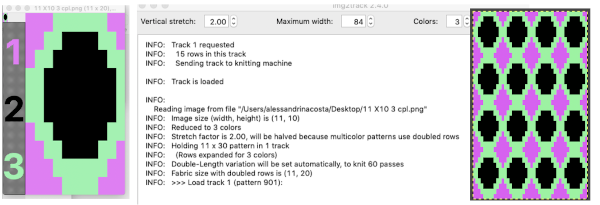 The method for knitting the pattern: the long stitches are formed by loops that are created on the top bed and dropped on the following row.
This is the method I used in my early dropped stitch samples: to begin with, cast on for every other needle rib, knit 2 circular rows followed by one-row all knit rib, transfer all main bed stitches to the ribber. For an open stitch cast on directions and photos see the post.
The pitch for every other needle  Set up needles on both beds for every needle rib with an extra needle in work at each end on the main bed, cancel end needle selection (KC II). With the main bed needles in the B position, set the knit carriage to slip in both directions so as not to pick up loops across the whole row on its way to the left. Change the pitch for when working on every needle on both beds.
  Make the first pass toward the color changer, needles will be preselected for the first pattern row
COL: the ribber remains set to knit every needle, the main bed to slip in both directions. A piece of tape in front of needle butts of needles in A position aside the edge of needles with stitches on them on each side helps keep from accidentally moving extra needles into work when dropping whole rows of stitches
COL: change color, as carriage moves to the right, selected needles will pick up loops on the main bed that will form the long stitches when dropped, while the next row of pattern is preselected, so by the time the carriage has reached the right side of the machine, the repeated needles selection is still present
COR: using any convenient tool (I use the edge of a piece of garter bar or ribber cast on comb), bring all needles in work out to E, and use the same tool to return all stitches back to B position. The loops formed on the main bed will be released forming the long stitches: check that all needles are indeed empty and that loops are free and between the beds
As the carriage moves to the left again toward the color changer, the ribber only will knit all stitches, needles on the main bed will be preselected for the next row of long stitches, selected needles do not knit until the next carriage pass from left to right.
COR: colors are changed every 2 rows
Ayab users have a different alternative for knitting this fabric as described in the post, using the circular ribber option. Instructions are given for dropping a single color or both. 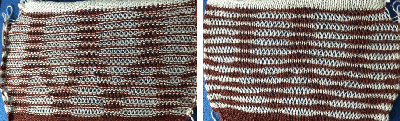 I cannot imagine manually dropping stitches after every row of loop formation on the top bed for any large piece in this manner. As time passed, I developed a hack for using a second knit carriage with a modified sinker plate.
 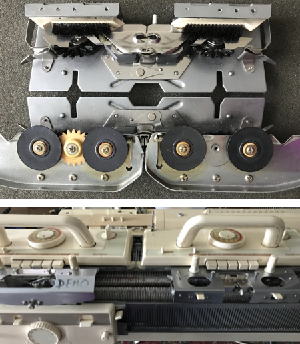 Anyone with a compatible second knit carriage may use it with the resulting modification to knit a variety of fabrics much more easily, including any that would require the ribber settings changed in both directions, more convenient if the action is required every even number of rows.
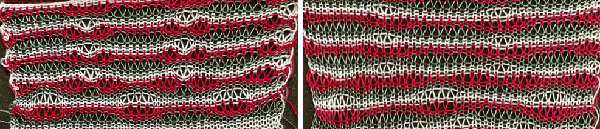
Back to drop stitch in 2 colors (or more) using img2track, changing the base design to a small geometric shape. The 8 stitch repeat scaled X 4 in length as separated in the previous post to 8 stitches by 32 rows is used in the following samples. ![]()
 Rather than relying on manipulating it in width or height and programming each repeat the changes in my swatches were made using variation key selections on my 930.
This type of fabric is best knit using a yarn with no memory, that will allow for retaining the blocked shape. The elongated stitches can have a peek-through quality that will allow for solid knit in a different color, an undergarment, or even bare skin to show through.
Working with a small geometric design to start with helps to develop a sense of the change in its aspect ratio as the original is scaled and knit in different widths and lengths.
Use any separation that allows for knitting each color pixel in each design row twice.
Begin with carriages on the right / COR
After EON cast on  and knitting the first full row from left to right, transfer the top bed stitches to the ribber. Place needles in work on the top bed in the B position with first and last outside those in work on the opposite bed. This will allow for edge stitches to be dropped in pattern as well. With the transition planned to every needle rib, the pitch needs to be adjusted accordingly
  The second carriage, C2 is set to KCII as well. It will be advancing the design with each pass as well and will drop loops on the first pass, preselect for the subsequent pattern row on the next
COR: using the paired carriages set the knit carriage to slip in both directions so as to avoid picking up loops on every needle in work on the top bed, the first row is knit on the ribber only toward the color changer.
Download the repeat.
Program it for the width of the needle bed.
Cancel end needle selection on the top bed, KCII
The separation is technically entered as a fair isle design, variation keys for altering the repeat in the individual machine brand ie double width or double height may still be used.
While moving to the left the first pattern row is preselected.
COL: When the left is reached, change color, the top bed remains set to slip in both directions, the ribber to knit in both throughout.
Before moving to the right for a single time push selected needles back to B so as not to pick up loops on the way back to the opposite side. The second pattern row is preselected during the move to the right, the ribber knits every stitch
COR: knit to left on creating loops, concurrently the next pattern row is preselected, I prefer to change color at this point leaving the carriages to the far left
C2OR: use the second knit carriage with the hacked sinker plate set for plain knitting, make 2 passes with no yarn in its yarn feeder. The first pass drops the stitches. The second pass returns it to the right leaving all needles in the B position. Because no cam buttons are selected in this version, the carriage does not engage the belt as it would if it was also used for advancing patterning.
COL: with the new color no loops are picked up on the way to the right, needles preselect for the next loop row created when moving from left to right
COR: knit back to left creating loops
C2OR: use the second carriage set for plain knitting to drop loops on as it moves to the left, needles are flatlined in B on its return to the right
It is easy to identify the last color used by looking at the ribber. At the completion of each stitch drop, with COL, ribber stitches will clearly be in the last color used.
COL: with the new color no loops are picked on the way to the right, they will be formed on the second pass returning carriages back to the left.
C2OR: use the second carriage for 2 passes
Repeat the last 2 steps until the desired length is reached
Transfer all stitches to the top bed, create a loose bind off tested on the test swatch.
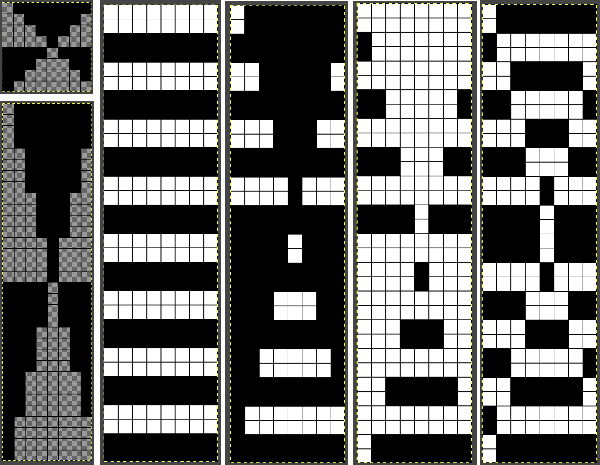
The sampled repeats altered using variation keys in the 930
8X32![]()
16X32 ![]()
16X64 ![]() The transition in aspect ratio as the original repeat used on the right is changed to double its width
The transition in aspect ratio as the original repeat used on the right is changed to double its width 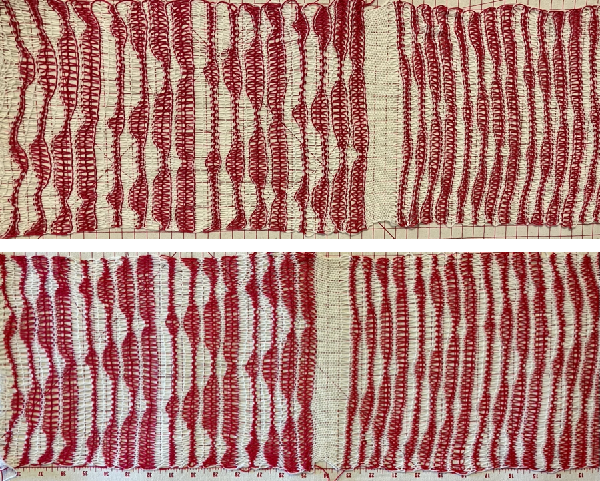 Here the comparison is made to the double-wide repeat also doubled in length
 The elongated stitches allow objects behind them to peek through
 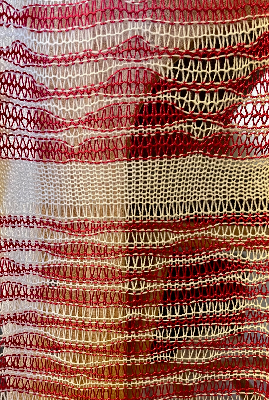 Another 2 color variation
 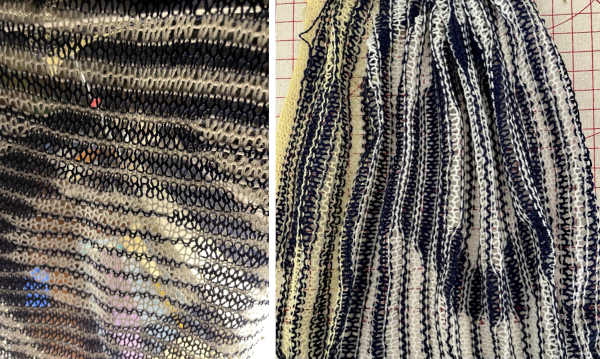 Previous posts include samples isolated on striped grounds, using 2 colors.
Adding a third color can make the overall appearance muddy and small designs can appear lost. One sample in the post  Here the goal is to use the img2 track separation, maintaining the same color change rotation in each piece.
Reviewing points to consider: in more than 2 colors dbj separations, the double-length variation key is set automatically except in the 950i, where it needs to be set manually.
In knitting drop stitch, the repeat chosen must have each color present in each design row unless the shapes are deliberately altered with solid color stripes in each color. The software is smart enough to recognize any design rows in which a color is not represented.
In conventional dbj, this keeps the design continuous, but in drop stitch, those extra rows will produce an all knit stripe interrupting the overall design.
The software scales the height of the motif to half the original, due to the fact that the double-length variation key is automatically turned on, restoring the original aspect ratio, the png loaded needs to be the original repeat scaled to double its height.
In DIY a small design will likely be less recognizable than larger ones, but working with one can help one understand how stitches can be formed.
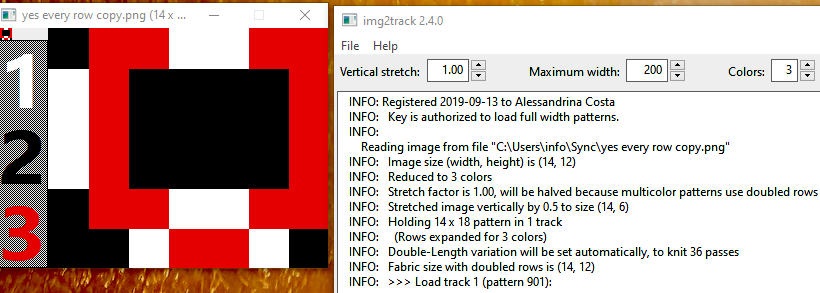
The initial design is 6 stitches by 7 rows. 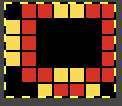
![]() It was stretched in width since the fabric elongates the design, and in height because to software will, in turn, reduce that by half to 14X12.
It was stretched in width since the fabric elongates the design, and in height because to software will, in turn, reduce that by half to 14X12. 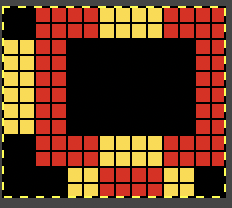
![]()
 The tiled potential appearance as a dbj fabric:
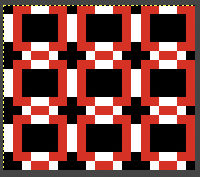 In the first sample three carriages are used:
after the basic cast on, transfer and set up needles as described for all variations.
To use the second knit carriage to drop stitches, the first preselection row is made from left to right with the color 1. As the pass is made to the right, no needles on the top bed pick up loops, the ribber knits in that color, preselection for the next row of knitting is made.
As the carriage returns to the left the first row of loops for the long stitches is formed, the ribber knits the second row in that same color.
With both carriages to the far left push the button selection for the next color selection. The number prompts for color changes by the machine will be off by a row during this process.
With the second knit carriage and its altered sinker plate on the right set only to knit make two passes, returning it to the far right. The first pass drops the loops, the second pass returns empty needles to the B position, creating the long stitches.
The paired carriages will knit only on the ribber as they move from the left to the right again, preselecting for the next row of loops. They will place loops in the pattern on the top bed needles as they return to the left, and knit a second row on the ribber.
With carriages to the far left push the button selection for the next color selection.
Use the knit carriage for two passes from right to left, repeating the two steps for the length of the piece.
When the top of the piece is reached, drop any loops on the top bed before knitting a row on the ribber and preparing for transferring stitches to the top bed and binding off.
Only one set of loops is created in each color.
 What of end release? because all 3 colors are present in every row, the design is suitable. The first preselection row is from right to left.
I found the combined carriages harder to push, and the knitting wanting to ride up toward the ribber bed needles.
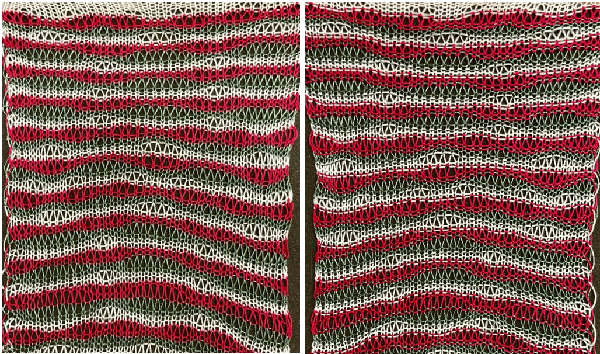
The bottom of the swatch has loops released before a transition to plain knit simply exchanging colors every 2 rows until the end of the test was reached. The top duplicates the effect achieved above by pushing preselected needles back to B position with a tool prior to moving with the new color from left to right. 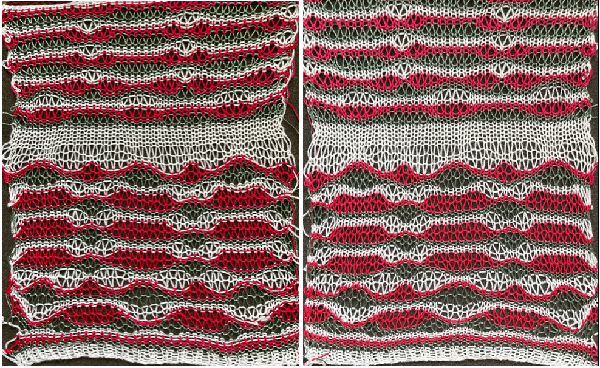 Side by side comparisons:
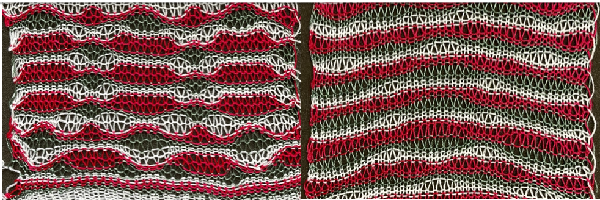
 If the end release fabric is preferred but the stitches riding up are a nuisance, the carriages are hard to push, not all stitches release on a larger swatch, or a slightly fuzzy yarn is used the same result is it possible once again using the modified knit carriage to drop stitches making passes from the right?
The problem with that concept: if the knit carriage or any other tool is used
periodically to drop stitches in a long piece when it moves across the row, it drops on the first pass, leaves needles in B position on the second pass when
returning to the right. As knitting resumes with both carriages, no loops are picked up on the first pass to the right, so the pattern with colors dropping for 2 consecutive rows is interrupted, resulting in a patterning error. Selectively dropping stitches while maintaining proper needle preselection is impractical.
Also, if the intent is to use the knit carriage also to select and drop stitches for 2 rows out of every 4, the motif would need to be lengthened several times. I found when programming the far longer repeat the software refused to make the proper needle selection, switching every 2 rows rather than repeating the same multiple times. That aside, the number of passes required becomes daunting.
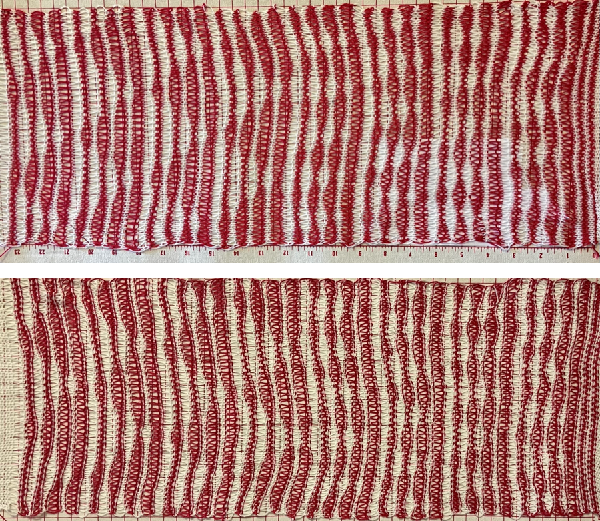
Changing color selection and order may make the individual shapes more noticeable: 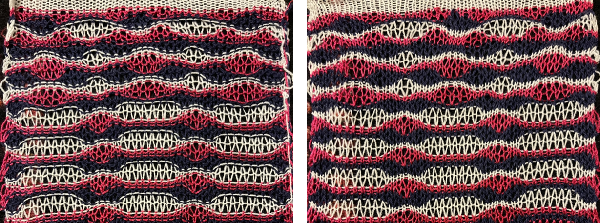 Any published or self-drawn separation for 3 colors per row patterning including every color in every row of the original design may be used, programmed as a single bed design, and knit for end release.
This swatch is only 24 stitches wide, it was a start in an attempt to place a better-defined geometric shape on a striped ground, with spaces where not every color is represented in every row between repeats. Its dbj version has some interesting surface texture on the reverse It is only part of the finished piece. 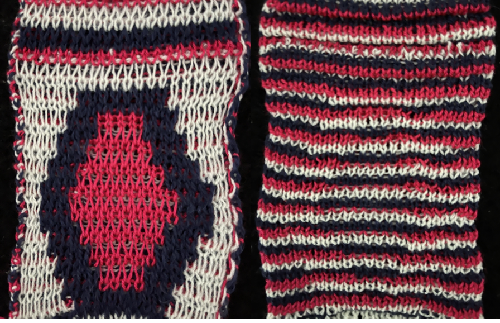 The same yarns and tensions as in the previous samples. Two of the problems with end release reared their heads: the color changer side formed too short floats producing a side edge a different length than the other, and several stitches were difficult to drop from the top to the bottom of the knit, with the yarn even breaking in some spots.
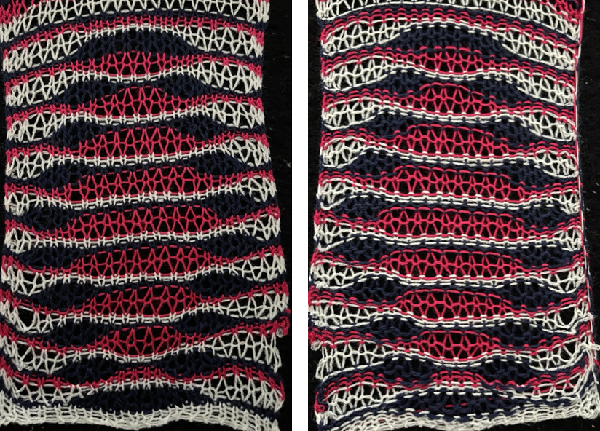
Working with only 2 colors makes the process for me far more predictable and manageable.
Previously published related posts:
Revisiting drop/release stitch lace 1 11/17
Drop stitch lace using Ayab software 2/ HOP 2/20
Drop stitch lace using Ayab software 1/18
Geometric shapes in drop stitch lace 3, end release 6/15
Geometric shapes in drop stitch lace 2, Brother KM 6/15
Geometric shapes in drop stitch lace 1, Brother KM 6/15
Drop stitch lace, 2 colors per row, Passap KM 10/13
Drop stitch lace, 2 colors per row, Japanese machines 10/13
Revisiting knit “bubbles” brother KM 10/17
A bubbles cousin 9/13
More knit bubbles 9/13
Knit bubbles and “stitch ditchers/dumpers” 9/12
Working out the kinks in my drop stitch lace saga 9/12