Previous related posts:
2 color ribbed brioche stitch on Brother knitting machine 1
Geometric shapes on ribber fabrics with tuck stitches 1
Geometric shapes on ribber fabrics with tuck stitches 2; knitting with 4 carriages
The last post on using Gimp: 2021/07/18/gimp-update-for-mac-2/
The method for color separation used for mosaics
The sources of inspiration from hand knitting or industrial knitting machine designs are endless. There are many features that simply cannot be duplicated, sometimes compromises can be reached that can achieve only imitations of the original. To my mind when knitting garments or long pieces the greater the degree of automation, the less likely one is to have patterning errors occur, in ribber fabrics, they are also more complicated to correct than single bed knitting.
I recently came across a pin of a Ravelry hand knit pattern which led to my return to this topic once more, including perhaps the addition of more colors. 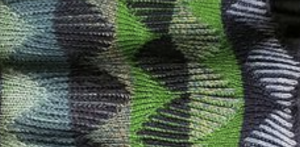 The plan is to create a repeat which may be knit using color changes every 2 rows. Each design row knits each color twice, so the standard built-in KRC separation is not a consideration, though the same cam settings may be used in those fabrics as well.
The required color separation has been discussed in several posts on the various forms of DBJ, a review:
The initial test repeat is 18 stitches by 44 rows, designed using 2 X 2 blocks, to begin with. How it might appear knit in fair isle: 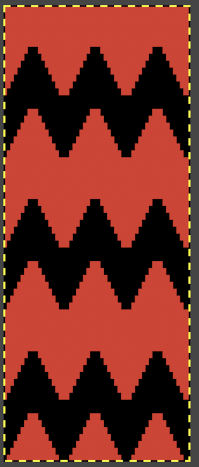 Transitions in charting visualizations:
A: FI repeat with pattern progression in two-row increments
B: every even-numbered row beginning with row 2 is color reversed
C: B repeat is doubled in length to 18X88 for initial samples
D: repeat adjustment for a first try at introducing 2 additional colors 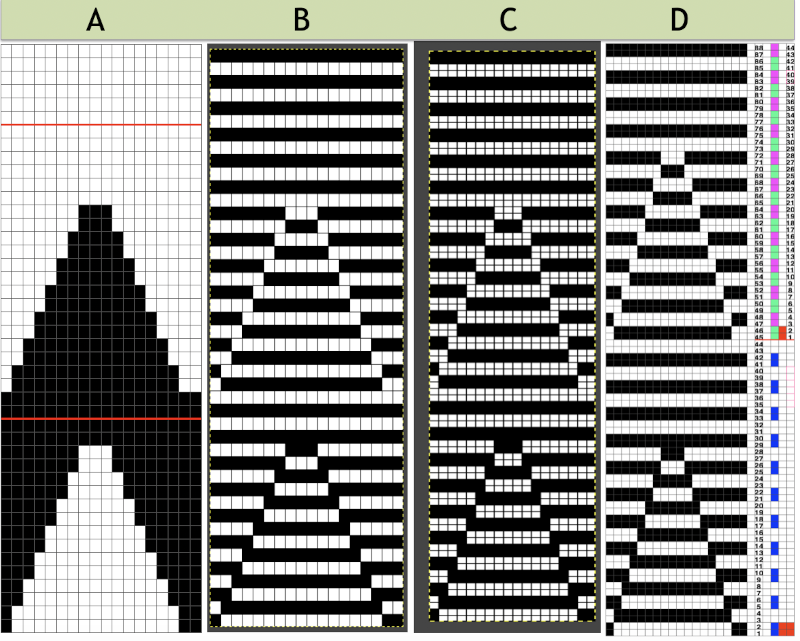
![]() End needle selection is canceled, the first and last needles are in work on each side on the ribber knitting every row, the first preselection row is from right to left, cam buttons are set after the left side is reached. Knitting in these samples began with the blue yarn in the number 2 position in the color changer. The ribber remains set for knitting in both directions throughout, the images on the right do not reflect the amount of surface 3D textures.
End needle selection is canceled, the first and last needles are in work on each side on the ribber knitting every row, the first preselection row is from right to left, cam buttons are set after the left side is reached. Knitting in these samples began with the blue yarn in the number 2 position in the color changer. The ribber remains set for knitting in both directions throughout, the images on the right do not reflect the amount of surface 3D textures.
with the main bed set to tuck in both directions: 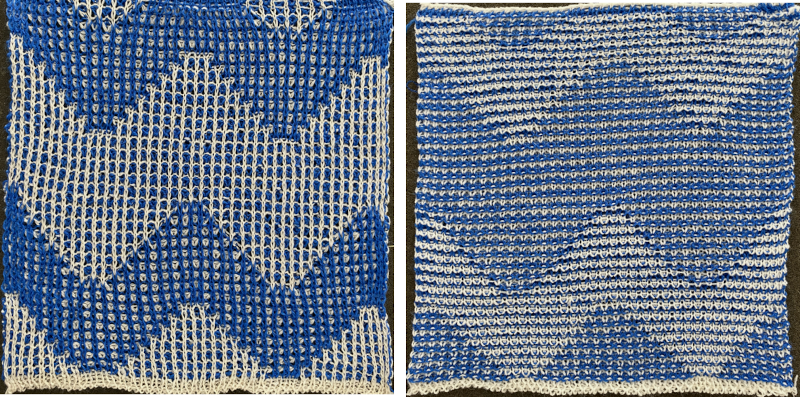 Lock settings are easier to achieve on the Passap than switching out cam buttons in Brother machines. This was knit using 4 carriages. Color one knits with the main bed set to tuck both ways, color two knits with the main bed set to slip both ways. The slip stitch reduces the width of the fabric considerably
 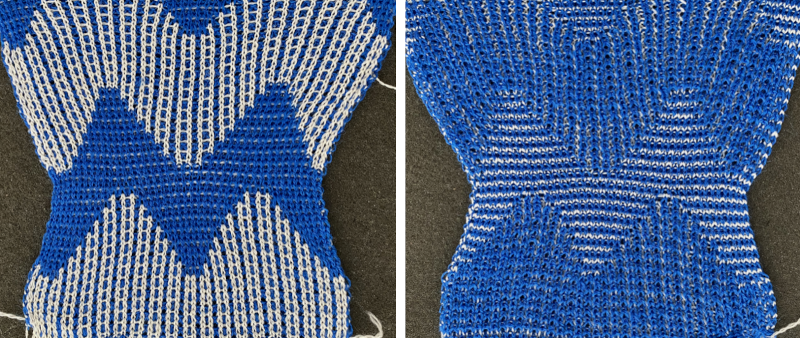 Here each color alternately tucks and slips. The choice of cam buttons matters, tucking first from left to right, slipping from right to left, with cam buttons set COL after the first preselection row
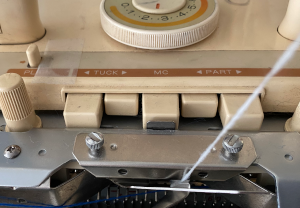
 This last cam setting appears to my eye to produce a texture “close enough” to the inspiration fabric. Attempting to add more colors: the repeat, D, is still 18 X 88 but is now shifted slightly.
 ![]() Somehow the slip cam button was not set, so the knit carriage tucked in one direction while knitting in the other. I am vaguely reminded of illusion knits. Considering altering both the color choices and placements again.
Somehow the slip cam button was not set, so the knit carriage tucked in one direction while knitting in the other. I am vaguely reminded of illusion knits. Considering altering both the color choices and placements again. 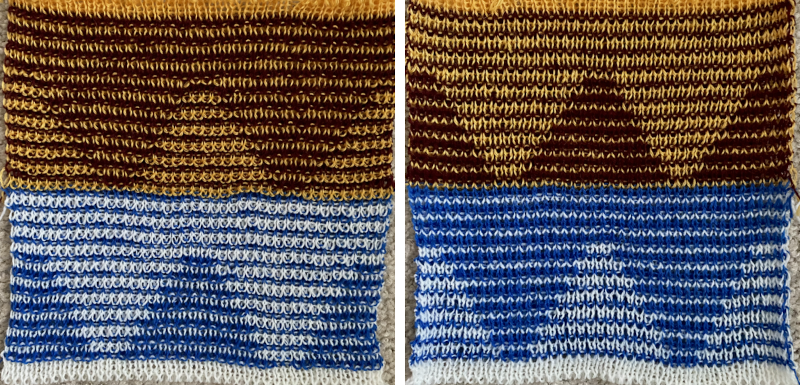 A way to imagine exact color change placements beginning with solid colors repeats once more, which can be followed by new color separations.
 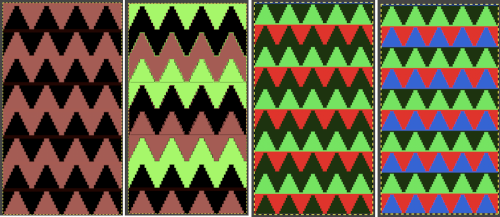 The existing repeat may be reduced further to 18 X 64, eliminating some of those extra rows in the center of the chevron shape
 ![]() The new BW image, tiled:
The new BW image, tiled: 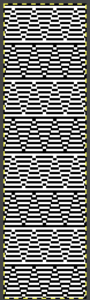 Whether or not the design is intended to retain chevron shapes in alternating textures, actions may be plotted pre knitting in any way that visually makes sense to the person designing the pattern and tools available to them.
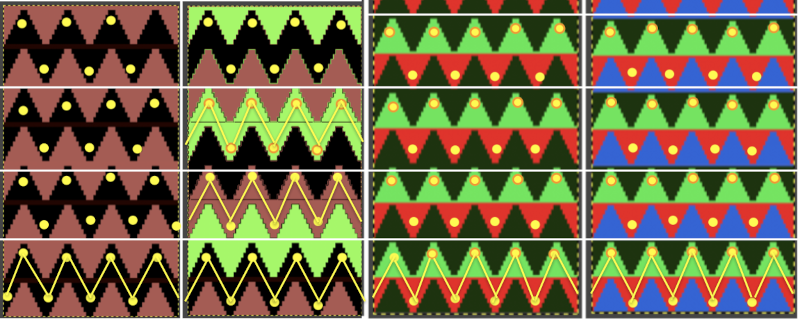
 Reversing the png so that the more textured stitches will begin with the color in yarn position 1
![]() Using either repeat, color changes now occur after every 32 rows knit. Another color change location clue is in the needle selection change above and immediately following the red border in the chart on the left.
Using either repeat, color changes now occur after every 32 rows knit. Another color change location clue is in the needle selection change above and immediately following the red border in the chart on the left. 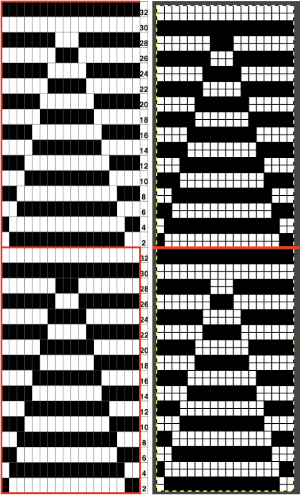 Adding colors can be planned cautiously or allowed to happen randomly depending on the preferences of the designer and end-use. Ribber fabric designs are not visible until several inches have been knit, too late to catch color sequence errors. Some machines allow for memo placements or sounds to help track color changes, but only within the initially programmed repeats. A quick spreadsheet can provide customizable checkboxes or added information. For an attempt to retain chevron shapes in different textures:
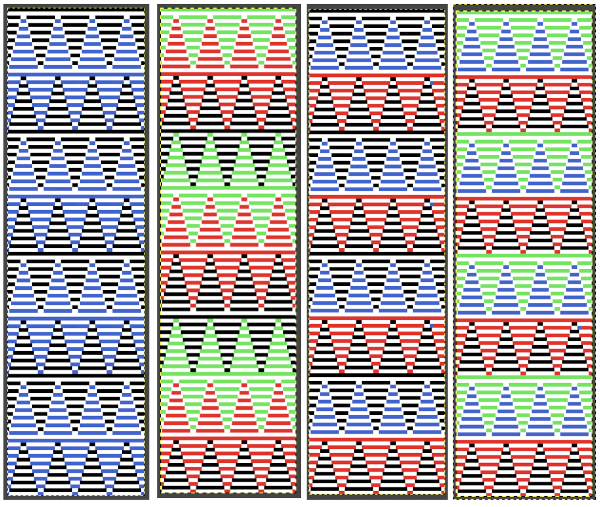
 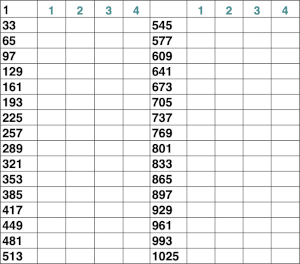 When using 3 colors, rather than 4, the texture of the zigzags on any specific color, will vary in placement. It is easy to change colors in any chart to approximate those that will actually be used in the knitting.
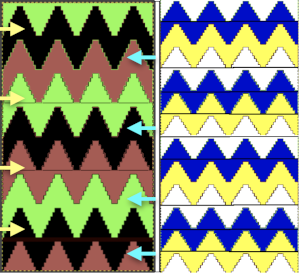
 Proof of concept: each of my yarns is slightly different in both thickness or fiber content from the others, which can be a drawback in resulting textures. As in any 2 color dbj, if 4 consequent rows are knit in one of two colors the positive and negative portions of the image reverse, as seen at the top of the swatch. The green was not intended to be used originally, the white yarn simply ran out. Such accidents at times may provide pleasant improvements. There is bleed-through of each color behind the other in the tighter knit areas as well which contributes to visual color blending, noticeable even in the areas with fewer tucked stitches.
 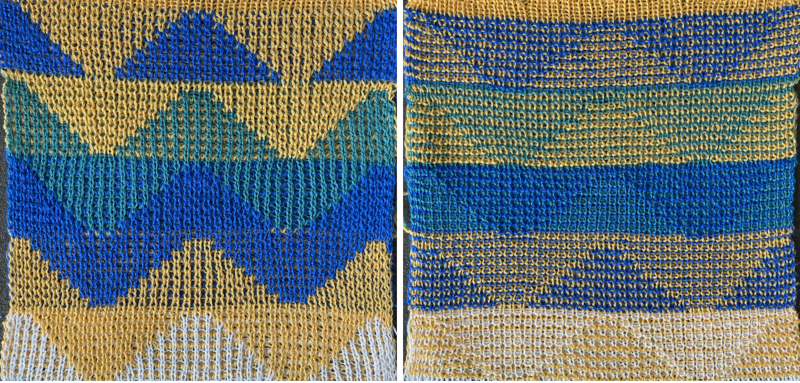 Splitting zig-zags into triangles, working color 1 with color 2, followed by color 3 with color 4 pairings
 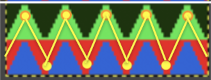 A PDF including row numbers and space for notations zig zag
An editable Excel spreadsheet created as an export from numbers zig zag
For Mac owners a Numbers doc. zig zag
A simpler repeat suitable punchcard owners as well using only 2 colors 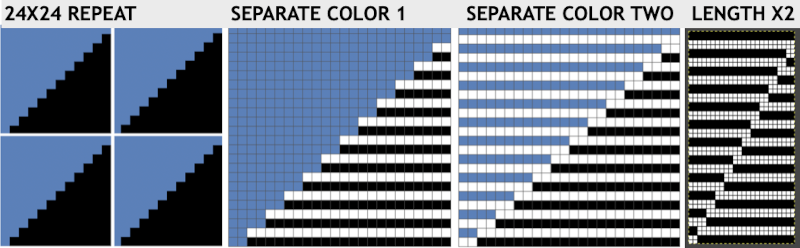
![]() The test swatch and observations: patterning was begun with color 2, yellow.
The test swatch and observations: patterning was begun with color 2, yellow.
The yellow yarn is 12/16, the maroon is 2/15 in thickness.
The triangle, because slip and tuck stitch settings are used, is compressed in height, while there is enough tuck happening to still make the knit wider.
The pattern is 24 stitches wide, the swatch was knit on 40 needles. Smaller swatches are fine for testing tension and colors. If committing to larger pieces, tests on at least 100 stitches by 100 rows are needed for gauge calculations in any double bed work or very textured patterns on the single bed. On some occasions when a far larger number of needles are in use, problems may turn up that require going back to the drawing board in terms of items ie tension settings, weight used, etc.
A: patterning was begun with thicker yarn, the yellow, in color changer position 2, both yarns are 100% wool
B: KCI, end needle selection on, a 2 color “beaded” edge is created
C: KCII, end needle selection canceled, patterning occurs on end needles
D: transferring to the top bed and using the standard latch tool bind off for these fabrics is far too tight 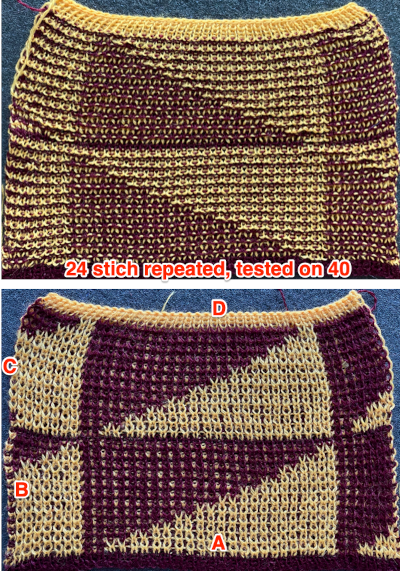 The tiled repeat, 24X48, does keep the stitch quality constant for both colors, Assumptions based on optics of tiling are not always accurate clues to potential patterning errors, here those darker lines are part of the actual design
 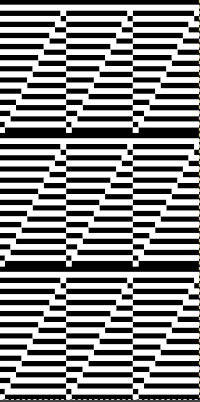 Continuing on a 24 stitch repeat, the original design may be rendered at double height and separated once more, doubling the separation height to 96 rows
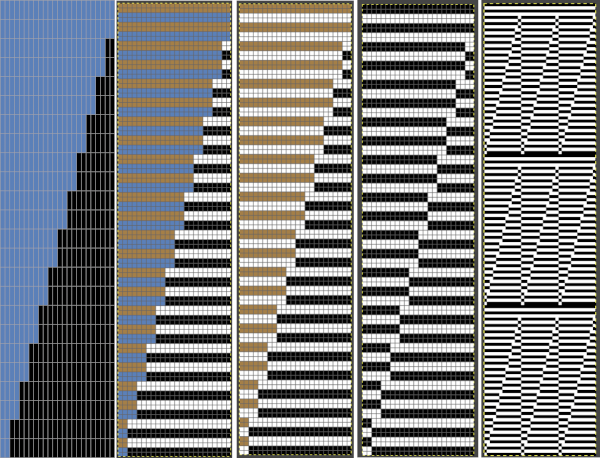
![]() There are days when either or both machine and knitter need a break. At the start of the first swatch, the cam buttons were not set, resulting in plain knit stripes. At its top, the purple did not get picked up properly from the color changer, and the knitting of course fell off the machine. On a second try, the same issue happened again with the purple yarn. Multiple incidences of such events were fondly nicknamed “dropitis” by my students. The test is on 24 stitches, the width of a single repeat, the triangles are much more balanced in size, this knitter is putting this pattern to rest.
There are days when either or both machine and knitter need a break. At the start of the first swatch, the cam buttons were not set, resulting in plain knit stripes. At its top, the purple did not get picked up properly from the color changer, and the knitting of course fell off the machine. On a second try, the same issue happened again with the purple yarn. Multiple incidences of such events were fondly nicknamed “dropitis” by my students. The test is on 24 stitches, the width of a single repeat, the triangles are much more balanced in size, this knitter is putting this pattern to rest. 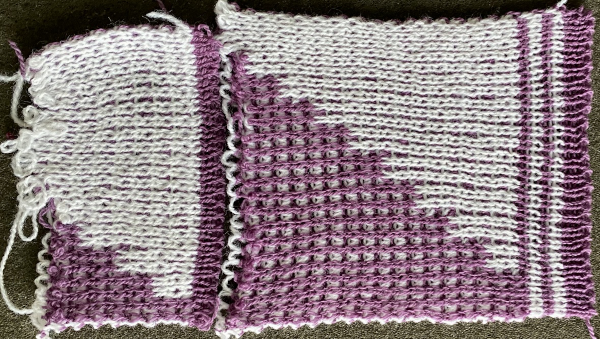 Another try at the diamond shapes that began this topic. The first .png
![]() when tiled appeared to not have enough space between the shapes, was amended to this
when tiled appeared to not have enough space between the shapes, was amended to this ![]() the differences when tiled
the differences when tiled 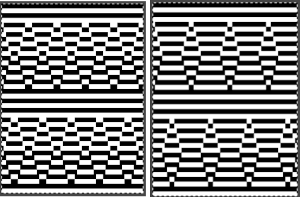 the color separation can happen completely within Gimp using color invert
 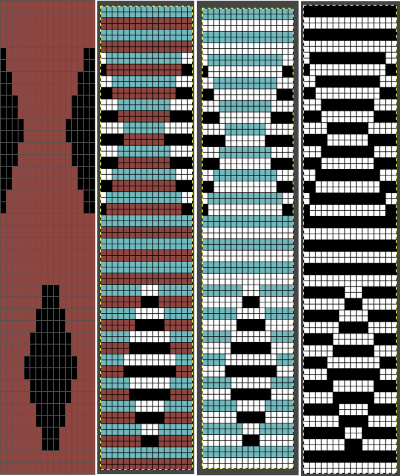 the white yarn is an acrylic, slightly thicker than the purple toned one. Sometimes simply exchanging yarn positions can change the qualities of the overall fabric.
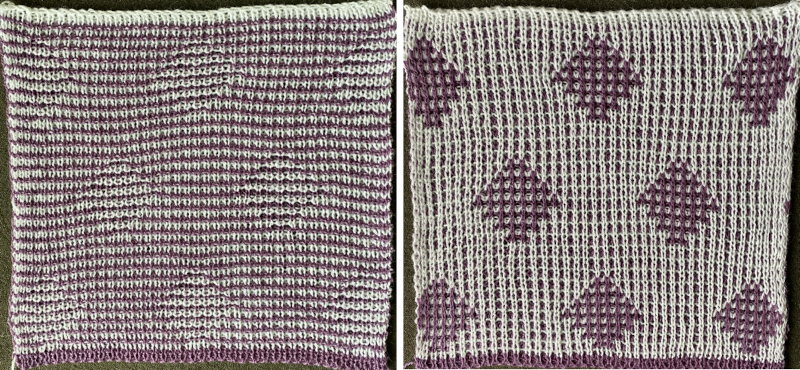
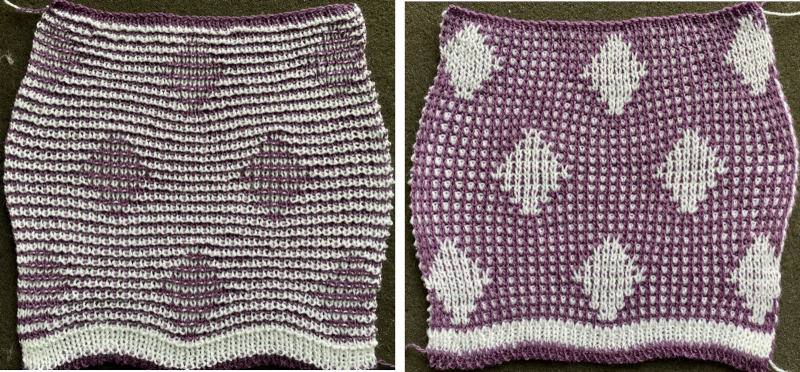 The repeat begins with 2 blank rows. To achieve the tighter white shape as opposed to the honeycomb purple one, at the start of the repeat that color needs to be in use on rows where knit stitches happen as the KC, set on slip to the right, knits needles brought forward to D position. Red in this chart segment marks pertinent rows
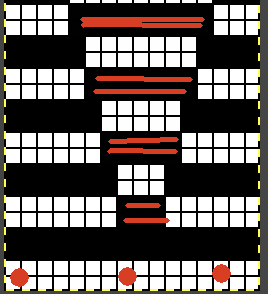 Both with hand knits and commercial knits because of the hand actions possible on both sides in the first, and as many as 4 beds selecting and knitting on the other may be in use at the same time with more complex needles as well, there are fabrics that are difficult or even impossible to duplicate. There often are obvious differences in the results, but the journey may still yield results that are pleasing and worth pursuing.
 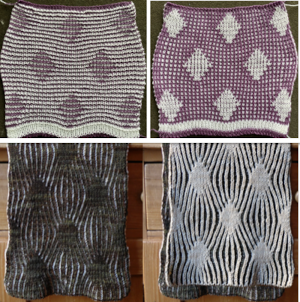 Another even more complex inspiration from a sweater attributed to Falke, Spring 20 collection, using similar stitch structures, but in addition, also transferring stitches between beds exposing a purl striped ground.