When switching between N/N and tuck/ tuck on the ribber it is not necessary to switch the tucking lever from its up position to the lower one. The ribber will knit every row when used in either of these settings 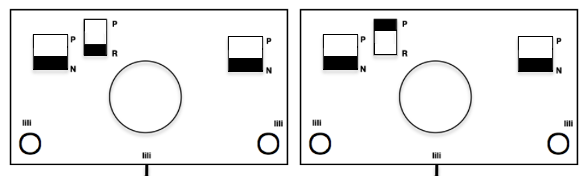 It is possible to knit this type of fabric using color separations such as those seen for one type of DBJ where color one for each design row knits 2 rows, followed by color 2 for corresponding design row also knitting for 2 rows. Each color may be drawn and programmed once, followed in turn with elongation X2 on both punchcard and electronic machines. I prefer to work with the elongated images, believing it makes it easier for me to correct errors or knitting problems, should they occur. This color separation is the default on Passap. In Brother electronics, it would need to be hand done and programmed. It is best to start with simple shapes. This triangle series has been used in several of my previous posts. The chart shows the transitions in the process
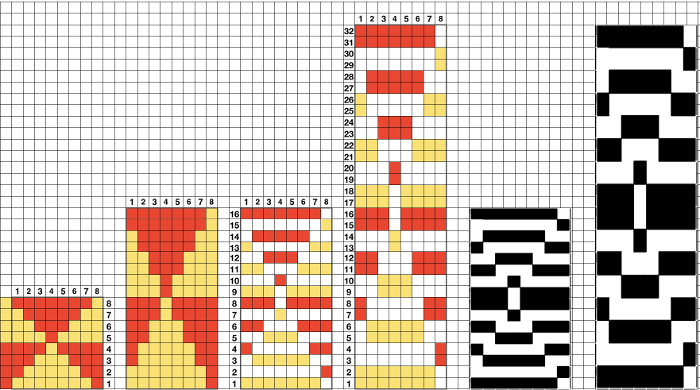
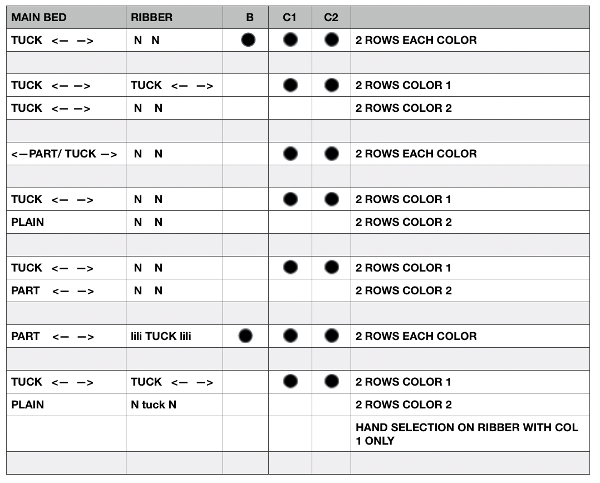
Brother DBJ settings using tuck on either bed, not addressing hand needle selection on the ribber for the production of reversible fabrics. The yellow color highlights cam settings that require changing by hand for every other pair of knit rows and making the changes with each color change. With the exception of the bottom 2, the same settings were used in some of my brioche variation experiments. 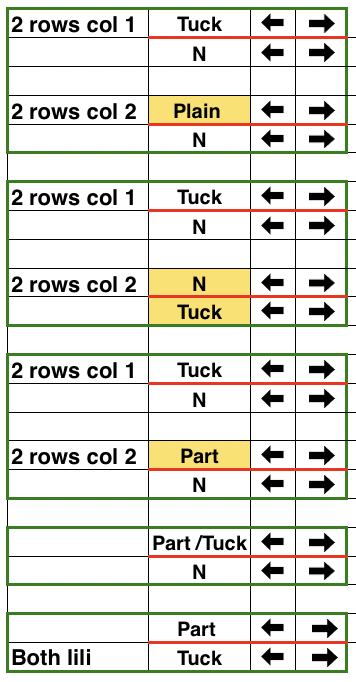 The resulting fabric, knit in reverse order from the chart (top setting down to first). The dropped stitches happened when I did not notice the ribber weight was resting on the floor, with no resulting weight on the fabric. There are single repeats of each motif.
 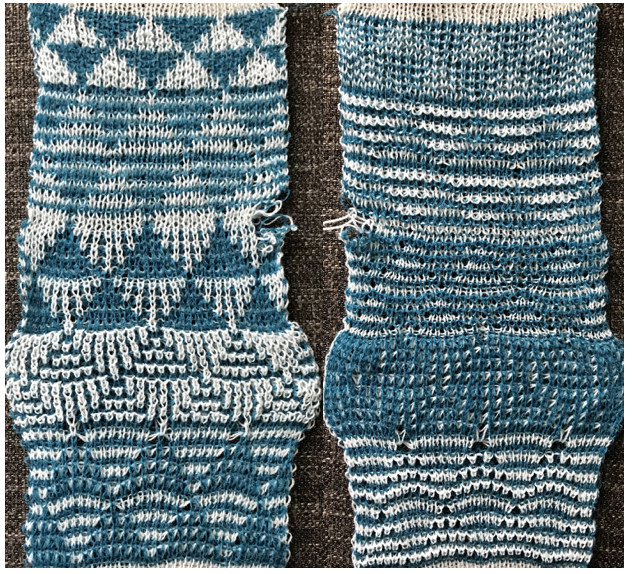 Two more possible DBJ variations
A full range of DBJ variations of the same repeat, including ones using slip stitch and shared in a previous post, executed in both one and 2 colors 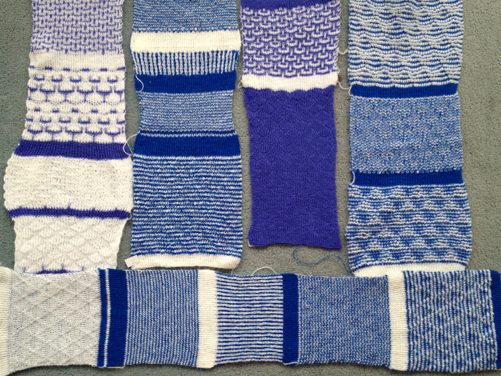
 Passap knitters have the option of arrow keys and stitch type on the back bed that makes fabrics possible with ease that is daunting to reproduce on Brother machines. There is a category search on my blog that will lead to a collection of posts on the topic of knitting with 2 carriages selecting patterns.
I have often considered the possibility of using 2 coupled knit and rib carriages for some of my patterns but found it limited knit width because of carriage stops on the ribber bed, the unwillingness to have my ribber carriages fly off the bed, and the added limitation imposed when both carriages are selecting needles. Now that setting changes were required every 2 rows on the ribber I found a solution of sorts. It is one of those try at your own risk tips, but for me, it made several of the last swatches in brioche achievable far more quickly and accurately.
Brother ribbers have a stopper pin on each end that will not allow for the ribber carriage to move beyond a fixed point or to be removed easily, requiring tilting the carriage forward to do so 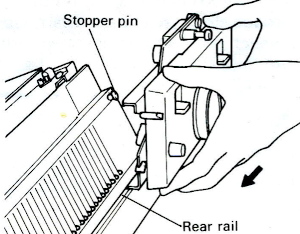 I have long ago removed both of mine. As in any knitting with pairs of carriages, when needle selection is happening from opposing sides, the turn marks need to be cleared on each side of the machine as the opposing carriage begins to move across the needle bed to avoid breaking the belt.
 ![]() I happen to be knitting present swatches on my orphaned 930, which still knits producing interesting sounds. It came with no carriages. I am actually using a knit carriage from a 910 and one from my 892E punchcard machine, with a magnet glued to the proper location facing the rear rail. I removed the stopper pins from either side of the ribber bed, placed lace extension rails on both sides as well as the color changer with all change buttons released as seen in this illustration. On the left, as the carriages move beyond the end of the needle bed, the return signal lever is tripped, making a characteristic noise. At that point, the turn mark on the left has been cleared, and it is safe to operate the carriages from the right toward the left
I happen to be knitting present swatches on my orphaned 930, which still knits producing interesting sounds. It came with no carriages. I am actually using a knit carriage from a 910 and one from my 892E punchcard machine, with a magnet glued to the proper location facing the rear rail. I removed the stopper pins from either side of the ribber bed, placed lace extension rails on both sides as well as the color changer with all change buttons released as seen in this illustration. On the left, as the carriages move beyond the end of the needle bed, the return signal lever is tripped, making a characteristic noise. At that point, the turn mark on the left has been cleared, and it is safe to operate the carriages from the right toward the left
The right side of the machine is more problematic. The extension rail will store the knit carriage safely, but the ribber carriage has to move out enough so without its stop it would fall to the floor. My solution was to jerry-rig an extension at the appropriate height so the ribber carriage could slide out as much as needed while being supported. I was able to knit the hundreds of rows required for many swatches with no problem other than operator errors. Here the pair of carriages on the right are seen resting far enough off the machine to clear the belt, at an adequate height for them to slide off and on easily. At first, I secured the connecting arm to the connecting pin with an elastic “just in case”, but that proved unnecessary. 
I have been asked lately about the lili setting used in all my ribber carriage illustrations (center position). I tend to use that as a default to prevent errors and for consistent quality in my ribbed fabrics, especially if matching gauge ie in garment pieces or bands are needed. That said, for the carriage to travel far enough on the right in this setup, the slide lever had to be used on I. The plastic tray helped reach the appropriate height and made for easy slide off and on. There are a few minutes of maneuvering when setting up the first selected row. As always it is good to begin with familiar yarn and previous experience with double bed fabrics.
Some of my own operator errors are due to the fact that I still am not used to the fact that the 930 appears to revert to factory defaults with each new design entered, that I have to remember to switch from isolation to all over, that the image is reversed on the knit side like on punchcard machines unless the reverse key is used. I spent decades using the 910, where once the selections were made and once the pattern variation buttons were set, that became the default until buttons were changed for specific applications.
Double jacquard motifs in multiple styles, shapes, and sizes may be knit with variations in tuck settings. My post on a-return-to-brother-ribber-and-dbj-settings/ reviewed many of the possible cam configurations as well as working with multiple and even altered carriages. Passap machines have the added benefit of far more patterning than Brother on their back bed, the equivalent of the Japanese ribber. I am still obsessing over 3D folding effects, racked herringbone is back on my mind, as well as tuck ribber settings on Brother if one is willing to hand manipulate needle selection. I have been browsing through some of the directions in Susanna’s book again. For anyone unfamiliar with it, it was published first in 1986 and is the ultimate textbook on knitting fabrics on punchcard machines. It predated most electronics. Susanna continued to write for magazines and later addressed electronics in those articles and in her teaching lectures and workshops. This shows the cover of the paperback version. 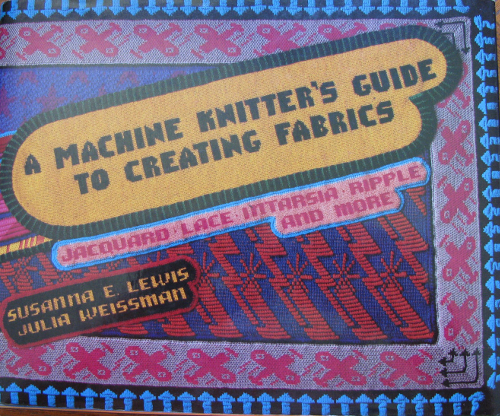 Over the years as many folks have written on DBJ, the separations have been named with some variations. In Susanna’s book, the original design is referred to as punchcard type A, the KRC separation built into Japanese machines is classified as Type B. This image shows the now-familiar series of triangles used in many of my blog posts on DBJ including at the start of this one. It is illustrated as the original repeat, then the separation is shown with either color represented by black squares. One of the peculiarities of this separation is the single-row color start. One may choose whether black squares or white squares knit first based on the pattern itself rather than simply on the convention in their specific machine brand. Color reverse in electronics is easy, but the function cannot be combined with KRC. It can easily happen if the separation is completed in software, prior to downloading the final repeat and knitting it. If a punchcard is used, simply exchange positions for each of the 2 colors in the color changer and follow the usual sequence. Designs must have an even number of rows.
 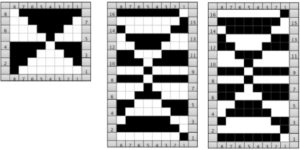 Susanna classifies the subsequent separations as C1 and C2. Because each color in each row knits twice, there may be an odd number of rows in the initial design repeat.
 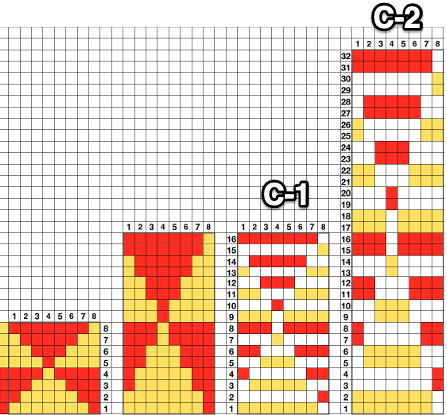 I am often asked as to why a type C1 or 2 separations would be a boon to fabrics made on Japanese machines. The options for new settings and resulting variations in the knit surfaces on both sides is increased many times over. These are some of Susanna’s suggestions for using the tuck setting in DBJ and begin to illustrate the point.