I have recently been asked about DBJ on the bulky machine, ribber setting options are offered at the bottom of this post. More to follow.
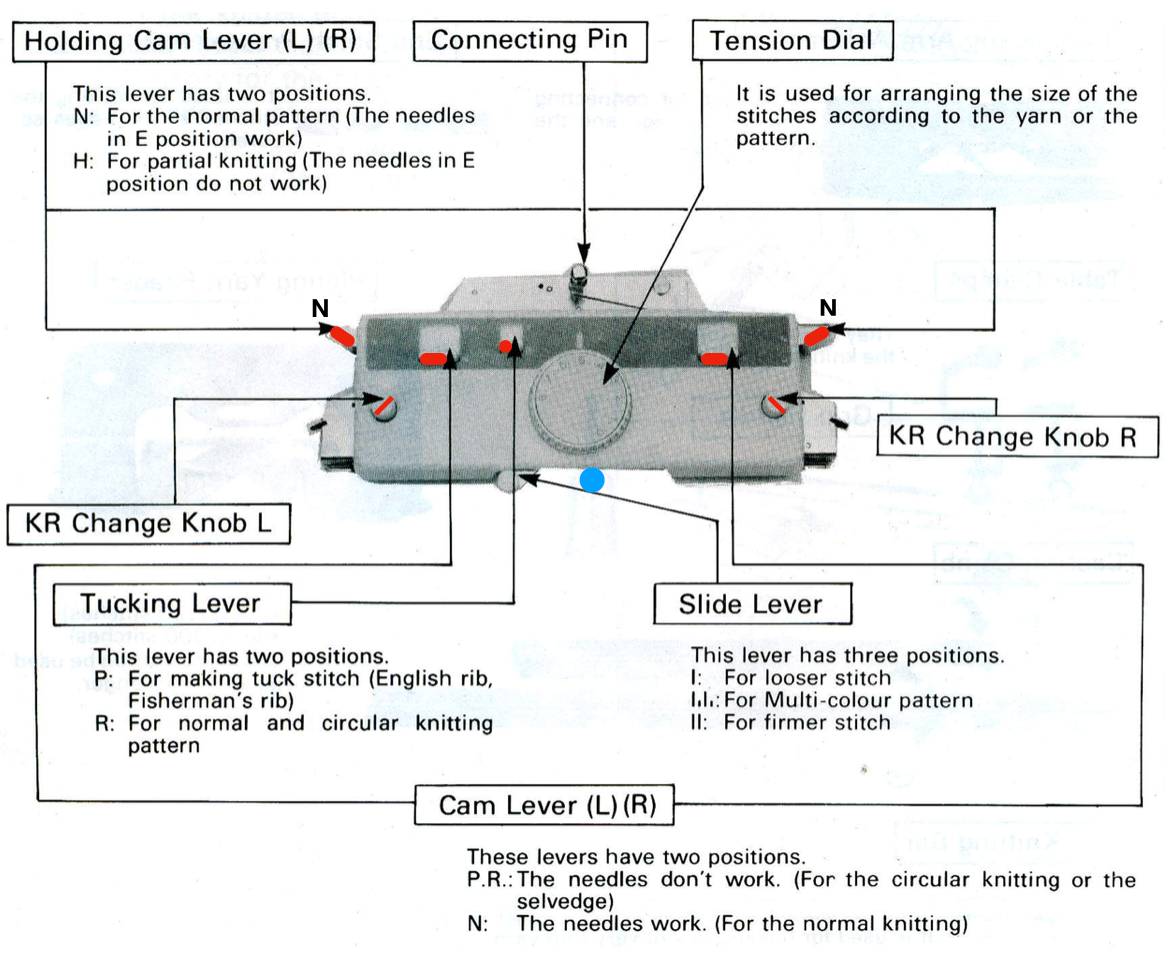
Ribber settings vary from one brand of machine to another. Here is a review of the Brother carriage features
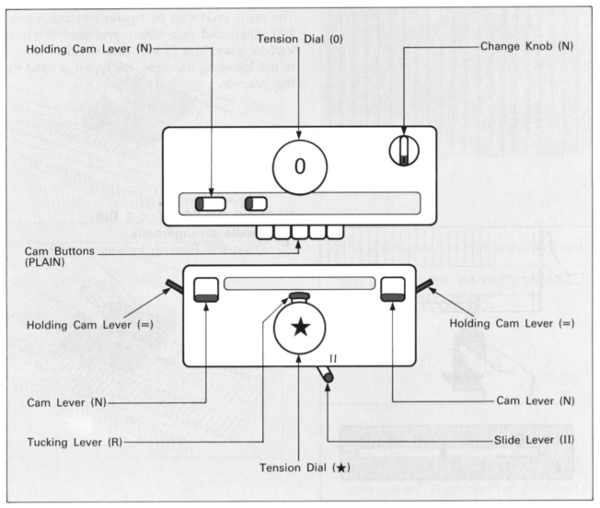
 Back in 2015, I wrote on quilting on the machine, using the carriage representation below. Here lili buttons are positioned for use
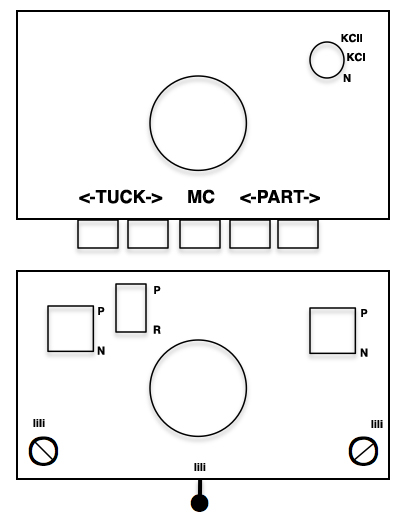
I no longer have Adobe programs available to me, for this post my images were created in Mac Pages. I have simplified the illustrated button and cam settings in red.
I tend to knit most if not all my rib fabrics with the slide lever in the center position (marked lili on the carriage, blue dot). This avoids accidental changes when altering the settings for sections of garments or forgetting to reset it ie. if one uses a ribbed band in a sweater front on one setting and accidentally uses a different one in the back, there will be a difference in width and height between the 2 bands that can be quite noticeable, and is not apparent until the garment pieces are completed and ready for seaming.
If you prefer to start with a 2 X 2 industrial rib, arrange needles to give a neat join at seams, plying yarns may again be required to give the rib more body. racking cast on may be used, avoiding transfers between beds after an every needle cast on Diana Sullivan shows one method of working and illustrates needle arrangement and transitions to main bed knitting well. Alternative needle setups:![]()
I personally never do 3 circular rows after the first cast-on row: it will produce floats on one side of the rib, which may be noticeable in your final fabric on one of the 2 garment sides.
To close holes when transitioning to garment pieces in other than every needle ribs, rack the beds one full turn, knit 2 rows, rack back again, and proceed as needed for the desired fabric
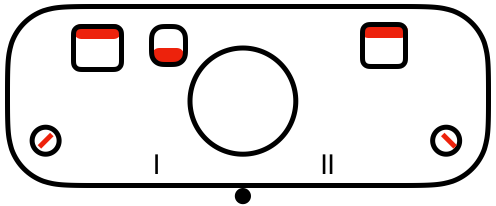
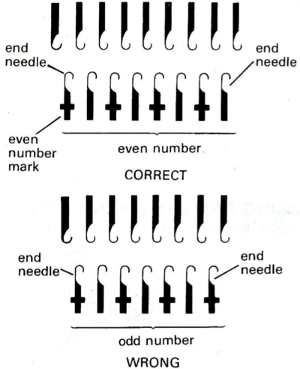
The lili buttons on the ribber are representations of every other needle set up, akin to the 1X1 card use on the main bed. It is essential for an even number of needles to be in use when the lili buttons are in use (pushed in, and turned toward the lili markings on each side of the ribber carriage, R to R, L to L). An easy way to ensure the even number is to look at the needle tape markings, which alternate between dashes and blank spaces between them. A line/ dash and space make a pair, so if you start with a needle on a line, the last needle on the opposing side needs to be on a blank space or vice versa. The holding cam lever remains in N position throughout these illustrations.
simple rib 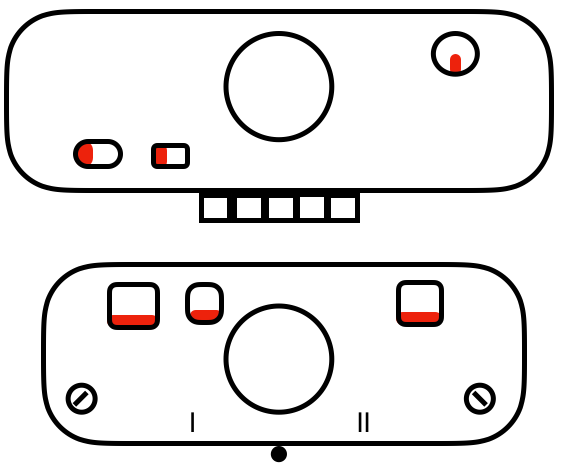
Setting for slip stitch: raising levers to P position will result in stitches slipping when the ribber carriage moves in that direction
slip to right 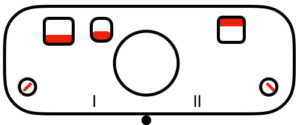 slip to left
 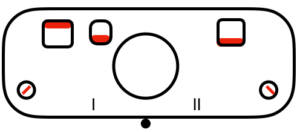 slip in both directions
Setting for tucking on ribber: it is possible to tuck on every needle on either bed when knitting every needle rib, as long as the needle on each side of the stitch forming the tuck loop on the opposing bed is creating a knit stitch, anchoring down those tuck loops on each side.
tuck to left  tuck to right
 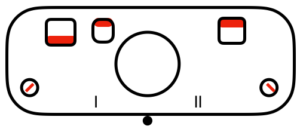 tuck in both directions
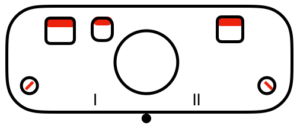
Double bed patterning DBJ
The most balanced fabrics are achieved when no more than 2 colors on any single design row are used, and the number of rows knit on the ribber total the same as the number of rows knit on the main bed. It is possible to knit designs with 3 or more colors per row. With Japanese standard machines, this would require a color separation, automatic ones are limited to 2 colors per row (Passap built-in techniques have a range of other options). The more strands of yarn, the thicker and heavier the fabric, with distortion in the aspect ratio of the design. As with single bed fabrics, double bed slip stitch creates knits that are short and skinny, tuck creates short and wide ones. As stitches slip, tuck, or get longer there will also be “bleed-through” of the alternate color on the front, “knit” face of the fabric. In small, balanced repeats this can create a color mix that may make the result either interesting or confusing. Garment swatches need to be larger than usual for when knitting single bed. I tend to use at least 80 or 100 stitches/rows on both beds to calculate garments.
When using no more than 2 colors per row, Japanese machines offer the option of a color separation that knits one design row per row, which is an added way to reduce motif elongations in the finished knit. Passap knitters may use tech 179 to achieve the same result. For different separation methods for double-bed fabrics, see color separation posts on them.
Brother lili buttons: illustrations found in brother manuals for their actions, an even number of needles in work on ribber is required
bird’s eye (lili <- ->): this is a common type of slip stitch. One pass of the carriage causes every other needle to knit. As the ribber carriage moves back to the starting side, the alternate needles knit, producing a single row of color. This helps double-check on the color used on the last row knit when knitting is interrupted on the color changer side. When knitting in 2 colors per row the fabric is fairly well balanced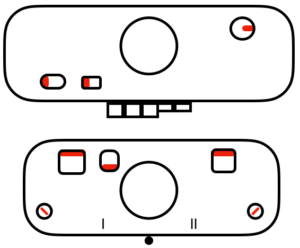
tucked bird’s eye backing (lili <- ->) with slip pattern on MB: if no cam buttons are pushed in on the Main bed, and the carriage is set to normal knit with no pattern selection, lili buttons on ribber will behave as though the 1X1 card is in use, no elongation or other changes are possible without changing levers manually as often as needed
tucked bird’s eye backing (lili <- ->) as above, with main bed set to tuck the main color and slip the contrast, requires manually resetting cam buttons with each color change, or alternately tucking the main color, knitting the contrast
color 1 color 2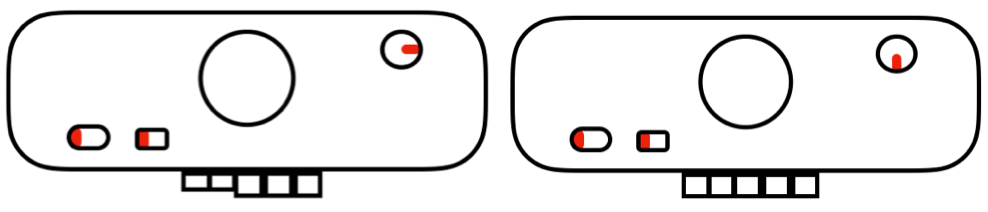
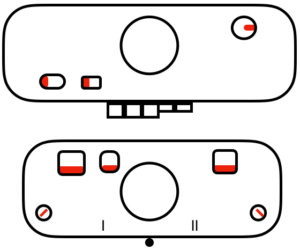
striper (double) backing: fabric is unbalanced, twice as many rows of ribber stitches as main bed ones, the design is elongated, but the fabric is softer and more flexible
single (half) striper backing: fairly well balanced. The ribber knits only one row for each 2 passes of the carriages, so for 2 colors again, there are no extra rows knit. Part button on ribber may be engaged on either side  tubular: either pair of opposite part buttons used
  tucked half Milano: when using tuck/slip combinations opposite cam buttons are used i.e. if right tuck cam button is pushed in, then the left slip button is also
 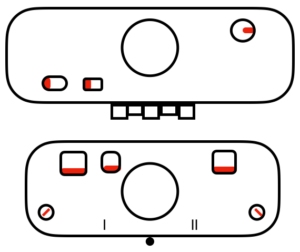 main bed <–> tucked jacquard: each needle on the ribber knits every row. Needles on the main bed knit in pattern according to punched holes, black squares on mylar, or programmed pixels. Non selected needles tuck. The patterns produced on the backside of the fabric are almost the reverse images of the front. Because so many tuck loops are formed the fabric is “short” and very wide, so cast ons and bind offs need to be planned accordingly
 variation: tucking the main color, knitting the contrast, manual cam button reset every 2 rows
solid backing: the part buttons on the ribber are reversed manually on the left side of the machine when the color changes are made. The solid backing color knits on the ribber when both part buttons are down (N<–>N), the second color will be slipped with both the part buttons in the up position. For an interesting effect use wool for solid back color 2, other fiber for color 1, and felt the result.
2 rows color 1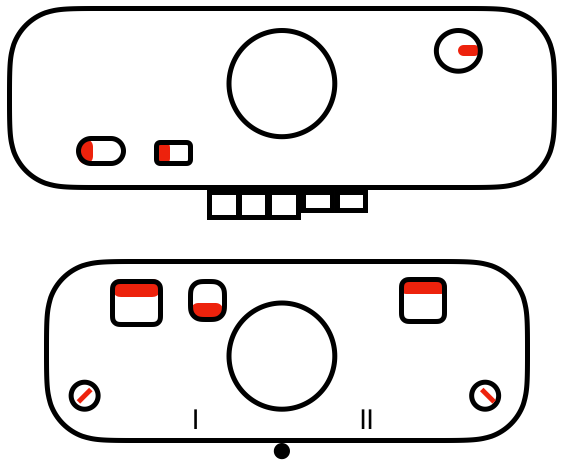 2 rows color 2 (solid back color)

See altering a sinker plate for producing this fabric using a second KC to knit rows only on the top bed, no ribber setting changes required.
tuck/plain combo: requires manually changing cam button settings on the main bed every 2 rows, change knob remains on pattern selection setting
2 rows color 1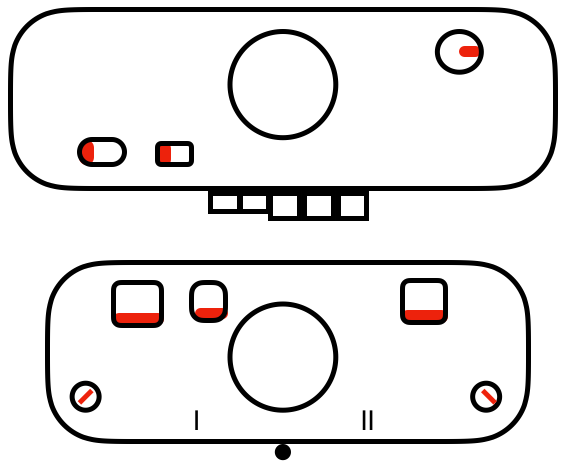 2 rows color 2
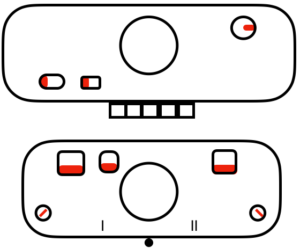
no automatic patterning on the main bed, change knob on N for English or half fisherman rib: tuck every needle either direction on ribber only
 full fisherman rib: tuck every needle alternately on both beds, in opposite carriage directions (below = L/R, or use R/L)
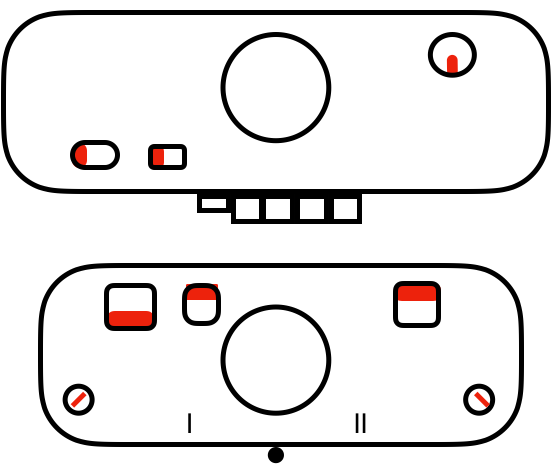
Vertical striper backing and “ladder-back” variations involving some hand manipulation and selection of needles in work are also alternatives for DBJ backing.
I have for decades and in my posts referred to this part as the ribber sinker plate; technically it is called the connecting arm in the Brother literature. There were slight differences between model years for them as well. Later connecting arms were branded with the number 2, earlier ones were not.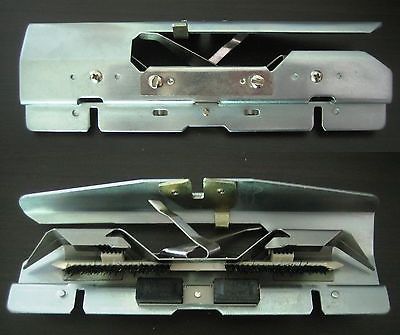
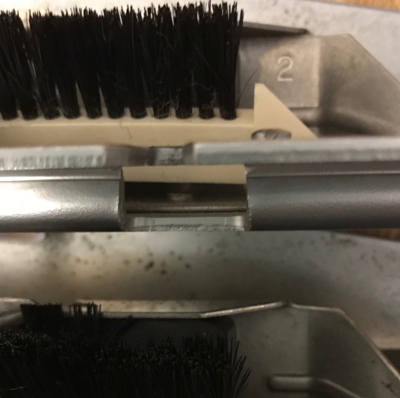
For knitting DBJ with the unmarked connecting arm, it was suggested in later manuals that an accessory be used: 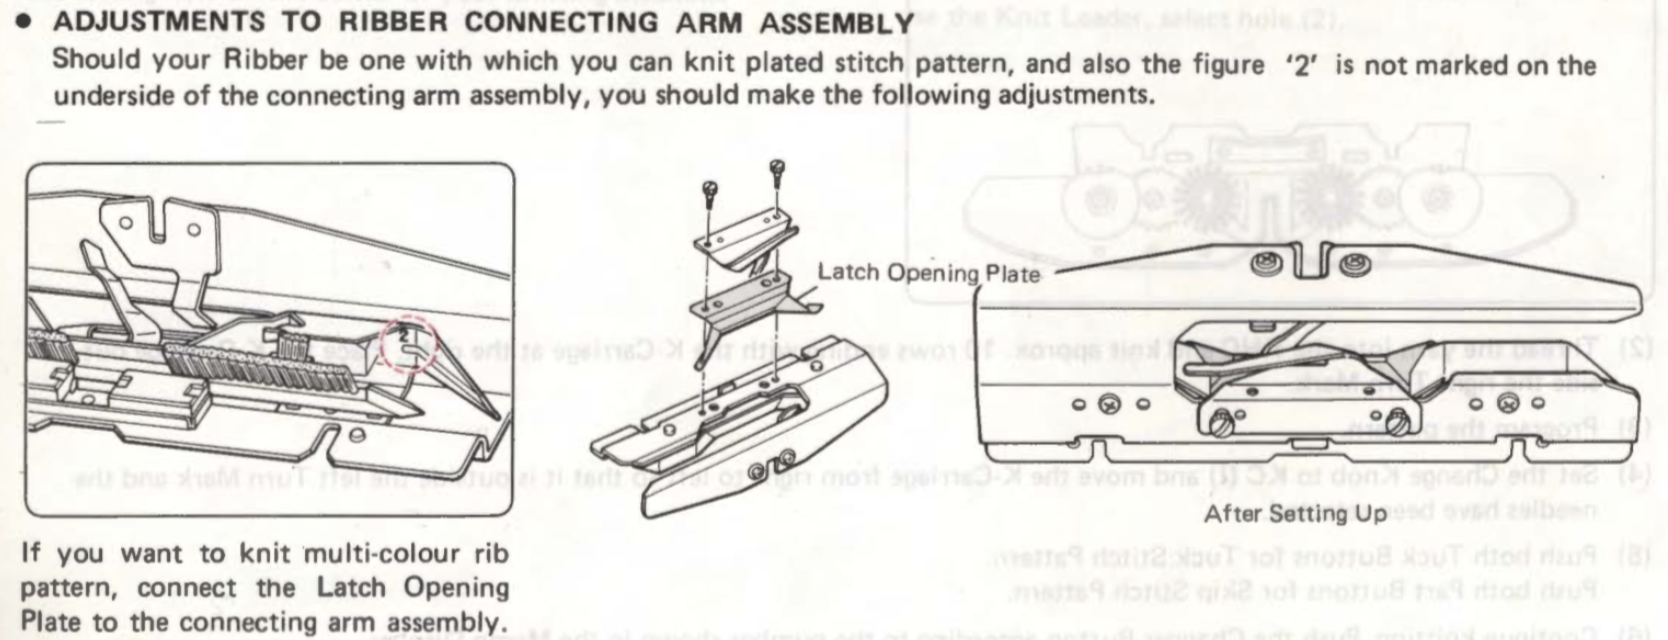 the result with the plate in place is a change in the height of the metal from the needles with stitches in work as seen below with the plate secured in place
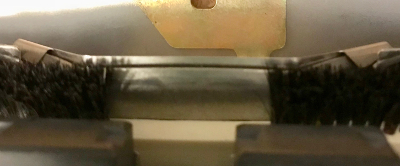
more on non-repetitive dbj images and ribber parts and settings:
two-color-dbj-non-repetitive-images/
ribber-fabrics-produced-with-2-knit-carriages-selecting-needles/
geometric-shapes-on-ribber-fabrics-with-tuck-stitches-2-knitting-with-4-carriages/
DBJ on bulky KR 260: parts as described in the ribber manual, followed by possible settings 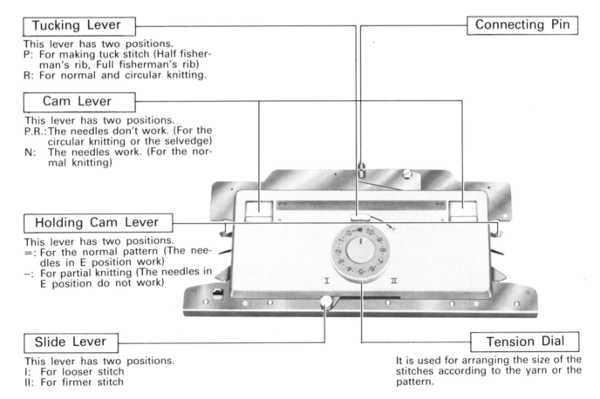
 slip to right
 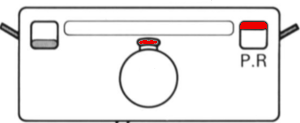 slip to left
 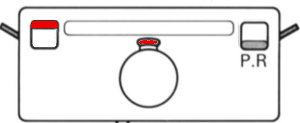 slip both directions
 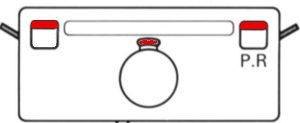 tuck to right
 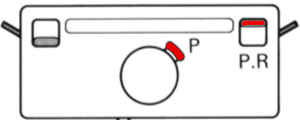 tuck to left
 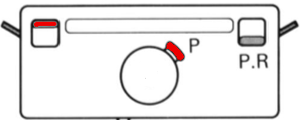 tuck both directions
Ribber settings are not affected by electronics. The ribber 2 color separation in ayab performs essentially the Japanese method automated in early electronic models, and often referred to as KRC. The only difference is whether the separation is begun with black or white squares, which if one pays attention to how they design is planned is of no consequence for me. The ribber is mechanical, so the knitter is in charge of any of the settings on it as illustrated in the manual, or adding manual manipulation of buttons or needles. In theory, any DBJ settings seen in my posts are possible using Ayab. The one clear distinction comes in with the use of 2 KNIT carriages selecting in pattern, seen in my latest posts. I have not been able to get that to work in using the previous version of Ayab, have not had the time to update the software or to do significant knitting since last fall, hope to test the possibilities soon using the latest release soon.
I will add information on 260 to this post as I can. In terms of foreign language manuals, they are best obtained online. I am not fluent enough in any other language to publish my posts in any other language, and there are some days that make me wonder about my English 😉
Hello Alessandrina, do you know if it is possible to make the alternative backing variants described in your article with AYAB, that is: does it need more modification to the workflow than changing the carriage settings to make it work with AYAB? If it is compatible with AYAB, I would like to update the ayab manual and add a link to this blog post. Regards, Chris
I know have a KR850 carriage for my KR830 ribber, so have the lili buttons… but before I made that purchase, I tried a number of other options, with varying success depending on the yarn used and the way the colours were distributed in the pattern. In other words, you have to try. 🙂
1) Set the ribber up with alternate needles in work (as in 1 x 1 rib) – or even every third needle in work. It’s not a true double-jacquard but is enough to tame the floats.
2) Set the ribber to slip in one direction and knit in the other.
In the KR850 User Guide (http://machineknittingetc.com/brother-kr850-ribber-user-guide.html) pp. 38-39 (How to knit multicolour rib), settings involve the “lili” buttons as well as in your detailed synthesis. Do you know how we can translate the situation for ribbers like the KR260, with no lili buttons ? Thank you