Related posts on creating loops:
long-loops-a-bit-on-method.
long-stitches-on-km/
some-long-stitch-swatches/
for double bed long loops in various designs in single or multiple colors see drop stitch lace
I became curious about creating long loop shapes on a knit ground using continuous strands of yarn, forming loops in the same direction, and allowing for knit rows between them resulting in returning the yarn to the starting loop formation side. My own preference is to make the loops with the knit carriage on the right, anchoring them with the following carriage pass to the left. To continue doing that, the yarn would either need to be cut leaving a yarn end, or it needs to travel back to the left, where it can form the next row of loops from left to right.
In these tests, the movement of the yarn back to the left was achieved by having it weave on every other needle from right to left.
Triangular shapes are easily recognized, and I began with a moderately large one, at first planning for loops on every other needle. Black cells on the right represent loop locations, and green the weaving pattern formed as the carriage knits right to left. 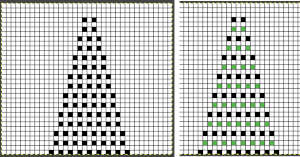
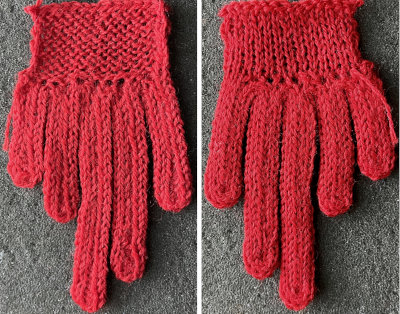
![]() The length of the loops determines end-use, long loops can become fringe, and short ones the macro version of pile knitting.
The length of the loops determines end-use, long loops can become fringe, and short ones the macro version of pile knitting.
Tools to aid loop formation that are fixed in height across the needle bed are needed if the pattern is not used as a single motif, but rather as a recurring one. Separate strands of yarn on bobbins or balls or cones would need to be used for each shape. The loops in this swatch are large, so there are extra knit rows between each set.
I use colors and yarns that are randomly on hand for swatches unless I am planning a specific finished item.
The first swatch is worked with loops on every other needle, the second with loops on every, as shown in the photos
Worked as a single motif:
KC II: preselection is made from left to right
COL: make loops moving from left to right using ribber gate pegs, I like to bring needles to be wrapped out to hold as I move across each row, wrapping frequency may be varied apart from needle preselection, 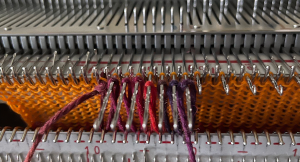 knit a row to left, anchoring them
 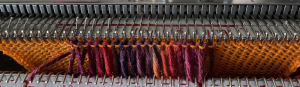 COL: knit to right, the needles for the weaving pattern to the left will preselect
 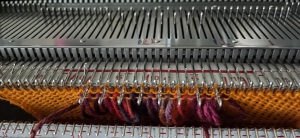 COR: check that weaving brushes are down, place yarn over preselected needles,
 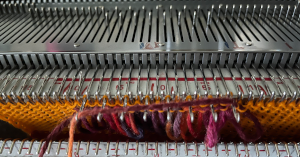 knit a row to the left, securing the weaving pattern, the yarn end will be on the left again
 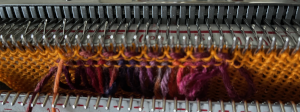 COL: knit a row to the right, needles for the next row of loops will be preselected
COR: use the yarn now on the left again to form loops from left to right, knit a row to the left to secure loops. Repeat the process. The resulting shape brings holiday knitting to mind.
The loops worked on every other needle 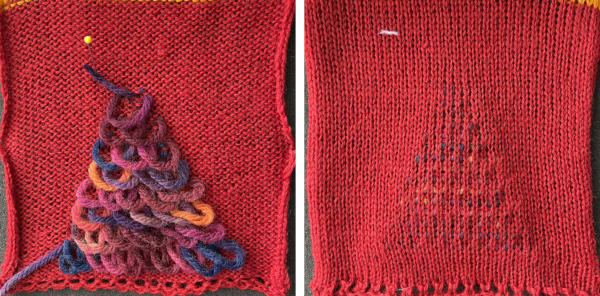 and on every needle. The original preselection repeat may be used. The only yarn ends that need to be dealt with are at the beginning and end of the shape, the reverse of the knit has the appearance typically seen in knit weaving, where the thicker yarn forces the stitches in the background one apart.
 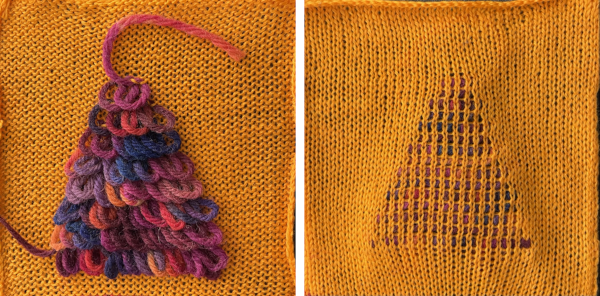 What of recurring shapes with reversing directions? It occurred to me plastic straws may prove to be handy tools for creating the loops and easier to manage than rulers. The maximum length of the straw is a limitation. Exploring the technique in a single motif gives one the opportunity to explore issues and limitations.
My straw is 10.25 inches wide, made of plastic, is not rigid, and can be squeezed flat easily. When using it as a loop guide, it was held low enough below the knitting on the top bed on the carriage side to allow some ease in the loops so the straw can have an easier time dropping below the sinker plate when the knit carriage passes over it, it can even partially collapse if needed.
I found managing the straw soon became rhythmic and easy.
The lengths of the straw on both sides of the loops serve as a handle on the left, and on the carriage, right side, the extra length can be guided down a bit to keep it from angling up and getting caught in the sinker plate.
Once the carriage begins to knit across I encountered no problems. The straw may get pushed slightly to the left with the carriage pass. 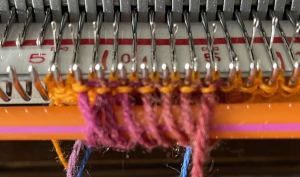 Planning possible actions and a starting repeat with single rows knit between loops. In this instance, loop formation happens when the carriage is on the right, and weaving when the carriage is on the left. The latter means the weaving yarn is laid over selected needles in the wrong direction, with the long end of the yarn away from the knit carriage. That said because weaving happens only on every other needle X3 and on a max of 7 on every other needle, the first selections were no problem, and the second was manageable with some caution. The arrows indicate the direction of the carriage movement after the loops are formed, and after the yarn is laid over the preselected needles for weaving.
The image on the right is the repeat tiled in Gimp to evaluate its vertical alignment. It is 14 pixels wide and 20 high, could be used in a punchcard and placed on the center of the card making it recur centered in each 24 stitch location on the needle bed.
If an attempt is to be made knitting several repeats, vertical columns of plain knit between the pile knit columns are desirable.
The needle preselection will begin on 14 stitches, so only for the first 2 rows, the needles preselected for the first 7 stitches of the 14, shown as grey cells, push the needles involved back to B.  Depending on the machine model and software used for the download, the repeat may need to be mirrored to achieve the result planned in the drawing, which is true in my 930. The starting png
 ![]() may be placed on a wider canvas in Gimp, here is a 30 stitch mirrored version for use on my 930.
may be placed on a wider canvas in Gimp, here is a 30 stitch mirrored version for use on my 930. ![]() The resulting design is quite dense but successful.
The resulting design is quite dense but successful. 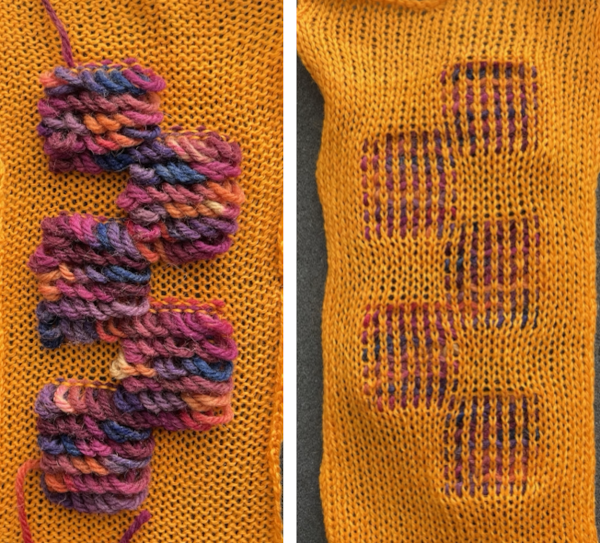 Planning moves on for weaving to happen with the yarn in the proper direction, particularly if more than one design is to be attempted horizontally, and to make the loops less dense. Extra rows of plain knitting are added between loop formation.
Here the design is placed once again on a 30 stitch ground but is now 40 rows high, drawn in the direction desired, not yet mirrored. It is expected the aspect ratio for the shapes will change, becoming elongated. Again, preselection for the first seven stitches on the right for the first two times selection occurs on those needles is canceled with needles pushed back to B.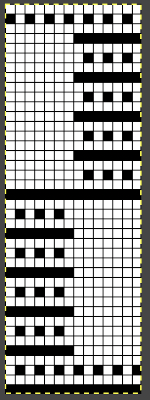
![]() Clothespins, as seen in the lower right, can come in handy to put slight weight on yarn ends to help hold them in place at the start of the piece or as it progresses.
Clothespins, as seen in the lower right, can come in handy to put slight weight on yarn ends to help hold them in place at the start of the piece or as it progresses. 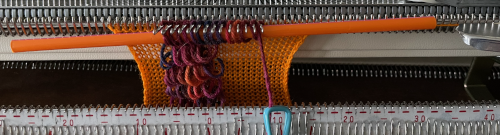 The proof of concept swatch shows a very different appearance in the distribution of the loops from the first sample.
 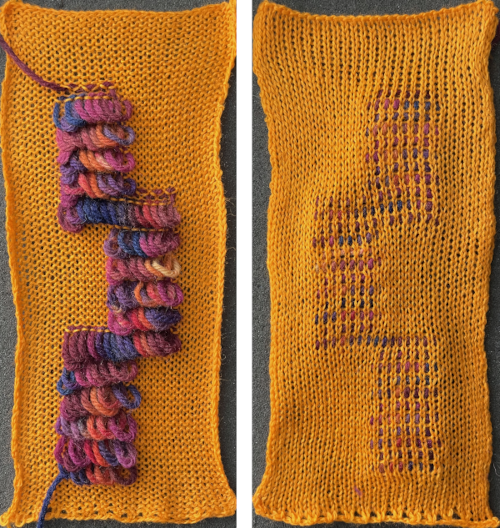 It is possible to knit more than multiple series of shapes. Enough spacing between the forms is required to allow for using of more than one straw.
I had the easiest result by leaving the straws uncut.
Each straw end on the carriage side again needs to be kept down until the sinker plate begins to pass above it.
It is a good idea to try the method first and practice some hand selections. 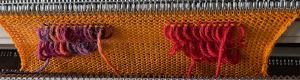 The rows where all 14 stitches in each group were worked required a bit of extra care, but knitting was quite manageable
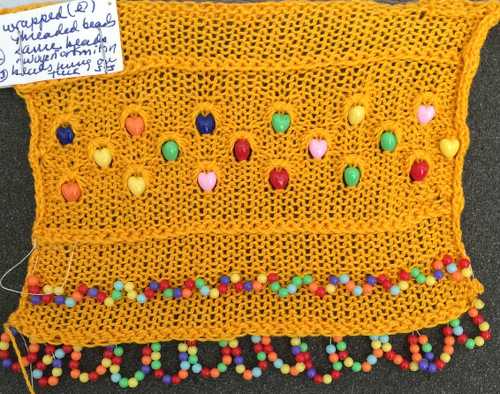
 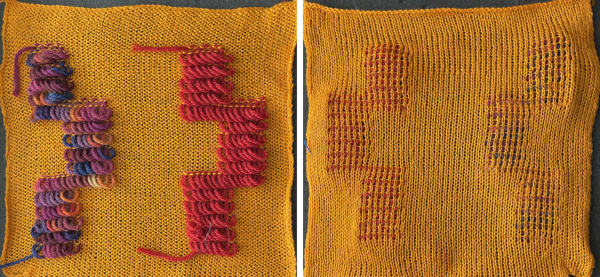 Long loops may also be created with i-cords, strips of knitting, or fabric, strung beads, and imagination is the limit depending on preference, available materials, and the specific design. Even tiny beads may be used to create loops as seen in this swatch. Dental floss may be used as the very strong “thread”, secured with e-wraps on the knit background where needed.
For threading the beads onto lengths of the chosen thread, a tool I have used (which also comes in handy for threading a serger) is an “EEZ-THRU” floss threader, recently available in this brand 
 Here strips of knitting are used along the edge and knotted, strips are also applied to the body of the swatch during knitting for contrasting color interest
  I cords may be applied to the edges of a knit ie scarves, but there are a lot of ends to weave in. There are trade-offs if techniques are explored to use continuous strands with limited or no cutting.
There is a hand knitting pattern called foxpaw, for which some illustrations may be found in the photos related to the advertisement for this class https://stitches.events/shop/classes/west-2022/intro-to-stacked-stitches-6/.
A while ago I was interested in trying out a simplified version using the knitting machine, the project has remained a UFO (unfinished object) since then.
The graduated size cording here were created by knitting lengths of i-cord on 4 stitches, knitting X number of rows, folding the cord upon itself, and joining the second half to the first using seam as you knit, continuing with the next shape immediately after completing the join. When applied to a cast on edge, if the goal is to use the technique for a substitute fringe, the double cords are a bit dense compared to the body of this particular knit and too close together. Perhaps creating a trim by applying the double cord to a side edge of a vertical strip and then in turn to where needed would produce a better result, or limited numbers of graduated cord lengths might provide interest in the body of a knit.