Related posts on creating loops:
long-loops-a-bit-on-method.
long-stitches-on-km/
some-long-stitch-swatches/
for double bed long loops in various designs in single or multiple colors see drop stitch lace
I became curious about creating long loop shapes on a knit ground using continuous strands of yarn, forming loops in the same direction, and allowing for knit rows between them resulting in returning the yarn to the starting loop formation side. My own preference is to make the loops with the knit carriage on the right, anchoring them with the following carriage pass to the left. To continue doing that, the yarn would either need to be cut leaving a yarn end, or it needs to travel back to the left, where it can form the next row of loops from left to right.
In these tests, the movement of the yarn back to the left was achieved by having it weave on every other needle from right to left.
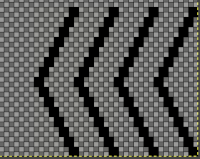
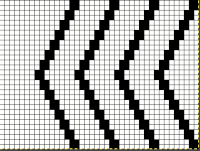
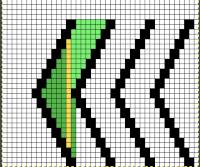
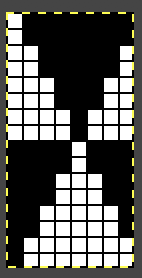
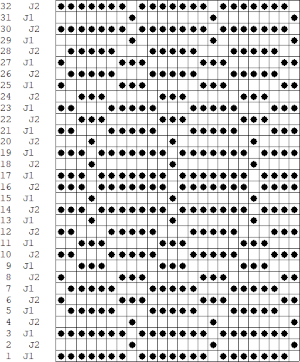
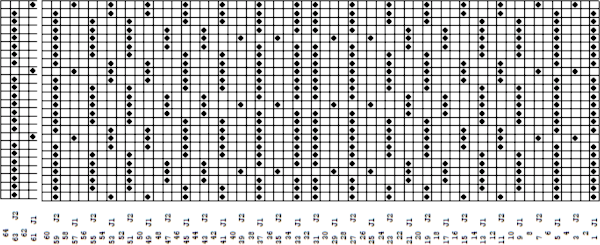
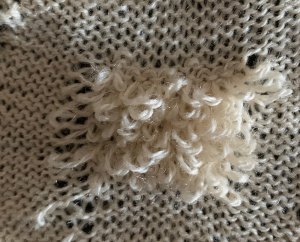
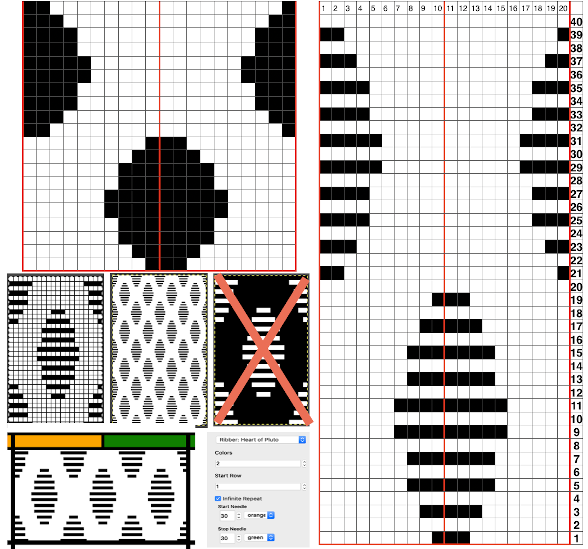
Triangular shapes are easily recognized, and I began with a moderately large one, at first planning for loops on every other needle. Black cells on the right represent loop locations, and green the weaving pattern formed as the carriage knits right to left. 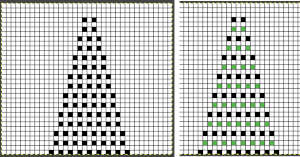
![]() The length of the loops determines end-use, long loops can become fringe, and short ones the macro version of pile knitting.
The length of the loops determines end-use, long loops can become fringe, and short ones the macro version of pile knitting.
Tools to aid loop formation that are fixed in height across the needle bed are needed if the pattern is not used as a single motif, but rather as a recurring one. Separate strands of yarn on bobbins or balls or cones would need to be used for each shape. The loops in this swatch are large, so there are extra knit rows between each set.
I use colors and yarns that are randomly on hand for swatches unless I am planning a specific finished item.
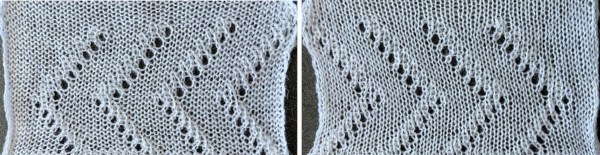
The first swatch is worked with loops on every other needle, the second with loops on every, as shown in the photos
Worked as a single motif:
KC II: preselection is made from left to right
COL: make loops moving from left to right using ribber gate pegs, I like to bring needles to be wrapped out to hold as I move across each row, wrapping frequency may be varied apart from needle preselection, 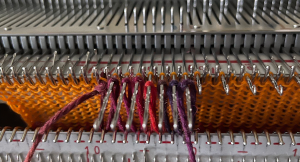 knit a row to left, anchoring them
  COL: knit to right, the needles for the weaving pattern to the left will preselect
 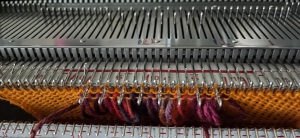 COR: check that weaving brushes are down, place yarn over preselected needles,
 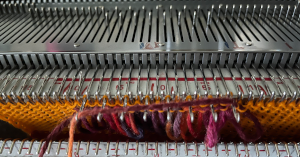 knit a row to the left, securing the weaving pattern, the yarn end will be on the left again
 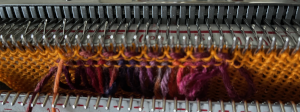 COL: knit a row to the right, needles for the next row of loops will be preselected
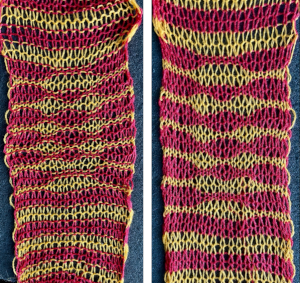
COR: use the yarn now on the left again to form loops from left to right, knit a row to the left to secure loops. Repeat the process. The resulting shape brings holiday knitting to mind.
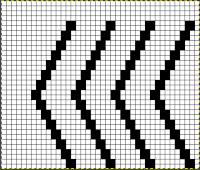
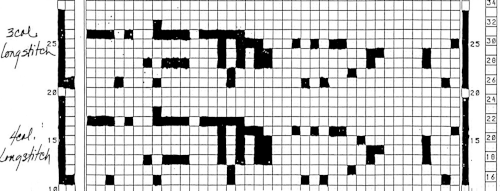
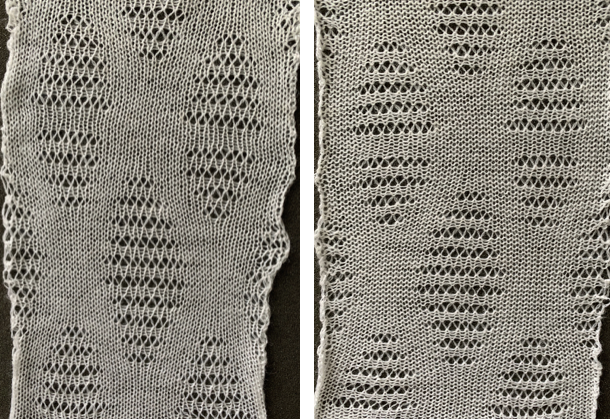
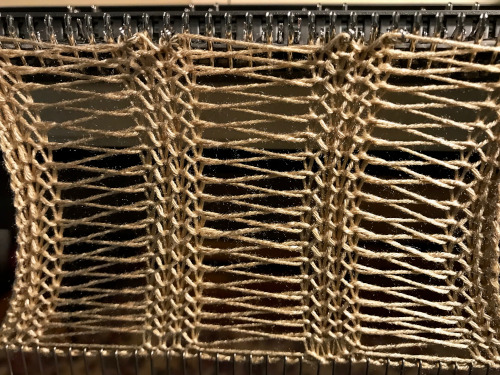
The loops worked on every other needle 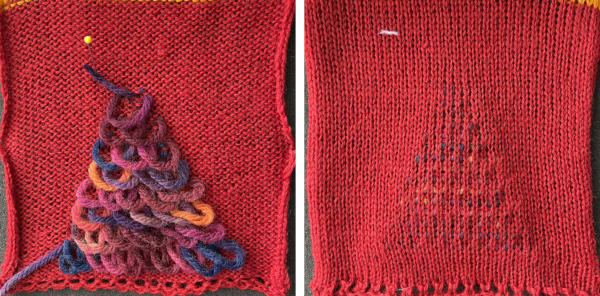 and on every needle. The original preselection repeat may be used. The only yarn ends that need to be dealt with are at the beginning and end of the shape, the reverse of the knit has the appearance typically seen in knit weaving, where the thicker yarn forces the stitches in the background one apart.
 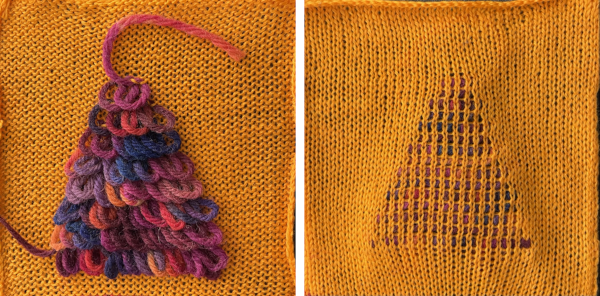 What of recurring shapes with reversing directions? It occurred to me plastic straws may prove to be handy tools for creating the loops and easier to manage than rulers. The maximum length of the straw is a limitation. Exploring the technique in a single motif gives one the opportunity to explore issues and limitations.
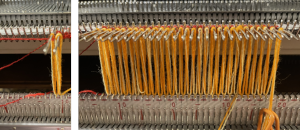
My straw is 10.25 inches wide, made of plastic, is not rigid, and can be squeezed flat easily. When using it as a loop guide, it was held low enough below the knitting on the top bed on the carriage side to allow some ease in the loops so the straw can have an easier time dropping below the sinker plate when the knit carriage passes over it, it can even partially collapse if needed.
I found managing the straw soon became rhythmic and easy.
The lengths of the straw on both sides of the loops serve as a handle on the left, and on the carriage, right side, the extra length can be guided down a bit to keep it from angling up and getting caught in the sinker plate.
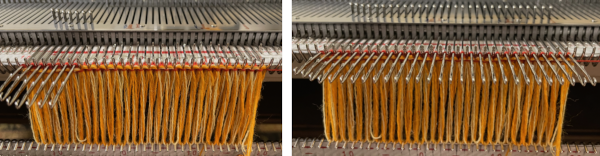
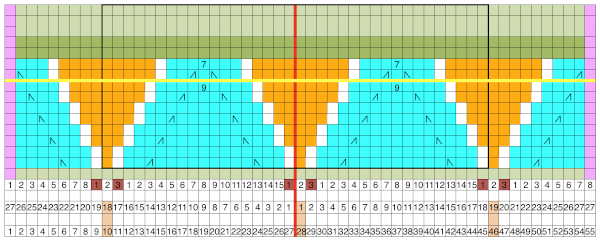
Once the carriage begins to knit across I encountered no problems. The straw may get pushed slightly to the left with the carriage pass. 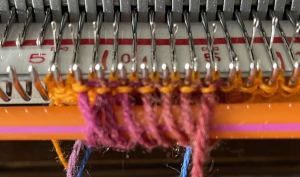 Planning possible actions and a starting repeat with single rows knit between loops. In this instance, loop formation happens when the carriage is on the right, and weaving when the carriage is on the left. The latter means the weaving yarn is laid over selected needles in the wrong direction, with the long end of the yarn away from the knit carriage. That said because weaving happens only on every other needle X3 and on a max of 7 on every other needle, the first selections were no problem, and the second was manageable with some caution. The arrows indicate the direction of the carriage movement after the loops are formed, and after the yarn is laid over the preselected needles for weaving.
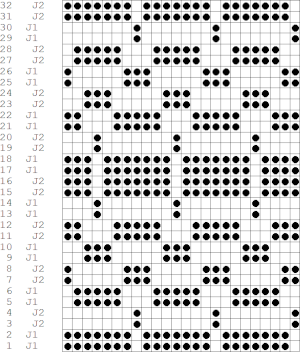
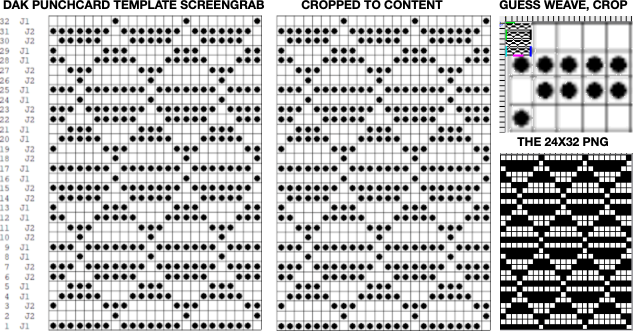
The image on the right is the repeat tiled in Gimp to evaluate its vertical alignment. It is 14 pixels wide and 20 high, could be used in a punchcard and placed on the center of the card making it recur centered in each 24 stitch location on the needle bed.
If an attempt is to be made knitting several repeats, vertical columns of plain knit between the pile knit columns are desirable.
The needle preselection will begin on 14 stitches, so only for the first 2 rows, the needles preselected for the first 7 stitches of the 14, shown as grey cells, push the needles involved back to B.  Depending on the machine model and software used for the download, the repeat may need to be mirrored to achieve the result planned in the drawing, which is true in my 930. The starting png
 ![]() may be placed on a wider canvas in Gimp, here is a 30 stitch mirrored version for use on my 930.
may be placed on a wider canvas in Gimp, here is a 30 stitch mirrored version for use on my 930. ![]() The resulting design is quite dense but successful.
The resulting design is quite dense but successful. 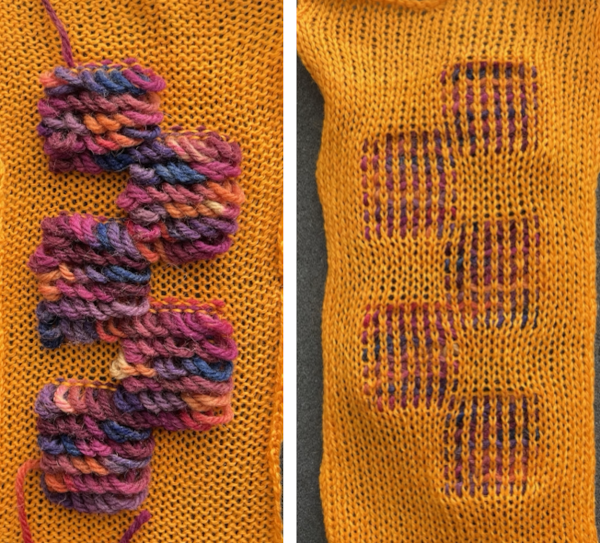 Planning moves on for weaving to happen with the yarn in the proper direction, particularly if more than one design is to be attempted horizontally, and to make the loops less dense. Extra rows of plain knitting are added between loop formation.
Here the design is placed once again on a 30 stitch ground but is now 40 rows high, drawn in the direction desired, not yet mirrored. It is expected the aspect ratio for the shapes will change, becoming elongated. Again, preselection for the first seven stitches on the right for the first two times selection occurs on those needles is canceled with needles pushed back to B.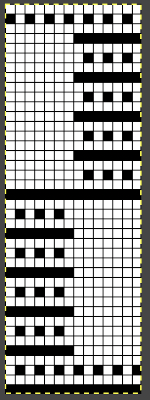
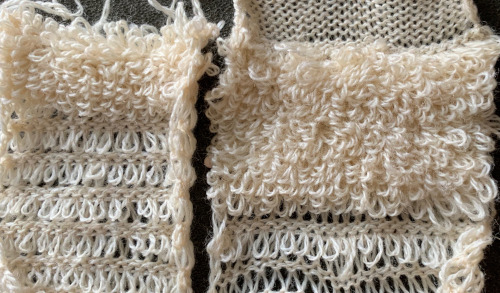
![]() Clothespins, as seen in the lower right, can come in handy to put slight weight on yarn ends to help hold them in place at the start of the piece or as it progresses.
Clothespins, as seen in the lower right, can come in handy to put slight weight on yarn ends to help hold them in place at the start of the piece or as it progresses. 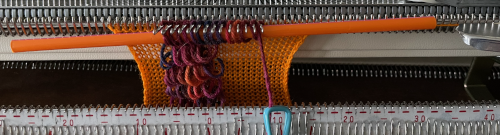 The proof of concept swatch shows a very different appearance in the distribution of the loops from the first sample.
 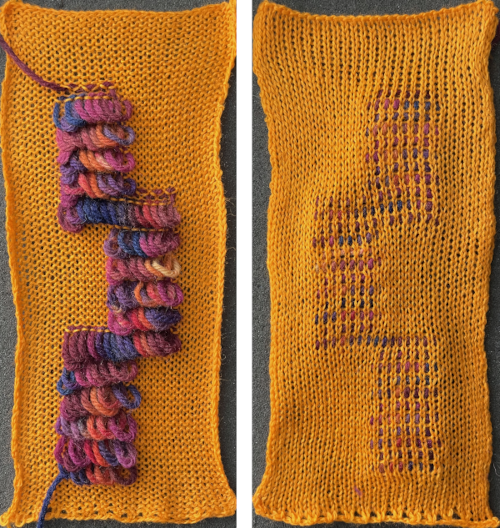 It is possible to knit more than multiple series of shapes. Enough spacing between the forms is required to allow for using of more than one straw.
I had the easiest result by leaving the straws uncut.
Each straw end on the carriage side again needs to be kept down until the sinker plate begins to pass above it.
It is a good idea to try the method first and practice some hand selections. 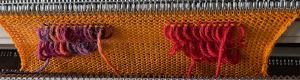 The rows where all 14 stitches in each group were worked required a bit of extra care, but knitting was quite manageable
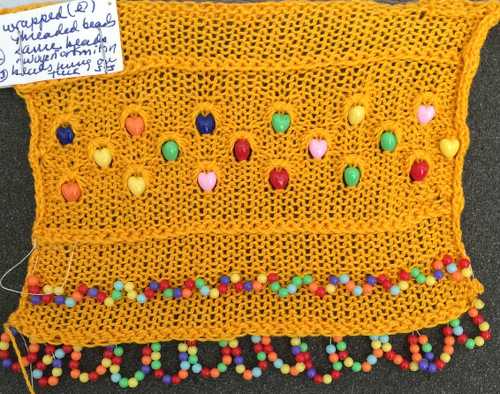
 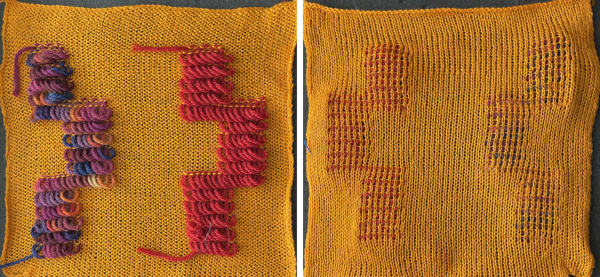 Long loops may also be created with i-cords, strips of knitting, or fabric, strung beads, and imagination is the limit depending on preference, available materials, and the specific design. Even tiny beads may be used to create loops as seen in this swatch. Dental floss may be used as the very strong “thread”, secured with e-wraps on the knit background where needed.
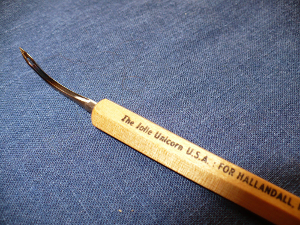
For threading the beads onto lengths of the chosen thread, a tool I have used (which also comes in handy for threading a serger) is an “EEZ-THRU” floss threader, recently available in this brand 
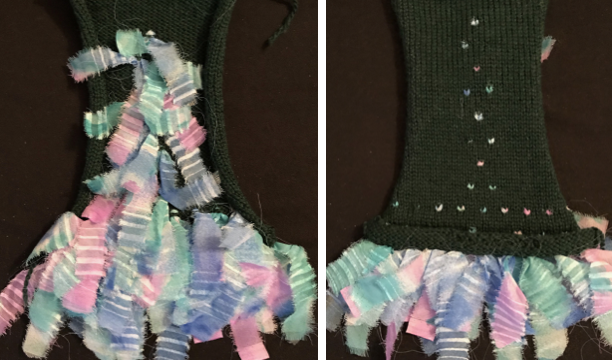
 Here strips of knitting are used along the edge and knotted, strips are also applied to the body of the swatch during knitting for contrasting color interest
  I cords may be applied to the edges of a knit ie scarves, but there are a lot of ends to weave in. There are trade-offs if techniques are explored to use continuous strands with limited or no cutting.
There is a hand knitting pattern called foxpaw, for which some illustrations may be found in the photos related to the advertisement for this class https://stitches.events/shop/classes/west-2022/intro-to-stacked-stitches-6/.
A while ago I was interested in trying out a simplified version using the knitting machine, the project has remained a UFO (unfinished object) since then.
The graduated size cording here were created by knitting lengths of i-cord on 4 stitches, knitting X number of rows, folding the cord upon itself, and joining the second half to the first using seam as you knit, continuing with the next shape immediately after completing the join. When applied to a cast on edge, if the goal is to use the technique for a substitute fringe, the double cords are a bit dense compared to the body of this particular knit and too close together. Perhaps creating a trim by applying the double cord to a side edge of a vertical strip and then in turn to where needed would produce a better result, or limited numbers of graduated cord lengths might provide interest in the body of a knit. 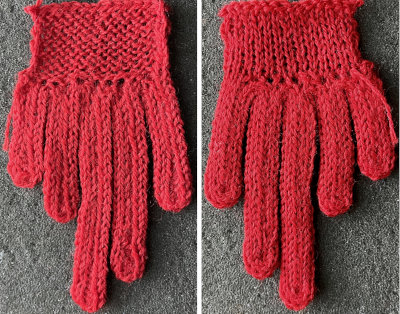


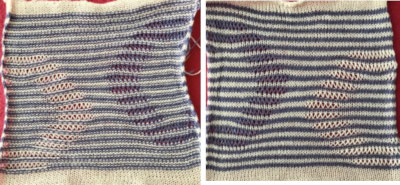
 Trying for a bit more detail, there is a see/peek-through quality.
 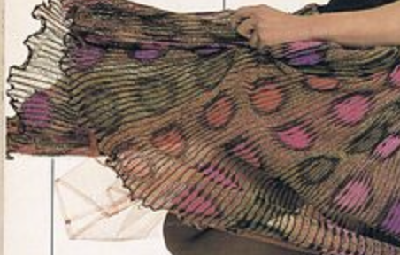 At first, I thought it might be a version of the stitch using 3 colors, but later, looking again, I came to believe it to be a 2 color
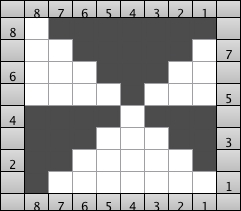
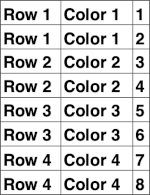
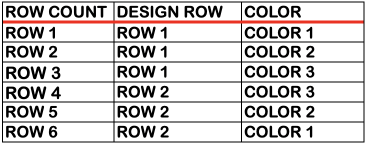
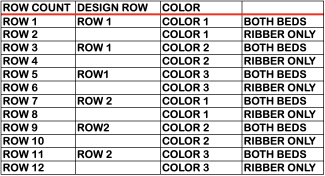
 I wanted to add solid color drop-stitch stripes, the solution being to add all black rows. Every needle will select every row in those areas, colors are changed every two rows, creating the desired effect when the corresponding stitches are dropped.
 A visual summary with an added color change column and row numbers with rows on which dropping all loops can occur marked with different color numbers. In this case, the ground is in the dark color, the shape in the lighter one.
 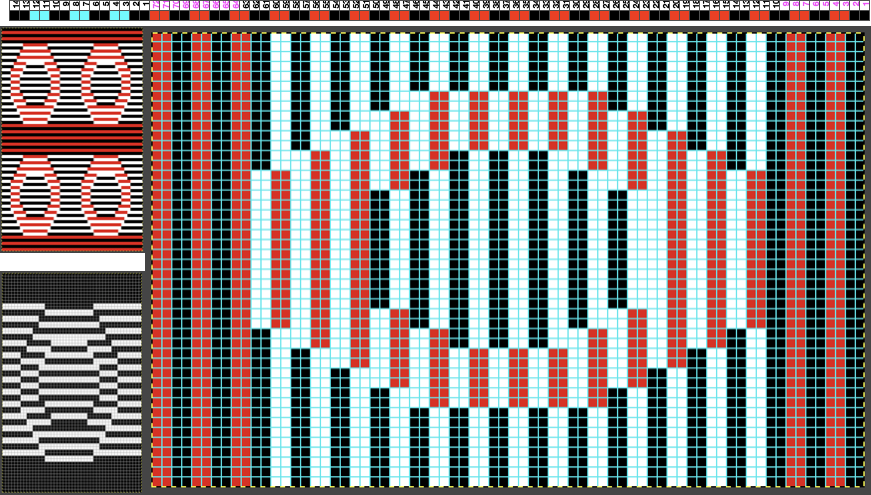 Determining whether the shape or the ground stripes knit the dark color is simply done by beginning the first all knit rows with the dark color or the light.
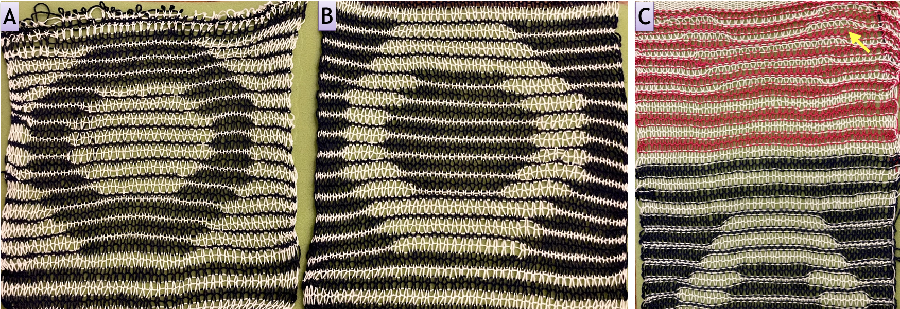
 but I would like to have stripes in the solid lighter colors as opposed to 2,

 Here some of the peek-through quality of the fabric is shown again. When any fabric is gathered sideways, it is likely the repeat will appear narrower and longer.
 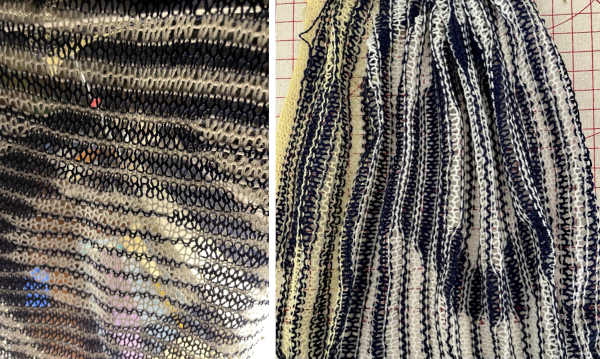 Using a 16/2 cotton at nearly the same tension produces a fabric that is even sheerer.
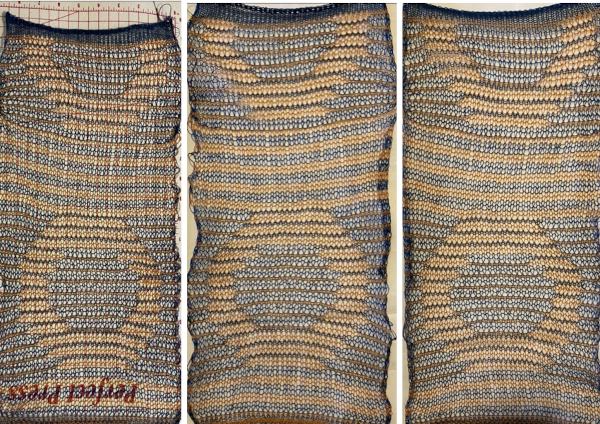
 And now those solid stripes in 2 rows knit are really bothering me, thinking they should be switched to only one row of loops, making the original repeat without those added black rows the better repeat?
 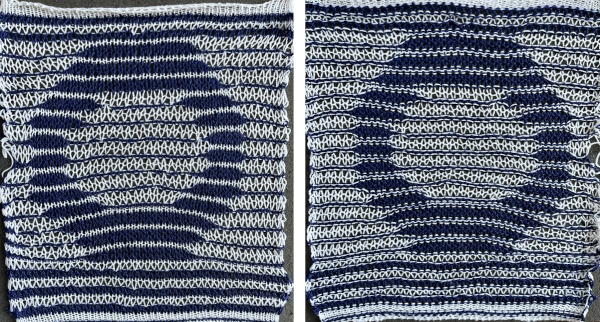 A potential use is for the thinner knit is for it to be used as a layer over a different pattern or the same design as seen here, in the thicker yarn
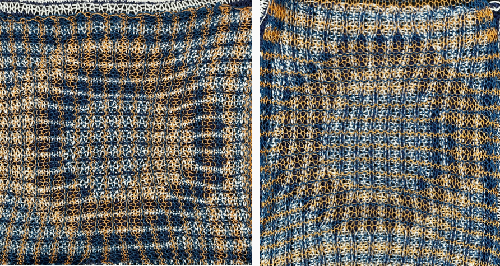
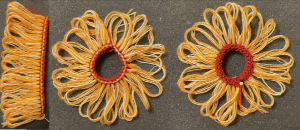
 seeking a rounder, smaller donut shape:
 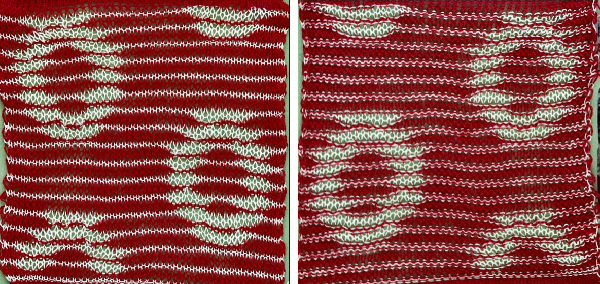 The red is a thicker yarn than the pale yellow, the fabric had an interesting slight curl evocative of shadow pleats. Other possible changes include the elimination of the top and bottom row in the original design.
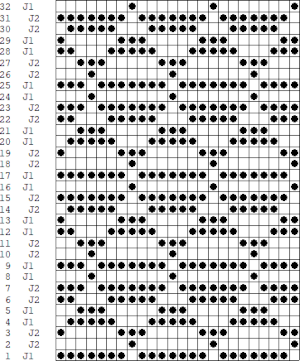
 As for more than 2 colors per row, performing the color separations may be achieved
 A “hack”
  stitch and row counts should match, and save the stp
 The separation methods in DAK:
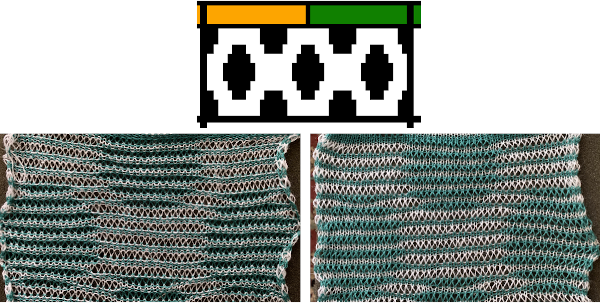
 Yarn choice and design make a big difference. Here the yarn is far too thin, and the repeat too narrow in width, but the possible result is illustrated. The main bed is set to slip in both directions throughout. The ribber setting needs to slip in both directions for every other pair of rows. When the ribber slips, the main bed will knit the color that will create the pockets, where there are many single stitches selected here, the KC was set to KC1. When the color is changed and the ribber is set to knit again, stitches in that color will knit on both beds, sealing the fabric in those areas and forming a solid color background on the reverse side. Here the white forms the pockets, and the floats after a pair of passes are seen in this photo.
 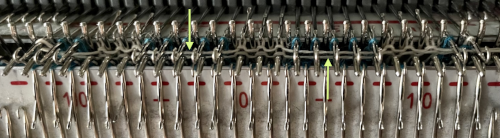 Because the yarn is so thin there is a considerable grin through on both sides, the areas marked with arrows indicate where the white pockets were lightly stuffed with yarn ends
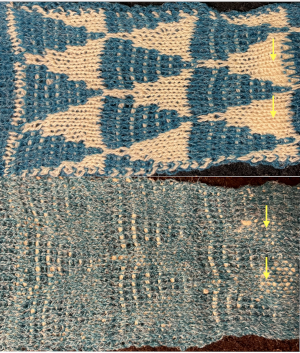
 If pngs are created outside the program, they may be doubled in length unless the repeat is designed that way.
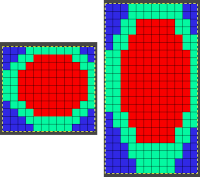
 How the different jacquard setups process the specific repeats:
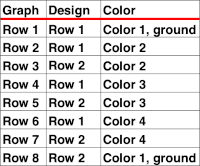
 Passap card reader techniques saved from long ago experiments.
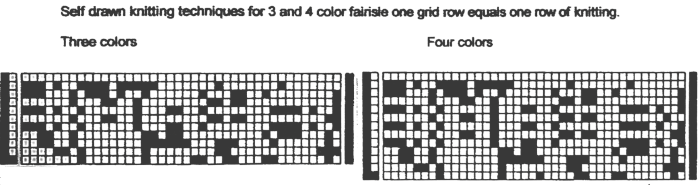
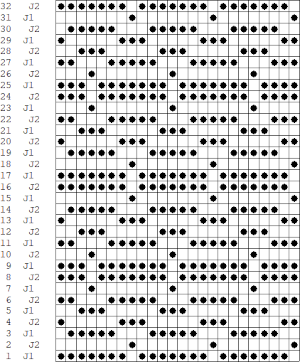
 Processing the template using numbers: a table is created twice the length of the 8X16 triangle repeat, followed by hiding the 32 odd-numbered rows, positioned in front of the scaled punchcard template, stitch markings are traced
 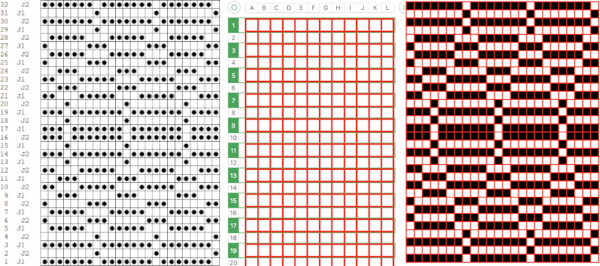 the rows are then unhidden, the repeat is checked, matched here to the F jacquard separation in Dak
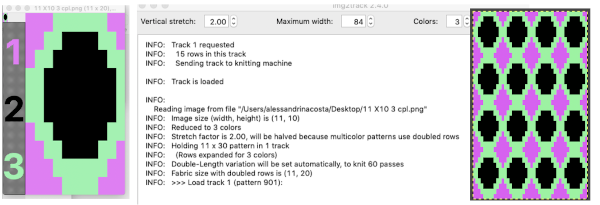
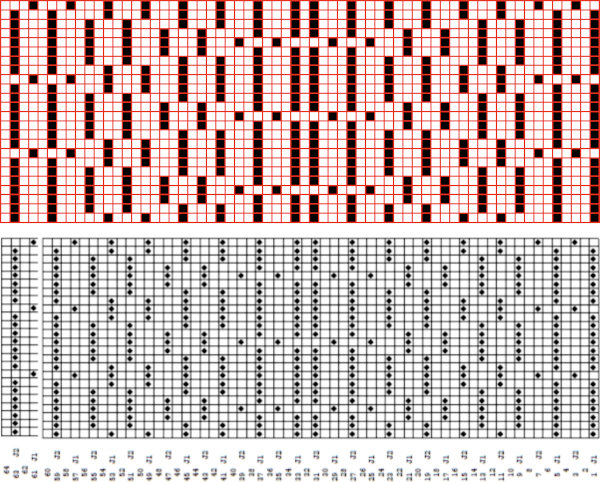 The numbers table is processed in Gimp to obtain the png for knitting the now 24X64 pattern
 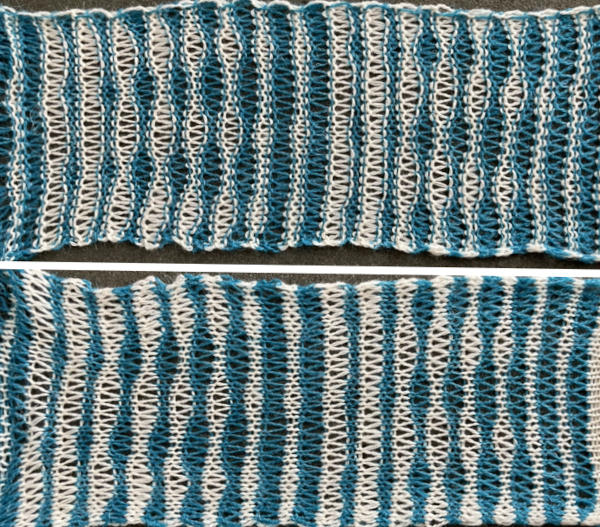 and the pattern executed as a tubular FI knit: I had yarn issues, hence the dropped stitches. Both swatches were knit to approximately the same point in the pattern repeats, there are obvious quality differences in width and length. In tubular knits, there are differences in the width and height of the knit on each side. The front is a slip stitch with floats, drawing the fabric in, while the ribber knits every stitch every other row. With a good choice of yarn and pattern, loosening the tension on the top bed may ease this problem. As often happens, casting on and binding off need special considerations ie to allow for any fabric stretch when off the machine or to leave a tubular knit open at either or both ends if that is the goal.
 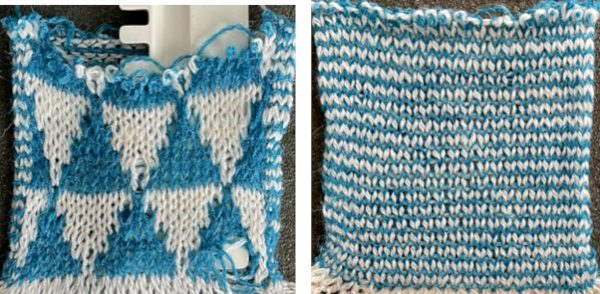 DAK has been a purchase made out of curiosity, and my use of it has been very limited since my designing needs are met by using other programs that are free to users and generate and accept files in multiple formats, while the Brother Knitleader or even simple use of the magic formula solves knitting any desired shape in any gauge.
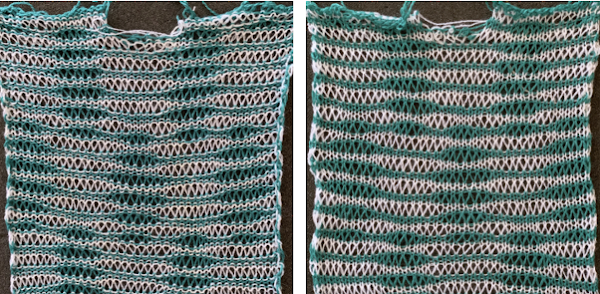
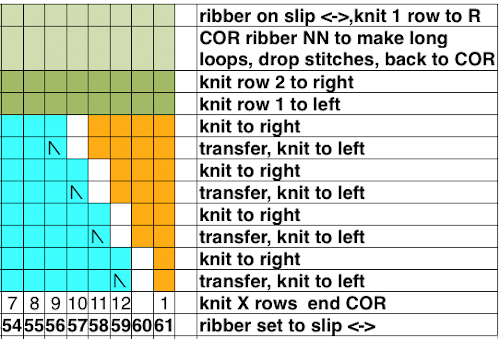
 Alternative settings for one color pile: Tech 256, back lock FX and both arrow keys, pushers one up, one down, front bed to LX, drop stitches every 2 rows.
 the loops, formed on every needle on both beds with the move to the left
  anchored in place on the ribber needles as the only the ribber knits as it returns to the right
  while the carriage is on the right, drop all stitches on the main bed,
 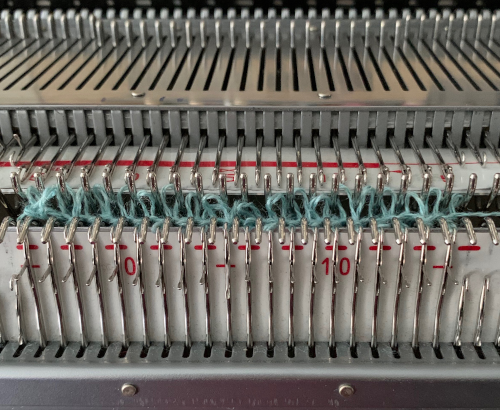 making certain no loops are stuck on gate pegs on the main bed,
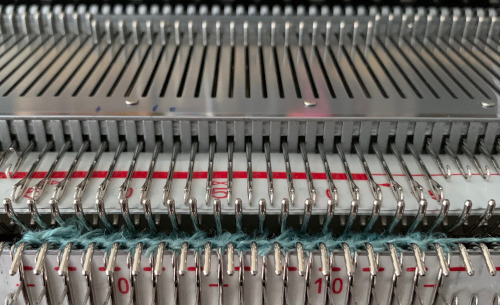
 Knitting was smoother with a change in yarn. An extra needle on each side of the knit on the ribber is brought out to hold manually to ensure their stitches knit with every pass of the ribber carriage. I prefer the all-over pile with its loops formed on the top bed. There were nearly no incidences of loops catching on gate pegs on the main bed. One of the drawbacks is that the main bed needles need to be dropped and brought back to the B position manually, bald spots will result where any needles are not returned to the proper work position, so they will not pick up loops.

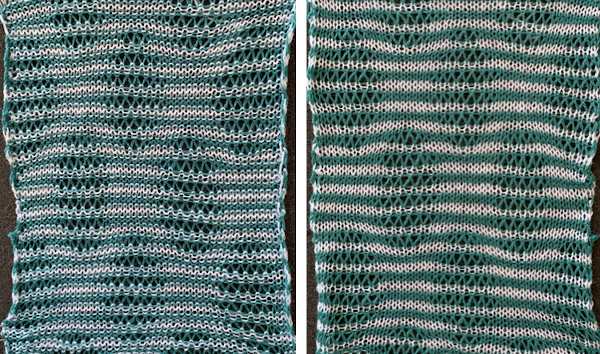
 and this is likely my last try at the single pile in a pattern using every other needle tuck on the ribber with the release of stitches every 4 rows. I actually like the elongated stitches in the ground but found the stitches planned for loops simply did not release easily or at all,
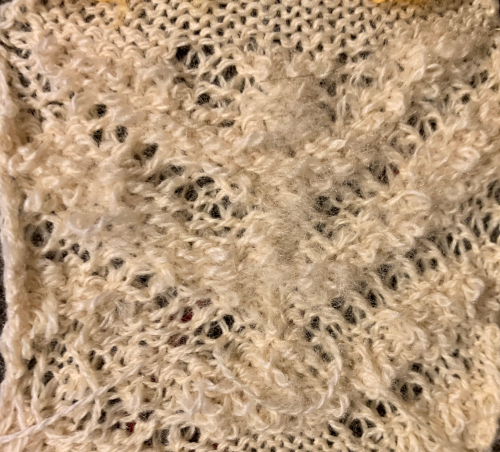
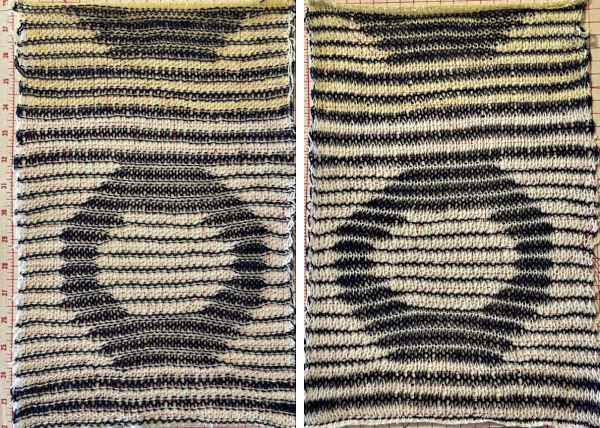
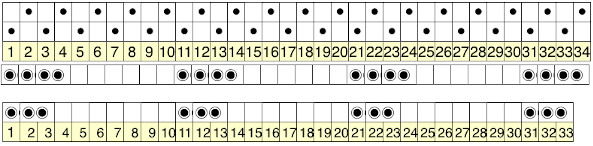
 Increments in height need to happen at sequences of 2 rows each, so the design was then doubled in height, resulting in a scaled image now 33 stitches by 46 rows in height, with a planned horizontal repeat X2 = 66. Note: the sidebar offers start and end needles are given for pattern placement on the needle bed. Sampling may occur on fewer stitches than that. Since the number of repeats programmed to add up to an even number and center alignment is chosen, the number of needles is even on each side of 0.
 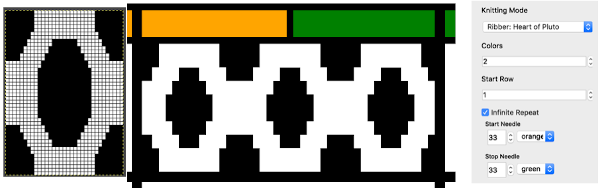 In my second series of swatches, I decided to try for a smaller “circular” shape, with the repeat now measuring 15 wide by 20 high, and a planned horizontal repeat X3 = 45. If centered, the software places the odd number of needles on the right-hand side of 0.
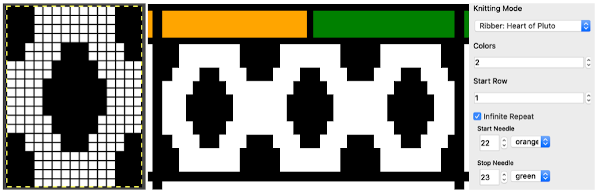
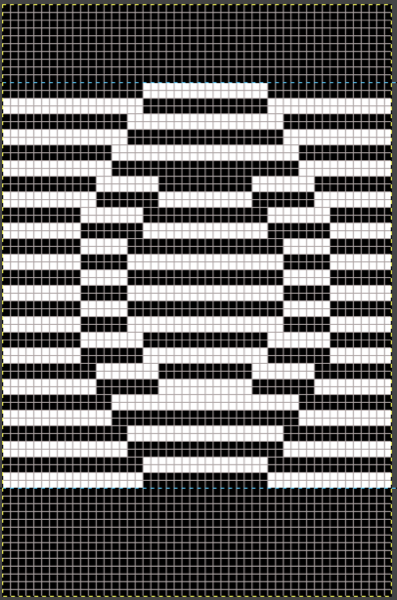
 The wider horizontal band of all knit stitches was due to operator error, happened when I pushed back preselection an extra time, resulting in the ribber only knitting extra rows. For the sake of added clarity, I have added color to the chart below, assigning yellow and grey to all-white design areas in the pattern. The black squares are what I choose to drop. For illustration purposes, this is only a segment of the repeat.
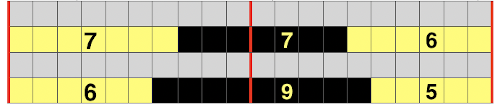

 drop the loops, return needles to B position. At this point, since all needles are in B a modified stitch ditcher may be used for 2 passes, dropping the loops on the first pass and returning the whole series back to B on the second.
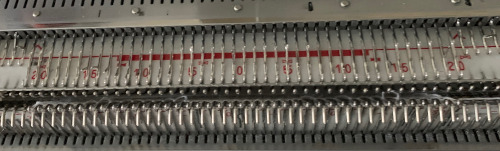
 COL: push all preselected needles back to B, as you knit back to the right the next group of white squares (yellow) in the next design row will be preselected
 COL: knit to the right in order to form loops on the main bed, continue for the desired number of repeats and end as suggested for the two-color version.
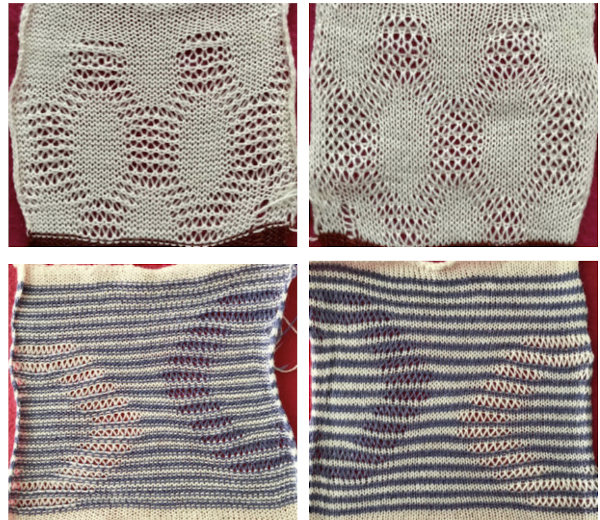
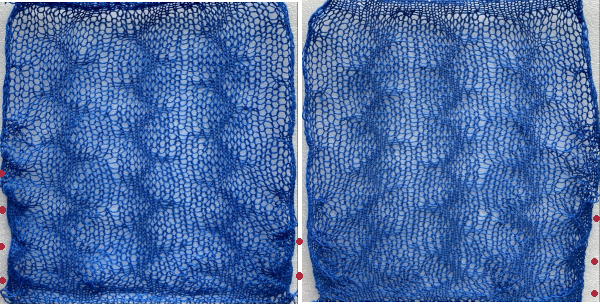
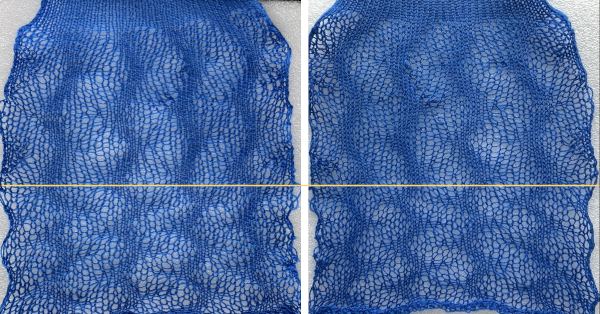
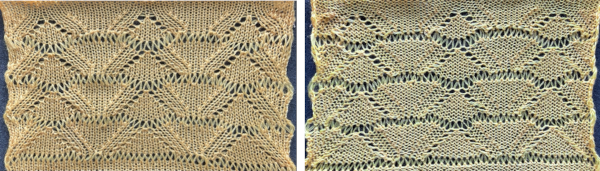
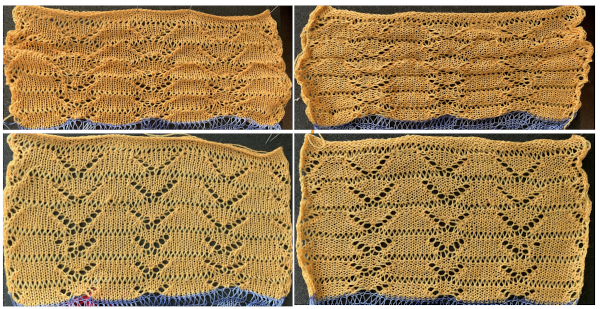
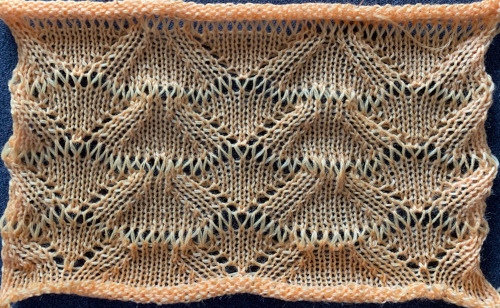
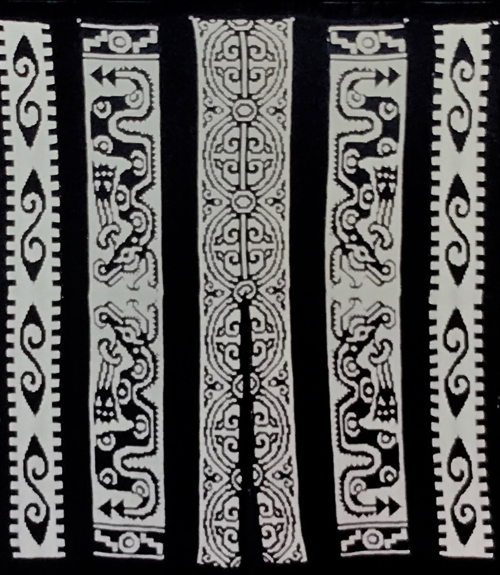
 At about that time I came across this image on Pinterest.
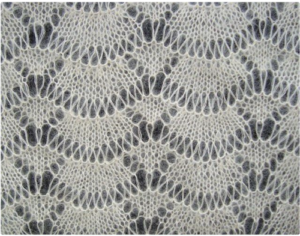 It combines transfer lace and long stitches, has characteristics that make some lace patterns unable to be reproduced on home knitting machines. Upon inspection, one will see that the number of stitches varies in different parts of the repeat. Aside from creating eyelets, the smaller triangular shapes increase in width, the fan shapes are decreased by half on their top row. Long stitches are created across all needles in work, then they are reconfigured so the center single stitch of the triangle and the center 2 stitches of the fan shape realign in the same position. The number of stitches at the start of the pattern and after the long stitches are created remains constant.
 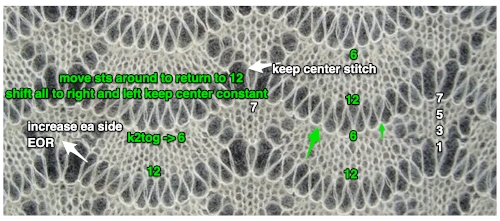 Trying variations on inspiration sources can lead to success, failure, somewhere in between, but also increase learning and skill that will carry over into other knitting techniques, even if the results are never used for a finished piece.
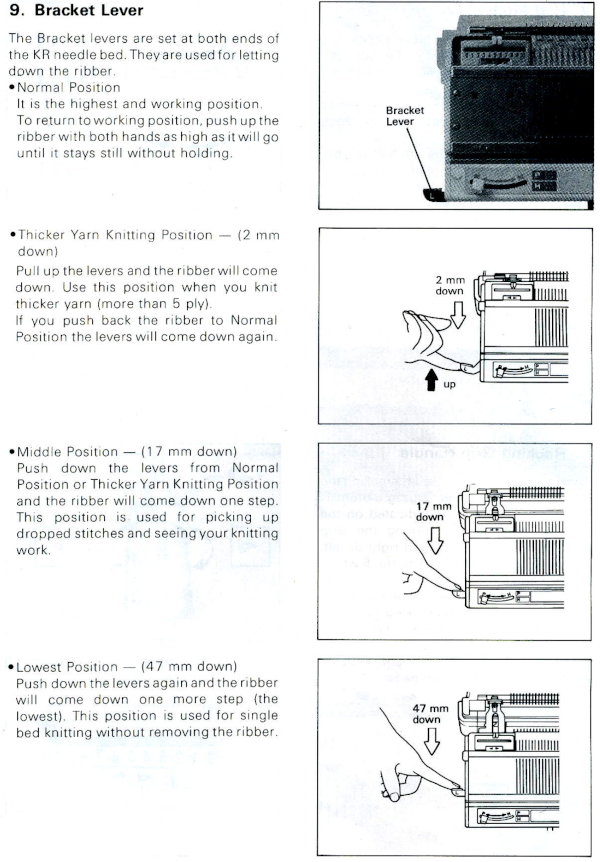

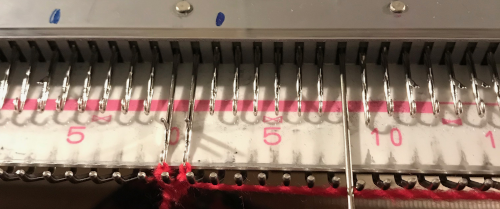
 I found making the transfers easier an the process more visible if I dropped one side of the ribber to the second, 17 mm. position
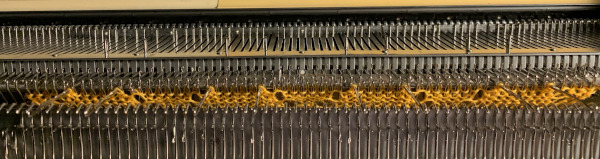
 The ribber is set to N <– –> for three rows. On the first pass, all its needles will pick up the yarn, creating loops on every needle
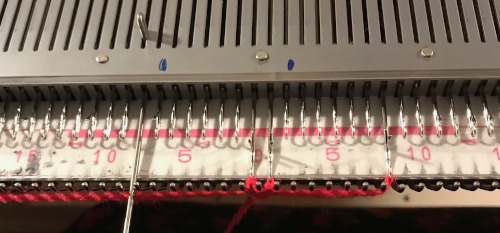
 With the ribber carriage alone, still set to N/N, free it, and make two passes to and from its starting side. The first pass releases the loops, the second returns it for coupling with the knit carriage. Below the long loops can be seen. My needle tape is “somewhere”, has not yet been returned to the ribber after my racking handle adventures were completed.
 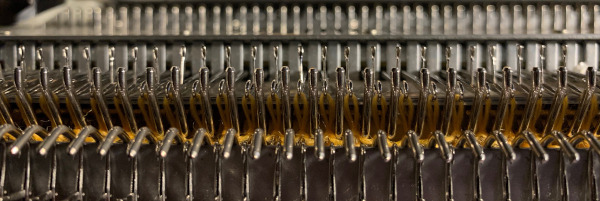 Return the ribber settings to slip in both directions, and repeat the process. Dropping the ribber to the lowest position at any point can verify goings-onHere one row has been knit on the main bed only, anchoring the loops, returning carriages to the opposite side prior to starting transfers once more
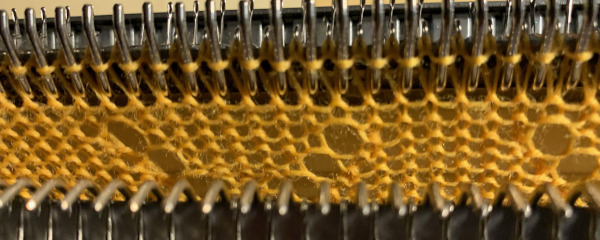 A word of caution: if loops are picked up on any single row that in theory was set to slip and was to be worked on only single bed, check to make certain the tuck lever has not been accidentally brought up to the tuck position. Although tuck <– –> can serve for a free pass on the main bed, having this setting on the ribber will create loops on all needles in work
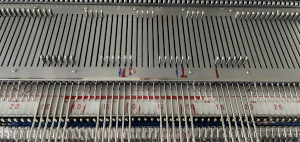
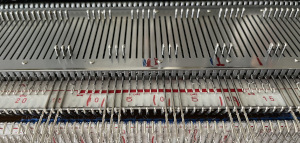
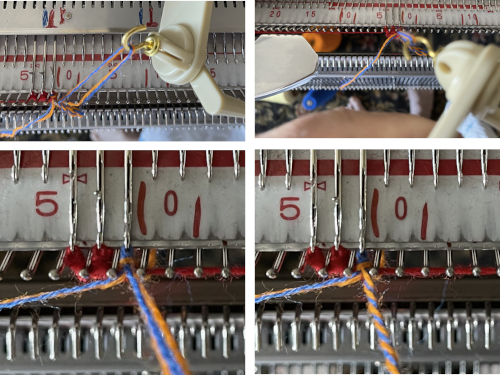
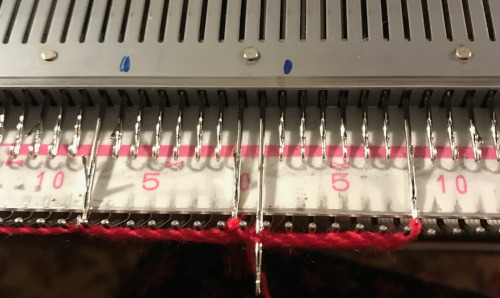
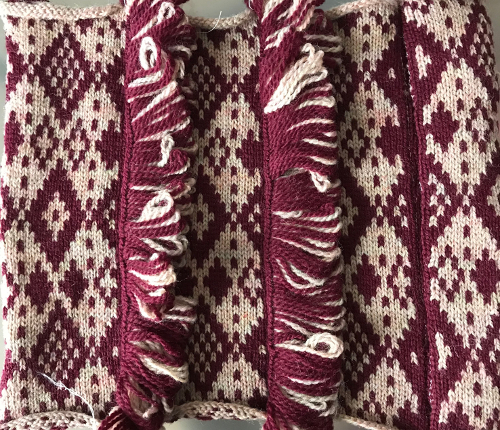
 I cast on 55 stitches 27 left, 28 right. A ribber comb and weights are required.
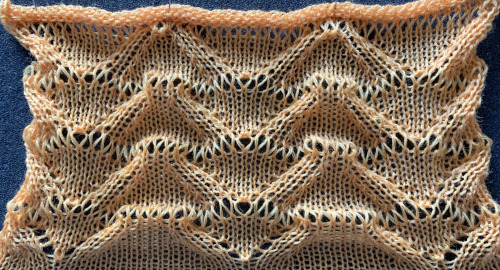
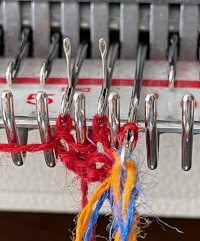
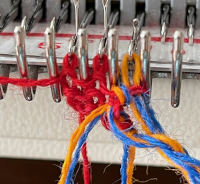
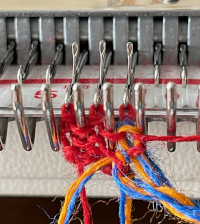
 e wrapping with second yarn before moving to left
 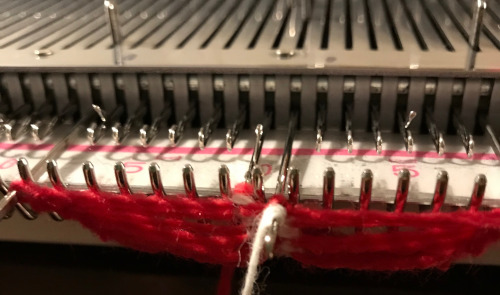 e wrapping with second yarn prior to returning to right, completing a sideways figure 8, end stitches out to E before prior to each carriage pass
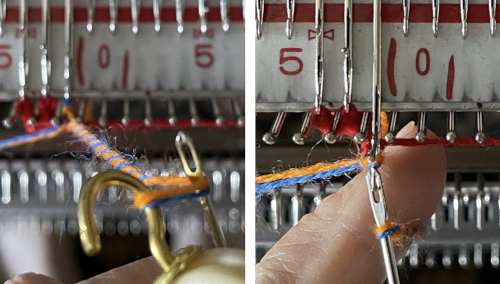
 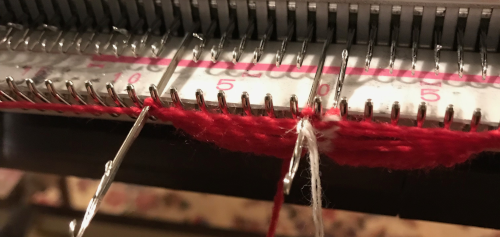 When the required number of rows has been knit, end COR. Unravel the first stitch on the right,
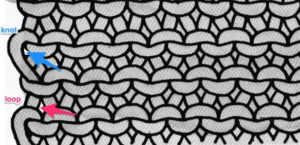
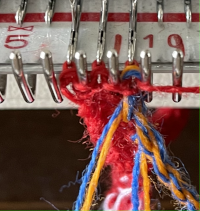
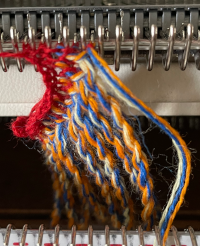
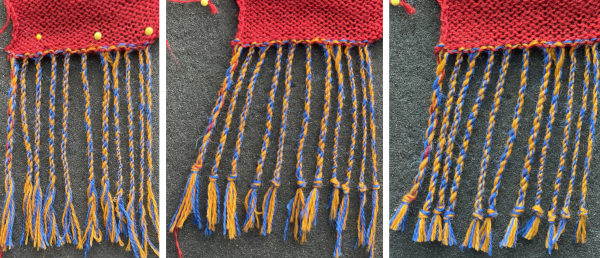
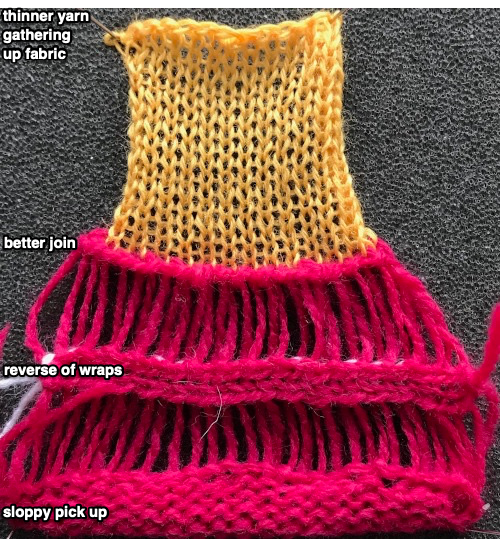
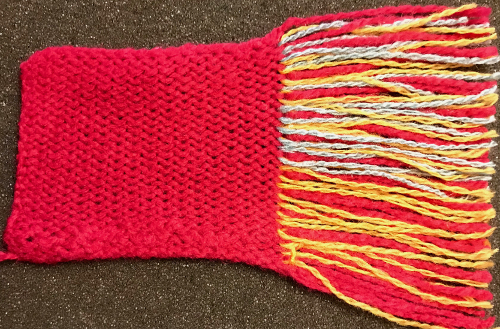
 Using thinner yarn for knitting after the join even if on the same number of stitches, will gather the fabric
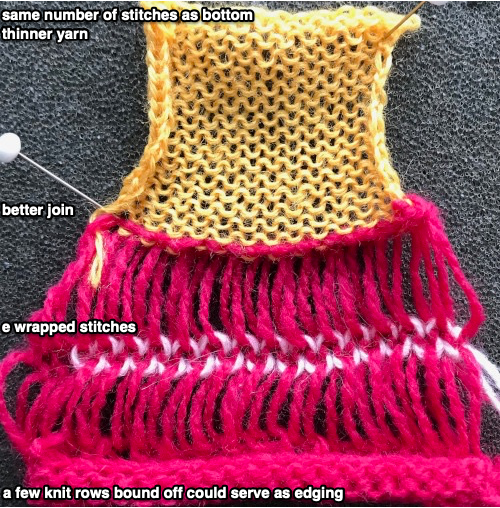
 More on seaming and joining knits
 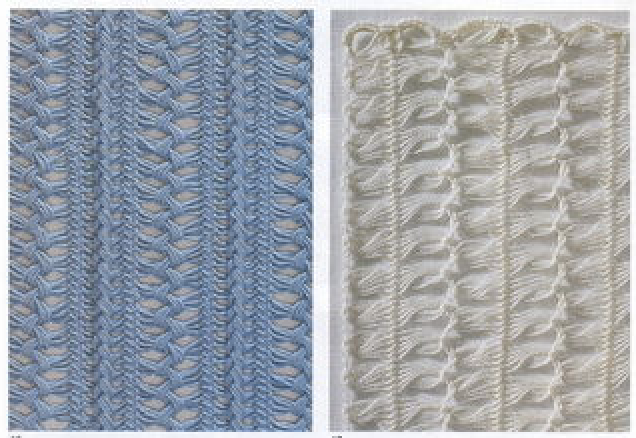 strips of different colors used
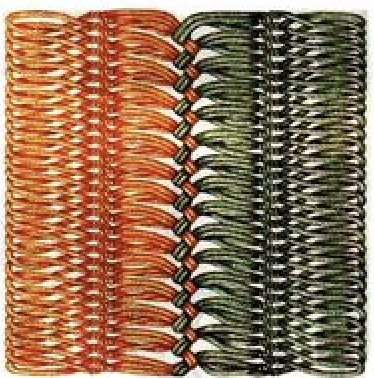
 The convention for joining strips of machine knitting by crocheting or latching side loops together suggest having a ladder space (white square, one or more may be used) and a side edge stitch on either side in segments of the final piece ie. afghan strips.
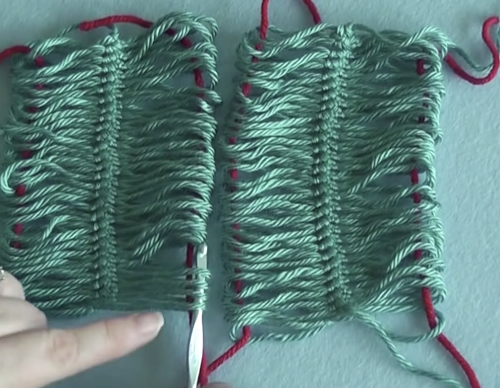
 A partial illustration from Pinterest from an unknown source showing how the loops coming together to make shapes might be charted out: the ovals represent chain stitches, the v slip stitches, the different colors the finish of a complete strip’s edge
  Tuck lace is a fabric produced with needles out of work in combination with tuck patterning on the main bed. Patterns for it can serve as the starting point for either the center strips in double-sided loop fabrics or they can be worked in repeats with wider ladder spaces between them for a far quicker “pretend” version. This is one of my ancient swatches for the technique from a classroom demo, using the 1X1 punchcard, shown sideways to save space.
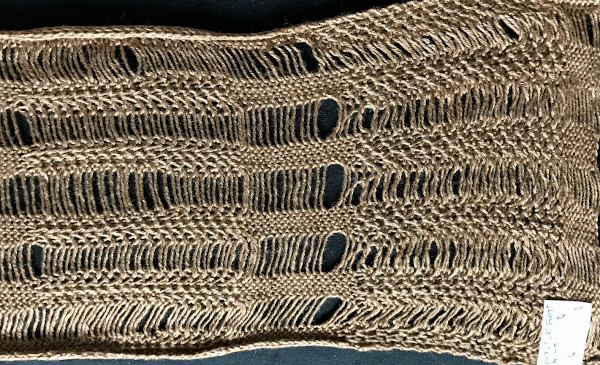 The card is used at normal rotation. Any time there are needles out of work, end needle selection is canceled to maintain patterning throughout including on end needles of each vertical strip. Tuck <– –> is used resulting in texture as opposed to simple stocking stitch and ladder fabric (center of the swatch). In the right segment, the ladder threads are twisted, in the one on the left they are not. This is what is happening: for twisted ladders on an even total number of needles have an even number in the selected pattern (4), and an even number out of work (6). This is one fabric that definitely benefits from the use of some evenly distributed weight and a good condition sponge bar. End needle selection must be canceled
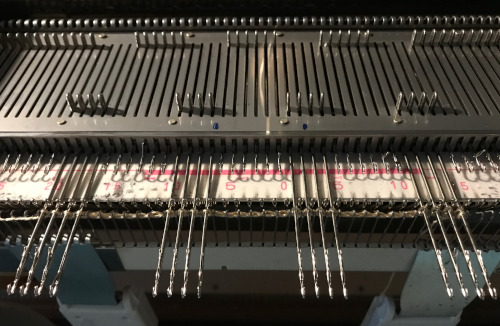
 Here the stitches are arranged with an odd number in work (3), an odd number out of work (7)
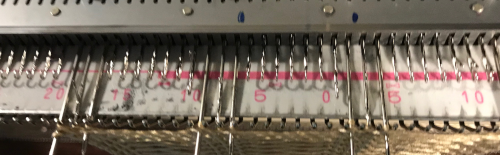
 I made a few items with twisted strands inspired by those seen in wovens produced by my weaving friends. I have no photos of those, failed to document my work for quite a few years. One excuse was the quality of any photos I attempted, and even back in the day, professional photographers charged $180 an hour plus model fees if used. It seemed that adding the cost of such photography to limited edition runs that were planned for sale would make the wholesale price higher than the market would bear. We all make choices based on information we have at that particular time, which was long before the recent easy-to-use photo technology.
 Here a ladder space created by needles out of work is left between vertical fair isle repeats, producing a fringe in 2 colors. The design was not planned, a standard punchcard was used for the purpose of the demo. A planned repeat would have more impact. End needle selection is on, which is usual in FI, not for most patterns with either tuck or slip stitch settings combined with needles out of work, is also true here so that a vertical line on each side of the needles out of work between repeats aids in sewing the strips together. Width is limited since the fabric will be gathered by seaming and become significantly narrower and likely turned sideways. Both sides are shown. Joining could be planned to occur only at the bottom of a piece if desired, stitching lines will be less visible if thread color matches that of the yarn
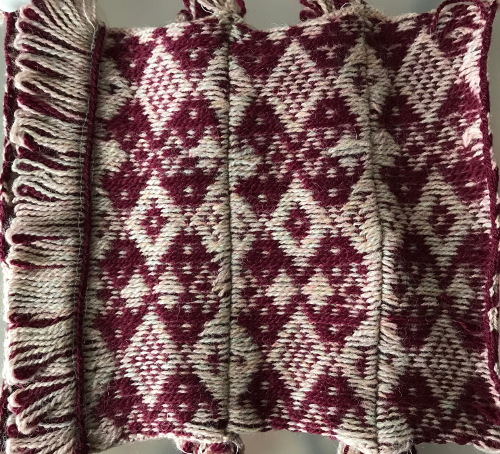
 A needle in work away from the edge produces a side “fringe” followed here by felting partially, cutting the single edge stitch, and finishing the felting process
 Adding thicker or multiple strands of yarns in
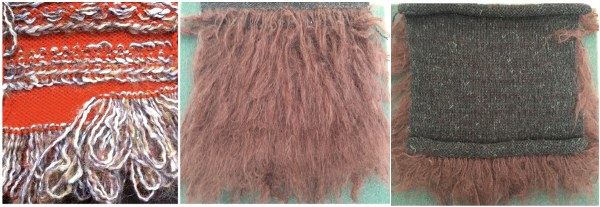
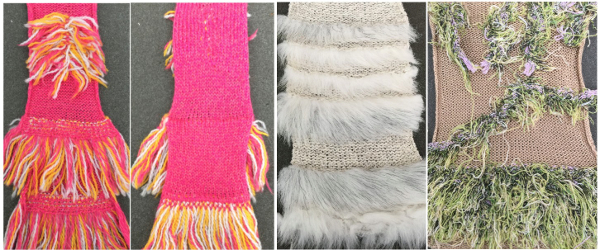
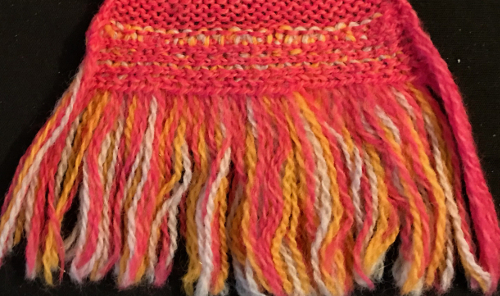
 Most often every other needle use is best. Here lace and pom trims are used, purchased fringes of all sorts could be applied the same way anywhere in the piece, joins to knit can be seen.
 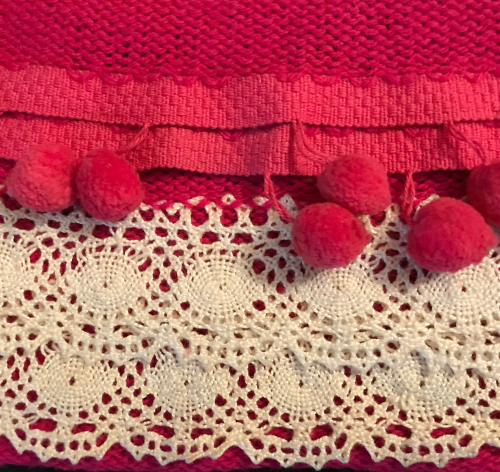 A length of roving may be twisted in its center and applied as you knit. For a while mittens using it as a lining for warmth were popular. A video by Carole Wurst shows a method used in socks
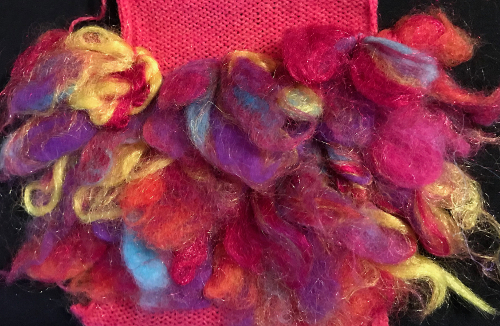
 The thickness of the yarn chosen is of critical importance. When I first attempted to knit a version of it on my 930 I encountered problems. To start with, I kept dropping off the stitches on one side or the other. I checked the ribber alignment, proper placement of the cast on comb, switched ribbers, and carriages, and continued to have problems. After all that, the solution turned out to be simply adding another 4 stitches (2 on each bed) toward the center of the piece (I did not count). Here I used a 2/24 which obviously does not have enough body to use as an edging. The Brother equivalent for the Duo setting is half fisherman rib, where one carriage knits in one direction, tucks in the other on every needle for every 2 rows knit, while the other bed’s carriage does the same, but in opposite directions. I used 3 needles on each side rather than 2 as in the Duo repeat, starting with the first needle in work on the left on the ribber, the last needle in work on the right on the top bed. One may begin to knit on either side, but when manually setting the cam buttons lead with settings so that first stitch knits as it moves to the opposite side. Using waste yarn at the start of the piece will produce a better cast on edge for the trim. Operating from the right:
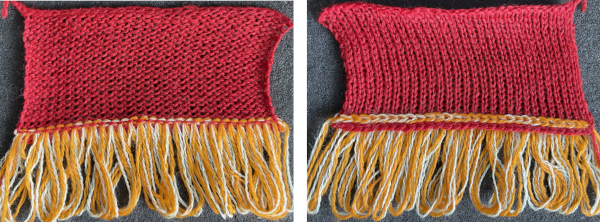
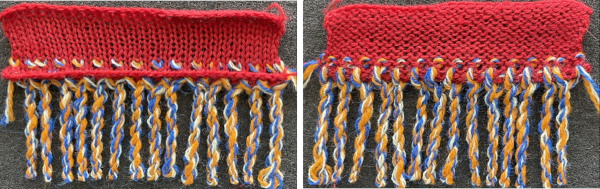
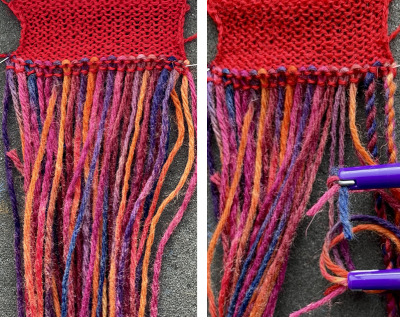
 A 2/11.5 acrylic provided more of a tension adjustment challenge but made for a better fringe.
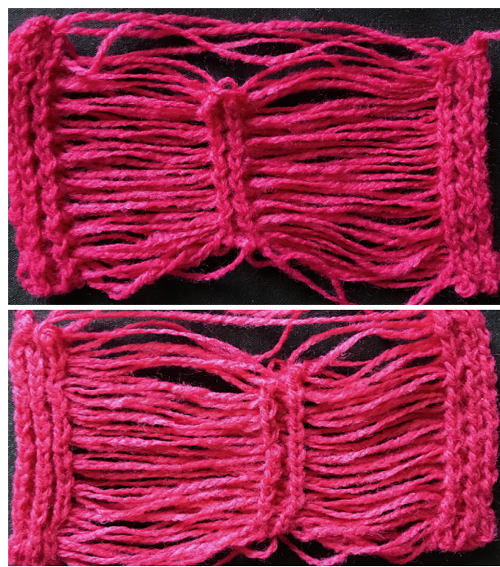 The first and last 3 stitches on either side were transferred to the top bed and bound off, the center stitches were not, allowing them to be unraveled if desired ie in case the fringe is to be folded in half. Those extra center stitches also provide a guide for cutting either down their center (bottom of photo) or on either side of them (toward the top). I found the latter method to produce a cleaner cut line
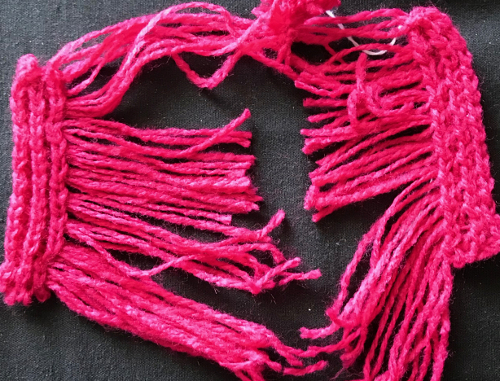 Suggestions for going wider with racked half fisherman rib on Japanese machines: begin with needle arrangement below, out of work needles can be as many as needed, set up and cast on with preferred racking position ie on 5, knit several rows in waste yarn making any adjustments needed so stitches knit are formed properly, weigh appropriately.
 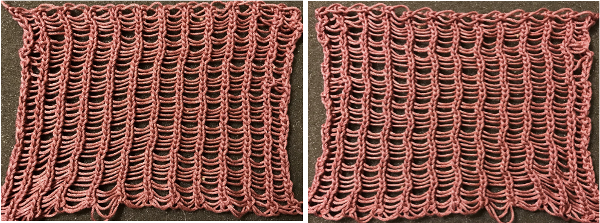 the edge that holds the fringe together is to be very narrow (or even added as one continues to knit) and one wishes to work on the single bed there are several options. With 4-ply and a “matching color” 2 ply I began with the top needle arrangement, and then switched to the one below it, knitting on a 4.5 mm machine.
  A permanent cast-on needs to take place in the preferred method over needles in work knit 2 rows. The stitch on the second needle from the left is going to want to stretch and tends not to be stable. To reduce that happening, there are 2 options involving the second strand of yarn. Here using a 2 ply helps serve that purpose and keeps the fringed strands closer together. The slower method is to remove the second stitch from the left on a tool after every 2 rows knit, then bring the separate yarn strand behind the now empty needle first from the right, then in turn from the left, returning the removed stitch to the machine, knitting 2 rows. I found that too slow for my patience, switched to just laying the second strand over needles before knitting each pair of rows, and decided to eliminate the out of work needle on the left side, moving the second stitch in work to its left.
 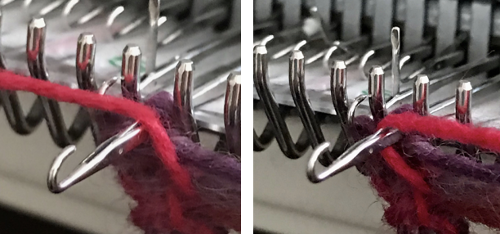 The single stitch on the far right of the chart need not be bound off. There will be 2 options after the work is off the machine. One is to unravel the single stitch column on the far right if loops are the goal, or cut it off, leaving a fairly good trimmed edge here, and what, in this yarn, appeared to me to be an acceptable edging. The 2 edge stitches on the left in my swatch did roll, making a very tight edge. Adjusting the tension used to change that effect would be another choice. Yarn use and personal taste contribute to a range of “successful” results when using any of these techniques.
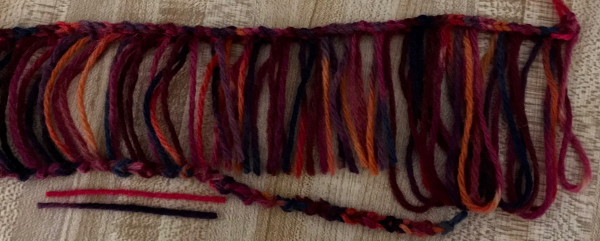
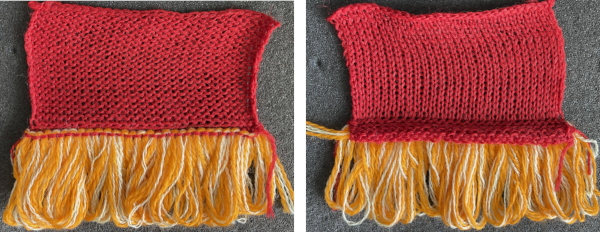
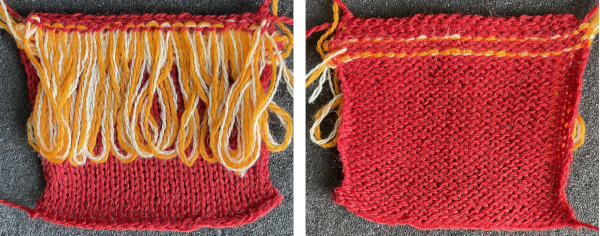
 At the top of the piece, I transferred and doubled up the stitches on left, bound them off, and the yarn end(s) can be woven back into the cord.
 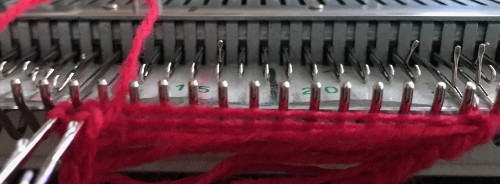 The side with the transfers is the “public” one, the finished fringe is usually hand sewn on, but it may also be used to cast on or be applied to several places in the knit both close together or at various intervals. Tension changes may be observed viewing from left to right, as well as the difference in length of loops as opposed to after the cutaway edge. The third stitch in work on the right may make for a more stable cutting line if looser tensions are preferred. Because the sinker plate used on the single bed has brushes and wheels in use, the width of the fringe can be considerable, without having to be concerned about stabilizing the center as it is when working on the double bed.
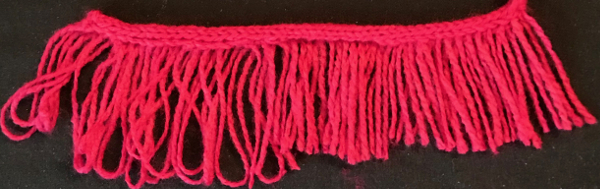
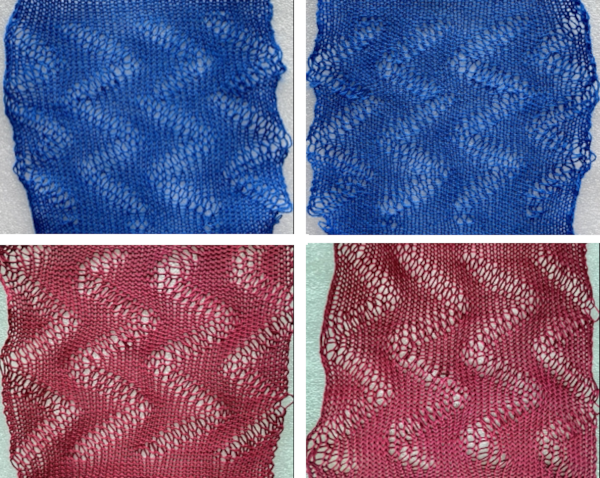
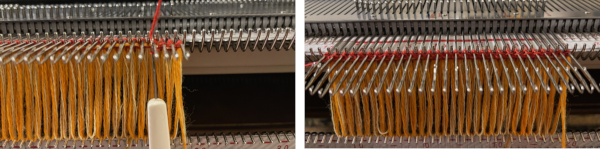
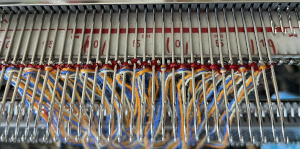
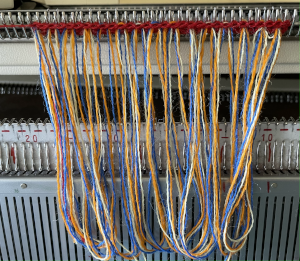
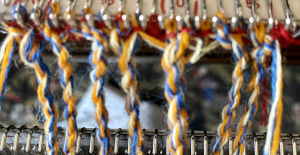
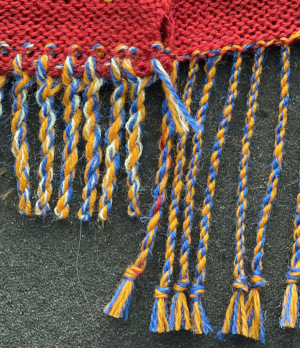
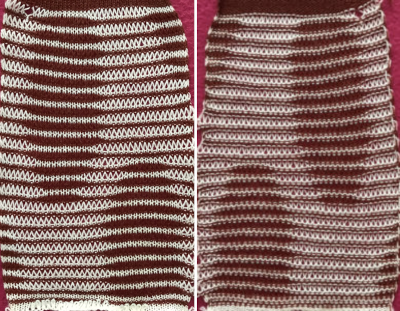
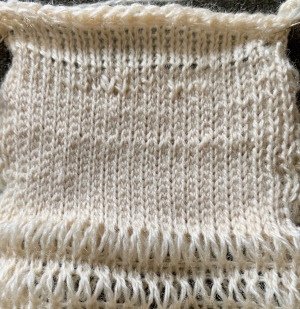
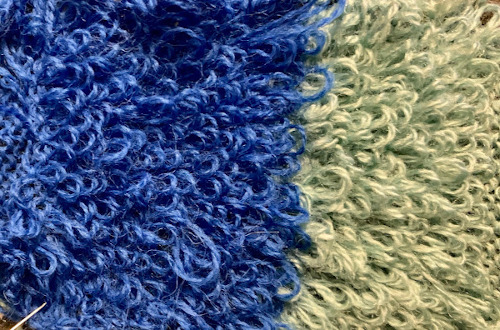
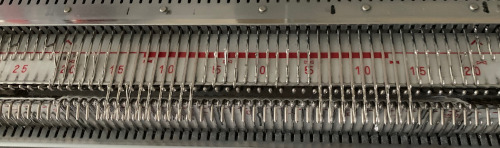
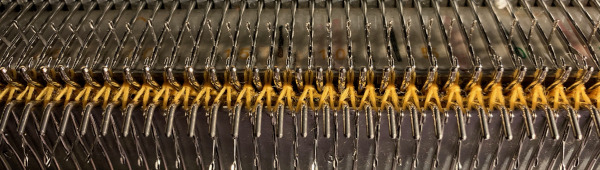
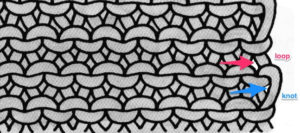
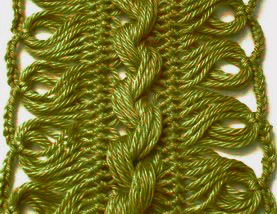
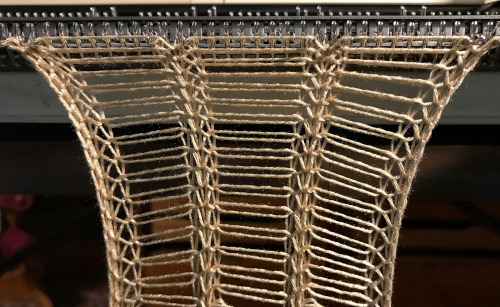
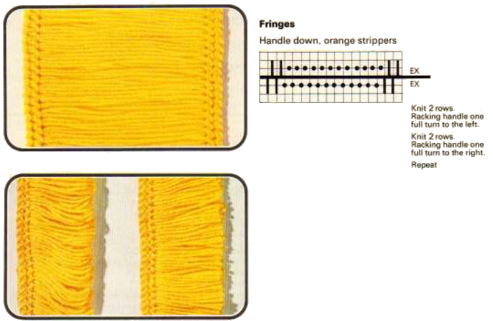
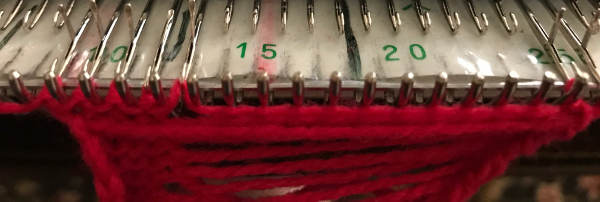
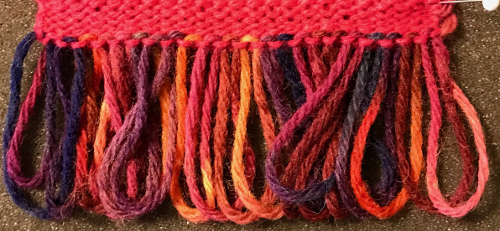
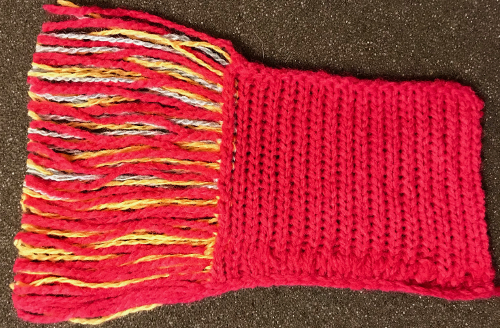
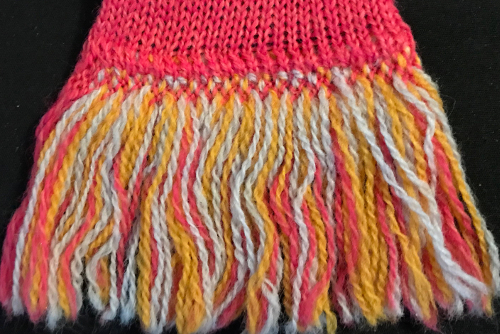 Long loops are best in a thicker yarn, here they are shown in an every other needle arrangement using mohair on 2/8 wool ground
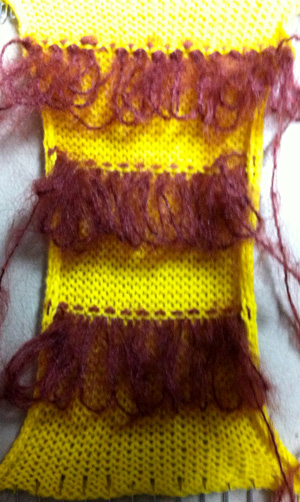

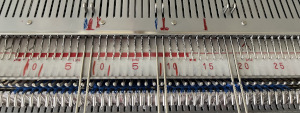
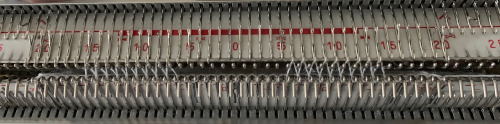
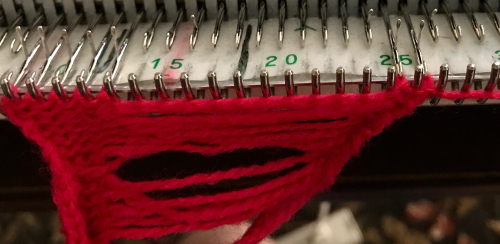
 With ribber in the down most position (4.5 cm loops)
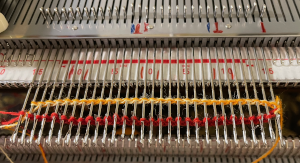
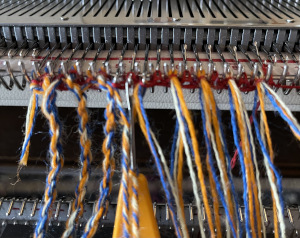
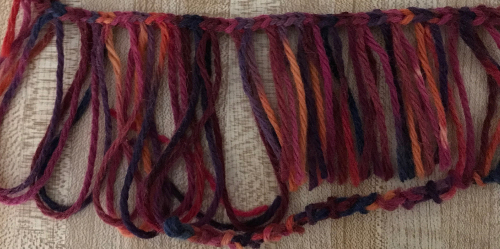
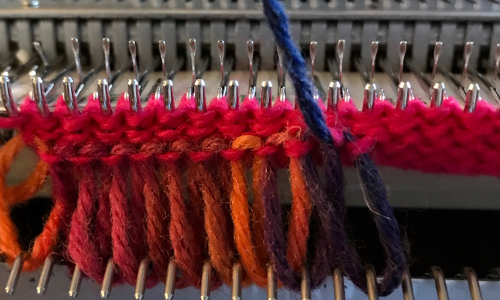
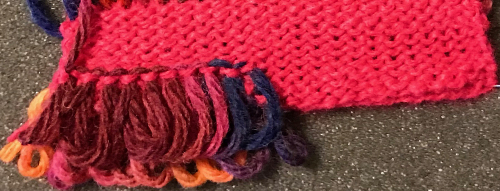
 In this case, knitting ended opposite the fringe, only these stitches were bound off, not the single one on the far right
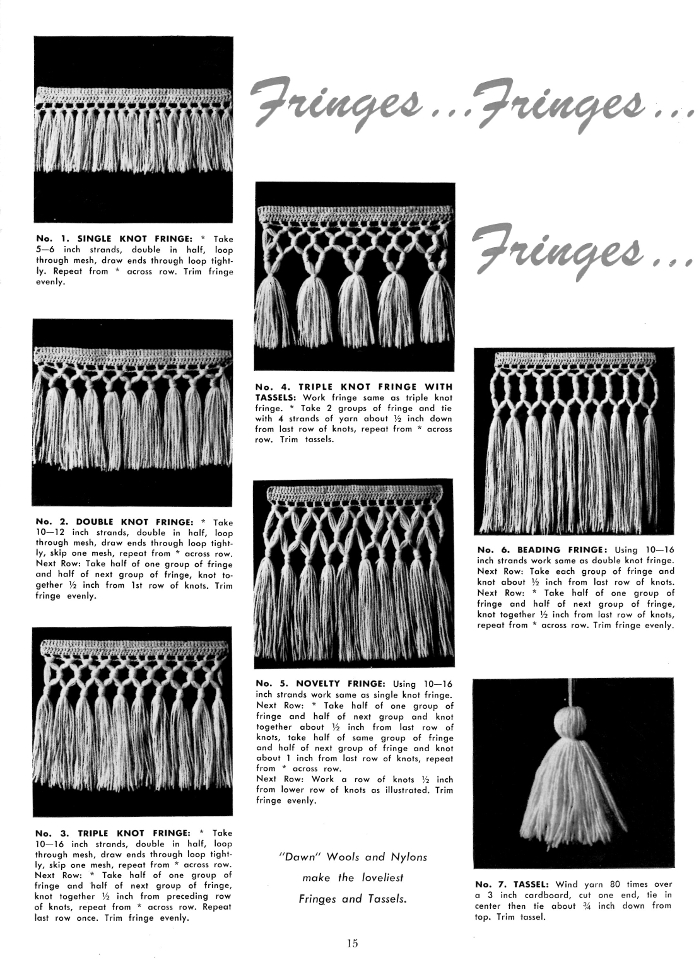
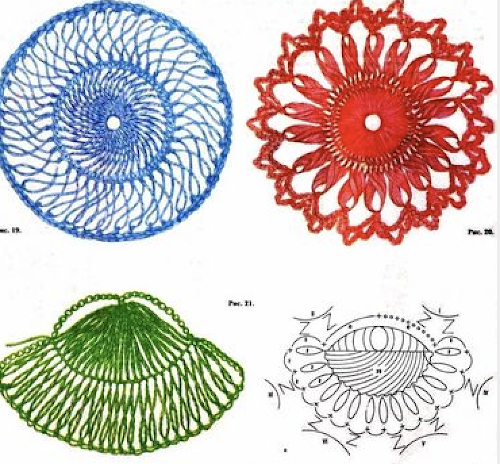
 Cut lengths of yarn may be added to edge or in the body of the knit, eyelets could be used as markers or for an all-over fabric, guiding placement. This illustration is from
 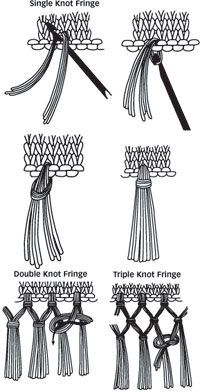 Fringes could also be crocheted or hand-knit, used to cast on the piece or be stitched in place upon its completion. I do not have the source for this, will credit it if I can find one