In online forums, many knitters, often beginners, bring up questions about the best methods to cast on and bind off on their varied knitting machines brands, and problems they encounter, which led me to this review with the addition of more information.
The content will be another work in progress, subject to further editing and the addition of more photos and documentation.
Previous posts on the topic:
More shapes on ribber fabrics with tuck patterning, fantasy fair isle ribber latch tool bind off 2/22
Ribber cast ons: breaking the “rules” 12/19
Ribber cast on comb/ open stitch single bed cast on 2/17
Binding off, double bed 4/19
Casting on, double bed 5/19
Casting on, binding-off single bed 5/19
A look at single bed mock rib 1/17
Picot cast on for every needle rib 11/15
Racked ribber cast on and rib configuration tips 11/15
Transitions in ribbing from EON to FNR fabrics 11/15
The Brother Making Garments Book  has clear, step-by-step illustrations for many techniques.
This information presents some of the same techniques as illustrated in the previous post on casting on and binding off the single bed in a different visual sequence.
The starting side for any knitting technique does not often matter. Some exceptions are: starting from the left for preselection rows when knitting 2 color dbj using the KRC button in electronic machines, and when the carriage needs to operate to and from the right, from right to left when the color changer is in use in patterns that require color changing every 2 or even number of rows.
The weaving cast-on leaves open stitches at the start of the piece, with the yarn traveling through them.
The weaving brushes need to be engaged, down position, and levers up.
It is not necessary to deactivate them by raising the levers, I tend to do most of my knitting with them in the brush-down weaving position.
Check that they spin freely, not only can fluff get caught between the bristles but sometimes under the brush itself, keeping it from rotating properly and resulting in weaving fails whether during this cast-on or when knit-weaving in pattern.
1. Begin with the lever down, brush up, loosen, and remove the screw
2. with the lever up, the brush will slip out right side up, turned over, 3, will show any fluff or threads wrapped around it. Remove the accumulated fibers, and if any bristles are poking out of place, pull them out or clip them with scissors
4-5. lever up, slide brush in place
6. with the lever down, brush up, replace the screw, and as with any screws, do not over-tighten, check that brush spins freely. BTW screws in knitting machines both Japanese and European are metric, a set of metric screwdrivers is very useful. 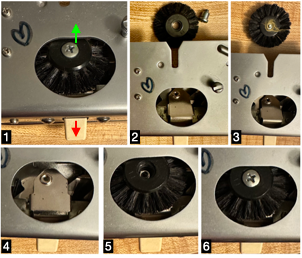 This is not a permanent edge, is handy when beginning with waste yarn, and if the piece is to be gathered at the center, the yarn end can be pulled, threaded into a needle, and passed through the open stitches again if needed, and secured.
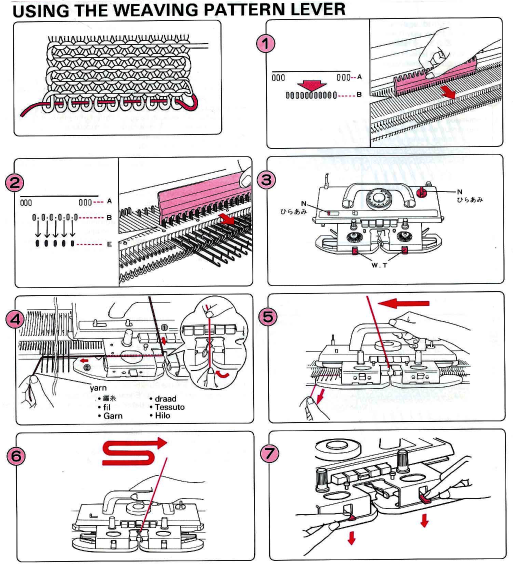
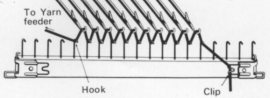
The Brother single bed cast-on combs, shown used immediately after the first cast-on row, are strictly a Brother thing. It is possible to continue knitting without them. My first machines were other brands and offered nothing like them.
If stitches do not immediately knit off properly, after any cast-on, bringing the needles out to hold position for the first 2-3 rows will generally solve the problem.
When I do use them I prefer to point their hooks toward the top bed rather than away from it
 EON e wrap cast on: forms a permanent edge that may also be used in decorative joining of pieces.
After e wrapping every other needle, in this case from left to right, place the yarn in the knit carriage A feeder and close the gate.
When inserting the comb front to back, the yarn end on the carriage side is easily caught in the hooks and would form a long loop on that side if knitting is continued  to avoid that, in any cast-on, lift the yarn up and over the gate pegs on the carriage side
 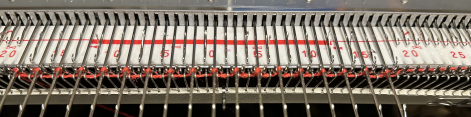 insert the comb, free the yarn from over the gate pegs
 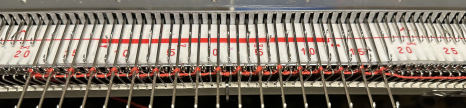 make the first carriage pass to the opposite side, the empty needles will pick up loops, eyelets will be formed as knitting continues
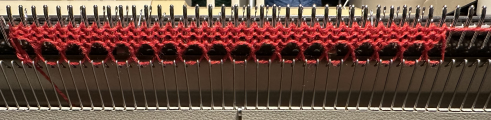
Every needle (EN) E wrap cast on creates a permanent edge. 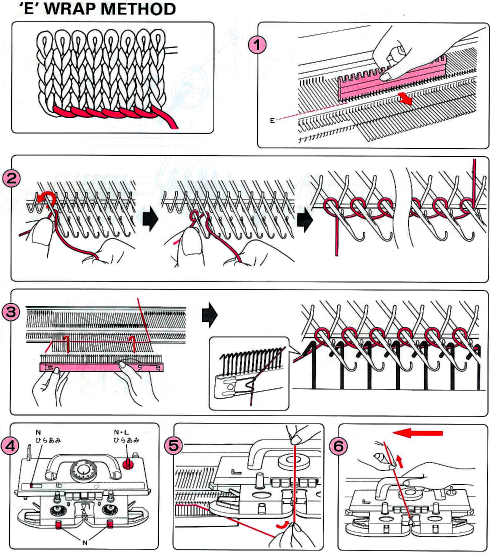 Using the needle bind-off method at the top of the piece will closely match the cast-on edge.
The crochet/ latch tool cast-on is my preferred one when decreasing multiple stitches as well. 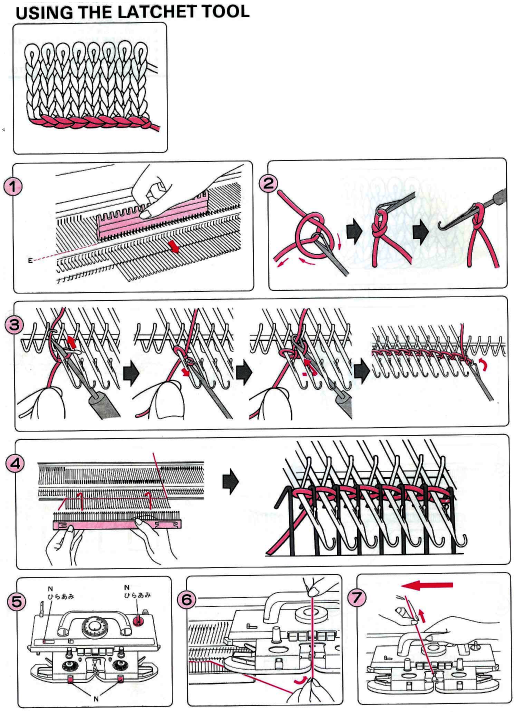 I prefer to lift the last single chain onto the last empty needle on the carriage side rather than continuing the chain and lifting the last open stitch onto it.
The latch tool bind-off around gate pegs will match its appearance. Both can be performed to create looser chains when needed.
Multiple decreases on both sides of a garment may be achieved by casting off the stitches opposite the carriage side using a separate strand of yarn using your favorite bind-off. My go-to is the crochet one.
In fair isle knitting, bringing all needles out to the E position opposite the carriage before knitting the row will ensure those stitches will be knit in a single color, for easy bind-off when the carriage reaches the opposite side, and 2 color knitting can resume.
A youtube video was shared on FB for a version of this bind-off, filmed on a Studio machine, suggesting it might be easier to use for knitters with hand or wrist problems.
On Brother machines, small tests are executable without the use of waste yarn and ravel cord.
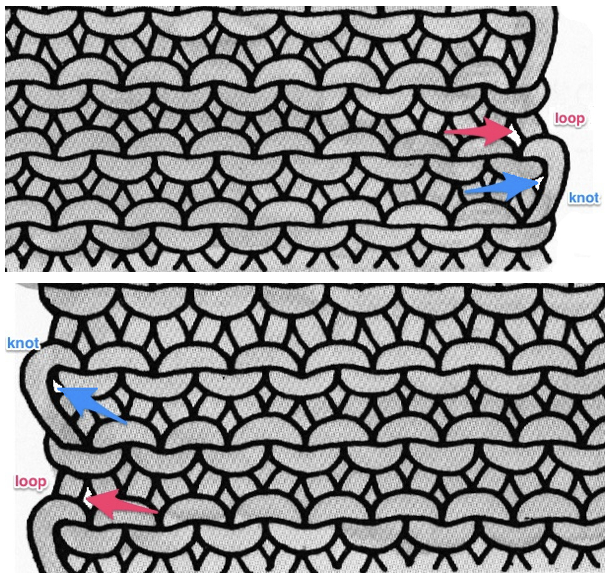
The technique takes into consideration the formation of the side edge stitches illustrated here for single stitch increases. When bringing one empty needle into work opposite the carriage, the yarn will twist and form a “knot” as the carriage moves to and from the opposite side. Knots (blue arrows) vs loops (red arrows) are shown in this illustration from the post on seam-as-you-knit
 Part/slip cast on: a single needle will be brought into work at a time opposite the carriage.
Use a familiar yarn, and set the tension one to two full numbers tighter than that appropriate for it in stocking stitch.
COR: set the knit carriage to slip in both directions
Opposite the carriage, bring the first needle on the far left of the intended group to be worked out to hold/E position.
As the knit carriage moves from right to left, the needle in the E position will knit and is returned to the B position.
COL: No knitting occurs as the carriage moves and returns to the right, that same stitch or any stitches in B will simply be skipped.
COR: Bring the second needle from the left out to the hold/E position.
As the carriage moves to the left the needle in the E position will be the only one to form a knit stitch and is returned to B.
COL: All stitches are slipped as the carriage moves and returns to the right.
Repeat the process, bringing single needles out to work moving from left to right until the cast on is complete.
Begin to knit the body of the piece slowly, making certain all stitches are formed properly.
Part/slip cast off :
Knit the last row at main tension, and end COR
Set the carriage to slip in both directions so that needles brought out to hold position will be knit.
Turn off any patterning mechanism, in Brother set the change knob to N-L
Hang a claw weight on the right.
Transfer the first stitch at the right onto the needle on its left, and pull that needle out to hold/ E.
As you move the carriage to the left the needle in the E position will knit, as it returns to the right the needle will be skipped.
COR: repeat the process beginning with the next needle on the carriage
side.
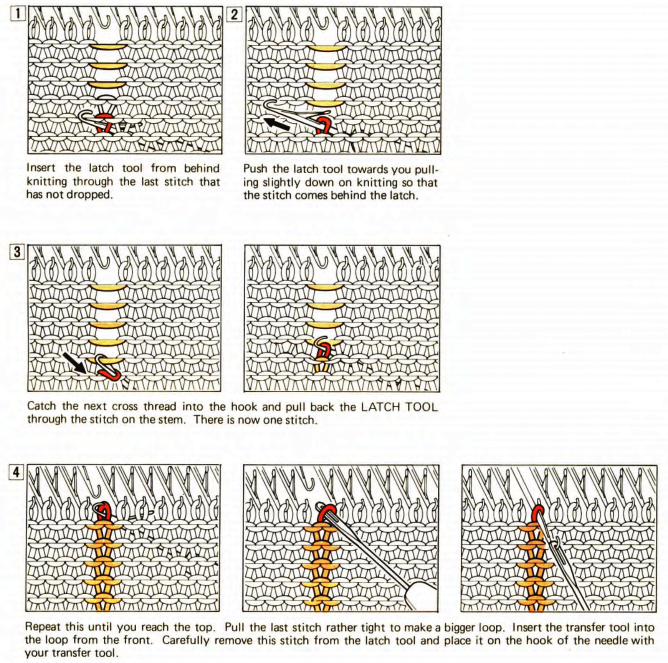
To pick up dropped stitches: 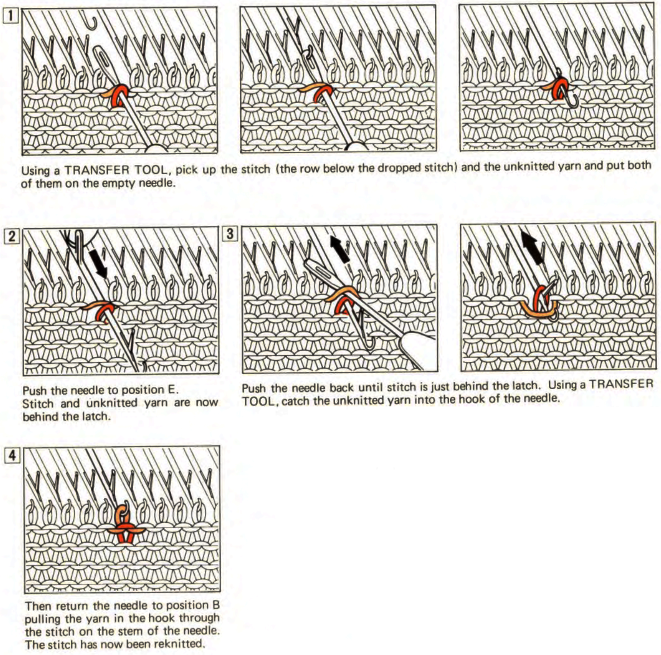
 Two stitches dropped side by side :
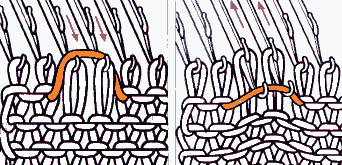
From the KH 800 manual: ![]()