Ribber manuals usually give instructions and diagrams for ribs, and in some early manuals, the way in which the needles should be set up so that side edges will match the when garment bands are seamed is not included.
In later model manuals, instructions began to call “perfect selvages”.
The position of the beds in relation to each other is dependent on the pitch lever. When both beds are being used, both the pitch and racking levers may be moved so that the ribber can travel one or half turns in either direction. A half turn is sometimes used to set up the position for some accessories, or may simply be what works best in the specific knit fabric and yarn.
If traveling between Japanese brand instructions, some of the names for parts differ.
Brother 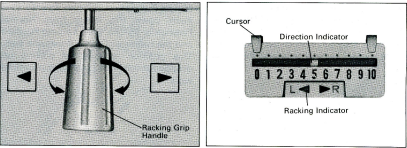 Studio or Silver Reed:
A: half pitch lever, B: swing handle, C: swing indicator 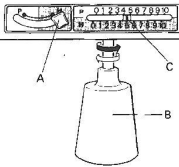 Not leaving out the Passap: the racking handle and racking indicator
  The Passap racking handle moves in a circular direction, clockwise or counterclockwise.
On the Bulky machines, after the zig-zag row, consider ladderback arrangements for less thick and stiff double bed work.
If the bulky rib was to be applied to single-bed work, I was never happy with direct transitions on the machine. Hand-knitters have some advantages when owning a range of needle sizes and types. One option then is to start on waste yarn, end with a row of ravel-cord, and begin the piece on open stitches. Upon its completion, pick up the open stitches on an appropriate size knitting needle, and knit and bind off the rib by hand.
If only the look of the cast-on row is not pleasing, another option can be to start ribbing after waste yarn configured to the necessary needle arrangement, ending with a row of ravel-cord and beginning the rib on open stitches while leaving a length of yarn for binding it off later.
After completing the piece, pick up the open stitches with a small gauge double-point knitting needle for added ease, but use an appropriate size hand knitting needle for binding off in rib configuration.
When choosing to leave a length of yarn for binding off a previously knit piece of fabric, wrap around all needles in work a minimum of four times, wrap it in a small bundle and secure it with yarn or another small tie, or wrap it around a bobbin like those used in embroidery or intarsia.
The third circular row is not needed after the zig-zag row and placement and addition of weights in ribber cast-ons. It actually will form a small float on one side of the fabric that will show if that side becomes the knit face of the finished piece.
That third row is recommended here, as in most pubs, in Brother Ribber Techniques.
The first setup given does not include any transfers between beds 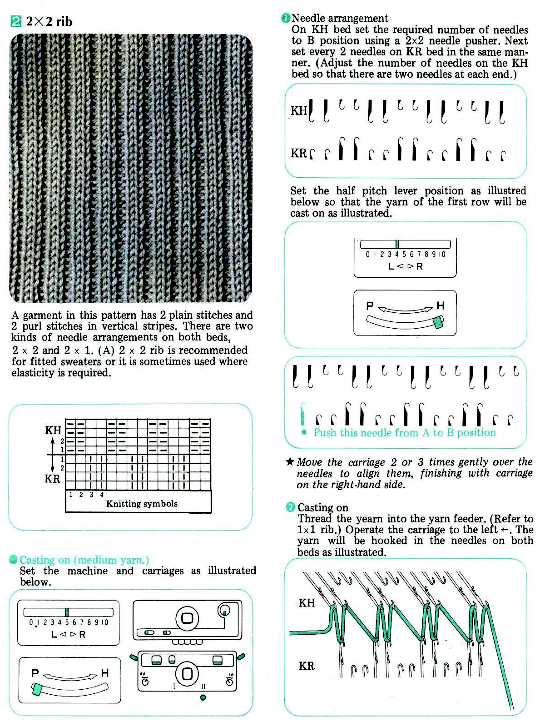
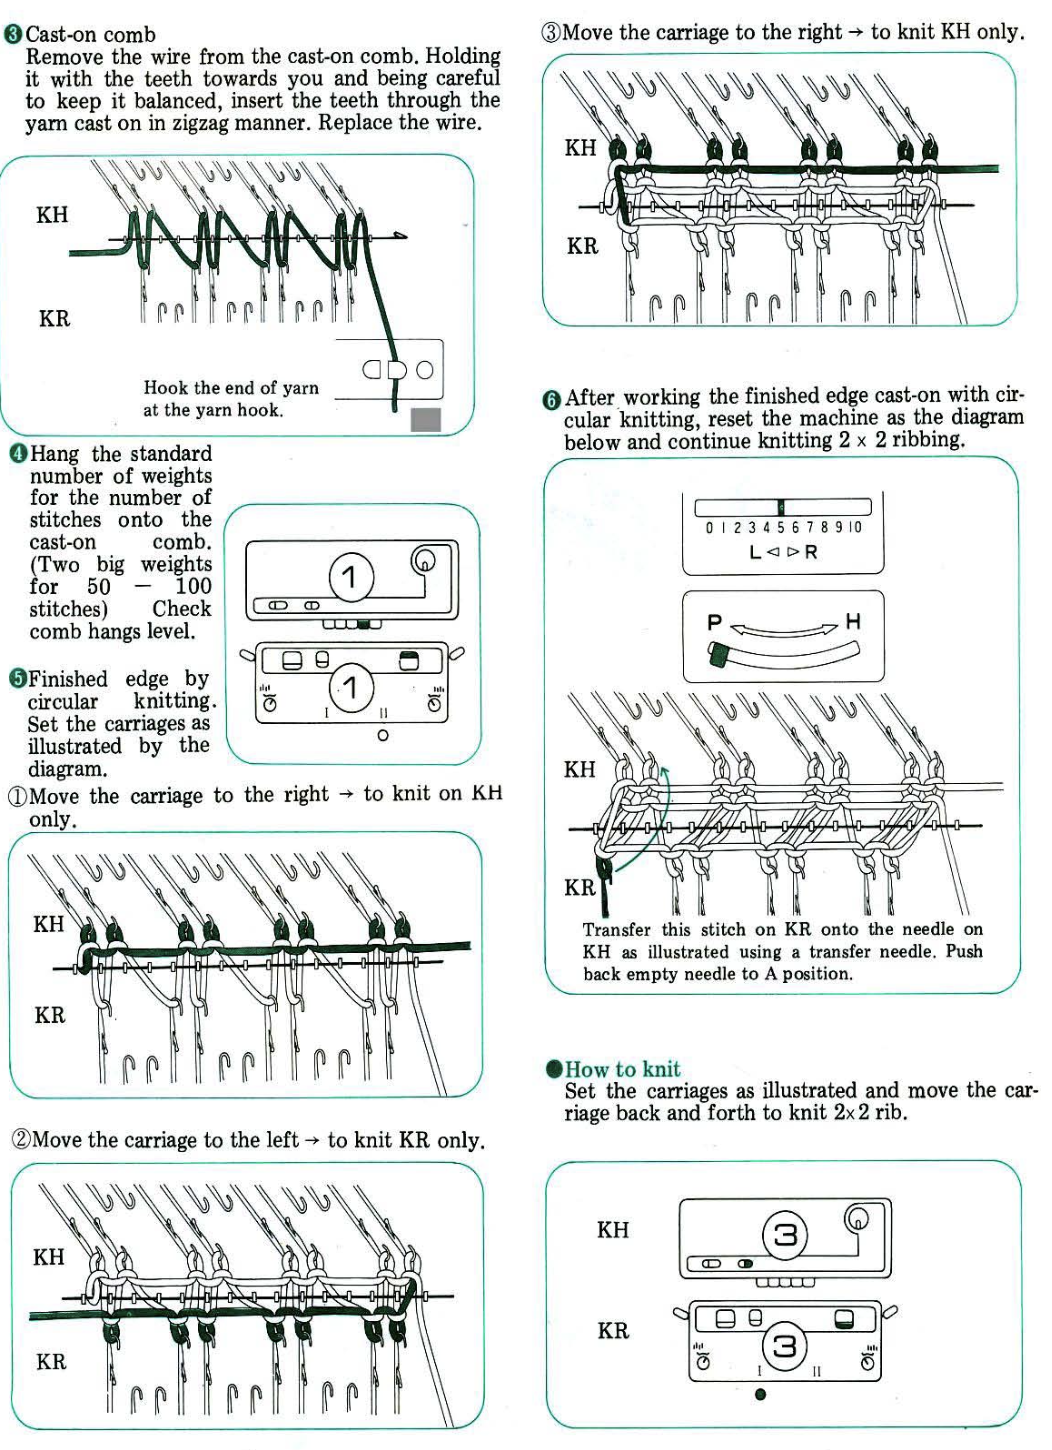
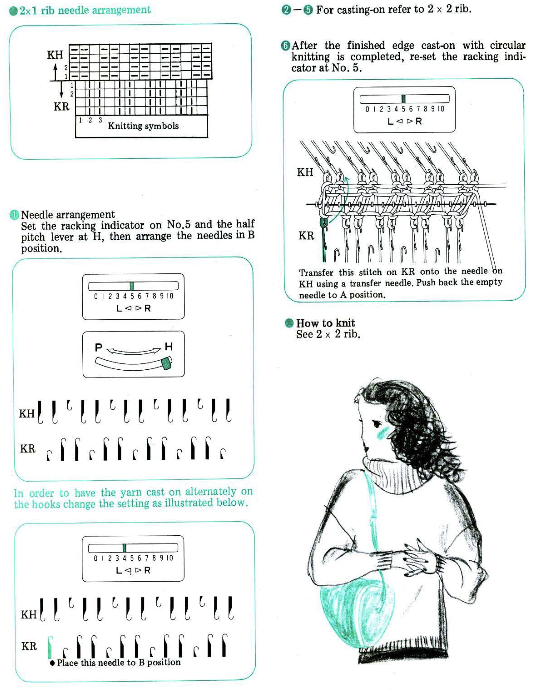 The rib with transfers recommendation results in a commercial-type rib which is used when the garment is to be knit entirely on double beds or when using fine yarns so that stitches are brought closer together, resulting in less distortion. Its use can make ribbed bands appear narrower than the remaining part of the garment, with no buckling or distortions after the technique change, while allowing the needed stretch.
There are other arrangements that will form ribs that lie flat and make better joins when used ie as bands in cardigan fronts.
Test swatches should include transfers to the final fabric bed arrangement, whether single or double followed by treating the swatch as one would the final piece before calculating the gauge and committing to a garment or even an accessory.
Begin with a zig-zag row and tension suitable for the yarn being used, and knit 2 circular rows.
At this point, stitches are transferred. If the fabric is to be used with the purl side facing transfer stitches on the ribber, for the knit side facing make the transfer on the main bed.
In this post, it is assumed that the knit side will be worn on the outside in each case. Seaming edge stitch allowances are taken into account.
The tension used after any final transfers to the opposite bed will need adjustment based on the yarn thickness, twist, and machine being used. It is wise to begin any experiments with familiar yarns.
The racking lever position is recommended to be set to 5 prior to any cast-on. Other positions may be used as long as the ribber can still be moved by one to one-and-a-half positions to either the right or left if there is any reason to do so. Passap markings are different. When racking I found it easier to mark its bed with my own numbers since I usually work out most of my patterns on Japanese machines. They do not apply if any reader technique racking numbers are in use, since any console prompts are based on the manufacturer’s sequencing. 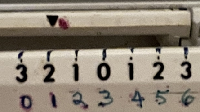 A practical reminder from Silver Reed: do not turn the swing/racking handle on any Japanese machine with all needles up to D on both beds on a serious collision course.
  It can sometimes appear easier when making transfers to have needles point to point. If that or another bed adjustment is made to any personal preference, keep the desired final setup in mind, and before continuing to knit, check that the machine is set for half pitch.
Prior to casting on bring the main bed needles into work. Bring the same number of needles into work on the ribber, plus an extra needle on the right.
On Half pitch, H, for knit side facing, transfer stitches from the main bed to the ribber for a 1X1 effect. The number of needles in work on the main bed should be a multiple of 2+1. After the transfer, adjust the tension settings. The pitch remains on H ![]() For a 2X2 effect, the cast-on method is the same, with every 3rd stitch transferred down to the ribber. The number of needles on the main bed should be a multiple of 3+2
For a 2X2 effect, the cast-on method is the same, with every 3rd stitch transferred down to the ribber. The number of needles on the main bed should be a multiple of 3+2 ![]() When the band is complete, all stitches may be transferred up to the top bed and the piece continues in single-bed knitting.
When the band is complete, all stitches may be transferred up to the top bed and the piece continues in single-bed knitting.
Straightforward two-by-two bands knit and applied as a long vertical strip will want to curl when joined to a knit. Modified commercial rib variations will produce far better results.
If a sideways application is chosen, after all the stitches are transferred to the top bed, knit a row before applying the band by the chosen method. This row may appear as a stitching line on the finished piece.
Other variations: here the number of needles in work on the top bed must be a multiple of 4 +1
with half pitch on H bring needles into work on both beds ![]() A single needle on each bed seen here on the left, remains in place until the cast on is complete
A single needle on each bed seen here on the left, remains in place until the cast on is complete ![]() the ribber is racked to the left, half pitch now set to P, those 2 end needles on the left of the above chart are moved to make the edges of the work identical
the ribber is racked to the left, half pitch now set to P, those 2 end needles on the left of the above chart are moved to make the edges of the work identical ![]() With a multiple of 3+1 needles in work on the main bed, begin with every needle, on half pitch
With a multiple of 3+1 needles in work on the main bed, begin with every needle, on half pitch ![]() the ribber is moved 1 whole position with the racking lever to the left, the end stitches on the above left are moved so as to produce identical ends.
the ribber is moved 1 whole position with the racking lever to the left, the end stitches on the above left are moved so as to produce identical ends. ![]() The post Seaming, joining, picking up stitches 3, ribbed knits offers suggestions on seaming techniques.
The post Seaming, joining, picking up stitches 3, ribbed knits offers suggestions on seaming techniques.
Vertically worked bands require their own small gauge swatch. The weighing of a small strip is bound to differ from that distributed across a wider band ie that at the waistline, and the results need to be calculated accordingly. The same consideration is a factor in shaped sleeves vs. sweater bodies.
End the bands with waste yarn, then if too many rows have been knit they can be unraveled, or if more are required the stitches may be rehung on the machine for continued knitting.
Apply bands to garment pieces that have been allowed to rest.
Some binding-off methods have been discussed in the post on binding off on the double bed.
Binding off ribbing sparks discussions on which way is best, especially if both the cast-on and bound-off edges are both visible and the hunt is on to get them both to match.
To review, bind-offs may be done in a multitude of ways on the machine by transferring stitches between beds or leaving them where they are, as well as working them after removing the knit from the machine on waste yarn.
Instructions abound in hand-knitting pubs and machine-knitting demonstrators talk about smiles-and-frowns visualizations including in some youtube videos when discussing tapestry needle-sewn bind-offs.
There are techniques that can accomplish similar effects with the knitting still on the machine as long as there is room to jump up several tension numbers before knitting the last row with both carriages from right to left.
The drawback I find using a tapestry needle with the work when it is off the machine is managing the length of yarn necessary in pieces wider than demonstration swatches.
The process may be easier for some if the work is taken off the machine and onto a hand-knitting needle, preferably a double-pointed one with needle stoppers available. Any hand-knitting illustrations or videos then become easier to follow.
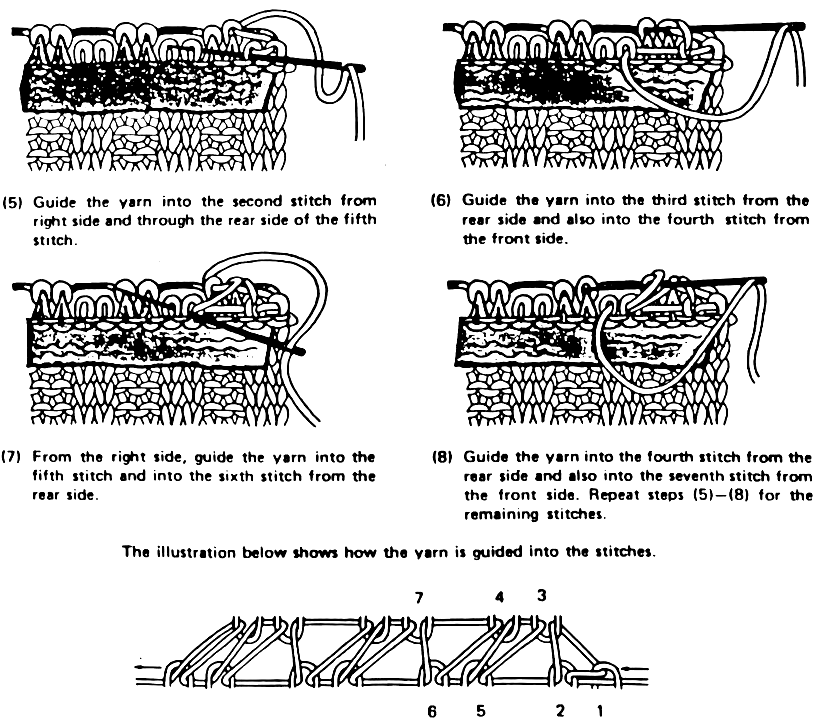
With a tapestry needle, one inserts the needle as if to purl into the first (knit, cyan) stitch and as if to knit on the second (purl, yellow), both stitches are left on the needle.
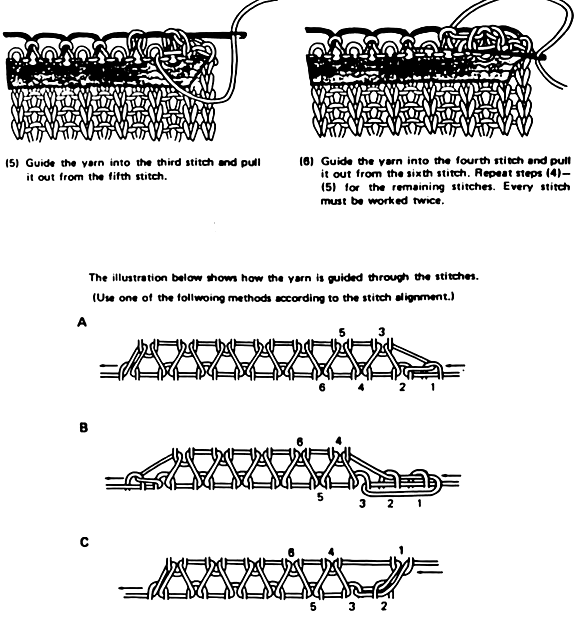
The first stitch is then “knit off” and the needle is inserted into the next stitch (knit) as if to purl. Both stitches are left on the needle. Repeat steps 1 and 2. I used to suggest my students think up ditties for repeated actions, here it might be “purl into a knit and knit into a purl”. 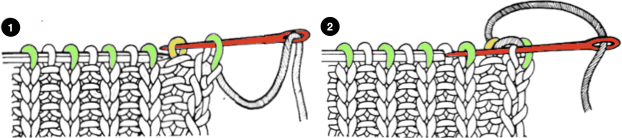 The steps after the work is scrapped off on waste yarn
 bring up discussions on how best to scrap off.
The missing how-to preparation for binding off:  When the rib is completed, transfer the stitches on the ribber up to the main bed, pulling needles out to E as you move across the bed
![]() Cut the yarn, leaving an end long enough for binding off.
Cut the yarn, leaving an end long enough for binding off.
Remove the ribber arm, exchange it for the standard sinker plate, place a contrasting color yarn in feeder A and secure it.
My test piece ended COR. Push in the cam button for slip stitch corresponding to the direction in which the carriage will move on its next pass, in this case, the left one. Another option is to simply push in both.
As the carriage moves to the opposite side, what is now identified as knit stitches will knit, and the B position needles will be skipped, creating a float.  Knit at least 10 rows in the contrast yarn. No ravel cord is needed as knitting ravels down easily to be removed.
  When the piece is scrapped off, the all knit rows will roll nicely to the back of the swatch, and the rib can be stretched easily, with the top of the knit and purl stitches easily identified for sewing.
  Two by 2 ribs with stitches transferred to a hand-knitting needle:
 Using the same waste yarn scrap off keeping as for the one-by-one rib, but keeping the two-by-two needle arrangements when setting the knit carriage cam buttons to slip:
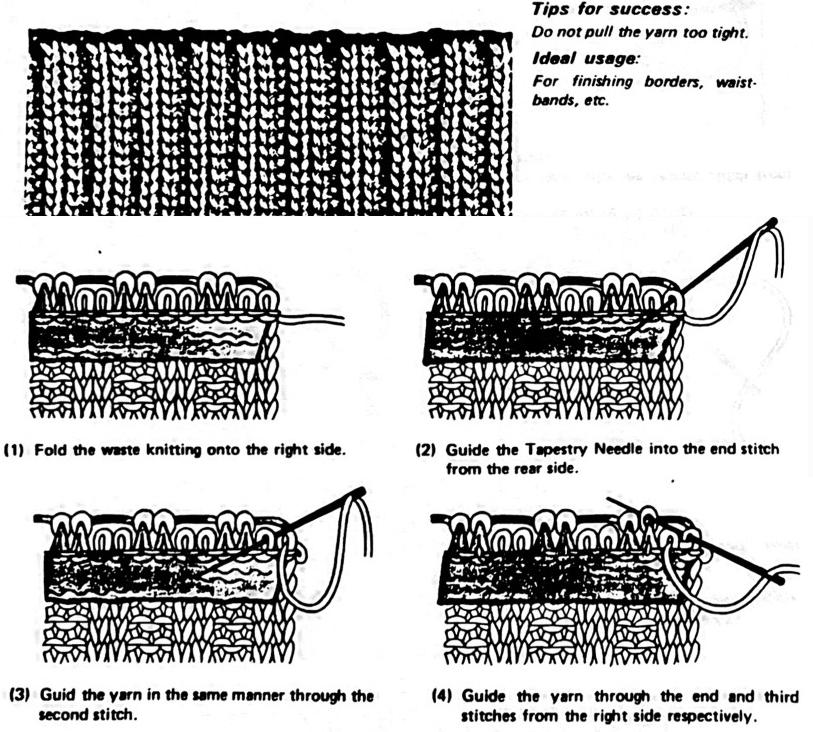
The collection of posts on casting on, binding off, and seaming ribs
Casting on, double bed
Ribber cast ons: breaking the “rules”
Picot cast on for every needle rib
Racked ribber cast on and rib configuration tips
Ribber trims 3: one trim, four variations
Ribber trims 2
Ribber trims/edgings 1
HK trim as MK edging
Binding off, double bed
More shapes on ribber fabrics with tuck patterning, fantasy fair isle
Seaming, joining and picking up stitches 3, ribbed knits
Twisted headband meet fisherman rib, seaming, variation ideas
Seaming, joining, and picking up stitches on knits 2
Transitions in ribbing from EON to FNR fabrics
When no ribber is available, single-bed mock rib
The method you describe is a good one to add to the more common ones. It becomes easier to execute after a bit of practice. A sketch for the wraps is provided in my post on casting on the double bed.
I like to start ribbing with a double bed e-wrap. Advantages: No need to rack the beds, and it can be used for almost every needle set-up, even odd ones.
Starting at left, I wrap the back bed counterclockwise and the front bed in clockwise fashion. All needles are in E position. After knitting one row, I hang DB comb and weights.
I do, however, hardly ever knit FNR patterns. The method may be less suitable for FNR.