Ribber trims 2 presented a series of ideas for edgings I meant to return to. Rather than adding more to that post presently, I am expanding on the topic here.
Scalloped trims are popular in single-bed knits. Preventing any needles from knitting for any number of rows will form a wave. If automatic needle selection is used, they may be formed using both the tuck and slip stitch settings.
This version from the Brother Ribber Techniques, with knitting directions included in Ribber trims and edgings 1 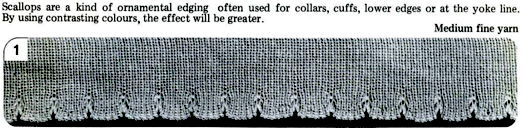 If there is a problem in double bed versions using loops formed by holding stitches or tuck patterning, try completing a tubular cast-on before starting either sequence.
Using tuck stitch rows created manually way can work as a cast-on method:
Begin with a familiar yarn and tensions to form the usual zig-zag row from right to left
Set the ribber to slip in both directions
Bring every 6th needle on the top bed out to hold, and set the knit carriage to knit.  At that point the yarn will be knitting solely on the top bed, so tension needs to be adjusted closer to what may be normally used in knitting it in stocking stitch.
Set the ribber to slip in both directions.
Make at least 4 passes on the main bed, 6 will yield more of an effect but may be hard to manage on Japanese machines while in Passap, the strippers facilitate the process.
My first swatches were knit using 2/8 wool, which pushes the limits for smooth knitting in every needle rib on the 4.5mm machine. After knitting 5 rows the top bed stitches began riding up. 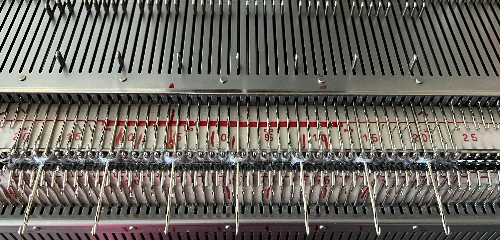 The next row needs to be knit across both beds, sealing the scallop.
Bringing the top bed needles all the way forward can help with that, but to ensure gathered loops will knit off properly, a bit of fiddling may be required, any tool can be used to push down lightly on alternating sides of the loops to keep the stitches to their side from unraveling. 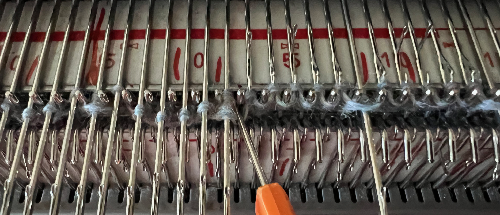 Release the hold lever on the top bed, set the ribber to knit in both directions, and continue in every needle rib to the desired length
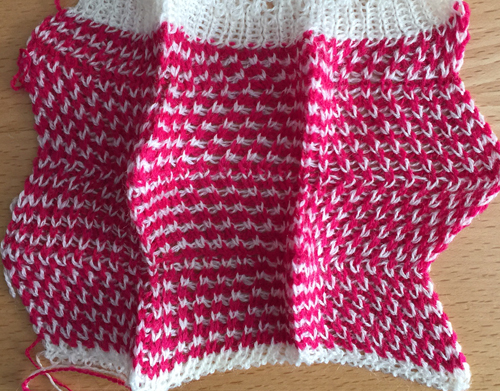
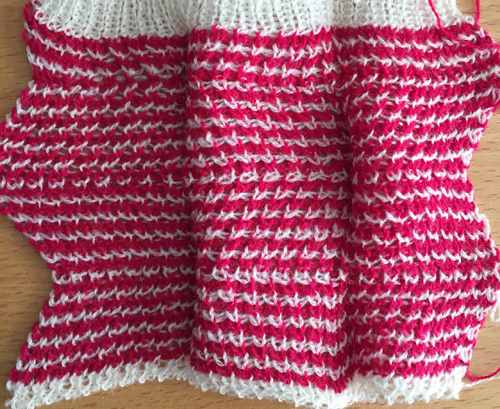
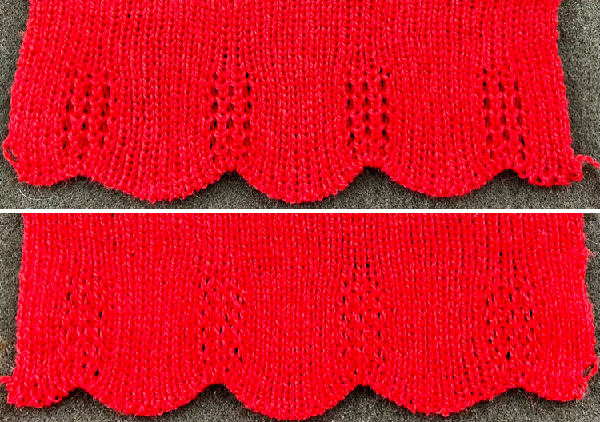
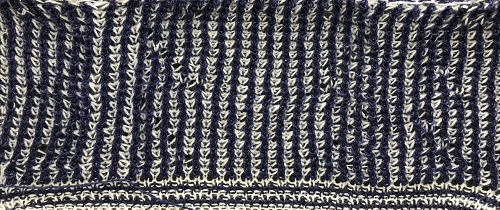
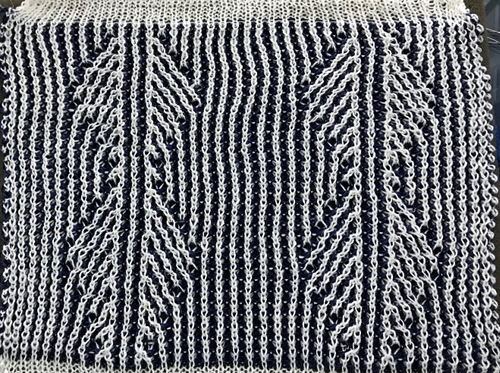
The top images show the result of forgetting to set the ribber to knit, so there are 2 extra all-knit rows on the top bed, the bottom images were knit with the proper setting transition 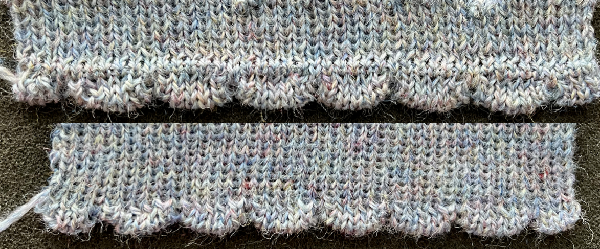 Since the top bed only knits for several rows, the ribber stitches can be seen elongated on this side of the knit
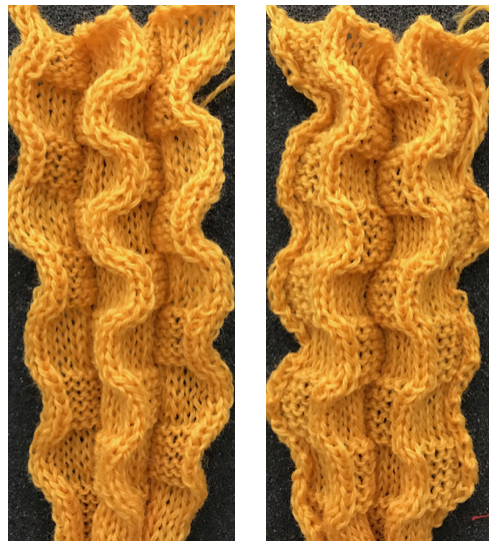
 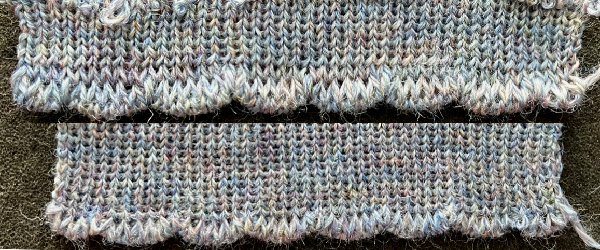 Switching to a 2/20 wool, the same needle spacing, and holding stitches for 6 rows:
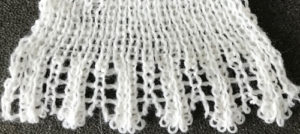
 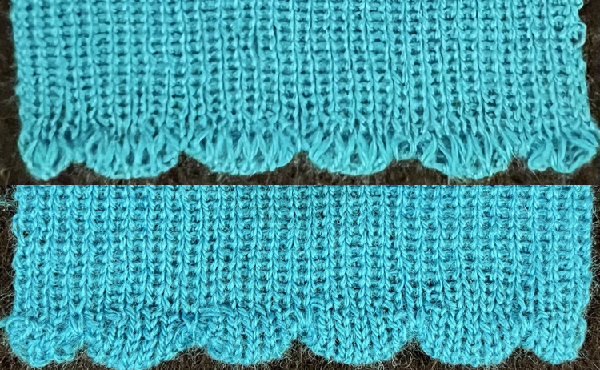 One last fiber switch, a different 2/20 wool shade.
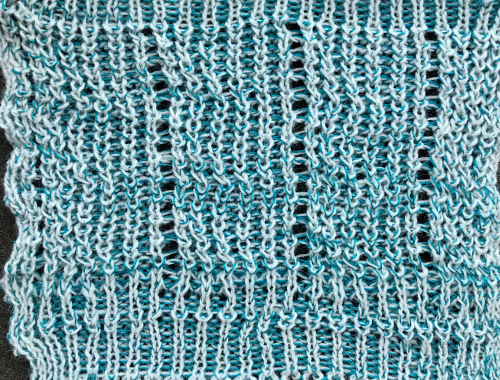
Here the detail is used at the bottom of the stocking stitch swatch rather than a ribbed one.
Watch for loops hung up on gatepegs, seen below in the top swatch.
The scallop shape wanted to turn toward the knit side but did set with some steaming.
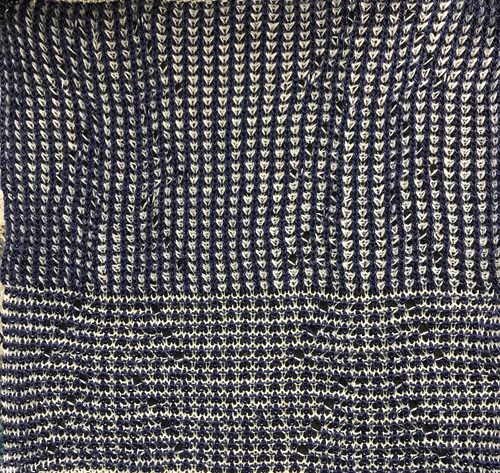
Upon completing the holding sequence, transfer all ribber stitches to the top bed.
The tension in the swatch remained the same throughout, but in the bottom views, a loose joining row (perhaps too loose) was knit after transferring all ribber stitches to the top bed, as is often done for smoother transitions in single-bed hems. After the single loosely knit row, the tension is adjusted set to a number appropriate for the specific yarn in single-bed work. 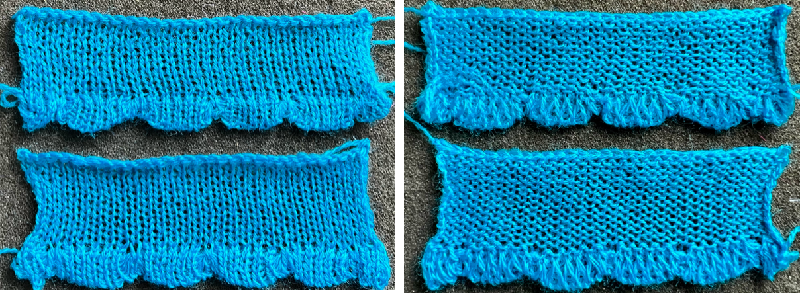 This information and pngs expand on the knit charts in the 2019 post. If the pngs are copied, check that mode has not been altered to RGB automatically, and index back to BW mode prior to downloading them to machines for knitting.
Though, in general, starting side does not often matter, when testing techniques consistently beginning on the same side and leaving a yarn end will help identify which surface is knit facing or purl facing and whether that is of implications in the specific design.
Designing the repeat tiled for the width of the bed when working on electronic machines allows one the opportunity to add all knit borders in specific widths and to program the result as single motifs without concerns about needle placements on the knit bed or how to influence edges.
Punchcard knitters are faced with fixed 24-stitch locations on the needle bed, all knit borders would require manually bringing the needles involved out to E before each carriage pass.
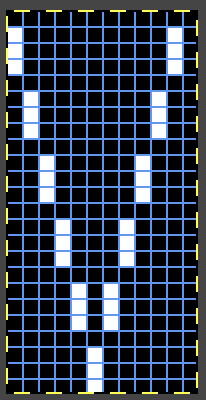
As always, white pixels/unpunched areas tuck, and black pixels/ punched holes knit.
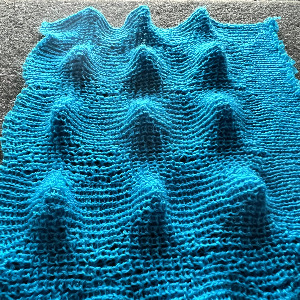
These repeats can make for interesting all-over fabrics as well as serve for edgings that flair and form bottoms that are wavy to different degrees.
12X18![]()
 Knit using a superfine 2/18 merino: the tension on either or both beds may need to be adjusted repeatedly for stitches to form and knit off properly, reflected in stitch size variations here.
 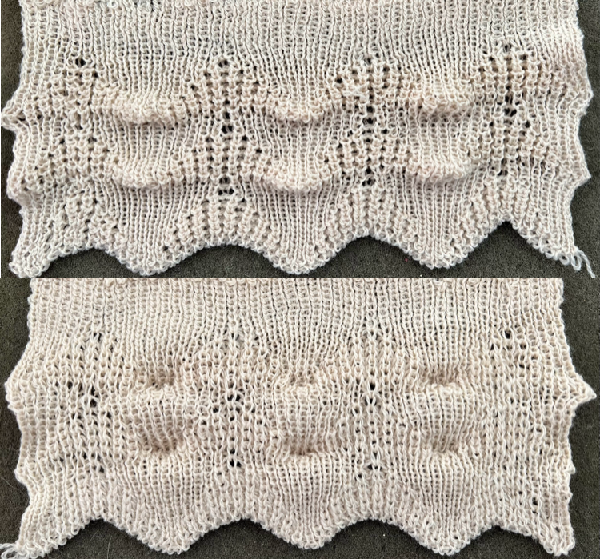 What happens when one is so engrossed with watching stitch formation that the fact that the cone has just run out of yarn is completely missed
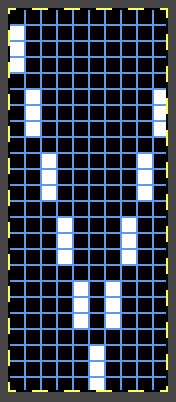
 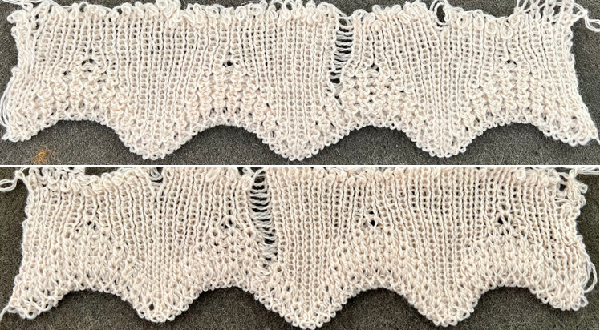 12X24
12X24 ![]()
 Switching yarn to 2/18 silk wool at the same tension produces knit with a very different density and drape. Light bounces off this yarn interestingly, making it harder to photograph in sharper focus.
 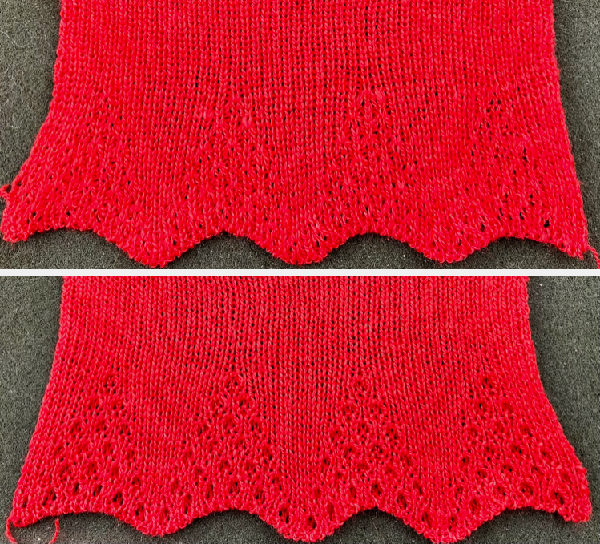 Here the same brand and weight yarn, steamed and pressed lightly, resulting in some flattening of the tuck texture’s 3D effect. Different colors or even different dye-lots of the same color in any yarn can behave differently with all else being equal. The relaxed and stretched view
  and an attempt at showing its ruffling effect.
 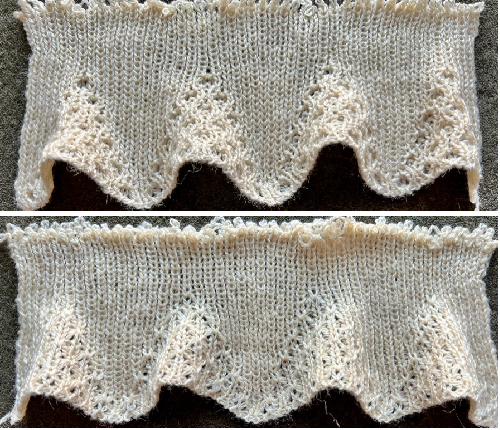 A very interesting surprise: a few years ago during one of my temporary obsessions I developed racked scale-like 3D patterns, this series reflects some of my first attempts
 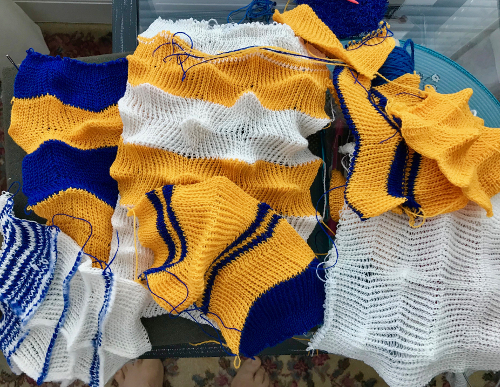 One of several illustrated repeats designed for assistance from needle patterning preselections
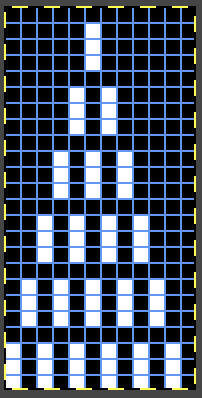
 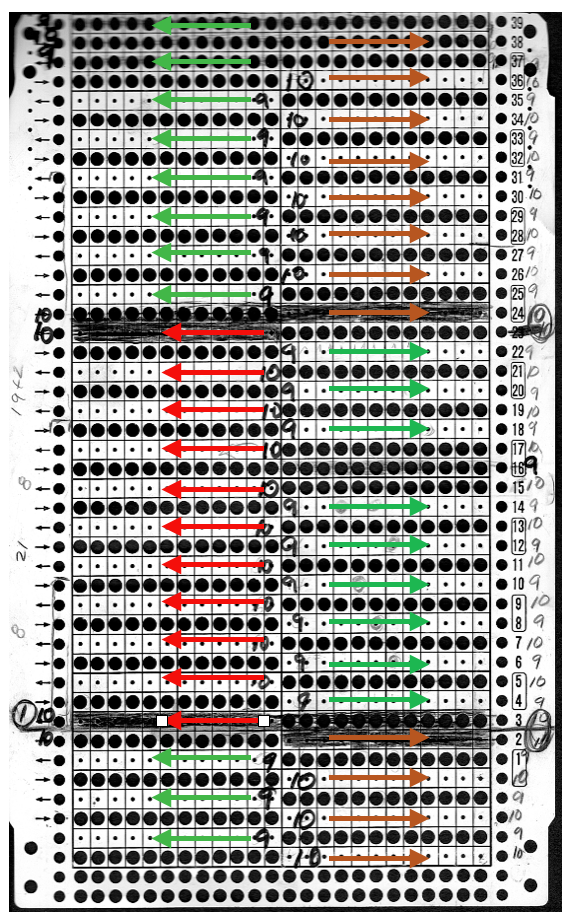 I wondered whether the triangular repeat for the trim above modified to a diamond shape might produce similar results. The proof of concept swatch was far easier to knit, with no racking, and no critical tracking of all-knit row locations than the every needle rib version.
![]()
 12X24, rendered suitable for punchcard use
 ![]()
 The tiled repeat for a sense of resulting pattern movement
 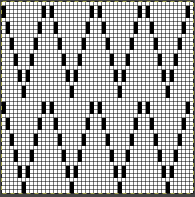 10X24 is missing the single all-knit vertical column seen above
 ![]()
 also tiled for visualizing the pattern’s movement
 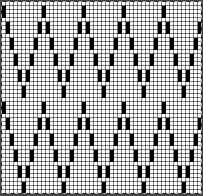 12X12 knit using the tuck setting,
 ![]()
 or the slip stitch setting, making for more subtle results
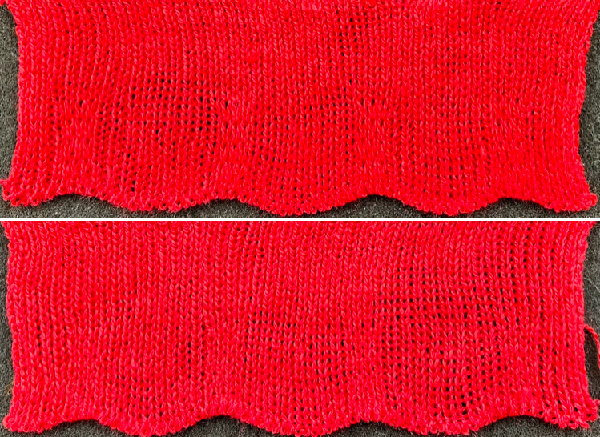
Category: Ribbed Stitches
More on standard and modified 1X1 and 2X2 ribs
Ribber manuals usually give instructions and diagrams for ribs, and in some early manuals, the way in which the needles should be set up so that side edges will match the when garment bands are seamed is not included.
In later model manuals, instructions began to call “perfect selvages”.
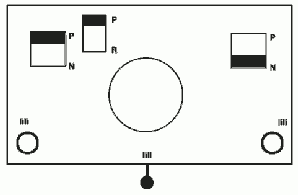
The position of the beds in relation to each other is dependent on the pitch lever. When both beds are being used, both the pitch and racking levers may be moved so that the ribber can travel one or half turns in either direction. A half turn is sometimes used to set up the position for some accessories, or may simply be what works best in the specific knit fabric and yarn.
If traveling between Japanese brand instructions, some of the names for parts differ.
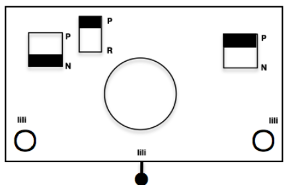
Brother 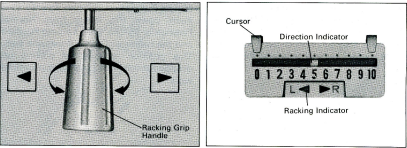 Studio or Silver Reed:
A: half pitch lever, B: swing handle, C: swing indicator 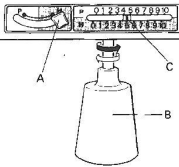 Not leaving out the Passap: the racking handle and racking indicator
 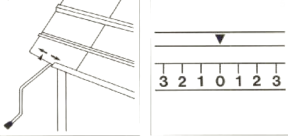 The Passap racking handle moves in a circular direction, clockwise or counterclockwise.
On the Bulky machines, after the zig-zag row, consider ladderback arrangements for less thick and stiff double bed work.
If the bulky rib was to be applied to single-bed work, I was never happy with direct transitions on the machine. Hand-knitters have some advantages when owning a range of needle sizes and types. One option then is to start on waste yarn, end with a row of ravel-cord, and begin the piece on open stitches. Upon its completion, pick up the open stitches on an appropriate size knitting needle, and knit and bind off the rib by hand.
If only the look of the cast-on row is not pleasing, another option can be to start ribbing after waste yarn configured to the necessary needle arrangement, ending with a row of ravel-cord and beginning the rib on open stitches while leaving a length of yarn for binding it off later.
After completing the piece, pick up the open stitches with a small gauge double-point knitting needle for added ease, but use an appropriate size hand knitting needle for binding off in rib configuration.
When choosing to leave a length of yarn for binding off a previously knit piece of fabric, wrap around all needles in work a minimum of four times, wrap it in a small bundle and secure it with yarn or another small tie, or wrap it around a bobbin like those used in embroidery or intarsia.
The third circular row is not needed after the zig-zag row and placement and addition of weights in ribber cast-ons. It actually will form a small float on one side of the fabric that will show if that side becomes the knit face of the finished piece.
That third row is recommended here, as in most pubs, in Brother Ribber Techniques.
The first setup given does not include any transfers between beds 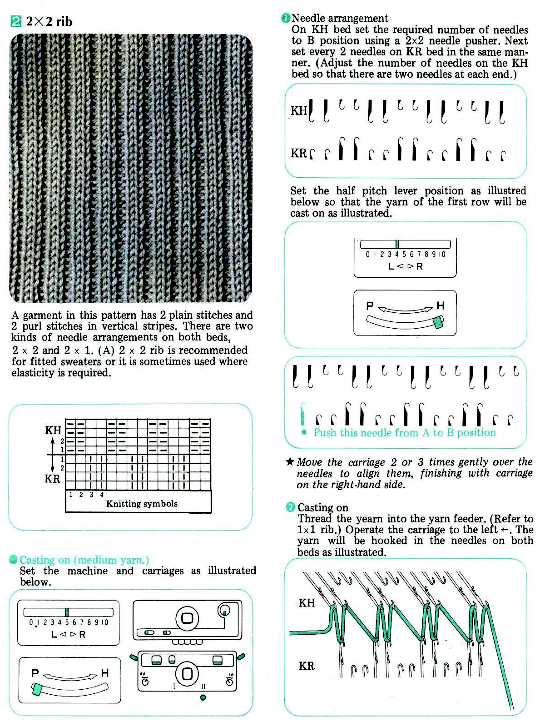
 The rib with transfers recommendation results in a commercial-type rib which is used when the garment is to be knit entirely on double beds or when using fine yarns so that stitches are brought closer together, resulting in less distortion. Its use can make ribbed bands appear narrower than the remaining part of the garment, with no buckling or distortions after the technique change, while allowing the needed stretch.
There are other arrangements that will form ribs that lie flat and make better joins when used ie as bands in cardigan fronts.
Test swatches should include transfers to the final fabric bed arrangement, whether single or double followed by treating the swatch as one would the final piece before calculating the gauge and committing to a garment or even an accessory.
Begin with a zig-zag row and tension suitable for the yarn being used, and knit 2 circular rows.
At this point, stitches are transferred. If the fabric is to be used with the purl side facing transfer stitches on the ribber, for the knit side facing make the transfer on the main bed.
In this post, it is assumed that the knit side will be worn on the outside in each case. Seaming edge stitch allowances are taken into account.
The tension used after any final transfers to the opposite bed will need adjustment based on the yarn thickness, twist, and machine being used. It is wise to begin any experiments with familiar yarns.
The racking lever position is recommended to be set to 5 prior to any cast-on. Other positions may be used as long as the ribber can still be moved by one to one-and-a-half positions to either the right or left if there is any reason to do so. Passap markings are different. When racking I found it easier to mark its bed with my own numbers since I usually work out most of my patterns on Japanese machines. They do not apply if any reader technique racking numbers are in use, since any console prompts are based on the manufacturer’s sequencing. 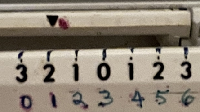 A practical reminder from Silver Reed: do not turn the swing/racking handle on any Japanese machine with all needles up to D on both beds on a serious collision course.
  It can sometimes appear easier when making transfers to have needles point to point. If that or another bed adjustment is made to any personal preference, keep the desired final setup in mind, and before continuing to knit, check that the machine is set for half pitch.
Prior to casting on bring the main bed needles into work. Bring the same number of needles into work on the ribber, plus an extra needle on the right.
On Half pitch, H, for knit side facing, transfer stitches from the main bed to the ribber for a 1X1 effect. The number of needles in work on the main bed should be a multiple of 2+1. After the transfer, adjust the tension settings. The pitch remains on H ![]() For a 2X2 effect, the cast-on method is the same, with every 3rd stitch transferred down to the ribber. The number of needles on the main bed should be a multiple of 3+2
For a 2X2 effect, the cast-on method is the same, with every 3rd stitch transferred down to the ribber. The number of needles on the main bed should be a multiple of 3+2 ![]() When the band is complete, all stitches may be transferred up to the top bed and the piece continues in single-bed knitting.
When the band is complete, all stitches may be transferred up to the top bed and the piece continues in single-bed knitting.
Straightforward two-by-two bands knit and applied as a long vertical strip will want to curl when joined to a knit. Modified commercial rib variations will produce far better results.
If a sideways application is chosen, after all the stitches are transferred to the top bed, knit a row before applying the band by the chosen method. This row may appear as a stitching line on the finished piece.
Other variations: here the number of needles in work on the top bed must be a multiple of 4 +1
with half pitch on H bring needles into work on both beds ![]() A single needle on each bed seen here on the left, remains in place until the cast on is complete
A single needle on each bed seen here on the left, remains in place until the cast on is complete ![]() the ribber is racked to the left, half pitch now set to P, those 2 end needles on the left of the above chart are moved to make the edges of the work identical
the ribber is racked to the left, half pitch now set to P, those 2 end needles on the left of the above chart are moved to make the edges of the work identical ![]() With a multiple of 3+1 needles in work on the main bed, begin with every needle, on half pitch
With a multiple of 3+1 needles in work on the main bed, begin with every needle, on half pitch ![]() the ribber is moved 1 whole position with the racking lever to the left, the end stitches on the above left are moved so as to produce identical ends.
the ribber is moved 1 whole position with the racking lever to the left, the end stitches on the above left are moved so as to produce identical ends. ![]() The post Seaming, joining, picking up stitches 3, ribbed knits offers suggestions on seaming techniques.
The post Seaming, joining, picking up stitches 3, ribbed knits offers suggestions on seaming techniques.
Vertically worked bands require their own small gauge swatch. The weighing of a small strip is bound to differ from that distributed across a wider band ie that at the waistline, and the results need to be calculated accordingly. The same consideration is a factor in shaped sleeves vs. sweater bodies.
End the bands with waste yarn, then if too many rows have been knit they can be unraveled, or if more are required the stitches may be rehung on the machine for continued knitting.
Apply bands to garment pieces that have been allowed to rest.
Some binding-off methods have been discussed in the post on binding off on the double bed.
Binding off ribbing sparks discussions on which way is best, especially if both the cast-on and bound-off edges are both visible and the hunt is on to get them both to match.
To review, bind-offs may be done in a multitude of ways on the machine by transferring stitches between beds or leaving them where they are, as well as working them after removing the knit from the machine on waste yarn.
Instructions abound in hand-knitting pubs and machine-knitting demonstrators talk about smiles-and-frowns visualizations including in some youtube videos when discussing tapestry needle-sewn bind-offs.
There are techniques that can accomplish similar effects with the knitting still on the machine as long as there is room to jump up several tension numbers before knitting the last row with both carriages from right to left.
The drawback I find using a tapestry needle with the work when it is off the machine is managing the length of yarn necessary in pieces wider than demonstration swatches.
The process may be easier for some if the work is taken off the machine and onto a hand-knitting needle, preferably a double-pointed one with needle stoppers available. Any hand-knitting illustrations or videos then become easier to follow.
With a tapestry needle, one inserts the needle as if to purl into the first (knit, cyan) stitch and as if to knit on the second (purl, yellow), both stitches are left on the needle.
The first stitch is then “knit off” and the needle is inserted into the next stitch (knit) as if to purl. Both stitches are left on the needle. Repeat steps 1 and 2. I used to suggest my students think up ditties for repeated actions, here it might be “purl into a knit and knit into a purl”. 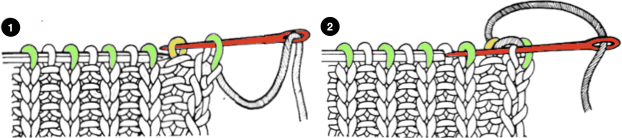 The steps after the work is scrapped off on waste yarn
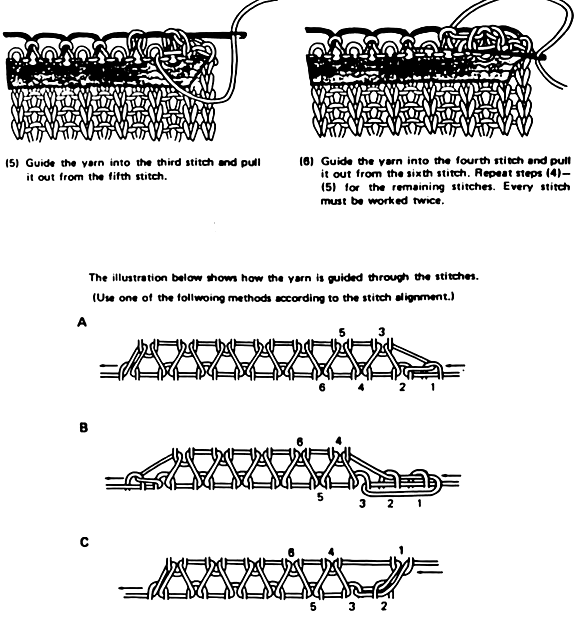 bring up discussions on how best to scrap off.
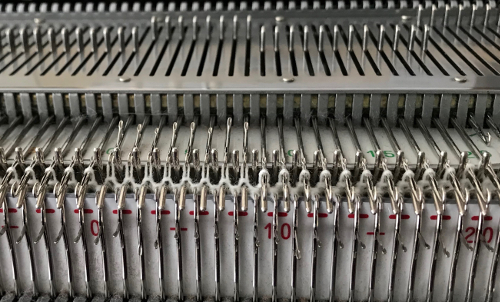
The missing how-to preparation for binding off:  When the rib is completed, transfer the stitches on the ribber up to the main bed, pulling needles out to E as you move across the bed
![]() Cut the yarn, leaving an end long enough for binding off.
Cut the yarn, leaving an end long enough for binding off.
Remove the ribber arm, exchange it for the standard sinker plate, place a contrasting color yarn in feeder A and secure it.
My test piece ended COR. Push in the cam button for slip stitch corresponding to the direction in which the carriage will move on its next pass, in this case, the left one. Another option is to simply push in both.
As the carriage moves to the opposite side, what is now identified as knit stitches will knit, and the B position needles will be skipped, creating a float. 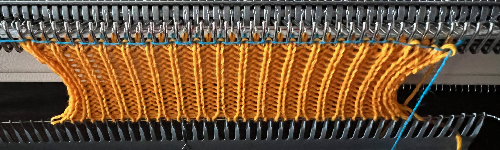 Knit at least 10 rows in the contrast yarn. No ravel cord is needed as knitting ravels down easily to be removed.
  When the piece is scrapped off, the all knit rows will roll nicely to the back of the swatch, and the rib can be stretched easily, with the top of the knit and purl stitches easily identified for sewing.
  Two by 2 ribs with stitches transferred to a hand-knitting needle:
 Using the same waste yarn scrap off keeping as for the one-by-one rib, but keeping the two-by-two needle arrangements when setting the knit carriage cam buttons to slip:
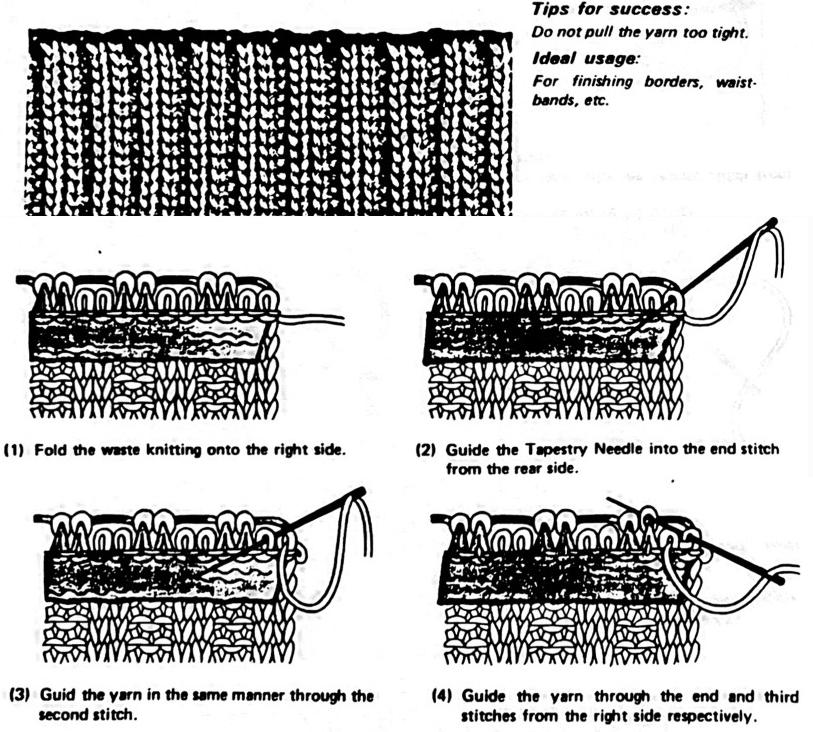
The collection of posts on casting on, binding off, and seaming ribs
Casting on, double bed
Ribber cast ons: breaking the “rules”
Picot cast on for every needle rib
Racked ribber cast on and rib configuration tips
Ribber trims 3: one trim, four variations
Ribber trims 2
Ribber trims/edgings 1
HK trim as MK edging
Binding off, double bed
More shapes on ribber fabrics with tuck patterning, fantasy fair isle
Seaming, joining and picking up stitches 3, ribbed knits
Twisted headband meet fisherman rib, seaming, variation ideas
Seaming, joining, and picking up stitches on knits 2
Transitions in ribbing from EON to FNR fabrics
When no ribber is available, single-bed mock rib
A ladder back dbj quest
The previous discussion on this topic: Ladderback double jacquard: backing variations
This backing technique has traditionally been used when the yarns are simply too thick to be worked in traditional dbj backing methods.
The majority of the needles will be knit on the main bed, so the tension should approximate that used for the same yarn worked in stocking stitch single bed.
The pattern will become a slip stitch one, with colors changed every two rows.
A FB Machine Knitting Group share led to a query on how this block type of ladder back might be duplicated on home knitting machines. 
 My interpretation of the knit:
  the planned block repeat, in turn, needs to be color separated and scaled for use in dbj.
This chart was developed using Numbers:
A: each color in each row is represented only once
B: the same repeat in black and white
C: the repeat double length so that each color is changed every 2 rows
D: getting the pattern to shift for every other pair of blocks is actually achieved by knitting the last 2 rows and the first two rows of the next repeat using the same color for 4 consecutive rows.
If the repeat is downloaded and programmed to be 24 rows long, the reminder to knit with the same color again is easy, since the pattern will roll back to row 1 with a warning, in this case, not to change color. It is easy enough to alter the height of the repeat to use this particular reminder. 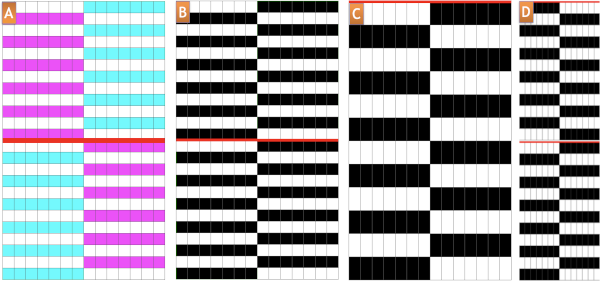 The motif used in the swatches is 14 stitches wide by 24 stitches high
 ![]() The machine set up: the main bed needles will need to continue to have weight evenly distributed on them, so the ribber comb placement needs to reflect that. The cast-on method can be one you prefer. I began with waste yarn, the ribber comb poked evenly through that, with the added use of ribber weights.
The machine set up: the main bed needles will need to continue to have weight evenly distributed on them, so the ribber comb placement needs to reflect that. The cast-on method can be one you prefer. I began with waste yarn, the ribber comb poked evenly through that, with the added use of ribber weights.
The pitch setting is for every needle rib.
End needle selection is used as in fair isle knitting to ensure that end stitches will be knit when either color is knit only on the top bed, resulting in the B feeder yarn being secured on the edge. If the end needle selection fails for any reason on the carriage side, push the needle forward manually.
The needle arrangement with red lines marking the location on the opposite bed.![]()
 COR: the first pass is made toward the color changer
COL: every other group of 7 needles is preselected, set both carriages to slip in both directions, change color if preferred, and bring up ribber needles in between those selected on the top bed to D position as shown here, on both the pass to the right and the return pass to the left. 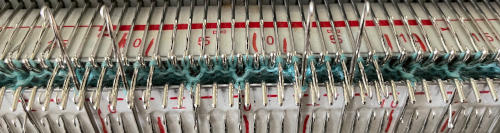 As the carriages make the pair of passes, floats will be created across the alternate group of 7 needles. Those floats will become secured as the next group of needles is selected and ribber stitches are brought up to form a line of knit stitches in the contrasting color in front of them.
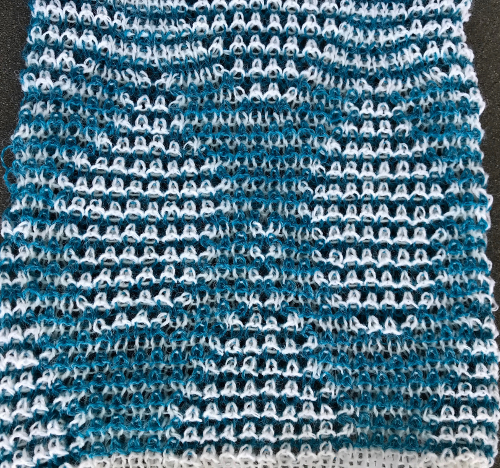
 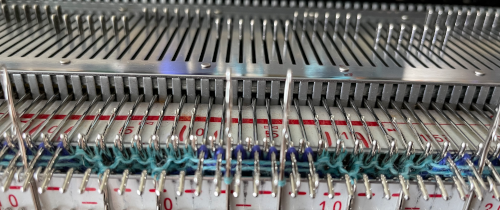 The yarn used here is 2/20 wool, really too thin for this type of backing, but I wanted to test the repeat and the concept.
 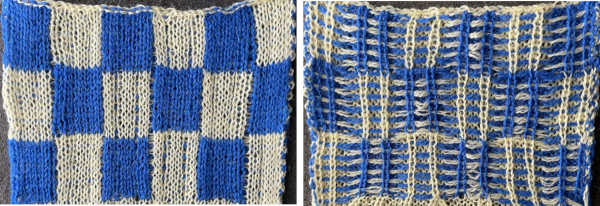 Using a 2/8 wool the result was optically the best, but I could not get any further than this without stitches jumping off needles in several places, regardless of tension adjustments
 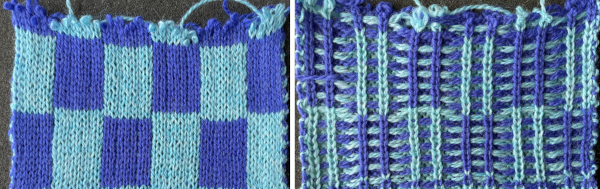 Using yarns in weight in between the 2, knitting was smooth, the tension on the top bed was set at tight as possible, this is the appearance of the knit on the machine
 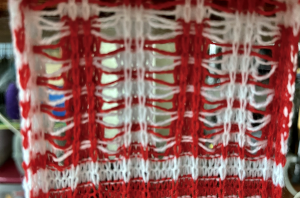 Off the machine, the bleed-through from the floats created on the top bed on the knit side begins to remind one of knit weaving as does the purl side. Not the intended effect and fabric, but perhaps worth pursuing intentionally.
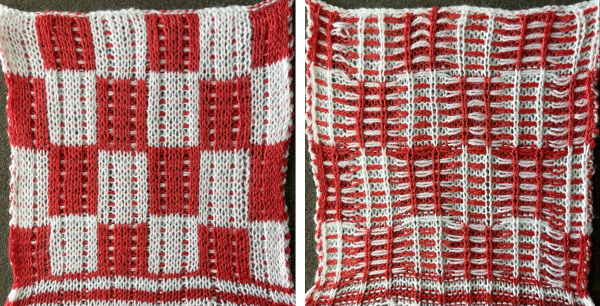
Ribber trims 2
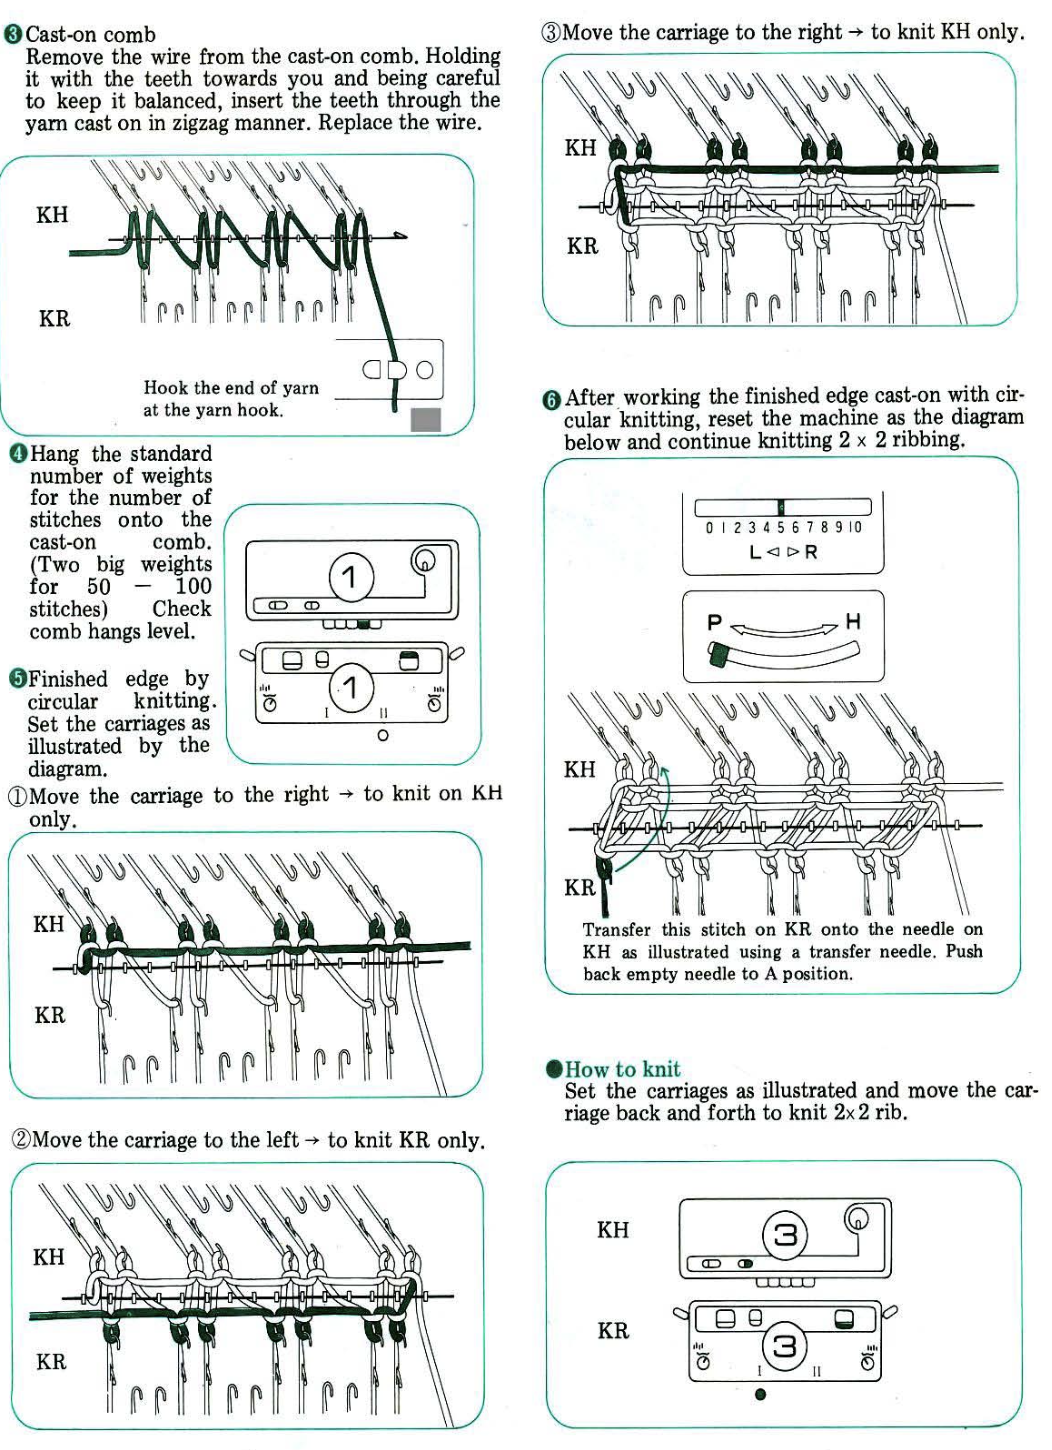
This is an illustration of the #3 frill from the Ribber Techniques Book:
1. COR: knit a zigzag row to left, hang comb and weights, no circular rows 2. knit second zigzag row to right
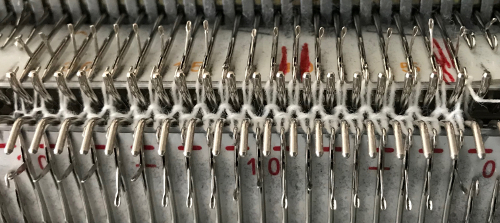 3. transfer stitches as shown
 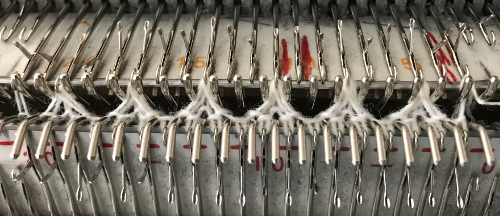 4. knit to left
 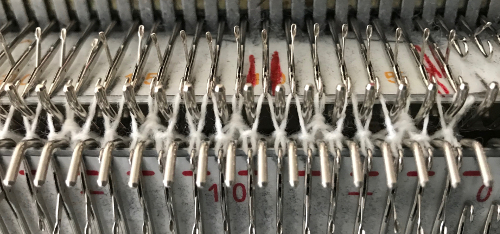 5. knit back to the right
  repeat steps 3-5 to the desired height
For another variation, knit 4 rows rather than 2 between transfers. My yarn is still a 2/24 acrylic. The trim would look quite different using a thicker yarn or even simply a tighter tension. I continued in rib. Ribber stitches could also be transferred to the top bed for continuation in stocking stitch 
 In theory, it is possible to knit lace transfers in Brother by dropping the ribber bed enough for the lace carriage to move across the beds while clearing the gate pegs. This remains on my “try someday” list. To my mind, hand transferring remains the best way to deal with lace/ ribber stitches combined.
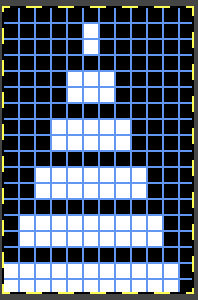
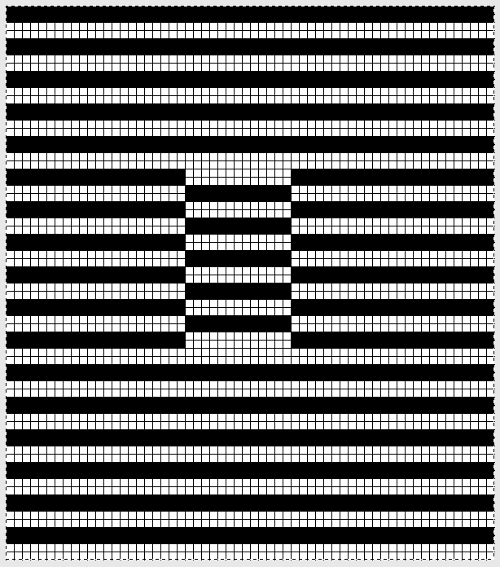
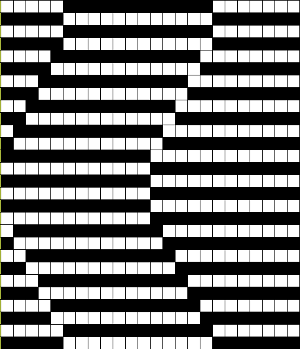
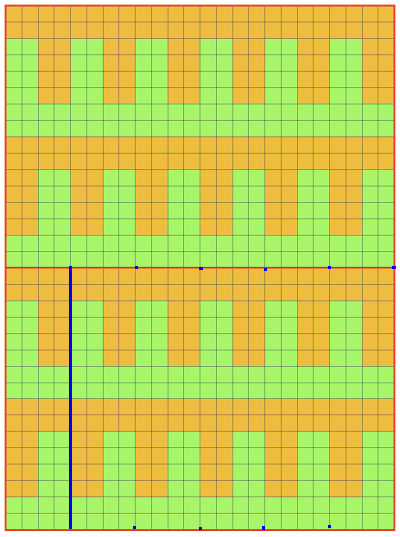
Tuck patterns on the main bed (or slip stitch) designs can be used to automate and create patterns where holding is recommended in some sources ie. 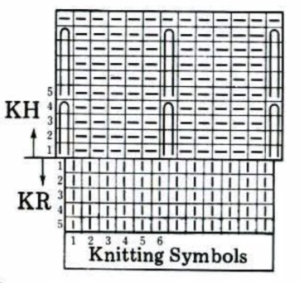 For a punchcard machine, the repeat must be a factor of 24 in width ie. 6 or 8, or 12 stitches wide. Electronic knitters can draw a single repeat, either the one on the left also using color reverse or the one on the right. Punchcard knitters need to punch the grey squares on the right across the card and repeat it in height. An extra all-knit row needs to be added at the top of each series of 4 rows tucked for the loops to be knit off automatically by the machine. Step 4 in the techniques book, resetting the main bed to N to knit a row after every 4 rows in a holding pattern is missing in their illustration above.
 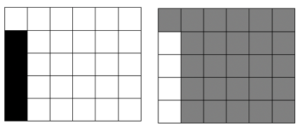 The punchcard repeat: punch each grey square to match the illustration
 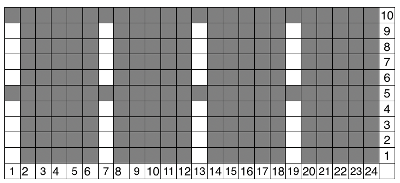 A few to try, shown in repeat X2, as BW gridded .bmps, and with the color reversed for knitting. All but one are 12 stitches in width, suitable for punchcard machines as well
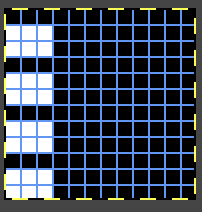
 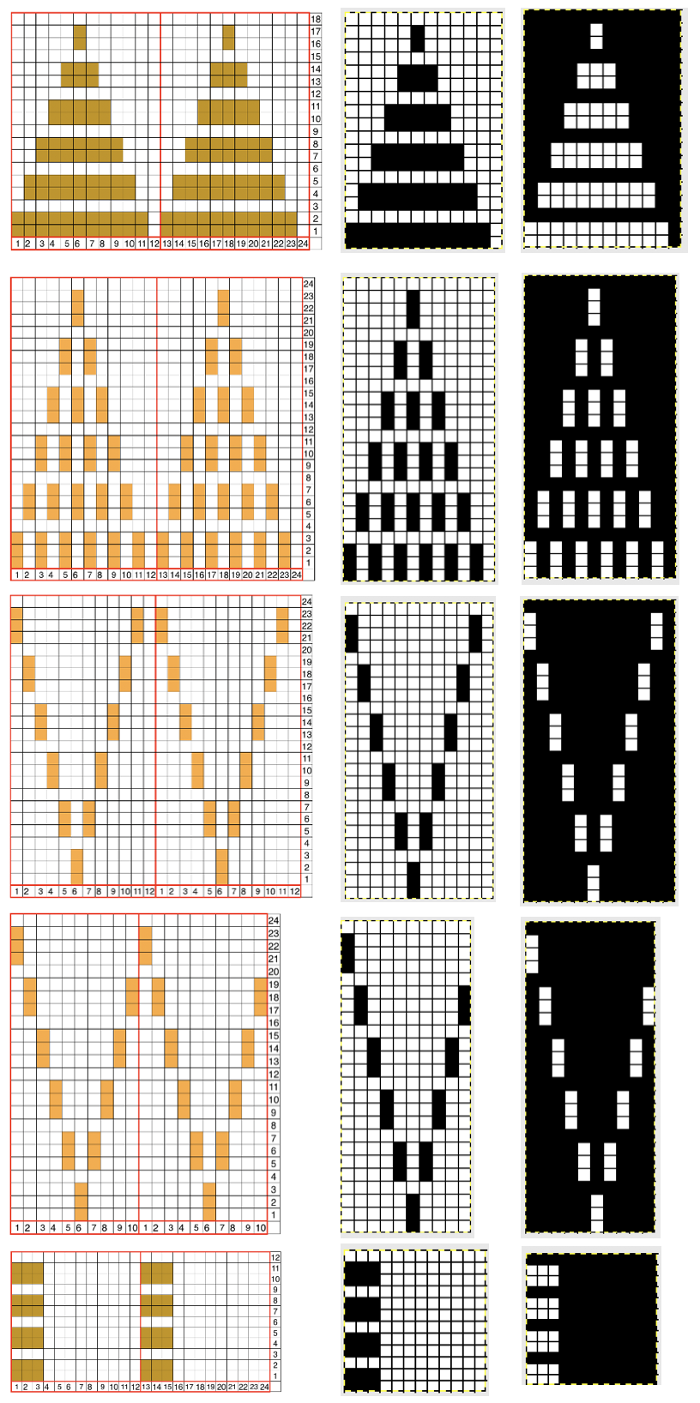 Too much black? want to count those black squares more easily? pick your preferred grid color, it will disappear when the image is saved
 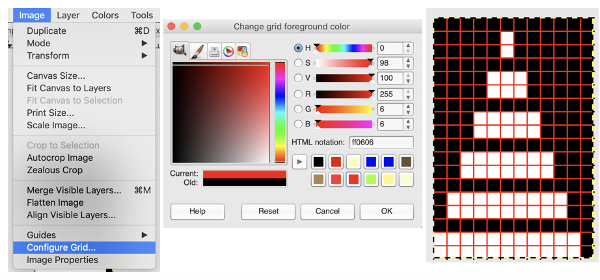 A screen grab from my iMac shows the original charts and the resulting single repeat .bmps after working in GIMP, ready for download with color reverse option and use on the electronic machines. Ayab knitters, in addition, would need to program the repeat in width to match the number of needles planned for use in the piece
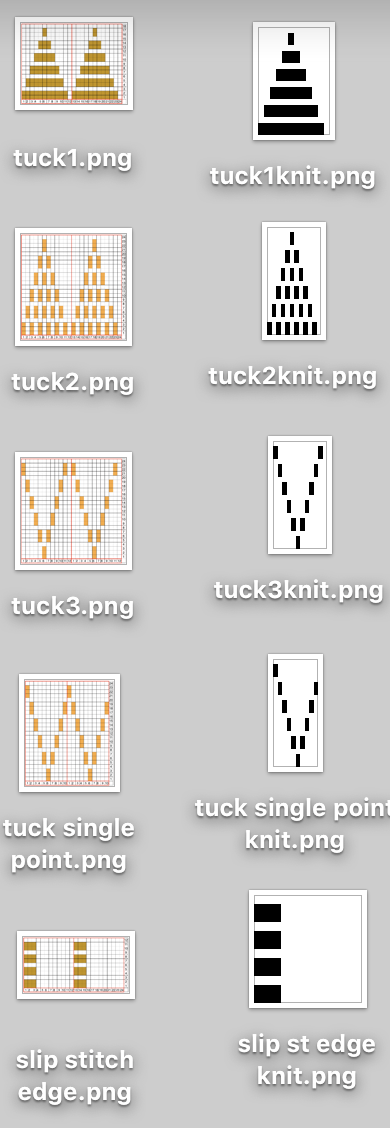
Lace transfers meet fisherman rib, 2 color ribbed brioche on Brother machines 2
Over the years I have avoided ribber fabrics that involve hand manipulation of stitches in addition to patterning. Runaway stitches are hard to see and repair.
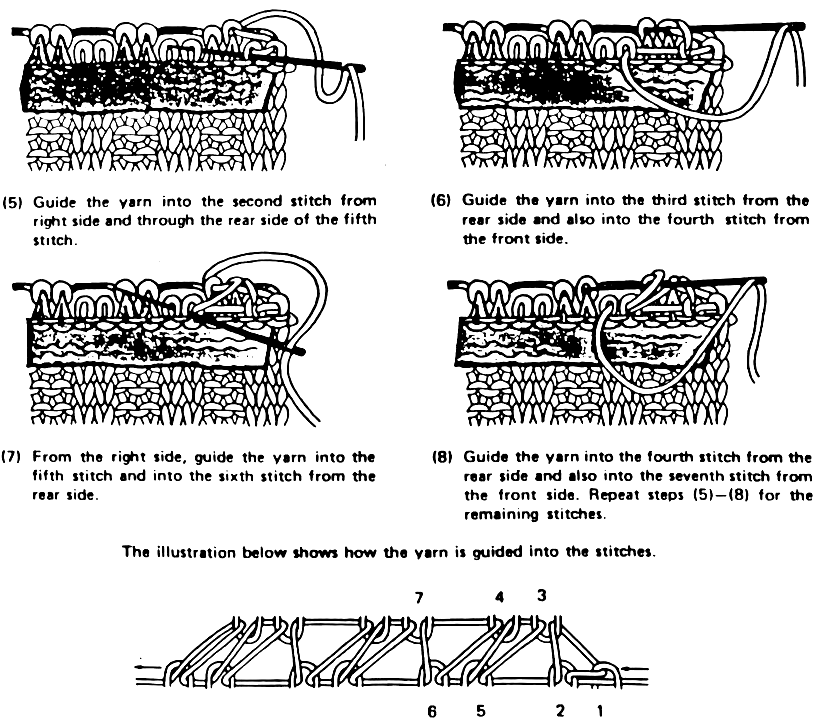
In these fabrics, transfers are made by hand with multiple transfer tools. As stitches are moved, the last of the stitches transferred on the purl side (in this illustration 4 stitches), one will lie directly behind one of the stitches on the main bed (marked in red), sharing the same needle hook space. As the next row is knit, the needle emptied by the transfers picks up a loop. The following knit carriage pass will complete the stitch on the needle holding the loop, and the eyelet.![]()
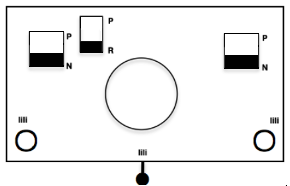
There is often confusion about the terminology, English, or half fisherman rib has only one bed tucking every needle, in a single direction, with all stitches knitting in the opposite. Here that bed is the ribber, the knit carriage is set to knit throughout. Illustrations from the Brother Ribber Techniques 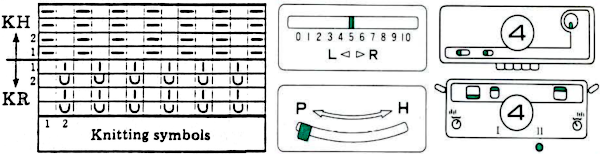 Fisherman, aka full fisherman rib, is a tubular tuck with each bed tucking in one direction, knitting in the other
 My recent posts reminded me of a repeat from an older Brother punchcard pattern book that combined lace transfers and fisherman’s rib.
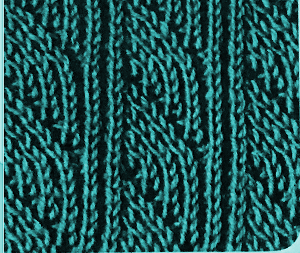 The original repeat is shown on the left, designed for use on punchcard machines. In this instance, the main bed knits in one direction and tucks in the other while the ribber knits every row.
  Stitch and tuck loop combination transfers are made every 4 rows, prior to knitting that row in the opposite direction. The machine is set for half fisherman’s rib. Tucking happens on the top bed on all needles in one direction only, the ribber remains set to knit both ways throughout.
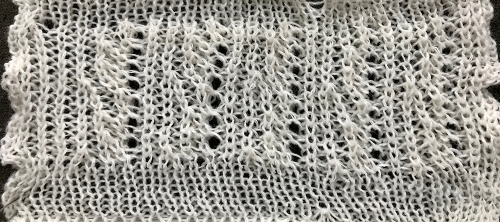
 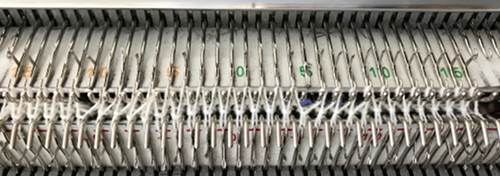 If all transfers originate on the same spot, a vertical line of eyelets is produced
 Can plaiting give me 2 colors the “easy” way?
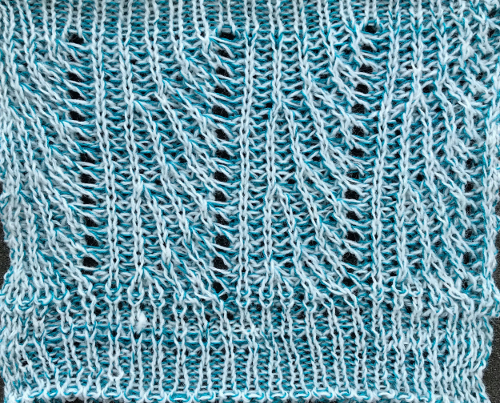
 If transfers move to the right or the left, an arc will be created
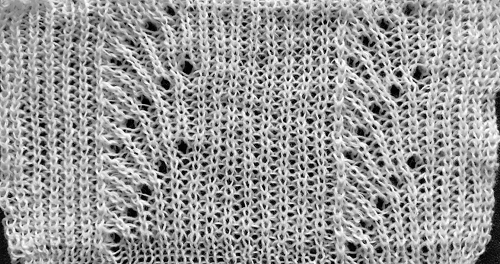 Aiming for the punchcard pattern book inspiration I began at first by marking up the needle tape with a water-soluble pen to help track repeat segments
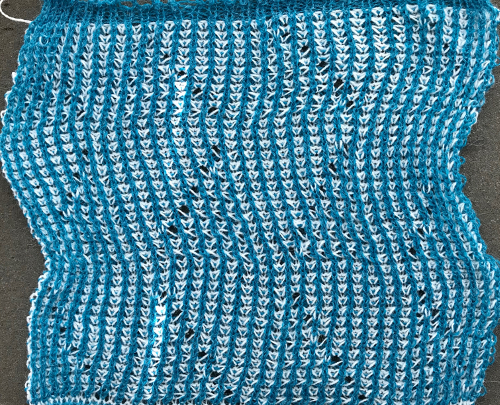
 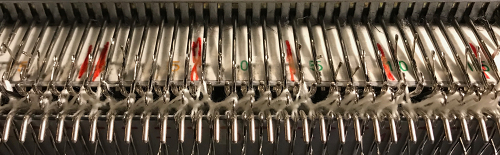 After a short trial swatch I sought to automate needle selection to serve as a guide for moving stitches across the needle bed
![]()
 The main bed is set to tuck in both directions. White cells tuck, black cells knit. Rows in Brother preselect for the next row with each pass of the carriage, so on even number design rows as the carriage moves to the opposite side, all needles will form tuck loops on the main bed. The next row will be preselected, with some needles now back in B rather than D position. With an appropriate transfer tool, move the stitches on the nonselected needles to the adjacent selected needle to their right after pushing it back to the B position. After each transfer, push all worked needles and their stitches as well as the now empty needle to the E position. As the carriage returns to the opposite side an all knit row will be completed. Several tension adjustments may be needed to ensure loops do not get hung up on gate pegs as stitches move across the bed, while still being loose enough to knit off properly.
The charts below reveal planning for a more complex fabric, a 2 color repeat with mirroring of the original above, colors are changed every 2 rows with setting changes on the ribber. For more detailed instructions see 2 color ribbed brioche stitch on Brother knitting machine 1.
Seeking new geometry, the repeat “inspiration” is mirrored horizontally. The final repeat is on the far right. The knit carriage is set to tuck in both directions throughout. On white cell design rows the main bed tucks, and the ribber is set to knit. For added directions see 2 color ribbed brioche stitch on Brother knitting machine 1. On most or all-black cell rows, the main bed will be knitting, the ribber is set to tuck. In this fabric, the transfers are made on knit stitches created on the previous row prior to moving the carriage back to the opposite side. All transferred stitches and the empty needle are brought out to the E position prior to moving the carriage to the opposite side, which will be creating the second all knit main bed row. Transfers are made every 8 rows, with pairs of transfers being made toward each other, no longer all in the same direction as in the single color sample 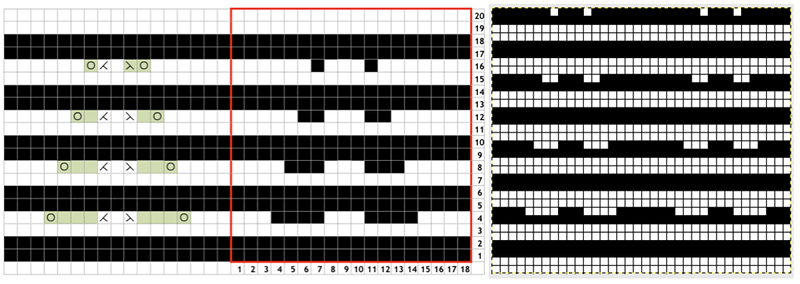 The central repeat is color reversed to achieve the final repeat on the above right in order to produce those transfers on knit rows. The final row count needs to be a multiple of 4 rows in height. Here is a 2 widths 36 stitch X 32-row repeat chart
  The extra line seen occurs when one forgets to reset the ribber to tuck, and stitches are all knit on a “wrong row”. It is by coincidence that they seem to occur in the same spot in the repeat
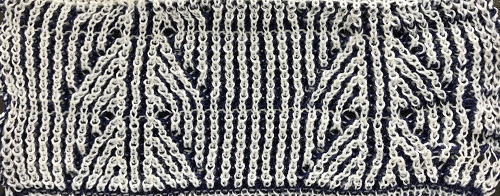
 more accurate knitting
 On the bottom half of the swatch below the difference is the result from when one carriage knits every row on both beds, requiring a change on the knit carriage as well, canceling its tuck setting with every other color change
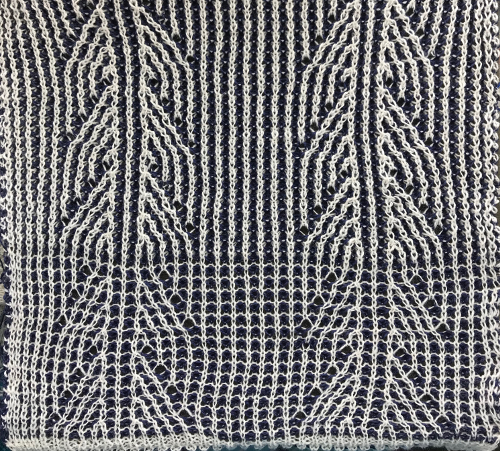
 The last repeat may be flipped vertically as well. It then needs to be edited so those white squares land on the row after an all knit row, not below it. The final repeat on the right is 36 stitches wide by 64 high. There are still 8 rows between transfers. On the left is the first resulting chart, on the right the amended chart places selection for transfers on the proper row.
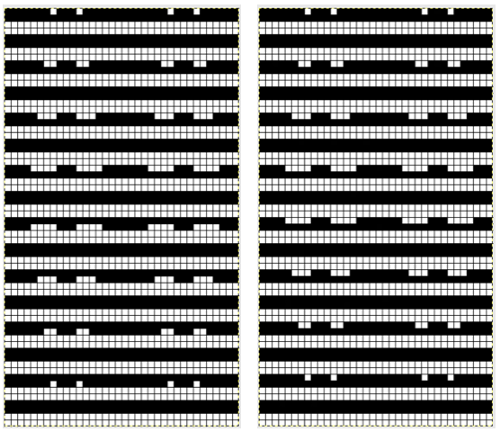
 the germ of one last idea, the repeat 14 stitches wide by 96 high, max transfer seven stitches (odd #)
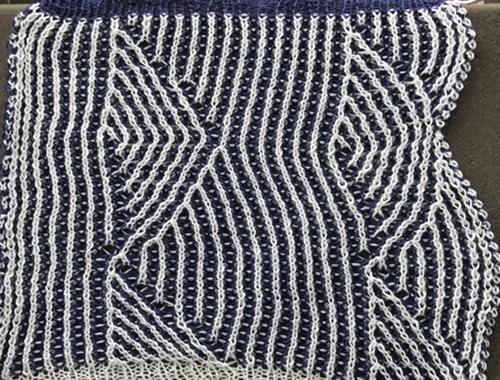 playing with ideas a bit more, max transfer six stitches (even#)
This was my attempt to shoot for a recurring shape and planning on having transfers land on like color, the repeat is 8 stitches in width, 112 rows height. Six stitches are the max number transferred. More would give a wider curve, the final repeat would be exponentially longer 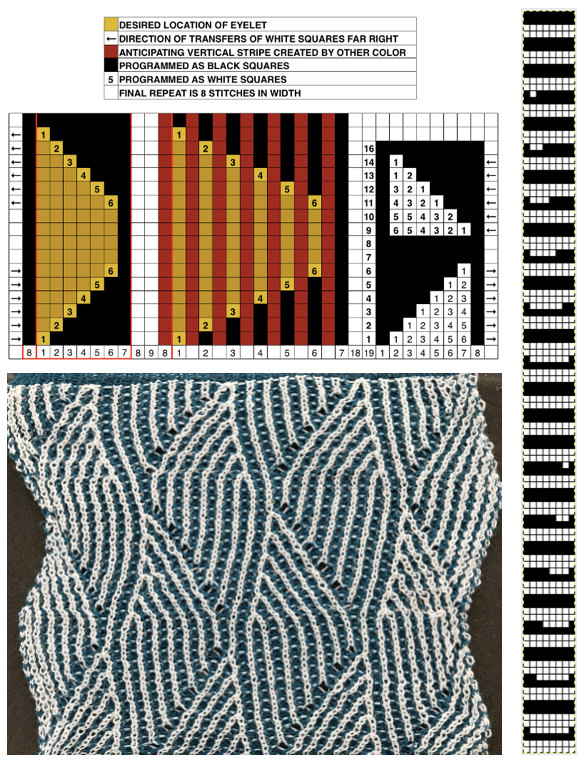 its reverse side :
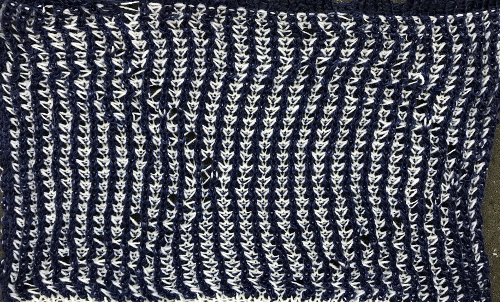
 When the main bed tucks in both directions with one color, knits in both directions with the other:
  I did try to eliminate those lace holes. On the right of the swatch as shown below I threaded a needle and attempted to close the eyelets with stitches, getting closer to the line one might get in a hand knit. On the left, I hooked up loops to fill the empty needles. The latter changes the intersecting lines completely
picking up only the white yarn from the tuck loop below the transfer 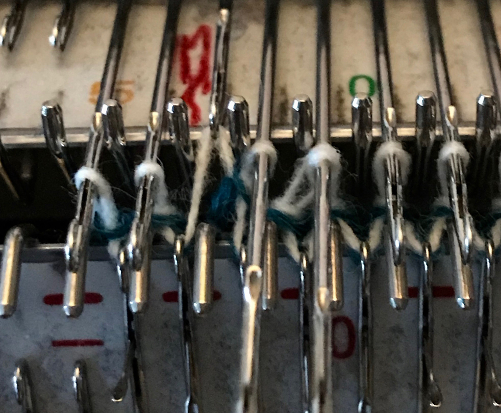 bringing filled in needle back to E position prior to knitting next row
  the difference in intersecting lines at the outer edge of my intended shape.
 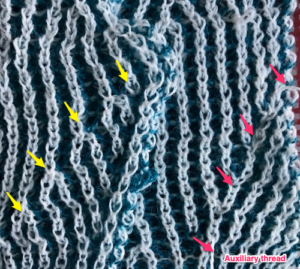 This is what happens when a new design is being tested, and the lili buttons “accidentally” happen to be engaged on the ribber
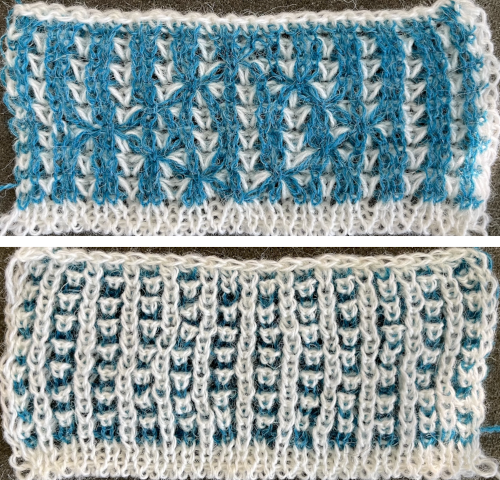
Geometric shapes on ribber fabrics with tuck stitches 1
The previous post elicited a Facebook query as to whether it might be possible to create solid shapes within the field of brioche vertical stripes. The inspiration for the query was a hand-knit pattern published in Ravelry 
https://www.ravelry.com/patterns/library/pariss-brioche-scarf
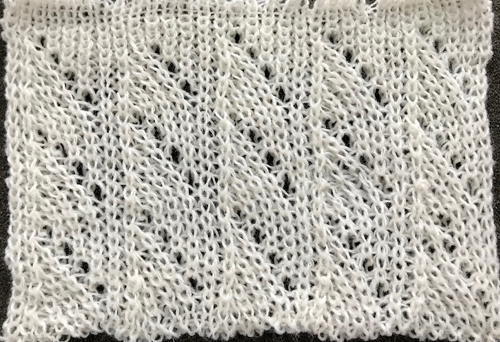
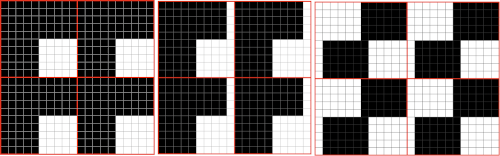
Many terms are used in instruction manuals and published directions. In my notes I will refer to fabric with tucking on both beds as full fisherman rib, tucking on one bed only as half fisherman. These were my first attempts at exploring the inspiration idea, the fabric has inherent differences as it requires both slip and tuck stitch settings, so technically it is neither fisherman. Knitting happened on a random drop stitch day, which explains the patterning interruption errors.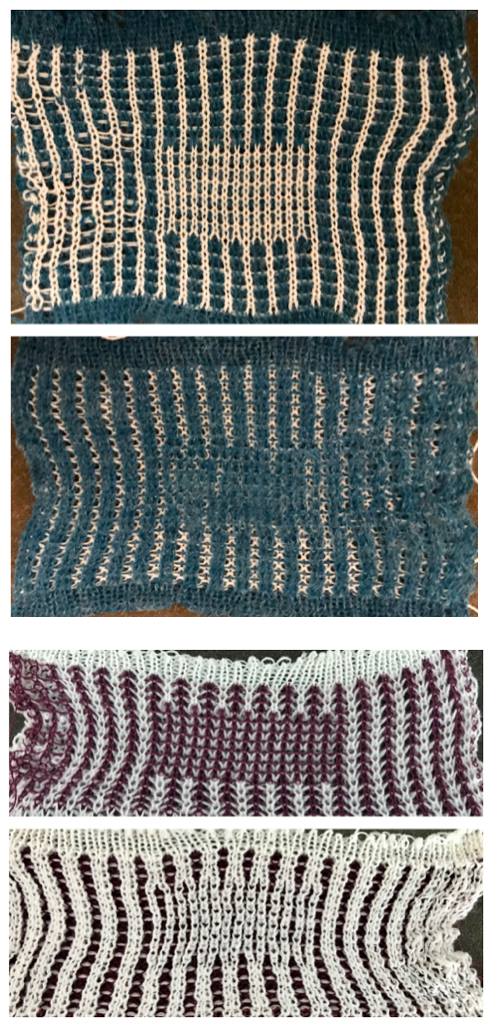 When attempting to knit isolated geometric areas on a field of frequently tucking stitches, automating the task when possible makes the process easier and faster. This was my first “diamond” pattern repeat, suitable for a punchcard machine as well. The design is illustrated on the left, converted to punched holes/black squares/pixels on the right
  The knit carriage is set to tuck throughout. The programmed repeat will alternate the knit/ tuck functions across the bed based on black squares, punched holes, or pixels.
 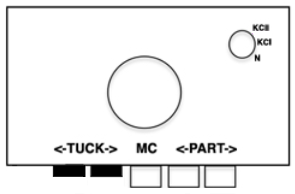 For full fisherman rib (top swatch) the ribber needs to tuck in one direction only, opposite to the action taking place on the main bed. A choice needs to be made on either of these 2 setting directions based on needle selection on the main bed and stays fixed throughout knitting. The ribber is set to knit on even-numbered design rows on the card, to tuck on odd. Row count numbers may be different than design row ones depending on row counter settings by the operator or built KM ones. Below are tuck settings for to the right on top, to the left on the bottom.
 For half fisherman rib (middle swatch), the ribber is set to knit with every pass.
 Note the half fisherman fabric is narrower than the full. Also, I am not used to my 930, overlooked that the machine was set for isolation, so its bottom diamond-shaped repeats are incomplete.
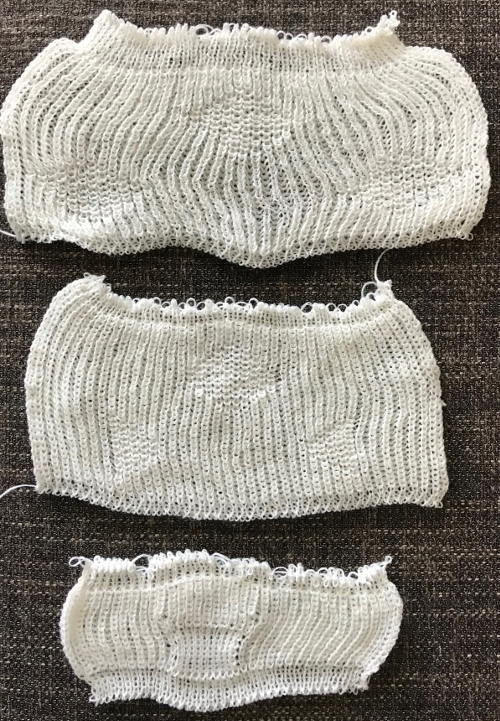
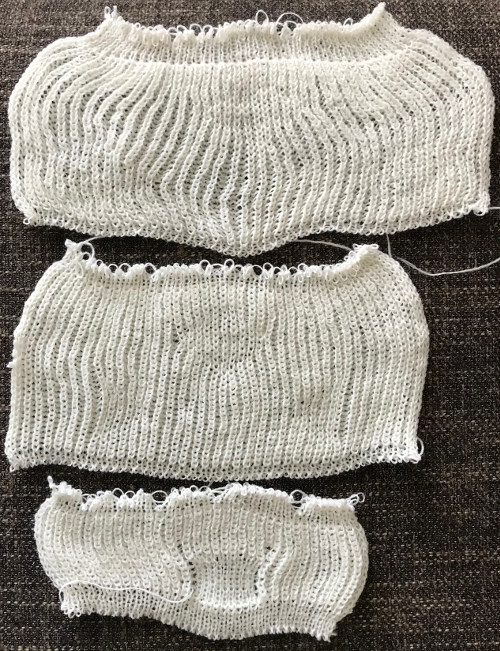
In the bottom swatch, I tried to produce a more distinct shape on tubular tuck created with only knit stitches on both sides of the fabric. Hand selection on the alternate beds on all tuck rows produced knit stitches in the desired area. A needle out of work made it easy for me to find a proper location on the needle bed.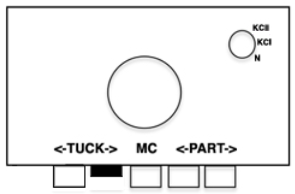
 Getting back to automating at least part of the process for such shapes: the repeat needs to be altered
 main bed will be knitting the black squares in the chart on the right on every row, tucking the white ones. When the ribber carriage is on the side appropriate for it to tuck the following row and no needles are selected in design segments on the top bed (odd-numbered design rows, ones with the majority of black squares, tuck may not be used in those locations because then the resulting stitches would be tucking on both beds with nothing holding the tuck loops down.
 bring all needles between selected main bed needles up to hold on the ribber so that they will knit while the remaining needles tuck on the next pass of the carriages.
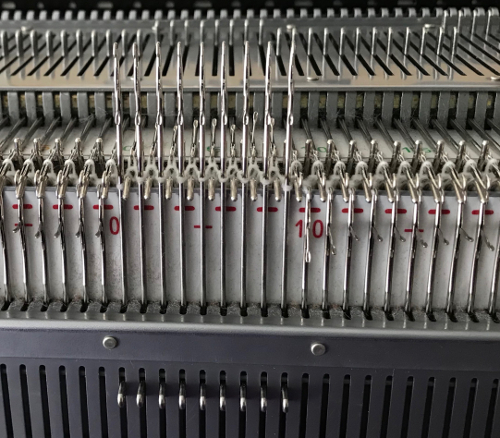
 In my sampling, the ribber was set to tuck when moving from right to left. Below is the resulting swatch, shown on both sides. Part of one diamond shape is missing due to the fact I was concentrating on moving needles around and missed the change in selection on one side of the machine.
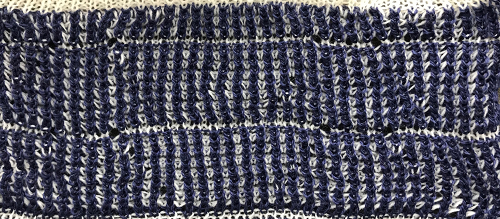
 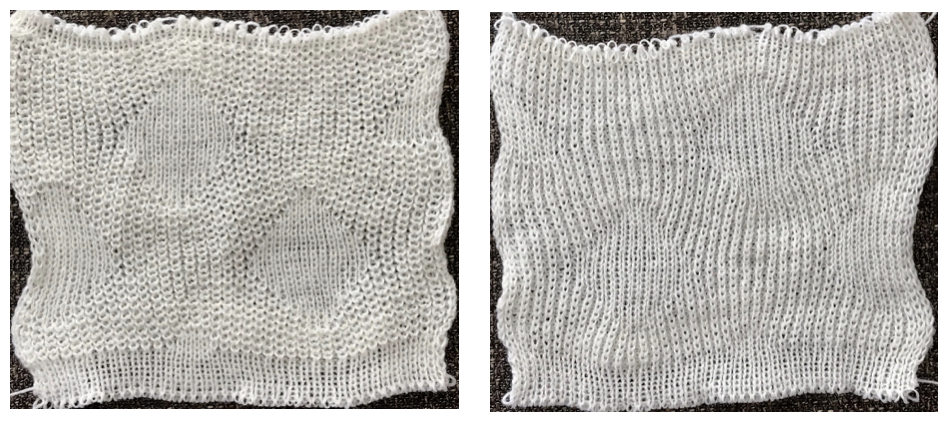 Back to the original method used in the previous post where ribber settings are changed from knit to tuck <– –> every 2 rows along with color changes. I chose a design that would make it easy to identify the location of non-selected needles on the main bed in rows where the ribber will be set to tuck in both directions. The result is interesting, but the solid areas, narrower than the remaining knit, are in the opposite color to the dominant one on each side, the reverse of the inspiration fabric.
 When needles are not selected on the main bed, interrupting the every needle selection.
 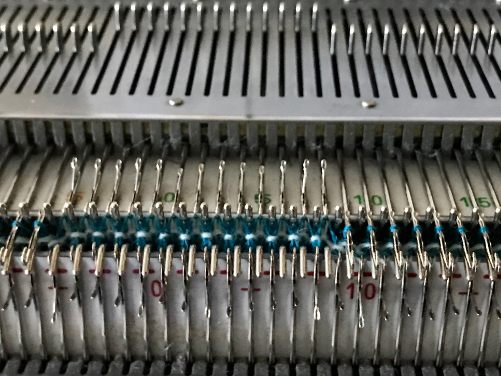 Bring all needles on the ribber between selected needles up to hold on each of the 2 passes from left to right, and right to left. Stitches on those needles will knit rather than tuck
 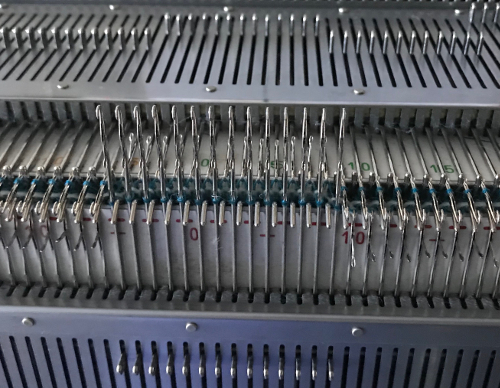 resulting in this fabric
 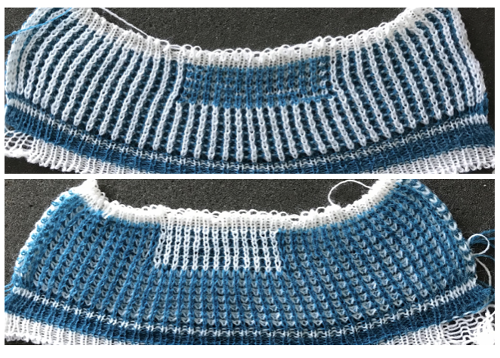 The first swatch at the top of this post was achieved going a very different route. Two knit carriages were used to select and knit from opposite sides of the machine. Each carried one of the two colors. When working with the first color and coupled carriages the main bed is set to tuck <– –>, the ribber to knit <– –>. The second color is knit using the main bed knit carriage only, set to slip <– –>. A knit sinker plate may be altered and used so as to knit on the main bed only rows, adjustments to it are shown in the post: 2018/04/15/ribber-fabrics-produced-with-2-knit-carriages-selecting-needles/. The chart for my working repeat with a multiple of 4 rows in each pattern segment, color changes every 2 rows indicated on right
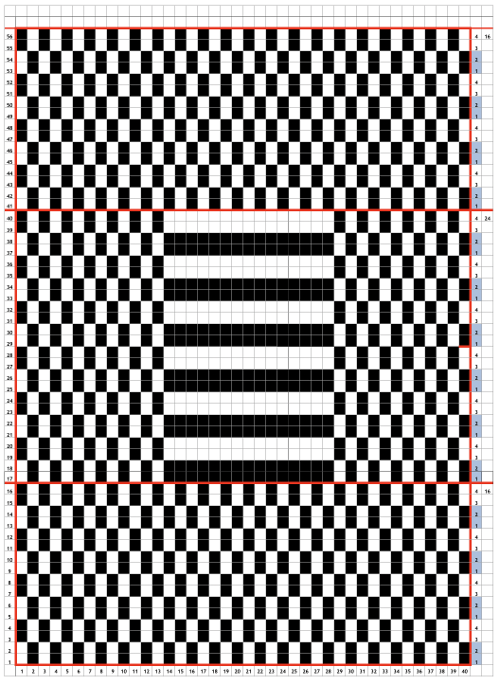 trying to produce a diamond shape using this technique, my first repeat had arbitrarily placed pixels:
  the cam settings on the right of the swatch images correspond to those used in each swatch segment. Colors were changed every 2 rows throughout. The first 2 rows in the pattern were knit in a tuck setting, followed by 2 rows knit in slip. In segment B when no needles were selected on the top bed, all those needles were brought out to hold before knitting to the opposite side. Because every row is now knitting in the corresponding color changes the result is a striped pattern. Segment C is knit with both carriages set for 2 rows as in C1 alternating with knit carriage only set as in C2. At that point the color being carried knits only on the ribber, skipping non selected needles on the top bed, avoiding the striped result. A float is created between the beds in areas where no needles are selected that will be “hidden” as one returns to knitting in rib with 2 carriages.
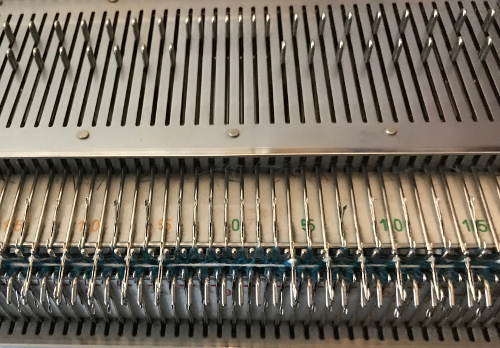 The arrow in the chart points to an area where two colors were picked up with the color swap rather than one. The resulting swatch samples
Analyzing the result in section C: the diamond is the same color on both sides, whereas the initial rectangular shape experiment reverses the colors. Reworking the diamond repeat in segments that are each a multiple of 4 rows: 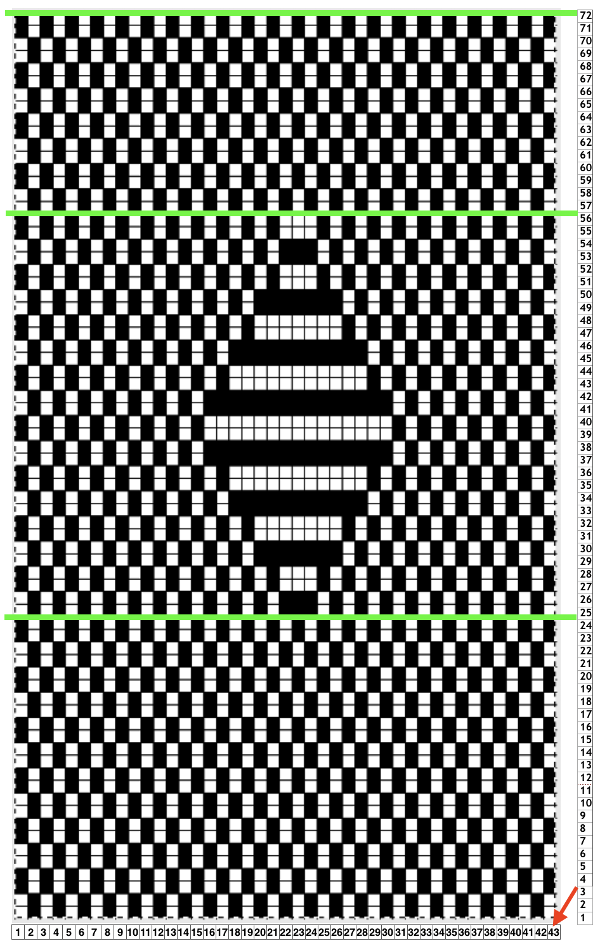 Other considerations in DIY designs. The background repeat for this pattern is actually composed of units 2 wide by 4 rows high. If the pattern is intended to be repeated across a larger number of stitches on the machine bed than that in the chart, it is always worth tiling the image to pick up any errors (sometimes happy design features). Tiling in width readily shows an error
 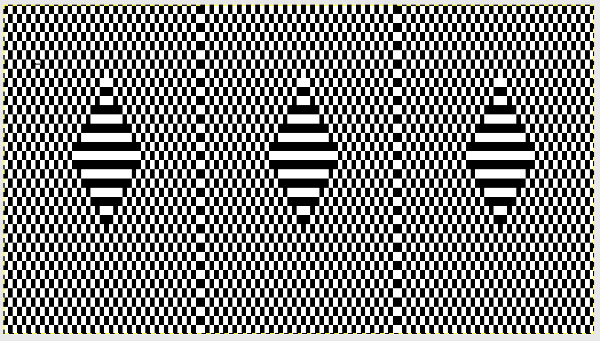 tiling in height as well proofs row intersections as well
 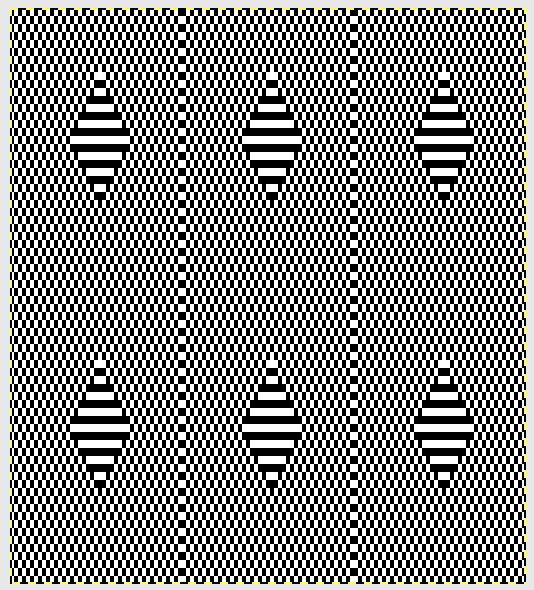 tiling the corrected width repeat, now 42 stitches wide by 72 rows high
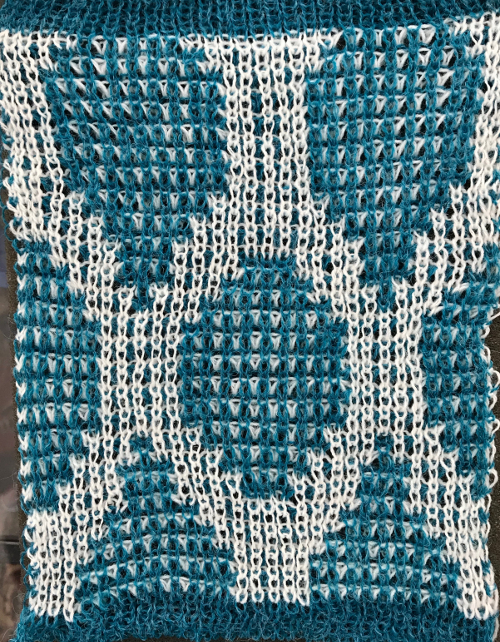
 sometimes tend not to keep immediate notes when I test ideas, which often comes with a price. I knit my first swatch using this repeat beginning the pattern with 2 rows of tuck, resulting in this fabric (and some randomly dropped stitches once more) with the same color diamond on both sides:
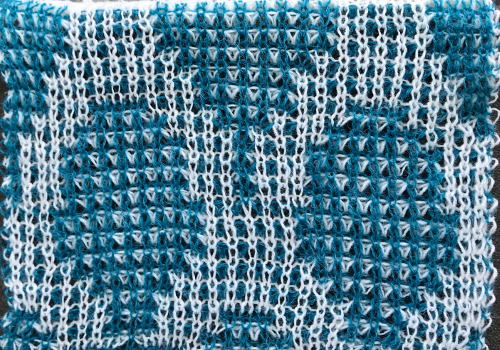
 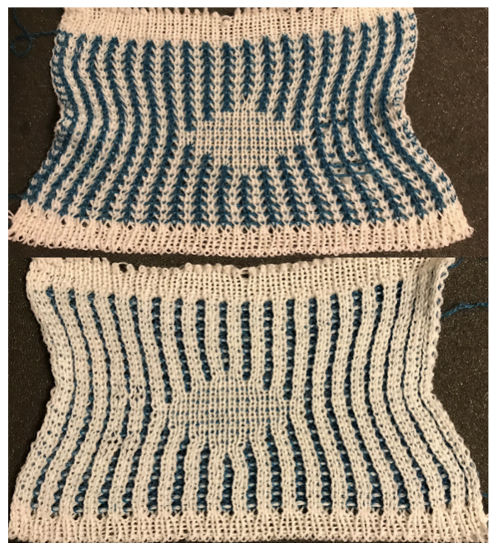 Beginning the pattern with 2 rows of slip stitch on the main bed only mirrors the swatch at the start of this post. Where no needles are selected on the main bed, with passes of the combined carriages, two rows of tuck will now be produced, resulting in the wider geometric shapes and the increased bleed through
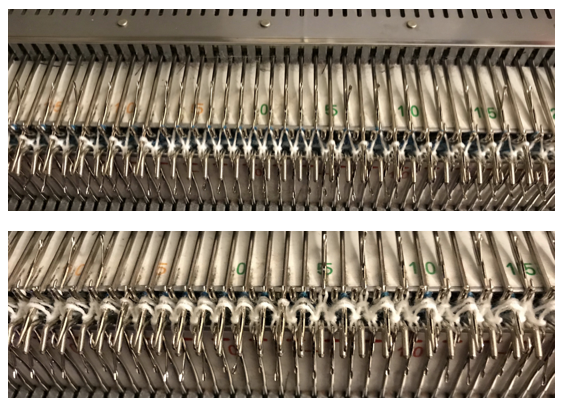
 The tuck loops created by the white in this instance have the elongated slip stitches in the alternate color (blue) partially covering them, creating the darker geometric shape in the top detail photo. The blue is thinner than the white, the effect will vary depending on yarn weight and tension used for the main bed yarn. One can begin to observe the change in width in areas with more stitches tucking.
If the aim is to have a tighter, more clearly defined diamond, after the swatches rested, the swatch that began in slip stitch setting appeared to “work” better to my eye, even with the single color geometric shape on both sides taken into account. Ultimately the choice is a personal one. The wider vertical stripes created in the white yarn in the slip combination fabric happen because of the 2- stitch wide repeat on the top bed as opposed to a single needle one in a true fisherman knit. Because of the slip setting the results will be narrower in width from it as well.
Ayab knitters will need to program any repeat across the width of the intended number of stitches, and use the single setting. Electronic knitters can enlarge the background pattern field easily, or create brickwork, extended repeats.
Arah-paint offers a free program that allows drawing repeats in different orientations with a few mouse clicks. Shifting this pattern must also be in pairs of pixels/black squares in this instance because of the 2X4 stitch background unit. The 21 (half) pixel shift shows an error in its continuity 22 stitch shift results in a “correct” all over repeat
Quite some time ago I experimented with shadow knits including in posts
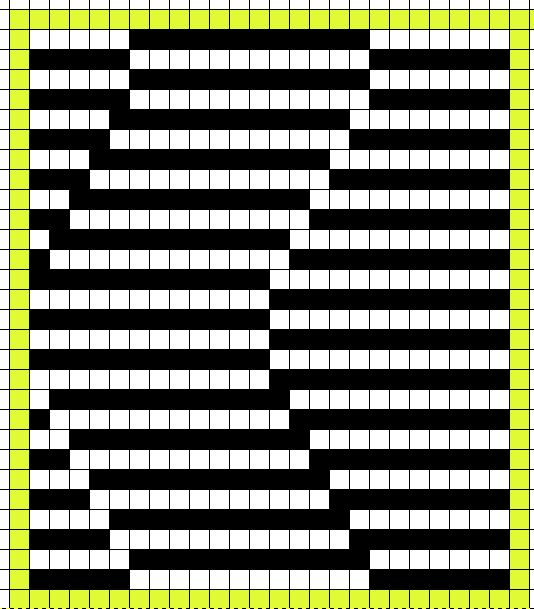

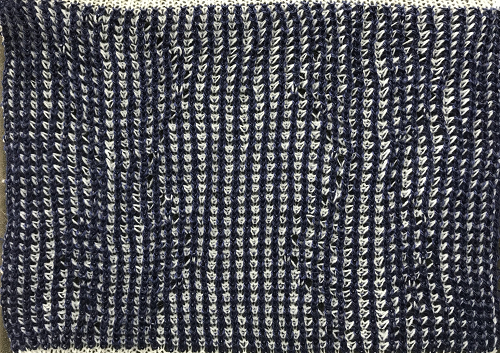
It occurred to me the same design might work in a tuck rib version. The original repeat was 24 stitches wide, 28 rows high ![]()
 scaled to double length, 24 stitches wide by 56 rows high
 ![]()
 a tile test of the new pattern
  The ribber remains set for knitting in both directions throughout, with the main bed set to tuck in both directions.
Knit tests: the red yarn was very strong cotton, hard to knit smoothly, the blue encountered some stitches not being picked up on the main bed as well, but the concept may be worth exploring further. The main bed is set to tuck in both directions, the ribber to knit throughout. The red and white fabric is considerably wider because of the tension required to get the red cotton to knit.
 Better stitch formation results with the different yarn used for the second color
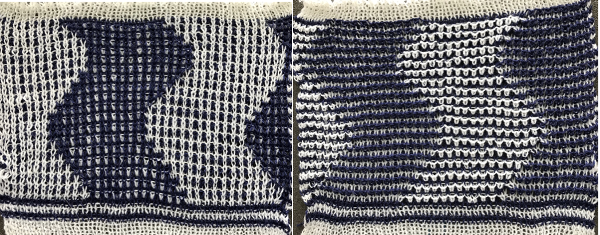
And lastly, a first quick adaptation of a design previously used for drop stitch lace, which requires some further clean up the yellow squares indicate loops tucking on both beds at the same time, the repeat on the far right is the one tested after eliminating those areas. It is 14 stitches wide by 80 rows high 
 an “improved” version, the choice remaining as to whether to make all the blue shapes pointed at top and bottom or “flat”
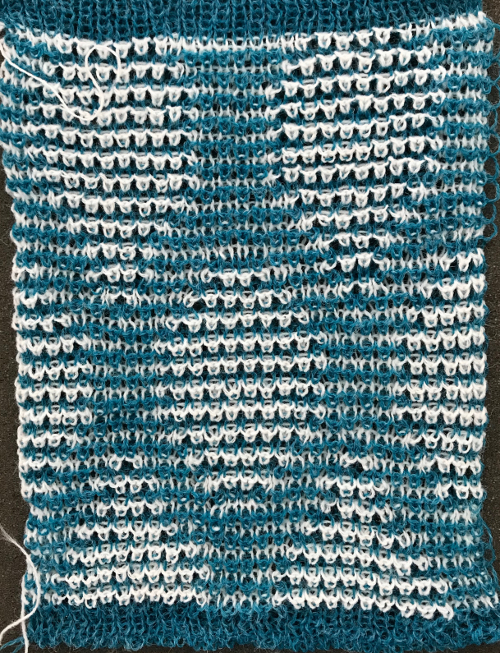
 this is my repeat, tiled. It is 14 stitches by 84 rows
 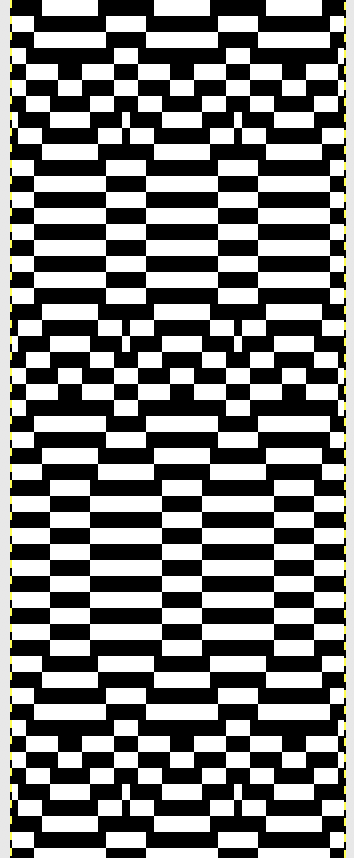 The single 14X84 png
 ![]()
Knit and purl blocks to create folding fabric_ “pleats”
Knit and purl combinations may be executed in hand or machine knitting. Knit charts are generally planned and illustrated based on the fact that the same side of the fabric is always facing the knitter. Hand knitters have to accommodate for the fact that the work is turned over (unless knitting tubular) with every row worked, so plans would need to reverse knit for purl and vice versa if needed. For more ribbed, pleated/ folding fabrics please see Pleats: ribbed, folding fabrics , and Origami inspired 2: more pleats and fold using the ribber
The easiest way to produce this particular fabric on Brother machines would be to let your garter carriage do the walking and working. For those of us that do not have that option, there are transfer carriages, (I honestly have only used mine once, decades ago, will have to dig it out of mothballs) and transferring needles by hand. Pairs of identical stitch transfer tools may be used to move stitches from one bed to the other. If the goal is to produce a knit with tension as tight as possible, the latter can be problematic and result in dropped stitches, so testing the yarn and the mode of transfer should be part of swatch trials prior to committing to larger knit pieces. I found moving stitches between beds one at a time for me was preferable and more reliable
The chart for the initial concept: The number of needles used for “pleats” is constant (7); 3 stitches move up (or down) in turn, indicated by arrows. After the first 3 are transferred, 3 more are now moved adjacent to the now remaining 4 stitches from the opposite bed in order to maintain a total of 7 on each bed, excluding any borders, in which stitch placement remains fixed.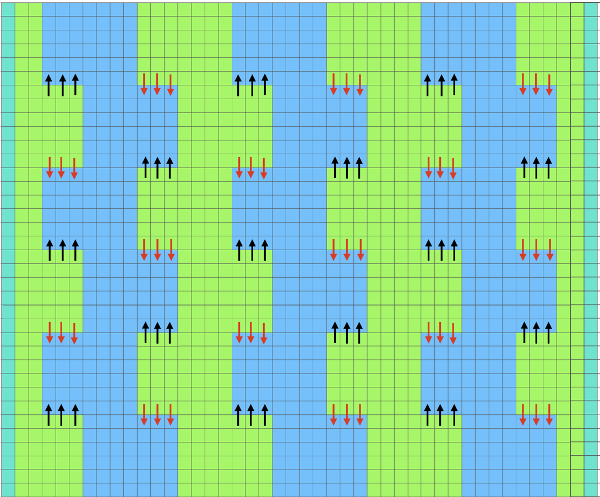
cast on for every other needle rib 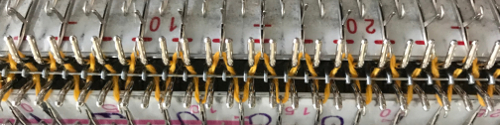 after completing cast on rows, set up for pattern by transferring between beds
 *knit 6 rows, transfer between beds
 knit 6 rows, transfer again restoring original selections**
 repeat * to **; transfer to main bed, bind off. Swatch on KM prior to binding off
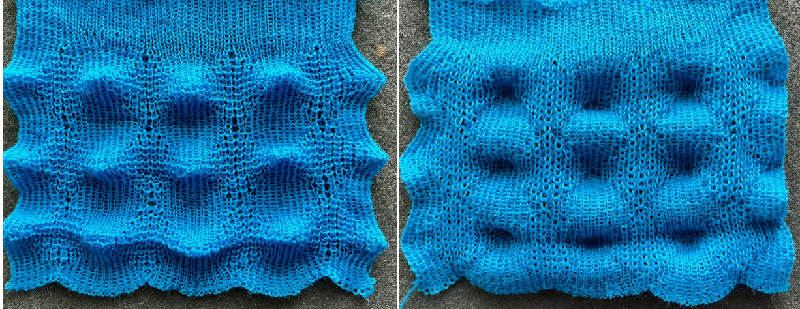
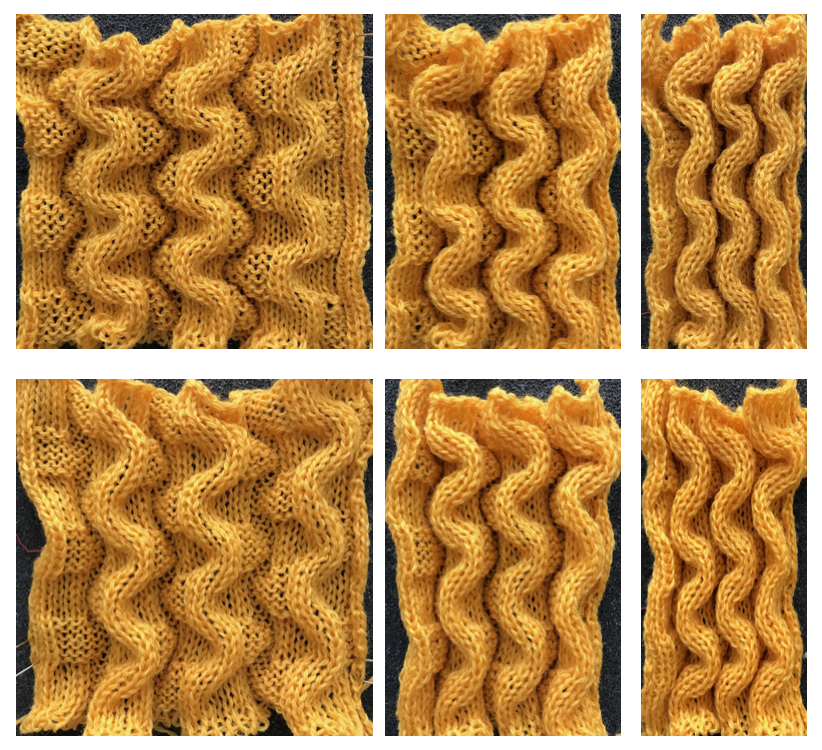
  If the goal is to retain the texture, it is best to knit using a yarn with “memory” such as wool, which may be steamed or blocked lightly while retaining the fabric’s quality. A rayon or cotton would flatten permanently if pressed. The photo shows both sides of my swatch, beginning on left with it slightly stretched with pins, relaxed in the center, and with a bit of vertical “tug”
 The fabric changes a bit when some stitches remain fixed on alternating beds, and the same sort of approach is used. My initial intent had been to transfer every 4 rows, but I actually did so after every 6 rows knit. Colors in the chart on right:
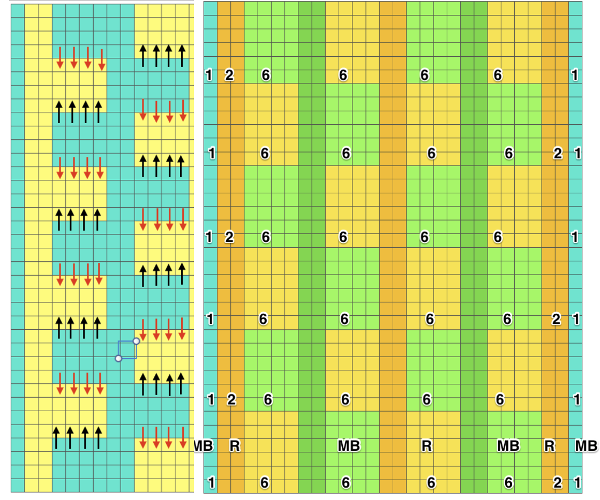 Its numbers indicate the working needles on each of the 2 beds. The first 3 needles on either side are never transferred. Groups on either bed after transfers remain constant at 6 with the exception of the borders. The starting set up
 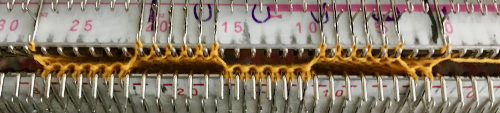 and the alternating one, repeated in turn throughout the knit. Note border stitch selection, constants in between
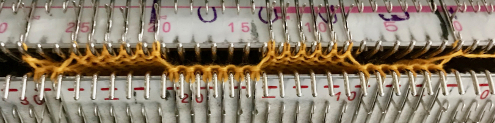 still on the machine,
  and my small test swatch. The fold on each side and the swing in the pattern appear crisper and better defined to me
 What of horizontal folds? Transferring every stitch to and from the main bed manually is more than I am willing to deal with in addition to transfers for those blocks. I am also interested in the effect produced with the use of thicker yarn. This repeat is presently on my hand knitting needles, is suitable for electronics or punchcard machines. A single unit is 5 by 16 rows, the punchcard repeat is 24 X 16 X 3; 32 rows is a tad shy of enough rows for the punchcard to roll and advance properly, 36 rows in height is the recommended minimum. Knitting as tight as possible makes for a stiffer, crisper fabric. I decided there were things about this repeat I did not like, however, including the change in pattern at the folds
 The new repeat, with only 2 rows worked rather than 4 between block pattern reversal, the repeat is now 12 rows rather than 16 in height
  The hand-knit swatch, using 4 ply yarn on #5 HK needles. The arrows mark the area where 4 rows were knit between knit and purl blocks rather than 2, creating an added ridge, and a straighter line than the row pairs
 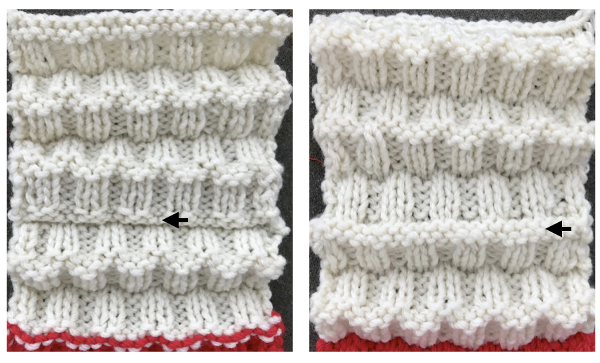 an attempt at a side view
 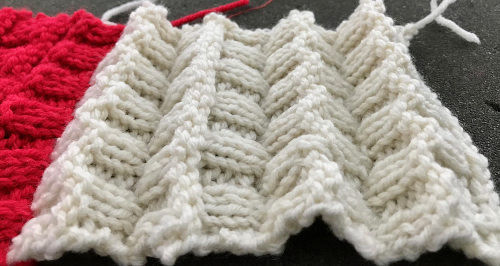 an earlier hand knit project in the same stitch family
 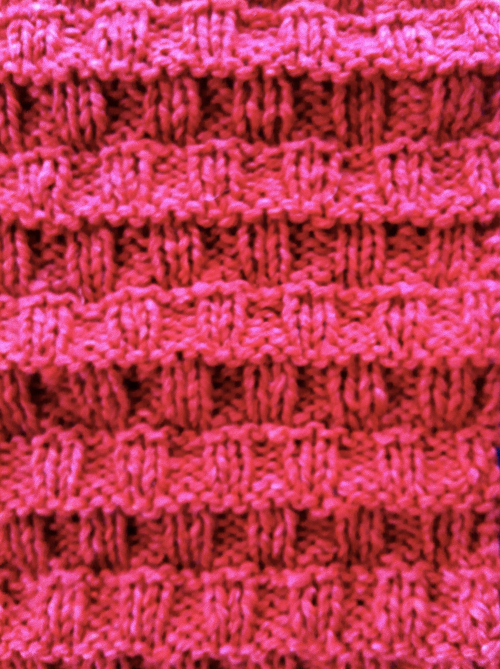 Another handknit swatch in worsted weight, perhaps suitable for G carriage
 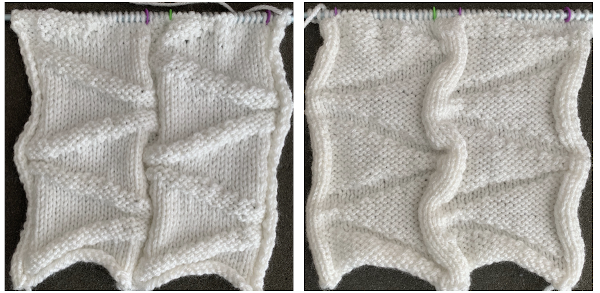 Its repeat turned 90 degrees clockwise
  Getting rid of those blocks altogether: a generously shared free pattern on Ravelry and a link to the author’s blog
 More blocks to try
 Zigzags in varied configurations
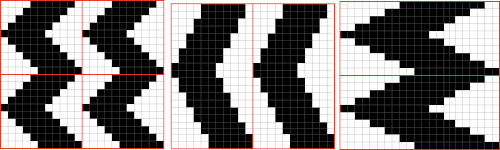
A look at single bed mock rib
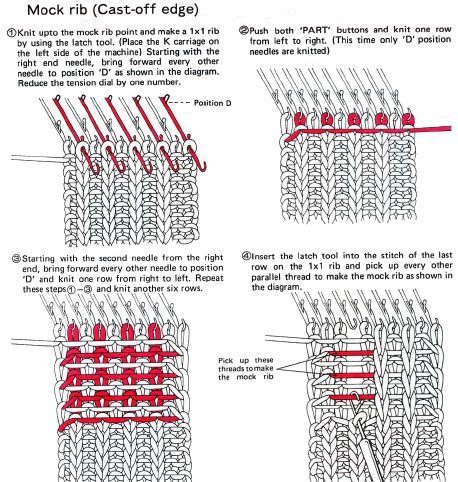
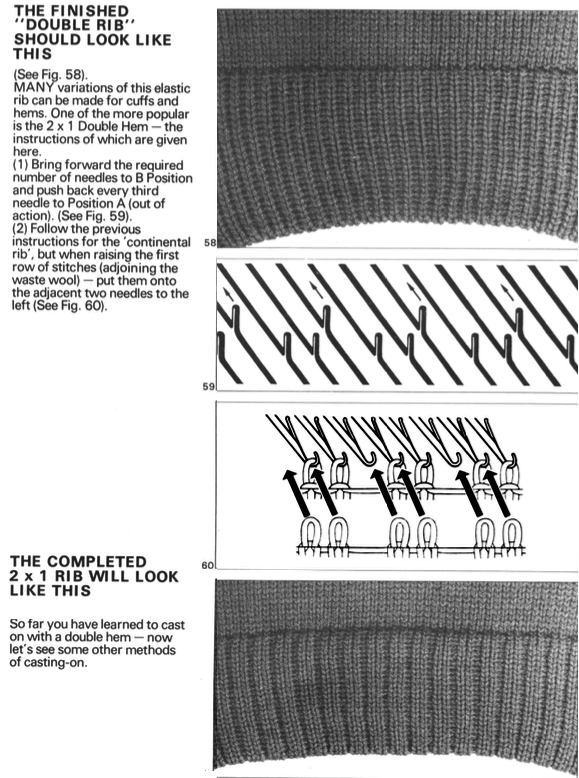
The Brother Knitting Techniques book has a series of illustrations on how to manage a mock rib in various configurations on pages 7-15. The manual is now available for free download online and is an excellent reference.
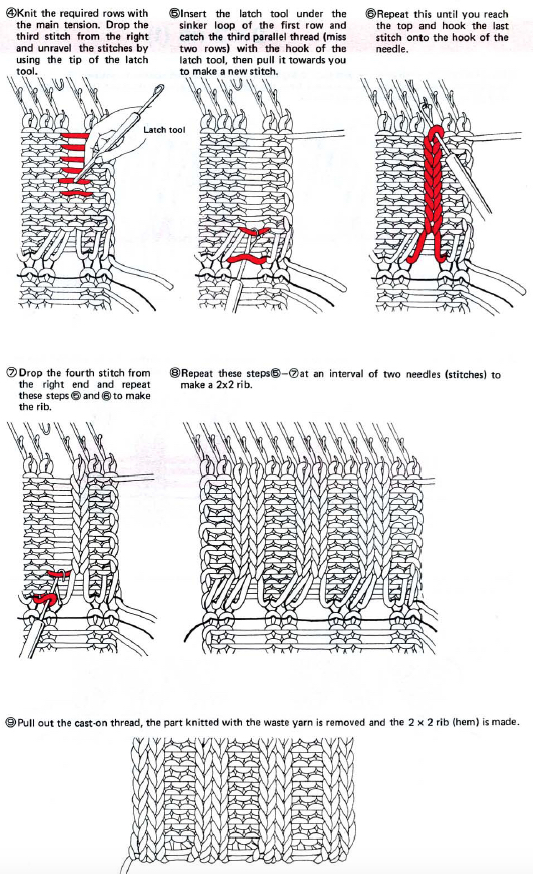
This technique requires a waste yarn start, followed by a row of ravel-cord. The resulting knit creates ladders or stitches that will, in turn, be dropped, then latched up and reformed into knit stitches on the purl ground. Reducing the knit tension by as much as 2-3 numbers is recommended after the ravel cord row.
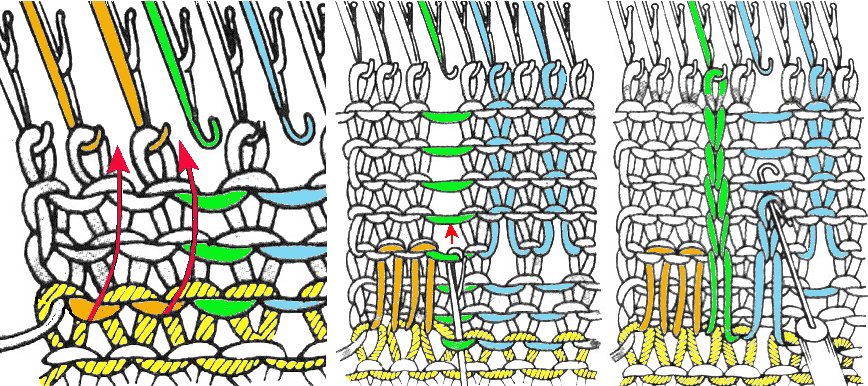
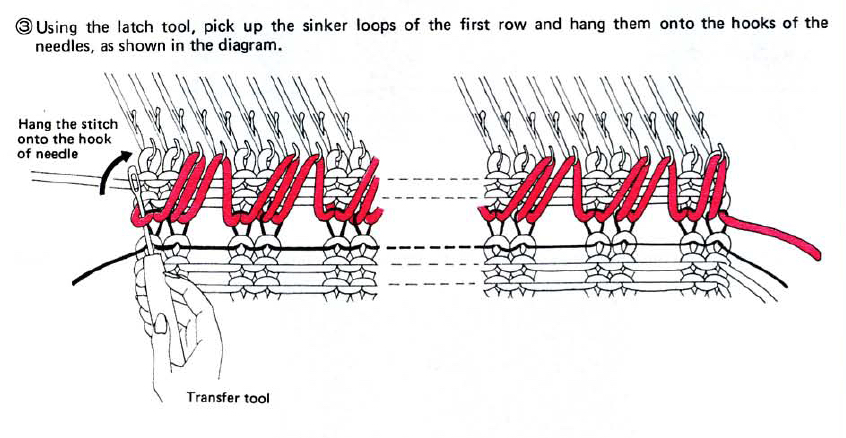
The needles marked in blue and green in the first image below are needles that are pulled back to the A position prior to starting the piece. After the waste yarn and ravel cord (hatched yellow) start, three rows are knit with the garment yarn. Using a transfer tool, pick up the sinker loops from the first row knit (orange), and hang them on the corresponding needles on the diagram (follow the red arrows).
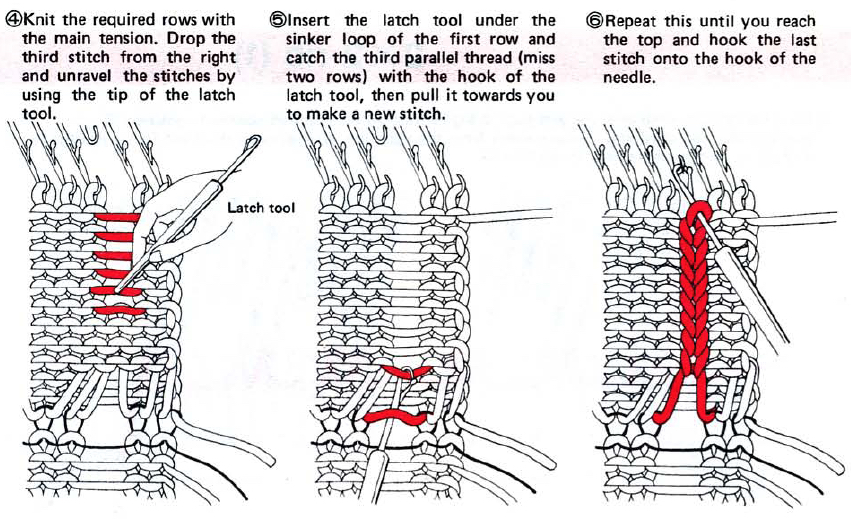
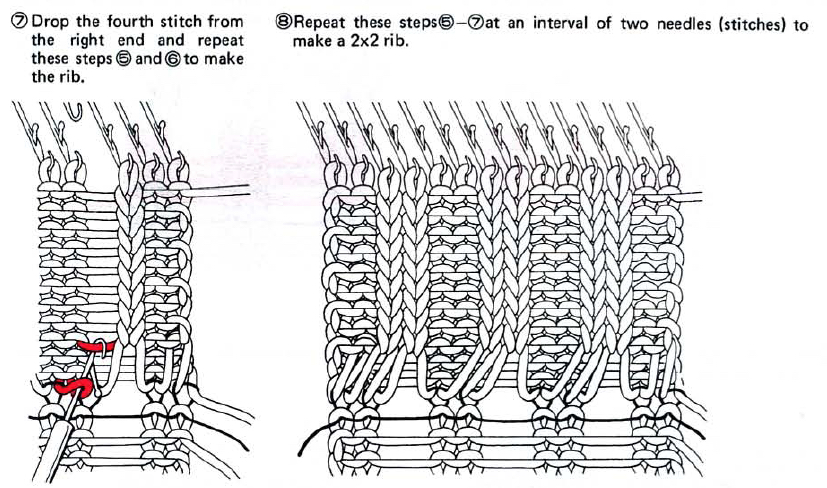
One may at this point continue with needles (green) left out of work, or return the needles (blue) to the work position. If needles are left OOW, ladders will continue to be created. If they are returned to work, a loop is created on the empty needle on the first knit pass, formed into a stitch on the second pass, resulting in an eyelet. Every needle treated in this manner will now be knitting. If stitches rather than ladders are formed for the height of the rib, then those stitches (blue) will need to be dropped, and in turn, latched up. In both instances, the latch tool goes under the first ladder created, and 2 rows are skipped, the latch tool then catches the third parallel row, and pulls it through the first to make the required knit stitch. The process continues up the height of the “rib”. In this illustration, the main yarn begins to knit with COL.
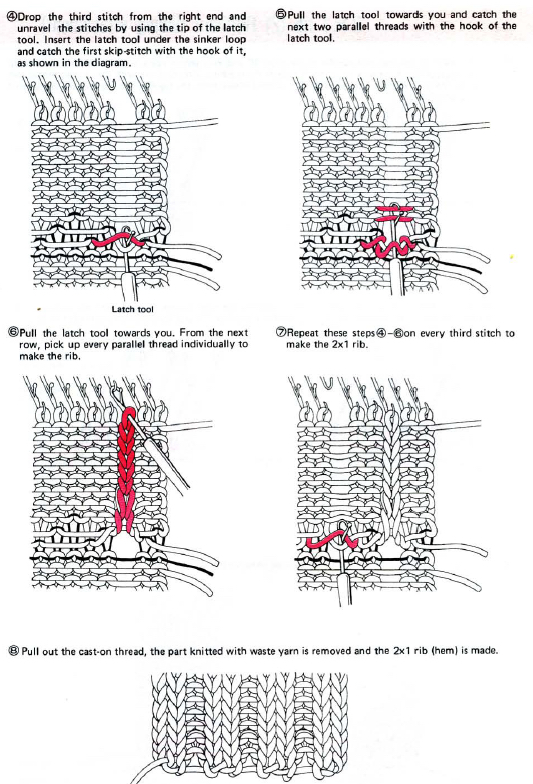
A 2X2 rib is possible. From the Techniques book: cast on with waste yarn and ravel cord (1, 2)
 an alternate: cast on with waste yarn and and ravel cord, knit 3 rows
pick up the sinker loop from a knit stitch, hang on 1 of the 2 NOOW (R)
knit height of the rib 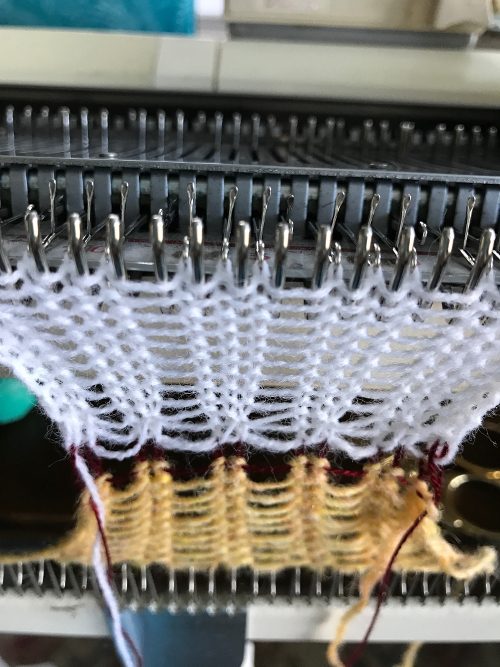
latch up the ladder as shown in drawings above

drop/ unravel the second stitch to be latched up (L)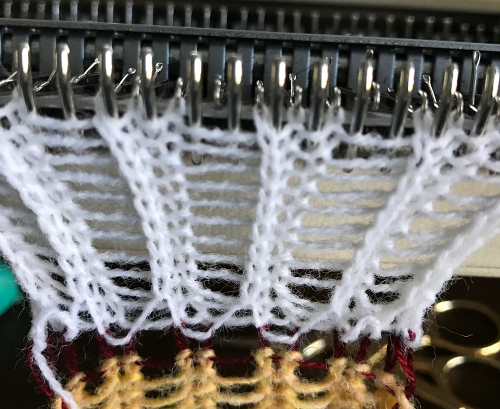
dropped stitches reformed for rib 
continue across the row, then proceed with the main body of the knit 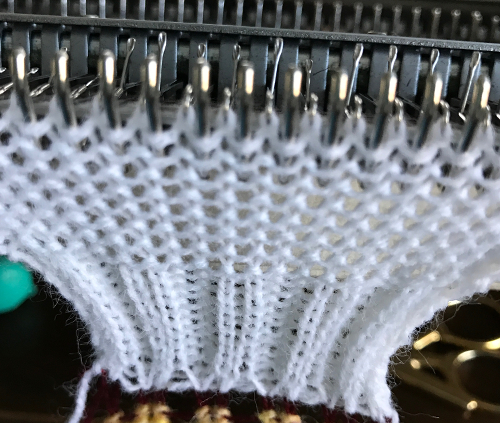
the rib, off the machine 
stretched out
My sample was knit in a 2/15 acrylic, a bit thin for this technique, and if pressed, the fabric would be flattened permanently. If the intent is to have the rib retain its “spring and stretch” it is best to use a yarn with memory, such as wool. If slip stitches or FI are to be used for the body of the knit, they will create a much denser fabric. The yarn in the rib may in turn need to be doubled to produce enough substance. As always swatching is recommended before committing to a large piece in any technique.
From the Brother Techniques Book a few more to try: 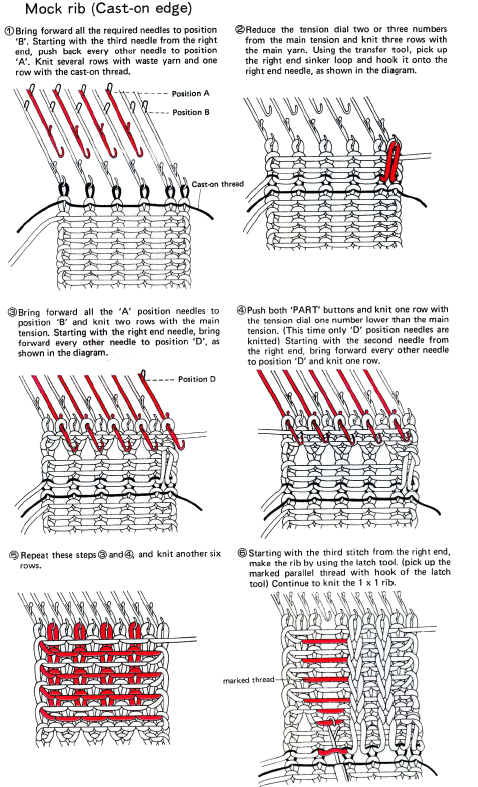
 2X1 rib using slip setting
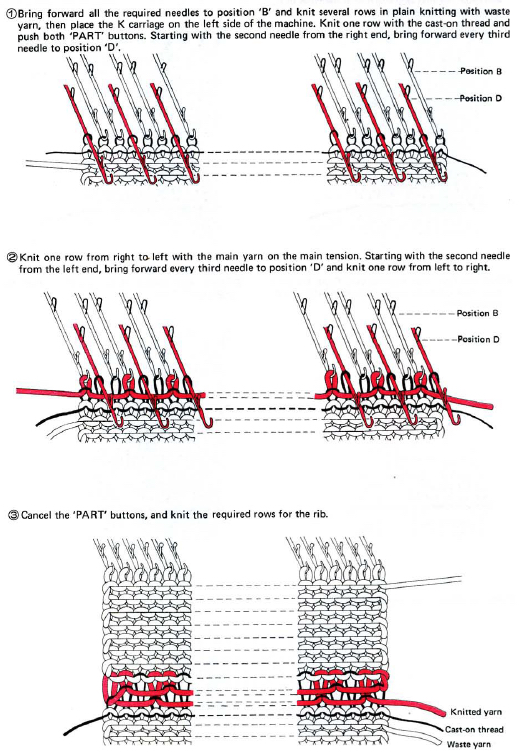
 2 X 2 rib: working with Brother cast-on comb, full text
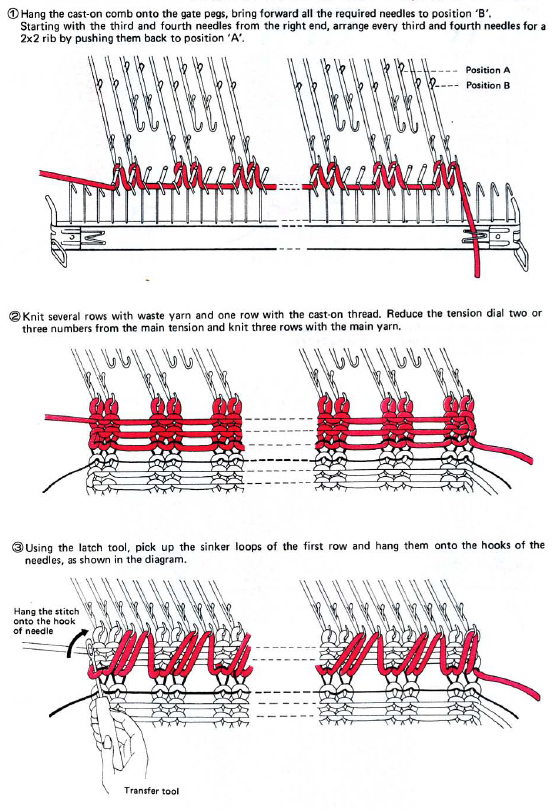
 using waste yarn
From the KH 800 manual, a double welt. Knitting the single joining row of hems at a looser tension will help the place where the two layers meet lie flatter 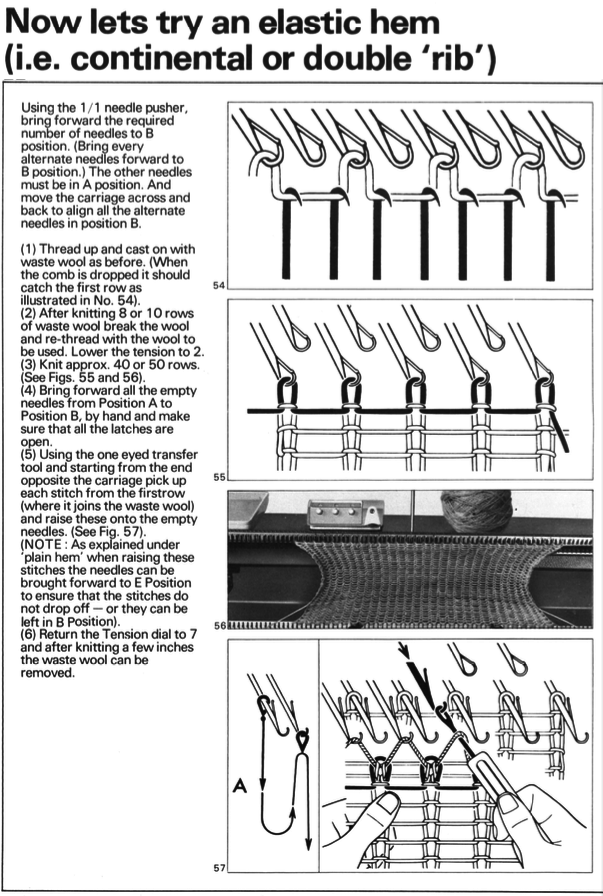
Vertical racking 3: automating half fisherman in pattern (2)
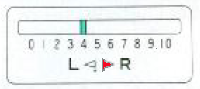
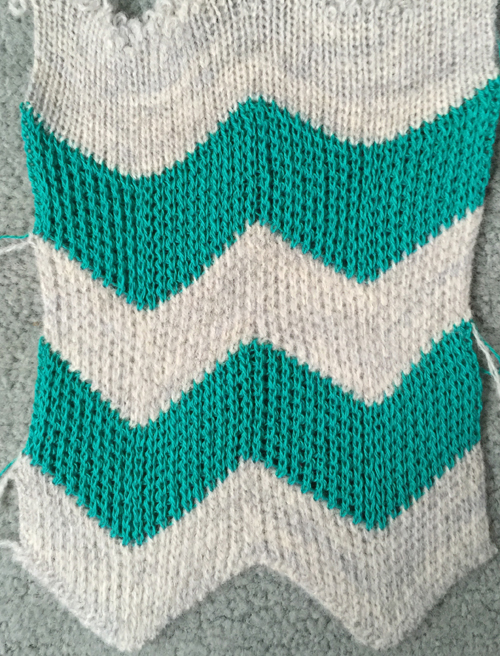
Working with the half fisherman racking discussed in the last post, here is an approach to interpreting the fabric seen below for knitting on a Brother model knitting machine.  For the sample chart, I chose a 12 stitch repeat, making it executable on any knitting machine. The ribber is set to half-pitch. An often-overlooked clue as to what is happening or is about to be found in the arrows just below the racking position indicator. With the latter at 5, the red triangle appears pointing to L. As the bed is racked to position 4, the red arrow now points to the letter R. This is a simple racking pattern involving only the 2 positions, either to R or L
Once on position 4, the red arrow indicates the direction in which the bed was racked on the last move (R), the “empty” arrow the direction for the next move (L), bringing the position back to 5. More complex patterns require a bit more planning and tracking to avoid errors.
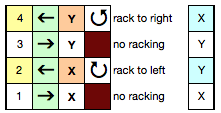
Racking patterns in books often recommend beginning the fabric with the setting on 5, or the center position for the machine in question. Doing so allows for balanced edges in patterns that swing by multiple positions in both directions. In this instance, for the sake of avoiding mistakes in as many ways as possible, I would start the pattern on racking position 10. Racking cannot go any further to the right, so no chance for example of racking to 6 rather than 4 in the knitting because of inattention. Having a “cheat sheet” with row numbers where no racking occurs, and the position of the carriage to R or L at their start and or after the knitting is also helpful. I had to lower the tension on both beds considerably to avoid forming loops that in turn got hung up on gate pegs. Especially at the start make certain that the comb and weights drop properly. Using KCI will ensure that the first and last stitch on the main bed always knit. In the patterning used on the Passap back bed (previous post), the groups of needles in each half of the repeat will change to the alternate position with each pass of the lock. On the rows where the back lock is changed to N, selection continues in pattern, but no tucking occurs. In this chart, the pattern is maintained continuously throughout, while blank “remaining” squares are filled in on rows where no tucking or racking occurs = N, every needle knits. In Brother machines, both tuck buttons are pushed in. Selected needles knit, non selected tuck across the row. 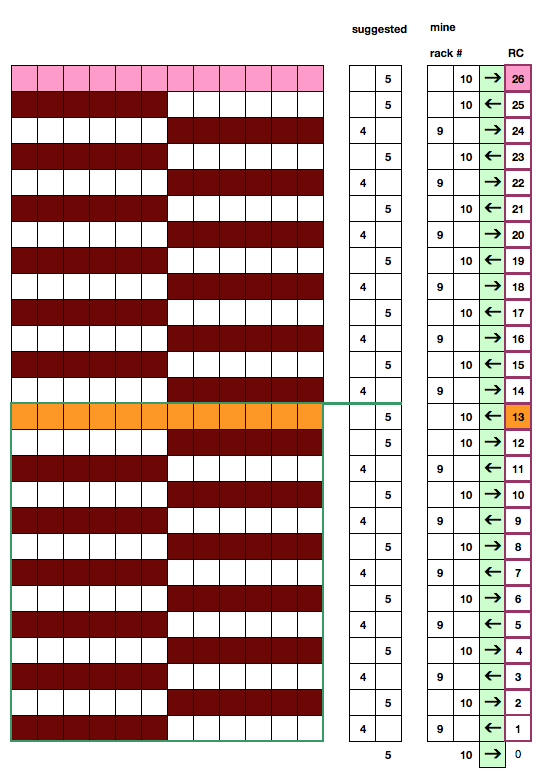
I tested the pattern approach on my 910, with a 38 row, 20 stitch repeat in a random acrylic. I had some issue with some needles not selecting properly, for whatever reason. The repeat was not planned so a full 10 stitches were at each side of the knit, resulting in the difference on the right side of the swatch photo from its left.

half the repeat with color change on a single plain knit row (use of color changer only possible with even row change sequences), the top stripe of the swatch in plain rib

back to scales and knitting them
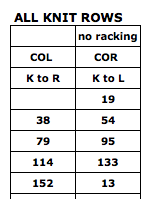
Overall, wider repeats and thicker yarns gave me harder to knit fabric, with less noticeable pockets and lack of stretch and “bounce”; ultimately I went back to a 6X6, 12 stitch 2-row sequences illustrated in the chart above. The thinner yarn needs to be with a bit of stretch, and enough strength not to break when ribbed and racked at the tightest possible tension. This is a fabric that requires concentration, having as many clues as possible to help stay on track is useful. If errors are made close enough to the all knit row, it is possible to unravel carefully to that point and continue on. Mylars or punchcards may be marked to reflect racking position. Here the mark on the right = 10, the one on the left = 9. Marks take into consideration that the card reader’ design row and knitter’s eye level row views are not the same.
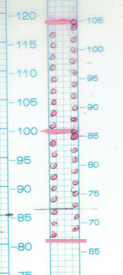
A row cheat sheet can help track carriage location for all knit rows. Pictured below is part of mine. Wording for clues or description of sequences should make sense to the person knitting, not necessarily follow a specific formula.
some of what “did not work”, including a very long swatch with a confusing pattern due to creative operator error
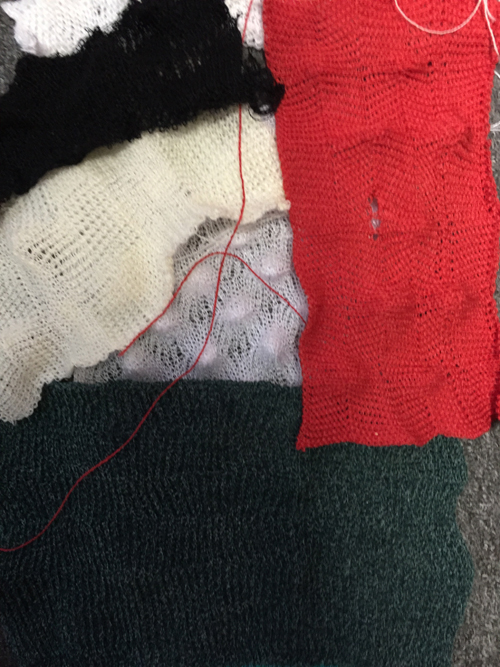 a finished piece with yarn ends not yet woven in
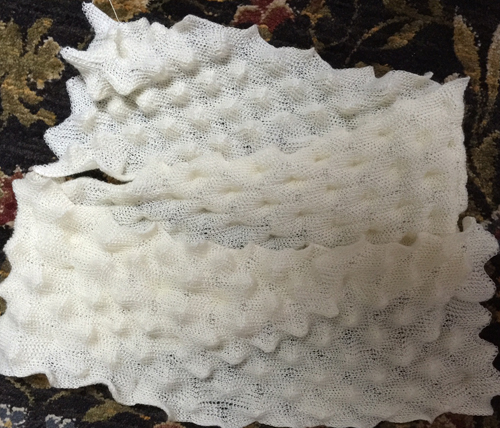
The fabric is tugged lengthwise, left unblocked, and pockets may pop on either side of it, with the majority on one side of the knit as opposed to the other
the start of a series in varied colors and fibers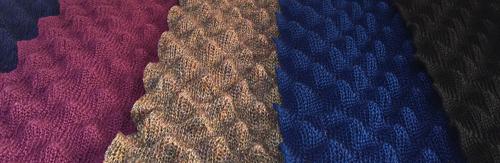
Racking 2: vertical chevrons/ herringbone +
Here again, half fisherman or full fisherman rib is be used. The zig-zag happens at the top and bottom of the fabric. In half fisherman, the setup is once again for full needle rib. If knitting in one color the sequence is: knit one row, rack a space, knit one row, rack back again (X and Y below represent the 2 racking positions involved 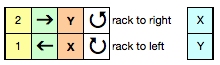
for 2 color fisherman, the sequence is knit 2 rows with col 1, rack one space, knit 2 rows with color 2, rack one space back again
 this fabric is produced in conjunction with a pattern repeat using the principle that black squares knit (pushers up, needles preselected), white squares tuck (pushers down, needles not selected), the repeat is 12 stitches wide, 2 rows high; it is possible to have 6 stitches tucking side by side because this is an every needle rib, and there will be a knit stitch on the opposite bed anchoring down each tuck loop
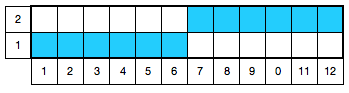

one color half fisherman side one 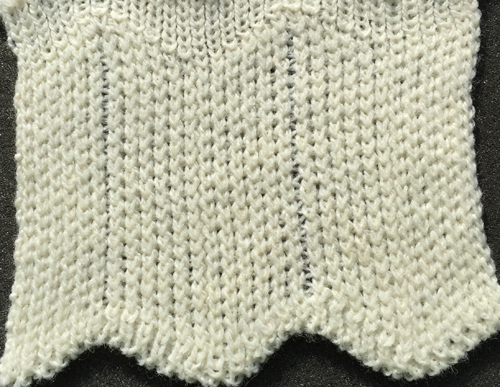 one color half fisherman side 2
 2 color setting, color changes every 2 rows, side 1, thinner yarn
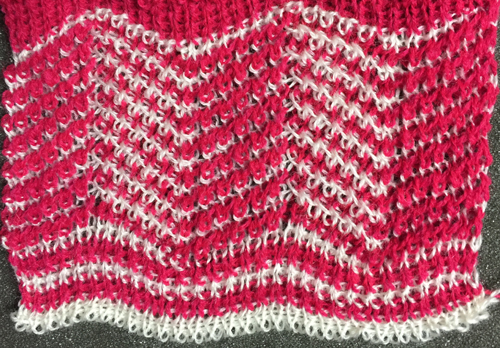 side 2
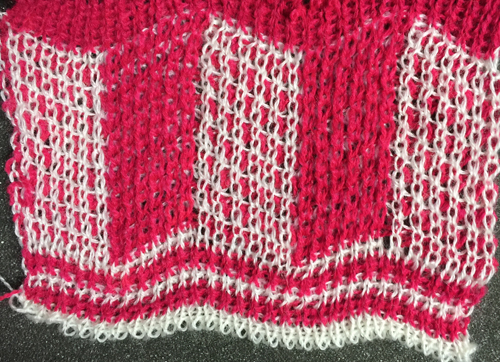
2 color version, changing color every 20 rows; racking interrupted with plain knit rows at top and bottom creating horizontal pockets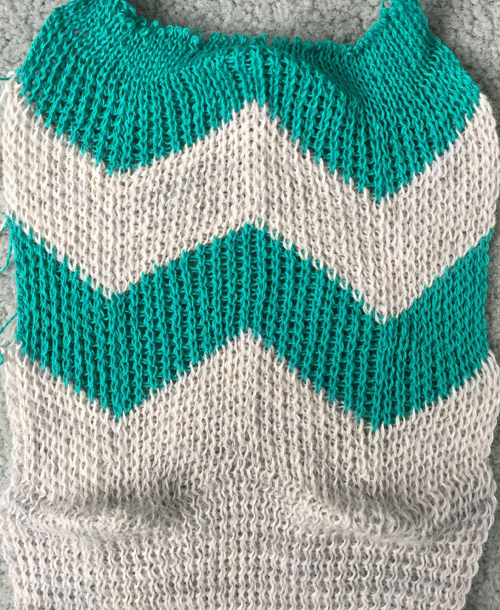
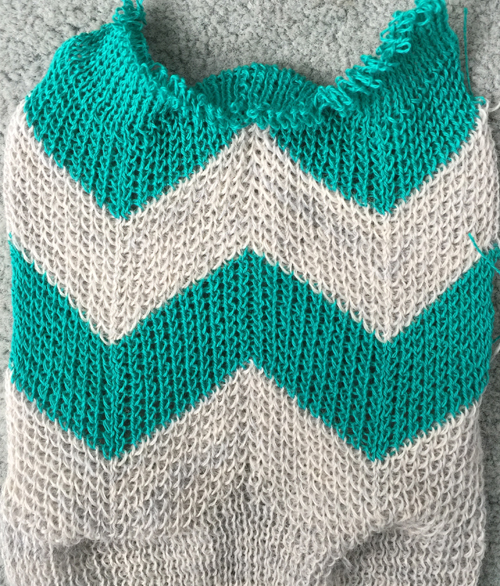
This type of repeat became popular in Passap clubs for use in their Passap ripple afghan. The racking first to the left and knit a row, knit to the right and knit a row, was interrupted after 36 rows, followed by a color change and a no-racking knit row before resuming the previous racking sequences.
When single or multiple odd # of rows with no racking are introduced at intervals the zigzags once again happen at sides rather than top or bottom, with the knitting after the no racking row(s) reversing direction. The yarn used in these swatches is a random acrylic, presses flat, not the best if aiming for any 3D textures; the color difference is due to photos being taken at different times of day
side one 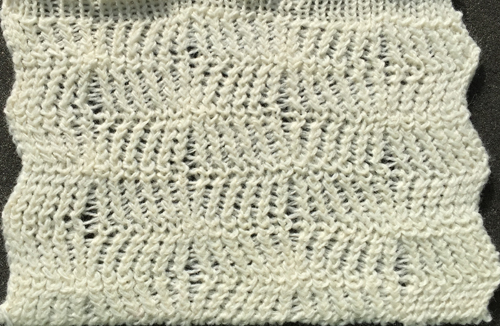 side two
what happens when multiple odd numbers of rows are knit changing back lock set to N (all knit), no tuck stitches. The fabric still swings in opposite directions, and in addition, the all knit rows produce areas that “poke out”, beginning to create scales of sorts
side one  side two
 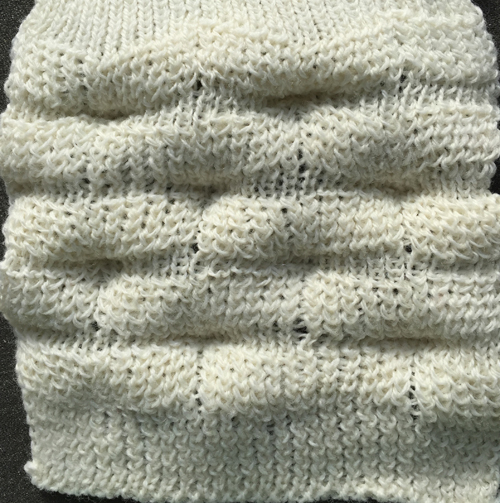 back to vertical: full fisherman with color changes every 2 rows, side one
 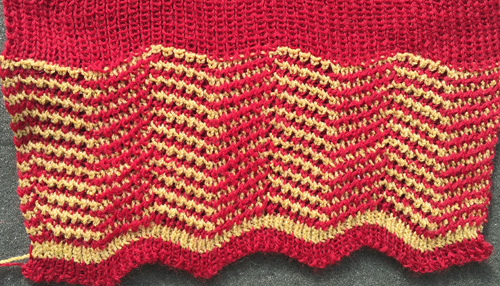 side 2, with a few stitches knit off issues
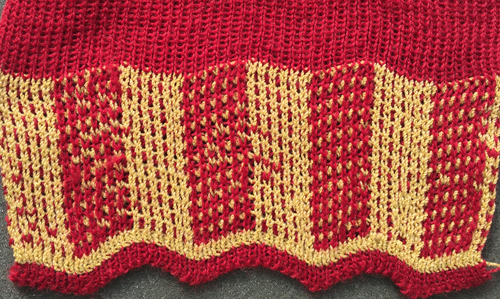
it is a matter of personal preference whether the extra effort with full fisherman rib is worth any difference in appearance or result in the final fabrics. Changes in tension, yarn fiber content, and machines used add to the variables. Good notes in trials help one determine predictable results and to choose whether the effort may be worth it or not. Using laborious techniques for borders rather than whole items is always an option.
1/22/2016: half fisherman racked rib knit in thinner yarn, wider # of stitches and more rows in pattern group before single N/N row, no blocking
 same fabric with color change every 2 rows