The previous discussion on this topic: Ladderback double jacquard: backing variations
This backing technique has traditionally been used when the yarns are simply too thick to be worked in traditional dbj backing methods.
The majority of the needles will be knit on the main bed, so the tension should approximate that used for the same yarn worked in stocking stitch single bed.
The pattern will become a slip stitch one, with colors changed every two rows.
A FB Machine Knitting Group share led to a query on how this block type of ladder back might be duplicated on home knitting machines. 
 My interpretation of the knit:
  the planned block repeat, in turn, needs to be color separated and scaled for use in dbj.
This chart was developed using Numbers:
A: each color in each row is represented only once
B: the same repeat in black and white
C: the repeat double length so that each color is changed every 2 rows
D: getting the pattern to shift for every other pair of blocks is actually achieved by knitting the last 2 rows and the first two rows of the next repeat using the same color for 4 consecutive rows.
If the repeat is downloaded and programmed to be 24 rows long, the reminder to knit with the same color again is easy, since the pattern will roll back to row 1 with a warning, in this case, not to change color. It is easy enough to alter the height of the repeat to use this particular reminder. 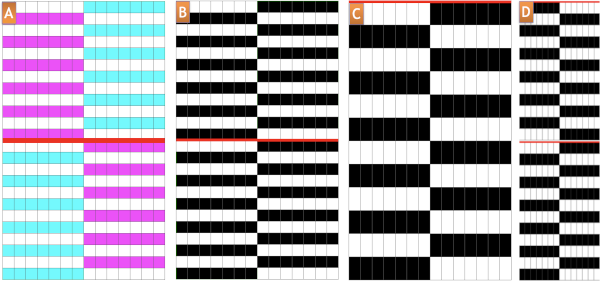 The motif used in the swatches is 14 stitches wide by 24 stitches high
 ![]() The machine set up: the main bed needles will need to continue to have weight evenly distributed on them, so the ribber comb placement needs to reflect that. The cast-on method can be one you prefer. I began with waste yarn, the ribber comb poked evenly through that, with the added use of ribber weights.
The machine set up: the main bed needles will need to continue to have weight evenly distributed on them, so the ribber comb placement needs to reflect that. The cast-on method can be one you prefer. I began with waste yarn, the ribber comb poked evenly through that, with the added use of ribber weights.
The pitch setting is for every needle rib.
End needle selection is used as in fair isle knitting to ensure that end stitches will be knit when either color is knit only on the top bed, resulting in the B feeder yarn being secured on the edge. If the end needle selection fails for any reason on the carriage side, push the needle forward manually.
The needle arrangement with red lines marking the location on the opposite bed.![]()
 COR: the first pass is made toward the color changer
COL: every other group of 7 needles is preselected, set both carriages to slip in both directions, change color if preferred, and bring up ribber needles in between those selected on the top bed to D position as shown here, on both the pass to the right and the return pass to the left. 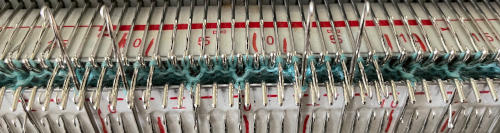 As the carriages make the pair of passes, floats will be created across the alternate group of 7 needles. Those floats will become secured as the next group of needles is selected and ribber stitches are brought up to form a line of knit stitches in the contrasting color in front of them.
 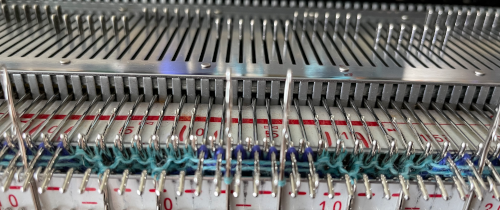 The yarn used here is 2/20 wool, really too thin for this type of backing, but I wanted to test the repeat and the concept.
 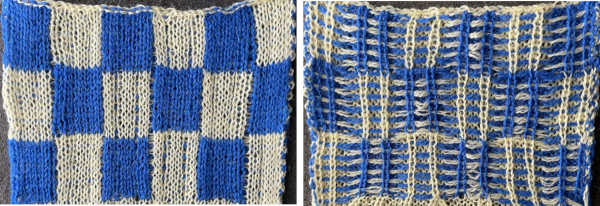 Using a 2/8 wool the result was optically the best, but I could not get any further than this without stitches jumping off needles in several places, regardless of tension adjustments
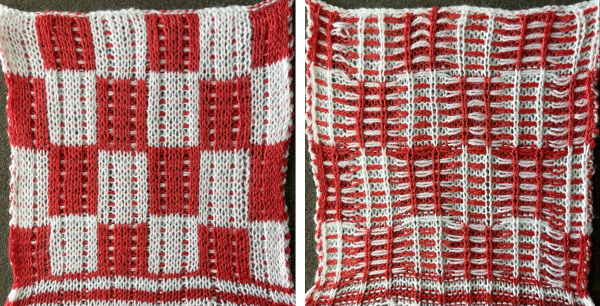
 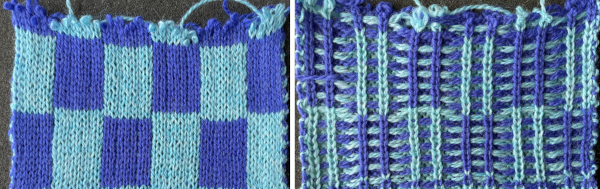 Using yarns in weight in between the 2, knitting was smooth, the tension on the top bed was set at tight as possible, this is the appearance of the knit on the machine
 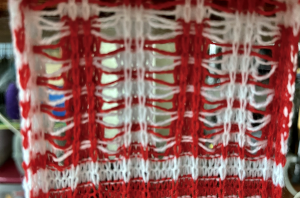 Off the machine, the bleed-through from the floats created on the top bed on the knit side begins to remind one of knit weaving as does the purl side. Not the intended effect and fabric, but perhaps worth pursuing intentionally.