The machine knitting forums in both Ravelry and Facebook have recently been buzzing with versions of twisted headbands in varied techniques and yarn weights. Tanya Cunningham sparked the discussions by showing her bulky tubular knotted version. In her blog, one may find clear instructions on fold and assembly.
I chose to knit mine in full fisherman rib, making the fabric reversible, so that facing side at the start did not matter when seaming. I wanted a single thickness and a lightweight but warm fabric that would lie flat, perhaps being worn under jacket hoods on winter walks. My first band was knit with a punchcard carriage with a magnet placed for using it on my electronic. I forgot I had removed its row counter when it was last used for knitting with 2 paired main/ribber carriages in order to clear the end of the bed. As a result, I was unable to use the row counter, as that fact eliminated the tripper for it.
Part of my plan was also to avoid bulk at the twist as much as possible. Increasing the stitch count for such warmers can easily approach more of a hat shape, and a “top” could be added to complete the piece if it is intended to be worn as one.
In terms of inspiration, there are endless sources for twisted bands available, most for hand knitting, but sometimes they can be adapted to machine knitting easily enough, especially if one also owns a G carriage. One such source is Dropsdesign , simply enter headbands, knit, in the search field.
Head sizes and what each of us determines as comfort can vary tremendously. A table of head circumferences may be found at craft yarn council, and for much more detailed charts see
The twist will take up some of the finished lengths.
My first band sailed through on my Brother 930 standard:
Cast on 22 stitches in 2/18 silk wool, tension 5/4, at the same tension as the body of the band, intentionally loose.
Knit to head circumference, checking the length on the machine with weight off periodically after weight hits floor (scientific measurement), and periodically after the weight and comb are moved up.
Transfer stitches to main bed
Knit one row single bed at a looser tension (I used 8 in this version)
Bind off around gate pegs, OK if tighter than the bottom, it will be part of the seam
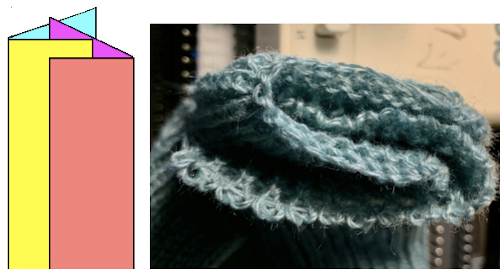
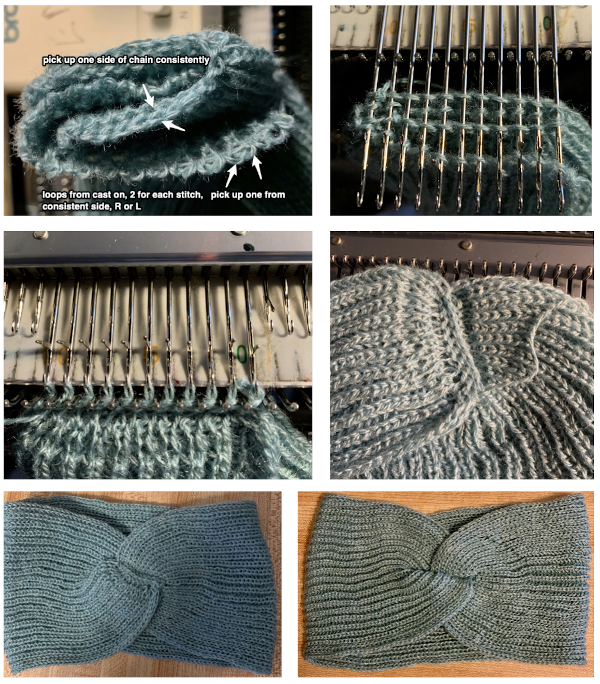
Twist and fold, rehang one side of the chain, alternate loops from the loose cast on
Knit a loose row across all layers and bind off,
Turn inside out.
Variations in color are due to the wonderful lighting in my apartment on another gloomy, rainy winter fall day.
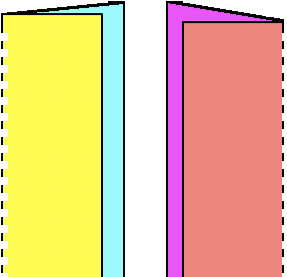
Visualizing the necessary folds: make certain not to twist the fabric, fold it in half. Colors are used to represent portions of the finished, continuous rectangle, dotted lines the approximate center line when it is folded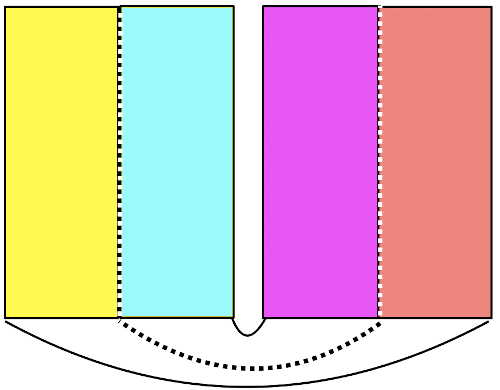
For my second effort, I switched the yarn to a yummy feeling 2/14 wool that was plagued with random dropped stitches on the Brother, no matter what I tried. That piece wound up lightly felted by hand after intentionally adding more knit length. I eventually gave up and moved over to my Passap, where things went smoothly knitting on 4/4. A reminder: in this fabric, one bed knits every needle while the opposite bed makes loops on every needle. It is helpful if the first stitch on each bed knits as carriages move to the opposite side.
Passap setting EX/ EX beginning on right and moving toward the left will tuck on the back bed (ribber setting), knit on the front (main bed setting) while tucking on front and knitting on the back when moving from left to right. Operating from the same side, the Brother settings to match would actually be the reverse of those illustrated in the ribber manual. Starting sides are in Brother instructions are often based on cast ons with 3 circular rows. I prefer 2 as I have explained in the past, it avoids a float forming between stitches on one side of the fabric. In this instance, it matters in set up only in terms of planning ahead as to which bed will form knit stitches first and having the first needle in work on that bed to ensure that the stitch will knit. In matching patterns between brands, cam settings could matter more. End needle selection brings stitches out to knit in patterning, but if KC is used here, all needles in work will be brought out to knitting position, so that is not a solution for having those stitches knit. Another thing to note in the instructions is one that might be missed upon a quick view. The Brother setting shown is for full pitch. That is because their instructions are for full fisherman knit for when every other needle is in use. If every needle were in use, the setting should be on H, not P 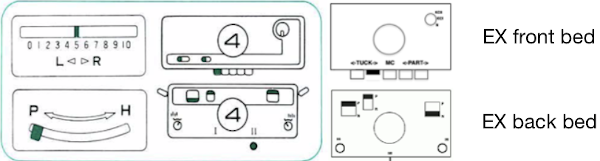 There is also the option when one wants to insure end stitches knit in patterns such as tuck to bring end stitches out to hold manually prior to knitting the next row.
A gauge swatch in double bed tuck should be at least 80-100 rows in length. One can sometimes “wing it”. It is important if you do that, that the length is measured between the beds as close to needles as possible, and down from there without weight and after the fabric has relaxed. Do not assume it will stretch to fit, the result may be several inches too small.
A comfortable length for me in the blue wool consisted of 310 rows, knit at T 4/4. Stitches were quite small, so after transfer to the back bed, I knit a row to the opposite side at tension 8 before binding off. I also placed contrasting color yarn markers at the center point of the cast on and bind off to make seaming up evenly easier, and held things together with a double eye tool so as not to accidentally twist the piece.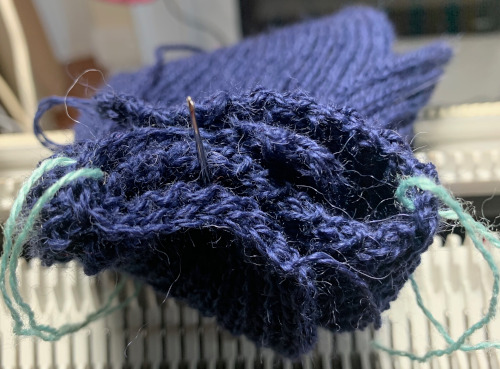
The number 4 band is my first sample, knit on Brother standard. Number one got pulled on to the planned length based on the “it will stretch” assumption. A metal ruler/yardstick was marked with tape at the desired height, while on the machine the marker was reached, but when off it, the final measurement was a whole 16 inches as the knit relaxed, far too small for most human adults! Number 2 is the brother version felted by hand to hide dropped stitch and edge stitch repairs, knit and shrunk to a measurement longer than head circumference for finished width, taking into consideration the fact that stretch is lost in felting. The fit was tested on my own head during shrinking and before drying. The number 3 band is the “comfy wool” one knit on my Passap. 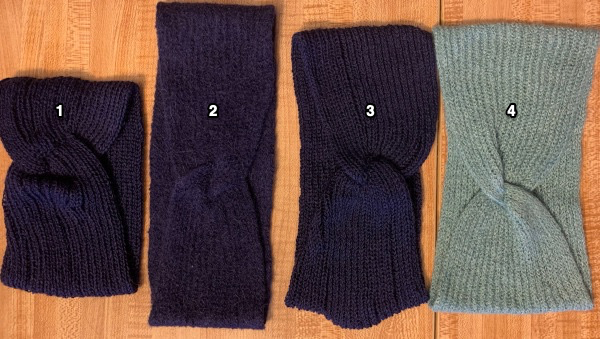 When I taught my course, after weeks of swatching the first “garment” involving a variety of automatic and hand techniques, students were required to knit a “baby hat with earflaps” exactly as given in printed instructions, using any stitch pattern and yarn of their choice. It provided an interesting exercise in gauge and proof of the need for swatching before beginning plans for actual garments. The results varied from so small the hats would only fit a small doll to ones too large for any human head.
Knitters are often resistant to swatching, but making assumptions about results can result in not the best use of both time and materials. If working in tubular stocking stitch the tension used should be the same as for knitting of that yarn in that stitch single bed. Tuck stitch is short and fat. In every needle rib there are stitches being worked on both beds, so double the number on the top bed would be actually worked than when using needles on only one bed. Loosening the tension by several numbers on both beds does not equate to matching width for similar numbers of stitches to the ribbed version. Here is a resulting mini-band, testing the same seaming technique used in the fisherman-rib samples. It was 20 stitches in width, 80 rows in length. I cast on at a loose tension, matching that used in the body of the stocking stitch tube and knit a row to seal before setting for circular knitting. When the top is reached, transfer stitches from the ribber to the top bed, knit at a looser tension tow to the opposite side prior to binding off and seaming (here I used 10). The technique should be usable on bulkier bands as well.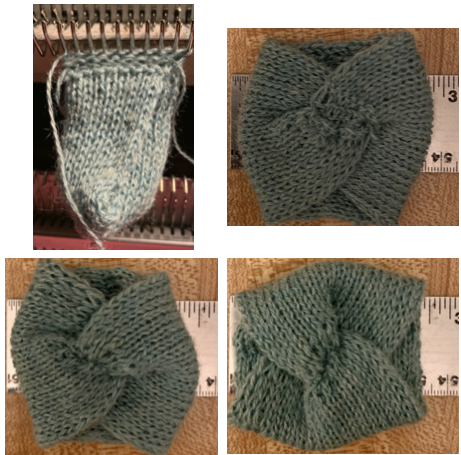 The elongated stitches at the top of the “band” are due to an extra needle in use on the ribber. To review, the proper settings from the Ribber Techniques Book:
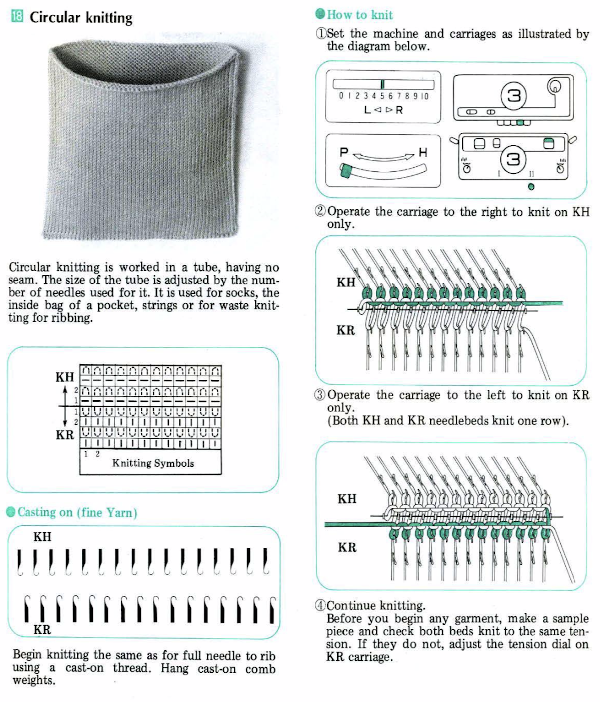
So many great ideas and suggestions. I also, have always felt the ‘knot’ was just a bit overthick. Never really thought about treating it like the top of a hat. Really great writeup, and thanks for all the photos of your various attempts. Super helpful resource!