Tuck stitch meets knit-weaving

This video was recently shared on Facebook. The sample in the video was knit on a Studio/Silver Reed brand knitting machine and prompted the question about the possibility of knitting the same pattern on a Brother machine.
Some techniques require infinite patience.
A summary of observations made looking at the video:
1: the machine tucks for two rows
2: the card is set to elongation for weaving rows, where the pattern selection continues, but the carriage is set to knit the background for woven rows
3: the carriage is set to tuck once more to complete what are 8 or more rows of pattern
4: start the process again by knitting four rows of tuck followed by 2 rows of knit weaving until the top of the piece is reached, ending with two rows of tuck before binding off.
Studio machines select as they knit each row, while Brother machines preselect each row as knitting continues after the initial preselection row.
There cam buttons switch from tuck to knit, and the card rotation settings are changed frequently from single to double length on the repeat segment as given.
To mimic the video, this is a chart for the adjusted repeat planning to knit a swatch on an electronic model using 2 knit carriages selecting needles with the pattern advancing one design row for each pass of the carriage.
The cam button variations: the yellow cells mark tuck stitch rows. The red cells mark the knit-woven rows, where the carriage is set to knit with continued pattern selection, and a weaving yarn is brought into play for 2 rows.
The knit carriage is then set to tuck once more, and the process repeats.   Punchcard users working with a single knit carriage can punch all black cells in the width given in the chart, and twice its height for 48 rows, eliminating the need for elongation shown in the video.
Using 2 knit carriages can eliminate cam button changes from tuck to knit and back.
When using any pair of carriages to select needles, each carriage must be disengaged from the belt while the other carriage is being used to avoid breaking it, so extension rails are required.
I began with the sample knit on 30 stitches on my 930.
The carriage set to tuck operates from the left, the knit-weaving one from the right, with the first preselection row made from right to left.
The 30-stitch test includes a one-stitch knit border vertically on either side. The main background yarn used for tuck rows color is a 3/9 wool, and the knit weaving carriage is threaded with a slightly thinner, darker yarn of unknown thickness. The weaving yarn is a worsted-weight wool.  Changing the ground yarn to the same yellow 2/20 in both carriages, the pattern was first knit in tuck stitch alone, possible for 6 rows because of the yarn thickness,  and then using the 2 carriages knit weaving at the same intervals resumed.   A pair of some of the previous posts on using 2 knit carriages to select needles on Brother machines
Knitting in pattern with 2 carriages vs color changer, Brother punchcard KMs 2 
Knitting in pattern with 2 carriages, Brother punchcard KMs 1 
The Punchcard used in the video Brother punchcard machines repeat the preselection of needles on the first pass with the carriage from the opposite side to advantage in reproducing the swatch. The two 892E carriages  If a second punchcard carriage is not available but an electronic one is, the model year may affect the fit, but an electronic carriage can be used on a punchcard machine to advance the card and select needles.
The first row on the Studio card is locked on row 3 to preselect the first tuck row on the Brother from right to left
Rows 1-2: COL, set the carriage to tuck in both directions, make 2 carriage passes, ending COL with the carriage positioned on the extension rail, clearing the belt
Rows 3-4: COR, begin with the second carriage set to KC and outside the set line, and do not push in any cam buttons. Prepare your weaving yarn. Knit to the left, the card does not advance.
COL: weave the second row, move the carriage back ending COR on the extension rail, clearing the belt
Rows 5-8: COL, the card does not advance on the first pass to the right, knit 4 rows of tuck stitches, ending COL on the extension rail, clearing the belt
Rows 9-10: COR, repeat 2 rows of knit weaving
reminder: any hesitation with movement back and forth of either carriage once it is on the knit bed and selecting, will advance the card one design row
Repeat Rows # 5-10 twice to complete each full repeat segment
Choose an ending pattern segment and bind-off.
The proof of concept uses two slightly different yarn background shades again   Other tuck-stitch combination fabrics
Tuck stitch combination fabrics 
Combining tuck stitches with lace 2 (automating them)
Combining tuck stitches with lace 1
Tuck and garter stitch: from hand knit to machine knit

“Crochet” meets machine knitting techniques: working with short rows
More on using multiple carriages
Revisiting knitting with 2 carriages single bed, 910 vs Ayab so far
Geometric shapes on ribber fabrics with tuck stitches 2; knitting with 4 carriages 
Ribber fabrics produced with 2 knit carriages selecting needles 

Knit weaving 1

In knit weaving, the knit carriage is threaded with the main yarn as usual. The choice of pattern is determined by needle selection. The most basic technique involves pulling the desired weaving needles forward manually or by using needle pushers which are available in a range of selection options. Automatic needle selection makes the process faster, consistent, and capable of more variations.
The weaving yarn, according to instructions in manuals, may be threaded through the tension mast and guided through the weaving yarn guide. Feeding thicker yarn smoothly through the standard mast may become problematic. Moving yarn from the groove on one side to that on the other is cumbersome. The punchcard machine manual for the 860 machines has some clear illustrations and directions  From the 260 manual: The “yarn guide” is that mysterious notch in each arm of the sinker plate. In the Studio accessory, the AW1 weaving arm, the yarn is also fed through the yarn mast, and moved physically from side to side after each pass of the carriage. Start the piece with waste yarn and some evenly distributed weight based on fabric width. Make sure the weaving brushes are activated. In Brother standard, their position is changed using the corresponding lever, in the bulky 260 the L and R wheel brushes need to be placed in their corresponding slots.  A good repeat, to begin with, is one that selects every other needle, every other row. The card is a standard factory issue with punchcard machines. In general, the knitting yarn is thinner than the weaving one. The tension needs to be adjusted to accommodate the surface yarn, not the background one. The tighter the tension the firmer and narrower the weave. It is also possible to create soft knits with a lot of drape ie by using sewing thread for the ground and fine mohair for the weft, there is a huge range for exploration.
The “weft” precedes the base knitting yarn which knits the stitch. It is laid over the top loop of the old stitch on a needle selected by a hole in the card, goes underneath the top loop of a previous stitch on a needle not selected by a blank on the card. When card 1, above, is in use, the weaving yarn is caught in a series of two loops, one above, one below forming a honeycomb effect.  The structure is typically illustrated this way in Japanese reference books and magazines in particular.  Early Brother punchcard volumes have illustrations of the over_under structures and in between floats along with providing the pattern repeats. Setting things up:  the weaving yarn is in front of the machine, fed from the floor. The short end goes to the carriage side, the long end is away from it. It is laid in front of the gatepegs, atop selected needles. A clothespin can provide enough weight on the short end to keep it from riding up and having to be managed with one’s hand. “Weaving” can begin from either side, here it starts on the left. Knitting in 2-row sequences will return the yarn ends to the starting position. Locking the card, as with any other pattern, will repeat the same needle selection, creating vertical repeats that resemble twill weaving on a loom.
a: card set to advance normally, b: card locked a: because stitches are actually knitting every other row, slipping while the needles on each side of them knit, they will alternately be a bit elongated; b: same needles knit every row, so their appearance is consistent. Depending on the difference in yarn thickness, the knit stitches in the ground become forced apart with what can be significant “bleed-through” on the reverse of the weaving to make that a really interesting fabric feature as well.
Some weaving patterns with variable floats will produce better edges if the end needles are brought out to E in every row if not selected to that position by the reader.
If a hairy or fuzzy yarn such as mohair is used it is possible that the fabric will start to bunch up, it may be necessary to reach up from behind the knitting and gently pull to release the little hairs from the gate pegs.
Most punchcards designed for weaving aim for short floats formed by unpunched areas, longer ones on occasion are planned for added manipulation.
Moving the yarn from the groove on one side to that on the other is cumbersome. Another way of working: the main yarn is threaded as usual and the weaving yarn sits on the floor. The method is often referred to as intarsia weaving. The shapes may be created using various punchcard designs ie diamonds, squares, etc, free-forming, or even through following planned drawings on knitleader mylar garment shapes.
The knitter guides the yarn. If the yarn is held too loosely it may jump off the knitting while weaving and thus create long loops. It should be guided and held just enough to slip through the hand as the carriage is passed.
Preselect for the first row of knitting. Lay the weaving yarn across selected needles in the direction in which the carriage will be moving.
If using yarns of different yarn weights within the piece, multiple strands of the thinner yarn may be used together, but test how the strands feed and if plying might lead to problems. Using wrapping methods on some rows or even creating floats and hooking them up periodically can produce added interest.
If using more than one yarn per row, the approach is similar to intarsia. In true intarsia, every needle is in use. These illustrations are from an intarsia carriage manual;  positioning the yarns for a first row from right to left, the “wraps” needed in each direction In knit weaving, assuming the first pattern row is preselected from left to right, with COR, the short end of the yarn of the carriage side, bring the first weaving yarn up from the floor, and lay it to the left across the selected needles, bringing it down between the last selected needle for A, and the first selected needle for B. In one method, bring the long end of the second yarn, B, up on the right side of the needle over which A just crossed, and lay it over the remaining selected needles and down to the floor. Small clothespins may be used to hold the short ends in place. When all the yarns have been laid in, grasp the ends loosely, pass the carriage to the left, and the first woven row will have been completed. The carriage will now be on the left, COL. For the next row begin on the right, bring A up and between the two needles directly above it, take it over selected needles to the end of selected needles, and down to the floor. Then take yarn B and bring it up around the left-hand needle, over and to between the two needles that served as the starting position for A. The yarns do not overlap the same needle going to the right, but they do to the left.
The more traditional intarsia crossings may be also be used, with the new yarn passing under and over the old between needles, seen here with the next row to be knit from left to right. a: crossings made using the traditional intarsia method, b: wrapping over the adjacent needle moving from left to right, c: no crossing at all also revealing single knit stitches between weaving yarns. In some spots, my weaving yarn split and got knit along with the ground yarn. To create isolated shapes: lay the yarn in any chosen area Shaping may happen in a straight vertical, a, there may be a slight separation along that edge. Increases are possible on both sides at the same time, are best done by adding single new selected needles to the pattern, b. Moving further out crossing over more weaving needles will cause floats, as seen in c and d. The woven segment forces the knit stitches apart, so the stocking stitch on either side of the shapes, e, appears to be formed  by smaller stitches, and pulls in toward the shape 
The ground yarn and color may be changed for added striping and color interest. Sharp angles are created by crossing over two weaving needles, and more gradual ones by crossing over more needles. Blank areas of ground may be left as well.
The intarsia approach may also be used with other cards designed for all-over patterning.

Using far thicker yarns may be made manageable when changing the card repeat or using weaving repeats with 12 stitch wide repeats, working on specific needles on a punchcard machine, or simply programmed twice as wide on electronic ones. The expanded version of every other needle set up for the punchcard models.  Sometimes plain knit rows need to be added between lines of weaving to help manage thicker yarns in any configuration or to add color interest and width changes to the piece.
Woven rows may be used to create folds in pleats.

Other weaving techniques include the pulling-up method, as a stand-alone or combined with lace patterning: from a Brother punchcard volume Three more hooking-up variations, including latching graduated-size floats 
Hand techniques: e-wrap rows may also be incorporated with any of the above or used alone, sketches of some varieties may be used around every needle or every other depending on the thickness of the yarn: a sketch eons ago  Vertical weaving Japanese instructions that came with the purchase of the standard garter bar. The accessory also came with foam-backed strips seen here clipped onto the width of the garter bar segment being used, they were useful in maintaining even spacing between yarn threads when working on wide areas of vertical weaving, as well as providing helpful weight. Any weight used to help handle the long ends of the weaving yarn on any number of threads will need to be moved down periodically.    More wrap ideas Variations can happen by changing the spacing between wrapped stitches, the number of rows between the moves, spacing threads apart, and using yarns in different thicknesses and colors.
In terms of tools to hold the weaving yarns, in addition to the garter bar, multiple transfer tools may be used, even bobbins. That said, the most efficient way is to have a guide suitable for the overall fabric, especially when creating wider pieces with spaced weaving repeats. It is possible to create cardboard guides with holes based on gauge, whether on the standard or the bulky and with 3D printing nowadays a whole other world for custom tools is open. Matching the gauge with guides has some leeway, but the closer the match, the faster and easier the process. When using thicker yarns for the warp knit, spacing in both stitches and rows becomes a necessity.
A half-hearted attempt at a template. Markings were generated to be point/mm specific. If working in narrow panels, individual segments may be more effective to manage if a bit slower to use than a wider tool.
This is the wrong way to feed the yarn, as the row gets knit woven in, the yarn will be locked in place and cannot be advanced to proceed up the knit The way to have continuously available yarn Adding a second set of holes for the yarn stabilize the short yarn ends and maintain even spacing throughout, some tape could be used in addition to secure the ends on wider widths of vertical weave A spreadsheet or graph paper may be used to plan the configuration of the weaves including double wraps, this was executed using Numbers, individual bobbins might be a practical consideration In my own experience most hand techniques and single bed textures are far easier to execute with the ribber removed. It is easier to view progress, move up weights, and correct mistakes. That said, my machines are all set up with the ribber brackets, not flat, I feel it helps slide the knit down toward the gate pegs, and in my opinion that makes textures and even lace easier to produce. I have ribber covers, they can be improvised if needed with paper or cloth, never use them since I see no reason for moving the knit on the top bed in front of the ribber. If the ribber is removed, it is worth checking its balance once more prior to returning to any rib knit. Ultimately this sort of thing is about personal preference, no steps are ever universally applicable and correct.

Tufting may be created with the help of a sewing machine.

“Weaving” foreign objects can be achieved by picking up loops from other knits, woven, trims, crochet chains, etc. Beads may be threaded onto weaving yarn as well.


Knit weaving 2: swatches, experiments

Many of these swatches are part of my stash from my teaching days. They were usually not intended for finished pieces, merely to illustrate a range of possible results with the techniques, often produced during my demonstrations. The colors were chosen to stand apart in the shared yarn stash in the studio, intended only for my personal use and for easier visibility during demos. The latter were being videotaped from some height and projected onto a large screen during classes for added visibility. At times enrollment was between 15 and 20 students per session.
Eyelets indicate tension # used for ground yarns. It is best to avoid dots between whole numbers. If swatches are too small to reflect the tension used, knots can be placed on yarn ends at the start of each experiment. The ends themselves may need to be doubled to make knots palpable.

thin mohair over a cotton/poly chenille over cotton, tests for a pillow 
chenille ground, wool weft hooked up floats vertical weave, the second with a scorched spot from an iron, experimenting with direction of wraps, a combination of loops and wrapswool ground, felted, monochrome acrylic weft, cut floats wool weft over cotton, cut floats, further trimmed in the top photo The same card 3 ways: the weft is too soft, the effect is lost in monochromatic version, cut floats become muddied with wear worked in the intarsia method, with a separate yarn strand for each shape, possible on monofilament to create floating shapes when placed over another fabric layer crochet start as cast on fringe woven with multiple strands of thin yarn appliqued to a long swatch.   beads strung through dental floss hooked on periodically, horizontal wraps;

ladders and long stitches with a needle or tool such as this, found in fabric stores, 10.5 inches in length automated pattern with added weaving through ladders “loop embossing”, separate threads were worked in and out vertically through ladder spaces worked on bulky 260, tension 2, using card 1 weaving and lace combinations. Weaving yarns may be laid in between the beds with the ribber in use. This is the option for “weaving” on the Passap. 1: shows the rib needle configuration, 2: racking is added, 3: floats are teased out. In the latter, a sewing machine could always be used to anchor added float arrangements. In this swatch, a waffle weave effect of sorts was intended between EON rib columns. The horizontal pairs of treads are an easy guide for feeding the yarn across rows with the work off the machine. Here the chenille was “woven in” off the machine using a tapestry needle, double-strand at the top 2 rows, single below them. Beads can also be threaded and laid in one at a time between the rib columns, Any fabric with eyelets may be used as a ground for inserting fabric strips, very thick yarns, even hard objects such as rods or twigs. A quick grab of random studio bits resulted in these: torn fabric has frayed edges that can be used to create secondary patterns depending on the fabric, and the way the strips behave depends on the width of the cut. A bodkin is useful in the threading process. Bodkins measure about 3 inches, and cost about $3 in US sewing supply stores a narrower strip of the same fabric began to permanently twist using thick yarns  Plastic bag strips “woven” on a Passap, “floats” were cut after finishing the piece used in a wearable made during my student days for a “recycling” art day. Hooking “things” on in a variety of ways, varied wraps, mixed techniques roving
strips of torn silk individually placed  wire shavings, on bulky  lace and trims hair decor and kite string tube knit on child’s circular “machine”

Finished items from eons ago, the pillow used the gauge calculated based on  the chenille swatch included above, the sweater was for my mom, likely knit in the very late 1980s

Punch cards to electronics: book symbols and samples

A number of variables need to be considered when adapting punchcard patterns for use on electronic knitting machines. These images pertain to Brother use, but the principles are shared between KM brands. I will add more information as time goes on. Online free downloads for magazines, manuals, etc. may be found at
http://knittsings.com/knitting-machine-manuals/
http://toyotaknitting.blogspot.com/
machineknittingetc.com
https://www.knititnow.com/ManualAndDocuments/
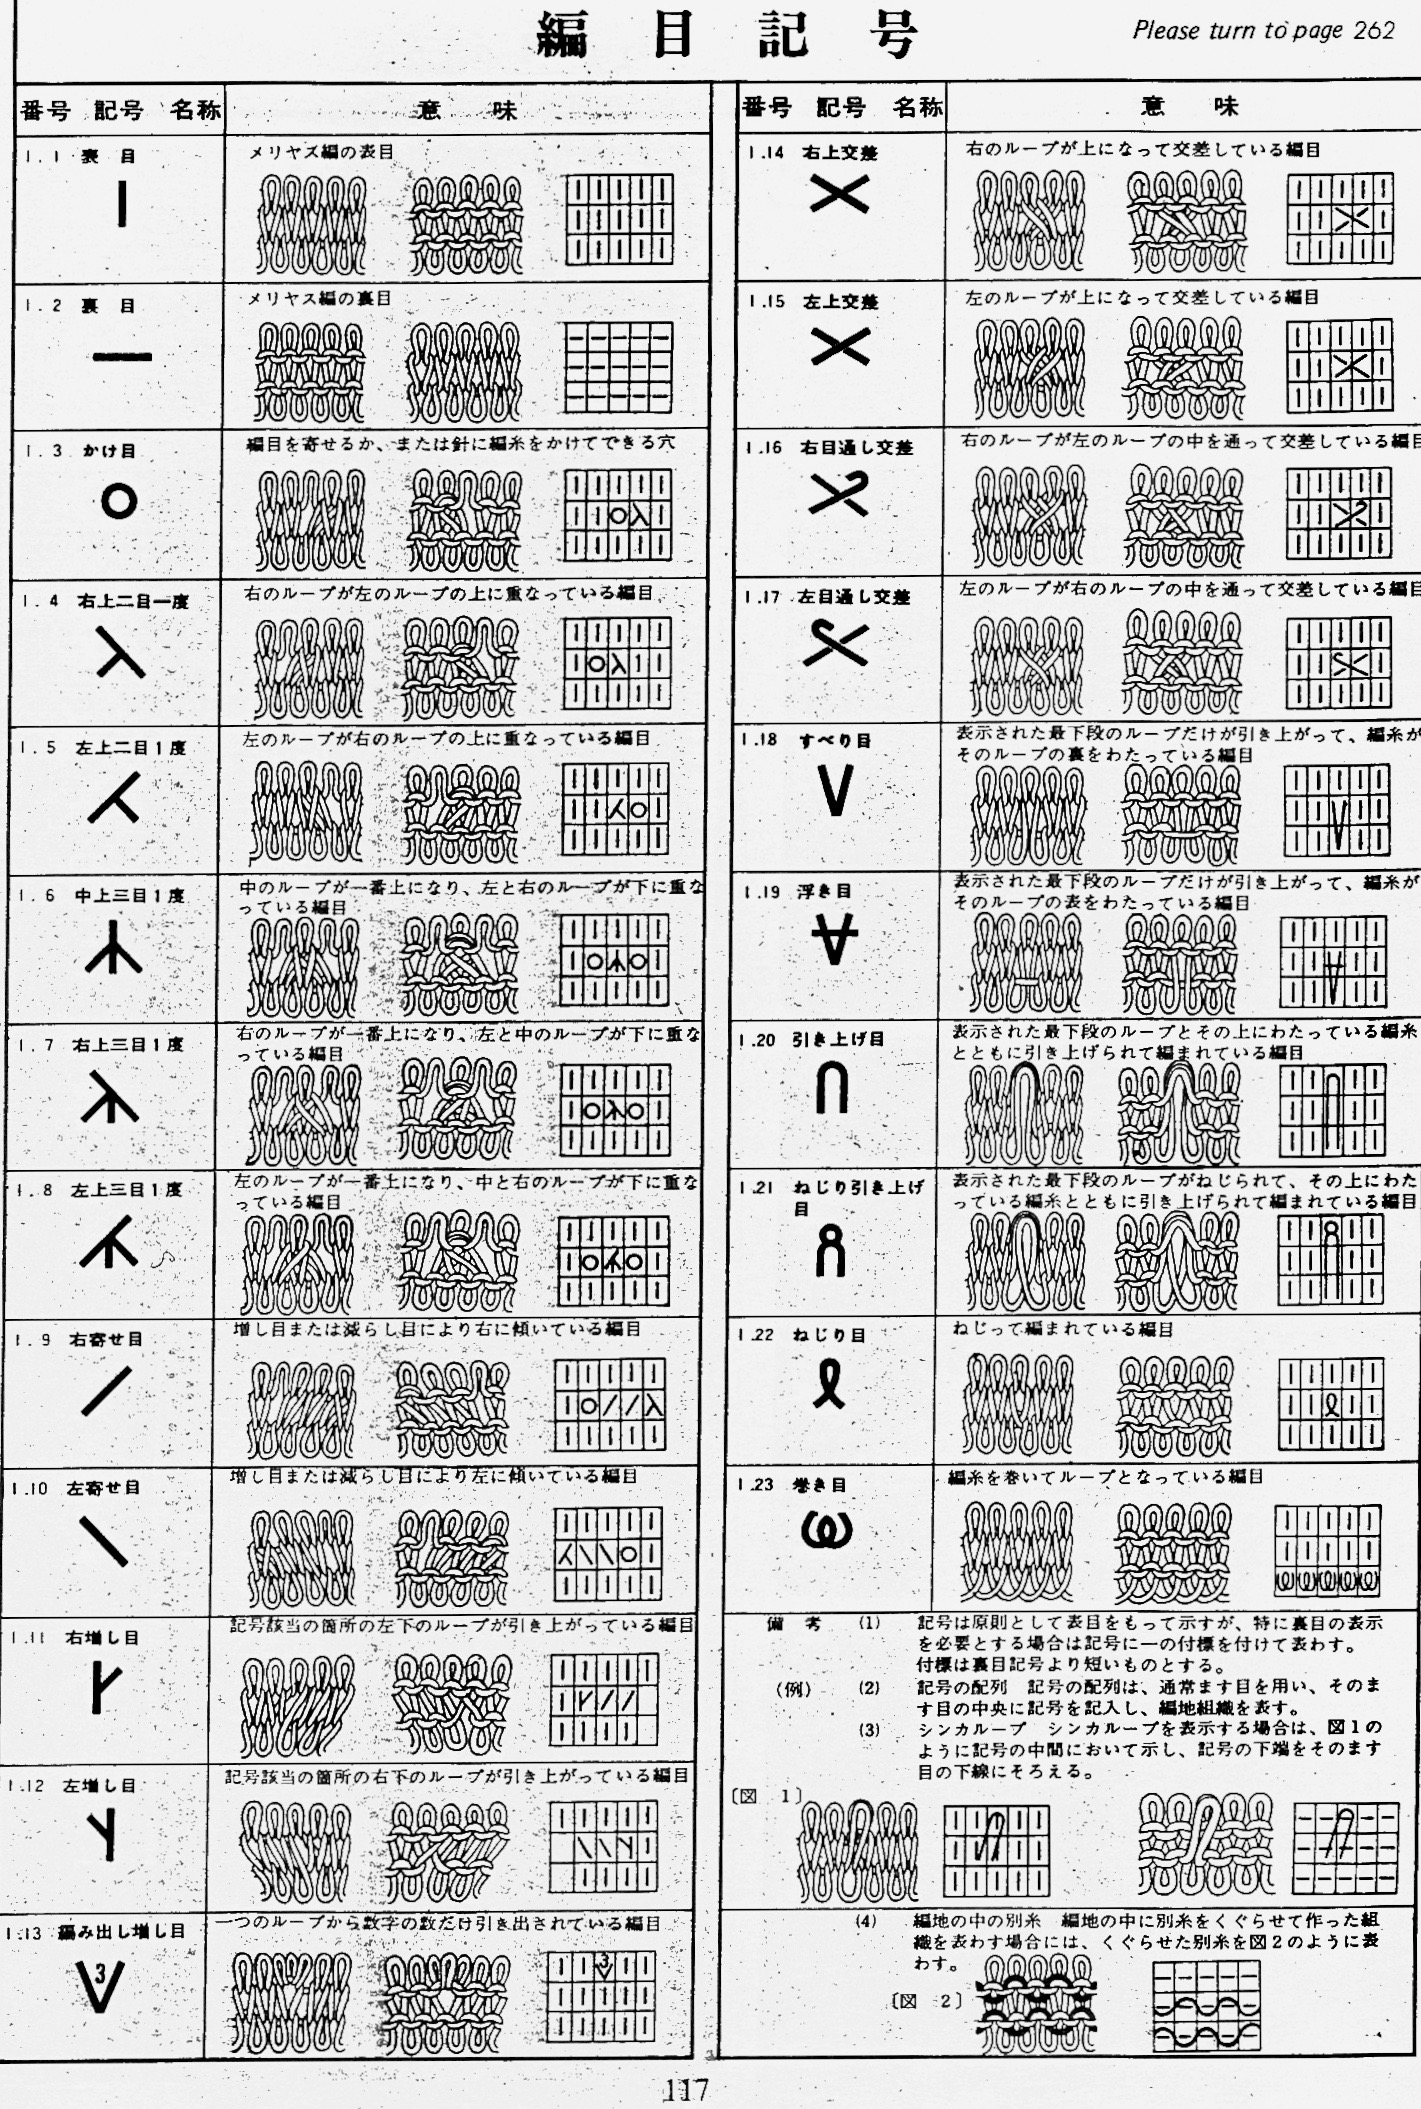
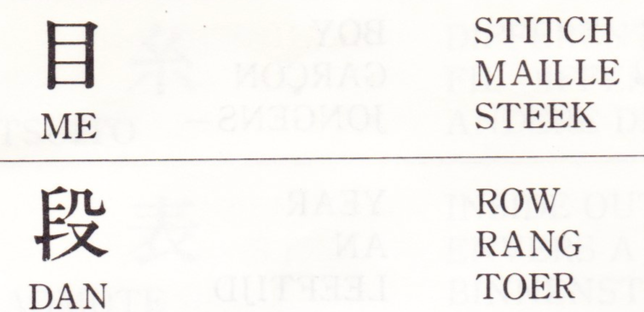
some additions of late include designs in 12, 18, and 30 stitch repeats in addition to the familiar 24 and 40 ones, and to help with interpretations of symbols:  Japanese symbols for machine knitters 

Punchcard collections for all brands @ needles of steel 

For a later post including information on scanning and editing published designs electronically see https://alessandrina.com/2018/07/02/numbers-to-gimp-to-create-images-for-electronic-download/
As the transition was made from manual machines to push-button, and then to punchcard selection systems, the early collections included diagrams of symbols familiar to hand knitters, and interestingly worded text that disappeared or was reduced in later punchcard books. I am presenting information in the order in which it appeared in this particular collection’s paper version, I have not found this volume in the above-mentioned sources for free download. Images are gathered from more than one source, so there is some repetition of information


LACE KNITTING

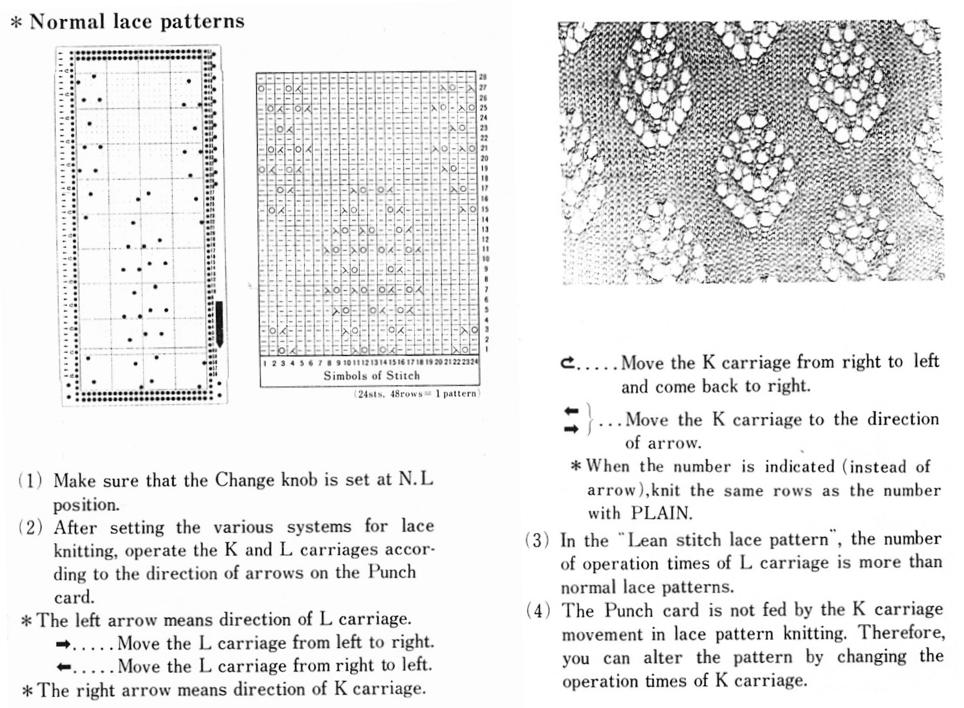
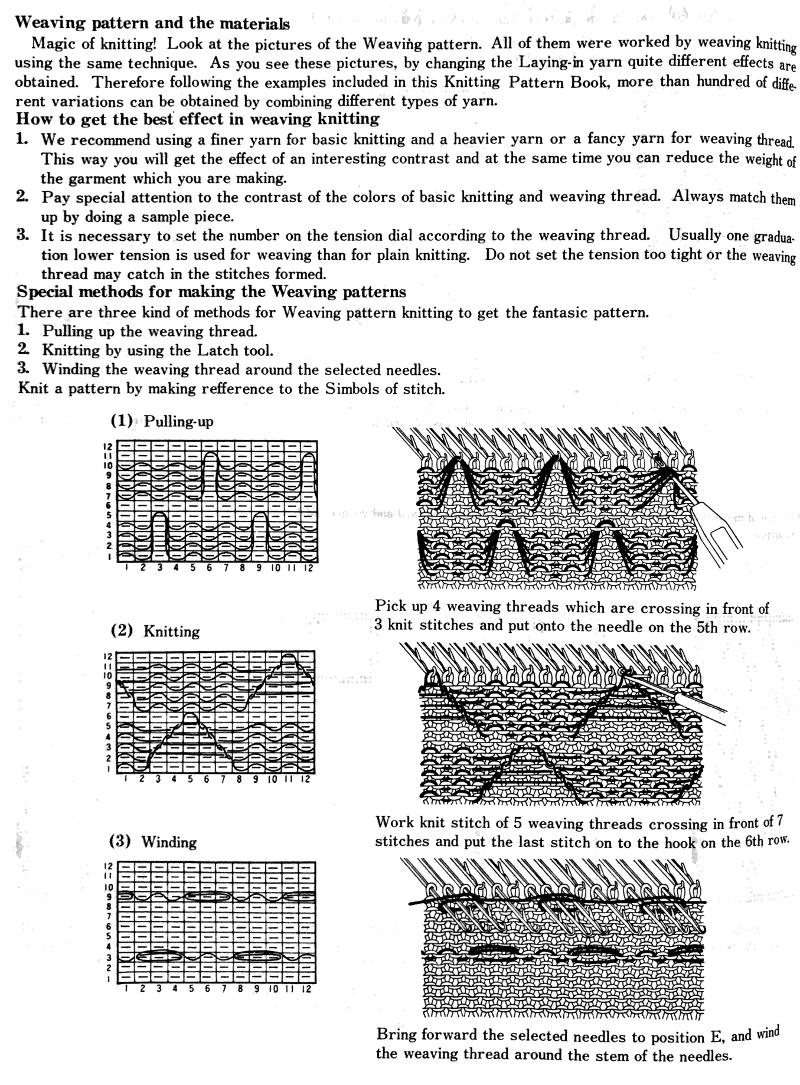
Punchcards may be used to guide one for hand techniques, here a version of e-wrap is used on selected needles for weaving effect, and the diagram on the upper left is for a different fabric. Punchcards may also be used to help track twisted stitches, cables, and racking 
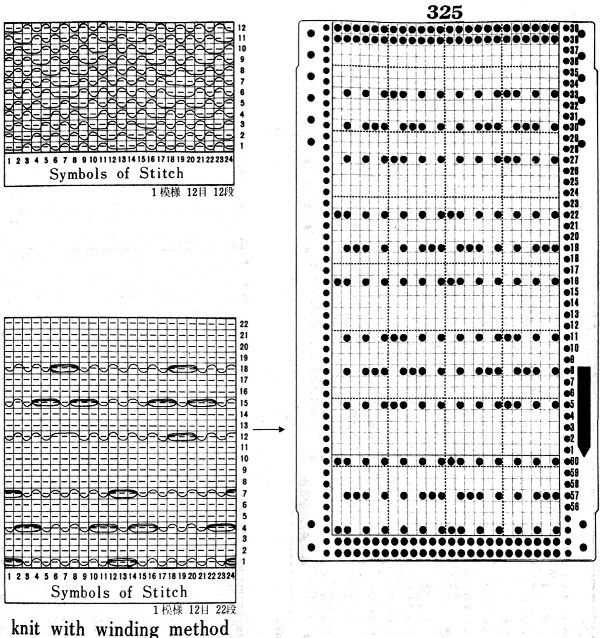
This is a 2 carriages patterning operation, lace extension rails must be used, with each carriage disengaged from the belt while the other is moving across the knitting and back to its resting place. 

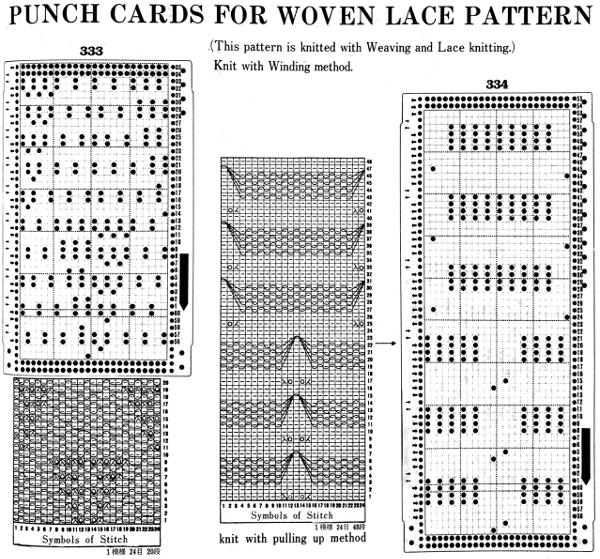
SYMBOLS IN PATTERN KNITTING

Below each punchcard, the repeat is identified in numbers for stitches and rows. The cards presented are the minimum length required for the card to roll smoothly within the reader when joined for continuous knitting (at least 36 rows). Electronic knitters may isolate the individual, smallest repeat, draw only the squares that appear as white in the cards, enter them via mylar or download, and use color reverse.

Skip is aka slip or part. These cards would work for tuck stitch as well, may even tolerate elongation, depending on yarn thickness.

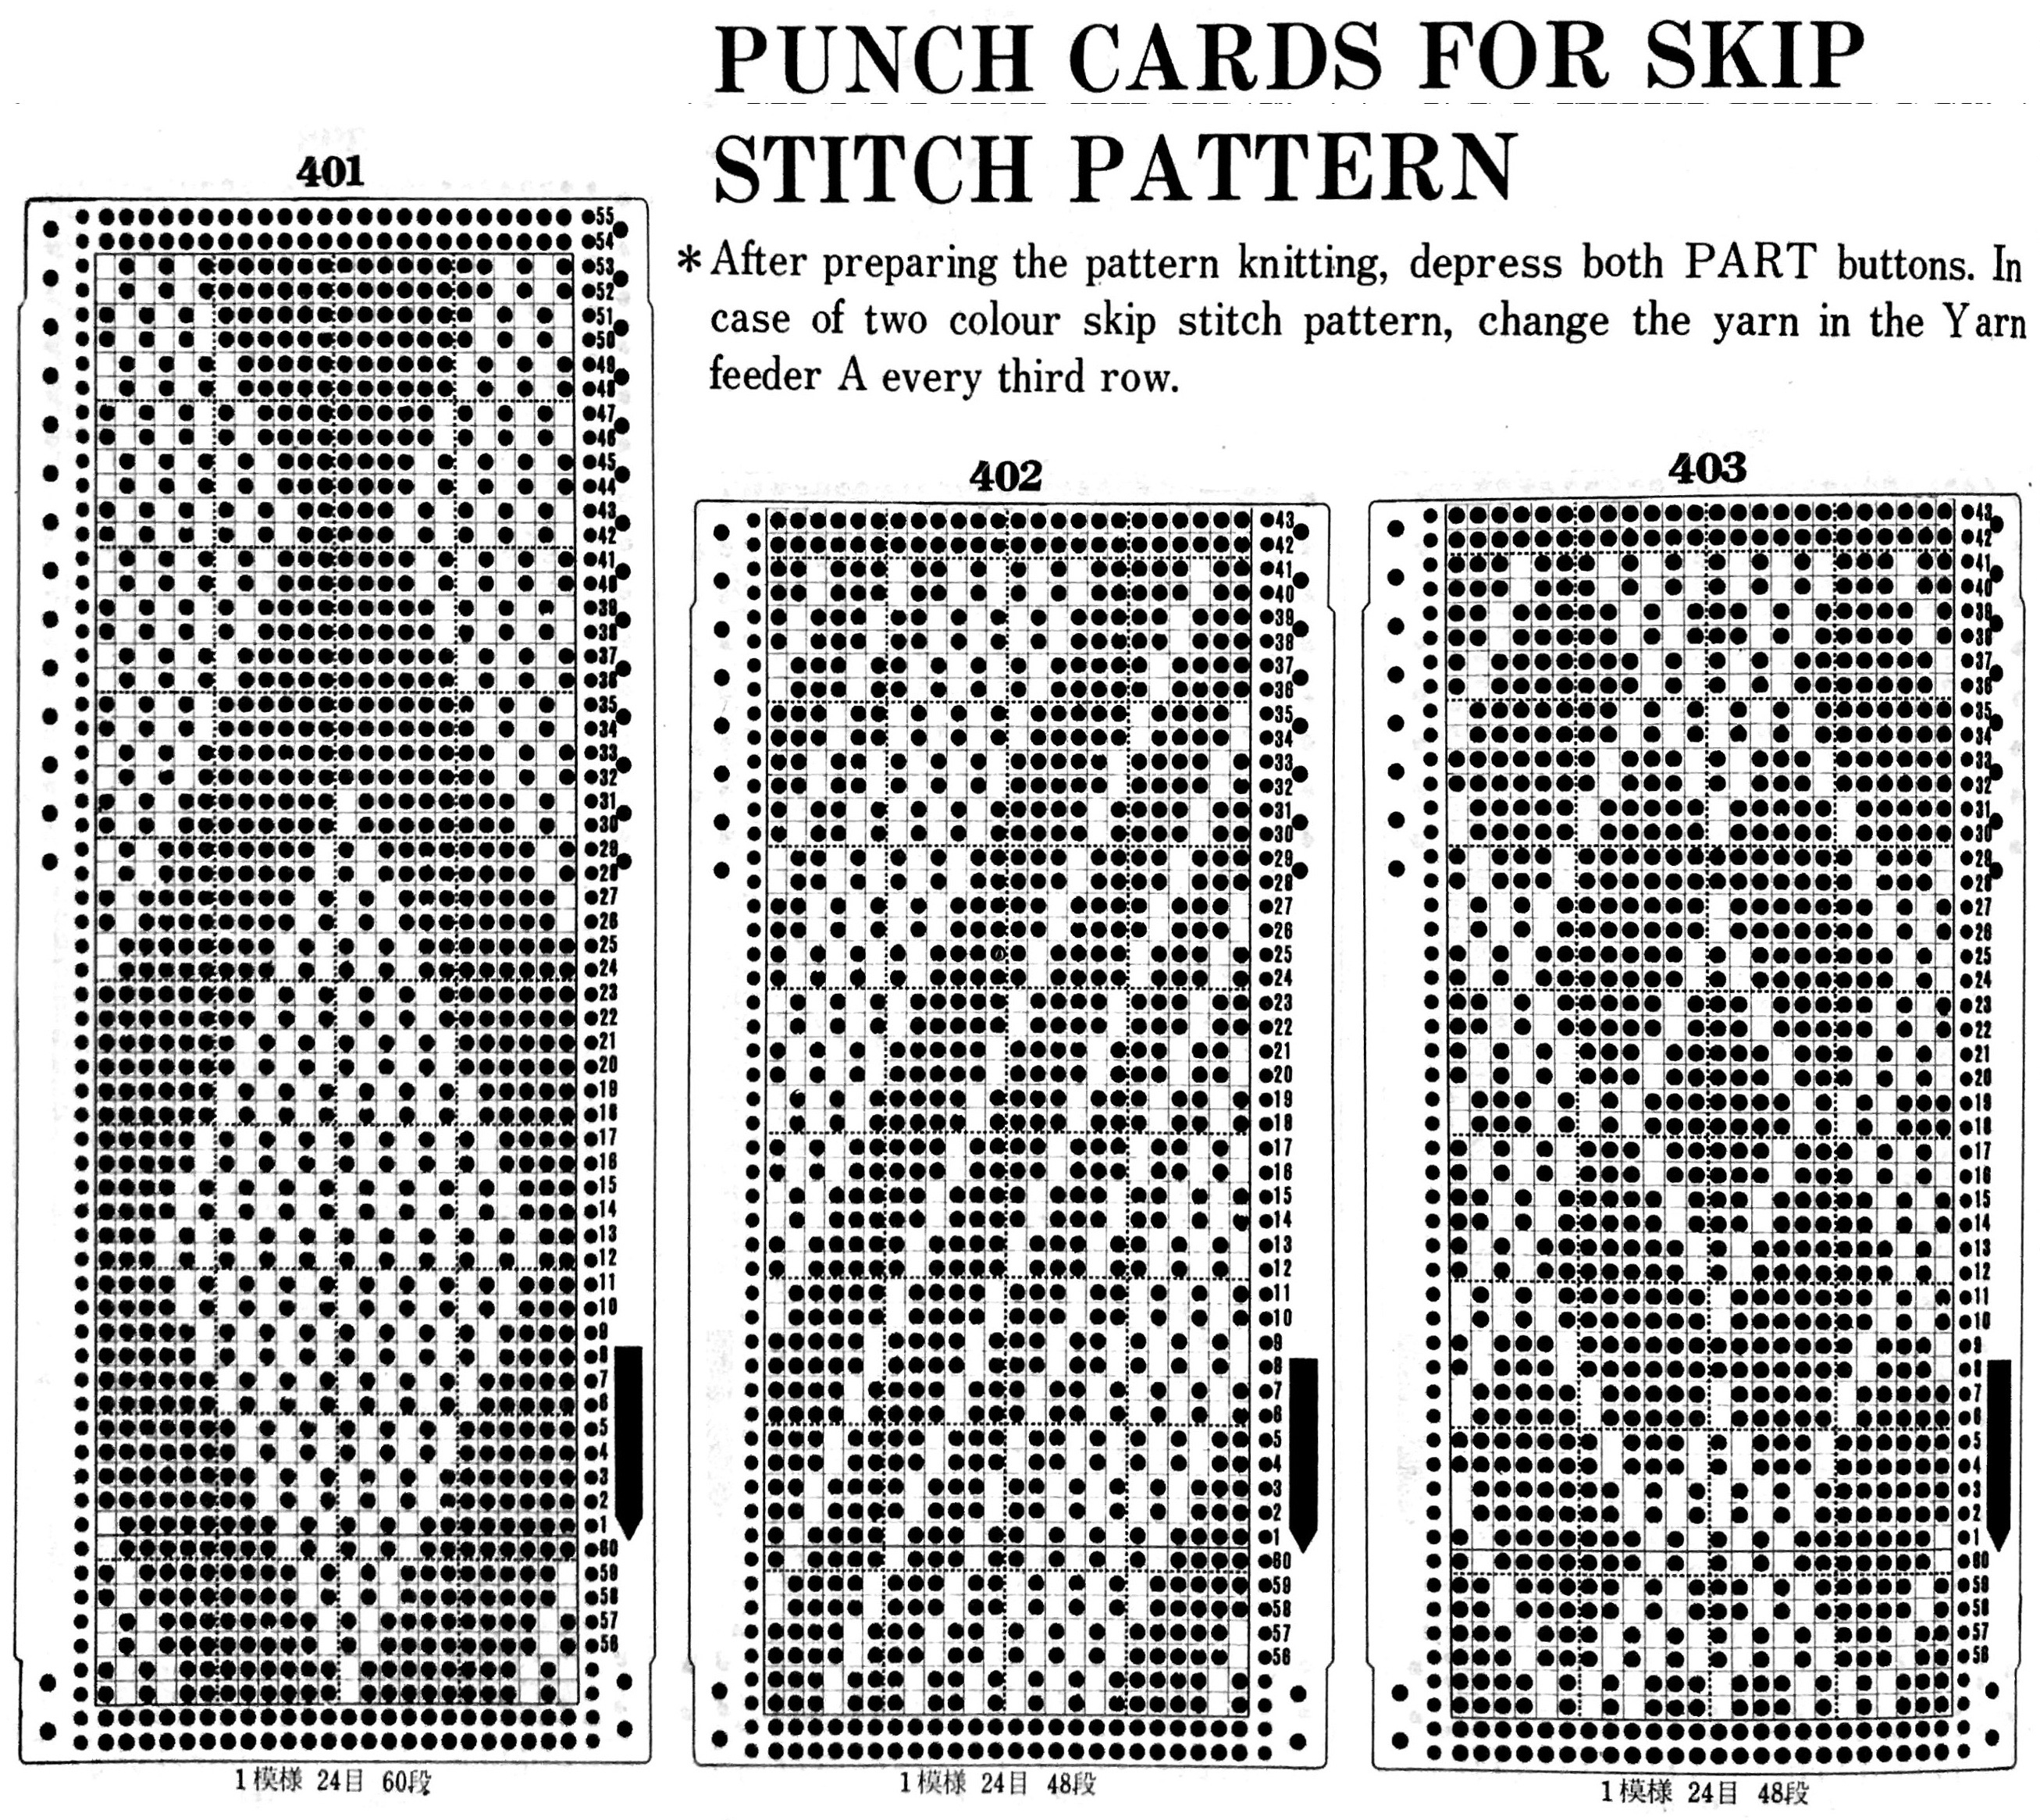
Opposite cam buttons are in use, the fabric changes appearance depending on which of the 2 stitch types is forward, so if instructions with cards are to be followed, then the starting side for the attern in this instance should be COR. Both tuck buttons (or slip) may be used as well, for a different fabric. If the tuck or slip texture is created over an even number of rows (2, 4), changing colors for each paired row sequence can create some interesting color patterns with very short floats akin to planned mosaics and mazes. 

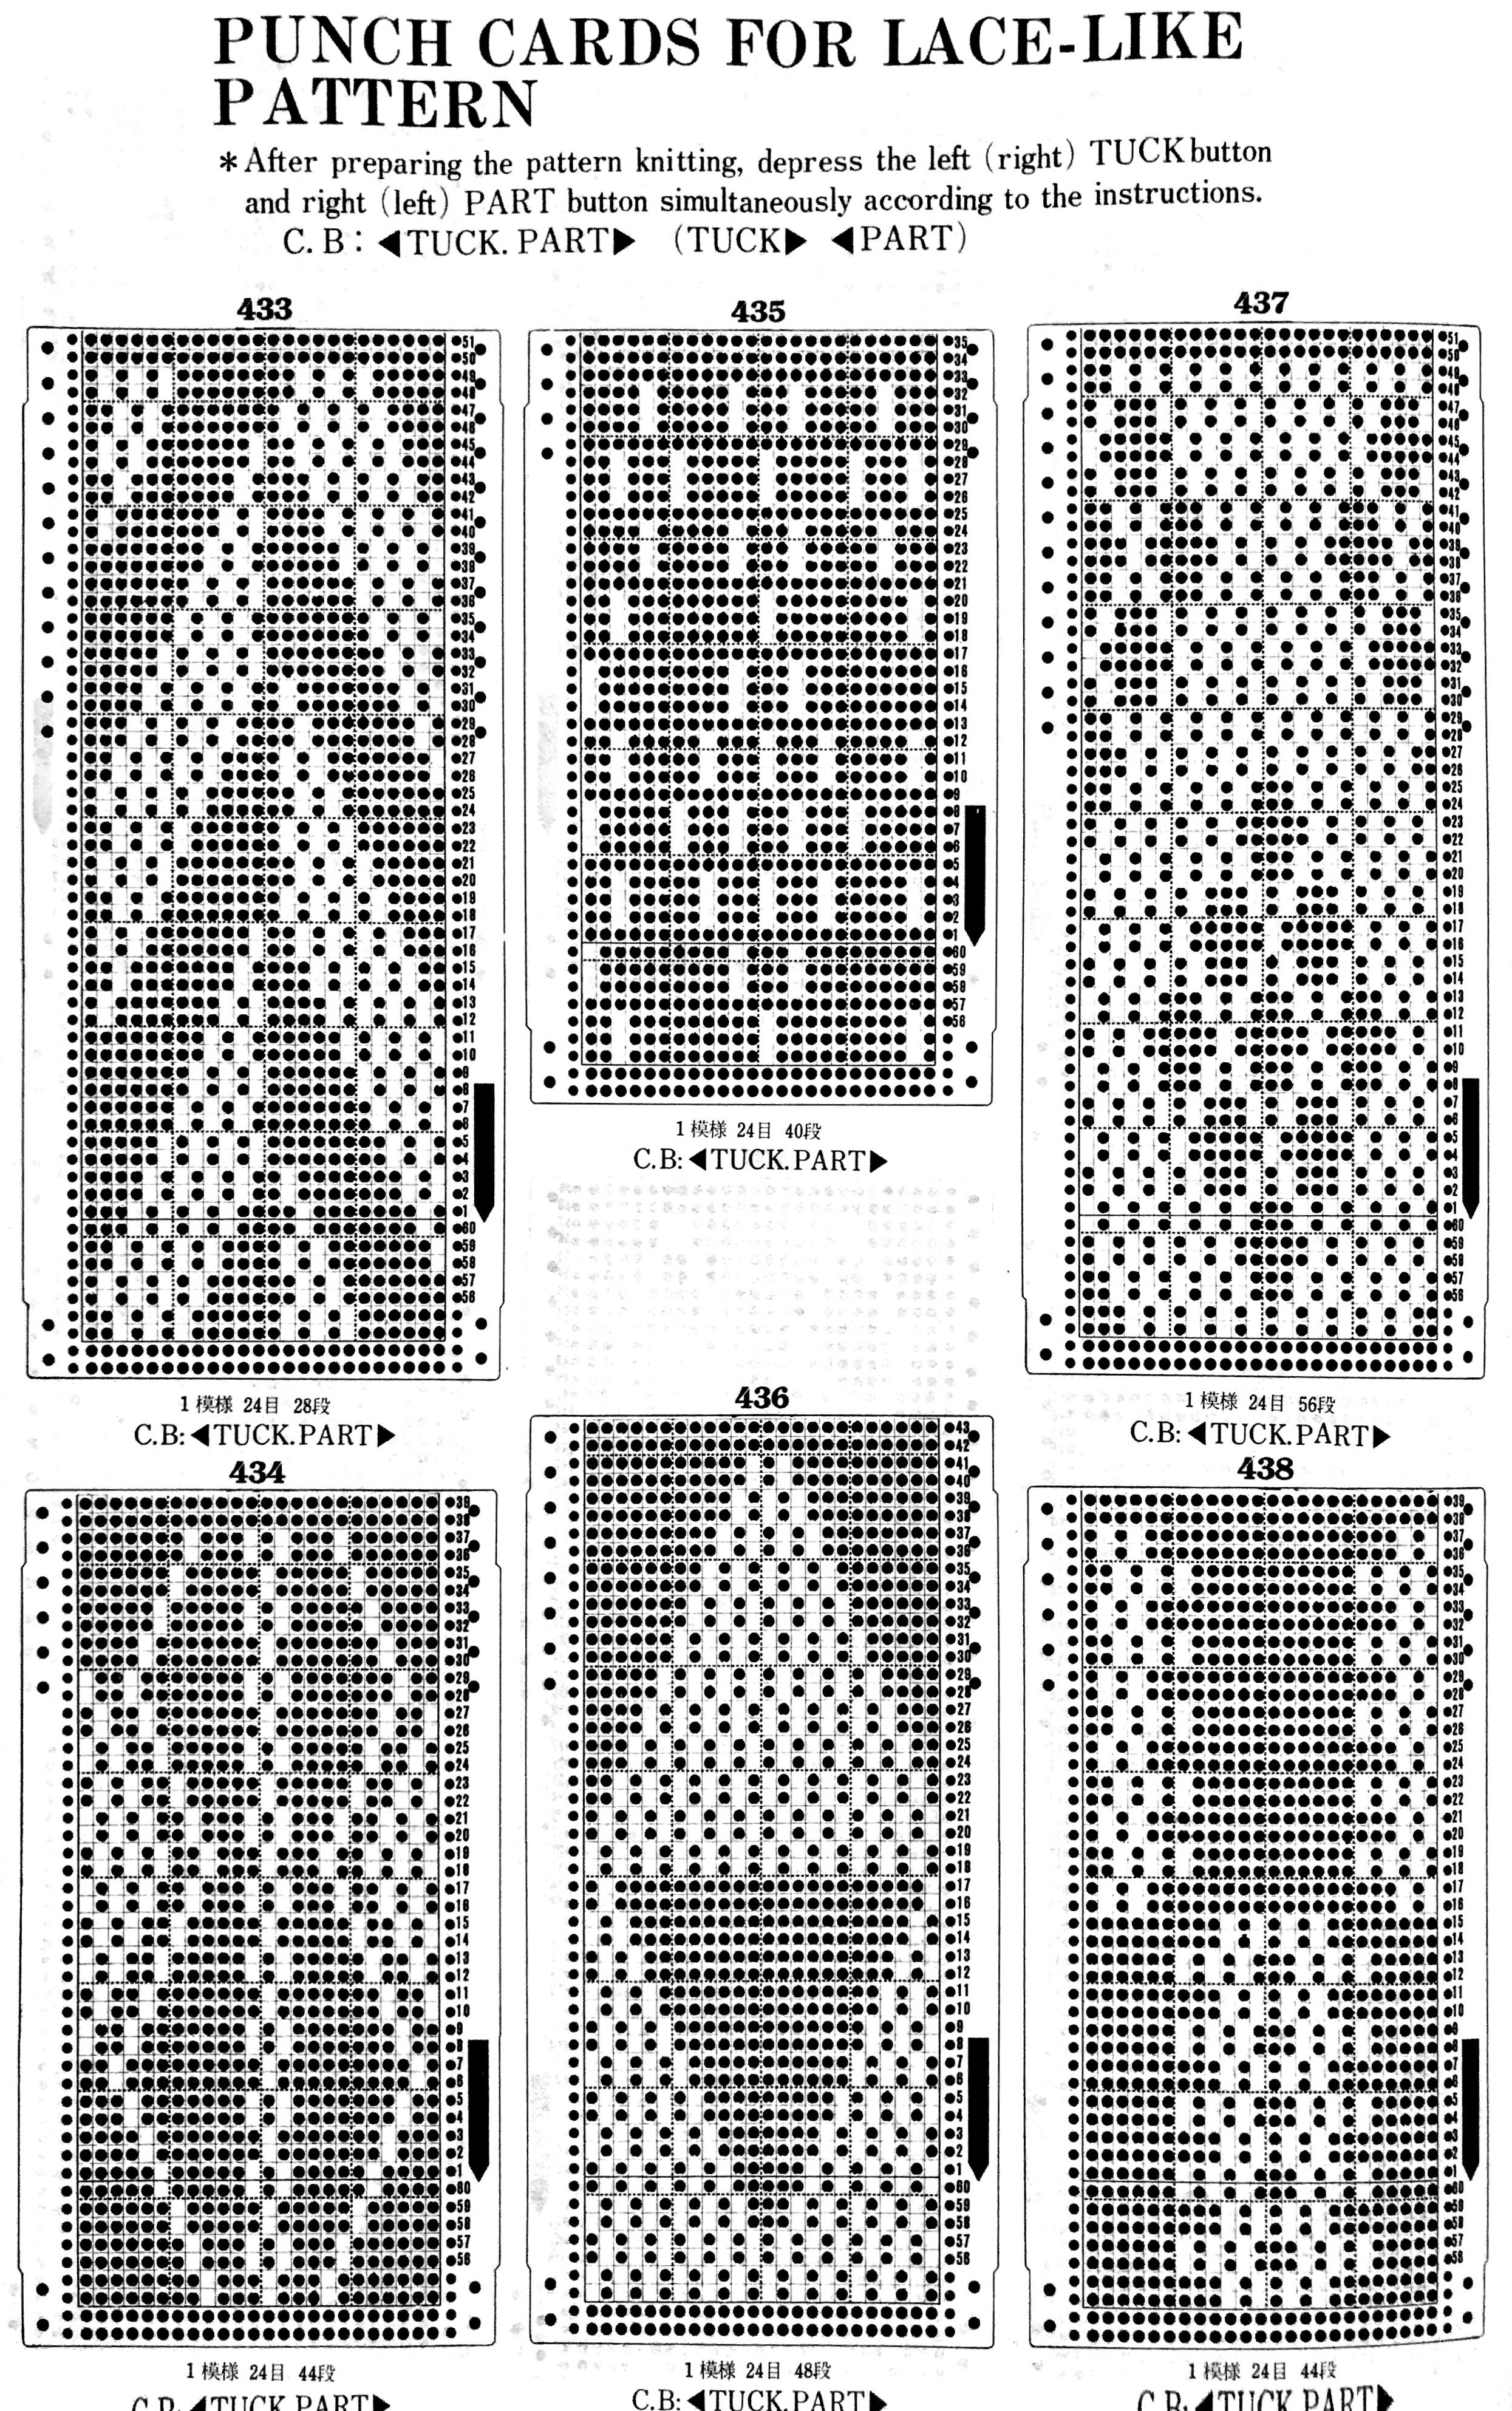
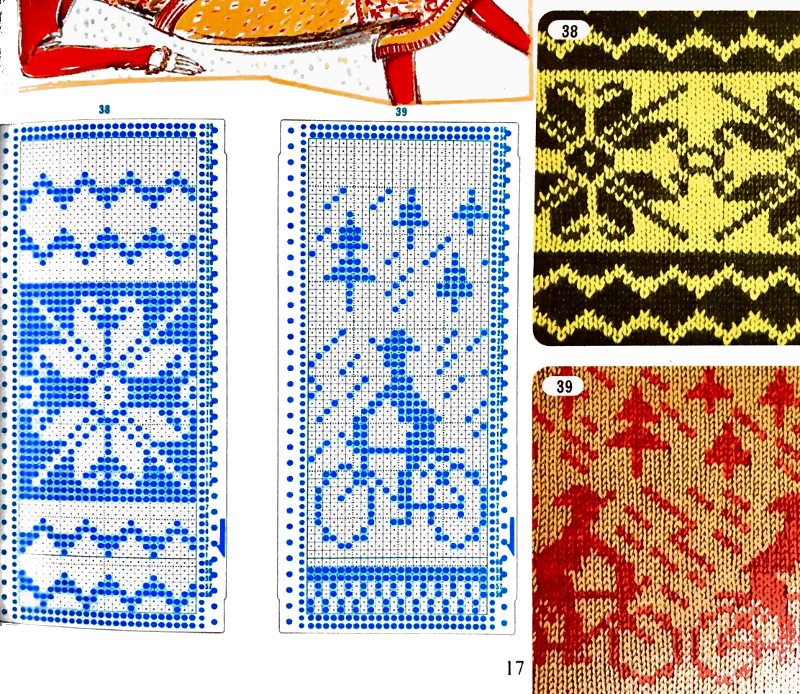
The fair isle patterns below are actually poor choices in terms of float control, pushing its limits. It is usually recommended that floats be no wider than 5 stitches, and even then, they may have to be controlled to make the finished garment easier to wear. 

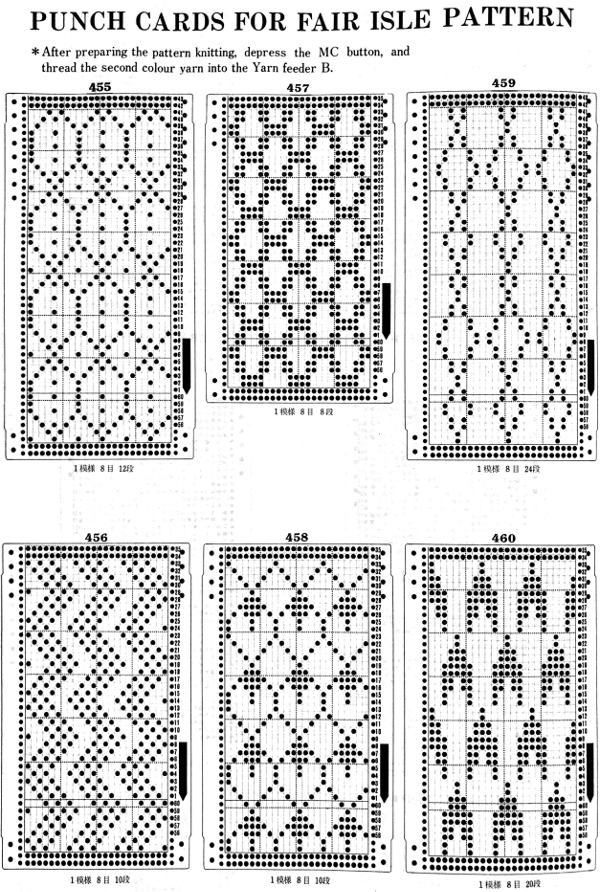
Brother only produces a transfer lace (as opposed to studio simple lace, where the carriage transfers and knits with each pass of the carriage). The lace carriage is the one advancing the punch card. The knit carriage does not select needles, but rather, knits 2 (or more) plain knit rows

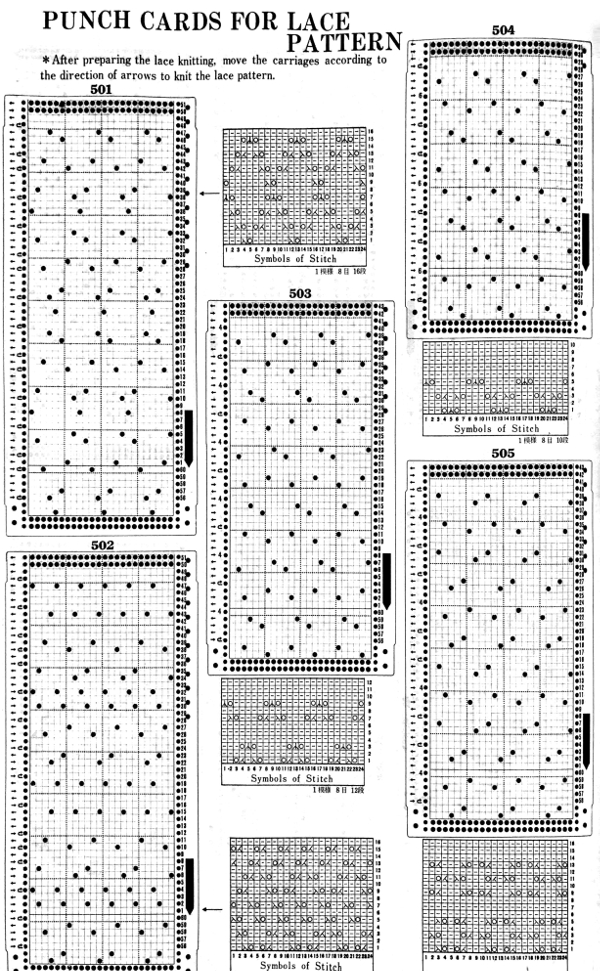
Lace card markings, including those for fine lace: in the latter, stitches are transferred and shared between pairs of needles, best knit in a light color, with smooth yarn so the surface texture becomes more noticeable.

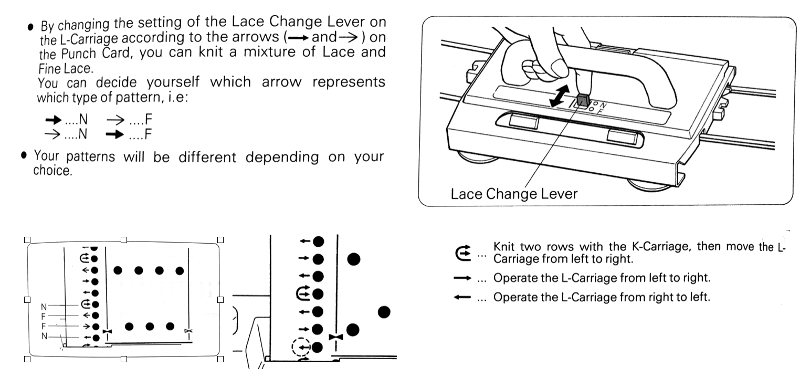
Lace point cams may be used on the punchcard machine to create vertical bands of lace. This is also achievable on the electronic by programming for knit stitches between vertical (or horizontal bands).

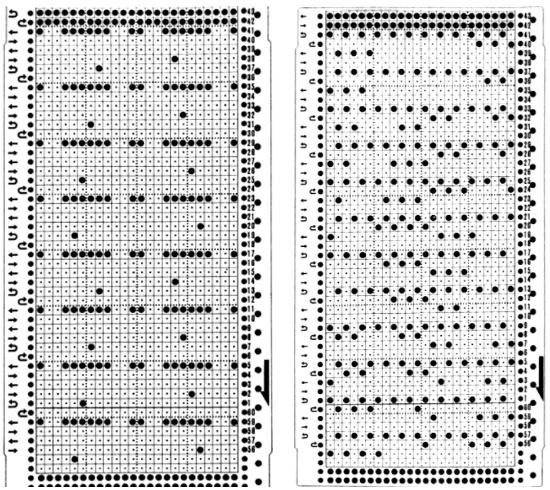
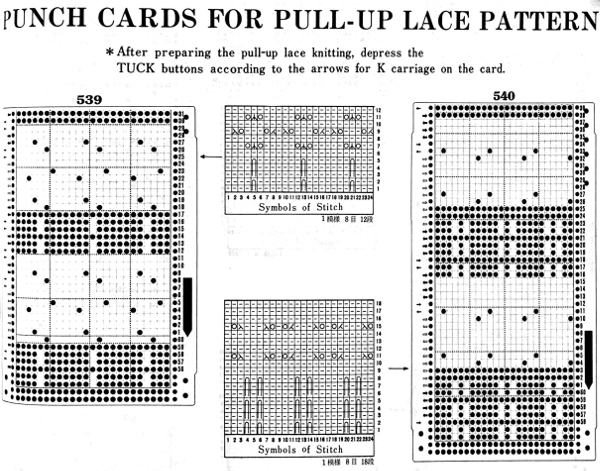
Tuck (left) and weaving (right) may be combined with lace. In these fabrics both carriages are selecting needles, so extension rails must be used. The two-column on the left of the cards indicate movements for the lace carriage on left and the knit carriage on right. Straight arrows indicate single carriage passes, curved ones 2.

Yet another fabric using 2 carriages selecting needles for patterning

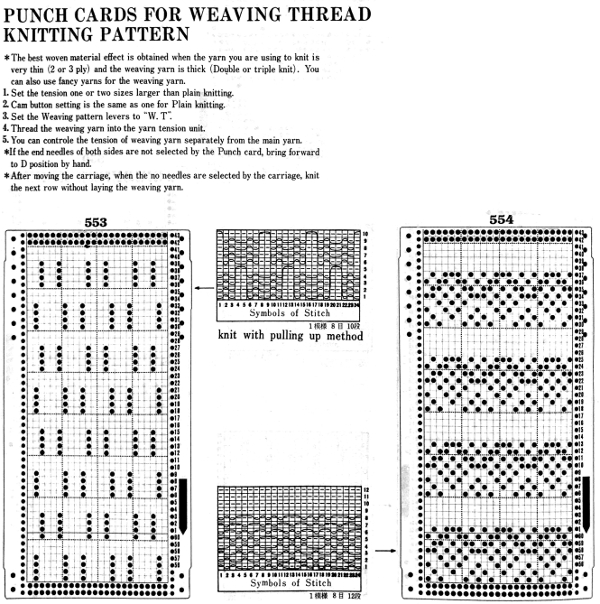
Here the “openness” is created by having the appropriate needles out of work, creating ladders in those spaces. Some interesting results can be obtained by transferring the recommended out of work needles’ stitches to the ribber. “air knitting” can help with verifying proper needle placement is in use

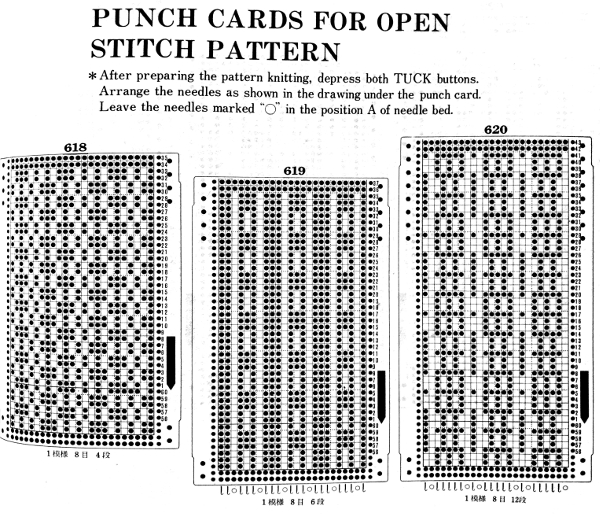
to match the location of the out of work needles to markings for punchcards, which are often given with lines delineating 0 needle position, the image will need to be mirrored horizontally

THREAD OR PUNCH LACE is possible only on machine models that have 2 buttons in mc position The thicker yarn knits along with the thinner one where there are unpunched areas or white squares, the thinner yarn knits alone where the punched holes or black squares occur, with the thicker yarn floating behind it more information on this fabric 

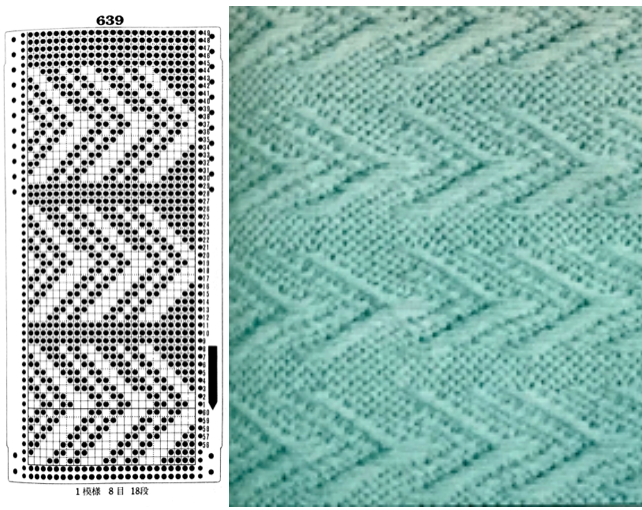
Suitable for tuck and possibly tolerant of elongation as well:

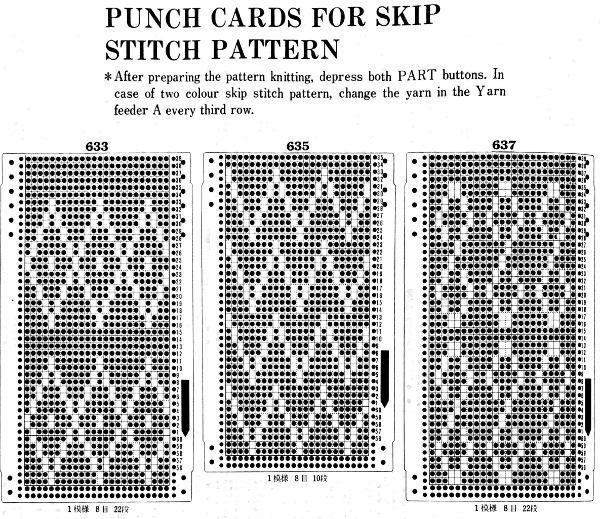
Punchcard machines mirror motifs when knit. This may not be noticed when copying small repeats, but it becomes more evident in larger ones. For knitting on the 910, the supplied motif would need to be mirrored when programmed to retain the intended direction. With other machine models, one needs to know whether the “image” on the card will appear on the purl side, matching punchcard pattern and needle selection, or the knit side, thus reversing it. 

Here are 2 FI samples: the one on the left is fairly evenly distributed, so little if any difference is noticed, the one on the right sends the biker to a different forest

reversal of lettering


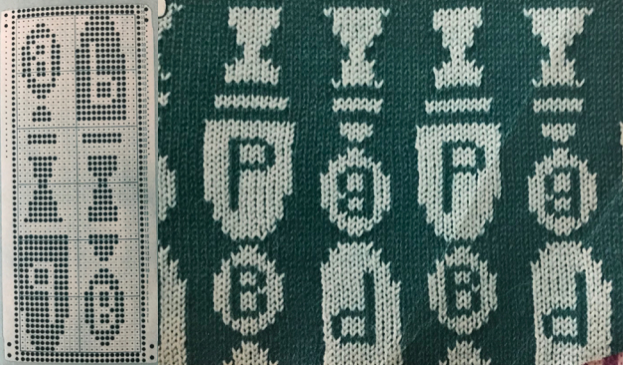
When you think that that is all sorted out in your head, there are these in slip stitch, the direction of stitches matches, because the purl side is used, images are reversed on the knit side.  

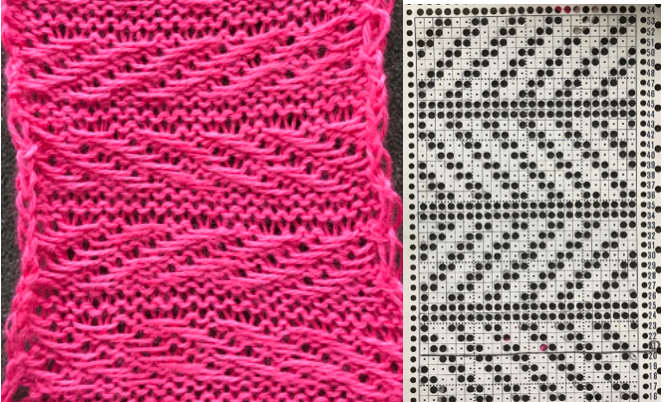
the mirrored punchcards 
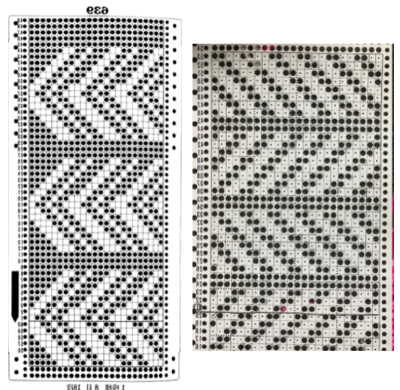
the punchcard change knob has selections for single motif and pattern knitting (KC)

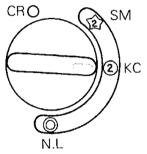
the 910 has settings KC I and II, KC II cancels end needle selection, while in punchcard machines this has to be done manually if the pattern stitch requires it. One such example is when any patterns are made with needles out of work. End needle selection would make the needles on each side of the empty space select forward and create a knit stitch. In tuck or slip, that would be an out-of-pattern knit stitch, in FI, a vertical line of the color in the B feeder would appear along on each side of the OOW needles.

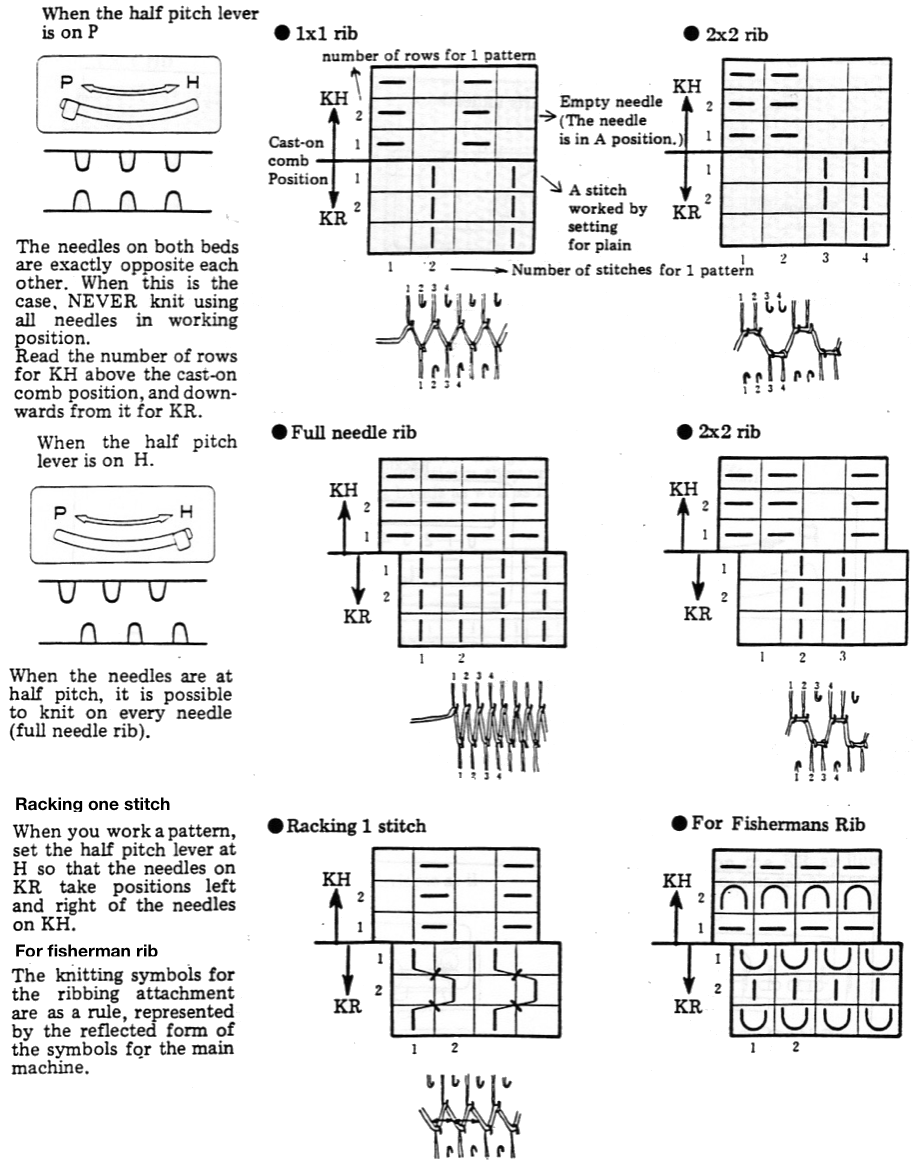
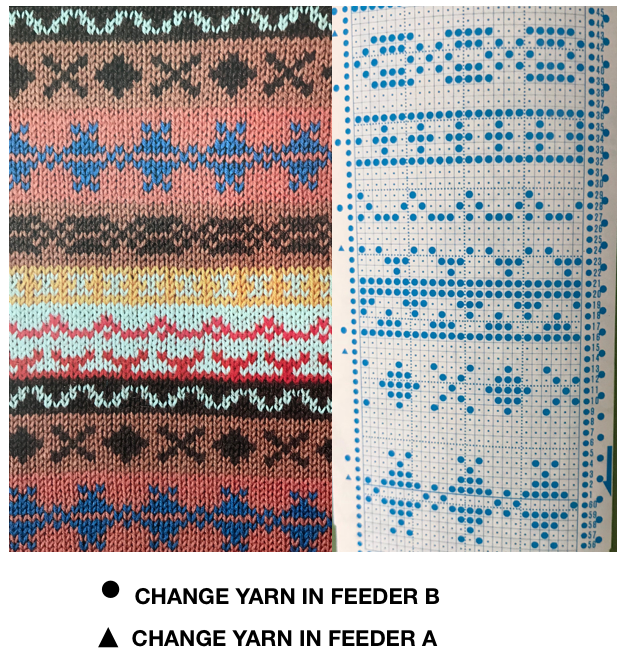
Ribber settings and symbols for Brother machines