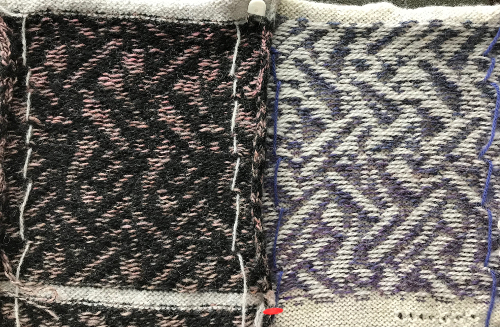
Nearly 9 years ago, I began exploring scale designs. At the time, my charts were generated using Excel 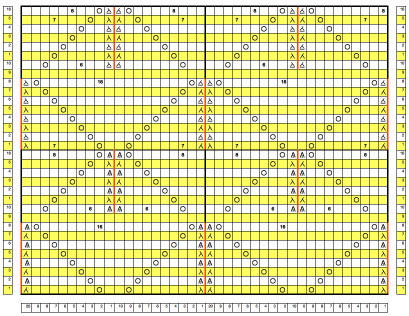 and a program called Intwined Pattern Studio, which soon became inoperative
  The above repeat, visualized tiled.
  At present, using custom-printed needle tapes has proven useful in tracking actions required in hand-manipulated stitches.
The attached PDFs have been printed in the proper aspect ratio with the following changes from default settings using Mac Preview,  and Acrobat Reader
  7 needles
single 4.5
Whether the knit tests are worth pursuing in large pieces with or without modifications is subject to end-use and personal preferences.
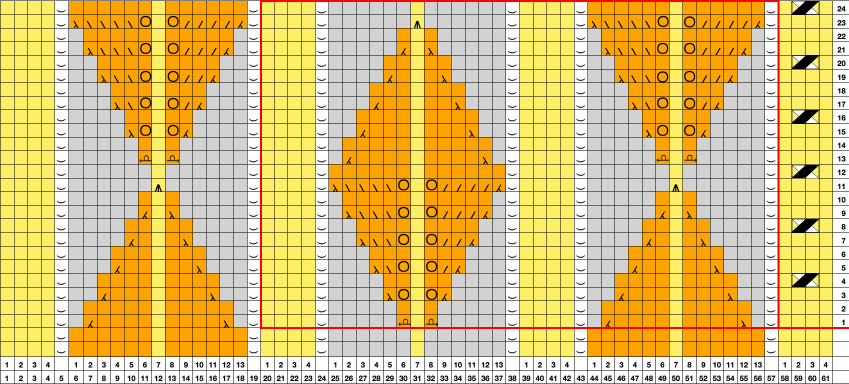
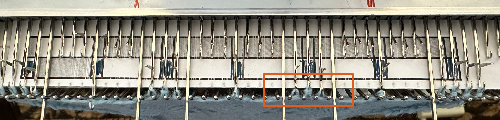
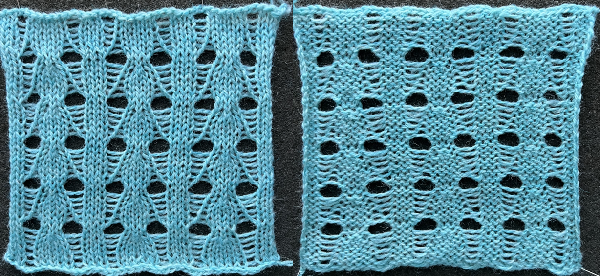
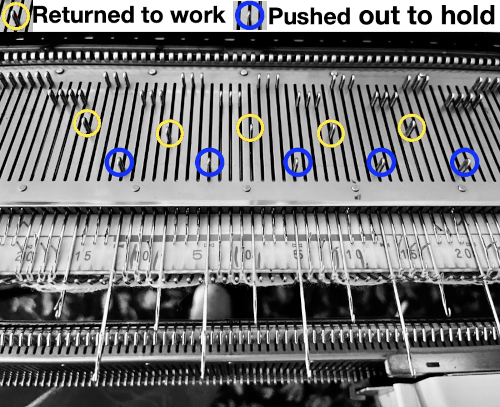
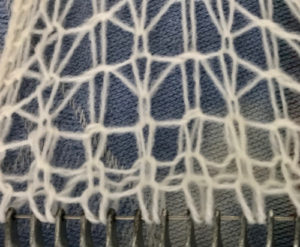
To begin with, stitches were transferred, the empty needles were pushed back to the A position, Out Of Work, and returned to the work, B position, for reversing or shifting the shapes.
Forming ladders: the chevron shapes are created by single stitch transfers, and bringing needles in and out of work.
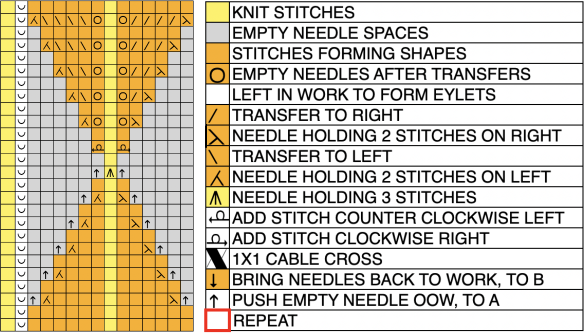
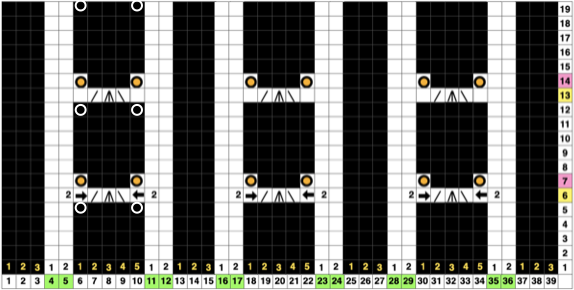
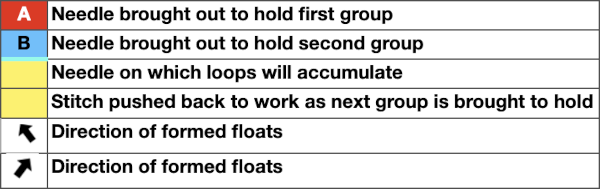
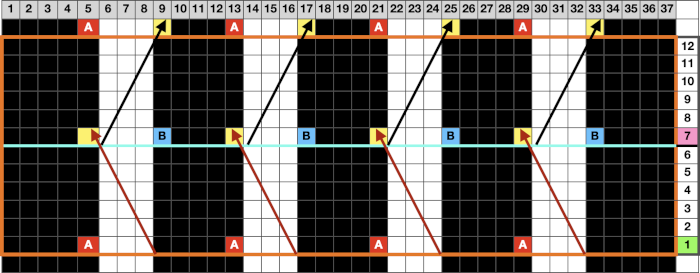
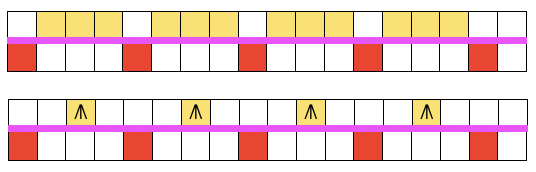
A starting chart:  Keeping the same palette as in previous charts, yellow cells represent needle positions where stitches are not disturbed, and the white cells where needles are taken OOW. The up-arrow needles mobed to A/OOW, and the down-arrow needles returned to B.
The work in progress:
1: to reduce the line length formed by the single stitches, the point at which needles are returned to work can be varied
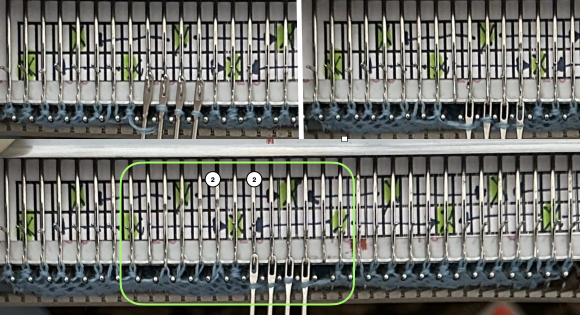
2: in this instance, as 5 empty needles side by side are reached, bring needles into work for the next shape on each side of the single stitch decreasing the number of empty needles to four. As the knit carriage returns to the opposite side, loops are formed on each of the needles returned to work
3: continue to bring an empty needle into work aside each pre-existing loop
4: after the last 2 empty needles are returned to work and are followed by a knit row the last two loops are formed
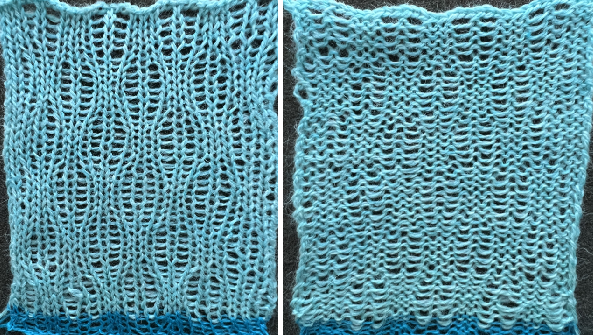
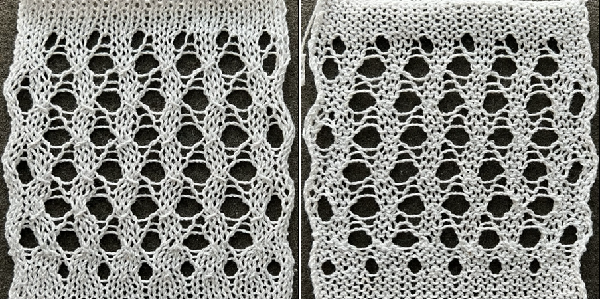
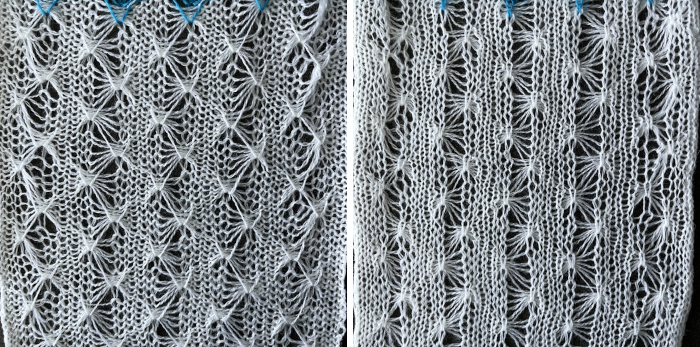
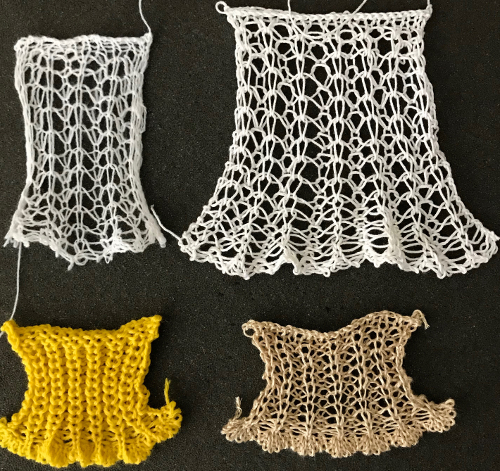
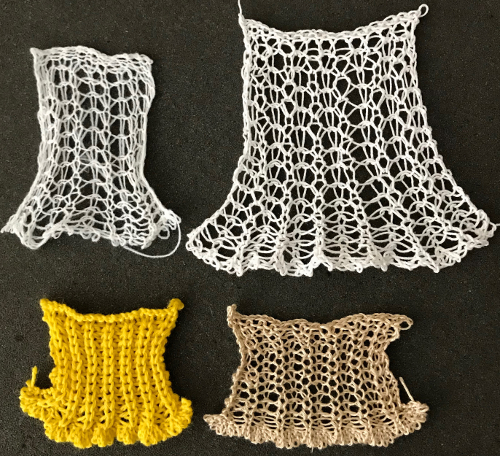
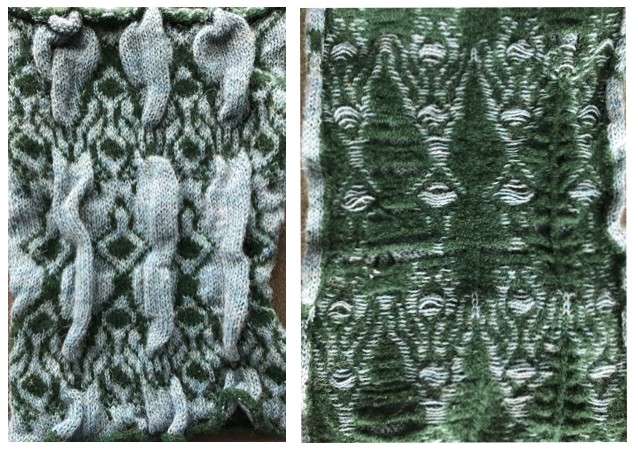
5: knit one last row across all the needles, and begin transfers for the alternate shape. 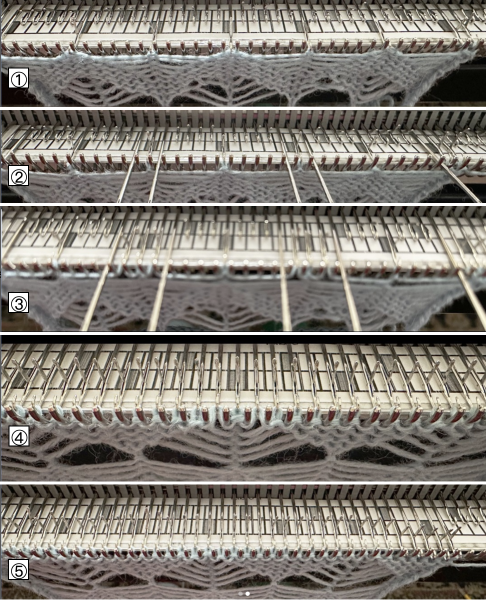 This yarn is a 2/8 wool, which worked nicely for holding ladder edge stitches in the leaf swatches but yielded a stiff knit in this case, and the elongated single stitches fold over at the top, creating extra nubs on the surface of the knit.
  Continuing designs with similarly shaped outlines but leaving the emptied needles in work, B position, produces different shapes. All needles remain in B throughout.
The yellow columns in the chart indicate the locations on the needle bed where stitches are never moved.
Visualizing the tiled repeat and the direction of the transfers: the initial experiment is also a 12-row repeat. The magenta cells indicate spots where extra all-knit rows may be added in DIY.
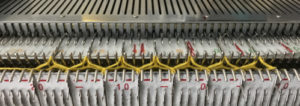
The work in progress:
A 7-prong tool is handy in making the 5 and 4-stitch transfers.
After each transfer, loops will form on the empty needles with the next carriage pass
3: the loop becomes part of the subsequent transfer, and the newly emptied needle remains in work
The first swatch began with a 12-row repeat and an all-knit row before transfers began for the alternate shape. 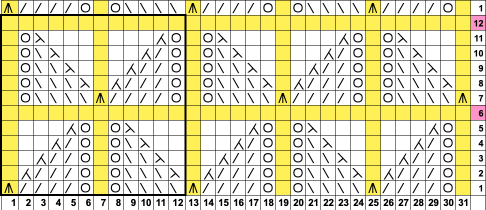 Visualized in larger BW tiling
 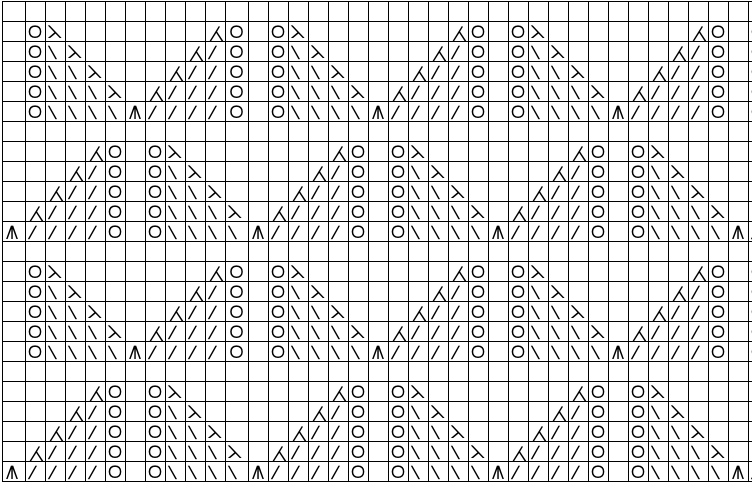 The transfers are made away from the circles in the chart using multiple transfer tools.
After each transfer, the empty needles are left in B or pushed out to E.
As the knit carriage moves to the opposite side, loops are formed on the empty needles.
Each loop becomes part of the next transfer.
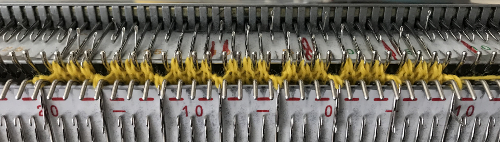
Setting up the first design row using a 7-prong tool with 5 prongs selected: the numbers in the lower image indicate the number of stitches on each of those needles as the setup row is completed. 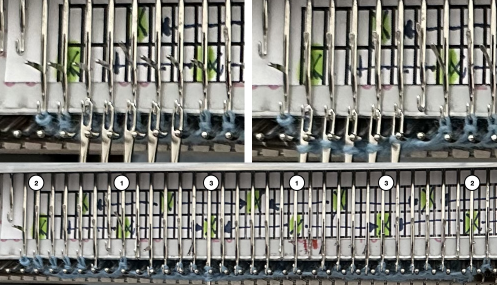 The second group moves 4 stitches at a time. Loops are treated as stitches.
After the transfers, there will be groups of 2 stitches adjacent to those holding 3 in the previous row.
The outline in the lower image points to one pair of transfers in the process of being completed.
 1: When this configuration is reached, knit one more row to the opposite side,
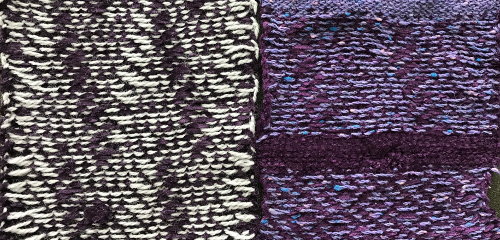
2: begin transfers away from the midpoint between the shapes to form the brick repeat. 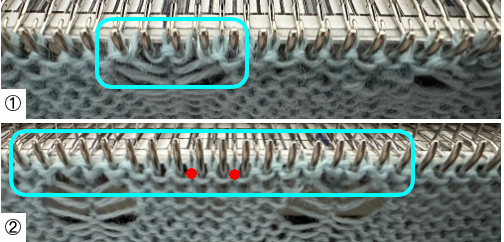 The result forms a bump once more due to the length of the single knit stitch columns.
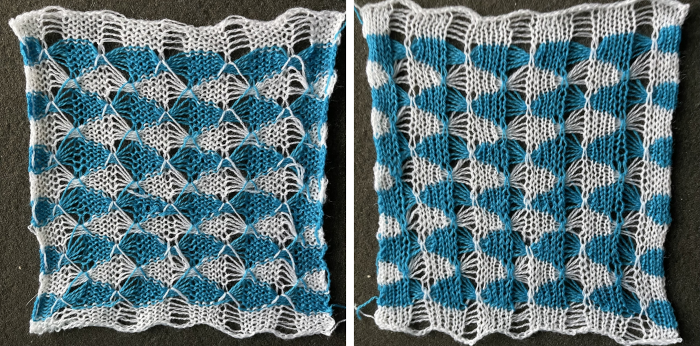
  The above yarn is a 2/8 wool, the swatch was quite stiff. A second swatch was knit using a softer, thinner, alpaca-silk blend.
The relaxed knit after removal from the machine was very textured and narrow,  this result followed some light pressing and steaming.
Traditional wet blocking would be required to maintain the shapes in a final piece.  Eliminating the all-knit row to reduce the extra lengths of those single-stitch columns did not produce what to my eye was an improved knit.
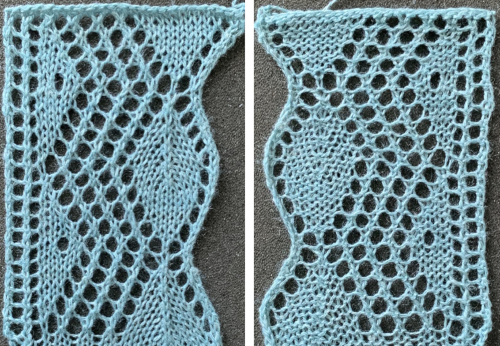
In a last what-if test, the chart was turned 180 degrees, with transfers beginning with a single stitch, and ending with moving five. 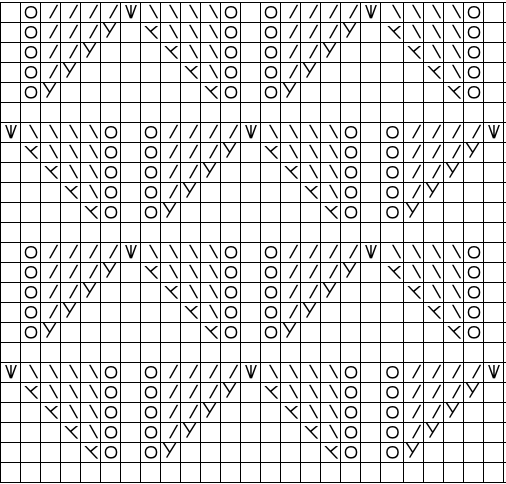 The results, knit in 2/15 wool and lightly steamed and pressed, appeared more successful to my eye.
  relaxed overnight, the surface is a bit more 3D
  Using a similar technique for multiple transfer lace designs: a 14-row repeat, magenta cells mark all knit rows, and all transfers are made toward stitches aside every 7 stitches except for on rows 6 and 13,
 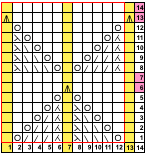 circles in the chart now indicate eyelets, transfers are made every row.
 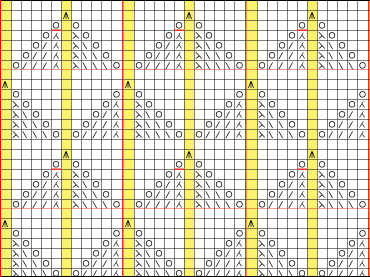 1: the setup row.
Empty needles are left in work, B. Cyan dots mark needles holding 2 stitches after the beginning transfers
2: the next knit carriage pass forms loops on the empty needles
3: with the next transfer, an empty needle results adjacent to each loop, the start of the next eyelet 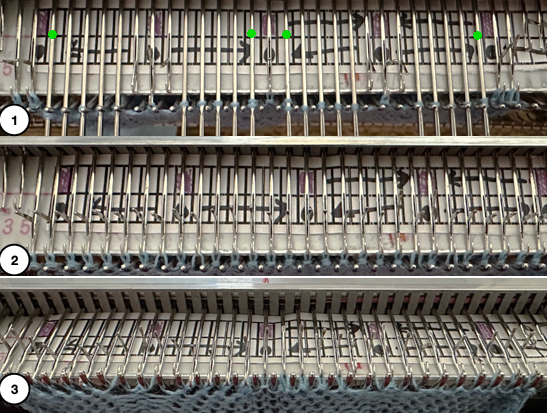 On Row 6 the last transfer results in 3 stitches on the normally undisturbed vertical stitch columns, 6A as the next carriage pass is made, 6B, loops are formed on the empty needles. A second row is knit on every needle, 7, and transfers begin to be reversed for the top half of the shape, 8.
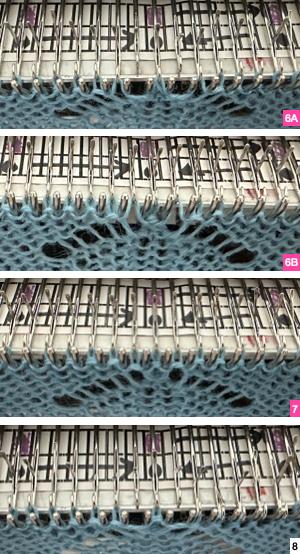
 The result shares some similarities with another hand technique .
![]()
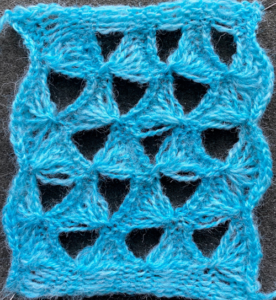
Category: Ladders
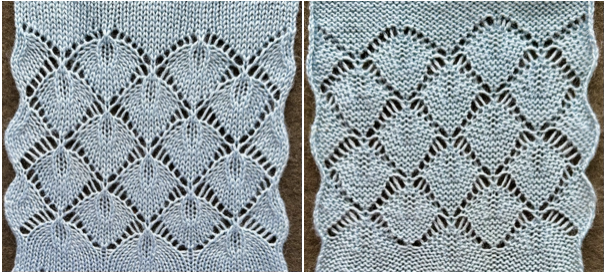
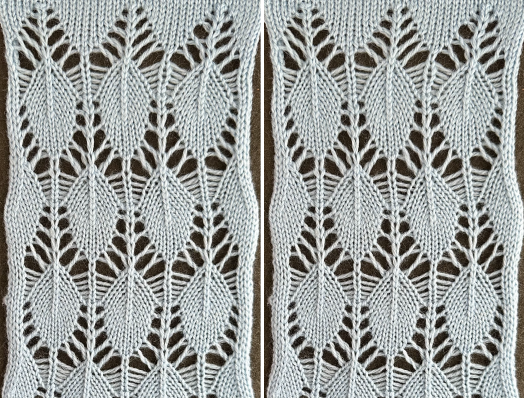
Revisiting lace leaf design repeats 2
I am constantly drawn into multiple knitting rabbit holes. Along with my revisiting 3D surfaces, more leaves are still in my line of sight for further exploration.
Here they are surrounded by a traveling mesh ground: a 12X52 repeat, marked for punchcard use:
 the associated PNG
 ![]() The test swatch knit on 38 stitches:
The test swatch knit on 38 stitches: 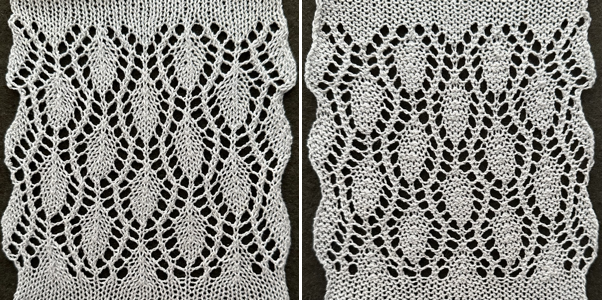 This design was shared as an stp file for use with DAK by Claudia Scarpa.
Her blog post includes downloadable files with clear markings for knit row locations, a punchcard version, a schematic for working it as a possible hand technique, and more.
DAK does not allow for exports in other file formats ie PNG.
Charts for the designs can be screengrabbed and processed with other programs ie Gimp and ArahPaint to make them usable in other ways including download options.
This electronic repeat is 20X136 pixels.
Horizontal mirroring was not required when using it in my 930. 
![]() Knit on 40 stitches, using the same wool-rayon yarn as in the first sample, there is a considerable change in the size of the resulting leaf shapes
Knit on 40 stitches, using the same wool-rayon yarn as in the first sample, there is a considerable change in the size of the resulting leaf shapes 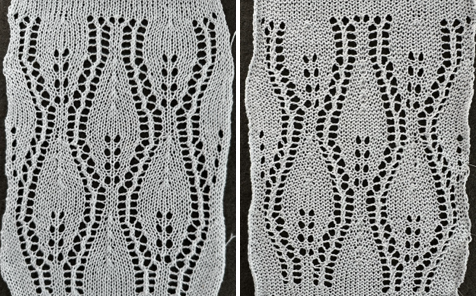 This is my chart for Claudia’s punchcard version, marked in 6X6 squares blocks as found in Brother factory punchcards,
  the result is a longer repeat resulting in larger leaf shapes, 24X228 pixels
 ![]() And then there is the world of leaves formed with hand techniques and surrounded by ladder spaces.
And then there is the world of leaves formed with hand techniques and surrounded by ladder spaces.
This was published in an early Silver Reed/ Studio pub eons ago and got filed in my “someday” image folder. 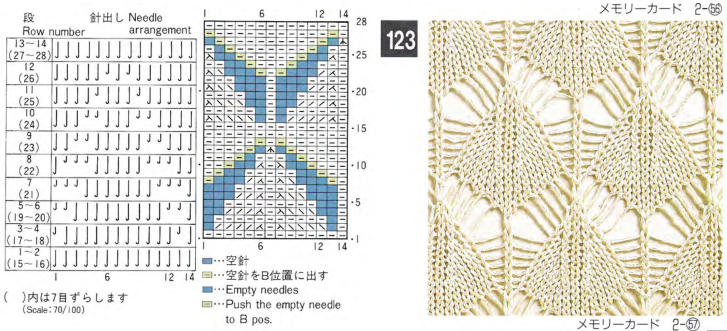 Visualizing repeats and necessary actions in spreadsheets before any actual knitting is useful.
With practice, we develop a personal library of choices regarding symbols and any additional information.
This was my initial draft taking into consideration:
the direction of the transfers
the location of single-stitch columns that are left undisturbed throughout
the needles on which stitches are doubled after transfers
where stitches are decreased, every 2 rows, marked with orange cells in the second column from the left
where stitches are brought back into work on every row, marked with green cells and arrows that point up in the first column on the left
 Printing custom needle tapes is an alternative to marking the needle beds or needle tapes to offer guides that help avoid errors or lots of needle counting in many hand techniques.
Mac Numbers version at present: 13.2. Its rulers can be set to centimeters for easy calculation of needle space cells with Japanese machine needles set 4.5 mm apart.
This PDF printed to the correct size for me when set to 100% landscape: 7 needles
4.5X7=31.5 mm: to convert the mm to cm in DIY move the decimal point one number to the left. Row height can vary with the limit being about 2 cm. The specs from the shared file:  The work in progress on the machine as transfers are being made and the empty needles are taken out of work back to the A position.
 ![]() The end of transfers approach and needles are returned to work before each carriage pass, forming loops on them.
The end of transfers approach and needles are returned to work before each carriage pass, forming loops on them. 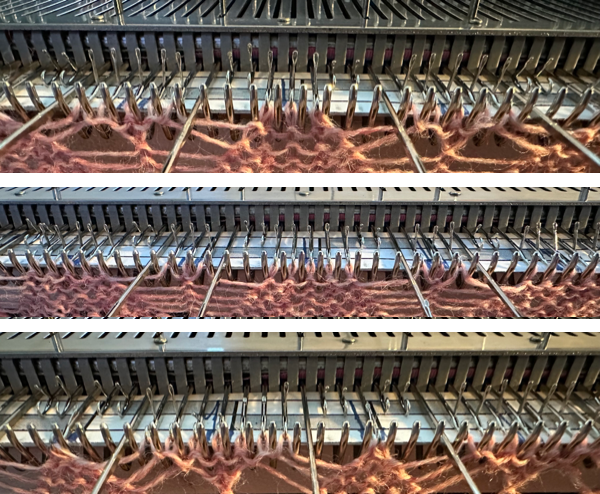 The test swatch, knit in 2/8 wool at tension 9, the color chosen randomly for weight and easy visibility
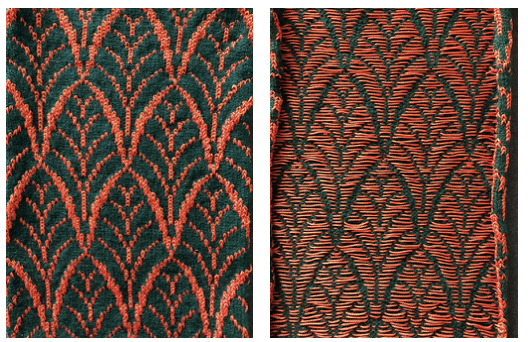
 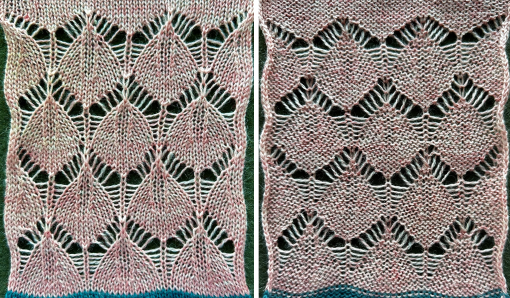 The pattern is evocative of another Studio transfer lace #112, 12X104
 ![]() a smaller design without the missing stitches and empty spaces.
a smaller design without the missing stitches and empty spaces. 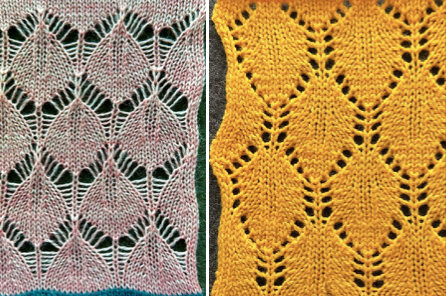 Following some research, the chart for Studio punch card 123:
 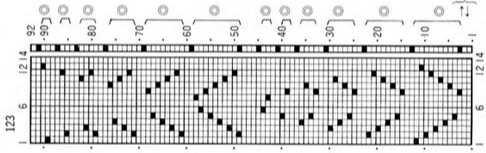 The electronic equivalent, 14X92 cells
 ![]() The file adjusted for knitting on Brother is now reduced to 14X88 cells, and the cyan is marking areas where the knit carriage makes 4 passes rather than the usual 2
The file adjusted for knitting on Brother is now reduced to 14X88 cells, and the cyan is marking areas where the knit carriage makes 4 passes rather than the usual 2 
![]() The result is a 14-stitch leaf in traditional transfer lace.
The result is a 14-stitch leaf in traditional transfer lace. 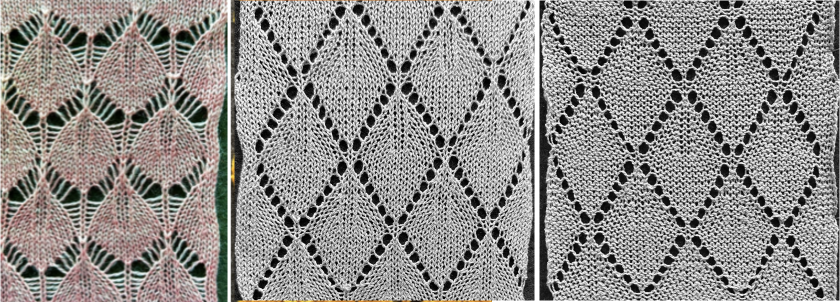 And then, the general shape begins to “appear” in other, older post swatches such as in this, part of the development of very different 12-24 stitch designs.
  More leaves combined with open spaces, returning to hand techniques:
in DIY charts symbols can be developed to suit and included or eliminated in final directions. Convention matters if directions are to be published with patterns for general use, and matters less when for personal use.
Examples:
 the starting diagram:
 The test swatch was begun on 2/8 wool, then switched to a 4/10 alpaca and silk because it was green, and the guess that the resulting looser stitches using it might make cable crossings and transfers easier, As can be seen in the work that follows, the size and definition of knit stitches at the edge of the vertical columns and the leaves are sharper and better retained in the thicker yarn.
 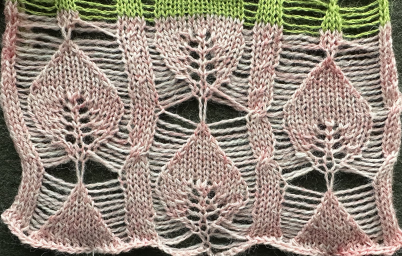 A chain cast-on was performed on the number of needles as shown above, and chains were dropped to achieve the proper setup
 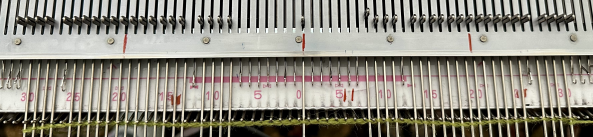 To make a visually balanced increase from one to three stitches, the tool is inserted from back to front of the ladder on each side of the stitch, twisted clockwise on the right, counter-clockwise on the left, with the twisted loops lifted and placed on the empty needles each side of that center stitch.
  An illustration from one of my earlier posts on leaf shapes surrounded by ladders
 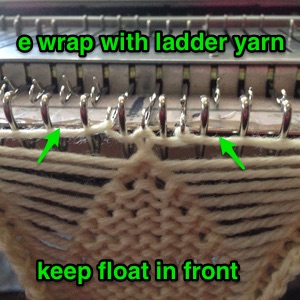 It is helpful to have a couple of 7-prong transfer tools to speed transfers along, with one set to move 4 stitches, the other 5, or simply use a combination of the standard ones.
  Another variation:
 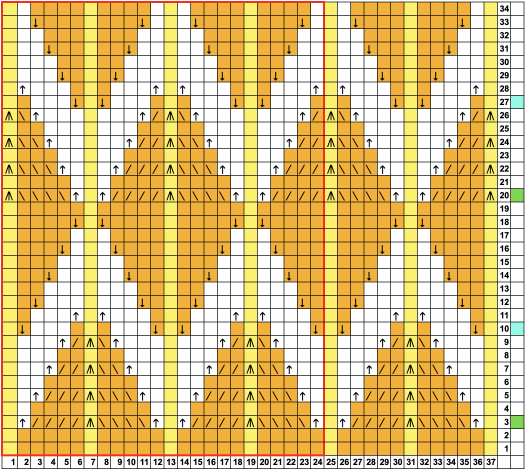 The slightly revised repeat
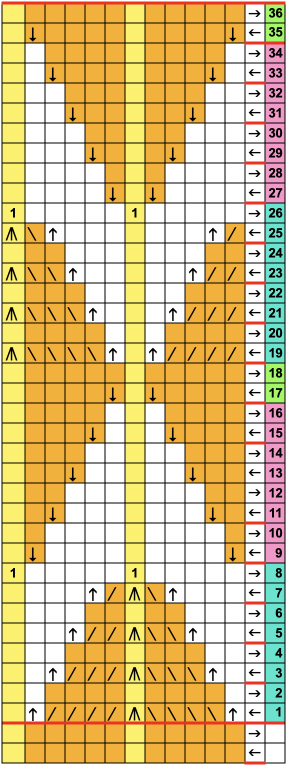
 A few images of the work in progress: in this design, actions take place every 2 rows.
The dark segments on the custom-printed needle tape mark the needle positions for stitches that are never transferred, ie rows # 1, 7, 13, 19, etc. in the chart.
At this point in the work, there are 3 stitches on the needles holding the last transfers, marked with circles, and single stitches on the alternate needle locations, marked with squares. 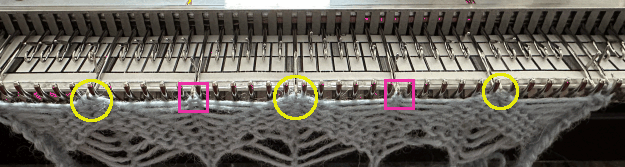 After a row is knit to the opposite side, the groups of 3 stitches are reduced to a single stitch.
 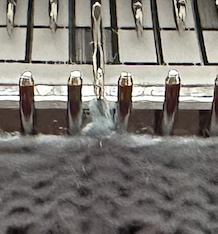 and it is time to begin to reduce the width of the floats.
Empty needles are brought to B position/work on each side of the single stitches.  Loops will form on each of those needles as the knit carriage moves to the opposite side.
 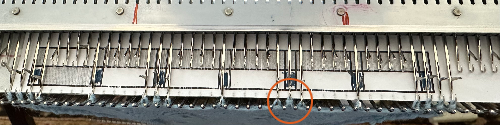 Moving forward, empty needles are brought into work adjacent to each loop every 2 rows.
 A closer look at the twist in the floats as the action continues and the number of needles out of work is reduced:
 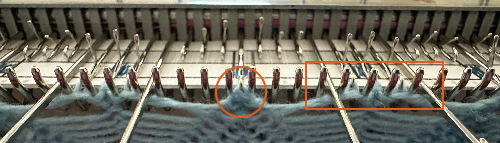 The locations in which stitches are taken out of work form straight floats, where needles are returned to work, the floats form the familiar twists seen in transfer lace patterns.
Not to be forgotten, fully automated lace edgings such as here
 and this, with both patterns shared in the same blog post
Using punchcards (3) or electronics to track small cables in pattern
Previous shares on aids to tracking cable transfers
Using punchcards to track small cables in pattern 1
Using punchcards to track cables and twists in pattern 2
Visualizing knit cables in color 2_ using Numbers and Gimp
Hand knitting patterns are usually depicted with the knit side facing.
If crossings are intended to match them exactly when working on knitting machines, they are made on the purl side, and their direction needs to be mirrored.
The blue dots illustrate hand-knit symbols, and the pink dots the machine-knit companions 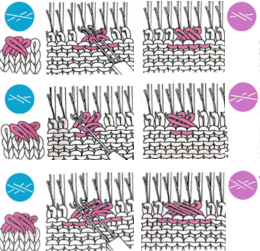 I was recently contacted about the possibility of reproducing the swatch on the far right. The image on the left is an actual knit, first tested with cable crossings mirroring each other along vertical columns.
The inspiration swatch was likely knit on the bulky, twisted every 4 rows, mine on a 4.5 mm machine, twisted every 5 rows.
It is possible to crop, copy, and paste initial photos, as in the center image, to visualize how the process may be altered prior to spending time creating new charts or any actual knitting. 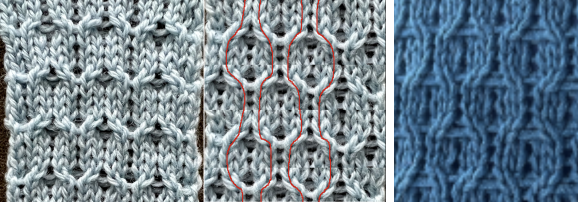 Building charts in a spreadsheet:
begin with creating and saving custom shapes, which can be made editable, and outlined if preferred (magenta) to further define the stitch brought forward, with the other moved behind it (blue).
Symbols used:
1. black cells/ knit stitches
2. white cells/ needles out of work, creating ladder spaces and non-selected needle areas where stitches are to be moved in the direction of superimposed arrows
3. red arrows/ stitches that are lifted off the needle bed, brought to the front on the purl side. The stitch on the adjacent black cell/selected needles is removed, travels behind it, and replaces it. The held stitch is then placed on the now-empty needle. Both stitches are brought out to hold/E position to knit properly on the next carriage pass.
The plan is to use the slip-stitch setting in both directions.
Since there are needles not in use, the end needle selection needs to be canceled.
Proper needle placement is required for patterning accuracy.
One option for achieving it is by air knitting the first row of the design, another is to program the width of the planned knit in electronic machines, establishing pairings, and using the single motif setting with no guesswork.
A chain cast-on can be performed, followed by dropping chains in ladder locations and taking those needles out of work to A position.
Even weight is useful if crossings are to begin after only 4 rows of knitting.
Each repeat is 8 stitches wide, punchcard users repeat it X3 in width, and in the charted height X3. 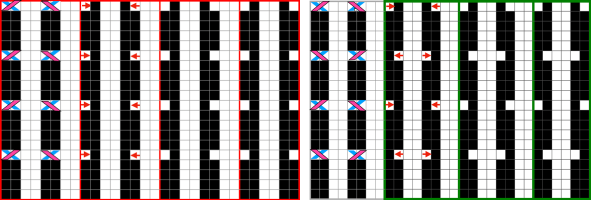 Proofs of concept: 30X20 electronic repeat for vertically mirrored transfers,
 ![]() and the alternating twisted arrangement
and the alternating twisted arrangement ![]() The work on the machine
The work on the machine 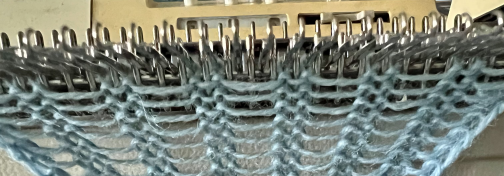 In the resulting swatches, patterning errors such as the marked one become difficult to repair after the fact as stitches grow in size and ladders nearly disappear
 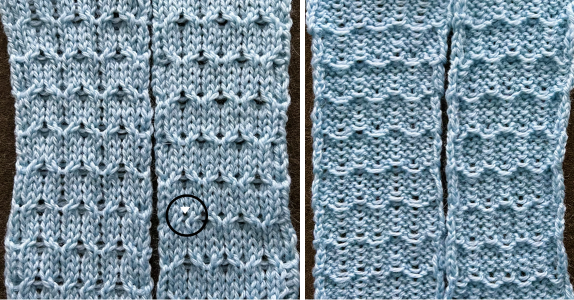 Both swatches measure less than 2.5 inches in width, another reason to explore the results on bulky models if they are to be used in garments.
If planned as panels combined with stocking stitch, careful planning is due to overall gauge differences and those in row counts when seaming and joining.
Building more textures in needles out of work spaces
A collection of previous posts exploring some variations on the topic:
Ladders with lace, (leaf) “making things work” 1 3/15
Ladders with lace, (leaf) “making things work” 2 3/15
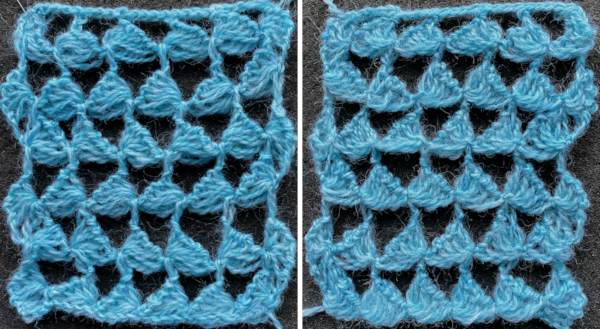
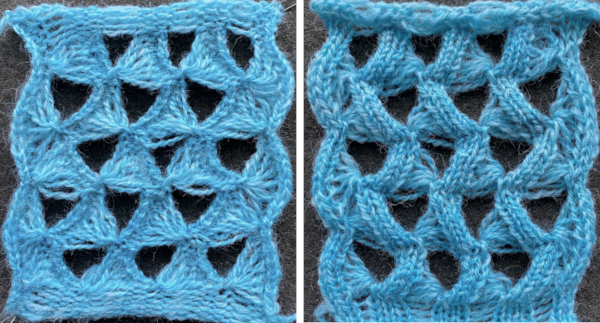
Ladder lace 8/13 Instructions reviewed in 2022, one of the accompanying swatches: 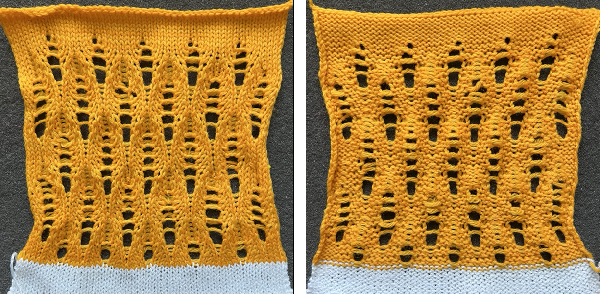 Ladders and Lace 8/13. MK ladders, and a bit of crochet 12/16
Tuck “lace” trims (and fabrics 1) 6/17
Tuck “lace” trims (and fabrics 2) 6/17
Tuck “lace” trims or fabrics 312/17
Automating tuck stitches combined with “lace” 2 6/17
Combining tuck stitches with “lace” 1 3/15
Many fabrics other than the traditional ones familiar to hand knitters and machine knitters that create eyelet patterns by transferring and combining stitches with yarnovers often include the term lace in their name, one such is ladder lace.
No matter what machine is in use, charts may be developed and followed that include row-by-row directions for needles out of work and any movement of stitches to alter the look of the floats created in the resulting spaces.
Knitology offers endless video inspiration for lovers of hand techniques including ones relying on patterns including ladders.
There are several aids in maintaining the desired repeat in NOOW (needles out of work). When establishing the initial needle configuration, punchcard knitters can punch a single row to match the required needle selection if the repeat works within the 24-stitch constraint, and use locked preselection to make transfers in base knitting.
Electronic knitters may use the same concept, I prefer if doing so to plan for programming the width of the stitches in use on the needle bed, adding pixels for knit borders on either side. Punchcard users may need to disregard some needle selections to form them.
Another option for hand technique tracking in addition to marking the needle tape or even the needle bed is to print custom needle tapes created in a spreadsheet.  They can be marked as needed to guide hand technique selections, with colors added if preferred, and are easily swapped out if corrected or additional tapes are needed for different segments of the same technique.
A variety of printable tapes for multiple gauge knitting machines is offered by Claudia Scarpa in her blog post.
A series of printable sheets for tracking row counts at even intervals may be found at the bottom of this post.
In laddered fabrics, the edge stitch on either side of the float may widen and grow in size over time.
The 8/13 swatch uses lace transfers that produce doubled-up stitches to help with stitch stability.
Adding hand techniques serves a similar purpose in wide or varying ladder space designs created on the knit bed.
The length of the item produced combined with the added weight in the finished piece as it is hung or worn may quicken any lengthening and narrowing of the piece, requiring blocking again or at the very least pressing and steaming.
The fiber used makes a difference in the retention of the blocked shapes, in this case, man-made fibers may serve better than wool with its spring back.
If a needle is emptied, if left forward or brought back to the B position, it will pick up a loop on the next pass, and when followed by a second knit row, an eyelet is formed in the loop location.
If a loop on a previously empty needle is dropped after it is formed, the resulting ladder grows in width.
Latching ladders while on the machine creates knit stitches on the purl ground.
Stitches may be removed and returned to the needle bed, cable crossings may be involved.
Picking up the heels of specific stitches on designated rows below and placing them on the knit stitches to the right or left of the ladder space is a way of adding non-vertical shaping.
If experimenting with the number of rows knit before adding hand techniques, keep good notes in order to be able to reproduce segments in an all-over pattern. Beginning patterning with simple transfers in stocking stitch ground, here the needle configuration shifts but remains constant throughout. My proof of concept swatch is knit in 2/8 wool. 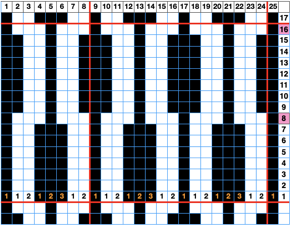 Visualizing the necessary actions:
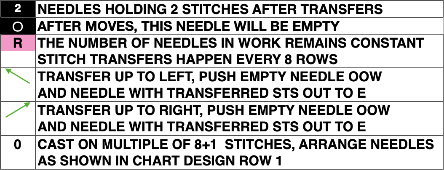
 The proof of concept:
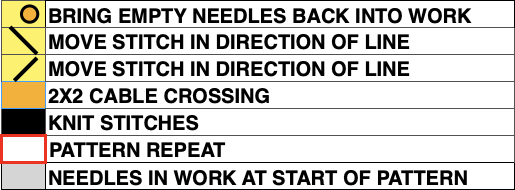
 Adding 2X2 cable crossings: this repeat is 12 stitches wide.
A chain cast-on allows for dropping the 2 chains in the location of the starting ladders, with some weight applied to the starting rows one may proceed to the first cable crossing.
On row 6, and then again at 10-row intervals from there, the designated pairs of stitches are crossed consistently in the same direction. The needles aside from the crossing are pushed back to the A position.
Knit 4 rows.
On row 10, and then again at 10-row intervals from there move the left stitch of the pair of the center needles to its left, and the right stitch to its right, restoring the empty column at the center of the chart. Return the remaining empty needles to the B or E position
Knit 6 rows.
Repeat the process, ending with 6 knit rows. ![]()
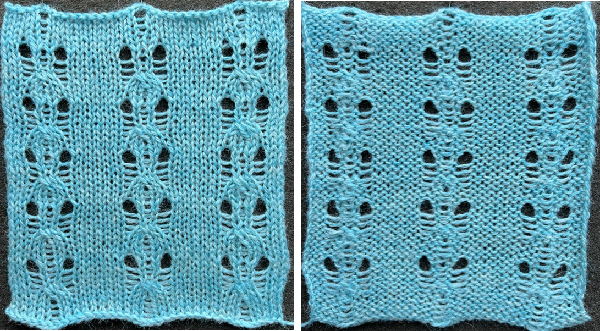 This variation uses transfer lace stitch crossings to produce larger eyelets than seen in the above swatch. Row counts for specific hand techniques can be tracked in a written or printed document if preferred.
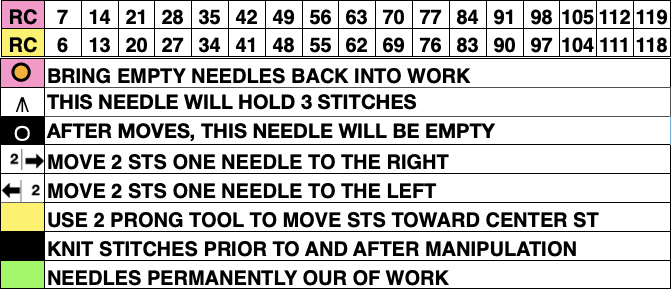
 The knitting in progress: the initial needle spacing:
  Emptied needles are in the process of being returned to work after the transfers to restore the initial setup, the first knit row will create loops on those needles, and the stitch is completed with the next knit pass from the opposite side
  The growing pattern becoming apparent
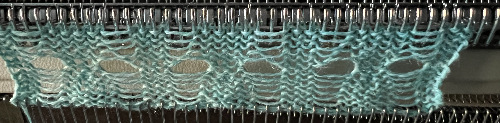
 After updating the 8/13 post, these experiments continue exploring the above concept. The yarn now used is a wool rayon, which appeared not to split, and retains blocking if it is used.
The samples use an 8-row repeat with different transfer methods. The first uses two-stitch transfers. The 24-stitch version is suitable for a punchcard, 48 rows in height.  the smallest electronic repeat
  tiled to a 28-stitch repeat for the electronic, in the width of my planned swatch, only for the required 8-row height
![]()
![]()
![]() The now familiar double loops
The now familiar double loops 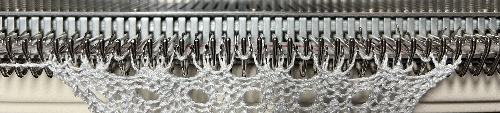 Beginning ladders
 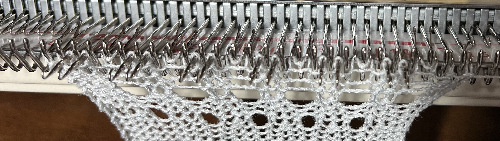 A partial row view of stitches moved 2 at a time toward the higher end stitch count, treating the loops as one would stitches
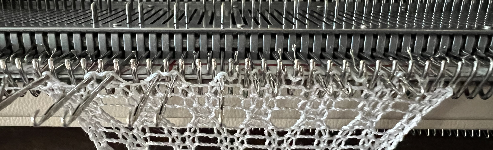
 e-wrapping one of the two loops consistently in the same direction at the top of the piece will form equal eyelets on the next pass
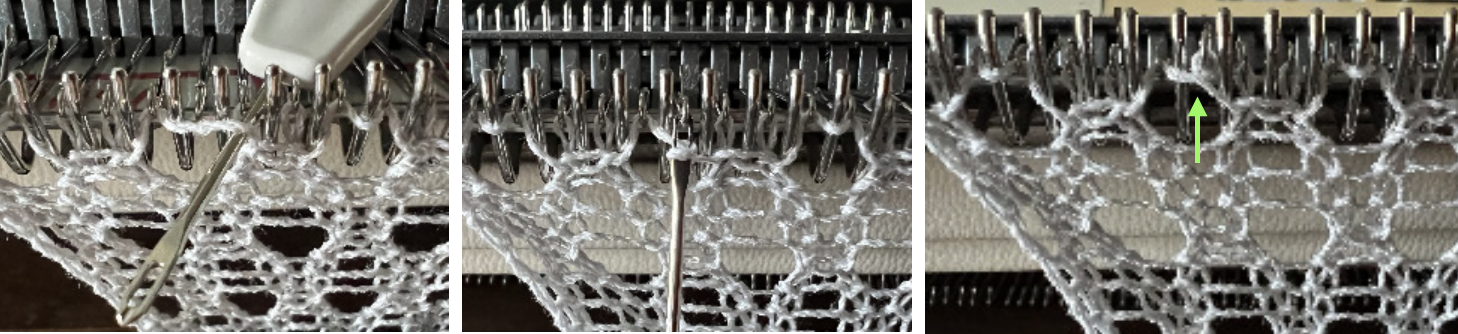
 Working with multiple loops held in hooks of specific needles: the following swatches were actually the beginning for what became the above thread
I tend to web surf in the early morning hours. Sometimes that includes coming across YouTube videos where contributors show fantastic dexterity at handling tools while developing complex fabrics using only hand techniques.
This is one example:
https://www.youtube.com/watch?v=IoJbbInlxck.
As usual, I attempted to automate as much as I could and failed to be able to execute a truly similar fabric.
In my first modified version, I introduced knit rows as seen below to make tracking of hand techniques easier and to facilitate knitting stitches/ loops groups.
The result is of course quite different from the swatch in the video.
To knit: begin with a permanent cast on over the planned number of needles. In this case, 2 needles are included to form vertical all-knit borders on both sides.
I knit most of my proof of concept swatches on an electronic machine and download a plain design repeat with a stitch count equal to the entire width of the number of needles in use on the bed.
On a punchcard model, the all-knit border needles would have to be brought out to E on every row for them to knit with each carriage pass.
Using provided repeat pngs as shared may require mirroring the repeat horizontally depending on the download program and the knitting machine model used, as well as changing the image mode back to indexed BW since downloaded designs from the posts may be converted to RGB mode as they are copied.
If working on a finished piece, knit several rows of waste yarn, followed by a row of ravel cord and a permanent cast-on, otherwise simply knit enough to hang a comb and some weights, required for most tuck knitting.
I happen to have a 2/20 wool as my go-to for most experiments that result in 4 or more loops building up in the needle hooks.
The beginning concept: hand transfers and automated tuck patterning

![]() The programmed repeat is planned for two rows of knit stitches between sets of loops
The programmed repeat is planned for two rows of knit stitches between sets of loops 
![]() After the cast-on and base knit rows, program the machine and preselect the first pattern row. The starting side does not matter unless the use of the color changer is planned, in which case, the first preselection row would need to move toward it.
After the cast-on and base knit rows, program the machine and preselect the first pattern row. The starting side does not matter unless the use of the color changer is planned, in which case, the first preselection row would need to move toward it.
Because some needles are taken out of work, end needle selection is canceled.
After the first preselection row, the machine is set to tuck in both directions.
My test repeat was programmed as a single motif on the 930, with the image mirrored horizontally.
Each pattern segment is 6 rows high, the full repeat is 12 rows tall. Color changes could be introduced every 6 rows.
Following the chart for the first segment, transfer the A marked nonselected location needles to the adjacent preselected ones on their left, push the emptied needles out to A position, OOW after each transfer, and its adjacent needle with the combined stitches/loops out to E position.
After 4 tuck stitch rows, push any needles previously placed out of work to A position out to E so they will knit appropriately on the next pass as part of an all-knit row.
As the carriage moves to the opposite side, the second all-knit row will preselect. As the carriage again moves once again to the previous side, it will knit the whole row, while preselecting for the first hand-technique row once more.
Prior to the next carriage pass, transfer each of the marked B location nonselected needles to the adjacent preselected ones on its right, push the emptied needles out to A, OOW after each transfer, and its adjacent needle with the combined stitches out to E.
Form loops for 4 more rows, and push any needles previously placed back to A position out to E so they will knit appropriately on the next pass, forming an all-knit row. As the carriage moves to the opposite side, the next all-knit row will preselect, followed by preselection for loops and transfers again as the carriage moves again to the previous side knitting every stitch.
Repeat the process for the desired length.
End the piece with at least 2 all-knit rows after a full or half design repeat. Cast off loosely to compensate for the widening due to the type of stitch formation. ![]() This fabric is executed as a hand technique/ short rows with no automated tuck patterning assistance. I have found when using the tuck automated setting in Brother models there is often a limit for accumulating no more than 4 strands in the hooks of the needles, while in using holding, manually pushing needles out to hold and back to work can be far more forgiving.
This fabric is executed as a hand technique/ short rows with no automated tuck patterning assistance. I have found when using the tuck automated setting in Brother models there is often a limit for accumulating no more than 4 strands in the hooks of the needles, while in using holding, manually pushing needles out to hold and back to work can be far more forgiving.
In this instance, loops are formed for 6 consecutive rows.
There are no all-knit rows. The color changes were made every 6 rows prior to knitting across the newly adjusted needle positions.
“Crochet” meets machine knitting techniques: working with short rows 2
Some previous posts exploring hand techniques that might be considered to fall in this family of stitches:
“Crochet” meets machine knitting techniques: tuck lace trims and fabrics 1
“Crochet” meets machine knitting techniques: tuck lace trims or fabrics 2
“Crochet” meets machine knitting techniques: working with “chains”
Search for “wisteria”
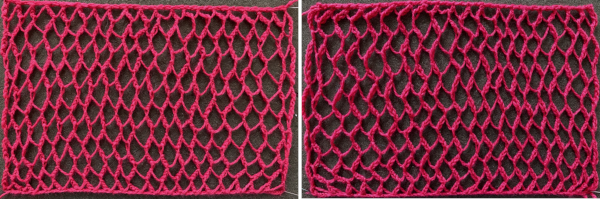
“Crochet” meets machine knitting techniques: working with short rows 1, June 2017 began to explore some of the fabrics presented in this category in a Portuguese language publication  I do not speak or read the language, so my swatches are best guess efforts at producing similar knits.
2022: In the latest Mac OS 12, an interesting feature is available now, but not at the time of the original writing of this post.
A: choose the design, in this case, #2, screen grab the image, import it into photos
B: open the image, position the pointer over the text, left click and drag to select the desired text
C: control-click on the selection, choose translate text, and then choose a language. If a specific language selection is not made, the mac translates automatically into the preferred language for your region
D: click and choose copy translation to copy it to clipboard for saving into a document ie Text Edit so that it may be saved for later use or printed if desired
![]() The result offers a starting point but is in need of added editing
The result offers a starting point but is in need of added editing
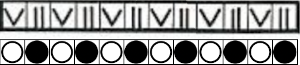
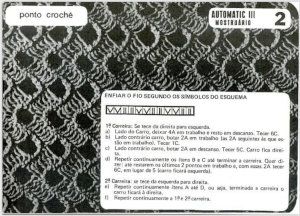
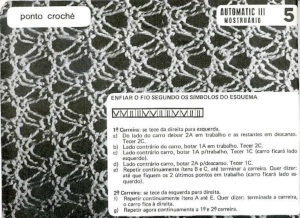
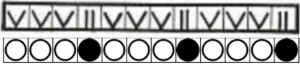
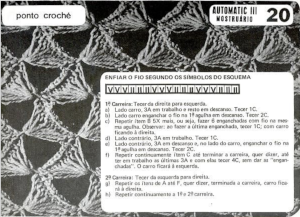
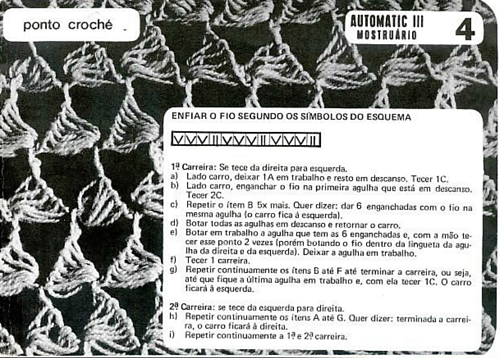
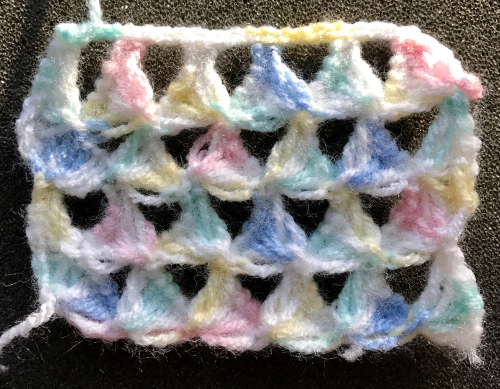
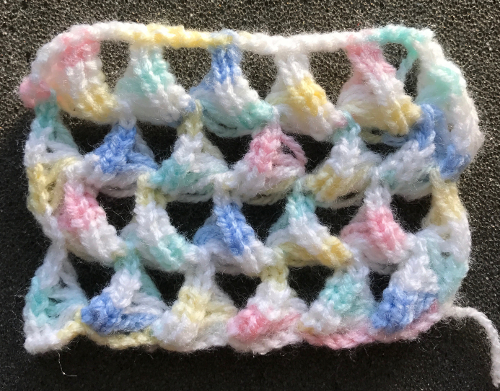
1% Career: You weave from right to left.
A)Side of the Car, leave 4A at work and rest at rest. Tecer 6C.
B) On the opposite side car, put 2A to work (the 2A next to those that are
So at work). Weave 1C.
C) On the opposite side of the car, put 2A on rest. Weave 5C. Car is saying-
Ta.
D) Continuously repeat items B and C until the carrera is finished. Do you want to di-
Zer: until the last 2 points are left at work and, with these 2A weaving
6C, instead of 5 (car will be left).
28 Career: weaves from left to right,
C) Continuously repeat items A to D, or soybeans, after the career or
The car will be on the right, fI
Continuously repeat the 19th and 28th career,
Guidelines at the beginning of the pub for #1, translated more slowly with added editing:
CLARIFICATION FOR THE EXECUTION OF THESE POINTS
A: in crochet stitches, the scheme is repeated across the entire width of the machine
B: in the “crochet ends”, braids and flowers, thread only the needles. Islands as indicated by the symbols in the scheme. Alternative: in crochet stitches of gallons and flowers thread the thread only on the needles as indicated in the diagram symbols
C: when starting to weave the car must always be on the right side unless the symbols in the scheme indicate otherwise, for example, crochet stitch #9
D: in crochet stitches count a career whenever the tip of the wire stays at the other end of the machine
E: the tension must be adjusted according to the stitch and thickness of the thread to be used, in general voltages 1-3 are used.”
Some familiarity with larger-scale patterns in this family can help visually with duplicating them independent of the written original language directions.
These fabrics share common hand technique movements across rows, singly, or in pairs. Similar structures are not presented in numerical order in the pub but will be here.
The yarn choice makes a critical difference both in managing the knitting and in how blocking, or not, affects the finished fabric. The knit carriage travels many times across each stitch as the technique is worked, with possibly pilling, so softly spun yarns should be avoided.
Clean the machine of any leftover fibers, while avoiding over-oiling which may leave dark streaks in the finished product.
Cast-ons and bind-offs need to be very loose to compensate for the fact that the completed knit will have considerable sideways stretch. 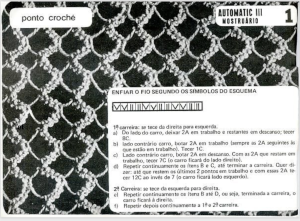
 Chain cast on 2 in work, 2 out of work, end with 2 needles in work
bring all stitches out to hold except for the first 2 stitches on the right
COR knit 8 rows
push adjacent pair of needles away from the carriage into work position, knit a row to left
COL bring the previously knit pair of needles out to hold
knit 7 rows, end COR
bring adjacent pair of needles opposite carriage into work, knit a row to left, end COL
COL when the last pair of needles is returned to work knit 8 rows
reverse shaping: bring the second pair of needles on left into work, knit a row, push the first pair of needles out to hold, and continue the process for the desired length
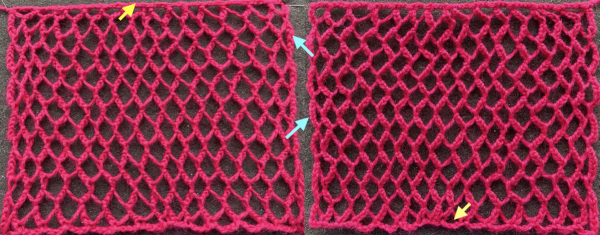
The yarn used is a 6X18 rayon, a “no memory” yarn that changes considerably with pressing. The arrows mark an operator error in tracking the sequence, the top and bottom edges are obviously narrower than the resulting mesh.  Number 11 is a close relative but worked on every other needle
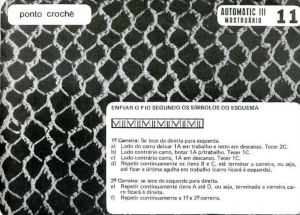
 The rayon used in the previous sample, and a 2/8 wool, were less successful than a 2/11 acrylic in knitting the swatch. The stitches need to be as tight as possible while also needing to be able to knit off properly
make a very loose chain cast-on on an even number of needles, then drop every other chain, taking every other needle completely out of work, and ending with a needle in work
bring all stitches out to hold except for the first stitch on the right
I believe the directions are given for knitting only 2 passes, I preferred the look with the count doubled to 4, so, COR knit 4 rows
push adjacent needle away from the carriage into work position, knit a row to left
COL bring the previously knit pair of needles out to hold
knit 3 rows, end COR
bring adjacent pair of needles opposite carriage into work, knit a row to left, end COL, knit 3 rows
COL when the last pair of needles is returned to work knit 4 rows, continue with
reverse shaping: bring the second pair of needles on left into work, knit a row, push the first needles out to hold, and continue the process for the desired length
In the top part of the swatch I knit 8 rows at starting and ending sequences, feeling the sides were tight, 6 may be the best answer
bing off very loosely after the last stitch is worked for 4 rows
 The same directions apply in this instance, the first sample worked with no needles out of work
 I added 3 chains between cast-on and bound-off stitches, making for a better top and bottom edge. The difference in width is highlighted on the bottom right, where I missed doing so between two stitches. At the end of each row, prior to reversing direction, I knit 6 rows rather than 4, ending with 4 rows only on the last needle prior to binding off. The swatch was not steamed or pressed.
 This knit begins on every needle
  I cast on chaining over 2 needles, followed by two extra chains where the ladder is expected, cast-off also with two extra chains in ladder spaces. The knit sequence is similar to the previous swatch, but needles are now moved in pairs
COR work first 2 stitches for 2 rows
push two needles on left into work, knit one row to left
COL *push the first 2 stitches to hold, knit one row to the right
COR bring the next two stitches on the left into work, knit one row to left
COL push previous 2 stitches to hold, knit one row to the right**
bring 2 stitches on left into work knit one row to left,
repeat across the row
when the last pair of stitches are left, COL knit two rows on them, and reverse shaping. Ending each sequence with two knit rows will produce fairly straight sides, knitting four rows on end stitches, except prior to binding off, may echo the movement of the in-between spaces and make the ladders at the sides more visible 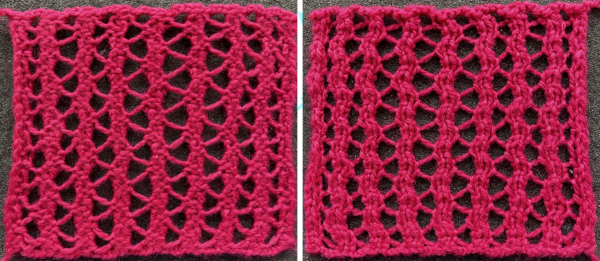 Eliminating those ladders or floats, here eyelets are created where stitches are held for two rows.
 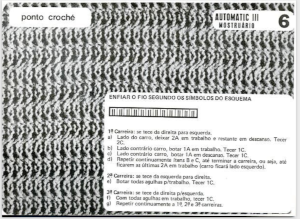 Care needs to be taken if stitches are dropped or other patterning errors are made in order to retain the correct pattern. Cast on and bind in this instance were executed with single chains added in between those on needles in work.
Version 1:
COR with the first 2 needles in work, knit 2 rows
COR bring one needle on left into work, knit 1 row
COL bring one needle out to hold opposite carriage, knit one row
COR bring one needle on left into work, knit 1 row
COL bring one needle out to hold opposite carriage, knit one row
repeat until there are 2 needles left in work, knit 2 rows
reverse shaping
end with 2 rows knit on the last pair of stitches before binding off 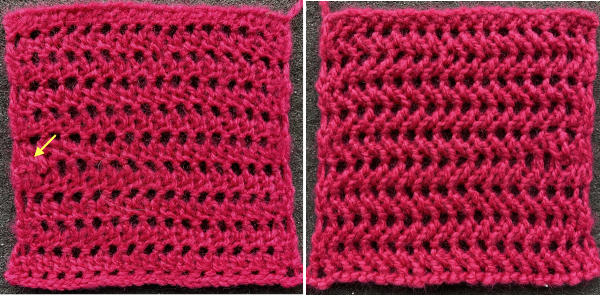 Version 2 adds 2 rows knit on every needle between holding pattern reversals, the fabric grows in length far more quickly
Cast on from left to right on every needle
COR knit 2 rows, bring all needles except for the first 2 on the carriage side out to hold
COR with the first 2 needles in work, knit 2 rows
COR bring one needle on left into work, knit 1 row
COL bring one needle out to hold opposite carriage, knit one row
COR bring one needle on left into work, knit 1 row
COL bring one needle out to hold opposite carriage, knit one row
repeat until there are 2 needles left in work, knit 2 rows, end COL
COL push remaining needles into work, knit 2 rows on all needles
COL bring all needles except the first 2 on the left into work, knit 2 rows
reverse shaping, ending with 2 knit rows on the far right
COR push all needles into work, knit 2 rows on all needles
COR bring all needles out to hold except for the first 2 on the right
repeat all
end with 2 rows knit on the last pair of stitches before binding off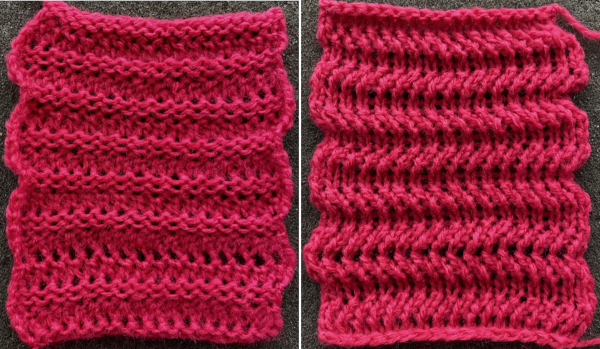
 chain cast on 2 in work, 2 out of work, end with 2 needles in work
worked in 2 pairs, 4 needles at a time
COR knit 6 rows on the first two pairs of stitches on the right push pair of needles on the left into work knit one row
 push first 2 of needles out to hold
 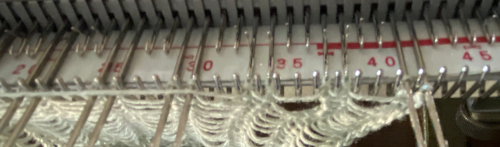 knit 5 rows COR
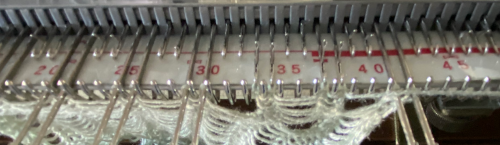 push next pair on left into work, knit one row
  push the third group on its right into hold position, knit 5 rows across remaining 4stitches bring a new group on left into work, knit one row
bring the pair to the far right out of work
repeat process across row
when the last pair of needles on the left is pushed back into work, knit one row
 COL knit 10 rows, bring the third pair of needles into work, knit one row
 Push the first pair of needles out to work, knit 5 rows, continue with reverse shaping.
If the pattern is to end on the right (or left), knit 6 rows on the last 4 stitches and stop, otherwise when the opposite side position is reached, knit 10 more rows before reversing and continuing in the pattern.
Tracking rows worked: 7 ladders are created in each space, 12 on each end. Depending on yarn and stitch size watch to see that even tension is maintained particularly on the first 2 stitches worked on each side.
The swatch is shown before and after some light pressing, the arrow marks some looser stitches on the side edge. 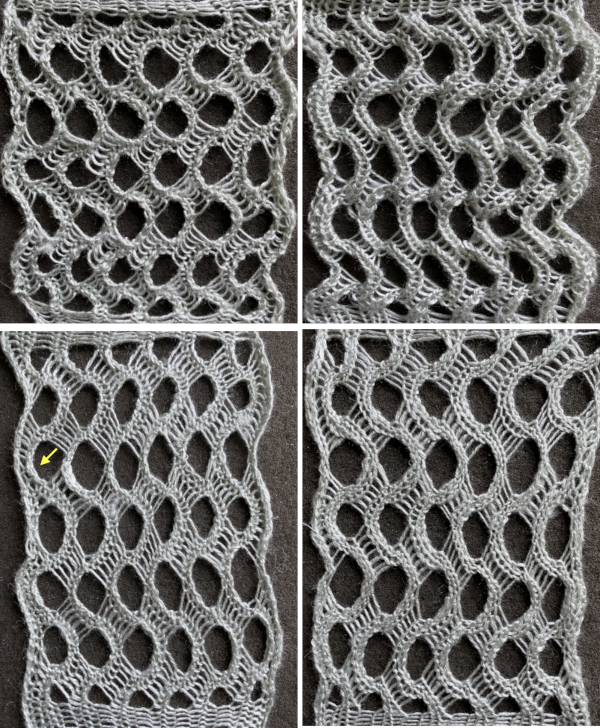
 Latch tool cast on from left to right, chaining 4 in no needle, future ladder spaces
COR with the first 2 needles in work, knit 2 rows
COR bring the first needle on left into work, knit 1 row to the left on three stitches
COL bring the first needle of the previous pair on the right out to hold, knit one row to the right on two stitches
COR bring the closest needle on the left into work, knit 1 row on three stitches
COL bring the second needle of the previous pair on the right out to hold, knit one row on two stitches
repeat working on 3, then 2 stitch sequences until there are only 2 needles left in work, end COL
COL knit two rows, begin reverse shaping by putting one needle into work on the right, knit one row on three needles
COR bring the first stitch on the far left out to work, knit one row on 2 needles
continue reverse shaping, ending with 2 needles in work on the far right
COR knit two rows on 2 stitches, repeat and continue the process until 2 stitches are left in work on the left, and reverse again
end fabric with 2 rows knit on last 2 stitches in work
latch tool bind off with chaining X 4 in ladder spaces
keep an eye on sequences, the floats are created in series of three, with experience knitting similar patterns, errors become easy to spot during is knitting 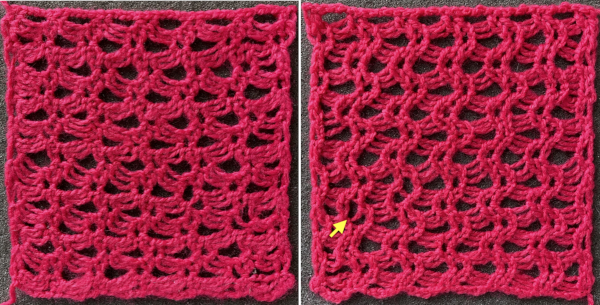 Shell shapes: #4 and # 20 directions are given in the 2017 blog post
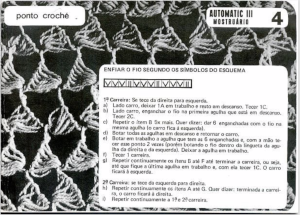
![]()
 Some of the trims in this pub may be far more easily and quickly executed using tuck stitches.
Ribber trims 3: one trim, four variations
I found this on a random sheet tucked away with references from some seminar or other eons ago, its origin is not known to me
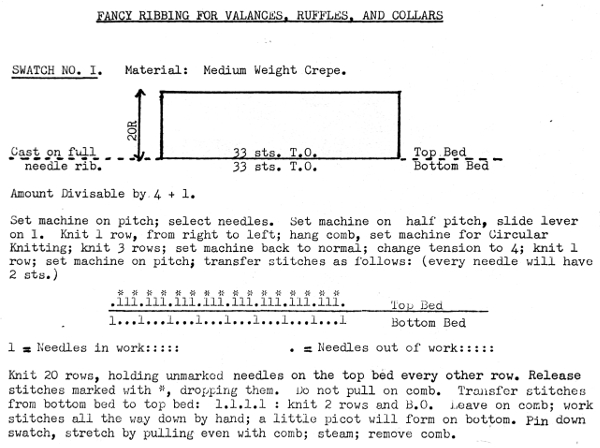 I like to chart out my repeats and plans for executing fabrics, along with ideas for possibly varying them in ways other than suggested, this was my beginning
 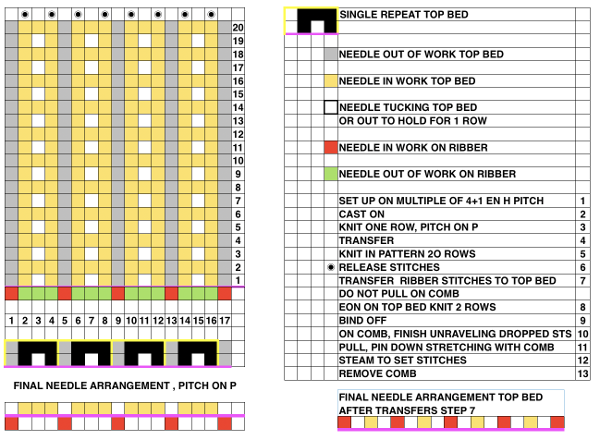 The sequence in photos, beginning with the cast on, 2/24 acrylic yarn, zigzag row with inserted ribber comb, half-pitch
 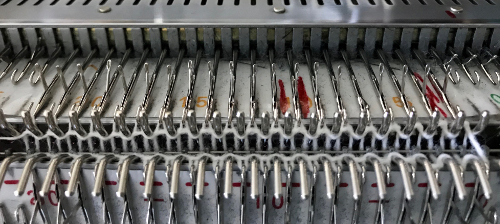 1 row is knit across all stitches to complete cast on,
 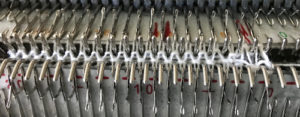 knit one more row to return to the opposite side
 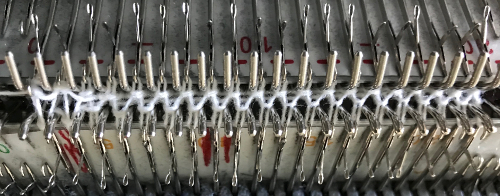 the setting is changed to full pitch, stitches are transferred between beds to match diagrams
 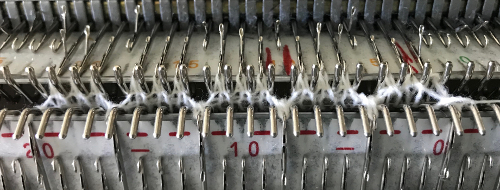 the center needle in each group of 3 is brought out to hold for one row, knit one row to return to the other side
 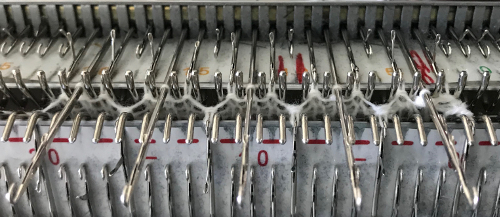 center needles are pushed back to D position in order to be knit on return pass to the opposite side
 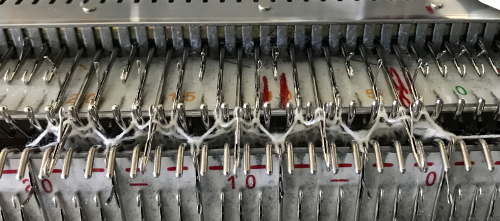 this tool makes that needle selection faster and easier
 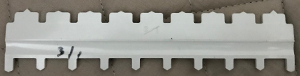 when the 20 rows had been knit in pattern drop stitches on each side of center stitch
  transfer ribber stitches up to main bed
 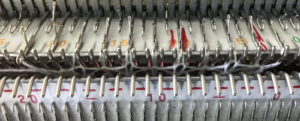 I knit 3 rows rather than 2, to return to right side for bind off
 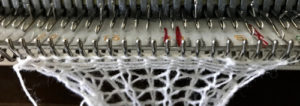 here is the swatch, still on comb for “setting stitches”
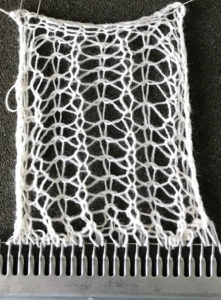
I found the above results upon completion disappointingly wimpy, then tried the same steps in tightly twisted and slightly thicker cotton, achieved better results, but was still not happy. That set me thinking about an alternative way to produce a similar fabric with changes in needle arrangements. The full series of swatches is seen below. The yellow is knit in a 2/8 wool, the beige in the same weight cotton as the white on the right. All swatches were knit on the same tension, for the same number of rows.
The adjustments on the original pattern are as follows. At half-pitch begin as above with zig zag to left, 2 circular rows, knit back to right. Set pitch to P, transfer between beds
 knit back to the opposite side, transfer each of the side stitches on the top bed onto the center needle in each group,
 bring those needles out to hold for easier knitting on the next pass
 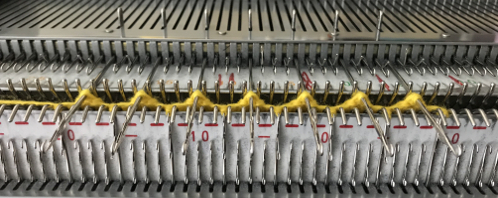 knit one row back to the right, making sure stitches have knit off properly. When you have returned to the right side, set the carriage to tuck from right to left only (left tuck button), RC000
 loops will be formed on the center needles as they would have been formed over the needles as if holding was in use
 when the 20 rows are completed the carriages will once again be on the right, all stitches will have been knit on the previous row
 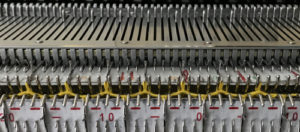 transfer all ribber stitches to top bed, knit 2 rows, bind off. None of my swatches were blocked other than by some tugging, particularly along the bottom edge. The spacing between stitches is narrower because ladders created by single needles left out of work are formed by yarn lengths that are shorter than those that happen when stitches are knit and then in turn dropped. The height of the swatch is also affected, and the half fisherman texture in the wool swatch, in particular, is more evident.
More variations to try in a multiple of 3+1: using either method or a DIY cast on, dropping (yellow) stitches marked with a * at the end, or transferring them to right or left and setting the main bed to tuck in one direction only. 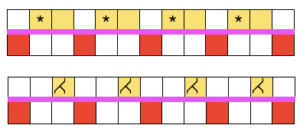 When the work is removed from the machine, stretch cast on outwards, then give each “scallop” a really good pull downwards. Steam lightly over the scallops to set them. Variations of the double bed trims may be worked on the single bed as well.
Fair isle variations
A review of links with associated hints and info:
Measuring gauge swatches, general information
Matching patterns across sweater bodies and sleeves
Float control
Scarf experiments
Design inspiration: binary alphabets
Adding hand techniques/ cables/ punchcard repeats
FI meets transfer lace on Brother machines
Adding the ribber, FI on main bed Tubular machine knit fabrics: fair isle, Brother/Passap
Altered patterning using bleach discharge on knits
These are random FI samples from my collection, most from my teaching days. None of them were ever intended for use in the finished product. They were knit to illustrate some of the possibilities for the different techniques using each of the cam button combinations. Some were knit during class demos. The colors made them easily identifiable as mine, knit using a personal yarn stash. The contrast helped identify how stitches were formed.
In this swatch, marking for measuring stitches per inch is done by leaving a needle out of work. The width between the resulting ladders should be checked at various points after the swatch is treated in the way you plan to treat (block) the finished fabric. Adding a third color per row would require altering the pattern to a color-separated slip stitch one, or one may add that color with duplicate stitching. The spots in this test are colored in with a permanent fabric marker. At the height of the art to wear movement one artist, in particular, was producing limited edition knitwear by knitting the same design in black and white, and in turn over-dyeing the white for different effects in each piece in the series. Eyelets at the bottom of the swatch are tension markings for the piece. The vertical line created by end needle selection (normally used in FI to avoid separation of colors et vertical edges) is interrupted in rows that are knit in only one color.  Recommended maximum width for floats is usually 5 stitches. How much the floats droop and cause potential “problems” on the purl side depend on fiber content. Sometimes such floats are intentionally created and worn on the outside of the garment as planned design features. The longer blue floats are seen below in the areas of the ladders where only the yellow is knitting, creating a wider span of the alternate color.
  These repeats are very simple. They are commonly associated with card #1 and card #2 in basic factory packs supplied with knitting machines purchases. Card #2 is reproducible by using card #1 elongated X2. A reminder: if using either repeat in pieces of garments ie baby leggings, etc. take note of which yarn feeder each color is in. Even if the repeat is correct and placed properly, the surface of the knit will appear different to the eye if the color placement is reversed in alternate pieces. The repeats may be used as backgrounds for a variety of other more complex fabrics in DIY designing.
 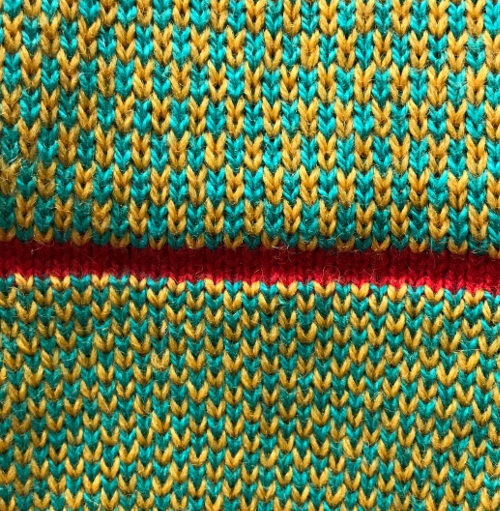 Here stainless 32 gauge wire is used as the second “color”, making the piece moldable and shape-retaining.
  Color may be added or “taken away” as seen in the post on bleach discharge on knits
  Another factory-supplied punchcard is used. Thinner yarns in lighter colors may have noticeable bleed-through of darker colors traveling behind them, as seen on the left, not an issue with the thicker wool on the right. Forgetting to set the card to advance can result in vertical lines, which may alternately be planned as a design feature.
  The longer floats seem manageable in these yarns, there is a bit of hooking up on the bottom right. The yarn traveling up the swatch on the right is an alternative way to mark for gauge measurements. A previous post provides some information on float control.
 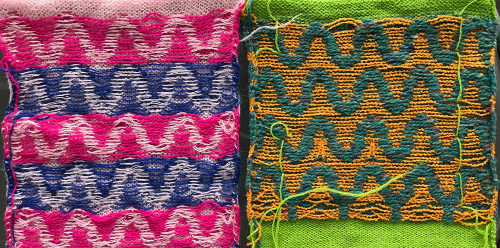 Varying the colors, fiber content, and considering complementary borders is worth exploring thoroughly at the swatch level, before committing to a larger piece. Truly contrasting yarn used at the bottom and top of the area to be measured for row gauge makes the process easier. As attractive and quick as single bed FI can be, keep in mind that long pieces knit in yarns with “memory” such as wool, will tend to roll to the purl side vertically even after blocking, and certainly with wearing of pieces such as scarves or shawls.
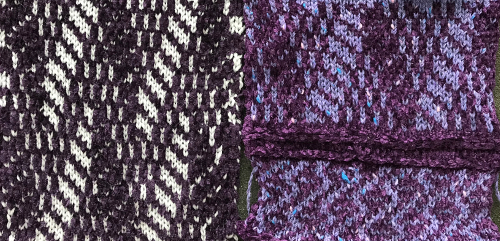
 Tone on tone chenille and all rayon, with “color reverse” by switching yarn positions in feeder
 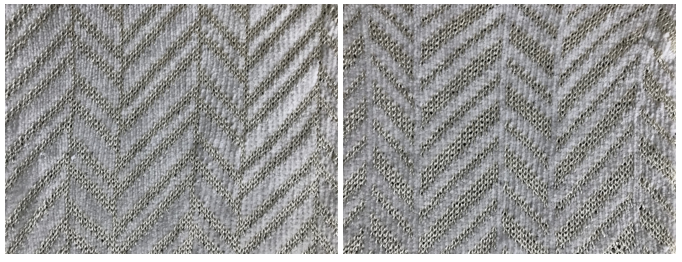 less effective with a flat yarn as the alternative to the chenille
 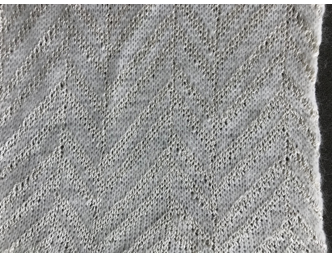 Using the same card: every needle, 4.5 mm electronic machine.
  Transferring stitches to every other needle, odd needles in work on one side, even-numbered needles on other using worsted weight (2 needles in the center in work side by side.
 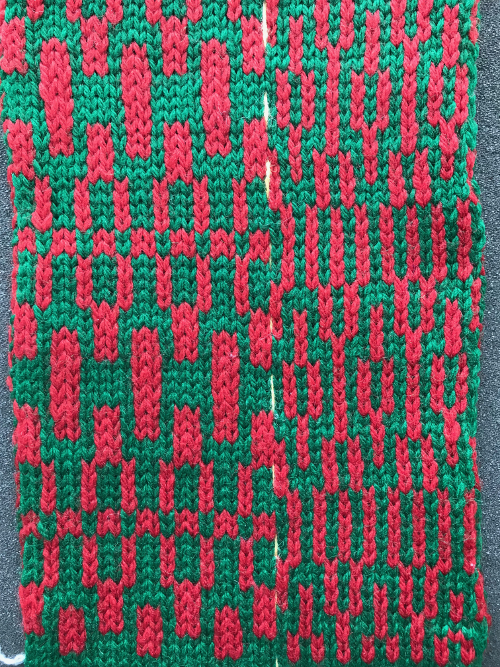 The motif is now used twice as wide with every other needle in use across the fabric width
 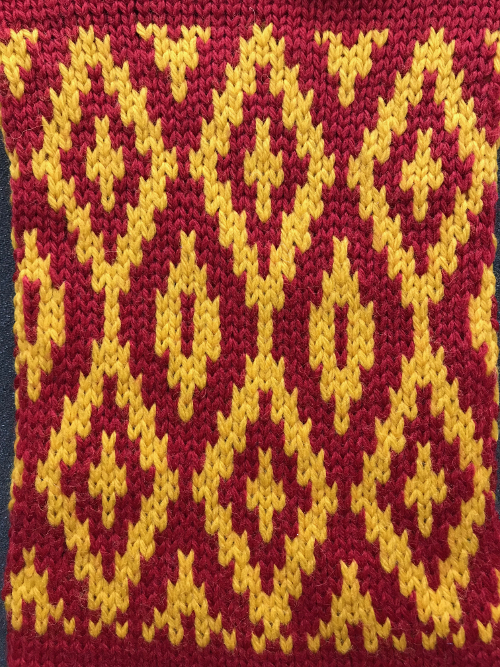 It is possible to vary designs by using the 3 functions of the card reader: locked, normal rotation, and elongation. Designs with long vertical features tend to separate at the edges where the 2 colors meet. Lining the fabric with a fusible makes the knit lose stretch, but it may be an option for stabilization, float control, and offers an opportunity for mock quilting by inserting some stuffing under floats before it is ironed on. High contrast colors are best for sorting out how stitches are formed. Embroidery alters the “step ladder” effect outlining the shapes.
 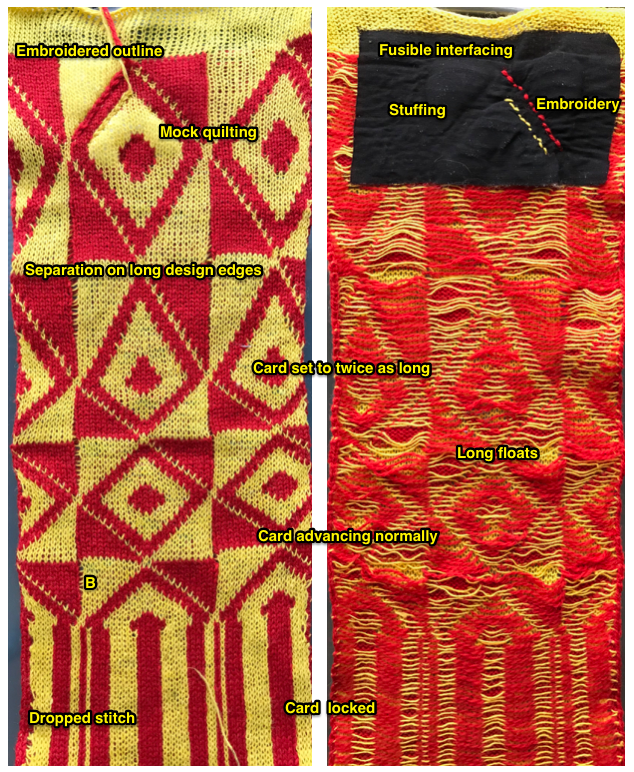 Hooked-up floats are not just for float control; note puckering on the knit side where they have been hung up in groups.
 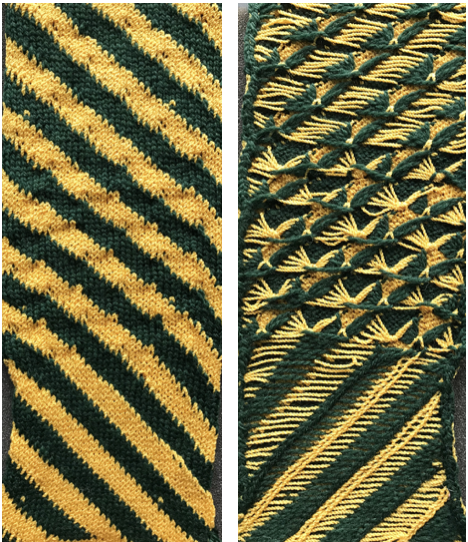 These swatches were worked from the bottom up, starting with positive/ negative comparison, sorting out the possible placement of the ladder with the intent of adding ladder lace details. Cancel end needle selection because of needles out of work, but bring needles into D or E position to avoid separation of colors and/ or dropped stitches at side edges.
 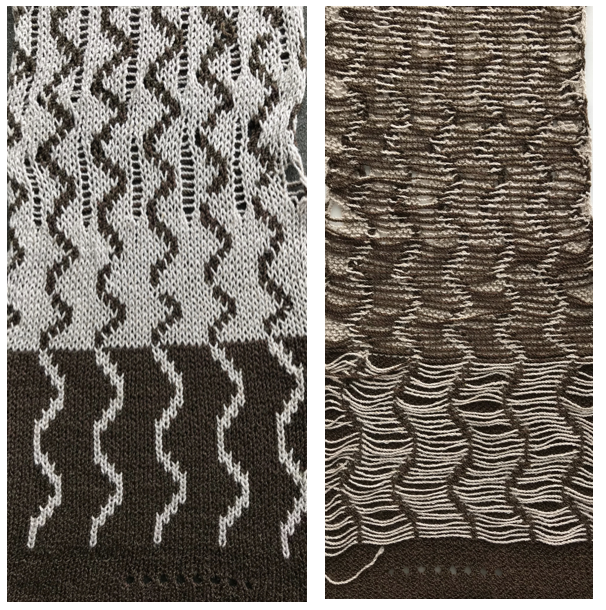 From the bottom up, transitioning from a ladder resulting from a single NOOW (needle out of work) to 2 NOOW, hooking up floats on opposite sides, ending in “lace” pattern alone
 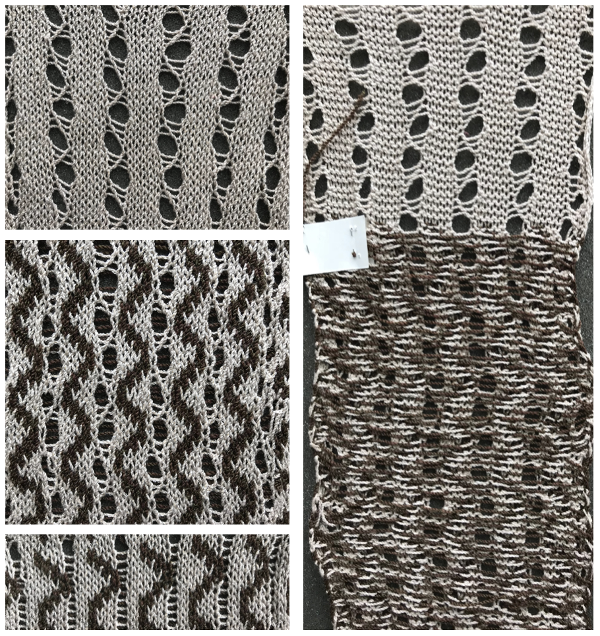 Combined with transfer lace Hand techniques (in this case cables) can be combined with FI. In Brother, it helps to be familiar with the pattern, as needle selection may have to be manually restored after the technique is performed to stay in the correct pattern.
With cables: some punchcard repeats
 With using a sewing machine: there is a vertical, single stitch line due to end needle selection in the contrast color formed on either side of any needle(s) out of work which provides a visual guide for altering the fabric. This swatch was knit with wide NOOW spaces, then sewing machine stitching joined the contrasting vertical lines to form a 2 color “fringe” on the knit side (left) and purl side (right)
 Variations with fibers for exploring surface textures: wool with raffia on the bottom, fishing line on top
 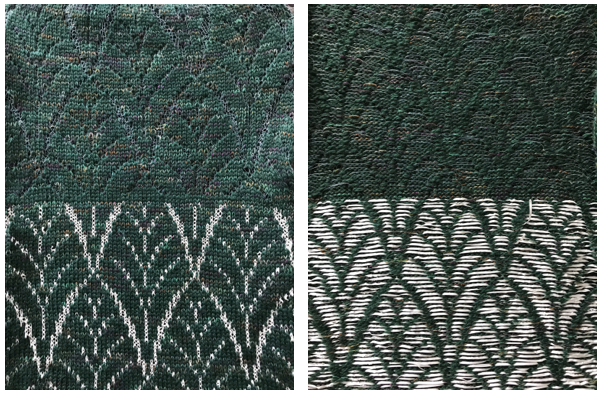 The same swatch continued on, using 3M elastic as the second color
 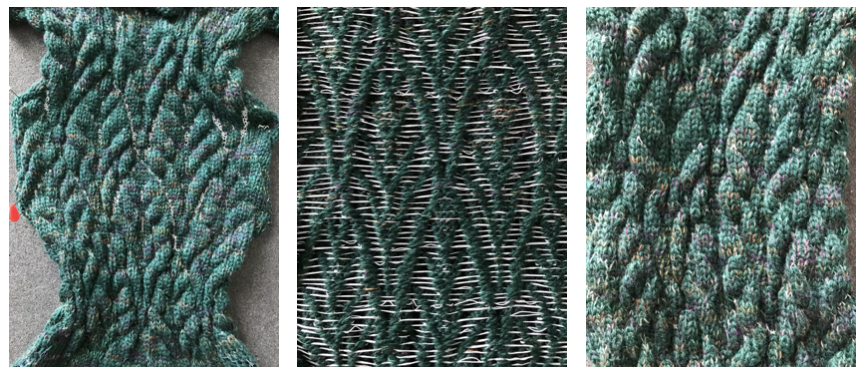 The same repeat in a rayon chainette and wool, followed by some felting. The rayon “bubbles” more visibly when the wool creates the wider floats
 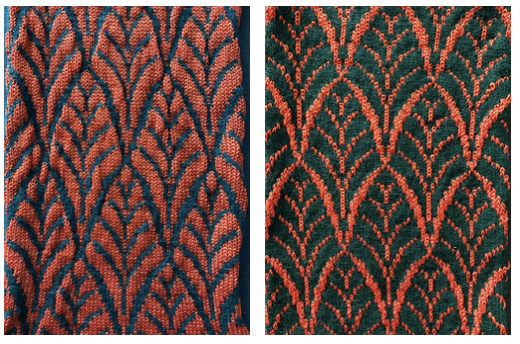 reversing color positions
 The punchcard is limited to varying the vertical repeat automatically in 3 ways: locking the card, normal rotation, and double length. Repeat width is fixed. Felting can produce interesting surfaces if one yarn is capable of being felted (green), and the other not (blue). The stitches knit with the latter will create puckers/ blisters. Since the knit will shrink in both width and height, the repeats here were used at double length. Note the added drooping of the blue floats on the purl side.
 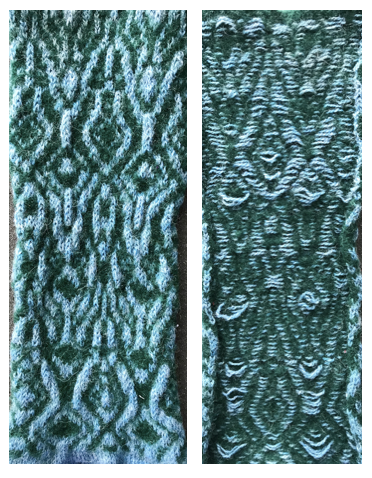 A punchcard can be further manipulated by masking areas with tape. It is not a good solution for production knitting, but adequate for testing out ideas before committing to punching a full, new card. The surface blisters here are much more dramatic. The green floats do not felt as much as in the previous swatch, and are considerably wider. On the right, far side you can see some of them were latched up, creating yet another design detail.
 The reverse of both swatches shows the resulting difference in relative width.
 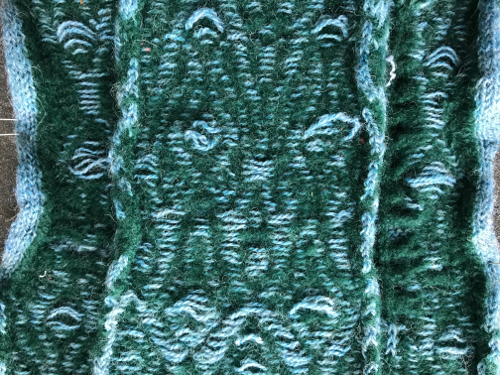 The contrast using a factory-supplied punchcard pattern with short floats, also felted. The fringe is created by ending on one side (in this case on the right) with a group of needles out of work and the outermost 2 needles in work, essentially producing a large “ladder”. Decreases and increases on needles close to the edge of the knit were brought in and out of work to create the “zig-zag”. The two edge stitches of the ladder may be trimmed before felting. The knit side is shown on the left, the purl side on the right, no clearly visible, separate floats, its surface is fairly flat.
“Crochet” meets machine knitting techniques: working with short rows 1
Another Ravelry thread recently looked at knitting this pattern, from an old Knittax pattern book
 I found this in a different manual, with a similar structure, and “English” directions
  Translation of symbols used in Knittax patterns
  On the purl side, this creates structures that emulate crocheted shells. My first attempts at trying to knit anything like this were in thin yarn, and I had enough issues to give up for the moment. Things worked out much better when I switched to a sport weight yarn that seemed to like knitting at T 10 for stocking stitch. With NOOW set up, my sample was knit at T 9. Waste yarn and ravel cord are often a good way to start, but not always necessary, the same is true of weight. I began with a crochet cast on, every needle, multiple of 4 st + 2, then dropped the alternate pairs of needles between the first and last 2 pairs of needles in work, pulling the needles back to A position, determining the width of my “shells”
My initial experiment was an adaptation of the concept, with more needles in work than in the inspiration photo.
Working from right to left, starting with COR; the first pair of needles on carriage side in work, remaining needles away from carriage are in hold position  moving toward left, the adjacent needle in the first pair in hold gets wrapped; be sure to retain proper positions for knitting and holding
 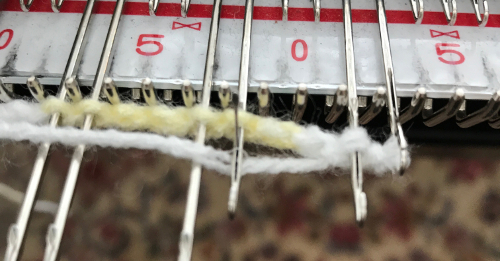 the first wrap completed, needles in position to continue
 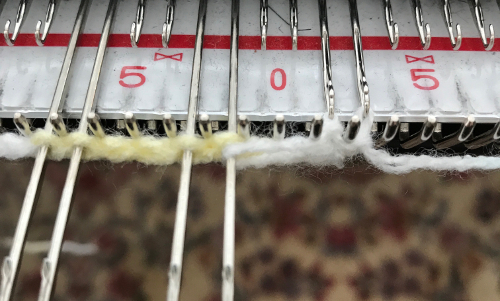 the process is repeated X number of times. I chose to wrap X 5, which requires 10 rows of knitting, making the row counter usable to track rows in easy increments. When wraps are completed, push wrapped needle and its partner into work, knit one row
 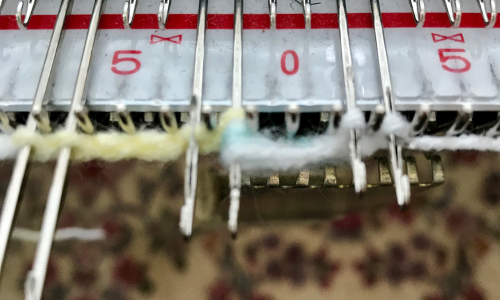 make certain all the loops have knit off, wrap the first needle to their left, bring pair on the right to hold
 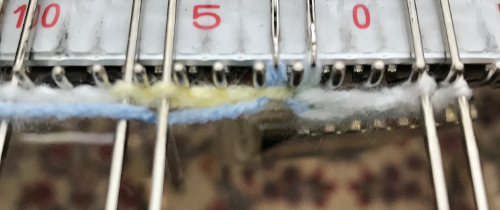 continue for your desired number of wraps
 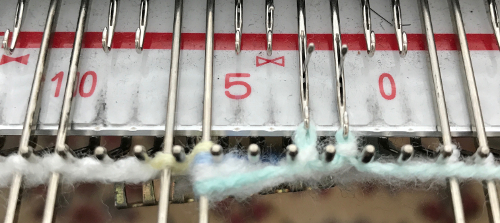 return wrapped needle and its partner to work position, knit one row, wrap next single needle on left
 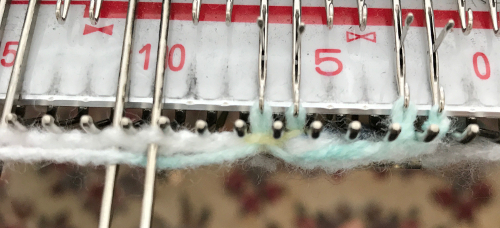 remember to bring needles to right of the pair just knit into hold
 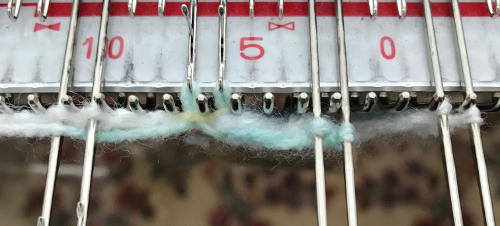 repeat to end of row. Reverse process moving from left to right (in progress photo). I found a single tooth from a claw weight on the pair of stitches doing all the knitting helpful.
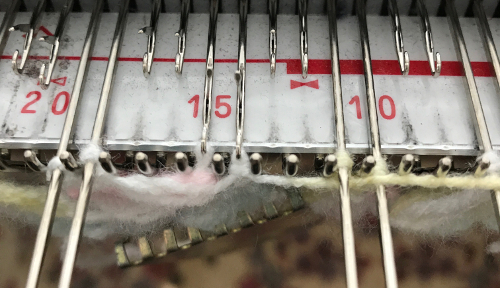
 Variations can include the number of needles in and out of work, yarn choices, etc.
 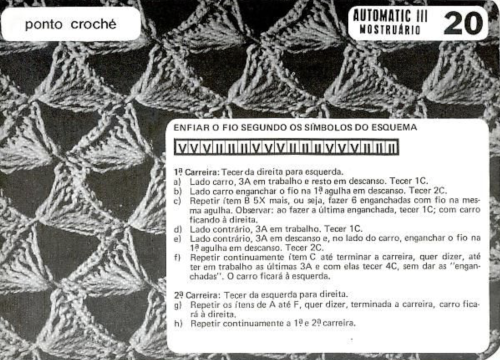 The needle arrangement to match the symbols with 3 in work, 3 out of work
 ![]() The same steps sequence is followed as for the first swatch, using a 2/8 wool. Summarizing the beginning series of movements starting with COR
The same steps sequence is followed as for the first swatch, using a 2/8 wool. Summarizing the beginning series of movements starting with COR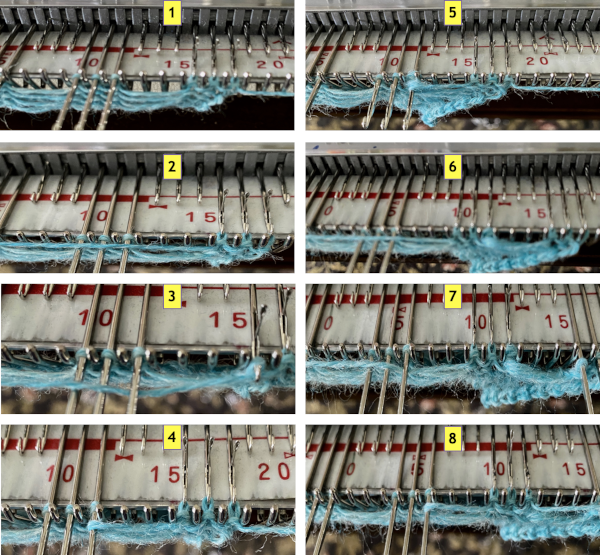
 The full series of patterns may be found in the Portuguese language booklet The illustrated needle arrangement for #4
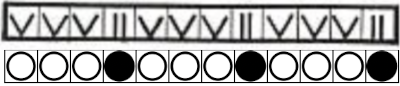 I like to begin using a chain cast on, and then dropping chains off needles out of work
 1: COR, leave the first needle in work, pull the remainder out to hold, knit 1 row
2: COL, bring the thread under the first needle in hold position  3: COL, knit 2 rows, repeat 1-3 5 more times, creating a total of 5 wrapped loops, ending COL
4: COL, put the needle storing the wrapped threads into work, and knit this stitch by hand twice, leave it in work
5: push the adjacent needle to its left into work, the needle on its right out to hold, knit one row, ending COL
Repeat steps 2-5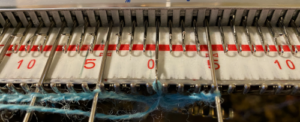 The fabric shares knitting sequences with the first 2 samples
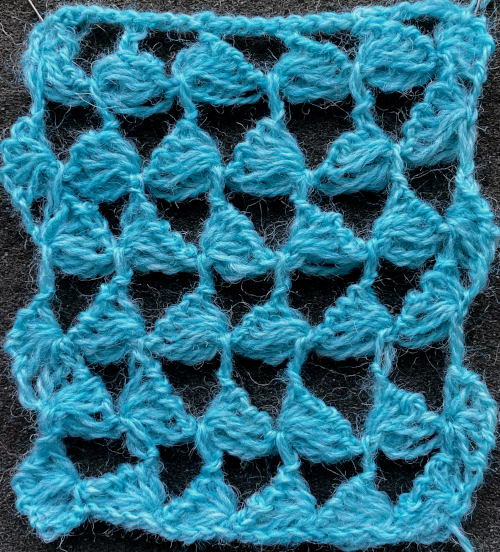
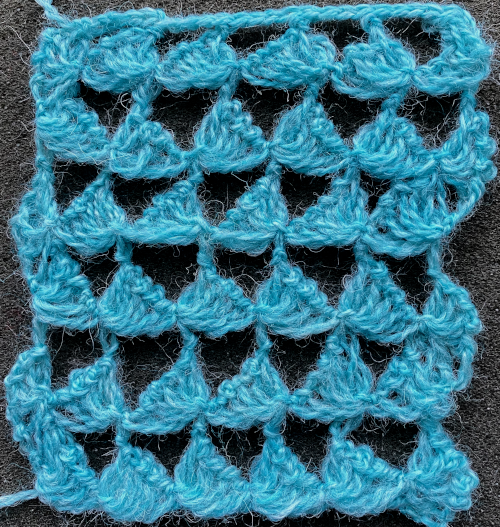 Here a similar technique is used for a trim, both sides are shown
 trying to imagine the process in chart format
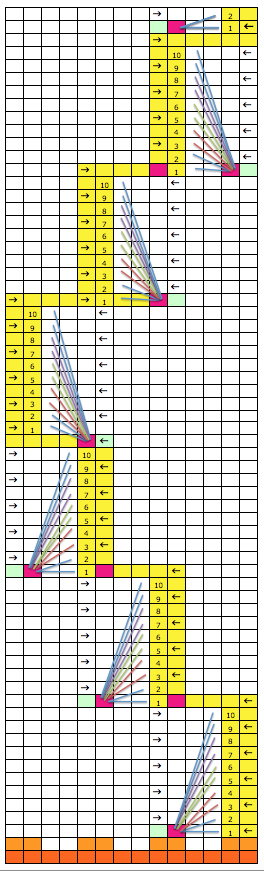
Online inspiration:
a youtube shawl
techniques that use holding while moving across the needle bed in a similar manner, though not necessarily producing “crochet-like” fabrics: https://www.youtube.com/watch?v=XR_7Ys9KIaU&t=4s
http://postila.ru/post/29275341
A follow-up post with more fabrics inspired by the Knittax pattern book
A new “leaf” lace
I am often surprised when I return to visiting past ideas and discover how long I have actually been blogging.
My temporary obsession with lace leaves began in 2011.
In 2016 Vogue knitting published what appeared to me to be an interesting pattern for a leaf lace variant combining dropped stitches and lace transfers.
Below, I am sharing my WIP swatches and notes.
I am presently working on some production knitwear pieces, and it is unclear when I will return to more samples of this variant.
The “new leaf” requires hand techniques and working with multiple transfer tools.
Dropped stitches in hand knitting can translate to ladders in a machine knit.
My first trial swatch was made on the standard KM. Casting off and on posed interesting questions. The lines where knit stitches meet ladders, as pointed out in previous posts, can result in the knit stitches aside the ladder growing in size
 I do not enjoy time-consuming hand techniques on the machine, so to speed things up I moved on to the bulky. As with any other knitting, the lengthwise sides of the knit are going to want to curl to the purl side. I deliberately worked with acrylic yarn, anticipating that blocking it would be required to attempt to get the results to stay flat. Here is the resulting swatch, as first off the KM
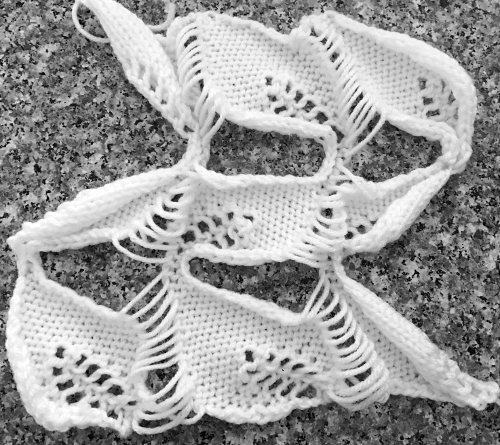
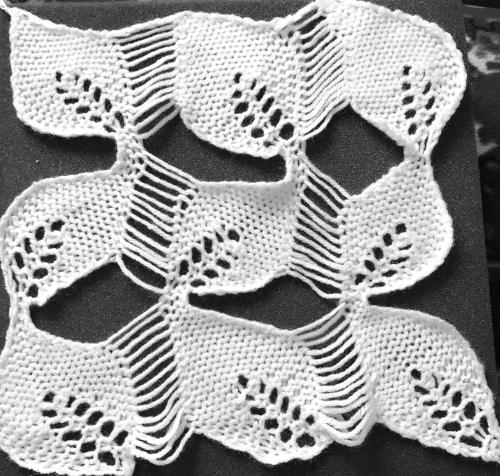
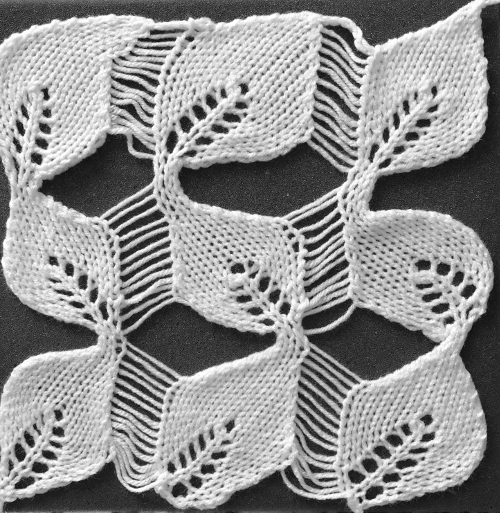 A couple of days later the fabric was still lying flat, so I decided to try to chart it out for slightly different results while planning for a different turning angle and a consistent number of ladders throughout.
I began to use Excel 2008 in 2009, as well as Apple’s Pages and sometimes Numbers over time to produce my charts and illustrations. I keep learning tiny bits as time goes on. Some features may disappear in such programs or become added with upgrades. These are settings I prefer for backgrounds and borders in Excel
format
 and for screen grabs or improved visibility, zoom comes in handy
For links to some online tutorial by other authors https://alessandrina.com/2013/10/29/charting-knits-in-excel/, a search in my own blog will lead you to my own explorations over time. Simple graph paper and color pencils may be used if the software is not available to help work out proper repeats, etc. A single repeat of my leaves so far is shown in 2 segments for increased visibility, successful knitting, probably in another “killable yarn” tbd.
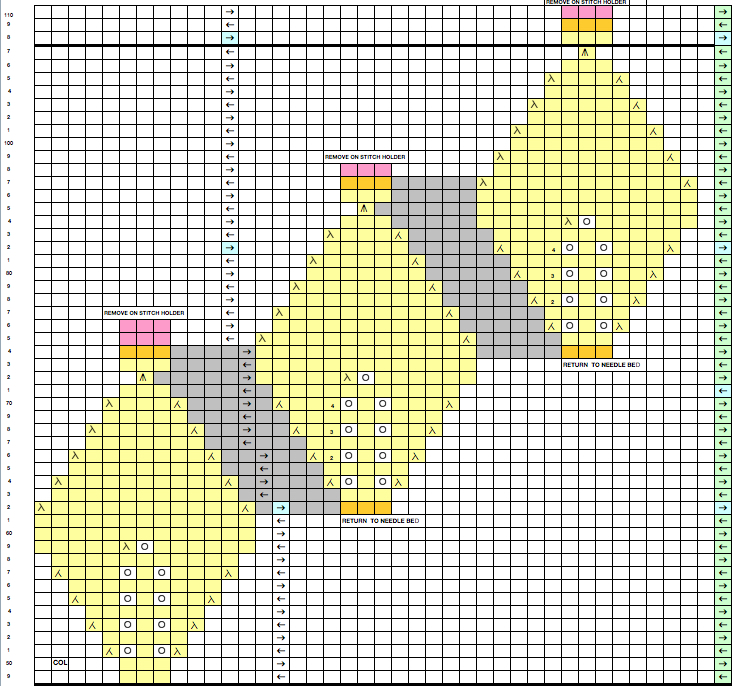
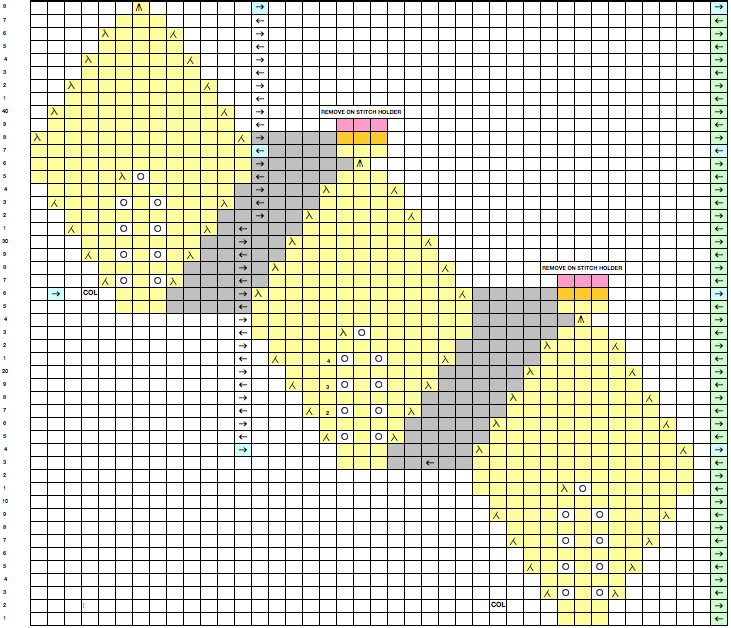
MK ladders, and a bit of crochet
I have recently been thinking about collars and edgings again, this time adding crochet detailing to help cut the edge curl and add interest. In a previous post, I showed an edging done in drop stitch (double bed lace). Here to simplify things, I decided to work with ladder spaces to create the fabric. If a large width of this fabric is required, multiple bands would need to be joined to achieve it, crochet is then applied in turn to the finished knit piece. Seam as you knit can make the joining nearly invisible. Using Excel, I tried to also create crochet symbols using its shapes menu. The number of rows knit in open pattern or all knit prior to binding off is at your discretion, depending on your needs and planned final product. For my sample I began knitting with COR, and to end with COR for bind off row, I chose to work with even numbered groups of rows. Consider fiber content if the intent is to permanently block as flat as possible, or not.
my chart symbols 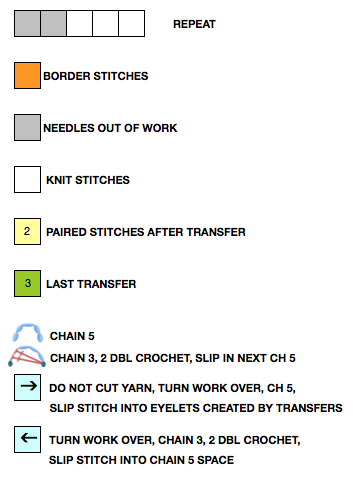
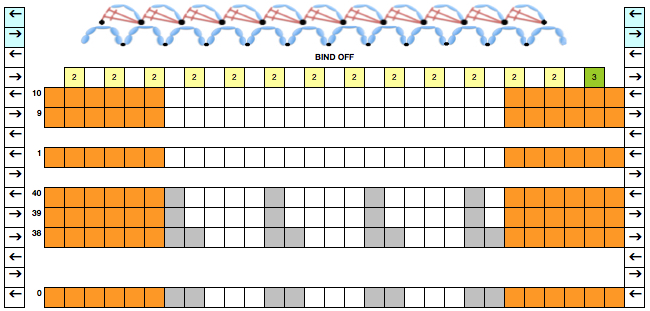
needle set up, waste yarn cast on, knit for the desired length ![]()
 bring one empty needle into work
 ![]()
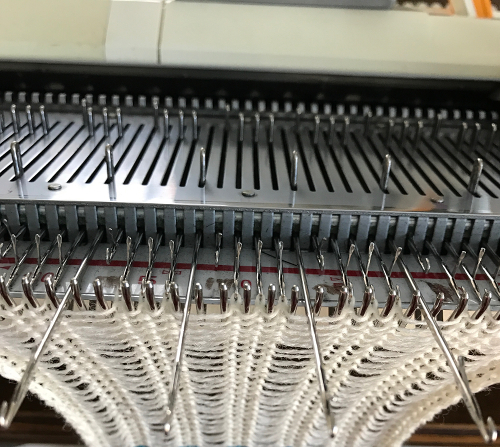 knit one row, bring remaining empty needle into work
 ![]()
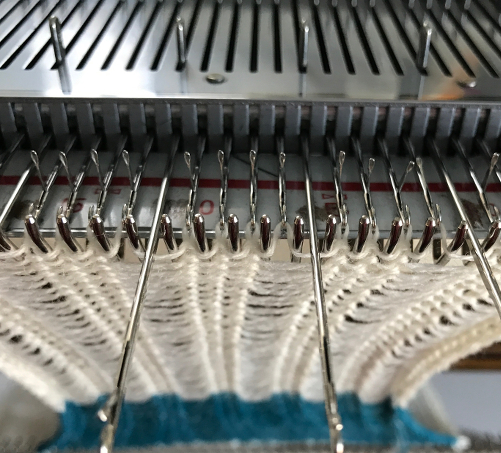 knit one row
 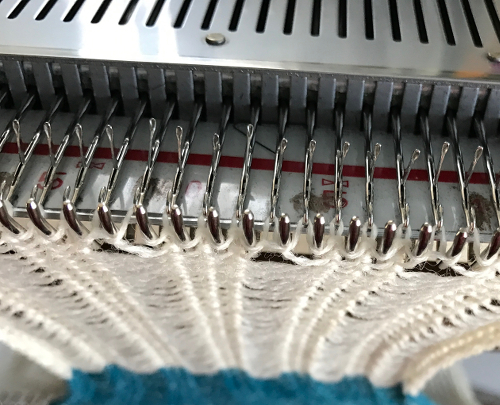 knit rows desired for top band
 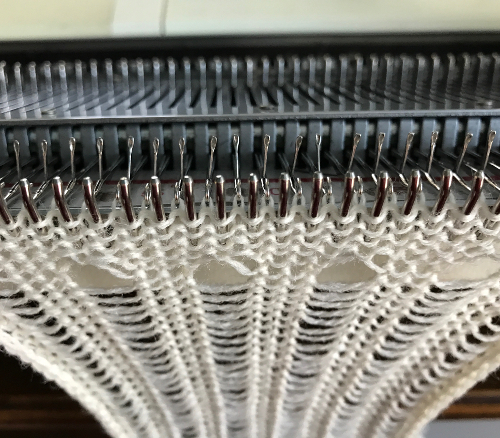 transfer eon from L to the right
 ![]()
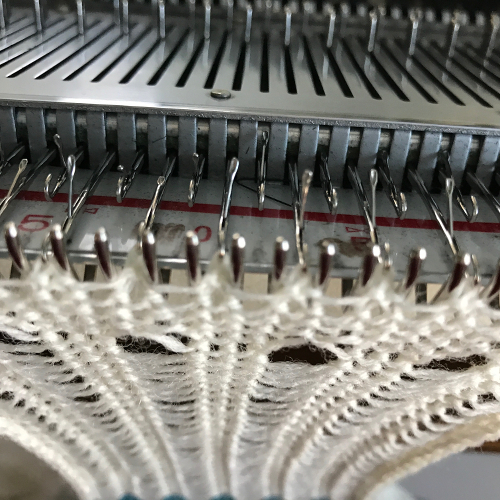 latch tool bind off around gate pegs for all needles/stitches
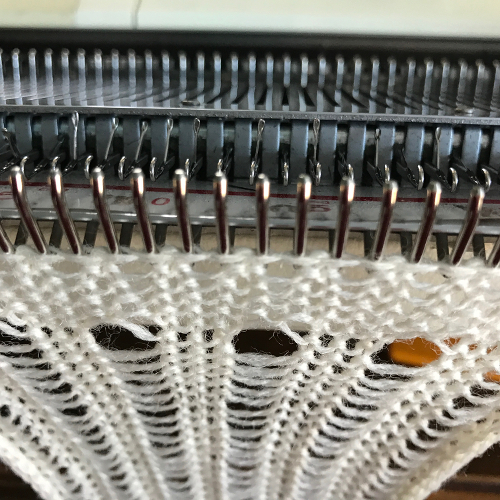 do not cut yarn, lift work off the machine; turn work over (knit side facing)
chain 5, slip stitch into eyelet created by transfers, repeat across the knit, end with a slip stitch into last eyelet space  turn work over (purl side facing once again), chain 3, 2 double crochet, slip stitch into the center of chain 5 space, repeat across the knit, end with a slip stitch into last chain 5 space
 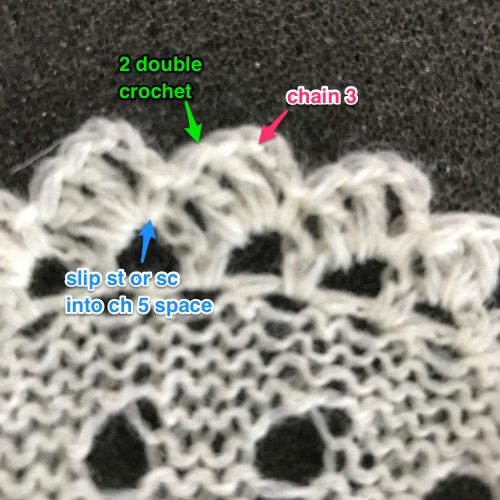 unblocked trim, 2/15 acrylic yarn
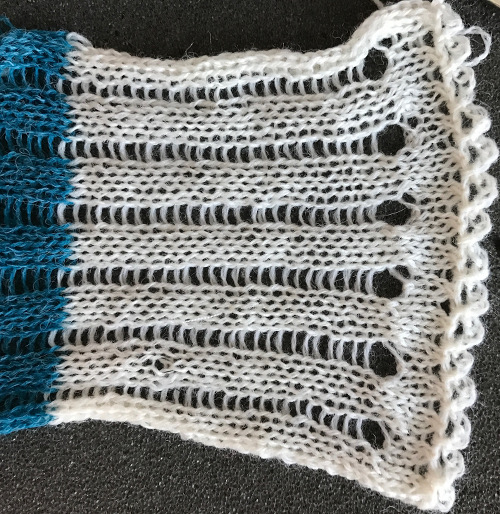
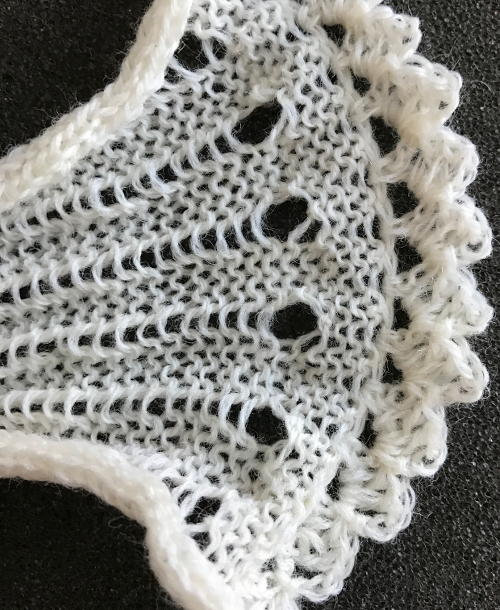 detail after steaming, the trim is side leaning
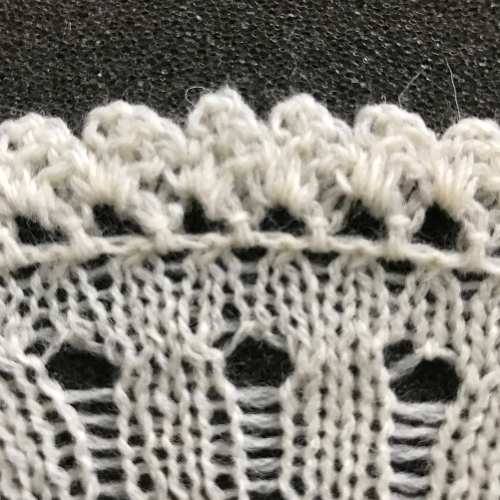
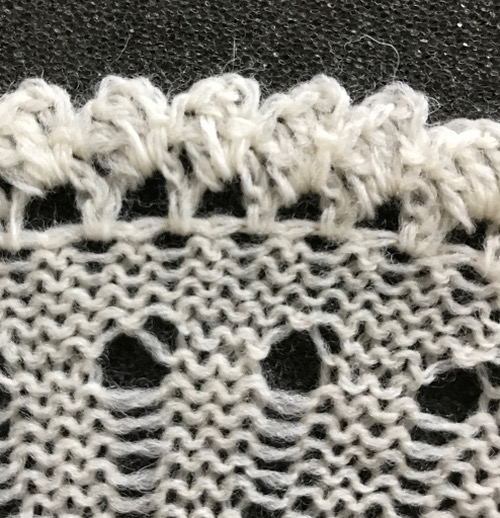
To use: rehang open stitches on every needle (or other arrangements) eliminating ladder spaces and bind off, join to another piece of knitting, etc.