I am constantly drawn into multiple knitting rabbit holes. Along with my revisiting 3D surfaces, more leaves are still in my line of sight for further exploration.
Here they are surrounded by a traveling mesh ground: a 12X52 repeat, marked for punchcard use:
 the associated PNG
 ![]() The test swatch knit on 38 stitches:
The test swatch knit on 38 stitches: 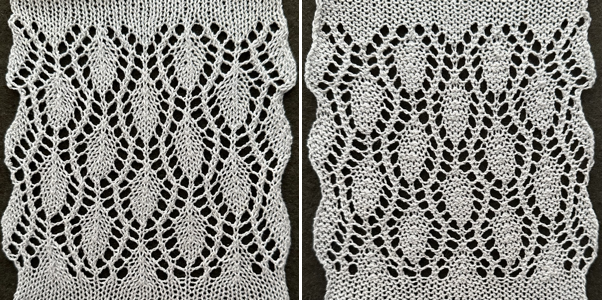 This design was shared as an stp file for use with DAK by Claudia Scarpa.
Her blog post includes downloadable files with clear markings for knit row locations, a punchcard version, a schematic for working it as a possible hand technique, and more.
DAK does not allow for exports in other file formats ie PNG.
Charts for the designs can be screengrabbed and processed with other programs ie Gimp and ArahPaint to make them usable in other ways including download options.
This electronic repeat is 20X136 pixels.
Horizontal mirroring was not required when using it in my 930. 
![]() Knit on 40 stitches, using the same wool-rayon yarn as in the first sample, there is a considerable change in the size of the resulting leaf shapes
Knit on 40 stitches, using the same wool-rayon yarn as in the first sample, there is a considerable change in the size of the resulting leaf shapes 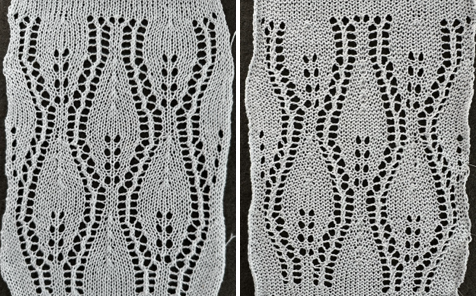 This is my chart for Claudia’s punchcard version, marked in 6X6 squares blocks as found in Brother factory punchcards,
  the result is a longer repeat resulting in larger leaf shapes, 24X228 pixels
 ![]() And then there is the world of leaves formed with hand techniques and surrounded by ladder spaces.
And then there is the world of leaves formed with hand techniques and surrounded by ladder spaces.
This was published in an early Silver Reed/ Studio pub eons ago and got filed in my “someday” image folder. 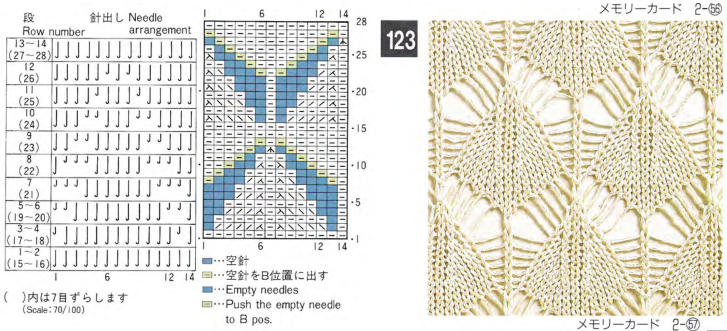 Visualizing repeats and necessary actions in spreadsheets before any actual knitting is useful.
With practice, we develop a personal library of choices regarding symbols and any additional information.
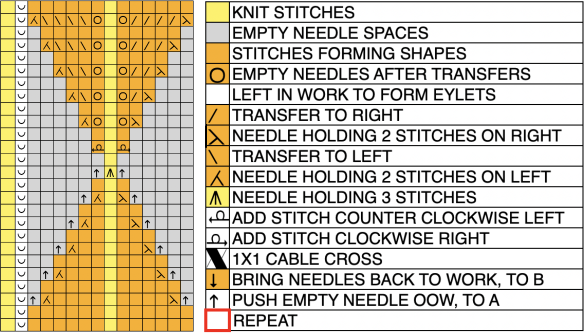
This was my initial draft taking into consideration:
the direction of the transfers
the location of single-stitch columns that are left undisturbed throughout
the needles on which stitches are doubled after transfers
where stitches are decreased, every 2 rows, marked with orange cells in the second column from the left
where stitches are brought back into work on every row, marked with green cells and arrows that point up in the first column on the left
 Printing custom needle tapes is an alternative to marking the needle beds or needle tapes to offer guides that help avoid errors or lots of needle counting in many hand techniques.
Mac Numbers version at present: 13.2. Its rulers can be set to centimeters for easy calculation of needle space cells with Japanese machine needles set 4.5 mm apart.
This PDF printed to the correct size for me when set to 100% landscape: 7 needles
4.5X7=31.5 mm: to convert the mm to cm in DIY move the decimal point one number to the left. Row height can vary with the limit being about 2 cm. The specs from the shared file: 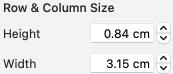 The work in progress on the machine as transfers are being made and the empty needles are taken out of work back to the A position.
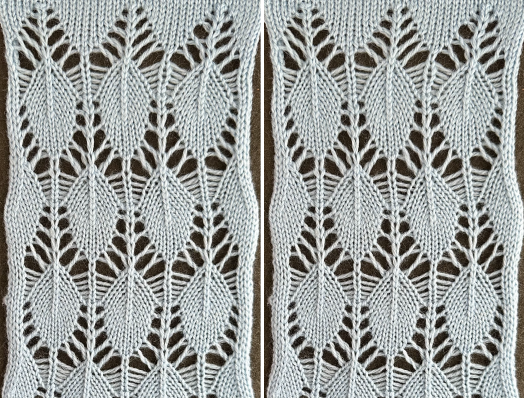
 ![]() The end of transfers approach and needles are returned to work before each carriage pass, forming loops on them.
The end of transfers approach and needles are returned to work before each carriage pass, forming loops on them. 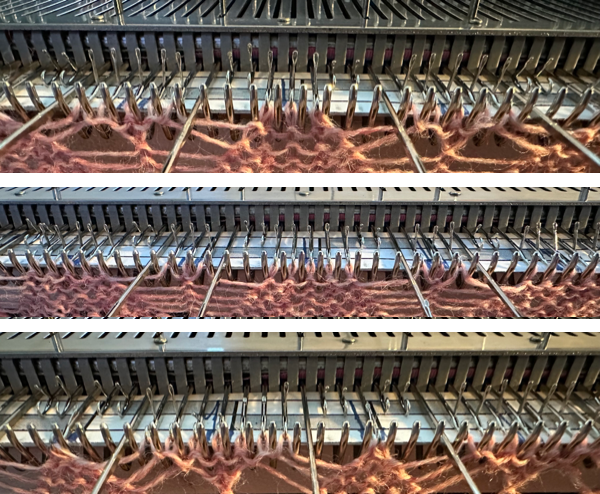 The test swatch, knit in 2/8 wool at tension 9, the color chosen randomly for weight and easy visibility
 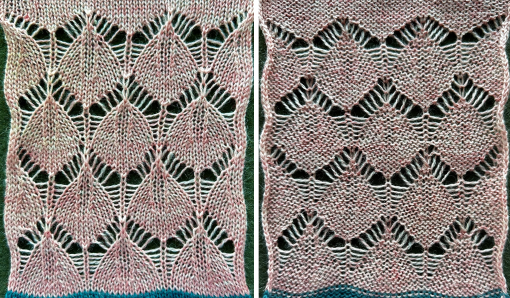 The pattern is evocative of another Studio transfer lace #112, 12X104
 ![]() a smaller design without the missing stitches and empty spaces.
a smaller design without the missing stitches and empty spaces. 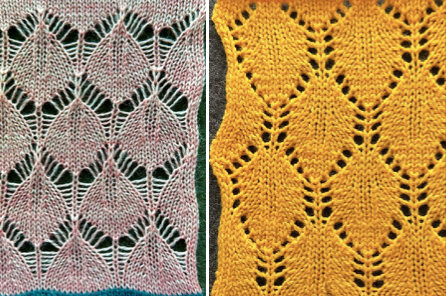 Following some research, the chart for Studio punch card 123:
 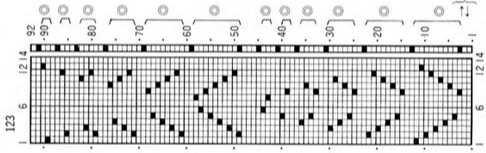 The electronic equivalent, 14X92 cells
 ![]() The file adjusted for knitting on Brother is now reduced to 14X88 cells, and the cyan is marking areas where the knit carriage makes 4 passes rather than the usual 2
The file adjusted for knitting on Brother is now reduced to 14X88 cells, and the cyan is marking areas where the knit carriage makes 4 passes rather than the usual 2 
![]() The result is a 14-stitch leaf in traditional transfer lace.
The result is a 14-stitch leaf in traditional transfer lace. 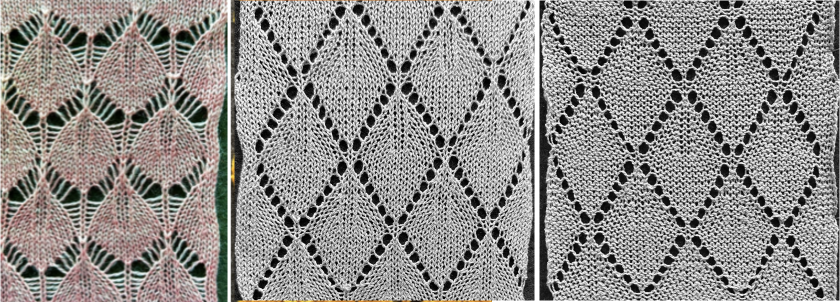 And then, the general shape begins to “appear” in other, older post swatches such as in this, part of the development of very different 12-24 stitch designs.
 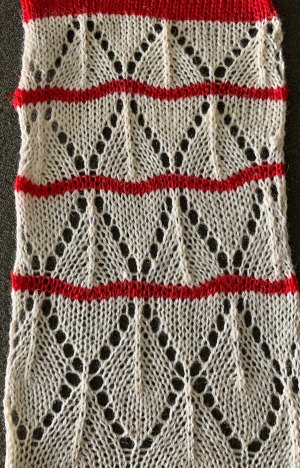 More leaves combined with open spaces, returning to hand techniques:
in DIY charts symbols can be developed to suit and included or eliminated in final directions. Convention matters if directions are to be published with patterns for general use, and matters less when for personal use.
Examples:
 the starting diagram:
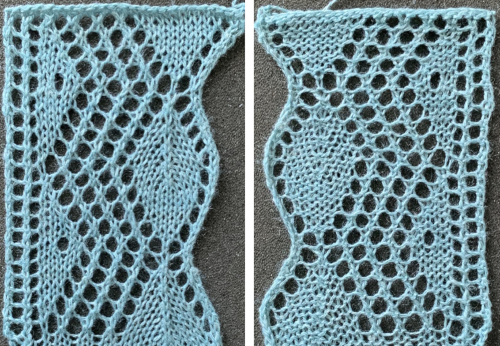
 The test swatch was begun on 2/8 wool, then switched to a 4/10 alpaca and silk because it was green, and the guess that the resulting looser stitches using it might make cable crossings and transfers easier, As can be seen in the work that follows, the size and definition of knit stitches at the edge of the vertical columns and the leaves are sharper and better retained in the thicker yarn.
 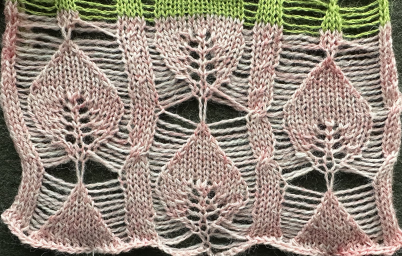 A chain cast-on was performed on the number of needles as shown above, and chains were dropped to achieve the proper setup
 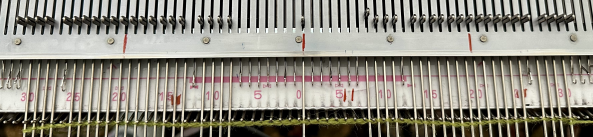 To make a visually balanced increase from one to three stitches, the tool is inserted from back to front of the ladder on each side of the stitch, twisted clockwise on the right, counter-clockwise on the left, with the twisted loops lifted and placed on the empty needles each side of that center stitch.
  An illustration from one of my earlier posts on leaf shapes surrounded by ladders
 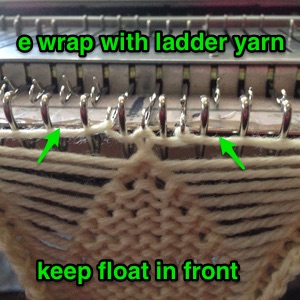 It is helpful to have a couple of 7-prong transfer tools to speed transfers along, with one set to move 4 stitches, the other 5, or simply use a combination of the standard ones.
  Another variation:
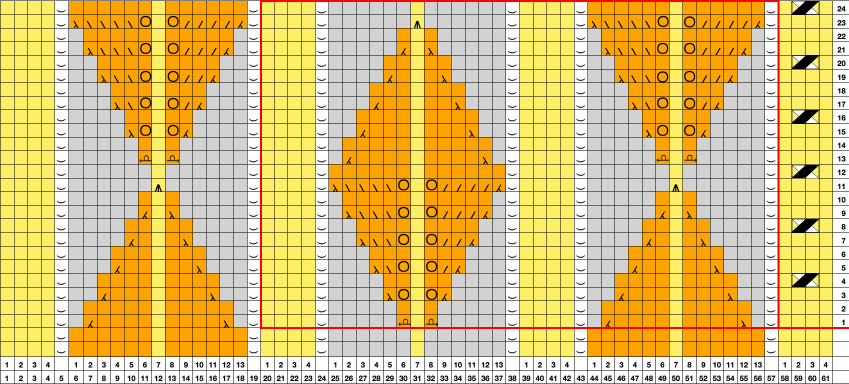
 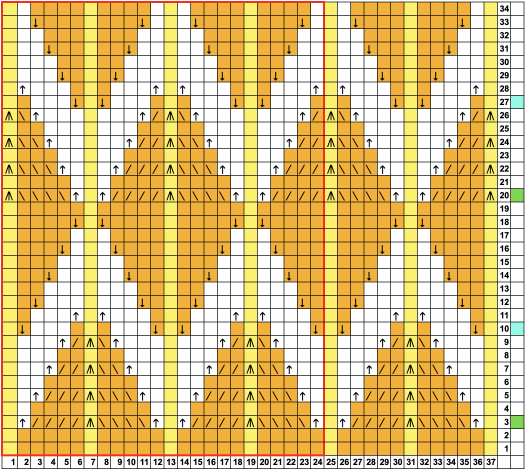 The slightly revised repeat
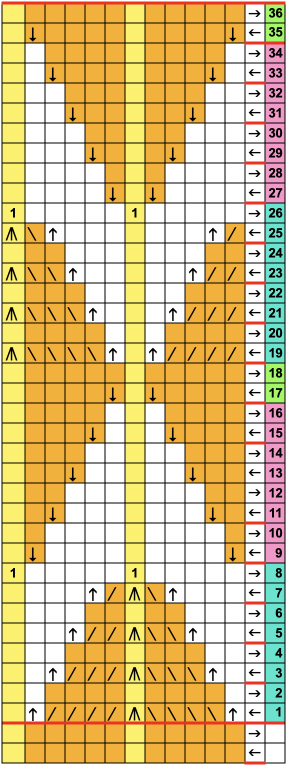
 A few images of the work in progress: in this design, actions take place every 2 rows.
The dark segments on the custom-printed needle tape mark the needle positions for stitches that are never transferred, ie rows # 1, 7, 13, 19, etc. in the chart.
At this point in the work, there are 3 stitches on the needles holding the last transfers, marked with circles, and single stitches on the alternate needle locations, marked with squares. 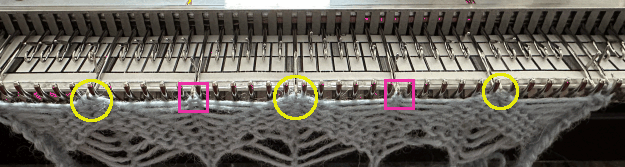 After a row is knit to the opposite side, the groups of 3 stitches are reduced to a single stitch.
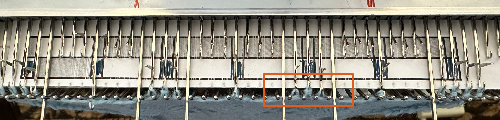
 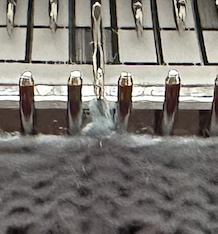 and it is time to begin to reduce the width of the floats.
Empty needles are brought to B position/work on each side of the single stitches.  Loops will form on each of those needles as the knit carriage moves to the opposite side.
 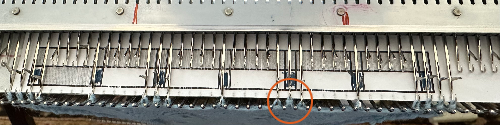 Moving forward, empty needles are brought into work adjacent to each loop every 2 rows.
 A closer look at the twist in the floats as the action continues and the number of needles out of work is reduced:
 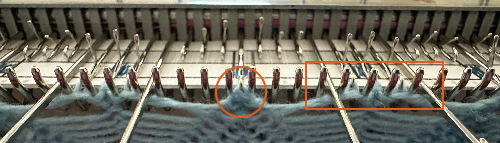 The locations in which stitches are taken out of work form straight floats, where needles are returned to work, the floats form the familiar twists seen in transfer lace patterns.
Not to be forgotten, fully automated lace edgings such as here
 and this, with both patterns shared in the same blog post